Starter Guide - gdlp01.c-wss.comgdlp01.c-wss.com/gds/9/0300004259/02/MF4580_STARTER_en-uv_R_… ·...
28
Starter Guide Please read this guide before operating this product. After you finish reading this guide, store it in a safe place for future reference. Open the next page. Read this guide first. Setting Up the Machine to Suit Your Purposes . . . . . . . . . . . . . . . . . . . . . . . . . . . . . . . . . . . . . . . . . . . . . . . 1 Available Features . . . . . . . . . . . . . . . . . . . . . . . . . . . . . . . . . . . . . . . . . . . . . . . . . . . . . . . . . . . . . . . . . . . . . . . . . 2 About the Supplied Manual . . . . . . . . . . . . . . . . . . . . . . . . . . . . . . . . . . . . . . . . . . . . . . . . . . . . . . . . . . . . . . . . 3 Connecting the Power Cord . . . . . . . . . . . . . . . . . . . . . . . . . . . . . . . . . . . . . . . . . . . . . . . . . . . . . . . . . . . . . . . . 4 Turning the Power ON and Specifying the Initial Settings. . . . . . . . . . . . . . . . . . . . . . . . . . . . . . . . . . . . . 4 Setting a Paper Size and Type . . . . . . . . . . . . . . . . . . . . . . . . . . . . . . . . . . . . . . . . . . . . . . . . . . . . . . . . . . . . . . 6 Specifying Initial Fax Settings and Connecting a Telephone Cable. . . . . . . . . . . . . . . . . . . . . . . . . . . . . 7 Selecting a Method for Connecting the Machine to a Computer . . . . . . . . . . . . . . . . . . . . . . . . . . . . . . 10 Network Connection and Configuration . . . . . . . . . . . . . . . . . . . . . . . . . . . . . . . . . . . . . . . . . . . . . . . . . . . 10 Installing the Driver/Software . . . . . . . . . . . . . . . . . . . . . . . . . . . . . . . . . . . . . . . . . . . . . . . . . . . . . . . . . . . . . 11 Appendix Perform Useful Tasks . . . . . . . . . . . . . . . . . . . . . . . . . . . . . . . . . . . . . . . . . . . . . . . . . . . . . . . . . . . . . . . . . . . . . . .12 Clearing Paper Jams . . . . . . . . . . . . . . . . . . . . . . . . . . . . . . . . . . . . . . . . . . . . . . . . . . . . . . . . . . . . . . . . . . . . . . .13 Replacing Toner Cartridge . . . . . . . . . . . . . . . . . . . . . . . . . . . . . . . . . . . . . . . . . . . . . . . . . . . . . . . . . . . . . . . . . .14
Transcript of Starter Guide - gdlp01.c-wss.comgdlp01.c-wss.com/gds/9/0300004259/02/MF4580_STARTER_en-uv_R_… ·...

Starter GuidePlease read this guide before operating this product.After you finish reading this guide, store it in a safe place for future reference.
Open the next page.
Read this guide first.
Setting Up the Machine to Suit Your Purposes . . . . . . . . . . . . . . . . . . . . . . . . . . . . . . . . . . . . . . . . . . . . . . . 1
Available Features . . . . . . . . . . . . . . . . . . . . . . . . . . . . . . . . . . . . . . . . . . . . . . . . . . . . . . . . . . . . . . . . . . . . . . . . . 2
About the Supplied Manual . . . . . . . . . . . . . . . . . . . . . . . . . . . . . . . . . . . . . . . . . . . . . . . . . . . . . . . . . . . . . . . . 3
Connecting the Power Cord . . . . . . . . . . . . . . . . . . . . . . . . . . . . . . . . . . . . . . . . . . . . . . . . . . . . . . . . . . . . . . . . 4
Turning the Power ON and Specifying the Initial Settings . . . . . . . . . . . . . . . . . . . . . . . . . . . . . . . . . . . . . 4
Setting a Paper Size and Type . . . . . . . . . . . . . . . . . . . . . . . . . . . . . . . . . . . . . . . . . . . . . . . . . . . . . . . . . . . . . . 6
Specifying Initial Fax Settings and Connecting a Telephone Cable. . . . . . . . . . . . . . . . . . . . . . . . . . . . . 7
Selecting a Method for Connecting the Machine to a Computer . . . . . . . . . . . . . . . . . . . . . . . . . . . . . .10
Network Connection and Configuration . . . . . . . . . . . . . . . . . . . . . . . . . . . . . . . . . . . . . . . . . . . . . . . . . . .10
Installing the Driver/Software . . . . . . . . . . . . . . . . . . . . . . . . . . . . . . . . . . . . . . . . . . . . . . . . . . . . . . . . . . . . .11
Appendix
Perform Useful Tasks . . . . . . . . . . . . . . . . . . . . . . . . . . . . . . . . . . . . . . . . . . . . . . . . . . . . . . . . . . . . . . . . . . . . . . .12
Clearing Paper Jams . . . . . . . . . . . . . . . . . . . . . . . . . . . . . . . . . . . . . . . . . . . . . . . . . . . . . . . . . . . . . . . . . . . . . . .13
Replacing Toner Cartridge . . . . . . . . . . . . . . . . . . . . . . . . . . . . . . . . . . . . . . . . . . . . . . . . . . . . . . . . . . . . . . . . . .14

1-4
MF4580dn
MF4580dn/MF4570dn/MF4550d/MF4450 Only
MF4570dn/MF4550d
MF4450
D520
MF4420n/MF4412
763 mm
100 mm804 mm
100 mm
100 mm
100 mm 100 mm631 mm
Papercassette
Feedercover
Feedercover
804 mm
100 mm
100 mm
100 mm
100 mm
100 mm617 mm
735 mm
Papercassette
Feedercover
784 mm
617 mm
100 mm
100 mm
100 mm
100 mm
100 mm 735 mm
Papercassette
Feedercover
Papercassette
781 mm
590 mm
100 mm
100 mm
100 mm100 mm 696 mm
100 mm
804 mm
590 mm 696 mm
Papercassette
100 mm
100 mm
100 mm
100 mm
100 mm

1-5
1
2MF4580dn
Carry the machine to the installation site.
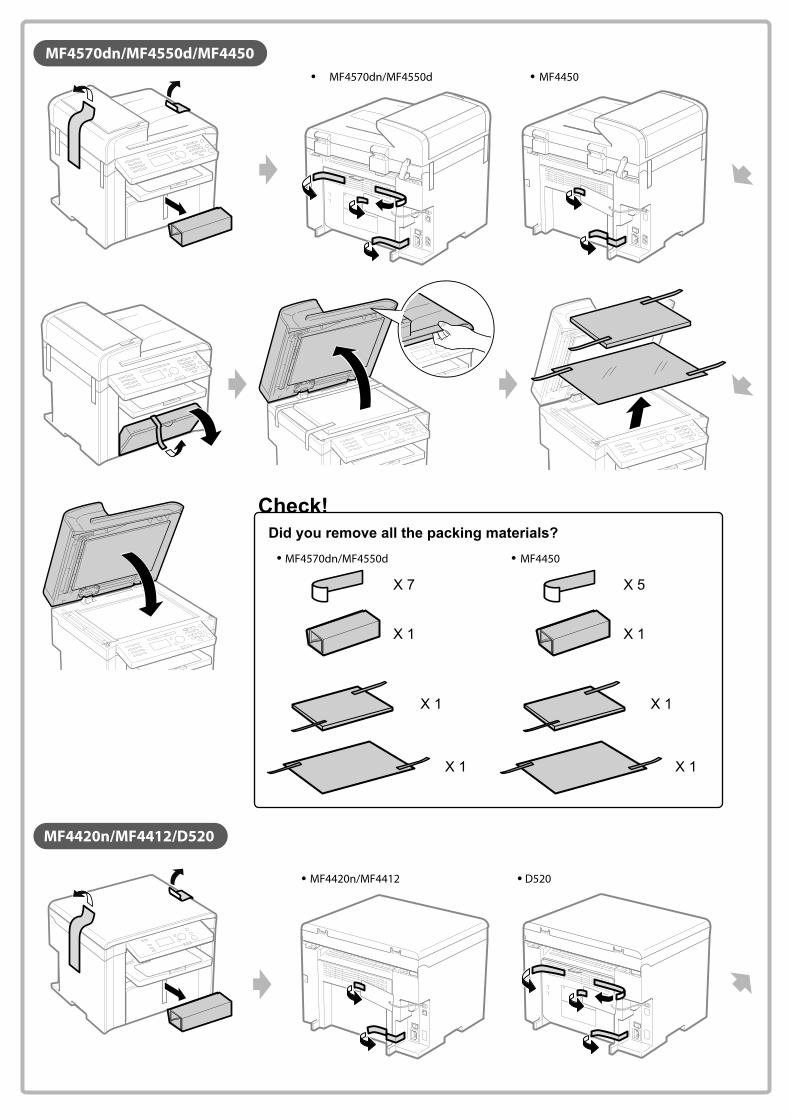
Remove the packing materials.
Did you remove all the packing materials?
Check!
X 8 X 1
X 2
1-6
MF4570dn/MF4550d/MF4450
MF4420n/MF4412/D520
MF4570dn/MF4550d
MF4570dn/MF4550d
MF4420n/MF4412 D520
MF4450
MF4450
Did you remove all the packing materials?Check!
X 1 X 1
X 1 X 1
X 1 X 1
X 7 X 5
1-7
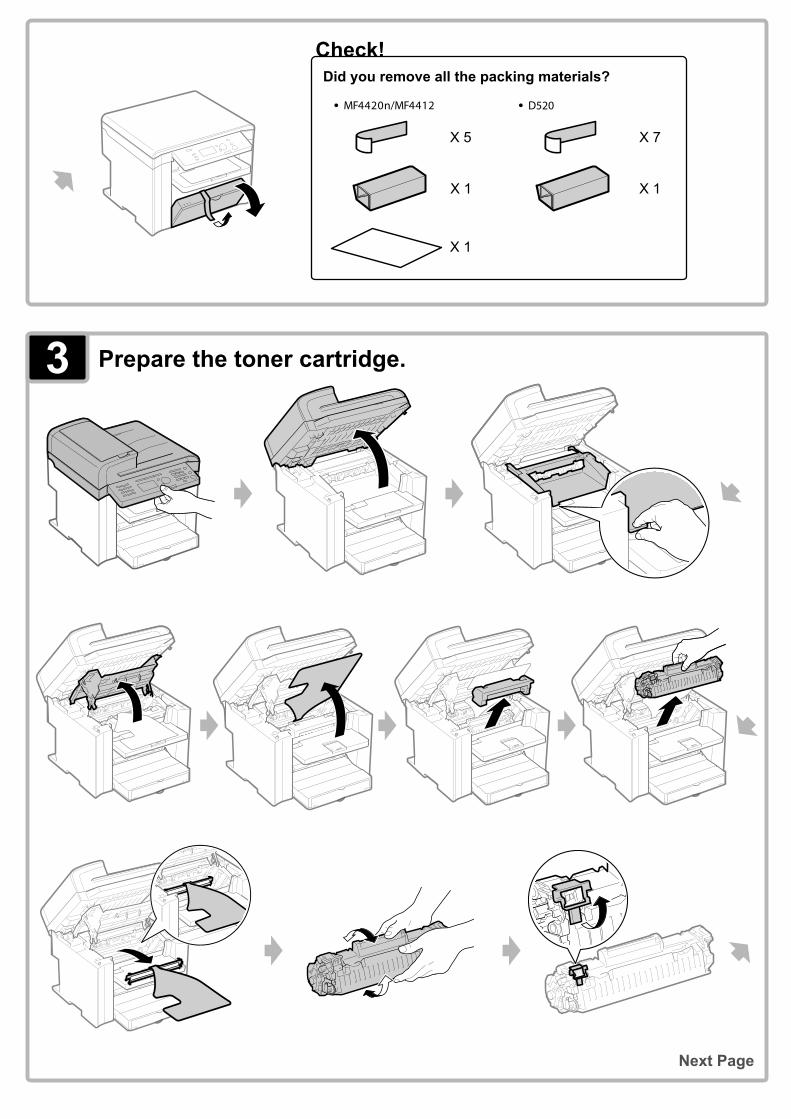
3 Prepare the toner cartridge.
Next Page
Did you remove all the packing materials?Check!
X 1
X 5
X 1
X 7
MF4420n/MF4412 D520
X 1

1-8
4
Did you remove all the packing materials?
Check!
Load the paper.

1-9
5
(1)
(2) MF4570dn/MF4550d/MF4450
Install the handset (optional).Use only the parts which are used in the following procedure. You do not need to use unnecessary parts.

1
Setting Up the Machine to Suit Your Purposes
Determine which machine functions (Copy, Print, Fax*1, PC Fax*1, Scan, Remote UI*2) you intend to use, and make the settings according to the flowchart below.
Connecting the Power Cord P. 4
Registering the Sender Information P. 7
Fax Settings *1
Settings are now complete.
Start Settings.
Selecting the Receive Mode P. 8
Connecting a Telephone Line P. 9
Turning the Power ON and
Specifying the Initial Settings Country and Region Settings Language Settings Current Time Settings P. 4
Installing the Software P. 11
Connecting to a Network *2 P. 10
Settings in a Computer
Copy Fax Settings froma Computer
PrintScan
PC Fax *1
PrintScan
PC Fax *1
Required Operations
RemoteUI *2
NetworkConnection*2
USBConnection
*1 This function is available only for MF4580dn/MF4570dn/MF4550d/MF4450.
*2 The network function is available only for MF4580dn/MF4570dn/MF4420n.
2
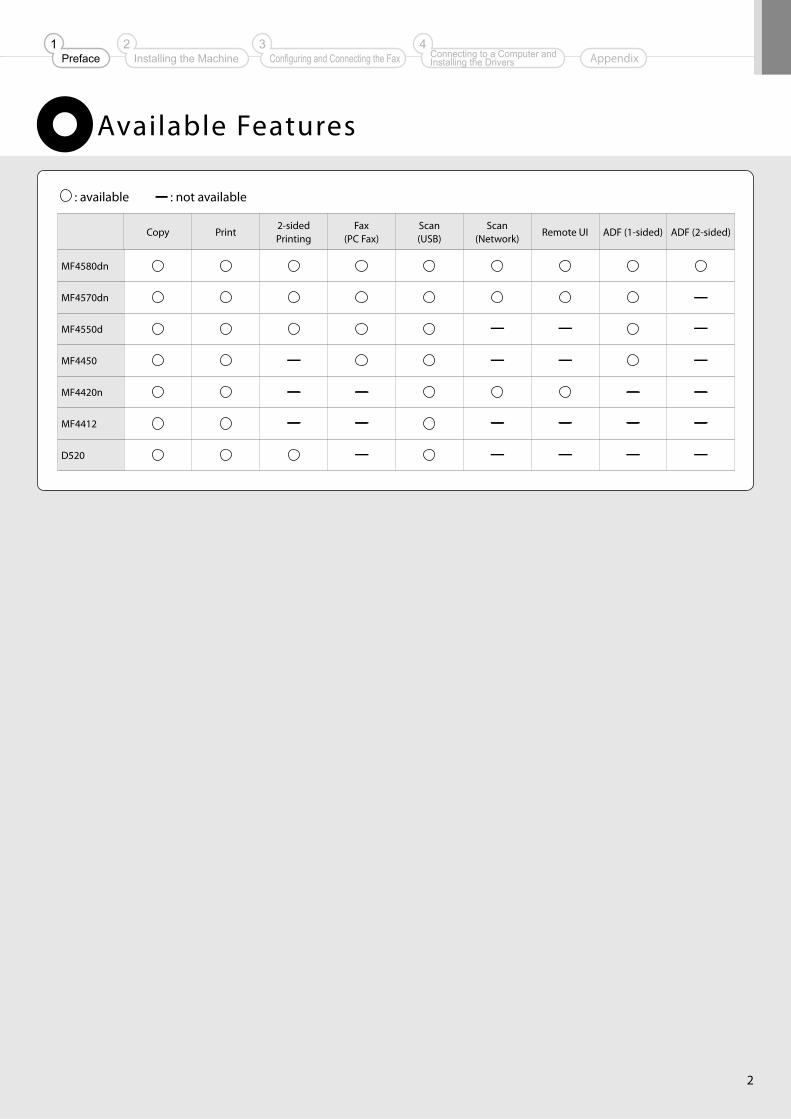
Available Features
: available : not available
Copy Print2-sided Printing
Fax (PC Fax)
Scan(USB)
Scan(Network)
Remote UI ADF (1-sided) ADF (2-sided)
MF4580dn
MF4570dn
MF4550d
MF4450
MF4420n
MF4412
D520
Preface1
Installing the Machine2
Configuring and Connecting the Fax3
Connecting to a Computer and Installing the Drivers
4Appendix
3
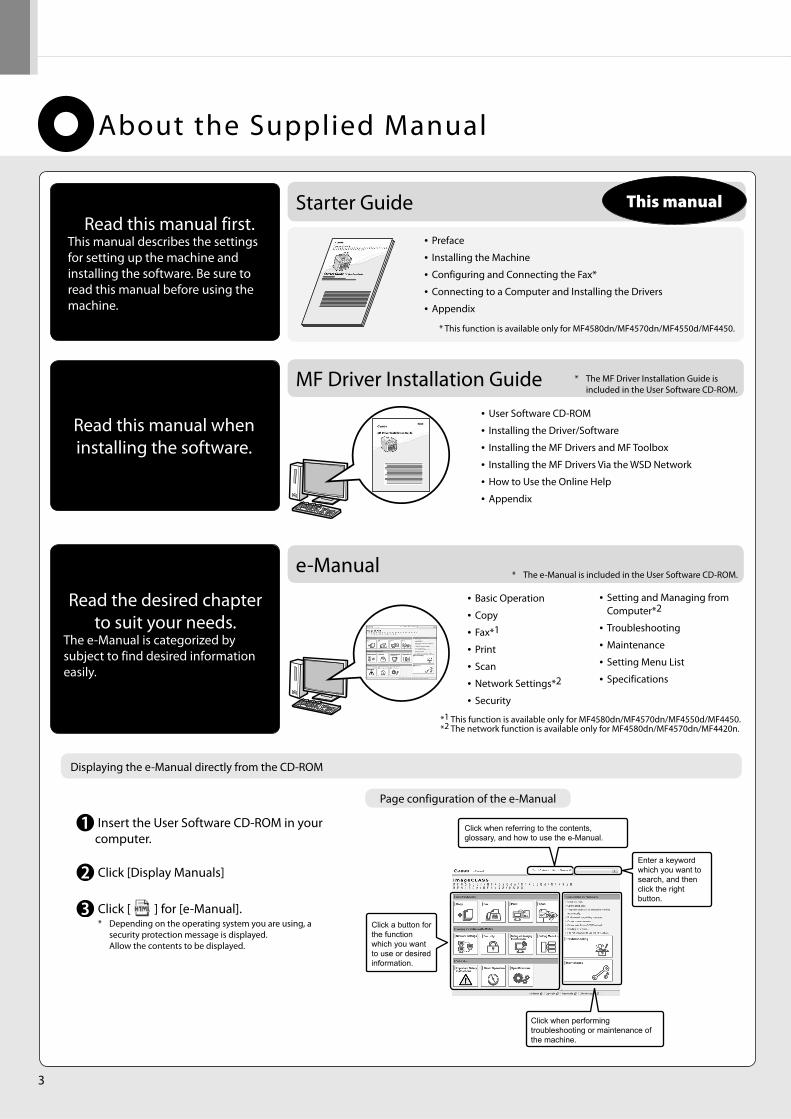
About the Supplied Manual
Read this manual first. This manual describes the settings for setting up the machine and installing the software. Be sure to read this manual before using the machine.
Starter Guide
MF Driver Installation Guide
e-Manual
Read this manual when installing the software.
Read the desired chapter to suit your needs.
The e-Manual is categorized by subject to find desired information easily.
This manual
*1 This function is available only for MF4580dn/MF4570dn/MF4550d/MF4450. *2 The network function is available only for MF4580dn/MF4570dn/MF4420n.
* This function is available only for MF4580dn/MF4570dn/MF4550d/MF4450.
• Preface
• Installing the Machine
• Configuring and Connecting the Fax*
• Connecting to a Computer and Installing the Drivers
• Appendix
• User Software CD-ROM
• Installing the Driver/Software
• Installing the MF Drivers and MF Toolbox
• Installing the MF Drivers Via the WSD Network
• How to Use the Online Help
• Appendix
• Basic Operation
• Copy
• Fax*1
• Scan
• Network Settings*2
• Security
• Setting and Managing from Computer*2
• Troubleshooting
• Maintenance
• Setting Menu List
• Specifications
* The e-Manual is included in the User Software CD-ROM.
Displaying the e-Manual directly from the CD-ROM
Insert the User Software CD-ROM in your computer.
Click [Display Manuals]
Click [ ] for [e-Manual]. * Depending on the operating system you are using, a
security protection message is displayed.Allow the contents to be displayed.
Page configuration of the e-Manual
* The MF Driver Installation Guide is included in the User Software CD-ROM.
Click a button for the function which you want to use or desired information.
Click when referring to the contents, glossary, and how to use the e-Manual.
Enter a keyword which you want to search, and then click the right button.
Click when performing troubleshooting or maintenance of the machine.

4
Connecting the Power Cord
2. Specify initial settings.
Press [ ] or [ ] to select, and then press [OK].
Turning the Power ON and Specifying the Initial Settings
Do not connect the USB cable. Connect the USB cable when installing the software.
Press [ ] or [ ] to select, and then press [OK].
OFF
Ensure that the machine is off. Plug the power plug into the power socket.
Plug the power plug into a AC power outlet.
1. Turn ON the machine.
ON
Language Chinese (Simplified) Chinese (Traditiona... English French
Select Country/Region Australia (AU) New Zealand (NZ) Other
Preface1
Installing the Machine2
Configuring and Connecting the Fax3
Connecting to a Computer and Installing the Drivers
4Appendix

5
Press [OK].
An initial screen appears, and initial setting is finished.
Press [ ] or [ ] to specify, and then press [OK].
• For MF4580dn/MF4570dn/MF4550d/MF4450, you can also enter values using the numeric key.
• Move the cursor with [ ] or [ ].
• Switch to <AM> or <PM> with [ ] or [ ].
Check and press [OK].
Open toner cover;seeif orange packingmaterial is removed.
Next
Check that tabs/tapeare removed fromtoner cartridge.
Next
Check that paper isloaded in Drawer 1.
Next
Current Time Set. Must rechg. battery for 24 hrs. to save time settings. After turning main
Current Time Settings
01/01 2010 12:52 AM
Copy: Press Start100% A4 Density: 0 Original Type: Text... 2-Sided: Off
1
+-
01

6
Setting a Paper Size and Type
• When using MF4580dn/MF4570dn/MF4550d/MF4450 • When using MF4420n/MF4412/D520
Next, perform the setup to use the fax function. Next, select a method for connecting the machine to a computer.
Specifying Initial Fax Settings and Connecting a Telephone Cable
P.7
Selecting a Method for Connecting the Machine to a Computer
P. 10
Press [ ] (Paper Settings). Press [ ] or [ ] to select, and then press [OK].
Press [ ] or [ ] to select, and then press [OK].
Press [ ] or [ ] to select, and then press [OK].
Press [ ] (Paper Settings) to close <Paper Settings> screen.
Paper Settings MP Tray Drawer 11
Paper Size A4 A5 B5 LTR
Paper Type Plain (60-90 g/m2) Plain L (60-90 g/m2) Recycled Color
• MF4580dn/MF4570dn/MF4550d/MF4450 • MF4420n/MF4412/D520
Preface1
Installing the Machine2
Configuring and Connecting the Fax3
Connecting to a Computer and Installing the Drivers
4Appendix

7
Specifying Initial Fax Settings and Connecting a Telephone Cable
1. Register the fax number and unit name.
Enter information (text, symbols, and numbers) into the machine using the following keys.
#CNumeric keys
OK
Entering text, symbols, and numbers
Enter with the numeric keys or [ ] (SYMBOLS).
Key Entry mode: <A> Entry mode: <a> Entry mode: <12>@ . - _ / 1
ABC abc 2
DEF def 3
GHI ghi 4
JKL jkl 5
MNO mno 6
PQRS pqrs 7
TUV tuv 8
WXYZ wxyz 9
(Not available) 0- . * # ! “ , ; : ^ ` _ = / | ‘ ? $
@ % & + \ ( ) [ ] { } < > (Not available)
Deleting text, symbols, numbers
To delete text, numbers, or symbols, press [ ] (Clear). To delete all text, numbers, or symbols, press and hold [ ] (Clear).
Press [ ]. Press [ ] or [ ] to select, and then press [OK].
Display “Fax Setup Guide” with the following operations to perform
the settings or connections if selecting <Set up Later>.
[ ] (Menu) → <Fax TX Settings> → <Fax Setup Guide>.
Press [OK]. Enter.
Press [ ] or [ ] to select <Apply>, and then press [OK].
Press [OK]. Enter.
Press [ ] or [ ] to select <Apply>, and then press [OK].
Text Input Method
Changing the entry mode
Press [ ] to select <Entry Mode>, and then press [OK]. You can also press [ ] (Tone) to change the entry mode.
Entry mode Available text<A> Alphabet (capital letters) and symbols<a> Alphabet (small letters) and symbols<12> Numbers
Moving the cursor (entering a space)
Move the cursor by pressing [ ] or [ ]. To enter a space, move the cursor to the end of the text and press [ ].
Perform fax setup?
Set up Now Set up Later
Register the unittelephone number for this machine.*Next Screen: Press OK
Fax No. 031234567 <Apply> +
Register unit name.(Sender name,company name, etc.)*Next Screen: Press OK
Register Unit NameABC <Apply> Entry Mode: A
What happens with the unit name
When you send faxes, the registered information is printed on at the top of the fax page.
Sending Date/Time
Fax/Telephone Number(FAX No.)
Page NumberSender Name(Unit Name)
Telephone NumberMark
01/01/2011 02:07 PM FAX 123XXXXXXX CANON P.0001
Operate the machine following the on-screen instructions and perform the following settings and connection. • Registering the fax number and unit name • Setting the fax receive mode • Connecting a telephone line
If you are using pulse dialing, change the line type after specifying the settings.
8
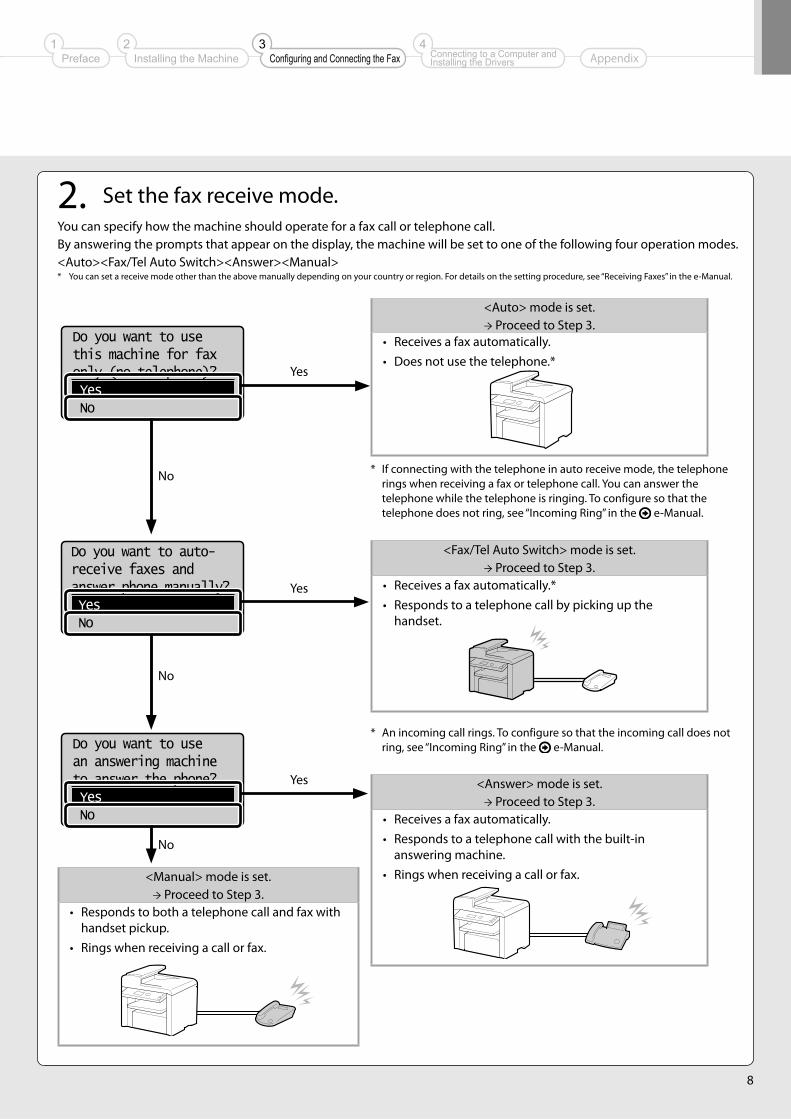
2. Set the fax receive mode.
<Auto> mode is set.→ Proceed to Step 3.
• Receives a fax automatically.• Does not use the telephone.*
* If connecting with the telephone in auto receive mode, the telephone rings when receiving a fax or telephone call. You can answer the telephone while the telephone is ringing. To configure so that the telephone does not ring, see “Incoming Ring” in the e-Manual.
Do you want to usethis machine for faxonly (no telephone)? Yes No
Do you want to auto-receive faxes andanswer phone manually? Yes No
Do you want to usean answering machineto answer the phone? Yes No
<Fax/Tel Auto Switch> mode is set.→ Proceed to Step 3.
• Receives a fax automatically.*• Responds to a telephone call by picking up the
handset.
* An incoming call rings. To configure so that the incoming call does not ring, see “Incoming Ring” in the e-Manual.
<Answer> mode is set.→ Proceed to Step 3.
• Receives a fax automatically.• Responds to a telephone call with the built-in
answering machine.• Rings when receiving a call or fax.<Manual> mode is set.
→ Proceed to Step 3.• Responds to both a telephone call and fax with
handset pickup.• Rings when receiving a call or fax.
You can specify how the machine should operate for a fax call or telephone call. By answering the prompts that appear on the display, the machine will be set to one of the following four operation modes. <Auto><Fax/Tel Auto Switch><Answer><Manual> * You can set a receive mode other than the above manually depending on your country or region. For details on the setting procedure, see “Receiving Faxes” in the e-Manual.
Yes
Yes
Yes
No
No
No
Preface1
Installing the Machine2
Configuring and Connecting the Fax3
Connecting to a Computer and Installing the Drivers
4Appendix
9
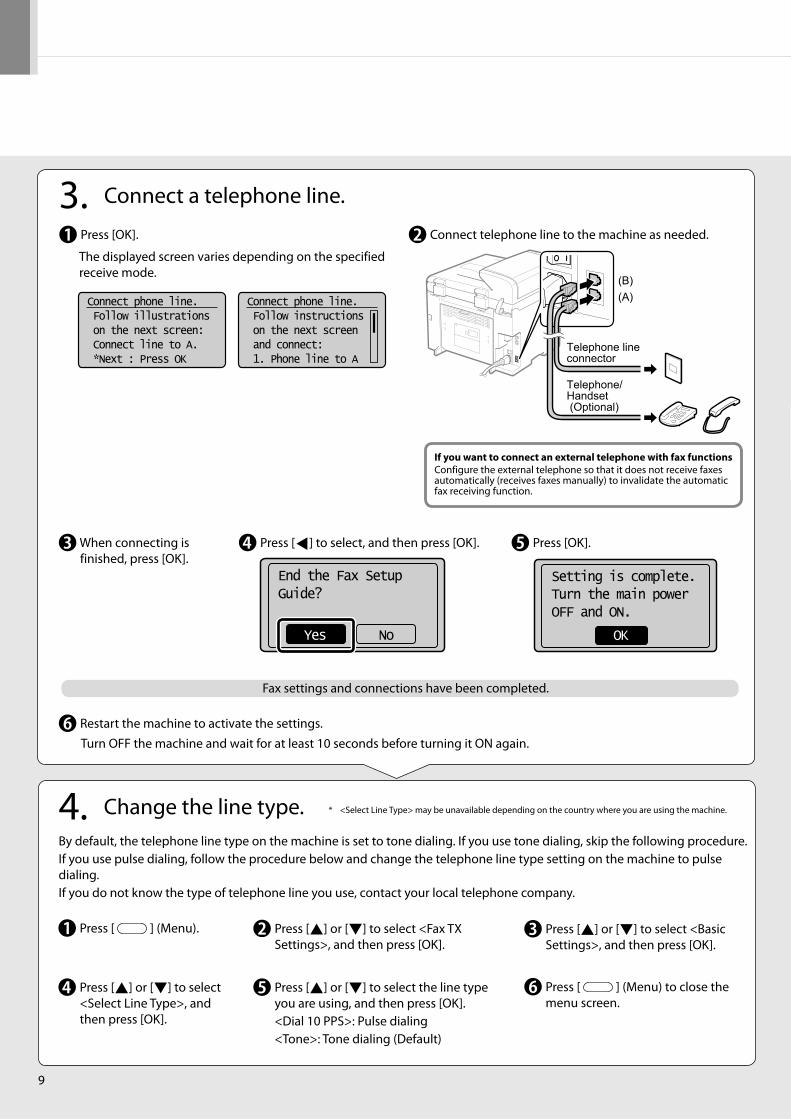
3. Connect a telephone line.
Press [OK].
The displayed screen varies depending on the specified receive mode.
Connect telephone line to the machine as needed.
Press [ ] to select, and then press [OK]. When connecting is finished, press [OK].
Fax settings and connections have been completed.
End the Fax SetupGuide?
NoYes
Restart the machine to activate the settings.
Turn OFF the machine and wait for at least 10 seconds before turning it ON again.
* <Select Line Type> may be unavailable depending on the country where you are using the machine.
Press [OK].
Setting is complete.Turn the main powerOFF and ON.
OK
If you want to connect an external telephone with fax functions Configure the external telephone so that it does not receive faxes automatically (receives faxes manually) to invalidate the automatic fax receiving function.
4. Change the line type. By default, the telephone line type on the machine is set to tone dialing. If you use tone dialing, skip the following procedure. If you use pulse dialing, follow the procedure below and change the telephone line type setting on the machine to pulse dialing. If you do not know the type of telephone line you use, contact your local telephone company.
Press [ ] (Menu). Press [ ] or [ ] to select <Fax TX Settings>, and then press [OK].
Press [ ] or [ ] to select <Basic Settings>, and then press [OK].
Press [ ] or [ ] to select <Select Line Type>, and then press [OK].
Press [ ] or [ ] to select the line type you are using, and then press [OK]. <Dial 10 PPS>: Pulse dialing <Tone>: Tone dialing (Default)
Press [ ] (Menu) to close the menu screen.
Connect phone line. Follow illustrations on the next screen: Connect line to A. *Next : Press OK
Connect phone line. Follow instructions on the next screen and connect: 1. Phone line to A
Telephone/Handset (Optional)
Telephone line connector
(A)(B)

10
Selecting a Method for Connecting the Machine to a Computer
About the LAN cable • The machine does not come with a LAN cable or a hub.
Have cables or a hub ready as needed.
• Use a Category 5 or higher twisted pair cable for the LAN.
Network Connection and Configuration
2. The machine sets the IP address automatically. Wait approximately 2 minutes. If you want to set the IP address manually, see the following. e-Manual "Setting IPv4 Address" e-Manual "Setting IPv6 Address"
If the IP address of the machine is changed When the machine and computer are on the same subnet, the connection is maintained.
Installing the Driver/Software P. 11
• For Network Connection (MF4580dn/MF4570dn/MF4420n Only)
• For USB Connection
Network Connection and Configuration P. 10
Installing the Driver/Software P. 11
There are two ways to connect the machine to a computer: Network connection and USB connection. Select the connection type according to your environment or functions to be used. * The network function is available only for MF4580dn/MF4570dn/MF4420n. * Functions with USB connection and network connection can be used simultaneously.
About obtaining the IP address automatically (AutoIP) <DHCP> or <Auto IP> is enabled in the default setting. Even if you do not set the IP address manually, this machine can obtain it automatically. • Even if you do not have a dedicated device such as a DHCP server,
the IP address is obtained automatically.
• The <DHCP> setting is prioritized over <Auto IP>. If a fixed IP address is set as the IP address of the computer, set the fixed IP address also for this machine manually.
1. Connect the LAN cable.
Preface1
Installing the Machine2
Configuring and Connecting the Fax3
Connecting to a Computer and Installing the Drivers
4Appendix

11
Installing the Driver/Software
Use the supplied User Software CD-ROM to install the drivers and software.The details of the installation is not described in this manual, see the MF Driver Installation Guide.
Insert the CD-ROM.
Click.
Click when referring to the MF Driver Installation Guide.
Click.

12
Per formUsefulTasks
•Enlarged/Reduced CopiesYoucanenlargeorreducestandardsizedocumentstocopyonstandardsizepaperorspecifythecopyratioinpercentage.•2-Sided Copying (MF4580dn/MF4570dn/MF4550d/D520 Only)Youcancopy1-sideddocumentsonbothsidesofpaper.•CollatingYoucansortcopiesintosetsarrangedinpageorder.•Reduced LayoutYoucanreducemultipledocumentstocopythemontoonesheet.
2 on 1 4 on 1
•Copying ID CardYoucanmakeacopyofa2-sidedcardontoonesideofpaper.
•Enlarged/Reduced Printing
•2-Sided Printing (MF4580dn/MF4570dn/MF4550d/D520 Only)
•Reduced LayoutYoucanreducemultipledocumentstoprintthemontoonesheet.
2 on 1 4 on 1
•Booklet Printing (MF4580dn/MF4570dn/MF4550d/D520 Only)
•Poster Printing
•Watermark Printing
•Displaying a Preview before Printing
•Selecting a “Profile”
•Saving the Documents Using the Operation Panel of the Machine
1
2
3
Documents
Data
•Saving the Documents Using Operations from a Computer• ScanningwiththeMFToolbox
1
2 3
Documents
Data
• ScanningfromanApplication• ScanningwiththeWIADriver(WindowsXP/Vista/7Only)
Thismachinecomesequippedwithanetworkinterfacethatyoucanconstructanetworkenvironmenteasily.Youcanprintadocument,usethePCfax,andusethenetworkscanfromallcomputerswhichareconnectedwiththemachine.Themachinesupportstoincreaseworkefficiencyasasharedmachineintheoffice.
Youcanunderstandtheconditionofthemachinefromthecomputersonthenetwork.Youcanaccessthemachineandmanagejobsorspecifyvarioussettingsvianetwork.
•Sending a Document Directly from a Computer (PC Fax)Inadditiontothenormalsendingandreceivingfaxes,youcanusethePCfax.•SendingYoucanregisterfaxdestinationsintheaddressbook.Youcanspecifythedestinationsusingvariousmethods,enablingyoutosenddocumentsquicklyandeasily.
• Destinationsearch• One-touchkeys• Codeddialing• DestinationGroup• Specifyingfromthesendinghistory• Sequentialbroadcast
•Receiving• Receivinginthememory
Youcanstorethereceiveddocumentsinthememory.Youcanprintthestoreddocumentsatanytimeorifyoudonotneedthem,youcandeletethem.
• RemoteReceivingIfanexternaltelephoneisconnected,youcanswitchtothefaxreceivingmodeimmediatelybydialingtheIDnumberforfaxreceivingusingthedialbuttonsofthetelephoneduringaphonecall.
Copy Print
Scan
Network Settings (MF4580dn/MF4570dn/MF4420n Only) Remote UI (MF4580dn/MF4570dn/MF4420n Only)
Fax (MF4580dn/MF4570dn/MF4550d/MF4450 Only)
Preface1
Installing the Machine2
Configuring and Connecting the Fax3
Connecting to a Computer and Installing the Drivers
4Appendix

13
Clearing Paper Jams
If the following screen appears, a paper jam has occurred in the feeder or inside the machine. Following the procedure displayed on the screen, remove the jammed document or paper.
For details on the procedure for clearing paper jams
This manual indicates only areas where paper jams occur. For details on the procedures, see the e-Manual.
HAND
SET EXT.
LINE
Duplex unit
MF4580dn/MF4570dn/MF4550d/D520
Paper jam.Press [ ] todisplay steps.
Inside the machine
Feeder
Multi-purpose tray
Paper cassette
MF4580dn MF4570dn/MF4550d/MF4450

14
Replacing Toner Cartridge
When the toner becomes nearly out in the middle of operating this machine, a message appears in the display.
Message When It Is Displayed Description and Solutions
<Prepare
toner
cartridge.>
When a toner cartridge soon needs to be replaced.
Redistribute the toner. e-Manual “Before Replacing the Toner Cartridge”
It is recommended that you replace the toner cartridge before printing a large amount of data.
e-Manual “Replacing the Toner Cartridge”
<Toner is
nearly out.>
When a toner cartridge has reached the end of its life.
Redistribute the toner. e-Manual “Before Replacing the Toner Cartridge”
If this message does not disappear, replace the toner cartridge. e-Manual “Replacing the Toner Cartridge”
If this message is displayed, the incoming fax will be stored in the memory without being printed. Also, reports may not be printed, even if they are set to be printed automatically.If <Continue Print. When Toner Is Nearly Out> in <RX Function Settings> is set to <On>, however, printing will be continued, but white streaks or smudges may appear on printouts.
e-Manual “Setting the Report to Print Automatically(MF4580dn/MF4570dn/MF4550d/MF4450 Only)”
e-Manual “Continue Print. When Toner Is Nearly Out”
When a Message Appears (MF4580dn/MF4570dn/MF4550d/MF4450 Only)
Toner cartridges are consumable products. When the toner has almost or completely run out in the middle of operating this machine, a message appears in the display, or the symptoms described below appears. Follow a proper resolution depending on the message or symptom.
White streaks appear or some parts are faded
If white streaks appear on the printouts or some parts are faded, the toner cartridge has almost reached the end of its life, even if no messages appear on the screen. If print quality declines, see “When White Streaks Appear On the Printouts or Some Parts Are Faded” and solve the problem.
Preface1
Installing the Machine2
Configuring and Connecting the Fax3
Connecting to a Computer and Installing the Drivers
4Appendix
When White Streaks Appear On the Printouts or Some Parts Are Faded
If the toner almost runs out, white streaks appear on the printouts or some parts are faded.
If the above symptoms appear
Follow the procedure in the section below before replacing the toner cartridge. You may print for some time, until the toner completely runs out.
e-Manual “Before Replacing the Toner Cartridge”
If print result is not improved
If white streaks or faded parts continue to appear after following the procedure in the section above, replace the toner cartridge.
e-Manual “Replacing the Toner Cartridge”
* No message appears on the display even if the toner almost runs out. Replace the toner cartridge when white streaks appear on the printouts or some parts of the printout are faded.
15
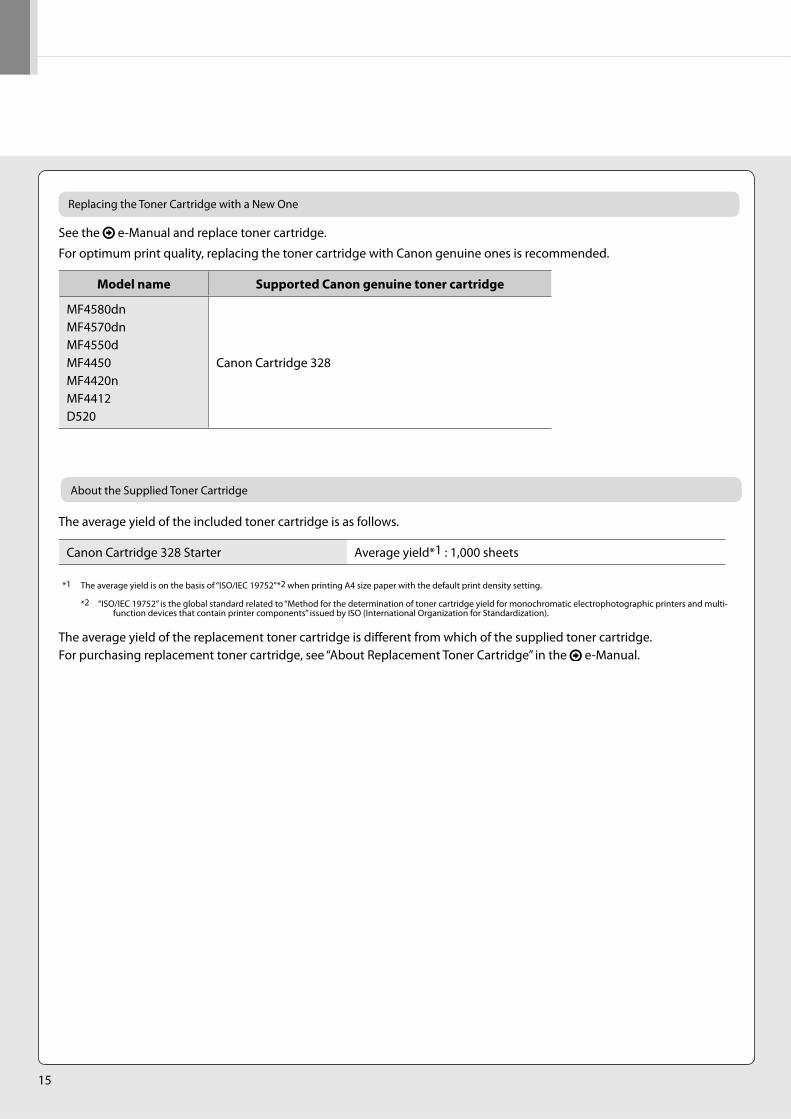
See the e-Manual and replace toner cartridge.
Replacing the Toner Cartridge with a New One
For optimum print quality, replacing the toner cartridge with Canon genuine ones is recommended.
Model name Supported Canon genuine toner cartridge
MF4580dnMF4570dnMF4550dMF4450MF4420nMF4412D520
Canon Cartridge 328
The average yield of the included toner cartridge is as follows.
Canon Cartridge 328 Starter Average yield*1 : 1,000 sheets
*1 The average yield is on the basis of “ISO/IEC 19752”*2 when printing A4 size paper with the default print density setting.
*2 “ISO/IEC 19752” is the global standard related to “Method for the determination of toner cartridge yield for monochromatic electrophotographic printers and multi-function devices that contain printer components” issued by ISO (International Organization for Standardization).
The average yield of the replacement toner cartridge is different from which of the supplied toner cartridge. For purchasing replacement toner cartridge, see “About Replacement Toner Cartridge” in the e-Manual.
About the Supplied Toner Cartridge

16
Symbols Used in This Manual
WARNING Indicates a warning concerning operations that may lead to death or injury to persons if not performed correctly. To use the machine safely, always pay attention to these warnings.
CAUTION Indicates a caution concerning operations that may lead to injury to persons if not performed correctly. To use the machine safely, always pay attention to these cautions.
IMPORTANT Indicates operational requirements and restrictions. Be sure to read these items carefully to operate the machine correctly, and avoid damage to the machine or property.
Indicates an operation that must not be performed. Read these items carefully, and make sure not to perform the described operations.
Keys and Buttons Used in This Manual
The following symbols and key names are a few examples of how keys to be pressed are expressed in this manual. • Operation panel keys: [Key icon] + (Key name)
Example: [ ] (Stop) • Display: <Specify destination.> • Buttons and items on the computer display: [Preferences]
Illustrations and Displays Used in This Manual
Illustrations and displays used in this manual are which of MF4570dn unless specified.
Important Safety Instructions
Please read these “Important Safety Instructions” thoroughly before operating the machine.As these instructions are intended to prevent injury to the user and other persons or to prevent destruction of property, always pay attention to these instructions and operational requirements.Also, as it may result in unexpected accidents or injuries, do not perform any operation unless otherwise specified in the manual.
Installation
WARNING • Do not install the machine in a location near alcohol, paint thinner, or other
flammable substances. If flammable substances come into contact with electrical parts inside the machine, this may result in a fire or electrical shock.
• Do not place the following items on the machine. - Necklaces and other metal objects - Cups, vases, flowerpots, and other containers filled with water or liquids
If these items come into contact with a high-voltage area inside the machine, this may result in a fire or electrical shock. If these items are dropped or spilled inside the machine, immediately turn off the power switches of the machine and computer (1) and disconnect the interface cable if it is connected (2). Then, unplug the power plug from the AC power outlet (3) and contact your local authorized Canon dealer.
OFF
OFF
(1)
(1)
(2)
(3)
(3)
CAUTION • Do not install the machine in unstable locations, such as on unsteady platforms
or inclined floors, or in locations subject to excessive vibrations, as this may cause the machine to fall or tip over, resulting in personal injury.
• The ventilation slots are provided for proper ventilation of working parts inside the machine. Never place the machine on a soft surface, such as a bed, sofa, or rug. Blocking the slots can cause the machine to overheat, resulting in a fire.
• Do not install the machine in the following locations, as this may result in a fire or electrical shock. - A damp or dusty location - A location exposed to smoke and steam, such as near a cookery or humidifier - A location exposed to rain or snow - A location near a water faucet or water - A location exposed to direct sunlight - A location subject to high temperatures - A location near open flames
• When installing the machine, gently lower the machine to the installation site so as not to catch your hands between the machine and the floor or between the machine and other equipment, as this may result in personal injury.
• When connecting the interface cable, connect it properly by following the instructions in this manual. If not connected properly, this may result in malfunction or electrical shock.
• When moving the machine, follow the instructions in this manual to hold it correctly. Failure to do so may cause you to drop the machine, resulting in personal injury.
e-Manual “Transporting the Machine”
Power Supply
WARNING • Do not damage or modify the power cord. Also, do not place heavy objects on
the power cord or pull on or excessively bend it. This can cause electrical damage, resulting in fire or electrical shock.
• Keep the power cord away from all heat sources. Failure to do so can cause the power cord insulation to melt, resulting in a fire or electrical shock.
• The power cord should not be taut, as this may lead to a loose connection and cause overheating, which could result in a fire.
• The power cord may become damaged if it is stepped on, fixed with staples, or if heavy objects are placed on it.
• Continued use of a damaged power cord can lead to an accident, such as a fire or electrical shock.
• Do not plug or unplug the power plug with wet hands, as this can result in electrical shock.
• Do not plug the power cord into a multiplug power strip, as this can result in a fire or electrical shock.
• Do not bundle up or tie up the power cord in a knot, as this can result in a fire or electrical shock.
• Insert the power plug completely into the AC power outlet. Failure to do so can result in a fire or electrical shock.
Preface1
Installing the Machine2
Configuring and Connecting the Fax3
Connecting to a Computer and Installing the Drivers
4Appendix

17
• Ifexcessivestressisappliedtotheconnectionpartofthepowercord,itmaydamagethepowercordorthewiresinsidethemachinemaydisconnect.Thiscouldresultinafire.Avoidthefollowingsituations:- Connectinganddisconnectingthepowercordfrequently.- Trippingoverthepowercord.- Thepowercordisbentneartheconnectionpart,andcontinuousstressis
beingappliedtothepoweroutletortheconnectionpart.- Applyingashocktothepowerconnector.
• Donotusepowercordsotherthantheoneprovided,asthiscanresultinafireorelectricalshock.
• Asageneralrule,donotuseextensioncords.Usinganextensioncordmayresultinafireorelectricalshock.
• RemovethepowerplugfromtheACpoweroutletandrefrainfromusingthemachineduringathunderstorm.Lightningcanresultinafire,electricalshockormalfunction.
CAUTION• Donotuseapowersupplyvoltageotherthanthatlistedherein,asthismayresult
inafireorelectricalshock.• Alwaysgraspthepowerplugwhenunpluggingthepowerplug.Donotpullon
thepowercord,asthismayexposethecorewireofthepowercordordamagethecordinsulation,causingelectricitytoleak,resultinginafireorelectricalshock.
• Leavesufficientspacearoundthepowerplugsothatitcanbeunpluggedeasily.Ifobjectsareplacedaroundthepowerplug,youmaybeunabletounplugitinanemergency.
Handling
WARNING• Donotdisassembleormodifythemachine.Therearehigh-temperatureandhigh-
voltagecomponentsinsidethemachinewhichmayresultinafireorelectricalshock.
• Electricalequipmentcanbehazardousifnotusedproperly.Donotallowchildrentotouchthepowercord,cables,internalgears,orelectricalparts.
• Ifthemachinemakesanunusualnoiseoremitssmoke,heat,oranunusualsmell,immediatelyturnoffthepowerswitchesofthemachineandcomputeranddisconnecttheinterfacecableifitisconnected.Then,unplugthepowerplugfromtheACpoweroutletandcontactyourlocalauthorizedCanondealer.Continuedusecanresultinafireorelectricalshock.
• Donotuseflammablespraysnearthemachine.Ifflammablesubstancescomeintocontactwithelectricalpartsinsidethemachine,thismayresultinafireorelectricalshock.
• Alwaysturnoffthepowerswitchesofthemachineandcomputer,andthenunplugthepowerplugandinterfacecablesbeforemovingthemachine.Failuretodosocandamagethecablesorcords,resultinginafireorelectricalshock.
• Confirmthatthepowerplugorpowerconnectorisinsertedcompletelyaftermovingthemachine.Failuretodosocanresultinanoverheatingandfire.
• Donotdroppaperclips,staples,orothermetalobjectsinsidethemachine.Also,donotspillwater,liquids,orotherflammablesubstances(alcohol,benzene,paintthinner,etc.)insidethemachine.Iftheseitemscomeintocontactwithahigh-voltageareainsidethemachine,thismayresultinafireorelectricalshock.Iftheseitemsaredroppedorspilledinsidethemachine,immediatelyturnoffthepowerswitchesofthemachineandcomputeranddisconnecttheinterfacecableifitisconnected.Then,unplugthepowerplugfromtheACpoweroutletandcontactyourlocalauthorizedCanondealer.
• WhenpluggingorunpluggingaUSBcablewhenthepowerplugispluggedintoanACpoweroutlet,donottouchthemetalpartoftheconnector,asthiscanresultinelectricalshock.
CAUTION• Donotplaceheavyobjectsonthemachine.Theobjectorthemachinemayfall,
resultinginpersonalinjury.• Turnoffthepowerswitchwhenthemachinewillnotbeusedforalongperiodof
time,suchasovernight.Turnoffthemachineandunplugthepowerplugifthemachinewillnotbeusedforanextendedperiodoftime,suchasforseveraldays.
• Openorclosecoversandinstallorremovecassettesgentlyandcarefully.Becarefulnottohurtyourfingers.
• Keepyourhandsandclothingawayfromtherollerintheoutputarea.Evenifthemachineisnotprinting,therollermaysuddenlyrotateandcatchyourhandsorclothing,resultinginpersonalinjury.
• Theoutputslotishotduringandimmediatelyafterprinting.Donottouchtheareasurroundingtheoutputslot,asthismayresultinburns.
• Printedpapermaybehotimmediatelyafterbeingoutput.Becarefulwhenremovingthepaperandaligningtheremovedpaper,especiallyaftercontinuousprinting.Failuretodosomayresultinburns.
• Whenperformingcopywithathickbookplacedontheplatenglass,donotpressthefeederortheplatenglasscoverforcefully.Thismaydamagetheplatenglassandcausepersonalinjury.
• Becarefulnottodropaheavyobject,suchasadictionary,ontheplatenglass.Thismaydamagetheplatenglassandcausepersonalinjury.
• Closethefeederortheplatenglasscovergentlysoasnottocatchyourhand.Thismayresultinpersonalinjury.
• Thelaserbeamcanbeharmfultothehumanbody.Thelaserbeamisconfinedinthelaserscannerunitbyacover,sothereisnodangerofthelaserbeamescapingduringnormalmachineoperation.Readthefollowingremarksandinstructionsforsafety.- Neveropencoversotherthanthoseindicatedinthismanual.- Donotremovethecautionlabelattachedtothecoverofthelaserscanner
unit.
- Ifthelaserbeamshouldescapeandenteryoureyes,exposuremaycausedamagetoyoureyes.
Maintenance and Inspections
WARNING• Whencleaningthemachine,turnoffthemachineandcomputer,andunplugthe
interfacecablesandpowerplug.Failuretodosocanresultinafireorelectricalshock.
• UnplugthepowerplugfromtheACpoweroutletperiodicallyandcleantheareaaroundthebaseofthepowerplug’smetalpinsandtheACpoweroutletwithadryclothtoremovealldustandgrime.Indamp,dusty,orsmokylocations,dustcanbuilduparoundthepowerplugandbecomedamp,whichcancauseashortcircuit,resultinginafire.
• Cleanthemachinewithawellwrungoutclothdampenedwithwaterormilddetergentdilutedwithwater.Donotusealcohol,benzene,paintthinner,orotherflammablesubstances.Ifflammablesubstancescomeintocontactwithelectricalpartsinsidethemachine,thismayresultinafireorelectricalshock.
• Someareasinsidethemachinearesubjecttohighvoltage.Whenremovingjammedpaperorwheninspectinginsideofthemachine,becarefulnottoallownecklaces,bracelets,orothermetalobjectstotouchtheinsideofthemachine,asthiscanresultinburnsorelectricalshock.
• Donotdisposeofusedtonercartridgesinopenflames.Thismaycausethetonerremaininginsidethecartridgestoignite,resultinginburnsorfire.
• Confirmthatthepowerplugorpowerconnectorisinsertedcompletelyaftercleaningthemachine.Failuretodosocanresultinanoverheatingandfire.
• Checkthepowercordandplugregularly.Thefollowingconditionsmayresultinfire,sopleasecontactyourlocalauthorizedCanondealerortheCanonhelpline.- Thereareburnmarksonthepowerplug.- Thebladeonthepowerplugisdeformedorbroken.- ThepoweristurnedOFForONwhenbendingthepowercord.- Thecoatingofthepowercordisdamaged,cracked,ordented.- Apartofthepowercordbecomeshot.
• Checkregularlythatthepowercordandplugarenothandledinthefollowingmanner.Failuretodosocanresultinafireorelectricalshock.- Thepowerconnectorisloosened.- Stressisbeingappliedtothepowercordbyaheavyobjectorbyfixingitwith
staples.- Thepowerplugisloosened.- Thepowercordistiedinabundle.- Apartofthepowercordisputinanaisle.- Thepowercordisputinfrontoftheheatingappliance.

18
CAUTION • The fixing unit and its surroundings inside the machine become hot during use.
When removing jammed paper or when inspecting the inside of the machine, do not touch the fixing unit and its surroundings, as this may result in burns.
• When removing jammed paper or when inspecting the inside of the machine, do not expose yourself to the heat emitted from the fixing unit and its surroundings for a prolonged period of time. Doing so may result in low temperature burns, even though you did not touch the fixing unit and its surroundings directly, as this may result in burns.
• If paper is jammed, remove the jammed paper so that any pieces of paper do not remain inside the machine according to the displayed message. Also, do not put your hand in an area other than indicated areas, as this may result in personal injuries or burns.
• When removing jammed paper or replacing a toner cartridge, be careful not to get any toner on your hands or clothing, as this will dirty your hands or clothing. If toner gets on your hands or clothing, wash them immediately with cold water. Washing with warm water sets the toner, making it impossible to remove the toner stains.
• When removing jammed paper, be careful not to allow the toner on the paper to scatter. The toner may get into your eyes or mouth. If toner gets into your eyes or mouth, wash them immediately with cold water and consult a physician.
• When loading paper or removing jammed documents or paper, be careful not to cut your hands with the edges of the paper.
• When removing a toner cartridge, remove the toner cartridge carefully so as to prevent the toner from scattering and getting into your eyes or mouth. If toner gets into your eyes or mouth, wash them immediately with cold water and consult a physician.
• Do not attempt to disassemble the toner cartridge. The toner may scatter and get into your eyes or mouth. If toner gets into your eyes or mouth, wash them immediately with cold water and consult a physician.
• If toner leaks from the toner cartridge, be careful not to inhale the toner or allow it to come into direct contact with your skin. If the toner comes into contact with your skin, wash with soap. If the skin becomes irritated or you inhale the toner, consult a physician immediately.
Consumables
WARNING • Do not dispose of used toner cartridges in open flames. This may cause the toner
to ignite, resulting in burns or fire. • Do not store toner cartridges or paper in a location exposed to open flames. This
may cause the toner or paper to ignite, resulting in burns or fire. • When disposing of a toner cartridge, place the toner cartridge into a bag to
prevent the toner from scattering, and then dispose of the toner cartridge according to local regulations.
CAUTION • Keep the toner cartridges and other consumables out of the reach of small
children. If the toner or other parts are ingested, consult a physician immediately. • Do not attempt to disassemble the toner cartridge. The toner may scatter and
get into your eyes or mouth. If toner gets into your eyes or mouth, wash them immediately with cold water and consult a physician.
• If toner leaks from the toner cartridge, be careful not to inhale the toner or allow it to come into direct contact with your skin. If the toner comes into contact with your skin, wash with soap. If the skin becomes irritated or you inhale the toner, consult a physician immediately.
• Do not pull out the sealing tape forcefully or stop at midpoint, as this may cause toner to spill out. If toner gets into your eyes or mouth, wash them immediately with cold water and consult a physician.
Others
WARNING • If you are using a cardiac pacemaker
This machine generates a low level magnetic field. If you use a cardiac pacemaker and feel abnormalities, please move away from this machine and consult your physician immediately.
Installation Requirements and Handling
In order to use this machine in a safe and trouble-free manner, install the machine in a place that fulfills the following conditions. Also, read the remarks carefully.
Temperature and Humidity Conditions
• Temperature range: 10 to 30°C • Humidity range: 20 to 80 % RH (no condensation)
IMPORTANT Protecting the machine from condensation • To prevent condensation from forming inside the machine in the following cases,
let the machine adjust to the ambient temperature and humidity for at least two hours before use. - When the room where the machine is installed is heated rapidly - When the machine is moved from a cool or dry location to a hot or humid
location • If water droplets (condensation) form inside the machine, this can result in paper
jams or poor print quality. When using an ultrasonic humidifier When you are using an ultrasonic humidifier, it is therefore recommended that you use purified water or other water that is free of impurities.If you use tap water or well water, impurities in the water will be dispersed through the air. This can be trapped inside the machine, causing degradation in print quality.
Power Supply Requirements
220 to 240 V, 50/60 Hz
IMPORTANT Precautions when connecting the power cord • Do not connect this machine to an uninterruptible power source. • Use an AC power outlet exclusively for the machine. Do not use the other sockets
of the AC power outlet. • Do not plug the power plug into the auxiliary outlet on a computer.
Do not use the same AC power outlet for both the machine and any of the following equipment. - Copy machine - Air conditioner - Shredder - Equipment that consumes a large amount of electricity - Equipment that generates electrical noise
• When unplugging the power cord, keep interval of 5 seconds or more before plugging it again.
Miscellaneous precautions • The maximum power consumption of the machine is 1,220 W or less. • Electrical noise or a dramatic drop in supplied voltage may cause the machine or
computer to operate incorrectly or lose data.
Preface1
Installing the Machine2
Configuring and Connecting the Fax3
Connecting to a Computer and Installing the Drivers
4Appendix

19
Installation Requirements
• A location with sufficient space • A location with good ventilation • A location with a flat, even surface • A location able to fully support the weight of the machine
IMPORTANT Do not install the machine in the following locations, as this may result in damage to the machine. • A location subject to dramatic changes in temperature or humidity • A location subject to condensation • A poorly ventilated location
(If you use the machine for a long time or to perform a large amount of printing in a poorly ventilated room, the ozone or other odors generated by the machine may create an uncomfortable working environment. In addition, chemical particles are dispersed during printing; therefore, it is important to provide adequate ventilation.)
• A location near equipment that generates magnetic or electromagnetic waves • A laboratory or location where chemical reactions occur • A location exposed to salt air, corrosive gases, or toxic gases • A location, such as on a carpet or mat, that may warp from the weight of the
machine or where the machine is liable to sink.
Maintenance and Inspections
IMPORTANT • Follow the instructions in the caution label attached to this machine. • Avoid shaking or applying a shock to this machine. • To prevent a paper jam, do not turn the power ON/OFF, open/close the operation
panel or rear cover, and load/unload paper in the middle of printing operation. • Be sure to remove the toner cartridge from the machine when transporting the
machine to a distance. • To avoid exposing the toner cartridge to light, place it in the protective bag
included with this machine or wrap it in a thick cloth. • Clean this machine regularly. If this machine becomes dusty, it may operate
improperly. • Use a modular cable of 3 m or shorter in length. • Depending on your locale or your telephone connection, you may be unable to
perform data communication. In this case, contact your local authorized Canon dealer or the Canon help line.
• The repairing parts and toner cartridges for the machine will be available for at least seven (7) years after production of this machine model has been discontinued.
Contacting Service Center
When you have a problem with your machine and you cannot solve it, even if you refer to the manuals or online help, please contact your local authorized Canon dealer from whom you purchased the equipment (if under warranty), or with whom you have a servicing contact.
Legal Notices
Model Names
MF4580dn (F159302) MF4570dn (F159302) MF4550d (F159302) MF4450 (F159502) MF4420n(F159500) MF4412 (F159500) D520(F159400)
EMC requirements of EC Directive
This equipment conforms with the essential EMC requirements of EC Directive. We declare that this product conforms with the EMC requirements of EC Directive at nominal mains input 230 V, 50 Hz although the rated input of the product is 220 to 240 V, 50/60 Hz. Use of shielded cable is necessary to comply with the technical EMC requirements of EC Directive.
International ENERGY STAR Program
As an ENERGY STAR® Partner, Canon Inc. has determined that this product meets the ENERGY STAR Program for energy efficiency.
The International ENERGY STAR Office Equipment Program is an international program that promotes energy saving through the use of computers and other office equipment.
The program backs the development and dissemination of products with functions that effectively reduce energy consumption. It is an open system in which business proprietors can participate voluntarily.
The targeted products are office equipment, such as computers, displays, printers, facsimiles, and copiers. The standards and logos are uniform among participating nations.
IPv6 Ready Logo
The protocol stack included in this machine has obtained the IPv6 Ready Logo Phase-1 established by the IPv6 Forum.
Laser Safety Information
Laser radiation could be hazardous to the human body. For this reason, laser radiation emitted inside this equipment is hermetically sealed within the protective housing and external cover. No radiation can leak from the machine in the normal operation of the product by the user.This machine is classified as a Class 1 Laser Product under IEC 60825-1: 2007, EN60825-1: 2007.
220 to 240 V Model
The label shown below is attached to the laser scan unit on the machine.
This machine has been classified under IEC 60825-1: 2007, EN60825-1: 2007 and conforms to the following classes: CLASS 1 LASER PRODUCT LASER KLASSE 1 APPAREIL À LASER DE CLASSE 1 APPARECCHIO LASER DI CLASSE 1 PRODUCTO LÁSER DE CLASE 1 APARELHO A LASER DE CLASSE 1 LUOKAN 1 LASER-TUOTE LASERPRODUKT KLASS 1
CAUTION Use of controls, adjustments, or performance of procedures other than those specified in the manuals for the machine may result in hazardous radiation exposure.

20
Users in New Zealand
This equipment does not fully meet Telecom’s impedance requirements. Performance limitations may occur when used in conjunction with some parts of the network. Telecom will accept no responsibility should difficulties arise in such circumstances.
Trademarks
Canon, the Canon logo, and imageCLASS are trademarks of Canon Inc.Microsoft, Windows and Windows Vista are either trademarks or registered trademarks of Microsoft Corporation in the United States and/or other countries.All other product and brand names are registered trademarks, trademarks or service marks of their respective owners.
Copyright
© 2011 by Canon Inc. All rights reserved.No part of this publication may be reproduced, transmitted, transcribed, stored in a retrieval system, or translated into any language or computer language in any form or by any means, electronic, mechanical, magnetic, optical, chemical, manual, or otherwise, without the prior written permission of Canon Inc.
Third Party Software
A. This product includes third-party software modules. Use and distribution of this software modules, including any updates of such software modules (collectively, the “SOFTWARE”) are subject to conditions (1) through (9) below. (1) You agree that you will comply with any applicable export control laws,
restrictions or regulations of the countries involved in the event that this product including the SOFTWARE is shipped, transferred or exported into any country.
(2) Rights holders of the SOFTWARE retain in all respects the title, ownership and intellectual property rights in and to the SOFTWARE. Except as expressly provided herein, no license or right, expressed or implied, is hereby conveyed or granted by rights holders of the SOFTWARE to you for any intellectual property of rights holders of the SOFTWARE.]
(3) You may use the SOFTWARE solely for use with the Canon product you purchased (the “PRODUCT”).
(4) You may not assign, sublicense, market, distribute, or transfer the SOFTWARE to any third party without prior written consent of rights holders of the SOFTWARE.
(5) Notwithstanding the foregoing, you may transfer the SOFTWARE only when (a) you assign all of your rights to the PRODUCT and all rights and obligations under the conditions to transferee and (b) such transferee agrees to be bound by all these conditions.
(6) You may not decompile, reverse engineer, disassemble or otherwise reduce the code of the SOFTWARE to human readable form.
(7) You may not modify, adapt, translate, rent, lease or loan the SOFTWARE or create derivative works based on the SOFTWARE.
(8) You are not entitled to remove or make separate copies of the SOFTWARE from the PRODUCT.
(9) The human-readable portion (the source code) of the SOFTWARE is not licensed to you.
B. Notwithstanding A above, in case the other conditions accompany third-party software modules, these software modules are subject to the other conditions.
The Software Subjected to the Other Conditions
Please refer to eManual on a CD-ROM bundled with this product, for more detail and corresponding license conditions.
Disclaimers
The information in this document is subject to change without notice.CANON INC. MAKES NO WARRANTY OF ANY KIND WITH REGARD TO THIS MATERIAL, EITHER EXPRESS OR IMPLIED, EXCEPT AS PROVIDED HEREIN, INCLUDING WITHOUT LIMITATION, THEREOF, WARRANTIES AS TO MARKETABILITY, MERCHANTABILITY, FITNESS FOR A PARTICULAR PURPOSE OF USE OR NON-INFRINGEMENT. CANON INC. SHALL NOT BE LIABLE FOR ANY DIRECT, INCIDENTAL, OR CONSEQUENTIAL DAMAGES OF ANY NATURE, OR LOSSES OR EXPENSES RESULTING FROM THE USE OF THIS MATERIAL.
Legal Limitations on Usage of Your Product and
the Use of Images
Using your product to scan, print or otherwise reproduce certain documents, and the use of such images as scanned, printed or otherwise reproduced by your product, may be prohibited by law and may result in criminal and/or civil liability. A non-exhaustive list of these documents is set forth below. This list is intended to be a guide only. If you are uncertain about the legality of using your product to scan, print or otherwise reproduce any particular document, and/or of the use of the images scanned, printed or otherwise reproduced, you should consult in advance with your legal advisor for guidance.
- Paper Money - Traveler’s Checks - Money Orders - Food Stamps - Certificates of Deposit - Passports - Postage Stamps (canceled or uncanceled) - Immigration Papers - Identifying Badges or Insignias - Internal Revenue Stamps (canceled or uncanceled) - Selective Service or Draft Papers - Bonds or Other Certificates of Indebtedness - Checks or Drafts Issued by Governmental Agencies - Stock Certificates - Motor Vehicle Licenses and Certificates of Title - Copyrighted Works/Works of Art without Permission of Copyright Owner
Considerable effort has been made to make sure that the manuals for the machine are free of inaccuracies and omissions. However, as we are constantly improving our products if you need an exact specification, please contact Canon.
Preface1
Installing the Machine2
Configuring and Connecting the Fax3
Connecting to a Computer and Installing the Drivers
4Appendix

FT5-3371 (010) XXXXXXXXXX © CANON INC. 2011 PRINTED IN KOREA
CANON INC.30-2, Shimomaruko 3-chome, Ohta-ku, Tokyo 146-8501, Japan
CANON MARKETING JAPAN INC.16-6, Konan 2-chome, Minato-ku, Tokyo 108-8011, Japan
CANON U.S.A., INC.One Canon Plaza, Lake Success, NY 11042, U.S.A.
CANON EUROPA N.V.Bovenkerkerweg, 59-61, 1185 XB Amstelveen, The Netherlands
CANON CHINA CO. LTD.15F Jinbao Building No.89, Jinbao Street, Dongcheng District, Beijing 100005, PRC
CANON SINGAPORE PTE LTD1 HarbourFront Avenue, #04-01 Keppel Bay Tower, Singapore 098632
CANON AUSTRALIA PTY LTD1 Thomas Holt Drive, North Ryde, Sydney NSW 2113, Australia
CANON GLOBAL WORLDWIDE SITEShttp://www.canon.com/
F T 5 - 3 3 7 1 - 0 1 0