Standard Operating Procedures - STLCC.edu
38
STLCC_CPLS;Morrison 12/18/2015 Page 1 Imagers- Molecular, Cell Standard Operating Procedures Prepared by: Bob Morrison STLCC-CPLS, Instrumentation Specialist Initial Jul 10, Revised 24 March 2015 add FLoid Bio-Rad ChemiDoc XRS and Image Lab Software Jump to Chemi-luminescence Protocol Jump to Export Images to other Apps Floid cell imaging station Life technologies
Transcript of Standard Operating Procedures - STLCC.edu

STLCC_CPLS;Morrison 12/18/2015Page 1
Imagers- Molecular, Cell Standard Operating Procedures
Prepared by: Bob Morrison
STLCC-CPLS, Instrumentation Specialist
Initial Jul 10, Revised 24 March 2015 add FLoid
Bio-Rad ChemiDoc XRS
and Image Lab Software
Jump to Chemi-luminescence Protocol
Jump to Export Images to other Apps
Floid cell imaging station
Life technologies

Imager- Molecular : Chemidoc Hood, On/Off , UV Shield
STLCC_CPLS;Morrison 12/18/2015Page 2
Power lines for the Camera
and Imager controls have
been routed to the Power
strip located right in front
of the unit.
Flip the Power Strip to “ON”
to Turn on both of these
units
How to install UV Shield when necessary
Pull out drawer, insert in slot at top .
1. Membrane buttons and
LEDs for hood.
2. Normally these are NOT
USED as the ImageLab
software will control all
functions for setup, image
capture, and analysis
Filter Choice Lever:
None, Filter 1, Filter 2
USB line to PC MUST
be connected to the
port as labeled on the
PC case.
Imager- Molecular : XcitaBlue and White Light Conversion
STLCC_CPLS;Morrison 12/18/2015Page 3
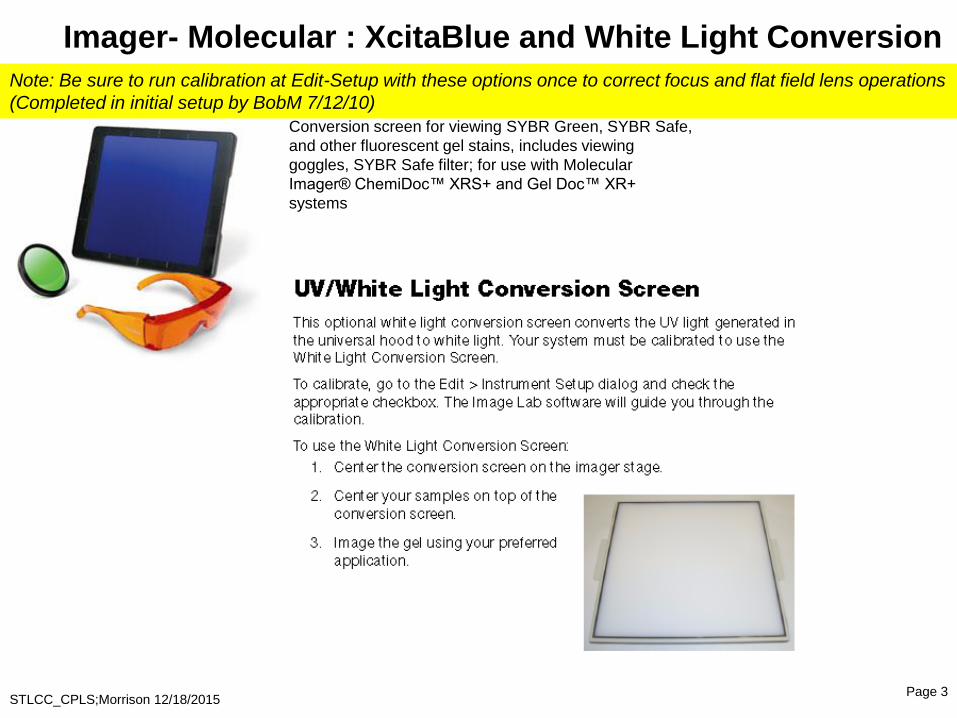
Conversion screen for viewing SYBR Green, SYBR Safe,
and other fluorescent gel stains, includes viewing
goggles, SYBR Safe filter; for use with Molecular
Imager® ChemiDoc™ XRS+ and Gel Doc™ XR+
systems
Note: Be sure to run calibration at Edit-Setup with these options once to correct focus and flat field lens operations
(Completed in initial setup by BobM 7/12/10)

Imager- Molecular : ChemiDoc XRS Features
STLCC_CPLS;Morrison 12/18/2015Page 4
The Molecular Imager® ChemiDoc™ XRS+ system is based on CCD high-resolution, high-sensitivity detection technology and
modular options to accommodate a wide range of samples and support multiple detection methods including fluorescence,
colorimetry, densitometry, chemiluminescence, and chemifluorescence. The system is controlled by Image Lab™ software to
optimize imager performance for fast, integrated, and automated image capture and analysis of various samples.
The system accommodates a wide array of samples, from large handcast polyacrylamide gels to small ReadyAgarose™ gels and
various blots. The system is an ideal accompaniment to PCR, purification, and electrophoresis systems, enabling image analysis and
documentation of restriction digests, amplified nucleic acids, genetic fingerprinting, RFLPs, and protein purification and
characterization.
Key benefits include:
• Gel and blot imaging and analysis are quick and accurate
• Automated, hands-off routines; no training is required
• Save and recall all the steps in the workflow for repeatable and reproducible results
• Optimize the system at setup for image data that is always accurate, reproducible, and free of imaging artifacts
• Range of applications with special accessories to preserve sample integrity for downstream research while ensuring user safety
Comprehensive, automated quantitative analysis of protein and DNA samples in seconds
Customize and organize data in reports
Obtain publication-quality results quickly
Users Manual ChemiDoc XRS and Image Lab Software …pdf (2.5mb)
Hardware Manual ChemiDoc XRS and Image Lab Software …pdf (2.4mb)

Imager- Molecular : ImageLab s/w, Start/Main Page
STLCC_CPLS;Morrison 12/18/2015Page 5

Imager-Molecular : Imagelab; Quick Start(To take pictures of Ethidium Bromide-Nucleic Acid Gels only)
STLCC_CPLS;Morrison 12/18/2015Page 6
Select “New…” to
set up protocol

Imager-Molecular : Imagelab; Quick Start
STLCC_CPLS;Morrison 12/18/2015Page 7
1. Select Nucleic
Acid Gels >
Ethidium Bromide
2. Place gel inside
imager, click
Position Gel, and
move gel as
needed.

Imager-Molecular : Imagelab; Quick Start
STLCC_CPLS;Morrison 12/18/2015Page 8
Click “Run Protocol”

Imager-Molecular : Imagelab; Quick Start
STLCC_CPLS;Morrison 12/18/2015Page 9
1. Save file to USB
Drive for further
analysis on laptops.
2. Or continue to use
analysis tools on
current computer
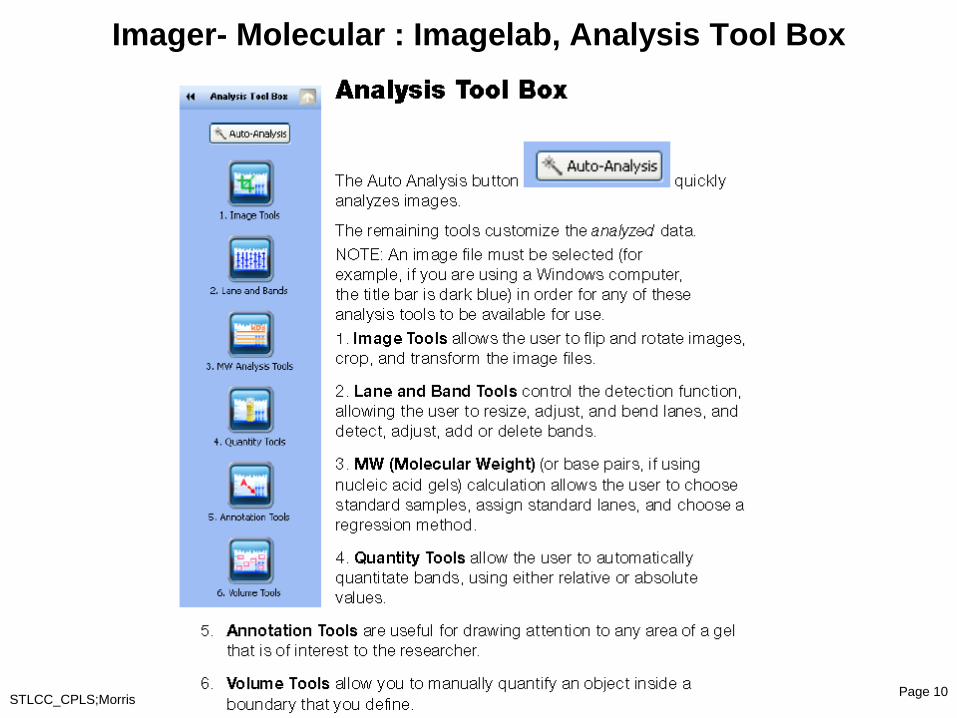
Imager- Molecular : Imagelab, Analysis Tool Box
STLCC_CPLS;Morrison 12/18/2015Page 10

Imager- Molecular : Imagelab; Protocol Setup, Gel Imaging
STLCC_CPLS;Morrison 12/18/2015Page 11

STLCC_CPLS;Morrison 12/18/2015Page 12
Imager-
Molecular :
Imagelab;
Position Gel

Imager- Molecular :
Imagelab; Detect
Lanes and Bands
STLCC_CPLS;Morrison 12/18/2015Page 13

Imager- Molecular : Imagelab; Viewing Results
STLCC_CPLS;Morrison 12/18/2015Page 14

Imager- Molecular: Imagelab; 3-D Projection
STLCC_CPLS;Morrison 12/18/2015Page 15

STLCC_CPLS;Morrison 12/18/2015Page 16
Imager-
Molecular :
ImageLab;
Analyze
Molecular
Weight

STLCC_CPLS;Morrison 12/18/2015Page 17
Imager- Molecular : Imagelab; Select/Edit Standards

STLCC_CPLS;Morrison 12/18/2015Page 18
Imager- Molecular
: Imagelab; Weight
Regression
Methods

Imager- Molecular: Imagelab; Lane Profile Option
STLCC_CPLS;Morrison 12/18/2015Page 19
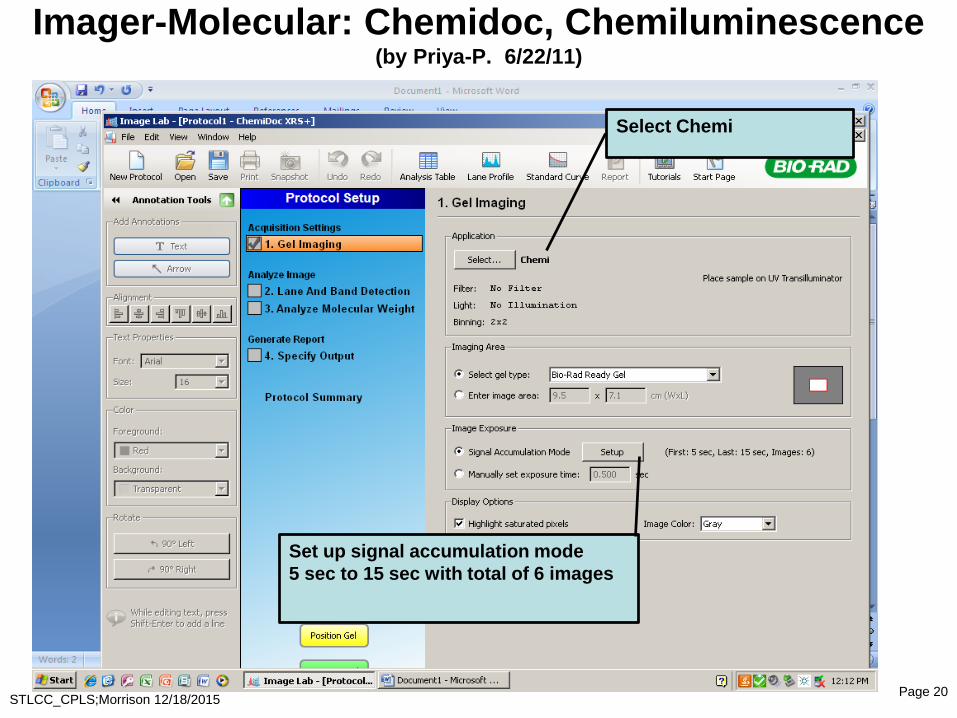
Imager-Molecular: Chemidoc, Chemiluminescence(by Priya-P. 6/22/11)
STLCC_CPLS;Morrison 12/18/2015Page 20
Select Chemi
Set up signal accumulation mode
5 sec to 15 sec with total of 6 images

Imager-Molecular: Chemidoc, Chemiluminescence(by Priya-P. 6/22/11)
STLCC_CPLS;Morrison 12/18/2015Page 21
Move Filter Selection slide bar
(behind front panel ) to
“NO FILTER” position
Be sure to return Filter Slide
Bar to the original setting after this use
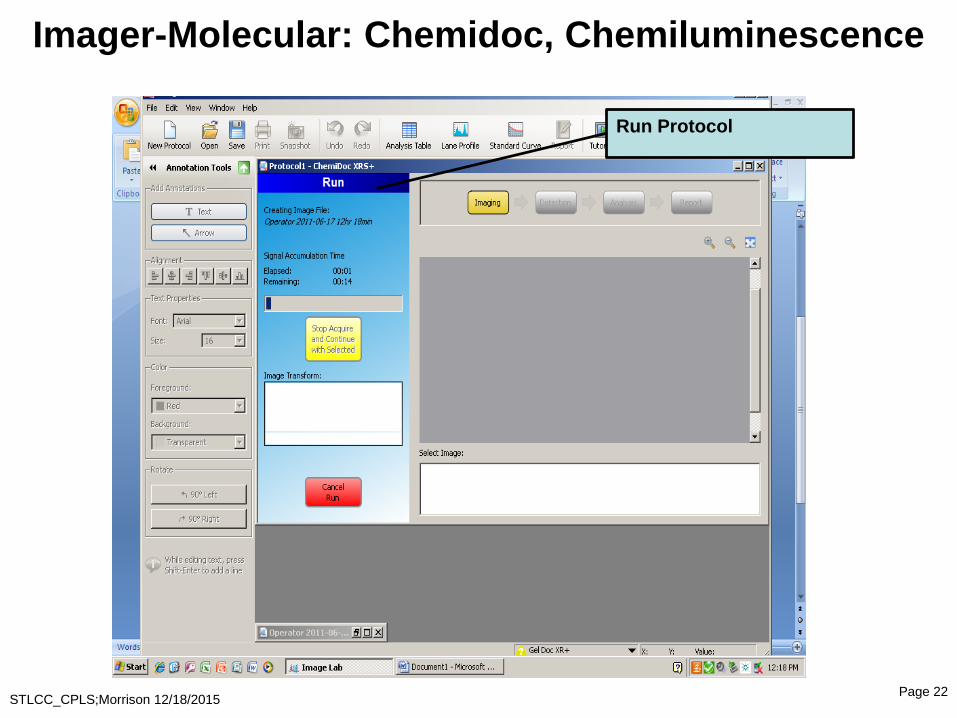
Imager-Molecular: Chemidoc, Chemiluminescence
STLCC_CPLS;Morrison 12/18/2015Page 22
Run Protocol

Imager-Molecular: Chemidoc, Chemiluminescence
STLCC_CPLS;Morrison 12/18/2015
Page 23
Select 15 sec, then click Yellow Button
at left

Imager-Molecular: Chemidoc, Chemiluminescence
STLCC_CPLS;Morrison 12/18/2015Page 24
The results will appear in gray scale.
Using comassie or stain free
background highlights the
chemiluminescence
Be sure to return Filter Slide
Bar to the original setting after this use

Imager-Molecular: Capture Images for Formatting or Other Documents
STLCC_CPLS;Morrison 12/18/2015Page 25
Use edit features to get
image you wish to copy,
then
Go to Edit in top Toolbar
Select Snapshot

Imager-Molecular: Copy Image to Clipboard
STLCC_CPLS;Morrison 12/18/2015Page 26
Select Clipboard (this is
the default location for all
Windows copy operations)

Imager-Molecular: Open Powerpoint or other App
and Paste Clipboard Image to any Slide
STLCC_CPLS;Morrison 12/18/2015Page 27
OR; Press Ctrl (Control) and
“V” keys simultaneously to
“paste” picture from the
Clipboard into Powerpoint

Imager-Molecular; Or, Paste Clipboard into MS Word using
Ctrl –V or Paste icon
STLCC_CPLS;Morrison 12/18/2015Page 28

STLCC_CPLS;Morrison 12/18/2015Page 29
Imager-
Molecular:
Application
Tables; Setup
Required
STLCC_CPLS;Morrison 12/18/2015Page 30
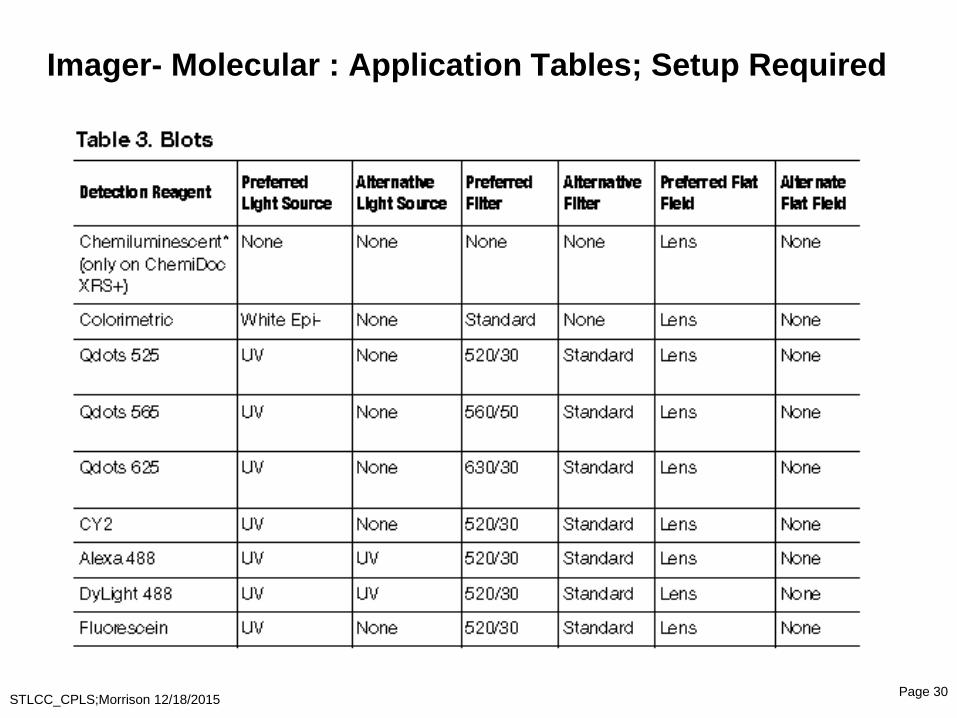
Imager- Molecular : Application Tables; Setup Required
STLCC_CPLS;Morrison 12/18/2015Page 31
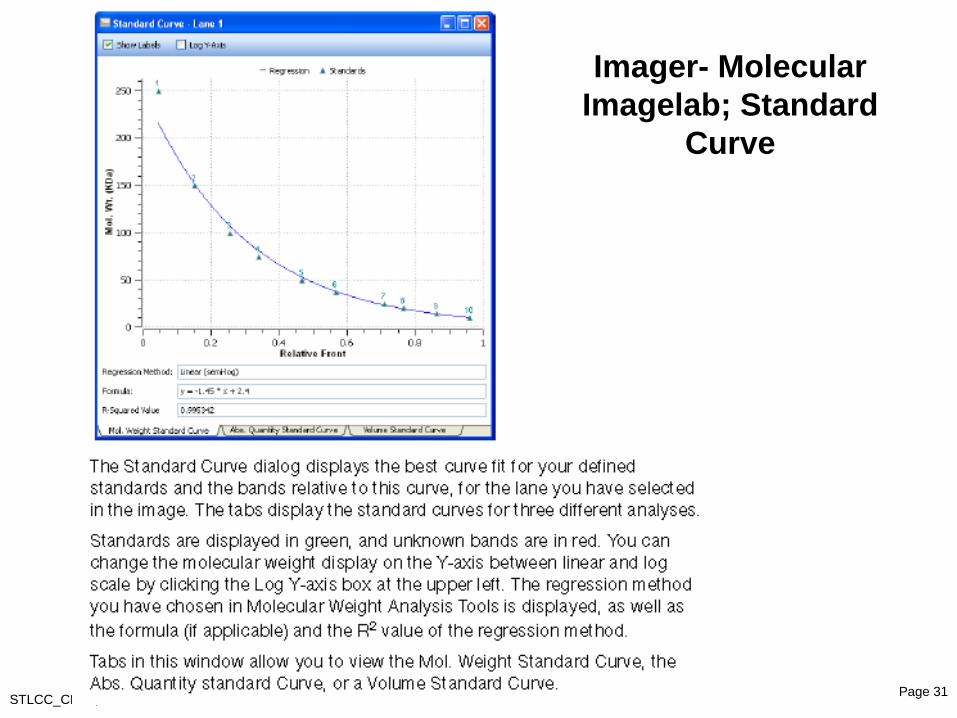
Imager- Molecular
Imagelab; Standard
Curve

Chemiluminescence Yes
Fluorescence* Yes
Colorimetry/densitometry Yes
Gel documentation Yes
Hardware Specifications
Maximum sample size 28 x 36 cm
Maximum image area 25 x 26 cm
Excitation source Trans-UV and epi-white are standard (302 nm included, with 254 nm and 365 nm available as options);
optional trans white, self-powered or conversion screen; optional XcitaBlue™ UV/blue conversion screen
Illumination control 5 modes (trans-UV, epi-white, and no illumination for chemiluminescence are standard); trans white and
XcitaBlue conversion screens are optional
Detector Supercooled CCD
CCD resolution (H x V) 1,392 x 1,040 µm
Pixel size (H x V) 6.45 x 6.45 µm
Cooling system Peltier
Camera cooling temperature –30°C controlled
Filter selector 3 positions (2 for filters, 1 without filter, for chemiluminescence)
Emission filters 1 included (standard), 3 optional
Dynamic range >4.0 orders of magnitude
Pixel density (gray levels) 65,535
Dynamic flat fielding Application specific, for all applications
Instrument size (L x W x H) 36 x 60 x 96 cm
Instrument weight 32 kg
Operating Ranges
Operating voltage 110/115/230 V AC nominal
Operating temperature 10–28°C (21°C recommended)
Operating humidity <70% noncondensing
Automation Capabilities
Workflow automated selection Application driven, user selected or recalled by a protocol
Workflow automated execution Controlled by a protocol via application specific setup for image area, illumination source,
filter, analysis, and reporting
Workflow reproducibility 100% repeatability via recallable protocols; from image capture to quantitative analysis and reports
Autofocus (patent pending) Precalibrated focus for any zoom setting or sample height
Image flat fielding** Dynamic; precalibrated and optimized per application
Autoexposure 2 user-defined modes (intense or faint bands)
*Use the optional XcitaBlue kit if performing SYBR® Safe DNA applications, because the UV to blue conversion screen allows you to
visualize DNA samples while protecting against UV damage.
Imager- Molecular: Chemidoc
XRS, Specifications
STLCC_CPLS;Morrison 12/18/2015Page 32

Imager- Molecular : ImageLab S/W Permission to Copy
STLCC_CPLS;Morrison 12/18/2015Page 33

Imager: Cells, Floid Imaging Station w Printer
STLCC_CPLS;Morrison 12/18/2015Page 34
On/Off toggle, right rear
Hard drive, removable
Product plate Info:
Canon Selphy Printer

Imaging: Cell, Floid Overview
STLCC_CPLS;Morrison 12/18/2015Page 35
The FLoid® Cell Imaging Station is an affordable, user-friendly imaging solution for the quick detection and
verification of fluorescently-labeled samples. The FLoid® Cell Imaging Station captures transmitted light and
three-color fluorescent images of your cells and samples right at your benchtop. You do not need to be
specially trained or have dedicated staff to operate it. An uncomplicated user interface, streamlined image
acquisition process, and real-time, multicolor display allow even imaging novices to produce high-quality
images with a few mouse clicks.
System specifications include:
• Objective: Fixed 20X plan fluorite; numerical aperture (NA) = 0.45; working distance (WD) = 5.9
mm.
• Color Channels: 4 channels (relief phase, blue, green, and red fluorescence)
• Illumination: LED (50,000 hour life), adjustable intensity
• Excitation: Blue channel: 390/40 nm; Green channel: 482/18 nm; Red channel: 586/15 nm
• Emission: Blue channel: 446/33 nm; Green channel: 532/59 nm; Red channel: 646/68 nm
• Captured Images: 16-bit monochrome, TIFF, PNG, JPG, or BMP (1296 × 964 pixels)
• LCD display: 15-inch color; display resolution 1366 x 768 pixels; image resolution 1296 x 964
pixels; adjustable tilt
• Dimensions: (W x H x D): 15.9" x 21.1 x 13.9" / 40.4 cm x 53.6 cm x 35.3 cm; 28 lbs / 12.7 kg
Hot link to Floid Users Manual (Life Technologies …pdf (2.5mb)

Imager; Cell, Floid, Quick Start Guide Page 1
STLCC_CPLS;Morrison 12/18/2015Page 36
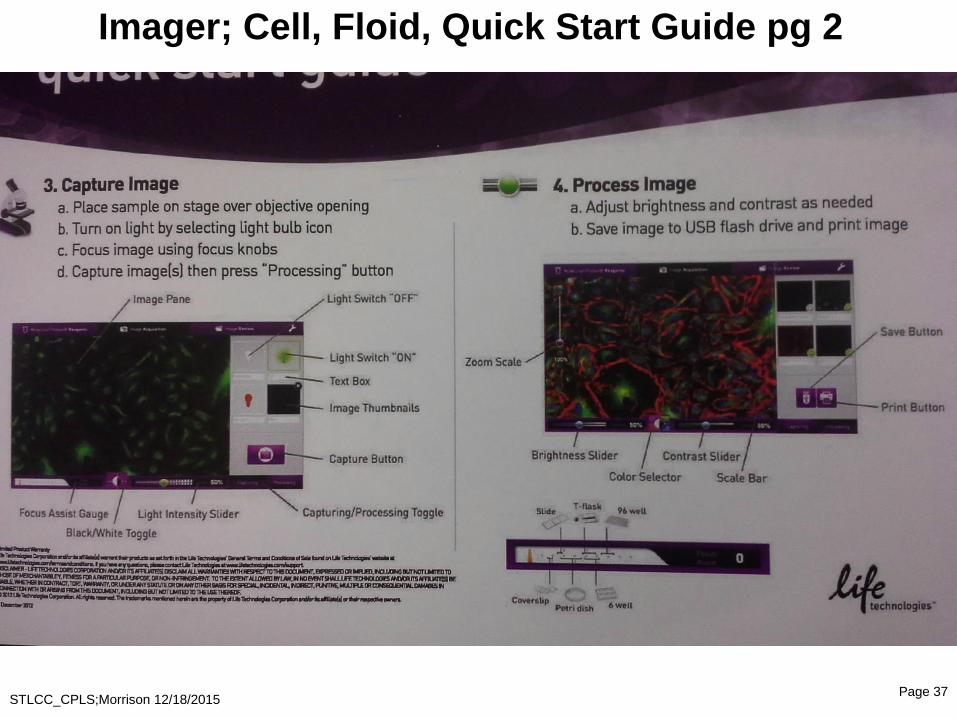
Imager; Cell, Floid, Quick Start Guide pg 2
STLCC_CPLS;Morrison 12/18/2015Page 37

STLCC_CPLS;Morrison 12/18/2015Page 38
: Other Options
• Future home of other detailed procedures or printout options ….