Standard Operating Procedure (SOP) 4: GPS Setup, Version 1
32
Standard Operating Procedure (SOP) 4: GPS Setup, Version 1.0 Dall’s Sheep Monitoring Protocol Arctic (ARCN) and Central Alaska (CAKN) Inventory and Monitoring Networks Kumi L. Rattenbury and Joshua H. Schmidt National Park Service 4175 Geist Road Fairbanks, Alaska 99709 March 2017 U.S. Department of the Interior National Park Service Natural Resource Stewardship and Science Fort Collins, Colorado
Transcript of Standard Operating Procedure (SOP) 4: GPS Setup, Version 1

Standard Operating Procedure (SOP) 4: GPS Setup,
Version 1.0
Dall’s Sheep Monitoring Protocol
Arctic (ARCN) and Central Alaska (CAKN) Inventory and
Monitoring Networks
Kumi L. Rattenbury and Joshua H. Schmidt
National Park Service
4175 Geist Road
Fairbanks, Alaska 99709
March 2017
U.S. Department of the Interior
National Park Service
Natural Resource Stewardship and Science
Fort Collins, Colorado

Please cite this Standard Operating Procedure as:
Rattenbury, K. L. and J. H. Schmidt. 2017. Standard Operating Procedure (SOP) 4: GPS Setup,
Version 1.0. Dall’s Sheep Monitoring Protocol, Arctic (ARCN) and Central Alaska (CAKN)
Inventory and Monitoring Networks. National Park Service, Fairbanks, Alaska. Available online
at https://irma.nps.gov/DataStore/Reference/Profile/2238918.
The main Narrative for the Protocol for Monitoring Dall’s Sheep, Arctic (ARCN) and Central
Alaska (CAKN) Inventory and Monitoring Networks is available from the NPS Inventory and
Monitoring Arctic Network website (http://science.nature.nps.gov/im/units/arcn/), the NPS I&M
Central Alaska Network website (http://science.nature.nps.gov/im/units/cakn/) and the Natural
Resource Publications Management website (http://www.nature.nps.gov/publications/nrpm/).

Dall’s Sheep Monitoring Protocol – Arctic (ARCN) and Central Alaska (CAKN) Networks
Standard Operating Procedure (SOP) #4: GPS Setup Version 1.0, 01 March 2017
SOP4-3 (Page 3 of 32)
SOP 4 – GPS Setup
Standard Operating Procedure #4
Version 1.0 (03/01/2017)
Revision History Log:
Previous Version #
Revision Date
Author Changes Made Reason for Change New Version
Add rows as needed for each change or set of changes associated with each version.
SOP 4 – Contents
Page
SOP 4 – Acknowledgments ............................................................................................................ 4
SOP 4.0 – Introduction ................................................................................................................... 4
SOP 4.1 – Filing System ................................................................................................................. 4
SOP 4.2 – Converting ArcGIS Shapefiles into Image Files Option 1:
GPSMapEdit-cgpsmapper-MapSetToolKit .................................................................................... 5
SOP 4.2.1 – GPSMapEdit and cgpsmapper: Converting Shapefile to
Image File ................................................................................................................................ 5
SOP 4.2.2 – MapSetToolKit and cgpsmapper: Loading Image File
into Garmin MapSource ........................................................................................................ 14
SOP 4.3 – Using MapSource to Upload Image Files to Garmin GPS Units ................................ 16
Appendix SOP4-1 – Converting ArcGIS Shapefiles into Image Files and
Importing them to Garmin GPS Units Option 2: Mapwel ............................................................ 23
Appendix SOP4-2 – Converting Polygon Shapefiles into Line Shapefiles and
Creating Center Point Shapefiles from Polygon Shapefiles ......................................................... 31

Dall’s Sheep Monitoring Protocol – Arctic (ARCN) and Central Alaska (CAKN) Networks
Standard Operating Procedure (SOP) #4: GPS Setup Version 1.0, 01 March 2017
SOP4-4 (Page 4 of 32)
SOP 4 – Acknowledgments We are indebted to Jon Paynter (NPS-DENA) who trained the SOP authors and compiled
instructional material for the Alaska NPS region regarding the use of these software programs to
upload image files to Garmin GPS units. We also borrowed material from an instructional
PowerPoint created by Andy Steel (NPS) and the following people with Minnesota’s Department
of Natural Resources (DNR): Chris Scharenbroich, Paul Olson, Tim Loesch, Chris Pouliot, Mike
Tronrud and Naoko Meyer. Appendix SOP4-1 was written by our GIS technician, Cody Priest.
SOP 4.0 – Introduction This SOP describes how to create and load transects and topographic maps onto the pilots’ GPS
units, which are used for navigating and marking sheep group locations and transect start and end
points as backup data to the ArcPad Applet data collected by the observer. These files are also
loaded onto the observers’ backup GPS unit. The GPS units commonly used by survey pilots at
the time of this printing are Garmin 296 and 496 (Olathe, Kansas), whereas the observers use
Garmin 76csx. This SOP does not pertain to the Garmin 18x, which is the external USB-GPS
unit used to provide location data to the field computer (see SOPs 3.1, 8.4 and 8.5).
The transect lines and start and end points are first prepared as shapefiles and then converted into
map image files (*.img), using either Option 1: the software trio of GPSMapEdit-cgpsmapper-
MapSetToolKit (SOP 4.2) or Option 2: Mapwel (Appendix SOP4-1). Image file(s) can be made
up of a combination of point, line, and polygon features along with labels and symbology for
each feature type. By creating separate image files for each feature type (or shapefile), the GPS
user (pilot/observer) has more options for displaying different features, just as if they were
turning on/off GIS layers and labels in ArcMap (ESRI, Redlands, California). For the sheep
surveys, there will be one image file for the transect lines (TrnOrig.shp, SOP 2.3.8) and one for
the transect start and end points (refer to SOP 4.2, step 1b to create this point shapefile). If the
observers and pilots also want background image files of the park boundary or other features,
those can be created and uploaded in a similar manner.
Until recently, Option 1 was the only option available for converting shapefiles to image files for
Garmin 296 or 496 (pilot-preferred GPS units). At this time, some users have been successful
using Mapwel to load shapefiles directly to Garmin 296 and 496. However there has not been
universal success with Mapwel and some users will continue to use Option 1. Therefore, we have
retained the Mapwel protocols as an appendix, rather than moving them to an SOP section. Both
options seem to work fine for Garmin 76csx. The image files are then uploaded to data cards that
can be inserted into the pilots’ and observers’ GPS units (SOP 4.3 and Appendix SOP4-1 step 7).
Topographic maps from Garmin’s MapSource TOPO U.S. 2008 program (Olathe, Kansas) are
also uploaded to the GPS data cards with the image files (SOP 4.3, steps 1-3 and 6-8).
SOP 4.1 – Filing System Multiple files are created in the process of converting shapefiles to image files and uploading
these to the Garmin GPS units using the protocols outlined here. To manage these files as they
are produced, set up a folder filing system directly on your C:\ drive as follows:
C:\GarminImageFiles\Software\GPSMapEdit
\cgpsmapper
\MapSetToolKit

Dall’s Sheep Monitoring Protocol – Arctic (ARCN) and Central Alaska (CAKN) Networks
Standard Operating Procedure (SOP) #4: GPS Setup Version 1.0, 01 March 2017
SOP4-5 (Page 5 of 32)
\OriginalShapefiles
\Working
\Final
The next SOP sections explain what files are saved to each of these folders. If you are using the
Mapwel option, you do not need to create the Software folder as shown above.
SOP 4.2 – Converting ArcGIS Shapefiles into Image Files Option 1: GPSMapEdit-cgpsmapper-MapSetToolKit Three software programs are used together to convert ArcGIS shapefiles (ESRI, Redlands,
California) into image files that can be imported as background layers onto Garmin GPS units.
These programs are GPSMapEdit (http://www.geopainting.com/, accessed 06 February 2012),
cgpsmapper (http://www.cgpsmapper.com/, accessed 06 February 2012) and MapSetToolKit
(http://sites.google.com/site/cypherman1/, accessed 06 February 2012). The final upload to the
GPS is performed using Garmin MapSource. GPSMapEdit is used to prepare the shapefile for
conversion into an image file, whereas cgpsmapper performs the actual export to and creation of
the image file using GPSMapEdit as the front-end interface (SOP 4.2.1). MapSetToolKit is the
front-end interface that works with cgpsmapper to bring the new image file into MapSource so
that it can be uploaded to Garmin GPS units (SOP 4.2.2). This process allows the user to bring
large amounts of line, point or polygon information onto the GPS as background images rather
than as waypoints or tracklogs stored in the GPS memory. The waypoint and tracklog memory
space, which is limited, can thus be used solely for collecting data points and flight lines during
the survey. NOTE – you must have administrative privileges on your computer in order to
download and properly run these software, in particular MapSetToolKit.
There are some alternative software programs that can perform the same functions. GPSMapEdit
and cgpsmapper can be used in conjunction with SendMap (also available from
http://www.cgpsmapper.com/, accessed 06 February 2012), which performs nearly the same
function as MapSetToolKit. SendMap is less problematic to use than MapSetToolKit which
occasionally can cause MapSource to crash, however GPS SendMap does not (at the time of this
publication) have a function to label the data objects (e.g., points or transect lines) in the
shapefile.
Mapwel (http://www.mapwel.eu/, accessed 06 February 2012) is one-stop software for bringing
shapefiles directly onto GPS units as image files and it includes a greater variety of symbols and
more accurate symbol transfer from the program to the GPS unit than the GPSMapEdit-
cgpsmapper-MapSetToolKit software path. However at the time that these SOPs were written,
Mapwel was not consistently compatible with Garmin 296 or 496 used by most survey pilots.
Therefore, we will continue to use GPSMapEdit, cgpsmapper and MapSetToolKit for this
process until a compatible version is created by Mapwel. Appendix SOP4-1 has instructions for
using Mapwel to bring shapefiles onto a Garmin 76csx or Garmin AERA (which are used by
some, but not most, pilots).
SOP 4.2.1 – GPSMapEdit and cgpsmapper: Converting Shapefile to Image File
GPSMapEdit is the current software used to create an image file from an ArcGIS shapefile (e.g.,
transect lines or start/end points) that can be loaded as a background map to Garmin GPS units
(Garmin, Olathe, Kansas). For ARCN and CAKN’s sheep transect surveys the typical GPS units
are the Garmin GPS 76csx used by the observers and Garmin GPS 296 or 496 used by the pilots.

Dall’s Sheep Monitoring Protocol – Arctic (ARCN) and Central Alaska (CAKN) Networks
Standard Operating Procedure (SOP) #4: GPS Setup Version 1.0, 01 March 2017
SOP4-6 (Page 6 of 32)
These models are compatible with the current GPSMapEdit version (1.1 update 73.2), as well as
older versions of GPSMapEdit (1.0 update 57.3, 1.0 update 63.0; http://www.geopainting.com/,
accessed 06 February 2012). NOTE – you must have administrative privileges on your
computer in order to download and properly run these software.
For the sheep surveys, you should make image files of the transects (TrnOrig.shp exported from
the NPS.gdb) and of the transect start and end points.
1) Create shapefiles that are subsets of the data you want displayed on the GPS units (park
boundary polygons, transect lines, point shapefiles of start/end points of transects, etc.).
Please note the following tips when creating these shapefiles.
a. Convert any polygon shapefiles into line shapefiles (e.g., if you wanted the park
boundary as an image file on the GPS units). See Appendix SOP4-2.
b. One way to create a point shapefile of the transect start and endpoints is to export the
TrnOrig shapefile’s table as a *.csv file. Open this file in Microsoft Excel. Reduce the
table’s columns to just the TransectID, DD_LAT1 (start latitude), DD_LONG1 (start
longitude), DD_LAT2 (end latitude) and DD_LONG2 (end longitude). Copy all cells
with a value in the TransectID and paste them below the original values so that you have
1, 2, 3, 4 . . . and those same values repeating below that. Add a column between
TransectID and DD_LAT1. Put an ‘a’ in all cells for the first set of transect ID numbers
and ‘b’ for the second set of transect ID numbers below that. Concatenate those two
columns, Copy and Paste Special the concatenated values in another column then delete
the original concatenate column. Cut the DD_LAT2 and DD_LONG2 values and put
them in the cells below the DD_LAT1 and DD_LONG1 cells, respectively. The result
should look like the sample table below having just three transects. Save that *.csv file,
bring it into ArcMap and assign the X and Y coordinates. Save this as a shapefile.
TransectID DD_LAT DD_LONG
1a 66.8981 -162.5928
2a 66.8946 -162.5844
3a 66.8981 -162.5794
1b 66.8928 -162.5928
2b 66.8998 -162.5798
3b 66.9024 -162.5723
c. If you’re working with a line shapefile that doesn’t have fields for the start and end
coordinates, do the following. Open the Attribute Table for your line shapefile. Add 4
fields to the table and label these StartX, StartY, EndX and EndY - all should be
“Double” for Type with “0” for Precision and Scale. Right-click the field heading for
StartX and select Calculate Geometry. A new window will open: for Property, select X
Coordinate of the Line Start, use coordinate system of the data source, and Decimal
Degrees for Units. Click OK and the column will be filled with the latitude coordinates of
one end of the line. Note that X coordinate = longitude, and Y coordinate = latitude.
Repeat this for StartY (Y Coordinate of the Line Start), EndX (X Coordinate of the Line
End) and EndY (Y Coordinate of the Line End). Now go to step b above (SOP 4.2.1, step
1, sub-step b) and follow those instructions substituting StartX for DDLong1, StartY for

Dall’s Sheep Monitoring Protocol – Arctic (ARCN) and Central Alaska (CAKN) Networks
Standard Operating Procedure (SOP) #4: GPS Setup Version 1.0, 01 March 2017
SOP4-7 (Page 7 of 32)
DDLat1, etc. See also
http://webhelp.esri.com/arcgisdesktop/9.3/index.cfm?id=750&pid=745&topicname=Mak
ing_field_calculations
2) Re-project the shapefiles so that they are all in the same projection. WGS84 is recommended.
3) Save the re-projected shapefiles in the OriginalShapefiles folder (i.e.,
C:\GarminImageFiles\OriginalShapefiles).
4) Download and install GPSMapEdit. The latest version is available online at
http://www.geopainting.com/ (accessed 06 February 2012, GPSMapEdit v1.1, update 73.2).
You can download the free version or buy the license key for advanced features. The
screenshots in this SOP are from v 1.1, update 73.2. We used version 1.0 update 57.3 and 1.0
update 63.0 to produce the image files for the 2009-2011 sheep surveys; the process is
similar. If you don’t use the default downloading file pathway (C:\Program
Files\Geopainting.com\GPSMapEdit 1.1), download and open the program files in your
GPSMapEdit folder (C:\GarminImageFiles\Software\GPSMapEdit).
5) Download and install cgpsmapper. The latest version is available online at
http://www.cgpsmapper.com (accessed 06 February 2012). You can download the free
version (version 0100d) or buy the relatively inexpensive Personal or Shareware versions.
We used the free version to produce the image files for the 2009-2011 sheep surveys. If you
don’t use the default downloading file pathway, download and open the program files in your
cgpsmapper folder (C:\GarminImageFiles\Software\cgpsmapper).
6) Open GPSMapEdit by clicking on the mapedit.exe icon in the folder where you downloaded
the program files.
7) Go to the File menu Import ESRI shape (*.shp). An Import window will open.
8) In the Import window, browse to and select your shapefile. Click Open. You may import just
one shapefile for conversion to a single image file (recommended), or several shapefiles
consecutively for conversion to a single image file (not recommended here). For the sheep
surveys, you should import and create one image file for the transects and one image file for
the transect start and end points.
9) Once you import a shapefile, GPSMapEdit will start a wizard to adjust settings for how the
shapefile will be imported and displayed in the resulting image file. The first window of the
import wizard will prompt you to ‘Select type of objects.’ Depending on the type of shapefile
you’ve imported (point, line or polygon) the window will display a set of symbol options that
match your shapefile type.
The screenshot below shows the symbol options window if you are importing a point shapefile.
One of the large city options will work if you are importing the start and endpoints of the
transects. After you’ve picked a symbol for the shapefile you are importing, click Next.

Dall’s Sheep Monitoring Protocol – Arctic (ARCN) and Central Alaska (CAKN) Networks
Standard Operating Procedure (SOP) #4: GPS Setup Version 1.0, 01 March 2017
SOP4-8 (Page 8 of 32)
The next screenshot shows the symbol options window if you import a line shapefile. Remember
to convert all polygon shapefiles into line shapefiles before importing them into GPSMapEdit.
When importing the sheep transects, choose the Major Highway, Railroad or International
Boundary option. After you’ve picked a symbol for the shapefile you are importing, click Next.
10) On the window ‘Select source of labels’, choose a field to be used for labeling your shapefile
data objects. When making image files of the TrnOrig (transect lines) shapefile, choose the
TransectID field. For the Transect start/endpoints, use your TransectID field again, but this
should have been modified so that the values are the transect number plus an ‘a’ or ‘b’
specifying the start or endpoint (e.g., 8a, 8b, etc.).

Dall’s Sheep Monitoring Protocol – Arctic (ARCN) and Central Alaska (CAKN) Networks
Standard Operating Procedure (SOP) #4: GPS Setup Version 1.0, 01 March 2017
SOP4-9 (Page 9 of 32)
11) On the window, ‘Assign additional attributes’, just click Next. You may not have this
window depending upon the version of GPSMapEdit that you are using.
12) On the window ‘Select source coordinate system’, pick ‘Latitude/Longitude (deg)’ for
Coordinate system and ‘WGS 84’ for Datum. Then click Next.

Dall’s Sheep Monitoring Protocol – Arctic (ARCN) and Central Alaska (CAKN) Networks
Standard Operating Procedure (SOP) #4: GPS Setup Version 1.0, 01 March 2017
SOP4-10 (Page 10 of 32)
13) On the window, ‘Select zoom levels to import’, check all levels shown. Typically the first
time you do this in a new GPSMapEdit session there will only be one zoom level to choose.
You will set and resave more zoom levels in steps 16-19 of this SOP.
14) Click Finish. Your shapefile should then show in the main GPSMapEdit window. The
sample screenshot below is of transects for the 2011 sheep survey in the Itkillik Preserve.
15) Go to the File menu and select Map Properties.
16) The Map Properties window will open; see the screenshot below. Select the Header tab. Type
set should already be Garmin. For ID, you must enter a unique 8-digit number for your map
(e.g., 20111111). You can pick a more meaningful name on the next line (e.g.,
Itkillik2011_Transects_20111111_Stransparency). This name will show in the Map Images
layer on the Garmin GPS unit. Check to make sure that the Datum is correct for the one you
chose when importing the shapefile (again, WGS84 is recommended). The Coding schema
should be set to ‘American (7-bit)’. Click Apply.

Dall’s Sheep Monitoring Protocol – Arctic (ARCN) and Central Alaska (CAKN) Networks
Standard Operating Procedure (SOP) #4: GPS Setup Version 1.0, 01 March 2017
SOP4-11 (Page 11 of 32)
17) On the Levels tab, set your zoom levels as shown below. If the zoom levels are not defined
correctly, the map will not export to an image file (*.img) correctly.
If you do not see enough levels as shown, click the Insert Before button to add levels. It will
keep adding the same values in the ‘Bits’ and ‘MapSource zoom’ columns for each inserted
level. To change those values, double-click on the level. A Level Settings window will open (see
screenshot below). Adjust the Bits and MapSource zoom range for each of your levels so that the

Dall’s Sheep Monitoring Protocol – Arctic (ARCN) and Central Alaska (CAKN) Networks
Standard Operating Procedure (SOP) #4: GPS Setup Version 1.0, 01 March 2017
SOP4-12 (Page 12 of 32)
final list looks like the screenshot above. When you are finished, click OK at the bottom of the
Map Properties window.
18) Re-import your shapefile (repeat SOP 4.2.1, steps 6-11).
19) When you get to the import wizard window to ‘Select zoom levels to import’, you should
now see options for all zoom levels (except the last one, Level 6) that you entered on the
Map Properties, Levels tab. Check all levels shown and then click Finish.
20) If you are given a message about ‘merge maps’, click ‘Yes’.
If you are adding more than one shapefile to create one image file (not recommended for the
sheep surveys), import your first shapefile following steps 6-19, add the remaining shapefiles
following steps 6-13 for each shapefile added, and then skip to step 20.
21) Go to the File menu and select Map Properties. Check to make sure that your settings on the
Header and Levels tabs are correct as established in steps 15 and 16.

Dall’s Sheep Monitoring Protocol – Arctic (ARCN) and Central Alaska (CAKN) Networks
Standard Operating Procedure (SOP) #4: GPS Setup Version 1.0, 01 March 2017
SOP4-13 (Page 13 of 32)
22) Select the cGpsMapper tab on Map Properties (see screenshot below). Look at the line for
‘Map is transparent.’ The default is ‘N – Map is not transparent’. You need to change this to
either the Y or S option. You do not need to do anything with the Bounds, Statistics, Source
or Extras tabs. Click Apply, then click OK.
23) Go to File Save As. A Save As window will open. Navigate to the Working folder (i.e.,
C:\GarminImageFiles\Working). Save this map as a Polish format (*.mp) file, using your 8-
digit unique ID number as the file name (e.g., 20111111.mp). In the next step, you will
export this Polish format file to an image file.
24) Go to File Export Garmin IMG / cgpsmapper.exe. The Save As window will open
again. Navigate to the Working folder (i.e., C:\GarminImageFiles\Working). Save it there
with the same unique ID number as the file name. ‘Save as type’ should already be set to
Garmin MapSource map (*.img).
25) A window will open to ‘Export to cgpsmapper.exe’ (see screenshot below). Click on the
button, navigate to the folder where you downloaded cgpsmapper (e.g.,
C:\GarminImageFiles\Software\cgpsmapper), select the cgpsmapper.exe icon and click
Open. The file pathway to cgpsmapper.exe should now be set. Hit Run. Text will begin to
run in the window, below ‘Output of cgpsmapper.exe’. Wait for the GPSMapEdit window

Dall’s Sheep Monitoring Protocol – Arctic (ARCN) and Central Alaska (CAKN) Networks
Standard Operating Procedure (SOP) #4: GPS Setup Version 1.0, 01 March 2017
SOP4-14 (Page 14 of 32)
with ‘Export is complete!’ to appear, and click OK. Then click Close on the Export to
cgpsmapper.exe window.
26) Close GPSMapEdit.
27) Now that you’ve created one GPSMapEdit map project and created your zoom levels, you
can reuse the same template for other maps. Simply open the *.mp (Polish file) that you just
created – this should be in C:\GarminImageFiles\Working. Go to the Edit menu Select
All Objects. Right click on any of the selected objects on the map (these are from your
previously imported shapefile) and hit Delete. Then import your new shapefile following
steps 6-15 and 19-25 of SOP 4.2.1.
SOP 4.2.2 – MapSetToolKit and cgpsmapper: Loading Image File into Garmin MapSource
MapSetToolKit then works with cgpsmapper to ‘install’ (load) the image file into Garmin
MapSource for easy uploading to the Garmin GPS units. MapSetToolKit is free, but it is a beta
version software meaning that there can be bugs that cause MapSource to crash. NOTE – you
must have administrative privileges on your computer in order to properly run
MapSetToolKit which places the images in MapSource. If not, it will appear that you have
installed your .img files in MapSource but MapSource will not recognize them.
Alternatively you can use SendMap which is available on the cgpsmapper website. There are no
protocols for SendMap with this SOP.
1) Download and install MapSetToolKit. The latest version is available online at
http://sites.google.com/site/cypherman1/ (accessed 07 February 2012, MapSetToolKit
v1.77). This version was used for the sheep surveys in 2011. If you don’t use the default
download location, please download and open the files in the MapSetToolKit folder (C:\
GarminImageFiles\Software\MapSetToolKit).

Dall’s Sheep Monitoring Protocol – Arctic (ARCN) and Central Alaska (CAKN) Networks
Standard Operating Procedure (SOP) #4: GPS Setup Version 1.0, 01 March 2017
SOP4-15 (Page 15 of 32)
2) Make sure that cgpsmapper is also installed. If it is not, see SOP 4.2.1, step 5.
3) Open MapSetToolKit.exe from where you downloaded it (e.g., C:\
GarminImageFiles\Software\MapSetToolKit).
4) Click on Select IMG and navigate to your *.img file is. It should be in
C:\GarminImageFiles\Working per SOP 4.2.1.
5) All *.img files from the Working folder will now show under ‘Source IMG files’. Select your
image file. You may need to scroll to the right to see your file’s name in full.
6) Click the Add button and your image file name should show up under ‘Selected IMG
files’. Select your image file in this window.
7) Click on the button next to ‘Mapset directory’ and navigate to the Final folder (i.e.,
C:\GarminImageFiles\Final). A Disc Image File (or Garmin MapSource Map file when using
older versions of the software) will be created here for MapSource to access and upload to
the Garmin GPS units. Do not set the Mapset directory to the Working folder.
8) For ‘Mapset name’ enter a descriptive name (e.g., Itkillik2011_Transects_20111111).
9) For ‘Product Code’ enter a unique 4-digit number. If you have previously created image files
and installed them in MapSource, you will see those under ‘Mapset installed’. You need to

Dall’s Sheep Monitoring Protocol – Arctic (ARCN) and Central Alaska (CAKN) Networks
Standard Operating Procedure (SOP) #4: GPS Setup Version 1.0, 01 March 2017
SOP4-16 (Page 16 of 32)
make sure to not repeat any of those 4-digit numbers (in the CODE field). Because we
created and are loading shapefiles individually (at least one for transect lines and one for the
transect start and end points), you will end up with several mapsets under ‘Mapset installed’.
10) Skip the fields for Family ID, Copyright info, Draw Priority, Transparent, TYP files and
gmaptool program.
11) For ‘cgpsmapper/cpreview folder’, click on the button, navigate to the folder where you
downloaded cgpsmapper (e.g., C:\GarminImageFiles\Software\cgpsmapper), select the
cgpsmapper.exe icon and click Open. The file pathway to cgpsmapper.exe should now be set
in the MapSetToolKit window.
12) Put a check mark in ‘Install in Mapsource’.
13) Click on START. Cgpsmapper will open in a new DOS window and you will see text
scrolling there. Then a new window should open saying ‘Convert completed’, click OK.
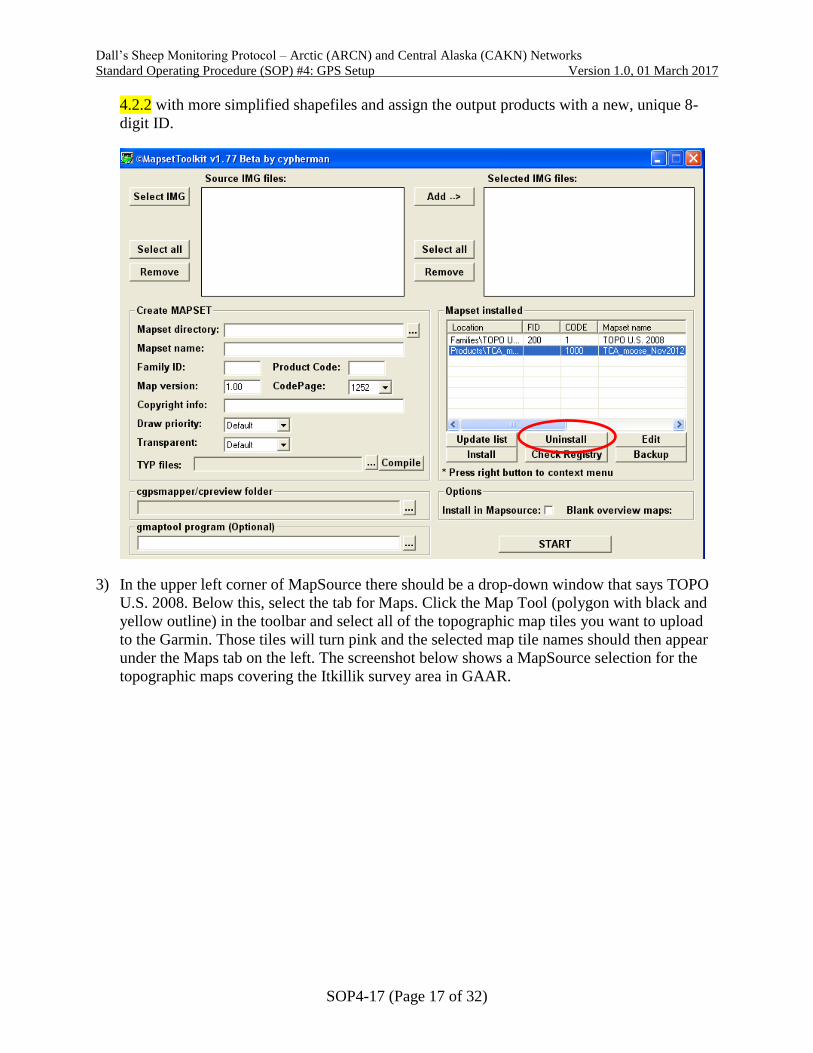
14) If things don’t work the first time you can select the faulty mapset in the ‘Mapset installed’
window and click on the Uninstall button. Then you may have to repeat this whole process
(SOPs 4.2.1 and 4.2.2) with more simplified shapefiles and assign the output products with a
new, unique 8-digit ID.
15) Close MapSetToolKit.
SOP 4.3 – Using MapSource to Upload Image Files to Garmin GPS Units 1) Download MapSource to your computer using the default program filing system. You can do
this with the Garmin TOPO US 2008 disk. The disk contains the 2008 version of the
software as well as georeferenced, physical topographic map images that can be uploaded to
different Garmin GPS units. Upgrades for MapSource software are available online at
www.garmin.com. NOTE – you must have administrative privileges on your computer
in order to properly run MapSetToolKit which places the images in MapSource. If not,
it will appear that you have installed your .img files in MapSource but MapSource will
not recognize them.
2) Open Garmin MapSource, which should open with a map window zoomed to the area of the
image files you created in SOP 4.2.
NOTE: If MapSource will not open, and you get an error message stating that MapSource
needs to be reinstalled or repaired, there is a problem with one of the .img files that you (or
someone on a previous survey) created and loaded using MapSetToolKit. Close the
MapSource error message. Open MapSetToolKit. If you know which mapset is the problem,
select it from the list under ‘Mapset installed’ and click the ‘Uninstall’ button (see screenshot
below). If you don’t know which mapset is causing the problem, select one of the mapsets
(do not select the TOPO U.S. 2008 mapset), and click the ‘Uninstall’ button. Try to restart
MapSource. If it opens, you’re good to go and can skip to step 3. If it still won’t open, keep
uninstalling all offending mapsets. If you uninstalled any of the mapsets that you need for
your survey because it was causing the problem, then you will have to repeat SOPs 4.2.1 and
Dall’s Sheep Monitoring Protocol – Arctic (ARCN) and Central Alaska (CAKN) Networks
Standard Operating Procedure (SOP) #4: GPS Setup Version 1.0, 01 March 2017
SOP4-17 (Page 17 of 32)
4.2.2 with more simplified shapefiles and assign the output products with a new, unique 8-
digit ID.
3) In the upper left corner of MapSource there should be a drop-down window that says TOPO
U.S. 2008. Below this, select the tab for Maps. Click the Map Tool (polygon with black and
yellow outline) in the toolbar and select all of the topographic map tiles you want to upload
to the Garmin. Those tiles will turn pink and the selected map tile names should then appear
under the Maps tab on the left. The screenshot below shows a MapSource selection for the
topographic maps covering the Itkillik survey area in GAAR.

Dall’s Sheep Monitoring Protocol – Arctic (ARCN) and Central Alaska (CAKN) Networks
Standard Operating Procedure (SOP) #4: GPS Setup Version 1.0, 01 March 2017
SOP4-18 (Page 18 of 32)
4) Change from TOPO 2008 in the drop-down list in the upper left corner of the MapSource
window and pick the map name of the image file (mapset) pertaining to your first shapefile.
You will then see that image file on the screen as a mapset tile. Select the tile using the Map
Tool (polygon with black and yellow outline) in the toolbar. The tile will change from yellow
to pink and the mapset name should appear under the Maps tab along with all of your TOPO
tiles.
In the first screenshot below, a mapset tile for the Seward Peninsula 2012 Muskox transect
survey has been opened (‘SPTransects_2012Mox_20122003’; 20122003 is the unique ID for
this map image). In the second screenshot, that mapset has been selected. In the third
screenshot, the Maps list shows that the mapset for the Seward Peninsula transects has been

Dall’s Sheep Monitoring Protocol – Arctic (ARCN) and Central Alaska (CAKN) Networks
Standard Operating Procedure (SOP) #4: GPS Setup Version 1.0, 01 March 2017
SOP4-19 (Page 19 of 32)
selected as well as TOPO U.S. 2008 tiles covering northwestern Alaska. The mapsets that
were selected total 104.7MB in size.

Dall’s Sheep Monitoring Protocol – Arctic (ARCN) and Central Alaska (CAKN) Networks
Standard Operating Procedure (SOP) #4: GPS Setup Version 1.0, 01 March 2017
SOP4-20 (Page 20 of 32)
5) Repeat step 4 for all of your image files (shapefiles) – transect lines, end and start points, etc.
6) Save this selection in MapSource (it will save as a Garmin GPS Database, or *.gdb). This
way, you’ll only have to do the selection process once per survey (i.e., you can just keep
opening up the *.gdb each time you need to load a Garmin GPS unit with the topo and image
files). This selection may be pertinent for longer if the transect lines and survey area are the
same from year to year.
7) Plug the Garmin GPS unit using its USB cable into the computer. Turn the GPS on.
8) In MapSource, select the Transfer dropdown menu and ‘Send to device’ to upload the
mapsets to the Garmin. A ‘Send To Device’ window will open and the program should find
your GPS unit and indicate what GPS type you have in the Device field. Select to transfer
just the Maps to the GPS unit. Do not upload Waypoints, Routes or Tracklogs if they are also
displayed as selectable on this window.

Dall’s Sheep Monitoring Protocol – Arctic (ARCN) and Central Alaska (CAKN) Networks
Standard Operating Procedure (SOP) #4: GPS Setup Version 1.0, 01 March 2017
SOP4-21 (Page 21 of 32)
You can also insert a Garmin 296/495/496 data card (or chip) into a Garmin card reader
which connects to the computer via a USB cable. Be sure that your selection of maps does
not exceed the capacity of the data chip. The card reader and data chips of 64MB, 128MB,
256MB and 512MB capacity can be purchased online. MapSource displays the number of
MB that the map selection requires below the list of topographic maps on the left of the
screen (please refer to the last screenshot in step 4).
9) Click Send on the Send To Device window and MapSource will start the transfer. NOTE:
this transfer of maps will erase any mapsets that you previously had on your GPS unit or data
chip. The transfer may take some time depending upon how many topos and mapsets you’ve
sent. When it is finished, you should get a Transfer Complete window stating that ‘the data
was sent successfully’. Click OK, close out of MapSource and unplug your GPS unit.
10) Once your topographic (TOPO U.S. 2008) and image files (mapset tiles) are uploaded to the
Garmin GPS units, the pilots and observers can turn on and off the individual custom maps
you have loaded (i.e., you can have just some of the topographic maps showing, just the
transects and no start/end points, etc.). It’s possible to have the base map viewable all the
time and the transect lines viewable just when you want to see them.
a. On the Garmin 76csx unit, scroll to the Map screen with the Page button, and then click
the Menu button. Scroll down and select ‘Setup Map’, and click the Enter button. On the
page that opens, scroll to using the central rocker button and select the icon that has a
circle with ‘i’ in the center. You can scroll up and down the list of mapsets using the
central rocker button, and then turn on and off (check or uncheck) the different mapsets
by clicking the Enter button.
b. On a Garmin 296, 495 or 496 scroll to the Map page and Select Menu. Select Map
Information from this menu. Various map sets are displayed here including one for
TOPO U.S. 2008 and one for your set of image files. Make sure those are both checked
‘on’. More often than not, your image file set will not be checked. If you uploaded more

Dall’s Sheep Monitoring Protocol – Arctic (ARCN) and Central Alaska (CAKN) Networks
Standard Operating Procedure (SOP) #4: GPS Setup Version 1.0, 01 March 2017
SOP4-22 (Page 22 of 32)
than one image file to the GPS unit, they will be bundled together under the name of one
of your image files. To turn just one of those files on and not the whole set, you can also
scroll to the right over your image file mapset so that the name is highlighted, and then
click the Enter button. This will show you all of the different image files that you’ve
uploaded to the Garmin as part that mapset and you can now turn on or off different
image files if you don’t want all of them showing (e.g., you only want the transect lines
and not the start/end points to display).
11) All other settings on the Garmin 76csx and 296/495/496 GPS units are covered in SOP 8.1.
They are detailed there because survey observers need to check all GPS settings prior to
starting any survey flights.

Dall’s Sheep Monitoring Protocol – Arctic (ARCN) and Central Alaska (CAKN) Networks
Standard Operating Procedure (SOP) #4: GPS Setup Version 1.0, 01 March 2017
SOP4-23 (Page 23 of 32)
Appendix SOP4-1 – Converting ArcGIS Shapefiles into Image Files and Importing them to Garmin GPS Units Option 2: Mapwel These protocols were written by C. Priest, YUGA cartographic technician, on 22 June 2011 and
revised by Kumi Rattenbury on 05 November 2012.
These instructions assume that you have purchased the Mapwel license ($90;
http://www.mapwel.eu/). Exporting shapefiles as background images to Garmin 76csx and
AERA 550 was successful, but inconsistently successful with a Garmin 296/496. In April 2012,
the Mapwel help site suggested changing the Mode to Automotive instead of Aviation, and also
setting the detail level to ‘Most’ for exporting to a Garmin 296, but that still did not work.
1) Before you start, make sure you that you have all of the TOPO U.S. 2008 quad maps from
MapSource already loaded on the Garmin (SOP 4.3, steps 1-3 and 6-8). Exporting these to
the device after you use Mapwel will clear all Mapwel maps from the unit.
2) After opening Mapwel, go to file → Open. Then navigate to your desired (ESRI *.shp)
shapefile. I have had the best luck using shapefiles that are in the Alaska Albers projection.
3) The ‘Import Shape File’ window will appear and you will move through the Step tabs
sequentially.
a. Step 1 Tab - Designate the Projection. The preferred projection is Alaska Albers Equal
Area Conic. They are listed in alphabetical order. The only WGS84 projection option is
TM 36 SE. This is used for off shore Mozambique, and oddly enough doesn’t project in
the correct spot. Then click Next.

Dall’s Sheep Monitoring Protocol – Arctic (ARCN) and Central Alaska (CAKN) Networks
Standard Operating Procedure (SOP) #4: GPS Setup Version 1.0, 01 March 2017
SOP4-24 (Page 24 of 32)
b. Step 2 Tab - Here you can designate which attributes from the shapefile (i.e., which
points, polygons or lines) will be transferred to the Garmin as map objects, and you will
set the symbology (‘Object type’) for the map objects. This is similar to using the Select
by Attributes function in ArcMap or changing the Symbology in ArcMap so that only a
specified set of the attributes show. Select the shapefile field name that will be used for
selecting the attributes from the drop down menu under ‘Attribute’. Click the ‘Add’
button. Right click on the highlighted box below the ‘Value’ column and select the
attribute values from the drop down list that you want shown in your map objects. If you
want all attributes of the shapefile to show, choose **ANY** under the Value column.
Right click under ‘Object type’ and pick one of the symbols. In the example below, we
designated the labels to come from the field ‘TransectID’ and used the red lines for
transect symbology for the map images going to the Garmin.
c. Step 3 Tab - Define the Zoom levels of the shapefile. Set the Attribute column to
whatever you chose for Attribute on the Step 2 Tab, or you can test other fields or even
‘Undefined’ under the Attribute column. You can choose Value 1 and Value 2, or leave
these columns as ‘Undefined’. Repeat this for all zoom levels (all rows) for which you’d
like these map objects to show on your GPS unit. We recommend choosing at least up
through Max Zoom: 20 km.

Dall’s Sheep Monitoring Protocol – Arctic (ARCN) and Central Alaska (CAKN) Networks
Standard Operating Procedure (SOP) #4: GPS Setup Version 1.0, 01 March 2017
SOP4-25 (Page 25 of 32)

Dall’s Sheep Monitoring Protocol – Arctic (ARCN) and Central Alaska (CAKN) Networks
Standard Operating Procedure (SOP) #4: GPS Setup Version 1.0, 01 March 2017
SOP4-26 (Page 26 of 32)
d. Step 4 Tab - Set ‘Names’ (IDs) and ‘Comments’ for the shapefile objects that will
display on your Garmin GPS unit. Under ‘Name’ choose the field from the shapefile that
will be used to label the map objects on your Garmin. For the sheep surveys, select the
Transect ID field.
‘Type’ will be shown when you put your cursor over the feature/map object on the
Garmin GPS unit. ‘Comment’ will show after ‘Type’. ELEVFT is a good field choice for
Comment or Type* so that the pilots and observers can calculate their flight altitude for
each transect based on those values.

Dall’s Sheep Monitoring Protocol – Arctic (ARCN) and Central Alaska (CAKN) Networks
Standard Operating Procedure (SOP) #4: GPS Setup Version 1.0, 01 March 2017
SOP4-27 (Page 27 of 32)
e. Step 5 Tab - Determine the appropriate Units. If you use an Alaska Albers projected
shapefile, set Elevation and Depth to Feet.
4) Click ‘Finish’ and you should be able to see your shapefile! This screenshot shows transects
in the Itkillik Preserve of northeastern GAAR. If you don’t see anything after clicking finish,
it will not show up correctly on the Garmin.

Dall’s Sheep Monitoring Protocol – Arctic (ARCN) and Central Alaska (CAKN) Networks
Standard Operating Procedure (SOP) #4: GPS Setup Version 1.0, 01 March 2017
SOP4-28 (Page 28 of 32)
5) Set the transparency. Go to File → Properties. Here, check the box for ‘Transparent Map’.
Designate a Map Name. This will be the mapset name on your Garmin GPS unit.

Dall’s Sheep Monitoring Protocol – Arctic (ARCN) and Central Alaska (CAKN) Networks
Standard Operating Procedure (SOP) #4: GPS Setup Version 1.0, 01 March 2017
SOP4-29 (Page 29 of 32)
6) Save your Mapwel file. For the Transparent Map option to stay, you must save the work as a
Mapwel file. Click File→ Save As and choose file type *.mpw. You are now ready to export
the file to your GPS unit.
7) Connect your Garmin GPS unit to the computer and turn it on. In Mapwel, click File
Upload Map to GPS. There is also a button for this (see screenshot below).
8) When prompted, click OK to confirm that the GPS unit is on. This window will open:
9) It is critical that you check the box ‘Add to existing maps’ on this window. Failure to do so
will clear all maps from the unit.

Dall’s Sheep Monitoring Protocol – Arctic (ARCN) and Central Alaska (CAKN) Networks
Standard Operating Procedure (SOP) #4: GPS Setup Version 1.0, 01 March 2017
SOP4-30 (Page 30 of 32)
10) Click ‘Upload to GPS’. This will take a long time (20-40 min) if you have a lot of
Topographic maps already on the Garmin GPS unit. For quick reference the Map on the
dialog box will show you where the maps are being exported to on the GPS. This is an
example of a successful export, as my data was located in the Brooks Range.
11) Click Exit.
12) Navigate to the data on the Garmin GPS unit and check that all image files (former
shapefiles) and TOPO U.S. 2008 maps are display as desired.

Dall’s Sheep Monitoring Protocol – Arctic (ARCN) and Central Alaska (CAKN) Networks
Standard Operating Procedure (SOP) #4: GPS Setup Version 1.0, 01 March 2017
SOP4-31 (Page 31 of 32)
Appendix SOP4-2 – Converting Polygon Shapefiles into Line Shapefiles and Creating Center Point Shapefiles from Polygon Shapefiles
To Convert Polygons to Lines:
1) Open your ArcMap project.
2) Click on the Search button in the main ArcMap toolbar to pull up the Search page
and look for tools. Type in Polygon to Point in the Search bar.
3) Pick the ‘Feature to Line (Data Management)’ tool. See screenshot below.
4) For ‘Input Features’, this is your polygon shapefile. If the polygon shapefile is in your
current, opened ArcMap project, you can select it by using the drop down menu. If it’s
not already there, you can navigate to it by clicking on the folder button to the right.
5) For ‘Output Feature Class’, click on the folder button to the right. A new window will
open. Navigate to the filing system where you want the new point shapefile to be stored,
and name your new shapefile.
6) Checkmark the ‘Preserve attributes (optional)’ box. Click OK.
To Generate Center Points for Polygons:
1) Open your ArcMap project.
2) Click on the Search button in the main ArcMap toolbar to pull up the Search page
and look for tools. Type in Polygon to Point in the Search bar.
3) Pick the ‘Feature to Point (Data Management)’ tool. See screenshot below.

Dall’s Sheep Monitoring Protocol – Arctic (ARCN) and Central Alaska (CAKN) Networks
Standard Operating Procedure (SOP) #4: GPS Setup Version 1.0, 01 March 2017
SOP4-32 (Page 32 of 32)
4) For ‘Input Features’, this is your polygon shapefile. If the polygon shapefile is in your
current, opened ArcMap project, you can select it by using the drop down menu. If it’s
not already there, you can navigate to it by clicking on the folder button to the right.
5) For ‘Output Feature Class’, click on the folder button to the right. A new window will
open. Navigate to the filing system where you want the new point shapefile to be stored,
and name your new shapefile.
6) Checkmark the ‘Inside (optional)’ box. Click OK.