User’s Guide - GPS Tracking Solutions & GPS Vehicle ... users manual.pdfHow to Communicate Between...
115
User’s Guide Increasing mobile workforce efficiency with the ultimate in GPS tracking
Transcript of User’s Guide - GPS Tracking Solutions & GPS Vehicle ... users manual.pdfHow to Communicate Between...

User’s Guide
Increasing mobile workforce efficiencywith the ultimate in GPS tracking

STREETEAGLE USER’S GUIDE
Table of Contents
I. Introduction........................................................................................................................... 1
II. Overview of StreetEagle Screen, StreetEagle Tracker Control Window and Map ........ 2
III. Step –by – Step Procedures .................................................................................................. 6
A. How to Open StreetEagle ................................................................................................... 6
B. How to View Current Vehicle or Asset Location .............................................................. 7
C. How to View Vehicle or Asset History .............................................................................. 8
D. How to View a Location .................................................................................................. 12
E. How to Create a Route ..................................................................................................... 13
F. How to Use Reports ......................................................................................................... 19
G. How to View on Screen Notifications .............................................................................. 37
H. How to Use Geofencing and Alerts (StreetEagle Advanced) ........................................... 38
I. How to Use the Status Monitor ........................................................................................ 45
J. How to Send Email........................................................................................................... 46
K. How to Use the Maintenance Module .............................................................................. 47
L. How to Add, Edit, Delete and Customize Vehicle Information and Settings .................. 55
M. How to Create and Edit Groups ....................................................................................... 57
N. How to Add, Delete, and Customize Location Information ............................................. 59
O. How to Specify Vehicle Information to View on a Map .................................................. 62
P. How to Print Routes, Directions, Maps, and Reports ....................................................... 63
Q. How to Control the Map ................................................................................................... 66
R. How to Communicate Between StreetEagle and a Garmin .............................................. 67
S. How to Track an Asset ..................................................................................................... 75
T. How to Setup Bus Management ....................................................................................... 76
APPENDIX A -- StreetEagle Vehicle Unit Installation ........................................................... 86
APPENDIX B -- VTU Troubleshooting Guide ....................................................................... 104
APPENDIX C -- Software Installation Guide ......................................................................... 106

- 1 -
I. Introduction
Welcome
The entire InSight USA team would like to thank you for investing in the StreetEagle
GPS Tracking System. InSight was among the first companies to pioneer GPS tracking
and we are dedicated to providing a workforce management solution to our customers to
help them increase productivity and profitability within their company.
With StreetEagle you will be able to manage your workforce with the many different,
easy to use features. With the ability to view your fleet vehicles exact location, at any
time, you can manage employee hours, billable hours, vehicle routes, etc. Our system
allows you to view historical vehicle routes and run management reports for all of your
mobile workforce and assets. This is just a few of the many functions StreetEagle offers
to help you improve your mobile workforce.
In this guide we will inform you on how to perform all of the advanced functions
StreetEagle has to offer and get you on your way to better workforce management to
increase your companies overall profitability. If you ever need any additional assistance
please feel free to contact our technical support team.
The entire InSight USA team thanks you!
Hardware/installation support 301-866-1990 x208
Software support 301-866-1990 x209
24/7 support Technical Support at 866-495-9240
We can also be reached via fax at 301-866-1992.
- 2 -
II. Overview of StreetEagle Screen, StreetEagle
Tracker Control Window and Map
The StreetEagle interface consists of the StreetEagle Tracker Control window on the left
and the Microsoft MapPoint window on the right.
The StreetEagle interface contains the following features:
1. Select Group to View allows user to select specific groups of vehicles to view
2. Pick list allows user to select vehicles, locations, and assets within a group
3. Vehicle status icons allows user to quickly identify status of vehicle
4. Vehicle Options Right click on a vehicle name to gain the following options:
• Show Information option allows user to check the most recent activity for that
vehicle
• Display Driver Names allows user view the driver name associated with their
vehicles
• Show History option allows user to check the history of a vehicle for any
specified time
• Follow option centers the vehicle on the screen. Every time the box reports, the
vehicle will be centered on the computer screen.
12
13
14
15
17
16
18
1
2
3
5
6
7
8
9
19
4
10
11

- 3 -
• Garmin allows user to communicate with the Garmin and view the Garmin Info
Center.
• Update Now allows user to request for a GPS position at the when
• Vehicle Properties option allows user to refer back to that vehicles information
• Routes option allows user to create a route from any given starting and ending
point with turn-by-turn directions
• Retrieve Mileage allows user to retrieve and instant mileage reading of the
vehicle
5. Maintenance Monitor button allows user to view routine maintenance of their fleet
6. Map Manager button allows user to toggle through Map Frame, MapPoint, Google
Earth, and Bing Maps.
7. Rout Manager button allows user save selected routes and send them to the selected
vehicles.
8. Geofencing And Alerts button allows user to add/edit Geofences, alerts, contacts and
vehicles monitored
9. Reports button allows user to generate detailed reports on a vehicles past
activity/performance
10. Status Monitoring allows user to a live status of all the vehicles at one time.
11. Help button allows user to get immediate on screen StreetEagle software assistance
or email Insight’s support
12. Messaging button allows user to send emails, text messages, and Garmin messages
from StreetEagle contacts selected
13. Show Information box allows user to specify vehicle information shown on the map
14. On-Screen Notifications button allows user to view alerts on screen, and change
settings
15. Vehicles button allows user to add, edit, and delete vehicles/vehicle information
16. Locations button allows user to add, edit, delete and customize locations
17. Bus Management allows user to create Bus Routes to assure their busses are actively
running the proper route.
18. Quit button allows user to close both StreetEagle and the Map window together
19. Selected vehicle is centered and highlighted on the map with its current reporting
status
- 4 -
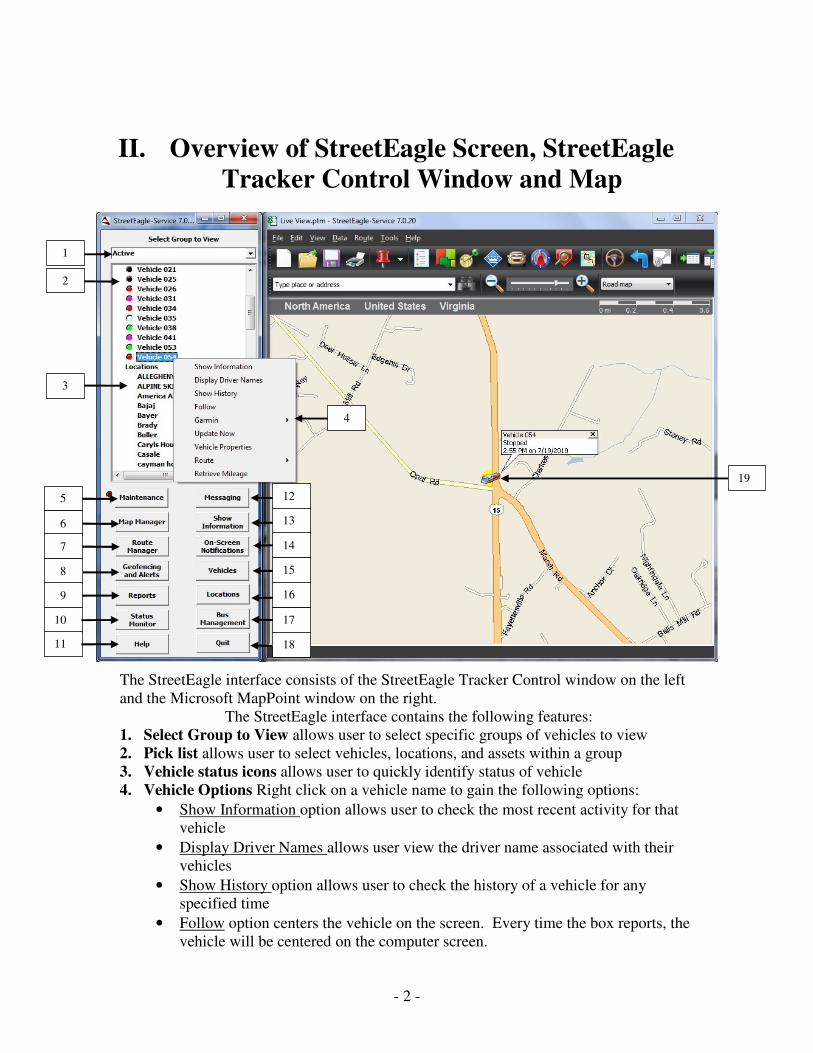
Vehicle Status Icons
The icons to the left of the vehicle name allow the
user to quickly identify the status of the vehicles in
their fleet.
The following chart identifies the icons:
White- Location report overdue Red- Stopped Black- Parked Green- Start/In Transit
Purple- Last report is more than 30 days old Blue- Follow Mode

- 5 -
5
1
4
2
3
StreetEagle and Google Earth
Google Earth allow the user to view vehicles in satellite mapping photos
1. The StreetEagle control window and functionality remains the same
2. Map Manager button allows user to toggle through Bing Maps, MapPoint,
Google Earth, and Map Frame Maps
3. Selected vehicle is centered and highlighted on the map with its current
reporting status
4. The Google Earth Side Bar is used for many functions in Google Earth
5. This button will close the Google Earth Side bar to allow a larger map view

- 6 -
III. Step –by – Step Procedures
A. How to Open StreetEagle
Click on the StreetEagle icon
located in Start > All Programs >
StreetEagle Folder > StreetEagle
StreetEagle will automatically open the Mapping application

- 7 -
B. How to View Current Vehicle or Asset Location
To show the current location of a vehicle or asset left
click on the vehicle or asset.
If viewing the history of a vehicle or asset, quit the
history before viewing the real-time locations.
The selected vehicle or asset will be centered and highlighted on the map.
The vehicle will display the current status. The asset will display the last
scanned date and time.

- 8 -
C. How to View Vehicle or Asset History StreetEagle allows the user to view the history of the vehicles in their fleet
To show the history of a vehicle for any specified time period:
•••• Select a Vehicle or Asset
In the pick list of the StreetEagle Tracker Control
window right-click on the vehicle or asset to be
viewed.
In the pop-up menu click on “Show History.”
•••• Select the Dates and Times
The history settings window will appear.
Click on the Activity dropdown list and select
an activity (the default is All).
Specify the starting and ending dates from the drop-down calendars
by clicking the down arrow next to the default dates.
Specify the starting and ending times on the selected starting and
ending dates by doing the following:
•••• Change the starting/ending hour by:
o Clicking/highlighting the hour position on the
displayed time and click the up/down arrows
to change to the desired hour
OR
o Using the keyboard to type the desired hour in
•••• Change the starting/ending minutes and seconds with
same procedure
•••• Change the AM/PM option by clicking/highlighting
its position and then clicking the up/down arrows to
switch between AM or PM

- 9 -
•••• Plot the History
Click the Plot History button to view the location history of the selected vehicle or
asset performing the specified activity between the specified dates and times. The
following format will be displayed containing:
•••• All historical points within specified time period each contain vehicle
information such as:
o Speed
o Heading
o Activity status:
� Parked – information balloon provides time parked
� Started – information balloon provides time started along with
the time the vehicle parked
� Stops – stop signs are displayed on history map where the
driver made stops
o Date and time
o Optional sensor information
•••• Replay Control box used to chronologically trace vehicle location and activity
-Proceed to Replaying vehicle or asset Location History for instructions on
vehicle location viewing capabilities and functions.
*Asset Location history only displays date, and time.

- 10 -
•••• Replaying Vehicle or Asset Location History
When viewing a vehicle’s or asset’s location history the Replay Control box will
appear allowing the user to chronologically trace a vehicle or asset through its
location history.
The Replay Control box provides the vehicle or asset’s name and the specified dates and
times of location
To replay a vehicles or asset location history:
1. When the Replay Control box appears press the ‘Step Through History’ button.
Replay Control will start at the point closest to the specified starting time.
2. Left click at any time to go directly to the beginning history point.
3. Left click to scroll back ten history points.
4. Left click to scroll through the history points one at a time in reverse order. 5. Left click to chronologically scroll through each point one at a time on the map. The
point will be centered and highlighted on the map.
6. Left click to scroll forward ten history points.
7. Left click to at any time to go directly to the ending history point.
8. Left click and drag the slider bar to zoom in and out on the map. Sliding the bar to
the left zooms out on the map, where sliding the bar right, zooms in on the current
history point.
9. Check this box if you want to automatically center the history point you are on after
every step.
10. Left click to allow the computer to chronologically show history points.
1
2 4 3 7 5 6
9
8
10

- 11 -
• While scrolling through each point, the Replay Control box displays the time
and date of the corresponding point that is being currently viewed/located on
the map.
• To exit the history/replay map and return to the real-time map click the Quit
button on the Replay Control box.

- 12 -
D. How to View a Location
All locations will appear under the Locations branch in the pick list on of
the StreetEagle Tracker Control Window
To view a location/assignment: • Left-click on the location/assignment under
the Locations branch of the Show Selection
on Map window.
• MapPoint automatically centers the location/assignment on the map

- 13 -
E. How to Create a Route
StreetEagle can be used to create a route for a vehicle based on daily
assignments.
A route must consist of a starting point and an ending point, and may
consist of any number of stops in between.
Creating a Route in MapPoint
•••• Adding and Editing Routes
To create a route:
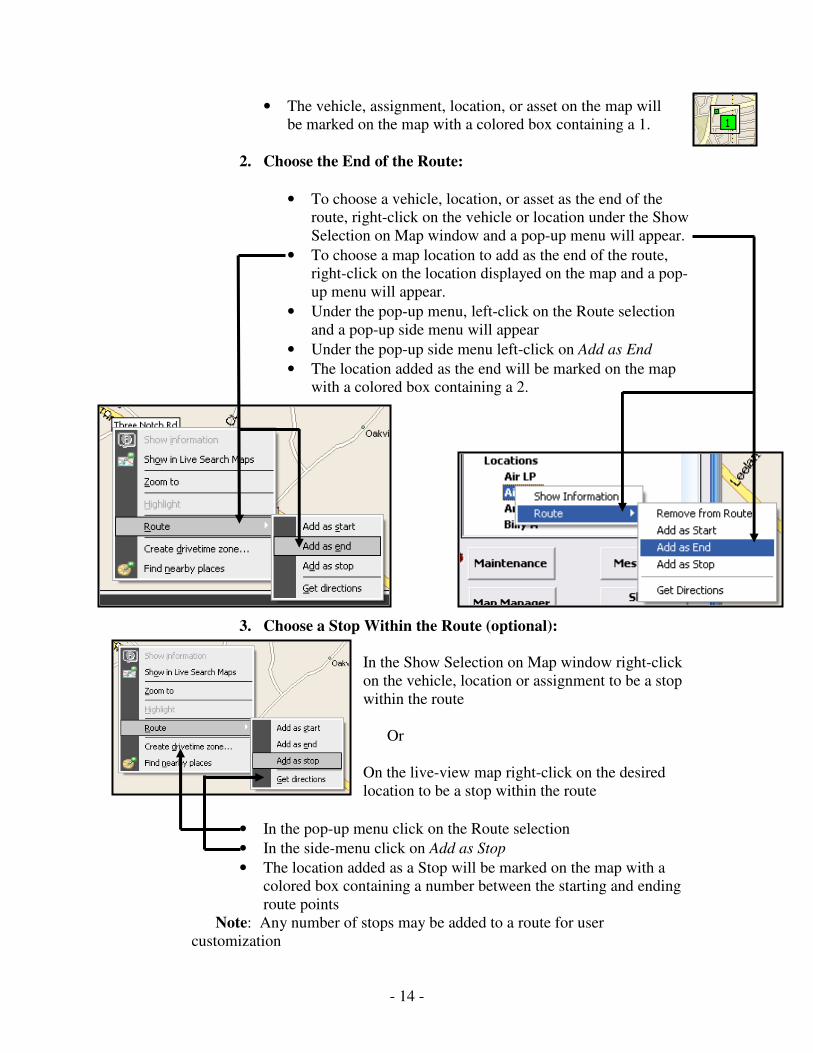
1. Choose the start of the route.
• To choose a vehicle, location, or asset as the start of the route,
right-click on the vehicle or location under the Show Selection
on Map window and a pop-up menu will
appear.
• To choose a map location to add as the
start of the route, right-click on the location displayed on the
map and a pop-up menu will appear.
• In the pop-up menu, left-click on the Route selection and a
pop-up side menu will appear. Under the pop-up side menu
left-click on Add as Start.
- 14 -
• The vehicle, assignment, location, or asset on the map will
be marked on the map with a colored box containing a 1.
2. Choose the End of the Route:
• To choose a vehicle, location, or asset as the end of the
route, right-click on the vehicle or location under the Show
Selection on Map window and a pop-up menu will appear.
• To choose a map location to add as the end of the route,
right-click on the location displayed on the map and a pop-
up menu will appear.
• Under the pop-up menu, left-click on the Route selection
and a pop-up side menu will appear
• Under the pop-up side menu left-click on Add as End
• The location added as the end will be marked on the map
with a colored box containing a 2.
3. Choose a Stop Within the Route (optional):
In the Show Selection on Map window right-click
on the vehicle, location or assignment to be a stop
within the route
Or
On the live-view map right-click on the desired
location to be a stop within the route
• In the pop-up menu click on the Route selection
• In the side-menu click on Add as Stop
• The location added as a Stop will be marked on the map with a
colored box containing a number between the starting and ending
route points
Note: Any number of stops may be added to a route for user
customization

- 15 -
This is an example of a map containing all necessary points to complete a route
4. To Get Directions:
• After adding a starting point, ending point, and all stopping
points, right-click anywhere on the real-time map.
• In the pop-up menu left-click on the Route selection
In the side-menu left-click on the Get Directions
selection to create the route.

- 16 -
5. Final Route/Directions Display
• A list of turn-by-turn directions from the starting point, through each stopping
point, to the ending point, providing the quickest and most economical route.
o The directions provide the following:
� Distance of each segment of the route
� Cumulative route distance
� Cumulative time beginning from the specified starting time
� Specific Street addresses with turning direction
� Construction warnings as well as other hazardous warnings
� Total time, distance, and cost of route
• The Route Planner window provides a list with the starting point, ending
point, and all stopping points within the route
• Option to add additional stopping points within the route
• Map displaying route from starting point, through stopping points, to ending
point
• The More Options button provides the user with the following options:
o Driving speed preferences
o Fuel/Vehicle cost settings
o Shortest route vs. Quickest route preferences
o Set starting and ending drive times
• The Optimize Stops button allows the user to align the routes from point to
point in order with what is shortest between each stop
- 17 -
Note: For more help on routing operation and options, see Microsoft MapPoint
Help
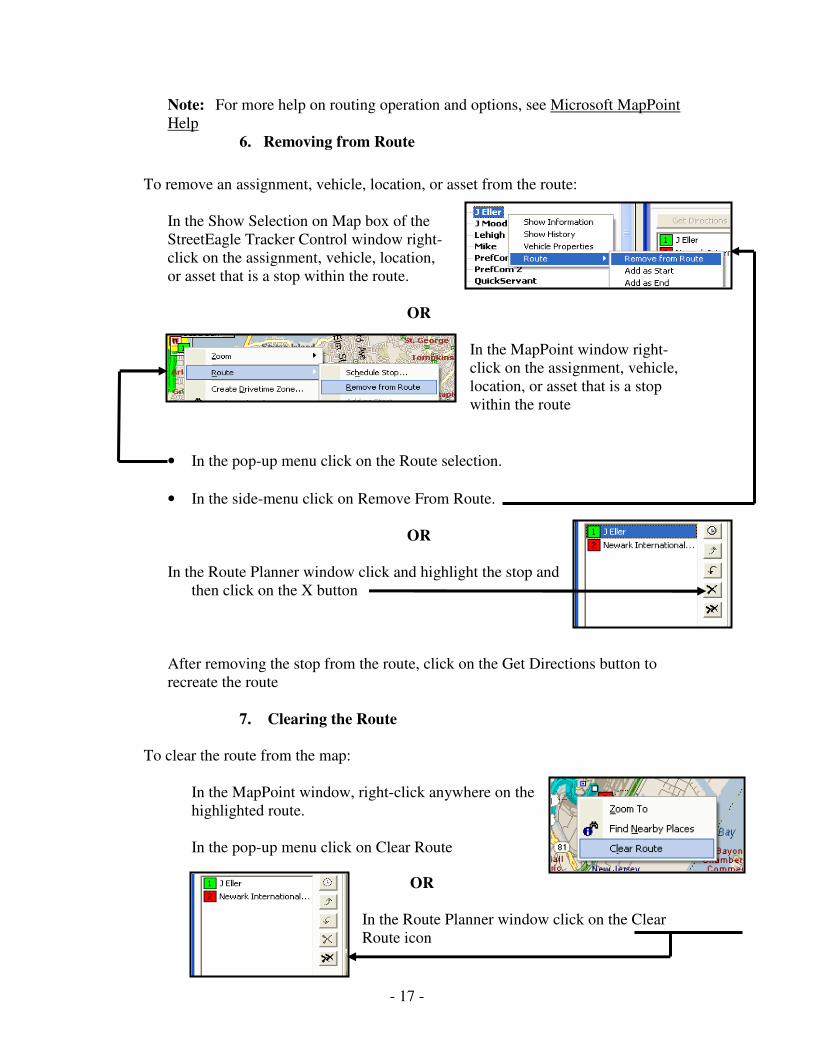
6. Removing from Route
To remove an assignment, vehicle, location, or asset from the route:
In the Show Selection on Map box of the
StreetEagle Tracker Control window right-
click on the assignment, vehicle, location,
or asset that is a stop within the route.
OR
In the MapPoint window right-
click on the assignment, vehicle,
location, or asset that is a stop
within the route
• In the pop-up menu click on the Route selection.
• In the side-menu click on Remove From Route.
OR
In the Route Planner window click and highlight the stop and
then click on the X button
After removing the stop from the route, click on the Get Directions button to
recreate the route
7. Clearing the Route
To clear the route from the map:
In the MapPoint window, right-click anywhere on the
highlighted route.
In the pop-up menu click on Clear Route
OR
In the Route Planner window click on the Clear
Route icon

- 18 -
Creating a Route to Send to a Garmin with Bing Maps
Creating a Route
• Click on the ‘Route Manager’ button
• Click Add
• Enter The desired Name of the Route
• Click Add Stops
• Enter the desired address or latitude/longitude, or
select from the locations that were already created
• Click Add/Save to add stop to route
• Add the desired number of stops to you list of stops
• Click exit to return to Route manage main menu
• Click Save Route
Editing and Deleting Routes
• Click within the Route Manager to modify
• Click Edit
• Click a location in the list of stops
• Click ‘Move Up’, or ‘Move Down’, or Delete
Stop’, or ‘Add Stop’
• When finished editing the list of locations in a route
click ‘Save Route’
*** Note: When creating or adjusting a route, numbers on the map will show the order of
the locations entered. ***
- 19 -
F. How to Use Reports Street Eagle can be used to run reports so that the user can more efficiently manage their
fleet.
A report must have vehicles selected, a time selected and all necessary parameters
selected
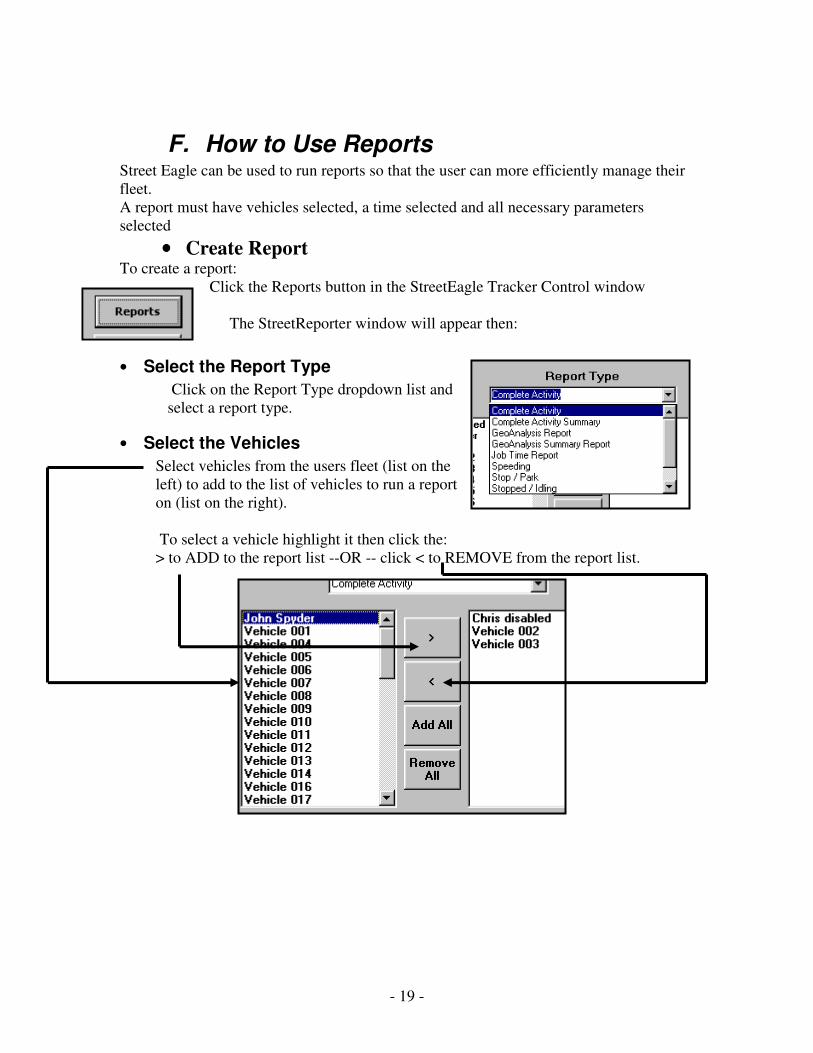
•••• Create Report To create a report:
Click the Reports button in the StreetEagle Tracker Control window
The StreetReporter window will appear then:
• Select the Report Type
Click on the Report Type dropdown list and
select a report type.
• Select the Vehicles
Select vehicles from the users fleet (list on the
left) to add to the list of vehicles to run a report
on (list on the right).
To select a vehicle highlight it then click the:
> to ADD to the report list --OR -- click < to REMOVE from the report list.

- 20 -
• Select a Time Period
Select the time period to run the report on (the
default is “custom” from 12:00AM to your current
time). (Refer to How to view vehicle and asset
location history page 6 to set the time period).
OR Select from the presets in the dropdown list
• Set the Parameters or Areas
In the parameters section set the Speed Threshold (in mph) and the Stop Threshold (in
minutes). For the Geo reports select an area. For Fuel tax reports the user can select to
Show Day By Day mileage.
• Create Report
Click Create Report and an Activity report will appear
containing the vehicle(s) name(s), time period for which the
report was run, an activity list and summary information. If
you
would
like to
- 21 -
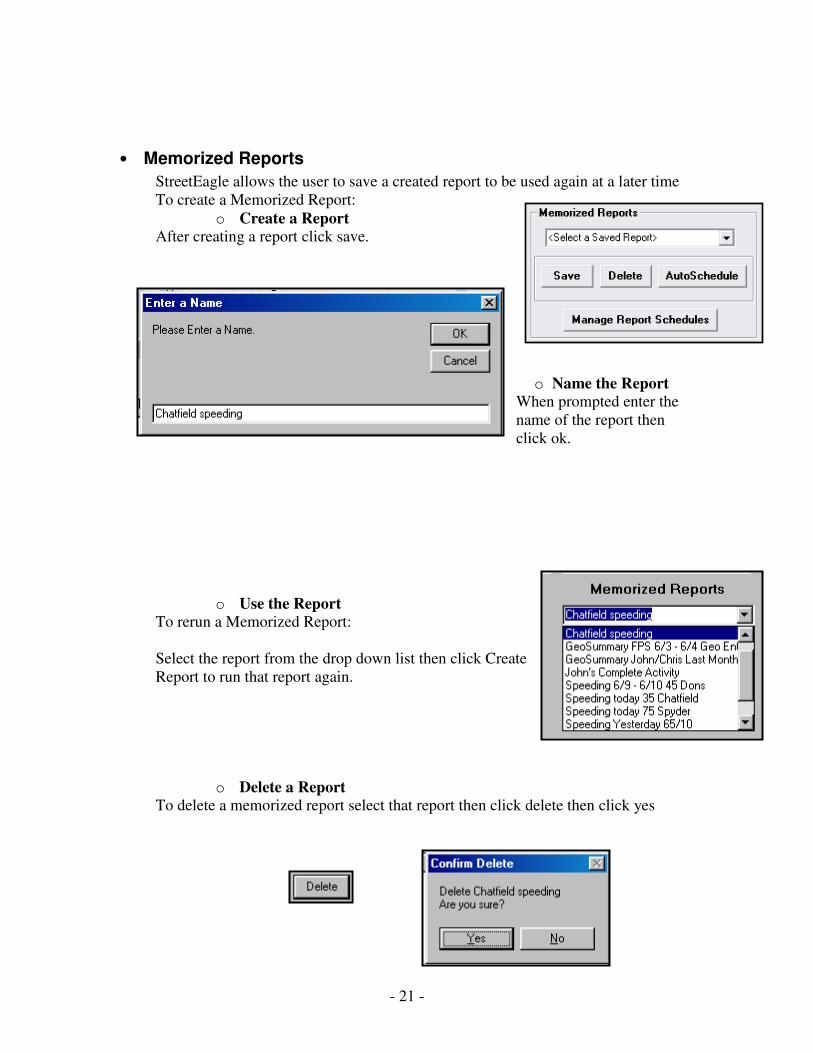
• Memorized Reports
StreetEagle allows the user to save a created report to be used again at a later time
To create a Memorized Report:
o Create a Report After creating a report click save.
o Name the Report When prompted enter the
name of the report then
click ok.
o Use the Report To rerun a Memorized Report:
Select the report from the drop down list then click Create
Report to run that report again.
o Delete a Report To delete a memorized report select that report then click delete then click yes

- 22 -
•••• Schedule Reports to Email StreetEagle allows users to receive scheduled emails of reports on selected vehicles
between selected times. o Create a Report
(Refer to ‘Memorized Reports’ on pg 21)
o Click AutoShedule
o Features in Schedule Reports to Email
1. ‘Add, edit, delete, disable, clone’ allows user to modify, add, copy, and disable
scheduled reports o Add allows users to add a memorized report and set
a time for a new o Edit allows users to edit the contacts, name and
- 23 -
Types of Reports
In the StreetReporter window select a specific Report Type form the dropdown list.
Select the desired dates and vehicles then set the necessary parameters then click
Create Report and a report will appear.
The following are types of reports the user may run:
Management Reports
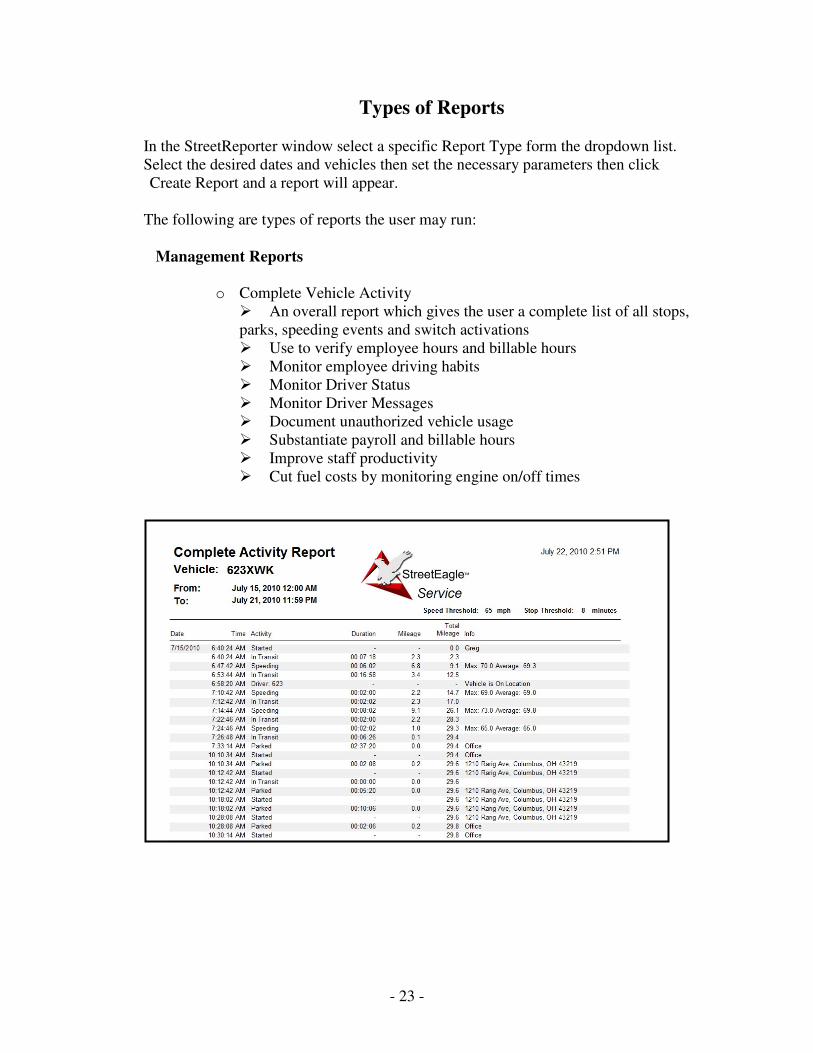
o Complete Vehicle Activity
� An overall report which gives the user a complete list of all stops,
parks, speeding events and switch activations
� Use to verify employee hours and billable hours
� Monitor employee driving habits
� Monitor Driver Status
� Monitor Driver Messages
� Document unauthorized vehicle usage
� Substantiate payroll and billable hours
� Improve staff productivity
� Cut fuel costs by monitoring engine on/off times

- 24 -
o Complete Activity Summary (StreetEagle Standard)
� Summarizes all vehicle activity over a specified period of time
� Shows total amount of time for stops, parks, speeding events, time
in transit and the total mileage
� Also gives percentage of time spent for each activity
o Vehicle Idling
� An easy way to tell if your employees are letting their engines run
for extended periods of time
� Decrease fuel cost by cutting waste
� Reduce maintenance costs by eliminating unnecessary engine use
� Use in employee performance reviews to reward conscientious
drivers and improve performance of drivers not consistently
following company policies
� Threshold for idling is adjustable to suit your specific situation

- 25 -
o Vehicle Idling Summary (StreetEagle Standard)
� Summarizes amount of time a vehicle spent idling over a specified
period of time
� Shows total engine operation time, time in transit, stopped/idling
time, percentage of time stopped/idling and percentage of time in
transit
o Parked/Stop
� “At-a-glance” report showing addresses for all vehicle starting and
stopping points for a specific period of time
� Use as an Automatic Time Clock to monitor actual hours worked
by employees in a given period
� Decrease overtime and improve efficiency of your mobile
workforce
� Reports can be faxed or emailed to clients to substantiate disputes
over billable hours, employee arrival and departure times, etc.
- 26 -
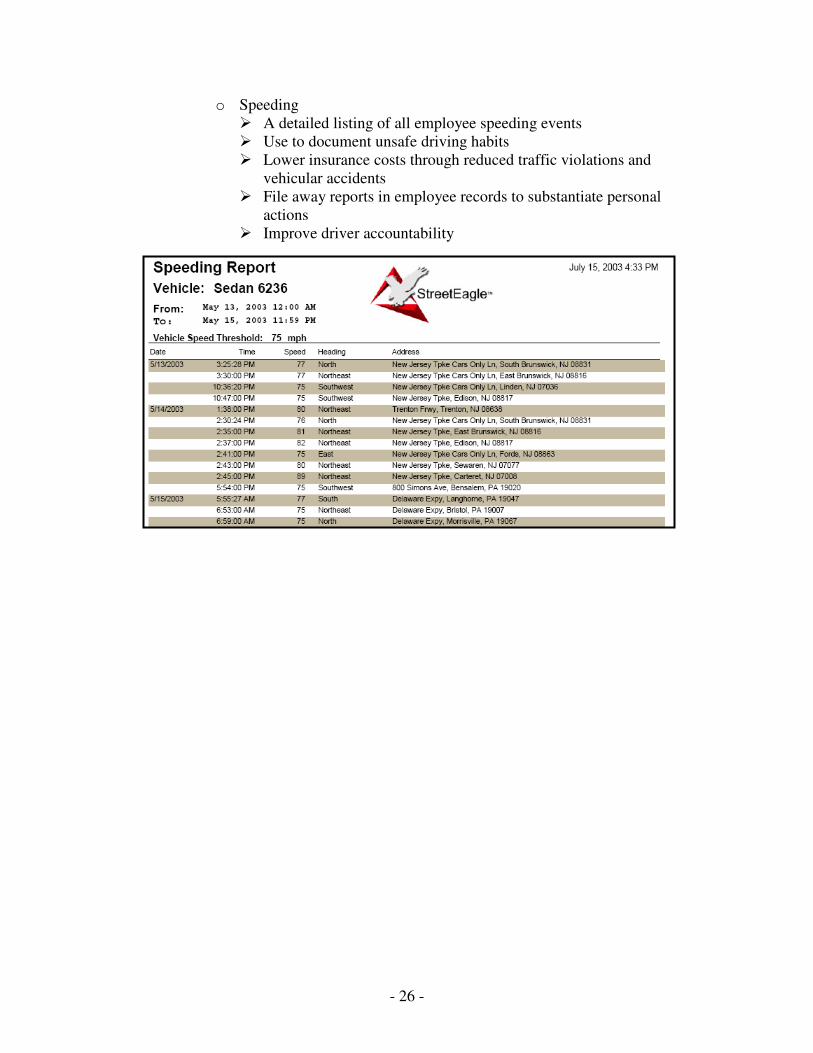
o Speeding
� A detailed listing of all employee speeding events
� Use to document unsafe driving habits
� Lower insurance costs through reduced traffic violations and
vehicular accidents
� File away reports in employee records to substantiate personal
actions
� Improve driver accountability
- 27 -
Advanced Reports o Service Reports
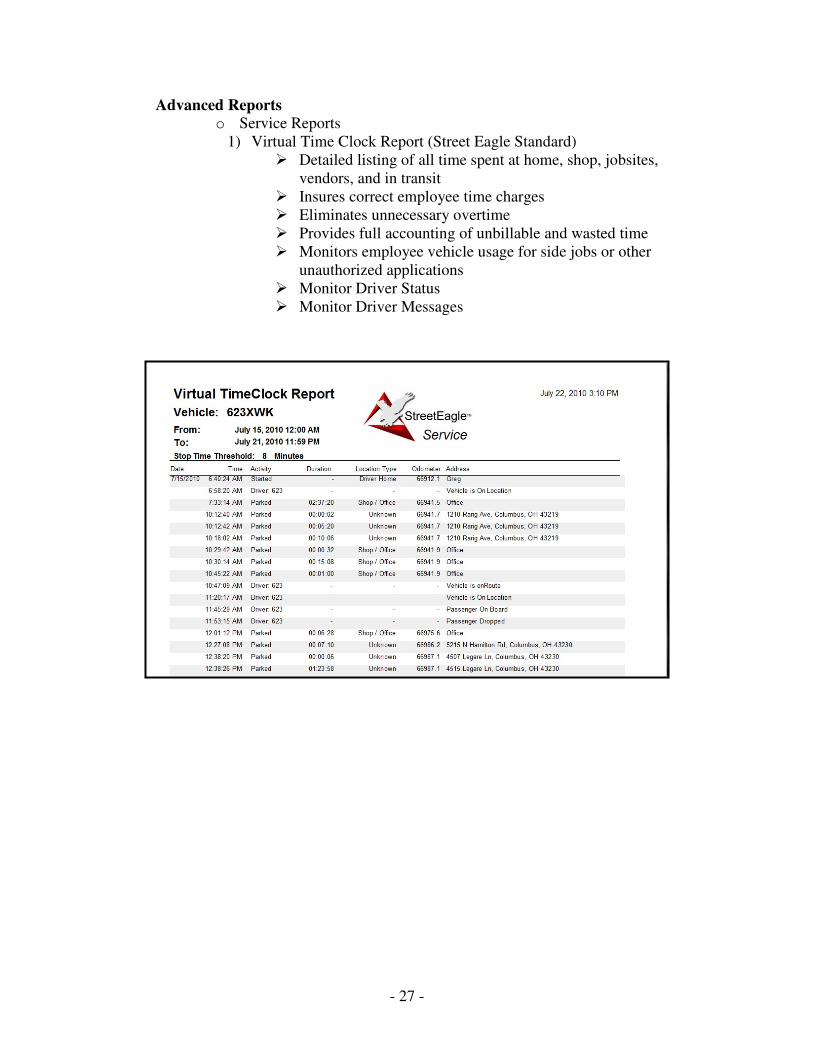
1) Virtual Time Clock Report (Street Eagle Standard)
� Detailed listing of all time spent at home, shop, jobsites,
vendors, and in transit
� Insures correct employee time charges
� Eliminates unnecessary overtime
� Provides full accounting of unbillable and wasted time
� Monitors employee vehicle usage for side jobs or other
unauthorized applications
� Monitor Driver Status
� Monitor Driver Messages
- 28 -
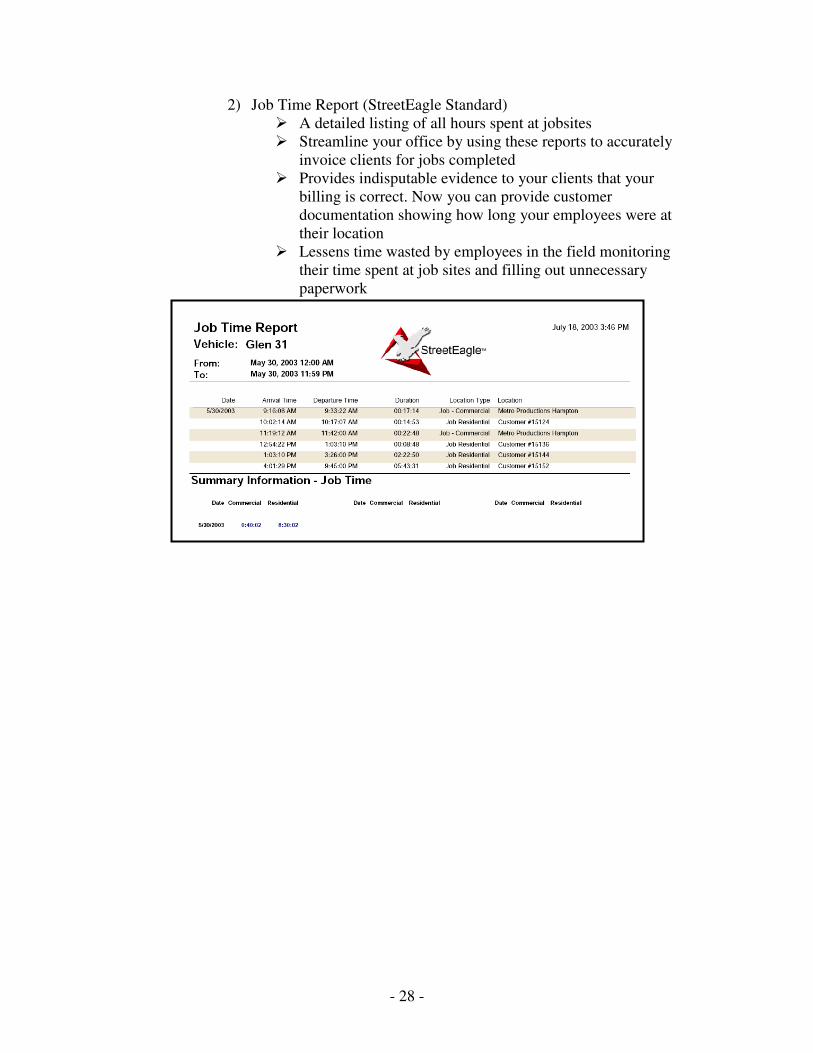
2) Job Time Report (StreetEagle Standard)
� A detailed listing of all hours spent at jobsites
� Streamline your office by using these reports to accurately
invoice clients for jobs completed
� Provides indisputable evidence to your clients that your
billing is correct. Now you can provide customer
documentation showing how long your employees were at
their location
� Lessens time wasted by employees in the field monitoring
their time spent at job sites and filling out unnecessary
paperwork

- 29 -
Limo Reports
1) Driver Arrival (StreetEagle Standard)
� Provides a complete listing of “friendly location” based driver
arrival and departure times
� Allows you to enter the names of frequent locations and the
report will list them by the names you designate
� Comes complete with all major local airport names and locations
pre-entered for your convenience
� Modules available with pre-entered major hotels, restaurants and
nightclubs.
� We can also pre-enter your client base, pricing for this service is
dependent upon quantities
2) Customer Pick-up/Drop-off (StreetEagle Standard)
� A detailed listing of all client door actuator events
� Use to document exact client pick-up/drop-off times
� When used in conjunction with the Driver Arrival report, this
report is a great way to show your client if your driver was on
time and the client was late
� File away for future use to document the quality of your service
to a client when negotiating new contracts

- 30 -
Waste Management
1) Collection Report (StreetEagle Standard)
� Provides a complete listing of collection times and locations.
� Eliminate unauthorized pick-ups and “side work”
� Allows you to enter the names of frequent locations and the
report will list them by the names you designate
� Determine at a glance, which collections have been completed
and which remain undone
� We can also pre-enter your client base, pricing for this service
depends upon quantities

- 31 -
Fuel Tax Report
� Provides a listing of miles traveled within states
� Viewed by dates and or states
� Eliminates need for mileage sheets
Day By Day
State Only

- 32 -
(StreetEagle Advanced)
Loceight Fleet Report
� Provides a list of the last known location of each Loceight Asset in the
fleet
� Provides Date/Time
� Provides motion information if in motion and the speed
� Provides which Geofence the Loceight Asset is within.

- 33 -
(StreetEagle Advanced)
Loceight IO Report
� Provides the accumulated hours of each I/O used.
� Provides the Last Location by address
� Provides reports day by day
(StreetEagle Advanced)
Loceight Asset History Report
� Provides the history report of the Asset’s activity
� Provides the Location, Motion, Address, Latitude/Longitude, and which
Geofence the Asset may be Within
� Provides reports day by day
- 34 -
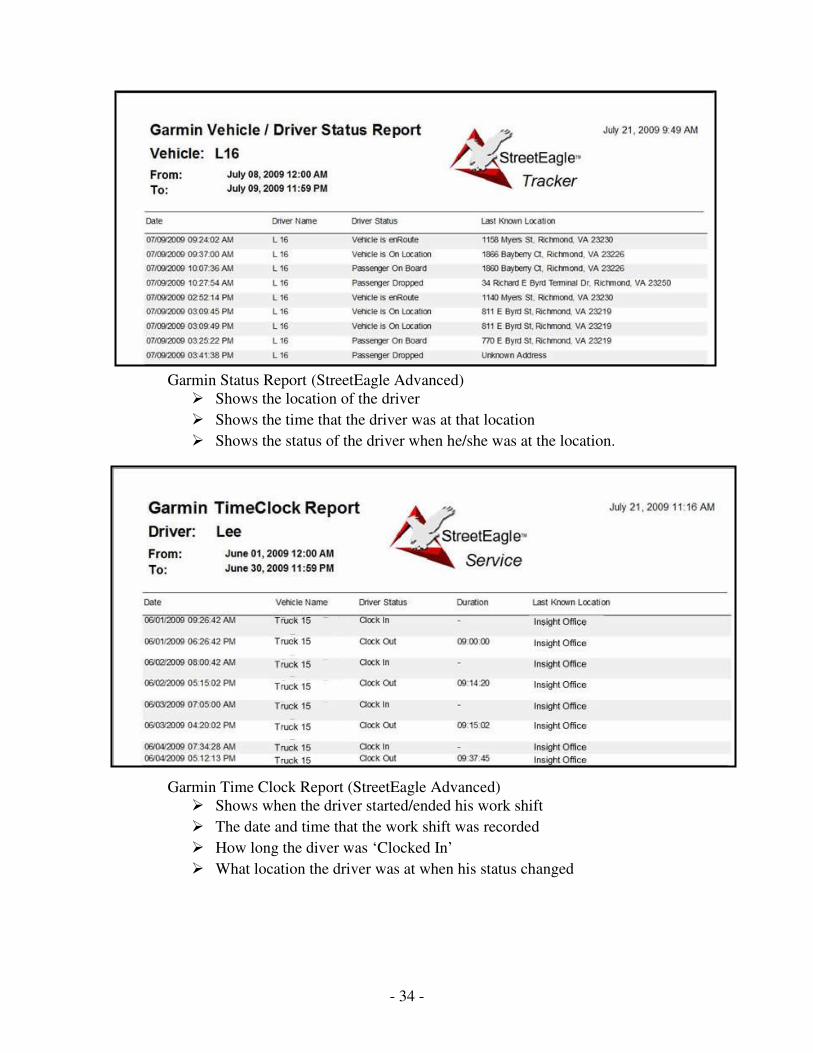
Garmin Status Report (StreetEagle Advanced)
� Shows the location of the driver
� Shows the time that the driver was at that location
� Shows the status of the driver when he/she was at the location.
Garmin Time Clock Report (StreetEagle Advanced)
� Shows when the driver started/ended his work shift
� The date and time that the work shift was recorded
� How long the diver was ‘Clocked In’
� What location the driver was at when his status changed

- 35 -
Data Export (StreetEagle Standard)
� Shows a complete data information update
� Displays the date and time that the information was recorded
� Allows the user to view the latitude and longitude of the vehicle
� Shows the speed and what direction the vehicle was heading
� Displays the address that the vehicle was at when the information was
gathered

- 36 -
• Geographic Analysis Report (StreetEagle Advanced)
StreetEagle can be used to verify an employee’s
whereabouts in relation to a jobsite
To create a GeoAnalysis report:
Select GeoAnalysis Report in the dropdown list
of general reports.
o Select Vehicles and a Time Period Select vehicles (Refer to how to use reports page 17) to run in the report, and a time
period (refer to How to view vehicle and asset location history page 6) for which to
run the report during.
o Select the Location Select the type area from
Locations or Geofences.
Use the dropdown list to select specific locations
or Geofences that the user has preset.
o Create the Report Click Create a report to view the arrival and departure time for each vehicle to the
specified area or jobsite.

- 37 -
G. How to View on Screen Notifications StreetEagle can be used to visually notify the user of vehicle status on the Map
point display
To use the on screen notifications:
In the StreetEagle tracker control window click the On Screen Notifications button.
Click show settings to adjust for the alerts you would like to see in
the Vehicle status monitor.
1. Select Settings
Check Follow and MapPoint will automatically center on the last notification.
To stop all sound check Mute.
Check the settings
to show specific
alerts in the
vehicle status
monitor.
To hear when an
alert is activated
place checks in
the sound column
for the individual
alerts.
2. Adjust Parameters
The user can adjust the amount of time
for the vehicle to report after idling or
being parked, and the user can adjust
how often the vehicle should report.
The user can also specify the
speed limit for the vehicle to
report.
Click Apply Changes to save the new settings.
3. Hide
To hide the settings click the Hide Settings button.
Maximum Lines in Buffer
adjusts how many total lines
the user can scroll through (up
to 99 lines).
- 38 -
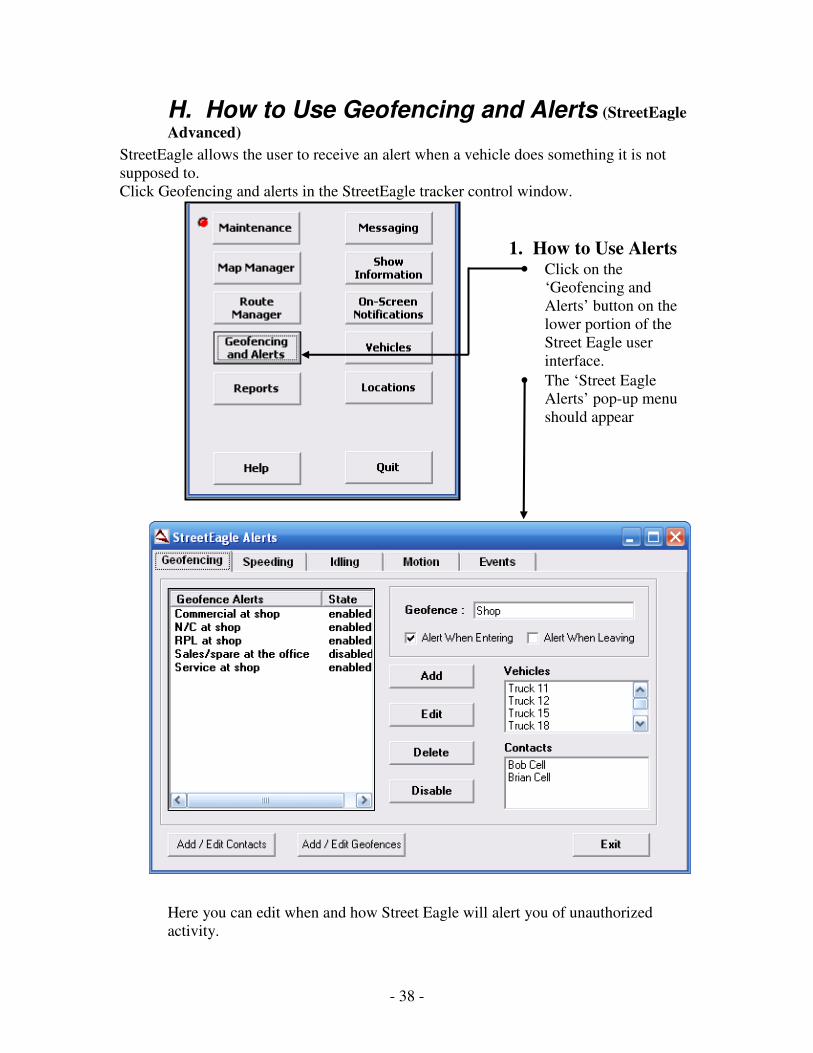
H. How to Use Geofencing and Alerts (StreetEagle
Advanced)
StreetEagle allows the user to receive an alert when a vehicle does something it is not
supposed to.
Click Geofencing and alerts in the StreetEagle tracker control window.
1. How to Use Alerts • Click on the
‘Geofencing and
Alerts’ button on the
lower portion of the
Street Eagle user
interface.
• The ‘Street Eagle
Alerts’ pop-up menu
should appear
Here you can edit when and how Street Eagle will alert you of unauthorized
activity.

- 39 -
Street Eagle Alerts Interface
• Geofence Window This menu displays all of your current Geofencing alerts. The
left column contains the names of all the current alerts, and the right column specifies
whether that geofence is enabled or disabled.
• Managing your Geofences Click on the ‘Add / Edit Geofences’ button to manage
your geofences.
• Managing your Contacts Left click on the ‘Add / Edit Contacts’ button to manage
your contacts.
• Vehicles Window Displays all of the vehicles assigned to the specified Geofence
alert.
• Contacts Displays who to contact in the event an alert is triggered.
• Selected Geofence Displays the geofence used with the selected alert. You can tell
Street Eagle to notify the contacts verified in the contacts window when the assigned
vehicle enters or leaves the assigned geofence by selecting the appropriate box.

- 40 -
Creating a Geofence To create a geofence, you must left click on the ‘Add / Edit Geofences’ button. This will
bring up the Geofence menu.
• Displays all of your current Geofences by
name, Latitude and Longitude coordinates,
and the type of area the geofence covers.
• Displays all geofences on the visual map.
• Displays the information on the currently
selected geofence.
• These commands allow you to add a new
geofence or edit any a geofence that already
exists.
To begin creating a geofence, left click on
the ‘Add’ button. This will cause all of the data
fields below to open up. You will then have
several options on how you want to create your
geofence.
You may choose to:
• Add Geofence Using Visual Geofence
Mapping Tools Use the tools from Microsoft Map Point to
create a Geofence or with Bing hold down
the Shift Key and drag your mouse on the
map to draw the radius or square.
• Enter the Street Address Enter the desired Street Address as a
geofence.
• Enter the Coordinates Enter the latitude and longitude coordinates
of your geofence.
• If you choose to use the Mapping tools, you can use the toolbar located at the
bottom of the Map Point window. Use the rectangular drawing tool to create a
rectangular geofence, or use the Circle tool to create a circular geofence.
• If you entered the position of your geofence, you will then be able to select
whether the geofence will be circular or rectangular by either inputting the
radius or the height and width of the selected area. Once done, left click the
‘Apply’ button.

- 41 -
Adding/Editing/Deleting Contacts
Within each separate alert section the user may have different contacts after selecting
an alert type click Add/Edit Contacts
•••• To Add a Contact
• Click Add.
• Enter the contact name.
• Select how to receive the alert
• To receive a text message select
text message then enter a phone
number (leaving the dashes out for
example 2404187369 is correct
240-418-7369 would be incorrect)
• Using the drop down list, select the
service provider.
• To Receive an E-Mail, select E-
Mail, then enter an E-Mail address.
• (Note: To receive both an E-Mail
and a Text Message you must set up
two separate contacts)
• Click Apply to save the changes
•••• To Edit a Contact
Select the contact from the list then click edit to change the
name, phone number/provider or the E-Mail address
Click Apply to save the changes
•••• To Delete a Contact
Select the contact from the list then click Delete
Click Apply to save changes
(Note: Left clicking the ‘Cancel’ button at any time will cancel out of the Add / Edit
process, however if you delete a contact, you will have to input the information again.)
Once all of your contact data has been set, click ‘Done’ to go to the previous menu.

- 42 -
Creating an Alert
• By clicking on the ‘Add’ button on your
Street Eagle Alerts menu, you will be
prompted to name your alert. When you are
done, left click the ‘next’ button.
• Now you will select which vehicles to
assign to the alert.
• To begin, click on the desired vehicle.
• Then click on the right arrow button. You
can add as many of the vehicles as want.
• You may also click the ‘Add all’ button if
you wish to make all the vehicles follow the
alert. Once done click ‘next’.
• Now you can select which contacts to
notify when the specified conditions for
the alert are met.
• Check the box next to the desired
contact to add them to the notification
list.
• Once done click next
• Next the program will require you to
select you settings for the current alert.
• Each alert has different settings.
• Once you have selected your desired
settings, click ‘Finish’ to finalize the
wizard.

- 43 -
Creating a New Geofence Alert Creating a geofence alert allows the user to monitor selected vehicles and alert them if
they enter or leave a designated area.
• This menu allows you select a
pre-made geofence, or allow you
to create a new one. Refer back
to Creating a Geofence on the
steps necessary to create a
geofence.
• You may also select whether the
alert will notify you of the
selected vehicle leaving, or
entering the designated area.
Creating a New Speeding Alert Creating a speeding alert will allow you to monitor when an assigned vehicle has gone
over the desired speed threshold.
• This menu allows you to input the
desired speed threshold, and
whether the contact will be
notified everytime this happens.
The threshold is basically the
limit to how fast you want the
driver of the vehicle to go.
• Once done, click ‘Finish’.
Creating a New Idling Alert Creating an idling alert allows you to notify selected contacts when the selected
vehicle(s) idles for too long.
• Now you may input the allowed
time the assigned vehicles can
idle before the alert is activated,
and how often the alert will report
after being activated.
• Once done, click ‘Finish’.

- 44 -
Creating a Motion Alert Creating a motion alert allows the selected contact to be notified when the selected
vehicle(s) is in use after work hours, on the weekends, or the first movement of the day.
• You can input whether this alarm
will activate if the assigned vehicles
move on the weekends and/or after
work hours. You may also select
the time range that if exceeded, will
activate the alert.
• Once done, click ‘Finish’.
Creating an Event Alert Creating an event alert allows the selected contacts to be notified when a PTO has been
used. These are preset actions the user selects when purchasing a VTU. These events
can be anything from a pump or a lift, to a mixer on a truck.
• You can input the desired events
will be. You can input the discrete
name of event(s) you want to
monitor. You may also determine if
you want the alert to notify the
specified contact(s) once the
event(s) have been cleared, or no
longer activated.
• Once done, click ‘Finish
- 45 -
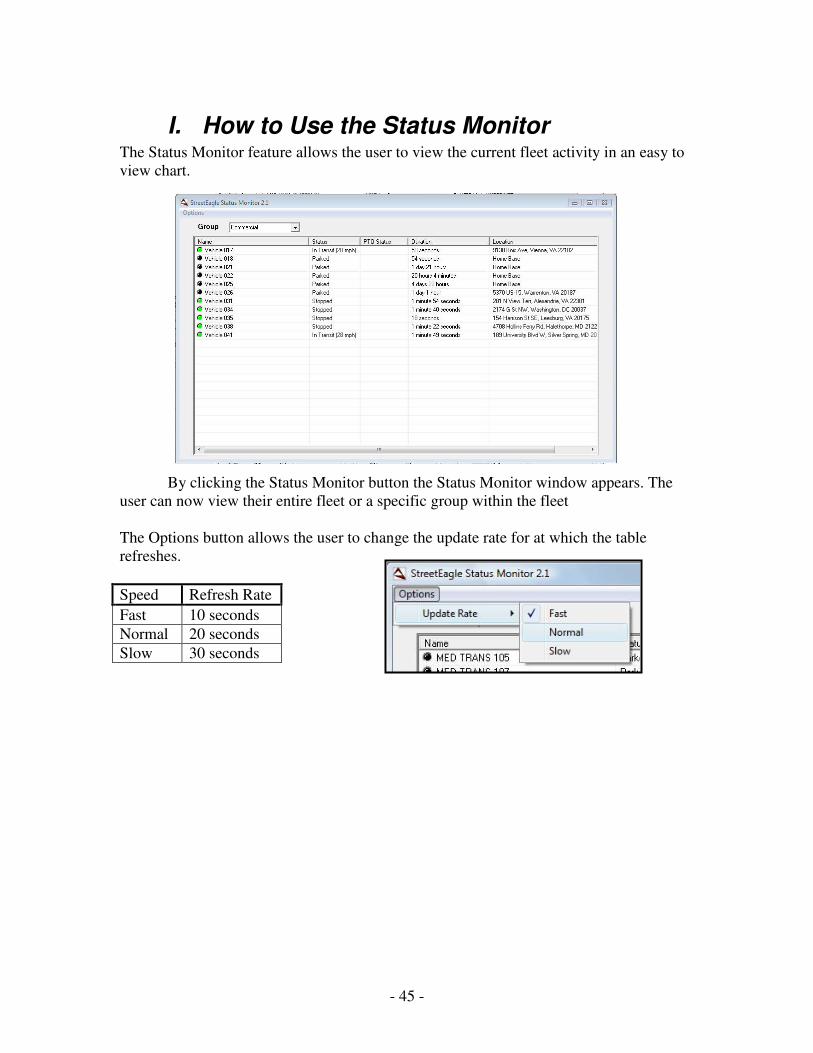
I. How to Use the Status Monitor The Status Monitor feature allows the user to view the current fleet activity in an easy to
view chart.
By clicking the Status Monitor button the Status Monitor window appears. The
user can now view their entire fleet or a specific group within the fleet
The Options button allows the user to change the update rate for at which the table
refreshes.
Speed Refresh Rate
Fast 10 seconds
Normal 20 seconds
Slow 30 seconds

- 46 -
J. How to Send Email The Send Email button allows the user to send an Email or Text message from
StreetEagle to any contact.
Click the Send Email button to open the Send Message Window. From this window the
select the contact or contacts to send a message to. (Refer to Add/Edit contacts in the
Geofencing and Alerts section Page 32). Then enter a subject for the message, and the
body of the message. To send the message simply click the Send Message button, or to
quit without sending click the Close/Cancel button.
The Garmin Message tab is used to send the messages to multiple Garmin enabled
vehicles.
- 47 -
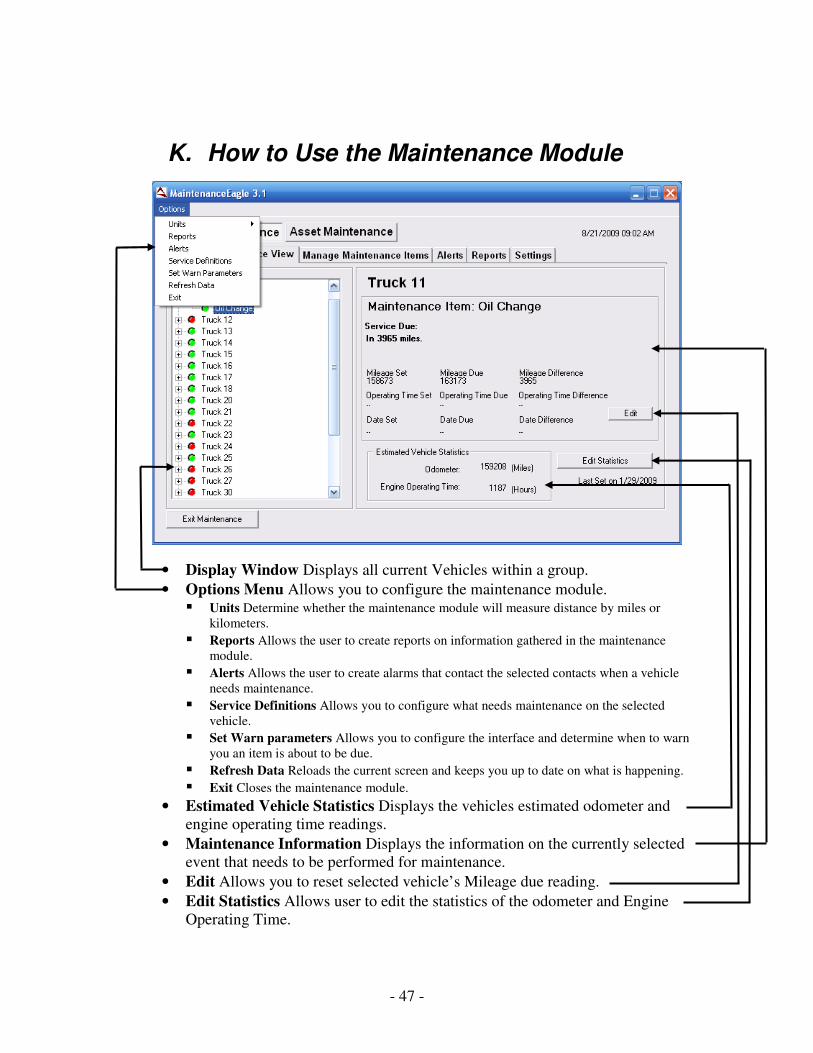
K. How to Use the Maintenance Module
• Display Window Displays all current Vehicles within a group. • Options Menu Allows you to configure the maintenance module.
� Units Determine whether the maintenance module will measure distance by miles or
kilometers.
� Reports Allows the user to create reports on information gathered in the maintenance
module.
� Alerts Allows the user to create alarms that contact the selected contacts when a vehicle
needs maintenance.
� Service Definitions Allows you to configure what needs maintenance on the selected
vehicle.
� Set Warn parameters Allows you to configure the interface and determine when to warn
you an item is about to be due.
� Refresh Data Reloads the current screen and keeps you up to date on what is happening.
� Exit Closes the maintenance module.
• Estimated Vehicle Statistics Displays the vehicles estimated odometer and
engine operating time readings. • Maintenance Information Displays the information on the currently selected
event that needs to be performed for maintenance. • Edit Allows you to reset selected vehicle’s Mileage due reading. • Edit Statistics Allows user to edit the statistics of the odometer and Engine
Operating Time.

- 48 -
I. Vehicle Maintenance Module
Creating a Maintenance Report The maintenance module allows the user to generate a summary of all maintenance
actions over a set period of time.
To create a maintenance report:
• Select ‘Reports’ from the options menu.
• The report generator will appear. Here
you can create a report that will give
you a list of all the vehicles that need
the required action, and when the due
date of the maintenance will be.
• You may also select the range of time
in the report. You may set your own
time period if necessary.
• You may also enter how many miles
the vehicles obtain daily, or how many
hours a day the vehicle is in use.
Creating a Maintenance Alert The maintenance module allows the user to create alerts, which are similar to the alerts in
the ‘Geofencing and Alerts’ section. These reports notify the selected contacts when a
service item is due.
To create an alert:
• Select ‘Alerts’ from the options menu.
• Here you can modify your alerts. You
may add, edit or delete your alerts by
clicking on the respective buttons.
• When you add an alert, you will be able
to name it, then select which people are to
be contacted, and finally you may select
from an existing service item which
vehicles will be in this alert.
• If necessary, you may also add or edit
your contacts list.
• You may also select whether the contact
will be notified only once by e-mail, or
multiple times at a continuous rate until
the service item is completed.
• When done, click ‘Exit’.

- 49 -
Setting Warn Parameters With the maintenance module, you may create warning parameters, which are general
reminders of the service items that will soon be due.
To set your warning parameters:
1. Select ‘Warning Parameters’
from the options menu. 2. The ‘Icon / Warn Parameters’
menu should appear. Here you
can change the color of the
bubbles located next to each
service item. For instance for a
service item that is due, you
can change the color to be red,
which will appear in the
interface. 3. The next set of options allows
you to set when you want the
module to warn you of a
service item. 4. For instance, if you have a
service item such as ‘wash
truck’ and it is set to be completed every 300 miles, if you input 50 miles into the
miles box located in this menu, once your vehicle gets within 50 miles of the desired
mileage, the bubble next to the service item will turn to the desired color, giving a
warning that the service item is soon due.
- 50 -
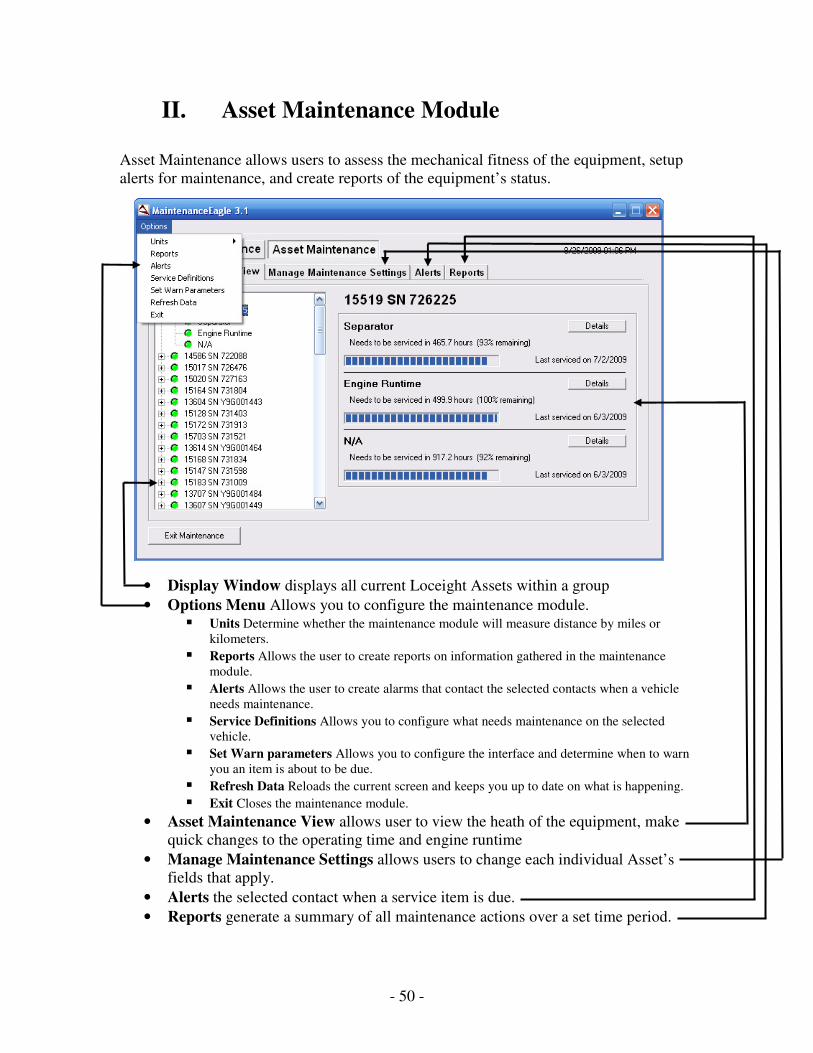
II. Asset Maintenance Module
Asset Maintenance allows users to assess the mechanical fitness of the equipment, setup
alerts for maintenance, and create reports of the equipment’s status.
• Display Window displays all current Loceight Assets within a group • Options Menu Allows you to configure the maintenance module.
� Units Determine whether the maintenance module will measure distance by miles or
kilometers.
� Reports Allows the user to create reports on information gathered in the maintenance
module.
� Alerts Allows the user to create alarms that contact the selected contacts when a vehicle
needs maintenance.
� Service Definitions Allows you to configure what needs maintenance on the selected
vehicle.
� Set Warn parameters Allows you to configure the interface and determine when to warn
you an item is about to be due.
� Refresh Data Reloads the current screen and keeps you up to date on what is happening.
� Exit Closes the maintenance module.
• Asset Maintenance View allows user to view the heath of the equipment, make
quick changes to the operating time and engine runtime • Manage Maintenance Settings allows users to change each individual Asset’s
fields that apply. • Alerts the selected contact when a service item is due. • Reports generate a summary of all maintenance actions over a set time period.

- 51 -
Create Input Labels for Assets
• Go to vehicle List • Select an Asset • Click edit • Create the Input Labels for each input used for each Asset • Click the update button to save the information.
Editing the Runtime Duration Thresholds and Total Runtime
• Select the ‘Maintenance’ button • Click the ‘Asset Maintenance Settings’ tab • Enter the hours of Runtime Duration Threshold, and Total runtime on
Item. • Click ‘Save Settings’ button

- 52 -
Creating an Asset Report The maintenance module allows the user to generate a summary of all maintenance
actions over a set period of time.
To create a report of Assets:
• Select ‘Reports’ tab
• The asset reporter will appear. Here you
can create a report of the selected assets
status, and when the due date of service
will be.
• Select the dropdown, for the ‘Report
Type’
• Select the desired Assets
• Select ‘Generate Report’ button
The Asset Maintenance Status Report will be created for the desired assets. The report
will provide the health percentage, last service date, estimated service date, health rating,
and Location Address/Geofence for each asset.

- 53 -
Creating an Asset Alert The maintenance module allows the user to create alerts, which are similar to the alerts in
the ‘Geofencing and Alerts’ section. These reports notify the selected contacts when a
service item is due.
To create an alert:
• Select ‘Alerts’ tab in the Asset Maintenance
Module.
• When you add an alert, you will be able to
name it, and then select which people are to
be contacted. Finally you may select from
an existing service item which Asset will be
in this alert.
• If necessary, you may also add or edit your
contacts list.
• You may also select whether the contact will
be notified only once by e-mail, or multiple
times at a continuous rate until the service
item is completed.
• When done, click ‘Exit’.
Setting Asset Warning Parameters With the maintenance module, you may create warning parameters, which are general
reminders of the service items that will soon be due.
To set your warning parameters:
1. Select ‘Warning Parameters’
from the options menu. 2. The ‘Icon / Warn Parameters’
menu should appear. Here you
can change the color of the
bubbles located next to each
service item. For instance for a
service item that is due, you can
change the color to be red, which
will appear in the interface. 3. The next set of options allows
you to set when you want the
module to warn you of a service
item. 4. For instance, if you have a
service item such as ‘wash truck’
and it is set to be completed every 300 miles, if you input 50 miles into the miles box
located in this menu, once your vehicle gets within 50 miles of the desired mileage,
the bubble next to the service item will turn to the desired color, giving a warning that
the service item is soon due.
- 54 -
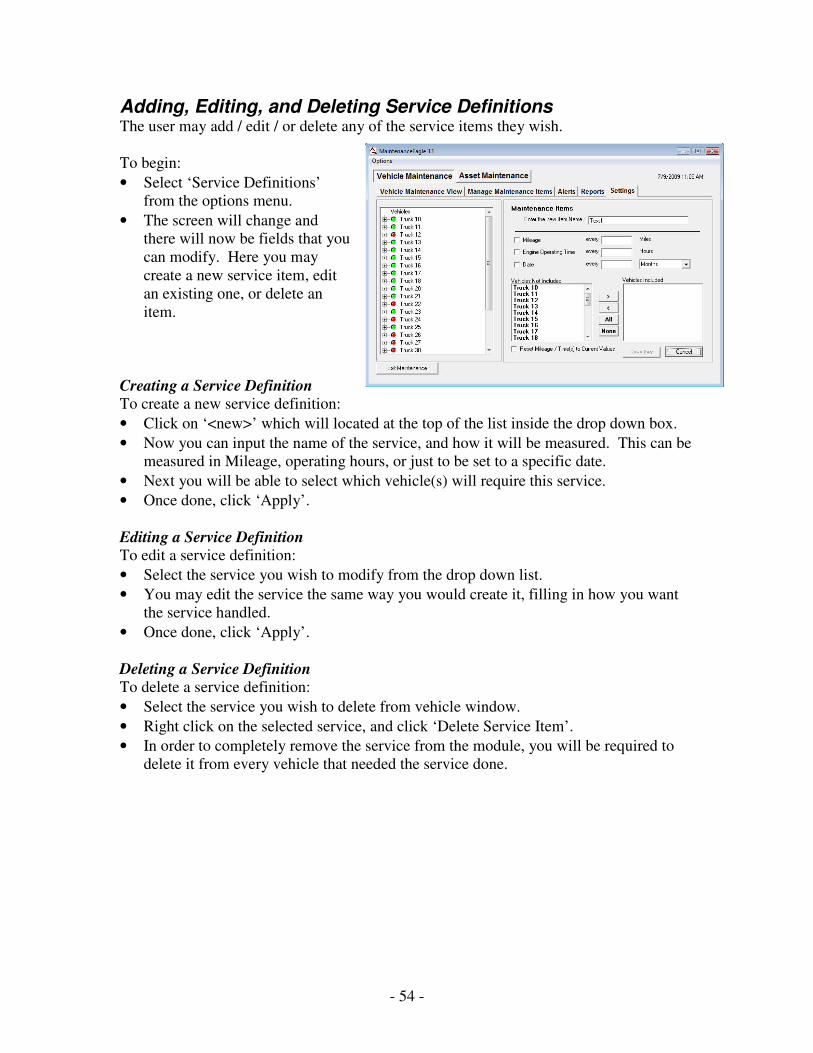
Adding, Editing, and Deleting Service Definitions The user may add / edit / or delete any of the service items they wish.
To begin:
• Select ‘Service Definitions’
from the options menu.
• The screen will change and
there will now be fields that you
can modify. Here you may
create a new service item, edit
an existing one, or delete an
item.
Creating a Service Definition To create a new service definition:
• Click on ‘<new>’ which will located at the top of the list inside the drop down box.
• Now you can input the name of the service, and how it will be measured. This can be
measured in Mileage, operating hours, or just to be set to a specific date.
• Next you will be able to select which vehicle(s) will require this service.
• Once done, click ‘Apply’.
Editing a Service Definition To edit a service definition:
• Select the service you wish to modify from the drop down list.
• You may edit the service the same way you would create it, filling in how you want
the service handled.
• Once done, click ‘Apply’.
Deleting a Service Definition To delete a service definition:
• Select the service you wish to delete from vehicle window.
• Right click on the selected service, and click ‘Delete Service Item’.
• In order to completely remove the service from the module, you will be required to
delete it from every vehicle that needed the service done.
- 55 -
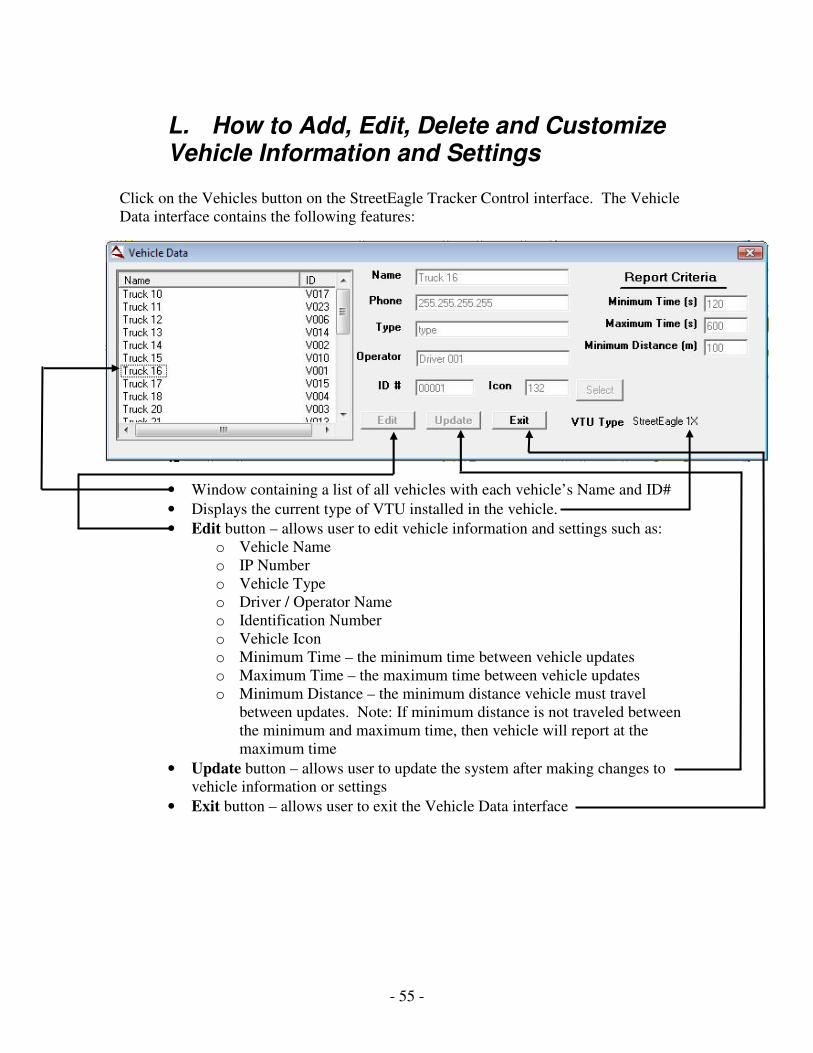
L. How to Add, Edit, Delete and Customize Vehicle Information and Settings
Click on the Vehicles button on the StreetEagle Tracker Control interface. The Vehicle
Data interface contains the following features:
• Window containing a list of all vehicles with each vehicle’s Name and ID#
• Displays the current type of VTU installed in the vehicle.
• Edit button – allows user to edit vehicle information and settings such as:
o Vehicle Name
o IP Number
o Vehicle Type
o Driver / Operator Name
o Identification Number
o Vehicle Icon
o Minimum Time – the minimum time between vehicle updates
o Maximum Time – the maximum time between vehicle updates
o Minimum Distance – the minimum distance vehicle must travel
between updates. Note: If minimum distance is not traveled between
the minimum and maximum time, then vehicle will report at the
maximum time
• Update button – allows user to update the system after making changes to
vehicle information or settings
• Exit button – allows user to exit the Vehicle Data interface

- 56 -
Editing Vehicle Information
To edit the information and settings of a vehicle:
• Click and highlight the desired vehicle under the Vehicles
List of the Vehicle Data interface. Note: The information
and settings of the highlighted vehicle will appear in
information text boxes on the Vehicle Data interface
• Click the Edit button
The user may edit the desired information and settings in each text box displayed.
To edit the Icon, click the Select button.
Select one of the following predefined icons from the chart
OR
Click on the Custom Icon button to select
a custom icon the user can import
Then click the OK button.
After the user has made all desired
changes to the vehicle information and
settings, click on the Update button in the
Vehicle Data interface to save and
implement the changes.
Click the Exit button to close the Vehicle Data interface
Adding and Deleting Vehicle Information To add or delete vehicles and vehicle information, contact Insight USA for assistance
- 57 -
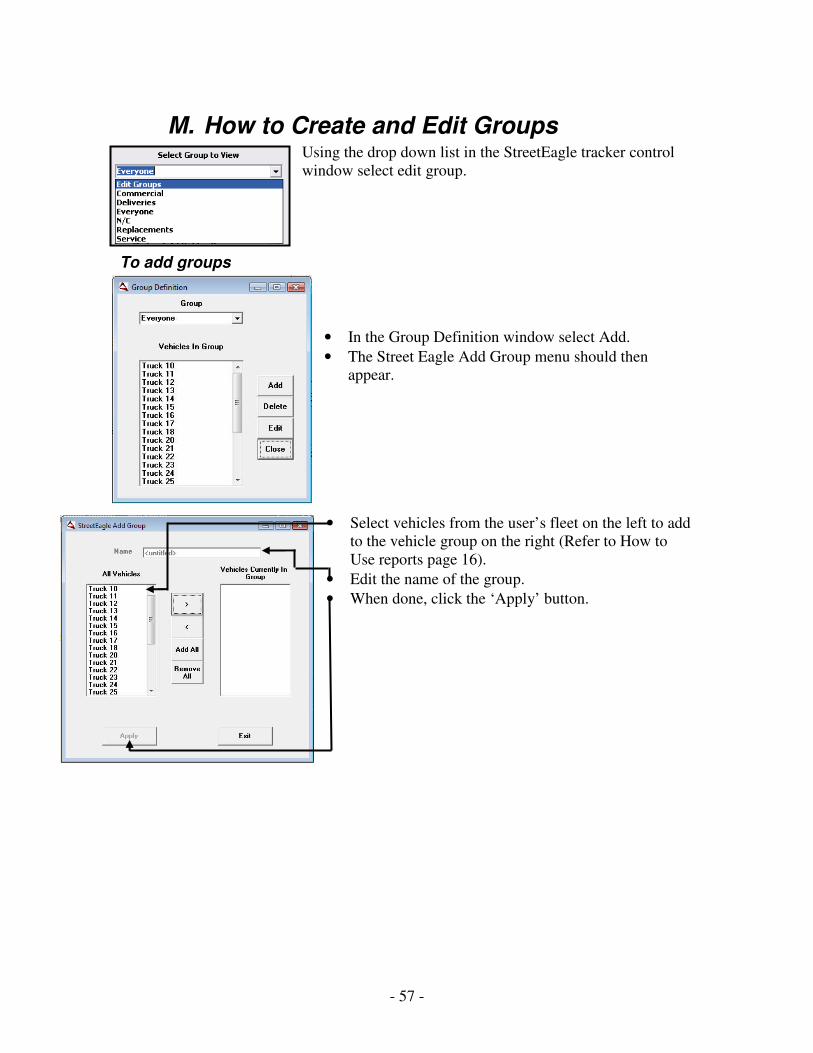
M. How to Create and Edit Groups Using the drop down list in the StreetEagle tracker control
window select edit group.
To add groups
• In the Group Definition window select Add.
• The Street Eagle Add Group menu should then
appear.
• Select vehicles from the user’s fleet on the left to add
to the vehicle group on the right (Refer to How to
Use reports page 16).
• Edit the name of the group.
• When done, click the ‘Apply’ button.

- 58 -
To Delete Groups • Select the group from the dropdown list.
• Then click the delete button.
• Then click the Yes button.
To Edit Groups • Select the group from the dropdown list.
• Click the edit button.
• Select vehicles to move into the group
(the group is on the right the user fleet is
on the left) or take them out (Refer to
How to Use reports page 16).
When done, click ‘Apply’ to save the
changes.
- 59 -
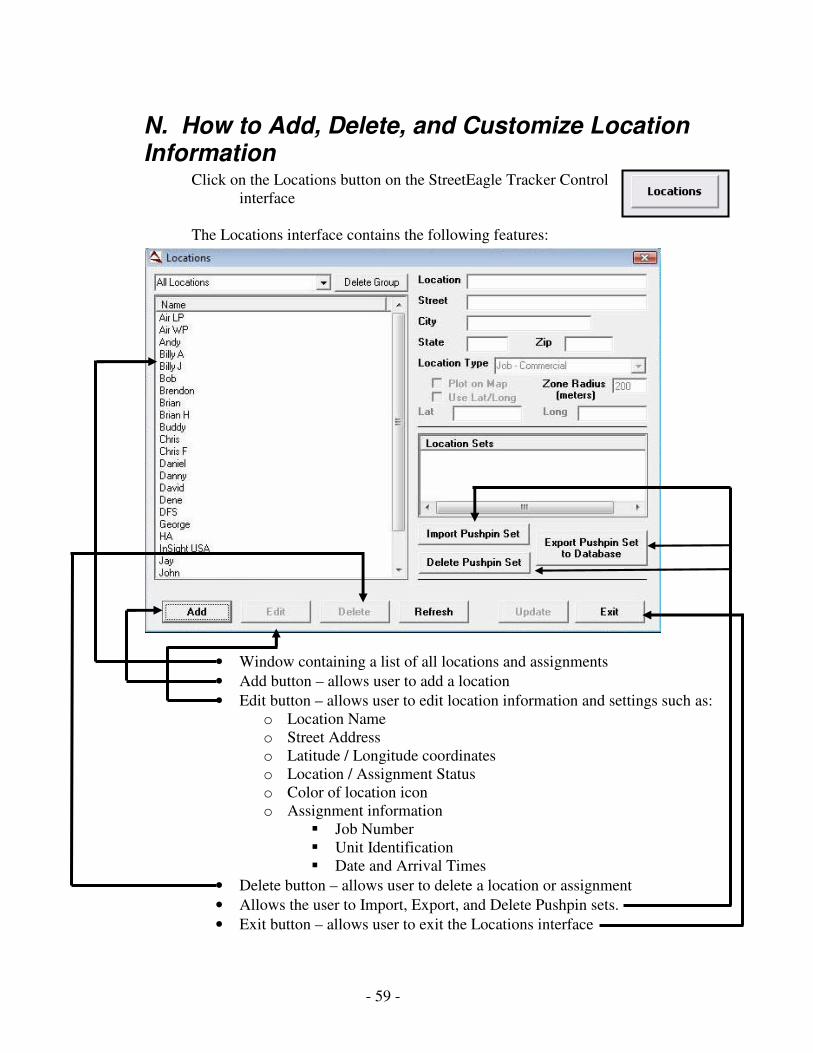
N. How to Add, Delete, and Customize Location Information
Click on the Locations button on the StreetEagle Tracker Control
interface
The Locations interface contains the following features:
• Window containing a list of all locations and assignments
• Add button – allows user to add a location
• Edit button – allows user to edit location information and settings such as:
o Location Name
o Street Address
o Latitude / Longitude coordinates
o Location / Assignment Status
o Color of location icon
o Assignment information
� Job Number
� Unit Identification
� Date and Arrival Times
• Delete button – allows user to delete a location or assignment
• Allows the user to Import, Export, and Delete Pushpin sets.
• Exit button – allows user to exit the Locations interface
- 60 -
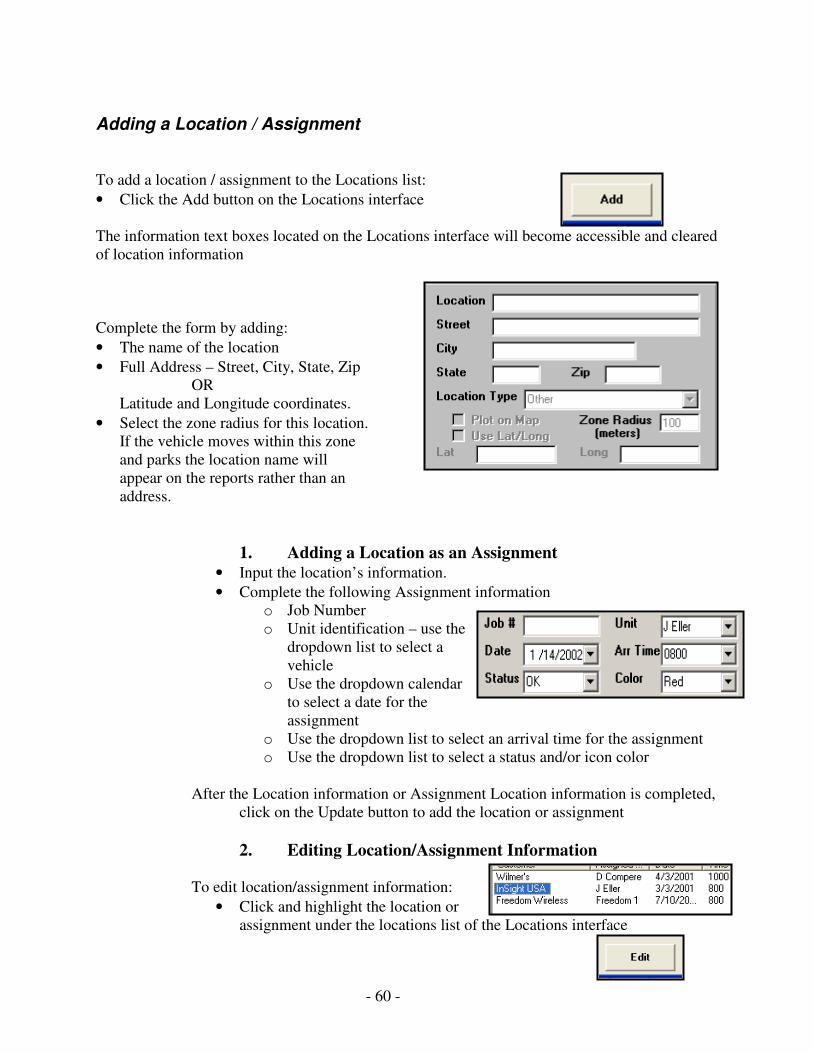
Adding a Location / Assignment
To add a location / assignment to the Locations list:
• Click the Add button on the Locations interface
The information text boxes located on the Locations interface will become accessible and cleared
of location information
Complete the form by adding:
• The name of the location
• Full Address – Street, City, State, Zip
OR
Latitude and Longitude coordinates.
• Select the zone radius for this location.
If the vehicle moves within this zone
and parks the location name will
appear on the reports rather than an
address.
1. Adding a Location as an Assignment • Input the location’s information.
• Complete the following Assignment information
o Job Number
o Unit identification – use the
dropdown list to select a
vehicle
o Use the dropdown calendar
to select a date for the
assignment
o Use the dropdown list to select an arrival time for the assignment
o Use the dropdown list to select a status and/or icon color
After the Location information or Assignment Location information is completed,
click on the Update button to add the location or assignment
2. Editing Location/Assignment Information
To edit location/assignment information:
• Click and highlight the location or
assignment under the locations list of the Locations interface

- 61 -
• Click the Edit button on the Locations interface
• Edit the desired information in the information text boxes
• After making all desired changes, click the Update button to update the
system with the changes
3. Deleting a location/Assignment
To delete a location or an assignment:
1. Click and highlight the location or assignment under the locations list of
the Locations interface
2. Click the Delete button on the Locations interface
3. The location will be removed from the map, the
list of locations in the Locations interface, and the Locations branch under
the Show Selection on Map window of the StreetEagle Tracker Control
window
4. Importing, Exporting, and Deleting Pushpin Sets To Import a pushpin set:
1. Click on the ‘Import Pushpin Set’
button
2. Now verify where the Excel file
containing the pushpin
data.
a. Your spreadsheet
must contain the
following columns
and column names:
Location City
Street State
Zip
3. Once opened the pushpin
set will now appear in the ‘Location Sets’ interface.
To take all the locations that are in the excel file you imported, select the
Location Set you wish to add to your location roster, and click the ‘Export
Pushpin Set’ button. This will make the new location set appear in the list
to your left.
To remove the pushpin set from your map, click the ‘Delete Pushpin Set’
button. This will remove all the pushpins from your Live View Map.

- 62 -
O. How to Specify Vehicle Information to View on a Map
The user may specify the vehicle information displayed on a
map by using the Vehicle Information box located on the
StreetEagle Tracker Control interface.
To specify the vehicle information shown on a map:
• Select from the following options:
o Name – displays a name next to vehicle icon
o All Information – displays the vehicle name,
current vehicle status, Date and Time of
current reporting status
o None – no information will be displayed next to the vehicle icon
• Click the Show button to implement the selected option
• Click ok to close the Vehicle Information window
Note: The selected vehicle information option will change the information
display for all vehicles displayed

- 63 -
P. How to Print Routes, Directions, Maps, and Reports
When printing either a route, set of directions, map, or report, the Print
interface will always be displayed with the following options:
• Printer destination selection
• Properties button – change the printing speed, quality, and order
• Current map view – allows user to print the area of the map currently
visible on the screen
• Driving directions only – allows user to print the turn-by-turn text
directions created by a route
• Turn-by-turn maps – allows user to print a separate map and directions for
each turn on the route calculated on the map
• Strip maps – allows user to print map segments with corresponding
directions for the route calculated on the map
• Selected area map – allows user to print a map of the area the user has
selected with the Select tool
• Highlighted places maps – allows user to print street-level maps with
associated text for each highlighted place or Pushpin on the map
• Portrait vs. Landscape – allows user to choose the orientation of the
printed text or map
• Title – user may title the map for future reference
• Map quality – user may specify the print quality of the map
• More Options – provides the user with the following display of print
options:
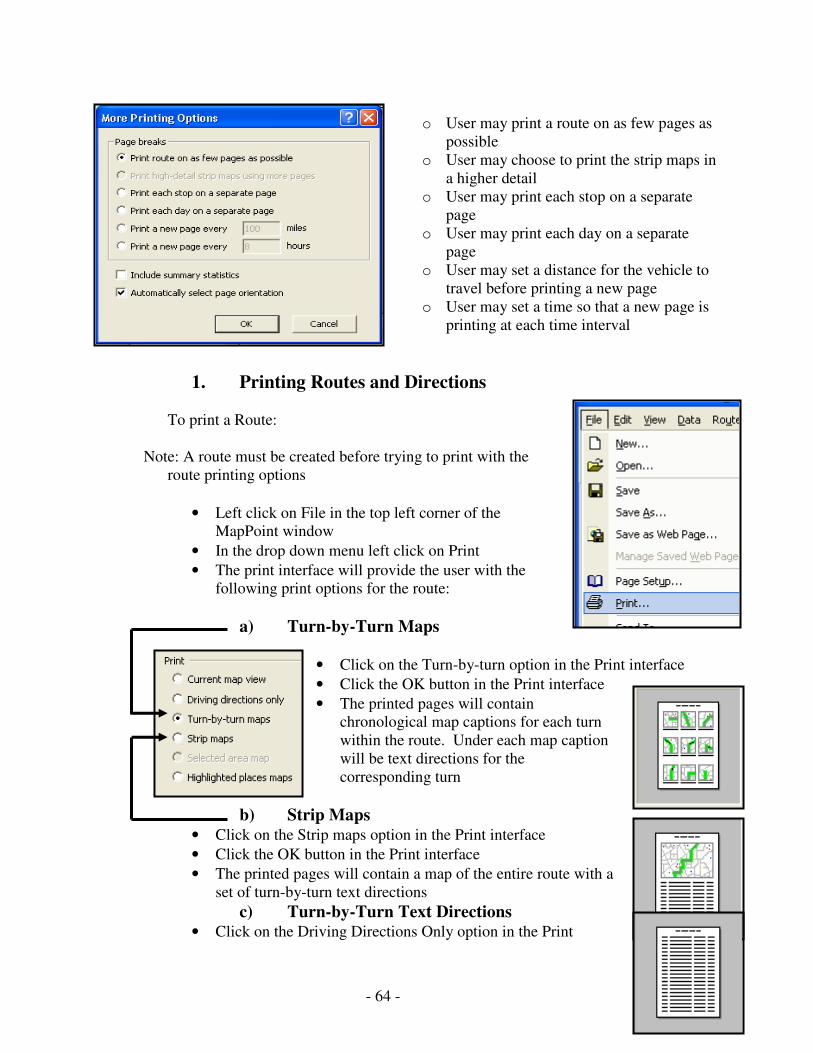
- 64 -
o User may print a route on as few pages as
possible
o User may choose to print the strip maps in
a higher detail
o User may print each stop on a separate
page
o User may print each day on a separate
page
o User may set a distance for the vehicle to
travel before printing a new page
o User may set a time so that a new page is
printing at each time interval
1. Printing Routes and Directions
To print a Route:
Note: A route must be created before trying to print with the
route printing options
• Left click on File in the top left corner of the
MapPoint window
• In the drop down menu left click on Print
• The print interface will provide the user with the
following print options for the route:
a) Turn-by-Turn Maps
• Click on the Turn-by-turn option in the Print interface
• Click the OK button in the Print interface
• The printed pages will contain
chronological map captions for each turn
within the route. Under each map caption
will be text directions for the
corresponding turn
b) Strip Maps • Click on the Strip maps option in the Print interface
• Click the OK button in the Print interface
• The printed pages will contain a map of the entire route with a
set of turn-by-turn text directions
c) Turn-by-Turn Text Directions • Click on the Driving Directions Only option in the Print

- 65 -
Interface
• Click the OK button in the Print interface
• The printed pages will contain a chronological list of directions from the
starting location to the ending location
2. Printing Reports
Note: To print a report, user must generate the report first
To print a report:
• The report will be displayed in a word processing window.
• Click on the printer icon in the top left corner of the word
processing window
• Users requested report will be printed in full length unless
user specifies the page range to print
3. Printing Maps
a) To Print the Map Currently Visible on the Screen:
• Left click on File in the top left corner of the
MapPoint window
• In the drop down menu left click on Print
• In the Print Interface, click on the Current Map
View option and then click OK to print
b) To Print the Selected Map Area • Note: user must select an area of the map with the Select Tool
• Left click on File in the top left corner of the MapPoint
window
• In the drop down menu left click on Print
• In the Print Interface, click on the
Selected area map option and then click
OK to print

- 66 -
Q. How to Control the Map
1. MapPoint Control Overview
Viewing / Finding Specific Locations • Find a location – user can enter a place, address or territory and click the
Find button to get a detailed map of that territory
Zoom Functions • Zoom In / Zoom Out – user can click on these to buttons to zoom in and
out
• Zoom In / Out by mileage – move the slide bar to the right to zoom in to
the location and move it left to zoom out
• User can use the scroll wheel on the mouse to zoom in and zoom out of
the current map view. Push the scroll wheel forward to zoom in to a
location and pull the scroll wheel toward you to zoom out.
• User can right-click on the map and drag the mouse, and then click inside
of the box created to zoom in.
Panning Functions
• User can click on the map, and then drag the mouse to pan through the
map.
• In the Select Tool mode, user can position the mouse pointer on the border
of the current map view to get a white arrow pointing towards the border.
Click and hold to move the map in the direction the arrow is pointing.
For further assistance on MapPoint functionality,
refer to the MapPoint Help Guide

- 67 -
R. How to Communicate Between StreetEagle and a Garmin
StreetEagle can be used to communicate between the drivers and the StreetEagle users. The
Garmin Interface in StreetEagle allows users to view waypoints, messages, and a Driver’s status.
StreetEagle allows the user send created and saved routes in the route manager.
I. How to Send Routes and Text Messages to the Garmin
To Send Route to Garmin
• Create a route on Map
Point
(Refer to section E)
• Right click on the
Garmin enabled
vehicle
• Click “Send Route to
Garmin”
To Send Text Message to
Garmin
• Right-click on the
Garmin
enabled vehicle.
• Select a the correct vehicle in the
drop-down menu if nessasary.
• The user can select a
Acknoledgement that the driver
can Acknoledge back to
StreetEagle.
• Click ‘Send Message’ Button

- 68 -
II. Sending Saved Routes to the Garmin
Send Saved Routes in the Route
Manger to the Garmin
• Click ‘Route Manager’
• Select a Desired saved
route
• Click ‘Send Route to
Garmin’
• Select the desired vehicles.
• If user wants to clear
previous route, check the
box ‘Clear Waypoints from
Garmin’
• Click Send
OR
***For MapPoint Software Only Plot locations on MapPoint and then send route to Garmin.
(Refer to Section E in the User Manual to save routes and create routes)
- 69 -
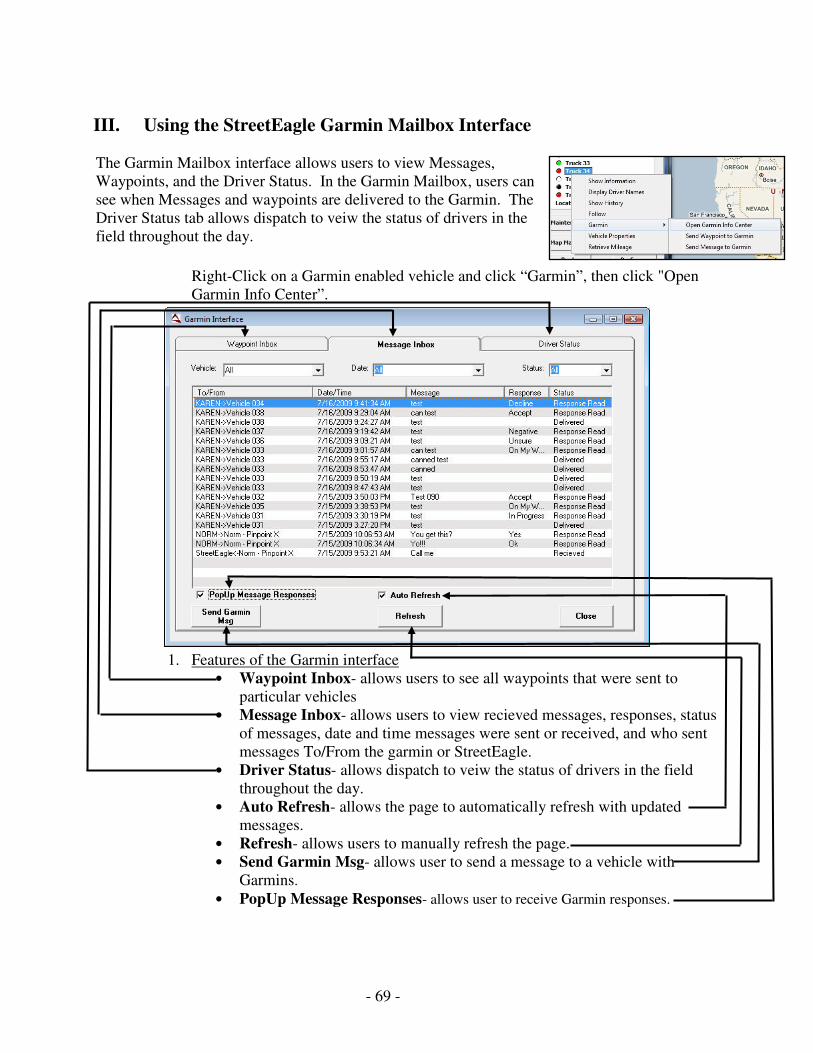
III. Using the StreetEagle Garmin Mailbox Interface
The Garmin Mailbox interface allows users to view Messages,
Waypoints, and the Driver Status. In the Garmin Mailbox, users can
see when Messages and waypoints are delivered to the Garmin. The
Driver Status tab allows dispatch to veiw the status of drivers in the
field throughout the day.
Right-Click on a Garmin enabled vehicle and click “Garmin”, then click "Open
Garmin Info Center”.
1. Features of the Garmin interface
• Waypoint Inbox- allows users to see all waypoints that were sent to
particular vehicles
• Message Inbox- allows users to view recieved messages, responses, status
of messages, date and time messages were sent or received, and who sent
messages To/From the garmin or StreetEagle.
• Driver Status- allows dispatch to veiw the status of drivers in the field
throughout the day.
• Auto Refresh- allows the page to automatically refresh with updated
messages.
• Refresh- allows users to manually refresh the page.
• Send Garmin Msg- allows user to send a message to a vehicle with
Garmins.
• PopUp Message Responses- allows user to receive Garmin responses.
- 70 -
IV. How to Use the Garmin Hardware
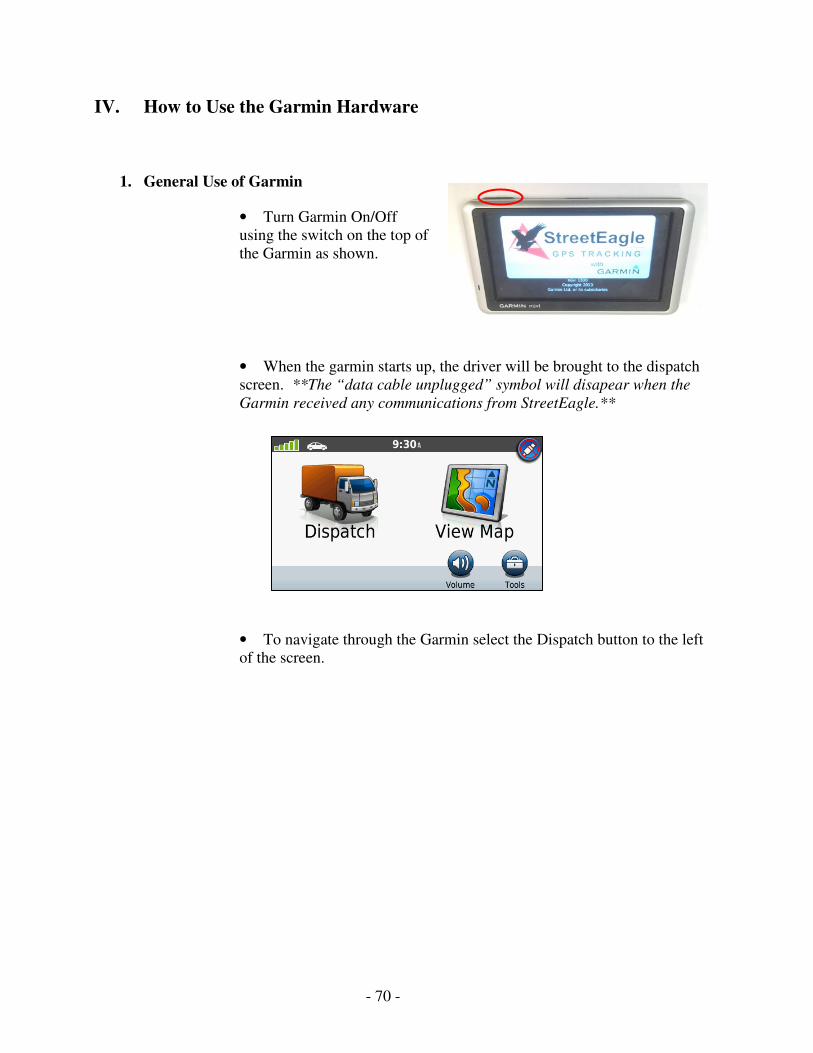
1. General Use of Garmin
• Turn Garmin On/Off
using the switch on the top of
the Garmin as shown.
• When the garmin starts up, the driver will be brought to the dispatch
screen. **The “data cable unplugged” symbol will disapear when the
Garmin received any communications from StreetEagle.**
• To navigate through the Garmin select the Dispatch button to the left
of the screen.

- 71 -
• When in the Dispatch window, the driver can select Stops, Messages,
Find Location, and Driver Info.
• Select Find Location to view the standard Garmin features for finding
places and entering addresses.
2. Receiving and Navigating to WayPoints
• A flag icon will appear in the upper right hand corner signifying a new
waypoint has appeared. Click on the flag to view the waypoint menu.
You may also select Dispatch then My Stops to see the same menu.
• Select the waypoint in which you wish to navigate to. A new screen
will be presented to you with additional information and the option to
select “Go” to begin navigating.
- 72 -
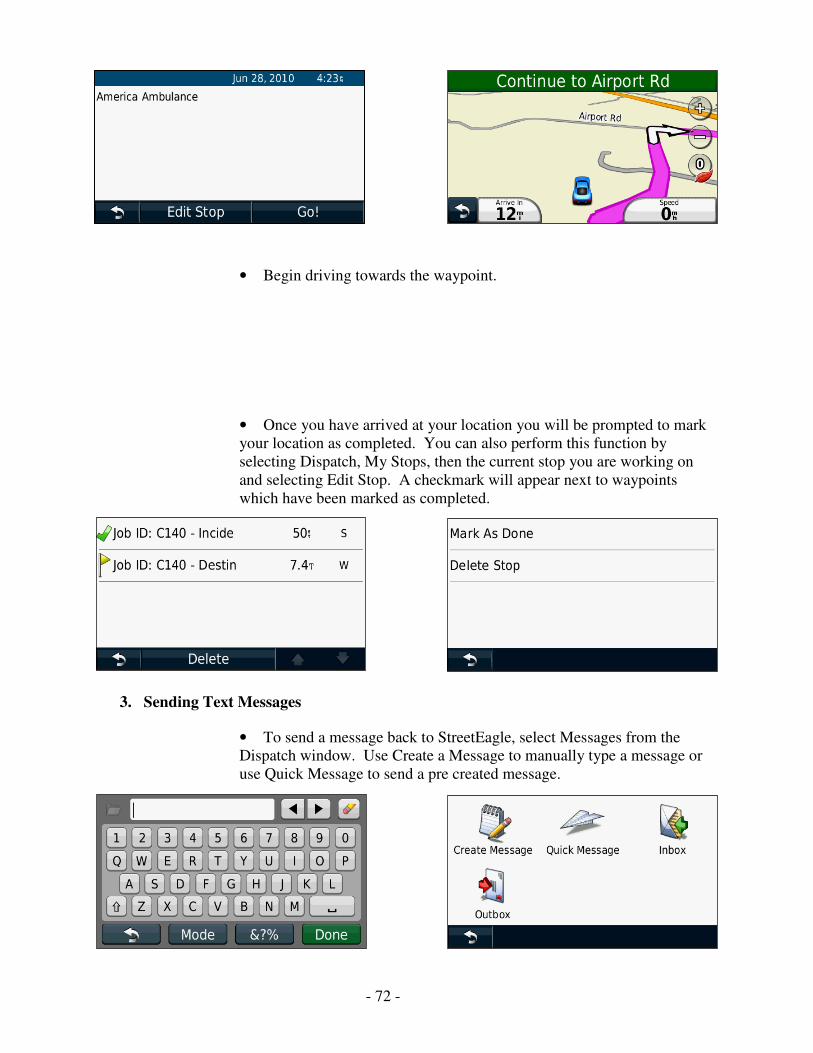
• Begin driving towards the waypoint.
• Once you have arrived at your location you will be prompted to mark
your location as completed. You can also perform this function by
selecting Dispatch, My Stops, then the current stop you are working on
and selecting Edit Stop. A checkmark will appear next to waypoints
which have been marked as completed.
3. Sending Text Messages
• To send a message back to StreetEagle, select Messages from the
Dispatch window. Use Create a Message to manually type a message or
use Quick Message to send a pre created message.
- 73 -
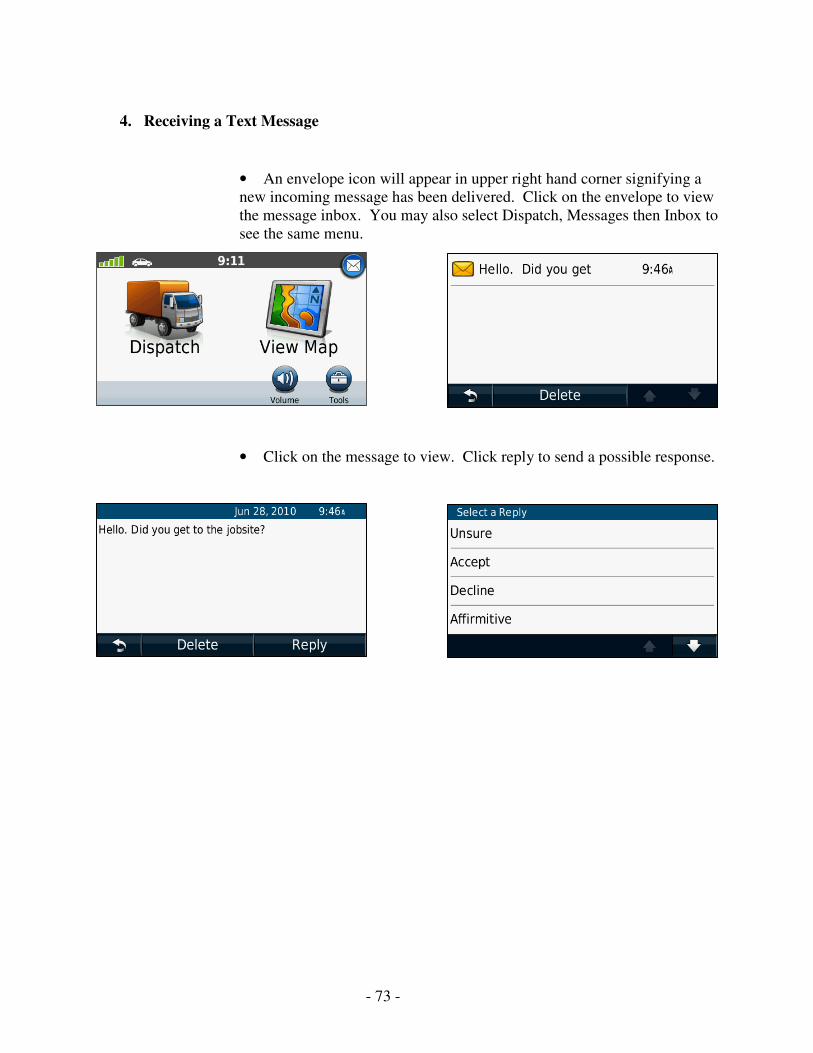
4. Receiving a Text Message
• An envelope icon will appear in upper right hand corner signifying a
new incoming message has been delivered. Click on the envelope to view
the message inbox. You may also select Dispatch, Messages then Inbox to
see the same menu.
• Click on the message to view. Click reply to send a possible response.
- 74 -
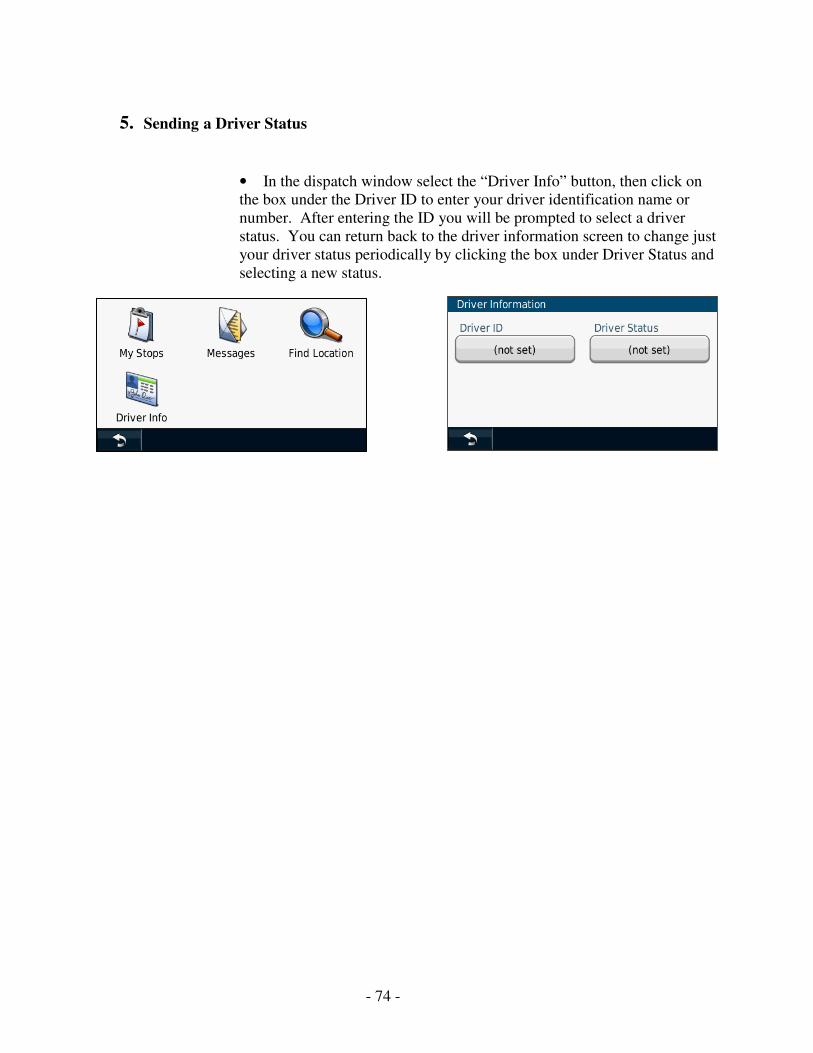
5. Sending a Driver Status
• In the dispatch window select the “Driver Info” button, then click on
the box under the Driver ID to enter your driver identification name or
number. After entering the ID you will be prompted to select a driver
status. You can return back to the driver information screen to change just
your driver status periodically by clicking the box under Driver Status and
selecting a new status.

- 75 -
S. How to Track an Asset
Asset tracking is a collective way to show the last known scanned location of the assets. Asset
tracking will allow you to keep track of your inventory.
• Creating an Asset
• Right click assets
• Click “Edit Asset
Properties”
• Click “Add New” and add your asset information to the table. The
asset ID has to match the barcode that you are scanning on you asset.
User can change the name and type, depending on what the user wants the
asset to be called. (e. g trailer, portable toilet, piece of equipment)
• Viewing the History of Assets
The user can view a breadcrumb trail of there assets (Refer to How to
view history page 7).

- 76 -
T. How to Setup Bus Management
(StreetEagle Advanced) The StreetEagle Bus Management solution allows users to create/manage Bus Route Definitions
to assure their busses are actively running the proper routes and verifying there on time
arrivals/departures. Users can create printable reports to review all bus activity. This feature also
incorporates a text messaging setup capability that allows riders to request arrival information of
the next bus to their exact stop.
1. How to Use Bus Management
• Click on the ‘Bus Management’
button on the lower portion of the
StreetEagle user interface.
• The ‘Bus Management System’
Pop-up menu should appear
Here you can add, edit, and delete routes.
Routes that are to be in or out of service may also be enabled/disabled.

- 77 -
Bus Management System Interface
•
• Route Window This menu displays all of the current routes that have been
created. The left column contains the route name and the right column specifies
whether the route is enabled or disabled.
• Managing your Bus Stops Click on the ‘Add/Edit Bus Stops’ button to
manage the bus stops.
• Managing your Contacts Click on the ‘Add/Edit Contacts’ button to
manage the contacts.
• Contacts Displays who will be contacted in the event that one of the alert
parameters has been triggered
• Bus Stops Displays what stops are assigned to the selected route.
• Vehicles Window Displays all of the vehicles/busses assigned to the currently
selected route.
• Alerts Displays the parameters for a bus/vehicle to arrive early or later. Each alert
is associated with the selected route. If Selected, StreetEagle will notify the
contacts verified in the contacts window that a bus/vehicle is arriving early or late
according to the parameters selected.

- 78 -
2. How to Create a Bus Route
To create a bus route, click on the ‘Add Route’ Button. This will bring up the first step of
the Route Creation Wizard.
• Enter a route name then select “Next”.
.
• Now, select the bus stops you wish to add to the route.
Note: ‘Available Bus Stops’ must be entered as ‘Bus Stop’ under
‘Location Type’ in order to appear in this list and function
properly. Refer to section ‘N’ of the manual to learn how to set
‘Location Type’.
• To begin, select the desired stop and double click to add. Another way to add is
by selecting the stop and left clicking on the ‘Add’ button.
• If a stop is added by mistake simply double click the stop in the right column to
remove. Another way is to click on the stop in the right column and click on the
‘Remove’ Button.
• Once done click ‘Next’. (Refer to the end of this section for ‘Configuring Text
Messaging for Bus Management System’.)

- 79 -
• Now the time schedule chart will
appear.
• To begin, first enable ‘Time Slot
1’ by clicking on the check box
next to ‘Enable’. Up to five time
slots per route may be created.
• Then select the days that the
busses/vehicles will be in route.
• Next select the ‘Start Time’ and
‘Stop Time’ that the
busses/vehicles will be in route.
• Then select the interval time. This is the time that it takes the bus/vehicle to complete the
route one time. This needs to be set in order for the alerts to work properly.
• Now set the ‘Alerts’ by filling in the ‘Time Early’ and ‘Time Late’ thresholds.
This allows the selected contact to receive a notification by email or text message that the
bus/vehicle is ahead or behind schedule.
• Once completed click ‘Next’.
• Now the window that allows you to add vehicles/busses to the route will appear.
• To add a bus/vehicle to the route, click on the bus/vehicle that will be added. The
bus/vehicle name will become highlighted. Then click on the double arrows pointing to
the right.
• The selected bus/vehicle will appear in the ‘Route Vehicles’ column.
• Once all selections have been made, click ‘Next’.
- 80 -
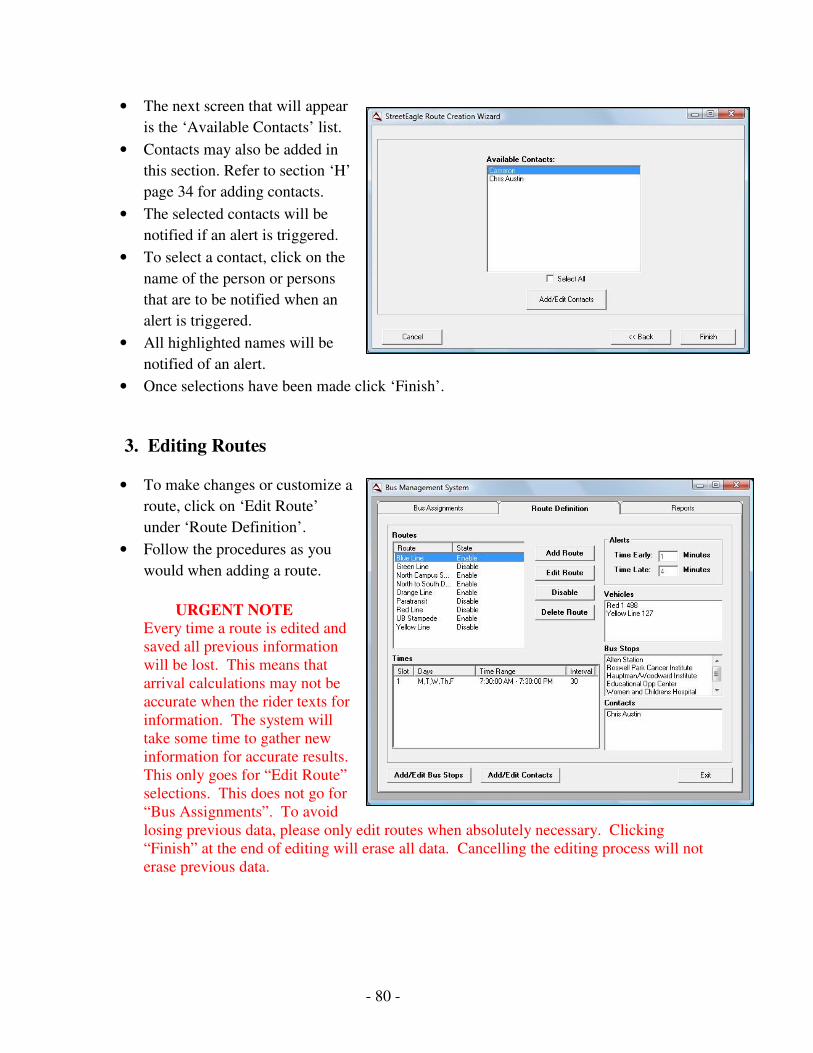
• The next screen that will appear
is the ‘Available Contacts’ list.
• Contacts may also be added in
this section. Refer to section ‘H’
page 34 for adding contacts.
• The selected contacts will be
notified if an alert is triggered.
• To select a contact, click on the
name of the person or persons
that are to be notified when an
alert is triggered.
• All highlighted names will be
notified of an alert.
• Once selections have been made click ‘Finish’.
3. Editing Routes
• To make changes or customize a
route, click on ‘Edit Route’
under ‘Route Definition’.
• Follow the procedures as you
would when adding a route.
URGENT NOTE Every time a route is edited and
saved all previous information
will be lost. This means that
arrival calculations may not be
accurate when the rider texts for
information. The system will
take some time to gather new
information for accurate results.
This only goes for “Edit Route”
selections. This does not go for
“Bus Assignments”. To avoid
losing previous data, please only edit routes when absolutely necessary. Clicking
“Finish” at the end of editing will erase all data. Cancelling the editing process will not
erase previous data.

- 81 -
4. Bus Assignments • To add/remove busses/vehicles from a
route, select the ‘Bus Assignments’
tab in the ‘Bus Management System
Interface’
• Select the route that busses/vehicles
are to be added to or removed from.
• The left column is busses/vehicles
that are available for assignment and
the right column are the
busses/vehicles that have already been
assigned to the route.
• To add a bus/vehicle, select the
bus/vehicle from the unassigned list.
It should become highlighted.
• Then click on the > arrow. The bus
selected should appear in the assigned
column
• To remove a bus, select the bus to remove from the
assigned column then click <.
• Once all changes have been made click ‘Apply’. You must
select ‘Apply’ to save changes.
Note: ‘Exit’ will NOT save changes made.
5. Creating Reports • To create a bus report, select on the
‘Reports’ tab in the ‘Bus Management
System’ interface.
• Then click on the drop down arrow and
select the type of report to run.

- 82 -
• Then select the route to run the report for
by clicking the drop down list. Note:
Only ‘Enabled’ routes will be available
for selection.
• Next select the stops to run the report for.
Note: Stop selections will only be
available for ‘Headway Report’. For
‘Average Headway’ and ‘Out of
Tolerance’ reports all stops will
automatically be selected.
• Now select the time slots to run the
report for. All time slots may be
selected if needed.
• Then set the ‘Thresholds’. Note:
Thresholds may only be set if running
the ‘Out of Tolerance’ report.
• Once all selections have been made
select ‘Create Report’.
• Headway Report - Allows user to view the time it takes for the next bus/vehicle
to arrive at a stop that a previous bus has left.

- 83 -
• Average Headway - Shows the average time that it took for the next
bus/vehicle to arrive at a stop after the previous bus has left.
If there are multiple ‘Time Slots’ then each slot will
be displayed in order from left to right. The time slots
will be labeled as ‘Time Slice 1’, ‘Time Slice 2’ etc.
• Out of Tolerance - Allows user to view when the busses/vehicles are arriving to
stops early or late according to the parameters set.
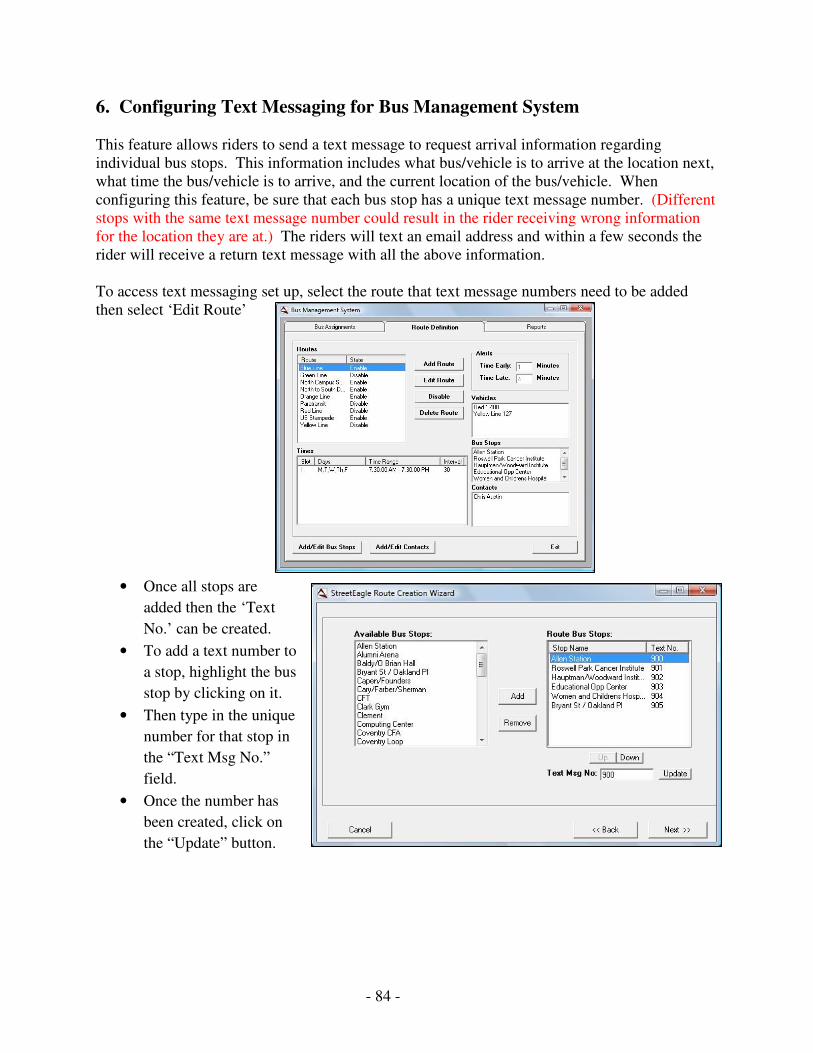
- 84 -
6. Configuring Text Messaging for Bus Management System
This feature allows riders to send a text message to request arrival information regarding
individual bus stops. This information includes what bus/vehicle is to arrive at the location next,
what time the bus/vehicle is to arrive, and the current location of the bus/vehicle. When
configuring this feature, be sure that each bus stop has a unique text message number. (Different
stops with the same text message number could result in the rider receiving wrong information
for the location they are at.) The riders will text an email address and within a few seconds the
rider will receive a return text message with all the above information.
To access text messaging set up, select the route that text message numbers need to be added
then select ‘Edit Route’
• Once all stops are
added then the ‘Text
No.’ can be created.
• To add a text number to
a stop, highlight the bus
stop by clicking on it.
• Then type in the unique
number for that stop in
the “Text Msg No.”
field.
• Once the number has
been created, click on
the “Update” button.

- 85 -
• Repeat these steps for every stop that needs a unique number.
• Once all stops have unique numbers, continue through the rest of the ”Route Creation
Wizard” then select “Finish”. Riders will now be able to text and receive information on
the bus/vehicle they are waiting for.
Texting Format
Example Email Address: [email protected]
Example Text Number: #900
NOTE Make sure that riders know to include the pound sign before
the unique text number or a return text will not be sent
Email Address for riders to text
will be provided by Insight USA

- 86 -
APPENDIX A -- StreetEagle Vehicle Unit Installation This installation guide will provide the guidelines for installing the StreetEagle Vehicle Tracking
Unit (VTU). Insight USA will not warranty the reliability of the VTU, and will not provide
compensation to the installer for service calls to the customer if these guidelines are not followed
exactly. If you require any further assistance during the installation process please call Insight
USA at (301) 866-1990 x208.
Insight USA Provided Equipment
• StreetEagle VTU
• Wiring harness
• Dual Mode Tri-Band antenna
• Mounting screws
• Torque Seal Inspection Lacquer
• Installation instructions
• ATM and Mini ATM Pigtail Fuses
• Insulated Butt Connectors
• Ring Terminal
Other Equipment that may be needed
• Multi-meter
• Crimpers and the appropriate connectors
• Fuse taps
• Electric Drill (cordless) with 1/4” socket, Phillips and flat screwdriver bit attachments, and
7/8” hole saw (for roof mount antennas)
• Cable ties or self-adhesive tie mounts
• Alcohol wipes (for window mount antennas)
Installation Procedures 1. Write down your vehicles name or number.
2. Write down the serial number of the Tracking Unit that went in the above
vehicle.
3. Find a suitable location and mount the VTU -- The vehicle unit must be
mounted in the vehicle so that it is isolated from the elements. The trunk or cab
of the vehicle is usually the most convenient. The unit must be mounted
horizontally on the floor of the vehicle with mounting screws. If this is
impossible, a vertical mount may be used provided it is secured to a metal
surface with at least 3 screws.
Ideal mounting locations include, but are not limited to: on the floor behind/under
the passenger seat, under the dash bolted to the floor board, in the trunk mounted
forward near the back of the passenger seats, etc.
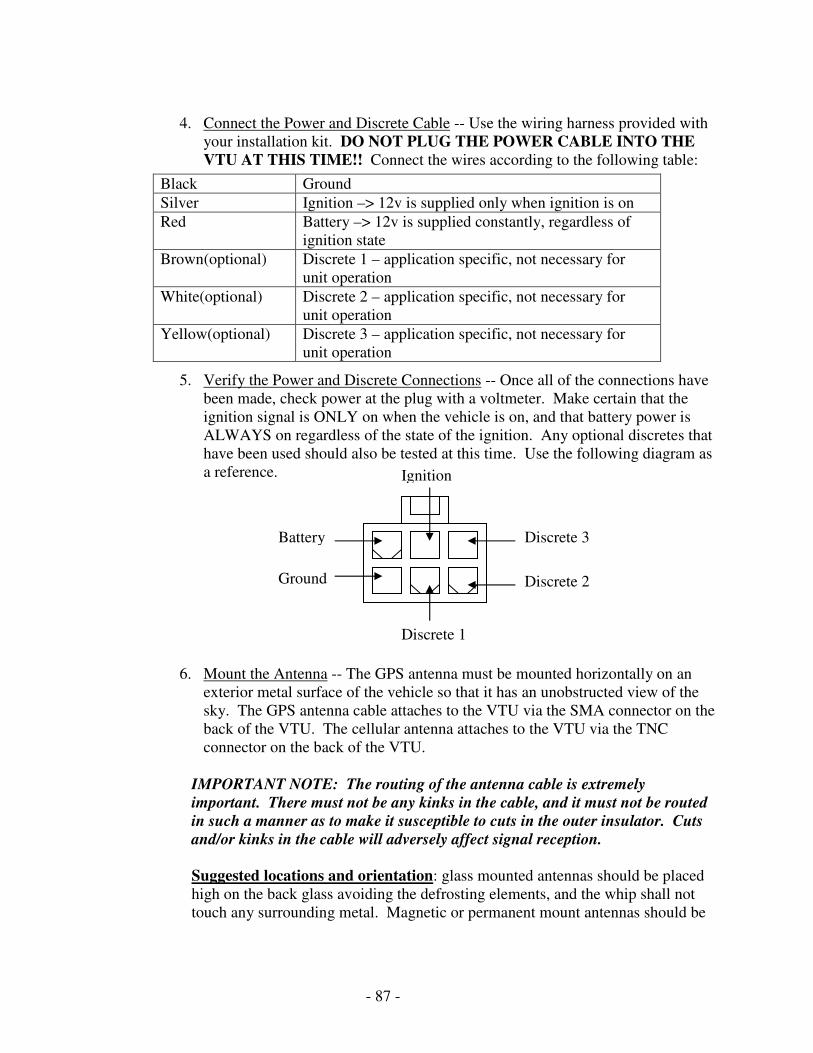
- 87 -
4. Connect the Power and Discrete Cable -- Use the wiring harness provided with
your installation kit. DO NOT PLUG THE POWER CABLE INTO THE
VTU AT THIS TIME!! Connect the wires according to the following table:
5. Verify the Power and Discrete Connections -- Once all of the connections have
been made, check power at the plug with a voltmeter. Make certain that the
ignition signal is ONLY on when the vehicle is on, and that battery power is
ALWAYS on regardless of the state of the ignition. Any optional discretes that
have been used should also be tested at this time. Use the following diagram as
a reference.
6. Mount the Antenna -- The GPS antenna must be mounted horizontally on an
exterior metal surface of the vehicle so that it has an unobstructed view of the
sky. The GPS antenna cable attaches to the VTU via the SMA connector on the
back of the VTU. The cellular antenna attaches to the VTU via the TNC
connector on the back of the VTU.
IMPORTANT NOTE: The routing of the antenna cable is extremely
important. There must not be any kinks in the cable, and it must not be routed
in such a manner as to make it susceptible to cuts in the outer insulator. Cuts
and/or kinks in the cable will adversely affect signal reception.
Suggested locations and orientation: glass mounted antennas should be placed
high on the back glass avoiding the defrosting elements, and the whip shall not
touch any surrounding metal. Magnetic or permanent mount antennas should be
Black Ground
Silver Ignition –> 12v is supplied only when ignition is on
Red Battery –> 12v is supplied constantly, regardless of
ignition state
Brown(optional) Discrete 1 – application specific, not necessary for
unit operation
White(optional) Discrete 2 – application specific, not necessary for
unit operation
Yellow(optional) Discrete 3 – application specific, not necessary for
unit operation
Ground
Battery
Ignition
Discrete 3
Discrete 2
Discrete 1

- 88 -
placed on a flat metal surface as high on the vehicle as possible with the whip
pointing vertically.
7. Connect the power cable to the VTU – with the ignition off, and antennas
connected, attach the power cable to the VTU. The retaining clip will snap into
place when the connector is properly seated.
1. Constant Power- always lit.
2. Switched Power- turns on and off with ignition.
3. Cell light- lights up with good cell signal.
4. GPS light- lights up with good GPS signal.
*3 and 4 will stay lit for 2 to 3 minutes after the unit is shutdown.
8. Turn ignition on to verify that all of the LED’s turn on-- When the VTU is
installed, it can take up to 20 minutes for the GPS to acquire its position after
initial power-up. Subsequent position acquisition will be less than 30 seconds
of vehicle start-up.
9. Call Insight USA – call Insight USA at 301-866-1990 ext.208 to verify correct
installation and functionality prior to proceeding to the next vehicle.
10. Update the vehicle name in the Street Eagle Tracker control menu.
11. Apply Torque Seal Inspection Lacquer – Torque Seal should be applied so
that it covers the point where the cable meets the box. It should be used
around the power cable, and also around the GPS antenna cable and the
Cellular/1X Antenna
Connection GPS Antenna
Connection
Serial Cable connection
(for custom applications) Power Cable Plug
3
1
2
4

- 89 -
1X antenna cable. The Torque Seal is important to help prevent and prove
tampering. Without the seal the user may not notice evidence of tampering.
IMPORTANT!! Upon completion of the installation procedures, call InSightUSA at (301)866-
1990 x 208 to have the vehicle unit activated. The unit will NOT report until
activated!
The StreetEagle Tracking Units Troubleshooting Guide
The StreetEagle tracking unit has 4 LEDs
• Constant power - on all the time
• Ignition power – turns on and off with the ignition
• Cell – turns on when cell signal is acquired
• GPS - turns on when GPS signal is acquired
Troubleshooting the StreetEagle tracking unit should be done with the vehicle on.
All four lights should be lit up during proper operation.
Problem Solution
Power LED is not on Verify that the red wire is connected to
constant power.
Ignition LED is not on Verify the silver wire is not connected to a
switch power source
Cell light is not on Check for proper installation of the
antenna.
Verify that the data account is active.
GPS light is not on Verify that the GPS antenna has a clear
view of the sky.
Verify that the GPS antenna is connected to
the tracking unit

- 90 -
StreetEagle Vehicle Unit Installation – MTG-L This installation guide will provide the guidelines for installing the StreetEagle Vehicle Tracking
Unit (VTU). Insight USA will not warranty the reliability of the VTU, and will not provide
compensation to the installer for service calls to the customer if their guidelines are not followed
are not followed exactly. If you require any further assistance during the installation process
please call Insight USA at (301) 866-1990 x208.
Insight USA Provided Equipment
• StreetEagle VTU
• Wiring harness
• Dual-mode GPS / GPRS antenna
• Mounting screws
• Tamper Evident Sealant
• Installation instructions
• ATM and Mini ATM Pigtail Fuses
• Insulated Butt Connectors
• Ring Terminal
Other Equipment that may be needed
• Multi-meter
• Crimpers and the appropriate connectors
• Fuse taps
• Electric Drill (cordless) with ¼” socket, Phillips and flat screwdriver bit attachments,
and 7/8” hole saw (for roof mount antennas)
• Cable ties or self-adhesive tie mounts • Alcohol wipes (for window mounts antennas)
Installation Procedures 1. Write down your vehicles name or number.
2. Write down the serial number of the Tracking Unit that went in the above vehicle.
3. Find a suitable location and mount the VTU-- The vehicle unit must be
mounted in the vehicle so that it is isolated from the elements. The trunk or cab
of the vehicle is usually the most convenient. The unit must be mounted
horizontally on the floor of the vehicle with the mounting screws. If this is
impossible, a vertical mount may be used provided it is secured to a metal surface
with at least 3 screws.
Ideal mounting locations include, but are not limited to: on the floor behind/under
the passenger seat, under the dash bolted to the floor board, in the trunk mounted
forward near the back of the passenger seats, etc.
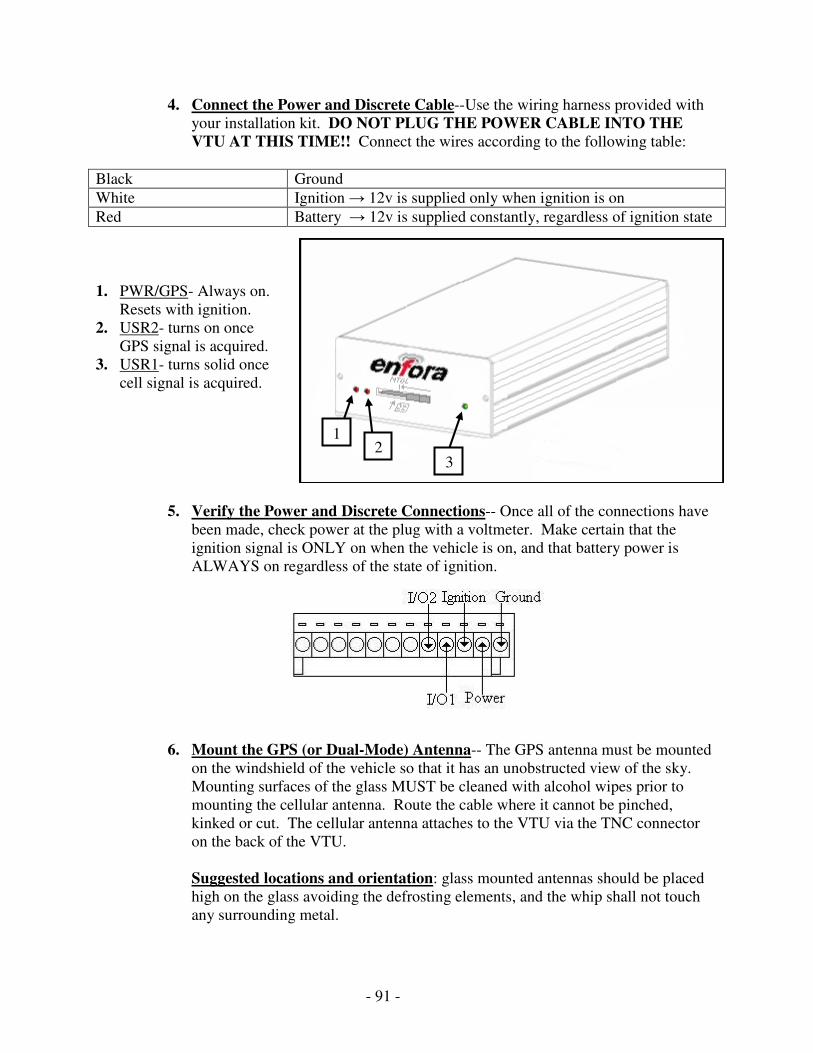
- 91 -
4. Connect the Power and Discrete Cable--Use the wiring harness provided with
your installation kit. DO NOT PLUG THE POWER CABLE INTO THE
VTU AT THIS TIME!! Connect the wires according to the following table:
Black Ground
White Ignition → 12v is supplied only when ignition is on
Red Battery → 12v is supplied constantly, regardless of ignition state
1. PWR/GPS- Always on.
Resets with ignition.
2. USR2- turns on once
GPS signal is acquired.
3. USR1- turns solid once
cell signal is acquired.
5. Verify the Power and Discrete Connections-- Once all of the connections have
been made, check power at the plug with a voltmeter. Make certain that the
ignition signal is ONLY on when the vehicle is on, and that battery power is
ALWAYS on regardless of the state of ignition.
6. Mount the GPS (or Dual-Mode) Antenna-- The GPS antenna must be mounted
on the windshield of the vehicle so that it has an unobstructed view of the sky.
Mounting surfaces of the glass MUST be cleaned with alcohol wipes prior to
mounting the cellular antenna. Route the cable where it cannot be pinched,
kinked or cut. The cellular antenna attaches to the VTU via the TNC connector
on the back of the VTU.
Suggested locations and orientation: glass mounted antennas should be placed
high on the glass avoiding the defrosting elements, and the whip shall not touch
any surrounding metal.
1 2
3

- 92 -
7. Connect the power cable to the VTU-- with the ignition off, and antennas
connected, attach the power cable to the VTU. The retaining clip will snap into
place when the connector is properly seated.
8. Turn on the ignition and call Insight USA-- call Insight USA at 301-866-1990
ext.208 to verify correct installation and functionality prior to proceeding to the
next vehicle.
Note: When the VTU is installed, it can take up to 20 minutes for the GPS to
acquire its position after initial power-up. Subsequent position acquisition will be
less than 30 seconds of the vehicle start-up.
9. Update the vehicle name in the Street Eagle Tracker control menu
10. Apply tamper evident sealant-- tamper evident sealant should be applied so that
it attached to the cable and to the box. It should be used on the top of the power
cable, and also on the GPS antenna cable and the GPRS antenna cable.
The GPRS Tracking Units Troubleshooting Guide
The GPRS units have 3 LEDs
• PWR/GPS – turns on and off with vehicle ignition
• USR1 - Blinks then turns on when cell signal is acquired
• USR2 - Turns solid when the unit gets a GPS fix
Troubleshooting the GPRS tracking unit should be done with the vehicle on.
All three lights should be lit up and solid during proper operation.
Problem Solution
PWR/GPS light is not lit The unit is not getting constant nor
switched power
PWR/GPS light is always lit (should reset
with ignition)
The red and white wires are both connected
to constant power, the white wire should be
moved to switched power
USR1 is blinking, no cell signal Check for proper installation of the antenna
verify that the SIM card is seated properly
verify that the data account is active
USR2 is not lit, no GPS signal Verify proper installation of antenna, verify
that GPS antenna has a clear view of the
sky
Time updates/changes, location does not GPS antenna is unplugged or antenna’s
view of sky is obstructed

- 93 -
Diagram for wiring a PTO Circuit BOSCH 0-332-209-138

- 94 -
StreetEagle Vehicle Unit Installation – MTG-uL This installation guide will provide the guidelines for installing the StreetEagle Vehicle Tracking
Unit (VTU). Insight USA will not warranty the reliability of the VTU, and will not provide
compensation to the installer for service calls to the customer if the guidelines are not followed
exactly. If you require any further assistance during the installation process please call Insight
USA at (301)-866-1990 x208.
Insight USA Provided Equipment
• StreetEagle VTU
• Wiring harness
• Dual-mode GPS / GPRS
• Mounting screws
• Tamper Evident Sealant
• Installation instructions
• ATM and Mini ATM Pigtail Fuses
• Insulated Butt Connectors
• Ring Terminal
Other Equipment that may be needed
• Multi-meter
• Crimpers and the appropriate connectors
• Fuse taps
• Electric Drill (cordless) with ¼” socket, 5/16” socket, Phillips and flat screwdriver bit
attachments, and 7/8” hole saw (for through hole antennas)
• Cable ties or self-adhesive tie mounts • Alcohol wipes (for window mounts antennas)
Installation Procedures 1. Write down your vehicles name or number.
2. Write down the serial number of the Tracking Unit that went in the above vehicle.
3. Find a suitable location and mount the VTU-- The vehicle unit must be
mounted in the vehicle so that it is isolated from the elements. The trunk or cab
of the vehicle is usually the most convenient. The unit must be mounted
horizontally on the floor of the vehicle with the mounting screws. If this is
impossible, a vertical mount may be used provided it is secured to a metal surface
with at least 3 screws.
Ideal mounting locations include, but are not limited to: on the floor behind/under
the passenger seat, under the dash, bolted to the floor board, in the trunk mounted
forward near the back of the passenger seats, etc.
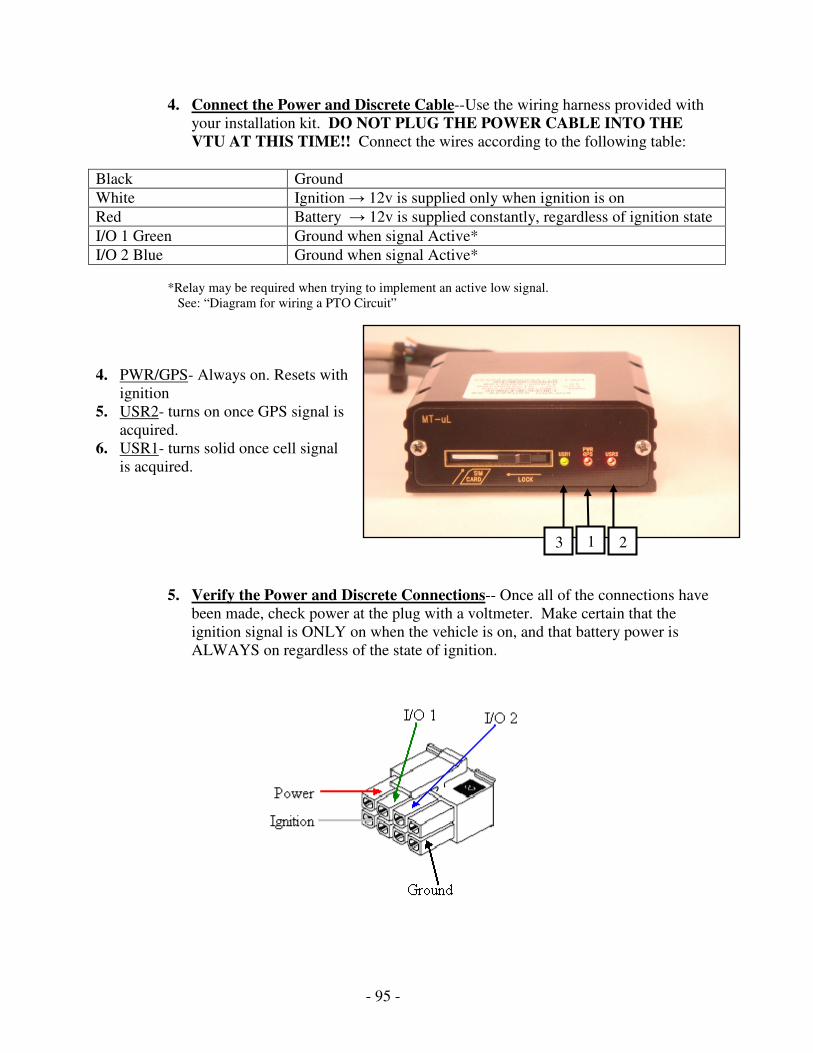
- 95 -
4. Connect the Power and Discrete Cable--Use the wiring harness provided with
your installation kit. DO NOT PLUG THE POWER CABLE INTO THE
VTU AT THIS TIME!! Connect the wires according to the following table:
Black Ground
White Ignition → 12v is supplied only when ignition is on
Red Battery → 12v is supplied constantly, regardless of ignition state
I/O 1 Green Ground when signal Active*
I/O 2 Blue Ground when signal Active*
*Relay may be required when trying to implement an active low signal.
See: “Diagram for wiring a PTO Circuit”
4. PWR/GPS- Always on. Resets with
ignition
5. USR2- turns on once GPS signal is
acquired.
6. USR1- turns solid once cell signal
is acquired.
5. Verify the Power and Discrete Connections-- Once all of the connections have
been made, check power at the plug with a voltmeter. Make certain that the
ignition signal is ONLY on when the vehicle is on, and that battery power is
ALWAYS on regardless of the state of ignition.
1 2 3
- 96 -
6. Mount the Dual-Mode Antenna-- The GPS antenna must be mounted on the
windshield of the vehicle so that it has an unobstructed view of the sky. Mount
the antenna with the word “UP” facing toward the sky. Mounting surfaces of the
glass MUST be cleaned with alcohol wipes prior to mounting the cellular antenna.
Route the cable where it cannot be pinched, kinked or cut. The cellular antenna
attaches to the VTU via the purple connector on the back of the VTU. The GPS
antenna attaches to the VTU via the blue connector on the back of the VTU.
***Without a good view of the sky the antenna may cause the unit to
report sporadically***
Suggested locations and orientation: glass mounted antennas should be placed
high on the glass avoiding the defrosting elements, and the whip shall not touch
any surrounding metal.
7. Connect the power cable to the VTU-- with the ignition off, and antennas
connected, attach the power cable to the VTU. The retaining clip will snap into
place when the connector is properly seated.
8. Turn on the ignition and call Insight USA-- call Insight USA at 301-866-1990
ext.208 to verify correct installation and functionality prior to proceeding to the
next vehicle.
Note: When the VTU is installed, it can take up to 20 minutes for the GPS to
acquire its position after initial power-up. Subsequent position acquisition will be
less than 30 seconds of the vehicle start-up.
9. Update the vehicle name in the Street Eagle Tracker control menu
10. Apply tamper evident sealant-- tamper evident sealant should be applied so that
it attached to the cable and to the box. It should be used on the top of the power
cable, and also on the GPS antenna cable and the GPRS antenna cable.
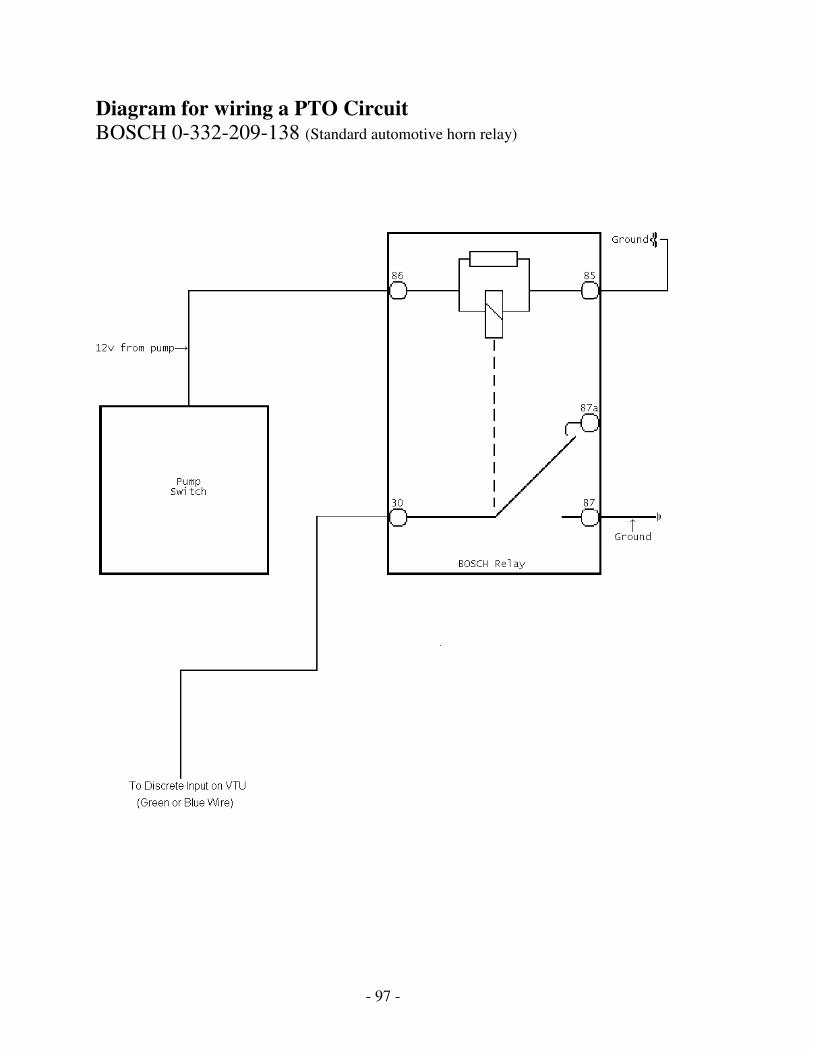
- 97 -
Diagram for wiring a PTO Circuit BOSCH 0-332-209-138 (Standard automotive horn relay)

- 98 -
StreetEagle Loceight AT Unit Installation This installation guide will provide the guidelines for installing the StreetEagle Loceight Asset
Tracker (AT). Insight USA will not warranty the reliability of the AT, and will not provide
compensation to the installer for service calls to the customer if the guidelines are not followed
exactly. If you require any further assistance during the installation process please call
.StreetEagle Loceight Installation Support at 866.495.9240
Provided Equipment
• StreetEagle Loceight AT device
• Mounting Bracket
• Mounting screws
• Installation instructions
• Loceight IO cable (optional)
• Relay for each monitored input (optional)
Other Equipment that may be needed
• Multi-meter
• Crimpers and the appropriate connectors
• Fuse taps
• Electric Drill (cordless) with screwdriver and drill bits Installation Procedures
1. Write down your asset/equipment name or number.
2. Write down the serial number of the Tracking Unit that is being installed on the
asset/equipment.
3. Turn the Unit On – Take Unit outside to ensure clear visibility of the sky, then
using a Flat head screwdriver remove the connector cover, invert then replace.
Notice behind the notch the “ON” or “OFF” label will
be displayed.
Device is OFF
Device is ON

- 99 -
4. Mounting - Find a suitable location and mount the Loceight Asset Tracker. The
AT should be securely mounted to a surface, facing the sky (side that reads “this
side towards sky”) with good visibility. The AT device should be mounted
horizontally, but may also be mounted vertically at an angle less than 90°. The
unit is weatherproof and may be mounted externally. The AT can be mounted
under plastic or fiberglass, yet must NOT be mounted with metal or concrete
obstructing the view of the sky. Attach the mounting bracket to the
asset/equipment with screws, and then attach the unit to the bracket.
5. Optional IO Cable - Connect the input adapter cable if necessary. Attach the
connector to the unit, then run the wires to the necessary inputs, use the chart as a
reference. The Loceight requires the input wire to receive a ground signal when
the discrete is active. Use relays if necessary.
Color Connection
Black Ground
Brown Not used
White Not used
Red Not used
Green Input 1 (ground when active)
Blue Input 2 (ground when active)

- 100 -
6. Replacing Batteries - The device uses 4 Lithium “AA” Batteries. If the batteries
need to be replaced, remove the six flat head screws from the top, take off the
water-tight cover, remove old batteries, and then insert new batteries. Place the
water-tight cover back over the battery compartment and insert the 6 flathead
screws.

- 101 -
Garmin Installation Guide
This installation guide will provide the guidelines for installing a Garmin unit with connection to
the StreetEagle device. Insight USA will not warranty the reliability of the VTU, and will not
provide compensation to the installer for service calls to the customer if the guidelines are not
followed exactly. If you require any further assistance during the installation process please call
Insight USA at (301) 866-1990 x208.
Insight USA Provided Equipment
• StreetEagle device
• Wiring harness
• Installation instructions
• Optional Equipment if ordered:
o Cigarette lighter socket P/N: 12VDCSOCKET
o ATM and Mini ATM Pigtail Fuses
o Insulated Butt Connectors
o Ring Terminal
Other Equipment that may be needed
• Multi-meter
• Crimpers and the appropriate connectors
• Fuse taps
• Electric Drill (cordless) with bit attachments • Cable ties or self-adhesive tie mounts
Installation Procedures
1. Upgrade Firmware-- Visit www.garmin.com, click Support> Software Updates> Unit
Software, then follow the instructions to update the firmware on the Garmin. (if you
purchased the Garmin directly from Insight USA this step has been completed for you)
Occasionally updating the Garmin unit maybe needed to take advantage of new
functionality.
2. Find a suitable location to mount the Garmin-- The Garmin unit must be mounted
where driver will not be distracted. The unit must also be able to receive a valid GPS
signal. Be sure the unit will be mounted securely and will not fall.
***Check local and State Laws on mounting the Garmin unit to the windshield.
3. Connect the serial cable-- Plug the serial cable from the StreetEagle device into the data
port on the Garmin.
4. Connect the power cable-- The Garmin unit must receive constant power. In order for
the Garmin to function properly, the Garmin must also be powered on at all times. If the
vehicle does not supply constant power to the cigarette lighter, P/N: 12VDCSOCKET
must be ordered and connected
Wire Cigarette lighter- (if necessary) Connect the Positive (red) wire to a constant
+12volts source. Connect the Negative (black) wire to a chassis ground. Run the socket
to a suitable mounting location and connect the Garmin power cable to it.
Every time the Garmin is first turned on the No Communication symbol will
appear until the unit receives a message or route.

- 102 -
Barcode Scanner Install Guide
This installation guide will provide the guidelines for installing a Barcode Scanner unit
connection to the StreetEagle device. Insight USA will not warranty the reliability of the VTU,
and will not provide compensation to the installer for service calls to the customer if the
guidelines are not followed exactly. If you require any further assistance during the installation
process please call Insight USA at (301) 866-1990 x208.
Insight USA Provided Equipment
• StreetEagle device
• Wiring harness
• Scanner and Base
• Installation instructions
• Optional Equipment if ordered:
o ATM and Mini ATM Pigtail Fuses
o Insulated Butt Connectors
o Ring Terminal
Other Equipment that may be needed
• Multi-meter
• Crimpers and the appropriate connectors
• Fuse taps
• Electric Drill (cordless) with bit attachments • Cable ties or self-adhesive tie mounts
Installation Procedures
5. Find a suitable location to mount the Barcode scanner-- The barcode scanner must be
mounted where the driver can access the barcode scanner easily. Make sure the scanner is
be mounted securely and will not fall.
6. Connect the serial cable-- Plug the serial cable from the StreetEagle vehicle-tracking
unit into the data port on the barcode scanner cable.
7. Connect the power cable-- The barcode scanner must receive switch power in order for
the barcode scanner to function properly. The red wire must be wire to switched 12-volt
power source. The black wire must be attached to chassis ground. The barcode scanner
will only transmit data when vehicle is turned on.
8. Scanner Data Setup--The scanner needs to be setup by scanning the “Barcode Scanner
Setup for >>>(data)<<<” provided on the next page.

- 103 -
Barcode Scanner Setup for >>>(data)<<<
To setup the barcode scanner, scan the charging bay’s barcode and then scan the barcodes listed
below. (It is very important that the barcodes are scanned in numerical order starting with
number 1.)
1. Erase rules
2. Begin New Rule
3. Send ASCII key > (Scan 3 times)
4. Send All that Remains
5. Send ASCII key < (Scan 3 times)
6. Save Rule

- 104 -
APPENDIX B -- VTU Troubleshooting Guide Symptom: No current date and time.
Problem: The VTU is not reporting.
Possible causes and corrective actions: 1. The VTU isn’t on – turn the ignition on.
2. The cellular antenna isn’t connected – check the connections.
3. The VTU is not powered – check power to the VTU. Check voltages on the wiring harness
using the correct diagram below. The Power/Battery pin should have a constant 12V. The
Ignition pin should have 12V only when the ignition switch is turned on.
4. If the previous steps don’t resolve the problem, call Insight USA.
Symptom: Current date and time, but not at the right location. No GPS light
Problem: The GPS is not updating
Possible causes and corrective actions: 1. The GPS antenna isn’t plugged in – screw the GPS antenna in fully
2. The GPS hasn’t initialized – leave the VTU on, with the vehicle outside, for 20 minutes.
3. The GPS antenna isn’t mounted correctly – make sure the GPS antenna is mounted in a
location where it has an unobstructed view of the sky. The roof of the vehicle is best
location.
4. The GPS antenna is damaged – check the installation of the antenna and cable. Make sure
that the cable hasn’t been pinched or cut, and make sure the outer insulator hasn’t been cut in
such a way that the inner shield is exposed and possibly touching a metal surface.
5. If the previous steps don’t resolve the problem, call Insight USA.
Symptom: The vehicle doesn’t report as “Parked”, but rather reports as being “Stopped”
repeatedly, even when the ignition is off.
Possible causes and corrective actions: 1. The ignition wire is connected to battery – find a source for the ignition signal that is 12V
only when the ignition is on.
2. No Cell light-- The VTU is not sending data. Verify that the antenna is plugged in correctly.
3. No Ignition light-- The VTU is not receiving power when the vehicle is turned on. Verify the
unit is receiving 12V from the vehicle.
4. No Power light-- The VTU is not receiving 12V of power even when vehicle is off. Verify
that the vehicle receives 12V of constant power. One way to check this is to turn the vehicle
off and check the plug to see if it still receives 12V of power
Enfora MTGuL Power Plug Enfora MTGL Power Plug StreetEagle Power Plug

- 105 -
Garmin Trouble Shooting Guide
If the Garmin is not receiving Routes or Messages check the following:
• Update Garmin software. This can be done via the WebUpdater utility provide on Garmin’s
website (Please visit www.garmin.com and select Support for more details)
• The Garmin must be plugged into constant power via either hardwired or
through the cigarette lighter plug (cannot run off battery alone)
• Communication cable must be plugged into data port on the side of the
Garmin, not charging port located on the cradle. (Standard Cable units
only)
• Every time the Garmin is first turns on the No Communication symbol will
appear until the unit receives a message or route. If this symbol does not
disappear please verify the above first and if not resolved contact Insight
Technical Support
Garmin Unit
Number
Standard Cable
(P/N 010-10813-00)
Specialty cable
(P/N 010-10865-00)
FMI 10 Cable
(P/N 010-11232-00)
Nuvi 255W X
Nuvi 350 X
Nuvi 360 X
Nuvi 550 X
Nuvi 6xx X
Nuvi 750 X
Nuvi 755T X
Nuvi 760 X
Nuvi 880 X
Nuvi 255 X
Nuvi 465 X
Nuvi 12xx X
Nuvi 13xx X
Nuvi 14xx X
Nuvi 5000 X
Street Pilot 2720 X
Street Pilot 2820 X
Street Pilot 7xxx X
Street Pilot c340 X
Street Pilot c530 X
Street Pilot c550 X
Street Pilot c580 X

- 106 -
APPENDIX C -- Software Installation Guide
System Requirements � Pentium 500MHZ, 96MB RAM, 500MB available hard disk space � Internet connectivity � Windows 2000, NT 4.0, or XP
Notes � StreetEagle is a robust, graphics intensive; Internet based client/server application.
Map graphics refresh rates are directly dependent on the speed of the Pentium processor and the performance of the video card in the client PC.
� Since communications between the client PC and the StreetEagle AVL server is over the Internet, performance also improves as the speed of the Internet connection increases. A slow Internet connection will yield longer delays in functions such as refreshing the maps, opening the Vehicle Database table, and opening the Vehicle Location History.
Installation Procedure 1. Insert Disk 1 – Microsoft MapPoint 2009 Setup CD into your computers CD ROM
drive. The ‘Full Installation’ option is recommended. 2. The Microsoft® MapPoint™ installation program will automatically begin on
computers set to CD Auto-run. If the MapPoint installation program does not begin automatically, select Run from the Start menu, select the CD ROM drive, select setup.exe, and then hit OK.
3. Insert Disk 2 – StreetEagle Setup CD. Click the StreetEagle V 6 button to install StreetEagle. Then click the Google Earth button to install Google earth.
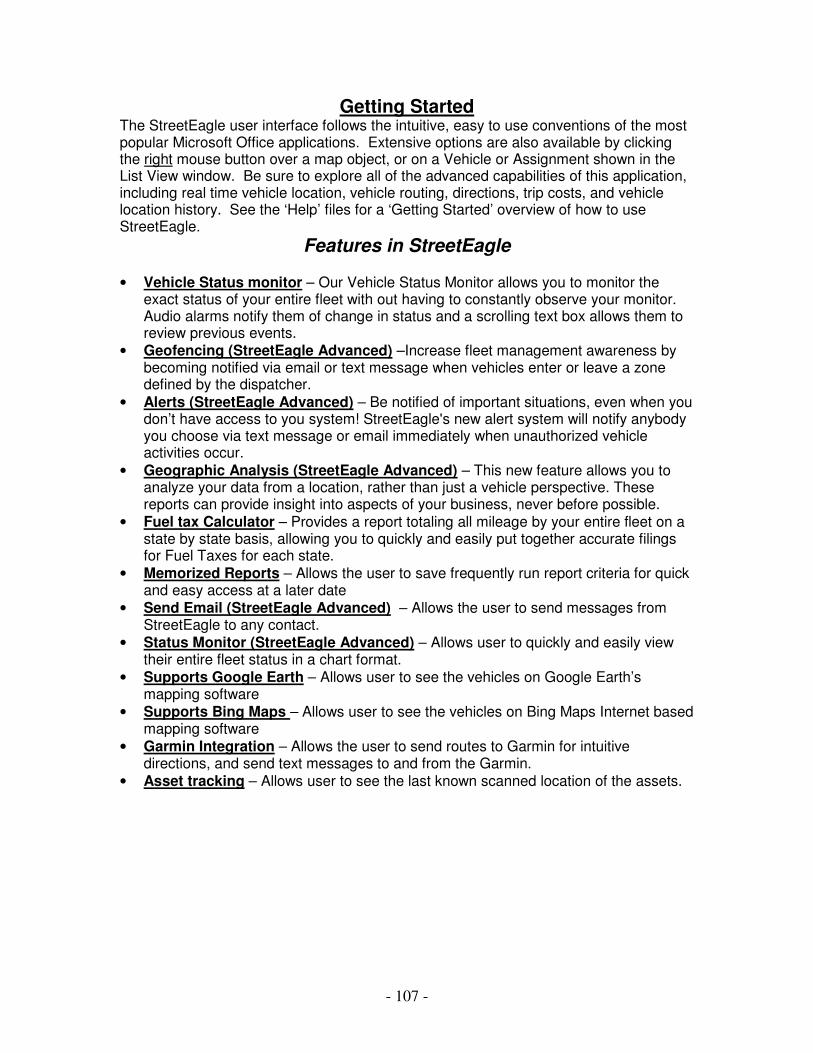
- 107 -
Getting Started The StreetEagle user interface follows the intuitive, easy to use conventions of the most popular Microsoft Office applications. Extensive options are also available by clicking the right mouse button over a map object, or on a Vehicle or Assignment shown in the List View window. Be sure to explore all of the advanced capabilities of this application, including real time vehicle location, vehicle routing, directions, trip costs, and vehicle location history. See the ‘Help’ files for a ‘Getting Started’ overview of how to use StreetEagle.
Features in StreetEagle
• Vehicle Status monitor – Our Vehicle Status Monitor allows you to monitor the exact status of your entire fleet with out having to constantly observe your monitor. Audio alarms notify them of change in status and a scrolling text box allows them to review previous events.
• Geofencing (StreetEagle Advanced) –Increase fleet management awareness by becoming notified via email or text message when vehicles enter or leave a zone defined by the dispatcher.
• Alerts (StreetEagle Advanced) – Be notified of important situations, even when you don’t have access to you system! StreetEagle's new alert system will notify anybody you choose via text message or email immediately when unauthorized vehicle activities occur.
• Geographic Analysis (StreetEagle Advanced) – This new feature allows you to analyze your data from a location, rather than just a vehicle perspective. These reports can provide insight into aspects of your business, never before possible.
• Fuel tax Calculator – Provides a report totaling all mileage by your entire fleet on a state by state basis, allowing you to quickly and easily put together accurate filings for Fuel Taxes for each state.
• Memorized Reports – Allows the user to save frequently run report criteria for quick and easy access at a later date
• Send Email (StreetEagle Advanced) – Allows the user to send messages from StreetEagle to any contact.
• Status Monitor (StreetEagle Advanced) – Allows user to quickly and easily view their entire fleet status in a chart format.
• Supports Google Earth – Allows user to see the vehicles on Google Earth’s mapping software
• Supports Bing Maps – Allows user to see the vehicles on Bing Maps Internet based mapping software
• Garmin Integration – Allows the user to send routes to Garmin for intuitive directions, and send text messages to and from the Garmin.
• Asset tracking – Allows user to see the last known scanned location of the assets.

- 108 -
StreetEagle Customer Support Guide
This guide is provided to help InSight USA customers answer questions and quickly resolve problems with their StreetEagle GPS Tracking system. The most commonly encountered problems and solutions are discussed in the following Troubleshooting Guide. These are exactly the same troubleshooting steps that our on-call support staff will suggest to isolate a listed problem. If these steps do not resolve the problem, please contact us by phone, voicemail, email, or use our online Support Request to get further assistance. Most support requests are handled immediately, but no later than the next business day.
StreetEagle 24/7 Customer Support (866) 495 9240
Our normal business hours are 8 AM to 5 PM Eastern time, Monday through Friday. If we are unavailable to take your call, please leave a voice message or send an email, and we will contact you as soon as possible.
StreetEagle Online Support For problem assistance anytime, please use our StreetEagle support website at http://www.mds-inc.com/StreetEagle-Service-Assistance.htm This is also available directly from the StreetEagle software by simply clicking the Help button on the main screen. By submitting a Support Request, you are assured of timely response to your question or problem by our support staff. StreetEagle User Guide The StreetEagle User Guide is available on your PC when you install the StreetEagle software. The Guide shows how to use all of the functionality of the StreetEagle software, and will answer most questions regarding operation of the system. The guide can be found at Start > Programs > StreetEagle > StreetEagle User Guide, and can be printed for future reference.
For Questions Regarding Phone Email
Hardware Installation and Troubleshooting
(301) 866-1990 x208 [email protected]
Software Installation and Operation
(301) 866-1990 x209 [email protected]
StreetEagleWeb Support (301) 866-1990 x205 [email protected]
Technical Support (301) 866-1990 x207 [email protected]
Sales (301) 866-1990 x201 [email protected]
Billing (301) 866-1990 x203 [email protected]

- 109 -
StreetEagle Troubleshooting Guide The most commonly encountered StreetEagle problems are listed in the Table below. Most problems can be resolved by taking the action recommended in the appropriate Possible Cause section. If the problem persists, contact the appropriate InSight support department by phone, voicemail, email, or online support request.
Problem
Possible Causes (See Troubleshooting Steps Below)
Hardware Installation
Weak Cellular Coverage
Weak GPS Signal
Antenna Placement
Cellular Data Outage
Internet Connectivity
Map Data Limitations
StreetEagle Server Down
Vehicle reporting inconsistently, other vehicles reporting correctly
X X X
Vehicle not reporting at all, other vehicles reporting correctly
X X
No vehicles reporting current location and status
X X X
Get ‘Server busy’ message when starting StreetEagle software
X X
Sometimes get wrong street addresses in reports
X
Vehicle location a block or two off from where it should be
X X X
- 110 -
Hardware Installation If the Tracking Unit is intermittently reporting, or not reporting at all, the connections to the box should be thoroughly checked to insure that power is properly supplied to the Tracking Unit. In most cases, this is due to wires being unplugged or improperly connected. Solution – Use the Installation Instructions provided in the installation kit to verify correct operation of the indicator lights on the Tracking Unit with vehicle ignition off and on, and insure antenna connections. Repair wiring or connections as necessary. If the problem persists, and power is being supplied correctly to the Tracking Unit connector, and the antenna is properly connected, this may indicate a bad Tracking Unit or Antenna. Call InSight for technical support for assistance. If the Tracking Unit connector is unplugged, use tamper sealant lacquer, provided in the installation kit, to discourage and provide evidence of further tampering. Weak Cellular Coverage Often when a vehicles actual location is significantly off from where the map shows it, it is due to not receiving the most recent location update from the vehicle, which is due to poor cellular coverage at the current vehicle location. This usually occurs when a car is parked in a garage or in an area blocked from cellular reception. Although the location report cannot be sent in real time in these situations, it will be reported as soon as the vehicle is again in a area with good cellular coverage, such that you will always have a complete record of vehicle location in the reports and on the history map. If there are gaps in the history for the vehicle (in the reports or on the history map), it is either due to a bad GPS or an intermittent wiring problem to the tracking unit. Solution - A higher gain external antenna may help with cellular reception, but there are tradeoffs to consider (antenna getting torn off, cosmetic, drilling hole in trunk, etc.). Sometimes antenna placement (see below) may be the issue, but you would typically notice this soon after the unit is installed. In most cases the only thing that can be done is wait for the vehicle to drive into an area with good cellular reception, at which point the Tracking Unit will dump out any stored data that accumulated during its drive in a bad cellular area. Weak GPS reception When vehicles travel through cities with tall buildings blocking a clear view of the sky, such as downtown New York City or Boston, the accuracy of the GPS can be diminished by what is called the 'urban canyon' effect. When this occurs, fewer GPS satellites are communicating with the antenna in the vehicle, causing a less accurate or erroneous vehicle location solution. Solution – There is no quick fix for this problem. If the inaccuracy of the GPS is a problem for your application, an advance GPS receiver with ‘Dead Reckoning’ is available at an additional cost, and will overcome this problem. Antenna Placement An inaccurate GPS location or weak cellular reception may occur if the antenna’s view of the sky is blocked by metal or heavy window tinting in the vehicle between the antenna and the sky. Solution - Reposition the antenna so that it has an obstruction free view of the sky. For Covert style antennas, make sure that the ‘GPS Side’ or the antenna is oriented to face the sky, as shown in the installation instructions. An externally mounted antenna, either mounted on the windshield or mounted on the roof or trunk of the vehicle, will also solve this problem.

- 111 -
Cellular Data Outage Cellular network reliability and coverage has steadily improved as wireless carriers have continued to improve their infrastructure, however there are still occasional outages which may effect one or more regions. When this occurs, the Tracking Units will store the vehicles location data, and will download the stored vehicle activity data once service is restored. Solution - Insight USA is not responsible for and cannot fix cellular outages. Typically these outages are short lived, and service is quickly restored. A complete history of vehicle activity during the outage will be available once service is restored. Internet Connectivity The StreetEagle software requires Internet connectivity to access your tracking data from our Servers. If there is a Internet outage with your Internet service provider, or an outage to the StreetEagle Servers, you will not be able to operate the StreetEagle software until the outage is resolved. Internet outages on the StreetEagle Server side are very infrequent as our Servers are connected directly to the Internet backbone. Any outage on our Internet connection is automatically detected, and service will be restored as soon as possible. Solution – To verify Internet connectivity with your local Internet service provider, open an Internet Explorer browser window. If you cannot successfully connect to your home page, the problem is with your PC or your local Internet service. Restart your PC, and if the problem persists, troubleshoot your Internet connection back to your service provider. Map Data Limitations Current generation map databases do not have exact addresses associated with the latitude and longitude of a location. Reverse geo-coding is the process of associating an address with a latitude and longitude (which we get from the GPS), is done by approximating the street address along a road segment in the map database. The map databases (all current map databases that we are aware of) are a collection of road segments, each with a starting and ending latitude and longitude and an address range covering that road segment. Map databases assume a linear distribution of addresses along each road segment, which is often inaccurate, especially in rural areas with long road segments. This is why the addresses are often skewed from the actual address your vehicles are located. Solution - As a workaround for this, we have recently integrated Google Earth maps with StreetEagle, so that you can actually see the vehicles location on a satellite or aerial photography map, and you can actually see the building where the vehicle is (or was). With this capability you can see an actual picture of your vehicle at the location, regardless of the address. For frequently visited locations, you can also specify the location as a StreetEagle Location, and define a radius around the location large enough to cover any address inaccuracy, and instead of an address, the reports will give you the location name. This may not be a definitive as the Google Earth solution above, but it may be useful in some instances. StreetEagle Server Down The StreetEagle Server availability is typically better that 99.9%, however there may be an occasional disruption of service beyond our control. Critical processes are monitored and detected with remote ‘watchdog’ monitoring software, and Network Operations Center personal are immediately notified when a problem is detected. StreetEagle Server outages are rare and short lived, and service is restored as soon as a problem is detected.

- 112 -

- 113 -
23330 Cottonwood Pkwy Suite 333
California, MD 20619 24/7 StreetEagle Customer Support
866-495-9240 www.mds-inc.com