Standard of Web Meeting MeetingPlaza for Mac Operation...
65
-Standard of Web Meeting MeetingPlaza for Mac Operation Manual NTT-IT Corporation February, 2015 MeetingPlaza is a registered trademark of NTT-IT Corporation. The product name, the brand name, the service name, and the company name that has been described in this manual are the trademarks or registered trademarks of each company. The intellectual property right of the copyright in this book etc. belongs to NTT-IT Corporation. The content of the description of this manual might be changed without notice. Although this manual is fully prepared, but the company does not contain content the accuracy, reliability or validity of any guarantees.
-
Upload
phamnguyet -
Category
Documents
-
view
213 -
download
0
Transcript of Standard of Web Meeting MeetingPlaza for Mac Operation...

-Standard of Web Meeting
MeetingPlaza for Mac Operation Manual
NTT-IT Corporation
February, 2015
MeetingPlaza is a registered trademark of NTT-IT Corporation.
The product name, the brand name, the service name, and the company name that has been
described in this manual are the trademarks or registered trademarks of each company.
The intellectual property right of the copyright in this book etc. belongs to NTT-IT
Corporation.
The content of the description of this manual might be changed without notice.
Although this manual is fully prepared, but the company does not contain content the
accuracy, reliability or validity of any guarantees.

1 Introduction ............................................................................. 4
1-1 What is a Web conference? ............................................................................................. 4 1-2 What can you do with MeetingPlaza? .............................................................................. 4 1-3 Necessary equipment for conference participation ............................................................. 4 1-4 Overview of this Manual ................................................................................................ 5
2 When you enter the conference room for the first time ................... 6
2-1 Installation of voice and video equipment ........................................................................ 6 2-2 Login method ................................................................................................................ 9
2-2-1 Log in of conference reservation ....................................................................................................... 9 2-2-2 Log in of Permanent meeting room ..................................................................................................12
2-3 Entering the conference room ....................................................................................... 16 2-3-1 Install program ..............................................................................................................................16 2-3-2 Communication speed test after installation .......................................................................................21 2-3-3 Confirmation of microphone and speaker when using it usually ...........................................................22 2-3-4 Confirmation of image ...................................................................................................................23 2-3-5 Logout and re-login .......................................................................................................................24 2-3-6 Uninstall program ..........................................................................................................................25
3 Communications in conference room ......................................... 26
3-1 Conference Room Type ................................................................................................ 26 3-2 Talking with other participants ...................................................................................... 28 3-3 Other participant’s images ............................................................................................ 28 3-4 Text chat ..................................................................................................................... 30 3-5 Data sharing ................................................................................................................ 32
3-5-1 File Sharing ..................................................................................................................................32 3-5-2 Application Sharing .......................................................................................................................35 3-5-3 Desktop Sharing ............................................................................................................................37 3-5-4 Web share .....................................................................................................................................40
3-6 Other functions............................................................................................................ 42 3-6-1 Q&A ...........................................................................................................................................42 3-6-2 Room information .........................................................................................................................44
3-7 Operation on the video image ....................................................................................... 45
4 The operations implemented by setting ...................................... 47
Contents
2

4-1 Audio ......................................................................................................................... 48 4-1-1 Select the speech mode ...................................................................................................................48 4-1-2 Adjustment of the microphone volume..............................................................................................49 4-1-3 Adjustment of the speaker volume....................................................................................................50 4-1-4 Mute of microphone and speaker .....................................................................................................50 4-1-5 AVS sensitivity ..............................................................................................................................52 4-1-6 Echo canceller ...............................................................................................................................52 4-1-7 Noise canceller (mic) .....................................................................................................................52 4-1-8 Noise canceller (spk) ......................................................................................................................53
4-2 Video ......................................................................................................................... 54 4-2-1 Display the name all the time ..........................................................................................................54 4-2-2 Show all users ...............................................................................................................................56
4-3 Miscellaneous ............................................................................................................. 58 4-3-1 Network speed ..............................................................................................................................58 4-3-2 Connection method ........................................................................................................................60 4-3-3 Global Access Point Settings ...........................................................................................................63 4-3-4 Logout automatically .....................................................................................................................64
5 What to do when this manual does not help? .............................. 65
3

1 Introduction Thank you for using the MeetingPlaza collaboration tools. This manual makes a description of machine’s preparations, the methods of the
conference room’s loading and operations in the conference room only for attending the web meeting for the first time by using Mac.
Please consider the content of this book as an introduction to MeetingPlaza.
1-1 What is a Web conference? It is a remote conference through the Internet done with a personal computer, using a web
browser1 with and a microphone, speaker and a camera, etc.
1-2 What can you do with MeetingPlaza? With MeetingPlaza, the following functions are provided.
Communications among participants of the conference are accomplished with a voice,
video, chat.
The participants of the conference can read the Internet homepage at the same time.
1-3 Necessary equipment for conference participation
A personal computer, Internet connection, microphone or headset, speaker are needed for MeetingPlaza.
You can also attend the conference without camera, but you can observe the situation each other when having a meeting, so we recommend using camera.
Details of the necessary equipment are shown below.
1 Program for accessing and searching the Internet, such as Safari 4

Mac Standard status installed with Mac OS X 10.6, 10.7, 10.8, 10.9
Hard Drive 20MByte or more available space
Web Browser Safari Version 5.1
Others Internet connection, microphone or headset, speaker and a web cam
1-4 Overview of this Manual When the following symbols are used < > and [ ] in this manual, they represent the following: < >: Represents what you will see on the screen [ ]: Represent when you are given a choice and a set of values from a pull down menu (Example of screen)
(Explanation example) The value of <Select the network environment> is set to [FTTH 1.0Mbps (sending),
3.0Mbps(receiving)]. The hint and word that relates to the content of the description are shown as follows.
Content of hint or wording.
5

2 When you enter the conference room for the first time
When using MeetingPlaza for the first time you will be prompted to adjust your microphone and speaker volume. Your Internet connection and web cameras installation will also be adjusted.
The preparation and running method will be described as follows.
2-1 Installation of voice and video equipment You will need a personal computer equipped with a headset or microphone and speaker2, a
web cam3 and an Internet connection. The following describes the installation process.
Web camera installation and connection After installing Web cameras along with the manual provided, please connect the camera to your
PC.
Connection of headset or microphone speaker Please connect the headset or microphone, speaker to the personal computer.
The microphone of the headset’s plug for Mac can’t use line input.
Please use the headset with USB connection.
Confirm the voice device Please confirm the device such as <mic> and <speaker>. Click the icon < System Environment Setting>.
2 You can also use microphone/speaker which has internal echo canceller. 3 Please use the Web camera which is available for Mac.
6

And then click <sound>.
Open the window of <sound>. Speaker’s confirmation steps are showed below.
① Click <output>.
② Choose sound output device.
③ Move the volume’s slide and confirm the voice.
7

Microphone’ s confirmation steps are shown below.
① Click <input>.
② Choose sound input device.
③ Move input volume slide and confirm whether input level has response.
8

2-2 Login method There are 2 ways to enter the conference room of MeetingPlaza.
Login by conference reservation(2-2-1 )
A conference may be booked for conference participants prior to the meeting. Invitations are
delivered to participants before the meeting with a URL that allows access to the meeting.
Log in of Permanent meeting room(2-2-2 )
There are two ways to enter preset Permanent meeting room.
1. Login by clicking a conference URL
2. Login Permanent meeting room by using a user ID Without booking in advance, a user may start a conference anytime.
2-2-1 Log in of conference reservation
URL of the following form is necessary to enter a conference room in MeetingPlaza. When the conference room manager reserves a conference room in MeetingPlaza, this URL is delivered to
the participant automatically by E-mail.
The following is included in the E-mail along with the URL for the conference room.
Conference room manager Participant
The conference room is reserved.
The confirmation and URL of the
reservation reach.
URL reaches.
Enter the conference room.
9

Title of E-mail:
(Example)
Invitation to Conference (Oct 30. 11:27)
Addressor of E-mail:
(Example)
1092813981_Jhr&[email protected]
Text of E-mail:
The URL for the conference room is shown in the red frame.
(Example)
To: Taro Dennmou,
(Contract ID xxxxx)
A MeetingPlaza Distance Conference is going to be held as follows:
----------------------------------------------
Subject:
Examination of conference reservation
Chairperson:
Taro Dennmou,
Start time (UTC+9:00) Oct 30, 2007 11:27 AM (Asia/Tokyo)
The same time in other areas of the world.
(UTC+9:00) Oct 30, 2007 11:27 AM (Korea/Japan)
(UTC+8:00) Oct 30, 2007 10:27 AM (China)
(UTC+7:00) Oct 30, 2007 09:27 AM (Vietnam/Thai)
(UTC+5:30) Oct 30, 2007 07:57 AM (India)
(UTC+1:00) Oct 30, 2007 03:27 AM (Europe)
(UTC+0:00) Oct 30, 2007 02:27 AM (UK/Portugal)
(UTC-4:00) Oct 29, 2007 22:27 PM (US (EST))
(UTC-5:00) Oct 29, 2007 21:27 PM (US (CST))
(UTC-6:00) Oct 29, 2007 20:27 PM (US (MST))
(UTC-7:00) Oct 29, 2007 19:27 PM (US (PST))
(UTC-10:00) Oct 29, 2007 16:27 PM (Hawaii)
End time (UTC+9:00) Oct 30, 2007 12:27 PM (Asia/Tokyo)
Message:
10

This is a test of the conference room reservation.
List of participants:
Total 2 Users
Taro Dennmou
Hanako Kaigi
Please access the following URL to enter the remote conference room.
https://xxxx.xxxxxx/oc/oneclick.cgi?URL=vccp://yyy.yyyyyyyyy/assignable_cw///119345324587_ElsdalrtuQ
2V&UID=zzzzzz&PASS=aaaaaaa&X=100%25&Y=100%25&TEMPLATE=V4_Standard/V4_Standard
You can test the accessibility to a MeetingPlaza Distance Conference Server in advance by accessing the
following URL (a public distance conference room).
https://xxxxx.xxxxxxx/oc/oneclick.cgi?URL=vccp://yyyyy.yyyyyyyy////common_room1&UID=asdflkaG&P
ASS=kljdas98734Ve&X=100%25&Y=100%25
Conference ID: 119345324587_ElsdalrtuQ2V
Telephone Login Number: nnnnnnnn
Telephone gateway phone number xxx-yyyy-zzzz (dialing charge is needed)
The setting by the conference room manager is done once for telephone participants.
Please see FAQ in detail.
http://xxxx.xxxxxxxxxxxx/support/teleconn.html
The following e-mail address is for communication among the
participants. Note that the e-mail address is only available
until the conference ends.
To all the participants: mailto:[email protected]
Note:
Please read the following document carefully. If you don't agree on the
document, please don't enter any of the Conference Rooms.
Server access permission contract
http://xxxx.xxxxxxx/product/asp/standard/access.html
Software License Agreement
11

http://xxxx.xxxxxxx/product/asp/standard/license.html
Remote conference service contract clause
http://xxxx.xxxxxxx/product/asp/standard/article.html
Remote lesson service contract clause
http://xxx.xxxxxxxx/product/asp/tele_edu/article.html
----------------------------------
The URL for the conference room is shown in the red frame. When the conference begins, click the URL to login.
2-2-2 Log in of Permanent meeting room
There are two ways to enter a Permanent meeting room to attend a meeting. 1. Login by clicking a conference URL
Email distribution is not available. Please ask your conference administrator for the correct conference URL.
2. Login Permanent meeting room by using user ID
Conference room manager Participant
Notify all participants of
Permanent meeting room URL.
Enter the conference room
12

There are two ways to enter Permanent meeting room type conference.
Click the URL link to member login screen, and enter your ID and Password to login first. Click the direct URL link to jump to the conference room.
URL, ID and Password are sent by Email to Permanent meeting room participants. http://xxxxx.xxxxxxx//teammgr/index.cgi While the conference administrator chooses the option of <send URL to participant for direct
login>, the direct URL link will be sent to participant by Email. When the conference room manager registers Permanent meeting room, this URL, ID, and the
password are delivered to the participant in E-mail automatically. E-mail including this URL is the following. Title of E-mail: Ex.)MeetingPlaza Permanent meeting room account Addressor of E-mail: Ex.)[email protected] Text of E-mail: It is URL, ID, and a password for the part shown with a red frame to enter the conference room.
Conference room manager Participant
The Permanent meeting room
participant is registered.
URL, ID, and the
password reach.
It enters the conference room.
13

To: test002, (Contract ID test_002) Your account is registered by MeetingPlaza Conference Manager. Your ACCOUNT: YCKAGEZS Your PASSWORD: CCBSWFZB Please access the following URL to enter the remote conference room. http://xxxxxxxxx.xxx/teammgr/index.cgi Please access the following URL to direct enter the remote conference room.
http://xxxxxxxxx.xxx/teammgr/ormdirectlogin.cgixxxxxxxxxxxxxxxxxxxxxxxxxxx
xxxxxxxxxxxxxxxxxxxxxxxxxxxxxxx TELEPHONE/H.323System LOGIN NUMBER: Note: Please read the following documents carefully. If you don't agree on the document, please don't enter any of the Conference Rooms. Software License Agreement http://xxxxxxxx.xxx/e/license.html ---------------------------------- When URL is clicked, the entrance screen is displayed. ID and the password are input, and it logs it in.
14

15

2-3 Entering the conference room Access URL to enter the conference room, you will need to install the MeetingPlaza program
only at the first time. Installation steps are shown below.
2-3-1 Install program
1. URL access After receiving invitation email, please click the conference URL stated in your email. When logging into a Permanent meeting room, a user chooses a room to enter, then click <Enter>
to login. A web browser starts automatically.
Depending on your email program, you may see a normal security warning before the Web
browser is started. It is not an error of MeetingPlaza, but just a normal response from Email
program. Please read it carefully, and if you have no problem with it, click <Yes>.
Besides, if there is a line feed of URL in the open Web browser, some prompt texts as
following may pop out. <Access in an incomplete state.(NO
UID)> or <There is a line feed of URL, access in an incomplete state.(NO PASS)>.
At the moment, please close the Web browser and open the enclosure in the email for
conference invitation (double click). Open the Web browser again, and this time, when you
click the URL of conference room, it won’t show the prompt texts like <Access in an
incomplete state.(NO UID)> or <There is a line feed of URL, access in an incomplete
state.(NO PASS)>.
16

2. Installation of MeetingPlaza program(1) Access URL correctly in the web browser, it shows the image below. Click Disk’s Download.
17

3. Installation of MeetingPlaza program(2) [MeetingPlaza.dmg] is displayed in the download menu. Please double click.
Double click and open the downloaded folder. Please double click MeetingPlaza.pkg.
18

Run the installation of MeetingPlaza for mac. Click <Continue>.
Show the standard installation image and click <Install>.
19

Show the finish image of installation. Click <Close>.
Return to Safari and click [Launch MeetingPlaza].
First time login or when the Mac starts, the image will be shown below, please click <Open>.
20

2-3-2 Communication speed test after installation
After MeetingPlaza’s installation, it will start to test the communication speed for login the conference room. After test, it will end automatically.
When you fail to login the conference room, it will show the error message.
Please set the path by manual when you cannot connect.
You can login the conference room now.
21

2-3-3 Confirmation of microphone and speaker when using it usually
In MeetingPlaza, you can also confirm the microphone and speaker even if you are the only person in the conference room. You can confirm them before the meeting.
Click <Audio> from the menu on the left, and click <Device>. Click <Speaker test> to confirm the melody of Do Re Mi…from the speaker. Proceeding loopback test by “speaker test”. Click <Microphone test> to do the loopback test. If you talk in this way, the voice will loopback in
the conference room and it can be heard from the speaker.
In this case, only you can hear the voice even if other participants are in the conference
room.
22

If you want to adjust the volume of microphone and speaker, please choose <Basic> of <Audio Setup> and move the slide bar.
When you finish the volume adjustment, please click <Exit Sound Test> and choose < Exit
LoopBack Test t> to close the sound setting window.
2-3-4 Confirmation of image
Your web camera image can be confirmed in the red frame in the figure below.
If the Web camera image is poor or not available, please read the manual of this camera.
23

2-3-5 Logout and re-login
If you want to logout from the conference room, please click < logout>.
Show the image of logout confirmation.
Click <NO>, don’t exit and return to the conference room. Click <Yes>, logout from the conference room. If you want to login the conference room again, re-access URL that you first used and click
[Launch MeetingPlaza].
24

2-3-6 Uninstall program
If you want to uninstall the program, please delete three places as follows. 1. Finder -> MeetingPlaza.dmg in Download 2. Finder -> home →MeetingPlaza in Applications 3. Finder -> library →MeetingPlaza folder in Application Support
25

3 Communications in conference room
When you enter the conference room with other participants, you can communicate with each other by voice, video and document sharing.
Please refer to the reference manual for a more detailed explanation.
3-1 Conference Room Type At conference administrator system, a user may select a room type when creating a new
conference room. Adhoc room (choose from conference room type)
Reserved conference room (choose from option settings)
There are three types of conference rooms to choose from.
Normal Conference ・・・ Conference room enabled with voice and video of all participants.
Normal Conference (Only administrator and talker are displayed) ・・・ Only videos of administrator and talker are displayed.
Voice Meeting ・・・ The conference enables voice only for all users participating in the conference.
26
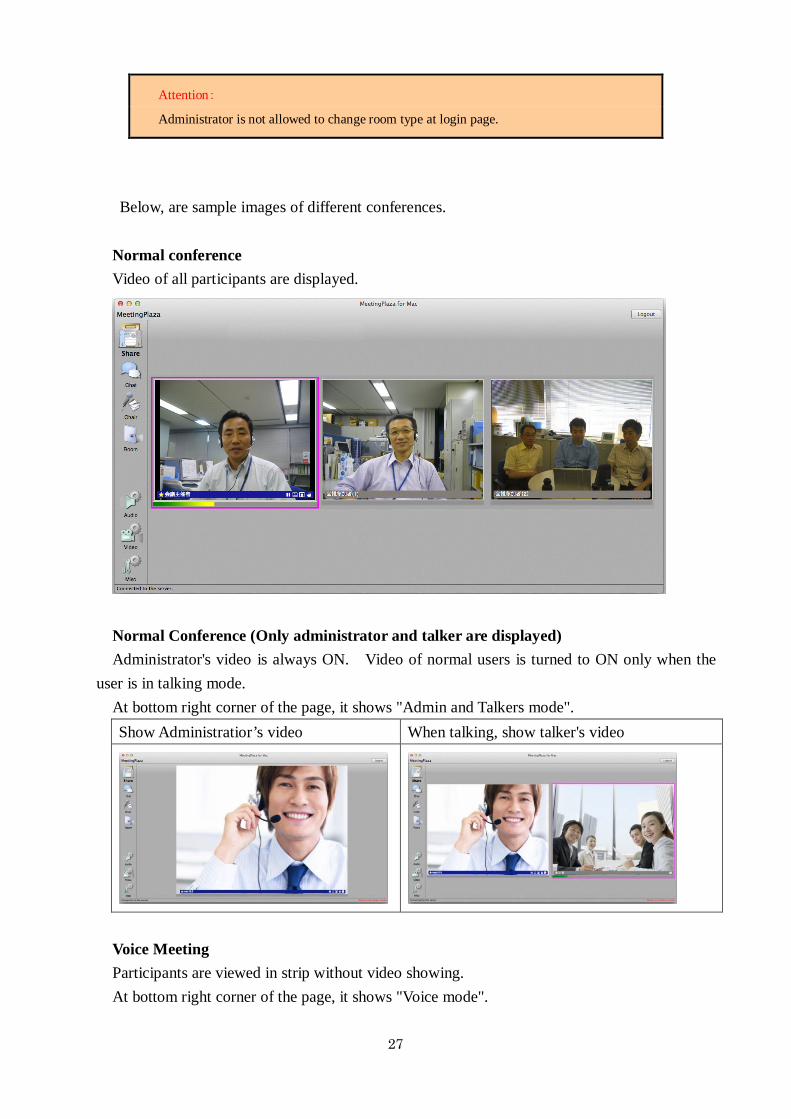
Attention:
Administrator is not allowed to change room type at login page.
Below, are sample images of different conferences.
Normal conference Video of all participants are displayed.
Normal Conference (Only administrator and talker are displayed) Administrator's video is always ON. Video of normal users is turned to ON only when the
user is in talking mode. At bottom right corner of the page, it shows "Admin and Talkers mode". Show Administratior’s video When talking, show talker's video
Voice Meeting Participants are viewed in strip without video showing. At bottom right corner of the page, it shows "Voice mode".
27
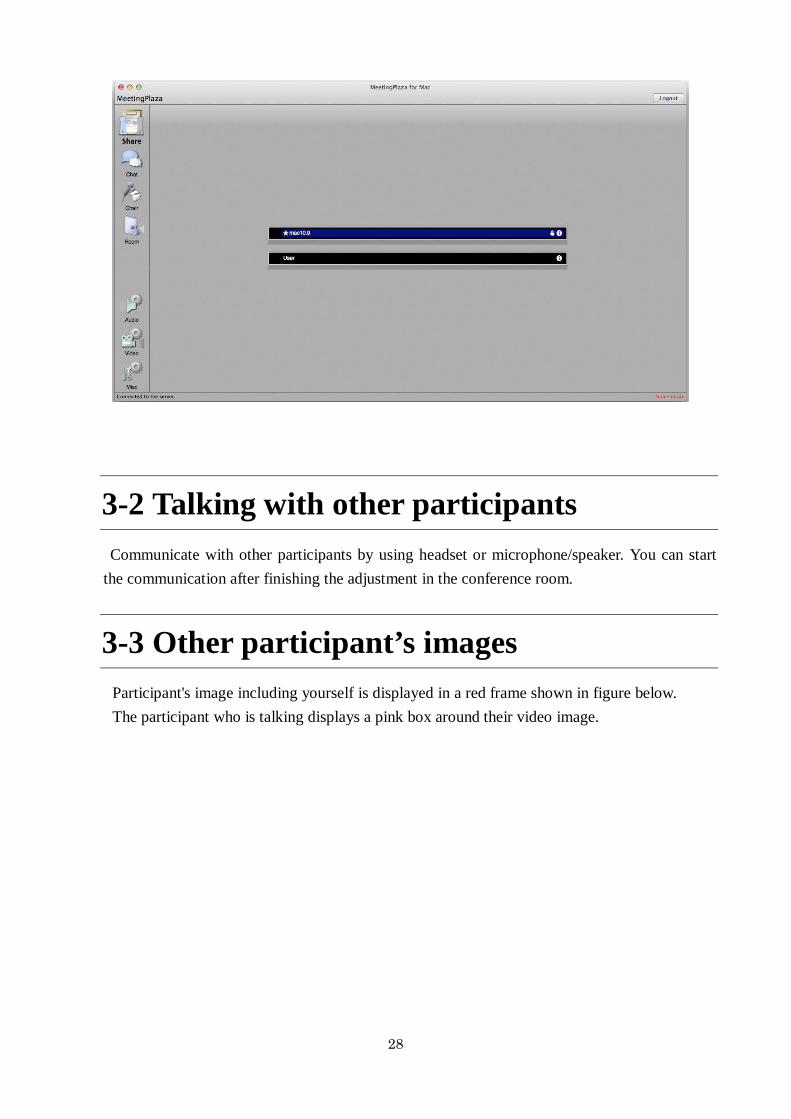
3-2 Talking with other participants Communicate with other participants by using headset or microphone/speaker. You can start
the communication after finishing the adjustment in the conference room.
3-3 Other participant’s images Participant's image including yourself is displayed in a red frame shown in figure below. The participant who is talking displays a pink box around their video image.
28

You can adjust screen smooth degree by video quality in <video setting>.
Move the slide to the left to adjust to low quality (low frame rate, the amount of data transmission is small due to net speed), and move the slide to the right to adjust to high quality (high frame rate, the amount of data transmission is large due to net speed).
Video Quality means <the quantity allocated to the videos> in the set speed of
network (bandwidth). Therefore, the video quality will be regulated in the range of the set speed of network (bandwidth).
29

3-4 Text chat You are also able to communicate by chat in the conference room. Click <Chat>, the chat area is shown below the image.
Type in the chat area and click < Submit > or <Enter> key.
Chat message from other participants will be shown in message bubble.
30

Click the bubble, and the message will be shown in the chat area.
31

3-5 Data sharing In a conference room, users may share files, applications, desktops and websites.
3-5-1 File Sharing
File sharing allows users to share PDF files, image files (.jpg, .bmp) etc. Administrators may share files that have been previously uploaded to the conference room, or files
on local hard disk. Normal users may only share files stored on their local hard disk. For steps on how to upload a file to share in advance, please refer to MeetingPlaza Reference
Manual.
Attention:
Movements such as turning a page or scrolling down/up are not in sync.
In addition, a host may change the window size, but the change will not be reflected on
other users' screens.
Steps on how to share files by pre-upload (Administrator Only) 1. Click [Share] -> Click [File Sharing].
2. Click [Choose Pre-Upload File].
32

3. From "Preuploaded Files", choose a file and click [Start Sharing].
4. Selected file is opened.
Steps on how to share a file stored on your local hard disk. (all users). 1. Click [Share] -> Click [File Sharing].
33

2. Administrator clicks [Choose Local File]. This page is disabled to normal users.
3. From "All My Files", choose a file to share and click [Open] to open.
4. Selected file is opened.
34

3-5-2 Application Sharing
To share an application, the user needs to start the application first. By clicking <Application Sharing>, a user chooses the application to share from the list. The shared application will stay on top, and screen data will be sent to the rest of participants.
A user may choose more than one application program to share with Below, is a description on how to share application. 1. Click <Share> -> Click <Application Sharing>.
35

2. From a list of application, a user chooses the application to share, click <Start Application Sharing>.
3. Shared document is displayed at upper right, with application sharing window opened
accordingly.
4. A host allows users to share documents by clicking <Allow other user to take control> and
choose the right user to proceed.
36

3-5-3 Desktop Sharing
To share a desktop, click <Desktop Sharing>, then click <Desktop> or <A part of Desktop> to proceed. By choosing <Desktop>, a user shares his desktop with the rest of participants. By choosing <A part of Desktop>, a user shares his desktop partially with the rest of participants.
Below, is a description on how to share the entire desktop. 1. Click <Share> -> Click <Desktop Sharing>.
2. Choose the entire desktop, then click <Start Desktop Sharing>.
3. Shared document is displayed at upper right of your window.
37

4. A host allows users to share documents by clicking <Allow other user to take control> and
choose the right user to proceed.
Below, is a description on how to share the desktop partially. 1. Click <Share> -> Click <Desktop Sharing>.
38

2. Choose part of your desktop to share with, then click <Start Desktop Sharing>.
3. A frame is displayed to let you enlarge, shrink or move around the part of desktop you want to
share with. Click [Stopped (Push to start)] to proceed.
4. Shared document is displayed at upper right of your window.
5. A host allows users to share documents by clicking <Allow other user to take control> and
choose the right user to proceed.
39

3-5-4 Web share
You can also share several pages. Page turning is synchronous when sharing the web. Click the URL in new window, the new label page will be opened and shared.
Note: format inputting and page turning are not synchronous.
Additional, size-changing of the window by organizer is not synchronous.
The steps of web sharing are shown below. 1. Click <Share>, and then click <Web Sharing>.
2. Enter URL, and click <Open>.
40

3. Open specified webpage.
4. When you click the upper left corner of the shared document, you can maximize,
minimize and close the displayed area of the shared document.
① Close the shared document. The following confirmation message is
displayed when closing.
② Minimize the shared document.
③ Viewing your displayed area of the shared document in full screen. 41

3-6 Other functions
3-6-1 Q&A
You can raise hand in the Chair.
You can also raise hand in the video image. The details of video image will be introduced in 3-6 Operation on the video image. 1. Raise hand
1. Click <Raise hand> in the Chair.
2. Click <Raise hand>.
3. The raise hand icon shows in the upper left corner of the video image.
42

2. Put down all participants’ hands
Only the user with administration authority can do this operation. 1. Click <Raise hand> in the Chair.
2. Click <Down all hands>.
3. The raise hand icon in the upper left corner of the video image disappears.
43

3-6-2 Room information
You can confirm the participants’ information from the conference room information.
You can confirm the participants’ username and ID.
44

3-7 Operation on the video image The method of operation on the video image shows below.
Double size
It will be displayed when the cursor is placed on or over the image. The image size will double when clicking on the x2 icon. Click the icon to return to original size.
The participant is in minimized display
When the cursor stops on the image, its icon will be displayed. The designated participant will be in minimized display. If you want to restore the original state, please click the minimization icon .
Pause Click pause icon to stop the transmission of video images. After selecting pause, you can click (Play) to resume transmission of video images.
Save
After clicking (Pause), When the camera video is under the suspended state, this button will become available so as to save the suspended image into the computer.
Still image
Only for .bmp with 80*64,160*128pixel. Use a bitmap image instead of live video by selecting still image and selecting the bitmap file of your choice that resides on your computer.
Raise hand
Click the icon and it will be displayed in the upper left corner of the video image. <Raise hand> can be also used in Chair.
45

46
4 The operations implemented by setting
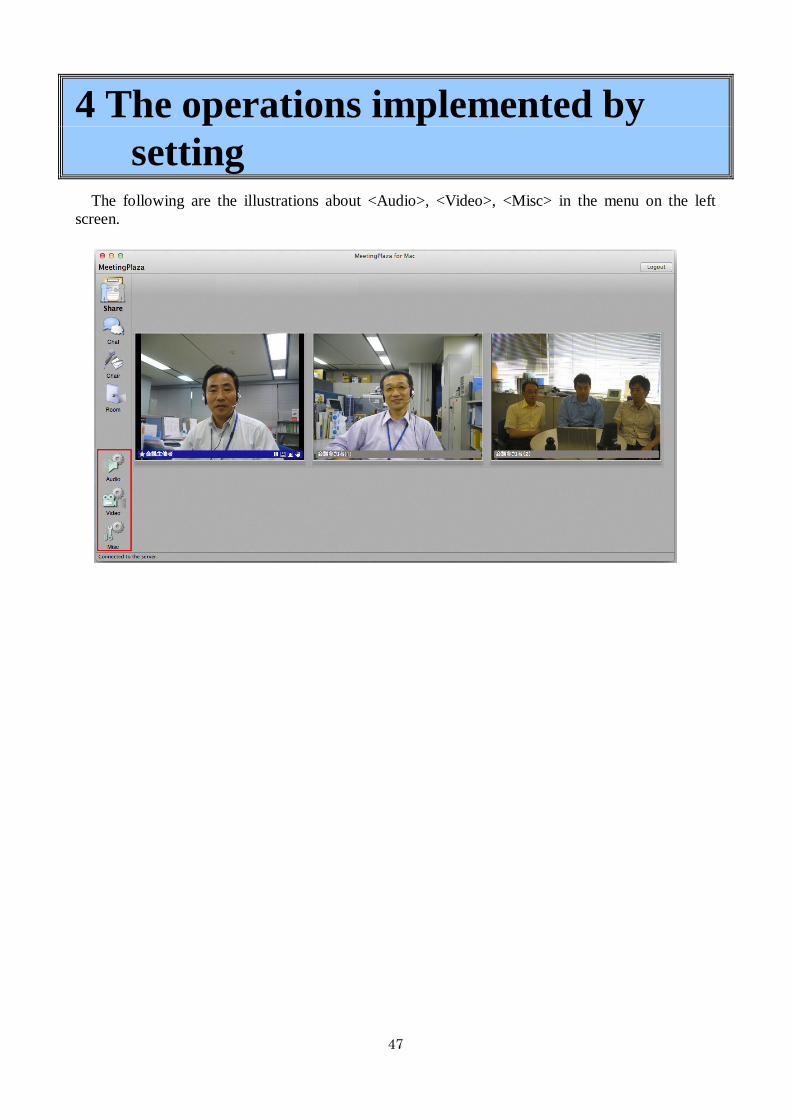
The following are the illustrations about <Audio>, <Video>, <Misc> in the menu on the left screen.
47

4-1 Audio Do the setting of microphone and speaker. You can choose the chat mode, adjust microphone and speaker and muffle from <Basic>. You can confirm the microphone device, speaker device, speaker test and microphone test in
<Device>. If you want to know the detail functions of <Device>, please refer to 2-3-3 Confirmation of
microphone and speaker when using it usually.
4-1-1 Select the speech mode
Click the right of <Mode> to select the speech mode.
48

There are three modes shown as follows:
Mic is on while Ctrl key is down You can talk by holding down the [Ctrl] key.
Mic is on automatically while speaking The sound from the mic, is automatically detected, and transmits the audio.
Press Ctrl key to turn on/off the mic Push the [Ctrl] key to start talking, and then push again to stop talking.
Mic is alway on. Use mute button to turn off Into state of speech.
4-1-2 Adjustment of the microphone volume
The microphone volume is adjusted by use of the slide indicator nearby the microphone icon.
Move the slide to the left to reduce the volume of microphone, move the slide to the right to increase the volume of microphone. There is an indicator displaying the microphone volume under the slide block. The indicator will show the color state from green to yellow on the computer being used. This is the standard for adjusting the volume to the state which can be clearly heard by the other side.
49

4-1-3 Adjustment of the speaker volume
The speaker volume is adjusted by moving the slide indicator nearby the speaker icon.
The volume will decrease by movement to the left and increase by movement to the right.
4-1-4 Mute of microphone and speaker
Select the option of noise elimination which is on the right of the microphone/speaker icon, and the state will be turned mute (no voice).
If the speech can’t be made or the voice can’t be heard, please check if the mute option is selected. This mute has nothing to do with the mute of the Mac itself. If the speech can’t be made or the voice can’t be heard, please confirm if the Mac itself is in the
state of mute. The method of checking the Mac equipment is as following. Click <System Environment Setting> at the bottom of the screen.
50

Click <Sound>.
Open sound frame.
Check if the mute option of<Sound Effects>, <Output>, <Input> is selected. 51

4-1-5 AVS sensitivity
The speech mode takes effort when [Mic is on automatically] is on The sensitivity of sound swithch can be adjusted.
4-1-6 Echo canceller
The use of an echo canceller allows the user to use an open mic without sending feedback to the conference participants’.
4-1-7 Noise canceller (mic)
Noise reduction (microphone) can eliminate noise associated with microphone usage.
52

4-1-8 Noise canceller (spk)
Noise reduction (speaker) can eliminate noise associated with speaker usage.
53

4-2 Video Do the setting about video.
4-2-1 Display the name all the time
You can choose whether display the name in the video.
If selected, the participant’s name will be displayed in the video. If not, the participant’s name won’t be displayed in the video image, but displayed
only when the cursor stops on the image.
54

Pic. 1 <Always display the name> being selected
Pic. 2 <Always display the name> being unselected
55

Pic. 3 <Always display the name> being unselected, and the cursor stops on
the participant’s image
4-2-2 Show all users
When the video of the participant is in minimized display, you can click <Show all users> to show all participants’ video images.
56

Pic. 4 Some participants not being displayed
Pic. 5 The result after clicking <Display all participants>
57

4-3 Miscellaneous Do the setting about network speed and connection method.
4-3-1 Network speed
The network speed that can be measured with MeetingPlaza is 6000Kbps (sending and receiving).
In the network setting, the maximum network speed that MeetingPlaza can use is set. There are 3 ways to set the upper limit. 1. Direct input
Select <Direct input> to do the operation. Input the value of Send (Upward) and Receive (Downward) speed.
58

2. Automatic detection Select <Direct input> to do the operation. Click <Measu>, and start to detect automatically.
3. Choose network environment You can do this operation when <By choose your network environment from the list> is selected. Choose your current network speed from the list.
59

4-3-2 Connection method
You can select connection modes including <Direct connection>, <HTTP tunneling> and <HTTP proxy>.
Connection method Explanation
Direct connection It is a method to communicate by using UDP(User Datagram Protocol)/TCP
HTTP tunneling It is a method to communicate by using HTTP/HTTPS.
HTTP proxy It is a method of the communication via the HTTP proxy server in addition to using same HTTP as the TCP tunneling (direct HTTP tunneling).
After changing the connection method, please click <Reconne>, disconnect (logout) -> reconnect (login).
1. Direct connection
Choose <Direct connection>
60

2. HTTP tunneling
Choose <HTTP tunneling> and appoint default port (server port number).
3. HTTP proxy Choose <HTTP tunneling> and input the server name in <HTTP proxy>. Input the port.
Note:If you do not know your server name (or IP address) and port value, please contact
your web administrator.
61

62

4-3-3 Global Access Point Settings
Users attend a web conference via the nearest available server, regardless where the web conference is held. Users can enjoy high-quality video, audio and data sharing on our consistent and reliable network.
To specify the Global Access Point, please click [Proxy] under [Miscellaneous], and then click [Global Access Point] to make changes on the Global proxy page.
- Depends on your contract type, [Global Access Point] may not be disabled. - The limited network connection between your device and the nearest server may deteriorate the
quality of the service.
63

4-3-4 Logout automatically
The function that logs out automatically is provided when only one person enters the conference room and it is left (When he forgets to log out and then leaves seat).
This function turns on by the standard. It is automatically set that it logs out 10 minutes after it enters the state entering a room only by one person.
Please turn off the check box when it is unnecessary or lengthen time.
64

5 What to do when this manual does not help?
If your problem is not answered by this manual please do the following: You can use the support window of NTT-IT for Consulting. Please choose <trouble shooting> in the <support> menu in the top page. It is also possible to contact the support window by E-mail. E-mail: [email protected]
65