STANDARD 14: NURSE AIDE SCOPE OF PRACTICE · STANDARD 14: NURSE AIDE SCOPE OF PRACTICE The nurse...
49
STANDARD 14: NURSE AIDE SCOPE OF PRACTICE The nurse aide will perform only the tasks in the course standards and Resident Care Procedures manual, unless trained appropriately by licensed staff of the facility with policies and procedures and a system for ongoing monitoring to assure compliance with the task, i.e., (see supplements for examples). This additional training would only apply for tasks, which are not prohibited by paragraphs 2 and 3 of this section and by current rule, which prohibits the giving of injections. The nurse aide will not perform any invasive procedures, including enemas and rectal temperatures, checking for and/or removing fecal impactions, instillation of any fluids, through any tubing, administering vaginal or rectal installations. The nurse aide will not administer any medications, perform treatment or apply or remove any dressings. Exception to the above would be the application of creams/ointments to intact skin, such as moisture barrier cream.
Transcript of STANDARD 14: NURSE AIDE SCOPE OF PRACTICE · STANDARD 14: NURSE AIDE SCOPE OF PRACTICE The nurse...
STANDARD 14: NURSE AIDE SCOPE OF PRACTICE
The nurse aide will perform only the tasks in the course standards and Resident Care Procedures manual, unless trained appropriately by licensed staff of the facility with policies and procedures and a system for ongoing monitoring to assure compliance with the task, i.e., (see supplements for examples). This additional training would only apply for tasks, which are not prohibited by paragraphs 2 and 3 of this section and by current rule, which prohibits the giving of injections.
The nurse aide will not perform any invasive procedures, including enemas and rectal temperatures, checking for and/or removing fecal impactions, instillation of any fluids, through any tubing, administering vaginal or rectal installations.
The nurse aide will not administer any medications, perform treatment or apply or remove any dressings. Exception to the above would be the application of creams/ointments to intact skin, such as moisture barrier cream.
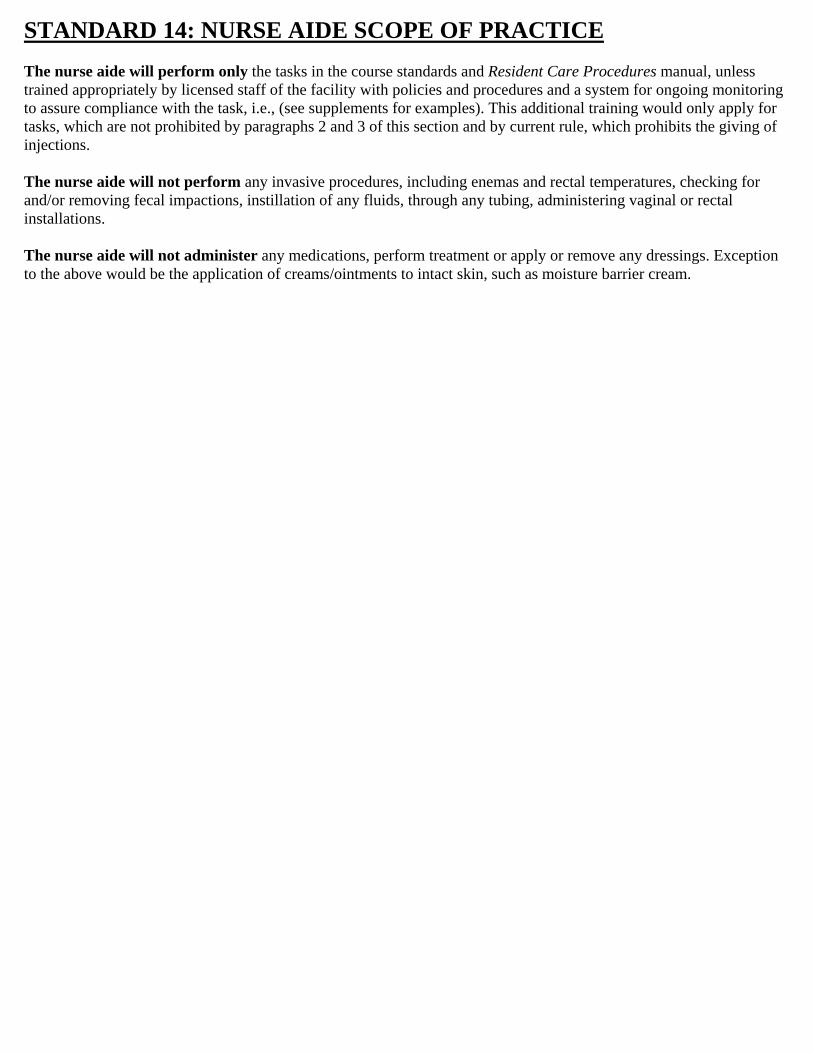
ABDOMINAL BINDER
STEP RATIONALE
1. Do initial steps.
2. Check the skin for redness, open areas, orincontinence.
2. Allows you to identify early signs of skinbreakdown and the need for cleansing prior tobinder application.
3. Place binder flat on the bed and haveresident lie down with the upper border atthe waist and the lower border at the levelof the gluteal fold. If resident is in bed,assist him/her to roll side-to-side whileplacing binder underneath him/her in thesame position.
3. A binder placed above the waist interferes withbreathing, one placed too low interferes withelimination and walking.
4. Bring the ends of the binder around theresident, and overlap them. Beginning at thebottom of the binder, secure the velcrofastener strip so that the binder fits snugly.
4. A snug fit provides maximum support. If thebinder is too loose, efficacy is impaired. Ifit is too tight, resident may be uncomfortable.
5. Ensure that there are no wrinkles or creasesin the binder.
5. Wrinkles and creases put pressure on the skinincreasing the risk for excoriation.
6. Do final steps.
I verify that this procedure was taught and successfully demonstrated according to facility policy.
_________________________________________ __________________________
Student/CNA Signature Date
_________________________________________ __________________________
Student/CNA Signature Date
_________________________________________ __________________________
Student/CNA Signature Date
_________________________________________ __________________________
Instructor Signature Date
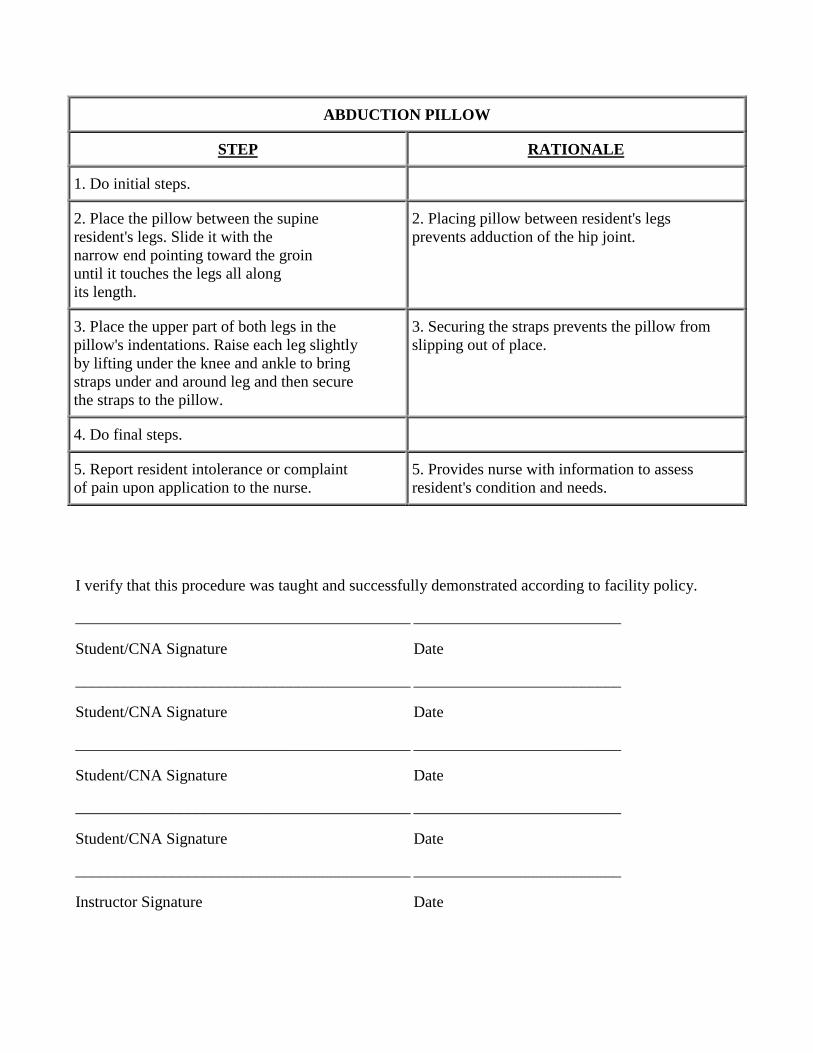
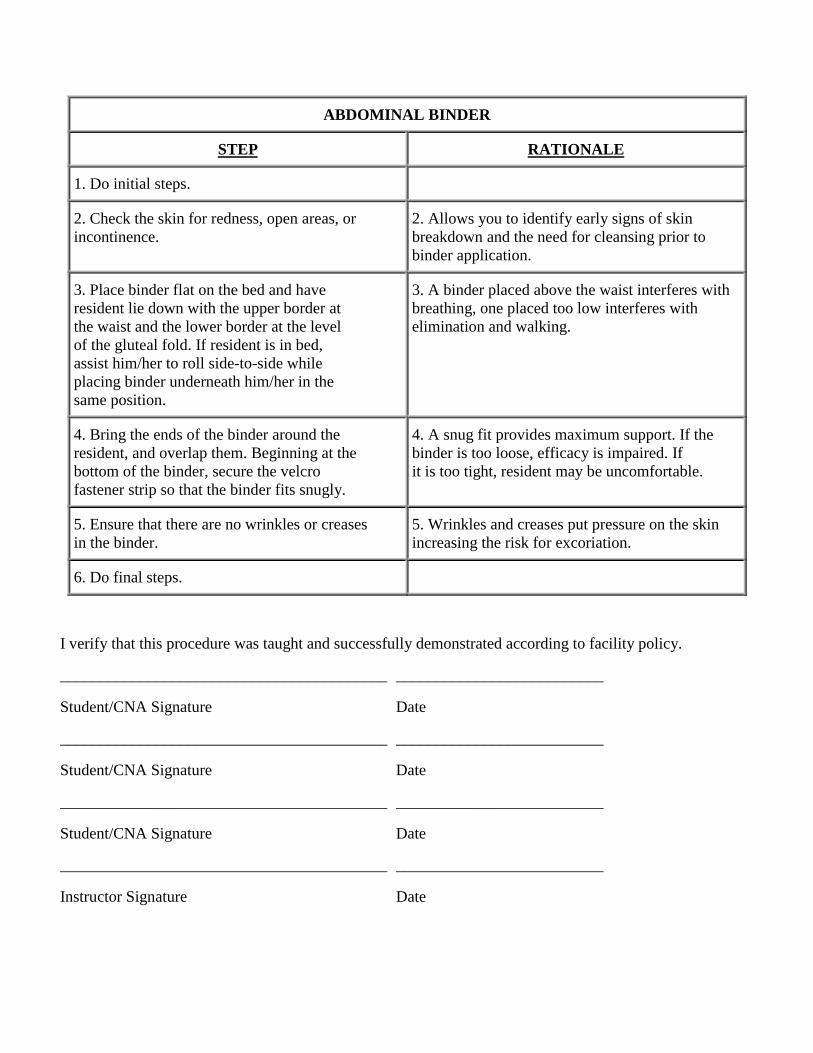
ABDUCTION PILLOW
STEP RATIONALE
1. Do initial steps.
2. Place the pillow between the supineresident's legs. Slide it with thenarrow end pointing toward the groinuntil it touches the legs all alongits length.
2. Placing pillow between resident's legsprevents adduction of the hip joint.
3. Place the upper part of both legs in thepillow's indentations. Raise each leg slightlyby lifting under the knee and ankle to bringstraps under and around leg and then securethe straps to the pillow.
3. Securing the straps prevents the pillow fromslipping out of place.
4. Do final steps.
5. Report resident intolerance or complaintof pain upon application to the nurse.
5. Provides nurse with information to assessresident's condition and needs.
I verify that this procedure was taught and successfully demonstrated according to facility policy.
__________________________________________ __________________________
Student/CNA Signature Date
__________________________________________ __________________________
Student/CNA Signature Date
__________________________________________ __________________________
Student/CNA Signature Date
__________________________________________ __________________________
Student/CNA Signature Date
__________________________________________ __________________________
Instructor Signature Date
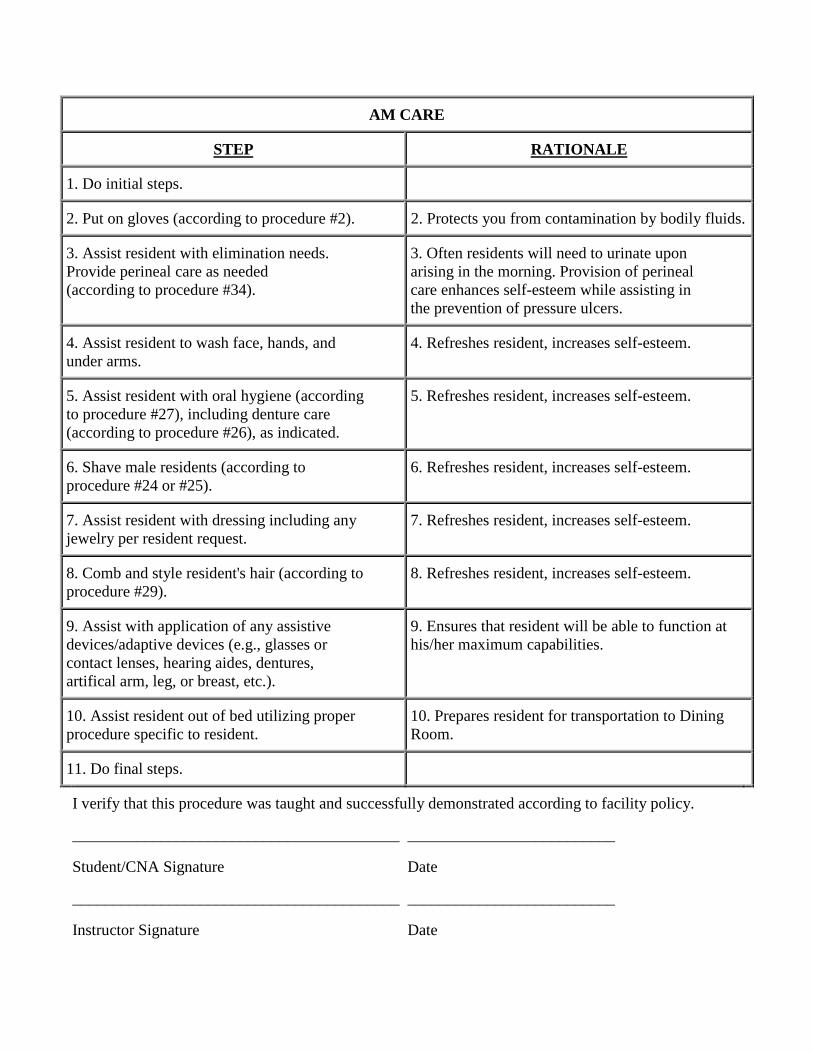
AM CARE
STEP RATIONALE
1. Do initial steps.
2. Put on gloves (according to procedure #2). 2. Protects you from contamination by bodily fluids.
3. Assist resident with elimination needs.Provide perineal care as needed(according to procedure #34).
3. Often residents will need to urinate uponarising in the morning. Provision of perinealcare enhances self-esteem while assisting inthe prevention of pressure ulcers.
4. Assist resident to wash face, hands, andunder arms.
4. Refreshes resident, increases self-esteem.
5. Assist resident with oral hygiene (accordingto procedure #27), including denture care(according to procedure #26), as indicated.
5. Refreshes resident, increases self-esteem.
6. Shave male residents (according toprocedure #24 or #25).
6. Refreshes resident, increases self-esteem.
7. Assist resident with dressing including anyjewelry per resident request.
7. Refreshes resident, increases self-esteem.
8. Comb and style resident's hair (according toprocedure #29).
8. Refreshes resident, increases self-esteem.
9. Assist with application of any assistivedevices/adaptive devices (e.g., glasses orcontact lenses, hearing aides, dentures,artifical arm, leg, or breast, etc.).
9. Ensures that resident will be able to function athis/her maximum capabilities.
10. Assist resident out of bed utilizing properprocedure specific to resident.
10. Prepares resident for transportation to DiningRoom.
11. Do final steps.
I verify that this procedure was taught and successfully demonstrated according to facility policy.
_________________________________________ __________________________
Student/CNA Signature Date
_________________________________________ __________________________
Instructor Signature Date
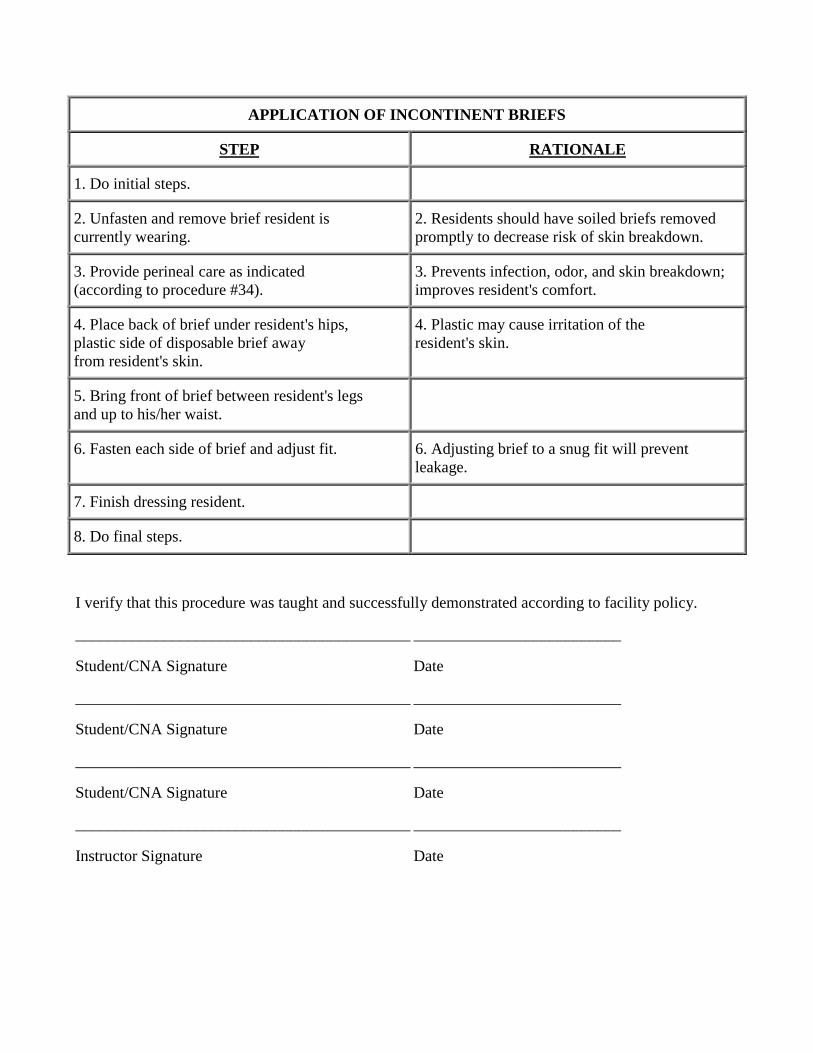
APPLICATION OF INCONTINENT BRIEFS
STEP RATIONALE
1. Do initial steps.
2. Unfasten and remove brief resident iscurrently wearing.
2. Residents should have soiled briefs removedpromptly to decrease risk of skin breakdown.
3. Provide perineal care as indicated(according to procedure #34).
3. Prevents infection, odor, and skin breakdown;improves resident's comfort.
4. Place back of brief under resident's hips,plastic side of disposable brief awayfrom resident's skin.
4. Plastic may cause irritation of theresident's skin.
5. Bring front of brief between resident's legsand up to his/her waist.
6. Fasten each side of brief and adjust fit. 6. Adjusting brief to a snug fit will preventleakage.
7. Finish dressing resident.
8. Do final steps.
I verify that this procedure was taught and successfully demonstrated according to facility policy.
__________________________________________ __________________________
Student/CNA Signature Date
__________________________________________ __________________________
Student/CNA Signature Date
__________________________________________ __________________________
Student/CNA Signature Date
__________________________________________ __________________________
Instructor Signature Date
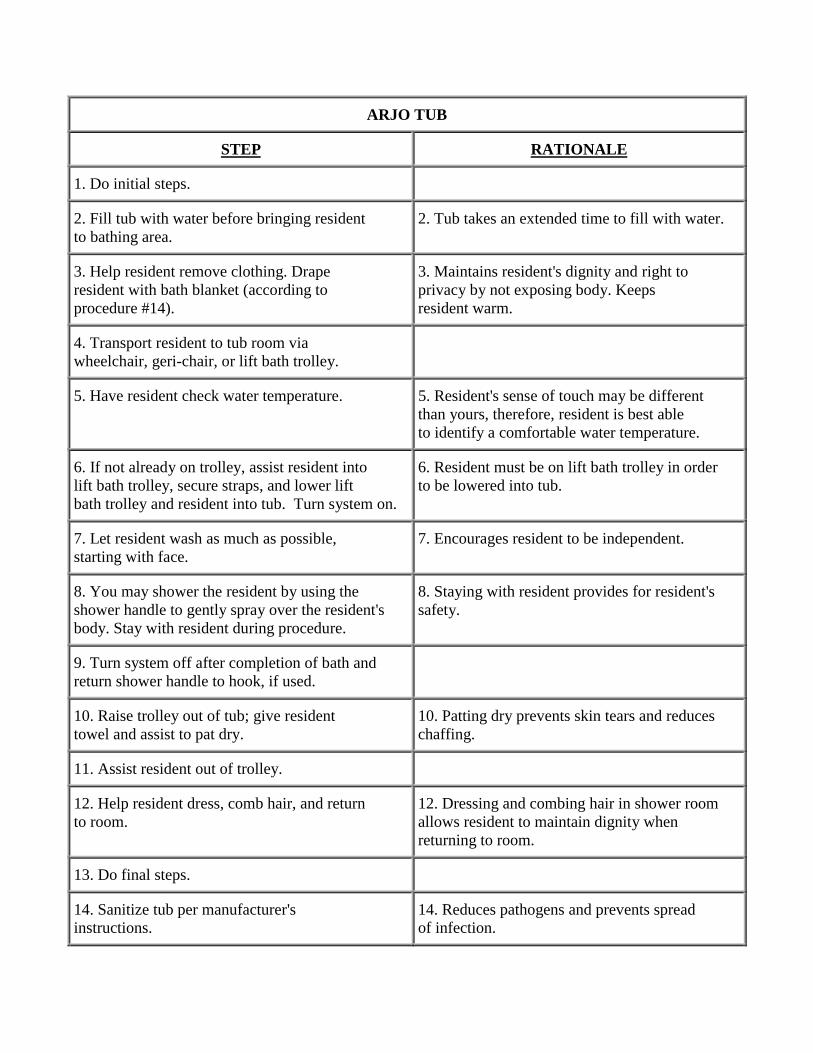
ARJO TUB
STEP RATIONALE
1. Do initial steps.
2. Fill tub with water before bringing residentto bathing area.
2. Tub takes an extended time to fill with water.
3. Help resident remove clothing. Draperesident with bath blanket (according toprocedure #14).
3. Maintains resident's dignity and right toprivacy by not exposing body. Keepsresident warm.
4. Transport resident to tub room viawheelchair, geri-chair, or lift bath trolley.
5. Have resident check water temperature. 5. Resident's sense of touch may be differentthan yours, therefore, resident is best ableto identify a comfortable water temperature.
6. If not already on trolley, assist resident intolift bath trolley, secure straps, and lower liftbath trolley and resident into tub. Turn system on.
6. Resident must be on lift bath trolley in orderto be lowered into tub.
7. Let resident wash as much as possible,starting with face.
7. Encourages resident to be independent.
8. You may shower the resident by using theshower handle to gently spray over the resident'sbody. Stay with resident during procedure.
8. Staying with resident provides for resident'ssafety.
9. Turn system off after completion of bath andreturn shower handle to hook, if used.
10. Raise trolley out of tub; give residenttowel and assist to pat dry.
10. Patting dry prevents skin tears and reduceschaffing.
11. Assist resident out of trolley.
12. Help resident dress, comb hair, and returnto room.
12. Dressing and combing hair in shower roomallows resident to maintain dignity whenreturning to room.
13. Do final steps.
14. Sanitize tub per manufacturer'sinstructions.
14. Reduces pathogens and prevents spreadof infection.
I verify that this procedure was taught and successfully demonstrated according to facility policy.
_________________________________________ __________________________
Student/CNA Signature Date
_________________________________________ __________________________
Student/CNA Signature Date
_________________________________________ __________________________
Student/CNA Signature Date
_________________________________________ __________________________
Student/CNA Signature Date
_________________________________________ __________________________
Student/CNA Signature Date
_________________________________________ __________________________
Student/CNA Signature Date
_________________________________________ __________________________
Student/CNA Signature Date
_________________________________________ __________________________
Student/CNA Signature Date
_________________________________________ __________________________
Student/CNA Signature Date
_________________________________________ __________________________
Student/CNA Signature Date
_________________________________________ __________________________
Student/CNA Signature Date
_________________________________________ __________________________
Instructor Signature Date
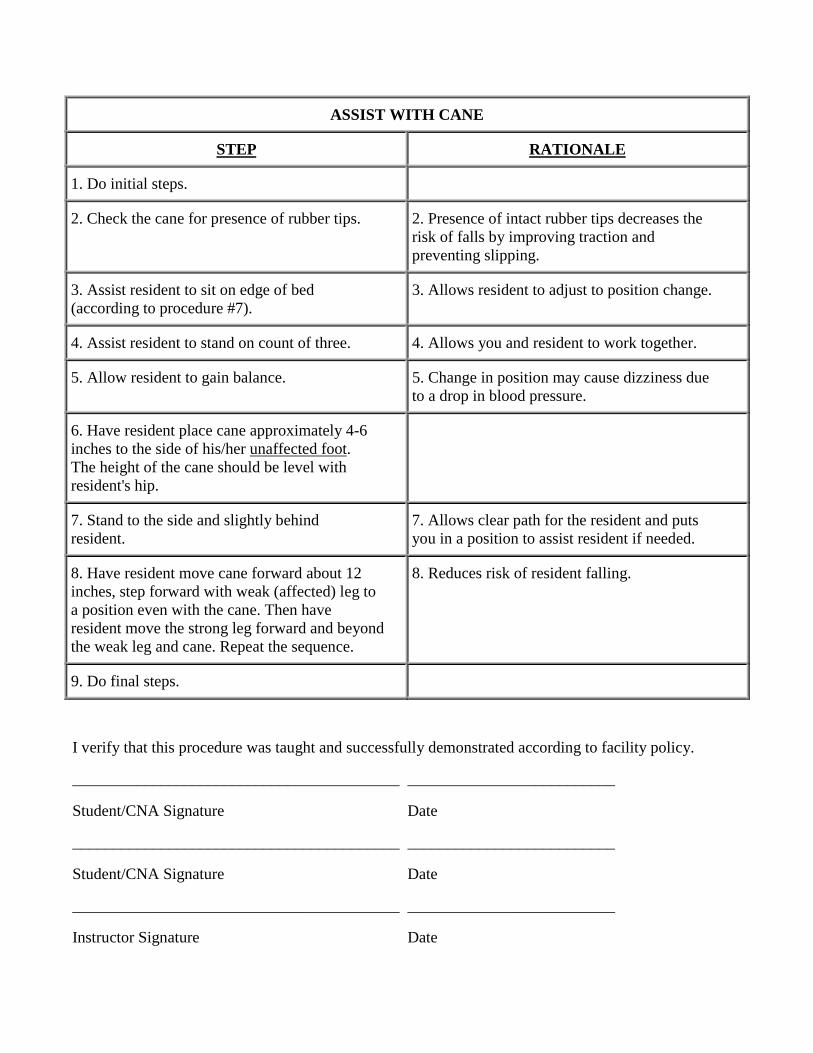
ASSIST WITH CANE
STEP RATIONALE
1. Do initial steps.
2. Check the cane for presence of rubber tips. 2. Presence of intact rubber tips decreases therisk of falls by improving traction andpreventing slipping.
3. Assist resident to sit on edge of bed(according to procedure #7).
3. Allows resident to adjust to position change.
4. Assist resident to stand on count of three. 4. Allows you and resident to work together.
5. Allow resident to gain balance. 5. Change in position may cause dizziness dueto a drop in blood pressure.
6. Have resident place cane approximately 4-6inches to the side of his/her unaffected foot.The height of the cane should be level withresident's hip.
7. Stand to the side and slightly behindresident.
7. Allows clear path for the resident and putsyou in a position to assist resident if needed.
8. Have resident move cane forward about 12inches, step forward with weak (affected) leg toa position even with the cane. Then haveresident move the strong leg forward and beyondthe weak leg and cane. Repeat the sequence.
8. Reduces risk of resident falling.
9. Do final steps.
I verify that this procedure was taught and successfully demonstrated according to facility policy.
_________________________________________ __________________________
Student/CNA Signature Date
_________________________________________ __________________________
Student/CNA Signature Date
_________________________________________ __________________________
Instructor Signature Date
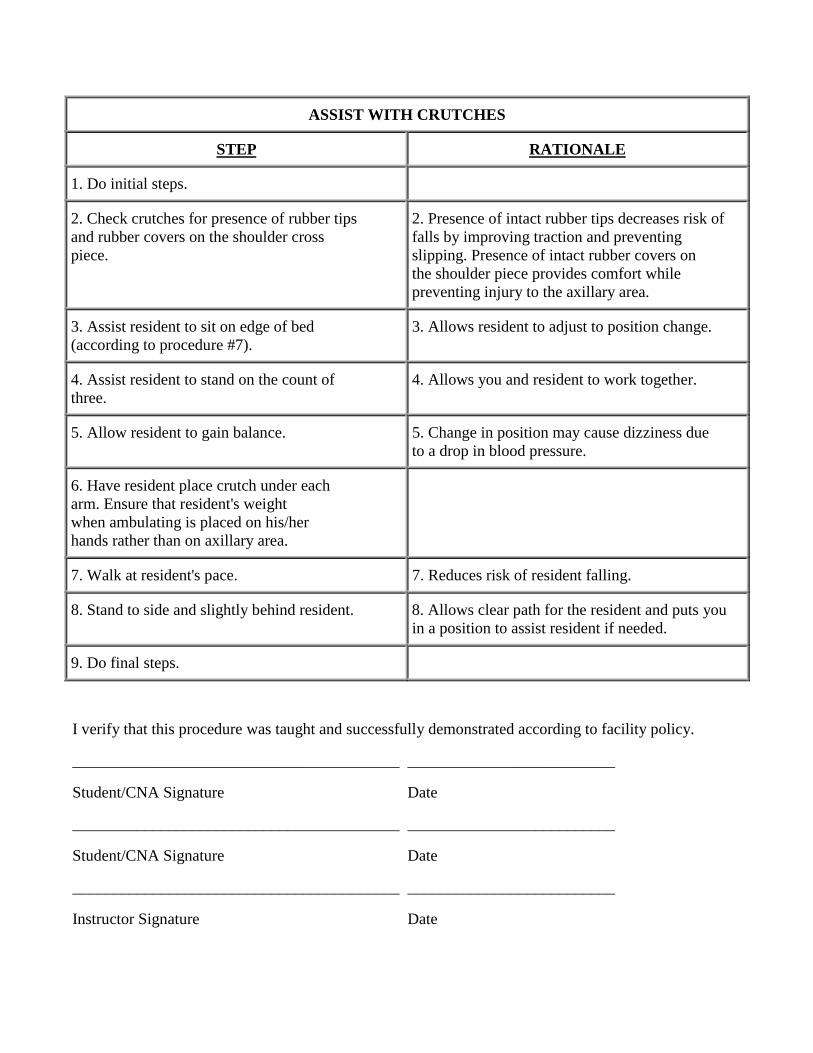
ASSIST WITH CRUTCHES
STEP RATIONALE
1. Do initial steps.
2. Check crutches for presence of rubber tipsand rubber covers on the shoulder crosspiece.
2. Presence of intact rubber tips decreases risk offalls by improving traction and preventingslipping. Presence of intact rubber covers onthe shoulder piece provides comfort whilepreventing injury to the axillary area.
3. Assist resident to sit on edge of bed(according to procedure #7).
3. Allows resident to adjust to position change.
4. Assist resident to stand on the count ofthree.
4. Allows you and resident to work together.
5. Allow resident to gain balance. 5. Change in position may cause dizziness dueto a drop in blood pressure.
6. Have resident place crutch under eacharm. Ensure that resident's weightwhen ambulating is placed on his/herhands rather than on axillary area.
7. Walk at resident's pace. 7. Reduces risk of resident falling.
8. Stand to side and slightly behind resident. 8. Allows clear path for the resident and puts youin a position to assist resident if needed.
9. Do final steps.
I verify that this procedure was taught and successfully demonstrated according to facility policy.
_________________________________________ __________________________
Student/CNA Signature Date
_________________________________________ __________________________
Student/CNA Signature Date
_________________________________________ __________________________
Instructor Signature Date
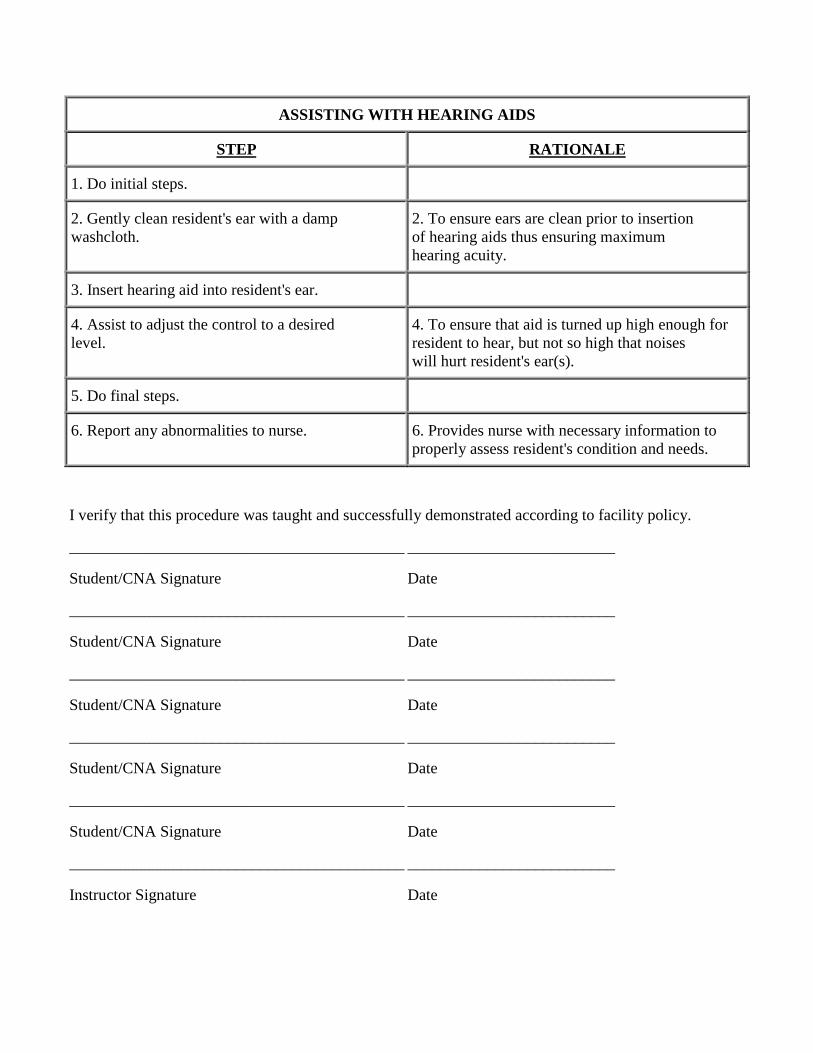
ASSISTING WITH HEARING AIDS
STEP RATIONALE
1. Do initial steps.
2. Gently clean resident's ear with a dampwashcloth.
2. To ensure ears are clean prior to insertionof hearing aids thus ensuring maximumhearing acuity.
3. Insert hearing aid into resident's ear.
4. Assist to adjust the control to a desiredlevel.
4. To ensure that aid is turned up high enough forresident to hear, but not so high that noiseswill hurt resident's ear(s).
5. Do final steps.
6. Report any abnormalities to nurse. 6. Provides nurse with necessary information toproperly assess resident's condition and needs.
I verify that this procedure was taught and successfully demonstrated according to facility policy.
__________________________________________ __________________________
Student/CNA Signature Date
__________________________________________ __________________________
Student/CNA Signature Date
__________________________________________ __________________________
Student/CNA Signature Date
__________________________________________ __________________________
Student/CNA Signature Date
__________________________________________ __________________________
Student/CNA Signature Date
__________________________________________ __________________________
Instructor Signature Date
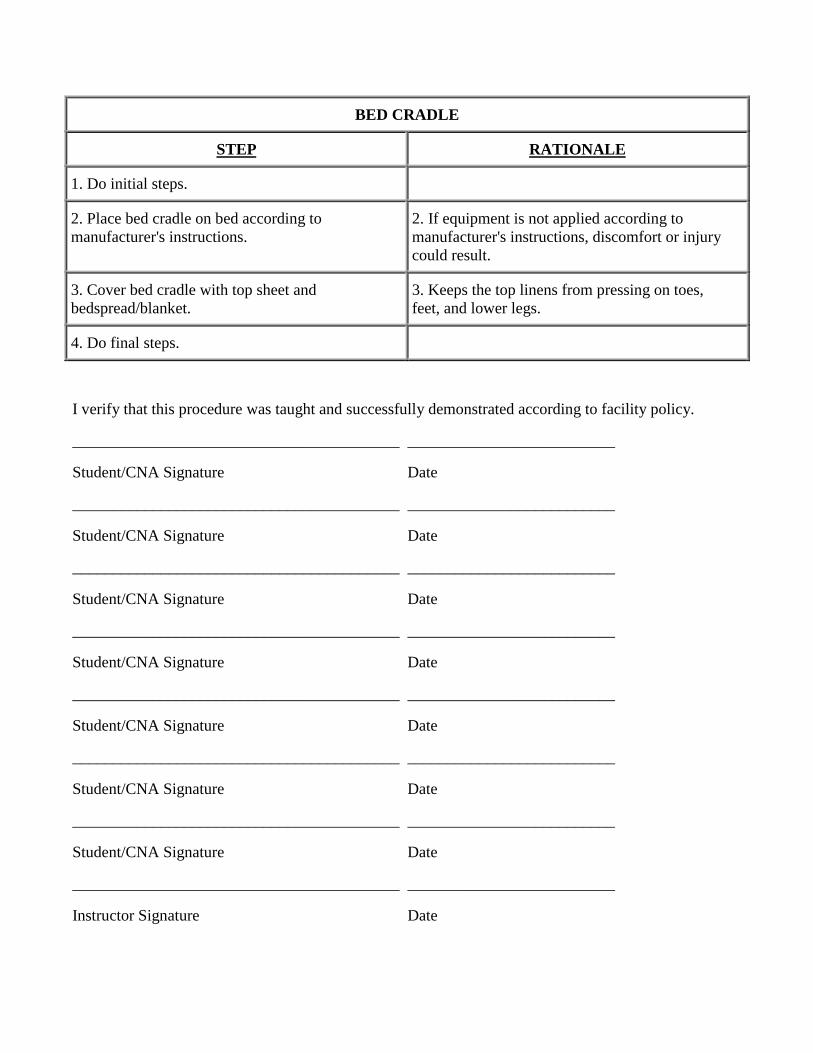
BED CRADLE
STEP RATIONALE
1. Do initial steps.
2. Place bed cradle on bed according tomanufacturer's instructions.
2. If equipment is not applied according tomanufacturer's instructions, discomfort or injurycould result.
3. Cover bed cradle with top sheet andbedspread/blanket.
3. Keeps the top linens from pressing on toes,feet, and lower legs.
4. Do final steps.
I verify that this procedure was taught and successfully demonstrated according to facility policy.
_________________________________________ __________________________
Student/CNA Signature Date
_________________________________________ __________________________
Student/CNA Signature Date
_________________________________________ __________________________
Student/CNA Signature Date
_________________________________________ __________________________
Student/CNA Signature Date
_________________________________________ __________________________
Student/CNA Signature Date
_________________________________________ __________________________
Student/CNA Signature Date
_________________________________________ __________________________
Student/CNA Signature Date
_________________________________________ __________________________
Instructor Signature Date
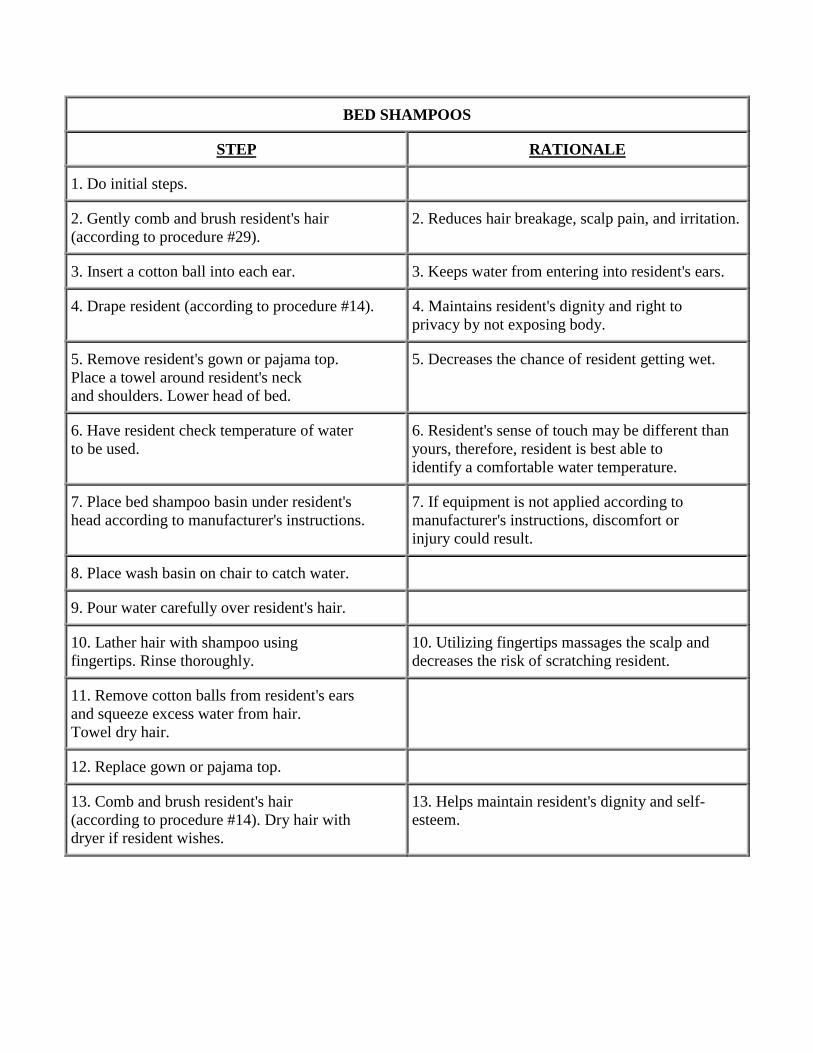
BED SHAMPOOS
STEP RATIONALE
1. Do initial steps.
2. Gently comb and brush resident's hair(according to procedure #29).
2. Reduces hair breakage, scalp pain, and irritation.
3. Insert a cotton ball into each ear. 3. Keeps water from entering into resident's ears.
4. Drape resident (according to procedure #14). 4. Maintains resident's dignity and right toprivacy by not exposing body.
5. Remove resident's gown or pajama top.Place a towel around resident's neckand shoulders. Lower head of bed.
5. Decreases the chance of resident getting wet.
6. Have resident check temperature of waterto be used.
6. Resident's sense of touch may be different thanyours, therefore, resident is best able toidentify a comfortable water temperature.
7. Place bed shampoo basin under resident'shead according to manufacturer's instructions.
7. If equipment is not applied according tomanufacturer's instructions, discomfort orinjury could result.
8. Place wash basin on chair to catch water.
9. Pour water carefully over resident's hair.
10. Lather hair with shampoo usingfingertips. Rinse thoroughly.
10. Utilizing fingertips massages the scalp anddecreases the risk of scratching resident.
11. Remove cotton balls from resident's earsand squeeze excess water from hair.Towel dry hair.
12. Replace gown or pajama top.
13. Comb and brush resident's hair(according to procedure #14). Dry hair withdryer if resident wishes.
13. Helps maintain resident's dignity and self-esteem.
I verify that this procedure was taught and successfully demonstrated according to facility policy.
_________________________________________ __________________________
Student/CNA Signature Date
_________________________________________ __________________________
Student/CNA Signature Date
_________________________________________ __________________________
Student/CNA Signature Date
_________________________________________ __________________________
Student/CNA Signature Date
_________________________________________ __________________________
Student/CNA Signature Date
_________________________________________ __________________________
Student/CNA Signature Date
_________________________________________ __________________________
Student/CNA Signature Date
_________________________________________ __________________________
Student/CNA Signature Date
_________________________________________ __________________________
Student/CNA Signature Date
_________________________________________ __________________________
Student/CNA Signature Date
_________________________________________ __________________________
Student/CNA Signature Date
_________________________________________ __________________________
Student/CNA Signature Date
_________________________________________ __________________________
Instructor Signature Date
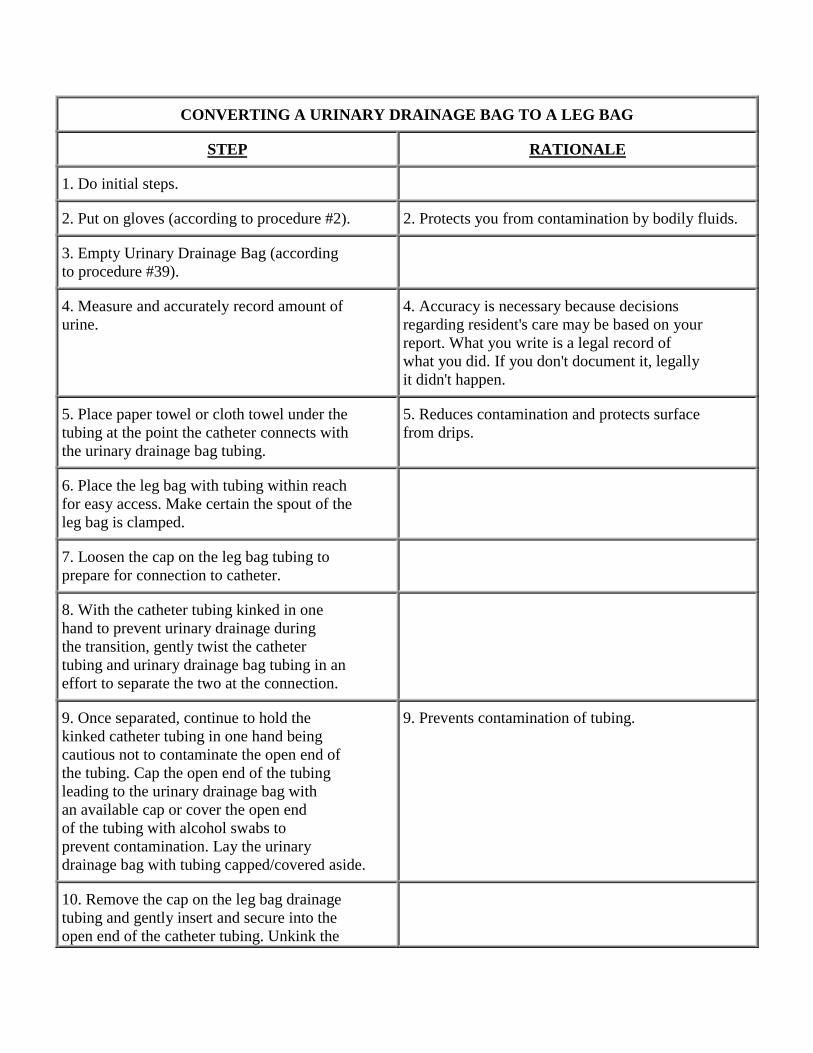
CONVERTING A URINARY DRAINAGE BAG TO A LEG BAG
STEP RATIONALE
1. Do initial steps.
2. Put on gloves (according to procedure #2). 2. Protects you from contamination by bodily fluids.
3. Empty Urinary Drainage Bag (accordingto procedure #39).
4. Measure and accurately record amount ofurine.
4. Accuracy is necessary because decisionsregarding resident's care may be based on yourreport. What you write is a legal record ofwhat you did. If you don't document it, legallyit didn't happen.
5. Place paper towel or cloth towel under thetubing at the point the catheter connects withthe urinary drainage bag tubing.
5. Reduces contamination and protects surfacefrom drips.
6. Place the leg bag with tubing within reachfor easy access. Make certain the spout of theleg bag is clamped.
7. Loosen the cap on the leg bag tubing toprepare for connection to catheter.
8. With the catheter tubing kinked in onehand to prevent urinary drainage duringthe transition, gently twist the cathetertubing and urinary drainage bag tubing in aneffort to separate the two at the connection.
9. Once separated, continue to hold thekinked catheter tubing in one hand beingcautious not to contaminate the open end ofthe tubing. Cap the open end of the tubingleading to the urinary drainage bag withan available cap or cover the open endof the tubing with alcohol swabs toprevent contamination. Lay the urinarydrainage bag with tubing capped/covered aside.
9. Prevents contamination of tubing.
10. Remove the cap on the leg bag drainagetubing and gently insert and secure into theopen end of the catheter tubing. Unkink the
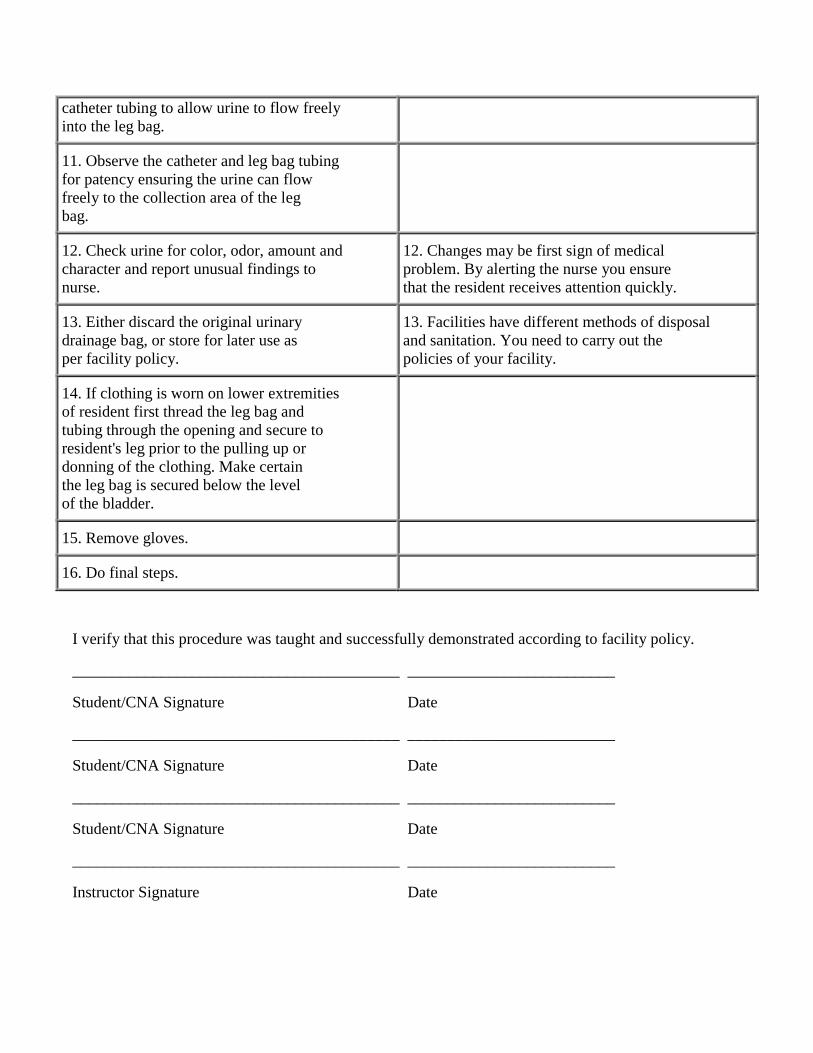
catheter tubing to allow urine to flow freelyinto the leg bag.
11. Observe the catheter and leg bag tubingfor patency ensuring the urine can flowfreely to the collection area of the legbag.
12. Check urine for color, odor, amount andcharacter and report unusual findings tonurse.
12. Changes may be first sign of medicalproblem. By alerting the nurse you ensurethat the resident receives attention quickly.
13. Either discard the original urinarydrainage bag, or store for later use asper facility policy.
13. Facilities have different methods of disposaland sanitation. You need to carry out thepolicies of your facility.
14. If clothing is worn on lower extremitiesof resident first thread the leg bag andtubing through the opening and secure toresident's leg prior to the pulling up ordonning of the clothing. Make certainthe leg bag is secured below the levelof the bladder.
15. Remove gloves.
16. Do final steps.
I verify that this procedure was taught and successfully demonstrated according to facility policy.
_________________________________________ __________________________
Student/CNA Signature Date
_________________________________________ __________________________
Student/CNA Signature Date
_________________________________________ __________________________
Student/CNA Signature Date
_________________________________________ __________________________
Instructor Signature Date
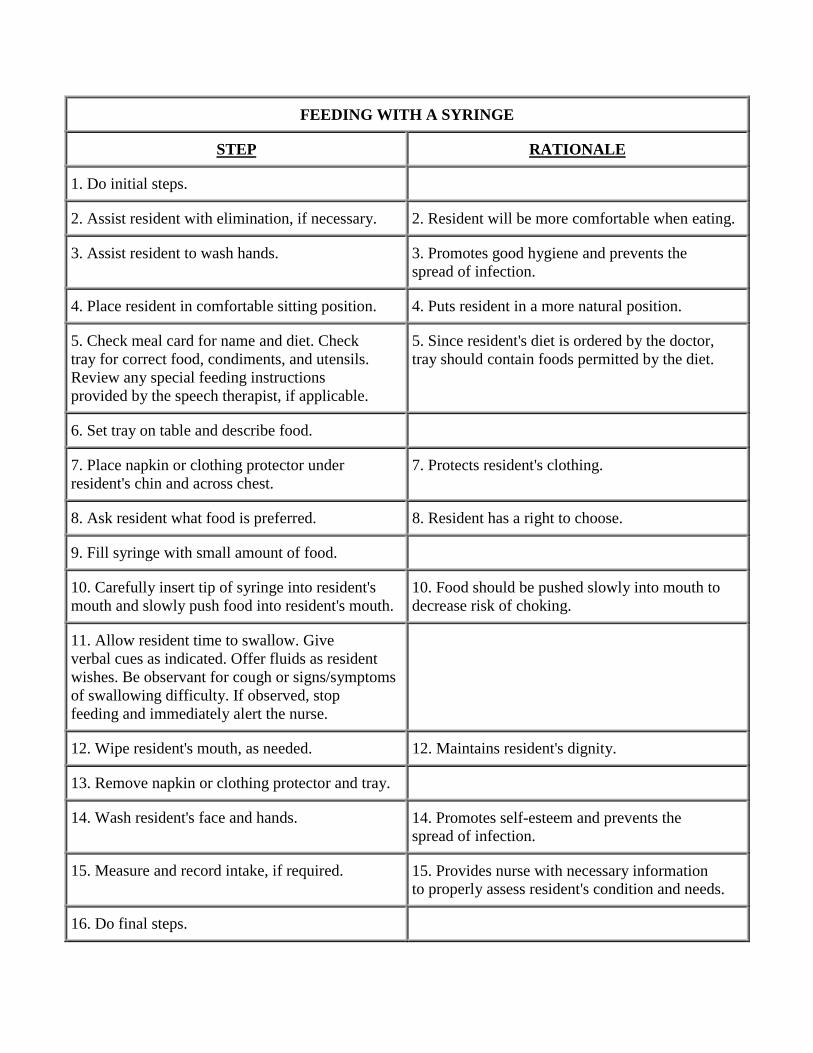
FEEDING WITH A SYRINGE
STEP RATIONALE
1. Do initial steps.
2. Assist resident with elimination, if necessary. 2. Resident will be more comfortable when eating.
3. Assist resident to wash hands. 3. Promotes good hygiene and prevents thespread of infection.
4. Place resident in comfortable sitting position. 4. Puts resident in a more natural position.
5. Check meal card for name and diet. Checktray for correct food, condiments, and utensils.Review any special feeding instructionsprovided by the speech therapist, if applicable.
5. Since resident's diet is ordered by the doctor,tray should contain foods permitted by the diet.
6. Set tray on table and describe food.
7. Place napkin or clothing protector underresident's chin and across chest.
7. Protects resident's clothing.
8. Ask resident what food is preferred. 8. Resident has a right to choose.
9. Fill syringe with small amount of food.
10. Carefully insert tip of syringe into resident'smouth and slowly push food into resident's mouth.
10. Food should be pushed slowly into mouth todecrease risk of choking.
11. Allow resident time to swallow. Giveverbal cues as indicated. Offer fluids as residentwishes. Be observant for cough or signs/symptomsof swallowing difficulty. If observed, stopfeeding and immediately alert the nurse.
12. Wipe resident's mouth, as needed. 12. Maintains resident's dignity.
13. Remove napkin or clothing protector and tray.
14. Wash resident's face and hands. 14. Promotes self-esteem and prevents thespread of infection.
15. Measure and record intake, if required. 15. Provides nurse with necessary informationto properly assess resident's condition and needs.
16. Do final steps.

I verify that this procedure was taught and successfully demonstrated according to facility policy.
__________________________________________ __________________________
Student/CNA Signature Date
__________________________________________ __________________________
Student/CNA Signature Date
__________________________________________ __________________________
Student/CNA Signature Date
__________________________________________ __________________________
Student/CNA Signature Date
__________________________________________ __________________________
Student/CNA Signature Date
__________________________________________ __________________________
Student/CNA Signature Date
__________________________________________ __________________________
Student/CNA Signature Date
__________________________________________ __________________________
Student/CNA Signature Date
__________________________________________ __________________________
Student/CNA Signature Date
__________________________________________ __________________________
Student/CNA Signature Date
__________________________________________ __________________________
Student/CNA Signature Date
__________________________________________ __________________________
Instructor Signature Date
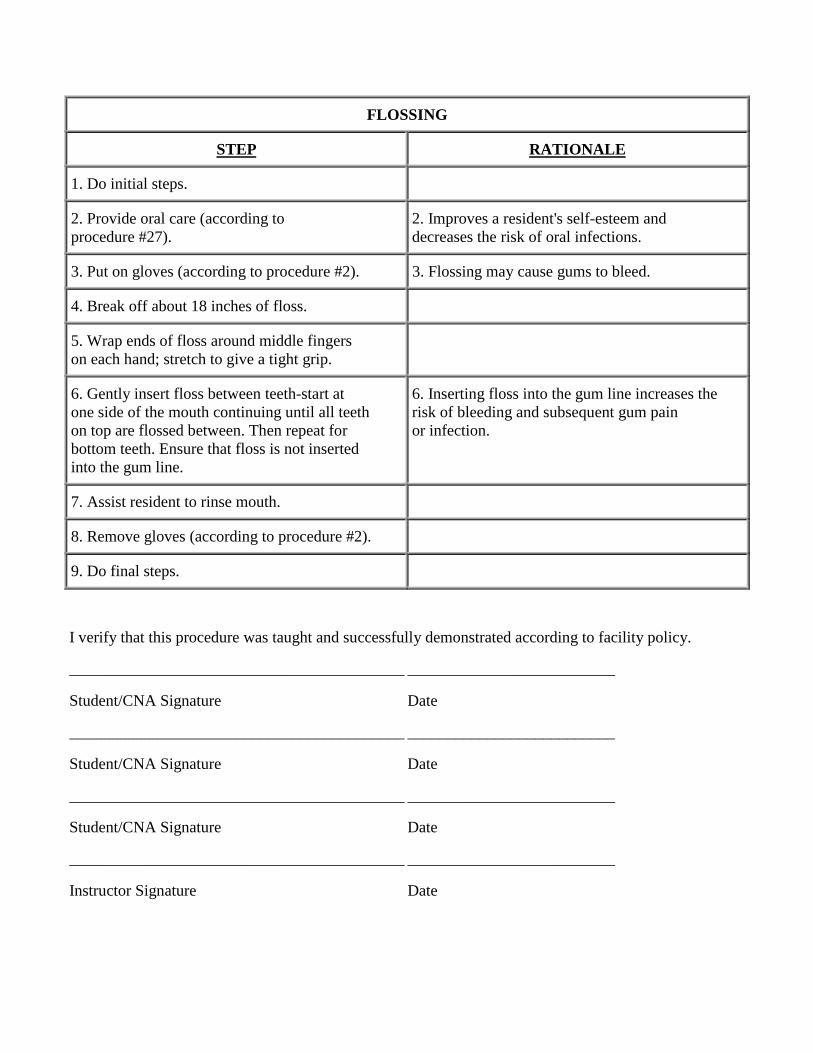
FLOSSING
STEP RATIONALE
1. Do initial steps.
2. Provide oral care (according toprocedure #27).
2. Improves a resident's self-esteem anddecreases the risk of oral infections.
3. Put on gloves (according to procedure #2). 3. Flossing may cause gums to bleed.
4. Break off about 18 inches of floss.
5. Wrap ends of floss around middle fingerson each hand; stretch to give a tight grip.
6. Gently insert floss between teeth-start atone side of the mouth continuing until all teethon top are flossed between. Then repeat forbottom teeth. Ensure that floss is not insertedinto the gum line.
6. Inserting floss into the gum line increases therisk of bleeding and subsequent gum painor infection.
7. Assist resident to rinse mouth.
8. Remove gloves (according to procedure #2).
9. Do final steps.
I verify that this procedure was taught and successfully demonstrated according to facility policy.
__________________________________________ __________________________
Student/CNA Signature Date
__________________________________________ __________________________
Student/CNA Signature Date
__________________________________________ __________________________
Student/CNA Signature Date
__________________________________________ __________________________
Instructor Signature Date
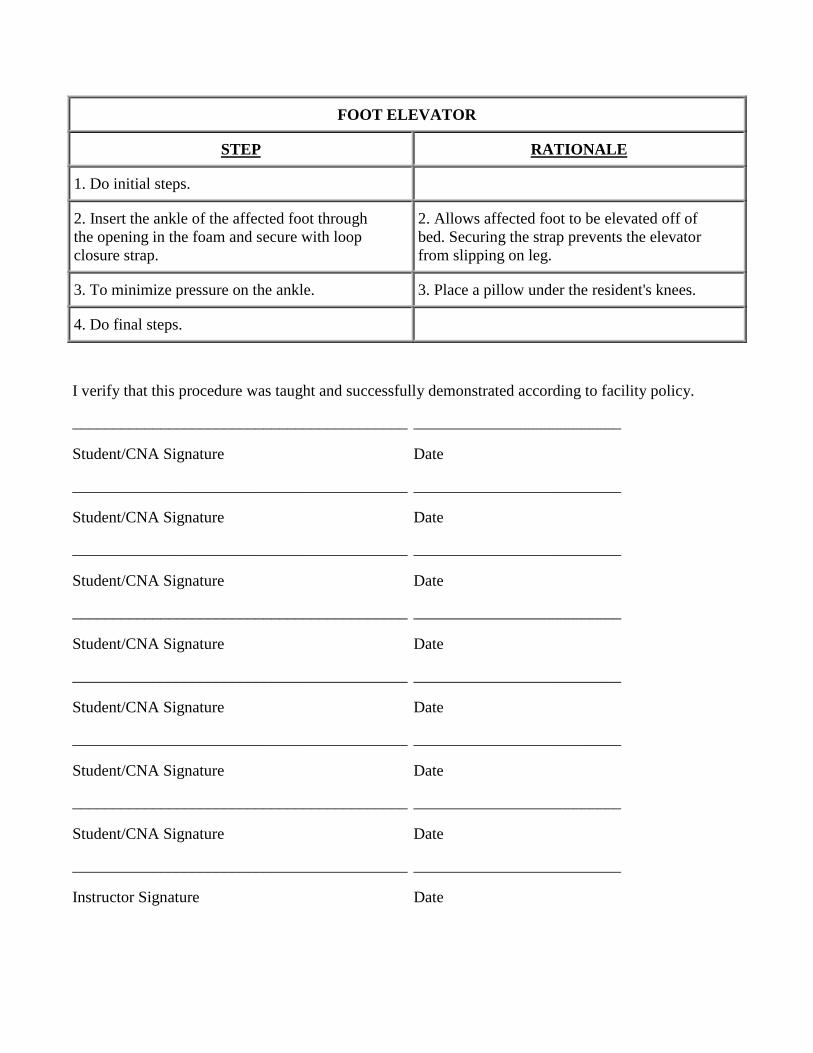
FOOT ELEVATOR
STEP RATIONALE
1. Do initial steps.
2. Insert the ankle of the affected foot throughthe opening in the foam and secure with loopclosure strap.
2. Allows affected foot to be elevated off ofbed. Securing the strap prevents the elevatorfrom slipping on leg.
3. To minimize pressure on the ankle. 3. Place a pillow under the resident's knees.
4. Do final steps.
I verify that this procedure was taught and successfully demonstrated according to facility policy.
__________________________________________ __________________________
Student/CNA Signature Date
__________________________________________ __________________________
Student/CNA Signature Date
__________________________________________ __________________________
Student/CNA Signature Date
__________________________________________ __________________________
Student/CNA Signature Date
__________________________________________ __________________________
Student/CNA Signature Date
__________________________________________ __________________________
Student/CNA Signature Date
__________________________________________ __________________________
Student/CNA Signature Date
__________________________________________ __________________________
Instructor Signature Date
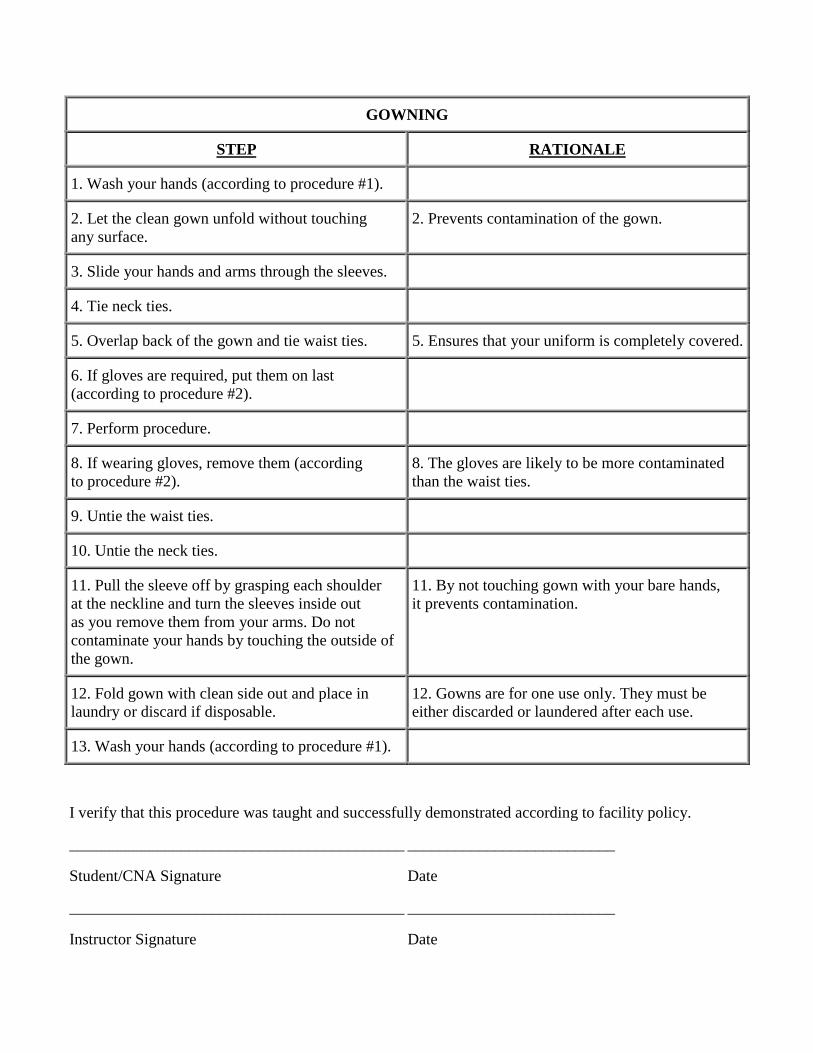
GOWNING
STEP RATIONALE
1. Wash your hands (according to procedure #1).
2. Let the clean gown unfold without touchingany surface.
2. Prevents contamination of the gown.
3. Slide your hands and arms through the sleeves.
4. Tie neck ties.
5. Overlap back of the gown and tie waist ties. 5. Ensures that your uniform is completely covered.
6. If gloves are required, put them on last(according to procedure #2).
7. Perform procedure.
8. If wearing gloves, remove them (accordingto procedure #2).
8. The gloves are likely to be more contaminatedthan the waist ties.
9. Untie the waist ties.
10. Untie the neck ties.
11. Pull the sleeve off by grasping each shoulderat the neckline and turn the sleeves inside outas you remove them from your arms. Do notcontaminate your hands by touching the outside ofthe gown.
11. By not touching gown with your bare hands,it prevents contamination.
12. Fold gown with clean side out and place inlaundry or discard if disposable.
12. Gowns are for one use only. They must beeither discarded or laundered after each use.
13. Wash your hands (according to procedure #1).
I verify that this procedure was taught and successfully demonstrated according to facility policy.
__________________________________________ __________________________
Student/CNA Signature Date
__________________________________________ __________________________
Instructor Signature Date
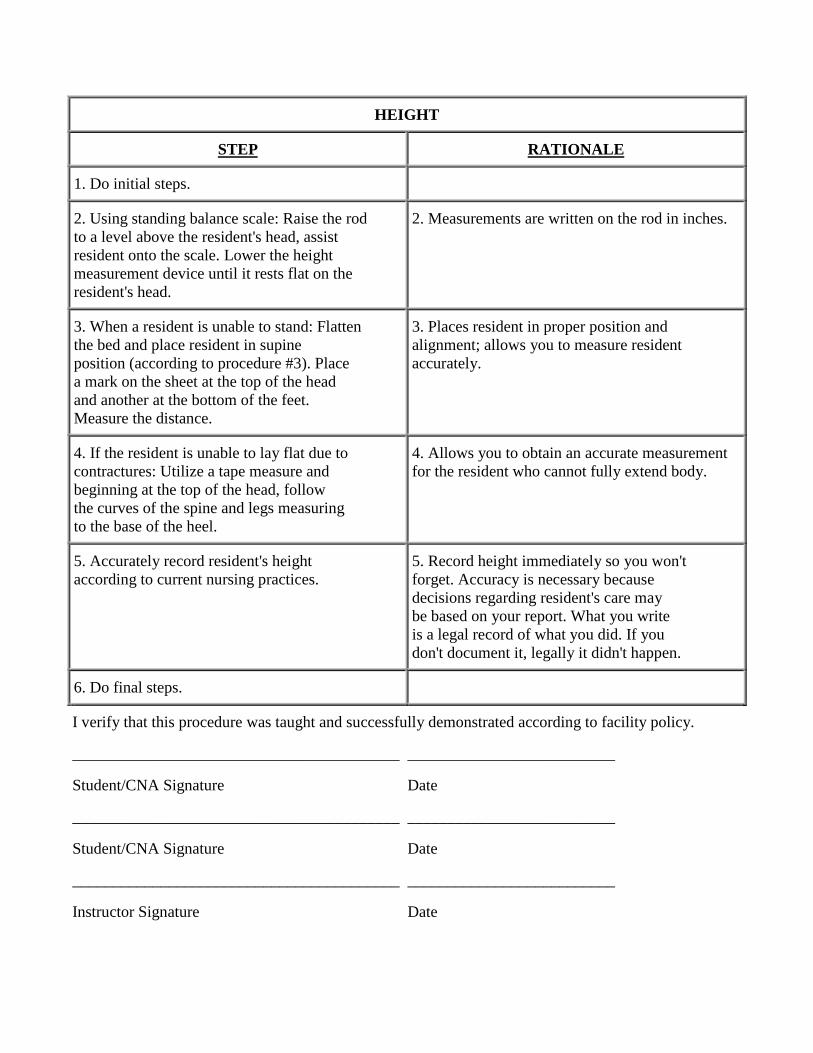
HEIGHT
STEP RATIONALE
1. Do initial steps.
2. Using standing balance scale: Raise the rodto a level above the resident's head, assistresident onto the scale. Lower the heightmeasurement device until it rests flat on theresident's head.
2. Measurements are written on the rod in inches.
3. When a resident is unable to stand: Flattenthe bed and place resident in supineposition (according to procedure #3). Placea mark on the sheet at the top of the headand another at the bottom of the feet.Measure the distance.
3. Places resident in proper position andalignment; allows you to measure residentaccurately.
4. If the resident is unable to lay flat due tocontractures: Utilize a tape measure andbeginning at the top of the head, followthe curves of the spine and legs measuringto the base of the heel.
4. Allows you to obtain an accurate measurementfor the resident who cannot fully extend body.
5. Accurately record resident's heightaccording to current nursing practices.
5. Record height immediately so you won'tforget. Accuracy is necessary becausedecisions regarding resident's care maybe based on your report. What you writeis a legal record of what you did. If youdon't document it, legally it didn't happen.
6. Do final steps.
I verify that this procedure was taught and successfully demonstrated according to facility policy.
_________________________________________ __________________________
Student/CNA Signature Date
_________________________________________ __________________________
Student/CNA Signature Date
_________________________________________ __________________________
Instructor Signature Date
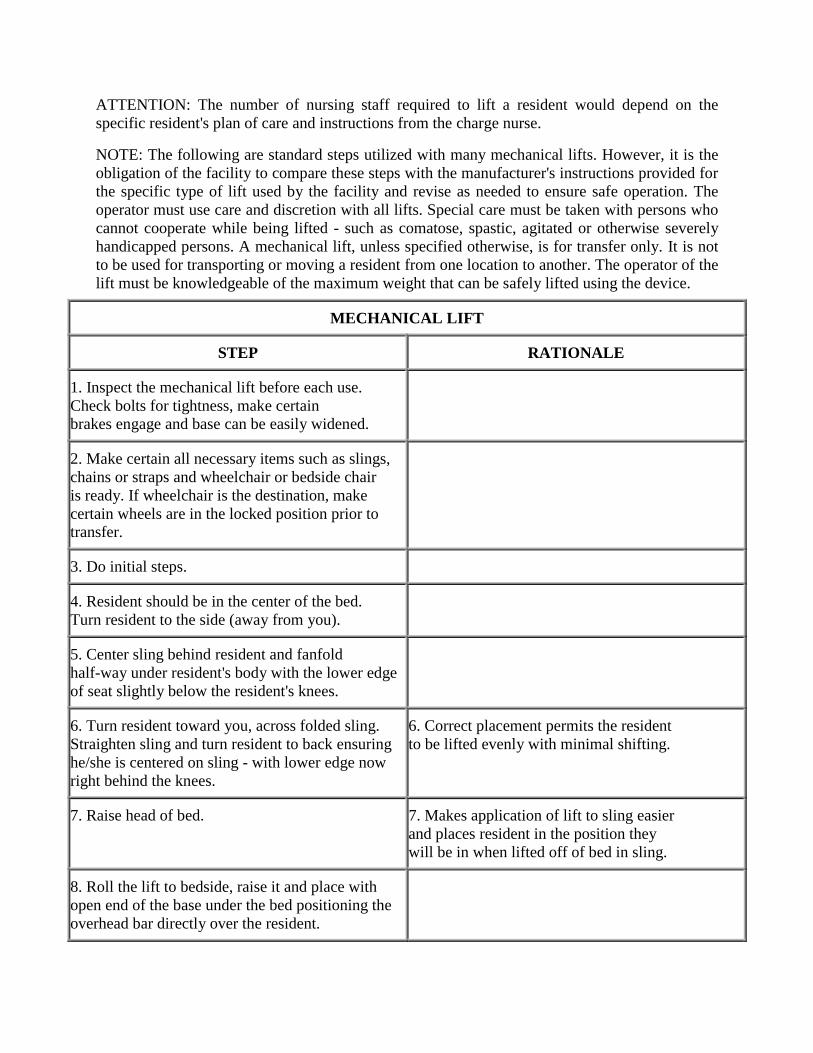
ATTENTION: The number of nursing staff required to lift a resident would depend on thespecific resident's plan of care and instructions from the charge nurse.
NOTE: The following are standard steps utilized with many mechanical lifts. However, it is theobligation of the facility to compare these steps with the manufacturer's instructions provided forthe specific type of lift used by the facility and revise as needed to ensure safe operation. Theoperator must use care and discretion with all lifts. Special care must be taken with persons whocannot cooperate while being lifted - such as comatose, spastic, agitated or otherwise severelyhandicapped persons. A mechanical lift, unless specified otherwise, is for transfer only. It is notto be used for transporting or moving a resident from one location to another. The operator of thelift must be knowledgeable of the maximum weight that can be safely lifted using the device.
MECHANICAL LIFT
STEP RATIONALE
1. Inspect the mechanical lift before each use.Check bolts for tightness, make certainbrakes engage and base can be easily widened.
2. Make certain all necessary items such as slings,chains or straps and wheelchair or bedside chairis ready. If wheelchair is the destination, makecertain wheels are in the locked position prior totransfer.
3. Do initial steps.
4. Resident should be in the center of the bed.Turn resident to the side (away from you).
5. Center sling behind resident and fanfoldhalf-way under resident's body with the lower edgeof seat slightly below the resident's knees.
6. Turn resident toward you, across folded sling.Straighten sling and turn resident to back ensuringhe/she is centered on sling - with lower edge nowright behind the knees.
6. Correct placement permits the residentto be lifted evenly with minimal shifting.
7. Raise head of bed. 7. Makes application of lift to sling easierand places resident in the position theywill be in when lifted off of bed in sling.
8. Roll the lift to bedside, raise it and place withopen end of the base under the bed positioning theoverhead bar directly over the resident.
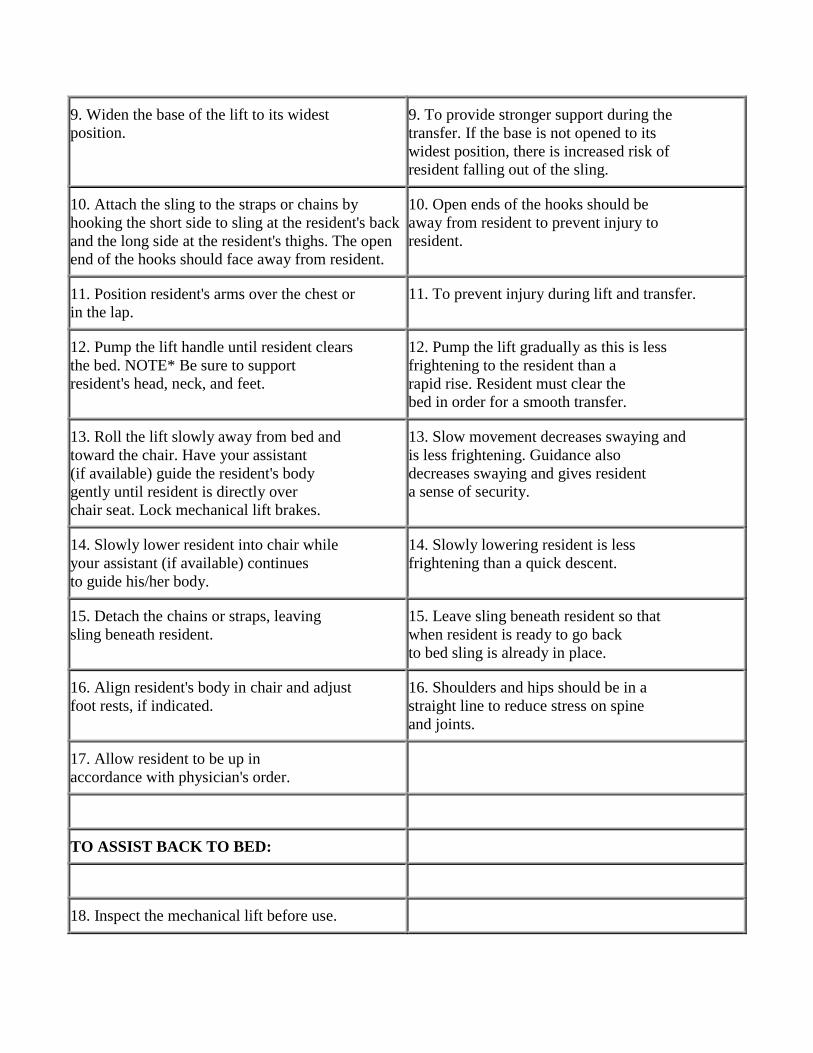
9. Widen the base of the lift to its widestposition.
9. To provide stronger support during thetransfer. If the base is not opened to itswidest position, there is increased risk ofresident falling out of the sling.
10. Attach the sling to the straps or chains byhooking the short side to sling at the resident's backand the long side at the resident's thighs. The openend of the hooks should face away from resident.
10. Open ends of the hooks should beaway from resident to prevent injury toresident.
11. Position resident's arms over the chest orin the lap.
11. To prevent injury during lift and transfer.
12. Pump the lift handle until resident clearsthe bed. NOTE* Be sure to supportresident's head, neck, and feet.
12. Pump the lift gradually as this is lessfrightening to the resident than arapid rise. Resident must clear thebed in order for a smooth transfer.
13. Roll the lift slowly away from bed andtoward the chair. Have your assistant(if available) guide the resident's bodygently until resident is directly overchair seat. Lock mechanical lift brakes.
13. Slow movement decreases swaying andis less frightening. Guidance alsodecreases swaying and gives residenta sense of security.
14. Slowly lower resident into chair whileyour assistant (if available) continuesto guide his/her body.
14. Slowly lowering resident is lessfrightening than a quick descent.
15. Detach the chains or straps, leavingsling beneath resident.
15. Leave sling beneath resident so thatwhen resident is ready to go backto bed sling is already in place.
16. Align resident's body in chair and adjustfoot rests, if indicated.
16. Shoulders and hips should be in astraight line to reduce stress on spineand joints.
17. Allow resident to be up inaccordance with physician's order.
TO ASSIST BACK TO BED:
18. Inspect the mechanical lift before use.
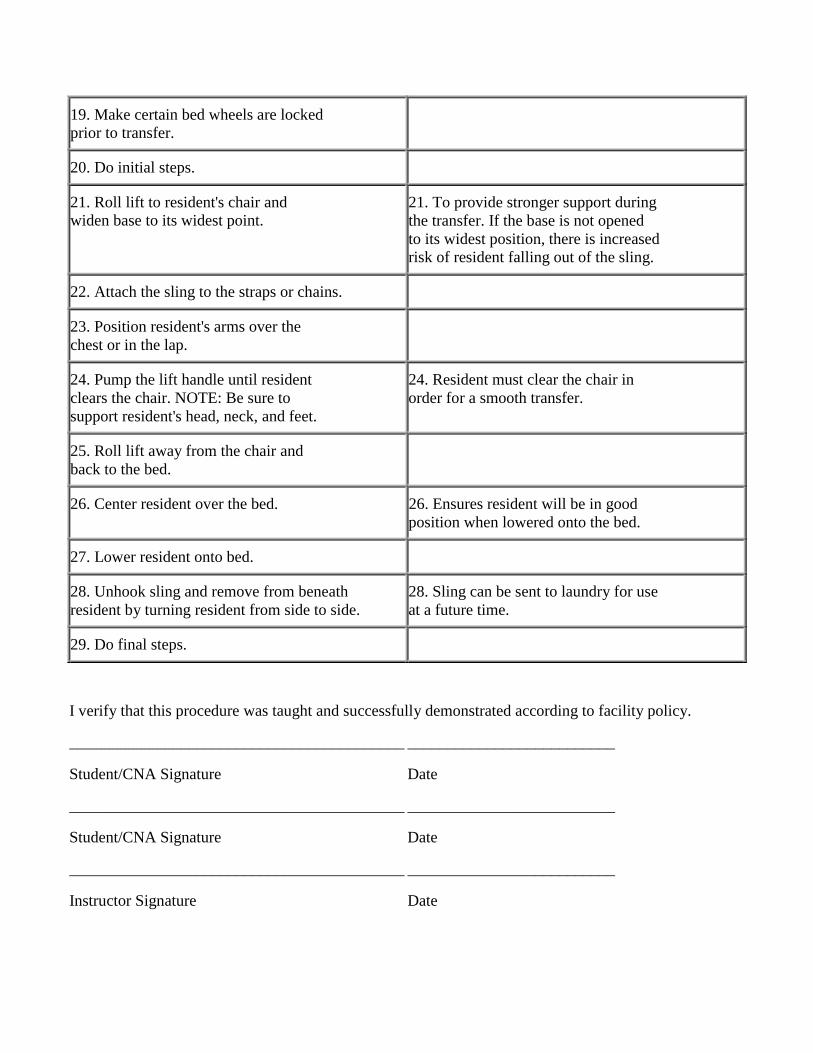
19. Make certain bed wheels are lockedprior to transfer.
20. Do initial steps.
21. Roll lift to resident's chair andwiden base to its widest point.
21. To provide stronger support duringthe transfer. If the base is not openedto its widest position, there is increasedrisk of resident falling out of the sling.
22. Attach the sling to the straps or chains.
23. Position resident's arms over thechest or in the lap.
24. Pump the lift handle until residentclears the chair. NOTE: Be sure tosupport resident's head, neck, and feet.
24. Resident must clear the chair inorder for a smooth transfer.
25. Roll lift away from the chair andback to the bed.
26. Center resident over the bed. 26. Ensures resident will be in goodposition when lowered onto the bed.
27. Lower resident onto bed.
28. Unhook sling and remove from beneathresident by turning resident from side to side.
28. Sling can be sent to laundry for useat a future time.
29. Do final steps.
I verify that this procedure was taught and successfully demonstrated according to facility policy.
__________________________________________ __________________________
Student/CNA Signature Date
__________________________________________ __________________________
Student/CNA Signature Date
__________________________________________ __________________________
Instructor Signature Date
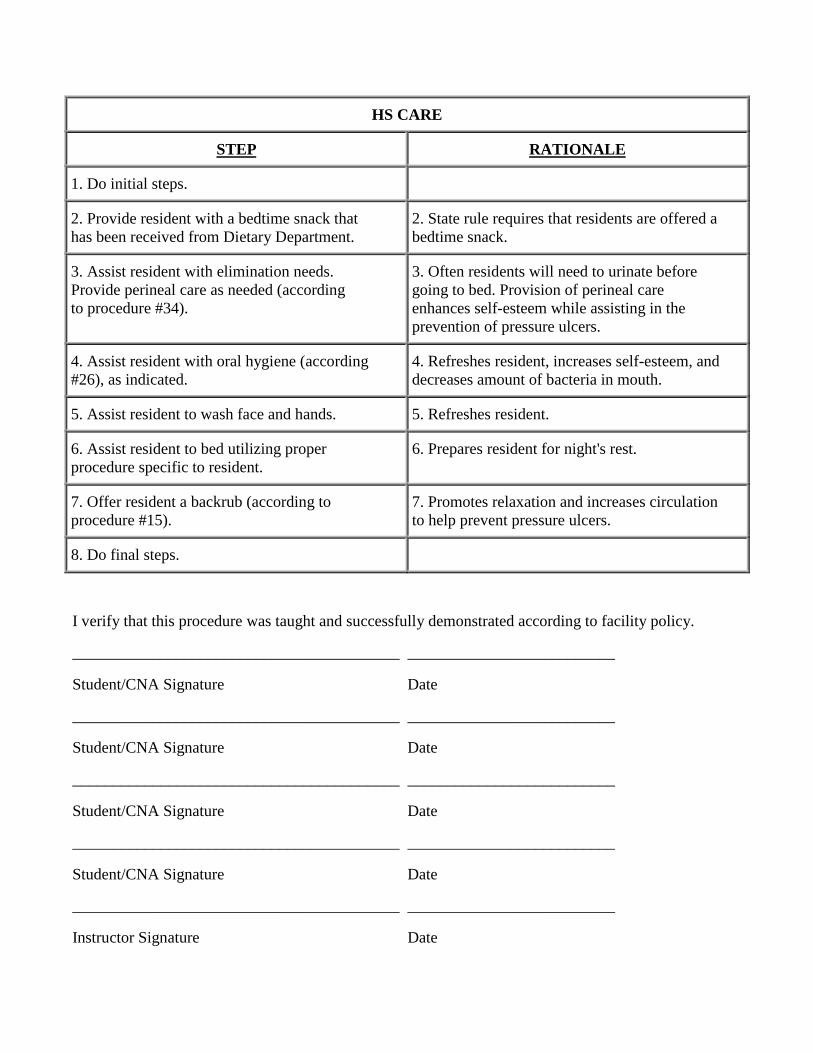
HS CARE
STEP RATIONALE
1. Do initial steps.
2. Provide resident with a bedtime snack thathas been received from Dietary Department.
2. State rule requires that residents are offered abedtime snack.
3. Assist resident with elimination needs.Provide perineal care as needed (accordingto procedure #34).
3. Often residents will need to urinate beforegoing to bed. Provision of perineal careenhances self-esteem while assisting in theprevention of pressure ulcers.
4. Assist resident with oral hygiene (according#26), as indicated.
4. Refreshes resident, increases self-esteem, anddecreases amount of bacteria in mouth.
5. Assist resident to wash face and hands. 5. Refreshes resident.
6. Assist resident to bed utilizing properprocedure specific to resident.
6. Prepares resident for night's rest.
7. Offer resident a backrub (according toprocedure #15).
7. Promotes relaxation and increases circulationto help prevent pressure ulcers.
8. Do final steps.
I verify that this procedure was taught and successfully demonstrated according to facility policy.
_________________________________________ __________________________
Student/CNA Signature Date
_________________________________________ __________________________
Student/CNA Signature Date
_________________________________________ __________________________
Student/CNA Signature Date
_________________________________________ __________________________
Student/CNA Signature Date
_________________________________________ __________________________
Instructor Signature Date
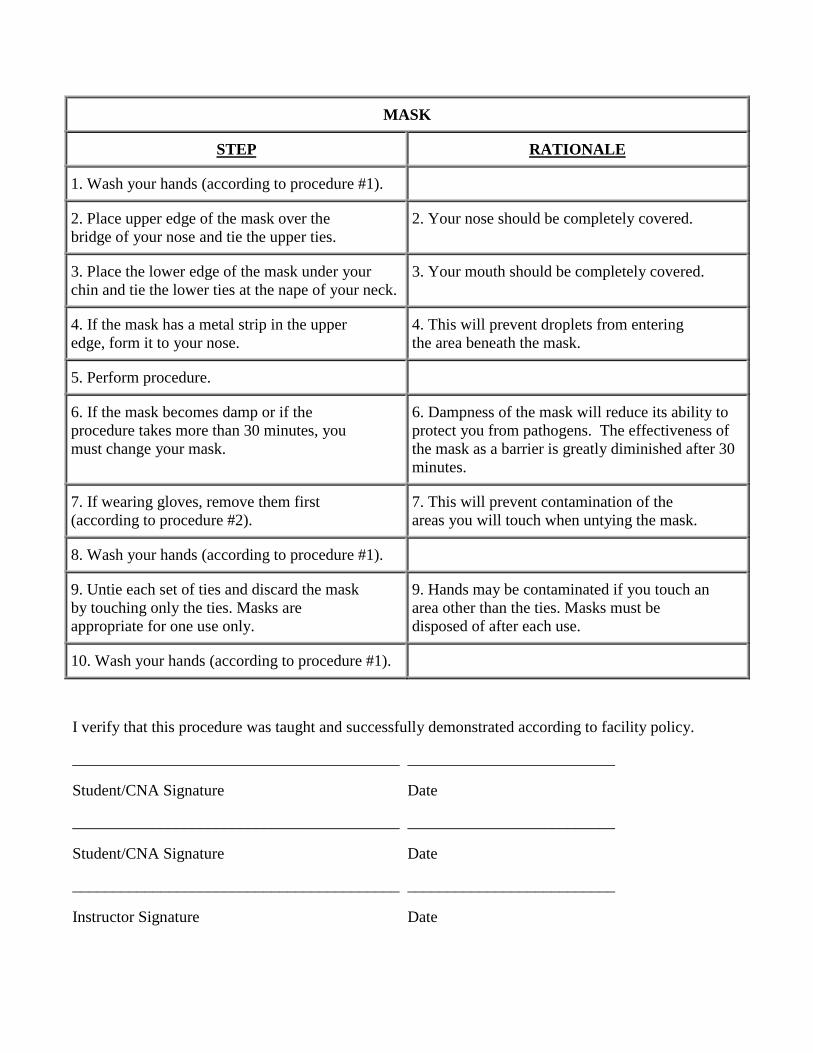
MASK
STEP RATIONALE
1. Wash your hands (according to procedure #1).
2. Place upper edge of the mask over thebridge of your nose and tie the upper ties.
2. Your nose should be completely covered.
3. Place the lower edge of the mask under yourchin and tie the lower ties at the nape of your neck.
3. Your mouth should be completely covered.
4. If the mask has a metal strip in the upperedge, form it to your nose.
4. This will prevent droplets from enteringthe area beneath the mask.
5. Perform procedure.
6. If the mask becomes damp or if theprocedure takes more than 30 minutes, youmust change your mask.
6. Dampness of the mask will reduce its ability toprotect you from pathogens. The effectiveness ofthe mask as a barrier is greatly diminished after 30minutes.
7. If wearing gloves, remove them first(according to procedure #2).
7. This will prevent contamination of theareas you will touch when untying the mask.
8. Wash your hands (according to procedure #1).
9. Untie each set of ties and discard the maskby touching only the ties. Masks areappropriate for one use only.
9. Hands may be contaminated if you touch anarea other than the ties. Masks must bedisposed of after each use.
10. Wash your hands (according to procedure #1).
I verify that this procedure was taught and successfully demonstrated according to facility policy.
_________________________________________ __________________________
Student/CNA Signature Date
_________________________________________ __________________________
Student/CNA Signature Date
_________________________________________ __________________________
Instructor Signature Date
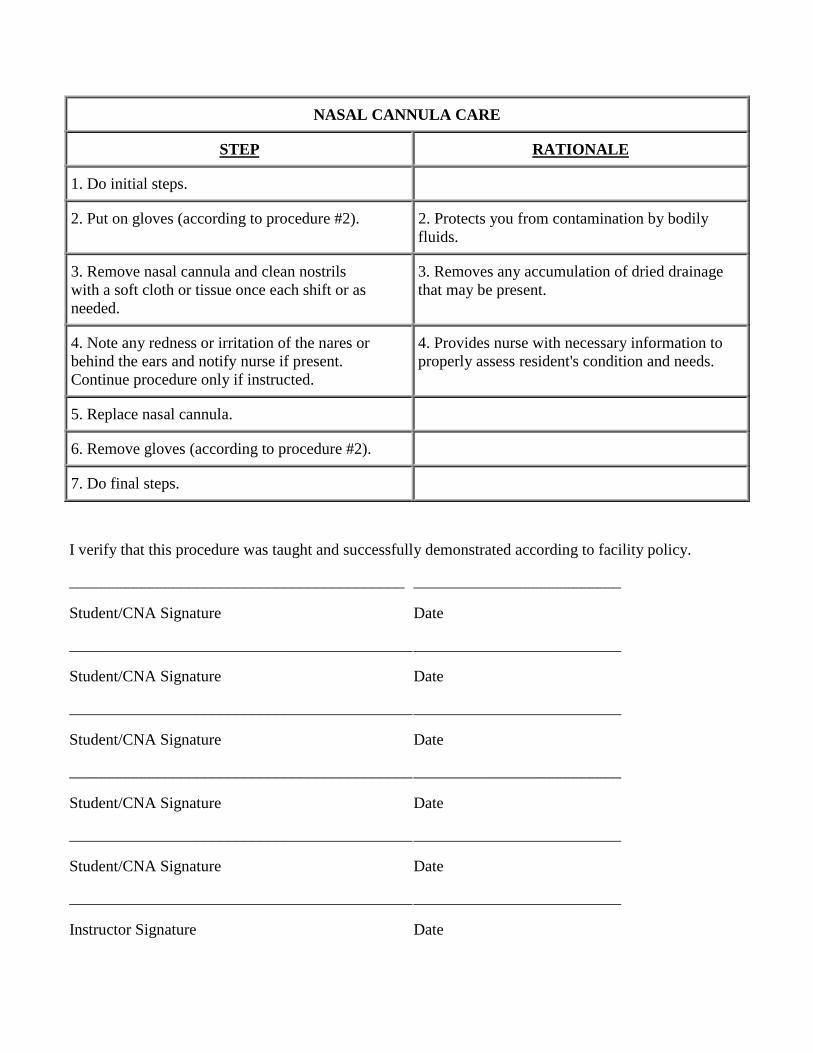
NASAL CANNULA CARE
STEP RATIONALE
1. Do initial steps.
2. Put on gloves (according to procedure #2). 2. Protects you from contamination by bodilyfluids.
3. Remove nasal cannula and clean nostrilswith a soft cloth or tissue once each shift or asneeded.
3. Removes any accumulation of dried drainagethat may be present.
4. Note any redness or irritation of the nares orbehind the ears and notify nurse if present.Continue procedure only if instructed.
4. Provides nurse with necessary information toproperly assess resident's condition and needs.
5. Replace nasal cannula.
6. Remove gloves (according to procedure #2).
7. Do final steps.
I verify that this procedure was taught and successfully demonstrated according to facility policy.
__________________________________________ __________________________
Student/CNA Signature Date
_____________________________________________________________________
Student/CNA Signature Date
_____________________________________________________________________
Student/CNA Signature Date
_____________________________________________________________________
Student/CNA Signature Date
_____________________________________________________________________
Student/CNA Signature Date
_____________________________________________________________________
Instructor Signature Date
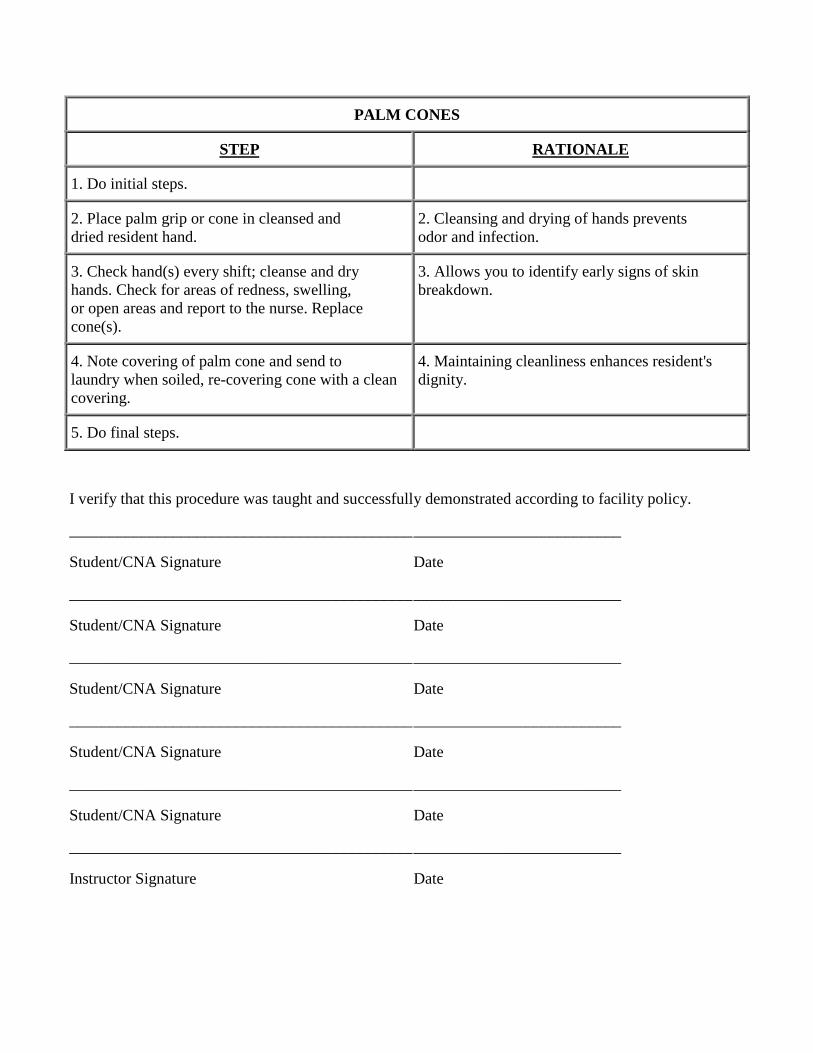
PALM CONES
STEP RATIONALE
1. Do initial steps.
2. Place palm grip or cone in cleansed anddried resident hand.
2. Cleansing and drying of hands preventsodor and infection.
3. Check hand(s) every shift; cleanse and dryhands. Check for areas of redness, swelling,or open areas and report to the nurse. Replacecone(s).
3. Allows you to identify early signs of skinbreakdown.
4. Note covering of palm cone and send tolaundry when soiled, re-covering cone with a cleancovering.
4. Maintaining cleanliness enhances resident'sdignity.
5. Do final steps.
I verify that this procedure was taught and successfully demonstrated according to facility policy.
_____________________________________________________________________
Student/CNA Signature Date
_____________________________________________________________________
Student/CNA Signature Date
_____________________________________________________________________
Student/CNA Signature Date
_____________________________________________________________________
Student/CNA Signature Date
_____________________________________________________________________
Student/CNA Signature Date
_____________________________________________________________________
Instructor Signature Date

PASSING FRESH ICE WATER
STEP RATIONALE
1. Do initial steps.
2. Obtain cart, ice container, and ice scoop andgo to ice machine. Keep ice scoop covered.
3. Fill container with ice using ice scoop.
4. Replace ice scoop in proper coveredcontainer, or cover it with a clean towel orplastic bag to prevent contamination.
4. Keeping the ice scoop covered maintainsinfection control practices.
5. Proceed to resident rooms, noting any fluidrestriction(s) prior to pass and anyresidents who require thickened liquids.
5. Residents who require a fluid restriction orthickened liquids should not have a waterpitcher placed at the bedside unless facility policystates differently.
6. Empty water from pitcher and bedside glassinto the sink.
6. Emptying the pitcher of old water will allowyou to fill it with ice and fresh water.Emptying the glass will allow you to fill it withfresh water.
7. Take pitcher into hall and fill it with ice.NOTE: Do not touch the pitcher with the ice scoop.
7. The ice scoop is utilized for all residents thusshould not be contaminated by touching a waterpitcher.
8. Replace the scoop in covered container,clean towel or plastic bag betweenrooms to prevent contamination.
8. Maintains infection control practices.
9. Return to resident's room and fill pitcherwith water at bathroom sink.
9. Ensures that resident has fresh ice water inpitcher.
10. Pour fresh water into bedside glass andleave a straw with the glass if needed.
10. Ensures that water is available and ready forresident when he/she desires it.
11. Offer the resident a drink of fresh water ifresident is present.
11. Resident may be unable to independently geta drink of water.
12. Repeat procedure until all residents have beenprovided with fresh ice water.
12. Ensures that all residents receive fresh icewater.
13. Do final steps.
I verify that this procedure was taught and successfully demonstrated according to facility policy.
___________________________________________ __________________________
Student/CNA Signature Date
___________________________________________ __________________________
Student/CNA Signature Date
___________________________________________ __________________________
Student/CNA Signature Date
___________________________________________ __________________________
Student/CNA Signature Date
___________________________________________ __________________________
Student/CNA Signature Date
___________________________________________ __________________________
Student/CNA Signature Date
___________________________________________ __________________________
Student/CNA Signature Date
___________________________________________ __________________________
Student/CNA Signature Date
___________________________________________ __________________________
Student/CNA Signature Date
___________________________________________ __________________________
Student/CNA Signature Date
___________________________________________ __________________________
Student/CNA Signature Date
___________________________________________ __________________________
Student/CNA Signature Date
___________________________________________ __________________________
Instructor Signature Date
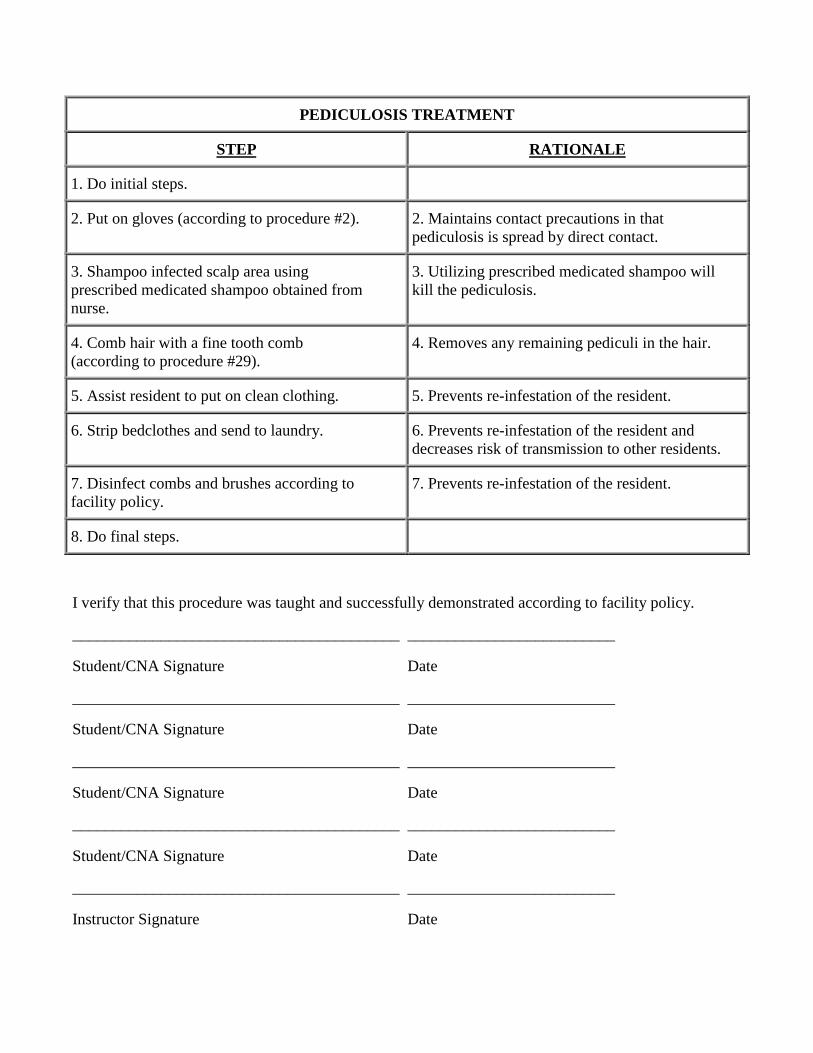
PEDICULOSIS TREATMENT
STEP RATIONALE
1. Do initial steps.
2. Put on gloves (according to procedure #2). 2. Maintains contact precautions in thatpediculosis is spread by direct contact.
3. Shampoo infected scalp area usingprescribed medicated shampoo obtained fromnurse.
3. Utilizing prescribed medicated shampoo willkill the pediculosis.
4. Comb hair with a fine tooth comb(according to procedure #29).
4. Removes any remaining pediculi in the hair.
5. Assist resident to put on clean clothing. 5. Prevents re-infestation of the resident.
6. Strip bedclothes and send to laundry. 6. Prevents re-infestation of the resident anddecreases risk of transmission to other residents.
7. Disinfect combs and brushes according tofacility policy.
7. Prevents re-infestation of the resident.
8. Do final steps.
I verify that this procedure was taught and successfully demonstrated according to facility policy.
_________________________________________ __________________________
Student/CNA Signature Date
_________________________________________ __________________________
Student/CNA Signature Date
_________________________________________ __________________________
Student/CNA Signature Date
_________________________________________ __________________________
Student/CNA Signature Date
_________________________________________ __________________________
Instructor Signature Date
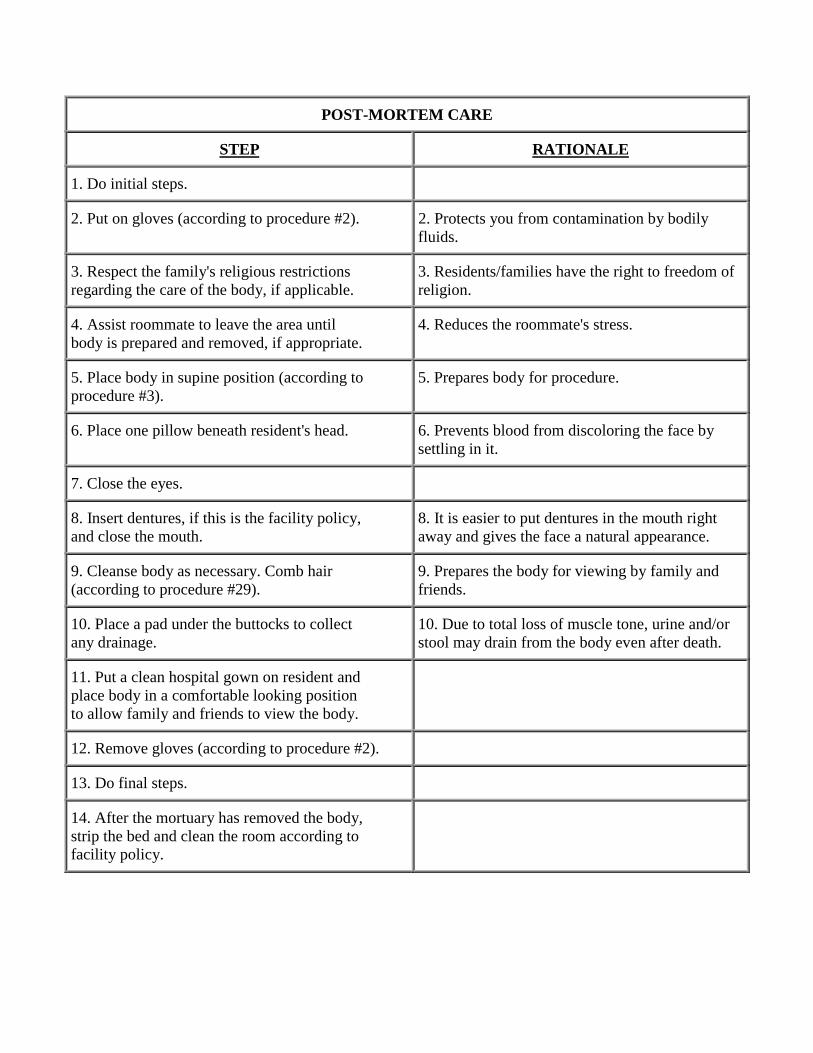
POST-MORTEM CARE
STEP RATIONALE
1. Do initial steps.
2. Put on gloves (according to procedure #2). 2. Protects you from contamination by bodilyfluids.
3. Respect the family's religious restrictionsregarding the care of the body, if applicable.
3. Residents/families have the right to freedom ofreligion.
4. Assist roommate to leave the area untilbody is prepared and removed, if appropriate.
4. Reduces the roommate's stress.
5. Place body in supine position (according toprocedure #3).
5. Prepares body for procedure.
6. Place one pillow beneath resident's head. 6. Prevents blood from discoloring the face bysettling in it.
7. Close the eyes.
8. Insert dentures, if this is the facility policy,and close the mouth.
8. It is easier to put dentures in the mouth rightaway and gives the face a natural appearance.
9. Cleanse body as necessary. Comb hair(according to procedure #29).
9. Prepares the body for viewing by family andfriends.
10. Place a pad under the buttocks to collectany drainage.
10. Due to total loss of muscle tone, urine and/orstool may drain from the body even after death.
11. Put a clean hospital gown on resident andplace body in a comfortable looking positionto allow family and friends to view the body.
12. Remove gloves (according to procedure #2).
13. Do final steps.
14. After the mortuary has removed the body,strip the bed and clean the room according tofacility policy.

I verify that this procedure was taught and successfully demonstrated according to facility policy.
__________________________________________ __________________________
Student/CNA Signature Date
__________________________________________ __________________________
Student/CNA Signature Date
__________________________________________ __________________________
Student/CNA Signature Date
__________________________________________ __________________________
Student/CNA Signature Date
__________________________________________ __________________________
Student/CNA Signature Date
__________________________________________ __________________________
Student/CNA Signature Date
__________________________________________ __________________________
Student/CNA Signature Date
__________________________________________ __________________________
Student/CNA Signature Date
__________________________________________ __________________________
Student/CNA Signature Date
__________________________________________ __________________________
Student/CNA Signature Date
__________________________________________ __________________________
Student/CNA Signature Date
__________________________________________ __________________________
Student/CNA Signature Date
__________________________________________ __________________________
Instructor Signature Date
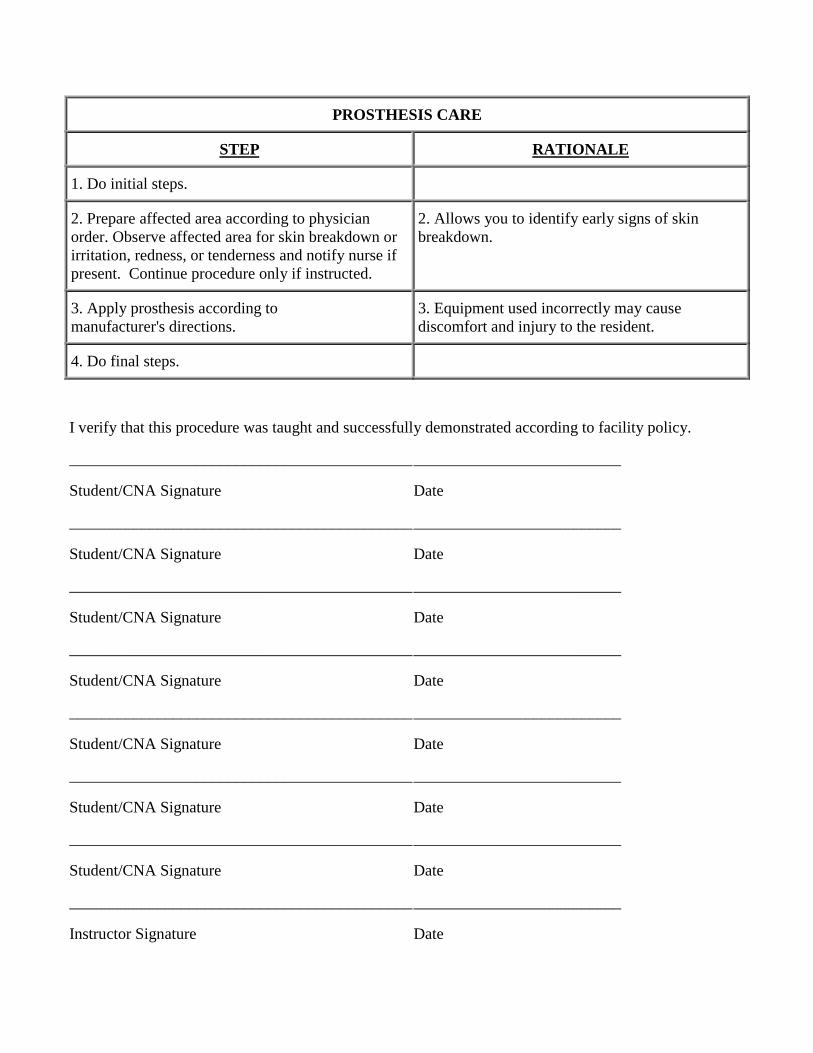
PROSTHESIS CARE
STEP RATIONALE
1. Do initial steps.
2. Prepare affected area according to physicianorder. Observe affected area for skin breakdown orirritation, redness, or tenderness and notify nurse ifpresent. Continue procedure only if instructed.
2. Allows you to identify early signs of skinbreakdown.
3. Apply prosthesis according tomanufacturer's directions.
3. Equipment used incorrectly may causediscomfort and injury to the resident.
4. Do final steps.
I verify that this procedure was taught and successfully demonstrated according to facility policy.
_____________________________________________________________________
Student/CNA Signature Date
_____________________________________________________________________
Student/CNA Signature Date
_____________________________________________________________________
Student/CNA Signature Date
_____________________________________________________________________
Student/CNA Signature Date
_____________________________________________________________________
Student/CNA Signature Date
_____________________________________________________________________
Student/CNA Signature Date
_____________________________________________________________________
Student/CNA Signature Date
_____________________________________________________________________
Instructor Signature Date
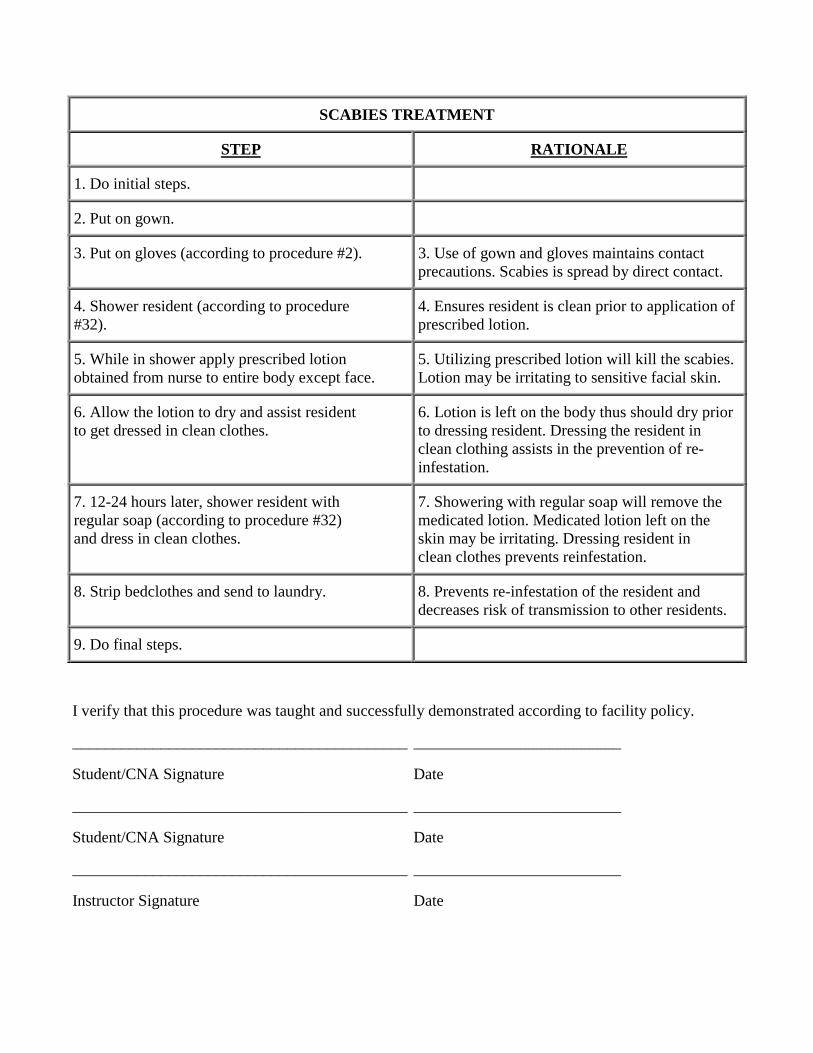
SCABIES TREATMENT
STEP RATIONALE
1. Do initial steps.
2. Put on gown.
3. Put on gloves (according to procedure #2). 3. Use of gown and gloves maintains contactprecautions. Scabies is spread by direct contact.
4. Shower resident (according to procedure#32).
4. Ensures resident is clean prior to application ofprescribed lotion.
5. While in shower apply prescribed lotionobtained from nurse to entire body except face.
5. Utilizing prescribed lotion will kill the scabies.Lotion may be irritating to sensitive facial skin.
6. Allow the lotion to dry and assist residentto get dressed in clean clothes.
6. Lotion is left on the body thus should dry priorto dressing resident. Dressing the resident inclean clothing assists in the prevention of re-infestation.
7. 12-24 hours later, shower resident withregular soap (according to procedure #32)and dress in clean clothes.
7. Showering with regular soap will remove themedicated lotion. Medicated lotion left on theskin may be irritating. Dressing resident inclean clothes prevents reinfestation.
8. Strip bedclothes and send to laundry. 8. Prevents re-infestation of the resident anddecreases risk of transmission to other residents.
9. Do final steps.
I verify that this procedure was taught and successfully demonstrated according to facility policy.
__________________________________________ __________________________
Student/CNA Signature Date
__________________________________________ __________________________
Student/CNA Signature Date
__________________________________________ __________________________
Instructor Signature Date
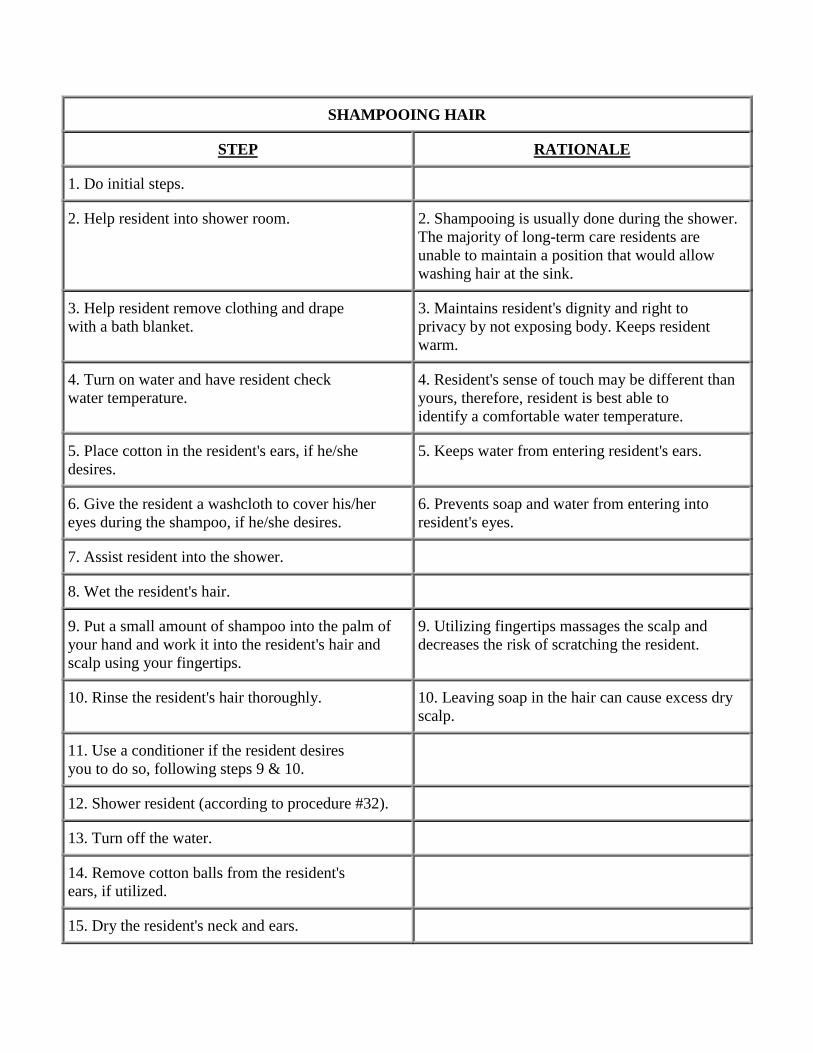
SHAMPOOING HAIR
STEP RATIONALE
1. Do initial steps.
2. Help resident into shower room. 2. Shampooing is usually done during the shower.The majority of long-term care residents areunable to maintain a position that would allowwashing hair at the sink.
3. Help resident remove clothing and drapewith a bath blanket.
3. Maintains resident's dignity and right toprivacy by not exposing body. Keeps residentwarm.
4. Turn on water and have resident checkwater temperature.
4. Resident's sense of touch may be different thanyours, therefore, resident is best able toidentify a comfortable water temperature.
5. Place cotton in the resident's ears, if he/shedesires.
5. Keeps water from entering resident's ears.
6. Give the resident a washcloth to cover his/hereyes during the shampoo, if he/she desires.
6. Prevents soap and water from entering intoresident's eyes.
7. Assist resident into the shower.
8. Wet the resident's hair.
9. Put a small amount of shampoo into the palm ofyour hand and work it into the resident's hair andscalp using your fingertips.
9. Utilizing fingertips massages the scalp anddecreases the risk of scratching the resident.
10. Rinse the resident's hair thoroughly. 10. Leaving soap in the hair can cause excess dryscalp.
11. Use a conditioner if the resident desiresyou to do so, following steps 9 & 10.
12. Shower resident (according to procedure #32).
13. Turn off the water.
14. Remove cotton balls from the resident'sears, if utilized.
15. Dry the resident's neck and ears.
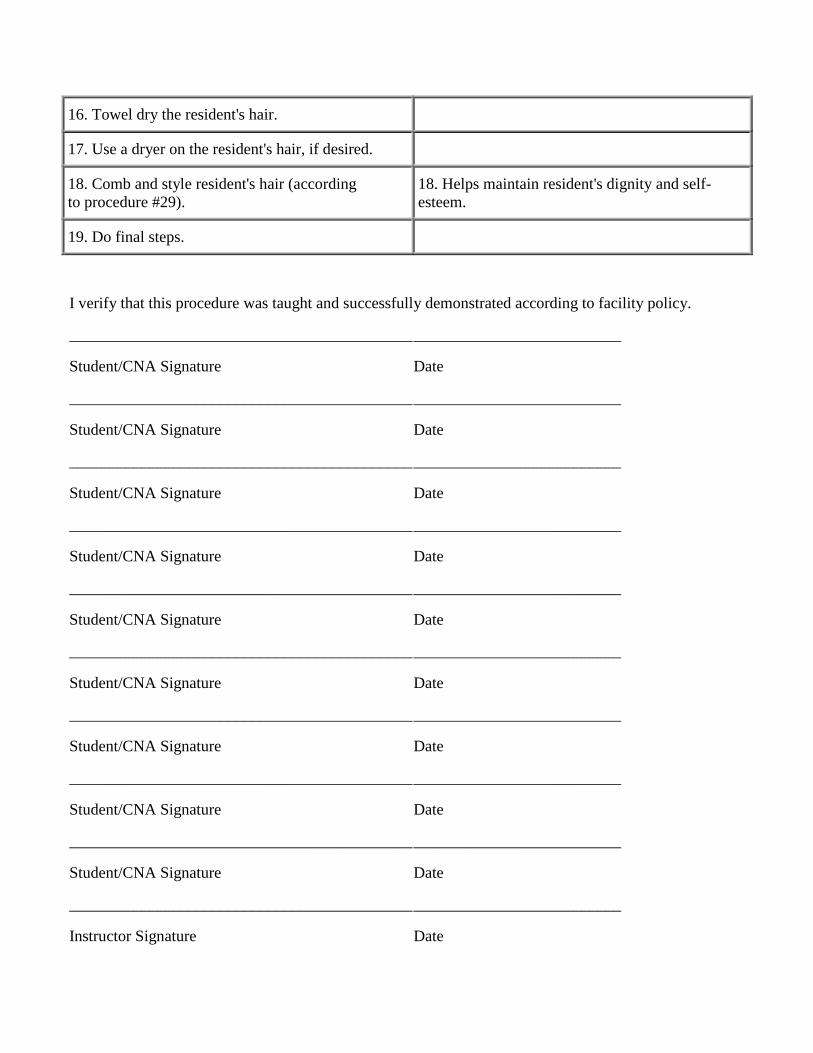
16. Towel dry the resident's hair.
17. Use a dryer on the resident's hair, if desired.
18. Comb and style resident's hair (accordingto procedure #29).
18. Helps maintain resident's dignity and self-esteem.
19. Do final steps.
I verify that this procedure was taught and successfully demonstrated according to facility policy.
_____________________________________________________________________
Student/CNA Signature Date
_____________________________________________________________________
Student/CNA Signature Date
_____________________________________________________________________
Student/CNA Signature Date
_____________________________________________________________________
Student/CNA Signature Date
_____________________________________________________________________
Student/CNA Signature Date
_____________________________________________________________________
Student/CNA Signature Date
_____________________________________________________________________
Student/CNA Signature Date
_____________________________________________________________________
Student/CNA Signature Date
_____________________________________________________________________
Student/CNA Signature Date
_____________________________________________________________________
Instructor Signature Date
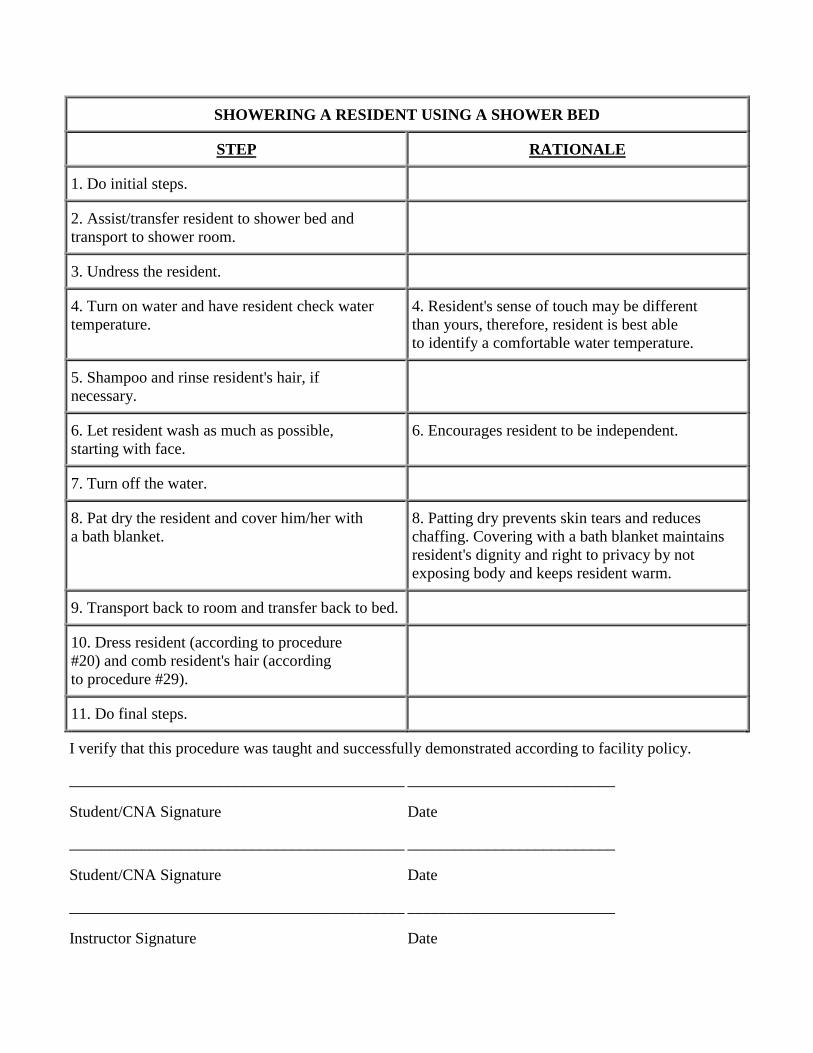
SHOWERING A RESIDENT USING A SHOWER BED
STEP RATIONALE
1. Do initial steps.
2. Assist/transfer resident to shower bed andtransport to shower room.
3. Undress the resident.
4. Turn on water and have resident check watertemperature.
4. Resident's sense of touch may be differentthan yours, therefore, resident is best ableto identify a comfortable water temperature.
5. Shampoo and rinse resident's hair, ifnecessary.
6. Let resident wash as much as possible,starting with face.
6. Encourages resident to be independent.
7. Turn off the water.
8. Pat dry the resident and cover him/her witha bath blanket.
8. Patting dry prevents skin tears and reduceschaffing. Covering with a bath blanket maintainsresident's dignity and right to privacy by notexposing body and keeps resident warm.
9. Transport back to room and transfer back to bed.
10. Dress resident (according to procedure#20) and comb resident's hair (accordingto procedure #29).
11. Do final steps.
I verify that this procedure was taught and successfully demonstrated according to facility policy.
__________________________________________ __________________________
Student/CNA Signature Date
__________________________________________ __________________________
Student/CNA Signature Date
__________________________________________ __________________________
Instructor Signature Date
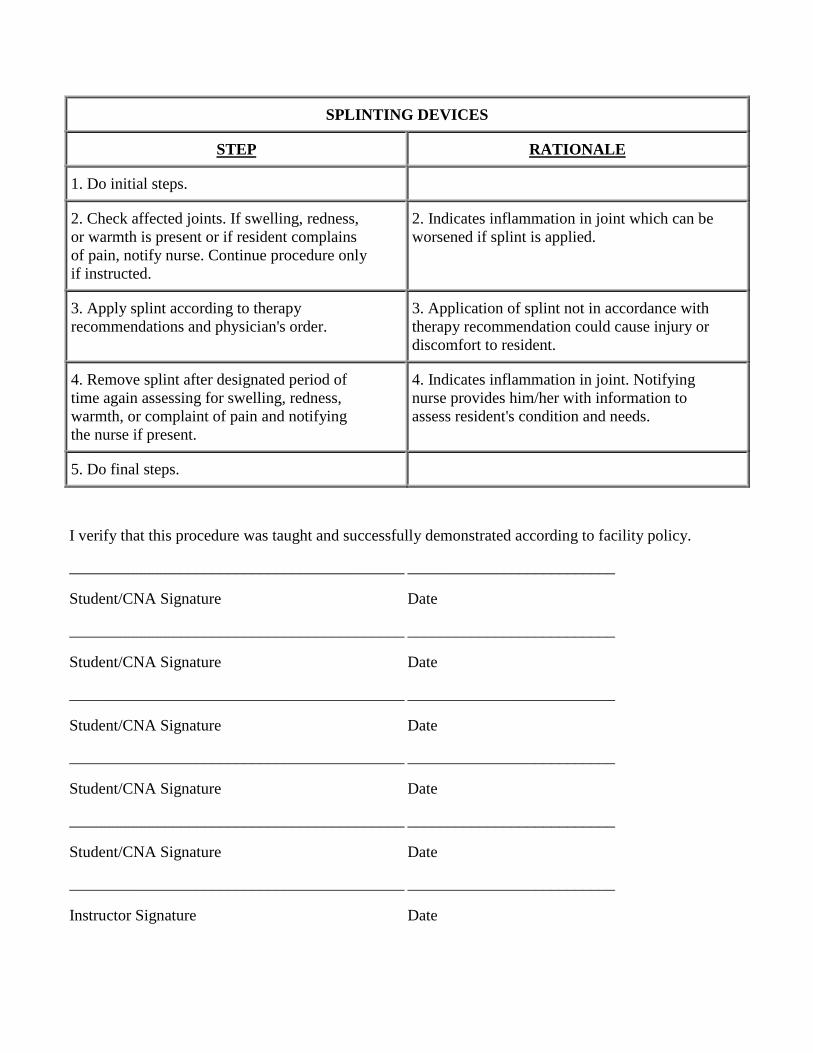
SPLINTING DEVICES
STEP RATIONALE
1. Do initial steps.
2. Check affected joints. If swelling, redness,or warmth is present or if resident complainsof pain, notify nurse. Continue procedure onlyif instructed.
2. Indicates inflammation in joint which can beworsened if splint is applied.
3. Apply splint according to therapyrecommendations and physician's order.
3. Application of splint not in accordance withtherapy recommendation could cause injury ordiscomfort to resident.
4. Remove splint after designated period oftime again assessing for swelling, redness,warmth, or complaint of pain and notifyingthe nurse if present.
4. Indicates inflammation in joint. Notifyingnurse provides him/her with information toassess resident's condition and needs.
5. Do final steps.
I verify that this procedure was taught and successfully demonstrated according to facility policy.
__________________________________________ __________________________
Student/CNA Signature Date
__________________________________________ __________________________
Student/CNA Signature Date
__________________________________________ __________________________
Student/CNA Signature Date
__________________________________________ __________________________
Student/CNA Signature Date
__________________________________________ __________________________
Student/CNA Signature Date
__________________________________________ __________________________
Instructor Signature Date

STOOL SPECIMENS
STEP RATIONALE
1. Do initial steps.
2. Prepare label for specimen with appropriateinformation and place it on specimencontainer, not the lid.
2. Label contains resident's identifying informationwhich is essential for the laboratory. Label shouldbe placed on specimen container in the event lid ismisplaced or thrown away.
3. Put on gloves (according to procedure #2). 3. Protects you from contamination by bodilyfluids.
4. Have resident utilize a clean bedpan orother collecttion device during bowelmovement. Instruct resident not to urinateinto specimen or place toilet paper in it.
4. A clean collection device is necessary foraccurate lab evaluation. Urine contaminatedstool will produce an inaccurate result.
5. Use a wooden tongue blade to remove 1-2tablespoons of feces from collection device.Try to collect material from different areasof the stool.
5. In order to ensure adequate amount of stool fortest ordered. Obtaining material from differentareas ensures that all possible contents will beidentified.
6. Put lid on specimen container and disposeof remaining stool.
7. Do final steps.
I verify that this procedure was taught and successfully demonstrated according to facility policy.
__________________________________________ __________________________
Student/CNA Signature Date
__________________________________________ __________________________
Student/CNA Signature Date
__________________________________________ __________________________
Student/CNA Signature Date
__________________________________________ __________________________
Instructor Signature Date
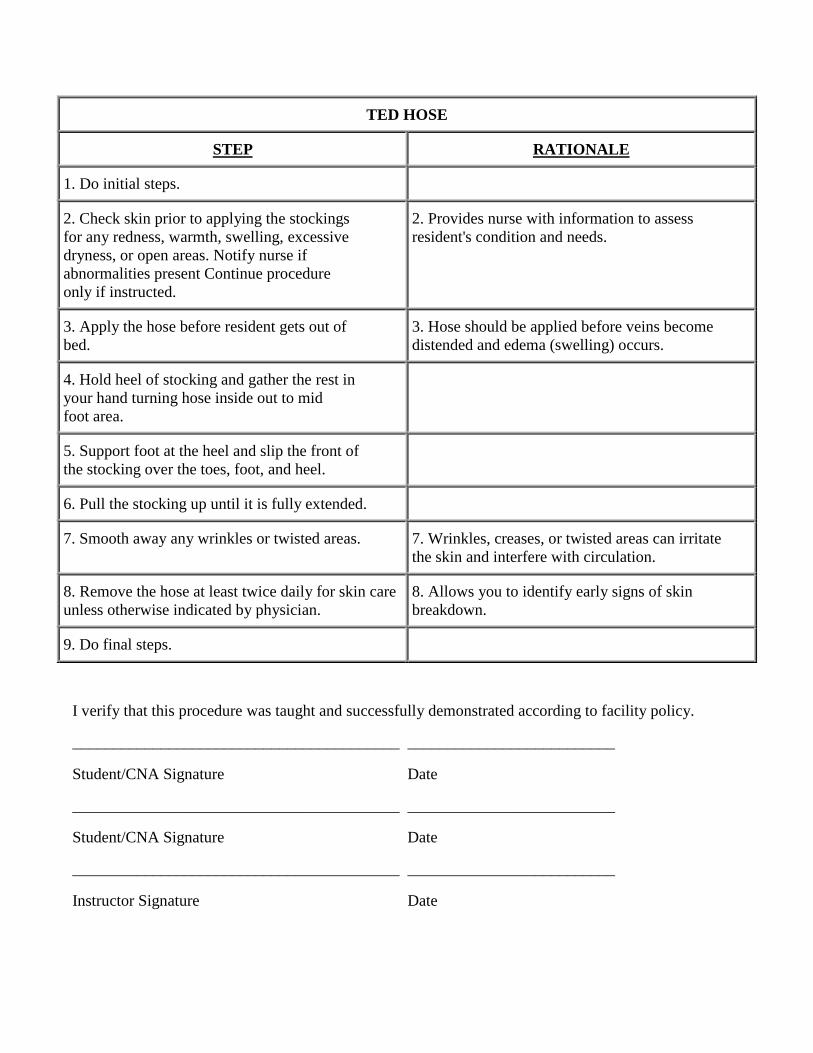
TED HOSE
STEP RATIONALE
1. Do initial steps.
2. Check skin prior to applying the stockingsfor any redness, warmth, swelling, excessivedryness, or open areas. Notify nurse ifabnormalities present Continue procedureonly if instructed.
2. Provides nurse with information to assessresident's condition and needs.
3. Apply the hose before resident gets out ofbed.
3. Hose should be applied before veins becomedistended and edema (swelling) occurs.
4. Hold heel of stocking and gather the rest inyour hand turning hose inside out to midfoot area.
5. Support foot at the heel and slip the front ofthe stocking over the toes, foot, and heel.
6. Pull the stocking up until it is fully extended.
7. Smooth away any wrinkles or twisted areas. 7. Wrinkles, creases, or twisted areas can irritatethe skin and interfere with circulation.
8. Remove the hose at least twice daily for skin careunless otherwise indicated by physician.
8. Allows you to identify early signs of skinbreakdown.
9. Do final steps.
I verify that this procedure was taught and successfully demonstrated according to facility policy.
_________________________________________ __________________________
Student/CNA Signature Date
_________________________________________ __________________________
Student/CNA Signature Date
_________________________________________ __________________________
Instructor Signature Date
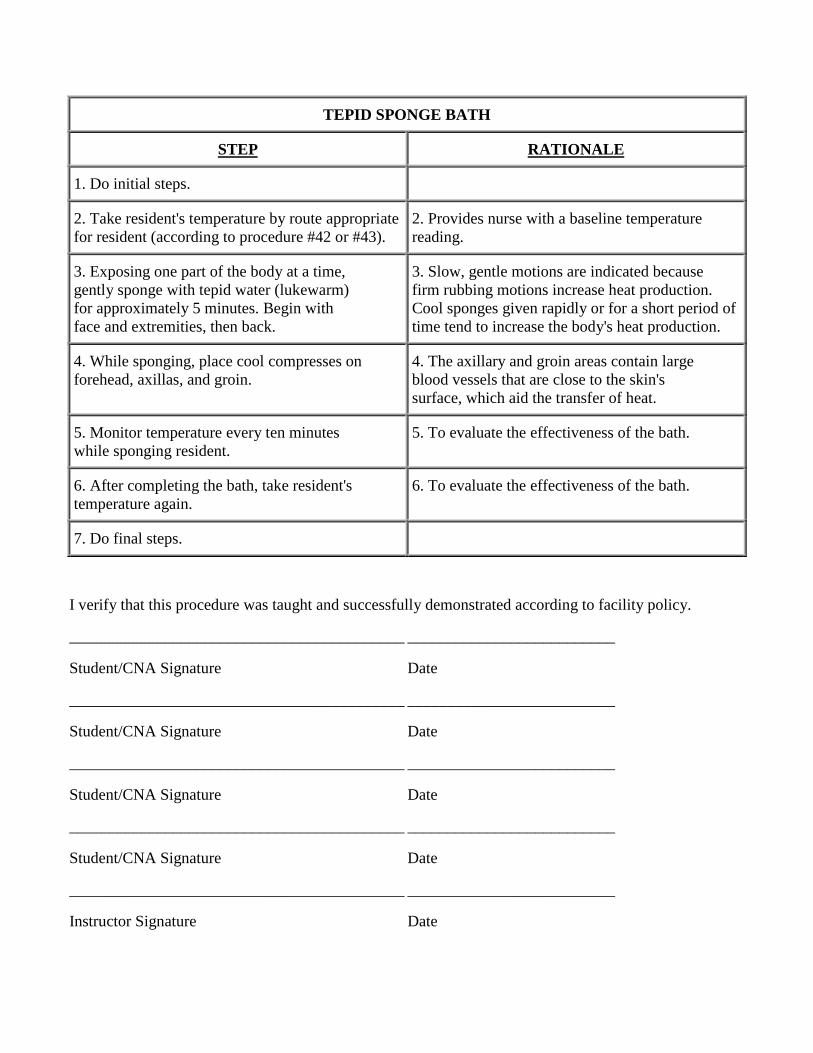
TEPID SPONGE BATH
STEP RATIONALE
1. Do initial steps.
2. Take resident's temperature by route appropriatefor resident (according to procedure #42 or #43).
2. Provides nurse with a baseline temperaturereading.
3. Exposing one part of the body at a time,gently sponge with tepid water (lukewarm)for approximately 5 minutes. Begin withface and extremities, then back.
3. Slow, gentle motions are indicated becausefirm rubbing motions increase heat production.Cool sponges given rapidly or for a short period oftime tend to increase the body's heat production.
4. While sponging, place cool compresses onforehead, axillas, and groin.
4. The axillary and groin areas contain largeblood vessels that are close to the skin'ssurface, which aid the transfer of heat.
5. Monitor temperature every ten minuteswhile sponging resident.
5. To evaluate the effectiveness of the bath.
6. After completing the bath, take resident'stemperature again.
6. To evaluate the effectiveness of the bath.
7. Do final steps.
I verify that this procedure was taught and successfully demonstrated according to facility policy.
__________________________________________ __________________________
Student/CNA Signature Date
__________________________________________ __________________________
Student/CNA Signature Date
__________________________________________ __________________________
Student/CNA Signature Date
__________________________________________ __________________________
Student/CNA Signature Date
__________________________________________ __________________________
Instructor Signature Date
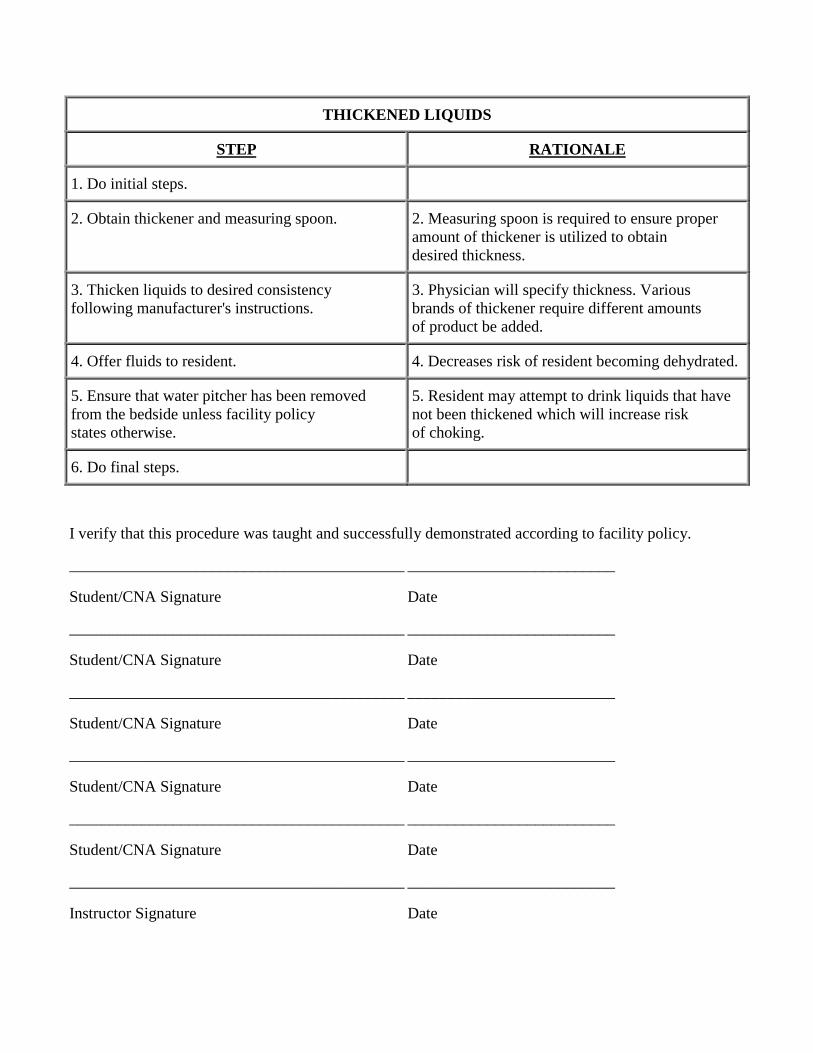
THICKENED LIQUIDS
STEP RATIONALE
1. Do initial steps.
2. Obtain thickener and measuring spoon. 2. Measuring spoon is required to ensure properamount of thickener is utilized to obtaindesired thickness.
3. Thicken liquids to desired consistencyfollowing manufacturer's instructions.
3. Physician will specify thickness. Variousbrands of thickener require different amountsof product be added.
4. Offer fluids to resident. 4. Decreases risk of resident becoming dehydrated.
5. Ensure that water pitcher has been removedfrom the bedside unless facility policystates otherwise.
5. Resident may attempt to drink liquids that havenot been thickened which will increase riskof choking.
6. Do final steps.
I verify that this procedure was taught and successfully demonstrated according to facility policy.
__________________________________________ __________________________
Student/CNA Signature Date
__________________________________________ __________________________
Student/CNA Signature Date
__________________________________________ __________________________
Student/CNA Signature Date
__________________________________________ __________________________
Student/CNA Signature Date
__________________________________________ __________________________
Student/CNA Signature Date
__________________________________________ __________________________
Instructor Signature Date
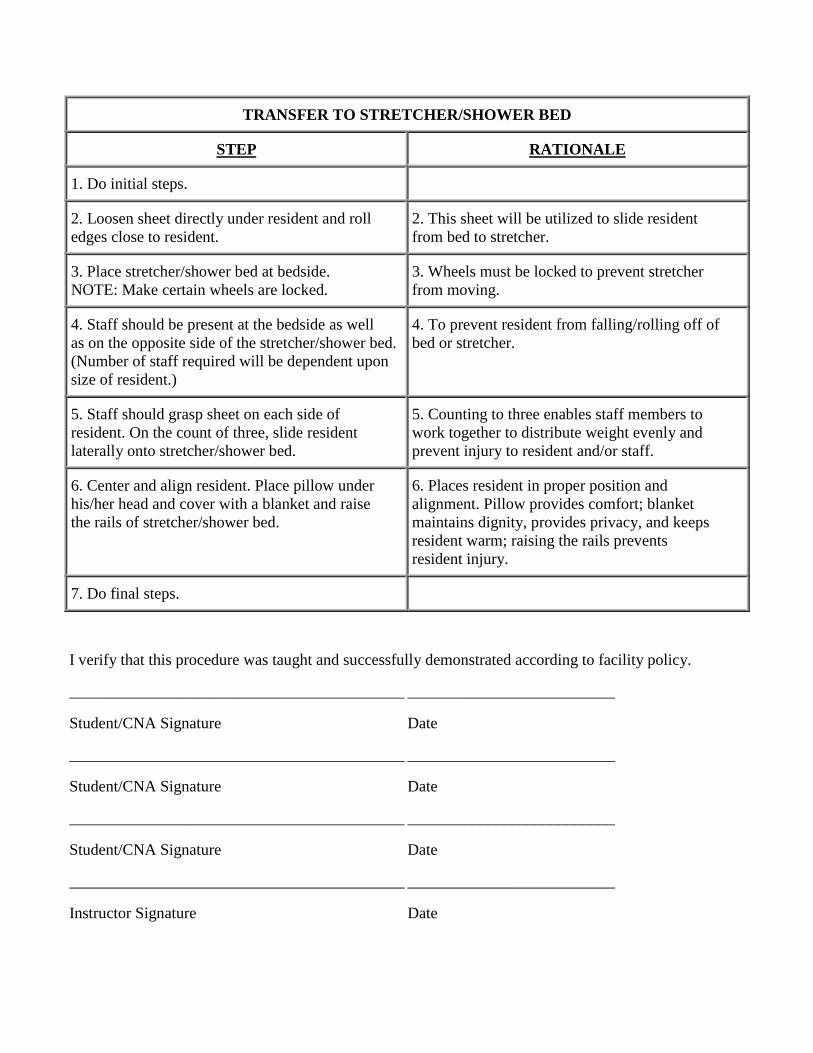
TRANSFER TO STRETCHER/SHOWER BED
STEP RATIONALE
1. Do initial steps.
2. Loosen sheet directly under resident and rolledges close to resident.
2. This sheet will be utilized to slide residentfrom bed to stretcher.
3. Place stretcher/shower bed at bedside.NOTE: Make certain wheels are locked.
3. Wheels must be locked to prevent stretcherfrom moving.
4. Staff should be present at the bedside as wellas on the opposite side of the stretcher/shower bed.(Number of staff required will be dependent uponsize of resident.)
4. To prevent resident from falling/rolling off ofbed or stretcher.
5. Staff should grasp sheet on each side ofresident. On the count of three, slide residentlaterally onto stretcher/shower bed.
5. Counting to three enables staff members towork together to distribute weight evenly andprevent injury to resident and/or staff.
6. Center and align resident. Place pillow underhis/her head and cover with a blanket and raisethe rails of stretcher/shower bed.
6. Places resident in proper position andalignment. Pillow provides comfort; blanketmaintains dignity, provides privacy, and keepsresident warm; raising the rails preventsresident injury.
7. Do final steps.
I verify that this procedure was taught and successfully demonstrated according to facility policy.
__________________________________________ __________________________
Student/CNA Signature Date
__________________________________________ __________________________
Student/CNA Signature Date
__________________________________________ __________________________
Student/CNA Signature Date
__________________________________________ __________________________
Instructor Signature Date
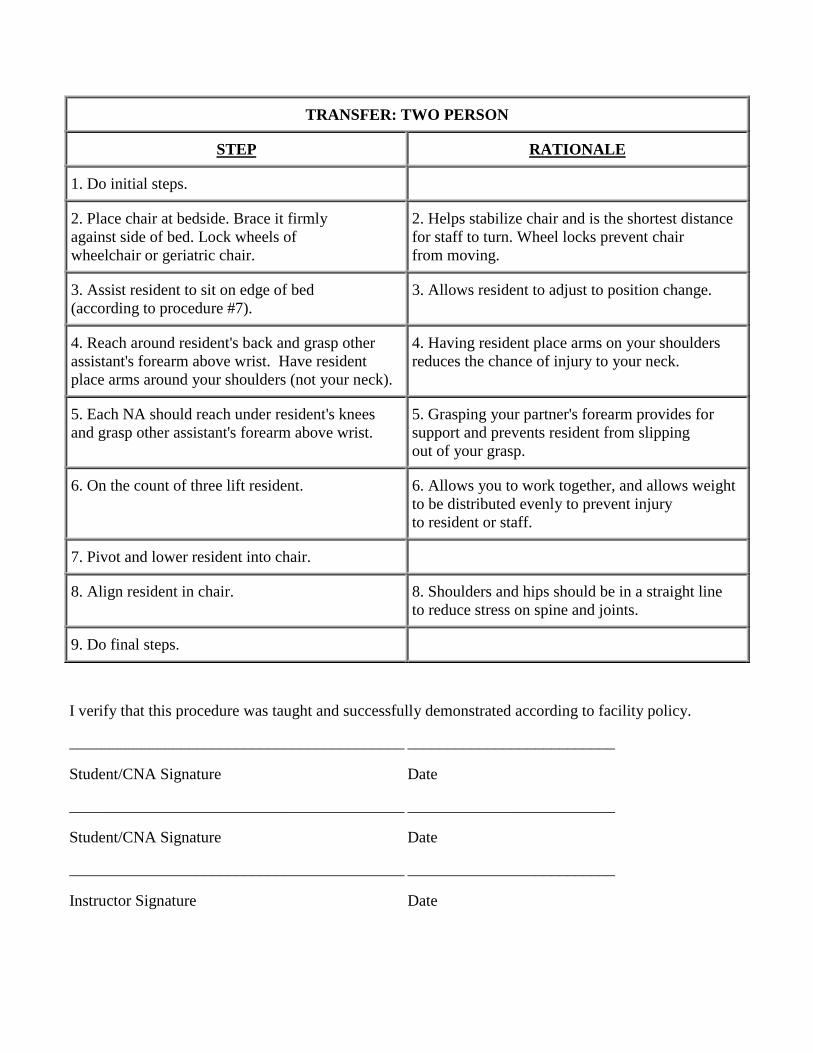
TRANSFER: TWO PERSON
STEP RATIONALE
1. Do initial steps.
2. Place chair at bedside. Brace it firmlyagainst side of bed. Lock wheels ofwheelchair or geriatric chair.
2. Helps stabilize chair and is the shortest distancefor staff to turn. Wheel locks prevent chairfrom moving.
3. Assist resident to sit on edge of bed(according to procedure #7).
3. Allows resident to adjust to position change.
4. Reach around resident's back and grasp otherassistant's forearm above wrist. Have residentplace arms around your shoulders (not your neck).
4. Having resident place arms on your shouldersreduces the chance of injury to your neck.
5. Each NA should reach under resident's kneesand grasp other assistant's forearm above wrist.
5. Grasping your partner's forearm provides forsupport and prevents resident from slippingout of your grasp.
6. On the count of three lift resident. 6. Allows you to work together, and allows weightto be distributed evenly to prevent injuryto resident or staff.
7. Pivot and lower resident into chair.
8. Align resident in chair. 8. Shoulders and hips should be in a straight lineto reduce stress on spine and joints.
9. Do final steps.
I verify that this procedure was taught and successfully demonstrated according to facility policy.
__________________________________________ __________________________
Student/CNA Signature Date
__________________________________________ __________________________
Student/CNA Signature Date
__________________________________________ __________________________
Instructor Signature Date
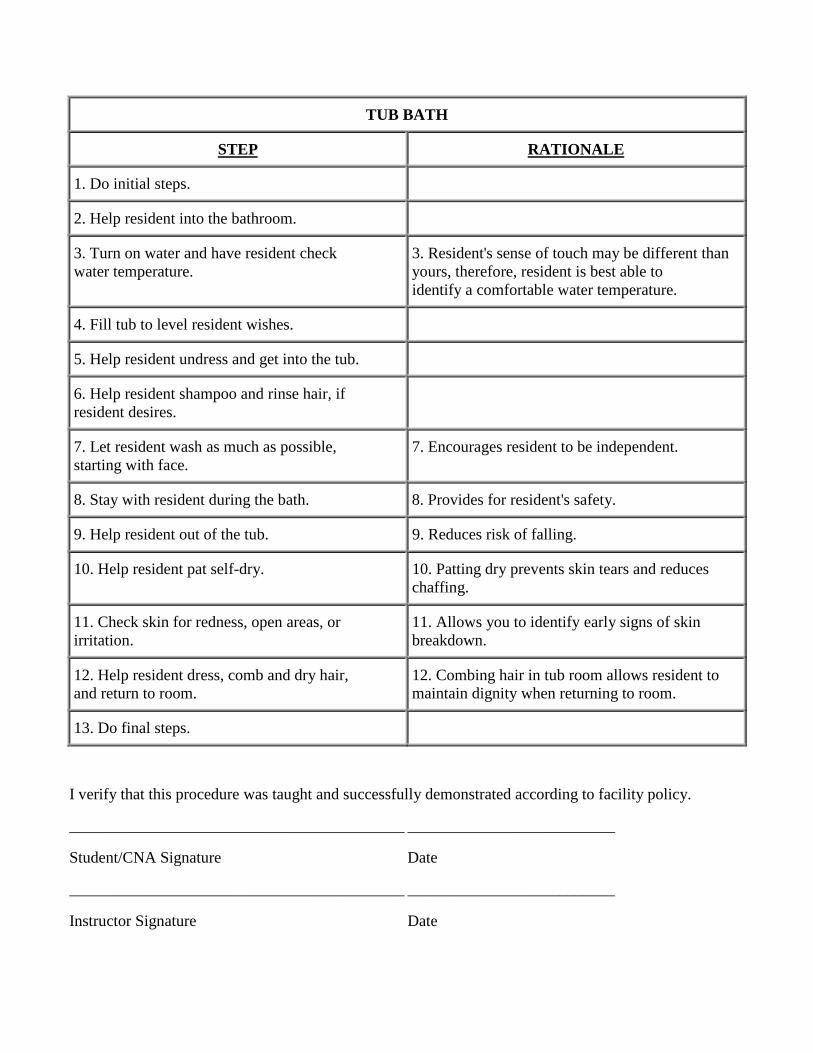
TUB BATH
STEP RATIONALE
1. Do initial steps.
2. Help resident into the bathroom.
3. Turn on water and have resident checkwater temperature.
3. Resident's sense of touch may be different thanyours, therefore, resident is best able toidentify a comfortable water temperature.
4. Fill tub to level resident wishes.
5. Help resident undress and get into the tub.
6. Help resident shampoo and rinse hair, ifresident desires.
7. Let resident wash as much as possible,starting with face.
7. Encourages resident to be independent.
8. Stay with resident during the bath. 8. Provides for resident's safety.
9. Help resident out of the tub. 9. Reduces risk of falling.
10. Help resident pat self-dry. 10. Patting dry prevents skin tears and reduceschaffing.
11. Check skin for redness, open areas, orirritation.
11. Allows you to identify early signs of skinbreakdown.
12. Help resident dress, comb and dry hair,and return to room.
12. Combing hair in tub room allows resident tomaintain dignity when returning to room.
13. Do final steps.
I verify that this procedure was taught and successfully demonstrated according to facility policy.
__________________________________________ __________________________
Student/CNA Signature Date
__________________________________________ __________________________
Instructor Signature Date
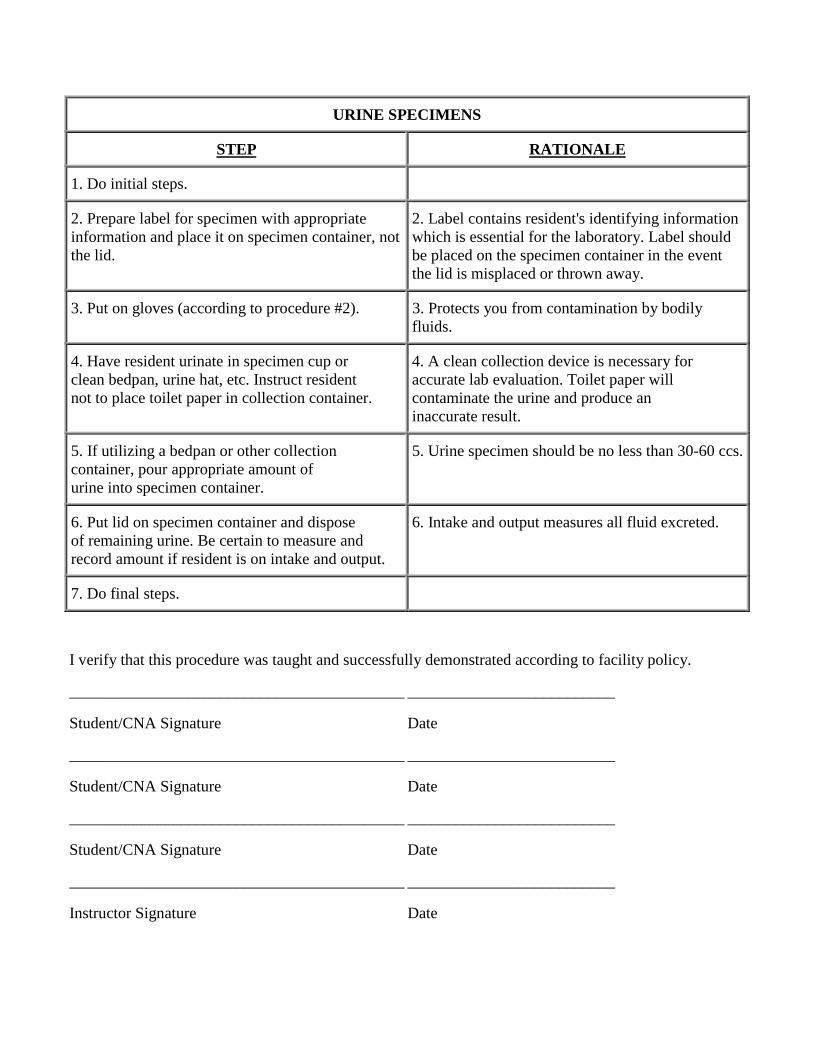
URINE SPECIMENS
STEP RATIONALE
1. Do initial steps.
2. Prepare label for specimen with appropriateinformation and place it on specimen container, notthe lid.
2. Label contains resident's identifying informationwhich is essential for the laboratory. Label shouldbe placed on the specimen container in the eventthe lid is misplaced or thrown away.
3. Put on gloves (according to procedure #2). 3. Protects you from contamination by bodilyfluids.
4. Have resident urinate in specimen cup orclean bedpan, urine hat, etc. Instruct residentnot to place toilet paper in collection container.
4. A clean collection device is necessary foraccurate lab evaluation. Toilet paper willcontaminate the urine and produce aninaccurate result.
5. If utilizing a bedpan or other collectioncontainer, pour appropriate amount ofurine into specimen container.
5. Urine specimen should be no less than 30-60 ccs.
6. Put lid on specimen container and disposeof remaining urine. Be certain to measure andrecord amount if resident is on intake and output.
6. Intake and output measures all fluid excreted.
7. Do final steps.
I verify that this procedure was taught and successfully demonstrated according to facility policy.
__________________________________________ __________________________
Student/CNA Signature Date
__________________________________________ __________________________
Student/CNA Signature Date
__________________________________________ __________________________
Student/CNA Signature Date
__________________________________________ __________________________
Instructor Signature Date

USING A GAIT BELT TO ASSIST WITH AMBULATION
STEP RATIONALE
1. Do initial steps.
2. Assist resident to sit on edge of bed(according to procedure #7).
2. Allows resident to adjust to position change.
3. Place belt around resident's waist with thebuckle in front (on top of resident's clothes)and adjust to a snug fit ensuring that youcan get your hands under the belt.
3. Buckle is difficult to release if in back andmay cause injury to ribcage if on side. Placingthe belt on top of resident's clothes maintainsproper infection control procedures. The beltmust be snug enough that it doesn't slip whenyou are assisting resident to move.
4. Assist the resident stand on count of three. 4. Allows you and the resident to work together.
5. Allow resident to gain balance. 5. Change in position may cause dizziness dueto a drop in blood pressure.
6. Stand to side and slightly behind residentwhile continuing to hold onto belt. Positionone hand on the belt at the resident's sideand the other hand at the resident's back.
6. Allows clear path for the resident and putsyou in a position to assist resident if needed.
7. Walk at resident's pace. 7. Reduces risk of falling.
8. Return resident to chair or bed and remove belt.
9. Do final steps.
I verify that this procedure was taught and successfully demonstrated according to facility policy.
_________________________________________ __________________________
Student/CNA Signature Date
_________________________________________ __________________________
Student/CNA Signature Date
_________________________________________ __________________________
Instructor Signature Date
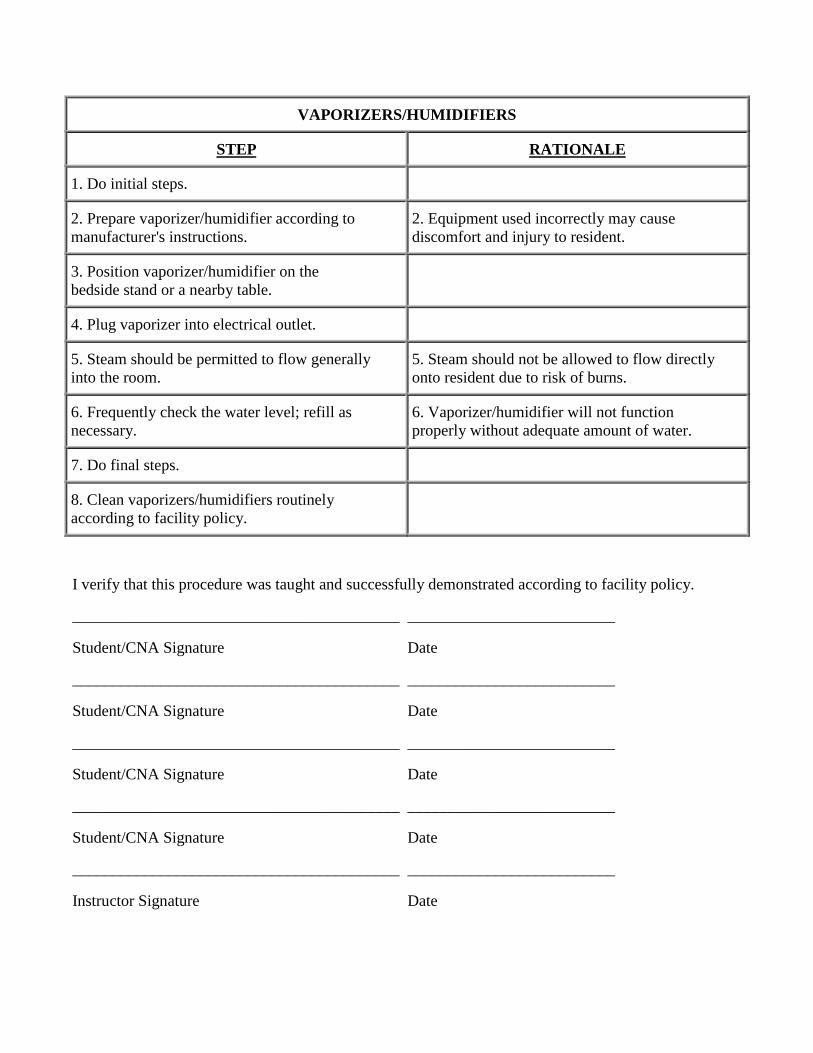
VAPORIZERS/HUMIDIFIERS
STEP RATIONALE
1. Do initial steps.
2. Prepare vaporizer/humidifier according tomanufacturer's instructions.
2. Equipment used incorrectly may causediscomfort and injury to resident.
3. Position vaporizer/humidifier on thebedside stand or a nearby table.
4. Plug vaporizer into electrical outlet.
5. Steam should be permitted to flow generallyinto the room.
5. Steam should not be allowed to flow directlyonto resident due to risk of burns.
6. Frequently check the water level; refill asnecessary.
6. Vaporizer/humidifier will not functionproperly without adequate amount of water.
7. Do final steps.
8. Clean vaporizers/humidifiers routinelyaccording to facility policy.
I verify that this procedure was taught and successfully demonstrated according to facility policy.
_________________________________________ __________________________
Student/CNA Signature Date
_________________________________________ __________________________
Student/CNA Signature Date
_________________________________________ __________________________
Student/CNA Signature Date
_________________________________________ __________________________
Student/CNA Signature Date
_________________________________________ __________________________
Instructor Signature Date