
Slouchy Faux Cable Hat Optional Brim Tutorial
18
1 Slouchy Brimmed Faux-Cable Hat (Optional Brim) Crochet Pattern Designed by C. Beth. Copyright 2011. Pattern also at http://cbethblog.blogspot.com/2011/04/slouchy-pattern.html Like the hat, but you don't know a crochet pattern from a physics formula? No worries--I sell these hats and other styles! Feel free to check out various ones I've made on the C. Beth Crochet Facebook Page (www.facebook.com/cbethcrochet). You can email me at [email protected] if you're interested in placing a custom order. This hat can be made with a brim... ...or without!
-
Upload
katemusic2000 -
Category
Documents
-
view
32 -
download
0
description
Slouchy Faux Cable Hat Optional Brim Tutorial
Transcript of Slouchy Faux Cable Hat Optional Brim Tutorial

1
Slouchy Brimmed Faux-Cable Hat (Optional Brim)
Crochet Pattern Designed by C. Beth. Copyright 2011.
Pattern also at http://cbethblog.blogspot.com/2011/04/slouchy-pattern.html
Like the hat, but you don't know a crochet pattern from a physics formula? No worries--I sell
these hats and other styles! Feel free to check out various ones I've made on the C. Beth Crochet
Facebook Page (www.facebook.com/cbethcrochet). You can email me at
[email protected] if you're interested in placing a custom order.
This hat can be made with a brim...
...or without!

2
I have included lots of photos in the tutorial below. Once you make your second or third hat in
this pattern (and I hope you like it enough to make a few!), you might want to skip to page 16. I
have the pattern written there in simple terms without all the extra how-to stuff.
This is a pattern for crocheters of at least intermediate level. You need to know the American
crochet terms/abbreviations. Google and YouTube are great resources for finding instructions
for stitches you aren't comfortable with!
This pattern looks really long...and honestly, it's not a quick hat to make. But just take it one step
at a time. It's fun to see it come together!
Ready to start?
Slouchy Ribbed Faux Cable Hat With or Without Brim
Pattern by C. Beth
Use worsted weight (4) or bulky (5) yarn, approximately 4-5 ounces. Solid color recommended.
You may use this pattern to make hats to sell, as long as you're not mass-producing the hats. You may not sell the
pattern itself or claim the design as your own. If you redistribute the pattern, please do so by referring people to the
blog post at http://cbethblog.blogspot.com/2011/04/slouchy-pattern.html or to the Ravelry.com link at
http://www.ravelry.com/patterns/library/slouchy-faux-cable-hat-optional-brim, or by distributing this printout.
Thanks!
PART ONE: HAT BODY
I use an I (5.5 mm) hook.
The first 9 rounds are first given as a normal written pattern, and below that I've posted a chart
showing those rounds. The chart helps me to visually keep track of what stitches I should be
doing. It may help you too--but it's not written the way a normal crochet chart would be, so if it
confuses you, just ignore it!
ROUND 1: Start with a Magic Adjustable Ring. CH-3 into ring (counts as DC), then 11 DC into
ring. (12 stitches.) Join at top of CH-3.
For Round 2 through Round 21, start each round with a CH-2. This counts as a DC, and I'm
going to call it a DC to make the pattern easier to read.
ROUND 2: 2 DC in each st. (24 stitches.) Join.
ROUND 3: 2 DC in first st, 1 DC in next st. Repeat around. (36 stitches.) Join.
Now in Round 4 we will be introducing FPDC (Front Post Double Crochet) stitches. The FPDC
stitches create the ribbing in the body of the hat.
ROUND 4: DC in first st, FPDC in next st, increase by working both DC & FPDC in next st.

3
Repeat this group of 4 stitches all the way around. (48 stitches.) Join.
This photo shows the first few stitches of Round 4.
For Rounds 5-21, each FPDC stitch should be around an FPDC stitch from the previous
round to create the ribbing.
ROUND 5: Work 2 DC in one st, FPDC, DC, FPDC, DC, FPDC, DC, FPDC. Repeat this group
of 9 stitches all the way around. (54 stitches.) Join.
ROUND 6: DC, DC, FPDC, 2 DC in one st, FPDC, DC, FPDC, DC, FPDC. Repeat this group of
10 stitches, all the way around. (60 stitches.) Join.
ROUND 7: DC, DC, FPDC, DC, DC, FPDC, 2 DC in one st, FPDC, DC, FPDC. Repeat this
group of 11 stitches, all the way around. (66 stitches.) Join.
ROUND 8: DC, DC, FPDC, DC, DC, FPDC, DC, DC, FPDC, 2 DC in one st, FPDC. Repeat
this group of 12 stitches, all the way around. (72 stitches.) Join.
ROUND 9: DC, DC, FPDC. Repeat this group of 3 stitches, all the way around. (72 stitches.)
Join.

4
CHART SHOWING ROUNDS 1-9.
ROUNDS 10 through 21: Repeat Row 9.
At this point your hat should look something like this:
PART TWO: HAT BAND
For a "one size fits most women" hat, use a J (6 mm) hook (or 1 size larger than body hook.) For
a large size women's hat, use a K (6.5 mm) hook (or 2 sizes larger than body hook.) For a small
size women's hat, use an I (5.5 mm) hook (or same size as body hook.)
ROUND 22: CH-1 (counts as HDC.) HDC all the way around. (72 stitches.) Join.
ROUND 23: CH-1 (Counts as BPHDC, Back Post Half Double Crochet.) FPHDC (Front Post
HDC.) Then alternate BPHDC/FPHDC all the way around. (72 stitches.) Join.
ROUND 24 through 26: Repeat Round 23.
Cut yarn, pull it through, and work in ends.
5
PART THREE: FAUX CABLE I used an I (5.5 mm) hook.
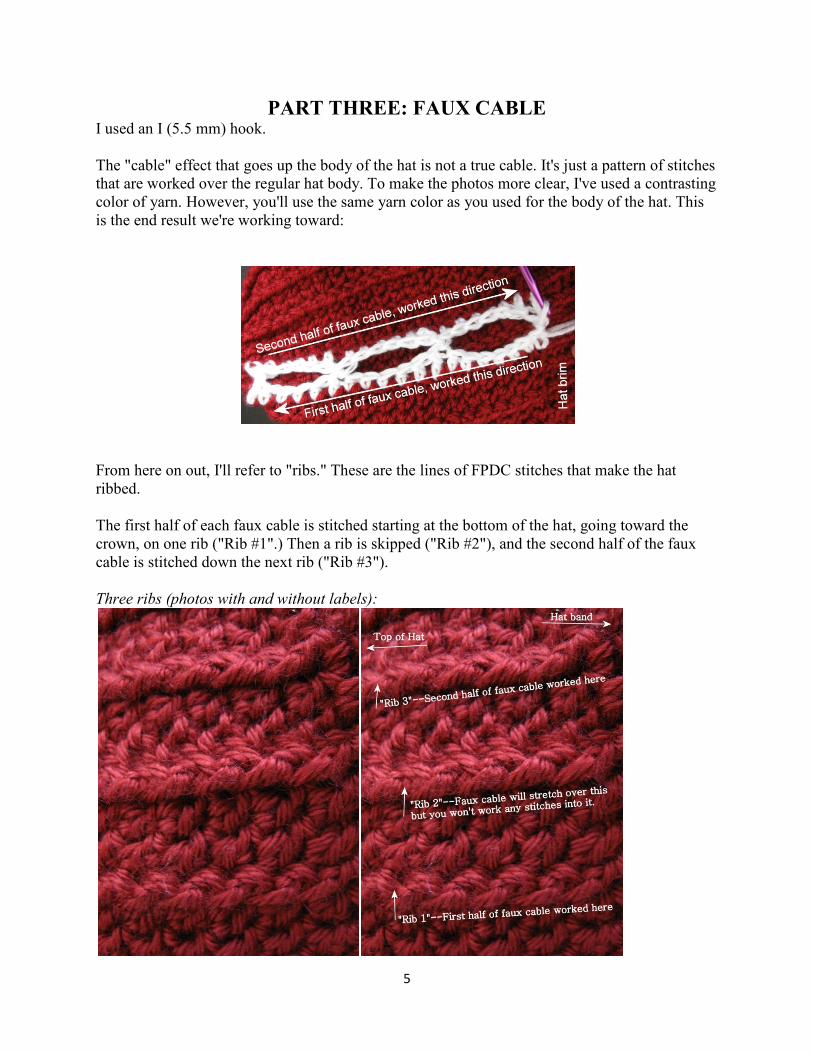
The "cable" effect that goes up the body of the hat is not a true cable. It's just a pattern of stitches
that are worked over the regular hat body. To make the photos more clear, I've used a contrasting
color of yarn. However, you'll use the same yarn color as you used for the body of the hat. This
is the end result we're working toward:
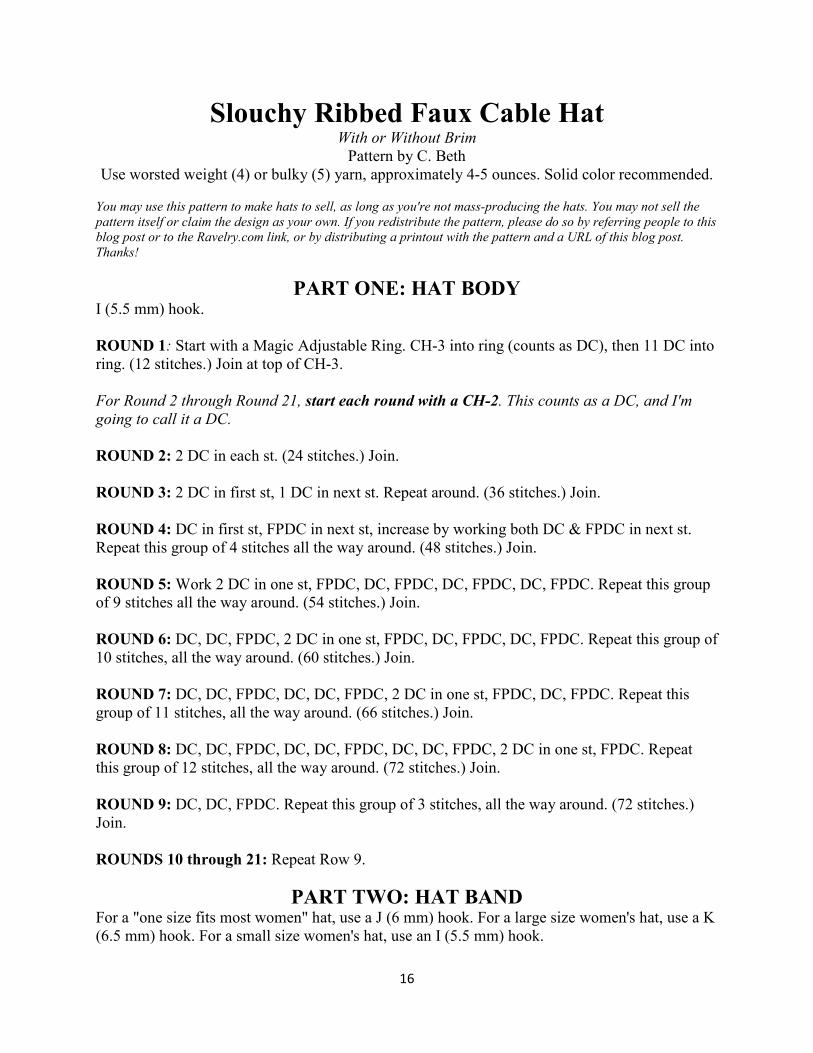
From here on out, I'll refer to "ribs." These are the lines of FPDC stitches that make the hat
ribbed.
The first half of each faux cable is stitched starting at the bottom of the hat, going toward the
crown, on one rib ("Rib #1".) Then a rib is skipped ("Rib #2"), and the second half of the faux
cable is stitched down the next rib ("Rib #3").
Three ribs (photos with and without labels):

6
Okay, let's start the first faux cable! Find a rib to start with (Rib #1.) It helps to fold the hat right
at that rib, with the rib at the "peak" of the fold. (See next photo.)
Because the FPDC stitches are elevated, it makes it easy to work the faux cable stitches into
them. Instead of putting your hook through loops at the top of the previous round of stitching, as
you usually do, you'll be putting your hook under the whole FPDC stitch. Work one stitch of the
faux cable around one FPDC stitch.
First, join your yarn at the very bottom of the hat body, in the last FPDC stitch.
Pull the yarn through, and ch-3. This counts as a TC.
After the CH-3, working up Rib #1, complete the following stitches:
DC, HDC, SC, SC, HDC, DC, TC, DC, HDC, SC, SC, HDC, DC, HDC, SC, SC, HDC, DC (19
stitches including CH-3.) This creates a scalloped effect.

7
The first few stitches of this half of the faux cable:
The first half of the faux cable:
When you finish the last DC of the first half of the faux cable, CH-2. This counts as the first DC
of the second half of the faux cable.

8
Now, we're going to make our way over to Rib #3 for the second half of the faux cable.
Slip stitch into Rib 3. Make sure you're slip stitching directly across from where you worked the
last stitch in Rib 1. In other words, work into the same round of the hat body.
We're ready to do the rest of the faux cable. Turn the hat around so that you can work into Rib 3.
Now that you've turned the hat around, your hook is at the "bottom" of the CH-2, and it should
be at the top before you do the next stitch. Slip stitch into both chain stitches that you just
completed--working your way to the top of the chain. (By the way, I've made the hat several
times without doing this, and it looks fine. So if this is confusing to you, just skip this step.)

9
You're going to work the same stitches as in the first half of the faux cable, but in opposite order.
Each time you hit a "peak" of the scalloped pattern, you'll need to slip stitch into the same "peak"
on the other half of the faux cable before continuing on. So...
Once you've slip stitched into each chain of the CH-2 (which counts as a DC), complete these
stitches:
HDC, SC, SC, HDC, DC (then slip stitch into DC on first half of faux cable), HDC, SC, SC,
HDC, DC, TC (then slip stitch into TC on first half of faux cable), DC, HDC, SC, SC, HDC, DC,
TC (then slip stitch into last FPDC of Rib #2, and slip stitch into top of CH-3 from first half of
faux cable.)
Some photos to show you what the heck all this looks like:
Slip stitch into a DC on the first half of the faux cable:

10
Slip stitch into Rib #2:
Slip stitch into top of CH-3 from first half of faux cable:
Completed faux cable...but yours will be much more subtle since you will use the same color of
yarn as the body of the hat:

11
Make sense? Now that your first faux cable is done, you can cut the yarn, pull it through, and
work the ends in.
There are 24 ribs around the hat. Each faux cable uses three ribs. I do four faux cables. If you
want to do four, skip three ribs entirely between each faux cable.
If you prefer to do six faux cables, just skip one rib between each faux cable.
Once your faux cables are done, you've got a very cute hat!
You can stop here, or add a brim.

12
PART FOUR: OPTIONAL BRIM
I use an I (5.5 mm) hook.
Use two strands of yarn for brim. If you are using bulky-weight yarn, this is optional, but the
brim will hold its form better with two strands.
Once again, to make the photos more clear, I've used a contrasting color of yarn. However, you'll
use the same yarn color as you used for the body of the hat. I also only used one strand of yarn
for the photos.
First, figure out where you want the front/center of your hat to be. I use the middle of one of the
cables as my front/center. You may prefer to use a point halfway between two of the cables.
The first row of the hat will be 17 HDC stitches. I like to use stitch markers on either side of
where these stitches will go, so I don't have to count repeatedly as I'm working. (If you don't
have stitch markers, get some--they're cheap! Mine are huge, but smaller ones are available.
Unlike most safety pins, they don't have a loop opposite of the clasp--those little loops can get
snagged in your yarn.)
With the hat upside down (as in the photo), you'll work from right to left. You'll be working
around the posts of the stitches in the second to the last row of the hat band.
Join your yarn to the hat band. Leave a tail a few inches longer than usual--you'll need it later.

13
Once the yarn is joined...
Row 1: CH-2 (Counts as HDC.) FPHDC (Front Post Half Double Crochet) into next 16 stitches
of hat band. Slip stitch around the post of the next stitch of hat band. (17 HDC + 1 slip stitch.)
DON'T turn yet.
Row 2: First do a FPHDC into band right next to the slip stitch you just did. This counts as the
first stitch of Row 2.
Now you can turn and continue Row 2. You'll be working into Row 1. Don't work into the slip
stitch at the end of Row 1, though. Start working in the last FPHDC of Row 1. (Follow this same
pattern for subsequent rows too--don't work into the slip stitch!)

14
Work these stitches: 2 HDC into each of the next 2 stitches. 1 HDC into each of the next 13
stitches. 2 HDC into each of the next 2 stitches. Now you should have reached the beginning of
Row 1. Slip stitch around the post of the next open stitch in the hat band. (22 HDC + 1 slip
stitch.) DON'T turn yet.
Row 3: First do a FPHDC right next to the slip stitch you just did. Then turn. Work into Row 2
of brim: 2 HDC into each of the next 2 stitches. 1 HDC into each of the next 18 stitches. 2 HDC
into each of the next 2 stitches. Now you should have reached the beginning of Row 2. Slip stitch
around the post of the next open stitch in the hat band. (27 HDC + 1 slip stitch.) DON'T turn yet.
Row 4: First do a FPHDC right next to the slip stitch you just did. Then turn. Work into Row 3
of brim: 2 HDC into each of the next 3 stitches. 1 HDC into each of the next 21 stitches. 2 HDC
into each of the next 3 stitches. Now you should have reached the beginning of Row 3. Slip stitch
around the post of the next open stitch in the hat band. (34 HDC + 1 slip stitch.) DON'T turn yet.
Row 5: First do a FPHDC right next to the slip stitch you just did. Then turn. Work into Row 4
of brim: 2 HDC into each of the next 3 stitches. 1 HDC into each of the next 28 stitches. 2 HDC
into each of the next 3 stitches. Now you should have reached the beginning of Row 4. Slip stitch
around the post of the next open stitch in the hat band. (41 HDC + 1 slip stitch.)
Your brim should look like this, except it'll be the same color as your hat, and it'll be thicker
since you'll use two strands of yarn.

15
Cut the yarn, pull it through, and work in the end. Before working in the extra yarn from where
you started the brim, you may want to use a bit of it to tack the edge (the beginning of Row 5) to
the hat band. That way it will match the other side better.
Congratulations! You're done!
When you've become an expert at the techniques in this hat, the short(er) version of the pattern
on the next page will be easier to read. See next page.
16
Slouchy Ribbed Faux Cable Hat With or Without Brim
Pattern by C. Beth
Use worsted weight (4) or bulky (5) yarn, approximately 4-5 ounces. Solid color recommended.
You may use this pattern to make hats to sell, as long as you're not mass-producing the hats. You may not sell the
pattern itself or claim the design as your own. If you redistribute the pattern, please do so by referring people to this
blog post or to the Ravelry.com link, or by distributing a printout with the pattern and a URL of this blog post.
Thanks!
PART ONE: HAT BODY
I (5.5 mm) hook.
ROUND 1: Start with a Magic Adjustable Ring. CH-3 into ring (counts as DC), then 11 DC into
ring. (12 stitches.) Join at top of CH-3.
For Round 2 through Round 21, start each round with a CH-2. This counts as a DC, and I'm
going to call it a DC.
ROUND 2: 2 DC in each st. (24 stitches.) Join.
ROUND 3: 2 DC in first st, 1 DC in next st. Repeat around. (36 stitches.) Join.
ROUND 4: DC in first st, FPDC in next st, increase by working both DC & FPDC in next st.
Repeat this group of 4 stitches all the way around. (48 stitches.) Join.
ROUND 5: Work 2 DC in one st, FPDC, DC, FPDC, DC, FPDC, DC, FPDC. Repeat this group
of 9 stitches all the way around. (54 stitches.) Join.
ROUND 6: DC, DC, FPDC, 2 DC in one st, FPDC, DC, FPDC, DC, FPDC. Repeat this group of
10 stitches, all the way around. (60 stitches.) Join.
ROUND 7: DC, DC, FPDC, DC, DC, FPDC, 2 DC in one st, FPDC, DC, FPDC. Repeat this
group of 11 stitches, all the way around. (66 stitches.) Join.
ROUND 8: DC, DC, FPDC, DC, DC, FPDC, DC, DC, FPDC, 2 DC in one st, FPDC. Repeat
this group of 12 stitches, all the way around. (72 stitches.) Join.
ROUND 9: DC, DC, FPDC. Repeat this group of 3 stitches, all the way around. (72 stitches.)
Join.
ROUNDS 10 through 21: Repeat Row 9.
PART TWO: HAT BAND
For a "one size fits most women" hat, use a J (6 mm) hook. For a large size women's hat, use a K
(6.5 mm) hook. For a small size women's hat, use an I (5.5 mm) hook.
17
ROUND 22: CH-1 (counts as HDC.) HDC all the way around. (72 stitches.) Join.
ROUND 23: CH-1 (Counts as BPHDC.) FPHDC. Then alternate BPHDC/FPHDC all the way
around. (72 stitches.) Join.
ROUND 24 through 26: Repeat Round 23.
Cut yarn, pull it through, and work in ends.
PART THREE: FAUX CABLE I (5.5 mm) hook.
Choose three ribs for your first faux cable.
Join yarn in the last FPDC stitch of Rib #1. Ch-3. This counts as a TC.
After the CH-3, working up Rib #1, complete the following stitches (one stitch in each FPDC of
rib):
DC, HDC, SC, SC, HDC, DC, TC, DC, HDC, SC, SC, HDC, DC, HDC, SC, SC, HDC, DC (19
stitches including CH-3.)
CH-2. This counts as the first DC of the second half of the faux cable.
Slip stitch into Rib 3 (2 Ribs above Rib 1), into the same round of the hat body as the DC you
just did in Rib 1.
Turn hat.
Slip stitch into both chain stitches that you just completed--working your way to the top of the
chain. Still counts as a DC. Working down Rib #3, complete the following stitches (one stitch in
each FPDC of rib):
HDC, SC, SC, HDC, DC (then slip stitch into DC on first half of faux cable), HDC, SC, SC,
HDC, DC, TC (then slip stitch into TC on first half of faux cable), DC, HDC, SC, SC, HDC, DC,
TC (then slip stitch into last FPDC of Rib #2, and slip stitch into top of CH-3 from first half of
faux cable.)
Cut yarn, pull it through, and work in ends.
Complete the rest of the faux cables. To do four faux cables: Skip three ribs between each faux
cable. To do six faux cables, skip one rib between each faux cable.
PART FOUR: OPTIONAL BRIM
I (5.5 mm) hook.

18
Use two strands of yarn for brim. If you are using bulky-weight yarn, this is optional, but the
brim will hold its form better with two strands.
Use stitch markers on hat band to mark where first 17 stitches of brim will be. Holding hat
upside down, you will work from right to left in the second to last row of the hat band.
Join your yarn to the hat band. Leave a tail a few inches longer than usual.
Row 1: CH-2 (Counts as HDC.) FPHDC into next 16 stitches of hat band. Slip stitch around the
post of the next stitch of hat band. (17 HDC + 1 slip stitch.) DON'T turn.
Row 2: FPHDC into band next to the slip stitch you just did. This counts as the first stitch of
Row 2. Turn. Work these stitches into Row 1 (SKIPPING slip stitch, here and throughout): 2
HDC into each of the next 2 stitches. 1 HDC into each of the next 13 stitches. 2 HDC into each
of the next 2 stitches. Slip stitch around the post of the next open stitch in the hat band. (22 HDC
+ 1 slip stitch.)
Row 3: FPHDC next to slip stitch. Turn. Work into Row 2 of brim: 2 HDC into each of the next
2 stitches. 1 HDC into each of the next 18 stitches. 2 HDC into each of the next 2 stitches. Now
you should have reached the beginning of Row 2. Slip stitch around the post of the next open
stitch in the hat band. (27 HDC + 1 slip stitch.)
Row 4: FPHDC next to slip stitch. Turn. Work into Row 3 of brim: 2 HDC into each of the next
3 stitches. 1 HDC into each of the next 21 stitches. 2 HDC into each of the next 3 stitches. Now
you should have reached the beginning of Row 3. Slip stitch around the post of the next open
stitch in the hat band. (34 HDC + 1 slip stitch.)
Row 5: First do a FPHDC next to slip stitch. Turn. Work into Row 4 of brim: 2 HDC into each
of the next 3 stitches. 1 HDC into each of the next 28 stitches. 2 HDC into each of the next 3
stitches. Now you should have reached the beginning of Row 4. Slip stitch around the post of the
next open stitch in the hat band. (41 HDC + 1 slip stitch.)
Cut the yarn, pull it through, and work in the end. Before working in the extra yarn from where
you started the brim, you may want to use a bit of it to tack the edge (the beginning of Row 5) to
the hat band.