
Siebel Order Management Guide Addendum for Industry ...Siebel Order Management Guide Addendum for...
130
Siebel Order Management Guide Addendum for Industry Applications Version 8.0 December 2006
Transcript of Siebel Order Management Guide Addendum for Industry ...Siebel Order Management Guide Addendum for...
Siebel Order Management Guide Addendum for Industry Applications
Version 8.0December 2006
Copyright © 2005, 2006, Oracle. All rights reserved.
The Programs (which include both the software and documentation) contain proprietary information; they are provided under a license agreement containing restrictions on use and disclosure and are also protected by copyright, patent, and other intellectual and industrial property laws. Reverse engineering, disassembly, or decompilation of the Programs, except to the extent required to obtain interoperability with other independently created software or as specified by law, is prohibited.
The information contained in this document is subject to change without notice. If you find any problems in the documentation, please report them to us in writing. This document is not warranted to be error-free. Except as may be expressly permitted in your license agreement for these Programs, no part of these Programs may be reproduced or transmitted in any form or by any means, electronic or mechanical, for any purpose.
PRODUCT MODULES AND OPTIONS. This guide contains descriptions of modules that are optional and for which you may not have purchased a license. Siebel’s Sample Database also includes data related to these optional modules. As a result, your software implementation may differ from descriptions in this guide. To find out more about the modules your organization has purchased, see your corporate purchasing agent or your Siebel sales representative.
If the Programs are delivered to the United States Government or anyone licensing or using the Programs on behalf of the United States Government, the following notice is applicable:
U.S. GOVERNMENT RIGHTS. Programs, software, databases, and related documentation and technical data delivered to U.S. Government customers are "commercial computer software" or "commercial technical data" pursuant to the applicable Federal Acquisition Regulation and agency-specific supplemental regulations. As such, use, duplication, disclosure, modification, and adaptation of the Programs, including documentation and technical data, shall be subject to the licensing restrictions set forth in the applicable Oracle license agreement, and, to the extent applicable, the additional rights set forth in FAR 52.227-19, Commercial Computer Software--Restricted Rights (June 1987). Oracle USA, Inc., 500 Oracle Parkway, Redwood City, CA 94065.
The Programs are not intended for use in any nuclear, aviation, mass transit, medical, or other inherently dangerous applications. It shall be the licensee's responsibility to take all appropriate fail-safe, backup, redundancy and other measures to ensure the safe use of such applications if the Programs are used for such purposes, and we disclaim liability for any damages caused by such use of the Programs.
Oracle, JD Edwards, PeopleSoft, and Siebel are registered trademarks of Oracle Corporation and/or its affiliates. Other names may be trademarks of their respective owners.
The Programs may provide links to Web sites and access to content, products, and services from third parties. Oracle is not responsible for the availability of, or any content provided on, third-party Web sites. You bear all risks associated with the use of such content. If you choose to purchase any products or services from a third party, the relationship is directly between you and the third party. Oracle is not responsible for: (a) the quality of third-party products or services; or (b) fulfilling any of the terms of the agreement with the third party, including delivery of products or services and warranty obligations related to purchased products or services. Oracle is not responsible for any loss or damage of any sort that you may incur from dealing with any third party.
Contents
Siebel Order Management Guide Addendum for Industry Applications 1
Chapter 1: What’s New in This Release
Chapter 2: Setting Up Order Management for Industry Applications
About Oracle’s Siebel Order Management Guide Addendum for Industry Applications 11
Activating Workflows for Order Management for Industry Applications 12
Setting Up the Workflow for the Order-To-Installation Task 13
Chapter 3: Employee Asset-Based Ordering for Industry Applications
Concepts of Order Management for Industry Applications 15
Updating Opportunities from Quotes in Industry Applications 17
Comparing Prices with Competitor Prices 18
Transferring Service to Another Location 19
Chapter 4: Workflows for Employee Asset-Based Ordering for Industry Applications
Workflow to Generate Revenue Line Items for an Opportunity 21SIS OM Update Revenue Workflow 21
Workflows to Transfer a Service to Another Location 22SIS OM Move Process 23SIS OM Move Exception Handling 28SIS OM Move Service Point Check 29SIS OM Move Display Quote 29
Workflows to Validate a Network 30VORD Validate (Quote) 30VORD Validate (Order) 31
Workflow for Pricing Comparison 32SIS OM PC Price Comparison Process 32SIS OM Goto Price Comparison View Process 34
Siebel Order Management Guide Addendum for Industry ApplicationsVersion 8.0
3

Contents ■
Workflows for Enrollment 35SIS OM PC Enrollment 35SIS OM PC Create Account Subprocess 37SIS OM PC Go To Opportunity View 38SIS OM PC Set Opportunity Account 38SIS OM PC Go to Order Entry - Line Items View (Sales) 38CUT eSales - PC Enrollment Process 39CUT eSales - Set Shopping Cart Price List 40CUT eSales - PC Prepare Cart Process 41
Chapter 5: Partner Asset-Based OrderingAbout Order Management in Siebel PRM 43
Scenario for Partner Order Management 44
Order Management with Standard Partner Commerce 45Adding Items to a Shopping Cart (Standard Partner Commerce) 46Customizing an Item (Standard Partner Commerce) 48Revising the Contents of the Shopping Cart (Standard Partner Commerce) 48Adding Bulk Items to the Shopping Cart (Standard Partner Commerce) 49Saving a Shopping Cart as a Quote or Quote Template (Standard Partner Commerce) 50Converting a Quote to an Order (Standard Partner Commerce) 50Processing an Order Checkout (Standard Partner Commerce) 51Adding Quote Template Items to the Shopping Cart (Standard Partner Commerce) 52Entering Shipping Information (Standard Partner Commerce) 52Using the Credit Card Payment Method (Standard Partner Commerce) 53Using the Bill Me Payment Method (Standard Partner Commerce) 53Using the Billing Account Payment Method (Standard Partner Commerce) 54Using the Purchase Order Method (Standard Partner Commerce) 54Reviewing and Submitting an Order (Standard Partner Commerce) 54Revising an Order (Standard Partner Commerce) 54Selecting Billing and Service Accounts (Standard Partner Commerce) 55Modifying an Order (Standard Partner Commerce) 55Disconnecting an Order (Standard Partner Commerce) 56
Order Management with Power Partner Commerce 56
Chapter 6: Workflows for Partner Asset-Based OrderingCUT eChannel - New Products & Services Process 59
CUT eChannel - Goto Product Catalog View 60
Siebel Order Management Guide Addendum for Industry Applications Version 8.0
4
Contents ■
Chapter 7: Customer Asset-Based OrderingAbout Customer Asset-Based Ordering 63
Scenario for Customer Asset-Based Ordering 64
Ungrouping Bulk Items in the Shopping Cart (End User) 65
Creating a Modify Order (End User) 66
Creating a Disconnect Order (End User) 66
Chapter 8: Workflows for Customer Asset-Based OrderingAbout Workflows for Customer Ordering 69
Workflows to Process an Order Checkout 70CUT eSales - Checkout Process 70CUT eSales - Set Quote Account Info 71eSales - Enter Shipping Details Process 73eSales - Save Shipping Address 74eSales - Set Primary Account Address 75eSales - Enter Payment Details Process 76CUT eSales - Bill Me Process 77eSales - Complete Checkout Process 78CUT eSales - Prepare Quote Process 80eSales - Authorize Order Process 81
Workflow to Ungroup Quotes 82CUT eSales - Ungroup Quote 82
Workflow to Order a Saved Quote 84CUT eSales - Order Quote Process 84
Workflow to Edit a Delta Quote Line Item 84CUT eSales - Edit Delta Quote Line Item 85
Workflows to Revise an Order 85CUT eSales - Revise Order Process 85CUT eSales - Goto Revise Order View 86
Workflow to Reject an Order 86eSales - Reject Order Process 86
Workflows to Modify Products and Installed Assets 87CUT eSales - Modify Products and Services Process 88CUT eSales - Prepare Shopping Cart Process - Interactive 88
Workflow to Disconnect Products and Services 90CUT eSales - Disconnect Products and Service Process 90CUT eSales - Prepare Shopping Cart Process 91
Siebel Order Management Guide Addendum for Industry ApplicationsVersion 8.0
5
Contents ■
Chapter 9: Setting Up Network OrderingAbout Network Ordering 93
Process of Defining Network Compound Products 95Defining Products for the Network 95Defining Rule Checker Business Services 97Defining Maximum and Minimum Quantities for Network Components 98Defining Error Messages for Compound Product Rules 99Defining Simple Expression Rules for Compound Products 99
Setting Up Premises 100
About the Compound Product Validation Engine 101Compound Product Validation Engine (CPVE) 104
Example of Defining Network Compound Products 104
About Creating Custom Rule Checkers 111
Chapter 10: Using Network OrderingProcess of Ordering New Networks 113
Creating an Account and Locations for a New Network 113Creating a Quote for a New Network 114Adding Nodes to a New Network 115Adding Connections to a New Network 116Validating a Quote for a Network 117Creating an Order for a New Network 117Converting a Completed Network Order to Assets 118
Viewing a Network as a Billing Item or Service Item 119
Process of Ordering New Sites in Existing Networks 119Adding a Location for a New Network Site 119Creating a Quote for a New Network Site 120Adding a Node for a New Network Site 120Adding a Connection for a New Network Site 121Validating a Quote for a New Network Site 122Converting a Quote to an Order for a New Network Site 122Converting an Order for a New Network Site to Assets 123
Process of Upgrading Bandwidth at Network Sites 123Displaying a Network To Be Upgraded 124Upgrading the Bandwidth at a Network Site 124Upgrading the Bandwidth of a Network Connection 124Validating a Network After Upgrading Bandwidth 125Converting a Quote to an Order to Upgrade Bandwidth 125
Siebel Order Management Guide Addendum for Industry Applications Version 8.0
6

Contents ■
Updating Assets when an Order to Upgrade Bandwidth Is Complete 126
Process of Disconnecting a Site from a Network 126Disconnecting a Network Node and Connections 127Validating a Network After Disconnecting a Site 127Converting a Quote to an Order to Disconnect a Network Site 127Updating Assets After Disconnecting a Network Site 128
Index
Siebel Order Management Guide Addendum for Industry ApplicationsVersion 8.0
7

Contents ■
Siebel Order Management Guide Addendum for Industry Applications Version 8.0
8

1 What’s New in This Release
What’s New in Siebel Order Management Guide Addendum for Industry Applications, Version 8.0 This guide has been updated to reflect product name changes. It was previously published as Siebel Order Management Guide Addendum for Industry Applications, Version 7.8.
Siebel Order Management Guide Addendum for Industry ApplicationsVersion 8.0
9

What’s New in This Release ■
Siebel Order Management Guide Addendum for Industry Applications Version 8.0
10
2 Setting Up Order Management for Industry Applications
This chapter is an overview of customer order management for the communications, media and energy industries. It covers the following topics:
■ “About Oracle’s Siebel Order Management Guide Addendum for Industry Applications” on page 11
■ “Activating Workflows for Order Management for Industry Applications” on page 12
About Oracle’s Siebel Order Management Guide Addendum for Industry ApplicationsThis book is an addendum that should be used in combination with Siebel Order Management Guide. For more complete background information about order management, and for information about how to set up order management, see Siebel Order Management Guide.
In addition to the functionality described in Siebel Order Management Guide, order management for industry applications supports the functionality covered in this book.
Employee, Customer, and Partner Asset-Based Ordering Asset-based ordering allows users to generate assets based on orders and to create new orders that modify these assets. For example, if a customer orders telephone service, the application generates an Asset record representing that service. Then the customer can place subsequent orders to modify the service (for example, by adding call waiting or automatic message forwarding) or to disconnect the service.
Asset-based ordering is covered in the following documents:
■ General Background. General background about asset-based ordering is covered in the sections about asset-based ordering in Siebel Order Management Guide.
■ Employee Asset-Based Ordering. Most asset-based ordering for employees is available in Siebel applications and in Siebel industry applications. It is covered in the sections about asset-based ordering in Siebel Order Management Guide. Additional functionality for employee asset-based ordering for industry applications is covered in Chapter 3, “Employee Asset-Based Ordering for Industry Applications” and Chapter 4, “Workflows for Employee Asset-Based Ordering for Industry Applications.”
■ Partner Asset-Based Ordering. Asset-based ordering for partners is available only in industry applications. It is covered in Chapter 5, “Partner Asset-Based Ordering” and Chapter 6, “Workflows for Partner Asset-Based Ordering.”
Siebel Order Management Guide Addendum for Industry ApplicationsVersion 8.0
11
Setting Up Order Management for Industry Applications ■ Activating Workflows for Order Management for Industry Applications
■ Customer Asset-Based Ordering. Asset-based ordering for customers is available only in industry applications. It is covered in Chapter 7, “Customer Asset-Based Ordering” and Chapter 8, “Workflows for Customer Asset-Based Ordering.”
Network OrderingNetwork Ordering allows companies to configure orders for large networks, such as computer networks and telecommunications networks.
Network ordering is covered in Chapter 9, “Setting Up Network Ordering” and Chapter 10, “Using Network Ordering.”
Activating Workflows for Order Management for Industry ApplicationsAsset-based ordering is based on Siebel workflows and configurable business services, so it can be customized to meet a company’s specific order management requirements.
For more information about Business Process Manager and how to use it, see Siebel Business Process Framework: Workflow Guide.
For details about these workflows, see the section about workflows for asset-based ordering in Siebel Order Management Guide, and the following chapters in this book: Chapter 4, “Workflows for Employee Asset-Based Ordering for Industry Applications,” Chapter 6, “Workflows for Partner Asset-Based Ordering,” and Chapter 8, “Workflows for Customer Asset-Based Ordering.”
In addition to the setup described in Siebel Order Management Guide, you must activate workflows specific to asset-based ordering for industry applications.
Activate the following workflows:
■ Siebel eSales.
■ all workflows that begin with CUT eSales
■ all workflows that begin with eSales
■ all workflows that begin with SIS OM
■ Siebel Partner Portal.
■ all workflows that begin with CUT eChannel
■ all workflows that begin with SIS OM (7.5 only)
■ Employee applications. activate
■ Workflows listed in the section about setting up asset-based ordering in Siebel Order Management Guide.
■ CUT Order Profile Process
■ CUT Quote Portal Process
■ CUT Order Portal Process
Siebel Order Management Guide Addendum for Industry Applications Version 8.0
12

Setting Up Order Management for Industry Applications ■ Setting Up the Workflow forthe Order-To-Installation Task
■ CUT Go To Customer Portal Sub-process
■ all workflows that begin with VORD Validate
For information about how to activate workflows, see Siebel Business Process Framework: Workflow Guide.
Setting Up the Workflow for the Order-To-Installation TaskSiebel Communications includes an Order-To-Installation task interface that brings together all of the features that a call center agent uses to sell a communications product.
After finishing these tasks, the call center agent clicks a button that calls a workflow that performs longer-term tasks performed after the sale, such as waiting for shipping confirmation, calling the customer to conduct a survey seven days after the product ships, and sending the customer a thank you for completing the survey.
The task interface that the call center agent uses is included with Siebel Communications. You can configure it using Siebel Tools, as you configure other Siebel applications.
The workflow that performs long-term tasks is not included with Siebel Communications. You create this workflow to meet your business requirements.
The Order-To-Installation Task InterfaceThe call center agent uses the order-to-installation task interface by navigating to There is a Task pane on the left, which lists all the tasks that a call center agent typically performs to sell a communications product. This pane includes a list of tasks, and the call center agent clicks the tasks in this list in order, from top to bottom, to display the screens that are needed to perform each of these tasks.
Some of these tasks are:
■ Create the order.
■ Create a new account with the order if this is a new customer.
■ Get customer information.
■ Assign phone numbers to the customer.
■ Get shipping information.
■ Get one-time payment information.
■ Get billing information.
■ Set up an appointment for installation of the product.
These tasks also include scripts that tell the agent what to say to the customer while performing the task.
Siebel Order Management Guide Addendum for Industry ApplicationsVersion 8.0
13
Setting Up Order Management for Industry Applications ■ Setting Up the Workflow for the Order-To-Installation Task
The Workflow for Follow-Up TasksWhen the call-center agent completes all these tasks and clicks Done, it sets off a workflow that performs longer-term tasks connected with this order.
Call center agents typically perform all the tasks listed above while they are talking to the customer who is placing the order.
Typically, there are also follow-up tasks performed after the product is installed. You set up the workflow to schedule or perform the follow-up tasks that your company performs after installation.
A sample workflow is distributed with the product, as an example to show you how to set up your company’s workflow.
Siebel Order Management Guide Addendum for Industry Applications Version 8.0
14

3 Employee Asset-Based Ordering for Industry Applications
This chapter describes how employee end users of asset-based ordering for industry applications can use all the functionality described in the section about asset-based ordering in Siebel Order Management Guide. In addition, they can use the functionality described in this chapter.
This chapter includes the following topics:
■ “Concepts of Order Management for Industry Applications” on page 15
■ “Updating Opportunities from Quotes in Industry Applications” on page 17
■ “Comparing Prices with Competitor Prices” on page 18
■ “Transferring Service to Another Location” on page 19
NOTE: The procedures in this chapter use the Customer Portal view as their starting point, because it is a central point for viewing information about an account. The Customer Portal view is part of the Order Processing module. If you have not licensed the Order Processing module, employee end users can start from one of the other screens that allow access to quotes and orders, such as the Quotes screen and Orders screen.
Concepts of Order Management for Industry ApplicationsSiebel Order Management for Industry Applications is based on the same concepts as asset-based ordering, described in the section about asset-based ordering in Siebel Order Management Guide. In addition, there are some concepts specific to Industry Applications, which are described in this section.
Terminology for Order ManagementSome terminology is different in Siebel Order Management and in Siebel Order Management for Industry Applications, as shown in Table 1.
Table 1. Terminology for Order Management
Term In Siebel Order Management
Term In Siebel Order Management for Industry Applications
Deactivate Disconnect
Installed Asset Service Item
Account Summary Customer Portal
Siebel Order Management Guide Addendum for Industry ApplicationsVersion 8.0
15

Employee Asset-Based Ordering for Industry Applications ■ Concepts of Order Management for Industry Applications
Installed Assets and Billing ItemsInstalled assets are the assets that are served to a particular account. Installed assets include both products and services. A line item from an order becomes a installed asset if it is marked as a trackable asset in the product record.
Billing items are the services that are billed to a particular account.
Sometimes installed assets are installed at one account location, but are billed to another account location. For example, a company might have 150 phone lines installed at two different locations, yet receive the bill for all 150 phone lines at one of those locations. In that case, the location that receives the bill might only have 50 installed assets (the ones installed at that location), but have 150 billing items.
The service account and billing account for each line item are specified during the quote-and-order process. For customer end users creating quotes and orders in Siebel eSales, the service account and billing account are automatically defaulted for every line item. Employee end users may need to select the service account and billing account.
Billing, Service, and Master AccountsThe master account is the primary, or parent, account for a customer. You can set up separate billing and service accounts for a customer, and those accounts will be associated with a higher-level master account for the client.
Service IDA service ID is a unique identifier of a service item, such as the phone number for a phone line.
When a customer orders a quantity of a certain product or service, such as a dozen phone lines, each phone line becomes an individual line item and can be given a separate service ID. End users can either explicitly ungroup the items to assign service IDs, or they will be automatically ungrouped when the quote is converted to an order.
The Service ID field is a text field, typically populated by your company’s asset management system.
Service PointA service point is an asset that is installed at a particular service location and represents a network delivery point, such as a phone jack or a gas pipe. A field on the Quote and Order forms lets you select a service point based on the product type. The use of Service Points requires the Siebel Premises module. For more information, see Siebel Applications Administration Guide.
Siebel Order Management Guide Addendum for Industry Applications Version 8.0
16

Employee Asset-Based Ordering for Industry Applications ■ Updating Opportunitiesfrom Quotes in Industry Applications
Additional Fields for Quote Line ItemsWhen you create a line item of a quote in Order Management for Industry Applications, the fields in Table 2 are available, in addition to the fields described in the section about adding a quote line item in Siebel Order Management Guide.
Updating Opportunities from Quotes in Industry Applications When the user updates an opportunity from a quote, the revenue associated with the quote is transferred to the opportunity listed in the quote’s Opportunity field. The user can display the opportunity and view the total revenue that has been transferred from Quotes and the individual line items contributing to total revenue.
For information on how to update an opportunity from a quote, see Siebel Order Management Guide.
In order management for industry applications, revenue from a quote is calculated in the following way:
1 Items with the One-Time price type are added together. Each item is then displayed separately in the Opportunities screen > Revenues view.
Table 2. Additional Fields for Quote Line Items in Order Management for Industry Applications
Field Comments
Tier Price Information about the pricing tiers applicable to the product.
Service Point Serial number of the service point’s asset with which the item is associated, for example a phone jack.
Service Id Free-text identifier for the service item, for example a phone number.
Billing Account Account which is billed for the service.
Service Account Account at which the service is provided.
Siebel Order Management Guide Addendum for Industry ApplicationsVersion 8.0
17

Employee Asset-Based Ordering for Industry Applications ■ Comparing Prices with Competitor Prices
2 The price of each item that has the Recurring price type is multiplied by a designated number of periods (occurrences). For example, an item is priced at $10 per month. If that item is typically purchased for one year, the number of occurrences associated with that product should be set to 12, so the revenue for this item is $120.
NOTE: You can change the number of occurrences used to compute the revenue in one of two ways:
You can define the number of periods used to compute revenue for an item by entering a number in the # of Occurrences field in the Item’s product record. This is useful when the company changes the way in which a product is sold—for example, if the default length of the contract is changed from one to two years. (You edit product records in the Product Administration screen > Products view.)
You can also define the number of periods in the # of Revenue Occurrences field in the Quotes screen > Line Item Detail view. This is useful when a particular customer purchase is for a different number of periods than is usual.
3 Items with the Recurring price type are added together. Each item is then displayed separately in the Opportunities screen > Revenues view.
4 The two price type subtotals are added together. When the user selects Update Opportunity in the Opportunities screen > Revenues view drop-down menu, the total is displayed in the Revenue field in the Opportunities screen > Opportunities view.
The amount of revenue contributed by each item is displayed in the Opportunities screen > Revenues view. Items with the One-Time price type display only once. Items with the Recurring price type display once for each unit of measure (per week, month, and so on.). For example, if an item’s revenue is computed using a period of 12 months, there is a separate line item for each month.
Comparing Prices with Competitor PricesPrice comparison allows a user to compare the prices of products offered by the company with the prices of similar products offered by competitors.
This feature can be used to compare competing rate plans for utilities. The products are considered similar based on factors such as location, payment method and meter type.
The application compares prices as follows:
■ The application asks the user questions about the region in which they are located, current supplier, current rate plan, details of their usage (number of units or dollar amount) and period during which the usage occurred (such as summer month, winter quarter).
■ The application uses this information to determine the average number of units the customer uses in a year.
■ The application calculates an annual total cost for the same number of units for each of the company's products that matches the specified criteria.
Siebel Order Management Guide Addendum for Industry Applications Version 8.0
18

Employee Asset-Based Ordering for Industry Applications ■ Transferring Service toAnother Location
■ The application displays a list of quotes for the company’s products, which specify how much the customer can save by switching to each of the products.
■ The user selects a quote and clicks Enroll to create an order and an account for the user.
For more information about setting up and using price comparisons, see the section about price comparison in Siebel Energy Guide.
Transferring Service to Another LocationWith asset-based ordering, employee end users can use the following procedure to disconnect services at one address (move-out address) and install the same services at another address (move-in address).
If the correct service points exist at the new address for the transferred services, the services are automatically assigned to these service points.
This procedure creates a quote that shows the service being deleted for one address and added for another address. The items displayed in the quote reflect the current configuration of the service adjusted for changes contained in open orders.
NOTE: A service can only be transferred if it is provisioned at a service point. The Workflow will not recognize services that are not tied to a service point.
To transfer a service to another location
1 Navigate to the Accounts screen > Accounts List view.
2 Click the name of the desired account.
3 In the Account form, in the Address field, click the select button.
The Account Addresses dialog box appears.
4 In the Account Addresses dialog box:
a If necessary, click New and add the move-in address to the Available list.
b If necessary, move the move-in address from the Available list to the Selected list.
c In the Selected list, in the record for the move-in address, in the Start Date field, enter the date on which you want the new address to become active for billing purposes.
d In the Selected list, in the record for the move-out address, in the End Date field, enter the date on which you want the old address to become inactive for billing purposes.
e In the Selected list, highlight the record for the move-in address, and click Transfer Service.
The Line Items view appears listing two copies of the service. The line items in one copy have an action code of Delete and are associated with the move-out address. The line items in the other copy have an action code of Add and are associated with the move-in address.
5 For each service item, verify that there is a service point in the Service Point field.
NOTE: This indicates that there is a service point available at the move-in address.
Siebel Order Management Guide Addendum for Industry ApplicationsVersion 8.0
19

Employee Asset-Based Ordering for Industry Applications ■ Transferring Service to Another Location
6 If a service item does not display a service point, delete the item from the quote.
7 Convert the quote to an order and submit it. For more information, see Siebel Order Management Guide.
Siebel Order Management Guide Addendum for Industry Applications Version 8.0
20
4 Workflows for Employee Asset-Based Ordering for Industry Applications
This chapter explains the Siebel workflows used for employee asset-based ordering that are specific to Siebel Industry Applications. In addition to the workflows covered here, employee Asset-Based Ordering for Industry Applications also uses the workflows that are covered in the section about workflows for employee Asset-Based Ordering in Siebel Order Management Guide.
This chapter includes the following sections:
■ “Workflow to Generate Revenue Line Items for an Opportunity” on page 21
■ “Workflows to Transfer a Service to Another Location” on page 22
■ “Workflows to Validate a Network” on page 30
■ “Workflow for Pricing Comparison” on page 32
■ “Workflows for Enrollment” on page 35
NOTE: Some of these workflows are used in both employee and customer applications. Workflows whose names begin with CUT eSales are used only or customer applications, but they are documented in this chapter because they are called by workflows used for both employee and customer applications.
Workflow to Generate Revenue Line Items for an OpportunityThis workflow generates revenue line items for an opportunity from its associated quote. It consists of the workflow process:
■ “SIS OM Update Revenue Workflow” on page 21
SIS OM Update Revenue WorkflowThis workflow creates revenue items for all quote line items. For quote line items that have a recurring charge, multiple revenue items are generated at intervals defined by the unit of measure. The number of occurrences specified in the quote line item defines the number of line items generated. This workflow is shown in Figure 1.
Siebel Order Management Guide Addendum for Industry ApplicationsVersion 8.0
21

Workflows for Employee Asset-Based Ordering for Industry Applications ■ Workflows to Transfer a Service to Another Location
A user initiates this workflow by clicking the Update Opportunity button in the Quote Detail view.
Workflow Description. This workflow does the following:
1 Reads the quote line items from the database.
2 Reads the revenue items associated with the opportunity related to the quote from the database.
3 Deletes the existing revenue items.
4 Creates revenue items for each quote line item that has the following:
■ An action code of Add or Update
■ A price type that is not Usage
■ An extended quantity that is not zero
For line items with recurring price types, the workflow generates a quantity of revenue items equal to the value of the quote line item’s Number of Occurrences field, at intervals equivalent to the unit of measure.
Associated Business Service Methods. The following table shows the step in this workflow that calls a business service method.
Workflows to Transfer a Service to Another LocationWhen a customer moves, this workflow facilitates the transfer of service from the old location to the new one. It consists of the workflow process and subprocesses:
■ “SIS OM Move Process” on page 23
■ “SIS OM Move Exception Handling” on page 28
■ “SIS OM Move Service Point Check” on page 29
■ “SIS OM Move Display Quote” on page 29
Figure 1. SIS OM Update Revenue Workflow
Workflow Step Business Service Method Called
Update Revenue Quote To Revenue
Siebel Order Management Guide Addendum for Industry Applications Version 8.0
22
Workflows for Employee Asset-Based Ordering for Industry Applications ■Workflows to Transfer a Service to Another Location
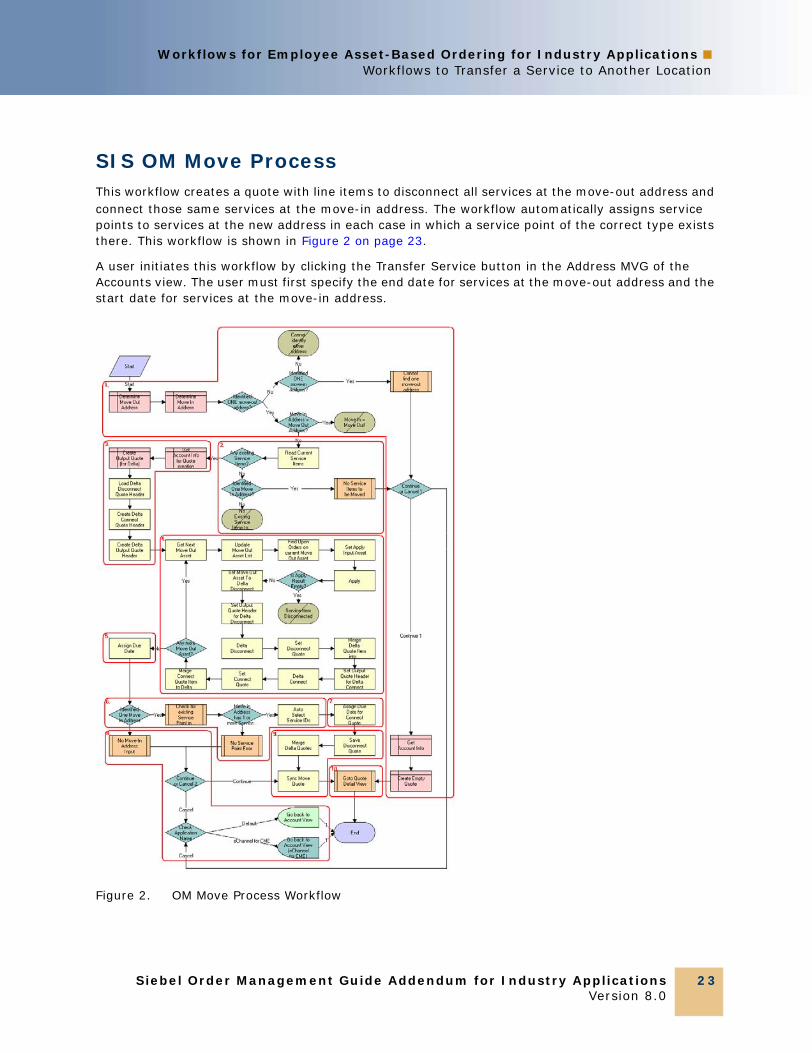
SIS OM Move ProcessThis workflow creates a quote with line items to disconnect all services at the move-out address and connect those same services at the move-in address. The workflow automatically assigns service points to services at the new address in each case in which a service point of the correct type exists there. This workflow is shown in Figure 2 on page 23.
A user initiates this workflow by clicking the Transfer Service button in the Address MVG of the Accounts view. The user must first specify the end date for services at the move-out address and the start date for services at the move-in address.
Figure 2. OM Move Process Workflow
Siebel Order Management Guide Addendum for Industry ApplicationsVersion 8.0
23

Workflows for Employee Asset-Based Ordering for Industry Applications ■ Workflows to Transfer a Service to Another Location
Workflow Description. This workflow does the following:
1 Identifies and validates the move-out and move-in addresses.
a The workflow identifies the move-out address as the address record for the current account that has been updated most recently and for which an end date later than the current date is specified.
b The workflow identifies the move-in address as the address record for the current account that has been updated most recently and for which a start date later than the current date is specified.
c If the workflow can identify neither a move-out address nor a move-in address, it displays the following error message: “Cannot identify the move-out address and move-in address. Press OK to return to the Account view.” Then the workflow stops.
d If the workflow cannot identify a move-out address but can identify a move-in address, the following error message is displayed: “Cannot identify the move-out address. Please press Cancel to return to the previous view and provide a valid move-out address, or Continue to manually create a Connect quote for the move-in address.” See “SIS OM Move Exception Handling” on page 28.
e If the user clicks OK, the workflow creates and displays an empty quote in the Quote Detail view. In this view, the user can manually add new items for the move-in address.
f If the user clicks Cancel, the workflow returns the user to the Account view.
g If the workflow identifies a move-out address and a move-in address that are the same, it displays the following error message: “The move-in address cannot be the same as the move-out address. Press OK to return to the previous view and try again. Move Out Address = <move-out address> Move Out Date = <move-out date> Move In Address = <move-in address> Move In Date = <move-in date>” Then it stops.
2 If the move-in address and the move-out address are validated, retrieves the service items for the move-out address.
a The workflow retrieves the service items.
Siebel Order Management Guide Addendum for Industry Applications Version 8.0
24

Workflows for Employee Asset-Based Ordering for Industry Applications ■Workflows to Transfer a Service to Another Location
b If there are no service items at the move-out address and a move-in address has not been identified, the workflow displays the following error message: “There are no existing service items at the move-out address selected. Press OK to return to the Accounts view.” Then it stops.
c If there are no service items at the move-out address and a move-in address has been identified, the workflow displays the following error message: “There are no existing service items at the move-out address selected. Press Cancel to return to the Accounts view, or Continue to manually create a Connect quote.”
d If the user clicks OK, the workflow displays an empty quote in the Quote Detail view. In this view, the user can manually add new items for the move-in address.
e If the user clicks Cancel, the workflow returns the user to the Account view.
3 Creates an output quote and fills in the account information.
4 Generates two quote line items for each service item at the move-out address:
■ A quote line item to disconnect the service item at the move-out address
■ A quote line item to connect the service item at the move-in address
a The workflow retrieves each service item at the move-out address in turn.
b The workflow applies all open and pending orders related to each service item to generate the requested future state of the item.
c The workflow checks whether the asset has been disconnected as a result of an open or pending order. If it has, an error message is displayed and the workflow is terminated.
d The workflow generates the delta of the requested state of service item and an empty future state to create the disconnect instructions for the item.
e The workflow adds the disconnect line items to the disconnect quote.
f The workflow generates the delta of the requested state of service item and an empty current state to create the connect instructions for the item.
g The workflow adds the connect line items to the connect quote.
Siebel Order Management Guide Addendum for Industry ApplicationsVersion 8.0
25

Workflows for Employee Asset-Based Ordering for Industry Applications ■ Workflows to Transfer a Service to Another Location
h If there are more service items at the move-out address, the workflow continues to the next item.
Associated Business Service Methods. The following table shows the steps in this part of the workflow that call business service methods.
5 Specifies the due date for each of the disconnect line items.
The workflow sets the due date to the end date for the move-out address.
Associated Business Service Methods. The following table shows the step in this part of the workflow that calls a business service method.
Workflow Step Business Service Method Called
Find Open Orders on current Move Out Asset Find Orders
Set Apply Input Asset Set Product Instance
Apply Apply
Set Move Out Asset To Delta Disconnect Set Product Instance
Set Output Quote Header for Delta Disconnect Set Output Header
Delta Disconnect Delta
Set Disconnect Quote Set Product Instance
Merge Delta Quote Item Into Disconnect Quote Merge
Set Output Quote Header for Delta Connect Set Output Header
Delta Connect Delta
Set Connect Quote Set Product Instance
Merge Connect Quote Item to Delta Connect Quote Merge
Workflow StepBusiness Service Method Called
Assign Due Date Set Field Value
Siebel Order Management Guide Addendum for Industry Applications Version 8.0
26
Workflows for Employee Asset-Based Ordering for Industry Applications ■Workflows to Transfer a Service to Another Location
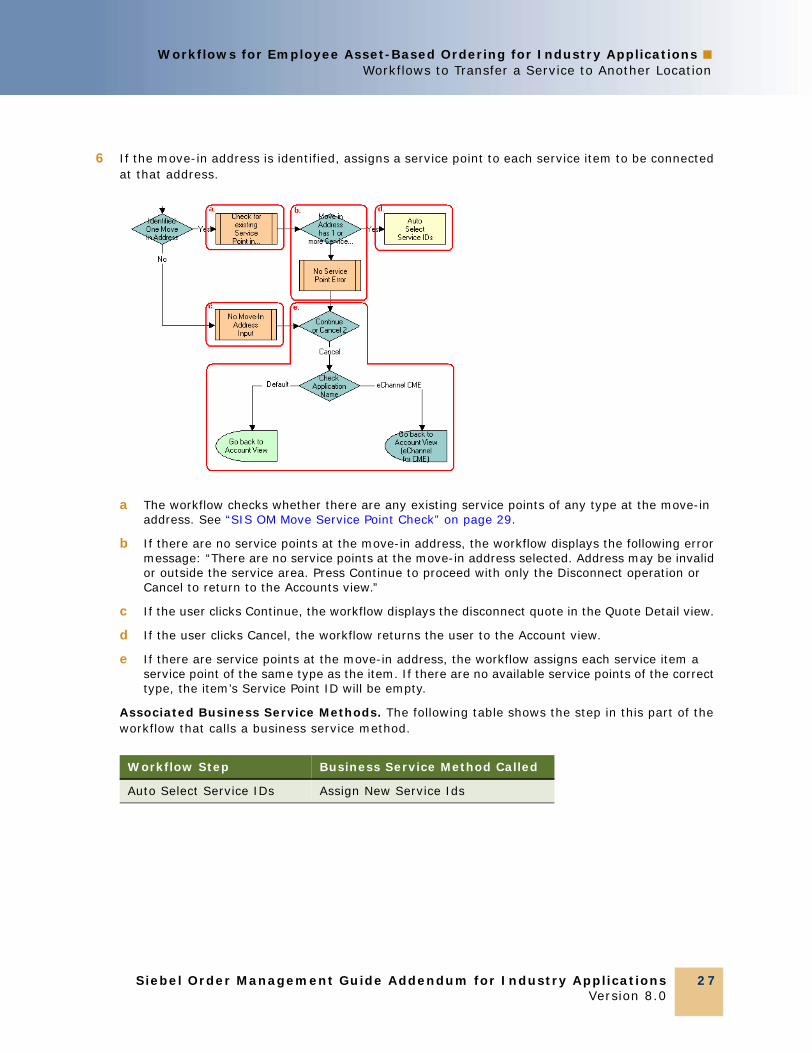
6 If the move-in address is identified, assigns a service point to each service item to be connected at that address.
a The workflow checks whether there are any existing service points of any type at the move-in address. See “SIS OM Move Service Point Check” on page 29.
b If there are no service points at the move-in address, the workflow displays the following error message: “There are no service points at the move-in address selected. Address may be invalid or outside the service area. Press Continue to proceed with only the Disconnect operation or Cancel to return to the Accounts view.”
c If the user clicks Continue, the workflow displays the disconnect quote in the Quote Detail view.
d If the user clicks Cancel, the workflow returns the user to the Account view.
e If there are service points at the move-in address, the workflow assigns each service item a service point of the same type as the item. If there are no available service points of the correct type, the item’s Service Point ID will be empty.
Associated Business Service Methods. The following table shows the step in this part of the workflow that calls a business service method.
Workflow Step Business Service Method Called
Auto Select Service IDs Assign New Service Ids
Siebel Order Management Guide Addendum for Industry ApplicationsVersion 8.0
27

Workflows for Employee Asset-Based Ordering for Industry Applications ■ Workflows to Transfer a Service to Another Location
7 Specifies the due date for each of the connect line items.
The workflow sets the due date to the start date for the move-in address.
Associated Business Service Methods. The following table shows the step in this part of the workflow that calls a business service method.
8 If there is no move-in address, displays the following error message: “Cannot identify the move-in address. Please press Cancel to return to the previous view and provide a valid start date or Continue to proceed with only a disconnect at the move-out address. Move In Date Entered =.” The user can cancel the process or proceed with the disconnect only. If the user clicks the Cancel button, redisplays the Accounts view.
9 Merges the disconnect line items and the connect line items into one quote and saves that quote to the database.
Associated Business Service Methods. The following table shows the steps in this part of the workflow that call business service methods.
10 Displays the quote in the Quote Detail view.
See “SIS OM Move Display Quote” on page 29.
SIS OM Move Exception HandlingThis workflow provides exception handling for the SIS OM Move Process. This workflow is shown in Figure 3.
Workflow StepBusiness Service Method Called
Assign Due Date for Connect Quote
Set Multiple Field Values
Workflow StepBusiness Service Method Called
Merge Delta Quotes Merge
Save Disconnect Quote Set Product Instance
Siebel Order Management Guide Addendum for Industry Applications Version 8.0
28

Workflows for Employee Asset-Based Ordering for Industry Applications ■Workflows to Transfer a Service to Another Location
The SIS OM Move Process initiates this workflow.
Workflow Description. This workflow displays an error message in a view (not in a popup window) and determines whether the user clicked the Continue button or the Cancel button.
Associated Business Service Methods. The following table shows the step in this workflow that calls a business service method.
SIS OM Move Service Point CheckThis workflow checks whether there are any service points in the move-in address. This workflow is shown in Figure 4.
The SIS OM Move Process initiates this workflow.
Workflow Description. For a given address, this workflow determines the number of service points associated with the address.
SIS OM Move Display QuoteThis workflow displays the newly created quote in the Quote Detail view. This workflow is shown in Figure 5.
Figure 3. SIS OM Move Exception Handling Workflow
Workflow Step Business Service Method Called
Translate Error Msg Set Exception Error Message
Figure 4. SIS OM Move Service Point Check Workflow
Siebel Order Management Guide Addendum for Industry ApplicationsVersion 8.0
29
Workflows for Employee Asset-Based Ordering for Industry Applications ■ Workflows to Validate a Network
The SIS OM Move Process initiates this workflow.
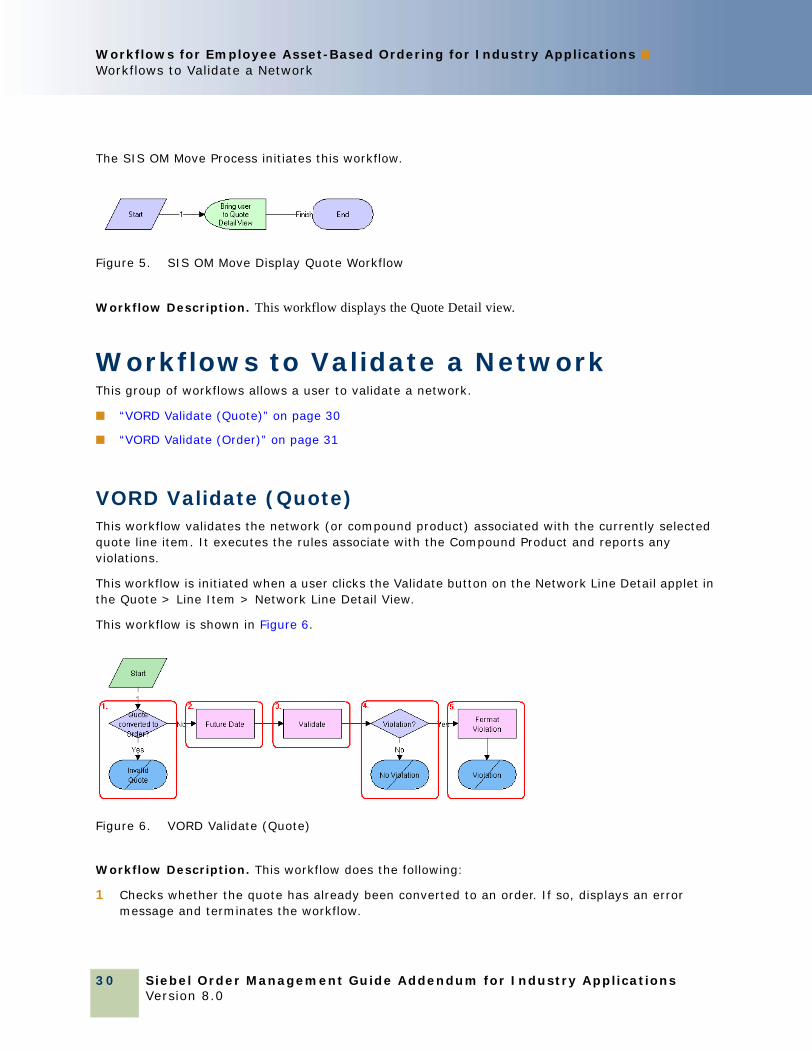
Workflow Description. This workflow displays the Quote Detail view.
Workflows to Validate a NetworkThis group of workflows allows a user to validate a network.
■ “VORD Validate (Quote)” on page 30
■ “VORD Validate (Order)” on page 31
VORD Validate (Quote)This workflow validates the network (or compound product) associated with the currently selected quote line item. It executes the rules associate with the Compound Product and reports any violations.
This workflow is initiated when a user clicks the Validate button on the Network Line Detail applet in the Quote > Line Item > Network Line Detail View.
This workflow is shown in Figure 6.
Workflow Description. This workflow does the following:
1 Checks whether the quote has already been converted to an order. If so, displays an error message and terminates the workflow.
Figure 5. SIS OM Move Display Quote Workflow
Figure 6. VORD Validate (Quote)
Siebel Order Management Guide Addendum for Industry Applications Version 8.0
30

Workflows for Employee Asset-Based Ordering for Industry Applications ■Workflows to Validate a Network
2 Calculates the future date for which the network is to be validated.
The future date is the due date of root line item in the current quote that is part of the same network, with the due date farthest in the future.
3 Invokes the Compound Product Validation Engine to validate each of the rules associated with the compound product.
4 If there are no violations, displays the following message: 'This <compound product> is valid”.
5 If there are violations, the error messages are concatenated into a single string and displayed to the user.
Associated Business Service Methods. The following table shows the steps in this workflow that call business service methods.
VORD Validate (Order)This workflow validates the network (or compound product) associated with the currently selected order line item. It executes the rules associate with the Compound Product and reports any violations.
This workflow is initiated when a user clicks the Validate button on the Network Line Detail Applet in the Order > Line Item > Network Detail View.
This workflow is shown in Figure 7.
Workflow Description. This workflow does the following:
1 Calculates the future date for which the network is to be validated.
The future date is the due date of root line item in the current order that is part of the same network, with the due date farthest in the future.
Workflow Step Business Service Method Called
Future DateFind Future Date
Validate Validate
Format Violation Format Violation
Figure 7. VORD Validate (Order)
Siebel Order Management Guide Addendum for Industry ApplicationsVersion 8.0
31

Workflows for Employee Asset-Based Ordering for Industry Applications ■ Workflow for Pricing Comparison
2 Invokes the Compound Product Validation Engine to validate each of the rules associated with the compound product.
3 If there are no violations, displays the following message: This <compound product> is valid.
4 If there are violations, the error messages are concatenated into a single string and displayed to the user.
Associated Business Service Methods. The following table shows the steps in this workflow that call business service methods.
Workflow for Pricing ComparisonThis group of workflows is used to modify products and installed assets. It consists of the workflow processes:
■ “SIS OM PC Price Comparison Process” on page 32
■ “SIS OM Goto Price Comparison View Process” on page 34
SIS OM PC Price Comparison ProcessThis workflow generates comparison quotes based on the service that a customer currently subscribes to with a competitor company. One quote is generated for each product that meets the customer needs, such as region of service, and gives the total annual charge and savings based on the current usage.
This workflow is shown in Figure 8.
Workflow Step Business Service Method Called
Future Date Find Future Date
Validate Validate
Format Violation Format Violation
Siebel Order Management Guide Addendum for Industry Applications Version 8.0
32

Workflows for Employee Asset-Based Ordering for Industry Applications ■ Workflowfor Pricing Comparison
The workflow is called by a SmartScript session that is invoked by clicking the New button in the SIS OM PC Opportunity Price Comparison view or by clicking the Compare Prices link on the Home Page.
Workflow Description. This workflow:
1 Checks to determine whether an opportunity exists for the Price Comparison. If there is an opportunity all existing price comparison quotes are deleted.
2 If an opportunity does not exist, creates a new opportunity.
3 Maps the SmartScript session questions to fields of a quote.
4 Converts the answers from the SmartScript session into a competitor quote using the mapping created in the previous step.
5 The Bill Decomposer method uses the competitor quote information to calculate the user's annual usage.
6 The Price Comparison method generates a comparison quote for each product offered by the company that meets the criteria specified by the user. The usage amounts calculated by the Bill Decomposer step are used to calculate the projected annual bill given the pricing of the product.
7 Displays the comparison quotes in the Opportunity Price Comparison view. For more details, see “SIS OM Goto Price Comparison View Process” on page 34.
Figure 8. SIS OM PC Price Comparison Process
Siebel Order Management Guide Addendum for Industry ApplicationsVersion 8.0
33
Workflows for Employee Asset-Based Ordering for Industry Applications ■ Workflow for Pricing Comparison
Associated Business Service Methods. The following table shows the steps in this workflow that call a business service method.
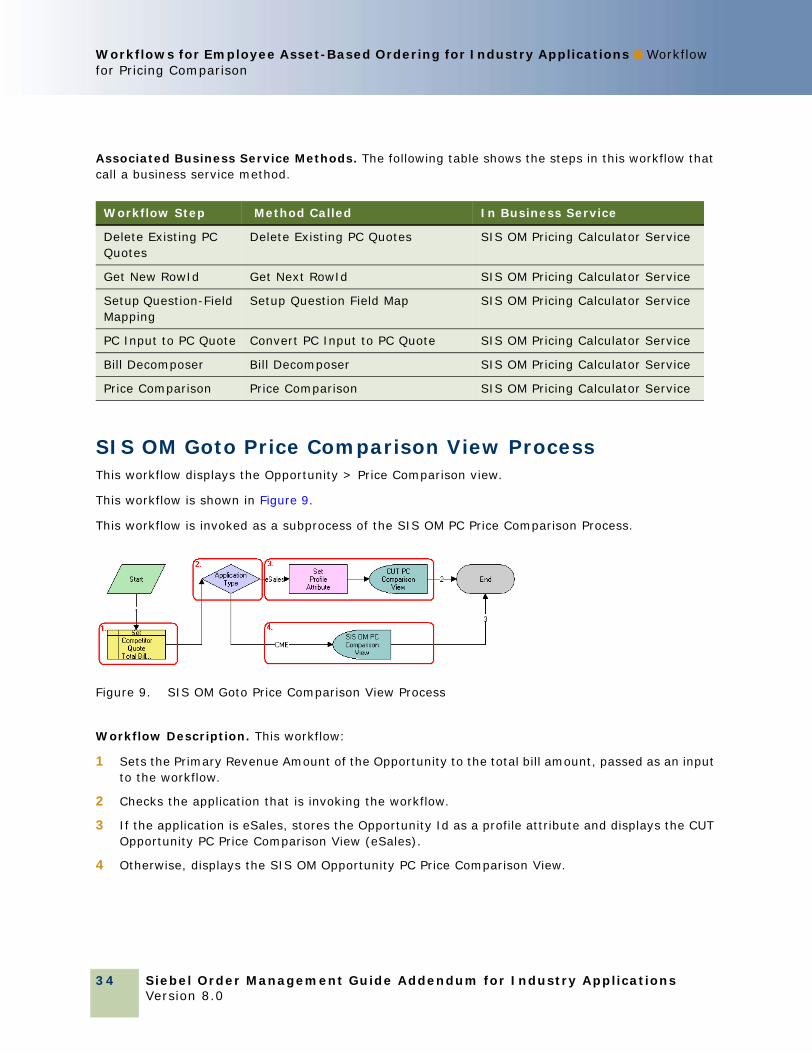
SIS OM Goto Price Comparison View ProcessThis workflow displays the Opportunity > Price Comparison view.
This workflow is shown in Figure 9.
This workflow is invoked as a subprocess of the SIS OM PC Price Comparison Process.
Workflow Description. This workflow:
1 Sets the Primary Revenue Amount of the Opportunity to the total bill amount, passed as an input to the workflow.
2 Checks the application that is invoking the workflow.
3 If the application is eSales, stores the Opportunity Id as a profile attribute and displays the CUT Opportunity PC Price Comparison View (eSales).
4 Otherwise, displays the SIS OM Opportunity PC Price Comparison View.
Workflow Step Method Called In Business Service
Delete Existing PC Quotes
Delete Existing PC Quotes SIS OM Pricing Calculator Service
Get New RowId Get Next RowId SIS OM Pricing Calculator Service
Setup Question-Field Mapping
Setup Question Field Map SIS OM Pricing Calculator Service
PC Input to PC Quote Convert PC Input to PC Quote SIS OM Pricing Calculator Service
Bill Decomposer Bill Decomposer SIS OM Pricing Calculator Service
Price Comparison Price Comparison SIS OM Pricing Calculator Service
Figure 9. SIS OM Goto Price Comparison View Process
Siebel Order Management Guide Addendum for Industry Applications Version 8.0
34

Workflows for Employee Asset-Based Ordering for Industry Applications ■Workflows for Enrollment
Associated Business Service Methods. The following table shows the step in this workflow that calls a business service method.
Workflows for EnrollmentThis group of workflows is used to modify products and installed assets. It consists of the workflow process and subprocesses:
■ “SIS OM PC Enrollment” on page 35
■ “SIS OM PC Create Account Subprocess” on page 37
■ “SIS OM PC Go To Opportunity View” on page 38
■ “SIS OM PC Set Opportunity Account” on page 38
■ “SIS OM PC Go to Order Entry - Line Items View (Sales)” on page 38
■ “CUT eSales - PC Enrollment Process” on page 39
❏ “CUT eSales - Set Shopping Cart Price List” on page 40
❏ “CUT eSales - PC Prepare Cart Process” on page 41
SIS OM PC EnrollmentThis workflow generates an Order for the product that the user selects from the quotes generated by the Price Comparison process.
This workflow is shown in Figure 10.
Workflow Step Method Called In Business Service
Set Profile Attribute Set Profile Attribute Product Manipulation Toolkit Service
Siebel Order Management Guide Addendum for Industry ApplicationsVersion 8.0
35

Workflows for Employee Asset-Based Ordering for Industry Applications ■ Workflows for Enrollment
This workflow is invoked by clicking the Enroll button in the SIS OM PC Opportunity Price Comparison View or the CUT Opportunity PC Price Comparison View (eSales).
Workflow Description. This workflow:
1 Checks to determine whether an account is associated with the opportunity.
2 If an account does not exist and the application that invoked the workflow is not eSales, displays the SIS OM PC Account Entry view to allow the user to create a new account. For more details, see “SIS OM PC Create Account Subprocess” on page 37.
3 Checks to see whether an account was created. If an account was not created, returns the user to the SIS OM PC Opportunity Price Comparison view. For more details, see “SIS OM PC Go To Opportunity View” on page 38.
4 If the user created a new account, associates the account with the opportunity. For more details, see “SIS OM PC Set Opportunity Account” on page 38.
5 Converts the comparison quote to a regular quote that can be processed through the order lifecycle.
6 Sets the Status of the comparison and competitor quotes to Order Placed.
7 If the application that invoked the workflow is eSales, merges the comparison quote with the shopping cart. For more details, see “CUT eSales - PC Enrollment Process” on page 39.
8 If the application is not eSales, converts the quote to an order and displays the order in the Order Line Item view. For more details, see “SIS OM PC Go to Order Entry - Line Items View (Sales)” on page 38.
Figure 10. SIS OM PC Enrollment Process
Siebel Order Management Guide Addendum for Industry Applications Version 8.0
36
Workflows for Employee Asset-Based Ordering for Industry Applications ■Workflows for Enrollment
Associated Business Service Methods. The following table shows the steps in this workflow that call a business service method.
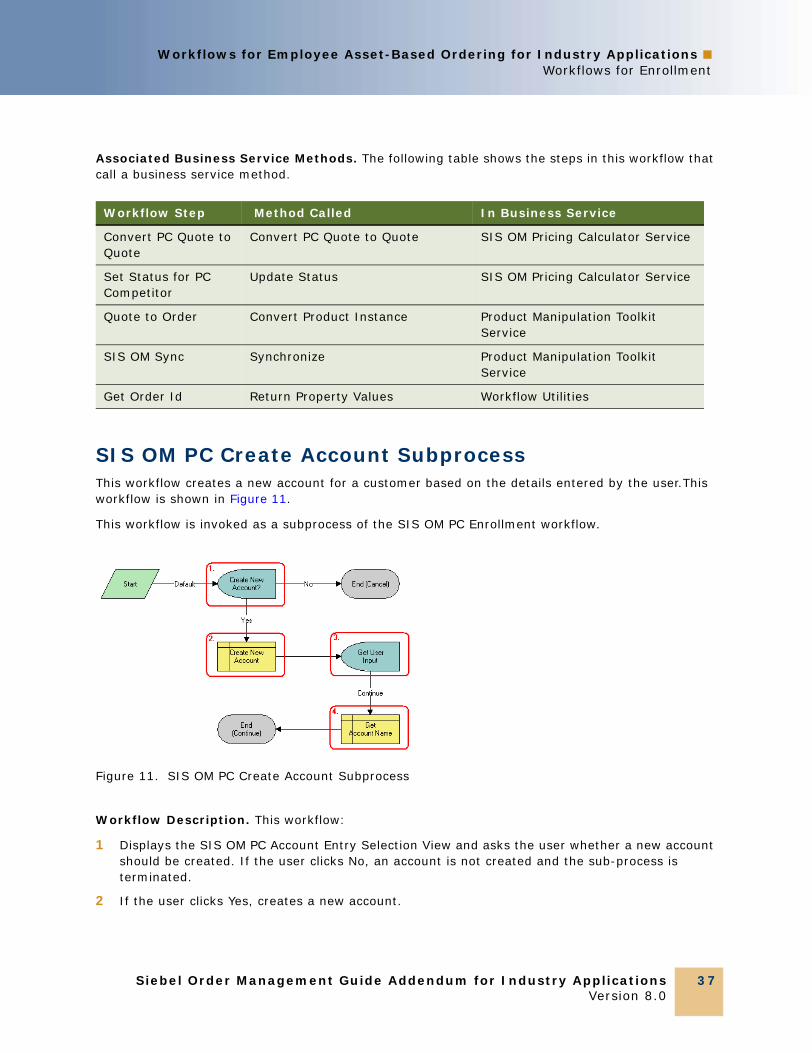
SIS OM PC Create Account SubprocessThis workflow creates a new account for a customer based on the details entered by the user.This workflow is shown in Figure 11.
This workflow is invoked as a subprocess of the SIS OM PC Enrollment workflow.
Workflow Description. This workflow:
1 Displays the SIS OM PC Account Entry Selection View and asks the user whether a new account should be created. If the user clicks No, an account is not created and the sub-process is terminated.
2 If the user clicks Yes, creates a new account.
Workflow Step Method Called In Business Service
Convert PC Quote to Quote
Convert PC Quote to Quote SIS OM Pricing Calculator Service
Set Status for PC Competitor
Update Status SIS OM Pricing Calculator Service
Quote to Order Convert Product Instance Product Manipulation Toolkit Service
SIS OM Sync Synchronize Product Manipulation Toolkit Service
Get Order Id Return Property Values Workflow Utilities
Figure 11. SIS OM PC Create Account Subprocess
Siebel Order Management Guide Addendum for Industry ApplicationsVersion 8.0
37
Workflows for Employee Asset-Based Ordering for Industry Applications ■ Workflows for Enrollment
3 Displays the SIS OM PC Account Entry View to allow the user to enter the details of the account.
The user clicks Continue.
4 Retrieves the name of the account and returns it to the calling workflow.
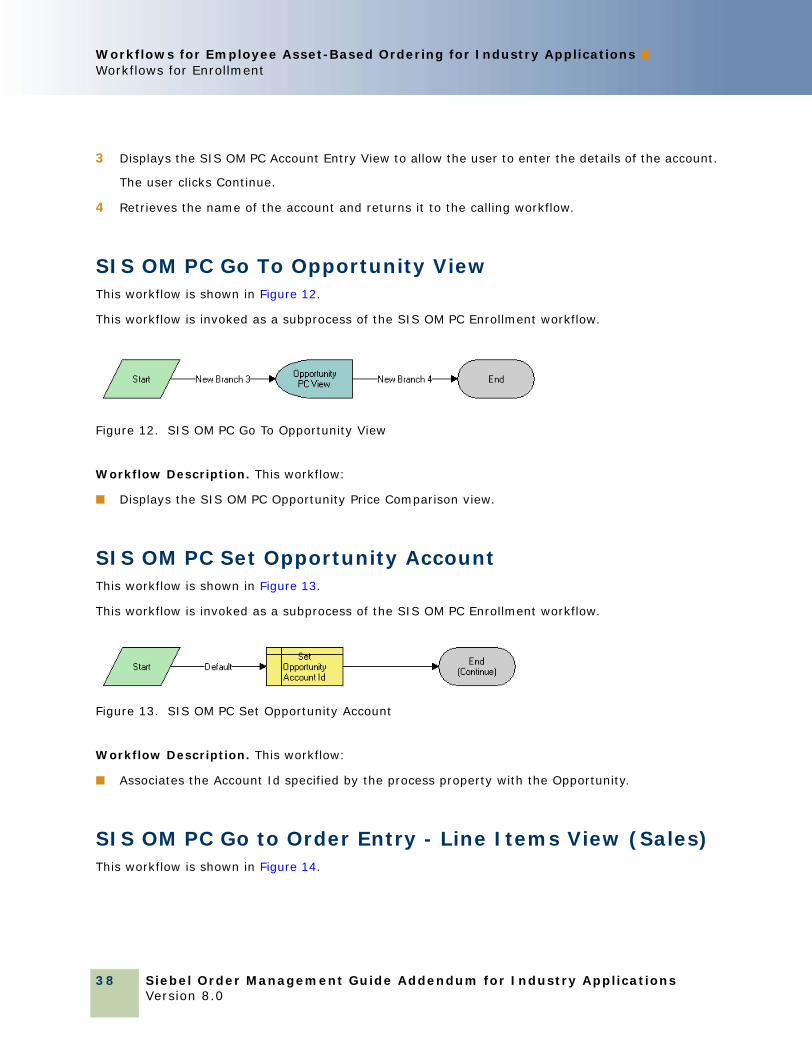
SIS OM PC Go To Opportunity ViewThis workflow is shown in Figure 12.
This workflow is invoked as a subprocess of the SIS OM PC Enrollment workflow.
Workflow Description. This workflow:
■ Displays the SIS OM PC Opportunity Price Comparison view.
SIS OM PC Set Opportunity AccountThis workflow is shown in Figure 13.
This workflow is invoked as a subprocess of the SIS OM PC Enrollment workflow.
Workflow Description. This workflow:
■ Associates the Account Id specified by the process property with the Opportunity.
SIS OM PC Go to Order Entry - Line Items View (Sales)This workflow is shown in Figure 14.
Figure 12. SIS OM PC Go To Opportunity View
Figure 13. SIS OM PC Set Opportunity Account
Siebel Order Management Guide Addendum for Industry Applications Version 8.0
38

Workflows for Employee Asset-Based Ordering for Industry Applications ■Workflows for Enrollment
This workflow is invoked as a subprocess of the SIS OM PC Enrollment workflow.
Workflow Description. This workflow:
■ Navigates to the Order Entry - Line Items View (Sales).
CUT eSales - PC Enrollment ProcessThis workflow adds product selected from the quotes generated by the Price Comparison process to the Shopping Cart. This workflow is shown in Figure 15.
This workflow is invoked as a subprocess of the SIS OM PC Enrollment workflow.
NOTE: This workflow is used only for customer applications. It is documented in this chapter because the workflow that calls it is used for both employee and customer applications.
Workflow Description. This workflow:
1 Checks the status of the shopping cart.
Figure 14. SIS OM PC Go to Order Entry - Line Items View (Sales)
Figure 15. CUT eSales - PC Enrollment Process
Siebel Order Management Guide Addendum for Industry ApplicationsVersion 8.0
39

Workflows for Employee Asset-Based Ordering for Industry Applications ■ Workflows for Enrollment
2 If the cart is empty, creates a new cart and sets the cart's price list to the Price Comparison internal price list. See CUT eSales - Set Shopping Cart Price List for more details, see “CUT eSales - Set Shopping Cart Price List” on page 40.
3 If the cart is not empty, compares the cart's price list to the price list of the comparison quote selected by the user. If the price lists are different, checks to see if the user explicitly logged in.
4 If the user logged in, displays the Save Cart Confirmation view to allow the user to specify how to handle the existing cart. For more details, see “CUT eSales - PC Prepare Cart Process” on page 41.
5 If the user is not logged in, makes a request to display the CUT Opportunity PC Price Comparison View (eSales) on log in, and displays the Login View. The workflow terminates.
6 If the user chose not to save or discard the existing cart, the workflow terminates.
7 If the comparison quote's price list and the cart's price list are the same, or new cart was created, adds the comparison quote line items to the cart.
8 Displays the Shopping Cart view.
Associated Business Service Methods. The following table shows the steps in this workflow that call a business service method.
CUT eSales - Set Shopping Cart Price ListThis workflow is shown in Figure 16.
Workflow Step Method Called In Business Service
Get Shopping Cart Status
GetShoppingCartStatus CUT OET Service
Get Property: Explicit Login
GetPropValue Shopping Service
New Cart NewCartHeader CUT OET Service
Set Pending Request Set Pending Request Shopping Service
Merge PC Quote & Cart
MergeCxObj CUT OET Service
Goto Shopping Cart GotoView CUT OET Service
Siebel Order Management Guide Addendum for Industry Applications Version 8.0
40

Workflows for Employee Asset-Based Ordering for Industry Applications ■Workflows for Enrollment
This workflow is invoked as a sub-process of the CUT eSales - PC Enrollment Process workflow.
NOTE: This workflow is used only for customer applications. It is documented in this chapter because the workflow that calls it is used for both employee and customer applications.
Workflow Description. This workflow:
■ Updates the cart's price list to the specified value.
CUT eSales - PC Prepare Cart ProcessThis workflow allows the user save the current shopping cart or discard the contents before adding the product selected from the quotes generated by the Price Comparison process.
This workflow is shown in Figure 17.
This workflow is invoked as a subprocess of the CUT eSales - PC Enrollment Process workflow.
NOTE: This workflow is used only for customer applications. It is documented in this chapter because the workflow that calls it is used for both employee and customer applications.
Workflow Description. This workflow:
1 Loads the current shopping cart and displays the Save Cart Confirmation view.
2 If the user chooses Save, saves the cart.
3 If the user chooses Discard, discards the cart.
Figure 16. CUT eSales - Set Shopping Cart Price List
Figure 17. CUT eSales - PC Prepare Cart Process
Siebel Order Management Guide Addendum for Industry ApplicationsVersion 8.0
41
Workflows for Employee Asset-Based Ordering for Industry Applications ■ Workflows for Enrollment
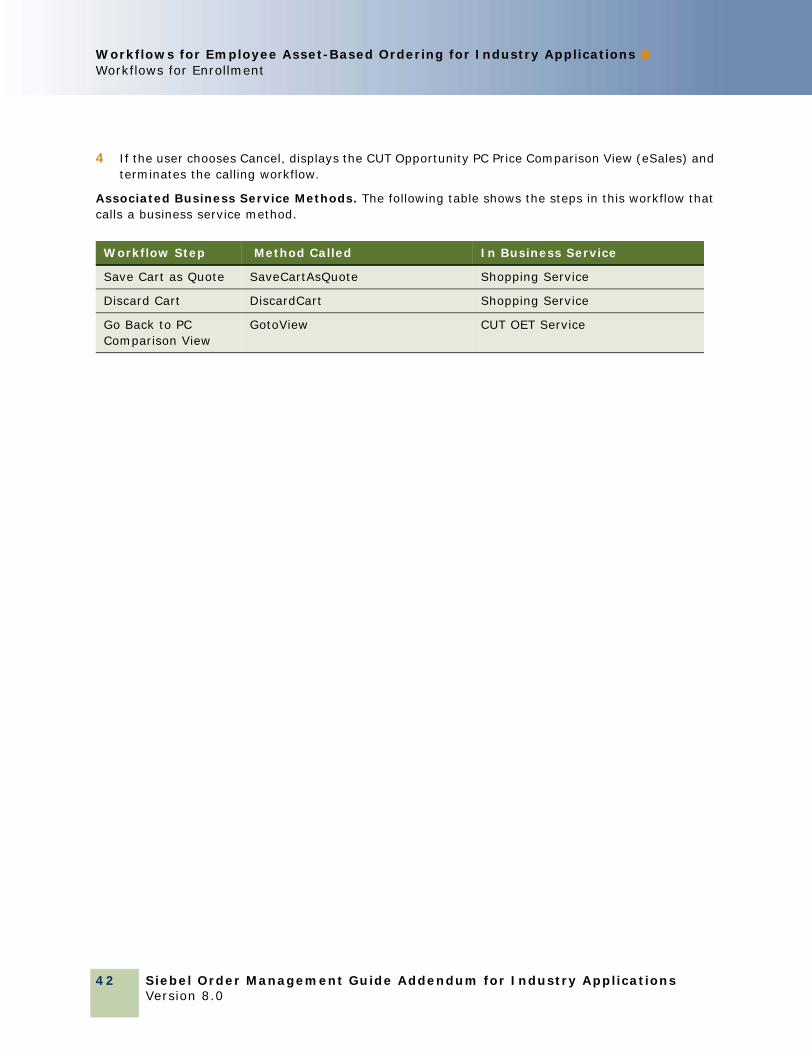
4 If the user chooses Cancel, displays the CUT Opportunity PC Price Comparison View (eSales) and terminates the calling workflow.
Associated Business Service Methods. The following table shows the steps in this workflow that calls a business service method.
Workflow Step Method Called In Business Service
Save Cart as Quote SaveCartAsQuote Shopping Service
Discard Cart DiscardCart Shopping Service
Go Back to PC Comparison View
GotoView CUT OET Service
Siebel Order Management Guide Addendum for Industry Applications Version 8.0
42

5 Partner Asset-Based Ordering
This chapter describes asset-based ordering within the Siebel Partner Relationship Management (PRM) applications. It focuses on the procedures a partner end-user would complete in order management and order placement.
This chapter includes the following sections:
■ “About Order Management in Siebel PRM” on page 43
■ “Scenario for Partner Order Management” on page 44
■ “Order Management with Standard Partner Commerce” on page 45
■ “Order Management with Power Partner Commerce” on page 56
About Order Management in Siebel PRM Siebel PRM allows your partners to resell or purchase your organization’s products. It also allows partners to communicate and collaborate with your organization. For more information about Siebel PRM, see Siebel Partner Relationship Management Administration Guide.
This chapter focuses on the user interfaces and workflows that are unique to the PRM module implementation of Order Management.
PRM order management processing has been enhanced to provide support for two different types of partner users within the PRM module:
■ Standard Partner Commerce User. This partner end user uses the shopping cart view to purchase product and services for their customers or for their organization. This Order Capture interface is similar to the one used in the eSales application and is designed for simplicity and ease of use and is most appropriate for business to consumer transactions. The Standard Partner Commerce user has access to the product catalog and Advisor.
■ Power Partner Commerce User. This partner end user uses the same quotes and orders modules used by employees. This role is meant to support the partner end user who is assisting customers in meeting their specialized needs.
These variations from standard PRM functionality are described in detail in:
■ “Order Management with Standard Partner Commerce” on page 45
■ “Order Management with Power Partner Commerce” on page 56
Siebel Order Management Guide Addendum for Industry ApplicationsVersion 8.0
43

Partner Asset-Based Ordering ■ Scenario for Partner Order Management
Scenario for Partner Order ManagementThis scenario describes how a partner organization could establish a partnership with a brand owner organization and complete sales channel. This is only an example. Depending upon your organization’s business requirements and your partnership program, you and your partners may apply different processes.
The Brandowner Recruits PartnersThe channel manager for TeleMedia Inc. Wireless has developed a partnership campaign to use channel partners to resell TeleMedia mobile phone packages.
Prospective partners receive a campaign email that directs them to the TeleMedia Partner Portal, where they can view information about available TeleMedia Inc. partner programs and apply to become partners.
The TeleMedia channel manager reviews and approves these applications. When an organization is approved, it is given full access to the Partner Portal. It is assigned accounts and responsibilities and its employees are assigned the appropriate user type, power users or standard users.
Partners Order Through the Partner Portal After being approved as a TeleMedia partner, the electronics department manager for ComTel Networks can expand his stores selection by offering TeleMedia products. The partner store manager logs into the TeleMedia Partner Portal. On the home page, there is a Partner Alert about a promotional campaign for the TeleMedia mobile package which includes partner re-sell incentives.
He decides to upgrade the existing store inventory of mobile phones and promote the mobile package through the newer mobile models along with clearance of older mobile models.
The partner store manager browses the TeleMedia Product Catalog and decides to use the Advisor to find the best deals TeleMedia is offering its partners. After being directed to a mobile package promotion by Advisor, the partner store manager adds the suggested products to the shopping cart, and completes the ordering process.
Partners Create and Modify Customer OrdersThe mobile package promotion allows ComTel Networks to sell a substantial number of TeleMedia products.
One of the mobile packages offered by TeleMedia is a family package that provides primary phone service with 1500 plan minutes with the option to add multiple mobile phones managed under one service account. Each additional mobile phone receives individual service options at discount rates and shares the primary service minutes.
A ComTel Networks customer purchases a family 1500 plan for his wife and daughter. The next morning, this customer calls and requests to add two new mobile products and services to his account.
This call is handled by a partner employee who is a Power Commerce user. The employee finds the customer’s account and all the products and services currently requested by this customer.
Siebel Order Management Guide Addendum for Industry Applications Version 8.0
44
Partner Asset-Based Ordering ■ Order Management with Standard Partner Commerce
The employee orders two more phone products with the service options the customer requested. In the Orders list, the employee selects the open order. The Sales Order form and Line Items list appear. The employee revises the order to add the two additional phone products and with the customizable service options.
The product Configurator appears showing all of the installed products for that customer and the expected state of the customer service profile after the open order is provisioned. The employee customizes the phone packages and submits the order.
The employee has essentially created a supplemental order, which is an order that revises an existing open order. When you submit the revised order it submits an entirely new order and not the difference between your revised order and your previous order. For more details, see the section about revising a submitted order in Siebel Order Management Guide.
Several weeks later, after the service is provisioned, this customer wants to change the service options for one family member in the plan.
A partner employee uses the TeleMedia Partner Portal to look up the customer’s account and sees the three mobile phones and service plan options purchased by this customer’s account. The employee uses Configurator to change the service options for one phone, and then submits the order.
This employee has modified an order that has already been fulfilled. For more details, “Revising an Order (Standard Partner Commerce)” on page 54.
NOTE: This ordering process would be different if the employee were a Standard Partner Commerce user. The employee would work with eCatalog and the Shopping Cart. For more information, see “Order Management with Standard Partner Commerce” on page 45.
Order Management with Standard Partner Commerce This section provides information about how Standard Commerce users create quotes and orders. The Standard Commerce user works with an interface similar to the Siebel eSales user interface, including eCatalog, the shopping cart, Advisor, and other simplified quote to order features.
This section covers the following tasks for quote and order management:
■ Standard Partner Commerce Quote Management Tasks:
■ “Adding Items to a Shopping Cart (Standard Partner Commerce)” on page 46
■ “Customizing an Item (Standard Partner Commerce)” on page 48
■ “Revising the Contents of the Shopping Cart (Standard Partner Commerce)” on page 48
■ “Adding Bulk Items to the Shopping Cart (Standard Partner Commerce)” on page 49
■ “Saving a Shopping Cart as a Quote or Quote Template (Standard Partner Commerce)” on page 50
■ Standard Partner Commerce Order Placement Tasks:
■ “Converting a Quote to an Order (Standard Partner Commerce)” on page 50
■ “Processing an Order Checkout (Standard Partner Commerce)” on page 51
Siebel Order Management Guide Addendum for Industry ApplicationsVersion 8.0
45

Partner Asset-Based Ordering ■ Order Management with Standard Partner Commerce
■ “Adding Quote Template Items to the Shopping Cart (Standard Partner Commerce)” on page 52
■ “Entering Shipping Information (Standard Partner Commerce)” on page 52
■ “Using the Credit Card Payment Method (Standard Partner Commerce)” on page 53
■ “Using the Bill Me Payment Method (Standard Partner Commerce)” on page 53
■ “Using the Billing Account Payment Method (Standard Partner Commerce)” on page 54
■ “Using the Purchase Order Method (Standard Partner Commerce)” on page 54
■ “Reviewing and Submitting an Order (Standard Partner Commerce)” on page 54
■ Standard Partner Commerce Change Order Tasks:
■ “Revising an Order (Standard Partner Commerce)” on page 54
■ “Selecting Billing and Service Accounts (Standard Partner Commerce)” on page 55
■ “Modifying an Order (Standard Partner Commerce)” on page 55
■ “Disconnecting an Order (Standard Partner Commerce)” on page 56
Adding Items to a Shopping Cart (Standard Partner Commerce)Standard Partner end users can add items to the shopping cart in several ways:
■ By selecting items from a catalog
■ By selecting items saved to Favorites
■ By choosing an item from Recommended items
■ By using Quick Add to specify an item
■ By retrieving a stored quote
■ By retrieving a quote template
When the user adds and item to the shopping cart from a catalog, the user remains in the catalog view and the item is displayed in the Last Item Added area.
If there are items in the shopping cart when the user exits the session, these items remain in the shopping cart when the user next logs in.
Users do not have to log in before adding items to the shopping cart. However, users must log in to convert the shopping cart contents into an order or to save the shopping cart as a quote or quote template.
There are two types of shopping cart pricing:
■ Non-recurring charge (NRC). This price is charged only once. Items such as hardware or one-time installation charges are examples.
Siebel Order Management Guide Addendum for Industry Applications Version 8.0
46
Partner Asset-Based Ordering ■ Order Management with Standard Partner Commerce
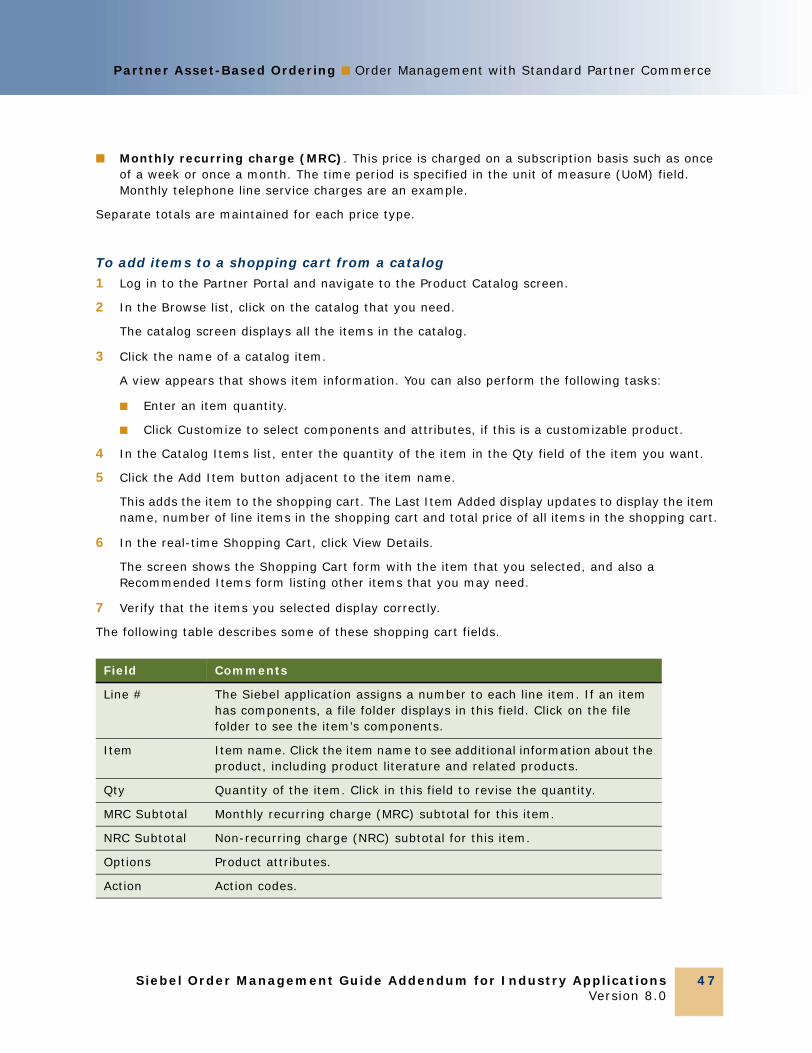
■ Monthly recurring charge (MRC). This price is charged on a subscription basis such as once of a week or once a month. The time period is specified in the unit of measure (UoM) field. Monthly telephone line service charges are an example.
Separate totals are maintained for each price type.
To add items to a shopping cart from a catalog
1 Log in to the Partner Portal and navigate to the Product Catalog screen.
2 In the Browse list, click on the catalog that you need.
The catalog screen displays all the items in the catalog.
3 Click the name of a catalog item.
A view appears that shows item information. You can also perform the following tasks:
■ Enter an item quantity.
■ Click Customize to select components and attributes, if this is a customizable product.
4 In the Catalog Items list, enter the quantity of the item in the Qty field of the item you want.
5 Click the Add Item button adjacent to the item name.
This adds the item to the shopping cart. The Last Item Added display updates to display the item name, number of line items in the shopping cart and total price of all items in the shopping cart.
6 In the real-time Shopping Cart, click View Details.
The screen shows the Shopping Cart form with the item that you selected, and also a Recommended Items form listing other items that you may need.
7 Verify that the items you selected display correctly.
The following table describes some of these shopping cart fields.
Field Comments
Line # The Siebel application assigns a number to each line item. If an item has components, a file folder displays in this field. Click on the file folder to see the item’s components.
Item Item name. Click the item name to see additional information about the product, including product literature and related products.
Qty Quantity of the item. Click in this field to revise the quantity.
MRC Subtotal Monthly recurring charge (MRC) subtotal for this item.
NRC Subtotal Non-recurring charge (NRC) subtotal for this item.
Options Product attributes.
Action Action codes.
Siebel Order Management Guide Addendum for Industry ApplicationsVersion 8.0
47

Partner Asset-Based Ordering ■ Order Management with Standard Partner Commerce
Customizing an Item (Standard Partner Commerce)Standard Partner Commerce users customize items by selecting item components and attributes in a configuration session. To start a configuration session, the user clicks Customize. When the user exits the configuration session, the configuration is transferred to the shopping cart.
NOTE: Only customizable or complex products can be customized.
If the quantity of a configurable item is greater than one when the user starts a configuration session, the configuration is applied to each of the configurable items. For example, a user adds a configurable Residential Phone Service Package to the shopping cart and specifies 4 in the Qty field, and clicks Customize. When the user exits the configuration session, the configuration is applied to all 4 of the Residential Phone Service Packages.
A Configurator license is required to configure customizable products.
To customize an item
1 In the Catalog screen, in the Items list, click Customize.
Selection pages appear showing customizable components and attributes.
2 In each category, select the component and enter a quantity (if applicable).
If a component has customizable attributes, an icon appears in the Customize column.
3 Click the icon to configure the attributes for the component.
If you select combinations of components or quantities that are incompatible, a configuration message displays and presents alternatives.
4 After configuring the item, click Save.
5 When you are finished, click Done.
You are returned to the Shopping Cart.
Revising the Contents of the Shopping Cart (Standard Partner Commerce)Standard Partner Commerce users can remove single items from the shopping cart or remove all items at once. Users can also change the quantity of items. In addition, end users can reconfigure items and add new items.
Unit Unit of measurement (per month, year, quarter).
Comments Comments from the Pricer.
Field Comments
Siebel Order Management Guide Addendum for Industry Applications Version 8.0
48

Partner Asset-Based Ordering ■ Order Management with Standard Partner Commerce
To revise the contents of the shopping cart
1 Navigate to the Shopping Cart.
2 Perform one or more of the following, as appropriate:
■ To delete an item, click the item’s active record indicator (the diamond icon in the left column), and then click the trash can button.
■ To delete all the items, click Empty Cart.
■ To change the quantity of an item, enter a new quantity in the Qty field and click the Update Quantity button.
■ To use Quick Add to add items, enter the Item Name, Item Code, or Manufacturer Code and click Add to Cart.
■ To add an item from Recommended Items, click on the item name. Then, when a view showing item information appears, click Add To Cart to add the item.
In the real time Shopping Cart, click View Cart to return to Shopping Cart.
Adding Bulk Items to the Shopping Cart (Standard Partner Commerce)Business users frequently need to order customizable items in bulk. For example, a business user may order 20 customizable phone lines for installation at the same location. Rather than configure each instance separately, users can configure the item once and apply the configuration to all the instances. They can then adjust the configuration of individual instances of the item as needed.
This procedure uses the workflow “CUT eSales - Ungroup Quote,” which is described in “Workflow to Ungroup Quotes” on page 82.
To add bulk items to the shopping cart
1 Add a customizable item to the Shopping Cart.
2 Navigate to the Shopping Cart and click the item’s active record indicator (the diamond button in the left column).
3 In the item’s Qty field, enter the quantity.
4 Click Update Quantity.
5 If necessary, click the item’s active record indicator to select it again.
6 Click Customize.
Selection pages appear that display the customizable components and attributes of the item.
7 Select components and attributes, and then click Done.
The Shopping Cart appears.
8 Verify that the item’s active record indicator is highlighted, and then click Ungroup.
Siebel Order Management Guide Addendum for Industry ApplicationsVersion 8.0
49
Partner Asset-Based Ordering ■ Order Management with Standard Partner Commerce
9 To adjust the configuration of an ungrouped instance of the item, click its active record indicator, and then click Customize.
Saving a Shopping Cart as a Quote or Quote Template (Standard Partner Commerce)When the user saves the shopping cart, the system first verifies the user is logged in. If not, the user is required to log in. If the user is not a registered user, the application makes the user register.
When the user saves the shopping cart as a quote, the quote is added to My Quotes. The user can convert the quote to an order at a later time. When the user converts a quote to an order from My Quotes, the quote is removed from My Quotes.
When the user saves a quote as a template, the quote is added to My Templates. The user can use the template to create orders at a later time. Templates are not removed from My Templates when they are used to create quotes.
To save a shopping cart as a quote or quote template
1 Navigate to the Shopping Cart.
2 Click Save Cart.
The Save Cart form appears.
3 In the Name field, enter a descriptive name.
4 To save the shopping cart as a quote, click Save as Quote.
5 To save the shopping cart as a quote template, click Save as Template.
If you save the shopping cart as a quote, My Quotes appears and lists the quote. The shopping cart is emptied.
If you save the shopping cart as a template, Shopping Cart appears, and its contents are unchanged.
Converting a Quote to an Order (Standard Partner Commerce)The user converts a quote to an order by retrieving a quote from My Quotes and transferring it to the shopping cart. This removes the quote from My Quotes.
If the quote has not expired, the items in the quote are transferred to the shopping cart and the check out process starts. If the quote has expired, the Siebel application does the following:
■ Verifies that the shopping cart is empty. If not, the Siebel application presents the contents of the shopping cart to the user. The user can cancel the process, save the shopping cart, or discard the shopping cart.
Siebel Order Management Guide Addendum for Industry Applications Version 8.0
50

Partner Asset-Based Ordering ■ Order Management with Standard Partner Commerce
■ If the shopping cart is empty, has been discarded, or has been saved, the quote is transferred to the shopping cart. Prices are recalculated. The Siebel application removes items that are no longer available from the quote.
To convert a quote to an order
1 In the Partner Portal, click Quotes.
2 In the Quotes screen, click My Quotes or My Customer Quotes to retrieve the appropriate account quote.
3 In the My Quotes or My Customer Quotes list, select the quote.
In the Quote view, verify that the quote contains all the items that you need, and that customizable items are configured correctly.
4 Click Order.
If the quote contains items that will be shipped, the Shipping Information view appears for you to select the shipping address.
If you have not yet set up a payment method, the Payment Method view appears.
Processing an Order Checkout (Standard Partner Commerce)When the user converts the shopping cart to an order, the Siebel application does the following:
■ Verifies that the user is logged in. If not, the user is required to register and log in.
■ Verifies that a complete shipping address has been provided. If not, the user is required to enter or select a shipping address.
■ Verifies that a payment method has been selected. If not, the user is required to enter credit card information, or select a billing or location purchase order.
■ Computes taxes and shipping costs.
■ Presents an order summary. The user can edit the shipping and payment details in the order (for example, assigning service IDs to items) summary before submitting the order.
This procedure uses the following workflows, which are described in “Workflows to Process an Order Checkout” on page 70:
■ “CUT eSales - Checkout Process”
■ “CUT eSales - Set Quote Account Info”
■ “eSales - Enter Shipping Details Process”
■ “eSales - Complete Checkout Process”
■ “eSales - Save Shipping Address”
■ “CUT eSales - Ungroup Quote”
Siebel Order Management Guide Addendum for Industry ApplicationsVersion 8.0
51
Partner Asset-Based Ordering ■ Order Management with Standard Partner Commerce
To check out an order
1 Navigate to the Shopping Cart.
2 Verify that the shopping cart contains all the items you want to purchase. Also verify that customizable items are configured correctly.
3 Click Check Out.
If the shopping cart contains items that will be shipped, the Shipping Information view appears for you to select the shipping address.
If you have not yet set up a payment method, the Payment Method view appears.
4 In the Payment Method form, either enter a credit card and click Continue, or click Bill Me.
If you select the Bill Me option, you must enter a specific billing address.
Adding Quote Template Items to the Shopping Cart (Standard Partner Commerce)The user can add items in a quote template to the shopping cart. These items can be the only items in the shopping cart or can be added to a shopping cart that already contains items.
To add quote template items to the shopping cart
1 Log in to Partner Portal and click Quotes.
2 In the Quotes list, click My Templates.
3 In the Template list, locate the quote template and click in the Name field.
4 In Template Items, delete any items from the quote template or change item quantities, if necessary.
5 In Template, click Order Template.
The Shopping Cart appears, and contains the items from the quote template. The Siebel application updates prices for these items to current prices.
6 Click Check Out.
If the shopping cart contains items that will be shipped, the Shipping Information view appears for you to select the shipping address.
If you have not yet set up a payment method, the Payment Method view appears.
Entering Shipping Information (Standard Partner Commerce)If an order contains items that are to be shipped, the Siebel application verifies that a complete shipping address exists. If not, the user must enter shipping information.
Siebel Order Management Guide Addendum for Industry Applications Version 8.0
52

Partner Asset-Based Ordering ■ Order Management with Standard Partner Commerce
To enter shipping information
1 In Shipping Information, click Edit Shipping Details.
2 Select the recipient and shipping method, and then click Save.
3 Click the record’s edit button to edit the address.
4 In the Select Shipping Address form, edit the address and click Save.
5 To create a new shipping address, click Add, fill out the address form, and click Save.
6 In the Select Shipping Address form, click Save.
The Payment Method view appears.
Using the Credit Card Payment Method (Standard Partner Commerce)This section explains how to use the Credit Card Payment Method.
To use the credit card payment method
1 In the Payment Method form, enter credit card information.
2 Enter the billing address.
3 To erase the form and start again, click Reset.
4 After entering all the information, click Continue.
The Order Summary appears.
Using the Bill Me Payment Method (Standard Partner Commerce)This section explains how to use the Bill Me Payment Method.
To use the Bill Me payment method
1 In the Payment Method tab, click Bill Me.
The Billing Information view appears.
2 In Select Billing Address, locate the billing address.
3 In the address Select field, click Select.
The Order Summary appears and contains the billing address.
Siebel Order Management Guide Addendum for Industry ApplicationsVersion 8.0
53
Partner Asset-Based Ordering ■ Order Management with Standard Partner Commerce
Using the Billing Account Payment Method (Standard Partner Commerce)This section explains how to use the Billing Account Payment Method.
To use the Billing Account payment method
1 In the Payment Method form, click the Billing Account select button.
The Pick Billing Account dialog box appears.
2 Select the billing account and click OK.
The Order Summary appears, showing the billing address.
Using the Purchase Order Method (Standard Partner Commerce)For information about this activity, see Siebel eSales Administration Guide and Siebel eSales Administration Guide Addendum for Industry Applications.
Reviewing and Submitting an Order (Standard Partner Commerce)This section explains how to review and submit an order.
To review and submit an order
1 Log in to Partner Portal and click My Account.
2 In the My Information list, click My Orders.
3 In the My Orders list, select an order with the status Pending.
4 Review the shipping information, payment information, items requested, and total cost to verify that all information is correct.
5 Select or confirm the Shipping address.
6 Click Submit.
Revising an Order (Standard Partner Commerce)The Customer end user can change an existing order. In this process, the user creates a supplemental order by changing an order that is not yet provisioned.
Siebel Order Management Guide Addendum for Industry Applications Version 8.0
54
Partner Asset-Based Ordering ■ Order Management with Standard Partner Commerce
This procedure uses the workflow “CUT eSales - Revise Order Process,” which is described in “Workflows to Revise an Order” on page 85.
To revise an order
1 Log in to Partner Portal and click My Account.
2 In the My Information list, click My Orders.
The My Orders list appears showing your existing orders. This screen is used to select an open order.
3 Select the appropriate order and click Revise.
The status of the order must be Open.
4 In the Line Items list, select the item to be revised.
5 Click Customize.
6 Change the item and click Checkout.
Selecting Billing and Service Accounts (Standard Partner Commerce)This procedure allows you to select and view an existing Billing and Service Account.
To select billing and service accounts
1 In the My Account screen, in the Products & Services list, click Billing Items or Service Items.
2 When the Billing Item or Service Item screen appears, select the account.
Modifying an Order (Standard Partner Commerce)This feature allows an end user to modify a service item that is already provisioned. In this action, you can change product attributes or a feature or component of the service item.
This procedure uses the workflows “CUT eSales - Modify Products and Services Process” and “CUT eSales - Prepare Shopping Cart Process - Interactive,” which are described in “Workflows to Modify Products and Installed Assets” on page 87.
To modify an existing service item
1 In the My Account screen, in the Products & Services list, click Service Items.
2 In the Select Account list, select the account to be changed.
3 In the Service Items list, select the item to be changed.
4 Click Modify.
Siebel Order Management Guide Addendum for Industry ApplicationsVersion 8.0
55

Partner Asset-Based Ordering ■ Order Management with Power Partner Commerce
5 When the selection pages appear, change the product attributes, features, or components, as needed.
6 Click Done.
7 When the Shopping Cart appears, you can see the changed action codes.
Disconnecting an Order (Standard Partner Commerce)This feature allows a user to disconnect a complete service item and all of its components. This action disconnects the parent product and all child products on lower levels of the hierarchy.
You cannot disconnect a child product by itself.
NOTE: In Standard Partner Commerce, orders and services are the same thing. When you select Service Items under the Products & Services tab, you are accessing screens to work with existing orders.
This procedure uses the workflow “CUT eSales - Disconnect Products and Service Process,” which is described in “Workflow to Disconnect Products and Services” on page 90
To disconnect an order
1 In the My Account screen, in the Products & Services list, click Service Items.
2 In the Select Account list, select the account.
3 In the Service Items list, select the item to be disconnected.
4 Click Disconnect.
You are taken to the Shopping Cart, where you see the product and all of its components with the Action code of Delete.
5 Click Check Out.
Order Management with Power Partner Commerce This section provides information about how Power Commerce users create quotes and orders. The Power Commerce user works with an interface similar to the quote and order screens of employee applications, such as Siebel Communications or Siebel Media Call Center. This order-entry interface gives the user full access to the Quotes and Orders modules used by employees.
NOTE: The processes and procedures using the Quotes and Orders modules are outlined in the section about asset-based ordering in Siebel Order Management Guide.
The Power User is able to help customers who required more assistance. For example, in helping an existing customer, a Power Commerce user may require access to customers account to compare customers existing entertainment service package to new service offering to upgrade their existing service.
Siebel Order Management Guide Addendum for Industry Applications Version 8.0
56

Partner Asset-Based Ordering ■ Order Management with Power Partner Commerce
After identifying the customer and accessing the customers account, the Power Commerce user can launch Advisor to analyze the needs of the customer and recommend product and service packages. The Power Commerce user then can create a quote and fax, email, or mail it to the customer.
At a later date, the customer may call again to add or delete items from the order, or get additional comparative information. The Power Commerce user can access the appropriate screens based upon the status of the order. Whether the order is pending or complete, the Power Commerce user can generate a quote and order based on the customer’s new requirements.
A Power Commerce user typically manages customer quotes and orders in the same way as an employee does. These methods are detailed in the section about asset-based ordering in Siebel Order Management Guide. See the sections in that book about:
■ Creating a Quote.
■ Modifying a Quote or Order.
■ Viewing Quote Details.
■ Converting a Quote to an Order.
■ Submitting an Order.
■ Modifying a Service Profile.
■ Disconnecting or Transferring a Customer’s Service.
Siebel Order Management Guide Addendum for Industry ApplicationsVersion 8.0
57

Partner Asset-Based Ordering ■ Order Management with Power Partner Commerce
Siebel Order Management Guide Addendum for Industry Applications Version 8.0
58

6 Workflows for Partner Asset-Based Ordering
This section explains the Siebel workflows that are specific to Siebel PRM order management. There are also many workflows that are common to Siebel PRM and employee or customer partner management, and they are covered in the section about workflows for asset-based ordering in Siebel Order Management Guide and in Chapter 8, “Workflows for Customer Asset-Based Ordering.”
There are two workflows specific to Siebel PRM, which determine whether the user is directed to the Power Partner Commerce user interface or the Standard Partner Commerce user interface:
■ “CUT eChannel - New Products & Services Process”
■ “CUT eChannel - Goto Product Catalog View”
NOTE: For more information about the Power Partner Commerce and Standard Partner Commerce user interfaces, see “About Order Management in Siebel PRM” on page 43.
CUT eChannel - New Products & Services ProcessThis workflow identifies the user role as either a Partner Power Commerce user or a Standard Partner Commerce user. Then it routes the user to the appropriate user interface.
This workflow is invoked when the user:
■ Logs in at the Partner Portal login screen
■ Selects the New button from the Installed Assets applet in the Customer Portal view
■ Selects New from the Service Items view the business process
Siebel Order Management Guide Addendum for Industry ApplicationsVersion 8.0
59
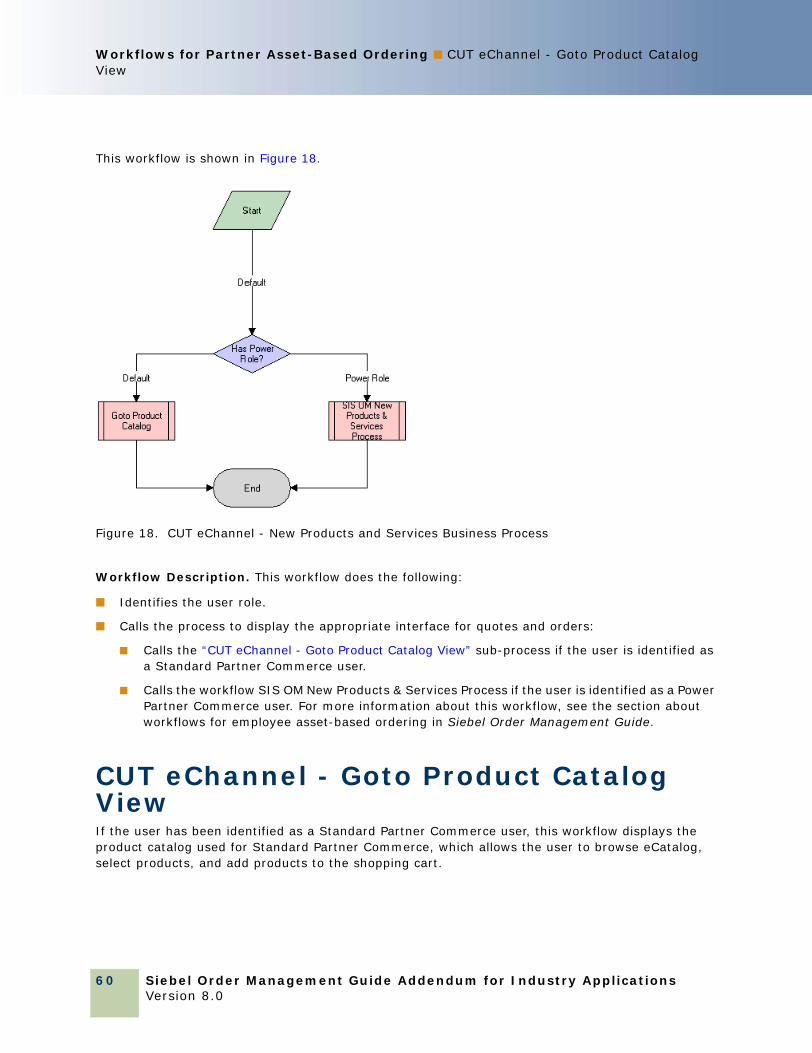
Workflows for Partner Asset-Based Ordering ■ CUT eChannel - Goto Product Catalog View
This workflow is shown in Figure 18.
Workflow Description. This workflow does the following:
■ Identifies the user role.
■ Calls the process to display the appropriate interface for quotes and orders:
■ Calls the “CUT eChannel - Goto Product Catalog View” sub-process if the user is identified as a Standard Partner Commerce user.
■ Calls the workflow SIS OM New Products & Services Process if the user is identified as a Power Partner Commerce user. For more information about this workflow, see the section about workflows for employee asset-based ordering in Siebel Order Management Guide.
CUT eChannel - Goto Product Catalog ViewIf the user has been identified as a Standard Partner Commerce user, this workflow displays the product catalog used for Standard Partner Commerce, which allows the user to browse eCatalog, select products, and add products to the shopping cart.
Figure 18. CUT eChannel - New Products and Services Business Process
Siebel Order Management Guide Addendum for Industry Applications Version 8.0
60

Workflows for Partner Asset-Based Ordering ■ CUT eChannel - Goto Product CatalogView
This workflow is shown in Figure 19.
Workflow Description. This workflow does the following:
■ The user role has already be identified as Standard Partner Commerce user by “CUT eChannel - New Products & Services Process”
■ Displays the product catalog for Standard Partner Commerce users.
Figure 19. CUT eChannel - Goto Product Catalog View Business Process
Siebel Order Management Guide Addendum for Industry ApplicationsVersion 8.0
61

Workflows for Partner Asset-Based Ordering ■ CUT eChannel - Goto Product Catalog View
Siebel Order Management Guide Addendum for Industry Applications Version 8.0
62
7 Customer Asset-Based Ordering
Customers can perform many order management tasks for themselves through the Web using Siebel eSales for CME. These are the same as many tasks that employees perform, such as creating accounts, creating quotes, placing orders, and changing orders. However, they use a different interface, which is suitable for general use through the Web.
This chapter describes customer application user interface. It includes the following sections:
■ “About Customer Asset-Based Ordering” on page 63
■ “Scenario for Customer Asset-Based Ordering” on page 64
■ “Ungrouping Bulk Items in the Shopping Cart (End User)” on page 65
■ “Creating a Modify Order (End User)” on page 66
■ “Creating a Disconnect Order (End User)” on page 66
About Customer Asset-Based OrderingUsing asset-based ordering, customers can perform all the tasks commonly performed using Siebel eSales, including:
■ Creating New Addresses for an Existing Account
■ Adding Items to a Shopping Cart
■ Customizing an Item
■ Saving a Shopping Cart as a Quote or Quote Template
■ Processing an Order Checkout
■ Converting a Quote to an Order
■ Adding Quote Template Items to the Shopping Cart
■ Entering Shipping Information
■ Using Payment Methods
■ Reviewing and Submitting an Order
■ Revising an Order
In addition, the user can perform the following tasks that are specific to asset-based ordering:
■ Account Management Tasks:
❏ “Ungrouping Bulk Items in the Shopping Cart (End User)” on page 65
■ End-User Change Order Tasks:
❏ “Creating a Modify Order (End User)” on page 66
Siebel Order Management Guide Addendum for Industry ApplicationsVersion 8.0
63
Customer Asset-Based Ordering ■ Scenario for Customer Asset-Based Ordering
❏ “Creating a Disconnect Order (End User)” on page 66
For more information about the tasks commonly performed using eSales, see Siebel eSales Administration Guide.
Scenario for Customer Asset-Based OrderingThis scenario provides an example of a process performed by customers of a telecommunications company. Your customers may follow a different process according to your company’s business process.
This scenario describes how customers can:
■ “Create a Quote and Convert it into an Order”
■ “Place a Supplemental Order”
Create a Quote and Convert it into an OrderA telecom analyst for a small corporation wants to establish ten local telephone lines for a new office his company has opened. He accesses the GCI Telecom Web site and enters his username and password to see his company’s account information. He creates a new location and enters details for the new service account for the company’s new office.
Then he launches Siebel Advisor and finds that GCI’s Small Business Enabler bundle is the most cost-effective solution for this customer.
Using Configurator, he customizes the GCI Small Business Enabler bundle of products.
The GCI Small Business Enabler bundle offers five to twenty local telephone lines for $5.99 per month per line, with voice mail and call waiting, and one additional optional feature included in the base price. The GCI Small Business Enabler bundle itself costs $25 per month and includes consolidated billing.
In Configurator, the analyst specifies 10 as the quantity and selects caller ID as the optional feature. He sets up all 10 lines with the same features and clicks Done.
In the shopping cart, he clicks the Checkout button and creates a new sales order.
Place a Supplemental OrderA residential customer receives an email from a GCI marketing campaign, which explains the advantages of GCI’s local phone service and suggests that the customer switch from her current phone company to GCI’s Oregon Local Breakthrough Package. She clicks on the URL provided in the email.
At the Web site, she sees that this package includes a local telephone line, caller Id, and call forwarding. She decides to place the order, selects the package, and configures the service.
Siebel Order Management Guide Addendum for Industry Applications Version 8.0
64

Customer Asset-Based Ordering ■ Ungrouping Bulk Items in the Shopping Cart (EndUser)
She decides to forward calls to her office number after six rings. She also decides to add voice mail service to the base package for an additional $6.95 per month. She clicks Checkout, enters new account and payment information, and confirms the order.
The Siebel application sends the order request to GCI’s provisioning system and sends the customer a confirmation email, which summarizes the purchased service. Twenty minutes later, the customer reads the email and decides that $6.95 per month is too much for voice mail service, so she clicks the link in the email to access the GCI Web site.
At the Web site, she views her order. All the order line items are still open, so she can click the Revise button to create a supplemental order.
The Siebel application marks the original order as inactive and copies it to a new active order with a status of Pending and a revision number of 2. The customer selects the GCI Oregon Local Breakthrough Package, and clicks the Customize button. In the configuration view, she deletes the voice mail feature.
She also decides to change the call forwarding number (which she provided earlier) to her cell phone number, so she selects the forwarding number attribute of the call forwarding service and changes it. Then, she saves the new configuration to the supplemental order and submits the order. She receives a message indicating that her order is confirmed.
Ungrouping Bulk Items in the Shopping Cart (End User)Business users working through the Web frequently need to order customizable items in bulk. For example, a business user may order 20 customizable phone lines for installation at the same location. Rather than configure each instance separately, they can configure the item once and apply the configuration to all the instances. They can then adjust the configuration of individual instances of the item as needed.
To add bulk items to the shopping cart
1 Add a customizable product to the Shopping Cart.
2 Navigate to the Shopping Cart.
3 In the product’s Qty field, enter the quantity.
4 Click Update Quantity.
5 If necessary, select the product’s record.
6 Click Customize.
Selection pages appear that display the customizable components and attributes of the item.
7 Select components and attributes, and then click Done.
The Shopping Cart appears.
8 Verify that the product’s record is selected, and then click Ungroup.
One record is created for each instance of the customizable item.
Siebel Order Management Guide Addendum for Industry ApplicationsVersion 8.0
65

Customer Asset-Based Ordering ■ Creating a Modify Order (End User)
9 To adjust the configuration of an ungrouped instance of the item, click its record, and then click Customize.
Creating a Modify Order (End User)A customer working through the Web can modify a service item that is already provisioned. In this action, the user can change product attributes or a feature or component of the service item.
NOTE: In Siebel eSales for Communications, Media and Energy, orders and services are the same thing. When you select Service Items under the Products & Services tab, you are accessing screens to work with existing orders.
To modify an existing service item
1 In the My Account screen, in the Products & Services list, click Service Items.
The Service Items screen appears.
2 In the Select Account list, if necessary, select the account whose service items will be changed.
You may have to select an account for this service, because one user can have multiple accounts.
3 In the Service Items list, select the item to be changed.
4 Click Modify.
5 When the selection pages appear, change the product attributes, features, or components, as needed.
6 Click Done.
7 When the Shopping Cart appears, you can see the changed action codes.
Creating a Disconnect Order (End User)A customer working through the Web can disconnect a complete service item and all of its components. This action disconnects the parent product and all child products on lower levels of the hierarchy.
You cannot disconnect a child product by itself.
NOTE: In Siebel eSales for Communications, Media and Energy, orders and services are the same thing. When you select Service Items under the Products & Services tab, you are accessing screens to work with existing orders.
To disconnect a service item
1 In the My Account screen, in the Products & Services list, click Service Items.
2 In the Select Account list, select the account.
3 In the Service Items list, select the item to be disconnected.
Siebel Order Management Guide Addendum for Industry Applications Version 8.0
66

Customer Asset-Based Ordering ■ Creating a Disconnect Order (End User)
4 Click Disconnect.
You are taken to the Shopping Cart, where you see the product and all of its components with the Action code of Delete.
5 Click Check Out.
Siebel Order Management Guide Addendum for Industry ApplicationsVersion 8.0
67

Customer Asset-Based Ordering ■ Creating a Disconnect Order (End User)
Siebel Order Management Guide Addendum for Industry Applications Version 8.0
68

8 Workflows for Customer Asset-Based Ordering
This chapter explains the Siebel workflows used for customers’ asset-based order management.
The workflows are grouped in sections that correspond to the business processes that they automate. Each section describes a workflow process and may describe one or more subprocesses that are called by the main process. These are grouped together to shows how the process and its subprocesses are related to each other.
This chapter include the following sections:
■ “About Workflows for Customer Ordering”
■ “Workflows to Process an Order Checkout”
■ “Workflow to Ungroup Quotes”
■ “Workflow to Order a Saved Quote”
■ “Workflow to Edit a Delta Quote Line Item”
■ “Workflows to Revise an Order”
■ “Workflow to Reject an Order”
■ “Workflows to Modify Products and Installed Assets”
■ “Workflow to Disconnect Products and Services”
About Workflows for Customer OrderingWorkflows are a central feature of Siebel Order Management. They automate the business processes associated with managing the cycle of accounts, quotes, orders, and assets.
You can modify these workflows to suit your own business model using Siebel Business Process Designer. For more information, see Siebel Business Process Framework: Workflow Guide.
Many of these processes and subprocesses business service methods that are specific to Order Management. The descriptions of workflows include tables listing the names of any methods they call. For information about these methods, see Siebel Order Management Infrastructure Guide.
Some of these Customer-facing CME workflows can override the functions specified by certain Siebel horizontal subprocesses. These possible overrides are indicated in Table 3.
Table 3. CME Workflows Overrides
CME Customer Workflow Horizontal Subprocess
CUT eSales - Order Quote Process Display Error Message
Siebel Order Management Guide Addendum for Industry ApplicationsVersion 8.0
69

Workflows for Customer Asset-Based Ordering ■ Workflows to Process an Order Checkout
Workflows to Process an Order CheckoutThis group of workflows is used to process an order checkout. It consists of the workflow process and subprocesses:
■ “CUT eSales - Checkout Process” on page 70
■ “CUT eSales - Set Quote Account Info” on page 71
■ “eSales - Enter Shipping Details Process” on page 73
■ “eSales - Save Shipping Address” on page 74
■ “eSales - Set Primary Account Address” on page 75
■ “eSales - Enter Payment Details Process” on page 76
■ “CUT eSales - Bill Me Process” on page 77
■ “eSales - Complete Checkout Process” on page 78
■ “CUT eSales - Prepare Quote Process” on page 80
■ “eSales - Authorize Order Process” on page 81
CUT eSales - Checkout ProcessThis workflow invokes multiple subprocesses to process an order checkout. This workflow is shown in Figure 20.
The user starts this workflow by clicking the Checkout button in the Shopping Cart View.
CUT eSales - Checkout Process Login View
CUT eSales - Prepare Shopping Cart View Display Error Message
Figure 20. CUT eSales - Checkout Process Workflow
Table 3. CME Workflows Overrides
CME Customer Workflow Horizontal Subprocess
Siebel Order Management Guide Addendum for Industry Applications Version 8.0
70

Workflows for Customer Asset-Based Ordering ■ Workflows to Process an OrderCheckout
Workflow Description. This workflow:
1 Checks to determine whether the user is logged in. If not, displays the Log In view and terminates.
NOTE: Set Pending Request is set so that the workflow continues with the checkout process. However, you can configure this stop to redefine the checkout process to meet your business needs.
2 If the user has logged in, the Quote ID is stored in the Current Checkout Quote Profile attribute. The account information is set for the quote.
See “CUT eSales - Set Quote Account Info” on page 71
The checkout process is complete.
CUT eSales - Set Quote Account InfoThis workflow is called to set Quote Account information. This workflow is shown in Figure 21.
The CUT eSales – Check Out Process invokes this workflow.
Workflow Description. This workflow:
1 Retrieves the account associated with the user. If the user does not have an account and the Quote’s ship to account is not specified, counts the number of accounts for which the user is a contact.
Figure 21. CUT eSales - Set Quote Account Info Workflow
Siebel Order Management Guide Addendum for Industry ApplicationsVersion 8.0
71
Workflows for Customer Asset-Based Ordering ■ Workflows to Process an Order Checkout
2 If the user is a contact of more than one account, displays the Select Account View.
The user must select an account.
3 If the user is an account user, or an account is identified as the only account, or it is chosen by the user, fills in the account.
4 If the ship to account is specified, sets the account to be the current account and fills in the Account Id information with the quote.
5 If the service account is empty, sets the service account to be the current account and fills in the Account Id information with the quote.
6 If the billing account is empty, sets the billing account to be the current account and fills in the Account Id information with the quote.
Associated Business Service Methods. The following table shows the steps in this workflow that call business service methods.
Workflow StepBusiness Service Method Called
Get # of Accounts GetBCCount Method
Siebel Order Management Guide Addendum for Industry Applications Version 8.0
72

Workflows for Customer Asset-Based Ordering ■ Workflows to Process an OrderCheckout
eSales - Enter Shipping Details ProcessThis workflow allows a user to specify a destination address for shipping products. This workflow is shown in Figure 22. This workflow is invoked by the eSales - Checkout Process.
Workflow Description. This workflow:
1 Checks to determine whether an address has already been selected
2 If no address has been selected, the workflow checks whether the user is associated with an account, and if so, whether the primary address of the account should be used.
3 If the user is associated with an account but the primary address is not used, the Select Account Address View is displayed. The user chooses an address. After the address is selected, the workflow sets the address as the account address.
4 If the user is not associated with an account, the user’s personal addresses are checked.
5 If the user’s personal address not to be used, and the user’s address book is empty, the Personal Shipping View is displayed. The user enters a shipping address.
6 If the address book is not empty, the Select Personal Address View is displayed and the user selects an existing address. The selected address is set as the user’s personal address.
Figure 22. eSales - Enter Shipping Details Workflow
Siebel Order Management Guide Addendum for Industry ApplicationsVersion 8.0
73
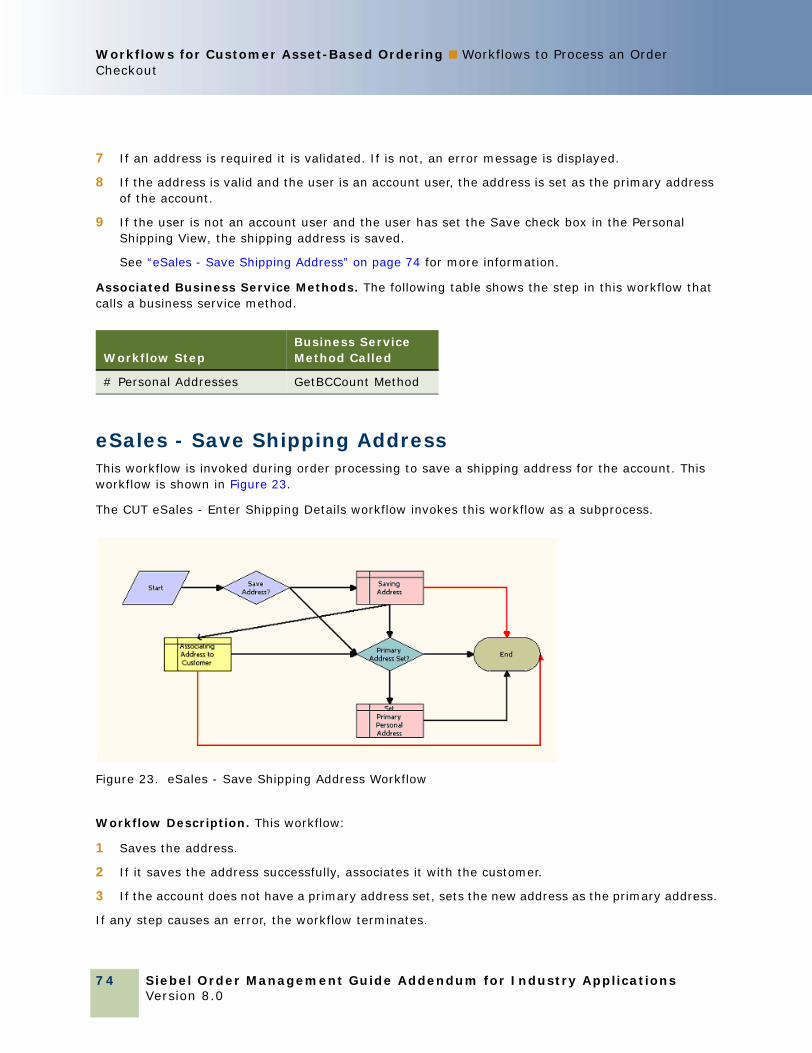
Workflows for Customer Asset-Based Ordering ■ Workflows to Process an Order Checkout
7 If an address is required it is validated. If is not, an error message is displayed.
8 If the address is valid and the user is an account user, the address is set as the primary address of the account.
9 If the user is not an account user and the user has set the Save check box in the Personal Shipping View, the shipping address is saved.
See “eSales - Save Shipping Address” on page 74 for more information.
Associated Business Service Methods. The following table shows the step in this workflow that calls a business service method.
eSales - Save Shipping AddressThis workflow is invoked during order processing to save a shipping address for the account. This workflow is shown in Figure 23.
The CUT eSales - Enter Shipping Details workflow invokes this workflow as a subprocess.
Workflow Description. This workflow:
1 Saves the address.
2 If it saves the address successfully, associates it with the customer.
3 If the account does not have a primary address set, sets the new address as the primary address.
If any step causes an error, the workflow terminates.
Workflow StepBusiness Service Method Called
# Personal Addresses GetBCCount Method
Figure 23. eSales - Save Shipping Address Workflow
Siebel Order Management Guide Addendum for Industry Applications Version 8.0
74

Workflows for Customer Asset-Based Ordering ■ Workflows to Process an OrderCheckout
eSales - Set Primary Account AddressThis workflow (shown in Figure 24) allows the user to specify a primary account.
Workflow Description.
1 Checks for a primary account address.
2 If there is not a primary account address, sets the specified account address as the primary account address.
Figure 24. eSales - Set Primary Account Address Workflow
Siebel Order Management Guide Addendum for Industry ApplicationsVersion 8.0
75

Workflows for Customer Asset-Based Ordering ■ Workflows to Process an Order Checkout
eSales - Enter Payment Details ProcessThis workflow allows the user to specify the type of payment: Credit Card, Purchase Order, or Bill to address. This workflow is shown in Figure 25. The eSales - Complete Checkout Process invokes this workflow.
Workflow Description.
1 Checks the caller workflow. If an error message was passed by the caller workflow, the payment must be reselected.
2 If a payment option has already been selected, it is verified.
3 If the user has a primary credit card, it is automatically selected as the payment option.
4 Checks to determine whether the user has a Purchase Order approved account.
5 If not, retrieves the user’s credit card information.
6 If a credit card is not specified for the user, displays the Standard Payment View.
7 If the user has one or more credit cards specified or has a Purchase order approved account, displays the Select Payment View.
The user selects to make payment by Purchase Order, Credit Card, or request to be billed.
8 If the user chooses to be billed, the Bill Me Process is invoked.
Bill Me applet is only displayed if the following two conditions are met:
Figure 25. eSales - Enter Payment Details Process Workflow
Siebel Order Management Guide Addendum for Industry Applications Version 8.0
76

Workflows for Customer Asset-Based Ordering ■ Workflows to Process an OrderCheckout
a The application definition is CME eSales (evaluated at the applet level)
b At least one of the products in the shopping cart is a service item as defined in the Product Administration.
See “CUT eSales - Bill Me Process” on page 77.
9 If the user selects credit card as the payment method, the purchase order number is cleared and the selected credit card details are retrieved.
10 If the user selects purchase order as the payment method, the credit card details are cleared and the purchase order payment method is set.
11 If the user chooses Continue in the Standard Payment View, the purchase order number is cleared.
12 The payment method is validated. If it is not valid, an error message is displayed.
13 If the credit card is valid, it is saved in the user’s profile.
CUT eSales - Bill Me ProcessThis workflow determines whether an address can be identified for billing the user. This workflow is shown in Figure 26. The CUT eSales - Enter Payment Details Process invokes this workflow as a subprocess.
Workflow Description. This workflow:
1 Clears any credit card or purchase order details.
2 If the user is not associated with an account, gets the address from the address book and sets this as the billing address.
NOTE: This information will be used to create a billing account for the user.
3 If the user is an account user but a billing account is not identified for the user, displays the Select Billing Account view. The user selects the billing account to be used.
Figure 26. CUT eSales - Bill Me Process Workflow
Siebel Order Management Guide Addendum for Industry ApplicationsVersion 8.0
77

Workflows for Customer Asset-Based Ordering ■ Workflows to Process an Order Checkout
4 Once a billing account is identified for the user, if an address cannot be identified for that account, displays the Select Billing Account Address View.
The user enters a billing address.
5 Validates the address by checking for required fields. If the fields are not filled in, displays an error message.
The user must enter a valid address.
Associated Business Service Methods. The following table shows the step in this workflow that calls a business service method.
eSales - Complete Checkout ProcessDisplaying the Order Summary View, this workflow allows the user to change the shipping details and payment details, cancel the order, or confirm the order. If the user decides to continue shopping, the Shopping Cart View is displayed. If the user decides to cancel the order, the Home Page view is displayed. If the user decides to continue with the order and depending upon the order items, the CUT eSales – Auto Select Billing, Service Accounts Process, and CUT eSales – Authorize Order Process are triggered to complete the ordering process. This workflow is shown in Figure 27.
Workflow StepBusiness Service Method Called
Primary Billing Account SelectPrimary Method
Siebel Order Management Guide Addendum for Industry Applications Version 8.0
78

Workflows for Customer Asset-Based Ordering ■ Workflows to Process an OrderCheckout
The CUT eSales - Checkout Process invokes this workflow.
Workflow Description. This workflow:
1 Explodes any item in the Shopping Cart that has quantity of more than one. The items are exploded into multiple items with a quantity of one.
CAUTION: If customers are expecting orders with large quantities, orders with quantities over 200, then the Explode step should be moved to after the Submit order as performance can be adversely impacted by exploding large quantities.
2 Checks to determine whether any products are to be shipped and if so, calculates the shipping costs.
3 Calculates the taxes and if there is an error, the user must re-enter shipping details.
4 Saves the error message returned by the ‘Calculated Taxes’ step.
5 If the tax calculation is successful, displays the Order Summary View.
The user indicates whether to change shipping details, change payment details, proceed with the order, or cancel the checkout.
6 If the user chooses to change the shipping details, invokes the Enter Payment Details subprocess.
See “eSales - Save Shipping Address” on page 74 for more information.
7 If the user chooses to cancel the checkout, returns the user to the Home Page or to the Shopping Cart View depending upon whether the checkout was initiated from a Quote or the Shopping Cart.
Figure 27. eSales - Complete Checkout Process Workflow
Siebel Order Management Guide Addendum for Industry ApplicationsVersion 8.0
79

Workflows for Customer Asset-Based Ordering ■ Workflows to Process an Order Checkout
8 If the user chooses to continue with the Order, invokes the Prepare Quote and Authorize Order processes to complete the checkout.
See “eSales - Complete Checkout Process” on page 78 and “eSales - Authorize Order Process” on page 81 for more information.
CUT eSales - Prepare Quote ProcessThis workflow is invoked as a subprocess to generate and return the necessary event information for the order. This workflow is shown in Figure 28.
The eSales - Complete Checkout Process invokes this workflow as a subprocess.
Workflow Description. This workflow:
1 Checks to determine whether any item in the shopping cart is a service instance. If not, it terminates.
Figure 28. CUT eSales - Prepare Quote Process Workflow
Siebel Order Management Guide Addendum for Industry Applications Version 8.0
80

Workflows for Customer Asset-Based Ordering ■ Workflows to Process an OrderCheckout
2 Checks to determine whether the user is associated with an account or not. If the user does not have an account, creates a customer account for the user (based on the shipping and billing address provided earlier in the checkout process) and sets the quote’s billing and service accounts to this new account.
3 If the user is an account user, selects the billing and service account and displays them in the Quote Summary View.
The user can accept the selected accounts and confirm the order by clicking Submit or choose to edit the accounts.
4 If the user chooses to edit the accounts, displays the User Select Service and Billing Account View.
The user selects the required service and billing accounts.
5 Getting Account information.
a If there are no changes to the Service and Billing Account fields (they are still NULL), their default values become the service and billing information included in the Order header.
b If either the Service or Billing Account fields are changed, the current (non-NULL) value is kept.
Associated Business Service Methods. The following table shows the steps in this workflow that call business service methods.
eSales - Authorize Order ProcessThis workflow verifies payment details and creates a credit card order or purchase order. Then it sends an order approved email and displays the Order Confirmation View. This workflow is shown in Figure 29.
Workflow StepBusiness Service Method Called
Creating Customer Account CreateOrder Method
Rolling Down Account Info to Line Items SetLIAccounts Method
Siebel Order Management Guide Addendum for Industry ApplicationsVersion 8.0
81

Workflows for Customer Asset-Based Ordering ■ Workflow to Ungroup Quotes
The eSales - Complete Checkout Process invokes this workflow as a subprocess.
Workflow Description. This workflow:
1 Checks the payment method selected by the user.
2 If the user has chosen to pay by purchase order, checks to determine whether any auctioned items are included in the order or not. If not, creates a purchase order.
3 If the user has elected to pay by credit card, authorizes the credit card. If it is not authorized, invokes the Enter Payment subprocess.
4 The user specifies an another payment method.
5 If the user chooses to pay using an authorized credit card, the workflow creates a credit card order and emails a confirmation email to the user.
6 Explodes order line items, creating multiple copies of a line item for any line item with a quantity greater than 1.
Workflow to Ungroup QuotesThis workflow is used to ungroup items of a quote (shopping cart):
■ “CUT eSales - Ungroup Quote” on page 82
CUT eSales - Ungroup QuoteThis workflow decomposes all or some line items into multiple instances with a quantity of one where the quantity is greater than 1. This workflow is shown in Figure 30.
Figure 29. eSales - Authorize Order Process Workflow
Siebel Order Management Guide Addendum for Industry Applications Version 8.0
82

Workflows for Customer Asset-Based Ordering ■ Workflow to Ungroup Quotes
The end user starts this workflow by clicking the Ungroup button in the Shopping Cart View.
Ungrouping Selected Line ItemsIf any line items are selected when the end user clicks the Ungroup button, FrameEventMethodUgroupSelected is called to ungroup only those selected line items. This workflow decomposes the root item, associated with the selected item, and all its children into multiple instances, each with a quantity of one where the original quantity is greater than 1.
Ungrouping All Line ItemsIf not line items are selected when the end user clicks the Ungroup button, FrameEventMethodUngroupAll is called to ungroup all the line items.
NOTE: If this workflow variations used, you must change the configuration by removing the select item column from the shopping cart.
The user starts this workflow by clicking the Ungroup button in the Shopping Cart View when a line item is selected.
Figure 30 represents both variations of the workflow.
Workflow Description. This workflow:
1 If a quote line item is selected, retrieves the Id associated with the root level item.
2 Reads the quote from the database.
3 If the quantity of any component of the selected line item or all line items if none is selected, is greater than 1, creates multiple copies of that line item each with a quantity of one.
4 If the quote is not fully ungrouped or exploded, terminates.
5 Otherwise, writes line items to the database and refreshes the Shopping Cart View.
Figure 30. CUT eSales - Ungroup Quote Workflow
Siebel Order Management Guide Addendum for Industry ApplicationsVersion 8.0
83

Workflows for Customer Asset-Based Ordering ■ Workflow to Order a Saved Quote
Associated Business Service Methods. The following table shows the steps in this workflow that call business service methods.
Workflow to Order a Saved QuoteThis workflow allows a user to order a saved quote. It consists of a single workflow process:
■ “CUT eSales - Order Quote Process” on page 84
CUT eSales - Order Quote ProcessThis workflow creates an Order from the current Quote copying the line items from the Quote to the Order.This workflow is shown in Figure 31.
The user invokes this workflow by clicking the Order button in the eSales application Quote Detail View.
Workflow Description. This workflow:
1 Checks to determine whether the quote has expired or not. If not, invokes the Checkout process.
See “CUT eSales - Checkout Process” on page 70 for more information.
2 If the quote has expired, invokes the Order Quote subprocess.
Workflow to Edit a Delta Quote Line ItemThis workflow allows a user to edit a delta quote line item. It consists of a single workflow process:
■ “CUT eSales - Edit Delta Quote Line Item” on page 85
Workflow Step Business Service Method Called
Explode Explode Method
Figure 31. CUT eSales - Order Quote Process Workflow
Siebel Order Management Guide Addendum for Industry Applications Version 8.0
84

Workflows for Customer Asset-Based Ordering ■ Workflows to Revise an Order
CUT eSales - Edit Delta Quote Line ItemThis workflow applies open and pending orders to the asset associated with the selected line item and displays the asset in the Product Configurator view. The user makes changes to define the newly requested state and clicks the Done button. The workflow writes the delta of the current and requested states of the asset to the current quote as 1 or more line items. This workflow is shown in Figure 32.
A user starts this workflow by clicking Customize in the Quote Detail view.
Workflow Description. This workflow does the following:
1 Calls SIS OM Edit Delta Quote Line Item to do configuration.
2 Returns to shopping cart.
Workflows to Revise an OrderThis group of workflows allows a user to display the latest version of a revised order. It consists of the workflow process and subprocess:
■ “CUT eSales - Revise Order Process” on page 85
■ “CUT eSales - Goto Revise Order View” on page 86
CUT eSales - Revise Order ProcessThis workflow invokes a subprocess to refresh the display. This workflow is shown in Figure 33.
Workflow Description. This workflow:
1 When the workflow starts, it invokes Get Order Number.
2 Get Order Number invokes Query For Revised Record.
Figure 32. CUT eSales - Edit Delta Quote Line Item Workflow
Figure 33. CUT eSales - Revise Order Process Workflow
Siebel Order Management Guide Addendum for Industry ApplicationsVersion 8.0
85

Workflows for Customer Asset-Based Ordering ■ Workflow to Reject an Order
3 Query For Revised Record invokes Goto Order Revision View.
The new view appears.
CUT eSales - Goto Revise Order ViewThis workflow displays the Revise Order view. This workflow is shown in Figure 34.
The CUT eSales - Revise Order Process workflow invokes this workflow automatically to display the revised order view.
Workflow Description. This workflow:
1 Retrieves the order number of the revised order.
2 Retrieves the latest revision of that order.
3 Displays this revision in the Order Revision View.
NOTE: Revising orders that are PO approved does not reevaluate the PO approval amount.
Workflow to Reject an OrderThis workflow allows a purchasing manager or delegated administrator to reject an order. It consists of a single workflow process:
■ “eSales - Reject Order Process” on page 86
eSales - Reject Order ProcessThis workflow is called to process an order that is rejected by a power user (delegated administrator or purchasing manager). This workflow is shown in Figure 35.
Figure 34. CUT eSales - Goto Revise Order View Workflow
Siebel Order Management Guide Addendum for Industry Applications Version 8.0
86

Workflows for Customer Asset-Based Ordering ■ Workflows to Modify Products andInstalled Assets
The user starts this workflow by clicking the Reject button on the Order Approval View.
Workflow Description. This workflow:
1 Checks the type of user that is rejecting the order.
2 If the user is not a power user (not a Purchasing Manager or Delegated Administrator), displays a message and terminates.
3 If the user is a power user, displays the Add Comments View.
The user enters comments explaining why the order is being rejected or cancels the process.
4 If the user does not cancel the process, sets the order status to Rejected.
5 Sends an email to the contact associated with the order, informing them of the rejection.
6 Returns the user to the Order Approval View.
Workflows to Modify Products and Installed AssetsThis group of workflows is used to modify products and installed assets. It consists of the workflow process and subprocess:
■ “CUT eSales - Modify Products and Services Process” on page 88
■ “CUT eSales - Prepare Shopping Cart Process” on page 91
Figure 35. CUT eSales - Reject Order Process Workflow
Siebel Order Management Guide Addendum for Industry ApplicationsVersion 8.0
87
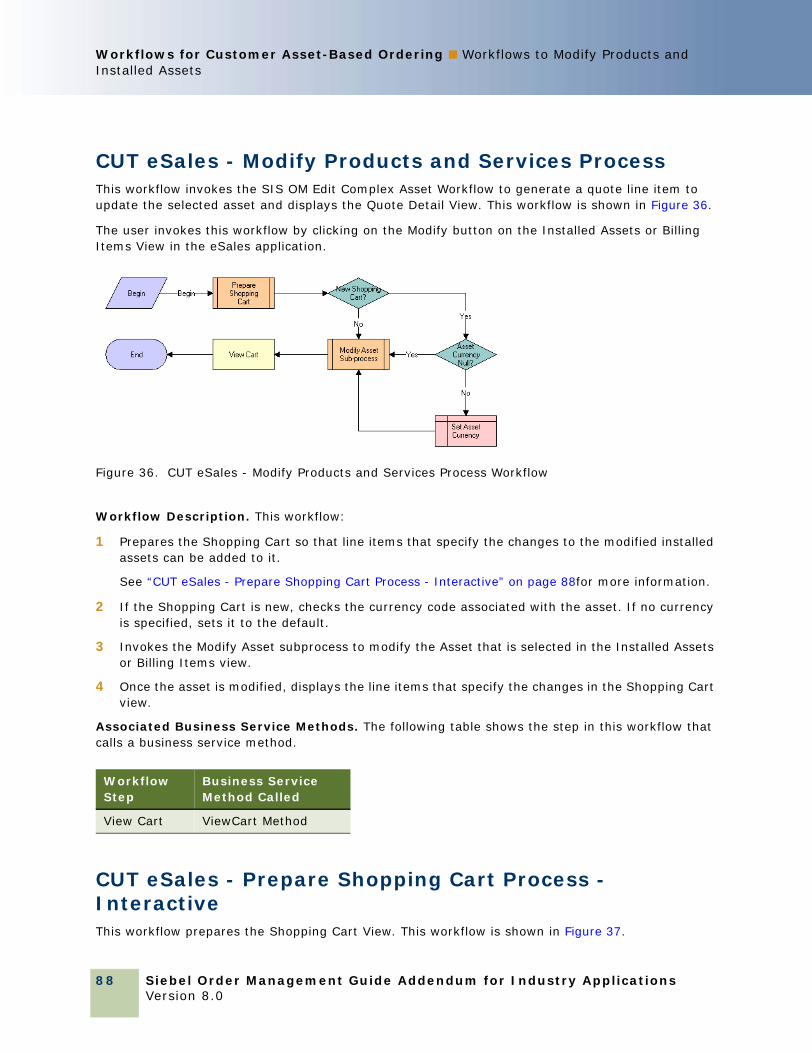
Workflows for Customer Asset-Based Ordering ■ Workflows to Modify Products and Installed Assets
CUT eSales - Modify Products and Services ProcessThis workflow invokes the SIS OM Edit Complex Asset Workflow to generate a quote line item to update the selected asset and displays the Quote Detail View. This workflow is shown in Figure 36.
The user invokes this workflow by clicking on the Modify button on the Installed Assets or Billing Items View in the eSales application.
Workflow Description. This workflow:
1 Prepares the Shopping Cart so that line items that specify the changes to the modified installed assets can be added to it.
See “CUT eSales - Prepare Shopping Cart Process - Interactive” on page 88for more information.
2 If the Shopping Cart is new, checks the currency code associated with the asset. If no currency is specified, sets it to the default.
3 Invokes the Modify Asset subprocess to modify the Asset that is selected in the Installed Assets or Billing Items view.
4 Once the asset is modified, displays the line items that specify the changes in the Shopping Cart view.
Associated Business Service Methods. The following table shows the step in this workflow that calls a business service method.
CUT eSales - Prepare Shopping Cart Process - InteractiveThis workflow prepares the Shopping Cart View. This workflow is shown in Figure 37.
Figure 36. CUT eSales - Modify Products and Services Process Workflow
Workflow Step
Business Service Method Called
View Cart ViewCart Method
Siebel Order Management Guide Addendum for Industry Applications Version 8.0
88

Workflows for Customer Asset-Based Ordering ■ Workflows to Modify Products andInstalled Assets
The CUT eSales - Modify Products and Services Process invokes this workflow.
Workflow Description. This workflow:
1 Checks the status of the current Shopping Cart. If the shopping cart is empty, creates a new quote (shopping cart).
2 If the shopping cart is not empty and is not associated with an account, sets the quote account to the account to which the asset being modified belongs. Then, it terminates.
3 If the shopping cart is not empty and has an associated account, determines if the quote’s master account matches the master account to which the asset being modified belongs. If the master accounts are the same, it terminates.
4 If the master accounts are not the same, displays the Modify Asset Confirmation View.
The user can save the existing cart, discard it, or cancel the Modify process.
5 If the user decides to cancel, displays the Installed Assets or Billing Items View depending on where the original process was invoked.
6 If the user decides to save, saves cart. If an error occurs, displays an error message and returns the user to the Modify Asset Confirmation View. If the cart is saved successfully, creates a new quote.
7 If the user decides to discard the cart, creates a new quote.
8 Sets the quote’s account to the account to which the asset being modified belongs.
For more information, see “CUT eSales - Modify Products and Services Process” on page 88.
Figure 37. CUT eSales - Prepare Shopping Cart Process - Interactive Workflow
Siebel Order Management Guide Addendum for Industry ApplicationsVersion 8.0
89
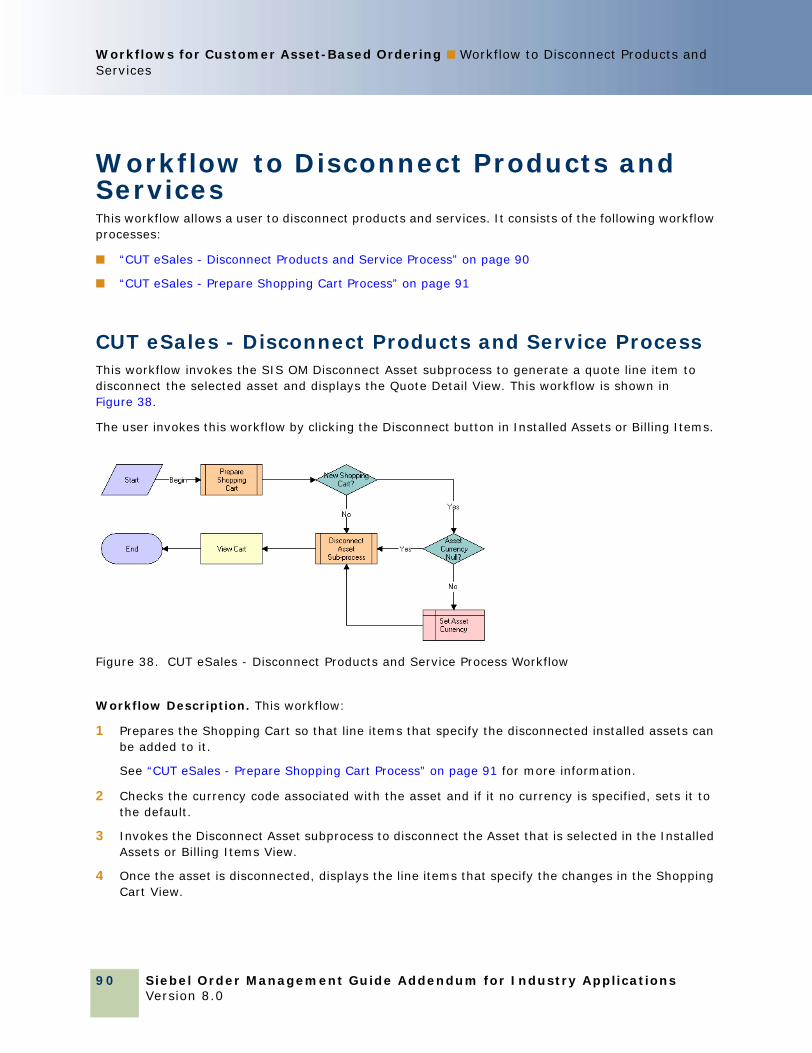
Workflows for Customer Asset-Based Ordering ■ Workflow to Disconnect Products and Services
Workflow to Disconnect Products and ServicesThis workflow allows a user to disconnect products and services. It consists of the following workflow processes:
■ “CUT eSales - Disconnect Products and Service Process” on page 90
■ “CUT eSales - Prepare Shopping Cart Process” on page 91
CUT eSales - Disconnect Products and Service ProcessThis workflow invokes the SIS OM Disconnect Asset subprocess to generate a quote line item to disconnect the selected asset and displays the Quote Detail View. This workflow is shown in Figure 38.
The user invokes this workflow by clicking the Disconnect button in Installed Assets or Billing Items.
Workflow Description. This workflow:
1 Prepares the Shopping Cart so that line items that specify the disconnected installed assets can be added to it.
See “CUT eSales - Prepare Shopping Cart Process” on page 91 for more information.
2 Checks the currency code associated with the asset and if it no currency is specified, sets it to the default.
3 Invokes the Disconnect Asset subprocess to disconnect the Asset that is selected in the Installed Assets or Billing Items View.
4 Once the asset is disconnected, displays the line items that specify the changes in the Shopping Cart View.
Figure 38. CUT eSales - Disconnect Products and Service Process Workflow
Siebel Order Management Guide Addendum for Industry Applications Version 8.0
90

Workflows for Customer Asset-Based Ordering ■ Workflow to Disconnect Products andServices
Associated Business Service Methods. The following table shows the steps in this workflow that calls a business service method.
CUT eSales - Prepare Shopping Cart ProcessThis workflow is identical to “CUT eSales - Prepare Shopping Cart Process” on page 91, except that it does not use the Interactive Flow workflow mode.
Workflow Step
Business Service Method Called
View Cart ViewCart Method
Siebel Order Management Guide Addendum for Industry ApplicationsVersion 8.0
91

Workflows for Customer Asset-Based Ordering ■ Workflow to Disconnect Products and Services
Siebel Order Management Guide Addendum for Industry Applications Version 8.0
92
9 Setting Up Network Ordering
This chapter describes how to set up network ordering. It includes the following sections:
■ “About Network Ordering” on page 93
■ “Process of Defining Network Compound Products” on page 95
■ “Defining Products for the Network” on page 95
■ “Defining Rule Checker Business Services” on page 97
■ “Defining Maximum and Minimum Quantities for Network Components” on page 98
■ “Defining Simple Expression Rules for Compound Products” on page 99
■ “Setting Up Premises” on page 100
■ “About the Compound Product Validation Engine” on page 101
■ “Example of Defining Network Compound Products” on page 104
■ “About Creating Custom Rule Checkers” on page 111
NOTE: In addition to the tasks described in this chapter, to set up network ordering, you must activate the appropriate workflows, as described in “Activating Workflows for Order Management for Industry Applications” on page 12.
About Network OrderingThe network order entry process is used to configure products that are too large to be configured in real time with Siebel Configurator.
Large telecommunications networks might have 500 nodes and 1,000 connections, with each of these components having about 30 attributes.
Siebel Configurator can be used for small telecommunications networks, up to about one-hundredth of the size mentioned in the previous paragraph. However, Configurator validates configuration in real time, and configuring large networks requires so much processing that real-time validation is not possible.
Network order entry solves this problem by:
■ Partitioning the network into a number of components.
■ Using Configurator to validate configuration of individual components in real time.
■ Using the Compound Product Validation Engine to validate cross-component rules only at key times, such as when the user clicks the Validate button.
Siebel Order Management Guide Addendum for Industry ApplicationsVersion 8.0
93

Setting Up Network Ordering ■ About Network Ordering
For example, Figure 39 illustrates part of a network that uses a frame relay as its network product and several ports and PVCs as its components. The network and its components are all defined as separate products. A foreign key field in the component products relates them to the network product. Configurator can be used to validate the configuration of the individual network product and component products. The Compound Product Validation Engine validates the network across products.
The Compound Product Validation Engine validates the network across components by applying rules, such as:
■ A multipoint service must have at least two Ports and at least one PVC.
■ There can only be one connection between any two Ports.
■ The To and From Ports for a connection must exist in the multipoint service.
■ The sum of the bandwidth attribute for all PVCs connected to a Port cannot exceed the speed attribute of the Port.
Network order entry partitions the network into multiple components:
■ Siebel Configurator handles intra-component validation rules.
■ Business services handle validation rules for the entire multi-component network. These business services are run by workflows that can be customized.
Figure 39. A Network and Its Components Are All Defined As Separate Products
Siebel Order Management Guide Addendum for Industry Applications Version 8.0
94

Setting Up Network Ordering ■ Process of Defining Network Compound Products
Process of Defining Network Compound ProductsA network is defined as a compound product, which is a loose group of products tied together by a common key. Three types of components make up the compound product structure:
■ Network. This is the product where one defines values that apply across the entire network. It is the root network product
■ Network Node. A point or a location within a network.
■ Network Connection. A circuit connecting two points within a network.
Each of these Network Product Components is a self-contained product that can be modeled as a customizable product, so users can configure each component of the network individually using Siebel Configurator. The Compound product structure allows us to validate across all these individual products; this is called cross-element validation.
To define a network as products, perform the following tasks:
1 “Defining Products for the Network” on page 95. Define the network root product, the network node product, and the network connection product
2 “Defining Rule Checker Business Services” on page 97. Define the business services which should be invoked to validate the compound product
3 “Defining Maximum and Minimum Quantities for Network Components” on page 98. Optionally, define maximum and minimum quantities required for components.
4 “Defining Error Messages for Compound Product Rules” on page 99. Create error messages to be used by the simple expression rules created in the next step.
5 “Defining Simple Expression Rules for Compound Products” on page 99. Create simple expression rules that validate the entire network and display messages if they are errors.
Defining Products for the NetworkYou must define all the network elements as products, including the network product and the network components.
This task is a step in “Process of Defining Network Compound Products” on page 95.
Defining the Network ProductYou can define the network product for network ordering (for example, the frame relay) in the same way you define other customizable products using the Customizable Products view of the Administration - Products screen, but you must enter information in additional fields.
Configurator rules are not required but can be used if needed.
For more information about defining customizable products, see Siebel Product Administration Guide.
Siebel Order Management Guide Addendum for Industry ApplicationsVersion 8.0
95

Setting Up Network Ordering ■ Process of Defining Network Compound Products
To define the network product
1 Navigate to the Administration - Product screen.
2 In the Products list, add a new record and define the product as you would define other products. In addition, use the fields of the More Info form described in the following table.
Defining Network Components as ProductsWhen customers order networks, your salespeople will add nodes and connections to the network, for example, ports and PVCs.
You must set up each of these products using Administration - Products > Customizable Products > Product Designer and Rule Designer to make sure that they choose only valid combinations of features for each node and connection.
To allow the salesperson to add these components to the network, you must:
■ Create product records for all the different types of nodes and connections that you sell as network components.
■ Model each node as an individual customizable product. For example, you may create a product for Port that has Installation and Local Access Line as child components. The Network Element Type of the root of the Customizable Product must be set to Network Node. Note that the Compound Product Flag should not be set.
■ Model each connection as an individual customizable product. For example, you may create a product for PVC with components that include CIR, Diversity, and so on. The Network Element Type of the root of the Customizable Product must be set to Network Connection. Note that the Compound Product Flag should not be set.
■ Set up Configurator rules defining valid combinations of features for each of these ports, accesses, and PVCs.
For more information about creating products and configuration rules, see Siebel Product Administration Guide.
To define the network components as products
1 Navigate to the Administration - Product screen.
Field Comments
Compound Product
Select this checkbox to define this as a compound product.
Network Element Type
Select Network.
Siebel Order Management Guide Addendum for Industry Applications Version 8.0
96
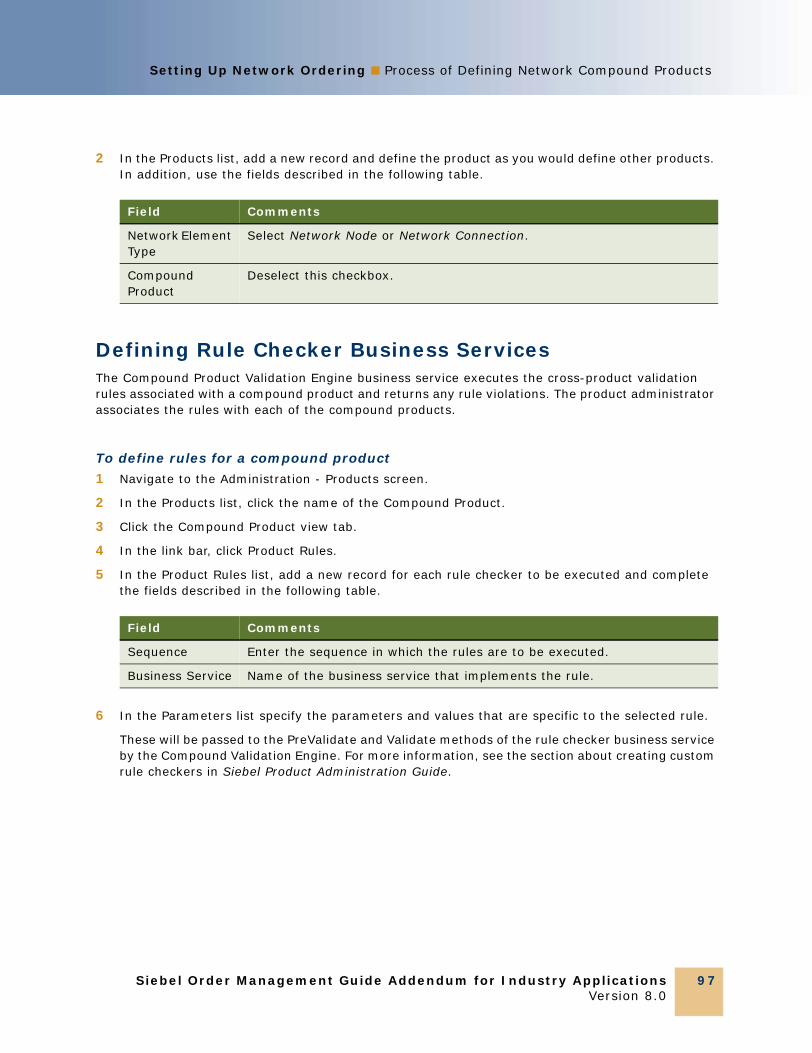
Setting Up Network Ordering ■ Process of Defining Network Compound Products
2 In the Products list, add a new record and define the product as you would define other products. In addition, use the fields described in the following table.
Defining Rule Checker Business ServicesThe Compound Product Validation Engine business service executes the cross-product validation rules associated with a compound product and returns any rule violations. The product administrator associates the rules with each of the compound products.
To define rules for a compound product
1 Navigate to the Administration - Products screen.
2 In the Products list, click the name of the Compound Product.
3 Click the Compound Product view tab.
4 In the link bar, click Product Rules.
5 In the Product Rules list, add a new record for each rule checker to be executed and complete the fields described in the following table.
6 In the Parameters list specify the parameters and values that are specific to the selected rule.
These will be passed to the PreValidate and Validate methods of the rule checker business service by the Compound Validation Engine. For more information, see the section about creating custom rule checkers in Siebel Product Administration Guide.
Field Comments
Network Element Type
Select Network Node or Network Connection.
Compound Product
Deselect this checkbox.
Field Comments
Sequence Enter the sequence in which the rules are to be executed.
Business Service Name of the business service that implements the rule.
Siebel Order Management Guide Addendum for Industry ApplicationsVersion 8.0
97

Setting Up Network Ordering ■ Process of Defining Network Compound Products
The rule-checker business services that are available without any customization of the product are shown in Table 4.
Defining Maximum and Minimum Quantities for Network ComponentsThe component cardinality checker business service allows product administrators to specify the maximum and minimum quantities of the network product and of the network components.
This task is a step in “Process of Defining Network Compound Products” on page 95.
To define maximum and minimum quantities for network components
1 Navigate to the Administration - Product screen.
2 In the Products list, click the name of the product that was defined as the compound product for the network.
3 Click the Compound Products view tab.
4 In the link bar, click Cardinality Rules.
The Compound Product Cardinality Rules list includes all the products that are valid components of this network.
5 Click New to add a component to the compound product and complete the fields described in the following table.
NOTE: You must also include the compound product itself in this list, with Min Qty of 1 and Max Qty of 1.
Table 4. Business Services for Checking Compound Product Validation Rules
Business Service Comments
VORD CPVE Component Cardinality Checker Service
The Cardinality Checker validates that the quantity of network component falls within the minimum and maximum allowed.
VORD CPVE Simple Validation Expression Checker Service
The Simple Validation Expression Checker executes rules defined in Siebel Query Language.
Field Comments
Min Qty Enter the minimum quantity required for this component.
Max Qty Enter the maximum quantity required for this component. If this field is blank, an unlimited quantity of this component is allowed.
Siebel Order Management Guide Addendum for Industry Applications Version 8.0
98
Setting Up Network Ordering ■ Process of Defining Network Compound Products
Defining Error Messages for Compound Product RulesBefore you create simple expression rules for compound products, you must use the Unified Messaging Service to define the error messages that these rules display.
For more information about using the Unified Messaging Service to define messages, see Siebel Order Management Infrastructure Guide.
This task is a step in “Process of Defining Network Compound Products” on page 95.
To define error messages for compound product rules
1 Navigate to the Administration - Order Management screen > Message Types view.
2 In the All Message Types list, add a new record and complete the necessary fields, as described in Siebel Order Management Infrastructure Guide.
The message that you enter in the Full Text field is displayed.
Defining Simple Expression Rules for Compound ProductsThe simple expression checker business service allows product administrators to use Siebel Query Language to create simple expressions that are used to validate a compound product.
This task is a step in “Process of Defining Network Compound Products” on page 95.
For each rule, you define a simple expression and select an error message that you defined using the Unified Messaging Service. If the expression is true, the application displays the error message to the end user and the compound product is invalid.
For more information about Oracle’s Siebel Query Language, see the section about operators, expressions, and conditions in Siebel Developer’s Reference.
To define simple expression rules for compound products
1 Navigate to the Administration - Product screen.
2 In the Products list, click the name of the product that was defined as the compound product for the network.
3 Click the Compound Products view tab.
4 In the link bar, click Simple Validation Expression Rules.
Siebel Order Management Guide Addendum for Industry ApplicationsVersion 8.0
99

Setting Up Network Ordering ■ Setting Up Premises
5 In the Compound Products list, add one or more new records and complete the necessary fields. Some fields are described in the following table.
Setting Up PremisesThis task is optional. It automatically populates fields when the salesperson captures the customer's network locations or creates the customer’s network. When creating a network node a salesperson will enter the locations Service Address, and the application populates the LATA, CLLI, and other fields based on what you enter when you set up premises.
NOTE: This data can also be entered by the end user in the Address Profile view of the Accounts screen.
To set up premises
1 Navigation to the Administration - Data screen.
2 On the link bar, click Premises.
Field Comments
Sequence Enter the sequence in which the rules are executed.
Message Select the error message that is displayed if the expression is true.
Search Expression
Enter an expression in Oracle’s Siebel Query Language.
The expression can refer to fields in the following business components.
■ Asset Mgmt – Asset
■ Asset Mgmt - Asset XA
■ Quote Item
■ Order Item XA
■ Order Entry – Line Item
■ Order Item XA
Aggregate Function
Enter the type of query to be run. Valid values are Count, Sum, Min, Max, and Avg.
Aggregate Field If the expression uses an aggregate function of Sum, Min, Max, or Avg enter the name of the field to aggregate.
Group By Fields If the expression uses an aggregate function, optionally enter a comma separated list of fields by which to group the Aggregate function.
Having Expression
If the expression uses an aggregate function, enter an expression that must be met to generate an error. For example, if you use the [Count] function to count the number of records with an error, you would not want to generate an error message when [Count] = 0, so in this field, you should enter [Count] >= 1.
Siebel Order Management Guide Addendum for Industry Applications Version 8.0
100

Setting Up Network Ordering ■ About the Compound Product Validation Engine
3 In the All Premises list, add a new record.
4 In the More Info form, click the More button.
5 Fill out the necessary information in the record and More Info form. Some fields are described in the following table.
About the Compound Product Validation Engine The Compound Product Validation Engine executes validation rules that cross product instances.
A compound product is a group of product instances in quote, order and asset tables that share a common key. A frame relay network is a good example of a compound product.
The Compound Product Validation Engine allows you to create rules that operate on a projected future state of a compound product that includes the current quote and any open orders on the existing assets. This future state is created and stored in the Projected Asset Cache object.
Field Comments
Prefix Enter the area code and first three digits of the telephone number for this location.
CLLI Enter the Common Language Location Identifier (CLLI) code. This standard is used primarily in the United States.
LATA Enter the Local Access and Transport Area (LATA). This is a term used in the United States defining a geographic area overed by a local telephone carrier.
Rate Center Enter the rate center. A rate center is a geographic area that contains one or more particular NPA/NXX codes. A rate center helps determine the cost of to/from traffic between two points.
Local Operating Company
Select the local telecommunications service provider. The dialog box displays all accounts where Wireline Operating Company is in the Account Type field.
Siebel Order Management Guide Addendum for Industry ApplicationsVersion 8.0
101
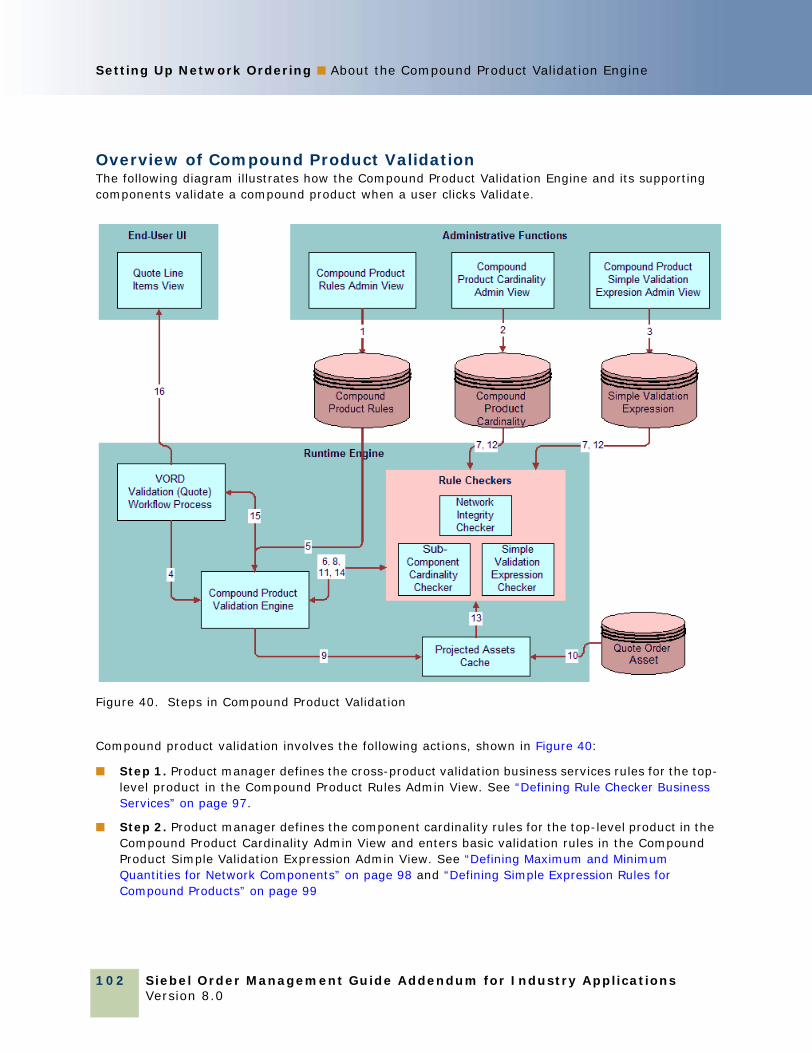
Setting Up Network Ordering ■ About the Compound Product Validation Engine
Overview of Compound Product ValidationThe following diagram illustrates how the Compound Product Validation Engine and its supporting components validate a compound product when a user clicks Validate.
Compound product validation involves the following actions, shown in Figure 40:
■ Step 1. Product manager defines the cross-product validation business services rules for the top-level product in the Compound Product Rules Admin View. See “Defining Rule Checker Business Services” on page 97.
■ Step 2. Product manager defines the component cardinality rules for the top-level product in the Compound Product Cardinality Admin View and enters basic validation rules in the Compound Product Simple Validation Expression Admin View. See “Defining Maximum and Minimum Quantities for Network Components” on page 98 and “Defining Simple Expression Rules for Compound Products” on page 99
Figure 40. Steps in Compound Product Validation
Siebel Order Management Guide Addendum for Industry Applications Version 8.0
102

Setting Up Network Ordering ■ About the Compound Product Validation Engine
■ Step 3. The end user creates a change quote for the compound product. The user validates the individual components using Configurator. After exiting Configurator and completing the network connections, the user clicks Validate. The Validate button invokes a named method on the Quote Item Business Component which invokes the VORD Validate (Quote) workflow process.
■ Step 4. The VORD Validate (Quote) workflow process determines the selected compound product instance. It also determines the future date for which to validate the network based upon the latest requested date of quote line items for the network. See the Future Date step in Vord Validate (Quote), which is covered in the section about creating custom rule checkers in Siebel Product Administration Guide. It then calls the Compound Product Validation Engine business service.
■ Step 6. The Compound Product Validation Engine retrieves the compound product validation rules for the top-level product. See the Validate step in Vord Validate (Quote), which is covered in the section about creating custom rule checkers in Siebel Product Administration Guide.
■ Step 6. For each rule, the Compound Product Validation Engine invokes the Pre-Validate method on the corresponding business service.
■ Step 7. If necessary, the rules checker business service retrieves product specific data related to the rule (for example, the cardinality constraints for sub-components of the compound product).
■ Step 8. The rule checker determines what fields and attributes it will require and returns them to the Compound Product Validation Engine which accumulates a list of fields and attributes required by all rules checkers.
■ Step 9. The Compound Product Validation Engine instructs the Projected Assets Cache to retrieve the compound product instance limited to fields and attributes required by the business service validation rules associated with the compound product.
■ Step 10. The Projected Assets Cache retrieves all asset records for the compound product. It then retrieves all open order line items due to complete before the specified due date and updates the records retrieved from the asset table to create a future state. Finally, all changes to the compound product instance in the current quote or current order are applied to generate the true future requested state.
■ Step 11. For each rule, the Compound Product Validation Engine invokes the associated rules checker business service method.
■ Step 12. If necessary, the rules checker business service retrieves product specific data related to the rule (for example, the cardinality constraints for sub-components of the compound product).
■ Step 13. The rules checker business service queries the Projected Assets Cache in order to evaluate the rule (for example, it gets the bandwidth for each PVC connected to a node).
■ Step 14. The rules checker business service returns a list of rule violations to the Compound Product Validation Engine.
■ Step 15. The Compound Product Validation Engine accumulates the rule violations for each rule and returns them to VORD Validate (Quote) workflow process.
Siebel Order Management Guide Addendum for Industry ApplicationsVersion 8.0
103

Setting Up Network Ordering ■ Example of Defining Network Compound Products
■ Step 16. The Compound Product Validation Engine business service displays the error message that was defined in Message Types view.
NOTE: The Compound Product Validation Engine operates independently of a customizable product definition. Furthermore, the engine only validates the top level component and its immediate attributes. This point will affect your modeling of Network products.
Compound Product Validation Engine (CPVE)The Compound Product Validation Engine is a business service that performs these major tasks:
■ It finds and sets the Future Date that will be passed into the Projected Asset Cache so only line items whose Due Date is prior to the Future Date are loaded into the Projected Asset Cache.
■ With the Product Id of the Compound Product that it was passed, it invokes all the Compound Product Business Service Rules associated with this Product Id. It then accumulates all the required unique Fields and Attributes within these Business Service Rules.
■ It initializes the Projected Asset Cache and passes it the required fields and attributes as parameters.
■ After the Projected Asset Cache has built the in-memory future requested compound product instance, the Compound Product Validation Engine invokes all associated Business Services and their rules to operate on the in-memory object instance containing the future projected state of the compound product.
■ It aggregates the error messages for all the rules violations into a single error message to display to the user.
For details on each of Rule Checker Business Service methods, see the section about creating validation rules for compound products in Siebel Product Administration Guide.
The Projected Asset CacheThe Projected Asset Cache holds an in-memory version of the future requested state of the compound product instance.
For information about the Projected Asset Cache, see Siebel Order Management Infrastructure Guide.
Example of Defining Network Compound ProductsThis example shows how to define a network composed of the following products:
■ Frame Relay Network. The network product.
■ Frame Relay Port. The node product.
■ Frame Relay PVC. The connection product.
Siebel Order Management Guide Addendum for Industry Applications Version 8.0
104

Setting Up Network Ordering ■ Example of Defining Network Compound Products
This example shows one possible way of defining network compound products. Your method of defining these products may differ, depending on your business model.
To define a network compound product, perform the following tasks:
■ Defining Products for the Network:
■ “Defining the Frame Relay Network Product” on page 105
■ “Defining the Frame Relay Port Product” on page 106
■ “Defining the Frame Relay PVC Product” on page 106
■ Defining the Compound Product:
■ “Defining Rule Checker Business Services” on page 107
■ “Defining Maximum and Minimum Quantities for Network Components” on page 108
■ “Defining Error Messages for Compound Product Rules” on page 109
■ “Defining Simple Expression Rules for Compound Products” on page 109
Defining the Frame Relay Network ProductThe Frame Relay Network is the network product for this sample network. All Compound Product rules will be associated with this product.
As the network product, it also allows you to define attributes that apply across the entire network. For example, if the same hardware vendor is used for all the products in the network, you can define it as an attribute of the Frame Relay Network.
To define the frame relay network product
1 Navigate to the Administration - Products screen.
2 In the Products list, add a new record and complete the necessary fields. Some fields are described in the following table.
Field Value
Product Name Frame Relay Network
Compound Product
True
Network Element Type
Network
Siebel Order Management Guide Addendum for Industry ApplicationsVersion 8.0
105
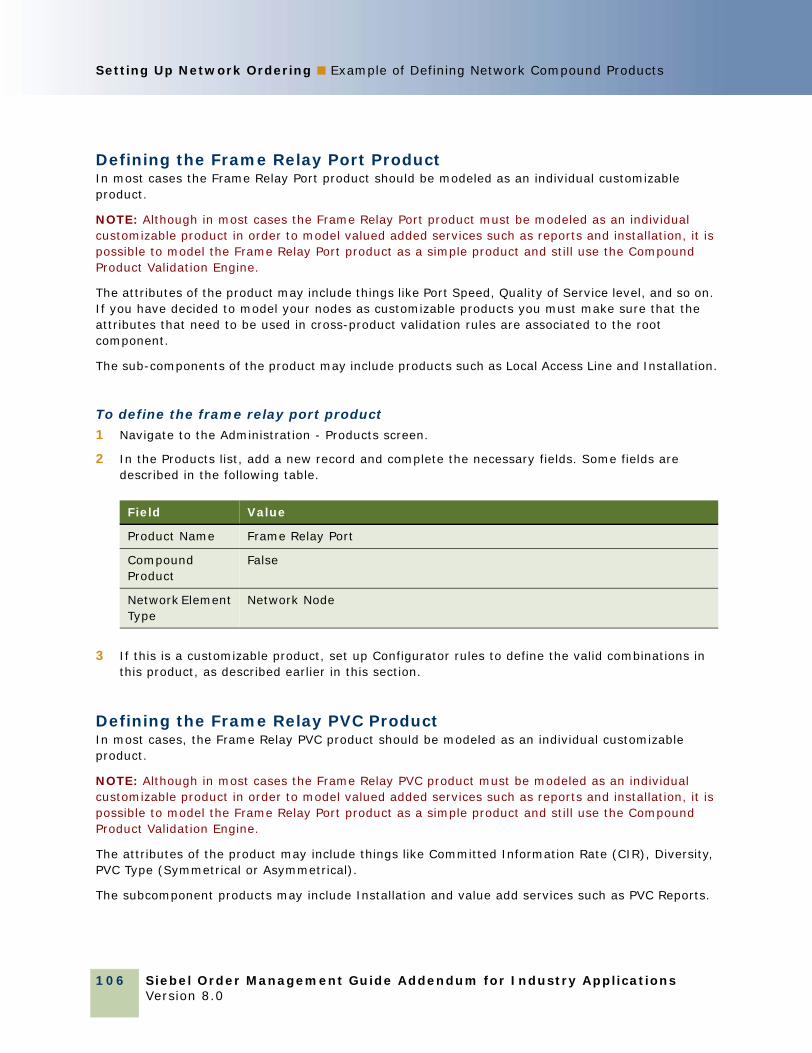
Setting Up Network Ordering ■ Example of Defining Network Compound Products
Defining the Frame Relay Port ProductIn most cases the Frame Relay Port product should be modeled as an individual customizable product.
NOTE: Although in most cases the Frame Relay Port product must be modeled as an individual customizable product in order to model valued added services such as reports and installation, it is possible to model the Frame Relay Port product as a simple product and still use the Compound Product Validation Engine.
The attributes of the product may include things like Port Speed, Quality of Service level, and so on. If you have decided to model your nodes as customizable products you must make sure that the attributes that need to be used in cross-product validation rules are associated to the root component.
The sub-components of the product may include products such as Local Access Line and Installation.
To define the frame relay port product
1 Navigate to the Administration - Products screen.
2 In the Products list, add a new record and complete the necessary fields. Some fields are described in the following table.
3 If this is a customizable product, set up Configurator rules to define the valid combinations in this product, as described earlier in this section.
Defining the Frame Relay PVC ProductIn most cases, the Frame Relay PVC product should be modeled as an individual customizable product.
NOTE: Although in most cases the Frame Relay PVC product must be modeled as an individual customizable product in order to model valued added services such as reports and installation, it is possible to model the Frame Relay Port product as a simple product and still use the Compound Product Validation Engine.
The attributes of the product may include things like Committed Information Rate (CIR), Diversity, PVC Type (Symmetrical or Asymmetrical).
The subcomponent products may include Installation and value add services such as PVC Reports.
Field Value
Product Name Frame Relay Port
Compound Product
False
Network Element Type
Network Node
Siebel Order Management Guide Addendum for Industry Applications Version 8.0
106
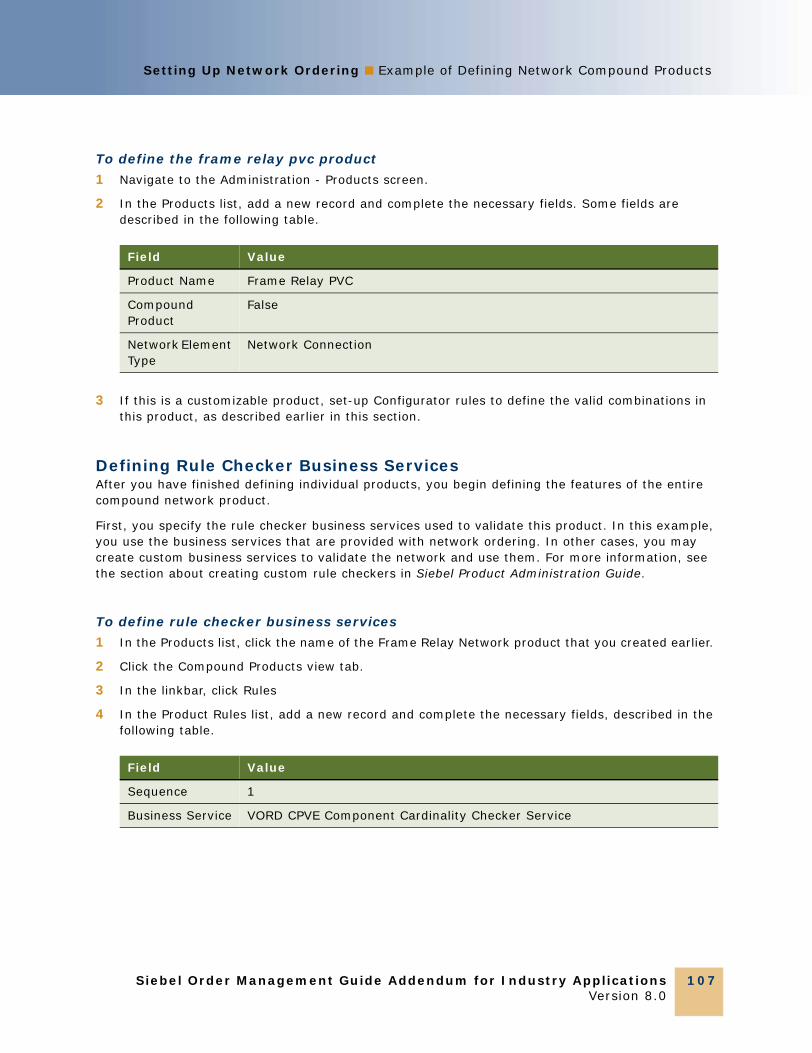
Setting Up Network Ordering ■ Example of Defining Network Compound Products
To define the frame relay pvc product
1 Navigate to the Administration - Products screen.
2 In the Products list, add a new record and complete the necessary fields. Some fields are described in the following table.
3 If this is a customizable product, set-up Configurator rules to define the valid combinations in this product, as described earlier in this section.
Defining Rule Checker Business ServicesAfter you have finished defining individual products, you begin defining the features of the entire compound network product.
First, you specify the rule checker business services used to validate this product. In this example, you use the business services that are provided with network ordering. In other cases, you may create custom business services to validate the network and use them. For more information, see the section about creating custom rule checkers in Siebel Product Administration Guide.
To define rule checker business services
1 In the Products list, click the name of the Frame Relay Network product that you created earlier.
2 Click the Compound Products view tab.
3 In the linkbar, click Rules
4 In the Product Rules list, add a new record and complete the necessary fields, described in the following table.
Field Value
Product Name Frame Relay PVC
Compound Product
False
Network Element Type
Network Connection
Field Value
Sequence 1
Business Service VORD CPVE Component Cardinality Checker Service
Siebel Order Management Guide Addendum for Industry ApplicationsVersion 8.0
107

Setting Up Network Ordering ■ Example of Defining Network Compound Products
5 In the Product Rules list, add another new record and complete the necessary fields, described in the following table.
NOTE: Do not add the following business services: VORD CPVE Validation Service and VORD Projected Asset Cache. These two services are invoked by the VORD Validation (Quote) and VOR Validation (Order) workflow processes or directly by other services. Adding them here will result in an error.
Defining Maximum and Minimum Quantities for Network ComponentsIn this example:
■ The compound product is the Frame Relay Network. The compound product must always have a Minimum Quantity of 1 and a Maximum Quantity of 1.
■ The Frame Relay Port product is the node. The definition of a network calls for at least two nodes, because there is no network without at least two nodes. Therefore, a Minimum Quantity of 2 for the Frame Relay Port product is defined.
■ The Frame Relay PVC product - the circuit connecting the two ports - is the connection. Because the two nodes must be connected, a Minimum Quantity of 1 is defined for the Frame Relay PVC product.
Because this network can be as large as the customer wants, within the boundaries of the providers network reach, we do not enter a Maximum Quantity for the Frame Relay Port and Frame Relay PVC products.
Because the Cardinality Checker is a Compound Product Business Service, it operates on the Projected Asset Cache. Therefore, these rules apply across the current Quote, existing Assets, and open Orders on the asset. For example, if a customer had 5 frame relay ports and attempted to disconnect four of them, the validation would display an error message saying the minimum quantity is not met for the Frame Relay Port product.
To define maximum and minimum quantities for network components
1 Navigate to the Administration - Product screen.
2 In the Products list, click the name of the product that was defined as the compound product for the network (the Frame Relay Network product).
3 Click the Compound Products view tab.
4 In the link bar, click Cardinality Rules.
The Compound Product Cardinality Rules list includes all the products that are valid components of this network.
Field Value
Sequence 2
Business Service VORD CPVE Simple Validation Expression Checker Service
Siebel Order Management Guide Addendum for Industry Applications Version 8.0
108

Setting Up Network Ordering ■ Example of Defining Network Compound Products
5 For each product, enter the appropriate value in the Maximum Quantity and Minimum Quantity fields, as shown in the following table.
Defining Error Messages for Compound Product RulesThis example defines an error message used by a rules that validates whether all nodes have service addresses.
To define error messages for compound product rules
1 Navigate to the Administration - Order Management screen > Message Types view.
2 In the All Message Types list, add a new record and complete the necessary fields, as shown in the following table.
Defining Simple Expression Rules for Compound ProductsFinally, you define simple expression rules to validate across the compound product and generate error messages. In this example, the rule checks whether all nodes have a service address and then displays the error message defined in the previous step.
To define simple validation expression rules for compound products
1 In the Administration - Product screen, in the Compound Products view, in the link bar, click Simple Validation Expression Rules.
Product Minimum Quantity Maximum Quantity
Frame Relay Network 1 1
Frame Relay Port 2
Frame Relay PVC 1
Field Value
Name Service Address Error Message
Title Validation that All Nodes Have a Service Address
Full Text [Count] [Product]s are missing Service Addresses
Siebel Order Management Guide Addendum for Industry ApplicationsVersion 8.0
109

Setting Up Network Ordering ■ Example of Defining Network Compound Products
2 In the Compound Products list, add one or more new records and complete the necessary fields. Some fields are shown in the following table.
Other Samples of Validation Rules and Messages. Table 5 includes more samples sample simple expression rules that you could use to validate network ordering. The first column contains the message you enter in the Short Text and Long Text fields the Message Type record. The next four columns values you enter in each Simple Validation Expression Rule record. The last column contains an explanation of what this rule does.
The first row in the table repeats the example given previously. You create the samples in the other rows in the same way you created the previous example: you enter the text of the message in the Message Type record, and then, when you enter values in the Simple Validation Rule record, select the name of the appropriate Message Type record.
Field Value
Seq 1
Search Expression
([Network Element Type] = "Network Node" AND [Service Address] = "")
Aggregate Function
Count
Group By Fields [Product Name]
Having Expression
[Count]>0
Message Service Address Error Message
Table 5. Samples of Simple Expression Rules
Message Text Search ExpressionAggregate Function
Group By Fields
Having Expression Explanation
[Count] [Product]s are missing Service Addresses
([Network Element Type] = "Network Node" AND [Service Address] = "")
Count [Product Name]
[Count]>0 Validates that all Nodes have a Service Address.
[Count] [Product] are missing a "Service Address" and/or a "To Service Address"
([Network Element Type] = "Network Connection" AND (([Service Address] = "") OR ([To Service Address] = "")))
Count [Product Name]
[Count]>0 Validates that all Connections have a Service Address associated with each end of the connection.
Siebel Order Management Guide Addendum for Industry Applications Version 8.0
110

Setting Up Network Ordering ■ About Creating Custom Rule Checkers
About Creating Custom Rule CheckersTo create custom rule checkers for network ordering, follow the same guidelines used to create custom rule checkers for product validation.
Rule checkers provided with the product are also the same for network ordering as for product validation.
For more information, see the section about product validation in Siebel Product Administration Guide.
[Product] at [Service Address] must have a different "To Service Address"
([Network Element Type] = "Network Connection" AND ([Service Address] = [To Service Address]))
Validates that the Addresses for each end of a connection are different.
[Count] [Product] are missing a From Node and/or To Node
([Network Element Type] = "Network Connection" AND ([Node] = "" OR [To Node] = ""))
Count [Product Name]
[Count]>0 Validates that all connections have a node associated with each end of the connection.
Table 5. Samples of Simple Expression Rules
Message Text Search ExpressionAggregate Function
Group By Fields
Having Expression Explanation
Siebel Order Management Guide Addendum for Industry ApplicationsVersion 8.0
111

Setting Up Network Ordering ■ About Creating Custom Rule Checkers
Siebel Order Management Guide Addendum for Industry Applications Version 8.0
112

10 Using Network Ordering
This chapter describes how end users work with network ordering. It includes the following topics:
■ “Process of Ordering New Networks” on page 113
■ “Viewing a Network as a Billing Item or Service Item” on page 119
■ “Process of Ordering New Sites in Existing Networks” on page 119
■ “Process of Upgrading Bandwidth at Network Sites” on page 123
■ “Process of Disconnecting a Site from a Network” on page 126
For information about setting up network ordering, see Chapter 9, “Setting Up Network Ordering.”
For general background information about network ordering, see “About Network Ordering” on page 93.
Process of Ordering New NetworksSalespeople can order new networks for new customers, adding the customer and all features of the network.
To order a new network, perform the following tasks:
1 “Creating an Account and Locations for a New Network” on page 113
2 “Creating a Quote for a New Network” on page 114
3 “Adding Nodes to a New Network” on page 115
4 “Adding Connections to a New Network” on page 116
5 “Validating a Quote for a Network” on page 117
6 “Creating an Order for a New Network” on page 117
7 “Converting a Completed Network Order to Assets” on page 118
Creating an Account and Locations for a New NetworkWhen salespeople order new networks for new customers, the first task is creating a new account representing the customer and adding locations for all the nodes of the network.
For more information about creating an account, see Siebel Applications Administration Guide.
This task is a step in “Process of Ordering New Networks” on page 113.
Siebel Order Management Guide Addendum for Industry ApplicationsVersion 8.0
113

Using Network Ordering ■ Process of Ordering New Networks
To create an account and locations for a new network
1 Navigate to the Accounts screen > Accounts list view.
2 In the Accounts list, add a new record, and enter basic information about the account.
3 Click the name of the Account.
4 Click the view tabs, and add more information about Contacts at this account, the account profile, and other data needed to create the account.
5 Click the Address Profile view tab.
6 In the Address Profile list, add a new record for each location where there will be a node of the network, and enter information about that location.
The following fields are automatically populated based on data for the premise: Prefix, CLLI, LATA, and Rate Center. For more information, see “Setting Up Premises” on page 100.
Creating a Quote for a New Network After adding records for all the locations of network nodes, the salesperson can create a Quote record for the new network. Later, all the components of the new network will be attached to this Quote record.
For more information about creating a quote, see Siebel Order Management Guide.
This task is a step in “Process of Ordering New Networks” on page 113.
To create a quote for a new network
1 Navigate to the Accounts screen > Accounts List view.
2 In the Accounts list, click the name of the desired account.
The Customer Portal view appears.
3 In the Installed Assets list, click New.
If your account type is not Residential, the Line Item view of the Quotes screen appears.
4 In the Quote header form, click the More button.
5 In the Network field, type a name for the new Network.
This field automatically defaults to the Quote number. Instead, you should enter a descriptive name. This value will be used as the key that will link together components of the network, and so it will be used as the default for the Network field for all line items added to the Quote.
Siebel Order Management Guide Addendum for Industry Applications Version 8.0
114
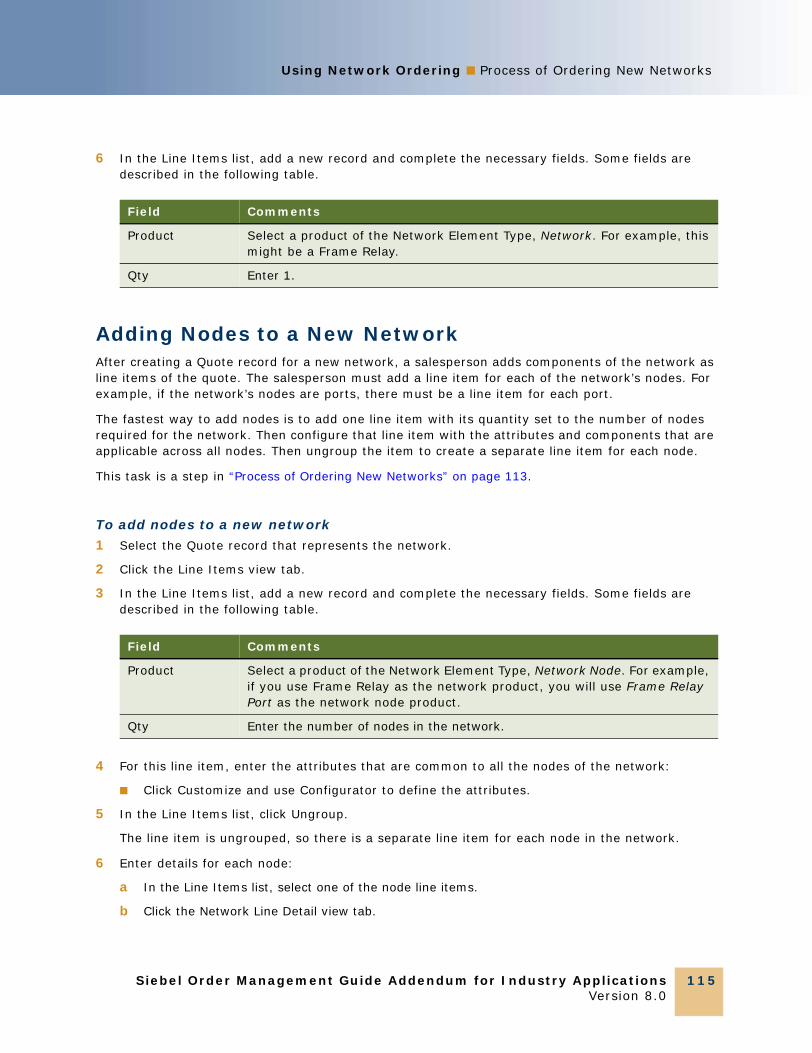
Using Network Ordering ■ Process of Ordering New Networks
6 In the Line Items list, add a new record and complete the necessary fields. Some fields are described in the following table.
Adding Nodes to a New NetworkAfter creating a Quote record for a new network, a salesperson adds components of the network as line items of the quote. The salesperson must add a line item for each of the network’s nodes. For example, if the network’s nodes are ports, there must be a line item for each port.
The fastest way to add nodes is to add one line item with its quantity set to the number of nodes required for the network. Then configure that line item with the attributes and components that are applicable across all nodes. Then ungroup the item to create a separate line item for each node.
This task is a step in “Process of Ordering New Networks” on page 113.
To add nodes to a new network
1 Select the Quote record that represents the network.
2 Click the Line Items view tab.
3 In the Line Items list, add a new record and complete the necessary fields. Some fields are described in the following table.
4 For this line item, enter the attributes that are common to all the nodes of the network:
■ Click Customize and use Configurator to define the attributes.
5 In the Line Items list, click Ungroup.
The line item is ungrouped, so there is a separate line item for each node in the network.
6 Enter details for each node:
a In the Line Items list, select one of the node line items.
b Click the Network Line Detail view tab.
Field Comments
Product Select a product of the Network Element Type, Network. For example, this might be a Frame Relay.
Qty Enter 1.
Field Comments
Product Select a product of the Network Element Type, Network Node. For example, if you use Frame Relay as the network product, you will use Frame Relay Port as the network node product.
Qty Enter the number of nodes in the network.
Siebel Order Management Guide Addendum for Industry ApplicationsVersion 8.0
115
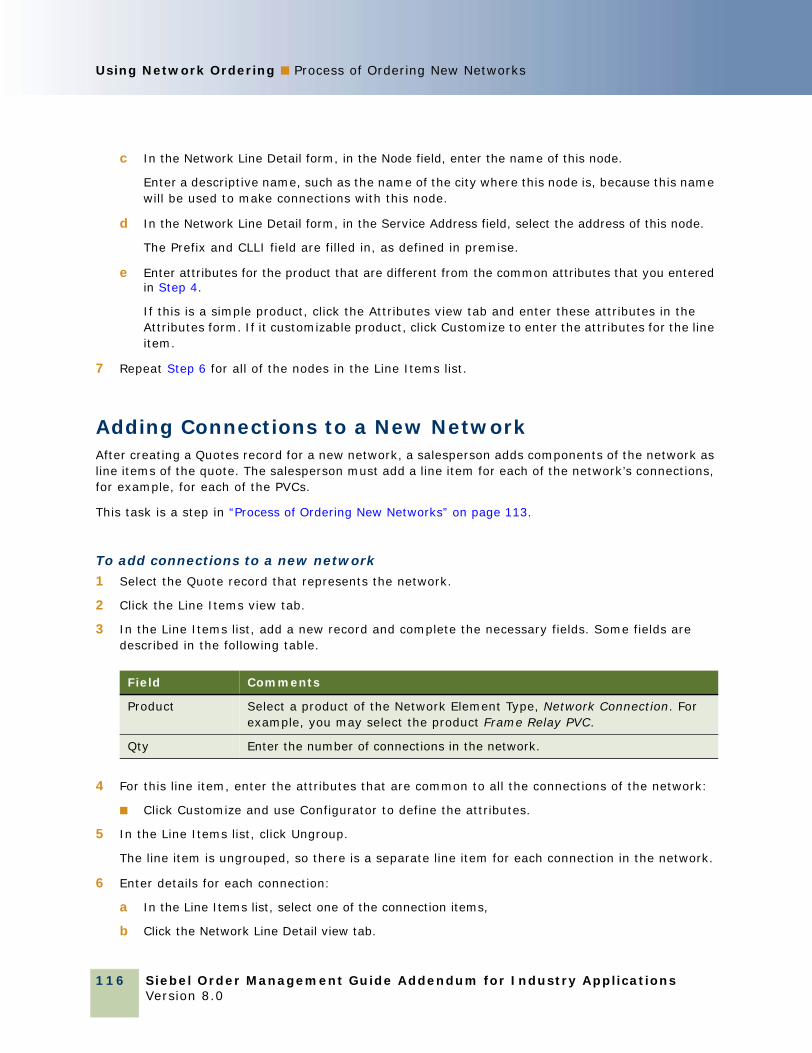
Using Network Ordering ■ Process of Ordering New Networks
c In the Network Line Detail form, in the Node field, enter the name of this node.
Enter a descriptive name, such as the name of the city where this node is, because this name will be used to make connections with this node.
d In the Network Line Detail form, in the Service Address field, select the address of this node.
The Prefix and CLLI field are filled in, as defined in premise.
e Enter attributes for the product that are different from the common attributes that you entered in Step 4.
If this is a simple product, click the Attributes view tab and enter these attributes in the Attributes form. If it customizable product, click Customize to enter the attributes for the line item.
7 Repeat Step 6 for all of the nodes in the Line Items list.
Adding Connections to a New NetworkAfter creating a Quotes record for a new network, a salesperson adds components of the network as line items of the quote. The salesperson must add a line item for each of the network’s connections, for example, for each of the PVCs.
This task is a step in “Process of Ordering New Networks” on page 113.
To add connections to a new network
1 Select the Quote record that represents the network.
2 Click the Line Items view tab.
3 In the Line Items list, add a new record and complete the necessary fields. Some fields are described in the following table.
4 For this line item, enter the attributes that are common to all the connections of the network:
■ Click Customize and use Configurator to define the attributes.
5 In the Line Items list, click Ungroup.
The line item is ungrouped, so there is a separate line item for each connection in the network.
6 Enter details for each connection:
a In the Line Items list, select one of the connection items,
b Click the Network Line Detail view tab.
Field Comments
Product Select a product of the Network Element Type, Network Connection. For example, you may select the product Frame Relay PVC.
Qty Enter the number of connections in the network.
Siebel Order Management Guide Addendum for Industry Applications Version 8.0
116
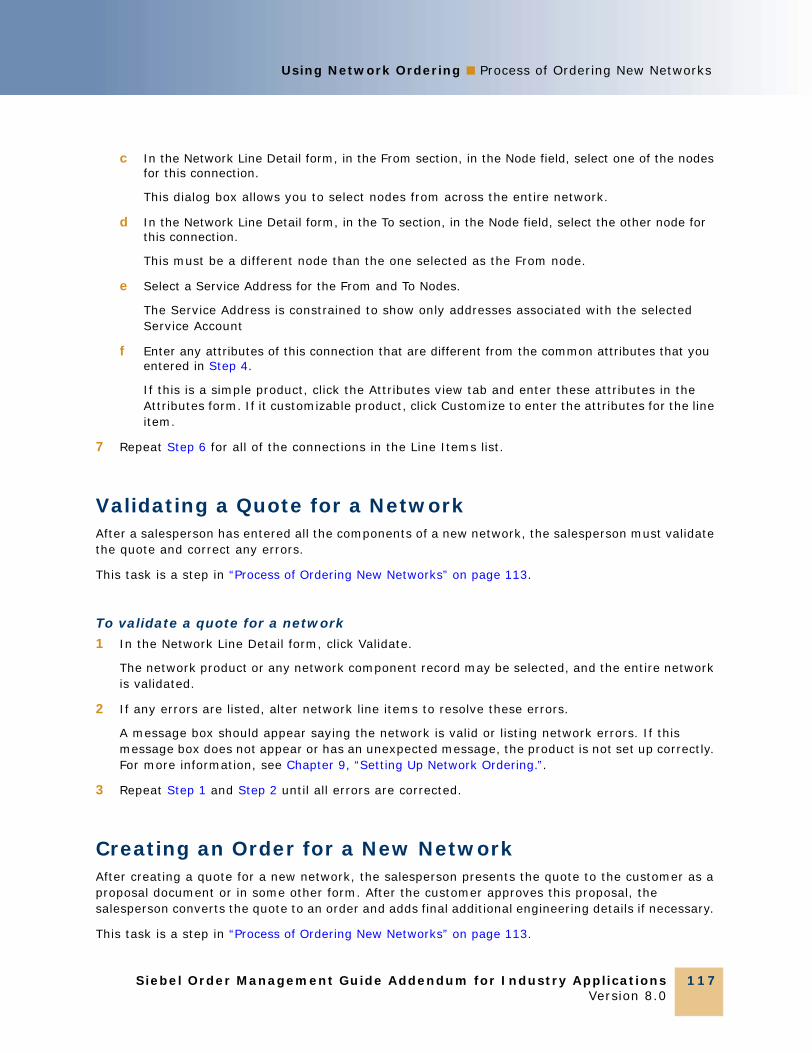
Using Network Ordering ■ Process of Ordering New Networks
c In the Network Line Detail form, in the From section, in the Node field, select one of the nodes for this connection.
This dialog box allows you to select nodes from across the entire network.
d In the Network Line Detail form, in the To section, in the Node field, select the other node for this connection.
This must be a different node than the one selected as the From node.
e Select a Service Address for the From and To Nodes.
The Service Address is constrained to show only addresses associated with the selected Service Account
f Enter any attributes of this connection that are different from the common attributes that you entered in Step 4.
If this is a simple product, click the Attributes view tab and enter these attributes in the Attributes form. If it customizable product, click Customize to enter the attributes for the line item.
7 Repeat Step 6 for all of the connections in the Line Items list.
Validating a Quote for a NetworkAfter a salesperson has entered all the components of a new network, the salesperson must validate the quote and correct any errors.
This task is a step in “Process of Ordering New Networks” on page 113.
To validate a quote for a network
1 In the Network Line Detail form, click Validate.
The network product or any network component record may be selected, and the entire network is validated.
2 If any errors are listed, alter network line items to resolve these errors.
A message box should appear saying the network is valid or listing network errors. If this message box does not appear or has an unexpected message, the product is not set up correctly. For more information, see Chapter 9, “Setting Up Network Ordering.”.
3 Repeat Step 1 and Step 2 until all errors are corrected.
Creating an Order for a New NetworkAfter creating a quote for a new network, the salesperson presents the quote to the customer as a proposal document or in some other form. After the customer approves this proposal, the salesperson converts the quote to an order and adds final additional engineering details if necessary.
This task is a step in “Process of Ordering New Networks” on page 113.
Siebel Order Management Guide Addendum for Industry ApplicationsVersion 8.0
117

Using Network Ordering ■ Process of Ordering New Networks
To create an order for a new network
1 Navigate to the Quotes screen > Quotes List view.
2 In the Quotes list, click the Name field for the quote for the network.
3 In the Quote Header form, click Auto Order.
The quote is converted into an order.
4 Click the Network Line Detail view tab.
5 Add additional details to network components, as needed, for example Service Id and Port number,.
6 Click Validate.
A dialog box should appear saying the network is valid or listing network errors. If this dialog box does not appear or has an unexpected message, the product is not set up correctly. For more information, see Chapter 9, “Setting Up Network Ordering.”
7 If any errors are listed, alter network components to resolve these errors.
8 Repeat Step 6 and Step 7 until all errors are corrected.
9 When the order is complete, to submit the order, click Submit.
Converting a Completed Network Order to AssetsAs components of the network order are installed, convert the line items representing these components to assets, so you can track them for service and for change orders.
For more information about converting orders to assets, see the section about workflow to apply an order to the service profile in Siebel Order Management Guide.
NOTE: Before configuration, the Auto-Asset button can be used to convert line items to assets. However, during configuration, the Auto-Asset button is usually removed and the process is automated. If the Auto-Asset button has not been removed, the end user can use the following procedure.
This task is a step in “Process of Ordering New Networks” on page 113.
To convert the network order to an asset
1 Navigate to the Sales Order screen > Order List.
2 Click the name of the network order that you want to convert.
3 For each root line item:
a Select Complete in the Status field of all subcomponents.
b Click Auto Asset.
Siebel Order Management Guide Addendum for Industry Applications Version 8.0
118

Using Network Ordering ■ Viewing a Network as a Billing Item or Service Item
Viewing a Network as a Billing Item or Service ItemIn the Billing Items view or Service Items view, only the network product is displayed.
The other products that are components of this network are not listed in this view, but if you click the name of the network product, the Networks screen appears, with all of the components listed as well as the network product.
To view a network as a billing item or a service item
1 Navigate to the Accounts screen > Accounts List view.
2 In the Accounts list, click the name of the desired account.
The Customer Portal view appears. The Billing Items list and Service Items list include the network products for the selected account.
3 Click the name of a billing item or service item that is a network product.
The Networks screen appears with this network product selected in the Networks list.
NOTE: Click the view tabs of the Network screen to view network components and process changes orders on network components.
Process of Ordering New Sites in Existing NetworksSalespeople can take orders to add new sites to an existing customer’s network.
To order a new site in an existing network, perform the following tasks:
1 “Adding a Location for a New Network Site” on page 119
2 “Creating a Quote for a New Network Site” on page 120
3 “Adding a Node for a New Network Site” on page 120
4 “Adding a Connection for a New Network Site” on page 121
5 “Validating a Quote for a New Network Site” on page 122
6 “Converting a Quote to an Order for a New Network Site” on page 122
7 “Converting an Order for a New Network Site to Assets” on page 123
Adding a Location for a New Network SiteIf a salesperson takes an order to add a new sites to an existing customer’s network, the first step is to add the location of the site.
For more information about working with accounts, see Siebel Applications Administration Guide.
Siebel Order Management Guide Addendum for Industry ApplicationsVersion 8.0
119
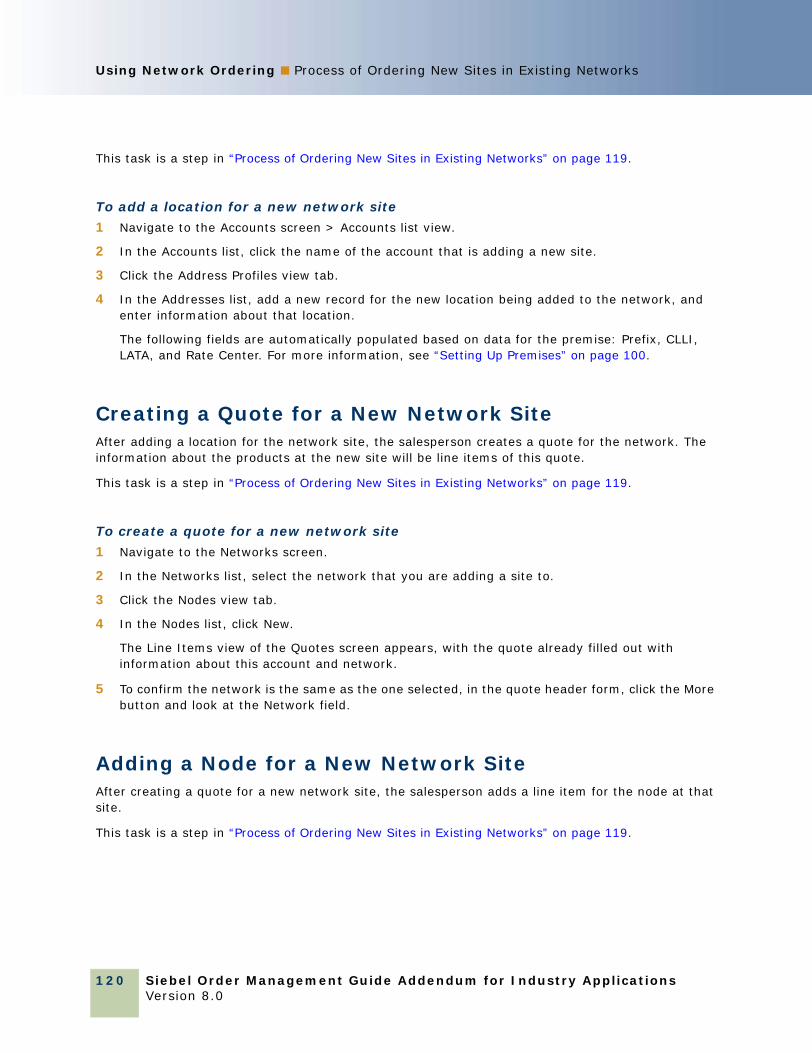
Using Network Ordering ■ Process of Ordering New Sites in Existing Networks
This task is a step in “Process of Ordering New Sites in Existing Networks” on page 119.
To add a location for a new network site
1 Navigate to the Accounts screen > Accounts list view.
2 In the Accounts list, click the name of the account that is adding a new site.
3 Click the Address Profiles view tab.
4 In the Addresses list, add a new record for the new location being added to the network, and enter information about that location.
The following fields are automatically populated based on data for the premise: Prefix, CLLI, LATA, and Rate Center. For more information, see “Setting Up Premises” on page 100.
Creating a Quote for a New Network SiteAfter adding a location for the network site, the salesperson creates a quote for the network. The information about the products at the new site will be line items of this quote.
This task is a step in “Process of Ordering New Sites in Existing Networks” on page 119.
To create a quote for a new network site
1 Navigate to the Networks screen.
2 In the Networks list, select the network that you are adding a site to.
3 Click the Nodes view tab.
4 In the Nodes list, click New.
The Line Items view of the Quotes screen appears, with the quote already filled out with information about this account and network.
5 To confirm the network is the same as the one selected, in the quote header form, click the More button and look at the Network field.
Adding a Node for a New Network SiteAfter creating a quote for a new network site, the salesperson adds a line item for the node at that site.
This task is a step in “Process of Ordering New Sites in Existing Networks” on page 119.
Siebel Order Management Guide Addendum for Industry Applications Version 8.0
120

Using Network Ordering ■ Process of Ordering New Sites in Existing Networks
To add a node for a new network site
1 In the Line Items view, add a line item for a product of the Network Element Type, Network Node.
For example, if you use Frame Relay as the network product, you will use Frame Relay Port as the network node product.
2 Click the Network Line Detail view tab.
3 Enter details for the node:
a In the Network Line Detail form, in the Node field, enter the name of this node.
Enter a descriptive name, such as the name of the city where this node is, because this name will be used to make connections with this node.
b In the Network Line Detail form, in the Service Address field, select the address of this node.
The Prefix and CLLI field are filled in, as defined in premise.
4 Enter the attributes of this node. Click Customize and use Configurator to define the attributes.
Adding a Connection for a New Network SiteAfter creating a quote for a new network site, the salesperson adds a line item for the connection at that site.
This task is a step in “Process of Ordering New Sites in Existing Networks” on page 119.
To add a connection for a new network site
1 In the Line Items view of the Quotes screen, click Add Item and add a line item for a product of the Network Element Type, Network Connection.
For example, you may select the product Frame Relay PVC.
2 Click the Network Line Detail view tab.
3 In the Network Line Detail form, enter details for the connection:
a In the From section, in the Node field, select one of the nodes for this connection.
This dialog box allows you to select nodes from across the entire network.
b In the To section, in the Node field, select the other node for this connection.
This must be a different node than the one selected as the From node.
NOTE: When selecting the From and To nodes, a user will be able to select from the existing nodes as well as the new sites which have just been added to this quote.
4 Enter attributes for this connection. Click Customize and use Configurator to define the attributes.
Siebel Order Management Guide Addendum for Industry ApplicationsVersion 8.0
121
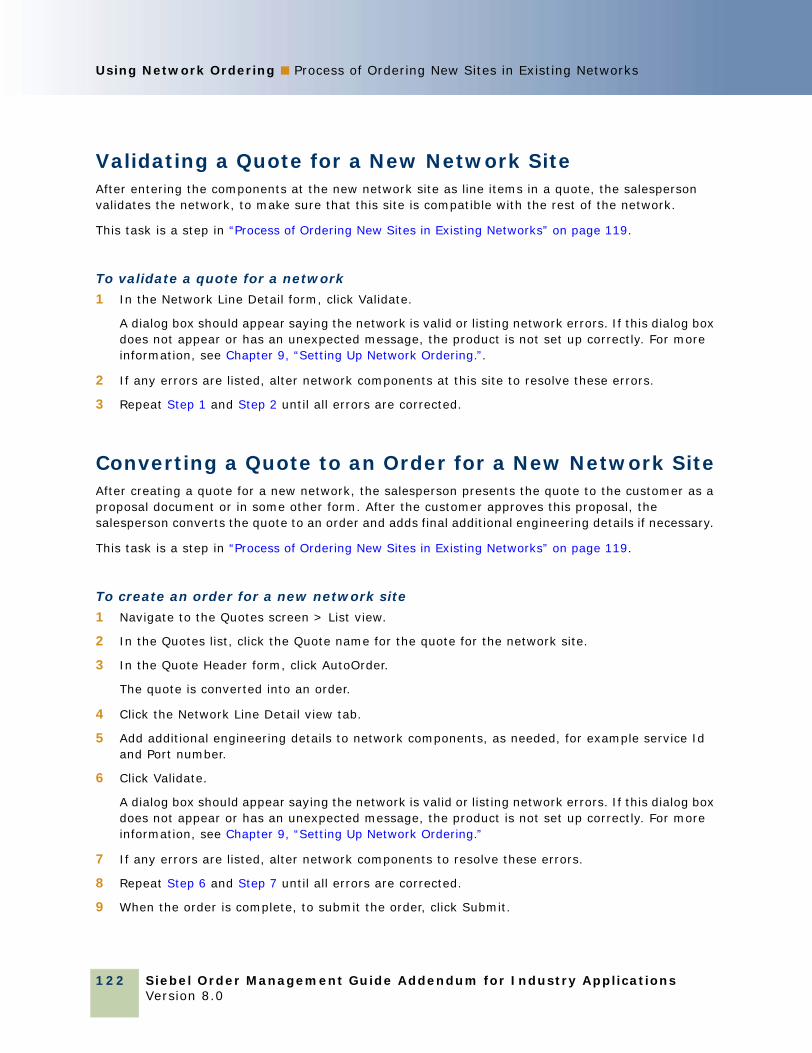
Using Network Ordering ■ Process of Ordering New Sites in Existing Networks
Validating a Quote for a New Network SiteAfter entering the components at the new network site as line items in a quote, the salesperson validates the network, to make sure that this site is compatible with the rest of the network.
This task is a step in “Process of Ordering New Sites in Existing Networks” on page 119.
To validate a quote for a network
1 In the Network Line Detail form, click Validate.
A dialog box should appear saying the network is valid or listing network errors. If this dialog box does not appear or has an unexpected message, the product is not set up correctly. For more information, see Chapter 9, “Setting Up Network Ordering.”.
2 If any errors are listed, alter network components at this site to resolve these errors.
3 Repeat Step 1 and Step 2 until all errors are corrected.
Converting a Quote to an Order for a New Network SiteAfter creating a quote for a new network, the salesperson presents the quote to the customer as a proposal document or in some other form. After the customer approves this proposal, the salesperson converts the quote to an order and adds final additional engineering details if necessary.
This task is a step in “Process of Ordering New Sites in Existing Networks” on page 119.
To create an order for a new network site
1 Navigate to the Quotes screen > List view.
2 In the Quotes list, click the Quote name for the quote for the network site.
3 In the Quote Header form, click AutoOrder.
The quote is converted into an order.
4 Click the Network Line Detail view tab.
5 Add additional engineering details to network components, as needed, for example service Id and Port number.
6 Click Validate.
A dialog box should appear saying the network is valid or listing network errors. If this dialog box does not appear or has an unexpected message, the product is not set up correctly. For more information, see Chapter 9, “Setting Up Network Ordering.”
7 If any errors are listed, alter network components to resolve these errors.
8 Repeat Step 6 and Step 7 until all errors are corrected.
9 When the order is complete, to submit the order, click Submit.
Siebel Order Management Guide Addendum for Industry Applications Version 8.0
122

Using Network Ordering ■ Process of Upgrading Bandwidth at Network Sites
Converting an Order for a New Network Site to AssetsAs components of the network order are installed, convert the line items representing these components to assets, so you can track them for service and for change orders.
For more information about converting orders to assets, see the section about workflow to apply an order to the service profile in Siebel Order Management Guide.
NOTE: Before configuration, the Auto-Asset button can be used to convert line items to assets. However, during configuration, the Auto-Asset button is usually removed and the process is automated. If the Auto-Asset button has not been removed, the end user can use the following procedure.
This task is a step in “Process of Ordering New Sites in Existing Networks” on page 119.
To convert a line item representing a network component to an asset
1 Navigate to the Sales Order screen > List view.
2 Click the order number of the network order that you want to convert.
3 Click the Line Items view tab.
4 For each line item that represents a network component:
a Select Complete in the Status field.
b Click Auto Asset.
Process of Upgrading Bandwidth at Network SitesA salesperson can take an order to upgrade bandwidth at an existing network site.
This example of how to upgrade bandwidth assumes that:
■ The Frame Relay Port product has an attribute called Port Speed.
■ The Frame Relay PVC product has an attribute called Committed Information Rate (CIR).
These attributes represent the bandwidth.
The actual process of upgrading bandwidth will depend on which attributes have been defined to represent bandwidth.
To upgrade bandwidth at a network site, perform the following tasks:
1 “Displaying a Network To Be Upgraded” on page 124
2 “Upgrading the Bandwidth at a Network Site” on page 124
3 “Upgrading the Bandwidth of a Network Connection” on page 124
4 “Validating a Network After Upgrading Bandwidth” on page 125
5 “Converting a Quote to an Order to Upgrade Bandwidth” on page 125
Siebel Order Management Guide Addendum for Industry ApplicationsVersion 8.0
123

Using Network Ordering ■ Process of Upgrading Bandwidth at Network Sites
6 “Updating Assets when an Order to Upgrade Bandwidth Is Complete” on page 126
Displaying a Network To Be UpgradedTo upgrade bandwidth at an existing network site, first you display the network to be upgraded.
This task is a step in “Process of Upgrading Bandwidth at Network Sites” on page 123.
To display a network to be upgraded
1 Navigate to the Networks screen.
2 In the Networks list, select the network that you are upgrading.
Upgrading the Bandwidth at a Network SiteTo upgrade bandwidth at an existing network site, you must increase the speed of the network node product, for example the port speed of the Frame Relay Port product.
This task is a step in “Process of Upgrading Bandwidth at Network Sites” on page 123.
NOTE: If you modelled all of your network components as simple products, instead of using this procedure and the following procedure, you can simply navigate to the All Network Elements view of the Networks screen and select both the Network Node and the Network Connection you wish to upgrade Once the two or more items have been selected, click Modify and a new change quote will appear with all selected items as line items. Then navigate to the Attributes view tab and upgrade accordingly.
To modify the access at a network site
1 After selecting the network that you are upgrading, click the Nodes view tab.
2 Use a query to find the nodes that you want to modify in the Nodes list.
3 After reviewing the current bandwidth in the attributes applet, click Modify.
A Configurator session appears allowing you to increase the port speed as required.
4 Click Done.
A change quote appears.
Upgrading the Bandwidth of a Network ConnectionYou use the same change quote to upgrade the Committed Information Rate (CIR) on a network connection.
This task is a step in “Process of Upgrading Bandwidth at Network Sites” on page 123.
Siebel Order Management Guide Addendum for Industry Applications Version 8.0
124

Using Network Ordering ■ Process of Upgrading Bandwidth at Network Sites
To upgrade the bandwidth of a network connection
1 After modifying the speed of the node, click Back to return to the Connections view.
2 Select the network connection that you want to upgrade and view the current CIR for this connection.
3 Click Modify
You enter a Configurator session where you can increase the speed of the network connection CIR.
4 Click Done.
The change quote appears with a second line item added.
Validating a Network After Upgrading BandwidthAfter upgrading bandwidth at an existing site, the salesperson validates the network, to make sure that this site is still compatible with the rest of the network.
This task is a step in “Process of Upgrading Bandwidth at Network Sites” on page 123.
To validate a quote for a network
1 In the Network Line Detail form, click Validate.
A dialog box should appear saying the network is valid or listing network errors. If this dialog box does not appear or has an unexpected message, the product is not set up correctly. For more information, see Chapter 9, “Setting Up Network Ordering.”
2 If any errors are listed, alter network components within the quote to resolve these errors.
3 If necessary, return to the network view and modify other components so they are compatible with the changes at this site.
4 Repeat Step 1 though Step 3 until all errors are corrected.
Converting a Quote to an Order to Upgrade BandwidthAfter creating a quote to upgrade bandwidth at an existing site, the salesperson presents the quote to the customer as a proposal document or in some other form. After the customer approves this proposal, the salesperson converts the quote to an order.
This task is a step in “Process of Upgrading Bandwidth at Network Sites” on page 123.
To create an order to upgrade bandwidth at a network site
1 Navigate to the Quotes screen.
2 In the Quotes list, click the Quote Name for the quote for the upgrade.
Siebel Order Management Guide Addendum for Industry ApplicationsVersion 8.0
125
Using Network Ordering ■ Process of Disconnecting a Site from a Network
3 In the Quote Header form, click Auto Order.
The quote is converted into an order.
4 To submit the order, click Submit.
Updating Assets when an Order to Upgrade Bandwidth Is CompleteAs components needed to upgrade bandwidth are installed, convert the line items representing these components to assets, so you can track them for service and for change orders.
For more information about assets, see Siebel Field Service Guide.
For more information about converting orders to assets, see the section about workflow to apply an order to the service profile in Siebel Order Management Guide.
NOTE: Before configuration, the Auto-Asset button can be used to convert line items to assets. However, during configuration, the Auto-Asset button is usually removed and the process is automated. If the Auto-Asset button has not been removed, the end user can use the following procedure.
This task is a step in “Process of Upgrading Bandwidth at Network Sites” on page 123.
To convert a line item representing a network component to an asset
1 Navigate to the Sales Order screen > List view.
2 Use a search to display the network order.
3 For each line item that represents a network component:
a Select Complete in the Status field.
b Click Auto Asset.
Process of Disconnecting a Site from a NetworkA salesperson can take an order to disconnect a site from a network.
To disconnect a site from a network, perform the following tasks:
1 “Disconnecting a Network Node and Connections” on page 127
2 “Validating a Network After Disconnecting a Site” on page 127
3 “Converting a Quote to an Order to Disconnect a Network Site” on page 127
4 “Updating Assets After Disconnecting a Network Site” on page 128
Siebel Order Management Guide Addendum for Industry Applications Version 8.0
126
Using Network Ordering ■ Process of Disconnecting a Site from a Network
Disconnecting a Network Node and ConnectionsWhen a salesperson disconnects a node from a network, all connections associated with that node are automatically disconnected.
This task is a step in “Process of Disconnecting a Site from a Network” on page 126.
To disconnect a node and all associate connections
1 Navigate to the Networks screen.
2 In the Networks list, select the network whose node you are disconnecting.
3 Click the Nodes view tab.
4 In the Nodes list, select the node.
5 In the Nodes list, click Disconnect.
A new quote is created. The node and any connections that are connected to it are copied to the quote and marked for Delete.
Validating a Network After Disconnecting a SiteAfter disconnecting a node, the salesperson validates the network, to make sure that removing this node has not compromised the network’s integrity.
This task is a step in “Process of Disconnecting a Site from a Network” on page 126.
To validate a quote for a network
1 In the Network Line Detail form, click Validate.
A dialog box should appear saying the network is valid or listing network errors. If this dialog box does not appear or has an unexpected message, the product is not set up correctly. For more information, see Chapter 9, “Setting Up Network Ordering.”
2 If any errors are listed, alter network components to resolve these errors.
3 Repeat Step 1 and Step 2 until all errors are corrected.
Converting a Quote to an Order to Disconnect a Network SiteAfter creating a quote to disconnect a network site, the salesperson summarizes the changes that will be made and captures the due date. When the customer confirms this order, the salesperson converts the quote to an order.
This task is a step in “Process of Disconnecting a Site from a Network” on page 126.
Siebel Order Management Guide Addendum for Industry ApplicationsVersion 8.0
127

Using Network Ordering ■ Process of Disconnecting a Site from a Network
To convert a quote to an order to disconnect a network site
1 Navigate to the Quotes screen > List view.
2 In the Quotes list, click the Quote Name for the quote for the disconnect.
3 In the Quote Header form, click Auto Order.
The quote is converted into an order.
4 To submit the order, click Submit.
Updating Assets After Disconnecting a Network SiteWhen the work of disconnecting each component at a network site is done, update the customer’s assets so they no longer include the component.
For more information about converting orders to assets, see the section about workflow to apply an order to the service profile in Siebel Order Management Guide.
NOTE: Before configuration, the Auto-Asset button can be used to convert line items to assets. However, during configuration, the Auto-Asset button is usually removed and the process is automated. If the Auto-Asset button has not been removed, the end user can use the following procedure.
This task is a step in “Process of Disconnecting a Site from a Network” on page 126.
To update assets after disconnecting a network site
1 Navigate to the Sales Order screen > List view.
2 Click the name of the disconnect order.
3 For each line item that represents a disconnected component:
a Select Complete in the Status field of all subcomponents.
b Click Auto Asset.
Siebel Order Management Guide Addendum for Industry Applications Version 8.0
128

Index
Bbilling items
installed assets and 16overview 16
Ccustomer experience
adding bulk items to shopping cart 65creating supplemental order 64disconnecting orders 66modifying service items 66quote-to-order process, customer
experience 64using Siebel eSales, business scenario 64
customer workflowsdelta quote line items, editing 84disconnecting products and services 90modifying products and installed assets 87Order Checkout workflows 70ordering from a saved quote 84rejecting an order, workflow 86revising orders, workflows for 85ungrouping quotes 82
CUT eSales - Bill Me Process 77CUT eSales - Checkout Process 70CUT eSales - Disconnect Products and
Service Process 90CUT eSales - Edit Delta Quote Line Item 85CUT eSales - Modify Products and Services
Process 88CUT eSales - Order Quote Process 84CUT eSales - Prepare Quote Process 80CUT eSales - Prepare Shopping Cart View 88CUT eSales - Reject Order Process
workflow 86CUT eSales - Set Quote Account Info 71CUT eSales - Ungroup Quotes 82
Ddelta quotes
workflow, editing line items 84
EeSales - Authorize Order Process 81eSales - Complete Checkout Process 78eSales - Enter Shipping Details Process 73
eSales - Save Shipping Address 74eSales - Set Primary Account Address 75
FFrameEventMethodUgroupAll 82FrameEventMethodUgroupSelected 82
Iinstalled assets
overview 16service point 16workflows for modifying 87
Mmultiple price types
opportunities and 17
Oopportunities
multiple price types, effects of 17Order Checkout workflows
CUT eSales - Bill Me Process 77CUT eSales - Checkout Process 70CUT eSales - Prepare Quote Process 80CUT eSales - Set Quote Account Info 71CUT eSales - Ungroup Quotes 82eSales - Authorize Order Process 81eSales - Complete Checkout Process 78eSales - Enter Shipping Details Process 73eSales - Save Shipping Address 74eSales - Set Primary Account Address 75process and subprocesses, listed 70
ordersdisconnecting orders, customer’s
experience 66from saved quote, workflow 84Order Checkout workflow 70rejecting an order, workflow 86
orders, revisingCUT eSales - Goto Revise Order View
workflow 86CUT eSales - Revise Order Process
workflow 85workflow for 85
orders, supplementalbusiness scenario, customer experience 64
Siebel Order Management Guide Addendum for Industry ApplicationsVersion 8.0
129

Index ■ P
Pproducts
disconnecting, workflow for 90workflows for modifying 87
Qquote line items
editing in delta quotes, workflow 84ungrouping 82
quotesordering from saved quote, workflow 84revenue generation, process of 17ungrouping quotes, workflow 82
Quote-to-Order processbusiness scenario, customer experience 64
Rrevenue computation
multiple price type, effects of 17
Sservice ID, description of 16
service itemsmodifying, customer experience 66
service pointsdescription of 16
servicesdisconnecting, workflow for 90
shopping cart, customer experienceadding bulk items 65
UUngroup button, methods for 82
Wworkflows, customer
disconnecting products and services 90editing delta quote line items 84modifying products and installed assets 87Order Checkout workflows 70ordering from a saved quote 84rejecting an order 86revising orders 85ungrouping quotes 82
Siebel Order Management Guide Addendum for Industry Applications Version 8.0
130