Side Window Deflectors Deflectores para ventanillas...
2
© 2015 by MacNeil IP LLC 3 Bow the deflector outward. Doble el deflector hacia afuera. 4 Insert rear edge leaving a gap at the top. Inserte el borde trasero dejando un espacio en la parte superior. 2 1 Slide forward, into window channel. Ensure edge rests on top of the outer window sill! Asegúrese de que el borde quede apoyado en la parte superior de la solera de la puerta exterior. Make sure windows are clean and dry. Then, lower windows halfway. Asegúrese de que las ventanillas estén limpias y secas. Luego, baje las ventanillas hasta la mitad Side Window Deflectors Deflectores para ventanillas laterales Installation Instructions Instrucciones de instalación Contents Contenido WARNING ADVERTENCIA (2 or 4) Side Window Deflectors included. If there is a WeatherTech ® label, it should be positioned toward the rear of the vehicle. Deflectores para ventanillas laterales (4). View Easy Installation Video Visionner une vidéo d’installation facile WeatherTech.com/install Accessories which are not properly fitted can be dangerous. Read the instructions carefully before installation, and comply with the instructions at all times. If in doubt, contact WeatherTech ® . A Los accesorios que no están ajustados correctamente pueden ser peligrosos. Lea las instrucciones cuidadosamente antes de realizar la instalación y respételas en todo momento. Si tiene alguna duda, comuníquese con WeatherTech ® . Left deflectors Deflectores izquierdos Right deflectors Deflectores derechos 1/4"-1/2" 6.35 mm-12.70 mm
Transcript of Side Window Deflectors Deflectores para ventanillas...
© 2015 by MacNeil IP LLC
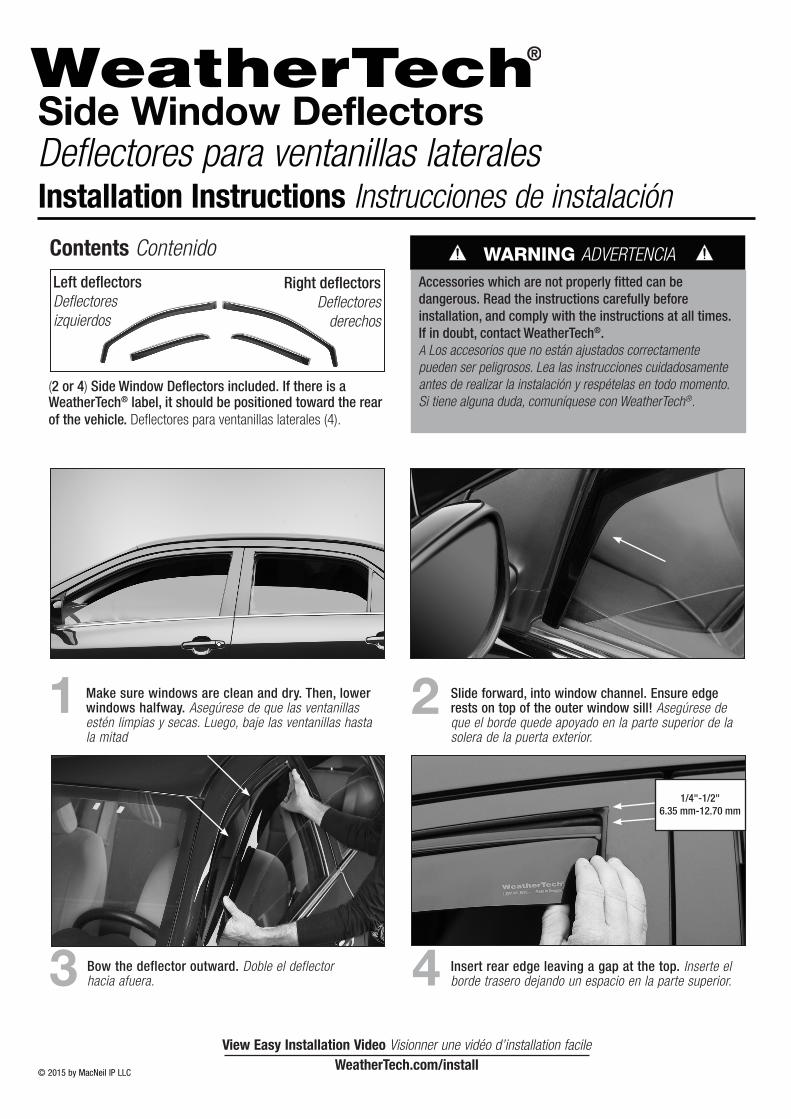
3 Bow the deflector outward. Doble el deflector hacia afuera. 4 Insert rear edge leaving a gap at the top. Inserte el
borde trasero dejando un espacio en la parte superior.
21 Slide forward, into window channel. Ensure edge rests on top of the outer window sill! Asegúrese de que el borde quede apoyado en la parte superior de la solera de la puerta exterior.
Make sure windows are clean and dry. Then, lower windows halfway. Asegúrese de que las ventanillas estén limpias y secas. Luego, baje las ventanillas hasta la mitad
Side Window DeflectorsDeflectores para ventanillas lateralesInstallation Instructions Instrucciones de instalación
Contents Contenido WARNING ADVERTENCIA
(2 or 4) Side Window Deflectors included. If there is a WeatherTech® label, it should be positioned toward the rear of the vehicle. Deflectores para ventanillas laterales (4).
View Easy Installation Video Visionner une vidéo d’installation facile WeatherTech.com/install
Accessories which are not properly fitted can be dangerous. Read the instructions carefully before installation, and comply with the instructions at all times. If in doubt, contact WeatherTech®. A Los accesorios que no están ajustados correctamente pueden ser peligrosos. Lea las instrucciones cuidadosamente antes de realizar la instalación y respételas en todo momento. Si tiene alguna duda, comuníquese con WeatherTech®.
Left deflectorsDeflectores izquierdos
Right deflectorsDeflectores
derechos
1/4"-1/2"6.35 mm-12.70 mm
© 2015 by MacNeil IP LLC
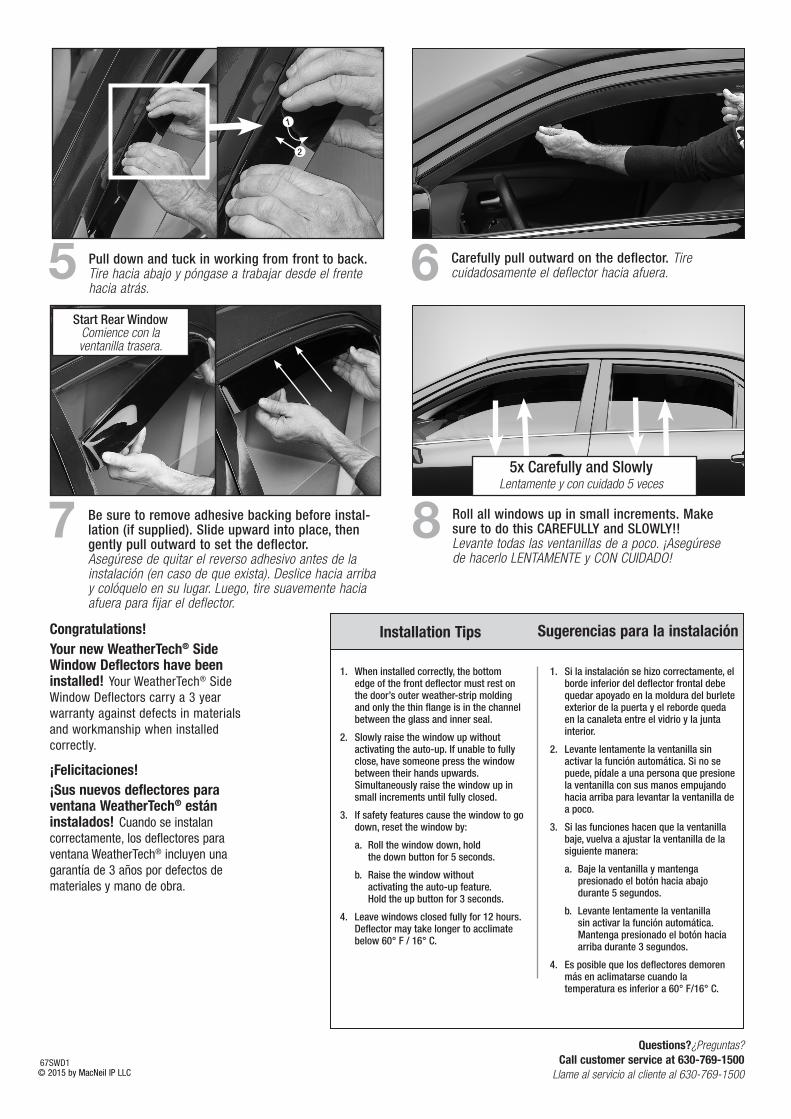
Pull down and tuck in working from front to back. Tire hacia abajo y póngase a trabajar desde el frente hacia atrás.
5
Be sure to remove adhesive backing before instal-lation (if supplied). Slide upward into place, then gently pull outward to set the deflector. Asegúrese de quitar el reverso adhesivo antes de la instalación (en caso de que exista). Deslice hacia arriba y colóquelo en su lugar. Luego, tire suavemente hacia afuera para fijar el deflector.
7 Roll all windows up in small increments. Make sure to do this CAREFULLY and SLOWLY!! Levante todas las ventanillas de a poco. ¡Asegúrese de hacerlo LENTAMENTE y CON CUIDADO!
8
Carefully pull outward on the deflector. Tire cuidadosamente el deflector hacia afuera. 6
¡Felicitaciones! ¡Sus nuevos deflectores para ventana WeatherTech® están instalados! Cuando se instalan correctamente, los deflectores para ventana WeatherTech® incluyen una garantía de 3 años por defectos de materiales y mano de obra.
Installation Tips Sugerencias para la instalación
1. Si la instalación se hizo correctamente, el borde inferior del deflector frontal debe quedar apoyado en la moldura del burlete exterior de la puerta y el reborde queda en la canaleta entre el vidrio y la junta interior.
2. Levante lentamente la ventanilla sin activar la función automática. Si no se puede, pídale a una persona que presione la ventanilla con sus manos empujando hacia arriba para levantar la ventanilla de a poco.
3. Si las funciones hacen que la ventanilla baje, vuelva a ajustar la ventanilla de la siguiente manera:
a. Baje la ventanilla y mantenga presionado el botón hacia abajo durante 5 segundos.
b. Levante lentamente la ventanilla sin activar la función automática. Mantenga presionado el botón hacia arriba durante 3 segundos.
4. Es posible que los deflectores demoren más en aclimatarse cuando la temperatura es inferior a 60° F/16° C.
1. When installed correctly, the bottom edge of the front deflector must rest on the door’s outer weather-strip molding and only the thin flange is in the channel between the glass and inner seal.
2. Slowly raise the window up without activating the auto-up. If unable to fully close, have someone press the window between their hands upwards. Simultaneously raise the window up in small increments until fully closed.
3. If safety features cause the window to go down, reset the window by:
a. Roll the window down, hold the down button for 5 seconds.
b. Raise the window without activating the auto-up feature. Hold the up button for 3 seconds.
4. Leave windows closed fully for 12 hours. Deflector may take longer to acclimate below 60° F / 16° C.
2
1
5x Carefully and Slowly Lentamente y con cuidado 5 veces
Start Rear WindowComience con la ventanilla trasera.
Congratulations! Your new WeatherTech® Side Window Deflectors have been installed! Your WeatherTech® Side Window Deflectors carry a 3 year warranty against defects in materials and workmanship when installed correctly.
67SWD1
Questions?¿Preguntas? Call customer service at 630-769-1500
Llame al servicio al cliente al 630-769-1500