SHOEBOX ® Audiometry Pro
57
SHOEBOX ® Audiometry Pro User Guide Think Outside of the Booth! ®
Transcript of SHOEBOX ® Audiometry Pro

SHOEBOX® Audiometry Pro User Guide
Think Outside of the Booth!®

Introduction Welcome to SHOEBOX® Audiometry Pro!
SHOEBOX Audiometry Pro is our advanced testing solution, perfect for hearing health professionals and those who need comprehensive diagnostic capabilities in a portable solution.
This user guide will help you learn all the capabilities of SHOEBOX Pro. If you’re looking to get set up quickly, you can view all topics at a glance using our online knowledge base at help.shoebox.md.
If your iPad was provided by SHOEBOX, you’ll find the user guides in your iBooks app.
If you have any questions about SHOEBOX, please contact [email protected].
If you are connecting SHOEBOX to your Noah database in your clinic, please refer to the “SHOEBOX Noah Integration Guide” at https://help.shoebox.md/Content/SHOEBOX_Audiometry/Noah_Integration.htm
Important Note for Audiologists SHOEBOX measures using dB HL, not SPL. Please consider this when configuring your test and viewing results.
SHOEBOX Audiometry Pro User Guide 2

SHOEBOX Ltd. 301-80 Aberdeen St Ottawa, ON, Canada K1S 5R5 www.shoebox.md 1-877-349-9934 SHOEBOX® is a Class II medical device listed with FDA (Registration No: 3007307502) and Health Canada (License No: 93571). Intended use: for diagnosis of human hearing loss. Summary: SHOEBOX® Audiometry is an iPad-based Type 3 Diagnostic Audiometer (as defined in ANSI /ASA S3.6-2010 and IEC 60645-1:2017) intended for diagnosis of human hearing loss.
Notified Body: BSI Group The Netherlands B.V.
MDSS GmbH Schiffgraben 41 30175 Hannover, Germany
Only applicable to SHOEBOX Audiometry Software
Applicable to headphone and external microphone
Australian Sponsor Name: AA-Med Pty Ltd Address: Level 8, 1 Chandos Street, St Leonards NSW 2065 Australia
IFU-2 3.0 2020/08 Legend:
Catalog Number
Manufacturer
Authorized Representative
Consult IFU A paper copy of this document is available upon request.
SHOEBOX Audiometry Pro User Guide 3

Contents
SHOEBOX Audiometry Pro 1
Introduction 2
Contents 4
Installing SHOEBOX 7
If you received your iPad from SHOEBOX 7
Is your iPad set to the correct Region? 7
If you provided your own iPad 7
Set up your SHOEBOX System 8
Don’t know your SHOEBOX login? 8
Get Started 9
Search for an Existing Patient 9
Create a New Patient 9
Working with Projects 10
Get To Know Your Switchbox 11
Set up your Switchbox 11
Get To Know Your External Microphone 12
Set up your External Microphone 12
Automated Pure Tone Test 15
Configure your Automated Pure Tone Test 15
Set up your Automated Pure Tone Test 17
Performing a Room Scan 18
Playing the Game 20
Addressing Notifications During the Test - REACT Wizard 21
Assisted Mode 23
Viewing Results 24
Audiogram View 24
Table View 25
SHOEBOX Audiometry Pro User Guide 4

Interpreting Results 26
Interpretation Text 26
Interpreting Issues in Audiogram View 27
Interpreting Issues in Table View 27
Manual Pure Tone Test 28
Configure your Manual Pure Tone Test 28
Set up your Manual Pure Tone Test 29
Conducting a Manual Pure Tone Test 29
Recording a Result 29
Masking 30
Bone Conduction 30
Adding Notes 30
Speech Reception Threshold / Speech Detection Threshold Test 31
Set up your SRT / SDT Test 31
Conducting an SRT / SDT Test 32
Masking 32
Recording a Result 32
Speech Discrimination Test 33
Download Word Lists 33
Set up your Speech Discrimination Test 33
Conducting a Speech Discrimination Test 34
Adjust the number of words 34
Changing Previously Set Results 35
Switching Ears 35
Finishing the Test 35
Questionnaires 36
Select a Questionnaire 36
Administering Questionnaires 36
Filling Out a Questionnaire 36
Summary Report 37
SHOEBOX Audiometry Pro User Guide 5

Create a Report 37
Report Confirmation 38
Emailing and Printing the Report 40
Saving the Report 41
Test Data 42
Data Backup & Synchronization 42
Status Indicators 43
Icon 43
Meaning 43
Possible Cause 43
Connecting SHOEBOX To Noah 44
General Settings 45
Additional Settings 46
Profile 46
About 46
Managing & Updating Transducers 47
Updating Transducers 48
Quick/Daily Biological Check 49
Recommendations for Biological Verification 50
Symbols Legend 51
Audiogram Threshold Symbols 51
Tabular View Abbreviations 51
Other Software Symbols 52
SHOEBOX Audiometry Specifications 53
SHOEBOX Audiometry Pro User Guide 6

Installing SHOEBOX If you received your iPad from SHOEBOX
1. Turn on your iPad
2. Connect to WiFi from within the iPad settings (hint: go to Settings> WiFi)
3. Tap the SHOEBOX app icon to launch SHOEBOX
Is your iPad set to the correct Region? To confirm your Region go to Settings > General > Language & Region
If you provided your own iPad
1. Turn on your iPad
2. If this is a brand new iPad, follow the Apple Installation Wizard to set up
3. Launch the App Store by tapping the App Store icon
4. Search for SHOEBOX Audiometry Pro
5. Tap the “GET” button to download and install SHOEBOX
6. Once installed, the app will appear on your iPad home screen
7. Tap the SHOEBOX app icon to launch SHOEBOX
Done! Now you can set up your SHOEBOX system
SHOEBOX Audiometry Pro User Guide 7

Set up your SHOEBOX System 1. Tap the SHOEBOX app icon to launch SHOEBOX
2. Tap the “Get Started” button to set up your software
3. Login using your SHOEBOX email and password
4. If prompted, select which license to activate
5. If prompted, select which transducer to download. Choose the one that matches the barcode on your transducer cord
6. If prompted, select which external microphone to download. Choose the one that matches the serial number on the base of your microphone
7. Set your passcode. It’s optional, but recommended
8. Enable Microphone Access and Location Access by tapping the “I understand” buttons
Don’t know your SHOEBOX login? Hint: the email is the one where you receive your SHOEBOX emails, and the password is the one you created on the SHOEBOX web portal. If you don’t know what these are, contact [email protected]
SHOEBOX Audiometry Pro User Guide 8
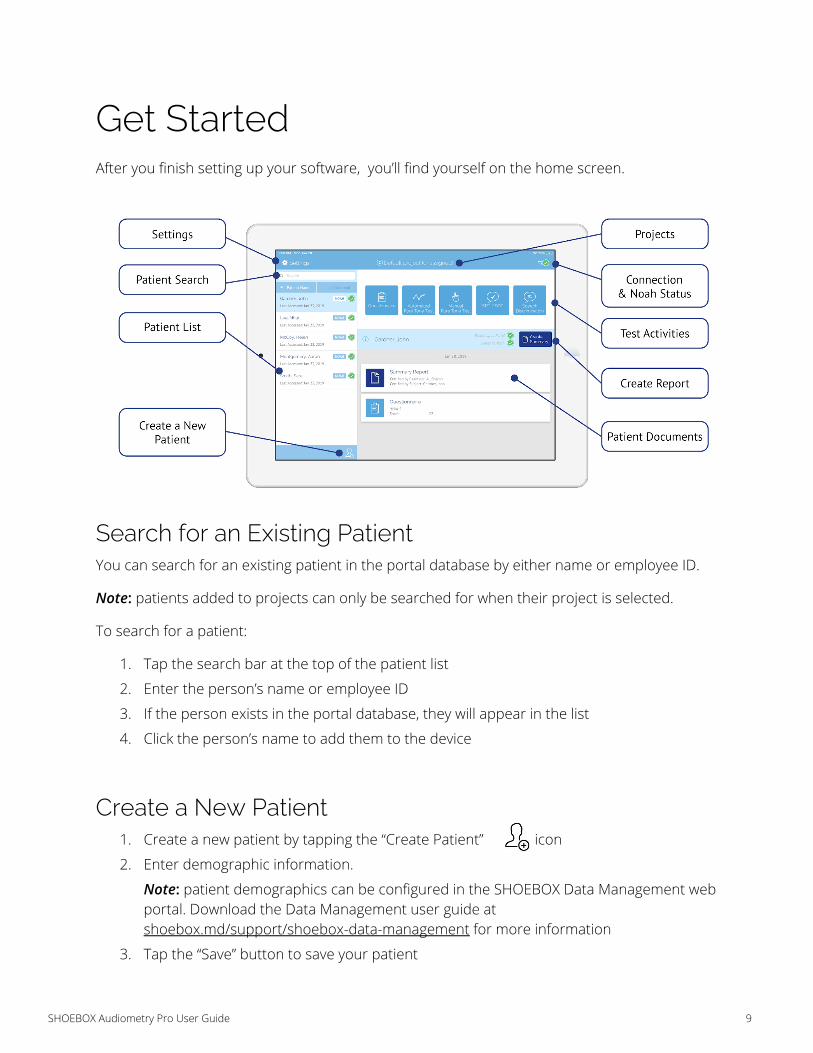
Get Started After you finish setting up your software, you’ll find yourself on the home screen.
Search for an Existing Patient You can search for an existing patient in the portal database by either name or employee ID.
Note: patients added to projects can only be searched for when their project is selected.
To search for a patient:
1. Tap the search bar at the top of the patient list
2. Enter the person’s name or employee ID
3. If the person exists in the portal database, they will appear in the list
4. Click the person’s name to add them to the device
Create a New Patient
1. Create a new patient by tapping the “Create Patient” icon
2. Enter demographic information.
Note: patient demographics can be configured in the SHOEBOX Data Management web portal. Download the Data Management user guide at shoebox.md/support/shoebox-data-management for more information
3. Tap the “Save” button to save your patient
SHOEBOX Audiometry Pro User Guide 9

Edit an Existing Patient On the main screen, select the patient you would like to edit from the patient list on the left hand side of your screen. You can use the search bar to search for your patient as well.
Once you have the patient selected, tap the symbol to open the patient edit page.
Make the changes to the patient info and click "Save" to save your changes.
Note: if you don’t see demographic fields here you’d like to enter, the "General Settings" section on the web portal has a full list of demographics that you can enable or disable. Once enabled, they will appear on both the patient edit page in the app, and on the individual patient page in the web portal.
Working with Projects When you first log in, your selected project will be “Default project (unassigned).”
If you’ve set up projects in your web portal (available to admin users with Data Management PLUS), you’ll be able to select them by tapping the project dropdown. If you haven’t, refer to the Data Management guide at shoebox.md/support/shoebox-data-management to learn more.
Note: Projects cannot be created on the device, and are only available with Data Management PLUS.
If your selected project already has patients in it, the patient names and their demographic information will sync to the iPad. If you create new patients on the app, their names, demographic information, and test results will sync to the portal when you’re connected to WiFi.
SHOEBOX Audiometry Pro User Guide 10

Get To Know Your Switchbox If you perform bone conduction testing, Switchbox is here to help you progress from air testing to bone testing easily and efficiently.
Right Bone Conduction Testing
Turn the dial to the left for bone conduction testing on
the right side
Air Conduction Testing
Turn the dial to the headphones in the center for
air conduction testing
Left Bone Conduction Testing
Turn the dial to the right for bone conduction testing on
the left side
Set up your Switchbox 1. Ensure transducers are firmly connected to Switchbox
2. Ensure Switchbox is firmly connected to the iPad
Note: unplug the air transducer from the Switchbox when performing unmasked bone testing.
Note: the switchbox cannot be used with an external microphone active in hardware settings.
SHOEBOX Audiometry Pro User Guide 11
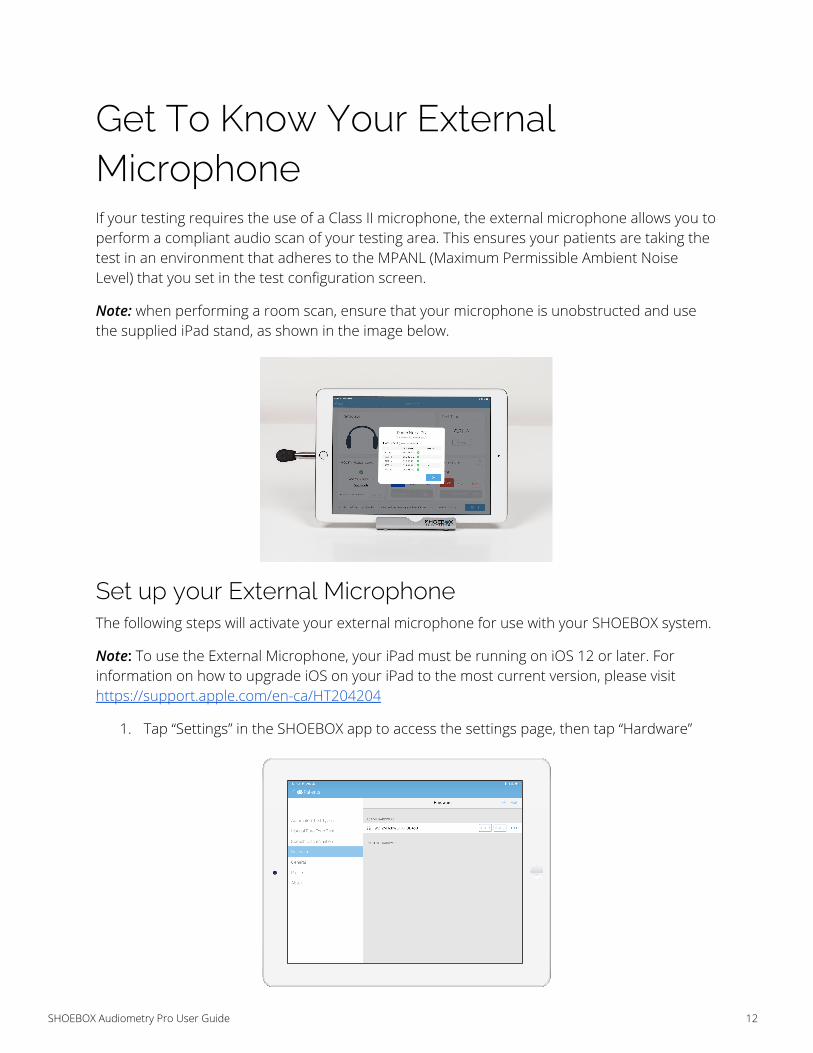
Get To Know Your External Microphone If your testing requires the use of a Class II microphone, the external microphone allows you to perform a compliant audio scan of your testing area. This ensures your patients are taking the test in an environment that adheres to the MPANL (Maximum Permissible Ambient Noise Level) that you set in the test configuration screen.
Note: when performing a room scan, ensure that your microphone is unobstructed and use the supplied iPad stand, as shown in the image below.
Set up your External Microphone The following steps will activate your external microphone for use with your SHOEBOX system.
Note: To use the External Microphone, your iPad must be running on iOS 12 or later. For information on how to upgrade iOS on your iPad to the most current version, please visit https://support.apple.com/en-ca/HT204204
1. Tap “Settings” in the SHOEBOX app to access the settings page, then tap “Hardware”
SHOEBOX Audiometry Pro User Guide 12

2. Tap the + symbol. This will bring up the “Add Hardware” window 3. Tap on the “Microphone” panel. This will bring up the “Add Microphone” window
4. On the “Add Microphone” window, enter the serial number of the microphone you will be using with your SHOEBOX system, and then tap the microphone’s serial number on the list below to ensure the microphone is selected (green checkmark appears next to it). Once that’s done, tap on “Add Microphone”
Your microphone will now be listed under “Active Hardware”.
SHOEBOX Audiometry Pro User Guide 13

Automated Pure Tone Test The SHOEBOX Audiometry Pro Automated Pure Tone Test supports air conduction testing with masking, and unmasked bone conduction testing.
Note: Masked bone conduction testing is considered advanced testing which is only fully supported in the Manual Pure Tone Test.
Configure your Automated Pure Tone Test Automated pure tone test types are pre-configured test settings for use with the Automated Pure Tone Test. They’re useful for setting up test configurations for different demographics or uses. SHOEBOX comes pre-configured with a number of different test types, but you can also customize your configuration by creating your own test types and settings as described below.
To configure your automated pure tone test settings, tap “Settings” in the top left corner of the home screen, then “Automated Test Types” in the settings navigation.
Active test types are test types that can be selected from the Automated Pure Tone Test setup screen. You can move a test type from Active to Inactive or vice versa by tapping and holding the test type, then dragging to the appropriate section.
To delete a test type, tap the “Edit” button, then tap the Delete icon.
To create a new test type, tap the “+” button.
To access a test type’s settings, tap the test type name. Settings include:
1. Test Type Name
2. Frequencies: controls frequencies used in the test and their presentation order. Tap “Frequencies” to go into the frequencies settings. Then adjust frequencies by pressing and holding the ladder icon in the far right corner of the row to enable dragging
a. To change order: arrange the frequencies in your desired test order in the “Active Frequencies” list
b. To move from Active to Unused or vice versa: drag the frequency to the appropriate list
3. Game Theme: sets the game interface of the Automated Pure Tone Test. Options are Classic, Arc, Puppies, and Assisted. Assisted is not intended to be a self-testing interface. See Assisted Mode section for more information
SHOEBOX Audiometry Pro User Guide 14

4. Minimum Volume and Maximum Volume: controls the highest and lowest levels at which the test will present tones
5. Noise Alert Mode: controls if and when you’re notified if noise levels are high enough to potentially interfere with test results
a. “Delay Notification” will notify you at the end of the test
b. “Notify Immediately” will interrupt the test to notify you
c. “Do Not Notify” will not notify you at all
Note: the in-test noise monitor will only be viewable to patients if this setting is set to “Notify Immediately”
6. MPANL (Maximum Permissible Ambient Noise Level) Protocol: the maximum level of noise acceptable per frequency based on organizational standards
7. Bone Testing: controls whether bone testing recommendations will be displayed if necessary Note: you must have a bone transducer downloaded to turn bone testing on
8. Masked Air Testing: controls whether masked air testing recommendations will be displayed if necessary
9. Automated Game Tutorial: controls whether the short tutorial displays to the patient at the start of each test
10. Display Volume Data: controls whether frequency and threshold data are displayed on the patient-facing game screen. We recommend leaving this off
11. Results display mode: controls whether results display in audiogram (graphical) or table view by default
12. Main Tone Type: controls whether the main tone presents a warble tone, pulsed tone, or pure tone
13. Auto-Retest Tone Type: controls whether the automated retest tone (used to retest a frequency during the automated test) presents a warble tone, pulsed tone, or pure tone. It is advised to set this to a different tone type than the Main Tone Type
When you are finished configuring your Automated Test Types settings, tap to go back to the main page.
To start an automated pure tone test, tap “Automated Pure Tone Test” in the test activities section of the home screen.
SHOEBOX Audiometry Pro User Guide 15
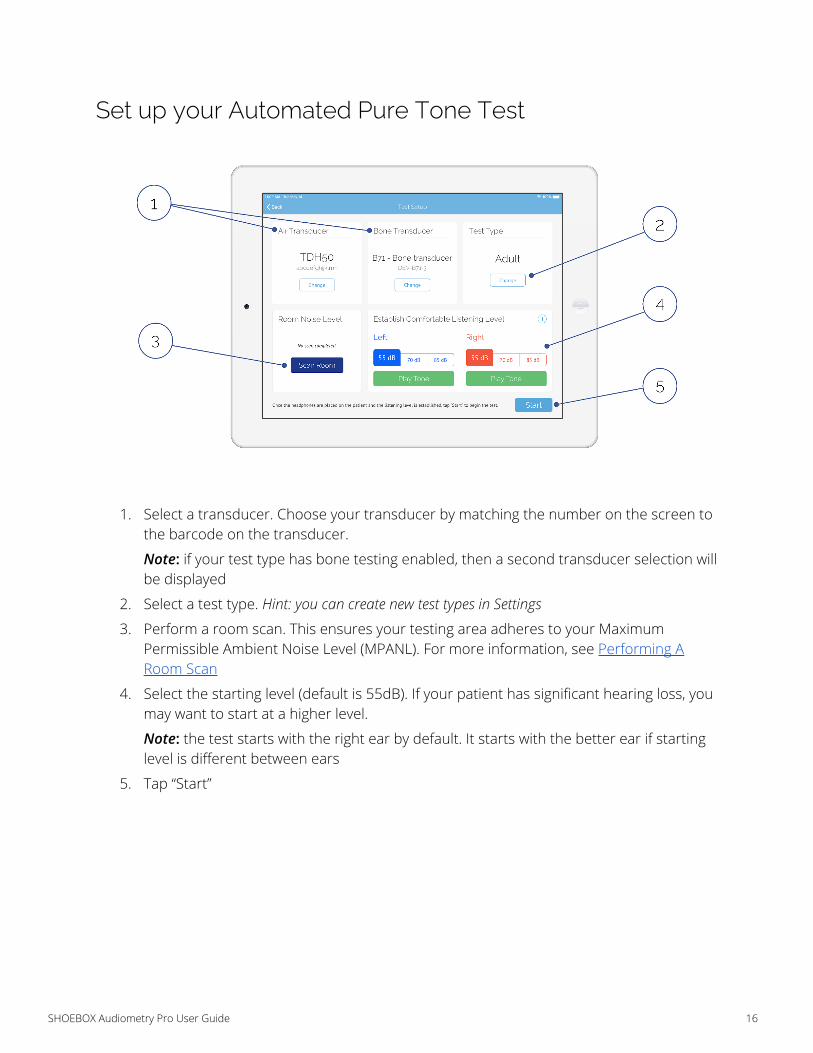
Set up your Automated Pure Tone Test
1. Select a transducer. Choose your transducer by matching the number on the screen to the barcode on the transducer.
Note: if your test type has bone testing enabled, then a second transducer selection will be displayed
2. Select a test type. Hint: you can create new test types in Settings
3. Perform a room scan. This ensures your testing area adheres to your Maximum Permissible Ambient Noise Level (MPANL). For more information, see Performing A Room Scan
4. Select the starting level (default is 55dB). If your patient has significant hearing loss, you may want to start at a higher level.
Note: the test starts with the right ear by default. It starts with the better ear if starting level is different between ears
5. Tap “Start”
SHOEBOX Audiometry Pro User Guide 16

Performing a Room Scan This feature enables you to perform an audio scan of your testing area. This ensures your patients are taking the test in an environment that adheres to the MPANL (Maximum Permissible Ambient Noise Level) that you set in the test configuration screen.
Note: when performing a room scan, ensure that your microphone is unobstructed and use the supplied iPad stand. Also, ensure that the correct Test Type (OSHA vs. ANSI) is selected.
To perform a room scan:
1. From the automated test setup screen, select "Scan Room" 2. If you have enabled an external microphone, it will now prompt you to plug it in
Note: If your testing requires the use of our Class II external microphone, and you have not enabled yours yet, take a look at Set Up Your External Microphone for instructions on how to enable your microphone
3. The scan will then begin, using the microphone to evaluate the testing area
SHOEBOX Audiometry Pro User Guide 17

4. If the noise in the room is too high, you will receive a "Room Noise Too High" result. If you receive this result, it is recommended that you either:
a. Find the source of the noise and prevent it from interfering with the test, e.g. low hums of HVAC units or fridges, high frequency fan whines, etc.
b. Find a new testing area
5. To restart the scan, tap "re-scan" to perform the scan again until you receive a "Room Noise OK" success message
Note: you can view your past scan results by tapping on "See Details." You can also view your scan results on the audiogram results screen.
SHOEBOX Audiometry Pro User Guide 18

Playing the Game If the tutorial is enabled (you can disable it in Settings), it will appear. Tap the Play button to start the tutorial.
Playing the game is as easy as…
1. Press and hold the blue disc to present a sound
2. If you hear a sound (even a very quiet one), tap or drag the blue disc to the green “sound speaker” icon
3. If you don’t hear any sound at all, tap or drag the blue disc to the red “no sound speaker” icon. Hint: more than 50% of the time, you will not hear a sound
Continue pressing and sorting the blue disc until the test is complete.
Various helpers encourage interaction with the interface. These include:
● Green arrow pointing to the blue disc
● Pulsing animation of the blue disc
● Dotted arrows pointing from the blue disc to the targets (when blue disc is tapped)
These helpers will appear if the patient stops interacting with the interface.
Note: if the test is not completed, and no previous thresholds for the patient have been recorded, the test results will be discarded.
SHOEBOX Audiometry Pro User Guide 19

Addressing Notifications During the Test - REACT™ Wizard If there’s an issue during the Automated Pure Tone Test, our Response and Environment Adaptive Control Technology (REACTTM) Wizard will help you resolve it by providing an explanation and recommending what steps to take to address the issue. The REACTTM Wizard is prompted in the following situations:
● Responses are inconsistent or follow a pattern
● The room is too noisy to obtain accurate test results. Hint: you can choose to delay or disable the Too Noisy notification in Settings
● If masking or bone testing are needed (if they are turned on in Settings)
REACTTM Wizard screens include the following information:
● A title referring to what’s causing the prompt
● A progress bar indicating the frequency (or frequencies) at which the issue is occuring
● A brief explanation of the issue and steps you can take to address it
● Action buttons
During the test, if Noise Monitoring is set to “Notify Immediately,” the patient-facing test screen will have a noise meter visible at the top of the screen, in the center of the progress bar. If the testing environment is too noisy, the noise meter will display a thick blue line, and will pause the test if a full rotation is completed.
Noise meter in a quiet environment Noise meter in a noisy environment
SHOEBOX Audiometry Pro User Guide 20
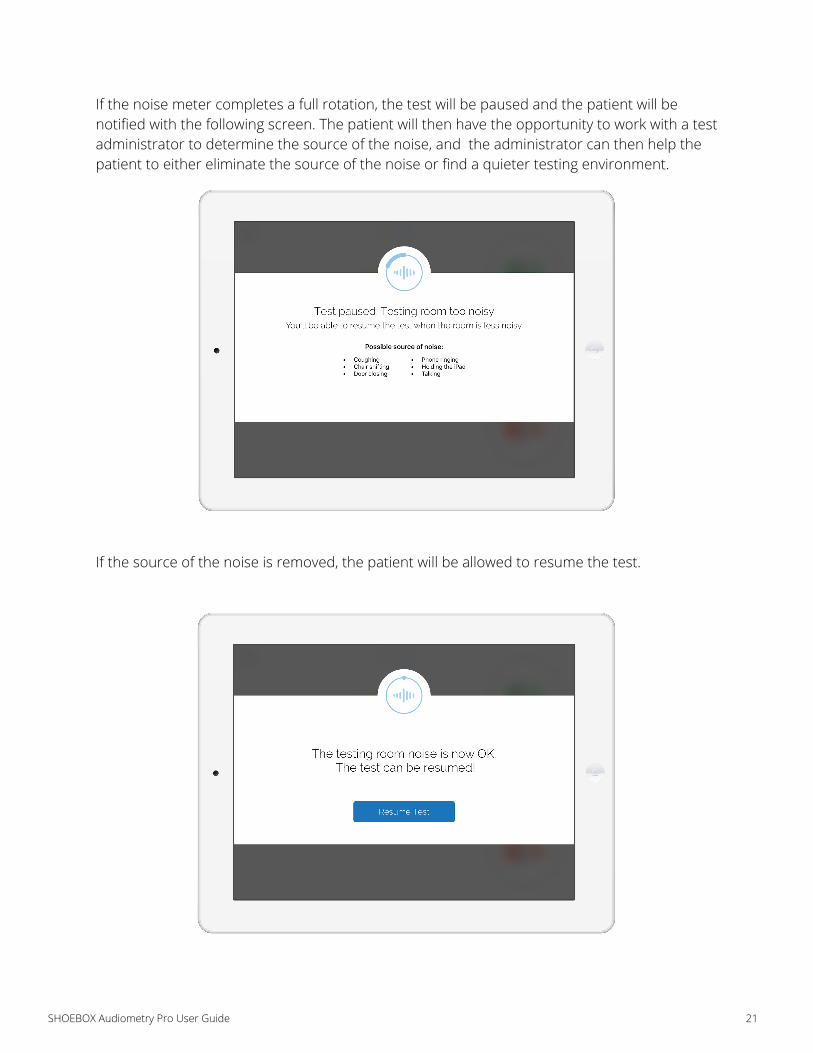
If the noise meter completes a full rotation, the test will be paused and the patient will be notified with the following screen. The patient will then have the opportunity to work with a test administrator to determine the source of the noise, and the administrator can then help the patient to either eliminate the source of the noise or find a quieter testing environment.
If the source of the noise is removed, the patient will be allowed to resume the test.
SHOEBOX Audiometry Pro User Guide 21
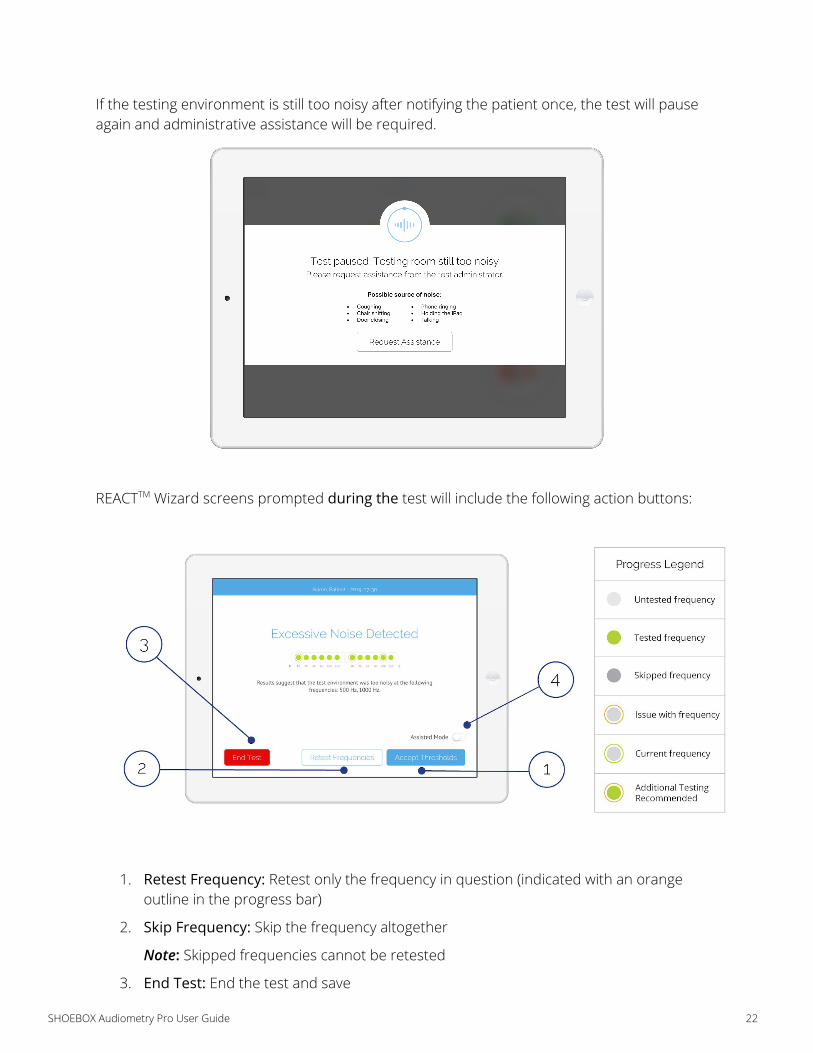
If the testing environment is still too noisy after notifying the patient once, the test will pause again and administrative assistance will be required.
REACTTM Wizard screens prompted during the test will include the following action buttons:
1. Retest Frequency: Retest only the frequency in question (indicated with an orange outline in the progress bar)
2. Skip Frequency: Skip the frequency altogether
Note: Skipped frequencies cannot be retested
3. End Test: End the test and save
SHOEBOX Audiometry Pro User Guide 22

Note: End Test saves the valid thresholds obtained up to that point in the results list, but the test cannot be restarted. If no thresholds are obtained, nothing will be saved
4. Assisted Mode: Turn on Assisted Mode (see next section)
If you have Noise Monitoring set to “Delay Notification,” the REACTTM wizard will only be prompted after the test, and will include the following action buttons:
1. Accept Thresholds: Accept and include the thresholds obtained at the frequencies where the room was too noisy (indicated with an orange outline in the progress bar)
2. Retest Frequencies: Retest only the frequencies where the room was too noisy (indicated with an orange outline in the progress bar)
3. End Test: End the test and save
Note: End Test saves the valid thresholds obtained up to that point in the results list, but the test cannot be restarted. As opposed to “Accept Thresholds,” the results will not include thresholds obtained at frequencies where the room was too noisy
4. Assisted Mode: Turn on Assisted Mode (see next section)
Regardless of settings, SHOEBOX does not monitor noise during bone testing
If you have masking or bone testing turned on—and results indicate the need for either—the REACTTM wizard will be prompted after the test, and will include the following action buttons:
1. Start Masked Air / Start Bone Test: Start the respective additional testing
2. End Test: End the test and save
SHOEBOX Audiometry Pro User Guide 23

Note: End Test saves the valid thresholds obtained up to that point in the results list, but the test cannot be restarted
3. Assisted Mode: Turn on Assisted Mode (see next section)
If at any time you wish to review progress, stop the test, or switch to Assisted Mode, tap the “pause” icon in the top corner of the screen. Then tap “Review Progress” and follow the prompts to get to the Test Paused screen.
Assisted Mode Assisted Mode allows for faster, operator-assisted testing of patients who may have trouble self-testing in automated mode. In Assisted Mode, the test is still automated, but the test administrator administers the test to the patient instead of the patient performing the test on their own.
To use Assisted Mode:
1. Tap the “Play Tone” button to present a tone
2. If the patient indicates having heard a tone, tap “Heard”
3. If the patient gives no indication of having heard a tone, tap “Not Heard”
Tips for using Assisted Mode:
● Have the patient face away from you
● Instruct the patient to indicate only when they hear a tone
● Vary the time between when you present tones. Try waiting for an extra second here and there, so the patient doesn’t notice a rhythm
Note: the test will start in “Assisted Mode” if the Test Type Game Theme is set to Assisted Mode
SHOEBOX Audiometry Pro User Guide 24

Viewing Results After you complete a test, you’ll be taken to the results screen. There are two results screen views: Audiogram View, and Table View.
Audiogram View
1. View test results and room scan results
Note: Pure Tone Average (PTA) can be configured in General Settings. If PTA is not shown on the results screen, the configured frequencies did not have thresholds recorded
2. Review interpretation text and tap box to add your own notes. Interpretation text will include an automated interpretation of results to aid non-hearing health professionals. For more information, see Interpreting Results
3. Calibration information
4. Menu options: print, email, reassign patient, switch to table view, delete
5. Display of the maximum output level of the air transducer
SHOEBOX Audiometry Pro User Guide 25

Table View
1. View test results
Note: Pure Tone Average (PTA) can be configured in General Settings. If PTA is not shown on the results screen, the configured frequencies did not have thresholds recorded
2. Review interpretation text and tap box to add your own notes. Interpretation text will include an automated interpretation of results to aid non-hearing health professionals. For more information, see Interpreting Results
3. Calibration information
4. Menu options: print, email, reassign patient, switch to audiogram view, delete
SHOEBOX Audiometry Pro User Guide 26

Interpreting Results SHOEBOX provides various visual and textual aids to help non-hearing health professionals in interpreting results. For the best understanding of test results, we recommend thoroughly reading the automated interpretation text, as well as reviewing any flags on your audiogram/table results.
Interpretation Text Interpretation text includes the following information:
● Obtained air thresholds, listed in a Hz: dB HL format
● Obtained bone thresholds, listed in a Hz: dB HL format
Note: this will only display if bone testing is completed
● Whether results indicate masking should be applied
● Whether results indicate bone testing should be conducted
Note: this will only display if bone testing is turned on in Settings
● Whether ambient noise levels were too high at certain frequencies
● Whether we were unable to obtain a valid threshold at certain frequencies
● If results are above 25 dB, information indicating which frequencies and a note that consulting a hearing health professional may be recommended
● If testing is terminated during the test, which frequencies were not tested
Note: the industry indicator for hearing loss at the standard testing frequencies is any threshold over 25 dBHL. Frequencies above 8 kHz, known as the Extended High Frequencies (EHF), do not follow that convention. Hearing thresholds are typically higher at those frequencies (10, 12.5 and 16 kHz) even for young, healthy listeners. Therefore, SHOEBOX Audiometry does not automatically indicate hearing loss at the Extended High Frequencies at the same threshold as the standard testing frequencies.
SHOEBOX Audiometry Pro User Guide 27

Interpreting Issues in Audiogram View
If there are any unresolved issues from your test, the audiogram view will display a pale yellow bar along the frequency line to indicate which frequency the issue occurred at. The interpretation text will indicate what this yellow bar is referring to. The yellow bar can refer to frequencies at which:
● Ambient noise levels were too high
● SHOEBOX was unable to obtain a valid threshold
● The application of masking is recommended
Interpreting Issues in Table View If there are any unresolved issues from your test, the table view will indicate the issue with a symbol. The interpretation text will indicate what this symbol is referring to. The symbols include:
● TN: Ambient noise levels were too high
● ?: SHOEBOX was unable to obtain a valid threshold
● +M: The application of masking is recommended
● NR: No response
SHOEBOX Audiometry Pro User Guide 28

Manual Pure Tone Test The SHOEBOX Audiometry Manual Pure Tone Test supports air and bone conduction testing with masking.
Configure your Manual Pure Tone Test To configure your manual pure tone test settings, tap “Settings” in the top left corner of the home screen, then “Manual Pure Tone Test” in the settings navigation.
You can configure the following settings:
● Frequencies: controls which frequencies are enabled for testing. Tap “Frequencies” to go into the frequencies settings. Then adjust frequencies by pressing and holding the ladder icon in the far right corner of the row to enable dragging
○ “Active” frequencies can be used during testing, “Unused” cannot
○ To move from Active to Unused or vice versa: drag the frequency to the appropriate list
● Default Tone Type: sets which tone type is used by default. This can be changed at any time on the testing screen. Options are pure tone, warble, and pulsed tone.
● Volume Up Step: configures dB steps for increasing volume
● Volume Down Step: configures dB steps for decreasing volume
● Volume Limits: sets minimum - maximum presentation levels. You will not be able to test at volumes below or above these levels
● Tone Presentation Markers: shows a history of the intensity (dB) level where you’ve presented tones at a particular frequency, indicated by small circles on the audiogram. These are helpful to see where you have tested during the process of obtaining a threshold
● Show Masking Controls: controls whether masking controls are available on the testing screen or not
● Default Tone Presentation Level: controls the default presentation level when you launch a new manual pure tone test.
To start a manual pure tone test, tap “Manual Pure Tone Test” in the test activities section of the home screen.
SHOEBOX Audiometry Pro User Guide 29

Set up your Manual Pure Tone Test
1. Select a transducer by tapping the dropdown in the center of the screen. Any transducers in your Active Transducers list will be available for selection
2. Select an ear by tapping the corresponding audiogram
3. Select the tone type by tapping the dropdown above the “Play Tone” button
Conducting a Manual Pure Tone Test 1. Select a frequency by tapping the audiogram or using the frequency arrows
2. Adjust presentation level by tapping the audiogram or using the buttons above the frequency arrows. Step increments can be set in Manual Pure Tone Test Settings
3. Present a tone by tapping the “Play Tone” button. The tone will play for however long you press the button
4. Record the result of the selected frequency by tapping the corresponding button next to the “Play Tone” button: “Set Threshold,” “Unreliable,” or “No Response.” The “Clear” option will clear a previously set result for the selected frequency
5. When you’re finished testing one ear, tap the corresponding audiogram to switch to the other ear
Recording a Result You can record a result by tapping the corresponding button next to the “Play Tone” button: “Set Threshold,” “Unreliable,” or “No Response.” “Clear” will clear a previously set result.
SHOEBOX Audiometry Pro User Guide 30

Masking 1. To bring up masking controls, tap the “+” button next to “Masking” in the lower center of
the screen
2. To change the masking level, use the +/- dB buttons in the masking controls section
3. To start playing the masking noise, tap “Start Masking”. The button will change to “Stop Masking” while masking is playing. For patient safety and comfort, masking will stop playing automatically when you change frequencies
Note: The masking and tone indicators will always be displayed under the corresponding (right/left) audiogram display
Bone Conduction
1. To switch to bone conduction, select a bone transducer from the transducer dropdown. A pop-up will appear explaining how to ensure proper setup for bone testing Note: unplug the air transducer from the Switchbox when performing unmasked bone testing
2. To enable masked bone testing, with the bone transducer selected in the dropdown, open the masking controls. A pop-up will appear explaining how to ensure proper setup for masked bone testing
Adding Notes Tap the notes icon at the top right corner of each audiogram to add ear-specific notes.
SHOEBOX Audiometry Pro User Guide 31

Speech Reception Threshold / Speech Detection Threshold Test SHOEBOX supports Speech Reception Threshold (SRT) and Speech Detection Threshold (SDT) testing via air conduction with masking.
Note: All test configurations for SRT / SDT testing can be made from the SRT / SDT test interface.
To start an SRT / SDT test, tap “SRT / SDT” in the test activities section of the home screen.
Set up your SRT / SDT Test 1. Select a transducer by tapping the dropdown in the center of the screen. Any air
transducers in your Active Transducers list will be available for selection
2. Select an ear by tapping the corresponding table
3. Select the word list by tapping the dropdown above the “Play Tone” button
4. Select the words you would like to use for testing by tapping the “+” button next to “Word Selection”. Tap the “-” button to close Word Selection
5. If you would like to conduct an SDT test, tap the SDT tab above the ear tables. If you attempt to switch test types after you’ve set results in one test type, you’ll be prompted to clear your results
SHOEBOX Audiometry Pro User Guide 32

Conducting an SRT / SDT Test 1. Adjust presentation level using the +/- dB buttons on the lower left side of the screen
2. The current word and next word are displayed below the ear tables
a. Play the next word by tapping the “Play Next Word” button
b. The word will move the left, increase in size, and change color
c. To skip words, tap “Skip Next Word.” A word won’t play until you tap the “Play Next Word” button Hint: You can quickly play through all the selected words at the same intensity for the familiarization task
3. When you’re finished testing one ear, tap the corresponding table to switch to the other ear
Masking 1. To bring up masking controls, tap the “+” button next to “Masking” in the lower center of
the screen
2. To change the masking level, use the +/- dB buttons in the masking controls section
3. To start playing the masking noise, tap “Start Masking”. The button will change to “Stop Masking” while masking is playing
Recording a Result You can record a result by tapping the corresponding button next to the “Play Word” button: “Set Threshold”, “Could Not Test”, or “No Response”. “Clear” will clear a previously set result.
Note: You can create a comprehensive patient summary report that includes the patient audiogram, SRT/SDT, Speech Discrimination, and Questionnaire results from the home screen by tapping the “Create Summary” button. See the Summary Report section for more information.
SHOEBOX Audiometry Pro User Guide 33

Speech Discrimination Test Download Word Lists Note: you must be connected to WiFi to download word lists
1. Tap “Settings” in the top left corner of the home screen
2. Tap “Speech Discrimination” in the settings navigation
3. Tap the switch next to each speech list you would like to download.
Note: Each speech list has an “a” and “b” version corresponding to the first and second half of each 50 word list
To start a Speech Discrimination test, tap “Speech Discrimination” in the test activities section of the home screen.
Set up your Speech Discrimination Test All test settings are under “Test Settings” on the left side of the screen in the Speech Discrimination interface.
1. Select a transducer by tapping the dropdown. Any air transducers in your Active Transducers list will be available for selection
2. Select the word list by tapping the dropdown. You’ll be able to select from any word lists you’ve downloaded in Settings
3. Select the starting ear by tapping the dropdown
SHOEBOX Audiometry Pro User Guide 34

4. Presentation level will be automatically set if PTA results are available from a pure tone test. You can adjust the presentation level using the corresponding buttons
5. “Play Test Word” plays a random test word to test the presentation level before starting the test
6. Tap “Start Test” to start the test
Hint: Instruct the patient by first explaining the intensity level you would like to present words at (if setting MCL) and asking them to repeat the words after the carrier phrase “Say the word”
Conducting a Speech Discrimination Test
1. The first word will be played immediately after tapping “Start Test”
2. Select “Correct” or “Missed” to mark the word accordingly
3. The next word will play automatically after the previous word is marked
4. Tap the “Skip Word” button to remove the word from the test score calculation
Adjust the number of words The test will automatically stop at 10 words. You have two options to adjust:
1. Press and hold “Stop at 10 words” marker and drag to the stop point you would like to use
2. Tap the “Use All Words” button to use all 25 words
SHOEBOX Audiometry Pro User Guide 35

Changing Previously Set Results To change previously set results, tap the box next to the word.
Switching Ears When the set number of words are complete, the “Switch Ear” button will turn from grey to green. At any point, you can also tap the “Switch Ear” button to finish the ear at that point.
When you switch to the second ear, the second word list of the a/b variations will automatically be selected.
Finishing the Test To finish the test, tap the “Finish Test” button. You’ll be taken to the results screen.
On the results screen, you can add notes and see the words tested, but you can’t adjust test results.
Note: You can create a comprehensive patient summary report that includes the patient audiogram, SRT/SDT, Speech Discrimination, and Questionnaire results from the home screen by tapping the “Create Summary” button. See the Summary Report section for more information.
SHOEBOX Audiometry Pro User Guide 36

Questionnaires Select a Questionnaire
1. Tap “Settings” in the top left corner of the home screen, then “General” in the settings navigation
2. Navigate to “Patient Questionnaire” in General Settings
Note: You can only select one questionnaire at a time. To remove “Questionnaire” from the test activities section of the home screen, select “None” from the “Patient Questionnaire” dropdown
Administering Questionnaires To administer a questionnaire, tap “Questionnaire” in the test activities section of the home screen.
Filling Out a Questionnaire
● To answer a single-answer question, tap the dropdown to answer. The dropdown of the next question will open as soon as a selection is made in the current one
● To answer a multi-answer question, tap the selection boxes
● To submit answers, tap the submit button
SHOEBOX Audiometry Pro User Guide 37

Summary Report You can create a comprehensive patient summary report from the home screen that includes the patient audiogram, SRT/SDT, Speech Discrimination, and Questionnaire results.
Note: your iPad must be connected to the internet to generate a summary report.
Create a Report
1. Select the patient you would like to create a report for in the patient list 2. Tap the “Create Summary” button below the activity section 3. You’ll find yourself on the report page, which includes a preview of the report and a
drawer with report actions, including report confirmation (if enabled in the portal), emailing, and printing the report (see following image)
SHOEBOX Audiometry Pro User Guide 38

Report Confirmation If you have Subject and/or Examiner Confirmation enabled in the SHOEBOX Data Management web portal, you will see additional confirmation tabs in the report drawer on the right hand side of the summary report screen. The confirmation message can be customized for both subject and examiner.
For more information on enabling and customizing Subject and/or Examiner Confirmation, download the SHOEBOX Data Management user guide at shoebox.md/support/data-management.
On this page, the subject is prompted to read through the subject confirmation message and provide their signature using the digital signature entry field.
SHOEBOX Audiometry Pro User Guide 39

After the subject has confirmed, they will then be prompted to hand the iPad back to the examiner.
The examiner is then prompted to enter their first and last name, and provide their own digital signature.
Once both the subject and examiner have provided their digital signatures, the signatures will appear at the bottom of the report and a "Confirmation Complete" message will appear, along with the option to print and/or email the report.
SHOEBOX Audiometry Pro User Guide 40

Emailing and Printing the Report The report can be emailed and/or printed from the final section in the report tab. In order to email a report, your email account must be configured in the “Accounts & Passwords” section of the iPad Settings.
Note: When emailing a report, you’ll be asked to create a password to protect the file. This password should be shared with whomever you are sending the report to so that they are able to view it.
The email will be sent from the email configured in your iPad Settings.
SHOEBOX Audiometry Pro User Guide 41

Saving the Report Once the required confirmations have been completed, the report can be saved. Saved reports will appear along with test results in the patient documents section. To save a report, tap to go back to the home screen.
SHOEBOX Audiometry Pro User Guide 42

Invalidating or Deleting a Saved Report If you need to remove a saved and signed report for regulatory or other purposes, you have two options to do so: “Remove” which will delete the summary report permanently, or “Mark Invalid” which will keep the history of the summary report saved, but will put the report into an unusable state to prevent the invalid report from being distributed.
1. From the main screen, swipe left on a patient’s summary report to reveal the “Mark Invalid” and “Remove” options
2. Select either “Mark Invalid” or “Remove”
“Remove” will permanently delete the summary report from your device. “Mark Invalid” will keep the history of the summary report saved, but will put the report into an unusable state to prevent the invalid report from being distributed, as seen in the image below.
SHOEBOX Audiometry Pro User Guide 43

Test Data Test results for each patient will be viewable on the home screen when the patient is selected.
You can tap into individual results to view more data.
Automated Pure Tone Test and Speech Discrimination results are read-only; Manual Pure Tone Test, SRT / SDT, and Questionnaire results can be altered and/or overwritten.
Data Backup & Synchronization For continuous backup of your data, we encourage you to use the Web Portal Backup feature of SHOEBOX. When enabled, Web Portal Backup will automatically backup your data to your SHOEBOX Data Management Web Portal. See the Settings section for more information. If you have chosen to disable web portal backup, you should establish your own data backup protocol for your test records.
For more information on using your SHOEBOX Data Management web portal, download the user guide at shoebox.md/support/shoebox-data-management.
You can view the connection status of your test data at the top right corner of the home screen, and the status of individual patient test data in both the patient list, and in the individual patient section.
You can tap on the connection status icon for more details about the connection and backup status.
SHOEBOX Audiometry Pro User Guide 44

Status Indicators Icon Meaning Possible Cause
SHOEBOX is syncing patient data with the SHOEBOX Data Management web portal.
Update made to patient.
SHOEBOX was unable to sync patient data (including test results) to the SHOEBOX Data Management web portal.
No internet connection.
SHOEBOX is not experiencing any issues. All data has been synced to the SHOEBOX Data Management web portal.
SHOEBOX is not connected to the SHOEBOX Data Management web portal, however all data has been previously synced.
No internet connection. Not connected to Noah.
Note: if you have disabled backups to the SHOEBOX Data Management web portal (not recommended), then the status indicator beside the patient will remain in the red error state.
SHOEBOX Audiometry Pro User Guide 45

Connecting SHOEBOX To Noah If you want to connect SHOEBOX to your clinic’s Noah database, download the “SHOEBOX Noah Integration Guide” at shoebox.md/support/shoebox-pro for instructions.
SHOEBOX Audiometry Pro User Guide 46

General Settings ● Audiogram Email: sets the email address an audiogram will go to when you choose
“Email” from the “Menu” dropdown on a test result page
● Passcode: allows you to change, enable, or disable your SHOEBOX passcode
● Screensaver: allows you to change the duration after which the screensaver will appear, as well as enable or disable it altogether
● Audiology: allows you to configure the frequencies that will be used to calculate the Pure Tone Average (PTA) in automated and manual pure tone tests.
Note: the PTA will only be calculated if results are captured at the configured frequencies. We recommend you ensure the settings here are aligned with your configuration on the web portal
● Patient Questionnaire: sets patient questionnaire. See the Questionnaires section for more information
● Re-enable All Confirmation Dialogs: allows you to re-enable all confirmations if you have disabled particular ones in the past
● Test Subject Language: sets the language used for all patient-facing messaging in the Automated Pure Tone Test
● Web Portal Backup: allows for enabling / disabling web portal backup. We do not recommend disabling web portal backup
● Last Web Portal Backup Date: displays a read-only view of the last date and time data was backed up to your web portal
● Presentation Mode: allows for demonstrations of the interface without needing to plug in transducers. This should not be enabled for clinical use
SHOEBOX Audiometry Pro User Guide 47

Additional Settings Profile “Profile” sets account information about the test administrator using SHOEBOX. It shows you who’s logged in and what license they have, as well allows you to log out.
Note: you cannot switch your user after logging out. The only way to switch a user is to delete the app and reinstall. If SHOEBOX provided your iPad, contact [email protected] for help.
About “About” lists version and legal information about SHOEBOX.
● Version: contains information on edition, version, build, and release date of the version of SHOEBOX you’re currently using
● Legal: where you can find our terms of service and privacy statement
● Credits: provides credits of 3rd-party software used by SHOEBOX in development
SHOEBOX Audiometry Pro User Guide 48

Managing & Updating Transducers To manage your downloaded transducers, tap “Settings” in the top left corner of the home screen, then tap “Hardware” in the settings navigation.
Transducers are organized into Active and Inactive lists. Only transducers in the Active list can
be used in tests. To move a transducer from one list to the other, tap and choose “Deactivate” or “Activate” transducer.
To download a transducer:
1. Tap the + symbol in the top right corner of the screen. This will open the “Add Hardware” window
2. Tap the “Transducer” panel. This will open the “Add Transducer(s) window
SHOEBOX Audiometry Pro User Guide 49
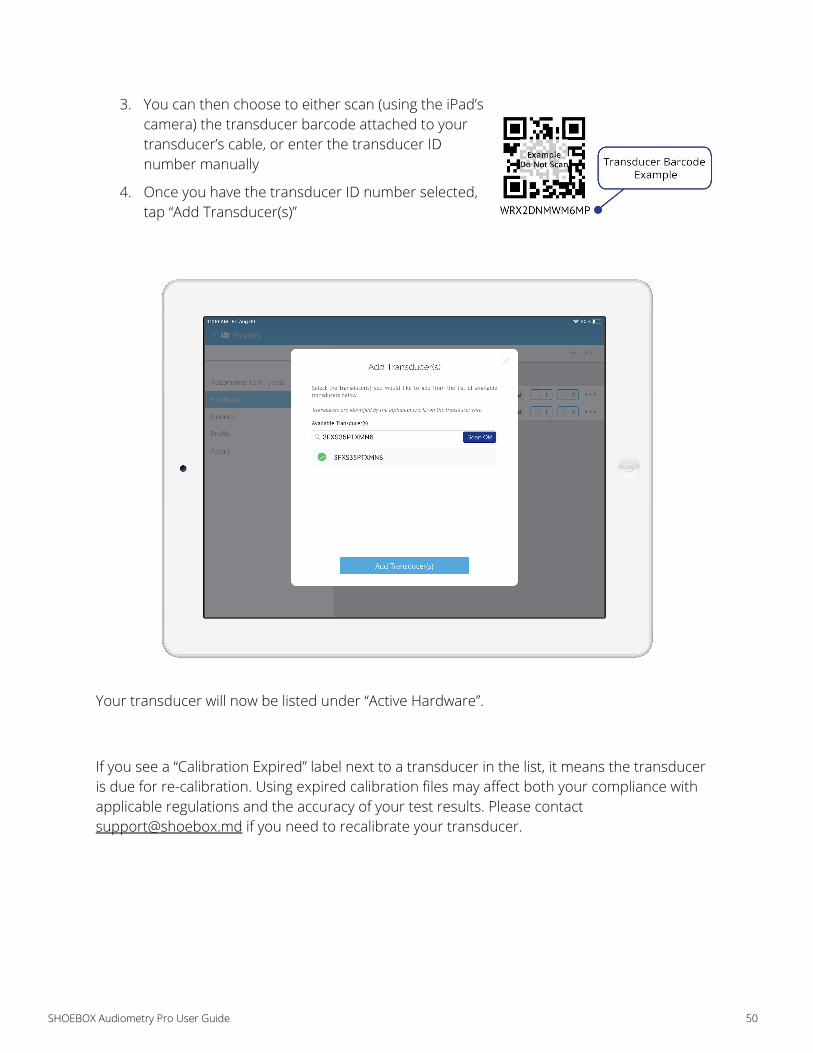
3. You can then choose to either scan (using the iPad’s camera) the transducer barcode attached to your transducer’s cable, or enter the transducer ID number manually
4. Once you have the transducer ID number selected, tap “Add Transducer(s)”
Your transducer will now be listed under “Active Hardware”.
If you see a “Calibration Expired” label next to a transducer in the list, it means the transducer is due for re-calibration. Using expired calibration files may affect both your compliance with applicable regulations and the accuracy of your test results. Please contact [email protected] if you need to recalibrate your transducer.
SHOEBOX Audiometry Pro User Guide 50

Updating Transducers Before updating your transducers, it’s important that you have the most recent version of SHOEBOX installed.
Once you’ve verified that you’re up to date, and you have received your newly calibrated transducer(s), follow the steps below to update the associated calibration files.
Tap “Settings” in the top left corner of the home screen, then “Hardware” in the settings navigation to access the hardware page.
To add your new transducers:
1. Tap the + symbol in the top right hand corner of the Hardware page. This will open the “Add Hardware” window
2. Tap the “Transducer” panel. This will open the “Add Transducer(s)” window
3. You can then choose to either scan (using the iPad’s camera) the transducer barcode attached to your transducer’s cable, or enter the transducer ID number manually
4. Once you have the transducer ID number selected, tap “Add Transducer(s)”
Your new transducer(s) will now be listed in the “Active Hardware” section.
To remove your old transducers:
1. Tap “Edit” in the top right hand corner of the Hardware page
2. Tap the delete icon. This will bring up a second delete prompt on the right hand side of the transducer’s listing
3. Tap “Delete” to remove the transducer from your device
SHOEBOX Audiometry Pro User Guide 51

Quick/Daily Biological Check This is a quick method to check the transducer output. For a more extensive verification, you can follow the Biological Verification Recommendations.
To test transducer output:
1. Tap the “L” and “R” buttons next to the transducer name
2. A 70 dB HL tone at 1000 Hz should play out of the corresponding side of the transducer
3. Place the headphones on your head and confirm the sound is loud and clear, even when moving the headphone cable
SHOEBOX Audiometry Pro User Guide 52

Recommendations for Biological Verification In addition to formal annual calibration, self-directed biological verification of your SHOEBOX system can be helpful in ensuring all of your components are performing properly.
A biological verification can be executed at any time, but is especially important when:
● You’re traveling with your system
● The system components haven’t been used for an extended period of time
Depending on the regulations you adhere to, biological verification can be used in place of a biological check when you’re required to maintain a log.
Biological verification can be done by testing an individual with known and stable hearing levels.
To perform a biological verification:
1. Create a control patient. We recommend naming it “Biological Verification” so it’s easy to find and won’t be confused with a real patient. This patient will be selected whenever you’d like to perform a check. This format makes it easy to:
a. Compare subsequent tests with the baseline audiogram already saved under the control patient
b. Find a tally of all the results from biological verification activities, which is useful for auditing and/or troubleshooting purposes
2. It’s recommended to test a minimum of two frequencies per ear (e.g. 1000 and 4000 Hz), but any number of frequencies can be selected
3. If any of the threshold(s) are more than 10dB different from those on the baseline test, a recalibration or change of transducer could be required
We also recommend ensuring all connections between equipment components are free from static, crackling, and/or intermittencies. To do this:
1. Play a tone.
2. While playing the tone, apply tactile pressure on the jack to the iPad and vary the pressure. Wiggling is also encouraged.
Note: this also applies to any connector cables, Switchboxes, and wires to the headphones
3. If static, crackling, or intermittencies are detected, the transducer, or associated component, should be replaced
SHOEBOX Audiometry Pro User Guide 53

Symbols Legend Audiogram Threshold Symbols
Symbol Meaning Symbol Meaning
Left air conduction Right air conduction
No response to upper limits air conduction, left
No response to upper limits air conduction, right
Left masked air conduction Right masked air conduction
No response to upper limits masked air conduction, left
No response to upper limits masked air conduction, right
Unmasked bone, left side
Unmasked bone, right side
No response to upper limits unmasked bone, left side
No response to upper limits unmasked bone, right side
Masked bone conduction left side
Masked bone conduction right side
No response masked bone left side
No response masked bone right side
Tabular View Abbreviations
Symbol Meaning Symbol Meaning
NR No Response M Threshold obtained using masking
TN Result too noisy N/A No threshold obtained
+M Masking recommended
SHOEBOX Audiometry Pro User Guide 54

Other Software Symbols
Symbol Meaning Symbol Meaning
New Patient Patient Information
Connection Status Notes
Add Item / Create New Reorder Item
Warning Download
Syncing
Unable to Sync
Synced
Not Connected
SHOEBOX Audiometry Pro User Guide 55

SHOEBOX Audiometry Specifications
Audiometer Type Type 3
Permissible environmental conditions See iPad technical specifications available on www.apple.com
Permissible power supply variations SHOEBOX Audiometry will only function when iPad is on battery power
Measures to minimise unwanted sound radiation Touch screen interface, no sound is emitted
Identification of the transducers and their reference equivalent threshold levels
See transducer calibration certificate for information on transducer calibration
Ear simulator used for calibration As per ANSI/ASA S3.6-2010
Static force provided As per ANSI/ASA S3.6-2010
Placement of bone vibrator Mastoid
Actual bandwidth of narrow-band masking noise Narrow-band masking noise bandwidth is 1/2 octave
Warm up time No warm up time required. See iPad technical specifications on www.apple.com
Sensitivities and nominal impedances of all input facilities.
No input facilities
Available voltage and nominal impedance of all output facilities
Output is CTIA/AHJ 3.5mm audio output of Apple iPad. See iPad technical specifications on www.apple.com
Pin assignment of all external plug connections Output is CTIA/AHJ 3.5mm audio output of Apple iPad. See iPad technical specifications on www.apple.com
Mode of operation Pure tone forced choice modality utilizing a Modified Hughson Westlake algorithm
Rate of change of sound pressure level for automatic-recording audiometers
n/a
Rate of change of frequency n/a, not a Bekesy algorithm
Frequency of modulating signal Warble tone frequency = 5Hz
Modulation waveform Sine
Modulation range 6%
Sound attenuation characteristics of the earphones as measured in accordance with ISO 4869-1
For transducer sound attenuation characteristics, refer to transducer manufacturer documentation
Maximum hearing level settings provided at each test frequency including limitations in use due to harmonic distortion
SHOEBOX Audiometry Pro = 120 dB HL SHOEBOX Audiometry Standard = 90 dB HL No limitations due to harmonic distortion
SHOEBOX Audiometry Pro User Guide 56

Effects of airborne sound radiation of the bone vibrator and means to obtain the correct test results
Refer to bone vibrator manufacturer’s documentation, reference to compliance with IEC 60645-1
Information about the time window for subject’s response for automated test procedures
Pure tone forced choice modality does not involve subject response timing
Type of battery, means of checking the battery and method of replacement, expected battery life time
See iPad technical specifications available on www.apple.com
Maintenance and calibration procedures and schedules
Headphones must be calibrated annually per ANSI/ASA S3.6-2010 Calibration procedure verifies correct operation and identifies required maintenance
EMC warning See iPad technical specifications available on www.apple.com
Type of auditory signal Pure tones, warble tones, pulsed tones, masking tones, speech recordings
Type of transducers and their headband force Various ANSI/ASA S3.6-2010 compliant transducers are available, refer to transducer manufacturer’s documentation
Sound field system None, not supported
Type of ear simulator or mechanical coupler used for calibration and the method of coupling the transducer
See calibration certificate for each transducer
Type of calibration Calibrated in dBHL for known RETSPLs for each transducer according to ANSI/ASA S3.6-2010
Acoustic or Vibratory Signal Level for a given setting of the output-level control
Control interface displays dBHL based on RETSPL of the currently selected transducer. This is mapped to output voltage level appropriately
Polarity of resulting acoustic or vibratory signal Left and right channel outputs produce in-phase sounds and their polarity is set during calibration
Repetition rate Modified Hughson Westlake algorithm is used
Duration of the initial sound pressure or vibratory force wave of a click and/or duration and rise/fall times of acoustic or vibratory tone-bursts
As specified in ANSI/ASA S3.6-2010 section 7.5.4
Subjective relationship between test signals and reference signals
RETSPLs from the manufacturers are used to enable normalized hearing level outputs
Environmental conditions at time of calibration As specified in ANSI/ASA S3.6-2010 and as recorded in annual calibration equipment certification
Frequency responses and tolerances in the frequency range from 250 Hz to 4 kHz for bone vibrator output
Refer to bone vibrator manufacturer’s documentation
Storage Store iPad and headphone accessories according to accessory manufacturer recommendations
SHOEBOX Audiometry Pro User Guide 57