Digital signage software | Digital Signage | Navori Softeare

SHARP Digital Signage Software Pro
PN-SS05
OPERATION MANUAL
Introduction ........................................... 2Precautions on Use ...........................................2Trademarks........................................................2How to Read this Manual ..................................3Definitions ..........................................................3
Installing/Launching ............................. 4Required Operating Environment ......................4Installing SHARP Digital Signage Software Pro ......................................................4Launching and Closing the Pro Manager ..........7Setting the Operation Environment .................10
Distributing .......................................... 16Distribution Schedule .......................................16Distribution Status (Delivery) ...........................20Distribution Status (Panel) ...............................21
Emergency Distribution ..................... 23Break-in Program ............................................23Emergency Scroll Message .............................26
Management ........................................ 29Status Monitoring / Control ..............................29Panel Information ............................................33
Viewer Update ..................................... 34
Distribution Scheduler ....................... 40Distribution Scheduler Menu ...........................40
Contents
Version 4.1

2
IntroductionThank you for purchasing SHARP Digital Signage Software Pro.This software expands the functions provided by the SHARP Digital Signage Software Network Version (PN-SS05) with various enhancement such as management and distribution of programs.
IMPORTANT:To aid reporting in case of loss or theft, please record the product’s model and serial numbers in the space provided.
Model No.:
Serial No.:
U.S.A. ONLY
Precautions on UseThis product is subject to exacting quality control and product inspection before shipment. In the unlikely •event that a failure or malfunction occurs, contact your retailer.Please note that SHARP CORPORATION bears no responsibility for any failure, malfunction, or •damages due to improper use of this product by the customer or a third party, except where indemnity liability is recognized under law.When showing TV, DVDs, or similar copyrighted programs and/or material you must obtain the •permission of the copyright holder or copyright holders.Transcribing or duplicating part or all of this manual and/or this software without permission from our •company is not permitted.As a part of our policy of continuous improvement, SHARP reserves the right to make design and •specificationchangesforproductimprovementwithoutpriornotice.Theperformancespecificationfiguresindicatedarenominalvaluesofproductionunits.Theremaybesomedeviationsfromthesevalues in individual units.
TrademarksMicrosoft, Windows, and Windows Vista are either registered trademarks or trademarks of Microsoft •Corporation in the United States and/or other countries.The Microsoft Internet Explorer logo is a trademark of Microsoft Corporation in the United States and •other countries.Pentium is a registered trademark or trademark of Intel Corporation and/or its subsidiaries in the United •States and/or other countries.Names of products and other proper nouns are the registered trademarks or trademarks of their •respective copyright holders.
3
Introduction
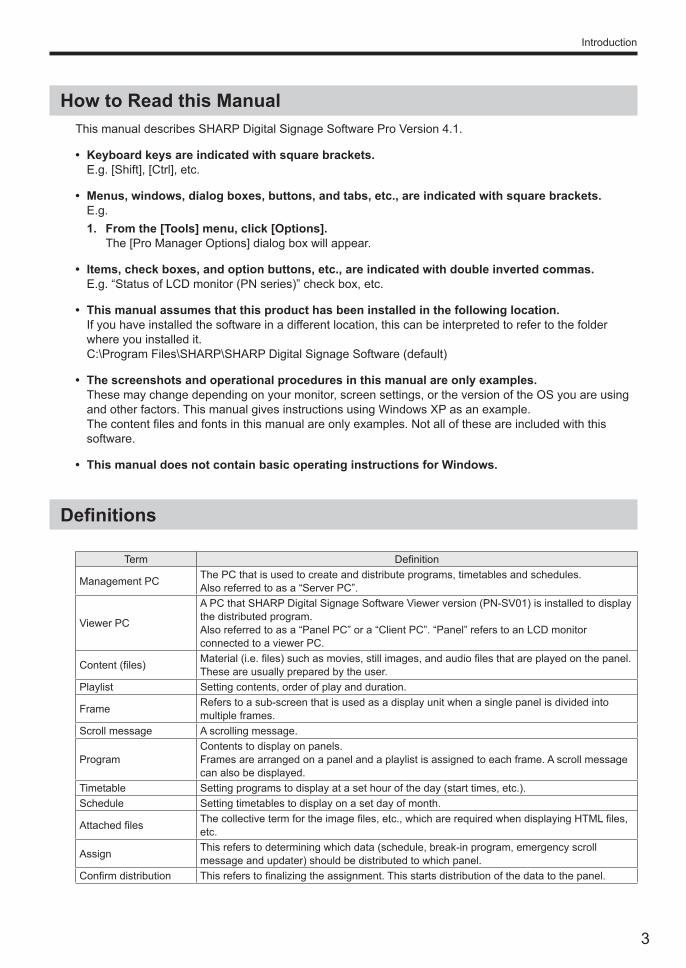
How to Read this ManualThis manual describes SHARP Digital Signage Software Pro Version 4.1.
Keyboard keys are indicated with square brackets.•E.g. [Shift], [Ctrl], etc.
Menus, windows, dialog boxes, buttons, and tabs, etc., are indicated with square brackets.•E.g.
From the [Tools] menu, click [Options].1. The [Pro Manager Options] dialog box will appear.
Items, check boxes, and option buttons, etc., are indicated with double inverted commas.•E.g. “Status of LCD monitor (PN series)” check box, etc.
This manual assumes that this product has been installed in the following location.•If you have installed the software in a different location, this can be interpreted to refer to the folder where you installed it.C:\Program Files\SHARP\SHARP Digital Signage Software (default)
The screenshots and operational procedures in this manual are only examples.•These may change depending on your monitor, screen settings, or the version of the OS you are using and other factors. This manual gives instructions using Windows XP as an example.Thecontentfilesandfontsinthismanualareonlyexamples.Notalloftheseareincludedwiththissoftware.
This manual does not contain basic operating instructions for Windows.•
Definitions
Term Definition
Management PC The PC that is used to create and distribute programs, timetables and schedules.Also referred to as a “Server PC”.
Viewer PC
A PC that SHARP Digital Signage Software Viewer version (PN-SV01) is installed to display the distributed program.Also referred to as a “Panel PC” or a “Client PC”. “Panel” refers to an LCD monitor connected to a viewer PC.
Content(files) Material(i.e.files)suchasmovies,stillimages,andaudiofilesthatareplayedonthepanel.These are usually prepared by the user.
Playlist Setting contents, order of play and duration.
Frame Refers to a sub-screen that is used as a display unit when a single panel is divided into multiple frames.
Scroll message A scrolling message.
ProgramContents to display on panels.Frames are arranged on a panel and a playlist is assigned to each frame. A scroll message can also be displayed.
Timetable Setting programs to display at a set hour of the day (start times, etc.).Schedule Setting timetables to display on a set day of month.
Attachedfiles Thecollectivetermfortheimagefiles,etc.,whicharerequiredwhendisplayingHTMLfiles,etc.
Assign This refers to determining which data (schedule, break-in program, emergency scroll message and updater) should be distributed to which panel.
Confirmdistribution Thisreferstofinalizingtheassignment.Thisstartsdistributionofthedatatothepanel.

4
Installing/Launching
Required Operating Environment
Item DescriptionPC CPU 2 GHz or higher Pentium 4 processor
OS Microsoft Windows XP, Windows Vista, Windows 7 (English version)Microsoft Windows Server 2003/2008 (English version)
Memory 512 MB or higherHard disk 40 MB or more free space (Additional space required for saving data)Interfaces LAN port (TCP/IP communication must be functional)
Monitor Full color display with resolution of at least 1280 x 1024SHARP Digital Signage Software PN-SS02 (network version)
* The operating environment requirements for SHARP Digital Signage Software must also be met to be able to create and edit programs. See the operation manual for SHARP Digital Signage Software for more details.
* You must have the newest version of the SHARP Digital Signage Software Viewer Version (PN-SV01) installed on the viewer PC. To perform panel control, the viewer PC and the panel must be connected with an RS-232C cable or the panelmustbeconnectedtotheLAN.Forthespecificationsofthepanelanditsconnectionandsettingmethods, read the operation manual of your panel.
Monitor (for viewer PC): PN series LCD monitor LB-1085, LB-T401, LB-T461, LB-T601, LB-46GX35, LB-52GX35 (For Japanese market only)
* If the OS of the viewer PC is Windows Vista or Windows 7, disable the user account control of the viewer PC.
* If there are any environmental requirements for the OS to operate besides the above, they must also be met.
Installing SHARP Digital Signage Software ProYou must log in as an administrator before beginning the installation process.•You need a license code to install this software.•
TIPS
When you install the SHARP Digital Signage Software Pro, the newest version of the SHARP Digital Signage Software Network Version (PN-SS02) will be also installed.If there is already a version of the SHARP Digital Signage Software Network Version installed on the PC, makesuretouninstallitfirst.
Installing SHARP Digital Signage Software Prozz
Start your PC.1. Close down all applications.2. Launch the SHARP Digital Signage Software setup program (setup.exe).3. Double-clickthesetup.exefiletolaunchthesetupprogram.•Ifasecuritywarningsaying‘Thepublishercouldnotbeverified.’isdisplayedduringtheinstallation,•click [Run].

5
Installing/Launching
If using the “SHARP Digital Signage Software Pro CD-ROM”(1) Load the “SHARP Digital Signage Software Pro
CD-ROM” into the computer’s CD-ROM drive.If the setup program is launched automatically, proceed to step 4. If the setup program does not launch after a few moments, launch the setup.exe fileintheCD-ROMfolder.
(2) In the [AutoPlay] dialog box, click “Run setup.exe”.If the [AutoPlay] dialog box does not appear, double-clickthesetup.exefileintheCD-ROMfolder.
(3) When the [User Account Control] dialog box appears, click [Allow] (for Windows Vista) or [Yes] (for Windows 7).
4. Follow the instructions on the screen to complete installation.Select “Pro Version” in the version selection window.
Caution
This is not “Pro Web Server Version” or “Pro Web Client Version”.Select carefully in the setup selection screen.
When installation is complete, a shortcut to the SHARP Digital Signage Software Pro Manager ( ) will be created on your desktop.The Pro Manager provides functions for creating, distributing and managing programs, including those provided by the SHARP Digital Signage Software.
Also, Distribution Scheduler ( ) and Client Scheduler ( ) will launch and appear in the Task Tray.
TIPS
If you input a temporary license code when installing, you will only be able to use the software for a two-month trial period.You should register the license code you obtained before the end of the trial period.You can register the license code by selecting [Help] - [About Pro Manager] - [Register] from the SHARP Digital Signage Software Pro Manager.

6
Installing/Launching
Uninstalling SHARP Digital Signage Software Prozz
TIPS
To install the SHARP Digital Signage Software Pro again after uninstalling it, you need to obtain a license code again.
Start your PC.1. Close down all applications.2. Launch the SHARP Digital Signage Software setup program (setup.exe).3. Double-clickthesetup.exefiletolaunchthesetupprogram.•Ifasecuritywarningsaying‘Thepublishercouldnotbeverified.’isdisplayedduringtheinstallation,•click [Run].
If using the “SHARP Digital Signage Software Pro CD-ROM”(1) Load the “SHARP Digital Signage Software Pro
CD-ROM” into the computer’s CD-ROM drive.If the setup program is launched automatically, proceed to step 4. If the setup program does not launch after a few moments, launch the setup.exe fileintheCD-ROMfolder.
(2) In the [AutoPlay] dialog box, click “Run setup.exe”.If the [AutoPlay] dialog box does not appear, double-clickthesetup.exefileintheCD-ROMfolder.
(3) When the [User Account Control] dialog box appears, click [Allow] (for Windows Vista) or [Yes] (for Windows 7).
4. Select the “Remove” option button, and click [Next].If you select the “Modify” or “Remove” option button, you will have to obtain a license code again.

7
Installing/Launching
5. Click [Yes].The uninstallation will start.
If the Distribution Scheduler or the Client Scheduler has been launched, a message will appear. In this case, click [Yes]. The Distribution Scheduler and the Client Scheduler will be forcibly terminated and the uninstallation will continue.
6. Click [Finish].The uninstallation is now complete.
Launching and Closing the Pro Manager
Launching the Pro Managerzz
On the desktop, double-click the short cut 1. .
TIPS
The Manager can also be started by going to the Windows Taskbar and clicking [Start], [All Programs], [SHARP Digital Signage Software], and then [SHARP Digital Signage Software Manager].
Closing the Pro Managerzz
Click 1. on the Pro Manager.
8
Installing/Launching
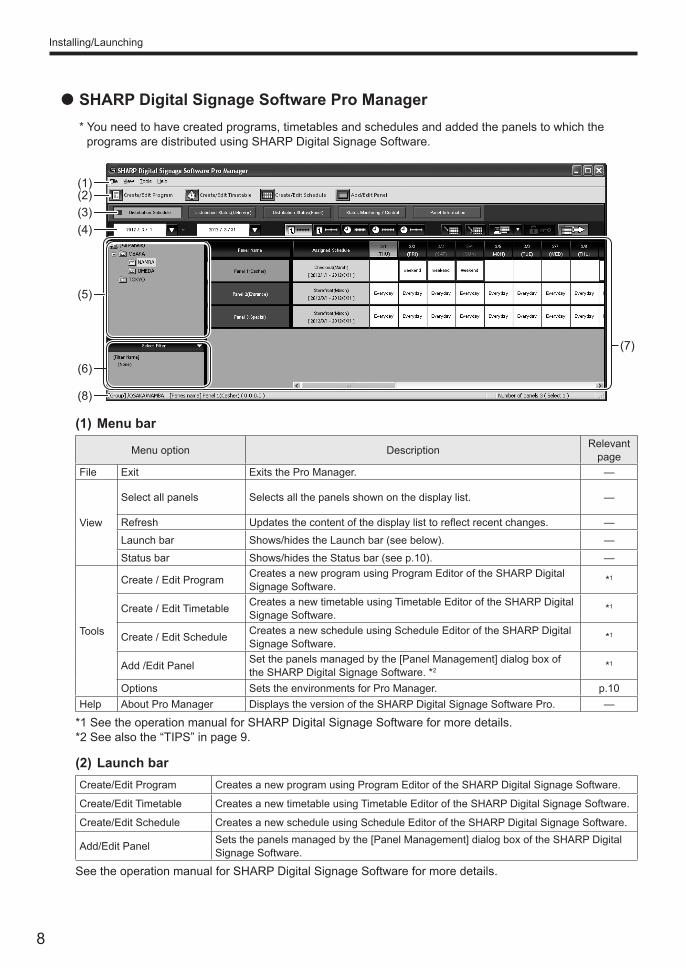
SHARP Digital Signage Software Pro Managerzz
* You need to have created programs, timetables and schedules and added the panels to which the programs are distributed using SHARP Digital Signage Software.
(1)
(7)
(2)(3)(4)
(8)
(5)
(6)
(1) Menu bar
Menu option Description Relevant page
File Exit Exits the Pro Manager. —
View
Select all panels Selects all the panels shown on the display list. —
Refresh Updatesthecontentofthedisplaylisttoreflectrecentchanges. —
Launch bar Shows/hides the Launch bar (see below). —
Status bar Shows/hides the Status bar (see p.10). —
Tools
Create / Edit Program Creates a new program using Program Editor of the SHARP Digital Signage Software. *1
Create / Edit Timetable Creates a new timetable using Timetable Editor of the SHARP Digital Signage Software. *1
Create / Edit Schedule Creates a new schedule using Schedule Editor of the SHARP Digital Signage Software. *1
Add /Edit Panel Set the panels managed by the [Panel Management] dialog box of the SHARP Digital Signage Software. *2 *1
Options Sets the environments for Pro Manager. p.10Help About Pro Manager Displays the version of the SHARP Digital Signage Software Pro. —
*1 See the operation manual for SHARP Digital Signage Software for more details.*2 See also the “TIPS” in page 9.
(2) Launch barCreate/Edit Program Creates a new program using Program Editor of the SHARP Digital Signage Software.
Create/Edit Timetable Creates a new timetable using Timetable Editor of the SHARP Digital Signage Software.
Create/Edit Schedule Creates a new schedule using Schedule Editor of the SHARP Digital Signage Software.
Add/Edit Panel Sets the panels managed by the [Panel Management] dialog box of the SHARP Digital Signage Software.
See the operation manual for SHARP Digital Signage Software for more details.

9
Installing/Launching
TIPS
Changes from the [Panel Management] dialog box of the SHARP Digital Signage SoftwareWith the SHARP Digital Signage Software Pro, the maximum limit of the number of the panels that can •be managed is increased to 1000. (The actual number of panels that can be managed is up to the number of the SHARP Digital Signage Software Viewer Versions licenses that you own.)With the SHARP Digital Signage Software Pro, you cannot control the panels manually from the [Panel •management] dialog box. The panels can be controlled manually from [Status Monitoring / Control]. (See p.29)The time adjustment function is added to the [Add Panel (Panel PC)] and [Edit Panel (Panel PC)] dialog •windows. When “Synchronize Viewer PC’s clock with this PC’s clock” check box is checked, the viewer PC clocks aresynchronizedwiththemanagementPCclockatthetimespecifiedin“Synchronizeat”.
(3) Function buttons
Name Description Relevant page
Distribution Schedule Assigns a schedule to a panel and reserves program distribution. p.16Distribution Status (Delivery) This button lets you check the schedule distribution status. p.20
Distribution Status (Panel) This button lets you check the schedule distributed to a panel. p.21Status Monitoring / Control This button lets you display the panel status and control the PC power supply. p.29Panel Information This button lets you display the panel information. p.33Break-in Program* This button lets you distribute a break-in program for emergency. p.23Emergency Scroll Message* This button lets you distribute a scroll message for emergency. p.26
Viewer Update*This button lets you update the SHARP Digital Signage Software Viewer Version on a viewer PC and change settings of a viewer PC.(This is not to guarantee any future software update.)
p.34
* These buttons are hidden in the default settings. Change the settings in Pro Manager Options to show these buttons. (p.11)
(4) ToolbarContains buttons (icons) for viewing the display list or controlling the selected panel.
(5) Group treeDisplays the groups of the registered panels.
(6) Filter barYoucanspecifyafilteringconditionandmakeonlythepanelsthatsatisfytheconditionappearonthedisplay listClick to show the following menus:
Menu option Description
(None) Nofilterisselected.Whennofilterhasbeencreated,“(thereisnofiltertoselect)”isshown.
<Filter Name>Whenafilterhasbeencreated,thefilternameappearshere.Whenyouselectafilter,onlythepanelsthatsatisfythefilterconditionappearonthedisplaylist.Thecurrentlyselectedfilterisindicatedbyacheck.
Createnewfilter Createsanewfilter.(p.10)Editcurrentfilter Editthecurrentlyselectedfilter.Deletecurrentfilter Deletethecurrentlyselectedfilter.
Whenafilterisselected,its[FilterName]and[Conditions]aredisplayed.
(7) Display listDisplays the panel information. The contents of the information to be displayed change depending on the selected function button.The panels can be displayed selectively using the Group tree or the Filter bar.

10
Installing/Launching
(8) Status barDisplays the name of the selected panel or the schedule, the number of the panels in the display list and of the selected panels, and so on.If information such as the cause of an error cannot be displayed all inside a display list item, click the relevant item to display the information in the Status bar.
Settingafilterzz
Sets conditions for the panels to be displayed on the display list.Click 1. andthenclick[Createnewfilter].The [Create New Filter] dialog box appears.
2. Specify the “Filter Name”. (Names must be within 50 characters)Select the “Properties”.3. Set the “Conditions”.4.
The applicable conditions differ depending on the •selected property.When “Panel Name”, “Hostname” or “Comments 1 to •3” are selected for the “Properties”: Enteraconditionstringforthefilter(within25characters). Next, select whether the string should be contained or not contained.When “Network Acknowledgment” or “Distribution Status (**)” are selected for the “Properties” •(Substitute ** with one of Schedule, Program, Scroll message and System update): Select a condition from the list.To add more conditions, click [Add New Condition] and follow the procedure from 3. •Only the panels that satisfy all the conditions appear on the display list.To delete an added condition, click [Delete].•
Click [Save].5. Thefilterissavedinthemenuandonlythepanelsthatsatisfytheconditionsappearonthedisplaylist.
Setting the Operation Environment
Distribution Typezz
The following distribution types are available with this software:
Distribution Type Protocol Management PC Viewer PC
1 PUSH type distribution(static IP address) FTP FTP client FTP server
2 PUSH type distribution(dynamic IP address)
FTPHTTP
FTP clientHTTP server
FTP serverHTTP client
3 PULL type distribution HTTP HTTP server HTTP client

11
Installing/Launching
PUSH type distribution (static IP address)Distribution data is provided via FTP from the management PC. Each viewer PC must have a static IP address assigned.IfaviewerPCresidesinsideafirewall,thefirewallsettingsmustbeconfiguredtoallowdistributiondatatoreach the viewer PC.
PUSH type distribution (dynamic IP address)Distribution data is provided via FTP from the management PC. With this distribution type, there is no needforstaticIPaddress,becauseeachviewerPCnotifiesitsIPaddresstothemanagementPCatregular intervals via the HTTP protocol.IfaviewerPCresidesinsideafirewall,thefirewallsettingsmustbeconfiguredtoallowdistributiondatatoreach the viewer PC.
PULL type distributionEach viewer PC retrieves distribution data from the management PC at regular intervals via the HTTP protocol.ThisdistributiontypeallowsaviewerPCinsideafirewalltoretrievedistributiondatawithoutchangingthefirewallsettings.
TIPS
You need to start the HTTP server to use “PUSH type distribution (dynamic IP address)” or “PULL type •distribution”.To start the HTTP server, click [Start HTTP server now] in the [HTTP Server] tab in the [Pro Manager •Options] dialog box.The HTTP server can be started automatically when the PC boots up by checking the “Start HTTP •server when this PC boots up.” check box.
Setting the Operation Environmentzz
Click [Options] in the [Tools] menu.1. The [Pro Manager Options] dialog box appears.
2. Set the options[General] tab
Show / Hide Function buttons •Sets which function buttons to show or hide. The function button whose check box is checked will be shown.Warning message for PULL type distribution •Sets whether to display a warning message if there is no access from the viewers within a certain period of time after the scheduled access date and time when the PULL type distribution is selected.
12
Installing/Launching
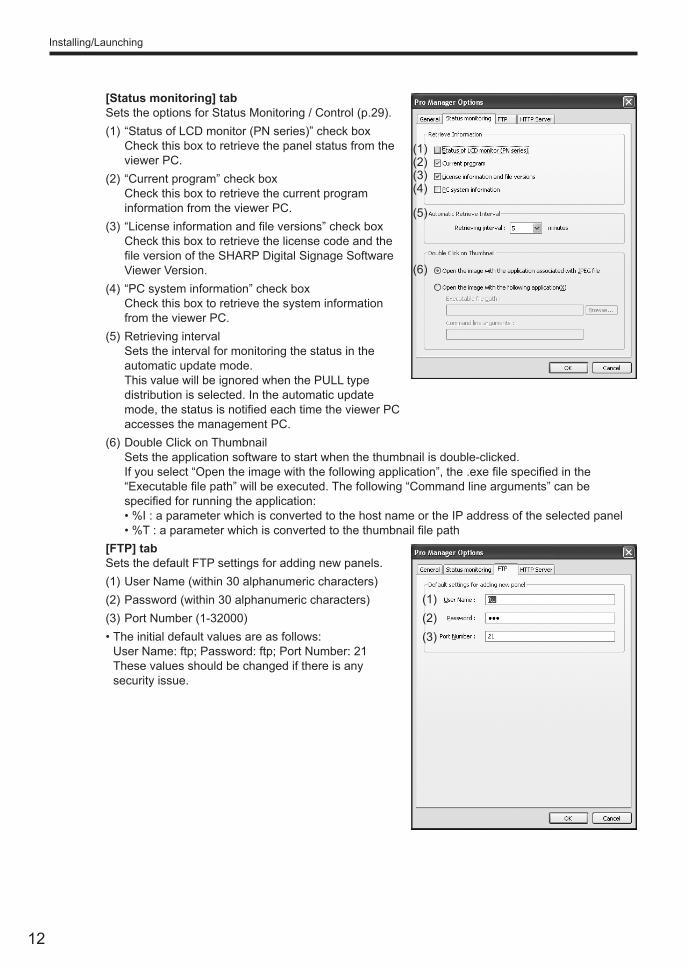
[Status monitoring] tabSets the options for Status Monitoring / Control (p.29).(1) “Status of LCD monitor (PN series)” check box
Check this box to retrieve the panel status from the viewer PC.
(2) “Current program” check boxCheck this box to retrieve the current program information from the viewer PC.
(3)“Licenseinformationandfileversions”checkboxCheck this box to retrieve the license code and the fileversionoftheSHARPDigitalSignageSoftwareViewer Version.
(4) “PC system information” check boxCheck this box to retrieve the system information from the viewer PC.
(5) Retrieving intervalSets the interval for monitoring the status in the automatic update mode.This value will be ignored when the PULL type distribution is selected. In the automatic update mode,thestatusisnotifiedeachtimetheviewerPCaccesses the management PC.
(6) Double Click on ThumbnailSets the application software to start when the thumbnail is double-clicked.Ifyouselect“Opentheimagewiththefollowingapplication”,the.exefilespecifiedinthe“Executablefilepath”willbeexecuted.Thefollowing“Commandlinearguments”canbespecifiedforrunningtheapplication:•%I:aparameterwhichisconvertedtothehostnameortheIPaddressoftheselectedpanel•%T:aparameterwhichisconvertedtothethumbnailfilepath
[FTP] tabSets the default FTP settings for adding new panels.(1) User Name (within 30 alphanumeric characters)(2) Password (within 30 alphanumeric characters)(3) Port Number (1-32000)
The initial default values are as follows:•User Name: ftp; Password: ftp; Port Number: 21These values should be changed if there is any security issue.
(1)(2)(3)(4)
(5)
(6)
(1)(2)(3)

13
Installing/Launching
[HTTP Server] tab(1) “Start HTTP server when this PC boots up.” check
boxCheck this box to start the HTTP server from the management PC when using PUSH type distribution (dynamic IP address) or PULL type distribution.
(2) HTTP settingSets the user name, the password and the port number.If connection from the viewer PC fails, contact your networkadministratorwhomaintainsthefirewalltoconfirmthesettingdetails.•UserName(within30alphanumericcharacters)•Password(within30alphanumericcharacters)•PortNumber(1-65535)
The initial default values are as follows:•Port Number: 80User Name: httpPassword: http
(3) Distribution folder settingSets the folder for storing distribution data when using PULL type distribution. Click [Browse] to change the folder.
(4) [Start HTTP server now]Click this to start the HTTP server immediately. Click this to start the HTTP server when using PUSH type distribution (dynamic IP address) or PULL type distribution.
Click [OK].3.
PersonalfirewallsettingsIf you plan to distribute content over a network, you must free a TCP/IP port for the SHARP Digital •SignageSoftwaretousewhenthedistributionportisassignedtoapersonalfirewall.Note that you can add this port number to the “Windows Firewall” exception list in Windows Control •Paneltoallowaconnection.Alternatively,youcanalsoaddexecutablefile“c:\Programfiles\sharp\e-Signage\www\w3d.exe” to the “Windows Firewall” exception list to allow a connection.
Starting the HTTP serverzz
Click [Options] in the [Tools] menu.1. The [Pro Manager Options] dialog box appears.Click the [HTTP Server] tab.2. Click [Start HTTP server now].3. The HTTP server will be started.Check the “Start HTTP server when this PC boots up.” check box4. This lets the HTTP server start when the management PC boots up.Click [OK].5.
(1)
(2)
(3)
(4)

14
Installing/Launching
Adding a panel (viewer PC)zz
Click [Add/Edit Panel] in the [Tools] menu.1. The [Panel Management] dialog box appears.Click [Add New panel].2. The [Add New Panel (Viewer PC)] dialog box appears.
3. Set the options.(1) Panel Name (Required)
Choose a Name that will make it easy to identify the panel.(Names must be within 50 characters)
(2) GroupIn the Group box, select a group to add the panel to.If you do not want to assign the panel to any particular group, select “(none)”. Panels that are not assigned to any particular group will be added under “All Panels”.
(3) Hostname or IP address (Required) •WhenusingPUSHtypedistribution(staticIP
address), specify a host name or an IP address of the viewer PC which is accessible from the server.
•WhenusingPUSHtypedistribution(dynamicIPaddress) or PULL type distribution, specify the viewer ID (alphanumeric characters) that starts with “@”.
(4) MAC addressSet the MAC address for the viewer PC if you want to turn it on from the management PC.
(5) Distribution TypeSelect “PUSH” to have the data sent to the viewer PC. Select “PULL” to have the viewer PC to retrieve data at regular intervals from the management PC.When using PUSH type distribution and if the viewer PC does not have a static IP address, checkthe“DistributetoIPaddressnotifiedfromviewers”checkbox.
(6) Power ManagementIfyouwanttoturnthepoweroftheviewerPConoroffataspecifiedtime,selectthe“Send“Turn On/Off” command to Viewer PC at the following time”, and set the “Turn On at” and “Turn Offat”.(Timescanbespecifiedinincrementsof5minutes.)
(7) Clock AdjustmentTo synchronize the clock of the management PC and that of the viewer PC, check the “Synchronize Viewer PC’s clock with this PC’s clock” check box and specify the time to synchronizetheclocks.(Timescanbespecifiedinincrementsof5minutes.)
(8) AttributesEnter comments for the viewer PC.
Click [Add].4.
TIPS
It is not possible to create two or more panels with the same host name, IP address or viewer ID.•
15
Installing/Launching
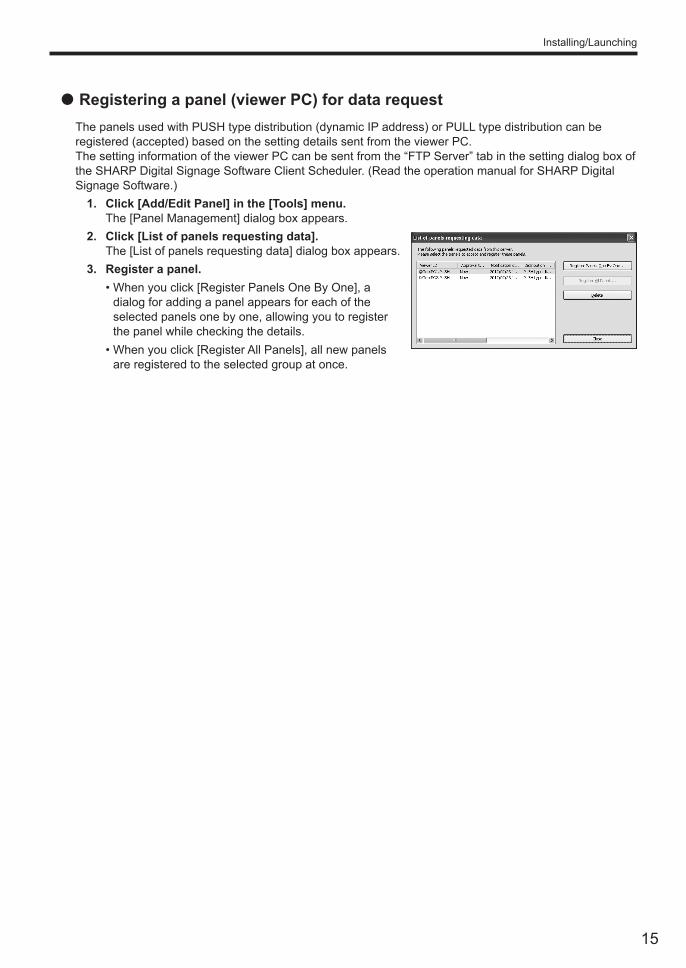
Registering a panel (viewer PC) for data requestzz
The panels used with PUSH type distribution (dynamic IP address) or PULL type distribution can be registered (accepted) based on the setting details sent from the viewer PC.The setting information of the viewer PC can be sent from the “FTP Server” tab in the setting dialog box of the SHARP Digital Signage Software Client Scheduler. (Read the operation manual for SHARP Digital Signage Software.)
Click [Add/Edit Panel] in the [Tools] menu.1. The [Panel Management] dialog box appears.
2. Click [List of panels requesting data].The [List of panels requesting data] dialog box appears.Register a panel.3.
When you click [Register Panels One By One], a •dialog for adding a panel appears for each of the selected panels one by one, allowing you to register the panel while checking the details.When you click [Register All Panels], all new panels •are registered to the selected group at once.

16
Distribution ScheduleAssigns a schedule to a panel and reserves program distribution.Schedules are created using Schedule Editor of the SHARP Digital Signage Software.
In the display list, panels and their assigned schedules are shown.For each day, the details of the timetable set for the day is displayed. (day view)By selecting an appropriate icon on the view toolbar, the timetable for a particular day can be displayed. (hour view)
Day view(1) (2)
(3) (4) (5)Hour view
(1) (2)
(3) (4) (7)(6)
TIPS
The Distribution Schedule function is for setting schedules which are going to be distributed. Schedules arenotdistributedtothepanelsuntiltheyareconfirmed.Therefore,theschedulesdisplayedinDistribution Schedule are different from the current schedules of the panels. The current schedules of the panels can be viewed from [Distribution Status (Panel)].Note that it is not possible to view schedules in the past with the SHARP Digital Signage Software Pro.
Distributing

17
Distributing
(1) View toolbar
Specifiesthedates(thestartdateandtheenddate)tobedisplayedonthedisplay list in the day view.Click the icon to display a dialog box and click the start date (end date) in the dialog box.The maximum number of days to display is 62 days.
Specifiesthedatetobedisplayedonthedisplaylistinthehourview.Click the icon to display a dialog box and click the date in the dialog box.
Specifiestheduration(thestarttimeandtheendtime)tobedisplayedonthedisplay list in the hour view.Click the icon to display a dialog box and specify the start time and the end time in the dialog box. Then click [OK].
TIPS
Thedatecanbespecifiedbetween1January2005and31December2020.
Sets the display list to the day view.The width of an item (a day) in the display list can be changed.
Sets the display list to the hour view.The width of an hour in the display list can be changed.
(2) Operation toolbarAssigns a schedule to a panel.Select a panel to assign the schedule and click this icon. (p.18)Reverts to the state before the schedule was assigned.Select a panel to revert and click this icon.Displays the schedule assigned to the panel shown in the display list using an application associatedtothexml/htmlfiles(typicallytheMicrosoftInternetExplorer).If printing function is available with the application, the schedule can be printed.Click the icon to display the menu to select xml or html.Cancelstheconfirmationoftheschedulewhichwasassignedtoapanelandconfirmed.Selectapaneltocanceltheconfirmationandclickthisicon.Confirmsthescheduleandreservesdistribution.Selectapaneltoconfirmthescheduleandclickthisicon.(p.18)
TIPS
Tocancelconfirmationsoftheschedulewhichiswaitingfordistributionorbeingdistributed,canceltheschedule in [Distribution Status (Delivery)]. (p.20)
(3) Panel NameDisplays the panel names.Panels can be displayed selectively using the Group tree or the Filter bar.Click the header to sort the panels in the ascending or descending order of their names.
18
Distributing
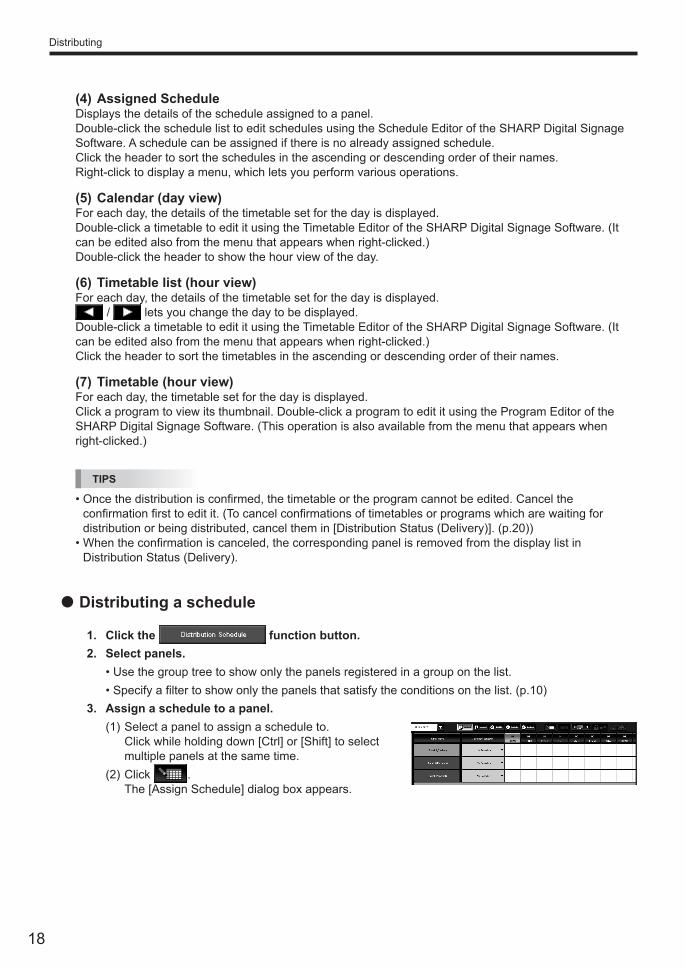
(4) Assigned ScheduleDisplays the details of the schedule assigned to a panel.Double-click the schedule list to edit schedules using the Schedule Editor of the SHARP Digital Signage Software. A schedule can be assigned if there is no already assigned schedule.Click the header to sort the schedules in the ascending or descending order of their names.Right-click to display a menu, which lets you perform various operations.
(5) Calendar (day view)For each day, the details of the timetable set for the day is displayed.Double-click a timetable to edit it using the Timetable Editor of the SHARP Digital Signage Software. (It can be edited also from the menu that appears when right-clicked.)Double-click the header to show the hour view of the day.
(6) Timetable list (hour view)For each day, the details of the timetable set for the day is displayed.
/ lets you change the day to be displayed.Double-click a timetable to edit it using the Timetable Editor of the SHARP Digital Signage Software. (It can be edited also from the menu that appears when right-clicked.)Click the header to sort the timetables in the ascending or descending order of their names.
(7) Timetable (hour view)For each day, the timetable set for the day is displayed.Click a program to view its thumbnail. Double-click a program to edit it using the Program Editor of the SHARP Digital Signage Software. (This operation is also available from the menu that appears when right-clicked.)
TIPS
Oncethedistributionisconfirmed,thetimetableortheprogramcannotbeedited.Cancelthe•confirmationfirsttoeditit.(Tocancelconfirmationsoftimetablesorprogramswhicharewaitingfordistribution or being distributed, cancel them in [Distribution Status (Delivery)]. (p.20))Whentheconfirmationiscanceled,thecorrespondingpanelisremovedfromthedisplaylistin•Distribution Status (Delivery).
Distributing a schedulezz
Click the 1. function button.Select panels.2.
Use the group tree to show only the panels registered in a group on the list.•Specifyafiltertoshowonlythepanelsthatsatisfytheconditionsonthelist.(p.10)•
Assign a schedule to a panel.3. (1) Select a panel to assign a schedule to.
Click while holding down [Ctrl] or [Shift] to select multiple panels at the same time.
(2) Click .The [Assign Schedule] dialog box appears.

19
Distributing
(3) Select the schedule data and click [Assign].The schedule is now assigned.
Confirmtheschedule4. (1)Selectapaneltoconfirmtheschedule.
Click while holding down [Ctrl] or [Shift] to select multiple panels at the same time.(2) Click .
The [Distribute Settings] dialog box appears.(3) Set the distribution date and time.
“Distribute Now” option button •In the PUSH type distribution, select this option to distribute the schedule after the procedure (7) is completed. This option is not available in PULL type distribution.“Distributeatthespecifieddate_time”optionbutton •Select this option to distribute the schedule at a specifieddateandtime. In PULL type distribution, the distribution will start atthetimeofthefirstaccessfromtheviewerPCafterthespecifieddateandtime.
(4) Set the distribution options.“Turn ON Viewer PC before starting distribution” •check box Check this box to turn on the viewer PC if it is not turned on before starting the schedule distribution. This option is not available in PULL type distribution.“Turn OFF Viewer PC after distribution” check box •Check this box to turn off the viewer PC after the distribution is complete.
(5) Select whether to re-distribute the contents distributed in the past to the viewer PC.Checkthe“DistributeonlydifferencesfromcontentfilesonViewerPC”checkboxtodistributeonlythecontentsyettobedistributed(thefileswithdifferentnames,creationdates,datasizes,etc.) and not to distribute the contents that have already been distributed.
(6) Check the “Merge this schedule with Viewer PC schedule” check box to add this schedule to the schedule already existing on the viewer PC. If this check box is not checked, the schedule of the viewer PC is overwritten with the schedule to be distributed.
(7) Click [OK].Thescheduleisnowconfirmed. Confirmedschedulesaremarkedwiththeconfirmedsign ( ).
TIPS
Check in the [Distribution Status (Delivery)] to see if the distribution is completed properly. (p.20)•Oncethedistributionisconfirmed,thetimetableortheprogramcannotbeedited.Cancelthe•confirmationfirsttoeditit.(Tocancelconfirmationsoftimetablesorprogramswhicharewaitingfordistribution or being distributed, cancel them in [Distribution Status (Delivery)]. (p.20))Distribution of schedules and programs may take some time. Even in the simultaneous distribution to •multiple panels, the data is actually sent sequentially. For this reason, there may be some time difference in schedule and program distribution.Old schedules are no longer required after new schedules have been sent. Unnecessary schedules and •their associated content will be automatically deleted the next time SHARP Digital Signage Software Client Scheduler starts.The schedule data of the past is not distributed. Only the schedule data for today and onward is distributed.•

20
Distributing
Distribution Status (Delivery)This button lets you check the schedule distribution status.
(1)
(2) (3) (4) (5) (6)
(1) Operation toolbarStopsuncompletedscheduledistributionandcancelstheconfirmation.Select a panel to stop distribution and click this icon.Resends the schedule for which a distribution error has occurred.Select a panel to resend the schedule and click this icon.
(2) Panel NameDisplays the panel names.Panels can be displayed selectively using the Group tree or the Filter bar.Click the header to sort the panels in the ascending or descending order of their names.
(3) Distribution InformationDisplaysthenamesofassignedschedulesandtheconfirmeddatesandtimesoftheirdistribution.Click the header to sort the panels in the ascending or descending order of the dates and times.
(4) Distribution ScheduleDisplays the dates and times the distribution is scheduled for.Click the header to sort the panels in the ascending or descending order of the dates and times.
(5) Distribution StartDisplays the dates and times the distribution is started.Click the header to sort the panels in the ascending or descending order of the dates and times.
(6) Distribution CompleteDisplays the dates and times the distribution is completed.If the distribution is not completed properly, the reason will be displayed.Click the header to sort the panels in the ascending or descending order of the dates and times.
21
Distributing
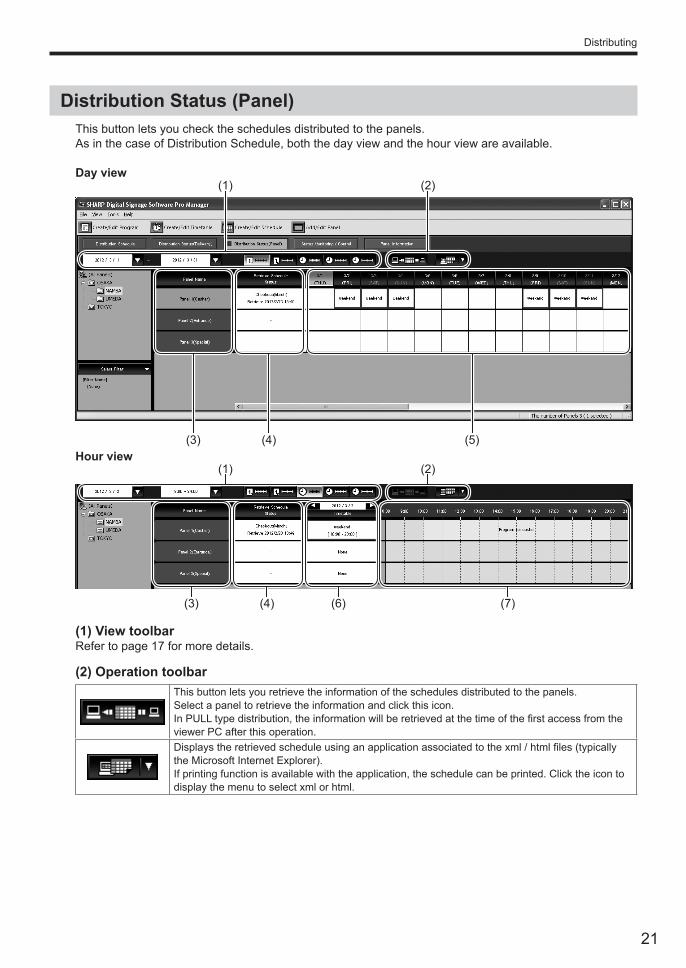
Distribution Status (Panel)This button lets you check the schedules distributed to the panels.As in the case of Distribution Schedule, both the day view and the hour view are available.
Day view(2)
(3) (4) (5)
(1)
Hour view(2)
(3) (4) (7)
(1)
(6)
(1) View toolbarRefer to page 17 for more details.
(2) Operation toolbarThis button lets you retrieve the information of the schedules distributed to the panels.Select a panel to retrieve the information and click this icon.InPULLtypedistribution,theinformationwillberetrievedatthetimeofthefirstaccessfromtheviewer PC after this operation.Displaystheretrievedscheduleusinganapplicationassociatedtothexml/htmlfiles(typicallythe Microsoft Internet Explorer).If printing function is available with the application, the schedule can be printed. Click the icon to display the menu to select xml or html.

22
Distributing
(3) Panel NameDisplays the panel names.Panels can be displayed selectively using the Group tree or the Filter bar.Click the header to sort the panels in the ascending or descending order of their names.
(4) Retrieve Schedule StatusDisplays the names of retrieved schedules and the dates and times when their retrieval was complete.Right-click this to display a menu and retrieve the schedule from the menu.
(5) Calendar (day view)For each day, the details of the timetable for the day is displayed.Double-click the header to show the hour view of the day.
(6) Timetable list (hour view)For each day, the details of the timetable set for the day is displayed.
/ lets you change the day to be displayed.Click the header to sort the timetables in the ascending or descending order of their names.
(7) Timetable (hour view)For each day, the timetable set for the day is displayed.Click a program to view its thumbnail.
23
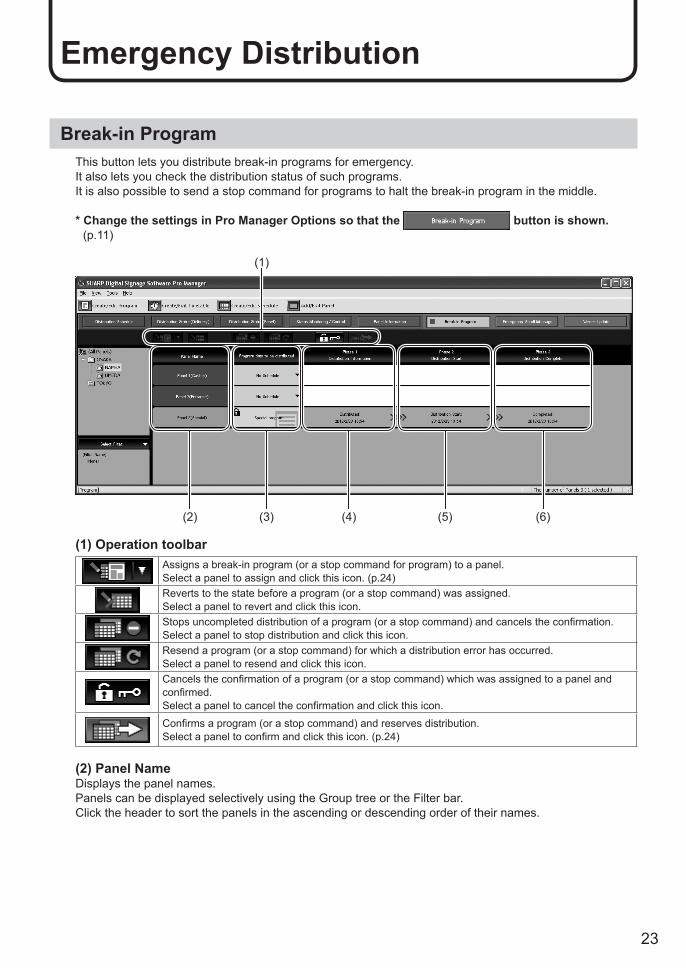
Break-in ProgramThis button lets you distribute break-in programs for emergency.It also lets you check the distribution status of such programs.It is also possible to send a stop command for programs to halt the break-in program in the middle.
* Change the settings in Pro Manager Options so that the button is shown. (p.11)
(1)
(2) (3) (4) (5) (6)
(1) Operation toolbarAssigns a break-in program (or a stop command for program) to a panel.Select a panel to assign and click this icon. (p.24)Reverts to the state before a program (or a stop command) was assigned.Select a panel to revert and click this icon.Stopsuncompleteddistributionofaprogram(orastopcommand)andcancelstheconfirmation.Select a panel to stop distribution and click this icon.Resend a program (or a stop command) for which a distribution error has occurred.Select a panel to resend and click this icon.Cancelstheconfirmationofaprogram(orastopcommand)whichwasassignedtoapanelandconfirmed.Selectapaneltocanceltheconfirmationandclickthisicon.
Confirmsaprogram(orastopcommand)andreservesdistribution.Selectapaneltoconfirmandclickthisicon.(p.24)
(2) Panel NameDisplays the panel names.Panels can be displayed selectively using the Group tree or the Filter bar.Click the header to sort the panels in the ascending or descending order of their names.
Emergency Distribution
24
Emergency Distribution
(3) Program data to be distributedDisplays the names of the programs assigned to the panels.Double-click an assigned program to edit it using the Program Editor of the SHARP Digital Signage Software. A program or a stop command can be assigned if there is no already assigned program.Click the header to sort the panels in the ascending or descending order of the program names.Right-click on the schedule list to display a menu, which lets you perform various operations.
(4) Distribution InformationDisplaystheconfirmeddatesandtimesofdistribution.Click the header to sort the panels in the ascending or descending order of their dates and times.
(5) Distribution StartDisplays the dates and times the distribution is started.Click the header to sort the panels in the ascending or descending order of the dates and times.
(6) Distribution CompleteDisplays the dates and times the distribution is completed.If the distribution is not completed properly, the reason will be displayed.Click the header to sort the panels in the ascending or descending order of the dates and times.
TIPS
Stop commands for programs cannot be edited by double-clicking.•Oncethedistributionisconfirmed,theprogramcannotbeedited.Canceltheconfirmationfirsttoeditit.•
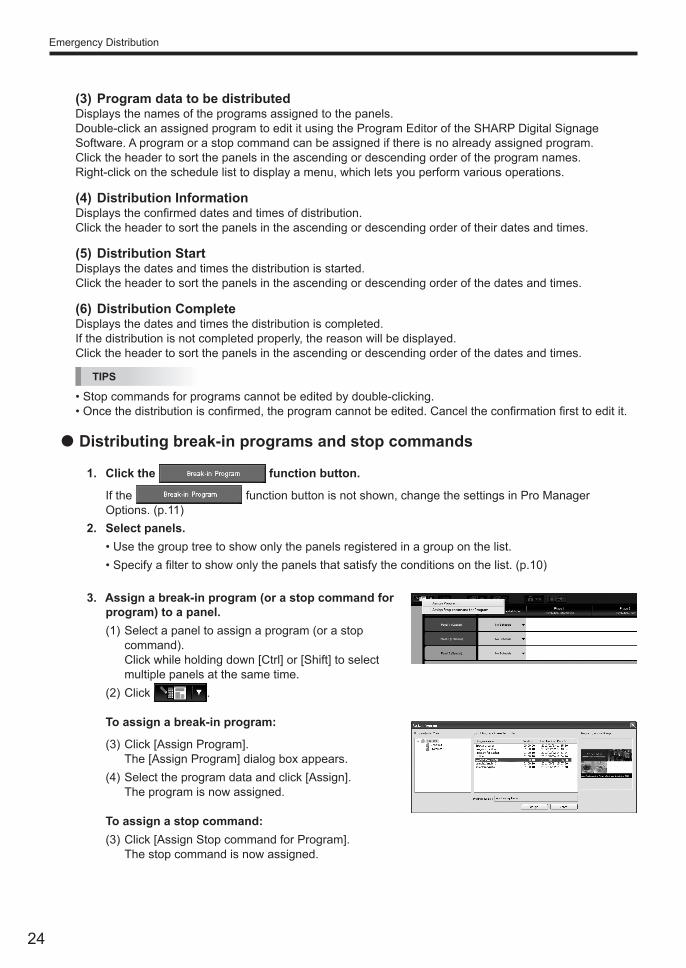
Distributing break-in programs and stop commandszz
Click the 1. function button.
If the function button is not shown, change the settings in Pro Manager Options. (p.11)Select panels.2.
Use the group tree to show only the panels registered in a group on the list.•Specifyafiltertoshowonlythepanelsthatsatisfytheconditionsonthelist.(p.10)•
3. Assign a break-in program (or a stop command for program) to a panel.(1) Select a panel to assign a program (or a stop
command).Click while holding down [Ctrl] or [Shift] to select multiple panels at the same time.
(2) Click .
To assign a break-in program:
(3) Click [Assign Program].The [Assign Program] dialog box appears.
(4) Select the program data and click [Assign].The program is now assigned.
To assign a stop command:(3) Click [Assign Stop command for Program].
The stop command is now assigned.

25
Emergency Distribution
Confirmdistribution4. (1)Selectapaneltoconfirmdistribution.
Click while holding down [Ctrl] or [Shift] to select multiple panels at the same time.(2) Click .
The [Start time and duration of Break-in Program] dialog box appears.•Whendistributingonlystopcommands,amessage
will appear instead of this dialog box. Click [Yes] to confirmthedistributionofstopcommands.
•Whendistributingbothbreak-inprogramsandstopcommands, the dialog box will appear. The settings in the dialog box are valid for break-in programs.
(3) Set the “Display time of Break-in program” area.•“StartdisplayingBreak-inprogramimmediately
after distribution is complete” option button Displays the program as soon as the distribution wizard exits.
•“StartdisplayingBreak-inprogramatspecifiedtime”optionbutton Starts program display at the set time.
(4) Set a “Duration”.(5) Select whether to re-distribute the contents distributed in the past to the viewer PC.
Checkthe“DistributedifferencesfromcontentfilesonviewerPC”checkboxtodistributeonlythecontentsyettobedistributed(thefileswithdifferentnames,creationdates,datasizes,etc.)and not to distribute the contents that have already been distributed.
If you do not want to perform panel control operations before and after a break-in program:(6) Clear the “Perform Panel control before and after Program display” check box.(7) Click [OK].
Thebreak-inprogramisnowconfirmed.Confirmedprograms(orstopcommands)aremarkedwiththeconfirmedsign( ).
If you want to perform panel control operations before and after a break-in program:(6) Check the “Perform Panel control before and after Program display” check box, and click [Next].
The [Panel Control Command Setting] dialog box will appear.(7) Set the panel control command.
•“TurnONthepanelpowerbeforeprogramisdisplayed” check box Turns the panel on before displaying the break-in program.
•“Changepanelinputasfollowsbeforeprogramisdisplayed” check box Switchestothespecifiedinputbeforedisplayingthe break-in program.
•“TurnOFFthepanelpowerafterprogramisdisplayed” check box Turns the panel off after the break-in program has finished.
•“Changepanelinputasfollowingafterprogramisdisplayed”checkbox Switchestothespecifiedinputafterdisplayingthebreak-inprogram.

26
Emergency Distribution
(8) Click [OK].Thebreak-inprogramisnowconfirmed.Confirmedprograms(orstopcommands)aremarkedwiththeconfirmedsign( ).
TIPS
InPULLtypedistribution,thedistributionwillstartatthetimeofthefirstaccessfromtheviewerPCafter•thedistributionisconfirmed.The following restrictions are applicable in the panel control:•
In the case of PN series and LB-1085, the input cannot be switched to “TV”.The break-in program will not be displayed if its scheduled time has already passed.•After the end of the break-in program display, programs in the normal schedule will be displayed. The •program which was originally scheduled to be displayed at the time when displaying of the break-in program has ended will be displayed from the beginning.The end of the break-in program is checked every minute (at second 00). The display of the normal •programwillstartfromthefirst00secondaftertheendofthebreak-inprogramdisplay.Only one break-in program can be assigned to one panel.•
Emergency Scroll MessageThis button lets you distribute scroll message for emergencies.It also lets you check the distribution status of such messages.
* Change the settings in Pro Manager Options so that the button is shown. (p.11)
TIPS
To stop displaying a scroll message in the middle, send a stop command for scroll message. (p.28)•Youneedtoprepareatelopfilecontainingthescrollmessagedatainadvance. •UsetheScrollMessageEditoroftheSHARPDigitalSignageSoftwaretocreatetelopfiles. The Scroll Message Editor can be started also by clicking “Create new scroll message” that is displayed when right-clicking the emergency scroll message.
(1)
(2) (3) (4) (5) (6)
27
Emergency Distribution
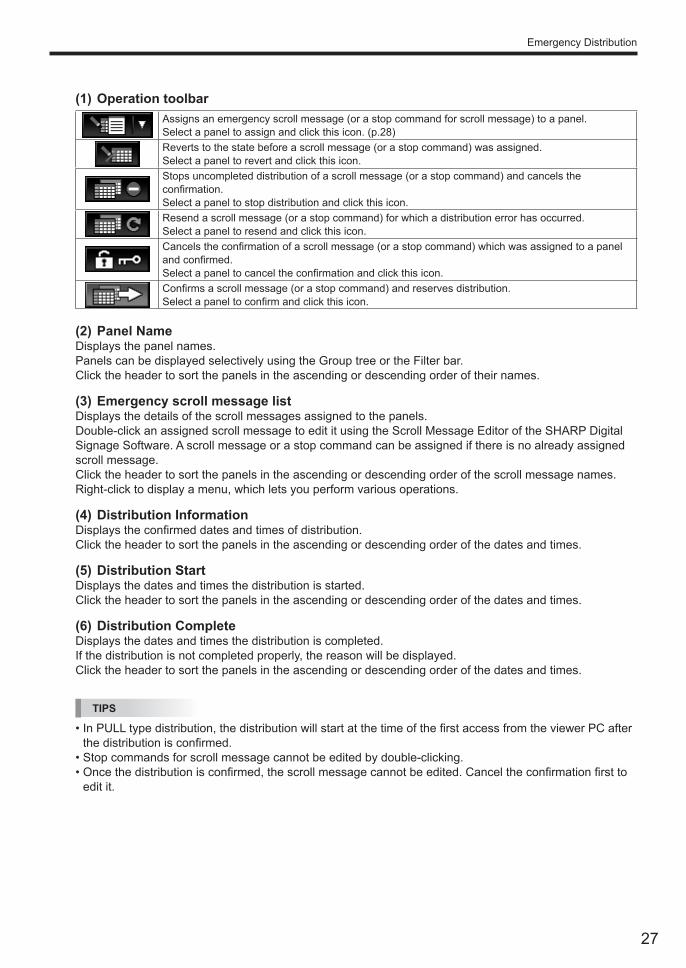
(1) Operation toolbarAssigns an emergency scroll message (or a stop command for scroll message) to a panel.Select a panel to assign and click this icon. (p.28)Reverts to the state before a scroll message (or a stop command) was assigned.Select a panel to revert and click this icon.Stops uncompleted distribution of a scroll message (or a stop command) and cancels the confirmation.Select a panel to stop distribution and click this icon.Resend a scroll message (or a stop command) for which a distribution error has occurred.Select a panel to resend and click this icon.Cancelstheconfirmationofascrollmessage(orastopcommand)whichwasassignedtoapanelandconfirmed.Selectapaneltocanceltheconfirmationandclickthisicon.Confirmsascrollmessage(orastopcommand)andreservesdistribution.Selectapaneltoconfirmandclickthisicon.
(2) Panel NameDisplays the panel names.Panels can be displayed selectively using the Group tree or the Filter bar.Click the header to sort the panels in the ascending or descending order of their names.
(3) Emergency scroll message listDisplays the details of the scroll messages assigned to the panels.Double-click an assigned scroll message to edit it using the Scroll Message Editor of the SHARP Digital Signage Software. A scroll message or a stop command can be assigned if there is no already assigned scroll message.Click the header to sort the panels in the ascending or descending order of the scroll message names.Right-click to display a menu, which lets you perform various operations.
(4) Distribution InformationDisplaystheconfirmeddatesandtimesofdistribution.Click the header to sort the panels in the ascending or descending order of the dates and times.
(5) Distribution StartDisplays the dates and times the distribution is started.Click the header to sort the panels in the ascending or descending order of the dates and times.
(6) Distribution CompleteDisplays the dates and times the distribution is completed.If the distribution is not completed properly, the reason will be displayed.Click the header to sort the panels in the ascending or descending order of the dates and times.
TIPS
InPULLtypedistribution,thedistributionwillstartatthetimeofthefirstaccessfromtheviewerPCafter•thedistributionisconfirmed.Stop commands for scroll message cannot be edited by double-clicking.•Oncethedistributionisconfirmed,thescrollmessagecannotbeedited.Canceltheconfirmationfirstto•edit it.

28
Emergency Distribution
Distributing emergency scroll messages and stop commands for scroll zz
messageThis button lets you distribute scroll message for emergency.To stop displaying a scroll message in the middle, send a stop command for scroll message.
Click the 1. function button.
If the function button is not shown, change the settings in Pro Manager Options. (p.11)Select panels.2.
Use the group tree to show only the panels registered in a group on the list.•Specifyafiltertoshowonlythepanelsthatsatisfytheconditionsonthelist.(p.10)•
Assign a scroll message (or a stop command) to a panel.3. (1) Select a panel to assign a scroll message (or a stop
command).Click while holding down [Ctrl] or [Shift] to select multiple panels at the same time.
(2) Click .
To assign an emergency scroll message:(3) Click [Assign Scroll Message].
The [Open] dialog box appears.(4) Select the scroll message data and click [Open].
The emergency scroll message is now assigned.
To assign a stop command:(3) Click [Assign Stop command for Scroll Message].
The stop command is now assigned.
Confirmdistribution.4. (1)Selectapaneltoconfirmdistribution.
Click while holding down [Ctrl] or [Shift] to select multiple panels at the same time.(2) Click .(3) Click [Yes].
Distributionisnowconfirmed.Confirmedscrollmessages(orstopcommands)aremarkedwiththeconfirmedsign( ).
TIPS
Specify the position to display the emergency scroll message using the SHARP Digital Signage Software •Client Scheduler on the viewer PC.When the emergency scroll message is displayed, the scroll message displayed in the original program •will not be displayed.
29
Management
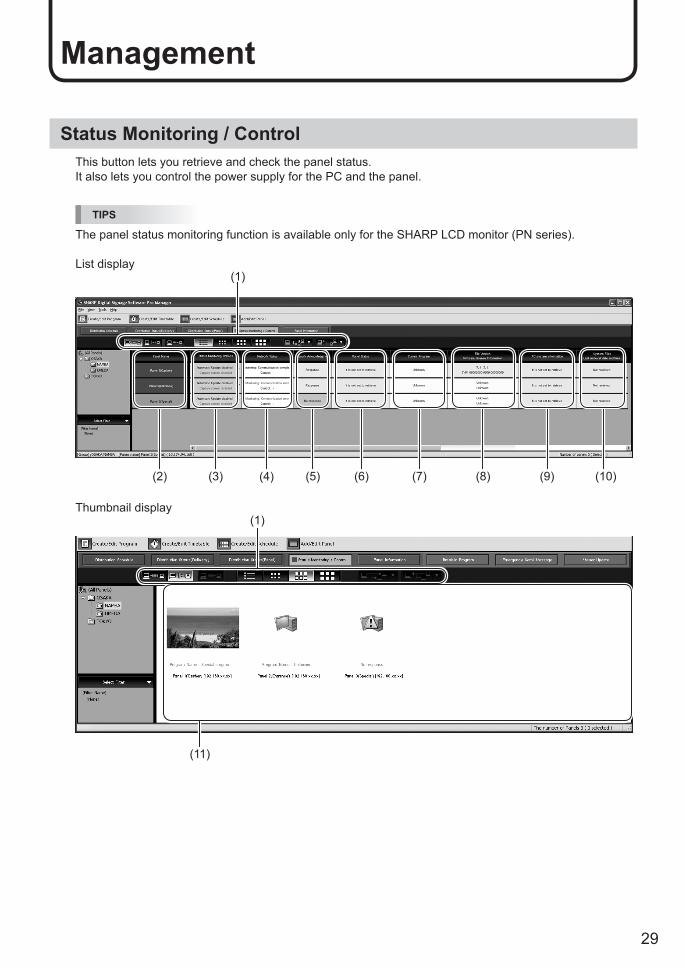
Status Monitoring / ControlThis button lets you retrieve and check the panel status.It also lets you control the power supply for the PC and the panel.
TIPS
The panel status monitoring function is available only for the SHARP LCD monitor (PN series).
List display(1)
(2) (3) (4) (5) (6) (7) (8) (9) (10)
Thumbnail display(1)
(11)

30
Management
(1) Operation toolbarMonitors the panels automatically.The information of the panels registered with the “Update automatically” option is retrieved at regular intervals and displayed.The interval for information retrieval can be changed in the Pro Manager Options settings. (p.11)
Stops the automatic monitoring of the panels.
Retrieves the panel status.Selectapaneltoretrievetheconfirmationandclickthisicon.
Displays the panel status as a list.
Displays the panel status by thumbnails.The thumbnail size can be changed.
This button lets you control the viewer PCs and the panels, such as turning the power on and off. (p.32)
ThisbuttonisforretrievingthesystemfilesoftheviewerPCs.(p.32)
(2) Panel NameDisplays the panel names.Panels can be displayed selectively using the Group tree or the Filter bar.Click the header to sort the panels in the ascending or descending order of their names.
(3) Status Monitoring Options listDisplays the content of the Status Monitoring Options settings for each panel.The settings can be changed from the menu which appears when right-clicked (or double-clicked).Retrieve status manually Retrieves the panel status.Openthumbnailfile DisplaysthethumbnailsusinganapplicationassociatedtotheJPEGfiles.Update automatically
Sets whether to update the screen or not when the panels are monitored automatically.Automatic Update disabledCapture screen enabled Sets whether to retrieve the image currently displayed by the viewer PC as a part of the
panel status.The captured image will be displayed as the thumbnail.Capture screen disabled
Click the header to sort the panels in the ascending or descending order of the content of settings.
(4) Network StatusDisplays the network status for status monitoring and control.Click the header to sort the panels in the ascending or descending order of the status.
(5) Network AcknowledgmentDisplays the acknowledgment results of communication.Click the header to sort the panels in the ascending or descending order of the status.
(6) Panel StatusDisplays the retrieved panel status.Click the header to sort the panels in the ascending or descending order of the status.To retrieve the panel status of the viewer PC, check the “Status of LCD monitor (PN series)” check box in the Pro Manager Options settings. (p.11)

31
Management
(7) Current ProgramDisplays the name of the currently displayed program.Click the header to sort the panels in the ascending or descending order of the program names.When the check is cleared in the “Current program” check box in the Pro Manager Options, the program names will not be displayed. (p.11)
(8) File Version, Software License InformationDisplays the version and the software license information of the SHARP Digital Signage Software Viewer Version installed in the viewer PC.Click the header to sort the panels in the ascending or descending order of the versions.Whenthecheckisclearedinthe“Licenseinformationandfileversions”checkboxintheProManagerOptions, the version and software license information will not be displayed. (p.11)
(9) PC system informationDisplays the PC system information of the viewer PC. Click this item to view the further details.If the Operating System of the viewer PC is older than the Windows 2000 Service Pack 1, the information on “CPU usage rate”, “number of threads” and “number of handles” cannot be retrieved.When the check is cleared in the “PC system information” check box in the Pro Manager Options, the system information will not be displayed. (p.11)
(10)SystemfilesLastretrievaldateandtimeDisplaysthedateandtimeoftheretrievalofsystemfilesfromtheviewerPCs.(p.32)Clickthisitemtoopenthefolderwherethesystemfilesaresaved.(Thesystemfilesareusedbytheservicepersons.)
(11) Panel icon/thumbnailDisplays the retrieved panel status in terms of icons and thumbnails.
Panel icon/thumbnail Description
Displayed when the status of the panel and the viewer PC have not been retrieved.
Displayed when there is no response from the viewer PC.
Displayed when there is a response from the viewer PC, but screen captures of the currently displayed screen cannot be retrieved.
(Example image only)
Displayed when there is a response from the viewer PC and screen captures of the currently displayed screen have been retrieved.* Thumbnails of retrieved screen captures will be displayed. (It differs depending on
the display of the viewer PC.)* The icon on the left will be displayed in the following LCD monitor conditions:
The power is turned off•A hardware error has been detected•When multiple PCs are being connected and there are differences in •conditionsWhen a status retrieval error has occurred•

32
Management
Panels can be displayed selectively using the Group tree or the Filter bar.Double-click the panel icons and the thumbnails to display a menu for status monitoring settings.Read “(3) Status Monitoring Options list” (p.30) for the details of the menu.Double-clickathumbnailtodisplayitusinganapplicationspecifiedintheProManagerOptionssettings.InPULLtypedistribution,thestatuswillberetrievedatthetimeofthefirstaccessfromtheviewerPC.
Controlling the viewer PC and the panelzz
This function lets you control the viewer PC and the panel.Click the 1. function button.Select panels.2.
Use the group tree to show only the panels registered in a group on the list.•Specifyafiltertoshowonlythepanelsthatsatisfytheconditionsonthelist.(p.10)•
Select a panel to control.3. Click while holding down [Ctrl] or [Shift] to select multiple panels at the same time.
Click 4. and select a control option.Menu option Description
Turn ON Viewer PC Turns on the viewer PC of selected panels.This option is not available in PULL type distribution.
Turn OFF Viewer PC Turns off the viewer PC of selected panels.Restart Viewer PC Restarts the viewer PC of selected panels.Adjust the clock of Viewer PC Synchronizes the clock of the viewer PC with that of the management PC.
Turn on LCD monitor Turns on the selected panels.Turn off LCD monitor Turns off the selected panels.
Select video input source Switches the video input source of the selected panels.In the case of PN series and LB-1085, the input cannot be switched to “TV”.
Pause Program Pauses program display.Restart Program Resumes displaying of a paused program.
Amessageconfirmingtheoptionwillbedisplayed.Click [Yes].5. The selected control option will be processed.InPULLtypedistribution,theselectedcontrolwillbeperformedatthetimeofthefirstaccessfromthe viewer PC after this operation.
Retrievingsystemfileszz
ThisfunctionisforretrievingthesystemfilesoftheviewerPC.(Thesystemfilesareusedbytheservicepersons.)
Click the 1. function button.Select panels.2.
Use the group tree to show only the panels registered in a group on the list.•Specifyafiltertoshowonlythepanelsthatsatisfytheconditionsonthelist.(p.10)•
Selectapaneltoretrievethesystemfile.3. Click while holding down [Ctrl] or [Shift] to select multiple panels at the same time.
Click 4. andselectthefiletoretrieve.InPULLtypedistribution,theselectedfilewillberetrievedatthetimeofthefirstaccessfromtheviewer PC after this operation.
33
Management
TIPS
Theretrievedsystemfilesaresavedforupto10retrievals.After10retrievals,theolderoneswillbe•deleted when Pro Manager starts up.To retrieve the Direct X information, the viewer PC must have the Direct X version 9.0 or newer installed.•FileretrievalmaytakesometimedependingonthestatusoftheviewerPCoronthefiletoretrieve.•Whilesystemfilesarebeingretrieved,thepanelstatuscannotberetrieved •If the automatic update for panel monitoring is running, suspend it beforehand.
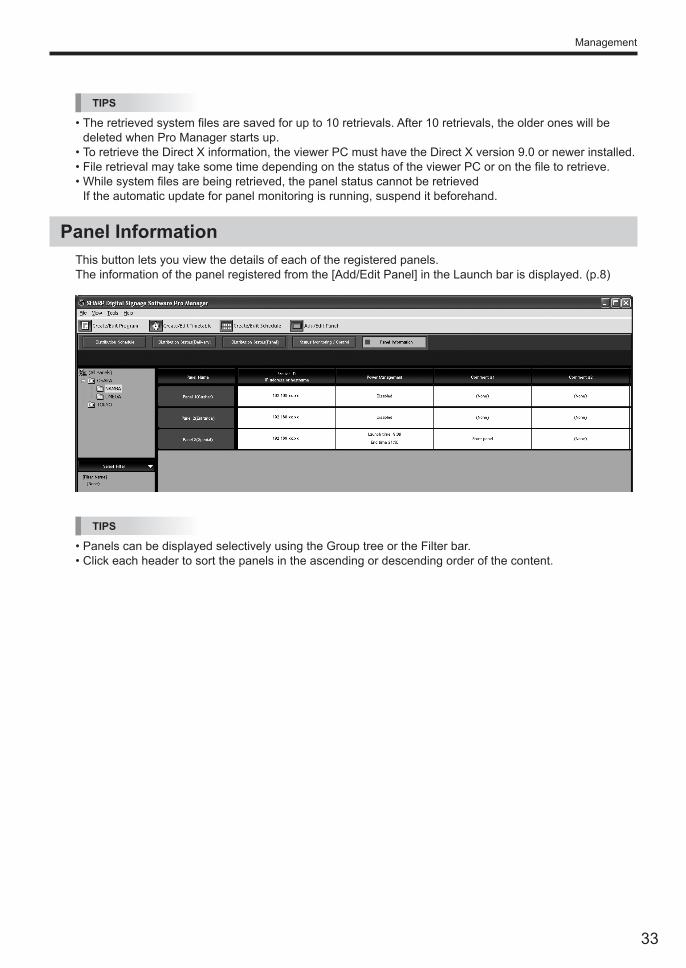
Panel InformationThis button lets you view the details of each of the registered panels.The information of the panel registered from the [Add/Edit Panel] in the Launch bar is displayed. (p.8)
TIPS
Panels can be displayed selectively using the Group tree or the Filter bar.•Click each header to sort the panels in the ascending or descending order of the content.•

34
This button lets you update the SHARP Digital Signage Software Viewer Version on the viewer PC and change settings of the viewer PC.* Change the settings in Pro Manager Options so that the button is shown.
(p.11)
TIPS
This is not to guarantee any future software update.
(1)
(2) (3) (4) (5) (6)
(1) Operation toolbarAssignsasystemfile(suchasupdatersorsettings)toapanel(ortheviewerPCthatisconnectedto)for distribution. Select a panel to assign and click this icon. (p.35)Revertstothestatebeforethesystemfilewasassigned.Select a panel to revert and click this icon.Stopsuncompletedsystemfiledistributionandcancelstheconfirmation.Select a panel to stop distribution and click this icon.Resendthesystemfileforwhichadistributionerrorhasoccurred.Select a panel to resend and click this icon.Cancelstheconfirmationofthesystemfilewhichwasassignedtoapanel(ortheviewerPCthatisassignedto)andconfirmed.Selectapaneltocanceltheconfirmationandclickthisicon.Confirmsassignmentofasystemfileandreservesdistribution.Selectapaneltoconfirmandclickthisicon.(p.35)
(2) Panel NameDisplays the panel names.Panels can be displayed selectively using the Group tree or the Filter bar.Click the header to sort the panels in the ascending or descending order of their names.
(3)SystemfilelistDisplaysthenamesofthesystemfiles(such as updaters and settings) assigned to panels.Double-clickthistoassignasystemfile.Clicktheheadertosortthepanelsintheascendingordescendingorderofthesystemfilenames.Right-click to display a menu, which lets you perform various operations.
Viewer Update

35
Viewer Update
(4) Distribution InformationDisplaystheconfirmeddatesandtimesofdistribution.Click the header to sort the panels in the ascending or descending order of the dates and times.
(5) Distribution StartDisplays the dates and times the distribution is started.Click the header to sort the panels in the ascending or descending order of the dates and times.
(6) Distribution CompleteDisplays the dates and times the distribution is completed.If the distribution is not completed properly, the reason will be displayed.Click the header to sort the panels in the ascending or descending order of the dates and times.
Distributing an updaterzz
This is for distributing an updater for the SHARP Digital Signage Software Viewer Version (PN-SV01) and performing update.
Click the 1. function button.
If the function button is not shown, change the settings in Pro Manager Options. (p.11)Select panels.2.
Use the group tree to show only the panels registered in a group on the list.•Specifyafiltertoshowonlythepanelsthatsatisfytheconditionsonthelist.(p.10)•
Assign an updater to a panel.3. (1) Select a panel to assign an updater to.
Click while holding down [Ctrl] or [Shift] to select multiple panels at the same time.(2) Click .(3) Click [Assign Viewer Update].
The [Open] dialog box appears.(4) Select the updater and click [Open].
The updater is now assigned.Confirmdistribution4. (1)Selectapaneltoconfirmdistribution.
Click while holding down [Ctrl] or [Shift] to select multiple panels at the same time.
(2) Click .(3) Click [Yes].
Distributionisnowconfirmed.Confirmedupdatersaremarkedwiththeconfirmedsign( ).
TIPS
When the viewer PC completes receiving the updater, the update starts. •Programs will not be displayed on the panel during the update is being processed. (The SHARP Digital Signage Software Program Viewer exits when the update starts.) When the update is complete, the viewer PC is restarted and the program display is resumed.
36
Viewer Update
Distributing preset programs/default programszz
This function lets you distribute preset programs and default programs.Prepare the program data to assign in the following method:(1) Export the program data.(2) Changethefilenameoftheexportedprogram.
Inthecaseofpresetprograms:changethefilenameto“presetprogramID.prg”. A preset program ID is a number between 1 and 99999999. E.g.: 35.prg
In the case of default programs: default.prg
Click the 1. function button.
If the function button is not shown, change the settings in Pro Manager Options. (p.11)Select panels.2.
Use the group tree to show only the panels registered in a group on the list.•Specifyafiltertoshowonlythepanelsthatsatisfytheconditionsonthelist.(p.10)•
Assign the program to a panel.3. (1) Select a panel to assign the program to.
Click while holding down [Ctrl] or [Shift] to select multiple panels at the same time.(2) Click .(3) Click [Assign Preset Program].
The [Open] dialog box appears.(4) Select a preset program and click [Open].
The program is now assigned.Confirmdistribution4. (1)Selectapaneltoconfirmdistribution.
Click while holding down [Ctrl] or [Shift] to select multiple panels at the same time.(2) Click .(3) Click [Yes].
Distributionisnowconfirmed.Confirmedpresetprogramsaremarkedwiththeconfirmedsign( ).
TIPS
Preset programs are used with the key/mouse monitoring tool of the SHARP Digital Signage Software.•The default program is used with the SHARP Digital Signage Software Client Scheduler for the •“Program” option in the “Paint the program area, if no program is played” setting.The programs currently displayed on the viewer PC cannot be distributed in this method. •Suspend the program by “Pause Program” before distributing the program. After the distribution is complete, resume the program by “Restart Program”. (p.32)
37
Viewer Update
Distributing contents in advancezz
This function lets you distribute contents to the viewer PC in advance.
Click the 1. function button.
If the function button is not shown, change the settings in Pro Manager Options. (p.11)Select panels.2.
Use the group tree to show only the panels registered in a group on the list.•Specifyafiltertoshowonlythepanelsthatsatisfytheconditionsonthelist.(p.10)•
Assign the contents to a panel.3. (1) Select a panel to assign the contents.
Click while holding down [Ctrl] or [Shift] to select multiple panels at the same time.(2) Click .(3) Click [Assign My Contents].
The [Open] dialog box appears.(4) Select the contents and click [Open].
The contents are now assigned.Confirmdistribution4. (1)Selectapaneltoconfirmdistribution.
Click while holding down [Ctrl] or [Shift] to select multiple panels at the same time.(2) Click .(3) Click [Yes].
Distributionisnowconfirmed.Confirmedcontentsaremarkedwiththeconfirmedsign( ).
TIPS
The contents are sent to the My Contents Folder in the viewer PC. •Ifthereisanexistingfilewiththesamefilenameinthefolder,itwillbeoverwritten. MyContentsFolderisconfiguredfromtheSHARPDigitalSignageSoftwareClientScheduler.The contents currently displayed on the viewer PC cannot be distributed in this method. •Suspend the contents by “Pause Program” before distributing it. After the distribution is complete, resume the contents by “Restart Program”. (p.32)The already distributed contents can be deleted from the viewer PC in one of the following methods:•-Distributeanemptyfile(size0)withthesamefilenameasthefileyouwishtodelete.-Distributeatextfilethatcontainsalistoffilestodelete. SpecifyeachfileinasinglelinebyapathnamerelativetotheMyContentsFolder. Thenameofthetextfileshouldbe“Delete.lst”.

38
Viewer Update
Distributingsystemsettingsfiles(forservicepersons)zz
This function is to be used only by service persons. This is not to be used during normal operations.This allows changing the settings of viewer PCs from the management PC.
Click the 1. function button.
If the function button is not shown, change the settings in Pro Manager Options. (p.11)Select panels.2.
Use the group tree to show only the panels registered in a group on the list.•Specifyafiltertoshowonlythepanelsthatsatisfytheconditionsonthelist.(p.10)•
Assignasystemsettingfiletoapanel.3. (1)Selectapaneltoassignafileto.
Click while holding down [Ctrl] or [Shift] to select multiple panels at the same time.(2) Click .(3)Click[AssignSystemsettingfiles].
The [Open] dialog box appears.(4)Selectafileandclick[Open].
Thesystemsettingfileisnowassigned.Confirmdistribution4. (1)Selectapaneltoconfirmdistribution. Click while holding down [Ctrl] or [Shift] to select multiple panels at the same time.(2) Click .(3) Click [Yes].
Distributionisnowconfirmed.Confirmedsystemsettingfilesaremarkedwiththeconfirmedsign( ).
39
Viewer Update
Distributing panel attributeszz
Distributes panel attributes (Panel Names, Group Names, Comments 1 to 3) to the viewer PCs.The panel attributes are used as judgment criteria for playing conditional contents on the viewer PC.
Click the 1. function button.
If the function button is not shown, change the settings in Pro Manager Options. (p.11)Select panels.2.
Use the group tree to show only the panels registered in a group on the list.•Specifyafiltertoshowonlythepanelsthatsatisfytheconditionsonthelist.(p.10)•
Assign the panel attributes to a panel.3. (1) Select a panel to assign the panel attributes.
Click while holding down [Ctrl] or [Shift] to select multiple panels at the same time.(2) Click .(3) Click [Assign Panel Attributes].
The panel attributes are now assigned.Confirmdistribution4. (1)Selectapaneltoconfirmdistribution.
Click while holding down [Ctrl] or [Shift] to select multiple panels at the same time.(2) Click .(3) Click [Yes].
Distributionisnowconfirmed.Confirmedpanelattributesaremarkedwiththeconfirmedsign ( ).
TIPS
The “Group” attribute is a string in which the group hierarchy is represented by the symbol “/”. •E.g.: “/Kanto/Tokyo/23districts”

40
Distribution SchedulerLaunching the Distribution Schedulerzz
Distribution Scheduler is a tool for managing communications with the viewer PC.Distribution Scheduler is automatically launched by “Startup” when Windows launches.When Distribution Scheduler launches, an icon ( ) is displayed (and resides permanently) in the Task Tray.Do not exit Distribution Scheduler unnecessarily.
TIPS
The SHARP Digital Signage Software Server Scheduler is not used with the SHARP Digital Signage •Software Pro.Do not launch the SHARP Digital Signage Software Server Scheduler when the Distribution Scheduler is running.•Normally, there is no need to operate the Distribution Scheduler.•
Distribution Scheduler MenuRight-click the icon ( ) in the Task Tray to display the menu.
View logDisplays the operation log of the Distribution Scheduler.The log can be cleared or updated to the most recent status.The PULL type distribution activities are not logged in the Distribution Scheduler operation log.
View statusDisplays the communication status as a list.The communication status of the PULL type distribution is not displayed in the list.# Displays the connection number of the communication.
Hostname Displays the host name (or the IP address) of the other end of the communication.
Kind Displays the kind of the communication.Status Displays the progress status of the communication.
ConfigSets the maximum number of connections allowed for simultaneous communications with the other PUSH type distribution hosts.* This number includes a connection exclusively used for control. For
this reason, the number of connections that can be used simultaneously for distributing schedules is “the maximum number of connections minus 1”. This setting does not affect the number of connections for PULL type distribution.
VersionDisplays the version of the Distribution Scheduler.

V4.1 EN12M(3)