Sharing videos on Microsoft Stream · Join the meeting by selecting ‘Join’ on the calendar...
19
Sharing videos on Microsoft Stream (1) Why use Microsoft Stream? Microsoft Stream is an Office365 app that allows you to upload and share files from cloud storage. Microsoft Stream videos can be integrated into Microsoft Teams to allow for the efficient sharing of videos to specific Teams channels. This guide covers: Terminology in Microsoft Stream How to setup a Microsoft Stream channel Integrating Microsoft Stream into Microsoft Teams Add a Microsoft Teams recording to Microsoft Stream Uploading and sharing independent videos (2) Terminology in Microsoft Stream (2.1) Channels in Microsoft Stream It’s important to note that a Microsoft Stream channel is different from a Microsoft Teams channel. A Stream channel is a place to collect videos together and in selecting who can access and view these videos, we can link it to a specific Teams channel. It will be useful to name your Stream channel in a way that helps you to distinguish it from the Teams channel. (2.2) Groups in Microsoft Stream Each Team automatically has a Group setup on Stream. Members or Owners of the Team are automatically copied over to be Members or Owners of the Group. Any video put into the Group will be available only to these Members and Owners, unless the video is marked as ‘companywide’ or the permissions are changed on a per user basis. For example, if you are the participant in the ‘English Literature 001’ Team on Microsoft Teams, this will appear under your Groups list in Microsoft Stream. As such, the Group that you will use for sharing your videos on Microsoft Stream will already be set up for you as the Team will already exist on Microsoft Teams. Please note: You will not be able to create your own Group within Microsoft Stream. Within the University this functionality is limited to IT only. Therefore, although you may see Microsoft guidance on this feature, you will not be able to do this yourself. This will not be an issue for you in setting up your classroom as the Group(s) you need will already exist so you will not need to create them. (2.3) Stream Channels vs Stream Groups
Transcript of Sharing videos on Microsoft Stream · Join the meeting by selecting ‘Join’ on the calendar...

Sharing videos on Microsoft Stream
(1) Why use Microsoft Stream? Microsoft Stream is an Office365 app that allows you to upload and share files from cloud
storage. Microsoft Stream videos can be integrated into Microsoft Teams to allow for the
efficient sharing of videos to specific Teams channels.
This guide covers:
Terminology in Microsoft Stream
How to setup a Microsoft Stream channel
Integrating Microsoft Stream into Microsoft Teams
Add a Microsoft Teams recording to Microsoft Stream
Uploading and sharing independent videos
(2) Terminology in Microsoft Stream
(2.1) Channels in Microsoft Stream
It’s important to note that a Microsoft Stream channel is different from a Microsoft
Teams channel. A Stream channel is a place to collect videos together and in selecting who
can access and view these videos, we can link it to a specific Teams channel. It will be
useful to name your Stream channel in a way that helps you to distinguish it from the Teams
channel.
(2.2) Groups in Microsoft Stream
Each Team automatically has a Group setup on Stream. Members or Owners of the Team
are automatically copied over to be Members or Owners of the Group. Any video put into the
Group will be available only to these Members and Owners, unless the video is marked as
‘companywide’ or the permissions are changed on a per user basis.
For example, if you are the participant in the ‘English Literature 001’ Team on Microsoft
Teams, this will appear under your Groups list in Microsoft Stream. As such, the Group that
you will use for sharing your videos on Microsoft Stream will already be set up for you as the
Team will already exist on Microsoft Teams.
Please note: You will not be able to create your own Group within Microsoft Stream. Within
the University this functionality is limited to IT only. Therefore, although you may see
Microsoft guidance on this feature, you will not be able to do this yourself. This will not be an
issue for you in setting up your classroom as the Group(s) you need will already exist so you
will not need to create them.
(2.3) Stream Channels vs Stream Groups

Think of Stream Channels as the storage of content in a collection and the Stream Group
as who the content gets shared with.
Please note: You do not have to share your video within a Stream Group or Stream
channel. You can also just share an individual video that does not link to a Group or channel
(how to do this is discussed in section 6).
(3) How to setup a Microsoft Stream channel
(3.1) Creating a Stream channel
1. In Microsoft Stream, go to ‘Create’ and ‘Channel’.
You will see the following option box:
2. Name the Stream channel and add a description.

3. Check that the ‘Group channel’ option is selected (selecting ‘Companywide channel’
will mean the video will be available to everyone at the University of Leeds).
4. Start typing the name of your Group into the ‘Search group’ field. This Group name
will be the name of the Team in Microsoft Teams that you want to use the Stream
channel within.
5. Select the name of the Group you want from the options and then select ‘Create’.
Your new channel page will look like this:
(3.2) Upload a video to a Stream channel
1. In Microsoft Stream, select the ‘My content’ tab from the toolbar and select
‘Channels’.
2. Select the appropriate channel from the list. This will take you to your channel page.
Note: if you have not created the Stream channel but are a channel Owner, you will be able
to access the channel and upload videos in the same way as described below. The only
difference will be that you will access the Stream channel page through ‘My content’ -
‘Groups’ - Select the Group you need - Select appropriate channel.
3. Select ‘Select more files’ in the centre of the screen or drag the video from your
computer file to upload.

4. Name your recording and give a brief description if required.
5. After the video is 100% uploaded select ‘Permissions’ from the dropdown menu.
This will appear as follows:
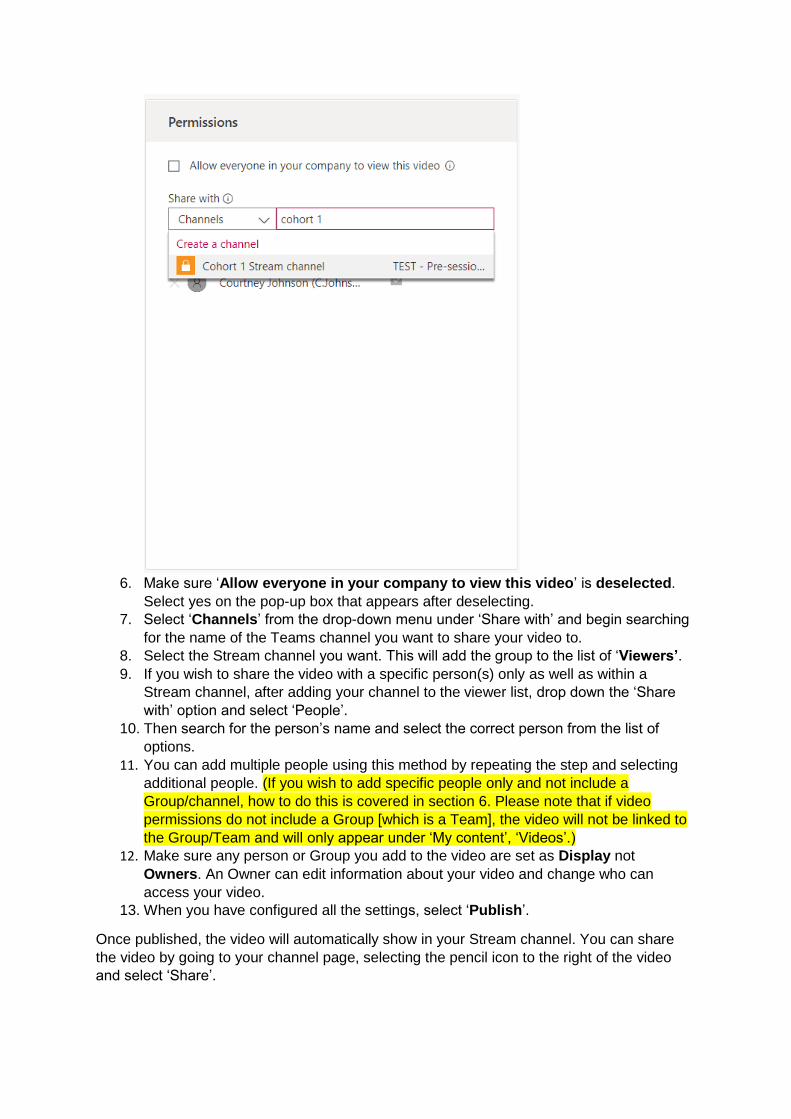
6. Make sure ‘Allow everyone in your company to view this video’ is deselected.
Select yes on the pop-up box that appears after deselecting.
7. Select ‘Channels’ from the drop-down menu under ‘Share with’ and begin searching
for the name of the Teams channel you want to share your video to.
8. Select the Stream channel you want. This will add the group to the list of ‘Viewers’.
9. If you wish to share the video with a specific person(s) only as well as within a
Stream channel, after adding your channel to the viewer list, drop down the ‘Share
with’ option and select ‘People’.
10. Then search for the person’s name and select the correct person from the list of
options.
11. You can add multiple people using this method by repeating the step and selecting
additional people. (If you wish to add specific people only and not include a
Group/channel, how to do this is covered in section 6. Please note that if video
permissions do not include a Group [which is a Team], the video will not be linked to
the Group/Team and will only appear under ‘My content’, ‘Videos’.) 12. Make sure any person or Group you add to the video are set as Display not
Owners. An Owner can edit information about your video and change who can
access your video. 13. When you have configured all the settings, select ‘Publish’.
Once published, the video will automatically show in your Stream channel. You can share
the video by going to your channel page, selecting the pencil icon to the right of the video
and select ‘Share’.

You can then copy the link and share it. The link will only be viewable to people who have
been added to the Viewer list as described above.
(4) Adding Microsoft Stream into Microsoft Teams
Adding a Microsoft Stream tab within Microsoft Teams lets you share videos from Stream
directly in a tab in your Microsoft Teams channel. This means that once Stream videos are
uploaded, they automatically populate in the linked Stream tab in Teams.
(4.1) Get a share link for your Stream channel
1. Find your channel on Microsoft Stream (‘My content’ – ‘Channels’ – ‘Select
channel’).
2. Select the three dots to the right of the channel title and select ‘Share’.
3. Select ‘Copy’ to copy the share link.

(4.2) Add a Stream tab in Microsoft Teams
1. Go to the channel within your Team that you wish to link with your Stream channel.
2. Select Add a tab (the + icon) next to your existing tabs and select ‘Stream’.
3. Add a name to the Tab name field (this could simply be ‘Stream’ or ‘Video’) and add
the link (obtained in the step above) to your Microsoft Stream channel.
The Stream tab within your Teams channel should now look like this:
(4.3) Note on access
It is important to note that a Stream channel is set up to link to an entire Team within
Microsoft Teams. Therefore, even if you add the Stream tab within a specific channel (be
that hidden or private), the share links for the video, even if sent to a Team member not
included within that specific channel, will still be viewable to any member of the wider Team.
However, for videos uploaded individually (as discussed in section 6) and set to be viewable
to specific people only, this inherently means that they are not linked to a Stream channel or
a Team. Therefore, these share links will only be accessible to the specific people added in
the viewer list within Permissions.
(5) Add a Microsoft Teams recording to Microsoft Stream
(5.1) Set up a Teams meeting
In Teams, go to Calendar and select ‘New meeting’. Enter the details and participants to be
in the meeting and select ‘Save’. This will then be added to your Teams calendar. You can

Join the meeting by selecting ‘Join’ on the calendar entry and then once the meeting has
opened select ‘Join meeting’.
(5.2) Record a Teams meeting
Once you have joined the meeting, go to the three dots and select ‘Start recording’.
Once you have started recording, a pop-up will appear at the top of the screen to notify
participants that they are being recorded. To be transparent, you may wish to inform
participants of this ahead of the meeting in case they do not wish to be recorded or in case
they wish to turn their camera off.
After you have finished the meeting, select the three dots and select ‘Stop recording’.

You will then need to confirm again by selecting ‘Stop recording’.
(5.3) Upload the recording to Stream
Once you have ended the recording for your meeting, you will be able to access your
recording within Microsoft Stream. It may take 10-15 minutes for the recording to process
and appear on Stream but you will receive an email once it is ready.
To access the recording, you can either use the email link you receive or, on Microsoft
Stream, go to ‘My content’ and ‘Videos’ or to ‘My content’ and then ‘Meetings’:

The recording will appear in the list of your videos. It will have the same title as the meeting
so you may wish to rename this by selecting the ‘Update video details’ pencil icon on the
right-hand side. Select this pencil icon to edit the options and permissions for this video.
Once you have selected this icon, you will see a page to edit video details, permissions and
other options.

In the ‘Details’ box, add the appropriate title, description and select a thumbnail for the video.
In the ‘Permissions’ box, select who you would like to share access with. Please refer to
section 3.2 ‘Upload a video to a Stream channel’ for details on how to set
permissions.
(6) Uploading and sharing independent videos
You may wish to upload and share a video to Microsoft Stream without adding it in to a
particular Stream channel. There are a few possible cases in which you may want to do this:
Sharing a video with a specific set of people only.
Sharing a video with a Group/Team but not including this video within a Stream
channel (this will still allow all Group/Team members to access it via a shareable link
but will mean the video is not added to a Stream channel collection).
(6.1) Sharing a video with a specific set of people only To do this, go to ‘Create’ and ‘Upload Video’.
Select ‘browse’ to select a video from your computer or drag and drop the video you wish to
upload.
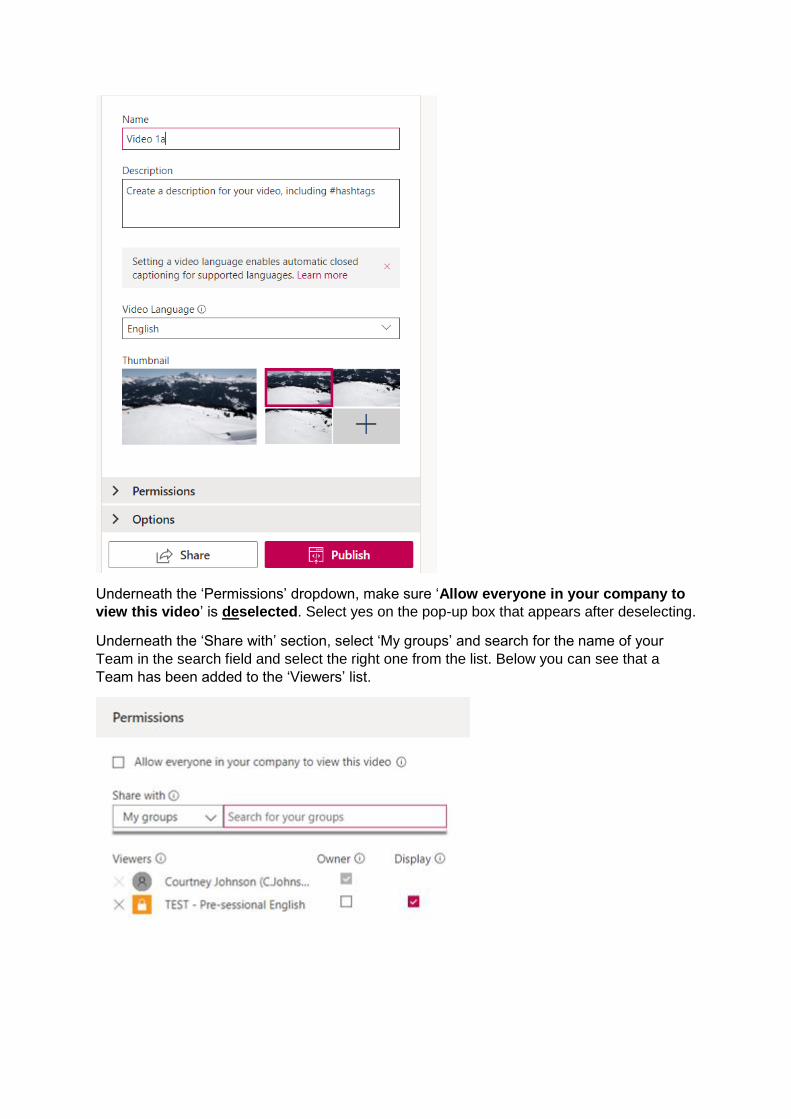
Here you can add the video title and an optional description. You can also add a thumbnail
of the video once it’s finished uploading.

Underneath the ‘Permissions’ dropdown, make sure ‘Allow everyone in your company to
view this video’ is deselected. Select yes on the pop-up box that appears after deselecting.
Underneath the ‘Share with’ section, select ‘People’ and search for the people you wish to
add, selecting them from the list that appears.

This will then add your selected people to the ‘Viewer’ list. Ensure that you have deselected
‘Owner’ for those you add to the Viewer list. If ‘Owner’ is selected, that person will be able to
alter the settings and delete or replace the video you have uploaded.

In the ‘Options’ dropdown you can also choose to enable or disable comments.

Select ‘Publish’ and then select ‘Share’. Then select ‘Copy’ to copy the shareable link.
You will be able to then copy this link and provide it to the specific people you intend. If the
link is shared with someone outside of those in the Viewer list you have set up in the
‘Permissions’ tab, the person/people will not be able to view it.
If you wish to alter any details of the video including title, description, permissions or options,
you can edit this information through accessing the ‘Update video details’ pencil icon on the
right-hand side of the video on the page found under ‘My content’ and ‘Videos’.

(6.2) Sharing a video with a Group/Team but not a Stream channel To do this, go to ‘Create’ and ‘Upload Video’.
Select ‘browse’ to select a video from your computer or drag and drop the video you wish to
upload.
Here you can add the video title and an optional description. You can also add a thumbnail
of the video once it’s finished uploading.
Underneath the ‘Permissions’ dropdown, make sure ‘Allow everyone in your company to
view this video’ is deselected. Select yes on the pop-up box that appears after deselecting.
Underneath the ‘Share with’ section, select ‘My groups’ and search for the name of your
Team in the search field and select the right one from the list. Below you can see that a
Team has been added to the ‘Viewers’ list.

Ensure that you have deselected ‘Owner’ for those you add to the Viewer list. If ‘Owner’ is
selected, the entire Team will be able to alter the settings and delete or replace the video
you have uploaded.
In the ‘Options’ dropdown you can also choose to enable or disable comments.
Select ‘Publish’ and then select ‘Share’. Then select ‘Copy’ to copy the shareable link.
You will be able to then copy this link and provide it to the specific Team you intend. If the
link is shared with someone outside of this Team, the person/people will not be able to view
it.
If you wish to alter any details of the video including title, description, permissions or options,
you can edit this information through accessing the ‘Update video details’ pencil icon on the
right-hand side of the video on the page found under ‘My content’ and ‘Videos’.