Shade Re-Stringing Instructions - UnitedShade Re-Stringin… · SHADE RE-STRINGING INSTRUCTIONS ......
2
WARNING: Contains small parts, which could be a choking hazard. This shade repair kit should be stored in a safe place away from children and small animals. Printed in U.S.A. ©2013 Dicor Corporation US-42 TM/11-13 a dicor company united shade 52878 Airport Parkway • Elkhart IN 46514 877-262-0954 • www.unitedshade.com Shades of Excellence 3.10 3.12 3.11 3.13 4.1 4.2 4.3 3.8 3.7 3.6 Cord Bushing Cord Bushing Cord Bushing Cord Bushing VERSION 3. NIGHT SHADE ONLY (2 CORDS) CONTINUED 3.10 Slide bottom rail back onto shade making sure the cords remain crossed. 3.11 Thread cord through the bottom rail end caps. Reinstall end caps. SHADE RE-STRINGING INSTRUCTIONS 3.12 Thread cord retainers onto end of cords. Flat side is top of cord retainer. Spool side is bottom of cord retainer. Thread cords up through spool side first and then back down through the flat side. The cord loop will be on top of the flat side of cord retainer. 3.13 With a tape measure, measure from the top of the top rail to desired drop of shade. Tie knots below cord retainer at that measurement. Refer to label on top rail for original drop. 3.14 Reinstall shade in window. Let entire shade drop. Screw each cord retainer into wall. 3.15 If shade does not stay in the upright position, you may need to increase the tension of the cords. Increase tension by retying knot in shorter position. VERSION 4. NIGHT SHADE ONLY (4 CORDS) Follow the same instructions as Version 3 (2 cords) except: 4.1 Remove two cords from kit. Attach two cords to each side of the spring by tying a double knot. 4.2 Cords will thread in same process but you will have two cords on the left and two cords on the right. 4.3 Thread both left cords through end caps/cord retainers and right cords through end caps/cord retainers. Flat side is top of cord retainer. Spool side is bottom of cord retainer. Thread cords up through spool side first and then back down through flat side. The cord loop will be on top of the cord retainer. BEFORE YOU START: You will need the following tools: scissors, flat head screwdriver and Phillips head screwdriver. YOU WILL NEED TO DETERMINE 1) The type of shade: Day/Night, Night only or Day only and, 2) The number of cords: two or four. VERSION 3. NIGHT SHADE ONLY (2 CORDS) 3.1 Remove shade from window by unclipping brackets or removing screws from top rail. Next remove screws from cord retainers at bottom of the window. 3.2 Place shade on a dry, clean and flat workstation. 3.3 Pry loose the end caps on all rails with a flat head screwdriver. The rails slide off horizontally. Bottom rail might get hung up on knob rivet so be firm and it will eventually slide off. 3.4 Cut off or remove cord retainers. 3.5 Pull out current cord from top rail. 3.6 Remove two cords from kit. Attach one cord to each side of the spring by tying a double knot. 3.7 Inspect the cord bushings in the fabric and if broken or worn, replace with supplied bushings. Carefully thread cord through bushing noting that the cord coming from the left will run down through the left side of the material. The cord coming from the right will run down through the right side of the fabric. 3.8 The cords will cross in the bottom rail so that the cord that runs down the left-hand portion of the shade will cross over and now come out through the right-hand side of the bottom rail. Do the same procedure for the right-hand side of the shade. It will cross over in the bottom rail and come out through the left-hand side of the bottom rail. 3.9 Slide top rail back onto shade. Position the top rail so bracket groove is toward front of the shade. Reinstall top rail end caps. Spring Cord Retainers Cord Retainers Head Rail Bottom Rail String 1 String 2 3.1-3 Spring Cord Retainers Cord Retainers Head Rail Bottom Rail String 1 String 3 String 2 String 4 4.1-3
Transcript of Shade Re-Stringing Instructions - UnitedShade Re-Stringin… · SHADE RE-STRINGING INSTRUCTIONS ......
WARNING: Contains small parts, which could be a choking hazard. This shade repair kit should be stored in a safe place away from children and small animals.
Printed in U.S.A. ©2013 Dicor Corporation US-42 TM/11-13
a dicor company
united shade
52878 Airport Parkway • Elkhart IN 46514 877-262-0954 • www.unitedshade.com Shades of Excellence
3.10
3.12
3.11
3.13
4.1
4.2
4.3
3.8
3.7
3.6
Cord Bushing
Cord Bushing
Cord Bushing
Cord Bushing
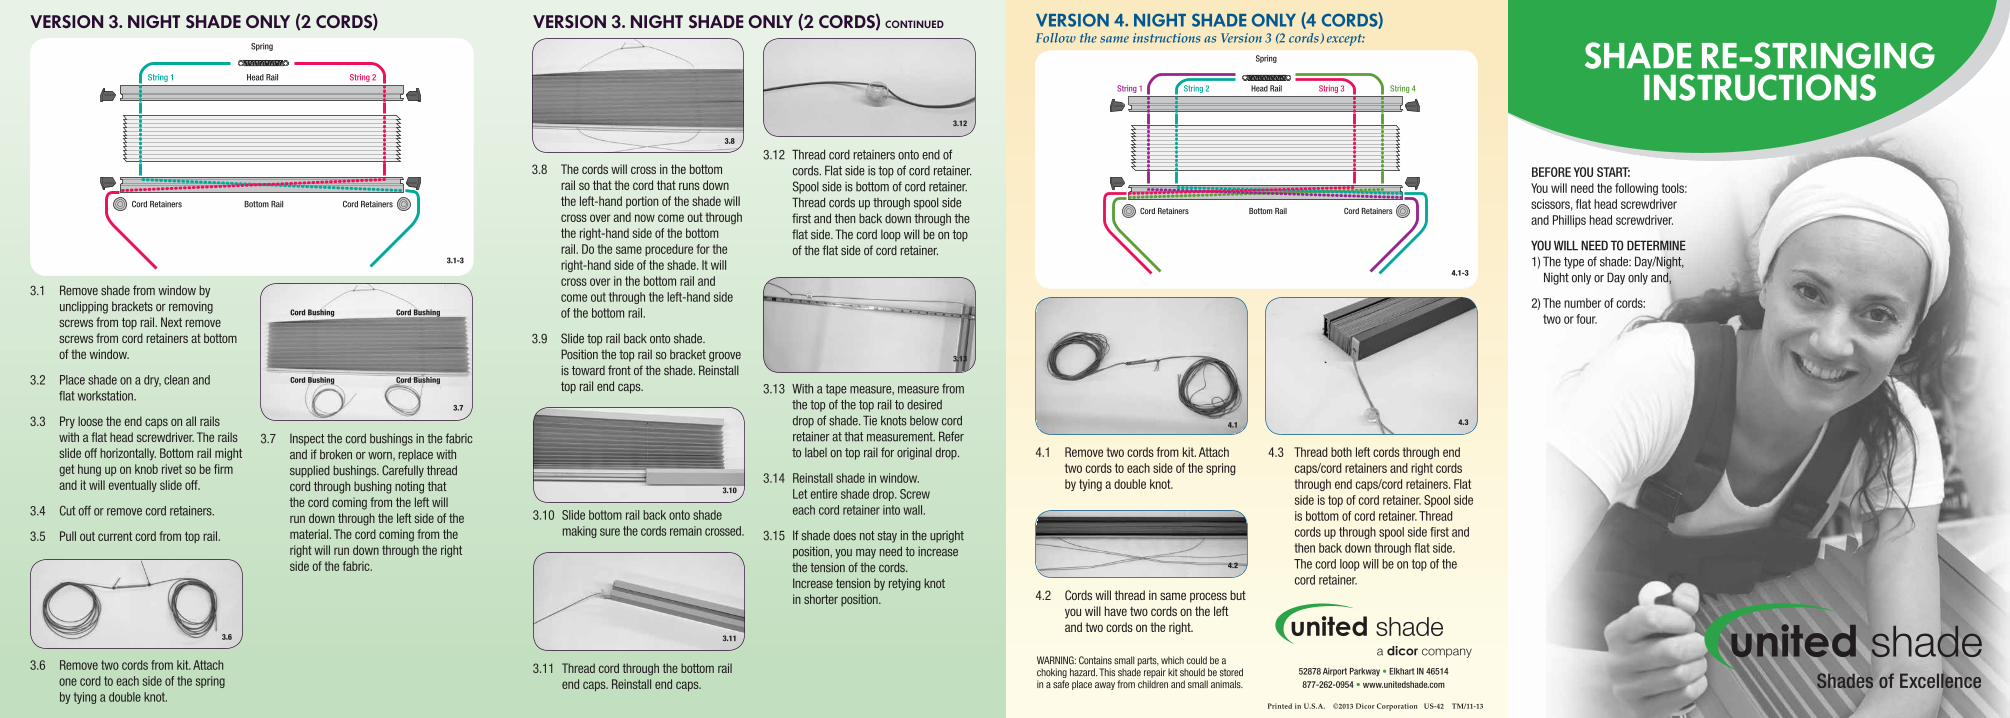
VERSION 3. NIGHT SHADE ONLY (2 CORDS) CONTINUED
3.10 Slide bottom rail back onto shade making sure the cords remain crossed.
3.11 Thread cord through the bottom rail end caps. Reinstall end caps.
SHADE RE-STRINGINGINSTRUCTIONS
3.12 Thread cord retainers onto end of cords. Flat side is top of cord retainer. Spool side is bottom of cord retainer. Thread cords up through spool side first and then back down through the flat side. The cord loop will be on top of the flat side of cord retainer.
3.13 With a tape measure, measure from the top of the top rail to desired drop of shade. Tie knots below cord retainer at that measurement. Refer to label on top rail for original drop.
3.14 Reinstall shade in window. Let entire shade drop. Screw each cord retainer into wall.
3.15 If shade does not stay in the upright position, you may need to increase the tension of the cords. Increase tension by retying knot in shorter position.
VERSION 4. NIGHT SHADE ONLY (4 CORDS) Follow the same instructions as Version 3 (2 cords) except:
4.1 Remove two cords from kit. Attach two cords to each side of the spring by tying a double knot.
4.2 Cords will thread in same process but you will have two cords on the left and two cords on the right.
4.3 Thread both left cords through end caps/cord retainers and right cords through end caps/cord retainers. Flat side is top of cord retainer. Spool side is bottom of cord retainer. Thread cords up through spool side first and then back down through flat side. The cord loop will be on top of the cord retainer.
BEFORE YOU START: You will need the following tools: scissors, flat head screwdriver and Phillips head screwdriver.
YOU WILL NEED TO DETERMINE 1) The type of shade: Day/Night, Night only or Day only and,
2) The number of cords: two or four.
VERSION 3. NIGHT SHADE ONLY (2 CORDS)
3.1 Remove shade from window by unclipping brackets or removing screws from top rail. Next remove screws from cord retainers at bottom of the window.
3.2 Place shade on a dry, clean and flat workstation.
3.3 Pry loose the end caps on all rails with a flat head screwdriver. The rails slide off horizontally. Bottom rail might get hung up on knob rivet so be firm and it will eventually slide off.
3.4 Cut off or remove cord retainers.
3.5 Pull out current cord from top rail.
3.6 Remove two cords from kit. Attach one cord to each side of the spring by tying a double knot.
3.7 Inspect the cord bushings in the fabric and if broken or worn, replace with supplied bushings. Carefully thread cord through bushing noting that the cord coming from the left will run down through the left side of the material. The cord coming from the right will run down through the right side of the fabric.
3.8 The cords will cross in the bottom rail so that the cord that runs down the left-hand portion of the shade will cross over and now come out through the right-hand side of the bottom rail. Do the same procedure for the right-hand side of the shade. It will cross over in the bottom rail and come out through the left-hand side of the bottom rail.
3.9 Slide top rail back onto shade. Position the top rail so bracket groove is toward front of the shade. Reinstall top rail end caps.
Spring
Cord Retainers Cord Retainers
Head Rail
Bottom Rail
String 1 String 2
3.1-3
Spring
Cord Retainers Cord Retainers
Head Rail
Bottom Rail
String 1 String 3String 2 String 4
4.1-3
Bottom Rail
Day Fabric
Center Rail
Night Fabric
Springs
Head Rail
Cord Retainers Cord Retainers 1.1-3
1.6
1.9
1.11
1.10
1.7
1.13
1.12
1.14
2.3
2.1
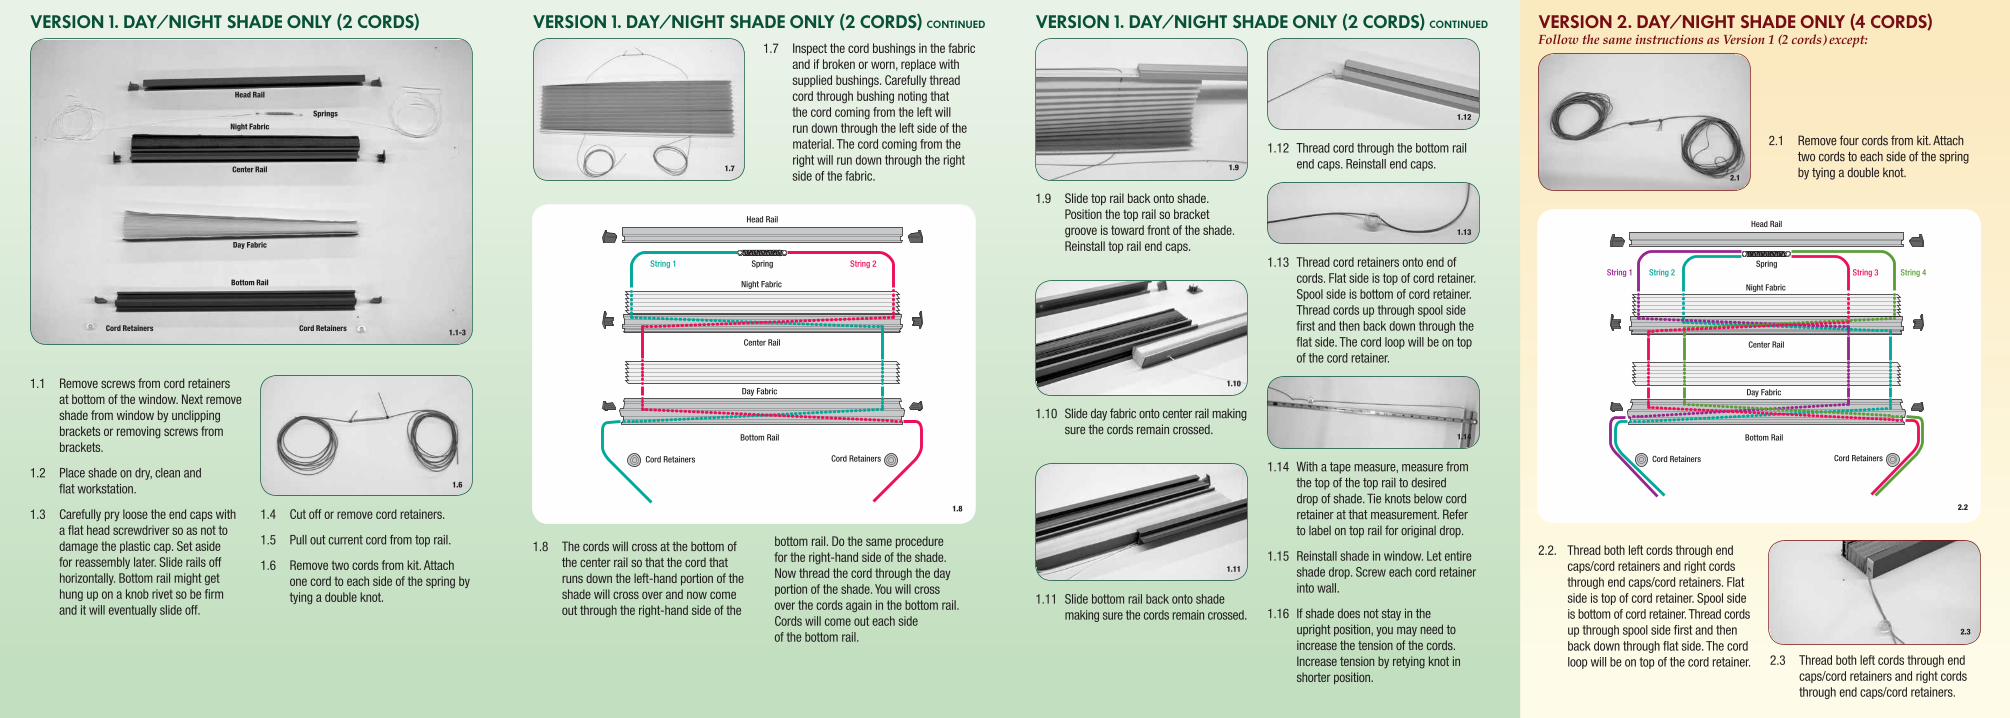
VERSION 1. DAY/NIGHT SHADE ONLY (2 CORDS)
1.1 Remove screws from cord retainers at bottom of the window. Next remove shade from window by unclipping brackets or removing screws from brackets.
1.2 Place shade on dry, clean and flat workstation.
1.3 Carefully pry loose the end caps with a flat head screwdriver so as not to damage the plastic cap. Set aside for reassembly later. Slide rails off horizontally. Bottom rail might get hung up on a knob rivet so be firm and it will eventually slide off.
1.4 Cut off or remove cord retainers.
1.5 Pull out current cord from top rail.
1.6 Remove two cords from kit. Attach one cord to each side of the spring by tying a double knot.
1.8 The cords will cross at the bottom of the center rail so that the cord that runs down the left-hand portion of the shade will cross over and now come out through the right-hand side of the
1.9 Slide top rail back onto shade. Position the top rail so bracket groove is toward front of the shade. Reinstall top rail end caps.
1.10 Slide day fabric onto center rail making sure the cords remain crossed.
1.11 Slide bottom rail back onto shade making sure the cords remain crossed.
1.7 Inspect the cord bushings in the fabric and if broken or worn, replace with supplied bushings. Carefully thread cord through bushing noting that the cord coming from the left will run down through the left side of the material. The cord coming from the right will run down through the right side of the fabric.
VERSION 1. DAY/NIGHT SHADE ONLY (2 CORDS) CONTINUED
1.12 Thread cord through the bottom rail end caps. Reinstall end caps.
1.13 Thread cord retainers onto end of cords. Flat side is top of cord retainer. Spool side is bottom of cord retainer. Thread cords up through spool side first and then back down through the flat side. The cord loop will be on top of the cord retainer.
1.14 With a tape measure, measure from the top of the top rail to desired drop of shade. Tie knots below cord retainer at that measurement. Refer to label on top rail for original drop.
1.15 Reinstall shade in window. Let entire shade drop. Screw each cord retainer into wall.
1.16 If shade does not stay in the upright position, you may need to increase the tension of the cords. Increase tension by retying knot in shorter position.
VERSION 2. DAY/NIGHT SHADE ONLY (4 CORDS) Follow the same instructions as Version 1 (2 cords) except:
2.1 Remove four cords from kit. Attach two cords to each side of the spring by tying a double knot.
2.2. Thread both left cords through end caps/cord retainers and right cords through end caps/cord retainers. Flat side is top of cord retainer. Spool side is bottom of cord retainer. Thread cords up through spool side first and then back down through flat side. The cord loop will be on top of the cord retainer. 2.3 Thread both left cords through end
caps/cord retainers and right cords through end caps/cord retainers.
bottom rail. Do the same procedure for the right-hand side of the shade. Now thread the cord through the day portion of the shade. You will cross over the cords again in the bottom rail. Cords will come out each side of the bottom rail.
VERSION 1. DAY/NIGHT SHADE ONLY (2 CORDS) CONTINUED
Head Rail
Spring
Night Fabric
Center Rail
Day Fabric
Bottom Rail
String 1 String 2
Cord Retainers Cord Retainers
1.8
Head Rail
Spring
Night Fabric
Center Rail
Day Fabric
Bottom Rail
String 1 String 3
Cord Retainers Cord Retainers
String 2 String 4
2.2