EN ASSEMBLY INSTRUCTION 20 DE MONTAGEANLEITUNG€¦ · To re-open use a screwdriver. The...
2
— Fitting with strain relief IP66 Zugentlastungsverschraubung IP66 ASSEMBLY INSTRUCTION MONTAGEANLEITUNG EN DE We reserve the right to make technical changes or modify the contents of this document without prior notice. With regard to purchase orders, the agreed particulars shall prevail. ABB AG does not accept any responsibility whatsoever for potential errors or possible lack of information in this document. We reserve all rights in this document and in the subject matter and illustrations contained therein. Any reproduction, disclosure to third parties or utilisation of its contents – in whole or in parts – is forbidden without prior written consent of ABB AG. Copyright© 2017 ABB All rights reserved ABB Switzerland Ltd PMA Cable Protection Aathalstrasse 90 CH-8610 Uster Switzerland Tel: +41 58 585 00 11 E-mail: [email protected] www.pma.ch The specifications and instructions for our customers in this document reflect the product engineering level at the time of manufacturing. ABB accepts no liability for damages resulting from unprofessional installation or misuse of the products. This disclaimer also includes damages to third parties. It is the customer‘s responsibility to check the delivered products and immediately notify ABB of detected faults. It is also the customer‘s responsibility to test the delivered product on its applicability for the intended purpose. ABB will accept no liability or responsibility for their products if a product or a ABB system is combined or used together with third-party products, i.e. products from other companies than ABB. Jurisdiction in all legal disputes concerning product liability have the courts of the canton of Zurich/Switzerland. Swiss law applies. For more information go to: www.pma.ch Die in diesem Dokument für unsere Kunden enthaltenen Angaben und Instruktionen entsprechen dem neuesten Stand unserer Technik zum Zeitpunkt der Herstellung des Produktes. Die ABB lehnt jede Haftung bei unsachgemässer Montage oder Verwendung sowie Zweckentfremdung des Produktes ab. Dieser Haftungsausschluss umfasst auch allfällige Drittschäden. Es obliegt dem Kunden, die gelieferte Ware zu prüfen und allfällig festgestellte Mängel sofort der ABB anzuzei- gen. Es obliegt ferner dem Kunden, die Ware auf ihre Eignung zwecks einer spezifischen Anwend- ung zu überprüfen. Die ABB lehnt jegliche Haftung für ihre Produkte ab, wenn ein einzelnes Pro- dukt oder ein ABB-System mit Fremdprodukten, d.h. Produkten anderer Unternehmungen kombiniert bzw. verwendet wird. Gerichtsstand für Streitigkeiten bezüglich Produkthaftung sind die Gerichte des Kantons Zürich/Schweiz. Es kommt Schweizer Recht zur Anwendung. Ergänzende Informationen unter: www.pma.ch SAFETY REMARKS: • Recommendation for applications with strong vibrations: Secure thread with common adhesive or sealant (e.g. Loctite) SICHERHEITSHINWEISE: • Empfehlung für Anwendungen mit starken Vibrationen: Gewinde mit handelsüblichem Sicherungs- oder Dichtmittel (z.B. Loctite) sichern — Contact ENGLISH DEUTSCH A. Conduit B. Fitting C. Universal safety clip D. Thread seal insert E. Socket A. Wellrohr B. Fitting C. Universal- Sicherheitssper re D. Dichtelement E. Sockel Cut the conduit straight in the corrugation (A). Rohr (A) im Wellental gerade abschneiden. Push in the conduit (A) with a slight twist until the stop. Pull conduit (A) back slightly to ensure the locking mechanism is fully engaged. Einstossmontage des Wellrohres (A) mit leichter Drehbewegung. Rohr bis zum Anschlag einstossen, anschliessend leicht zurückziehen, damit die Verriegelungselemente optimal einrasten. Screw up fitting (B) with socket (D+E). Fitting (B) mit dem Sockel (D+E) verschrauben. To re-open use a screwdriver. The screwdriver slot in the clip (C) should be on the conduit side. Wieder öffnen mittels Schraubenzieher. Die Schraubenzieher-Öffnungsnut an der Sperre (C) muss rohrseitig positioniert sein. Screw in socket (E) with pushed in seal element (D). The cable diameter has to be within the clamping area of the seal element. Please refer to data sheet. Sockel (E) mit eingestossenem Dichtelement (D) festschrauben. Der Kabeldurchmesser muss im Klemmbereich des Dichtelements liegen. Siehe Datenblatt. 4 B 6 C 5 A A 20 3 D+E 1 A B C D E 2 A
Transcript of EN ASSEMBLY INSTRUCTION 20 DE MONTAGEANLEITUNG€¦ · To re-open use a screwdriver. The...
— Fitting with strain relief IP66Zugentlastungsverschraubung IP66
ASSEMBLY INSTRUCTIONMONTAGEANLEITUNG
EN
DE
We reserve the right to make technical changes or modify the contents of this document without prior notice. With regard to purchase orders, the agreed particulars shall prevail. ABB AG does not accept any responsibility whatsoever for potential errors or possible lack of information in this document.
We reserve all rights in this document and in the subject matter and illustrations contained therein. Any reproduction, disclosure to third parties or utilisation of its contents – in whole or in parts – is forbidden without prior written consent of ABB AG.
Copyright© 2017 ABBAll rights reserved
ABB Switzerland LtdPMA Cable ProtectionAathalstrasse 90CH-8610 UsterSwitzerlandTel: +41 58 585 00 11E-mail: [email protected]
www.pma.ch
The specifications and instructions for our customers in this document reflect the product engineering level at the time of manufacturing. ABB accepts no liability for damages resulting from unprofessional installation or misuse of the products. This disclaimer also includes damages to third parties. It is the customer‘s responsibility to check the delivered products and immediately notify ABB of detected faults. It is also the customer‘s responsibility to test the delivered product on its applicability for the intended purpose. ABB will accept no liability or responsibility for their products if a product or a ABB system is combined or used together with third-party products, i.e. products from other companies than ABB. Jurisdiction in all legal disputes concerning product liability have the courts of the canton of Zurich/Switzerland. Swiss law applies. For more information go to: www.pma.ch
Die in diesem Dokument für unsere Kunden enthaltenen Angaben und Instruktionen entsprechen dem neuesten Stand unserer Technik zum Zeitpunkt der Herstellung des Produktes. Die ABB lehnt jede Haftung bei unsachgemässer Montage oder Verwendung sowie Zweckentfremdung des Produktes ab. Dieser Haftungsausschluss umfasst auch allfällige Drittschäden. Es obliegt dem Kunden, die gelieferte Ware zu prüfen und allfällig festgestellte Mängel sofort der ABB anzuzei-gen. Es obliegt ferner dem Kunden, die Ware auf ihre Eignung zwecks einer spezifischen Anwend-ung zu überprüfen. Die ABB lehnt jegliche Haftung für ihre Produkte ab, wenn ein einzelnes Pro-dukt oder ein ABB-System mit Fremdprodukten, d.h. Produkten anderer Unternehmungen kombiniert bzw. verwendet wird. Gerichtsstand für Streitigkeiten bezüglich Produkthaftung sind die Gerichte des Kantons Zürich/Schweiz. Es kommt Schweizer Recht zur Anwendung. Ergänzende Informationen unter: www.pma.ch
SAFETY REMARKS:• Recommendation for applications with strong vibrations: Secure thread with common adhesive
or sealant (e.g. Loctite)
SICHERHEITSHINWEISE:• Empfehlung für Anwendungen mit starken Vibrationen: Gewinde mit handelsüblichem
Sicherungs- oder Dichtmittel (z.B. Loctite) sichern
— Contact
ENGLISH DEUTSCH
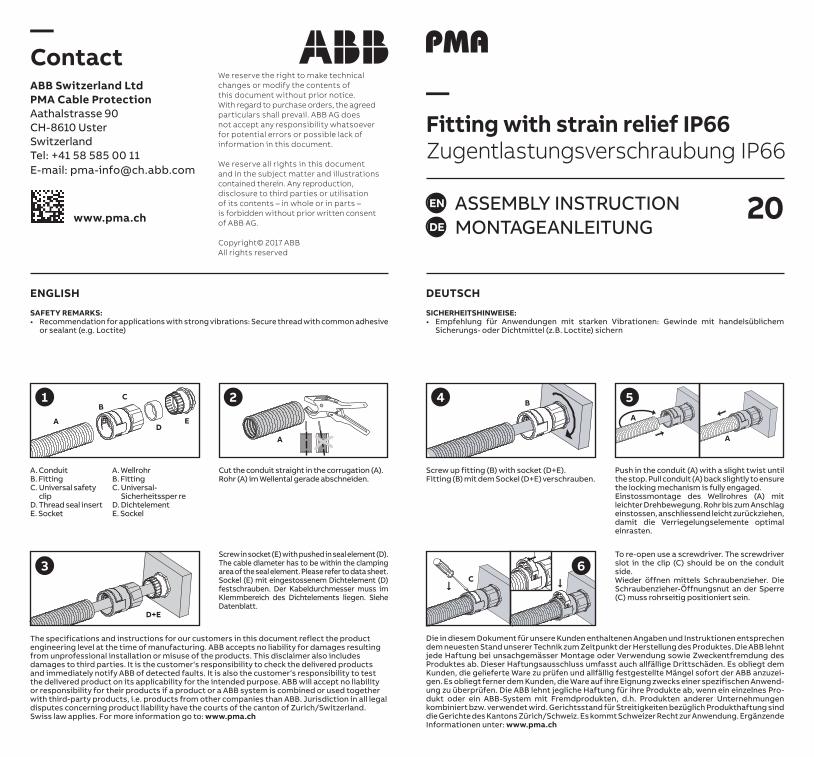
A. ConduitB. FittingC. Universal safety
clipD. Thread seal insertE. Socket
A. WellrohrB. FittingC. Universal-
Sicherheitssper reD. DichtelementE. Sockel
Cut the conduit straight in the corrugation (A).Rohr (A) im Wellental gerade abschneiden.
Push in the conduit (A) with a slight twist until the stop. Pull conduit (A) back slightly to ensure the locking mechanism is fully engaged.Einstossmontage des Wellrohres (A) mit leichter Drehbewegung. Rohr bis zum Anschlag einstossen, anschliessend leicht zurückziehen, damit die Verriegelungselemente optimal einrasten.
Screw up fitting (B) with socket (D+E).Fitting (B) mit dem Sockel (D+E) verschrauben.
To re-open use a screwdriver. The screwdriver slot in the clip (C) should be on the conduit side.Wieder öffnen mittels Schraubenzieher. Die Schraubenzieher-Öffnungsnut an der Sperre (C) muss rohrseitig positioniert sein.
Screw in socket (E) with pushed in seal element (D). The cable diameter has to be within the clamping area of the seal element. Please refer to data sheet.Sockel (E) mit eingestossenem Dichtelement (D) festschrauben. Der Kabeldurchmesser muss im Klemmbereich des Dichtelements liegen. Siehe Datenblatt.
4 B
6C
5
A
A
20
3
D+E
1
A
BC
DE
2
A

— Raccord à decharge de traction IP66Racor descarga de tracion IP66
MODE D’EMPLOIFOLLETO DE INSTRUCCIONES
FR
ES
We reserve the right to make technical changes or modify the contents of this document without prior notice. With regard to purchase orders, the agreed particulars shall prevail. ABB AG does not accept any responsibility whatsoever for potential errors or possible lack of information in this document.
We reserve all rights in this document and in the subject matter and illustrations contained therein. Any reproduction, disclosure to third parties or utilisation of its contents – in whole or in parts – is forbidden without prior written consent of ABB AG.
Copyright© 2017 ABBAll rights reserved
ABB Switzerland LtdPMA Cable ProtectionAathalstrasse 90CH-8610 UsterSwitzerlandTel: +41 58 585 00 11E-mail: [email protected]
www.pma.ch
Les spécifications et instructions destinées à nos clients dans le présent document concernent le niveau de construction du produit au moment de la fabrication. ABB n’accepte pas de responsabilité pour des dommages résultant d’une installation ou d’une application non professionnelle ou d’une mauvaise utilisation. Ce désaveu de responsabilité comporte également des dommages à des tierces parties. Il est de la responsabilité du client de vérifier les produits livrés et d’informer immédiatement ABB des défauts décelés. Il est également de la responsabilité du client de tester le produit livré pour son applicabilité à l’objet prévu. ABB n’accepte pas de responsabilité concernant ses produits si un produit ou un système ABB est combiné ou utilisé conjointement à des produits de tierces parties, à savoir des produits d’autres sociétés que ABB. Pour tous les litiges concernant la responsabilité produits, les tribunaux de Zurich/Suisse sont compétents. La législation suisse s’applique. Pour plus d’informations, veuillez consulter: www.pma.ch
Las instrucciones y especificaciones de este documentopara nuestros clientes reflejan el nivel de ingeniería del producto en el momento de fabricarlo. ABB no acepta responsabilidad por daños que resulten de la instalación o aplicación no profesional o mal uso. Esta cláusula también incluye daños a terceros. Es responsabilidad del cliente comprobar los productos entregados y notificar inmediatamente a ABB los defectos encontrados. También es responsabilidad del cliente probar el producto entregado para su aplicación específica. ABB no aceptará responsabilidad sobre sus productos si un producto o sistema ABB se combina o se usa junto a productos de terceros, es decir, productos de otras empresas que no sean ABB. La jurisdicción sobre cualquier disputa legal referente a responsabilidad de producto corresponde a los tribunales del cantón de Zurich/Suiza. Se aplicará la ley suiza. Para más información consulte: www.pma.ch
REMARQUES CONCERNANT LA SÉCURITÉ:• Recommandations pour les applications subissant de fortes vibrations : fixer le filetage avec
un adhésif ou un matériau d’étanchéité courant (par ex. Loctite)
OBSERVACIONES DE SEGURIDAD:• Recomendación para aplicaciones con fuertes vibraciones: fije la rosca con adhesivo o sellador
(p. ej. Loctite)
— Contact
FRANÇAIS ESPAÑOL
20
A. GaineB. RaccordC. Clip universel
sécuritéD. Insert d’étanchéitéE. Ensemble
A. TuboB. RacorC. Clip universal de
seguri dadD. Pieza de
estanqueidadE. Base
Couper la gaine annelé droite (A) dans le creux de l‘onde.Cortar el tubo (A) transversalmente.
Pousser la gaine (A) à l’intérieur du raccord en tournant légèrement jusqu’à l’arrêt. Tirer légèrement sur la gaine (A) pour s’assurer que le mécanisme de verrouillage est bien enclenché.Introducir hasta el fondo el tubo (A) en el racor con un ligero mo- vimiento de torsión. Tirar ligera-mente del tubo (A) para asegurarse de que los elementos de bloqueo encajan perfectamente.
Visser le raccord (B) dans l’ensemble (D+E).Roscar el racor (B) en la base (D+E).
Pour enlever le clip utilisez le tournevis. Il faut positionner la fente du clips (C) coté gaine.Utilizar un destornilladro para abrir. Al volver a montar el clip de seguridad (C), asegurarse de que la ranura para el destornillador queda orientada hacia el tubo.
Visser dans l’ensemble (E) avec l’élément d’étanchéité poussé (D). Le diamètre du câble doit se situer dans la zone d’attache du joint. Veuillez vous reporter à la fiche de données.Atornillar la base (E) junto al elemento de estanqueidad (D). El diámetro del cable debe hallarse entre los márgenes del área de cierre del elemento de estanqueidad. Por favor consulte la hoja de datos.
4 B
6C
5
A
A
3
D+E
1
A
BC
DE
2
A