SAP Applications Made High Available on SUSE … · SAP Applications Made High Available on SUSE...
127
SAP Applications Made High Available on SUSE Linux Enterprise Server 10 prepared by: Markus Gürtler, Fabian Herschel, Matthias Schlarb, Alexander Krauth Technical Guide www.novell.com
Transcript of SAP Applications Made High Available on SUSE … · SAP Applications Made High Available on SUSE...

SAP Applications Made High Available on SUSE Linux Enterprise Server 10
prepared by: Markus Gürtler, Fabian Herschel, Matthias Schlarb, Alexander Krauth
Technical Guide www.novell.com

Table of Contents
1 Planning and Concept..........................................................................................................................................6
1.1 Preface.........................................................................................................................................................6
1.2 Scope ..........................................................................................................................................................6
1.3 Practicability.................................................................................................................................................6
1.4 High Availability............................................................................................................................................6
1.5 High Availability Storage Infrastructure........................................................................................................8
1.6 Wording........................................................................................................................................................9
2 Architecture........................................................................................................................................................11
2.1 Top Level Design and Goals......................................................................................................................11
2.1.1 Use Case 1 “Enqueue Replication”....................................................................................................12
2.1.2 Use Case 2 “Simple Stack”................................................................................................................12
2.2 Components...............................................................................................................................................13
2.2.1 SUSE Linux Enterprise Server 10 As Basis ......................................................................................14
2.2.2 Heartbeat 2.........................................................................................................................................15
2.2.3 Heartbeat, Mirroring and Shared Data...............................................................................................17
2.2.4 Storage Scenarios and I/O Stacks for SAP........................................................................................19
2.3 Failures and Solutions Matrix.....................................................................................................................23
2.4 Resource Protection...................................................................................................................................24
2.4.1 STONITH............................................................................................................................................25
2.4.2 SFEX (Shared Disk File EXclusiveness Control Program)................................................................25
2.4.3 Ping-Nodes.........................................................................................................................................25
2.4.4 Failcount Checks................................................................................................................................26
2.5 Prerequisites..............................................................................................................................................26
3 Implementation Cluster 1 “Enqueue Replication”..............................................................................................27
3.1 OS Installation............................................................................................................................................27
3.1.1 Prerequisites for the OS Installation...................................................................................................27
p. 2

3.1.2 Various Installation Sources for Installation of SUSE Linux Enterprise Server 10 SP2.....................28
3.1.3 Installation Steps................................................................................................................................28
3.2 I/O Stack.....................................................................................................................................................39
3.2.1 NFS Server Preconfiguration..............................................................................................................39
3.2.2 SAN and Multipath I/O Preconfiguration............................................................................................39
3.2.3 MD RAID Preconfiguration.................................................................................................................39
3.2.4 LVM Preconfiguration.........................................................................................................................40
3.2.5 ext3 Preconfiguration..........................................................................................................................40
3.3 SAP Installation..........................................................................................................................................40
3.3.1 SAP Architecture................................................................................................................................40
3.3.2 Virtual IP Address Configuration........................................................................................................42
3.3.3 SAP File Systems...............................................................................................................................43
3.3.4 SAP Installation..................................................................................................................................45
3.3.5 SAP Installation Post-processing.......................................................................................................53
3.3.6 Enqueue Replication Server...............................................................................................................56
3.4 Heartbeat Base Configuration....................................................................................................................56
3.4.1 Heartbeat Packages...........................................................................................................................56
3.4.2 Heartbeat Autostart............................................................................................................................56
3.4.3 Heartbeat 2 Base Configuration.........................................................................................................57
3.4.4 UNIX User Hacluster..........................................................................................................................59
3.4.5 Cluster Tools......................................................................................................................................59
3.4.6 SFEX Disk Locking.............................................................................................................................59
3.4.7 First Heartbeat Start...........................................................................................................................60
3.5 Heartbeat Resource Configuration.............................................................................................................61
3.5.1 Cluster and Resource Configuration Using the Heartbeat GUI..........................................................61
3.5.2 Cluster and Resource Configuration Using the XML Interfaces.........................................................66
3.6 Heartbeat Resources Use Case 1 “Enqueue Replication” ........................................................................67
3.6.1 The Heartbeat CIB Bootstrap Settings...............................................................................................67
3.6.2 Cluster Resources..............................................................................................................................68
3.6.3 Dependencies of the Resources........................................................................................................82
p. 3

4 Implementation Cluster 2 “Simple Stack”...........................................................................................................86
4.1 Heartbeat 2 Base Configuration.................................................................................................................86
4.2 Heartbeat Resources Use Case 2 “Simple Stack”.....................................................................................86
4.2.1 The Resources of the Cluster.............................................................................................................86
4.2.2 Dependencies of the Resources........................................................................................................87
4.3 Configuring the Resources Using Wow.....................................................................................................87
5 Cluster Maintenance and Tests.........................................................................................................................87
5.1 Cluster Maintenance..................................................................................................................................87
5.1.1 Stopping and Starting Resources and Resource Groups..................................................................87
5.1.2 Analyzing and Solving a Cluster Problem..........................................................................................88
5.1.3 Monitoring a Heartbeat 2 Cluster Manually........................................................................................89
5.1.4 Monitoring a Heartbeat 2 Cluster Using External Monitoring Applications.........................................89
5.1.5 Practical Method of Operating a Heartbeat 2 Cluster.........................................................................89
5.1.6 Operating a Heartbeat 2 Cluster in Productive Environments...........................................................89
5.2 Cluster Tools..............................................................................................................................................89
5.2.1 ClusterService.sh...............................................................................................................................89
5.2.2 Cluster Overall Status.........................................................................................................................92
5.2.3 showscore.sh......................................................................................................................................92
5.3 Cluster Commands.....................................................................................................................................92
5.4 Basic Cluster Tests....................................................................................................................................92
6 Future Prospects................................................................................................................................................95
6.1 SUSE Linux Enterprise Server 11..............................................................................................................95
6.1.1 High Availability Extension.................................................................................................................95
6.1.2 Pacemaker and Open-AiS..................................................................................................................95
6.1.3 SAP Made High Available on SUSE Linux Enterprise Server 11.......................................................95
6.2 Alternatives to an External NFS Server......................................................................................................95
6.2.1 Local High-availability NFS Server.....................................................................................................95
6.2.2 Oracle Cluster File System (OCFS2).................................................................................................96
6.3 Oracle RAC................................................................................................................................................96
6.4 Stretched-cluster Scenarios.......................................................................................................................96
p. 4

7 Acknowledgments..............................................................................................................................................98
7.1 B1 Systems................................................................................................................................................98
7.2 REALTECH................................................................................................................................................98
7.3 SAP Linux Labs..........................................................................................................................................98
7.4 Additional Supporters.................................................................................................................................98
8 Appendix............................................................................................................................................................98
8.1 Downloading the Cluster Tools, SFEX and More.......................................................................................98
8.2 Components Not Supported by Novell.......................................................................................................98
8.3 Description of the SAP Resource Agents..................................................................................................99
8.3.1 SAPInstance Resource Agent............................................................................................................99
8.3.2 SAPDatabase Resource Agent........................................................................................................102
8.4 References...............................................................................................................................................106
8.5 SAP Notes................................................................................................................................................107
8.6 Cluster Information Base of the Enqueue Replication.............................................................................107
8.7 Cluster Information Base of the Simple Stack.........................................................................................116
p. 5

1 Planning and Concept
1.1 PrefaceSAP Business Suite is based on the SAP NetWeaver platform and is fully certified by SAP for SUSE Linux
Enterprise Server 10. SAP Business Suite is the platform for mid-size companies and large enterprises.
Maximum availability of the SAP applications is a pre-requirement in business critical environments. SUSE Linux
Enterprise Server 10 SP2 running on modern x86 64-bit hardware platforms offers all functionality required to
ensure high availability of all critical SAP services. Together with a redundant layout of the technical
infrastructure, all single points of failure can be eliminated.
1.2 Scope This white paper describes two technical use cases for SAP NetWeaver installations made high available on
SUSE Linux Enterprise Server 10 together with the included cluster software Heartbeat 2. These use cases can
be easily adopted to most SAP scenarios, running the SAP NetWeaver stack.
The document describes the installation and configuration of the following software components:
• SUSE Linux Enterprise Server 10 SP 2• Heartbeat 2 cluster software (version 2.1.4)• SAP NetWeaver stack (7.0)• MaxDB (Oracle and DB2 are also supported)
Furthermore, it describes possible failure scenarios and mechanisms to avoid them. It also covers the operation
and maintenance of a Heartbeat 2 HA-cluster. Finally, it points out future prospects for upcoming features in
future releases and additional functionality that extend the described use cases for very specific SAP
installations.
It is strongly recommended that you read the related SAP note for SUSE Linux Enterprise Server 10 (#958253)
and the SAP note for SAP software on Linux (#171356) as well as the SUSE Linux Enterprise Server 10
installation guide.
1.3 PracticabilityThis document is based on several years of practical experience with the described high availability solution for
SAP NetWeaver applications. It is a consolidation of the long-time experience, collected during several
customer projects, performed by Novell, Realtech and B1 Systems.
There are already dozens of productive SAP clusters running using a similar configuration to the one described
in this white paper. Some of the productive clusters are running business critical SAP systems, like Internet
portals or ERP systems. This underlines the reliability and acceptance of the described solution.
1.4 High AvailabilityThe term “high availability” is used in a wide context. It usually refers to the accessibility of an IT service (i.e. an
SAP system) by end users, expressed as a percentage per year, normally excluding maintenance windows. If
an IT service reaches an availability of "99.999 percent", it will be unavailable for less than five minutes per year.
This is also the threshold to call a system "highly available.”
p. 6

The availability is improved by reducing the number of single points of failure (SPOF). A single point of failure
can be, for example, a server, a single FC SAN cable or a network switch. It can also be a service relevant
software component, which is not able to move automatically to another system.
In order to make an IT service highly available, all single points of failure in a data center—or even across
several sites—have to be identified and made appropriately robust. This is usually accomplished by laying out
all involved hardware and software components redundantly. There can even be several layers of redundancy
for a certain component. The overall availability value, as described above, is always identical with the lowest
availability value of a single involved component.
The following are examples of redundancy mechanisms to reduce the number of single points of failure:
SPOF Solution
network cable, NIC, connector Redundant Ethernet network connections
(channel bonding) to several switches
network switch, uplink cable Switching protocols, i.e. Spanning-Tree, MPLS and redundant laid out switches
router Routing protocols, i.e. OSPF, IS-IS, HSRP and redundant laid out routers
SAN path to the storage unit, FC cable Multipathing in SAN environments and redundant laid out SAN switches
storage unit Storage- or SAN-based mirroring and redundant laid out storage units
power supply Redundant power supplies in servers
single instance of a service Distributed running services like DNS
server hardware High availability clusters
application (failures)
service (failures)
Table 1: SPOF and Solutions
p. 7
Illustration 1: Downtimes
Availability100%99,99999%99,9999%99,999%99,99%99,9%99%90%
Yearly downtime0
3 seconds0, 5 minutes
5 minutes52 minutes
9 hours3, 5 days~1 month

1.5 High Availability Storage InfrastructureYour data is the most valuable asset that you have—it is what your business depends on. Robust, scalable and
manageable storage is a top priority for your IT department. The high availability of storage, applications and
services is a critical requirement for your business to be competitive. But even as data grows, you can lower
storage management costs and still benefit from an easy-to-manage, high-availability storage foundation that
scales as needed.
In Fortune 1000 companies, storage is doubling every 10 months. History has shown that data loss or
inaccessibility to data for longer than two weeks due to disaster can even cause a company to go out of
business. The documentation requirements accompanying recent compliance regulations force companies to
continually increase their data storage. This growth not only drives demand for capacity, but it also creates a
need for storage management that can handle the growing data. Because business continuity relies on
uninterrupted access to information and services, the storage management infrastructure must ensure both data
integrity and availability.
The High Availability Storage Infrastructure, a featured technology in SUSE Linux Enterprise Server 10, satisfies
these needs. It includes high availability service and application clustering, file systems/clustered file systems,
network file systems (NAS), volume managers, networked storage systems and drivers (SAN)—and the
management of all these components working together.
Unlike proprietary solutions, the High Availability Storage Infrastructure keeps costs low by integrating open
source, enterprise-class components. The key components of the High Availability Storage Infrastructure are:
• Heartbeat 2, a high availability resource manager that supports multinode failover • Oracle Cluster File System 2 (OCFS2), a parallel cluster file system that offers scalability • Logical Volume Manager 2 (LVM2), a logical volume manager for the Linux kernel, which provides a
method of allocating space on mass storage devices that is more flexible than conventional partitioning schemes
SUSE Linux Enterprise 10 integrates these open source storage technologies and enables you to support line-
of-business workloads traditionally reserved for UNIX and mainframe systems. Without this integration, you
would have to configure each component separately, and manually prevent conflicting administration operations
from affecting shared storage. When delivered as an integrated solution, the High Availability Storage
Infrastructure technology automatically shares cluster configuration and coordinates cluster-wide activities to
ensure deterministic and predictable administration of storage resources for shared-disk-based clusters.
The multinode failover support in Heartbeat 2, the improved node and journaling recovery in OCFS2, and the
snapshots in the Enterprise Volume Management System 2 (EVMS2) represent a small sampling of the high
availability features in the storage infrastructure. Other features such as the cluster awareness and ready-to-run
support of Oracle RAC enrich the environment, simplifying administrative tasks or eliminating them completely.
And iSCSI gives you the flexibility you need for low-cost storage area networks.
SUSE Linux Enterprise Server 10 Service Pack 2 (SP2) further improves on the open source integration of this
enterprise-class High Availability Storage Infrastructure by adding robustness and manageability to its core
components.
Overall, the High Availability Storage Infrastructure protects your data in a way that lowers costs, simplifies
storage management and, most importantly, keeps your enterprise running reliably.
p. 8

1.6 WordingThe UNIX, SAP and even the cluster worlds are using several terms in different context. In order to avoid
misunderstanding, the following table explains the most important technical terms with their meanings as they
are used in this paper.
p. 9

(cluster) node One of the physical servers (hostnames) running the
cluster software Heartbeat 2
target system Single server, i.e. for installation tasks
resource Application or service, controlled by Heartbeat using
a resource agent
network device/ interfaces The logical Linux network interface, i.e. eth0
bonding device/ interfaces The logical Linux channel bonding interface
network port Refers to the physical network port
heartbeat network (physical) Physical network used for the Heartbeat cluster
intercommunication
heartbeat link (logical) Logical cluster intercommunication channel
physical IP address Permanent IP address, configured via/etc/sysconfig/
network on exactly one server
virtual IP address IP address, controlled by the cluster, that may be
started on both cluster nodes, but only on one node
at a time
split brain scenario A situation in which all cluster intercommunication
network links are down. The cluster nodes don't
know the status of their partner nodes any more.
split site scenario Similar to split brain: A situation in which the cluster
nodes are placed in different data centers, and the
network links (used for the cluster
intercommunication) between both data centers are
down
SAP instance Administrative unit that groups components of an
SAP system that provide one or more services.
These services are started and stopped at the same
time.
SAP instance number Every SAP instance of an SAP system has a unique
instance number.
SAP service Specific service within an SAP instance like
disp+work or jcontrol
Table 2: Wording
p. 10
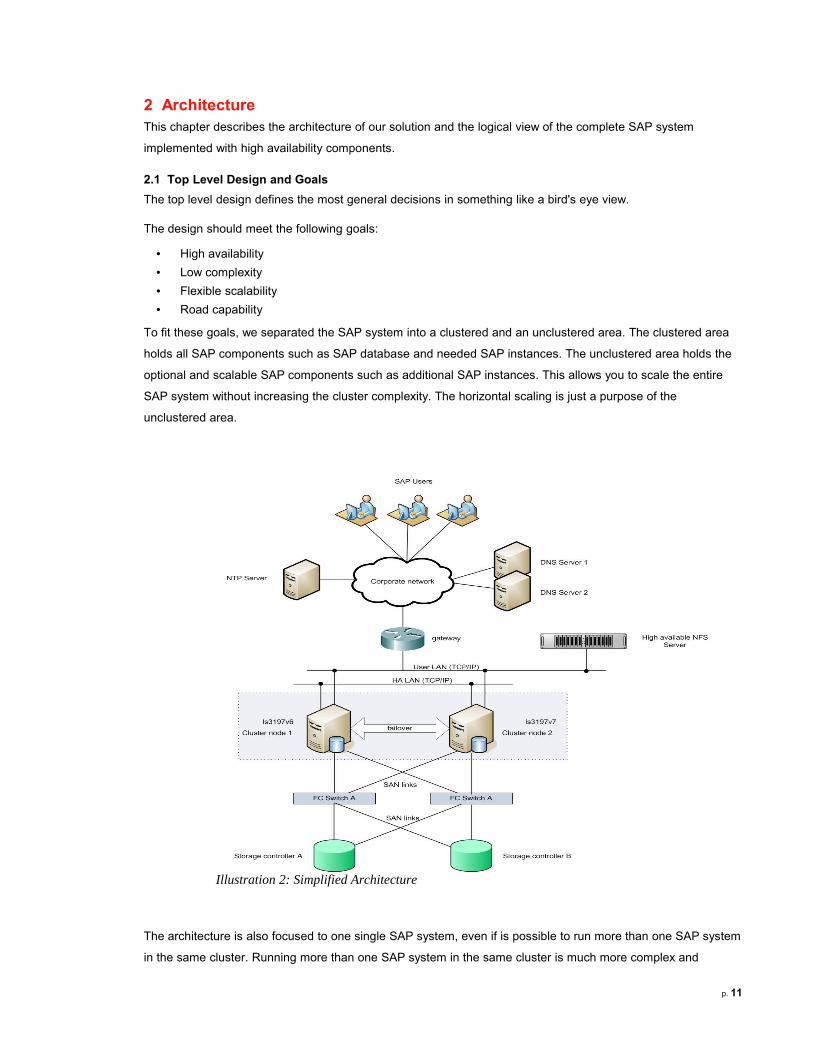
2 ArchitectureThis chapter describes the architecture of our solution and the logical view of the complete SAP system
implemented with high availability components.
2.1 Top Level Design and GoalsThe top level design defines the most general decisions in something like a bird's eye view.
The design should meet the following goals:
• High availability• Low complexity• Flexible scalability• Road capability
To fit these goals, we separated the SAP system into a clustered and an unclustered area. The clustered area
holds all SAP components such as SAP database and needed SAP instances. The unclustered area holds the
optional and scalable SAP components such as additional SAP instances. This allows you to scale the entire
SAP system without increasing the cluster complexity. The horizontal scaling is just a purpose of the
unclustered area.
The architecture is also focused to one single SAP system, even if is possible to run more than one SAP system
in the same cluster. Running more than one SAP system in the same cluster is much more complex and
p. 11
Illustration 2: Simplified Architecture

requires advanced testing to avoid domino effects. These domino effects can occur when cluster nodes run into
overload.
For different needs in operational and administrative procedures, concepts and standards, we provide two use
cases in this white paper.
2.1.1 Use Case 1 “Enqueue Replication”Use case 1 “Enqueue Replication” does support running an entire SAP system balanced on both cluster nodes.
The master/slave mechanism of the SAP instance resource agent for the SCS/ASCS instances allows to run the
enqueue replication server. It increases the availability of the SCS/ASCS instances by providing a replication of
the central locking table. In case of a cluster failover, the SCS/ASCS instances are able to take over the
replicated lock table. This mechanism improves the availability of the SAP system.
The components of the clustered area in our architecture are described in the section “Components.”
The advantages of this cluster model are:
• Lock table replication using the enqueue replication server improves the availability of the SAP system
• Load balancing (database/instances) over both cluster nodes
A disadvantage is:
• The model is only suitable for a single SAP system running on the cluster. Multiple SAP systems are possible from a technical point of view, but may heavily increase the complexity of the cluster configuration.
2.1.2 Use Case 2 “Simple Stack”Use case 2 “Simple Stack” defines an entire SAP system (database and all cluster controlled instances) on a
single cluster node, running within a single resource group.
The advantages of this cluster model:
• Less complex cluster design• Easy to expand with additional SAP systems• Avoids domino effects, if running one single SAP system in the cluster
Some disadvantages are:
• Less flexible in the view of SAP load balancing• No enqueue replication server support
p. 12
Illustration 3: Enqueue replication stack architecture

• Hierarchical dependencies within the resource group (Database, SCS, CI)
2.2 ComponentsAvailability is a result of the interaction of cluster software with application services on the first side and the
operating system and hardware resources on the other side.
Following this basic idea, cluster software like Heartbeat could not increase the availability on its own. It needs a
lot of modules, such as the services, resource agents, the heartbeat kernel, network and file system availability,
and a stable Linux kernel designed and configured for productive server systems in data centers.
Application and Services
The central application of our cluster is the SAP system itself. We need to provide the SAP database and the
central SAP instance with high availability.
p. 13
Illustration 5: Modules of a High Availability SAP Cluster
Heartbeat
SAPDatabase SAPInstance FS
Ext3LVM
MD RAIDMultipathNetworkBonding
Network
Linux system / Kernel
Oracle SAP IP FS
SFEX
IPAddr2 LVMMDSfex
Illustration 4: "Simple stack" architecture

In addition to these two major resources, we need many more services available to run the SAP system. These
are the virtual IP addresses for the SAP database and SAP instances, the file systems and other components of
the file I/O stack.
Resource Agents
The Heartbeat kernel does not “know” anything about how to control or check the configured services
(resources). To control and monitor such a resource, Heartbeat uses resource agents. There are a lot of
resource agents available in the Heartbeat packages of SUSE Linux Enterprise Server 10 SP2. The set of
resource agents includes (but is not limited to) the SAP database and SAP instance, resource agents for IP
addresses and file systems, Logical Volume Manager, Software RAID and the Shared Disk File EXclusiveness
Control Program (SFEX).
Please note that SFEX is not part of the SUSE Linux Enterprise Server 10 SP2 high availability stack.
Heartbeat
With the term “heartbeat” in this scope, we mean the cluster software itself, while the Heartbeat project covers
much more (such including STONITH, resource agents and so on). To describe this central module of the high
availability solution, we mean the heartbeat kernel or engine. Heartbeat includes the following functionalities:
• The cluster resource manager (CRM). The CRM is used to manage all cluster configuration changes and to guarantee all online cluster nodes have the same resource configuration (auto replication).
• The cluster membership layer (CML). The CLM is introduced to provide a consistent view of all online cluster nodes, which cluster nodes are members of the cluster (online), and which nodes are not members (offline).
• The policy engine (pengine). The policy engine determines where to place resources.• The transition engine (tengine). The transition engine executes the plan provided by the pengine.• The local resource manager (LRM). The LRM is the part that communicates locally on each node with
the installed resource agents.
Network Bonding
Our use cases uses network bonding to increase the stableness of the cluster solution. A simple physical link
failure will not result into a heartbeat logical link failure. Network Bonding could also be used to provide higher
bandwidth.
Multipath
Multipath is used to handle multiple SAN-I/O paths to each LUN provided by the SAN Storage systems.
Multipath is able to react on path state changes such as failures and reinitiations.
Kernel
A stable and tested OS kernel such as part of SUSE Linux Enterprise Server 10 is the basis of all the modules
above.
2.2.1 SUSE Linux Enterprise Server 10 As Basis The platform for the described scenarios is SUSE Linux Enterprise Server 10 Service Pack 2 with installed
online updates.
p. 14
To find more information about the advantages of SUSE Linux Enterprise Server, visit the Novell Web site at
http://www.novell.com/linux
The following overview shows some of the necessary components and interfaces used in a complete cluster
scenario.
2.2.2 Heartbeat 2Heartbeat 2 is the standard cluster software, shipped with SUSE Enterprise Server 10. The newest available
version is Heartbeat 2.1.4, which can be obtained with SUSE Linux Enterprise Server 10 SP2 including online
updates.
It is a fully featured cluster solution for HA and load balancing clusters that has been designed to control
business critical services (like SAP) in professional data center environments.
Heartbeat 2 includes two resource agents for SAP, one for SAP applications (SAPInstance) and one for SAP
databases (SAPDatabase). Resource agents provide an interface to cluster resources (i.e. applications). The
SAP resource agents are optimized for the use with SAP software and databases on Linux. They provide many
configuration options as well as many extra features, for the application monitoring, database recovery and
more.
Unlike other cluster software solutions, Heartbeat 2 is free software under the terms of the General Public
License and therefore provides optimal cost effectiveness in a high availability enabled SAP stack.
High Availability Clusters
A high availability computer cluster is a group of servers working closely together to cover the failure of one or
more servers or running services.
p. 15
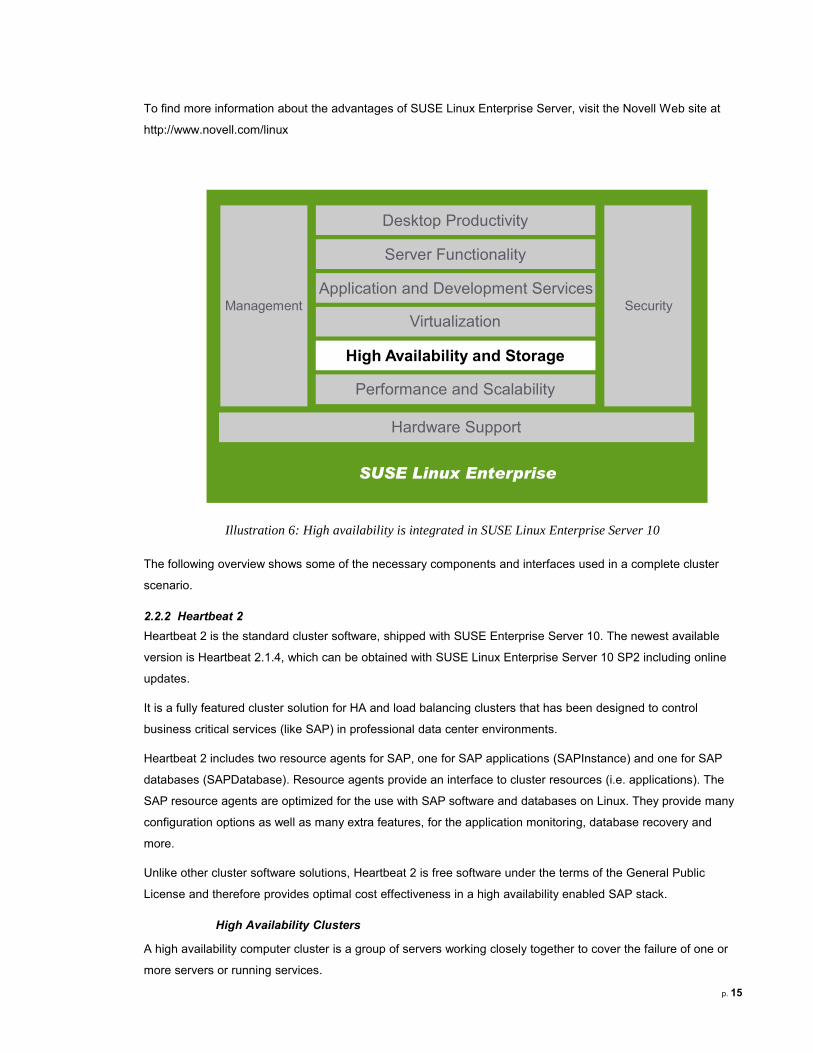
Illustration 6: High availability is integrated in SUSE Linux Enterprise Server 10
SUSE Linux Enterprise
Performance and Scalability
High Availability and Storage
Virtualization
Application and Development Services
Server Functionality
Security
Desktop Productivity
Management
Hardware Support

These clusters use a dedicated cluster software that automates the distribution of services based on predefined
rules, i.e. the availability of a server, the server load, the availability of hardware or infrastructure components, or
other related services.
A high availability cluster covers the following single points of failure:
• Server (e.g., server crash or power outage)• Hardware components of a server (e.g., a failed network card)• Infrastructure components (e.g., TCP/IP networks, SAN availability, even the availability of a whole
data center)• Software components (e.g., an SAP application)• Related software component (e.g., an SAP database)• Other related services (e.g., I/O stack required for an SAP application)• Other kinds of computer clusters are performance clusters (e.g., load balancing clusters) or grid
computing clusters
Heartbeat Features
The Heartbeat project has included many usable and reliable features that help you create a cluster setup.
These features enable you to complete all phases of a cluster setup project, from the architecture necessary
during the design stage, to the cluster operation and change management phases.
• Multinode ClustersYou can integrate up to 16 cluster nodes in a single Heartbeat cluster. This is a limit of the official tests and official support. The technical limit is higher, but it is required for SAP clusters not to break the limits defined by the support.
• Active/Active and Active/PassiveHeartbeat resources can run either as Active/Active or Active/Passive. This means a resource could be defined to run either on a single node or on more than one node. Of course running on more than one node (clone resource or master/slave resource) must be supported by the resource itself. A simple file system is a good example for running Active/Passive.
• Resource Dependency ModelThe flexible resource dependency model allows you to define dependencies between any kind of cluster resources and cluster nodes. This allows you to place resources, to define colocations or anti-colocations and also to react to special cluster events such as network problems or application failures.
• Service MonitoringThe service monitoring introduced for the Open Cluster Framework (OCF) resources enhances the cluster design from a so-called hardware cluster, which only reacts to complete cluster failures to a cluster which is able to control and monitor resources and to react on failures of each of the resources.
• Online ConfigurationEven a good planning and cluster design could not prevent, that there will be some changes in the future. To increase availability, Heartbeat supports online configuration changes. This includes all definitions of resources and dependencies.
• Auto Replication of ConfigurationThe cluster design includes the auto replication of configuration changes. You only have to tell the cluster, what you want to be changed. The cluster then synchronizes these changes to all available cluster nodes. Cluster nodes joining the cluster after an online change will be synchronized during their cluster join procedure.
• Open Cluster FoundationAs already mentioned above, the cluster supports the Open Cluster Framework (OCF) standard. This allows to use resource agents for any cluster software, which also supports the OCF. On the oether
p. 16

hand the OCF has defined a lot of enhancements against the more simple LSB start/stop scripts. An OCF resource agent must support the monitoring of a resource. There is also a defined method to tell administration tools (like the CLI or GUI), which parameters are available and required.
• What-if PreviewA very interesting feature is the “What-if Preview”. You can simulate some cluster changes and then ask the cluster what would happen if the changes occured.
• STONITHIn some cases, the cluster cannot rely on the consensus if a node is up or down. In these situations, Heartbeat uses some methods to restart or switch off the lost cluster node. These methods are named “Shoot The Other Node In The Head“ (STONITH). It is a server based fencing.
• Resource PrioritizationBeside the above resource dependencies, the cluster software also supports resource prioritization. This could be needed, if the capacity of the cluster nodes could not hold a special set of resources. Than the priorities decides, which resources should be stopped and which resources could continue the operation (maybe after a takeover).
• Time Based ConfigurationSome operational concepts have different usage needs of the cluster nodes depending on the time of day. An example would be a special backup in the night. Heartbeat supports time based configurations.
• Strong Cluster Node AuthenticationA good cluster will not stay alone. An increasing number of clusters will lead into the requirement that clusters do not join. It must be stable, which node belongs to which cluster. Furthermore a protection against malicious attacks is required. This is guaranteed by a strong cluster node authentication like MD5.
• Graphical User InterfaceHeartbeat has a lot of command line tools. For easy setup and overview it also includes a Graphical User Interface (GUI). The program is called hb_gui.
• Resource Agent APIHeartbeat is prepared to be enhanced with new resource agents. Therefore, it supports resource agent API.
2.2.3 Heartbeat, Mirroring and Shared DataThe stack described above also has some technical limitations. One limitation is that host based mirroring is not
cluster aware. This means that only one cluster node should run a special host mirror device at a time. You
could also run a host based mirror resource in an Active/Passive setup. This leads us to the following main
cluster architectures.
Cluster with Host-based Mirroring
If we need to mirror the data by running the host based mirroring, we could use such mirrored devices only on
one cluster node per time. If you have more than one mirrored device, each mirror device could run on its own
cluster node.
p. 17

Features
This cluster type supports the following features:
• Host-based mirror. This reduces the costs of data storage.• No parallel file system access.
Examples
Typical examples for such clusters are:
• SAP• Oracle (non-RAC)• Novell IDM• Xen (without live migration)• NFS
Components
The cluster normally uses the following components:
• Heartbeat to have high availability• LVM2/XFS/EXT3 to have flexibility for file system changes• MD RAID to do both: host mirroring and securing the LVM objects (only one cluster node could
access them per time)• Multipath I/O to increase the availability in case of a SAN problem
Cluster with SAN-based Mirroring
If we need to access the data on more than one node at a time, we must use SAN based mirroring. The parallel
access to the data is the central feature of a cluster file system. SUSE Linux Enterprise Server 10 SP2 supports
OCFS2 as a cluster file system.
p. 18
Illustration 7: Cluster with Host Mirroring

Features
This cluster type supports the following features:
• Parallel file system access for parallel operation and horizontal scalability• Hardware mirror
Examples
Typical projects running such a cluster design are:
• SAP• Apache• Xen (including live migration)
Components
The cluster architecture normally uses the following cluster components:
• Heartbeat to have high availability• OCFS2 the cluster file system to have parallel access to the data for horizontal scalability or partial
parallel operation (f.e. Xen live migration)• Multipath I/O to increase the availability in case of a SAN problem
For the use cases described in this white paper we used the first cluster design. We do not need a cluster file
system and therefore could use the host based mirror to decrease the storage costs.
2.2.4 Storage Scenarios and I/O Stacks for SAP
UNIX File Systems
The file systems, required by the Operating System (i. e. mounted on / or /var), are usually stored on local hard
drives using Raid-1 or Raid-5 disk arrays. Sometimes also the LVM is being used in order to gain more flexibility
i. e. for online file system extensions.
p. 19
Illustration 8: Cluster with SAN Mirror

Beside the usual OS file systems, SAP and the SAP databases require their own file systems. These file
systems are not stored locally. Instead they are provided by NFS file servers or on LUNs exported by Storage
Units in Storage Area Networks.
Local File Systems
As mentioned above, the basic OS file systems are stored on internal hard drives. This implies that these file
systems can only be accessed by the local OS or applications running locally on this server.
Remote and Shared File Systems
Some file systems have to be shared across all cluster nodes in a way, that every cluster node can access the
file system at the same time. In our use case this is true for the /sapmnt mount point and the file systems of the
ASCS and ERS instances. The recommended way of providing this service is the usage of Network File
systems (NFS). The NFS file systems are stored remotely on a NFS server in a TCP/IP network. In order to
avoid a single point of failure, the NFS service has also to be highly available.
There are also some other possibilities for sharing file systems across multiple cluster nodes available, i.e. block
based cluster file systems on SAN or ISCSI devices like OCFS2 or a cluster-local high available NFS server. In
the future prospects section, there is a more detailed description of how to use OCFS2 in high available SAP
environments.
Remote and Non-shared File Systems
Other file systems, mounted to i.e. /usr/sap/<SID> or /oracle/<SID> have to be available only on one cluster
node at the same time. However, each cluster node must be able to access these file systems if the cluster
manager decides to use them.
These file systems are stored remotely on LUNs in the SAN. They are accessible by all nodes in the cluster.
Since the file systems itself are usual UNIX file systems, they can't be mounted on several cluster nodes
simultaneously.
The cluster manager has to guarantee, that a file systems is only mounted on a single node. Mounting these file
systems on multiple nodes would lead to a loss of data.
Heartbeat 2 uses several mechanisms to secure the file systems even under extreme cluster conditions, i.e. in
case of a cluster split-brain.
SAN File Systems and I/O Layers
The UNIX file system is the highest layer of a whole I/O stack consisting of multiple I/O layers. Each layer
provides a certain kind of functionality.
For all I/O critical tasks, we have configured an I/O stack which supports the following functionality:
• High I/O throughput and fast response times (low latency)• Host-based mirroring for storing data simultaneously on two separate storage units in a SAN• Logical Volume Manager for a flexible management of file systems• SAN Multipath I/O for an additional level of redundancy for file systems, stored on LUNs in the SAN• Online resizing (extending, shrinking) of file systems, snapshots of file systems using LVM snapshots,
moving or copying file systems
p. 20

Used Technologies:
High I/O throughput Usage of fast 4 Gbit/s SAN FC connections, provided by certified FC adapter cards (HBA) and performance optimized drivers
SAN Multipath I/O Linux Multipath tools
Host-Based-Mirroring Linux MD-Raids
Logical Volume Groups and Volumes
Linux Volume Manager (LVM)
High data integrity Linux standard file system Ext3 with journaling support
Table 3: Used Storage Technologies
Raw Devices Coming from a SAN
The Linux SCSI subsystem creates a raw devices in /dev for each detected LUN and path to the Storage Unit. If
you have exported 4 LUNs and you have 2 paths to the Storage Unit, you will end up with 8 raw devices.
The raw devices have the usual scsi device format /dev/sd*.
Multipath I/O
The raw devices for each SAN-path of a LUN have to be logically grouped together to single devices. This
functionality is provided by the Linux Multipath tools. In the case of a path failure, the associated raw device is
not available anymore and the Multipath Software would immediately switch to a remaining path. Linux
Multipathing has many configuration options, i. e. regarding the load balancing between paths or the path
failback behaviour
p. 21
Illustration 9: I/O Layer

Host-based Mirroring Using MD RAIDs
Host-based mirroring is a commonly used technology where the host stores data simultaneously on two
independent storage units. It is a similar technology to the SAN-based mirroring, where the storage units mirror
their data themselves. In our setup the Linux MD RAID technology is used to mirror data from one storage unit
to another.
A host-based mirroring MD RAID consists of two multipath devices configured as Raid-1 (mirroring). Each
multipath devices belongs to a LUN of one of the two storage units.
An MD RAID that consists of SAN devices must not be activated on both cluster nodes at the same time. Since
the MD-Layer is not cluster-aware, an assembly of a Raid would result in a loss of data! In order to avoid
automatic Raid assembly during the OS boot, the boot.mdadm service must be deactivated.
There is a difference between MD RAIDs, controlled by the cluster and MD RAIDs that are configured locally,
outside of the cluster.
Cluster controlled MD RAIDs are used by SAP instances and database instances. These MD- RAIDs can
failover to another node. They are activated and deactivated.
Local MD RAIDs are only allowed to be activated on one node. For example, they are used for SAP test
systems which are not controlled by the cluster. Since the SUSE initscript boot.mdadm is deactivated, local MD
RAIDs would not be assembled during the system startup. A separate initscript called boot.non-cluster-md can
safely activate local MD RAIDs. The configuration of the local MD RAIDs is stored in the
file/etc/mdadm.conf.localdevices.
The file /etc/mdadm.conf must always be empty.
p. 22
Illustration 10: Host based mirroring architecture

Volume Groups and Logical Volumes Using LVM
The Linux Volume Manager (LVM) offers the functionality of modern Volume Managers. This includes basic
features like volume groups, logical volumes as well as advanced features like resizing, merging, snapshots and
backups of logical volumes.
In our setup, we have one volume group per MD RAID. Each volume group has one or more logical volumes.
UNIX File Systems
The UNIX file system being used is Ext3. It is a commonly used, fast and reliable file system with journaling
support. It also offers advanced features like online-resizing (enlarging, not shrinking).
Ext3 is not a cluster-aware file system. This means, that ext3 file systems can only mounted on one cluster node
at the same time. Mounting a ext3 file system on both cluster nodes would result in a loss of data.
2.3 Failures and Solutions MatrixIn a complex, high availability SAP environment, several types of failures may happen. These failures range
from software crashes up to a loss of the whole network or SAN infrastructure. The cluster must be able to
handle safely all of these failures. Even in a split brain scenario, if the cluster communication between both
nodes is broken, the cluster must ensure a proper continuation of all services.
The illustration below shows all possible failure scenarios and how the cluster deals with them.
Multipath Bonding Resource restart
Resource failover
STONITH SFEX Ping Nodes
Application crash on active node
1st action
1)
2nd action
Active node crashes 2nd action 1st action
2)
Network outage, cluster inter-
communication fails (Split-Brain)
1st action
3)
1st action
4)
Partial network outage on any node
(one link fails)
Switch to 2nd
5)
Partial network outage on active
node (gateway not reachable)
2nd action 1st action
6)
SAN outage on active node
2nd action 1st action
7)
SFEX
8)
Partial SAN outage on any node (one
link)
1st action
9)
Power outage of the active node
2nd action 1st action
10)
Split-Site (not described in this Use
Case)
1st action
11)
Table 4: Failures and Mechanisms
Remarks:
p. 23

1. Three times
2. Ensures that the node is really dead
3. If STONITH is enabled
4. If STONITH is disabled
5. Ensures that the node is really dead
6. Shutdown of active resources
7. Triggered by file system monitoring
8. Detects missing locking disk
9. Failover to 2nd path
10. Requires operator interaction if no external APC device for STONITH is used
11. Disk locking secures SAN devices
2.4 Resource Protection
2.4.1 STONITHThe STONITH (Shoot The Other Node In The Head) mechanism is used to prevent split-brain situations. If one
node can't reach its partner node anymore (i.e. if all network links used for the cluster intercommunication are
down), it will try to safely remove it out of the cluster partition. It's doing that by executing a reboot or power-off
operation on the partner node, by using a mechanism provided by the particular STONITH agent. For example,
this mechanism can be a reboot operation via IPMI, by connecting to the remote management board of the
partner node.
STONITH is an integral feature of Heartbeat 2 and is mandatory for all shared storage configurations.
2.4.2 SFEX (Shared Disk File EXclusiveness Control Program)
When Do You Need It• You want to have an additional coverage to your applied fencing method that shared storage data
partitions with local file systems cannot be accessed more than once by Heartbeat 2.• In a situation where you have Split Brain and failed fencing but still access to the shared storage, you
prevent the Administrator (because Heartbeat 2 itself won't do anything in case of failed fencing) from starting an SFEX protected resource group manually which is still used by another node.
• In a situation after a STONITH fence and after the fenced node rebooted, Heartbeat 2 usually won't be started automatically. As long as the split-brain scenario is still valid, a manual Heartbeat start would cause the cluster to start its resources, even if they are still running on the other node. SFEX prevents that critical resources (i.e. Raids and file systems), get started.
Concept
SFEX uses a partition of the shared storage as a meta data container. It contains information about which node
locks which meta data index (which is logically assigned to a shared storage data partition) and blocks the
access for other nodes. The lock mechanism is timestamp based.
p. 24
What It Does Not
It does not hinder manual mounts of partitions even if they are configured in SFEX. The lock mechanism of
SFEX does only work in a running Heartbeat 2 environment. So if Heartbeat 2 got canceled (and thereby SFEX
and its timestamp mechanism, too) on node1 but the mount of a shared storage data partition persists, then
node2—even with running SFEX on that node—can mount this partition.
Additional Configuration of SFEX for Heartbeat 2
Every shared storage data partition which you want to protect via SFEX has to contain the "sfex"-type primitive
as first resource in its group. You can use one partition per shared storage as meta data container for SFEX. In
this container you can use several metadata indexes; one for every shared storage data partition you want to
protect.
2.4.3 Ping-NodesPing nodes are usually used to determine the network connectivity to the User LAN. Therefore the ping nodes
should be realistic points in the network, that reflect the accessibility of a cluster node by end users. For
example, this can be the user LAN gateway, NTP or DNS servers.
If all ping nodes are not reachable by a cluster node (i.e., in case of a network failure), appropriate location rules
make sure, that resources are moved to the other cluster node. If both nodes are losing the network
connectivity, the controlled resources can't run on any node.
2.4.4 Failcount ChecksFailcount checks prevent resources from restarting indefinitely. They are started n-times before they are
migrated to the second node. If they also fail on the second node n-times, they are prevented from running
anywhere in the cluster. This is a useful protection for unwanted restart loops, such as those caused by
application configuration errors.
In the described use cases, we don't use the Heartbeat resource failure stickiness functionality. Instead, we are
checking the fail count attributes directly, using location rules.
2.5 PrerequisitesThe described setup has some hardware and software prerequisites for the technical infrastructure.
The table below describes the minimal requirements needed in order to set up a HA-cluster as described with
this use case.
p. 25

Hardware components
Prerequisite Description
Two X86_64 based servers (19”)
• 16 GB RAM• Two CPUs (AMD or Intel, 64 bit)• Remote Service Board with IPMI support• Two HBAs, Four SAN FC Ports• Four Network ports, Gigabit Ethernet• Two internal hard drives (36 GB), configured as
internal Raid-1• Redundant power supplies• Redundant fans
Modern x86-based industry servers with
AMD or Intel 64 bit processors; Although the
cluster offers high availability across two
servers, one single server should already
have the maximum possible availability using
certain redundant devices.
Ethernet infrastructure
• Two Gigabit Ethernet Switches• Cat 5/7 cables
Ethernet infrastructure without any single
point of failure
SAN Storage infrastructure
• Two Storage controllers• Two Fibre Channel SAN switches• LC fiber optic cables
SAN storage infrastructure without any
single point of failure
Power infrastructure; two independent power lines Power infrastructure without any single point
of failure
Redundant physical infrastructure; one server room (single site
cluster) or two server rooms (split site cluster), two 19” racks
In order to avoid administrative mistakes, it
is highly recommended to install the servers
in two independent 19“ racks
Table 5: Hardware Components
Software components
Prerequisite Description
SUSE Linux Enterprise Server 10 Service Pack 2 Operating system
Heartbeat 2 Novell Cluster Tools Set of tools, providing ClusterService.sh,
clusterstate.pl, showscores.sh, linkstate.sh,
list_failcounts.sh and reset_failcounts.sh; See
appendix for a download link
SFEX 1.3 SFEX disk locking suite, containing the tools and
resource agents needed for the exclusive disk
locking; SFEX is part of the cluster tools package
and available via download, see appendix for
more information.
Table 6: Software Components
p. 26

3 Implementation Cluster 1 “Enqueue Replication”This chapter describes the implementation of the Heartbeat cluster in use case 1. For a supported installation,
you should also explore the SAP Notes and Novell Support Knowledgebase Documents for further information
(including updated information released after this white paper).
Information from SAP—The SAP Notes
The general view of the installation of SAP on Linux is described in the SAP Note 171356 - SAP software on
Linux: Essential information. This SAP note can also point you toward other SAP notes with more detailed
information about hardware platforms and Linux enterprise distributions. A good entry point for installing SAP on
SUSE Linux Enterprise Server 10 is Note 958253 - SUSE LINUX Enterprise Server 10: Installation notes. You
can find these SAP Notes on the SAP Service Marketplace (http://service.sap.com). You will need an account to
access this information.
Information from Novell—The TIDs
Novell provides Support Knowledgebase Documents (TIDs) via the search engine
http://www.novell.com/support/search.do, where you can search either by TID or keywords.
In this chapter we assume a normal installation ”from scratch“ at the software level of SUSE Linux Enterprise
Server 10 SP2. If you want to install your SAP system on a system running SUSE Linux Enterprise Server 10
GA or SUSE Linux Enterprise Server 10 SP1, you should first update your system to SUSE Linux Enterprise
Server 10 SP2. Please read the Novell Support TID 7000387 article and the README file (section 5), which
can be found on the first installation disc.
3.1 OS Installation
3.1.1 Prerequisites for the OS InstallationFor the network installation procedure, we define these prerequisites:
• Install media SUSE Linux Enterprise Server 10 SP2 (either installation server or DVD media). We use the x86_64 version for AMD64 and Intel EM64T systems.
• Update repository to get the newest packages. While SUSE Linux Enterprise Server 10 SP2 provides Heartbeat 2.1.3, the update stream already includes Heartbeat 2.1.4 with enhancements and bug fixes. For your update repository, you could either use a local mirror (SMT) or the Novell update repository. You need to register to receive the updates.
• To configure bonding, we need at least four network interfaces.
3.1.2 Various Installation Sources for Installation of SUSE Linux Enterprise Server 10 SP2SUSE Linux Enterprise Server 10 supports many installation source types:
• PXE, DHCP, DNS, NFS, HTTP, DVD• PXE configuration• DVD based installation• Network based installation
3.1.3 Installation Steps
p. 27

Pre-YaST Boot Screen
This installation uses a local available DVD image or media inserted in the physical or virtual DVD drive of the
target system.
If the system boots from the inserted standard installation media of SUSE Linux Enterprise Server 10 SP2, it
should show the following screen:
You should adjust the language (F2) to ”English“, the resolution (F3) to a value matching your monitor (physical
hardware or virtual console). Use the driver option (F5) only if you need to use an optional driver update disk.
Select “Installation” from the list. You can provide additional boot options. Whether or not you need such options
depends on:
• the used hardware• the selected way to install the system (for example network installation)
For normal installations, no more steps will be necessary until the installation system has booted and started
YaST.
First Installation Settings
1. The SAP Notes recommend installing Linux using English as the main system language. Select “English US” from the list on the Language screen.
2. The license agreement will be shown in the selected language. You will have to accept this agreement to proceed.
3. YaST then asks for the installation type. Select ”New Installation“ as the installation type.4. Define the clock settings. You have to specify the region and the time zone, and you might have to
adjust the time and date. In our use case, we used Europe as the region and Germany as the time zone, and we set the hardware clock to UTC.
p. 28
Illustration 11: Bootscreen

Software Selection and Disk Partitioning
1. In the next step, select the software to be installed. We recommend that you install as little software as
needed. We de-selected the ”GNOME Desktop Environment,” because we planned to run the target
servers in runlevel 3 and to not use local GNOME sessions.
There is some software that SAP recommends you to install:
p. 29
Illustration 12: Timezones and hardware clock
Illustration 13: Software selection

• The pattern ”SAP Application Server Base“ • The pattern ”C/C++ Compiler and Tools.” Even if the installation of this pattern should be done as a
general rule, we must install the packages if we need to install an Oracle database (as part of the use case in this white paper).
• In our use case (x86_64 hardware) we select the package glibc-devel-32bit.
The heartbeat packages will be installed later.
1. Change the keyboard definition to a keymap matching your keyboard hardware. In our use case we changed from the US keyboard layout to the German keyboard key bindings.
2. Change partitioning to fit your needs depending on administration and operational decisions and standards. We used the following setup:
• Swap space two times of the size of the RAM size• / (root) partition of 3GB and ext3• Additional extended partition• /tmp (temporary) partition of 2GB and ext3• /var (variable data) partition of 2GB and ext3
During the installation, do not partition the shared disk. Only the system disks are handled here. You can
change the partitions with the following dialog steps:
• Start the partitioning dialog by clicking ”Partitioning“ in the ”Installation Settings“ overview.• Select ”Custom Partitioning (for experts)“ in the ”Preparing Hard Disk: Step 1“.• While the swap partition is the first one you have to delete all other partitions to increase the swap
space to fit the size of 2xRAM. Select a partition in the list and press the ”Delete“ button on the bottom of the dialog page.
• To create new partitions click ”Create.” After selecting ”primary“ or extended partition“ the create dialog appears.
p. 30
Illustration 14: Partitioning
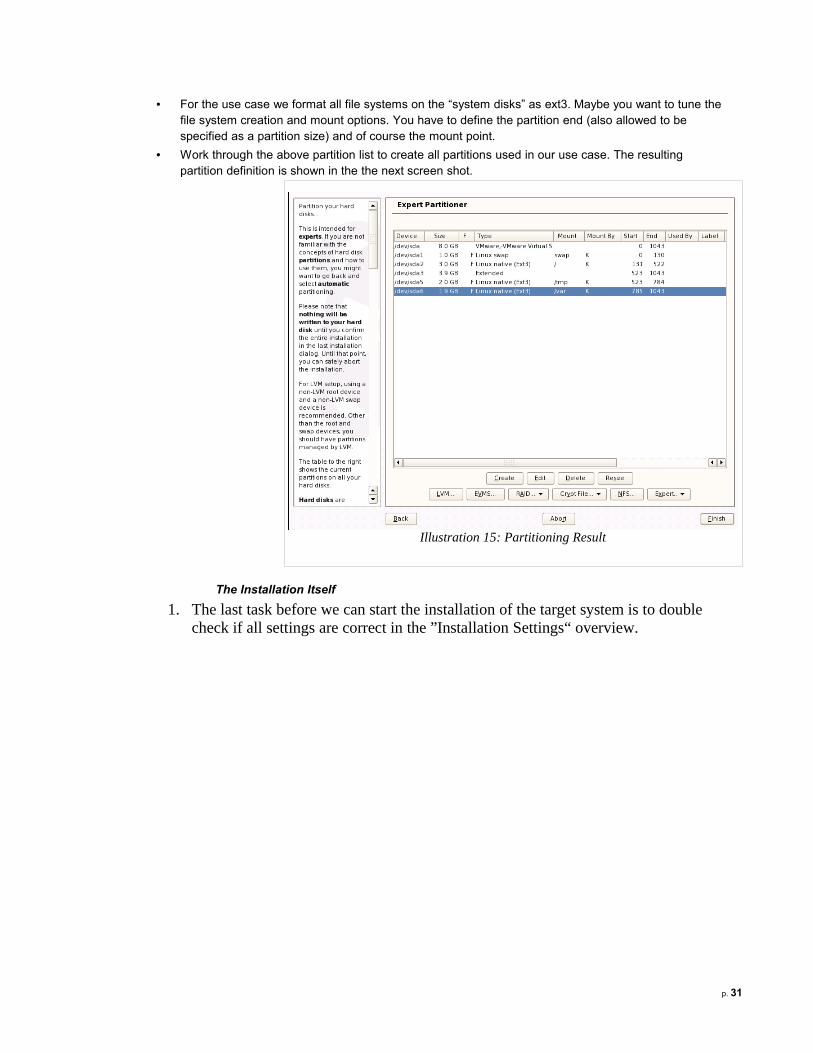
• For the use case we format all file systems on the “system disks” as ext3. Maybe you want to tune the file system creation and mount options. You have to define the partition end (also allowed to be specified as a partition size) and of course the mount point.
• Work through the above partition list to create all partitions used in our use case. The resulting partition definition is shown in the the next screen shot.
The Installation Itself
1. The last task before we can start the installation of the target system is to double check if all settings are correct in the ”Installation Settings“ overview.
p. 31
Illustration 15: Partitioning Result

2. Click on ”Accept“ to end the installation settings phase. There is one more pop up before the
partitioning, file system creation and package installation begin.
3. Start the installation process. YaST runs automatically through the steps• Creating partitions and file systems • Installing packages• Configuration of the installed software• Reboot of the target system
Steps after the System Installation Phase
1. After YaST has finished these steps some additional interactions are needed.
2. Set the root users password. Use the “Expert Options” button to adjust the password encryption. SAP
recommends to use the MD5 password encryption instead of the default Blowfish encryption. One of
the above mentioned SAP notes explains why this is needed.
p. 32
Illustration 16: Installation Setting Overview

3. Set the name and domain of the target system. Deselect ”Change Hostname via DHCP“ in this step.
Later we need to check, that the command “hostname” only reports the short hostname and not the
complete full qualified host name (SAP recommendation, but should fit normal installations without any
changes). “hostname -f” reports the full qualified hostname.
4. In the Network Configuration Dialog ”Switch the firewall to be disabled“ (You can define firewall rules
for clusters, but this is an advanced task and not discussed in this paper). We do not need Ipv6 Setup
in this use case.
5. Configure all network interface NOT to use fixed or dynamic IP addresses. This let us use these
interface for the binding configuration. To change a interface in the list use the edit dialog and switch to
the option ”No IP address (for bonding interfaces)“.
6. To configure the bonding interfaces we have to add two new interfaces using the add dialog in the
network interface list.
7. Select ”Manual Network Card Configuration“ if not already selected. In the section ”Network
Configuration“ use the ”Device Type“ ”Bond Network“ and the “Configuration Name“ 0 (1 for the second
bond).
8. On the second dialog page of the add dialog, we need to select the bonding interface to be configured,
we need to setup fix IP addresses for the cluster and we need to select the correct slaves (interfaces
assigned to the bond).
p. 33
Illustration 17: MD5 Password Encryption

9. Bonding driver options are set to ”mode=active-backup“, which implements a fallback scenario. The
bonding slaves and networking will be configured later. At this point of time we only can setup the IP
addresses of the bonding interfaces. We need to remove any available configuration, which is
assigned to one of the bonding slave interfaces.
After the setup of all interfaces we have six interfaces:
• bond0 (Bond Network) with IP address 172.30.100.11/24• bond1 (Bond Network) with IP address 172.30.101.11/24• eth0 (configured for bond)• eth1 (configured for bond)• eth2 (configured for bond)• eth3 (configured for bond)
We will have to change the interface names of eth0..eth3 later to ensure the correct bonding save assignment.
1. We skip the Internet connection test, because we do not have any access from our SAP system to the
Internet.
2. We skip the setup of CA and LDAP for now. This means we do not change any settings on this dialog.
If your use case includes either Cas or LDAP you are free to setup this services now.
3. For the normal system users we use local users (/etc/passwd).
4. Create the appropriate user accounts and groups. The accounts needed for SAP and Oracle will be
created later
5. Wait for YaST finishing the system configuration (”Setup linker cache...“)
p. 34
Illustration 18: Configureing Bonding Devices

6. Skip the graphical configuration—we do not need Xorg to be configured to run locally on the SAP
cluster nodes.
7. Check the release notes.
8. You could proudly accept YaSTs congratulations, be happy and select ”Disable ZMD Service“. Leave
”Clone This System for AutoYaST selected. We will use the created AutoYaST control file later.
9. YaST terminates and the system should show you a simple graphical login. We will change to normal
test console (runlevel 3) later.
Administration after the Completed Installation and System Setup
1. Log in as user root with your password provided in one of the steps above.
2. To change the system to run in textmode (runlevel 3) you can use either YaST or edit the inittab
directly. Edit the file /etc/inittab and change the entry with id “id” and action “initdefault”. Change the
default runlevel from 5 to 3. The resulting line should be:
id:3:initdefault:
3. To change the runlevel of the system now, you could either run “init 3” or you can reboot to try, if the
system comes up with runlevel 3 after a system startup.
4. To setup helpful names for the bonding slave interfaces we edit the file /etc/udev/rules.d/30-
net_persistent_names.rules.
We change the interfaces names in the following order:
eth0 → ul0 (“user lan” slave 0)
eth1 → ul1 (“user lan” slave 1)
eth2 → cl0 (“cluster lan” slave 0)
eth3 → cl1 (“cluster lan” slave 1)
5. Of course this change does not show any effect until there are new kernel events for network
interfaces. Again, we have more than one way to activate our changes: First, we could reboot the
system. During the reboot, the detected network interfaces will create the needed kernel events and
this will trigger udev to create the needed network devices (ul0..cl1). A shorter and smarter procedure
is to unload the matching kernel module and to reload it. In our use case the kernel module e1000
handles all four network interfaces:
rmmod e1000
modprobe e1000
You should now have the network interfaces ul0..cl1 instead of eth0..eth3.
6. After changing the network interface names of the native network interfaces, we need to configure the
assignment between the native and the bonding devices.
7. We change to the directory /etc/sysconfig/network and change the configuration of the bonding
interfaces bond0 and bond1. The configuration of these devices are stored in the files ifcfg-bond0 and
ifcfg-bond1.
p. 35

Add the following lines to ifcfg-bond0
BONDING_SLAVE_0=ul0
BONDING_SLAVE_1=ul1
Add the following lines to ifcfg-bond1
BONDING_SLAVE_0=cl0
BONDING_SLAVE_1=cl1
8. Now we can restart the network using the command
rcnetwork restart
9. During the network start you should see messages like:
bond0 enslaving interfaces: ul0 ul1
bond0 IP address: 172.30.100.11/24 as bonding master
p. 36
Illustration 19: Network Topology (Layer 3)
Illustration 20: Physical network topology (Layer 2)

10. We proceed to configure the systems to use the same system time by using a NTPD server. For that
task, you can use
yast ntp-client
11. Reduce the services started at system boot time. You can use YaST runlevel for that task. Your needs
and operating procedures will determine which services are needed and which other services should
not be started.
Proceed an Online Update
For the online update of your systems, you can configure your systems to contact the Novell update server
directly. You have to register the systems for that step.
An other possibility is to use an SMT (or yup) mirror to fetch the updates from the Novell update server and to
provide these updates inside you data center. In that scenario only the mirror system needs to access the
Internet, which might match your security policies more closely.
The use case in this white paper uses an SMT (or yup) mirror.
On the target system you need to run through the following steps:
1. Start YaST and select “Installation Source”
2. Add a new installation source. We used the URL-based way to specify the source).
3. Provide the complete URL of the SMT cache. We used an http-based repository.
4. YaST will add your mirror to the list of “Configured Software Catalogs”
5. In the main menu of YaST select “Online Update”
6. YaST detects all needed patches, already available on the mirror cache
7. We have select all needed patches (all patches with higher version numbers) to get all patches for the
target
p. 37

8. Click “Accept to start the update
9. YaST downloads all selected patches and installs the packages
Installing the Heartbeat Software Packages
1. In the YaST main menu, select “Software Management”
2. In the select area, enter the search word “heartbeat”
3. On the right side, YaST shows all packages matching this search string
4. Select the following packages (YaST will automatically add some more packages)
• heartbeat• heartbeat-cmpi• heartbeat-ldirectord• heartbeat-pils• heartbeat-stonith
1. Click “Accept” to start the installation
2. YaST will prompt you to install of some additional packages like “openhp“
3. After committing the changes, YaST installs the manually and automatically selected packages
4. As of the publication date of the white paper, you should get the heartbeat packages in the version
2.1.4 (SP2 was at level 2.1.3).
You can either repeat the manual installation for the second node or speed up some of the tasks by using the
AutoYaST control file stored on the first node.
p. 38
Illustration 21: Software Update

3.2 I/O StackBefore the integration of the I/O resources in the cluster, all I/O components have to be configured outside of
the cluster. This is necessary for the SAP installation and the first SAP tests.
3.2.1 NFS Server PreconfigurationMake sure to have a fast HA NFS server in your network, which is connected with at least Gigabit Ethernet.
Also, make sure that the network infrastructure to this NFS server is redundant.
This setup uses the NFS server with the hostname “nfshost” and the IP address 172.30.100.105. Make sure to
enter this hostname either in your (redundant) DNS servers or in the /etc/hosts file on both nodes.
3.2.2 SAN and Multipath I/O PreconfigurationFor SAN and multipath I/O make sure that you see the devices for all paths of all LUNs in the /dev/disk-by-name
directory. Also make sure that the command “multipath -l” lists all multipath devices (SAN LUNs) with two active
paths.
We recommend that you modify the failback time to a re-initiated path to a value >0. This setting reduces the
chance to run into I/O errors if a single SAN path starts to frequently go up and down in a very short time (path
flapping).
This setting can be modified in the multipath configuration file /etc/multipath.conf. The parameter name is
“failback <in seconds>”
3.2.3 MD RAID PreconfigurationCluster controlled MD devices should never be assembled by the OS during boot. Make sure to turn off the
automatic assembly of MD devices using the command
chkconfig boot.md off
Furthermore, it is necessary to have an empty mdadm configuration file. Edit the file /etc/mdadm.conf and enter
the following content.
--- SNIP ---# Never add any devices to this file # Cluster mdadm configuration files can be found # in the directory /clusterconf/<sapinstance>/mdadm.conf # # Always make sure that the bood.md service is disabled # chkconfig boot.md off # # MD-Devices, that are not under cluster control are stored # in the file /etc/mdadm.conf.localdevices # # The file /etc/mdadm.conf.localdevices is used by the boot # script /etc/rc.d/boot.non-cluster-md # --- SNAP ---
It is still possible to use local MD devices. These can be configured in the file /etc/mdadm.conf.localdevices,
which uses the same syntax as the /etc/mdadm.conf. The cluster tools RPM package contains a new initscript
called boot.md-localdevices. Copy this file to the /etc/init.d directory and enable it using the command
chkconfig boot.md-localdevices on
p. 39

3.2.4 LVM PreconfigurationThe Linux Volume Manager automatically tries to find volume groups and logical volumes on all devices in /dev.
This can be dangerous, especially if MD devices with a RAID header prior to version 1.1 are used. Since the
headers resist at the end of a MD device, the beginning of a MD block device is identical to the beginning of a
multipath device. This may result in data corruption.
To avoid this, make sure that you adjust the LVM filter in the file /etc/lvm/lvm.conf to something like this.
filter = [ "a|/dev/sda[1-4]|", "a|/dev/md.*|", "r|/dev/.*|" ]
This filter avoids scanning for VGs in /dev/disk* directories. If you are using VGs for local file systems on your
internal hard drives, make sure to add the local devices to this filter (a|/dev/<my_device>).
3.2.5 ext3 PreconfigurationExt3 supports online resizing of file systems only if these file systems are created with some special parameters.
Use the command “mkfs.ext3” with the following syntax:
mkfs.ext3 /dev/<device> -o resize_inode -E resize=<max-online-resize>
<max-online-resize> specifies the maximum file system size (after resizing) in number of blocks. Omitting this
option would cause a default of a maximum file system size of 1,024 times of the original file system size.
3.3 SAP Installation
3.3.1 SAP ArchitectureWorking along the SAP documentation is strongly recommended:
SAP Installation Guide (here: "SAP NetWeaver 7.0 SR3 ABAP+Java on Linux: SAP MaxDB")
http://service.sap.com/instguidesNW70
SAP Technical Infrastructure Guide
https://www.sdn.sap.com/irj/sdn/ha
p. 40

For use case 01, the following media have been chosen:
Name Short Name Media No
MaxDB RDBMS 7.6.03 Build 09 - Linux on x86_64 MaxDB 51033492
NW 7.0 SR3 Installation Export Export 51033493
BS2005 SR3 Installation Master Linux on x86_64 InstMaster 51033511
NW 7.0 SR3 SP14 Java based SW Comp. Java 51033513
NW 7.0 SR3 UC-Kernel 7.00 Linux on x86_64 Kernel 51033508
Following values during the installation have been chosen:
Name Short Name Value
SAP Product NetWeaver 7.0 SR3
WebAS Type Double Stack (ABAP + Java)
p. 41
Illustration 22: SAP Architecture for Use Case 01

Database DB MaxDB 7.6 ("ADA")
SAP System ID SID HB2
ABAP Central Services Instance ASCS ASCS00
Java Central Services Instance SCS SCS01
Central Instance/Primary App. Server CI/PAS DVEBMGS02
ABAP Enqueue Replication Instance ERS ERS10
Java Enqueue Replication Instance ERS ERS11
3.3.2 Virtual IP Address ConfigurationUsually SAP NetWeaver is installed by the graphical installation tool sapinst. Before you start the installation,
create a concept of which IP addresses and hostnames you want to use during the SAP installation. Each node
needs at first a static IP address and a related hostname. This address or hostname is also called the physical
IP address or hostname. Each group of database and SAP instances you plan to create later needs another
virtual IP address and hostname. These virtual addresses must not be configured on the operating system level,
because they are under control of Heartbeat. Those addresses and hostnames are called virtual IP addresses
or hostnames.
Local dialog instances, which are not part of the cluster, use a virtual hostname that is an alias for the physical
hostname. This is so those SAP instances do not fail over by Heartbeat.
Do not relate the virtual hostname to the physical hostnames. After a switch over this could confuse people
when accessing the systems. Like:
• physical hostname = node1 • virtual hostname = sapnode1
It is better to use functional names like:
• physical hostname = node1 • virtual hostname = sap<sid>pas (where "pas" stands for "primary application server")
This is the virtual IP address and hostname configuration for HB2:
Instance Hostname IP
ASCS00 ascshost 172.30.100.101
SCS01 jscshost 172.30.100.102
MaxDB dbhost 172.30.100.103
DVEBMGS02 cihost 172.30.100.104
ERS10 ers10host -
ERS11 ers11host -
The enqueue replication instances do not need IP addresses, because nothing establishes a connection to
them. The virtual hostname is only used to start the instances manually via the sapstart command and to
distinguish their profile names from physical hostnames.
Edit /etc/hosts on both nodes and add the virtual hostnames and their addresses. Also add any other cluster
relevant hostname or address (eg. the physical hostnames or addresses of the nodes) to /etc/hosts so that the
DNS server is not a SPOF anymore.
p. 42

3.3.3 SAP File SystemsThe file systems for our scenario have to be prepared before installing SAP NetWeaver.
File systems have to be set up locally (separately on every node), on a shared storage and on a HA NFS server.
Local File Systems
Create the following directories locally:
Directory Size (GB) Owner:Group
/usr/sap 0.5 root:sapsys
/usr/sap/HB2 3 hb2adm:sapsys
/usr/sap/HB2/ERS10 2 hb2adm:sapsys
/usr/sap/HB2/ERS11 2 hb2adm:sapsys
File systems for ERS instances have to be set up locally on every node because of the later master/slave
mechanism of the SAPInstance resource agent. This mechanism starts a slave resource (ERS instance)
simultaneously on both nodes before it promotes on one node the resource to master (ASCS/SCS instance).
Shared Storage File Systems
The file systems from shared storage are set on top of a RAID 1 mirrored device (md) to achieve advantages of
host-based mirroring.
Two LUNs (possible: each from a different storage) are used for one md device. So if one disk array/LUN fails
on one storage, the content still remains on the other storage.
To do a proper host-based mirroring setup, it is important to be aware of the I/O stack and its layers (see
2.2.4.5). Here is an example with the file system for the directory of the SAP central instance:
I/O stack
7 File system (ext3) mount point /usr/sap/HB2/DVEBMGS02
6 logical volume lv_dvebmgs02
5 volume group vg_ci
4 md (raid 1) ---> physical volume /dev/md0
3 multipath device /dev/dm-0 /dev/dm-1
2 HBA raw device /dev/sdc, /dev/sdd /dev/sde, /dev/sdf
1 SAN LUN LUN A LUN B
Examples for md Configuration
Create md devices:
mdadm --create /dev/md0 --raid-devices=2 --level=1 --metadata=1.2 /dev/sdb5 /dev/sdc5
p. 43

Create the mdadm.conf and put it to /clusterconf/<SID>/:
ARRAY /dev/md0 UUID=bc1bda22:a234b979:6a3f064d:4fc679bb name=md_HB2_0
ARRAY /dev/md1 UUID=39b2f064:c700ae63:256cd6cb:4cd0486e name=md_HB2_1
ARRAY /dev/md2 UUID=0b3393b2:7613d414:0d039263:a1895ba3 name=md_HB2_2
ARRAY /dev/md3 UUID=0d0e7369:240d7ec5:da8e8597:0e22a7ae name=md_HB2_3
ARRAY /dev/md4 UUID=1a3c52d6:1805412f:a50ad794:0135c33a name=md_HB2_4
You can manually start and stop md devices like this:
for DEVICE in /dev/md0 /dev/md1 /dev/md2 /dev/md3 /dev/md4; do mdadm --assemble "${DEVICE}" --config=/clusterconf/HB2/mdadm.conf; done;
for DEVICE in /dev/md0 /dev/md1 /dev/md2 /dev/md3 /dev/md4; do mdadm --stop "${DEVICE}"; done;
For every mount point, a logical volume in a separate volume group is used. Create following directories on
shared storage mirrored devices:
Volume Group Logical Volume Directory Size (GB) Owner:Group
vg_ci lv_dvebmgs02 /usr/sap/HB2/DVEBMGS02 4 hb2adm:sapsys
vg_db_sapdb lv_sapdb /sapdb 2 sdb:sdba
vg_db_sapdata lv_sapdata /sapdb/HB2/sapdata 28 sdb:sdba
vg_db_saplog lv_saplog /sapdb/HB2/saplog 8 sdb:sdba
NFS Mounted File Systems
Other file systems come from NFS. Make sure that you have a HA NFS server and permanently provide these
files systems:
Directory Size (GB) Mount Options
/sapmnt/HB2 3 hard,intr,wsize=32768,rsize=32768
/usr/sap/HB2/ASCS00 2 hard,intr,wsize=32768,rsize=32768
p. 44

/usr/sap/HB2/SCS01 2 hard,intr,wsize=32768,rsize=32768
Before You Start with the SAP Installation
Before you install SAP NetWeaver, mount all the file systems. Be aware of the overmount-effect: don't mount
eg. /sapdb/HB2/sapdata before you mount /sapdb.
Beware activating mirrored devices on more than one node. If a mirrored device is already active on one node
and it will also been assembled on the other, it will probably be destroyed and data will be lost.
3.3.4 SAP InstallationWhen starting the SAP installation tool sapinst you always need to specify the virtual hostname.
sapinst SAPINST_USE_HOSTNAME=<virtual hostname>
There are only a few steps of the SAP installation shown in this document. You should use the SAP Installation
Guide (see 3.3.1) as a reference.
Before you install, make sure that you have a Solution Manager Key for your SAP installation. See SAP Note
805390.
p. 45
Illustration 23: SAP Installation Master

For all SAP instances and database instances that you install, choose either the installation options "Distributed
System" or "High-Availability System."
Install in suggested order: ASCS -> SCS -> Database Instance -> Central Instance
ASCS—SID and SAP Mount Directory
For the system ID, you can choose any string containing three alphanumeric characters (there are some
exceptions).
We recommend that you leave /sapmnt as default SAP Mount Directory.
p. 46
Illustration 24: SAP System General Parameters

Database Instance—Java Development Kit Directory
SUSE Linux Enterprise Server 10 SP2 provides the IBM JDK 1.4.2 SR10. /usr/lib64/jvm/java is the default path
to it.
You can verify if you have the correct versions with:
rpm -qa | grep java
The output should look like this:
java-1_4_2-ibm-1.4.2_sr10 [+ minor version suffix]
java-1_4_2-ibm-devel-1.4.2_sr10 [+ minor version suffix]
Note that SR11 of the IBM JDK is not supported by SAP. See SAP Note 1172419.
p. 47
Illustration 25: SAP System - Java Development Kit

Database Instance—DBSID and Database Host
We recommend that you choose the same system ID for the database as you chose for the SAP system.
You can verify here that the database will be installed with the correct virtual hostname.
p. 48
Illustration 26: SAP System - Database Parameters

Database Instance—Database Parameters
For Volume Medium Type, choose "File System.”
The caching and the amount of sessions is related to your system hardware. sapinst will calculate values you
can operate with.
p. 49
Illustration 27: MaxDB - Database Parameters

Database Instance—Log Volumes
Here, you can choose the directory where you mounted an md device.
p. 50
Illustration 28: MaxDB - Log Volumes

Database Instance—Data Volumes
Here, you can choose the directory where you mounted an md device.
p. 51
Illustration 29: MaxDB - Data Voluimes

Central Instance—Software Units
Here, you can choose your desired software units. In our setup we only installed the WebAS ABAP + WebAS
Java with no additional software units.
p. 52
Illustration 30: SAP System - Softwaree Units

Central Instance—Solution Manager Key
See SAP Note 805390 for details.
3.3.5 SAP Installation Post-processing
Users, Groups and Home Directories
Create users and groups on the second node as they were created by the SAP installation on the first node.
Use the same user ID and group ID.
Example /etc/passwd snippet:
smdadm:x:1003:1001:SMD Agent user:/home/smdadm:/bin/csh
hb2adm:x:1004:1001:SAP System Administrator:/home/hb2adm:/bin/csh
sdb:x:1005:1004:Database Software Owner:/home/sdb:/bin/csh
sqdhb2:x:1006:1001:Owner of Database Instance HB2:/home/sqdhb2:/bin/csh
p. 53
Illustration 31: SAP System - SAP Solution Manager

Example /etc/group snippet:
sapinst:!:1000:root,smdadm,hb2adm
sapsys:!:1001:
sdba:!:1004:sqdhb2
Ensure that the same user login profiles for the <sid>adm user are on all nodes. You can do so by copying the /
home/<sid>adm directory to every node or provide it via NFS.
Depending on the Installation Master CD that was used for the SAP installation, the logon profiles for the SAP
administrator user (<sid>adm) and the database administrator user might be different. In older and non-HA
installations the user logon profiles look similar to this one: .sapenv_hostname.csh
Using the hostname in the user login profiles is a problem in an HA environment. By default the profiles .login,
.profile and .cshrc will search for two types of user login profiles: first for the one including the local hostname
(e.g. .dbenv_hostname.csh) and then for a version without the hostname included. Latest versions of the
InstMaster CDs will install both versions of the user login profiles. This might lead to some confusion for the
administrator, regarding which version is used in which case. We recommend removing all user login profiles
that include a hostname in the filename. Do this for both users: the SAP administrator <sid>adm and also for the
database administrator user.
These are the user login profiles needed to run SAP in the cluster:
.sapsrc.sh
.sapsrc.csh
.sapenv.sh
.sapenv.csh
.profile
.login
.j2eeenv.sh
.j2eeenv.csh
.dbenv.sh
.dbenv.csh
.cshrc
Synchronizing Files and Directories
Copy the /etc/services or its values that were adjusted by the sapinst (see SAP related entries at the end of the
file) to all nodes.
There are other directories within the SAP file system that have to be configured. These directories belong to
specific SAP services, so their configurations depend on the particular SAP landscape. To set up systems
quickly in no greater context or SAP landscape, it's sufficient to just copy them to the other node.
p. 54

If you choose MaxDB as the database, the files and directories will have to be synchonized too. Copy the file
/etc/opt/sdb and the directory structure /usr/spool/sql to the other node.
Make the directories (with their content) /sapdb/programs/lib and /sapdb/programs/runtime available even if the
file system /sapdb is not mounted. To do so, mount /sapdb, copy the directories to a temporary directory, and
unmount /sapdb and copy them locally to /sapdb/programs/lib and /sapdb/programs/runtime. Do so on every
node.
Operating System
sapinst will create a script /etc/rc.d/sapinit and a configuration file /usr/sap/sapservices. Both are not needed if
you use the SAPInstance resource agent. Make sure /etc/rc.d/sapinit is not defined in a runlevel for startup of
the operating system:
chkconfig sapinit off
SAP Profiles
The most important SAP profile parameter for a clustered SAP system is "SAPLOCALHOST.” After the
installation with sapinst, make sure that all SAP instance profiles contain this parameter. The value of the
parameter must be the virtual hostname that you have specified during the installation.
As a general requirement the SAP parameter "es/implementation" must be set in the SAP DEFAULT.PFL to
"std.” See also SAP Note 941735. The SAPInstance resource agent is not able to use the
AUTOMATIC_RECOVERY function for systems have set this parameter to "map."
In the START profiles, the parameter "SAPSYSTEM" must be set (default since 7.00).
SAP Release-specific Post-processing
For improved SAP hardware key determination in high-availability scenarios of SPA Note 1178686.
For SAP kernel release 4.6D, follow the instructions in appendix A1 of SAP Note 1008828.
For SAP kernel release 6.40, follow the instructions of SAP Note 877795.
For SAP kernel release 6.40, update the SAP kernel to at least patch level 208.
When using a SAP kernel 6.40, please check and implement the actions from the section "Manual post-
processing" from SAP Note 995116.
7.10:
SAPDatabase + J2EE_ONLY=true
JAVA_HOME must be set to /usr/sap/VAP/<Inst>/exe/sapjvm_5 (parameter jstartup/vm/home).
DB_JARS must be set to DB JDBC Driver (parameter j2ee/dbdriver).
Oracle= /oracle/client/10x_64/instantclient/ojdbc14.jar
SAPDB= /sapdb/programs/runtime/jar/sapdbc.jar
Restriction: jvm 5 must always be available on the DB server node.
p. 55
7.10 + DB/2:
Tivoli System Automation for Multiplatforms cannot be installed.
Before You Can Start the Cluster
An empty work directory (/usr/sap/<SID>/<Instance><Number>/work) of an SAP instance leads to a monitoring
error of the SAPInstance resource agent. Every instance has to be started manually so the correct entries will
be written to the work directory. After that, you can do a manual shutdown of the instances and then the cluster
is ready to control them.
Remember that the virtual IP addresses for the SAP instances you want to start have to be active. You can start
them manually (e.g., with the Linux command 'ip') and after shutting down the SAP instances, stop the IP
addresses again.
3.3.6 Enqueue Replication ServerFollow the instructions of the official SAP Library:
http://help.sap.com/saphelp_nw2004s/helpdata/en/de/cf853f11ed0617e10000000a114084/frameset.htm
Remember that you have to set up the file system of the ERS instances on every node.
3.4 Heartbeat Base Configuration
3.4.1 Heartbeat PackagesMake sure that you have the latest version of the Heartbeat 2 packages installed. The following list shows the
patch level being used for the demo setup of this use case.
• heartbeat-cmpi-2.1.4-0.4
• heartbeat-pils-2.1.4-0.4
• sles-heartbeat_en-10.1-0.20
• heartbeat-ldirectord-2.1.4-0.4
• heartbeat-2.1.4-0.4
• yast2-heartbeat-2.13.13-0.3
• heartbeat-stonith-2.1.4-0.4
3.4.2 Heartbeat AutostartThere are many discussions about whether it makes sense to start Heartbeat 2 automatically during a system
boot. In scenarios where processes require an automatic start of all applications after a system boot, Heartbeat
2 may be started automatically.
In all other scenarios, the automatic start of Heartbeat 2 should be disabled. If a cluster node gets fenced
(rebooted by a STONITH action) during a failure situation, an automatic Heartbeat start would cause a rejoin of
this node in the cluster. Depending on the cluster configuration, a failback of some resources may occur. If the
failure situation appears again on this node, another fence (reboot) may happen. This could lead into a reboot
loop and may also affect the availability of the clustered SAP services.
To disable the automatic start of Heartbeat 2, use the following command:
chkconfig heartbeat off
p. 56

Note: Disabled automatic start of Heartbeat will cause SAP databases and instances not to start automatically
after a system boot.
To start Heartbeat 2 manually type
/etc/init.d/heartbeat start
Don't forget to make all changes on both cluster nodes.
3.4.3 Heartbeat 2 Base Configuration
Heartbeat 2 uses configuration files residing in the directory /etc/ha.d. It requires two configuration files.
/etc/ha.d/ha.cf
The /etc/ha.d/ha.cf file configures all parameters for the basic cluster operation. In use case 1, we used the
configuration printed below.
Configuration, Distributed to Both Nodes:
--- SNIP ---# # Whitepaper Demo Cluster Setup # by FH, MG, MS #
# Cluster interconnect communication settings # user lan, unicast ucast bond0 172.30.100.11 ucast bond0 172.30.100.12 # cluster lan, unicast ucast bond1 172.30.101.11 ucast bond1 172.30.101.12
# Cluster uses dedicated Heartbeat 2 features (CRM) crm true
# If the logging daemon is used, all log messages will be sent through# IPC to the logging daemon, which then writes them into log files.# You should check the config file for logging daemon (the default is# /etc/logd.cf). use_logd yes
# Cluster nodes that are allowed to join the cluster node ls3197v6 node ls3197v7
# Pingd monitor, handled by Heartbeat, to monitor network connectivity respawn root /usr/lib64/heartbeat/pingd -m 100 -d 5s -a pingd
# Nodes ping in order to check network connectivity of the User LAN# (usually DNS servers or gateways).# Don't add IPs of the cluster nodes hereping 10.20.88.1
# # Timeout parameters
p. 57

#
# deadtime: how long-to-declare-host-dead? # # If you set this too low you will get the problematic # split-brain (or cluster partition) problem. # See the FAQ for how to use warntime to tune deadtime. # #deadtime 30 # # warntime: how long before issuing "late heartbeat" warning? # See the FAQ for how to use warntime to tune deadtime. # warntime 10 # # Very first dead time (initdead) # # On some machines/OSes, etc. the network takes a while to come up # and start working right after you've been rebooted. As a result # we have a separate dead time for when things first come up. # It should be at least twice the normal dead time. # initdead 120 # # What UDP port to use for bcast/ucast communication? --- SNAP ---
The cluster intercommunication happens on two separate network links (bond0, bond1). Both of them are are
network bonds. This results in four physical links used for the cluster intercommunication.
Bond0 is connected to the user LAN. Bond0 is also used to connect SAP users and to allow the SAP instances
to communicate among themselves. Furthermore, the communication between the SAP instances and
databases as well as for the connection between the OS and the NFS server also happens over the user LAN
interface bond0.
Bond1 is connected to the cluster LAN. This LAN is dedicated to the intercommunication of Heartbeat 2.
The cluster intercommunication is configured to use the communication method “unicast.” This results in slightly
different configuration files for each node. The method “multicast” can also be used. However, the network
infrastructure must be multicast enabled in order to support this communication type. We do not recommend to
using “broadcast.”
In order to use the full functionality of Heartbeat 2, the option “crm on” must be set. If this option is disabled,
Heartbeat 2 behaves like Heartbeat version 1.
Ping nodes are used to determine the availability of a network. This feature is not intended to replace checks of
the interface status. In fact, it offers a way for a cluster node to determine its availability within a network. In the
described configuration, we want to determine the availability of a cluster node in the user LAN. If the
connection to the user LAN gets interrupted, or if users can't access a cluster node anymore (i.e. in case of a
gateway failure), all resources should be failed over to the second node. If this node also looses its connection
to the ping nodes, all resources are shut down. This makes sense, since it implies that users can't connect to
any carried SAP service anymore.
Choose at least two different ping nodes in your network.
p. 58

The node parameters specify the unique names of the both nodes in the cluster. These names have to be
identical to the node hostnames (uname -n).
/etc/ha.d/authkeys
The heartbeat communication is encrypted. The encryption details are configured in the file /etc/ha.d/authkeys.
The following authkeys file is used in this setup.
--- SNIP ---auth 3 3 md5 ls3197v6v7 The cluster intercommunication --- SNAP ---
The encryption mechanism used is MD5. The encryption key is stored in clear-text (ls3197v6v7). In order to
improve the security, the authkeys file requires the file permissions 600, the owner must be root.
The authkeys file must be identical on both nodes.
3.4.4 UNIX User HaclusterSome heartbeat processes run under the user hacluster. Also the authentification within the Heartbeat 2 GUI
uses the password of the user hacluster.
The user is created automatically. However, you have to make sure to set a password for this user using the
command:
passwd hacluster
If you supply an empty password, the GUI authentication also works without a password.
3.4.5 Cluster ToolsThe Heartbeat 2 cluster tools provide important tools for cluster maintenance, monitoring, controlling and
debugging.
The cluster tools rpm package is not part of SUSE Linux Enterprise Server 10 SP2, but is available via
download (see Appendix).
3.4.6 SFEX Disk Locking
Installation Instructions
Prerequisites:
SFEX is released as a source code package in the format of a gunzip compressed tar file. SFEX is not part of
SUSE Linux Enterprise Server 10. It is available via download (see 7.1).
To unpack the source package, type the following command in the Linux console window:
$ tar zxf sfex-1.3.tar.gz
The source files will uncompress to the "sf-ex-x.x" directory.
Build and Installation:
Change unpacked directory first.
p. 59

$ cd sfex-1.3
Type the following command in the Linux console window:
Press Enter after each command.
$ ./configure
$ make
$ su
(you need root's password)
# make install
"make install" will copy the modules to /usr/lib64/heartbeat (no system directories will be touched)
NOTE: "make install" should be done on all nodes which Heartbeat would run.
3.4.7 First Heartbeat StartAfter the basic configuration is finished, Heartbeat 2 can be started for the first time on both nodes using the
command
/etc/init.d/heartbeat start
This will result in an output on stderr similar to this one.
Starting High-Availability servicesheartbeat[11088]: 2008/11/27_18:34:03 info: Version 2 support: true heartbeat: baudrate setting must precede media statementsheartbeat[11088]: 2008/11/27_18:34:03 WARN: Core dumps could be lost if multiple dumps occur. heartbeat[11088]: 2008/11/27_18:34:03 WARN: Consider setting non-default value in /proc/sys/kernel/core_pattern (or equivalent) for maximum supportability heartbeat[11088]: 2008/11/27_18:34:03 WARN: Consider setting /proc/sys/kernel/core_uses_pid (or equivalent) to 1 for maximum supportability heartbeat[11088]: 2008/11/27_18:34:03 info: No log entry found in ha.cf -- use logd heartbeat[11088]: 2008/11/27_18:34:03 info: Enabling logging daemon heartbeat[11088]: 2008/11/27_18:34:03 info: logfile and debug file are those specified in logd config file (default /etc/logd.cf) heartbeat[11088]: 2008/11/27_18:34:03 info: ************************** heartbeat[11088]: 2008/11/27_18:34:03 info: Configuration validated. Starting heartbeat 2.1.4
After a couple of minutes, the cluster startup is finished and both nodes joined the cluster.
In order to verify a proper operation, call the cluster-tool /clusterconf/bin/ClusterService.sh
You may also check the logfiles /var/log/messages and start the Heartbeat 2 GUI.
p. 60

Note: The Heartbeat 2 GUI is an X-Window application and therefore needs an X-communication channel. If you
are logged in via ssh, you may use “ssh -X” in order to enable X forwarding.
• Checks before• Use YaST or edit directly• /etc/ha.d/ha.cf• /etc/ha.d/authkeys
3.5 Heartbeat Resource ConfigurationHeartbeat 2 stores all configuration data and also the cluster and resource status information in a shared
configuration file, called CIB. The CIB is automatically synchronized between both cluster nodes. Its content is in
XML format. The current cib can be queried using the command
cibadmin -Q
There are three possible ways of entering configuration information into the CIB:
• Using the Heartbeat GUI (hb_gui)• Using the XML interface and the Heartbeat 2 CLI tools• Using WOW for a automated generation of the configuration
3.5.1 Cluster and Resource Configuration Using the Heartbeat GUIThe Heartbeat 2 GUI is a Heartbeat 2 configuration and monitoring application. It runs as an X-Window
application either remotely on one of the both cluster nodes or locally on an Operator workstation.
It is invoked running the command
hb_gui
Note: If hb_gui is started on one of the both cluster nodes, the X-Window display forwarding has to be
configured (i.e. $DISPLAY, “ssh -X”, etc.)
After starting the GUI, a login is required. The default user is “hacluster.” The user's password is identical to the
one of the corresponding UNIX user.
After logging in, the GUI displays in the left column a hierarchical tree view with the following elements:
• Nodes: Contains both cluster nodes ls3197v6 and ls3197v7, started resources on this node (unordered), the nodes and resources status as well as the ping nodes
• Resources: All configured resources, resource groups, clones and master/slave resources as well as their status
• Constraints: All order, location and colocation constraints
The column on the right shows the details of a selected resource or constraint. If the Linux-HA element is
selected, it displays advanced cluster configuration details (information of the CIB not the contents of the ha.cf
file).
The fully configured cluster of this demo setup looks like this:
p. 61

The following example explains how to add the resource group “grp_sapdb_HB2” with first resource
“rsc_sfex_HB2.”
You will start with an empty cluster, which should look similar to this screenshot.
1. Select the item “Add new item” in the dropdown box “Resources”
2. Select item type “group” and click “ok”
3. Enter a unique ID for this group, “grp_sapdb_HB2.” The ID should always contain the SAP SID in the
name, HB2 in our case. Then click “ok”
→ The resource configuration dialog for the first resource in the group is starting up automatically
p. 62
Illustration 32: Operational cluster
Illustration 33: Empty cluster

4. The first resource in this group will be a SFEX resource, for locking the SAN LUNs. Enter the name of
the resource “rsc_sfex_HB2” in the ID field.
5. Make sure that the group “grp_sapdb_HB” is selected in the group selection box on the left
6. Choose the resource agent “SFEX”, which provides the service for the SFEX disk locking mechanism
7. In the parameters field, enter the following parameters
device: /dev/<your SFEX LUN device>
monitor_interval: 5
index: 1
lock_timeout: 20
8. Click “Add.” The new group and resource will be created. You can see the new group in the tree-view
of the left column.
p. 63
Illustration 34: Add group

9. Select the new created resource
10. Click on “Operations” in the right column
11. Add the operations “monitor”, “start”, “stop” using operation values as shown on the screen “Add
operations”
12. Click “apply”
13. Right click the group “grp_sapdb_HB” in the left column and select “Start” from the drop-down menu.
This will set the resource group target role to “started.” If everything is correctly configured, the SFEX
resource will be started and displayed green in the GUI. If something went wrong, use the
ClusterService.sh script to analyze the problem.
p. 64
Illustration 35: Add resource

The GUI can be used to configure a whole cluster. Also constraints and the CIB Bootstrap settings can be
edited.
3.5.2 Cluster and Resource Configuration Using the XML InterfacesThe resource configuration using the XML interface is accomplished via the Heartbeat 2 CLI tools. The cluster
provides two tools:
• cibadmin: Administration tool for the Heartbeat 2 CIB• crm_resource: Administration tool for the administration of cluster resources
Resources and constraints are usually configured using XML snippets. Each snippet contains the XML elements
of one or more resources or constraints.
The following example shows a XML snippet for the group “grp_sapdb_HB2” and the first resource
“rsc_sfex_HB.” XML Snippets are usually stored as text files, with unique names.
--- SNIP --- <group id="grp_sapdb_HB2"> <primitive id="rsc_sfex_HB2" class="ocf" type="sfex" provider="heartbeat"> <instance_attributes id="rsc_sfex_HB2_instance_attrs">
p. 65
Illustration 36: Add operations

<attributes> <nvpair id="rsc_sfex_HB2_device" name="device" value="/dev/sdg"/> <nvpair id="rsc_sfex_HB2_monitor_interval" name="monitor_interval" value="5"/> <nvpair id="rsc_sfex_HB2_index" name="index" value="1"/> <nvpair id="rsc_sfex_HB2_lock_timeout" name="lock_timeout" value="20"/> </attributes> </instance_attributes> <meta_attributes id="rsc_sfex_HB2_meta_attrs"> <attributes/> </meta_attributes> <operations> <op id="rsc_sfex_HB2_monitor" name="monitor" interval="5" timeout="60" start_delay="10" on_fail="block" disabled="false" role="Started"/> <op id="rsc_sfex_HB2_start" name="start" timeout="60" on_fail="block" start_delay="0" disabled="false" role="Started"/> <op id="rsc_sfex_HB2_stop" name="stop" timeout="10" on_fail="block" start_delay="0" disabled="false" role="Started"/> </operations> </primitive> </group> --- SNAP ---
To add this XML Snippet to the CIB, use the following command:
cibadmin -C -o resources -x grp_sapdb_HB2.snippet.xml
For a better overview, only the configuration via the XML interface is described in the following sections.
3.6 Heartbeat Resources Use Case 1 “Enqueue Replication”
3.6.1 The Heartbeat CIB Bootstrap SettingsThe Heartbeat CIB contains some global cluster settings, which are configured in the CIB bootstrap section. The
following bootstrap parameters are used:
p. 66

<crm_config> <cluster_property_set id="cib-bootstrap-options"> <attributes> <nvpair name="symmetric-cluster" id="cib-bootstrap-options-symmetric-cluster" value="true"/> <nvpair id="cib-bootstrap-options-no_quorum-policy" name="no_quorum-policy" value="stop"/> <nvpair name="default-resource-stickiness" id="cib-bootstrap-options-default-resource-stickiness" value="10000"/> <nvpair id="cib-bootstrap-options-default-resource-failure-stickiness" name="default-resource-failure-stickiness" value="0"/> <nvpair id="cib-bootstrap-options-stonith-enabled" name="stonith-enabled" value="true"/> <nvpair id="cib-bootstrap-options-stonith-action" name="stonith-action" value="reboot"/> <nvpair id="cib-bootstrap-options-stop-orphan-resources" name="stop-orphan-resources" value="true"/> <nvpair id="cib-bootstrap-options-stop-orphan-actions" name="stop-orphan-actions" value="true"/> <nvpair id="cib-bootstrap-options-transition-idle-timeout" name="transition-idle-timeout" value="2min"/> <nvpair id="cib-bootstrap-options-default-action-timeout" name="default-action-timeout" value="120s"/> <nvpair id="cib-bootstrap-options-is-managed-default" name="is-managed-default" value="true"/> <nvpair id="cib-bootstrap-options-no-quorum-policy" name="no-quorum-policy" value="stop"/> </attributes> </cluster_property_set> </crm_config>
The most important settings are:
• default-resource-failure-stickiness: The tendency of resources to stay on one node; set to 10,000 (resources tend to stay on one node)
• transition-idle-timeout: Master timeout for resource transitions, set to two minutes• default-action-timeout: Master timeout for action that has no timeout value set; 120 seconds• stonith-enabled: STONITH is enabled; true
3.6.2 Cluster ResourcesThe cluster design uses the following resource agents:
• IPaddr2OCF resource agent for virtual IP addresses. They always run together with the applications that use the virtual IPs. A virtual IP address can failover from one node to the other node, by releasing it on the first node and configuring it on the second node. Gratuitous ARPs ensure that the ARP caches of network devices in the same Ethernet segment are up-to-date.
• SFEXOCF resource agent that provides a disk locking mechanism. It protects a whole group of resources.In the case of a split-brain (network dead, SAN still working), both nodes will try start the same resources, mounting file systems, etc. The first resource in a logical order (i.e. the DB group) is always the SFEX agent. Therefore the SFEX Resource Agent is started first. The “start” operation would try to get an exclusive lock. Since the lock is already set by the other node, the lock can't be acquired, leading into a failed “start” operation. In this case, the resource will be set to “blocked.” All other resources, which would be started in the logical order after the SFEX resource, won't be touched anymore. They are protected.
• RAID 1OCF resource agent that assembles, disassembles and monitors mdadm RAID 1 raid groups.
• LVMOCF resource agent that activates, deactivates and monitors LVM Volume Groups.
• File systemOCF resource agent, that mounts, unmounts and monitors a file system (ext3 and NFS in our setup)
p. 67

• SAPDatabaseOCF resource agent that starts, stops and monitors an SAP database. It can operate DB2, MaxDB and Oracle databases.
• SAPInstanceOCF resource agent that starts, stops and monitors an SAP instance. In master/slave mode, it can also operate the enqueue replication server.
• SUN IPMI STONITHOCF resource agent that provides STONITH for Sun Microsystem x86 64 bit servers using the IPMI.
DB Group
The group “grp_sapdb_HB” contains all resources required for the SAP database. In this demo setup, we used
MaxDB as database. Of course, other databases like DB2 or Oracle can be used.
<group id="grp_sapdb_HB2"> </group>
• SFEX
The SFEX resource protects the database resource group in the case of a split-brain.
device, index: It uses the device /dev/sdg on storage controller A with the internal SFEX index 1.
monitor_interval: The monitor interval is set to five seconds. This parameter is used for internal timers. The value has to be same as the monitor interval of the monitor operation.
lock_timeout: The lock timeout is set to 20 seconds. This parameter specifies how long the lock is valid. It has to be updated within a shorter frequency in order to keep the lock valid. If another node tries to acquire the lock and the lock hasn't been released already, it will wait until the lock is expired.
The start, stop and monitor operations are set to block the resource in case if an operation fails. For example, a failed start operation means, that a exclusive lock couldn't be acquired. In this case the resource is set to “blocked” and protects all following resources in the logical order.
<primitive id="rsc_sfex_HB2" class="ocf" type="sfex" provider="heartbeat"> <instance_attributes id="rsc_sfex_HB2_instance_attrs"> <attributes> <nvpair id="rsc_sfex_HB2_device" name="device" value="/dev/sdg"/> <nvpair id="rsc_sfex_HB2_monitor_interval" name="monitor_interval" value="5"/> <nvpair id="rsc_sfex_HB2_index" name="index" value="1"/> <nvpair id="rsc_sfex_HB2_lock_timeout" name="lock_timeout" value="20"/> </attributes> </instance_attributes> <meta_attributes id="rsc_sfex_HB2_meta_attrs"> <attributes/> </meta_attributes> <operations> <op id="rsc_sfex_HB2_monitor" name="monitor" interval="5" timeout="60" start_delay="10" on_fail="block" disabled="false" role="Started"/> <op id="rsc_sfex_HB2_start" name="start" timeout="60" on_fail="block" start_delay="0" disabled="false" role="Started"/> <op id="rsc_sfex_HB2_stop" name="stop" timeout="10" on_fail="block" start_delay="0" disabled="false" role="Started"/> </operations> </primitive>
• IP (IPAddr2)
The IPAddr2 resource agent configures or removes the virtual IP, which is used for the database connection. The IP is mapped to the hostname dbhost in the /etc/hosts file.
p. 68

IP: The IP address is set to 172.30.100.103 (dbhost). The resource agent automatically determines the correct network interface for the IP address.
<primitive class="ocf" provider="heartbeat" type="IPaddr2" id="rsc_IP_HB2_dbhost"> <operations> <op id="rsc_IP_HB2_dbhost_op_0" name="monitor" description="monitor" interval="5s" timeout="20s" start_delay="10s" disabled="false" role="Started"/> <op id="rsc_IP_HB2_dbhost_op_1" name="start" timeout="15s" disabled="false" role="Started" start_delay="5s"/> </operations> <instance_attributes id="rsc_IP_HB2_dbhost_inst_attr"> <attributes> <nvpair id="rsc_IP_HB2_dbhost_attr_0" name="ip" value="172.30.100.103"/> </attributes> </instance_attributes> </primitive>
• MD RAIDs (RAID 1) md0, md1, md2, md3
There are four RAID 1 resources, which provide the MD RAIDs md0, md1, md2 and md3.
raidconf: Specifies the mdadm configuration file “/clusterconf/HB2/mdadm.conf”. This parameter must never set to the default mdadm configuration file /etc/mdadm.conf.
raiddev: /dev/md<0-3>
This resource is critical. A failed monitor operation leads into a STONITH fence operation.
p. 69

<primitive class="ocf" provider="heartbeat" type="Raid1" id="rsc_RAID1_HB2_md0"> <operations> <op id="rsc_RAID1_HB2_md0_mon" interval="120s" name="monitor" timeout="60s" start_delay="0" disabled="false" role="Started"/> </operations> <instance_attributes id="rsc_RAID1_HB2_md0"> <attributes> <nvpair id="rsc_RAID1_HB2_md0_attr_0" name="raidconf" value="/clusterconf/HB2/mdadm.conf"/> <nvpair id="rsc_RAID1_HB2_md0_attr_1" name="raiddev" value="/dev/md0"/> </attributes> </instance_attributes> </primitive> <primitive class="ocf" provider="heartbeat" type="Raid1" id="rsc_RAID1_HB2_md1"> <operations> <op id="rsc_RAID1_HB2_md1_mon" interval="120s" name="monitor" timeout="60s" start_delay="0" disabled="false" role="Started"/> </operations> <instance_attributes id="rsc_RAID1_HB2_md1"> <attributes> <nvpair id="rsc_RAID1_HB2_md1_attr_0" name="raidconf" value="/clusterconf/HB2/mdadm.conf"/> <nvpair id="rsc_RAID1_HB2_md1_attr_1" name="raiddev" value="/dev/md1"/> </attributes> </instance_attributes> </primitive> <primitive class="ocf" provider="heartbeat" type="Raid1" id="rsc_RAID1_HB2_md2"> <operations> <op id="rsc_RAID1_HB2_md2_mon" interval="120s" name="monitor" timeout="60s" start_delay="0" disabled="false" role="Started"/> </operations> <instance_attributes id="rsc_RAID1_HB2_md2"> <attributes> <nvpair id="rsc_RAID1_HB2_md2_attr_0" name="raidconf" value="/clusterconf/HB2/mdadm.conf"/> <nvpair id="rsc_RAID1_HB2_md2_attr_1" name="raiddev" value="/dev/md2"/> </attributes> </instance_attributes> </primitive> <primitive class="ocf" provider="heartbeat" type="Raid1" id="rsc_RAID1_HB2_md3"> <operations> <op id="rsc_RAID1_HB2_md3_mon" interval="120s" name="monitor" timeout="60s" start_delay="0" disabled="false" role="Started"/> </operations> <instance_attributes id="rsc_RAID1_HB2_md3"> <attributes> <nvpair id="rsc_RAID1_HB2_md3_attr_0" name="raidconf" value="/clusterconf/HB2/mdadm.conf"/> <nvpair id="rsc_RAID1_HB2_md3_attr_1" name="raiddev" value="/dev/md3"/> </attributes> </instance_attributes> </primitive>
Linux Volume Manager (LVM) for VGs vg_db_sapdb, vg_db_sapdata, vg_db_saplog
The LVM resource agent controls the Volume Groups vg_db_sapdb, vg_db_sapdata, vg_db_saplog, by
activating or deactivating them.
volgrpname: Name of the Volume Group <vg_db_sapdb | vg_db_sapdata | vg_db_saplog>
This resource is critical. A failed monitor operation leads into a STONITH fence operation.
p. 70

<primitive class="ocf" provider="heartbeat" type="LVM" id="rsc_LVM_HB2_vg_db_sapdb"> <operations> <op id="rsc_LVM_HB2_vg_db_sapdb_mon" interval="120s" name="monitor" timeout="60s" start_delay="0" disabled="false" role="Started"/> <op id="rsc_LVM_HB2_vg_db_sapdb_stop" name="stop" timeout="30" on_fail="fence" start_delay="0" disabled="false" role="Started"/> </operations> <instance_attributes id="rsc_LVM_HB2_vg_db_sapdb"> <attributes> <nvpair id="rsc_LVM_HB2_vg_db_sapdb_attr_0" name="volgrpname" value="vg_db_sapdb"/> </attributes> </instance_attributes> </primitive> <primitive class="ocf" provider="heartbeat" type="LVM" id="rsc_LVM_HB2_vg_db_sapdata"> <operations> <op id="rsc_LVM_HB2_vg_db_sapdata_mon" interval="120s" name="monitor" timeout="60s" start_delay="0" disabled="false" role="Started"/> <op id="rsc_LVM_HB2_vg_db_sapdata_stop" name="stop" timeout="30" on_fail="fence" start_delay="0" disabled="false" role="Started"/> </operations> <instance_attributes id="rsc_LVM_HB2_vg_db_sapdata"> <attributes> <nvpair id="rsc_LVM_HB2_vg_db_sapdata_attr_0" name="volgrpname" value="vg_db_sapdata"/> </attributes> </instance_attributes> </primitive> <primitive class="ocf" provider="heartbeat" type="LVM" id="rsc_LVM_HB2_vg_db_saplog"> <operations> <op id="rsc_LVM_HB2_vg_db_saplog_mon" interval="120s" name="monitor" timeout="60s" start_delay="0" disabled="false" role="Started"/> <op id="rsc_LVM_HB2_vg_db_saplog_stop" name="stop" timeout="30" on_fail="fence" start_delay="0" disabled="false" role="Started"/> </operations> <instance_attributes id="rsc_LVM_HB2_vg_db_saplog"> <attributes> <nvpair id="rsc_LVM_HB2_vg_db_saplog_attr_0" name="volgrpname" value="vg_db_saplog"/> </attributes> </instance_attributes> </primitive>
• Linux File Systems (File system)
The file system resource agent controls the ext3 file systems mounted to /sapdb, /sapdb/HB2/saplog and /sapdb/HB2/sapdata.
device: Specifies the Linux block devices </dev/vg_db_sapdb/lv_sapdb | /dev/vg_db_saplog/lv_saplog | /dev/vg_db_sapdata/lv_sapdata>
directory: Specifies the Linux mount points </sapdb | /sapdb/HB2/saplog | /sapdb/HB2/sapdata>
This resource is critical. A failed monitor operation leads into a STONITH fence operation.
p. 71

<primitive class="ocf" provider="heartbeat" type="Filesystem" id="rsc_FS_HB2_sapdb"> <operations> <op id="rsc_FS_HB2_sapdb_mon" interval="120s" name="monitor" timeout="60s" start_delay="0" disabled="false" role="Started"/> <op id="rsc_FS_HB2_sapdb_stop" name="stop" description="stoptimeout" timeout="300s" disabled="false" role="Stopped"/> </operations> <instance_attributes id="rsc_FS_HB2_sapdb"> <attributes> <nvpair id="rsc_FS_HB2_sapdb_attr_0" name="device" value="/dev/vg_db_sapdb/lv_sapdb"/> <nvpair id="rsc_FS_HB2_sapdb_attr_1" name="directory" value="/sapdb"/> </attributes> </instance_attributes> </primitive> <primitive class="ocf" provider="heartbeat" type="Filesystem" id="rsc_FS_HB2_sapdb_saplog"> <operations> <op id="rsc_FS_HB2_sapdb_saplog_mon" interval="120s" name="monitor" timeout="60s" start_delay="0" disabled="false" role="Started"/> <op id="rsc_FS_HB2_sapdb_saplog_stop" name="stop" description="stoptimeout" timeout="300s" disabled="false" role="Stopped"/> </operations> <instance_attributes id="rsc_FS_HB2_sapdb_saplog"> <attributes> <nvpair id="rsc_FS_HB2_sapdb_saplog_attr_0" name="device" value="/dev/vg_db_saplog/lv_saplog"/> <nvpair id="rsc_FS_HB2_sapdb_saplog_attr_1" name="directory" value="/sapdb/HB2/saplog"/> </attributes> </instance_attributes> </primitive> <primitive class="ocf" provider="heartbeat" type="Filesystem" id="rsc_FS_HB2_sapdb_sapdata"> <operations> <op id="rsc_FS_HB2_sapdb_sapdata_mon" interval="120s" name="monitor" timeout="60s" start_delay="0" disabled="false" role="Started"/> <op id="rsc_FS_HB2_sapdb_sapdata_stop" name="stop" description="stoptimeout" timeout="300s" disabled="false" role="Stopped"/> </operations> <instance_attributes id="rsc_FS_HB2_sapdb_sapdata"> <attributes> <nvpair id="rsc_FS_HB2_sapdb_sapdata_attr_0" name="device" value="/dev/vg_db_sapdata/lv_sapdata"/> <nvpair id="rsc_FS_HB2_sapdb_sapdata_attr_1" name="directory" value="/sapdb/HB2/sapdata"/> </attributes> </instance_attributes> </primitive>
• SAPDatabase (Database MaxDB HB2)
The SAPDatabase resource agent controls the MaxDB SAP database.
SID: The SAP SID “HB”DBTYPE: The database type “ADA” (MaxDB)
Note: Other databases may require additional parameters. See Appendix for a detailed description of the resource agent.
p. 72

<primitive class="ocf" type="SAPDatabase" provider="heartbeat" id="rsc_SAPDatabase_HB2"> <instance_attributes id="rsc_SAPDatabase_HB2_instance_attrs"> <attributes> <nvpair id="rsc_SAPDatabase_HB2_attr_0" name="SID" value="HB2"/> <nvpair id="rsc_SAPDatabase_HB2_attr_1" name="DBTYPE" value="ADA"/> </attributes> </instance_attributes> <operations> <op id="rsc_SAPDatabase_HB2_start" name="start" timeout="1800" start_delay="0" disabled="false" role="Started"/> <op id="rsc_SAPDatabase_HB2_stop" name="stop" timeout="1800" start_delay="0" disabled="false" role="Started" on_fail="block"/> <op id="rsc_SAPDatabase_HB2_mon" name="monitor" interval="120" timeout="60" start_delay="180" disabled="false" role="Started"/> </operations> <meta_attributes id="rsc_SAPDatabase_HB2_meta_attrs"> <attributes/> </meta_attributes> </primitive>
ASCS instance with virtual IP address• Virtual IP (IPAddr2)
IP: 172.30.100.101 (ascshost)
<primitive class="ocf" provider="heartbeat" type="IPaddr2" id="rsc_IP_HB2_ascshost"> <operations> <op id="rsc_IP_HB2_ascshost_op_0" name="monitor" description="monitor" interval="5s" timeout="20s" start_delay="10s" disabled="false" role="Started"/> <op id="rsc_IP_HB2_ascshost_op_1" name="start" timeout="15s" disabled="false" role="Started" start_delay="5s"/> </operations> <instance_attributes id="rsc_IP_HB2_ascshost_inst_attr"> <attributes> <nvpair id="rsc_IP_HB2_ascshost_attr_0" name="ip" value="172.30.100.101"/> </attributes> </instance_attributes> <meta_attributes id="rsc_IP_HB2_ascshost_meta_attrs"> <attributes/> </meta_attributes> </primitive>
• The SAPInstance resource agent controls the ASCS00 instance as well as the appropriate enqueue replication server instance.
It is configured as a master/slave resource that extends the roles of the resource from “started” and “stopped” to “master” and “slave.” A promoted master instance starts the SAP ASCS00 instance. The demoted slave instance starts the enqueue replication server instance.
The master/slave mode ensures that an ASCS00 instance is never started on the same node as the enqueue replication server.
Attributes:
clone_max: Start a maximum of two clones.
clone_node_max: Start a maximum of one clone instance on one node
master_max: Start a maximum of one master instance
p. 73

master_node_max: Start a maximum of one master instance on one node
notify: “true”, inform peers before and after any clone is stopped or started.
globally_unique: “true”
Parameters:
InstanceName: HB2_ASCS00_ascshost
AUTOMATIC_RECOVER: true
START_PROFILE: /sapmnt/HB2/profile/START_ASCS00_ascshost
ERS_InstanceName: HB2_ERS10_ers10host
ERS_START_PROFILE: /sapmnt/HB2/profile/START_ERS10_ers10host
Operations:
Additionally for the start, stop and monitor operations, this resource uses promote and demote
operations.
p. 74

<master_slave id="msl_sap_HB2_ASCS00_ascshost"> <meta_attributes id="msl_sap_HB2_ASCS00_ascshost_meta_attrs"> <attributes> <nvpair id="msl_sap_HB2_ASCS00_ascshost_metaattr_clone_max" name="clone_max" value="2"/> <nvpair id="msl_sap_HB2_ASCS00_ascshost_metaattr_clone_node_max" name="clone_node_max" value="1"/> <nvpair id="msl_sap_HB2_ASCS00_ascshost_SCS_metaattr_master_max" name="master_max" value="1"/> <nvpair id="msl_sap_HB2_ASCS00_ascshost_metaattr_master_node_max" name="master_node_max" value="1"/> <nvpair id="msl_sap_HB2_ASCS00_ascshost_SCS_metaattr_notify" name="notify" value="true"/> <nvpair id="msl_sap_HB2_ASCS00_ascshost_SCS_metaattr_globally_unique" name="globally_unique" value="false"/> </attributes> </meta_attributes> <primitive id="rsc_SAP_HB2_ASCS00_ascshost" class="ocf" type="SAPInstance" provider="heartbeat"> <instance_attributes id="rsc_SAP_HB2_ASCS00_ascshost_instance_attrs"> <attributes> <nvpair id="ms_SAP_HB2_ASCS00_ascshost_attr_InstanceName" name="InstanceName" value="HB2_ASCS00_ascshost"/> <nvpair id="ms_SAP_HB2_ASCS00_ascshost_attr_AUTOMATIC_RECOVER" name="AUTOMATIC_RECOVER" value="true"/> <nvpair id="ms_SAP_HB2_ASCS00_ascshost_SCS_attr_START_PROFILE" name="START_PROFILE" value="/sapmnt/HB2/profile/START_ASCS00_ascshost"/> <nvpair id="ms_SAP_HB2_ASCS00_ascshost_SCS_attr_ERS_InstanceName" name="ERS_InstanceName" value="HB2_ERS10_ers10host"/> <nvpair id="ms_SAP_HB2_ASCS00_ascshost_attr_ERS_START_PROFILE" name="ERS_START_PROFILE" value="/sapmnt/HB2/profile/START_ERS10_ers10host"/> </attributes> </instance_attributes> <operations> <op id="ms_SAP_HB2_ASCS00_ascshost_oper_start" name="start" timeout="180" role="Started" start_delay="0" disabled="false"/> <op id="ms_SAP_HB2_ASCS00_ascshost_oper_stop" name="stop" timeout="240" role="Started" start_delay="0" disabled="false"/> <op id="ms_SAP_HB2_ASCS00_ascshost_oper_monitor" name="monitor" interval="30" timeout="60" start_delay="5" role="Master" disabled="false"/> <op id="ms_SAP_HB2_ASCS00_ascshost_oper_promote" name="promote" timeout="320" start_delay="0" role="Master" disabled="false"/> <op id="ms_SAP_HB2_ASCS00_ascshost_oper_demote" name="demote" timeout="320" role="Slave" start_delay="0" disabled="false"/> </operations> </primitive> </master_slave>
SCS Instance with Virtual IP Address
The SCS instances and their IP addresses can't be configured within a resource group. This is because the
SCS instance is configured as a “clone.” Clones generally can't reside in resource groups.
The SCS instances and their virtual IPs are bound together using appropriate order and colocation constraints
(see below).
• Virtual IP (IPAddr2)
IP: 172.30.100.102 (jscshost)
p. 75

<primitive class="ocf" provider="heartbeat" type="IPaddr2" id="rsc_IP_HB2_jscshost"> <operations> <op id="rsc_IP_HB2_jscshost_op_0" name="monitor" description="monitor" interval="5s" timeout="20s" start_delay="10s" disabled="false" role="Started"/> <op id="rsc_IP_HB2_jscshost_op_1" name="start" timeout="15s" disabled="false" role="Started" start_delay="5s"/> </operations> <instance_attributes id="rsc_IP_HB2_jscshost_inst_attr"> <attributes> <nvpair id="rsc_IP_HB2_jscshost_attr_0" name="ip" value="172.30.100.102"/> </attributes> </instance_attributes> <meta_attributes id="rsc_IP_HB2_jscshost_meta_attrs"> <attributes/> </meta_attributes> </primitive>
• SAPInstance SCS01/ERS11 Master/Slave
The SAPInstance resource agent controls the SCS01 instance as well as the appropriate enqueue replication server instance.
It is configured as master/slave resource, that extends the roles of the resource from “started” and “stopped” to “master” and “slave.” A promoted master instance, starts the SAP SCS01 instance. The demoted slave instance, starts the enqueue replication server instance.
The master/slave mode ensures, that an SCS instance is never started on the same node as the enqueue replication server.
Attributes:
clone_max: Start a maximum of two clones
clone_node_max: Start a maximum of one clone instance on one node
master_max: Start a maximum of one master instance
master_node_max: Start a maximum of one master instance on one node
notify: “true”, inform peers before and after any clone is stopped or started
globally_unique: “true”
Parameters:
InstanceName: HB2_SCS01_jscshost
AUTOMATIC_RECOVER: true
START_PROFILE: /sapmnt/HB2/profile/START_SCS01_jscshost
ERS_InstanceName: HB2_ERS11_ers11host
ERS_START_PROFILE: /sapmnt/HB2/profile/START_ERS11_ers11host
Operations:
Additionally, for the start, stop and monitor operations, this resource uses promote and demote operations.
p. 76

<master_slave id="msl_sap_HB2_SCS01_jscshost"> <meta_attributes id="msl_sap_HB2_SCS01_jscshost_meta_attrs"> <attributes> <nvpair id="msl_sap_HB2_SCS01_jscshost_metaattr_clone_max" name="clone_max" value="2"/> <nvpair id="msl_sap_HB2_SCS01_jscshost_metaattr_clone_node_max" name="clone_node_max" value="1"/> <nvpair id="msl_sap_HB2_SCS01_jscshost_SCS_metaattr_master_max" name="master_max" value="1"/> <nvpair id="msl_sap_HB2_SCS01_jscshost_metaattr_master_node_max" name="master_node_max" value="1"/> <nvpair id="msl_sap_HB2_SCS01_jscshost_SCS_metaattr_notify" name="notify" value="true"/> <nvpair id="msl_sap_HB2_SCS01_jscshost_SCS_metaattr_globally_unique" name="globally_unique" value="false"/> </attributes> </meta_attributes> <primitive id="rsc_SAP_HB2_SCS01_jscshost" class="ocf" type="SAPInstance" provider="heartbeat"> <instance_attributes id="rsc_SAP_HB2_SCS01_jscshost_instance_attrs"> <attributes> <nvpair id="ms_SAP_HB2_SCS01_jscshost_attr_InstanceName" name="InstanceName" value="HB2_SCS01_jscshost"/> <nvpair id="ms_SAP_HB2_SCS01_jscshost_attr_AUTOMATIC_RECOVER" name="AUTOMATIC_RECOVER" value="true"/> <nvpair id="ms_SAP_HB2_SCS01_jscshost_SCS_attr_START_PROFILE" name="START_PROFILE" value="/sapmnt/HB2/profile/START_SCS01_jscshost"/> <nvpair id="ms_SAP_HB2_SCS01_jscshost_SCS_attr_ERS_InstanceName" name="ERS_InstanceName" value="HB2_ERS11_ers11host"/> <nvpair id="ms_SAP_HB2_SCS01_jscshost_attr_ERS_START_PROFILE" name="ERS_START_PROFILE" value="/sapmnt/HB2/profile/START_ERS11_ers11host"/> </attributes> </instance_attributes> <operations> <op id="ms_SAP_HB2_SCS01_jscshost_oper_start" name="start" timeout="180" role="Started" start_delay="0" disabled="false"/> <op id="ms_SAP_HB2_SCS01_jscshost_oper_stop" name="stop" timeout="240" role="Started" start_delay="0" disabled="false"/> <op id="ms_SAP_HB2_SCS01_jscshost_oper_monitor" name="monitor" interval="30" timeout="60" start_delay="5" role="Master" disabled="false"/> <op id="ms_SAP_HB2_SCS01_jscshost_oper_promote" name="promote" timeout="320" start_delay="0" role="Master" disabled="false"/> <op id="ms_SAP_HB2_SCS01_jscshost_oper_demote" name="demote" timeout="320" role="Slave" start_delay="0" disabled="false"/> </operations> </primitive> </master_slave>
SAP Group
The SAP group (grp_sap_HB2_DVEBMGS02) contains all resources required to start the SAP central instance.
<group id="grp_sap_HB2_DVEBMGS02"> </group>
• SFEX
Protects all resources in the group in case of a split-brain scenario (network down, SAN up)
device: /dev/sdg
monitor_interval: 5
index: 2
lock_timeout: 20
p. 77

<primitive id="rsc_sfex_HB2_2" class="ocf" type="sfex" provider="heartbeat"> <instance_attributes id="rsc_sfex_HB2_2_instance_attrs"> <attributes> <nvpair id="rsc_sfex_HB2_2_device" name="device" value="/dev/sdg"/> <nvpair id="rsc_sfex_HB2_2_monitor_interval" name="monitor_interval" value="5"/> <nvpair id="rsc_sfex_HB2_2_index" name="index" value="2"/> <nvpair id="rsc_sfex_HB2_2_lock_timeout" name="lock_timeout" value="20"/> </attributes> </instance_attributes> <meta_attributes id="rsc_sfex_HB2_2_meta_attrs"> <attributes/> </meta_attributes> <operations> <op id="rsc_sfex_HB2_2_monitor" name="monitor" interval="5" timeout="60" start_delay="10" on_fail="block" disabled="false" role="Started"/> <op id="rsc_sfex_HB2_2_start" name="start" timeout="60" on_fail="block" start_delay="0" disabled="false" role="Started"/> <op id="rsc_sfex_HB2_2_stop" name="stop" timeout="10" on_fail="block" start_delay="0" disabled="false" role="Started"/> </operations> </primitive>
• Virtual IP Address
The IPAddr2 resource agent configures or removes the virtual IP, which is used by the central instance. The IP address is mapped to the hostname cihost in the /etc/hosts file.
IP: The IP address is set to 172.30.100.104 (cihost). The resource agent automatically determines the correct network interface for the IP address.
<primitive class="ocf" provider="heartbeat" type="IPaddr2" id="rsc_IP_HB2_cihost"> <operations> <op id="rsc_IP_HB2_cihost_op_0" name="monitor" description="monitor" interval="5s" timeout="20s" start_delay="10s" disabled="false" role="Started"/> <op id="rsc_IP_HB2_cihost_op_1" name="start" timeout="15s" disabled="false" role="Started" start_delay="5s"/> </operations> <instance_attributes id="rsc_IP_HB2_cihost_inst_attr"> <attributes> <nvpair id="rsc_IP_HB2_cihost_attr_0" name="ip" value="172.30.100.104"/> </attributes> </instance_attributes> </primitive>
• MD RAID (Raid1) md10
raidconf: /clusterconf/HB2/mdadm.conf
raiddev: /dev/md10
This resource is critical. A failed monitor operation leads into a STONITH fence operation.
<primitive class="ocf" provider="heartbeat" type="Raid1" id="rsc_RAID1_HB2_md10"> <operations> <op id="rsc_RAID1_HB2_md10_mon" interval="120s" name="monitor" timeout="60s" start_delay="0" disabled="false" role="Started"/> </operations> <instance_attributes id="rsc_RAID1_HB2_md10"> <attributes> <nvpair id="rsc_RAID1_HB2_md10_attr_0" name="raidconf" value="/clusterconf/HB2/mdadm.conf"/> <nvpair id="rsc_RAID1_HB2_md10_attr_1" name="raiddev" value="/dev/md10"/> </attributes> </instance_attributes> </primitive>
• Linux Volume Manager (LVM) for VG vg_ci
The LVM resource agent controls the Volume Groups vg_ci.
p. 78

volgrpname: vg_ci
This resource is critical. A failed monitor operation leads into a STONITH fence operation.
<primitive class="ocf" provider="heartbeat" type="LVM" id="rsc_LVM_HB2_vg_ci"> <operations> <op id="rsc_LVM_HB2_vg_ci_mon" interval="120s" name="monitor" timeout="60s" start_delay="0" disabled="false" role="Started"/> <op id="rsc_LVM_HB2_vg_ci_stop" name="stop" timeout="30" on_fail="fence" start_delay="0" disabled="false" role="Started"/> </operations> <instance_attributes id="rsc_LVM_HB2_vg_ci"> <attributes> <nvpair id="rsc_LVM_HB2_vg_ci_attr_0" name="volgrpname" value="vg_ci"/> </attributes> </instance_attributes> </primitive>
• Linux File systems (File system)
The File system resource agent controls the ext3 file systems mounted to /usr/sap/HB2/DVEBMGS02
device: /dev/vg_ci/lv_dvebmgs02
directory: /usr/sap/HB2/DVEBMGS02
This resource is critical. A failed monitor operation leads into a STONITH fence operation.
<primitive class="ocf" provider="heartbeat" type="Filesystem" id="rsc_FS_HB2_hb2_dvebmgs02"> <operations> <op id="rsc_FS_HB2_hb2_dvebmgs02_mon" interval="120s" name="monitor" timeout="60s" start_delay="0" disabled="false" role="Started"/> <op id="rsc_FS_HB2_hb2_dvebmgs02_stop" name="stop" description="stoptimeout" timeout="300s" disabled="false" role="Stopped"/> </operations> <instance_attributes id="rsc_FS_HB2_hb2_dvebmgs02"> <attributes> <nvpair id="rsc_FS_HB2_hb2_dvebmgs02_attr_0" name="device" value="/dev/vg_ci/lv_dvebmgs02"/> <nvpair id="rsc_FS_HB2_hb2_dvebmgs02_attr_1" name="directory" value="/usr/sap/HB2/DVEBMGS02"/> </attributes> </instance_attributes> </primitive>
• SAPInstance DVEBMGS02 (CI)
The central instance is also controlled by the SAPInstance resource agent. In this case it is not operating in the master/slave mode.
Parameters:
InstanceName: HB2_DVEBMGS02_cihost
AUTOMATIC_RECOVER: true
START_WAITTIME: 600
ERS_InstanceName: HB2_ERS11_ers11host
PRE_START_USEREXIT: /clusterconf/HB2/pre-start-userexit.sh
p. 79

<primitive class="ocf" type="SAPInstance" provider="heartbeat" id="rsc_SAPInstance_HB2_DVEBMGS02_cihost"> <instance_attributes id="rsc_SAPInstance_HB2_DVEBMGS02_cihost_instance_attrs"> <attributes> <nvpair id="rsc_SAPInstance_HB2_DVEBMGS02_cihost_attr_0" name="InstanceName" value="HB2_DVEBMGS02_cihost"/> <nvpair id="rsc_SAPInstance_HB2_DVEBMGS02_cihost_attr_1" name="AUTOMATIC_RECOVER" value="true"/> <nvpair name="START_WAITTIME" id="rsc_SAPInstance_HB2_DVEBMGS02_cihost_attr_3" value="120"/> <nvpair id="cbf1d01e-1b25-4a6a-97f6-f97f6d565a1c" name="PRE_START_USEREXIT" value="/clusterconf/HB2/pre-start-userexit.sh"/> </attributes> </instance_attributes> <operations> <op id="rsc_SAPInstance_HB2_DVEBMGS02_cihost_start" name="start" timeout="240" start_delay="0" disabled="false" role="Started"/> <op id="rsc_SAPInstance_HB2_DVEBMGS02_cihost_stop" name="stop" timeout="240" start_delay="0" disabled="false" role="Started" on_fail="block"/> <op name="monitor" interval="120" timeout="60" disabled="false" role="Started" id="rsc_SAPInstance_HB2_DVEBMGS02_cihost_mon" start_delay="5"/> </operations> <meta_attributes id="rsc_SAPInstance_HB2_DVEBMGS02_cihost_meta_attrs"> <attributes> <nvpair name="is_managed" id="rsc_SAPInstance_HB2_DVEBMGS02_cihost_metaattr_is_managed" value="true"/> <nvpair id="rsc_SAPInstance_HB2_DVEBMGS02_cihost_metaattr_target_role" name="target_role" value="stopped"/> </attributes> </meta_attributes> </primitive>
SUN IPMI STONITH (sunipmi)
The Sun IPMI STONITH resources provide the STONITH functionality for x86 64 bit servers from Sun
Microsystems. These agents are not configured as clone resources in this demo setup, even ifmost STONITH
agents would be configured as clones. The STONITH resources are configured as two single primitives, one
primitive for each cluster node.
p. 80

<primitive id="rsc_stonith_sunipmi_ls3197v6" class="stonith" type="external/sunipmi" provider="heartbeat"> <instance_attributes id="rsc_stonith_sunipmi_ls3197v6_instance_attrs"> <attributes> <nvpair id="rsc_stonith_sunipmi_ls3197v6_hostlist" name="hostname" value="ls3197v6"/> <nvpair id="rsc_stonith_sunipmi_ls3197v6_hostmap" name="ipaddr" value="172.30.100.21"/> <nvpair id="rsc_stonith_sunipmi_ls3197v6" name="userid" value="root"/> <nvpair id="rsc_stonith_sunipmi_ls3197v6_passwd" name="passwd" value="mypasswd"/> <nvpair id="rsc_stonith_sunipmi_ls3197v6_auth" name="auth" value="MD5"/> <nvpair id="rsc_stonith_sunipmi_ls3197v6_priv" name="priv" value="ADMINISTRATOR"/> <nvpair id="rsc_stonith_sunipmi_ls3197v6_interface" name="interface" value="lan"/> </attributes> </instance_attributes> </primitive> <primitive id="rsc_stonith_sunipmi_ls3197v7" class="stonith" type="external/sunipmi" provider="heartbeat"> <instance_attributes id="rsc_stonith_sunipmi_ls3197v7_instance_attrs"> <attributes> <nvpair id="rsc_stonith_sunipmi_ls3197v7_hostlist" name="hostname" value="ls3197v7"/> <nvpair id="rsc_stonith_sunipmi_ls3197v7_hostmap" name="ipaddr" value="172.30.100.22"/> <nvpair id="rsc_stonith_sunipmi_ls3197v7" name="userid" value="root"/> <nvpair id="rsc_stonith_sunipmi_ls3197v7_passwd" name="passwd" value="mypasswd"/> <nvpair id="rsc_stonith_sunipmi_ls3197v7_auth" name="auth" value="MD5"/> <nvpair id="rsc_stonith_sunipmi_ls3197v7_priv" name="priv" value="ADMINISTRATOR"/> <nvpair id="rsc_stonith_sunipmi_ls3197v7_interface" name="interface" value="lan"/> </attributes> </instance_attributes> </primitive>
3.6.3 Dependencies of the Resources
Location Constraints
As the other resources will be placed by the colocation constraints (see next section), there is no need to define
location rules for resources, except for the Sun IPMI STONITH resources.
Since the STONITH resources are not configured as resource clones in this setup, each of the STONITH
resource instances belongs to a dedicated cluster node. This is implemented by location rules; for example, you
could specify that a STONITH resource for a dedicated node is not allowed to run on the other node, using a
score of -INFINITY.
The “no_ping_node_rule” location constraints set a score of -INFINITY for certain resources and resource
groups if the pingd attribute (set by the pingd deamon) falls to 0. This happens, if pingd attribute can't ping any
ping-node. A score of -INFINITY makes the resource or resource group move away from the current node. If
both nodes can't ping any ping-node, the resources will stop on both nodes. Since the ping-nodes reflect the
accessibility of end users, this logic tries to move resources to a node that can still be accessed by end users.
The “failcount-check” constraints make sure that certain resources will be restarted only two times if they fail
(monitor failure). After the second restart, those resources will be moved to the other node. If they fail twice on
the new node, they will be stopped and won't be started until the failcounts are reset.
p. 81

<rsc_location id="location_sun_ipmi_ls3197v6_never_run_on_ls3197v6" rsc="rsc_stonith_sunipmi_ls3197v6"> <rule id="prefered_location_sun_ipmi_ls3197v6_never_run_on_ls3197v6" score="-INFINITY"> <expression attribute="#uname" id="e633ee6d-c3a9-4ff2-b971-060682d29bc4" operation="eq" value="ls3197v6"/> </rule> </rsc_location> <rsc_location id="location_sun_ipmi_ls3197v7_never_run_on_ls3197v7" rsc="rsc_stonith_sunipmi_ls3197v7"> <rule id="prefered_location_sun_ipmi_ls3197v7_never_run_on_ls3197v7" score="-INFINITY"> <expression attribute="#uname" id="13e7e99e-c5c9-4ec1-886c-cf2214fdfa8c" operation="eq" value="ls3197v7"/> </rule> </rsc_location> <rsc_location id="no_ping_node_rule_grp_sapdb_HB2" rsc="grp_sapdb_HB2"> <rule id="prefered_no_ping_node_rule_grp_sapdb_HB2" score="-INFINITY" boolean_op="and"> <expression attribute="pingd" operation="eq" value="0" id="e9003d59-a60d-4d6a-9261-21f7f9ddb6be"/> </rule> </rsc_location> <rsc_location id="no_ping_node_rule_grp_sap_HB2_DVEBMGS02" rsc="grp_sap_HB2_DVEBMGS02"> <rule id="prefered_no_ping_node_rule_grp_sap_HB2_DVEBMGS02" score="-INFINITY" boolean_op="and"> <expression attribute="pingd" operation="eq" value="0" id="ec731907-d3f7-4d1d-9c23-5f76555bca65"/> </rule> </rsc_location> <rsc_location id="no_ping_node_rule_msl_sap_HB2_SCS01_jscshost" rsc="msl_sap_HB2_SCS01_jscshost"> <rule id="prefered_no_ping_node_rule_msl_sap_HB2_SCS01_jscshost" score="-INFINITY" boolean_op="and"> <expression attribute="pingd" id="6e3d7f9e-0541-4a15-bea8-290500d8e4fd" operation="eq" value="0"/> </rule> </rsc_location> <rsc_location id="no_ping_node_rule_msl_sap_HB2_ASCS00_ascshost" rsc="msl_sap_HB2_ASCS00_ascshost"> <rule id="prefered_no_ping_node_rule_msl_sap_HB2_ASCS00_ascshost" score="-INFINITY" boolean_op="and"> <expression attribute="pingd" id="b5bf6e0c-6174-41d8-abb5-8aed431a709b" operation="eq" value="0"/> </rule> </rsc_location> <rsc_location id="failcount-checks-for-grp_sapdb_HB2" rsc="grp_sapdb_HB2"> <rule id="fc-check-move-away-grp_sapdb_HB2" score="-INFINITY" boolean_op="or"> <expression attribute="fail-count-rsc_SAPDatabase_HB2" id="fc-check-grp_sapdb_HB2-rsc_SAPDatabase_HB2" operation="gt" value="3"/> </rule> </rsc_location> <rsc_location id="failcount-checks-for-grp_sap_HB2_DVEBMGS02" rsc="grp_sap_HB2_DVEBMGS02"> <rule id="fc-check-move-away-grp_sap_HB2_DVEBMGS02" score="-INFINITY" boolean_op="or"> <expression attribute="fail-count-rsc_SAPInstance_HB2_DVEBMGS02_cihost" id="fc-check-grp_sap_HB2_DVEBMGS02-rsc_SAPInstance_HB2_DVEBMGS02_cihost" operation="gt" value=" 3"/> </rule> </rsc_location>
Colocation Constraints
Colocation constraints are used to define where to place resources in relationship to each other. While a group
normally implies colocation of all group members, you can define this placement more granularly, when using
explicit colocation constraints.
p. 82

The relevance of a colocation constraint could be leveled by the score parameter. The score makes it possible
to distinguish between four modes:
• Resources must run together are defined with INFINITE score • Resources which should run together are defined with positive score• Resources which should not run together (anti-colocation) are defined with a negative score• Resources which must not run together (also anti-colocation) are defined with -INFINITE score
The illustration shows a simplified view of the colocation constraints.
This diagram shows:
• Normally scored anti-colocation between the database and the central instance (DVEBMGS). This should help balance the load. This anti-colocation is not required; your operational concepts decide whether this constraint should be a anti-colocation or a colocation
• The colocations between the virtual IP addresses and the corresponding SAP instance <rsc_colocation id="acol_rsc_SAPDatabase_HB2_rsc_SAPInstance_HB2_DVEBMGS02_cihost" from="rsc_SAPDatabase_HB2" to="rsc_SAPInstance_HB2_DVEBMGS02_cihost" score="-1000"/> <rsc_colocation id="col_rsc_IP_ascshost_msl_sap_HB2_ASCS00_ascshost_master" to_role="Master" from="rsc_IP_HB2_ascshost" to="msl_sap_HB2_ASCS00_ascshost" score="INFINITY"/> <rsc_colocation id="col_rsc_IP_jscshost_msl_sap_HB2_SCS01_jscshost_master" to_role="Master" from="rsc_IP_HB2_jscshost" to="msl_sap_HB2_SCS01_jscshost" score="INFINITY"/>
p. 83
Illustration 37: Simplified view of the colocation constraints
SAPInstanceSCS01 - HB2
SAPInstanceASCS00 - HB2
SAP group
I/O Stack forcentral instance
Ipaddr2cihost
SAPInstanceDVEBMGS - HB2
Ipaddr2scshost
Ipaddr2ascshost
SAPInstanceERS11 - HB2
SAPInstanceERS10 - HB2
DB group
I/O Stack forDatabasefiles
IPaddr2dbhost
SAPDatabaseMaxDB - HB2
Master/Slave
Master/Slave
anti-colocation(score -1000)
Resources to be placedtogether on a cluster node
Resources to be placedon the other node

Order Constraints
Order constraints are used to configure a start and (reverse) stop sequence. Order constraints should be limited
to urgent start/stop dependencies.
While a resource group normally implies an internal start/stop sequence, explicit order constraints could be
used to configure the order between resources that could not be combined into a group or to define a
dependency between 1:n or n:1.
The illustration shows a simplified view of the order constraints.
The use case includes the following types of order constraints:
• The virtual service address is started before the matching SAP instance• The database and the service instances SCS and ASCS are started before the central instance
In addition to the normal start/stop sequence, an order constraint also defines what to do if a service fails and
has to be restarted: All successive services must also be restarted.
This is the reason we do not define an order constraint between the database and the service instances SCS
and ASCS.
p. 84
Illustration 38: Simplified view of the order constraints
DB group
I/O Stack forDatabasefiles
IPaddr2dbhost
SAPDatabaseMaxDB - HB2
SAPInstanceSCS01 - HB2
SAPInstanceASCS00 - HB2
SAP group
I/O Stack forDatabasefiles
IPaddr2cihost
SAPInstanceDVEBMGS02 - HB2
Ipaddr2scshost
Ipaddr2ascshost

<rsc_order id="ord_rsc_IP_ascshost_msl_sap_HB2_ASCS00_ascshost" from="rsc_IP_HB2_ascshost" to_action="promote" to="msl_sap_HB2_ASCS00_ascshost" type="before"/> <rsc_order id="ord_rsc_IP_jscshost_msl_sap_HB2_SCS01_jscshost" from="rsc_IP_HB2_jscshost" to_action="promote" to="msl_sap_HB2_SCS01_jscshost" type="before"/> <rsc_order id="ord_rsc_SAPDatabase_HB2_rsc_SAPInstance_HB2_DVEBMGS02_cihost" from="rsc_SAPDatabase_HB2" to="rsc_FS_HB2_hb2_dvebmgs02" type="before"/>
4 Implementation Cluster 2 “Simple Stack”
4.1 Heartbeat 2 Base Configuration
The Heartbeat base configuration is also nearly the same as for cluster 01. You only have to exchange the node
names in /etc/ha.d/ha.cf:
node maloja01node maloja02
And of course you need to define an other cluster authentication in /etc/ha.d/authkeys:
--- SNIP ---auth 3 3 md5 maloja01maloja02--- SNAP ---
4.2 Heartbeat Resources Use Case 2 “Simple Stack”The “Simple Stack” is very similar to the configuration of use case 01. The main difference is that all resources
are configured within a single resource group. Furthermore, it doesn't support the use of the Enqueue
Replication Server.
The cluster configuration is not described in detail for this stack. The sample CIB of this setup is attached in the
Appendix.
4.2.1 The Resources of the ClusterThe cluster design uses the following resource agents:
SFEX, IPaddr2, Raid1, LVM, File system, SAPDatabase, SAPInstance and STONITH sunipmi
SAP System Group “grp_sap_SID”• SFEX: Resource protection using SFEX disk locking• IPaddr2: Virtual IP addresses• Raid1: MDADM Raid 1 arrays• LVM: LVM Volume Groups• File system: Ext3 file systems• SAPDatabase: Oracle Database• SAPInstance SCS03: Java Central services instance• SAPInstance DVEBMGS01: Central instance• SAPInstance D02: Dialog instance
4.2.2 Dependencies of the Resources
Location Constraints
Both cluster nodes have equal hardware, so we do not need a location constraint to place the SAP system
group “grp_sap_SID.” Operational procedures and standards may require a location rule for this entire SAP
system; we recommend setting location rules with a scope of 1,000.
p. 85

We need some additional location rules to be sure that the entire SAP system starts only on the node, which fits
all operational needs.
• We need a rule for each STONITH resource, so they don't run on the node, which would be fenced by the resource. The cluster would do this automatically for us, but binding resources to the other node is more explicit. There should be two rules: one per STONITH resource.
• We add a rule to place each STONITH on the other node. In a two-node cluster setup, this is not really necessary, but if the cluster is projected to grow in the future, it's more explicit and the standard status of the cluster can be documented easily. There should be two rules: one per STONITH resource.
• We define location scores for the group grp_sap_SID to place the entire system in the normal operation status. By tuning the score of this location rule, we could define whether the system should automatically fall back or not. There should be two rules: one per cluster node.
• Define a location rule. This rule will move the entire SAP system to the other node if the failcount of either of the databases or of a SAP instance is too high. This should help increase the availability even if one of the nodes has a defect and can't run the SAP system, but is available from the cluster view. There should be four rules, one per database and SAP instance.
• Define a location rule. This rule will move the entire SAP system to the other node if the node cannot reach at least one of the ping nodes. This should help increase availability even if the cluster node has a partial network defect and cannot reach the ping node, but is still visible to the cluster. This mechanism also includes a split-brain scenario, where only one cluster node is able to reach the ping node. We decided to use the standard gateway as the ping node. If the standard gateway is used to help SAP clients communicate with the SAP system, this also shows that the correct node (which should be also reachable from the clients) is selected in a split brain scenario. Of course, the standard gateway is a critical resource for client/server communication and should also be highly available. On the other hand, the standard gateway should be visible only on one site in case of a split side scenario.
Colocation Constraints
All needed colocations are implicitly defined by adding all SAP system components to a resource group.
Order Constraints
All needed orders are implicitly defined by adding all SAP system components to a resource group.
4.3 Configuring the Resources Using WowWow is a simple program, which helps create cluster configurations. It is based on cib-xml-snipsets and scripts.
The snipsets may contain variable references that are resolved by the scripts and the Wow engine
Wow is part of the Heartbeat ClusterTools RPM-Package.
5 Cluster Maintenance and Tests
5.1 Cluster Maintenance
5.1.1 Stopping and Starting Resources and Resource GroupsResources and resource groups can be started and stopped using either the Heartbeat GUI or the cluster tools.
Starting and stopping a resource always means changing the „target_role“ XML attribute. Changing this attribute
doesn't trigger a start or stop action directly; it simply changes the target role of the resource.
p. 86

The cluster calculates a path, covering all dependencies, to reach the new target role of the resource. For
example, a target role „stop“ on a resource may imply that other dependent resources must be stopped before
the new target role can be applied and vice versa.
The target_role of a resource is stored in the „meta attributes“ section in the CIB. It is displayed in the Attributes
section of a resource in the Heartbeat GUI.
Heartbeat GUI:
To change the target_role of a resource using the GUI, right-click on the resource and choose „stop“ from the
drop-down box. The target_role attribute in the Attributes section in the right column now reflects the new target
role.
ClusterService.sh:
Select option 1 (start a resource) or 2 (stop a resource), choose a resource and confirm the change of the
target_role.
It may take some time, until the new role of a resource has been reached. Have a look at the cluster transition
status of the ClusterService.sh script in order to determine if the cluster is still in transition.
5.1.2 Analyzing and Solving a Cluster Problem1. Start the ClusterService.sh script. It shows the overall status (green, yellow, red), as well as the
Heartbeat link status.
2. Look at the detailed cluster error messages using option 31.
3. Analyze the error message and solve the problem.
4. Sometimes it makes sense to look at the cluster action history using option 32.
5. If you need more information, look at the file /var/log/messages.
6. Reset resource failcounts, if there are any, using option 28.
7. Clean up all resources that have errors, using option 25. The “cleanup” command deletes all status
entries of a resource in the CIB. The cluster will continue with the next planned operation for this
resource and will try to get a new status using a monitoring operation.
8. If you can't solve the problem and if it must be solved to immediately start the affected resource, you
can set the resource to ”unmanaged“ using option 22 and then try to start it manually outside of the
cluster.
To be able to analyze a problem later, it may make sense to make a copy of the CIB before making any
changes. A copy can be generated using the following command:
cibadmin -Q > cluster-cib.xml
• The CIB can be analyzed later using the cluster tool clusterstate.pl:
clusterstate.pl -f cluster-cib.xml
5.1.3 Monitoring a Heartbeat 2 Cluster Manually
p. 87

The Heartbeat GUI gives indicates the status of resources and groups: it shows if they are running and, if so, on
which node they are running.
For more accurate monitoring, the ClusterService.sh tool can be used. It shows the overall status, the Heartbeat
link status and the transition status. It can also print detailed error messages.
5.1.4 Monitoring a Heartbeat 2 Cluster Using External Monitoring ApplicationsIf you want to use Nagios, or any other external monitoring application, you may use the cluster overall status,
as it is printed by the following command:
clusterstate.pl -l -s
A practical way of monitoring a cluster is to run the clusterstate.pl every minute within a cronjob and redirect the
output to syslog (i.e., via the logger command).
Almost any monitoring application provides a syslog probe, which can analyze the syslog file using customized
filters. A string such as ”cluster status RED“ may be configured to raise a critical alert.
5.1.5 Practical Method of Operating a Heartbeat 2 ClusterThe best way of operating a Heartbeat 2 cluster is to use a combination of the Heartbeat GUI and the
ClusterService.sh script. Start the Heartbeat GUI on one node and put it in the background. Then start the
ClusterService.sh script.
5.1.6 Operating a Heartbeat 2 Cluster in Productive EnvironmentsHigh availablility SAP systems running on a HA cluster are based on very complex setups. Especially in large
enterprises, dedicated groups are responsible for the operation of the IT infrastructure. Even if the operators
have Heartbeat 2 knowledge and experience, it may be difficult to analyze a problem within a short time.
To solve cluster problems quickly and securely, it is strongly recommended that a detailed operators' guide be
provided that describes how to react to certain problems.
5.2 Cluster ToolsThere are cluster tools that come with the clustertools.rpm. The tools will be installed to /clusterconf/bin.
The tools are:
• ClusterService.sh• clusterstate.pl• showscores.sh• linkstate.sh• list_failcounts.sh• reset_failcounts.sh• Wow cluster configuration suite
5.2.1 ClusterService.sh
The ClusterService.sh script provides advanced maintenance and monitoring features for Heartbeat 2 clusters.
It responds more quickly than the hb_gui and provides more detailed information about the cluster status.
1) Stop a Resource / Clone / Group: Stops a resource, clone or group.
p. 88

2) Start a Resource / Clone / Group: Starts a resource, clone or group.
10) Migrate a Resource / Clone / Group: Moves a resource, clone or group from one node to another by setting
a temporary location constraint.
11) Delete Migration rules: Deletes the temporary location constraint created by the migration. It depends on
stickiness values if the resource, clone or group moves back to its original host.
20) Set node to standby: Sets a node to standby. A standby node does not hold any resources, although it is
known by the cluster.
21) Set node to active: Sets a standby node to active.
22) Set a Resource / Clone / Group to unmanaged: Tells the cluster that it should not touch a resource, clone or
group anymore.
23) Set a Resource / Clone / Group to managed: Tells the cluster to activate given operations; these operations
may have been deactivated by setting the resource, clone or group to unmanaged.
p. 89
Illustration 39: Menu of CheckCluster

25) Cleanup resource: The cluster generates status entries for every resource. Failures will be written to the
status section. If a resource failure is over a given limit, the cluster won't try to run it anymore. “Cleanup
resource” resets this status section.
27) Show resource failcounts: The cluster counts monitor failures for every resource separately on every node. If
the failcount for a resource on one node is over a given limit, the cluster won't run that resource on that node
anymore.
28) Reset resource failcounts: Sets the failcount for all resources on all nodes to 0.
29) Reset status / failcounts for all failed resources: Resets the status for all failed resources and removes all
resource failcounts. This option can be used to bring the cluster into a consistent state. It should only be used
after all errors that caused the problems have been identified and fixed.
30) Show resource status (crm_mon): Shows the status of all resources.
31) Show detailed cluster failure status (clusterstate.pl): Provides more information about the cluster failure
status YELLOW or RED (e.g., which resources are involved in the cluster failure situation).
32) Show detailed cluster action history (clusterstate.pl): Shows recent actions of the clusters and their return
codes.
33) Show detailed Heartbeat link status (linkstate.sh): Shows detailed information about the Heartbeat link
status; for example, which devices are up and running.
0 ) Exit program: Exits the program.
Cluster Transition Status
S_IDLE: The cluster isn't moving, starting or stopping resources.
S_TRANSITION: The cluster is moving, starting or stopping resources. And other states like electing, joining
and leaving.
Cluster Failure Status
See “Cluster overall status” section
Heartbeat Link Status
ALL HEARTBEAT LINKS UP: All network links used for the Heartbeat communication are working.
FAILED LINKS: One or more Heartbeat communication links are not working.
clusterstate.pl: Uses the live configuration or a CIB file to determine the cluster status.
* Returns an overall status: GREEN, YELLOW or RED
* Prints a status message for each identified problem
* Prints a list of all recorded operations in the chronologically correct order:
-f <cib file> : Uses XML cib configuration file as input
-l : Does a live check using the current cib from the cluster
p. 90

-r : Prints a list of all recorded operations in the chronologically correct order
-s : Prints the overall status, without status messages
5.2.2 Cluster Overall StatusThe tools ClusterService.sh and clusterstate.pl display a cluster overall status using the colors “green,” “yellow”
and “red.” The overall status gives a quick overview of the cluster health.
GREEN No errors have been detected; the cluster is operating normally
YELLOW An error has occured, which could be automatically recovered by the cluster or does not affect any resource; i.e., a resource restart (failcount > 0)
RED An error has occurred, which could not be automatically recovered by the cluster; one or more resources might be affected
5.2.3 showscore.shThis command shows the scores of all resources for every cluster node. The score values determine on which
node a resource prefers to run.
5.3 Cluster CommandsThe following list shows some important CLI cluster commands.
hb_gui Heartbeat GUI
crm_mon Cluster monitoring tool
crm_resource Configures resources
crm_resource -L Lists all resources
crm_resource -M -r <resource name>
Migrates a resource or group from one node to the other by setting a temporary location constraint.
crm_resource -U -r <resource_name>
Deletes the temporary location constraint which was set by the migration.
crm_standby -U <node-name> -v <[true|false]>
Sets a node to standby (-v true) or to active (-v false)
cibadmin -Q Writes the current CIB to STDOUT (XML format). Can be used to save the CIB.
crm_failcount -G -r <resource name>
Shows the failcount of a resource.
crm_failcount -D -r <resource name>
Deletes the failcount of a resource.
5.4 Basic Cluster TestsFor productive cluster installations an advanced test-plan must be created that will cover all possible failure
scenarios. The following list describes some important cluster basic tests.
p. 91

Test Set one node to standby that runs the ASCS and JSCS master
instance.
Action Set one node to standby, using the Heartbeat 2 GUI.
Expected Result Heartbeat 2 shuts down all resources on the node set to standby.
On the remaining node, the ASCS and JSCS instances will end up
running in master state. The enqueue replication table is taken over.
The database and CI instance group is running on the remaining
node. The ASCS and JSCS virtual IPs are running on the remaining
node.
Test Shutdown one cluster node gracefully.
Action /etc/init.d/heartbeat stop
Expected Result Heartbeat 2 shuts down all resources on one node, and the node
leaves the cluster. The Initscript returns success.
On the remaining node, the ASCS and JSCS instance will run in
master state. The enqueue replication table is taken over. The
database and CI instance group moves to the remaining group and
starts.
Test Turn off one cluster node.
Action Physically hit the power button.
Expected Result The cluster detects that one node is dead. The remaining node will
try to STONITH (fence) the dead node to make sure that it is really
dead. If the STONITH was successful, the remaining node takes over
all resources.
Test Turn the custer node on again and start Heartbeat2.
Action Physically hit the power button.
/etc/init.d/heartbeat start
Expected Result The cluster node rejoins the cluster and starts the resources. The
ASCS and JSCS clones are running in slave state (enqueue
replication server). The CI host moves to the rejoined node.
Test Unplug both network cables of the user LAN.
Action Physically plug in network cables.
p. 92

Expected Result The cluster communication is still active using the backup link.
However, the connectivity to the NFS server as well as to the ping
node is down. All resources on the affected node are shutdown and
the second node takes over all resources. Depending on the
configuration, the affected node gets rebooted by a STONITH action
from the second node.
Test Unplug both SAN links.
Action Physically plug in SAN cables.
Expected Result The SAN connection is interrupted and the monitoring of the SAN
resources (MD, LVM, file systems) fail. The affected node gets
fenced (rebooted) by the second node using STONITH.
Test Unplug all network cables (split brain).
Action Physically plug in network cables.
Expected Result The cluster communication is interrupted. Both nodes will try to fence
each other using STONITH. The STONITH fails since there is no
network connectivity. The cluster stops doing anything (resource
keep running), since both nodes can't determine the state of their
counterpart. This loop can be interrupted by disabling STONITH in
the GUI on not affected node.
Additionally, the SAN devices are secured by SFEX disk locking.
Test Kill the SAP CI instance.
Action Kill the UNIX process of the CI instance.
Expected Result The CI instance restarts three times. After the third try, it fails over to
the second node.
Test Kill the database.
Action Kill the UNIX process of the database.
Expected Result The database instance restarts three times. After the third try, it fails
over to the second node.
Test Shutdown one storage controller
Action Physically interrupt the connection to one storage controller.
Expected Result The MD-Mirrors get degraded, but continue to work.
p. 93

6 Future Prospects
6.1 SUSE Linux Enterprise Server 11SUSE Linux Enterprise Server 11 is the next version of SUSE Linux Enterprise Server. It will be available in the
first quarter of 2009.
6.1.1 High Availability ExtensionThe High Availability extension of SUSE Linux Enterprise Server 11 will contain all high availability-related
software components. It is optimized for use in mission-critical environments and includes software
components, such as:
• Heartbeat 2◦ Pacemaker and Open-AiS◦ Improved Heartbeat 2 GUI
• cLVM, cluster aware Volume Manager• DRDB 8.0• OCFS2 general FS• and more
6.1.2 Pacemaker and Open-AiSHeartbeat is continually improved and developed. The development takes place at Novell in close collaboration
with the open source community.
SUSE Linux Enterprise Server 11 will ship with a completely new version of the Heartbeat cluster resource
manager, Pacemaker.
Pacemaker will support the Open-AiS cluster framework (see http://www.linux-ha.org/OpenAIS)
6.1.3 SAP Made High Available on SUSE Linux Enterprise Server 11The high availability extension of SUSE Linux Enterprise Server 11 has even better capabilities for highly
available SAP environments. Currently we are planning to develop an updated version of this white paper that
will describe similar SAP scenarios running on SUSE Linux Enterprise Server 11. This updated document will
also cover additional features, such as DRDB (raid over the network) for asynchronous data mirroring across
long distances and even faster failover mechanisms.
6.2 Alternatives to an External NFS ServerThe described setup heavily uses an external NFS server, which has to support high availability. However, in
some IT infrastructures, an external NFS server is not available.
There are several alternatives available that provide the same functionality such as shared file systems,
mounted on both cluster nodes at the same time.
6.2.1 Local High-availability NFS ServerThe SAP recommended method of supplying shared file systems locally on a Linux HA cluster is the use of a
local NFS server. This server is controlled by the cluster itself and, therefore, supports high availability.
p. 94

This local server uses file systems coming from the SAN and exports them to both cluster nodes via NFS. If a
node crashes, the NFS server fails over to the second node. At any time, both nodes have access to the NFS
file systems.
The disadvantage of this method is that during a failover, the file systems are not available for a short time. The
timing of all start, stop and monitor operations of the NFS file system-dependent resources must be adjusted
accordingly.
6.2.2 Oracle Cluster File System (OCFS2)OCFS2 is a block-based cluster-aware file system, shipped with SUSE Linux Enterprise Server 10. It is fully
integrated in the Heartbeat communication layer. OCFS2 file systems can be mounted on both cluster nodes at
the same time.
Using OCFS2 as described above, integration into LVM as the LVM in SUSE Linux Enterprise Server 10 is not
possible and is not cluster aware. It is also not possible to do online-resizing of OCFS2 file systems.
As of January 2009, there are also no performance benchmarks with SAP running on OCFS2 (using Heartbeat
2 for communication) available.
With SUSE Linux Enterprise Server 11, an improved and full POSIX conform version of OCFS2, with online
extension capabilities will be available, as well as a cluster-aware LVM.
6.3 Oracle RACThe Oracle RAC (Real Application Cluster) provides high availability for Oracle RDBMS. It uses its own cluster
to provide fault tolerance (high availability), load balancing and scalability. It is currently the most reliable
method of running Oracle RDBMS.
An integration into a Heartbeat 2 cluster is not required, since the RAC has its own cluster functionality. SAP
instances running under the control of Heartbeat 2 can use RAC-controlled Oracle databases.
6.4 Stretched-cluster ScenariosThe fault tolerance of large IT infrastructures also covers the outage of a whole data center; for example, in case
of a power outage or natural disaster. In such scenarios the IT services are split across two or more data
centers. Each site is able to take over all services of the other site.
p. 95

It is possible to run Heartbeat 2 clusters across two data centers. This ensures the availability of Heartbeat 2-
controlled resources, even if one data center goes down. These setups are called stretched clusters.
Stretched HA clusters are much more complex compared to usual HA clusters running on one site; therefore,
many considerations have to be made.
It is important to have redundant SAN and network connectivity between both data centers. The geographical
distance between the two sites also must be considered. In case of a loss of network connectivity (split brain),
there must be a decision mechanism in order to decide which cluster side takes over the resources and which
side must shut everything down.
Stretched Heartbeat 2 two-node clusters can be configured, but are currently (with some exceptions) not
supported by Novell.
A stretched Heartbeat 2 cluster usually has the following differences compared to a cluster running in a single
data center.
• The two storage controllers used for host-based mirroring are located at different sites
p. 96
Illustration 40: Stretched cluster operation

• SFEX disk locking is used to avoid the start of multiple instances of resources, such as two independently running SAP systems with diverging databases. The SFEX replaces a quorum disk
• Enabled STONITH would require an interaction by an administrator in case of a split-site situation
7 AcknowledgmentsWe would like to thank several people and organizations, that were involved in the writing of this document as
well as in the development and architecture of the described high availability solutions.
7.1 B1 SystemsB1 Systems delivered a major part of the architecture and implementation for the initial version of the enqueue
replication stack. Based on the experiences of the previous version, REALTECH developed an enhanced SAP
resource agent that simplifies the cluster setup when using the SAP enqueue replication server.
Special thanks to Jan Sperling and Thomas Korber (B1 Systems) who helped to plan and implement the initial
enqueue replication scenario during a customer workshop.
7.2 REALTECHREALTECH supported us during all phases of this document. Special thanks to the Consultants from
REALTECH for their help as authors or providing their strong concept knowledge which helped to overcome
technical hurdles we've been faced with during project.
7.3 SAP Linux LabsMost of this document was written at the SAP Linux Labs in St. Leon-Rot near Walldorf, Germany. We would
like to thank Manfred Stein (SAP) and Alexander Hass (SAP) who supported us with their in-depth SAP and
Linux knowledge.
7.4 Additional SupportersSpecial thanks to Matthias Schlarb for his help as author of this document and Alexander Krauth for his
concepts and his fast and straightforward help during difficult technical issues.
8 Appendix
8.1 Downloading the Cluster Tools, SFEX and MoreAll additional tools, not included in SUSE Linux Enterprise Server 10 SP2, can be downloaded via the following
URL:
http://www.novell.com/sap
→ Technical Guide “SAP made high available using SUSE Linux Enterprise Server 10”
Here, you can also find the example CIB files, as they are described in this document.
8.2 Components Not Supported by NovellSome software components described in this document are not supported by Novell. However, these
components can safely be used in productive cluster environments. They are well tested and already in use by
some Novell customers.
• Heatbeat 2 Clustertools (i.e. ClusterService.sh)• SFEX disk locking suite
p. 97

The described HA cluster setups can also be configured without the use of these additional tools. However, this
would reduce the usability (Cluster Tools) and reliability (SFEX) of the cluster.
8.3 Description of the SAP Resource Agents
8.3.1 SAPInstance Resource AgentWith Heartbeat 2.1.4 (included in SUSE Linux Enterprise Server 10 SP2 and updates) the SAPInstance
resource agent supports those types of SAP instances:
• SAP WebAS ABAP Release 4.6C - 7.10 • SAP WebAS Java Release 6.40 - 7.10 (min. 6.40 SP22, 7.00 SP15, 7.10 SP00)
SAP WebAS ABAP + Java Add-In Release 6.20 - 7.10 (Java is not monitored by the cluster in that case)
For SAP kernel release 4.6D, follow the instructions in appendix A1 of SAP Note 1008828.
For SAP kernel release 6.40, follow the instructions of SAP Note 877795.
When using an SAP Kernel 6.40, please check and implement the actions from the section "Manual post-
processing" from SAP Note 995116.
There can be several services within these types of SAP instances. Usually, you will find the defined services in
the START profile of the related instance (Attention: With SAP Release 7.10 the START profile content was
moved to the instance profile). Not all of these services have to be monitored by the cluster. For example, you
do not want to failover your SAP instance, if the central syslog collector daemon fails.
Those services are monitored within the SAPInstance resource agent:
• disp+work • msg_server • enserver • enrepserver • jcontrol • jstart
The reverse conclusion of this is that a SAP instance without any of these services will not work with the
resource agent. You could think of a standalone gateway instance or a standalone Web dispatcher instance
which will fail to work with the resource agent. The next version of the agent may have a parameter which can
be used to select which services should be monitored. But this does not mean that you cannot include a SAP
Web Dispatcher into another SAP instance, which uses one of the monitored services. For example a SCS
instance running a msg_server and a enserver. In that case the Web Dispatcher will get started and stopped
together with the other services by the cluster. The Web Dispatcher is just not monitored than, which means a
hanging or died sapwebdisp process does not cause a failover of the whole SAP instance. Possibly that is
exactly what you want.
All operations of the SAP instance resource agent are done by using the startup framework called SAP
Management Console or sapstartsrv that was introduced with SAP kernel release 6.40. Find more information
about the SAP Management Console in SAP Note 1014480. Using this framework defines a clear interface for
the Heartbeat cluster, how it sees the SAP system. The options for monitoring the SAP system are also much
better than other methods such as watching the ps command for running processes or doing some pings to the
p. 98

application. sapstartsrv uses SOAP messages to request the status of running SAP processes. Therefore, it can
actually ask a process what it's status is, independent from other problems that might exist at the same time.
sapstartsrv knows 4 status colors:
• GREEN = Everything is fine • YELLOW = Something is wrong, but the service is still working • RED = The service does not work • GRAY = The service has not been started
The SAP instance resource agent will interpret GREEN and YELLOW as acceptable. That means that minor
problems will not be reported to the Heartbeat cluster. This prevents the cluster from doing an unwanted
failover. The statuses RED and GRAY are reported as NOT_RUNNING to the cluster. Depending on the status
the cluster expects from the resource, it will do a restart, failover or just nothing.
The parameters of the SAP instance resource agent are:
Parameter Description
InstanceName The full qualified SAP instance name.
In the format: SID_INSTANCE_VIR-HOSTNAME
e.g.: HB2_DVEBMGS02_cihost
Usually this is the name of the SAP instance profile.
MANDATORY
DEFAULT: none
DIR_EXECUTABLE The full qualified path where to find sapstartsrv and sapcontrol.
Specify this parameter if you have changed the SAP kernel directory location after
the default SAP installation.
NOT MANDATORY
DEFAULT: /usr/sap/<SID>/<INSTANCE>/exe
or /usr/sap/<SID>/SYS/exe/run
DIR_PROFILE The full qualified path where to find the SAP START profile.
Specify this parameter if you have changed the SAP profile directory location after
the default SAP installation.
NOT MANDATORY
DEFAULT: /usr/sap/<SID>/SYS/profile
p. 99

START_PROFILE The name of the SAP START profile.
Specify this parameter if you have changed the name of the SAP START profile
after the default SAP installation. As SAP release 7.10 does not have a START
profile anymore, you need to specify the Instance Profile than.
MANDATORY for SAP Release 7.10
DEFAULT: START_<INSTANCE>_<VIR-HOSTNAME>
START_WAITTIME After that time in seconds, a monitor operation is executed by the resource agent.
Does the monitor return SUCCESS, the start is handled as SUCCESS. This is
useful to resolve timing problems with the J2EE-AddIn instance.
Usually the resource agent waits until all services are started and the SAP
Management Console reports a GREEN status. A double stack installation (ABAP
+ Java AddIn) consists of an ABAP dispatcher and a JAVA instance. Normally the
start of the JAVA instance takes much longer than the start of the ABAP instance.
For a JAVA Instance you may need to configure a much higher timeout for the
start operation of the resource in Heartbeat. The disadvantage here is, that the
discovery of a failed start by the cluster takes longer. Somebody might say: For
me it is important, that the ABAP instance is up and running. A failure of the JAVA
instance shall not cause a failover of the SAP instance. Actually the SAP MC
reports a YELLOW status, if the JAVA instance of a double stack system fails.
From the resource agent point of view YELLOW means: everything is OK. Setting
START_WAITTIME to a lower value determines the resource agent to check the
status of the instance during a start operation after that time. As it would wait
normally for a GREEN status, now it reports SUCCESS to the cluster in case of a
YELLOW status already after the specified time.
That is only useful for double stack systems.
NOT MANDATORY
DEFAULT: 3600
p. 100

AUTOMATIC_RECOVER The SAP instance resource agent tries to recover a failed start attempt
automatically one time. This is done by killing running instance processes and
executing cleanipc.
Sometimes a crashed SAP instance leaves some processes and/or shared
memory segments behind. Setting this option to true will try to remove those
leftovers during a start operation. That is to reduce manual work for the
administrator.
NOT MANDATORY
DEFAULT: false
PRE_START_USEREXIT
POST_START_USEREXIT
PRE_STOP_USEREXIT
POST_STOP_USEREXIT
The full qualified path where to find a script or program which should be executed
before/after this resource got started/stopped.
SAP systems required often additional software to run on the same server. That
can be monitoring software or software for some interfaces the SAP system uses.
You may include those programs by writing an own OCF resource agent into the
Heartbeat cluster. But sometimes writing a own resource agent is just to much
effort for this task. With the provided userexits you many easily include own
scripts, that do not follow the OCF standard, into the cluster. Be aware that the
returncode of you own script will not be used by the SAP instance resource agent.
The call of the userexit is syncron. That means, the time your script needs is going
into the timeout of the start/stop operation defined in the Heartbeat cluster
configuration.
If your script hangs, SAP may not be started!
NOT MANDATORY
DEFAULT: empty
8.3.2 SAPDatabase Resource AgentThe SAPDatabase resource agent supports the following databases in a SAP installation:
• Oracle 10.2.x • DB/2 UDB for Windows and UNIX 9.x • SAP-DB / MaxDB 7.x
The purpose of the resource agent is to start, stop and monitor the database instance of a SAP system.
Together with the RDBMS system it will also control the related network service for the database. Like the
Oracle Listener and the xserver of MaxDB. The resource agent expects a standard SAP installation and
therefore needs less parameters to configure.
The monitor operation of the resource agent can test the availability of the database by using SAP tools
(R3trans or jdbcconnect). With that it ensures, that the database is really accessible for the SAP system. The
p. 101

parameter STRICT_MONITORING controls, if this is done only during the start operation or also in the periodic
monitoring intervals of the cluster.
After an unclean exit or crash of a database, it may need a recover procedure to start again. The resource agent
has a procedure implemented for each database type. With the parameter AUTOMATIC_RECOVER you may
use this functionality, if you like.
Here is what happens in detail for each database:
Database recover actions
Oracle shutdown abort
startup mount
alter database recover automatic database
alter database open
DB/2 db2_kill
db2start
db2 activate database
MaxDB db_stop
db_clear
db_online
The parameters of the SAPDatabase resource agent are:
Parameter Description
SID The unique SAP system identifier.
e.g. HB2
MANDATORY
DEFAULT: empty
DBTYPE The name of the database vendor you use.
Set either: ORA,DB6,ADA
MANDATORY
DEFAULT: empty
p. 102
DIR_EXECUTABLE The full qualified path where to find the SAP kernel. The resource agent needs the
startdb and the R3trans executables.
For that reason the directory with the SAP kernel must also be accessible for the
database server at any time. Specify this parameter, if you have changed the SAP
kernel directory location after the default SAP installation.
NOT MANDATORY
DEFAULT: /usr/sap/<SID>/<INSTANCE>/exe
or /usr/sap/<SID>/SYS/exe/run
or /sapmnt/<SID>/exe
NETSERVICENAME The Oracle TNS listener name
NOT MANDATORY
DEFAULT: LISTENER (if DBTYPE = ORA)
DBJ2EE_ONLY If you do not have a ABAP stack installed in the SAP database, set this to true.
Non ABAP system cannot be monitored using R3trans. That parameter changes
the monitoring method to jdbcconnect.
NOT MANDATORY
DEFAULT: false
JAVA_HOME This is only needed if the DBJ2EE_ONLY parameter is set to true. Enter the path
to the Java SDK which is used by the SAP WebAS Java.
You need to set this parameter, if the environment variable JAVA_HOME is not set
for the root user, or points to another directory as the JAVA_HOME of the sidadm
user.
NOT MANDATORY
DEFAULT: $JAVA_HOME
p. 103

STRICT_MONITORING This controls how the resource agent monitors the database. If set to true, it will
use SAP tools to test the connect to the database. Do not use with Oracle,
because it will result in unwanted failovers in case of an archiver stuck.
NOT MANDATORY
DEFAULT: false
AUTOMATIC_RECOVER The SAPDatabase resource agent tries to recover a failed start attempt
automatically one time. This is done by running a forced abort of the RDBMS and/
or executing recovery commands.
NOT MANDATORY
DEFAULT: false
DIR_BOOTSTRAP This is only needed if the DBJ2EE_ONLY parameter is set to true. The full
qualified path where to find the J2EE instance bootstrap directory.
e.g. /usr/sap/HB2/J00/j2ee/cluster/bootstrap
Specify this parameter, if you have changed the SAP j2ee bootstrap directory
location after the default SAP installation.
NOT MANDATORY
DEFAULT: /usr/sap/<SID>/*/j2ee/cluster/bootstrap
DIR_SECSTORE This is only needed if the DBJ2EE_ONLY parameter is set to true. The full
qualified path where to find the J2EE security store directory.
Specify this parameter, if you have changed the SAP j2ee secure store directory
location after the default SAP installation.
NOT MANDATORY
DEFAULT: /usr/sap/<SID>/SYS/global/security/lib/tools
p. 104

DB_JARS This is only needed if the DBJ2EE_ONLY parameter is set to true.
The full qualified filename of the jdbc driver for the database connection test. It will
be automaticaly read from the bootstrap.properties file in Java engine 6.40 and
7.00. For Java engine 7.10 the parameter is mandatory.
Example: /oracle/client/10x_64/instantclient/libclntsh.so
MANDATORY for Release 7.10
DEFAULT: empty
PRE_START_USEREXIT
POST_START_USEREXIT
PRE_STOP_USEREXIT
POST_STOP_USEREXIT
The full qualified path where to find a script or program which should be executed
before/after this resource got started/stopped.
SAP systems required often additional software to run on the same server. That
can be monitoring software or software for some interfaces the SAP system uses.
You may include those programs by writing an own OCF resource agent into the
Heartbeat cluster. But sometimes writing a own resource agent is just to much
effort for this task. With the provided userexits you many easily include own
scripts, that do not follow the OCF standard, into the cluster. Be aware that the
returncode of you own script will not be used by the SAPDatabase resource agent.
The call of the userexit is syncron. That means, the time your script needs is going
into the timeout of the start/stop operation defined in the Heartbeat cluster
configuration. If your script hangs, the database may not be started!
NOT MANDATORY
DEFAULT: empty
8.4 ReferencesOnline resource URL
Novell Web site http://www.novell.com
Novell SAP Portal http://www.novell.com/sap
Realtech Web site http://www.realtech.com
SAP Web site http://www.sap.com
B1 System Web site http://www.b1-systems.de
Linux HA/Heartbeat 2 community Web site http://www.linux-ha.org/
SFEX documentation http://www.linux-ha.org/sfex
SUSE Linux Enterprise Server 10 http://www.novell.com/linux
SAP on Linux http://www.sap.com/linux
Novell Support & Knowledgebase http://www.novell.com/support
p. 105

Novell Support document TID
How to update to SLES/SLED 10 SP2 7000387
8.5 SAP NotesNote 1008828 - ACC 7.1 PI / Adaptive Computing Controller Collective Note
Note 877795 - Problems w/ sapstartsrv as of Release 7.00 & 6.40 patch 169
Note 995116 - Backward porting of sapstartsrv for earlier releases
Note 1014480 - SAP Management Console (SAP MC)
Note 958253 - SUSE LINUX Enterprise Server 10: Installation notes
Note 171356 - SAP software on Linux: Essential information
8.6 Cluster Information Base of the Enqueue Replication<cib> <configuration> <crm_config> <cluster_property_set id="cib-bootstrap-options"> <attributes> <nvpair id="cib-bootstrap-options-dc-version" name="dc-version" value="2.1.4-node: 73f24cbe8ed77837a75df445272edf2674d50f00"/> <nvpair name="symmetric-cluster" id="cib-bootstrap-options-symmetric-cluster" value="true"/> <nvpair id="cib-bootstrap-options-no_quorum-policy" name="no_quorum-policy" value="stop"/> <nvpair name="default-resource-stickiness" id="cib-bootstrap-options-default-resource-stickiness" value="10000"/> <nvpair id="cib-bootstrap-options-default-resource-failure-stickiness" name="default-resource-failure-stickiness" value="0"/> <nvpair id="cib-bootstrap-options-stonith-enabled" name="stonith-enabled" value="false"/> <nvpair id="cib-bootstrap-options-stonith-action" name="stonith-action" value="reboot"/> <nvpair id="cib-bootstrap-options-stop-orphan-resources" name="stop-orphan-resources" value="true"/> <nvpair id="cib-bootstrap-options-stop-orphan-actions" name="stop-orphan-actions" value="true"/> <nvpair id="cib-bootstrap-options-transition-idle-timeout" name="transition-idle-timeout" value="2min"/> <nvpair id="cib-bootstrap-options-default-action-timeout" name="default-action-timeout" value="120s"/> <nvpair id="cib-bootstrap-options-is-managed-default" name="is-managed-default" value="true"/> <nvpair id="cib-bootstrap-options-no-quorum-policy" name="no-quorum-policy" value="stop"/> <nvpair name="last-lrm-refresh" id="cib-bootstrap-options-last-lrm-refresh" value="1228234619"/> </attributes> </cluster_property_set> </crm_config> <nodes> <node id="d2c57790-6917-4f0d-8e33-d3d214e82009" uname="ls3197v7" type="normal"> <instance_attributes id="nodes-d2c57790-6917-4f0d-8e33-d3d214e82009"> <attributes> <nvpair id="standby-d2c57790-6917-4f0d-8e33-d3d214e82009" name="standby" value="off"/> </attributes> </instance_attributes> </node> <node id="030f54fd-1216-49a5-b136-d3916f294781" uname="ls3197v6" type="normal"> <instance_attributes id="nodes-030f54fd-1216-49a5-b136-d3916f294781"> <attributes> <nvpair id="standby-030f54fd-1216-49a5-b136-d3916f294781" name="standby" value="off"/> </attributes>
p. 106

</instance_attributes> </node> </nodes> <resources> <primitive id="rsc_stonith_sunipmi_ls3197v6" class="stonith" type="external/sunipmi" provider="heartbeat"> <instance_attributes id="rsc_stonith_sunipmi_ls3197v6_instance_attrs"> <attributes> <nvpair id="rsc_stonith_sunipmi_ls3197v6_hostlist" name="hostname" value="ls3197v6"/> <nvpair id="rsc_stonith_sunipmi_ls3197v6_hostmap" name="ipaddr" value="172.30.100.21"/> <nvpair id="rsc_stonith_sunipmi_ls3197v6" name="userid" value="root"/> <nvpair id="rsc_stonith_sunipmi_ls3197v6_passwd" name="passwd" value="mypasswd"/> <nvpair id="rsc_stonith_sunipmi_ls3197v6_auth" name="auth" value="MD5"/> <nvpair id="rsc_stonith_sunipmi_ls3197v6_priv" name="priv" value="ADMINISTRATOR"/> <nvpair id="rsc_stonith_sunipmi_ls3197v6_interface" name="interface" value="lan"/> </attributes> </instance_attributes> <meta_attributes id="rsc_stonith_sunipmi_ls3197v6_meta_attrs"> <attributes> <nvpair id="rsc_stonith_sunipmi_ls3197v6_meta_attr_target_role" name="target_role" value="stopped"/> </attributes> </meta_attributes> </primitive> <primitive id="rsc_stonith_sunipmi_ls3197v7" class="stonith" type="external/sunipmi" provider="heartbeat"> <instance_attributes id="rsc_stonith_sunipmi_ls3197v7_instance_attrs"> <attributes> <nvpair id="rsc_stonith_sunipmi_ls3197v7_hostlist" name="hostname" value="ls3197v7"/> <nvpair id="rsc_stonith_sunipmi_ls3197v7_hostmap" name="ipaddr" value="172.30.100.22"/> <nvpair id="rsc_stonith_sunipmi_ls3197v7" name="userid" value="root"/> <nvpair id="rsc_stonith_sunipmi_ls3197v7_passwd" name="passwd" value="mypasswd"/> <nvpair id="rsc_stonith_sunipmi_ls3197v7_auth" name="auth" value="MD5"/> <nvpair id="rsc_stonith_sunipmi_ls3197v7_priv" name="priv" value="ADMINISTRATOR"/> <nvpair id="rsc_stonith_sunipmi_ls3197v7_interface" name="interface" value="lan"/> </attributes> </instance_attributes> <meta_attributes id="rsc_stonith_sunipmi_ls3197v7_meta_attrs"> <attributes> <nvpair id="rsc_stonith_sunipmi_ls3197v7_meta_attr_target_role" name="target_role" value="stopped"/> </attributes> </meta_attributes> </primitive> <group id="grp_sapdb_HB2"> <meta_attributes id="grp_sapdb_HB2_meta_attrs"> <attributes/> </meta_attributes> <primitive id="rsc_sfex_HB2" class="ocf" type="sfex" provider="heartbeat"> <instance_attributes id="rsc_sfex_HB2_instance_attrs"> <attributes> <nvpair id="rsc_sfex_HB2_device" name="device" value="/dev/sdg"/> <nvpair id="rsc_sfex_HB2_monitor_interval" name="monitor_interval" value="5"/> <nvpair id="rsc_sfex_HB2_index" name="index" value="1"/> <nvpair id="rsc_sfex_HB2_lock_timeout" name="lock_timeout" value="20"/> </attributes> </instance_attributes> <meta_attributes id="rsc_sfex_HB2_meta_attrs"> <attributes/> </meta_attributes> <operations> <op id="rsc_sfex_HB2_monitor" name="monitor" interval="5" timeout="60" start_delay="10" on_fail="block" disabled="false" role="Started"/> <op id="rsc_sfex_HB2_start" name="start" timeout="60" on_fail="block" start_delay="0" disabled="false" role="Started"/> <op id="rsc_sfex_HB2_stop" name="stop" timeout="10" on_fail="block" start_delay="0" disabled="false" role="Started"/> </operations>
p. 107

</primitive> <primitive class="ocf" provider="heartbeat" type="IPaddr2" id="rsc_IP_HB2_dbhost"> <operations> <op id="rsc_IP_HB2_dbhost_op_0" name="monitor" description="monitor" interval="5s" timeout="20s" start_delay="10s" disabled="false" role="Started"/> <op id="rsc_IP_HB2_dbhost_op_1" name="start" timeout="15s" disabled="false" role="Started" start_delay="5s"/> </operations> <instance_attributes id="rsc_IP_HB2_dbhost_inst_attr"> <attributes> <nvpair id="rsc_IP_HB2_dbhost_attr_0" name="ip" value="172.30.100.103"/> </attributes> </instance_attributes> </primitive> <primitive class="ocf" provider="heartbeat" type="Raid1" id="rsc_RAID1_HB2_md0"> <operations> <op id="rsc_RAID1_HB2_md0_mon" interval="120s" name="monitor" timeout="60s" start_delay="0" disabled="false" role="Started"/> </operations> <instance_attributes id="rsc_RAID1_HB2_md0"> <attributes> <nvpair id="rsc_RAID1_HB2_md0_attr_0" name="raidconf" value="/clusterconf/HB2/mdadm.conf"/> <nvpair id="rsc_RAID1_HB2_md0_attr_1" name="raiddev" value="/dev/md0"/> </attributes> </instance_attributes> </primitive> <primitive class="ocf" provider="heartbeat" type="Raid1" id="rsc_RAID1_HB2_md1"> <operations> <op id="rsc_RAID1_HB2_md1_mon" interval="120s" name="monitor" timeout="60s" start_delay="0" disabled="false" role="Started"/> </operations> <instance_attributes id="rsc_RAID1_HB2_md1"> <attributes> <nvpair id="rsc_RAID1_HB2_md1_attr_0" name="raidconf" value="/clusterconf/HB2/mdadm.conf"/> <nvpair id="rsc_RAID1_HB2_md1_attr_1" name="raiddev" value="/dev/md1"/> </attributes> </instance_attributes> </primitive> <primitive class="ocf" provider="heartbeat" type="Raid1" id="rsc_RAID1_HB2_md2"> <operations> <op id="rsc_RAID1_HB2_md2_mon" interval="120s" name="monitor" timeout="60s" start_delay="0" disabled="false" role="Started"/> </operations> <instance_attributes id="rsc_RAID1_HB2_md2"> <attributes> <nvpair id="rsc_RAID1_HB2_md2_attr_0" name="raidconf" value="/clusterconf/HB2/mdadm.conf"/> <nvpair id="rsc_RAID1_HB2_md2_attr_1" name="raiddev" value="/dev/md2"/> </attributes> </instance_attributes> </primitive> <primitive class="ocf" provider="heartbeat" type="Raid1" id="rsc_RAID1_HB2_md3"> <operations> <op id="rsc_RAID1_HB2_md3_mon" interval="120s" name="monitor" timeout="60s" start_delay="0" disabled="false" role="Started"/> </operations> <instance_attributes id="rsc_RAID1_HB2_md3"> <attributes> <nvpair id="rsc_RAID1_HB2_md3_attr_0" name="raidconf" value="/clusterconf/HB2/mdadm.conf"/> <nvpair id="rsc_RAID1_HB2_md3_attr_1" name="raiddev" value="/dev/md3"/> </attributes> </instance_attributes> </primitive> <primitive class="ocf" provider="heartbeat" type="LVM" id="rsc_LVM_HB2_vg_db_sapdb"> <operations> <op id="rsc_LVM_HB2_vg_db_sapdb_mon" interval="120s" name="monitor" timeout="60s" start_delay="0" disabled="false" role="Started"/> <op id="rsc_LVM_HB2_vg_db_sapdb_stop" name="stop" timeout="30" on_fail="fence" start_delay="0" disabled="false" role="Started"/> </operations> <instance_attributes id="rsc_LVM_HB2_vg_db_sapdb"> <attributes> <nvpair id="rsc_LVM_HB2_vg_db_sapdb_attr_0" name="volgrpname" value="vg_db_sapdb"/> </attributes>
p. 108

</instance_attributes> </primitive> <primitive class="ocf" provider="heartbeat" type="LVM" id="rsc_LVM_HB2_vg_db_sapdata"> <operations> <op id="rsc_LVM_HB2_vg_db_sapdata_mon" interval="120s" name="monitor" timeout="60s" start_delay="0" disabled="false" role="Started"/> <op id="rsc_LVM_HB2_vg_db_sapdata_stop" name="stop" timeout="30" on_fail="fence" start_delay="0" disabled="false" role="Started"/> </operations> <instance_attributes id="rsc_LVM_HB2_vg_db_sapdata"> <attributes> <nvpair id="rsc_LVM_HB2_vg_db_sapdata_attr_0" name="volgrpname" value="vg_db_sapdata"/> </attributes> </instance_attributes> </primitive> <primitive class="ocf" provider="heartbeat" type="LVM" id="rsc_LVM_HB2_vg_db_saplog"> <operations> <op id="rsc_LVM_HB2_vg_db_saplog_mon" interval="120s" name="monitor" timeout="60s" start_delay="0" disabled="false" role="Started"/> <op id="rsc_LVM_HB2_vg_db_saplog_stop" name="stop" timeout="30" on_fail="fence" start_delay="0" disabled="false" role="Started"/> </operations> <instance_attributes id="rsc_LVM_HB2_vg_db_saplog"> <attributes> <nvpair id="rsc_LVM_HB2_vg_db_saplog_attr_0" name="volgrpname" value="vg_db_saplog"/> </attributes> </instance_attributes> </primitive> <primitive class="ocf" provider="heartbeat" type="Filesystem" id="rsc_FS_HB2_sapdb"> <operations> <op id="rsc_FS_HB2_sapdb_mon" interval="120s" name="monitor" timeout="60s" start_delay="0" disabled="false" role="Started"/> <op id="rsc_FS_HB2_sapdb_stop" name="stop" description="stoptimeout" timeout="300s" disabled="false" role="Stopped"/> </operations> <instance_attributes id="rsc_FS_HB2_sapdb"> <attributes> <nvpair id="rsc_FS_HB2_sapdb_attr_0" name="device" value="/dev/vg_db_sapdb/lv_sapdb"/> <nvpair id="rsc_FS_HB2_sapdb_attr_1" name="directory" value="/sapdb"/> </attributes> </instance_attributes> </primitive> <primitive class="ocf" provider="heartbeat" type="Filesystem" id="rsc_FS_HB2_sapdb_saplog"> <operations> <op id="rsc_FS_HB2_sapdb_saplog_mon" interval="120s" name="monitor" timeout="60s" start_delay="0" disabled="false" role="Started"/> <op id="rsc_FS_HB2_sapdb_saplog_stop" name="stop" description="stoptimeout" timeout="300s" disabled="false" role="Stopped"/> </operations> <instance_attributes id="rsc_FS_HB2_sapdb_saplog"> <attributes> <nvpair id="rsc_FS_HB2_sapdb_saplog_attr_0" name="device" value="/dev/vg_db_saplog/lv_saplog"/> <nvpair id="rsc_FS_HB2_sapdb_saplog_attr_1" name="directory" value="/sapdb/HB2/saplog"/> </attributes> </instance_attributes> </primitive> <primitive class="ocf" provider="heartbeat" type="Filesystem" id="rsc_FS_HB2_sapdb_sapdata"> <operations> <op id="rsc_FS_HB2_sapdb_sapdata_mon" interval="120s" name="monitor" timeout="60s" start_delay="0" disabled="false" role="Started"/> <op id="rsc_FS_HB2_sapdb_sapdata_stop" name="stop" description="stoptimeout" timeout="300s" disabled="false" role="Stopped"/> </operations> <instance_attributes id="rsc_FS_HB2_sapdb_sapdata"> <attributes> <nvpair id="rsc_FS_HB2_sapdb_sapdata_attr_0" name="device" value="/dev/vg_db_sapdata/lv_sapdata"/> <nvpair id="rsc_FS_HB2_sapdb_sapdata_attr_1" name="directory" value="/sapdb/HB2/sapdata"/>
p. 109

</attributes> </instance_attributes> </primitive> <primitive class="ocf" type="SAPDatabase" provider="heartbeat" id="rsc_SAPDatabase_HB2"> <instance_attributes id="rsc_SAPDatabase_HB2_instance_attrs"> <attributes> <nvpair id="rsc_SAPDatabase_HB2_attr_0" name="SID" value="HB2"/> <nvpair id="rsc_SAPDatabase_HB2_attr_1" name="DBTYPE" value="ADA"/> </attributes> </instance_attributes> <operations> <op id="rsc_SAPDatabase_HB2_start" name="start" timeout="1800" start_delay="0" disabled="false" role="Started"/> <op id="rsc_SAPDatabase_HB2_stop" name="stop" timeout="1800" start_delay="0" disabled="false" role="Started" on_fail="block"/> <op id="rsc_SAPDatabase_HB2_mon" name="monitor" interval="120" timeout="60" start_delay="180" disabled="false" role="Started"/> </operations> <meta_attributes id="rsc_SAPDatabase_HB2_meta_attrs"> <attributes/> </meta_attributes> </primitive> </group> <master_slave id="msl_sap_HB2_ASCS00_ascshost"> <meta_attributes id="msl_sap_HB2_ASCS00_ascshost_meta_attrs"> <attributes> <nvpair id="msl_sap_HB2_ASCS00_ascshost_metaattr_clone_max" name="clone_max" value="2"/> <nvpair id="msl_sap_HB2_ASCS00_ascshost_metaattr_clone_node_max" name="clone_node_max" value="1"/> <nvpair id="msl_sap_HB2_ASCS00_ascshost_SCS_metaattr_master_max" name="master_max" value="1"/> <nvpair id="msl_sap_HB2_ASCS00_ascshost_metaattr_master_node_max" name="master_node_max" value="1"/> <nvpair id="msl_sap_HB2_ASCS00_ascshost_SCS_metaattr_notify" name="notify" value="true"/> <nvpair id="msl_sap_HB2_ASCS00_ascshost_SCS_metaattr_globally_unique" name="globally_unique" value="false"/> </attributes> </meta_attributes> <primitive id="rsc_SAP_HB2_ASCS00_ascshost" class="ocf" type="SAPInstance" provider="heartbeat"> <instance_attributes id="rsc_SAP_HB2_ASCS00_ascshost_instance_attrs"> <attributes> <nvpair id="ms_SAP_HB2_ASCS00_ascshost_attr_InstanceName" name="InstanceName" value="HB2_ASCS00_ascshost"/> <nvpair id="ms_SAP_HB2_ASCS00_ascshost_attr_AUTOMATIC_RECOVER" name="AUTOMATIC_RECOVER" value="true"/> <nvpair id="ms_SAP_HB2_ASCS00_ascshost_SCS_attr_START_PROFILE" name="START_PROFILE" value="/sapmnt/HB2/profile/START_ASCS00_ascshost"/> <nvpair id="ms_SAP_HB2_ASCS00_ascshost_SCS_attr_ERS_InstanceName" name="ERS_InstanceName" value="HB2_ERS10_ers10host"/> <nvpair id="ms_SAP_HB2_ASCS00_ascshost_attr_ERS_START_PROFILE" name="ERS_START_PROFILE" value="/sapmnt/HB2/profile/START_ERS10_ers10host"/> </attributes> </instance_attributes> <operations> <op id="ms_SAP_HB2_ASCS00_ascshost_oper_start" name="start" timeout="180" role="Started" start_delay="0" disabled="false"/> <op id="ms_SAP_HB2_ASCS00_ascshost_oper_stop" name="stop" timeout="240" role="Started" start_delay="0" disabled="false"/> <op id="ms_SAP_HB2_ASCS00_ascshost_oper_monitor" name="monitor" interval="30" timeout="60" start_delay="5" role="Master" disabled="false"/> <op id="ms_SAP_HB2_ASCS00_ascshost_oper_promote" name="promote" timeout="320" start_delay="0" role="Master" disabled="false"/> <op id="ms_SAP_HB2_ASCS00_ascshost_oper_demote" name="demote" timeout="320" role="Slave" start_delay="0" disabled="false"/> </operations> </primitive> </master_slave> <master_slave id="msl_sap_HB2_SCS01_jscshost"> <meta_attributes id="msl_sap_HB2_SCS01_jscshost_meta_attrs"> <attributes> <nvpair id="msl_sap_HB2_SCS01_jscshost_metaattr_clone_max" name="clone_max" value="2"/> <nvpair id="msl_sap_HB2_SCS01_jscshost_metaattr_clone_node_max" name="clone_node_max" value="1"/>
p. 110

<nvpair id="msl_sap_HB2_SCS01_jscshost_SCS_metaattr_master_max" name="master_max" value="1"/> <nvpair id="msl_sap_HB2_SCS01_jscshost_metaattr_master_node_max" name="master_node_max" value="1"/> <nvpair id="msl_sap_HB2_SCS01_jscshost_SCS_metaattr_notify" name="notify" value="true"/> <nvpair id="msl_sap_HB2_SCS01_jscshost_SCS_metaattr_globally_unique" name="globally_unique" value="false"/> </attributes> </meta_attributes> <primitive id="rsc_SAP_HB2_SCS01_jscshost" class="ocf" type="SAPInstance" provider="heartbeat"> <instance_attributes id="rsc_SAP_HB2_SCS01_jscshost_instance_attrs"> <attributes> <nvpair id="ms_SAP_HB2_SCS01_jscshost_attr_InstanceName" name="InstanceName" value="HB2_SCS01_jscshost"/> <nvpair id="ms_SAP_HB2_SCS01_jscshost_attr_AUTOMATIC_RECOVER" name="AUTOMATIC_RECOVER" value="true"/> <nvpair id="ms_SAP_HB2_SCS01_jscshost_SCS_attr_START_PROFILE" name="START_PROFILE" value="/sapmnt/HB2/profile/START_SCS01_jscshost"/> <nvpair id="ms_SAP_HB2_SCS01_jscshost_SCS_attr_ERS_InstanceName" name="ERS_InstanceName" value="HB2_ERS11_ers11host"/> <nvpair id="ms_SAP_HB2_SCS01_jscshost_attr_ERS_START_PROFILE" name="ERS_START_PROFILE" value="/sapmnt/HB2/profile/START_ERS11_ers11host"/> </attributes> </instance_attributes> <operations> <op id="ms_SAP_HB2_SCS01_jscshost_oper_start" name="start" timeout="180" role="Started" start_delay="0" disabled="false"/> <op id="ms_SAP_HB2_SCS01_jscshost_oper_stop" name="stop" timeout="240" role="Started" start_delay="0" disabled="false"/> <op id="ms_SAP_HB2_SCS01_jscshost_oper_monitor" name="monitor" interval="30" timeout="60" start_delay="5" role="Master" disabled="false"/> <op id="ms_SAP_HB2_SCS01_jscshost_oper_promote" name="promote" timeout="320" start_delay="0" role="Master" disabled="false"/> <op id="ms_SAP_HB2_SCS01_jscshost_oper_demote" name="demote" timeout="320" role="Slave" start_delay="0" disabled="false"/> </operations> </primitive> </master_slave> <clone id="rsc_stonith_ssh"> <meta_attributes id="rsc_stonith_ssh_meta_attrs"> <attributes> <nvpair id="rsc_stonith_ssh_metaattr_clone_max" name="clone_max" value="2"/> <nvpair id="rsc_stonith_ssh_metaattr_clone_node_max" name="clone_node_max" value="1"/> </attributes> </meta_attributes> <primitive id="rsc_stonith_ssh_clone" class="stonith" type="external/ssh" provider="heartbeat"> <instance_attributes id="rsc_stonith_ssh_clone_instance_attrs"> <attributes> <nvpair id="68f6c400-ee2d-4ed7-a864-a23136104038" name="hostlist" value="ls3197v7,ls3197v6"/> </attributes> </instance_attributes> </primitive> </clone> <primitive class="ocf" provider="heartbeat" type="IPaddr2" id="rsc_IP_HB2_ascshost"> <operations> <op id="rsc_IP_HB2_ascshost_op_0" name="monitor" description="monitor" interval="5s" timeout="20s" start_delay="10s" disabled="false" role="Started"/> <op id="rsc_IP_HB2_ascshost_op_1" name="start" timeout="15s" disabled="false" role="Started" start_delay="5s"/> </operations> <instance_attributes id="rsc_IP_HB2_ascshost_inst_attr"> <attributes> <nvpair id="rsc_IP_HB2_ascshost_attr_0" name="ip" value="172.30.100.101"/> </attributes> </instance_attributes> <meta_attributes id="rsc_IP_HB2_ascshost_meta_attrs"> <attributes/> </meta_attributes> </primitive> <primitive class="ocf" provider="heartbeat" type="IPaddr2" id="rsc_IP_HB2_jscshost"> <operations> <op id="rsc_IP_HB2_jscshost_op_0" name="monitor" description="monitor" interval="5s" timeout="20s" start_delay="10s" disabled="false" role="Started"/>
p. 111

<op id="rsc_IP_HB2_jscshost_op_1" name="start" timeout="15s" disabled="false" role="Started" start_delay="5s"/> </operations> <instance_attributes id="rsc_IP_HB2_jscshost_inst_attr"> <attributes> <nvpair id="rsc_IP_HB2_jscshost_attr_0" name="ip" value="172.30.100.102"/> </attributes> </instance_attributes> <meta_attributes id="rsc_IP_HB2_jscshost_meta_attrs"> <attributes/> </meta_attributes> </primitive> <group id="grp_sap_HB2_DVEBMGS02"> <meta_attributes id="grp_sap_HB2_DVEBMGS02_meta_attrs"> <attributes/> </meta_attributes> <primitive id="rsc_sfex_HB2_2" class="ocf" type="sfex" provider="heartbeat"> <instance_attributes id="rsc_sfex_HB2_2_instance_attrs"> <attributes> <nvpair id="rsc_sfex_HB2_2_device" name="device" value="/dev/sdg"/> <nvpair id="rsc_sfex_HB2_2_monitor_interval" name="monitor_interval" value="5"/> <nvpair id="rsc_sfex_HB2_2_index" name="index" value="2"/> <nvpair id="rsc_sfex_HB2_2_lock_timeout" name="lock_timeout" value="20"/> </attributes> </instance_attributes> <meta_attributes id="rsc_sfex_HB2_2_meta_attrs"> <attributes/> </meta_attributes> <operations> <op id="rsc_sfex_HB2_2_monitor" name="monitor" interval="5" timeout="60" start_delay="10" on_fail="block" disabled="false" role="Started"/> <op id="rsc_sfex_HB2_2_start" name="start" timeout="60" on_fail="block" start_delay="0" disabled="false" role="Started"/> <op id="rsc_sfex_HB2_2_stop" name="stop" timeout="10" on_fail="block" start_delay="0" disabled="false" role="Started"/> </operations> </primitive> <primitive class="ocf" provider="heartbeat" type="IPaddr2" id="rsc_IP_HB2_cihost"> <operations> <op id="rsc_IP_HB2_cihost_op_0" name="monitor" description="monitor" interval="5s" timeout="20s" start_delay="10s" disabled="false" role="Started"/> <op id="rsc_IP_HB2_cihost_op_1" name="start" timeout="15s" disabled="false" role="Started" start_delay="5s"/> </operations> <instance_attributes id="rsc_IP_HB2_cihost_inst_attr"> <attributes> <nvpair id="rsc_IP_HB2_cihost_attr_0" name="ip" value="172.30.100.104"/> </attributes> </instance_attributes> </primitive> <primitive class="ocf" provider="heartbeat" type="Raid1" id="rsc_RAID1_HB2_md10"> <operations> <op id="rsc_RAID1_HB2_md10_mon" interval="120s" name="monitor" timeout="60s" start_delay="0" disabled="false" role="Started"/> </operations> <instance_attributes id="rsc_RAID1_HB2_md10"> <attributes> <nvpair id="rsc_RAID1_HB2_md10_attr_0" name="raidconf" value="/clusterconf/HB2/mdadm.conf"/> <nvpair id="rsc_RAID1_HB2_md10_attr_1" name="raiddev" value="/dev/md10"/> </attributes> </instance_attributes> </primitive> <primitive class="ocf" provider="heartbeat" type="LVM" id="rsc_LVM_HB2_vg_ci"> <operations> <op id="rsc_LVM_HB2_vg_ci_mon" interval="120s" name="monitor" timeout="60s" start_delay="0" disabled="false" role="Started"/> <op id="rsc_LVM_HB2_vg_ci_stop" name="stop" timeout="30" on_fail="fence" start_delay="0" disabled="false" role="Started"/> </operations> <instance_attributes id="rsc_LVM_HB2_vg_ci"> <attributes> <nvpair id="rsc_LVM_HB2_vg_ci_attr_0" name="volgrpname" value="vg_ci"/> </attributes> </instance_attributes> </primitive>
p. 112

<primitive class="ocf" provider="heartbeat" type="Filesystem" id="rsc_FS_HB2_hb2_dvebmgs02"> <operations> <op id="rsc_FS_HB2_hb2_dvebmgs02_mon" interval="120s" name="monitor" timeout="60s" start_delay="0" disabled="false" role="Started"/> <op id="rsc_FS_HB2_hb2_dvebmgs02_stop" name="stop" description="stoptimeout" timeout="300s" disabled="false" role="Stopped"/> </operations> <instance_attributes id="rsc_FS_HB2_hb2_dvebmgs02"> <attributes> <nvpair id="rsc_FS_HB2_hb2_dvebmgs02_attr_0" name="device" value="/dev/vg_ci/lv_dvebmgs02"/> <nvpair id="rsc_FS_HB2_hb2_dvebmgs02_attr_1" name="directory" value="/usr/sap/HB2/DVEBMGS02"/> </attributes> </instance_attributes> </primitive> <primitive class="ocf" type="SAPInstance" provider="heartbeat" id="rsc_SAPInstance_HB2_DVEBMGS02_cihost"> <instance_attributes id="rsc_SAPInstance_HB2_DVEBMGS02_cihost_instance_attrs"> <attributes> <nvpair id="rsc_SAPInstance_HB2_DVEBMGS02_cihost_attr_0" name="InstanceName" value="HB2_DVEBMGS02_cihost"/> <nvpair id="rsc_SAPInstance_HB2_DVEBMGS02_cihost_attr_1" name="AUTOMATIC_RECOVER" value="true"/> <nvpair name="START_WAITTIME" id="rsc_SAPInstance_HB2_DVEBMGS02_cihost_attr_3" value="120"/> <nvpair id="cbf1d01e-1b25-4a6a-97f6-f97f6d565a1c" name="PRE_START_USEREXIT" value="/clusterconf/HB2/pre-start-userexit.sh"/> </attributes> </instance_attributes> <operations> <op id="rsc_SAPInstance_HB2_DVEBMGS02_cihost_start" name="start" timeout="240" start_delay="0" disabled="false" role="Started"/> <op id="rsc_SAPInstance_HB2_DVEBMGS02_cihost_stop" name="stop" timeout="240" start_delay="0" disabled="false" role="Started" on_fail="block"/> <op name="monitor" interval="120" timeout="60" disabled="false" role="Started" id="rsc_SAPInstance_HB2_DVEBMGS02_cihost_mon" start_delay="5"/> </operations> <meta_attributes id="rsc_SAPInstance_HB2_DVEBMGS02_cihost_meta_attrs"> <attributes> <nvpair name="is_managed" id="rsc_SAPInstance_HB2_DVEBMGS02_cihost_metaattr_is_managed" value="true"/> </attributes> </meta_attributes> </primitive> </group> </resources> <constraints> <rsc_location id="location_sun_ipmi_ls3197v6_never_run_on_ls3197v6" rsc="rsc_stonith_sunipmi_ls3197v6"> <rule id="prefered_location_sun_ipmi_ls3197v6_never_run_on_ls3197v6" score="-INFINITY"> <expression attribute="#uname" id="e633ee6d-c3a9-4ff2-b971-060682d29bc4" operation="eq" value="ls3197v6"/> </rule> </rsc_location> <rsc_location id="location_sun_ipmi_ls3197v7_never_run_on_ls3197v7" rsc="rsc_stonith_sunipmi_ls3197v7"> <rule id="prefered_location_sun_ipmi_ls3197v7_never_run_on_ls3197v7" score="-INFINITY"> <expression attribute="#uname" id="13e7e99e-c5c9-4ec1-886c-cf2214fdfa8c" operation="eq" value="ls3197v7"/> </rule> </rsc_location> <rsc_location id="no_ping_node_rule_grp_sapdb_HB2" rsc="grp_sapdb_HB2"> <rule id="prefered_no_ping_node_rule_grp_sapdb_HB2" score="-INFINITY" boolean_op="and"> <expression attribute="pingd" operation="eq" value="0" id="e9003d59-a60d-4d6a-9261-21f7f9ddb6be"/> </rule> </rsc_location> <rsc_location id="no_ping_node_rule_grp_sap_HB2_DVEBMGS02" rsc="grp_sap_HB2_DVEBMGS02"> <rule id="prefered_no_ping_node_rule_grp_sap_HB2_DVEBMGS02" score="-INFINITY" boolean_op="and"> <expression attribute="pingd" operation="eq" value="0" id="ec731907-d3f7-4d1d-9c23-5f76555bca65"/>
p. 113

</rule> </rsc_location> <rsc_location id="no_ping_node_rule_msl_sap_HB2_SCS01_jscshost" rsc="msl_sap_HB2_SCS01_jscshost"> <rule id="prefered_no_ping_node_rule_msl_sap_HB2_SCS01_jscshost" score="-INFINITY" boolean_op="and"> <expression attribute="pingd" id="6e3d7f9e-0541-4a15-bea8-290500d8e4fd" operation="eq" value="0"/> </rule> </rsc_location> <rsc_location id="no_ping_node_rule_msl_sap_HB2_ASCS00_ascshost" rsc="msl_sap_HB2_ASCS00_ascshost"> <rule id="prefered_no_ping_node_rule_msl_sap_HB2_ASCS00_ascshost" score="-INFINITY" boolean_op="and"> <expression attribute="pingd" id="b5bf6e0c-6174-41d8-abb5-8aed431a709b" operation="eq" value="0"/> </rule> </rsc_location> <rsc_colocation id="acol_rsc_SAPDatabase_HB2_rsc_SAPInstance_HB2_DVEBMGS02_cihost" from="rsc_SAPDatabase_HB2" to="rsc_SAPInstance_HB2_DVEBMGS02_cihost" score="-1000"/> <rsc_colocation id="col_rsc_IP_ascshost_msl_sap_HB2_ASCS00_ascshost_master" to_role="Master" from="rsc_IP_HB2_ascshost" to="msl_sap_HB2_ASCS00_ascshost" score="INFINITY"/> <rsc_colocation id="col_rsc_IP_jscshost_msl_sap_HB2_SCS01_jscshost_master" to_role="Master" from="rsc_IP_HB2_jscshost" to="msl_sap_HB2_SCS01_jscshost" score="INFINITY"/> <rsc_order id="ord_rsc_IP_ascshost_msl_sap_HB2_ASCS00_ascshost" from="rsc_IP_HB2_ascshost" to_action="promote" to="msl_sap_HB2_ASCS00_ascshost" type="before"/> <rsc_order id="ord_rsc_IP_jscshost_msl_sap_HB2_SCS01_jscshost" from="rsc_IP_HB2_jscshost" to_action="promote" to="msl_sap_HB2_SCS01_jscshost" type="before"/> <rsc_location id="failcount-checks-for-grp_sapdb_HB2" rsc="grp_sapdb_HB2"> <rule id="fc-check-move-away-grp_sapdb_HB2" score="-INFINITY" boolean_op="or"> <expression attribute="fail-count-rsc_SAPDatabase_HB2" id="fc-check-grp_sapdb_HB2-rsc_SAPDatabase_HB2" operation="gt" value="3"/> </rule> </rsc_location> <rsc_location id="failcount-checks-for-grp_sap_HB2_DVEBMGS02" rsc="grp_sap_HB2_DVEBMGS02"> <rule id="fc-check-move-away-grp_sap_HB2_DVEBMGS02" score="-INFINITY" boolean_op="or"> <expression attribute="fail-count-rsc_SAPInstance_HB2_DVEBMGS02_cihost" id="fc-check-grp_sap_HB2_DVEBMGS02-rsc_SAPInstance_HB2_DVEBMGS02_cihost" operation="gt" value="3"/> </rule> </rsc_location> <rsc_order id="ord_rsc_SAPDatabase_HB2_rsc_SAPInstance_HB2_DVEBMGS02_cihost" from="rsc_SAPDatabase_HB2" to="rsc_FS_HB2_hb2_dvebmgs02" type="before"/> </constraints> </configuration> </cib>
8.7 Cluster Information Base of the Simple Stack <cib generated="true" admin_epoch="0" have_quorum="true" ignore_dtd="false" num_peers="2" cib_feature_revision="2.0" crm_feature_set="2.0" ccm_transition="4" dc_uuid="521fe166-6967-4c44-b907-3e271570ba0e" num_updates="1" epoch="298"> <configuration> <crm_config> <cluster_property_set id="cib-bootstrap-options"> <attributes> <nvpair name="symmetric-cluster" id="cib-bootstrap-options-symmetric-cluster" value="true"/> <nvpair id="cib-bootstrap-options-no_quorum-policy" name="no_quorum-policy" value="stop"/> <nvpair id="cib-bootstrap-options-default-resource-stickiness" name="default-resource-stickiness" value="0"/> <nvpair id="cib-bootstrap-options-default-resource-failure-stickiness" name="default-resource-failure-stickiness" value="0"/> <nvpair name="stonith-enabled" id="cib-bootstrap-options-stonith-enabled" value="true"/> <nvpair id="cib-bootstrap-options-stonith-action" name="stonith-action" value="reboot"/> <nvpair id="cib-bootstrap-options-stop-orphan-resources" name="stop-orphan-resources" value="true"/> <nvpair id="cib-bootstrap-options-stop-orphan-actions" name="stop-orphan-actions" value="true"/>
p. 114

<nvpair id="cib-bootstrap-options-remove-after-stop" name="remove-after-stop" value="false"/> <nvpair id="cib-bootstrap-options-short-resource-names" name="short-resource-names" value="true"/> <nvpair id="cib-bootstrap-options-transition-idle-timeout" name="transition-idle-timeout" value="2min"/> <nvpair name="default-action-timeout" id="cib-bootstrap-options-default-action-timeout" value="120s"/> <nvpair id="cib-bootstrap-options-is-managed-default" name="is-managed-default" value="true"/> <nvpair id="cib-bootstrap-options-startup-fencing" name="startup-fencing" value="true"/> </attributes> </cluster_property_set> </crm_config> <nodes> <node id="3b85c29b-a3c6-4e59-b934-c6c75fb1fa0f" uname="maloja02" type="normal"> <instance_attributes id="nodes-3b85c29b-a3c6-4e59-b934-c6c75fb1fa0f"> <attributes> <nvpair id="standby-3b85c29b-a3c6-4e59-b934-c6c75fb1fa0f" name="standby" value="off"/> </attributes> </instance_attributes> </node> <node uname="maloja01" type="normal" id="fd17a08d-67ec-456a-9bc7-68ebe890624a"> <instance_attributes id="nodes-fd17a08d-67ec-456a-9bc7-68ebe890624a"> <attributes> <nvpair name="standby" id="standby-fd17a08d-67ec-456a-9bc7-68ebe890624a" value="off"/> </attributes> </instance_attributes> </node> </nodes> <resources> <primitive id="stonith_sun_ipmi_maloja02" class="stonith" type="external/sunipmi" provider="heartbeat"> <meta_attributes id="stonith_sun_ipmi_maloja02_meta_attrs"> <attributes/> </meta_attributes> <instance_attributes id="stonith_sun_ipmi_maloja02_instance_attrs"> <attributes> <nvpair id="stonith_sun_ipmi_maloja02_hostname" name="hostname" value="maloja02"/> <nvpair id="stonith_sun_ipmi_maloja02_ipaddr" name="ipaddr" value="192.168.178.201"/> <nvpair id="stonith_sun_ipmi_maloja02_auth" name="auth" value="MD5"/> <nvpair id="stonith_sun_ipmi_maloja02_priv" name="priv" value="ADMINISTRATOR"/> <nvpair id="stonith_sun_ipmi_maloja02_userid" name="userid" value="stonith"/> <nvpair id="stonith_sun_ipmi_maloja02_passwd" name="passwd" value="f@nce"/> <nvpair id="stonith_sun_ipmi_maloja02_interface" name="interface" value="lan"/> </attributes> </instance_attributes> </primitive> <primitive id="stonith_sun_ipmi_maloja01" class="stonith" type="external/sunipmi" provider="heartbeat"> <meta_attributes id="stonith_sun_ipmi_maloja01_meta_attrs"> <attributes/> </meta_attributes> <instance_attributes id="stonith_sun_ipmi_maloja01_instance_attrs"> <attributes> <nvpair id="stonith_sun_ipmi_maloja01_hostname" name="hostname" value="maloja01"/> <nvpair id="stonith_sun_ipmi_maloja01_ipaddr" name="ipaddr" value="192.168.178.202"/> <nvpair id="stonith_sun_ipmi_maloja01_auth" name="auth" value="MD5"/> <nvpair id="stonith_sun_ipmi_maloja01_priv" name="priv" value="ADMINISTRATOR"/> <nvpair id="stonith_sun_ipmi_maloja01_userid" name="userid" value="stonith"/> <nvpair id="stonith_sun_ipmi_maloja01_passwd" name="passwd" value="f@nce"/> <nvpair id="stonith_sun_ipmi_maloja01_interface" name="interface" value="lan"/> </attributes> </instance_attributes> </primitive> <group id="group_NV1"> <primitive id="rsc_SFEX_NV1" class="ocf" type="sfex-two-devices" provider="heartbeat"> <instance_attributes id="rsc_SFEX_NV1_instance_attrs"> <attributes>
p. 115

<nvpair id="rsc_SFEX_NV1_instance_attrs_01" name="device" value="/dev/disk/by-name/703552050e00055131000000000101010"/> <nvpair id="rsc_SFEX_NV1_instance_attrs_02" name="device2" value="/dev/disk/by-name/703552050e00055131010000000101010"/> <nvpair id="rsc_SFEX_NV1_instance_attrs_03" name="monitor_interval" value="5"/> <nvpair id="rsc_SFEX_NV1_instance_attrs_04" name="index" value="1"/> <nvpair id="rsc_SFEX_NV1_instance_attrs_05" name="lock_timeout" value="20"/> </attributes> </instance_attributes> <meta_attributes id="rsc_SFEX_NV1_meta_attrs"> <attributes/> </meta_attributes> <operations> <op id="rsc_SFEX_NV1_instance_op_01" name="monitor" interval="5" timeout="60" start_delay="10" on_fail="block" disabled="false" role="Started"/> <op id="rsc_SFEX_NV1_instance_op_02" name="start" timeout="60" on_fail="block" start_delay="0" disabled="false" role="Started"/> <op id="rsc_SFEX_NV1_instance_op_03" name="stop" timeout="10" on_fail="block" start_delay="0" disabled="false" role="Started"/> </operations> </primitive> <primitive class="ocf" provider="heartbeat" type="IPaddr2" id="rsc_IPaddr2_NV1_sap81"> <operations> <op id="rsc_IPaddr2_NV1_sap81_mon" interval="5s" name="monitor" timeout="15s" start_delay="0" disabled="false" role="Started"/> <op id="rsc_IPaddr2_NV1_sap81_start" name="start" timeout="5s" start_delay="0" disabled="false" role="Started"/> </operations> <instance_attributes id="rsc_IPaddr2_NV1_sap81"> <attributes> <nvpair id="rsc_IPaddr2_NV1_sap81_attr_0" name="ip" value="192.168.178.104"/> </attributes> </instance_attributes> </primitive> <primitive class="ocf" provider="heartbeat" type="IPaddr2" id="rsc_IPaddr2_NV1_sap85"> <operations> <op id="rsc_IPaddr2_NV1_sap85_mon" interval="5s" name="monitor" timeout="15s" start_delay="0" disabled="false" role="Started"/> <op id="rsc_IPaddr2_NV1_sap85_start" name="start" timeout="5s" start_delay="0" disabled="false" role="Started"/> </operations> <instance_attributes id="rsc_IPaddr2_NV1_sap85"> <attributes> <nvpair id="rsc_IPaddr2_NV1_sap85_attr_0" name="ip" value="192.168.178.105"/> </attributes> </instance_attributes> </primitive> <meta_attributes id="group_NV1_meta_attrs"> <attributes> <nvpair id="group_NV1_metaattr_resource_stickiness" name="resource_stickiness" value="2000"/> <nvpair id="group_NV1_meta_attrs-is_managed" name="is_managed" value="true"/> </attributes> </meta_attributes> <primitive class="ocf" provider="heartbeat" type="Raid1" id="rsc_RAID1_NV1_md1"> <operations> <op id="rsc_RAID1_NV1_md1_mon" interval="120s" name="monitor" timeout="60s" start_delay="0" disabled="false" role="Started"/> </operations> <instance_attributes id="rsc_RAID1_NV1_md1"> <attributes> <nvpair id="rsc_RAID1_NV1_md1_attr_0" name="raidconf" value="/clusterconf/NV1/mdadm.conf"/> <nvpair id="rsc_RAID1_NV1_md1_attr_1" name="raiddev" value="/dev/md1"/> </attributes> </instance_attributes> <meta_attributes id="rsc_RAID1_NV1_md1_meta_attrs"> <attributes/> </meta_attributes> </primitive> <primitive class="ocf" provider="heartbeat" type="Raid1" id="rsc_RAID1_NV1_md2"> <operations> <op id="rsc_RAID1_NV1_md2_mon" interval="120s" name="monitor" timeout="60s" start_delay="0" disabled="false" role="Started"/> </operations>
p. 116

<instance_attributes id="rsc_RAID1_NV1_md2"> <attributes> <nvpair id="rsc_RAID1_NV1_md2_attr_0" name="raidconf" value="/clusterconf/NV1/mdadm.conf"/> <nvpair id="rsc_RAID1_NV1_md2_attr_1" name="raiddev" value="/dev/md2"/> </attributes> </instance_attributes> <meta_attributes id="rsc_RAID1_NV1_md2_meta_attrs"> <attributes/> </meta_attributes> </primitive> <primitive class="ocf" provider="heartbeat" type="Raid1" id="rsc_RAID1_NV1_md3"> <operations> <op id="rsc_RAID1_NV1_md3_mon" interval="120s" name="monitor" timeout="60s" start_delay="0" disabled="false" role="Started"/> </operations> <instance_attributes id="rsc_RAID1_NV1_md3"> <attributes> <nvpair id="rsc_RAID1_NV1_md3_attr_0" name="raidconf" value="/clusterconf/NV1/mdadm.conf"/> <nvpair id="rsc_RAID1_NV1_md3_attr_1" name="raiddev" value="/dev/md3"/> </attributes> </instance_attributes> </primitive> <primitive class="ocf" provider="heartbeat" type="Raid1" id="rsc_RAID1_NV1_md4"> <operations> <op id="rsc_RAID1_NV1_md4_mon" interval="120s" name="monitor" timeout="60s" start_delay="0" disabled="false" role="Started"/> </operations> <instance_attributes id="rsc_RAID1_NV1_md4"> <attributes> <nvpair id="rsc_RAID1_NV1_md4_attr_0" name="raidconf" value="/clusterconf/NV1/mdadm.conf"/> <nvpair id="rsc_RAID1_NV1_md4_attr_1" name="raiddev" value="/dev/md4"/> </attributes> </instance_attributes> </primitive> <primitive class="ocf" provider="heartbeat" type="Raid1" id="rsc_RAID1_NV1_md5"> <operations> <op id="rsc_RAID1_NV1_md5_mon" interval="120s" name="monitor" timeout="60s" start_delay="0" disabled="false" role="Started"/> </operations> <instance_attributes id="rsc_RAID1_NV1_md5"> <attributes> <nvpair id="rsc_RAID1_NV1_md5_attr_0" name="raidconf" value="/clusterconf/NV1/mdadm.conf"/> <nvpair id="rsc_RAID1_NV1_md5_attr_1" name="raiddev" value="/dev/md5"/> </attributes> /instance_attributes> </primitive> <primitive class="ocf" provider="heartbeat" type="LVM" id="rsc_LVM_NV1_nv1_log1"> <operations> <op id="rsc_LVM_NV1_nv1_log1_mon" interval="120s" name="monitor" timeout="60s" start_delay="0" disabled="false" role="Started"/> <op id="rsc_LVM_NV1_nv1_log1_stop" name="stop" timeout="30" on_fail="fence"/> </operations> <instance_attributes id="rsc_LVM_NV1_nv1_log1"> <attributes> <nvpair id="rsc_LVM_NV1_nv1_log1_attr_0" name="volgrpname" value="nv1_log1"/> </attributes> </instance_attributes> </primitive> <primitive class="ocf" provider="heartbeat" type="LVM" id="rsc_LVM_NV1_nv1_log2"> <operations> <op id="rsc_LVM_NV1_nv1_log2_mon" interval="120s" name="monitor" timeout="60s" start_delay="0" disabled="false" role="Started"/> <op id="rsc_LVM_NV1_nv1_log2_stop" name="stop" timeout="30" on_fail="fence"/> </operations> <instance_attributes id="rsc_LVM_NV1_nv1_log2"> <attributes> <nvpair id="rsc_LVM_NV1_nv1_log2_attr_0" name="volgrpname" value="nv1_log2"/> </attributes> </instance_attributes> </primitive> <primitive class="ocf" provider="heartbeat" type="LVM" id="rsc_LVM_NV1_nv1_oradg"> <operations> <op id="rsc_LVM_NV1_nv1_oradg_mon" interval="120s" name="monitor" timeout="60s" start_delay="0" disabled="false" role="Started"/>
p. 117

<op id="rsc_LVM_NV1_nv1_oradg_stop" name="stop" timeout="30" on_fail="fence"/> </operations> <instance_attributes id="rsc_LVM_NV1_nv1_oradg"> <attributes> <nvpair id="rsc_LVM_NV1_nv1_oradg_attr_0" name="volgrpname" value="nv1_oradg"/> </attributes> </instance_attributes> </primitive> <primitive class="ocf" provider="heartbeat" type="LVM" id="rsc_LVM_NV1_nv1_sapdg"> <operations> <op id="rsc_LVM_NV1_nv1_sapdg_mon" interval="120s" name="monitor" timeout="60s" start_delay="0" disabled="false" role="Started"/> <op id="rsc_LVM_NV1_nv1_sapdg_stop" name="stop" timeout="30" on_fail="fence"/> </operations> <instance_attributes id="rsc_LVM_NV1_nv1_sapdg"> <attributes> <nvpair id="rsc_LVM_NV1_nv1_sapdg_attr_0" name="volgrpname" value="nv1_sapdg"/> </attributes> </instance_attributes> </primitive> <primitive class="ocf" provider="heartbeat" type="Filesystem" id="rsc_Filesystem_oracle_NV1"> <operations> <op id="rsc_Filesystem_oracle_NV1_mon" interval="120s" name="monitor" timeout="60s"/> </operations> <instance_attributes id="rsc_Filesystem_oracle_NV1"> <attributes> <nvpair id="rsc_Filesystem_oracle_NV1_attr_0" name="device" value="/dev/nv1_oradg/lv_oranv1"/> <nvpair id="rsc_Filesystem_oracle_NV1_attr_1" name="directory" value="/oracle/NV1"/> </attributes> </instance_attributes> </primitive> <primitive class="ocf" provider="heartbeat" type="Filesystem" id="rsc_Filesystem_oracle_NV1_sapreorg"> <operations> <op id="rsc_Filesystem_oracle_NV1_sapreorg_mon" interval="120s" name="monitor" timeout="60s"/> </operations> <instance_attributes id="rsc_Filesystem_oracle_NV1_sapreorg"> <attributes> <nvpair id="rsc_Filesystem_oracle_NV1_sapreorg_attr_0" name="device" value="/dev/nv1_oradg/lv_nv1_sapreorg"/> <nvpair id="rsc_Filesystem_oracle_NV1_sapreorg_attr_1" name="directory" value="/oracle/NV1/sapreorg"/> </attributes> </instance_attributes> </primitive> <primitive class="ocf" provider="heartbeat" type="Filesystem" id="rsc_Filesystem_oracle_NV1_102_64"> <operations> <op id="rsc_Filesystem_oracle_NV1_102_64_mon" interval="120s" name="monitor" timeout="60s"/> </operations> <instance_attributes id="rsc_Filesystem_oracle_NV1_102_64"> <attributes> <nvpair id="rsc_Filesystem_oracle_NV1_102_64_attr_0" name="device" value="/dev/nv1_oradg/lv_nv1_102_64"/> <nvpair id="rsc_Filesystem_oracle_NV1_102_64_attr_1" name="directory" value="/oracle/NV1/102_64"/> </attributes> </instance_attributes> </primitive> <primitive class="ocf" provider="heartbeat" type="Filesystem" id="rsc_Filesystem_oracle_NV1_sapdata1"> <operations> <op id="rsc_Filesystem_oracle_NV1_sapdata1_mon" interval="120s" name="monitor" timeout="60s"/> </operations> <instance_attributes id="rsc_Filesystem_oracle_NV1_sapdata1"> <attributes> <nvpair id="rsc_Filesystem_oracle_NV1_sapdata1_attr_0" name="device" value="/dev/nv1_oradg/lv_nv1_sapdata1"/>
p. 118

<nvpair id="rsc_Filesystem_oracle_NV1_sapdata1_attr_1" name="directory" value="/oracle/NV1/sapdata1"/> </attributes> </instance_attributes> </primitive> <primitive class="ocf" provider="heartbeat" type="Filesystem" id="rsc_Filesystem_oracle_NV1_sapdata2"> <operations> <op id="rsc_Filesystem_oracle_NV1_sapdata2_mon" interval="120s" name="monitor" timeout="60s"/> </operations> <instance_attributes id="rsc_Filesystem_oracle_NV1_sapdata2"> <attributes> <nvpair id="rsc_Filesystem_oracle_NV1_sapdata2_attr_0" name="device" value="/dev/nv1_oradg/lv_nv1_sapdata2"/> <nvpair id="rsc_Filesystem_oracle_NV1_sapdata2_attr_1" name="directory" value="/oracle/NV1/sapdata2"/> </attributes> </instance_attributes> </primitive> <primitive class="ocf" provider="heartbeat" type="Filesystem" id="rsc_Filesystem_oracle_NV1_sapdata3"> <operations> <op id="rsc_Filesystem_oracle_NV1_sapdata3_mon" interval="120s" name="monitor" timeout="60s"/> </operations> <instance_attributes id="rsc_Filesystem_oracle_NV1_sapdata3"> <attributes> <nvpair id="rsc_Filesystem_oracle_NV1_sapdata3_attr_0" name="device" value="/dev/nv1_oradg/lv_nv1_sapdata3"/> <nvpair id="rsc_Filesystem_oracle_NV1_sapdata3_attr_1" name="directory" value="/oracle/NV1/sapdata3"/> </attributes> </instance_attributes> </primitive> <primitive class="ocf" provider="heartbeat" type="Filesystem" id="rsc_Filesystem_oracle_NV1_sapdata4"> <operations> <op id="rsc_Filesystem_oracle_NV1_sapdata4_mon" interval="120s" name="monitor" timeout="60s"/> </operations> <instance_attributes id="rsc_Filesystem_oracle_NV1_sapdata4"> <attributes> <nvpair id="rsc_Filesystem_oracle_NV1_sapdata4_attr_0" name="device" value="/dev/nv1_oradg/lv_nv1_sapdata4"/> <nvpair id="rsc_Filesystem_oracle_NV1_sapdata4_attr_1" name="directory" value="/oracle/NV1/sapdata4"/> </attributes> </instance_attributes> </primitive> <primitive class="ocf" provider="heartbeat" type="Filesystem" id="rsc_Filesystem_oracle_NV1_saparch"> <operations> <op id="rsc_Filesystem_oracle_NV1_saparch_mon" interval="120s" name="monitor" timeout="60s"/> </operations> <instance_attributes id="rsc_Filesystem_oracle_NV1_saparch"> <attributes> <nvpair id="rsc_Filesystem_oracle_NV1_saparch_attr_0" name="device" value="/dev/nv1_log2/lv_nv1_saparch"/> <nvpair id="rsc_Filesystem_oracle_NV1_saparch_attr_1" name="directory" value="/oracle/NV1/saparch"/> </attributes> </instance_attributes> </primitive> <primitive class="ocf" provider="heartbeat" type="Filesystem" id="rsc_Filesystem_oracle_NV1_origlogA"> <operations> <op id="rsc_Filesystem_oracle_NV1_origlogA_mon" interval="120s" name="monitor" timeout="60s"/> </operations> <instance_attributes id="rsc_Filesystem_oracle_NV1_origlogA"> <attributes> <nvpair id="rsc_Filesystem_oracle_NV1_origlogA_attr_0" name="device" value="/dev/nv1_log1/lv_nv1_origlogA"/> <nvpair id="rsc_Filesystem_oracle_NV1_origlogA_attr_1" name="directory" value="/oracle/NV1/origlogA"/> </attributes>
p. 119

</instance_attributes> </primitive> <primitive class="ocf" provider="heartbeat" type="Filesystem" id="rsc_Filesystem_oracle_NV1_origlogB"> <operations> <op id="rsc_Filesystem_oracle_NV1_origlogB_mon" interval="120s" name="monitor" timeout="60s"/> </operations> <instance_attributes id="rsc_Filesystem_oracle_NV1_origlogB"> <attributes> <nvpair id="rsc_Filesystem_oracle_NV1_origlogB_attr_0" name="device" value="/dev/nv1_log1/lv_nv1_origlogB"/> <nvpair id="rsc_Filesystem_oracle_NV1_origlogB_attr_1" name="directory" value="/oracle/NV1/origlogB"/> </attributes> </instance_attributes> </primitive> <primitive class="ocf" provider="heartbeat" type="Filesystem" id="rsc_Filesystem_oracle_NV1_mirrlogA"> <operations> <op id="rsc_Filesystem_oracle_NV1_mirrlogA_mon" interval="120s" name="monitor" timeout="60s"/> </operations> <instance_attributes id="rsc_Filesystem_oracle_NV1_mirrlogA"> <attributes> <nvpair id="rsc_Filesystem_oracle_NV1_mirrlogA_attr_0" name="device" value="/dev/nv1_log2/lv_nv1_mirrlogA"/> <nvpair id="rsc_Filesystem_oracle_NV1_mirrlogA_attr_1" name="directory" value="/oracle/NV1/mirrlogA"/> </attributes> </instance_attributes> </primitive> <primitive class="ocf" provider="heartbeat" type="Filesystem" id="rsc_Filesystem_oracle_NV1_mirrlogB"> <operations> <op id="rsc_Filesystem_oracle_NV1_mirrlogB_mon" interval="120s" name="monitor" timeout="60s"/> </operations> <instance_attributes id="rsc_Filesystem_oracle_NV1_mirrlogB"> <attributes> <nvpair id="rsc_Filesystem_oracle_NV1_mirrlogB_attr_0" name="device" value="/dev/nv1_log2/lv_nv1_mirrlogB"/> <nvpair id="rsc_Filesystem_oracle_NV1_mirrlogB_attr_1" name="directory" value="/oracle/NV1/mirrlogB"/> </attributes> </instance_attributes> </primitive> <primitive class="ocf" provider="heartbeat" type="Filesystem" id="rsc_Filesystem_sapmnt_NV1"> <operations> <op id="rsc_Filesystem_sapmnt_NV1_mon" interval="120s" name="monitor" timeout="60s"/> </operations> <instance_attributes id="rsc_Filesystem_sapmnt_NV1"> <attributes> <nvpair id="rsc_Filesystem_sapmnt_NV1_attr_0" name="device" value="/dev/nv1_sapdg/lv_nv1_sapmnt"/> <nvpair id="rsc_Filesystem_sapmnt_NV1_attr_1" name="directory" value="/sapmnt/NV1"/> </attributes> </instance_attributes> </primitive> <primitive class="ocf" provider="heartbeat" type="Filesystem" id="rsc_Filesystem_usr_sap_NV1"> <operations> <op id="rsc_Filesystem_usr_sap_NV1_mon" interval="120s" name="monitor" timeout="60s"/> </operations> <instance_attributes id="rsc_Filesystem_usr_sap_NV1"> <attributes> <nvpair id="rsc_Filesystem_usr_sap_NV1_attr_0" name="device" value="/dev/nv1_sapdg/lv_nv1_usrsap"/> <nvpair id="rsc_Filesystem_usr_sap_NV1_attr_1" name="directory" value="/usr/sap/NV1"/> </attributes> </instance_attributes> </primitive>
p. 120

<primitive class="ocf" provider="heartbeat" type="Filesystem" id="rsc_Filesystem_usr_sap_NV1_ixos"> <operations> <op id="rsc_Filesystem_usr_sap_NV1_ixos_mon" interval="120s" name="monitor" timeout="60s"/> </operations> <instance_attributes id="rsc_Filesystem_usr_sap_NV1_ixos"> <attributes> <nvpair id="rsc_Filesystem_usr_sap_NV1_ixos_attr_0" name="device" value="/dev/nv1_sapdg/lv_nv1_usrsap_ixos"/> <nvpair id="rsc_Filesystem_usr_sap_NV1_ixos_attr_1" name="directory" value="/usr/sap/NV1/ixos"/> </attributes> </instance_attributes> </primitive> <primitive class="ocf" provider="heartbeat" type="Filesystem" id="rsc_Filesystem_R3READ"> <operations> <op id="rsc_Filesystem_R3READ_mon" interval="120s" name="monitor" timeout="60s"/> </operations> <instance_attributes id="rsc_Filesystem_R3READ"> <attributes> <nvpair id="rsc_Filesystem_R3READ_attr_0" name="device" value="/dev/nv1_sapdg/lv_nv1_R3READ"/> <nvpair id="rsc_Filesystem_R3READ_attr_1" name="directory" value="/R3READ"/> </attributes> </instance_attributes> </primitive> <primitive class="ocf" provider="heartbeat" type="Filesystem" id="rsc_Filesystem_R3WRITE"> <operations> <op id="rsc_Filesystem_R3WRITE_mon" interval="120s" name="monitor" timeout="60s"/> </operations> <instance_attributes id="rsc_Filesystem_R3WRITE"> <attributes> <nvpair id="rsc_Filesystem_R3WRITE_attr_0" name="device" value="/dev/nv1_sapdg/lv_nv1_R3WRITE"/> <nvpair id="rsc_Filesystem_R3WRITE_attr_1" name="directory" value="/R3WRITE"/> </attributes> </instance_attributes> </primitive> <primitive class="ocf" type="SAPDatabase" provider="heartbeat" id="rsc_SAPDatabase_NV1"> <instance_attributes id="rsc_SAPDatabase_NV1_instance_attrs"> <attributes> <nvpair id="rsc_SAPDatabase_NV1_attr_0" name="SID" value="NV1"/> <nvpair id="rsc_SAPDatabase_NV1_attr_1" name="DBTYPE" value="ORA"/> <nvpair id="rsc_SAPDatabase_NV1_attr_2" name="NETSERVICENAME" value="LISTENER"/> <nvpair id="rsc_SAPDatabase_NV1_attr_3" name="AUTOMATIC_RECOVER" value="true"/> </attributes> </instance_attributes> <operations> <op id="rsc_SAPDatabase_NV1_start" name="start" timeout="1800" start_delay="0" disabled="false" role="Started"/> <op id="rsc_SAPDatabase_NV1_stop" name="stop" timeout="1800" start_delay="0" disabled="false" role="Started" on_fail="block"/> <op id="rsc_SAPDatabase_NV1_mon" name="monitor" interval="120" timeout="60" start_delay="180" disabled="false" role="Started"/> </operations> <meta_attributes id="rsc_SAPDatabase_NV1_meta_attrs"> <attributes> <nvpair id="rsc_SAPDatabase_NV1_metaattr_target_role" name="target_role" value="started"/> </attributes> </meta_attributes> </primitive> <primitive class="ocf" type="SAPInstance" provider="heartbeat" id="rsc_SAPInstance_NV1_SCS03"> <instance_attributes id="rsc_SAPInstance_NV1_SCS03_instance_attrs"> <attributes> <nvpair id="rsc_SAPInstance_NV1_SCS03_attr_0" name="InstanceName" value="NV1_SCS03_sap81"/> <nvpair id="rsc_SAPInstance_NV1_SCS03_attr_1" name="AUTOMATIC_RECOVER" value="true"/>
p. 121

</attributes> </instance_attributes> <operations> <op id="rsc_SAPInstance_NV1_SCS03_start" name="start" timeout="240" start_delay="0" disabled="false" role="Started"/> <op id="rsc_SAPInstance_NV1_SCS03_stop" name="stop" timeout="240" start_delay="0" disabled="false" role="Started" on_fail="block"/> <op id="rsc_SAPInstance_NV1_SCS03_mon" name="monitor" interval="120" timeout="60" start_delay="240" disabled="false" role="Started"/> </operations> <meta_attributes id="rsc_SAPInstance_NV1_SCS03_meta_attrs"> <attributes> <nvpair id="rsc_SAPInstance_NV1_SCS03_meta_attrs-target_role" name="target_role" value="started"/> </attributes> </meta_attributes> </primitive> <primitive class="ocf" type="SAPInstance" provider="heartbeat" id="rsc_SAPInstance_NV1_DVEBMGS01"> <instance_attributes id="rsc_SAPInstance_NV1_DVEBMGS01_instance_attrs"> <attributes> <nvpair id="rsc_SAPInstance_NV1_DVEBMGS01_attr_0" name="InstanceName" value="NV1_DVEBMGS01_sap81"/> <nvpair id="rsc_SAPInstance_NV1_DVEBMGS01_attr_1" name="AUTOMATIC_RECOVER" value="true"/> <nvpair id="rsc_SAPInstance_NV1_DVEBMGS01_attr_2" name="START_WAITTIME" value="30"/> </attributes> </instance_attributes> <operations> <op id="rsc_SAPInstance_NV1_DVEBMGS01_start" name="start" timeout="240" start_delay="0" disabled="false" role="Started"/> <op id="rsc_SAPInstance_NV1_DVEBMGS01_stop" name="stop" timeout="240" start_delay="0" disabled="false" role="Started" on_fail="block"/> <op id="rsc_SAPInstance_NV1_DVEBMGS01_mon" name="monitor" interval="120" timeout="60" start_delay="240" disabled="false" role="Started"/> </operations> <meta_attributes id="rsc_SAPInstance_NV1_DVEBMGS01_meta_attrs"> <attributes> <nvpair id="rsc_SAPInstance_NV1_DVEBMGS01_meta_attrs-target_role" name="target_role" value="started"/> </attributes> </meta_attributes> </primitive> <primitive class="ocf" type="SAPInstance" provider="heartbeat" id="rsc_SAPInstance_NV1_D02"> <instance_attributes id="rsc_SAPInstance_NV1_D02_instance_attrs"> <attributes> <nvpair id="rsc_SAPInstance_NV1_D02_attr_0" name="InstanceName" value="NV1_D02_sap85"/> <nvpair id="rsc_SAPInstance_NV1_D02_attr_1" name="AUTOMATIC_RECOVER" value="true"/> </attributes> </instance_attributes> <operations> <op id="rsc_SAPInstance_NV1_D02_start" name="start" timeout="240" start_delay="0" disabled="false" role="Started"/> <op id="rsc_SAPInstance_NV1_D02_stop" name="stop" timeout="240" start_delay="0" disabled="false" role="Started" on_fail="block"/> <op id="rsc_SAPInstance_NV1_D02_mon" name="monitor" interval="120" timeout="60" start_delay="240" disabled="false" role="Started"/> </operations> <meta_attributes id="rsc_SAPInstance_NV1_D02_meta_attrs"> <attributes> <nvpair id="rsc_SAPInstance_NV1_D02_metaattr_target_role" name="target_role" value="started"/> </attributes> </meta_attributes> </primitive> </group> </resources> <constraints> <rsc_location id="location_sun_ipmi_maloja01_never_run_on_maloja01" rsc="stonith_sun_ipmi_maloja01"> <rule id="prefered_location_sun_ipmi_maloja01_never_run_on_maloja01" score="-INFINITY"> <expression attribute="#uname" id="ed2a5b9b-3db0-490f-ab0e-782b80e0277d" operation="eq" value="maloja01"/>
p. 122

</rule> </rsc_location> <rsc_location id="location_sun_ipmi_maloja02_never_run_on_maloja02" rsc="stonith_sun_ipmi_maloja02"> <rule id="prefered_location_sun_ipmi_maloja02_never_run_on_maloja02" score="-INFINITY"> <expression attribute="#uname" id="182c47e0-8f82-4e5d-a7ba-f4ebde374209" operation="eq" value="maloja02"/> </rule> </rsc_location> <rsc_location id="location_stonith_sun_ipmi_maloja01_prefer_on" rsc="stonith_sun_ipmi_maloja01"> <rule id="prefered_location_stonith_sun_ipmi_maloja01_prefer_on" score="1000"> <expression attribute="#uname" id="f68a9fa6-07bf-4c2f-bf5b-73a13fe6343e" operation="eq" value="maloja02"/> </rule> </rsc_location> <rsc_location id="location_stonith_sun_ipmi_maloja02_prefer_on" rsc="stonith_sun_ipmi_maloja02"> <rule id="prefered_location_stonith_sun_ipmi_maloja02_prefer_on" score="1000"> <expression attribute="#uname" id="499285d2-66ea-4ff1-87ba-3c38e84754e2" operation="eq" value="maloja01"/> </rule> </rsc_location> <rsc_location id="location_group_NV1_on_maloja01" rsc="group_NV1"> <rule id="prefered_location_group_NV1_on_maloja01" score="0"/> </rsc_location> <rsc_location id="location_group_NV1_on_maloja02" rsc="group_NV1"> <rule id="prefered_location_group_NV1_on_maloja02" score="1000"> <expression attribute="#uname" id="de9a1839-65d3-420f-80d8-839da1d236e5" operation="eq" value="maloja02"/> </rule> </rsc_location> <rsc_location id="failcount-checks-for-group_NV1" rsc="group_NV1"> <rule id="fc-check-move-away-group_NV1" score="-INFINITY" boolean_op="or"> <expression attribute="fail-count-rsc_SAPDatabase_NV1" id="fc-check-group_NV1-rsc_SAPDatabase_NV1" operation="gt" value="2"/> <expression attribute="fail-count-rsc_SAPInstance_NV1_SCS03" id="fc-check-group_NV1-rsc_SAPInstance_NV1_SCS03" operation="gt" value="2"/> <expression attribute="fail-count-rsc_SAPInstance_NV1_DVEBMGS01" id="fc-check-group_NV1-rsc_SAPInstance_NV1_DVEBMGS01" operation="gt" value="2"/> <expression attribute="fail-count-rsc_SAPInstance_NV1_D02" id="fc-check-group_NV1-rsc_SAPInstance_NV1_D02" operation="gt" value="2"/> </rule> </rsc_location> <rsc_location id="rsc_location_constraint_group_NV1_noping" rsc="group_NV1"> <rule id="prefered_rsc_location_constraint_group_NV1_noping" score="-INFINITY" boolean_op="and"> <expression attribute="pingd" id="1c631673-915c-4c06-ba83-9a44b5af3849" operation="eq" value="0"/> <expression attribute="blafasel" id="01328eda-907c-42ab-8582-dab161ab1653" operation="eq" value="1000"/> </rule> </rsc_location> </constraints> </configuration> <status> </status> </cib>
p. 123

Contact your local Novell Solutions Provider, or call Novell at:
1 888 321 4272 US/Canada
1 801 861 4272 Worldwide
1 801 861 8473 Facsimile
Novell, Inc.
404 Wyman Street
Waltham, MA 02451 USA
Copyright 2009 © Novell, Inc. All rights reserved. Novell, the Novell logo and SUSE are registered trademarks of
Novell, Inc. in the United States and other countries. All other third-party trademarks are the property of their
respective owners.
471-001020-001p. 124

p. 125

p. 126

p. 127