Santana D 2018 Ed. User Guide - Woosh bikes CD 2018.pdf · 3 The Santana 2018 Edition from Woosh...
17
1 Sales: 01702 435566 — Support: 01702 684444 — E-mail: [email protected] Santana CD 2018 Ed. User Guide Read this manual. It contains important informaon regarding your safety, the correct use of the bike and how to avoid expensive repair fees in the future. Support is available Mon to Fri from 10am to 5pm on 01702
Transcript of Santana D 2018 Ed. User Guide - Woosh bikes CD 2018.pdf · 3 The Santana 2018 Edition from Woosh...
1
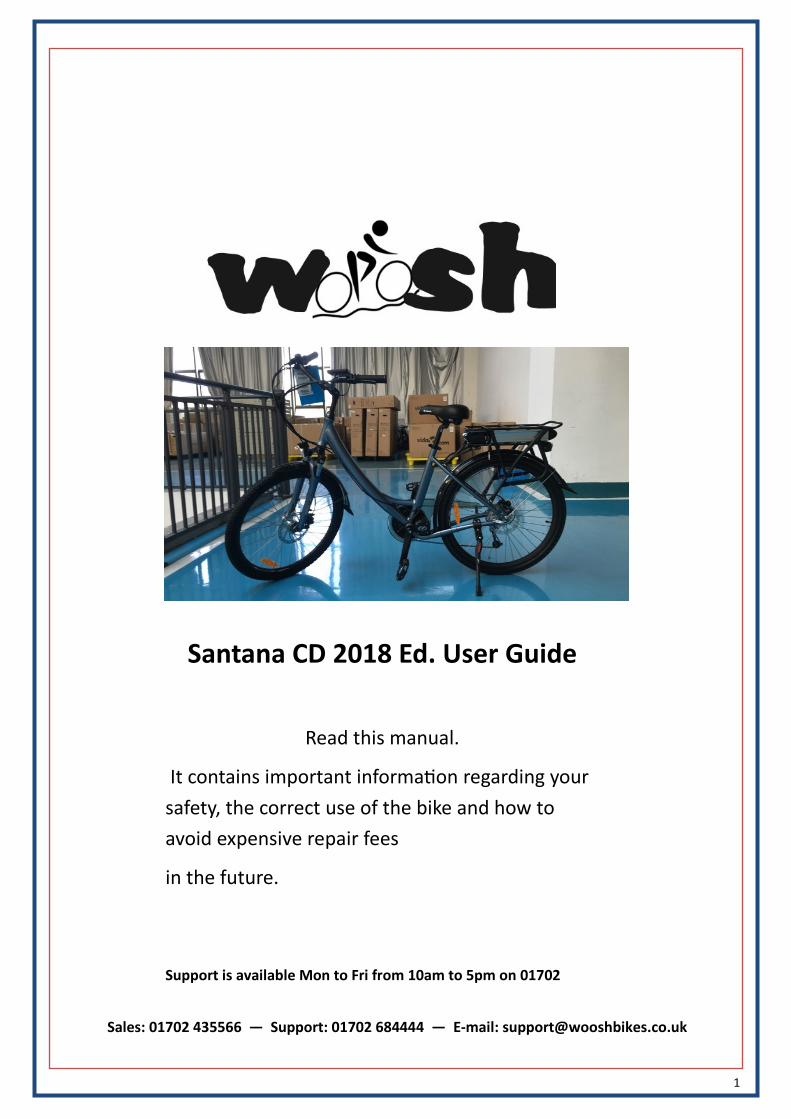
Sales: 01702 435566 — Support: 01702 684444 — E-mail: [email protected]
Santana CD 2018 Ed. User Guide
Read this manual.
It contains important information regarding your
safety, the correct use of the bike and how to
avoid expensive repair fees
in the future.
Support is available Mon to Fri from 10am to 5pm on 01702

2

3
The Santana 2018 Edition from Woosh
The Santana 2018 Edition is a strong sturdy bike which can be used for commuting to and from work.
Battery capacities of 13Ah, 15Ah and 17Ah are available for this model. If you rely heavily on the throttle
and do not put much effort in yourself, then the battery will run down more quickly and the distance able
to be travelled on a single charge will be reduced accordingly.
The Santana can be used on roads and cycle paths, it is not suitable for off-road use and should not be
used in competition events. It should not be used for jumping, stunting or aerobatic activities and should
not be ridden through deep puddles or fords. Incorrect use of your bike could result in injury and will void
your warranty.
You must be a minimum of 14 years of age to ride an electric cycle in the UK
The maximum weight including rider and luggage is 17 stone/108 kg.
Before you ride your bike, and for your ongoing safety, familiarise yourself with the “user manual” and
the “maintenance manual”. There are many components on the Santana, and it is critical that they are
checked regularly and maintained where necessary. Details of how to maintain the various aspects of your
bike are included in the “maintenance manual”.
If you have any issues which are not covered by the manuals, it is likely that you would need to enlist the
help of a professional. Most people don’t have a complete set of tools for maintaining a bike, so things
like adjustments to the bottom bracket and bleeding of the hydraulic brakes will need to be done by your
local bike dealer. You should enlist the help of your local dealer whenever something needs adjusting that
you are not able to do yourself. Your safety is paramount, so you must ensure that the bike is maintained
in the correct manner, if in doubt, consult your nearest bike dealer.
4
Important Safety Notice — please read
Your bike has had a full electrical check before despatch.
It has also had a general mechanical check, but you need to ensure yourself that when you complete the
assembly of your bike, that you also check the whole bike over before riding it.
You should be prepared to do this yourself, or if you are not sufficiently experienced, ask a local bike shop
to do this for you. A typical fee for this would be around £35
A full inspection should include (but is not limited to):
Checking that the brakes are set correctly and work properly.
All nuts, bolts, major fixings, spokes and cranks etc. are correctly tightened.
Both wheels are properly trued
Headset/stem properly adjusted
Cranks are tight
Bottom bracket properly adjusted
Pedals, saddle and handlebars are correctly fitted and properly secured.
See the maintenance manual for how to adjust and maintain the various components of the bike.
Please note that failure to carry out these checks properly could result in serious injury for which Woosh
Bikes Ltd will not be held liable.
If you have any doubts about your own ability to perform the necessary checks, we strongly recommend
you visit your local bike shop and pay their fee. If you are unable to take your bike to a local bike shop
there will almost certainly be a mobile bike technician in your area who will come to your home or office
and do this for you.
Visit www.cycletechuk.com for a full national listing.

5
Unpacking:
Two people are required to unpack the bike.
Stand the carton upright. Remove the shipping straps, cut the tape seals and then remove any/all loose
packaging materials.
Keep the carton/bike in the upright position, and then lift the bike out of the carton and then engage the
kick-stand. DO NOT destroy the carton as it will be required if the bike needs to be returned for any rea-
son in the future.

6
Handlebars:
If you haven’t already, slide the handlebar stem into the frame at the desired height, remove the weather-
proof cap and then tighten the Allen bolt indicated below to secure the stem in position, whilst ensuring
that the handlebars line up correctly with the front wheel.
Warning:
It is extremely important to ensure that the handlebars are properly secured. If they were to rotate or other-
wise move unexpectedly during use, it could result in an accident and/or serious injury. If you have any
doubts regarding the correct configuration of this part (or any other part of the bike), you should take your
bike along to your nearest bike dealer and have them prepare it for you (at your cost).
Once the stem has been secured, you can now fine tune the positioning of the handlebars. The handle-
bars can be adjusted in two ways. They can be rotated within the clamp, and they can also be brought
closer/higher to the rider, or further away/lower. You should adjust the height first. This is done by loosen-
ing the large bolt on the underside of the handlebars (shown below left). This bolt secures a stepped piece
that locks the handlebars into position. You will need to loosen the bolt enough so that the handlebars can
be rotated, then tighten this piece back into position when you have the handlebars at the desired height.
To adjust the rotation of the handlebars (to ensure that the angle of the brakes/display etc. is correct),
loosen the front-most bolt on the underside of the handlebars as shown above right. Rotate the handle-
bars into the desired position and then re-tighten the bolt. Check the adjacent bolt is sufficiently tight and
tighten if required.

7
Now that the front wheel has been fitted, you can flip the bike right side up and use the kick-stand to
keep the bike in the upright position.
The Santana 2018 now comes 95% built, and so the below is for reference only.
You are now ready to fit the front wheel to the forks. First you will need to fit the skewer to the wheel,
the skewer is the spindle which slides through the wheel. The skewer consists of the spindle (with clamp
on one side), two springs and a tension nut. Remove the tension nut and one of the springs, and then
slide the skewer through the wheel so that the clamp is on the opposite side of the wheel to the rotor
(brake disc). Fit the other spring back into position and then replace the tension nut, giving just a few
turns to secure it so that it doesn’t come off. Now lower the wheel into position ensuring that the rotor is
on the correct side and that it sits properly between the callipers. Ensure that the wheel is fully seated
and then tighten the tension nut until the clamp has significant resistance when attempting to close it,
you may need to open the clamp and make adjustments to the tension nut several times before you reach
the optimum clamping force. The clamp should be reasonably difficult to close to ensure that the wheel is
properly secured when the clamp is engaged.
8
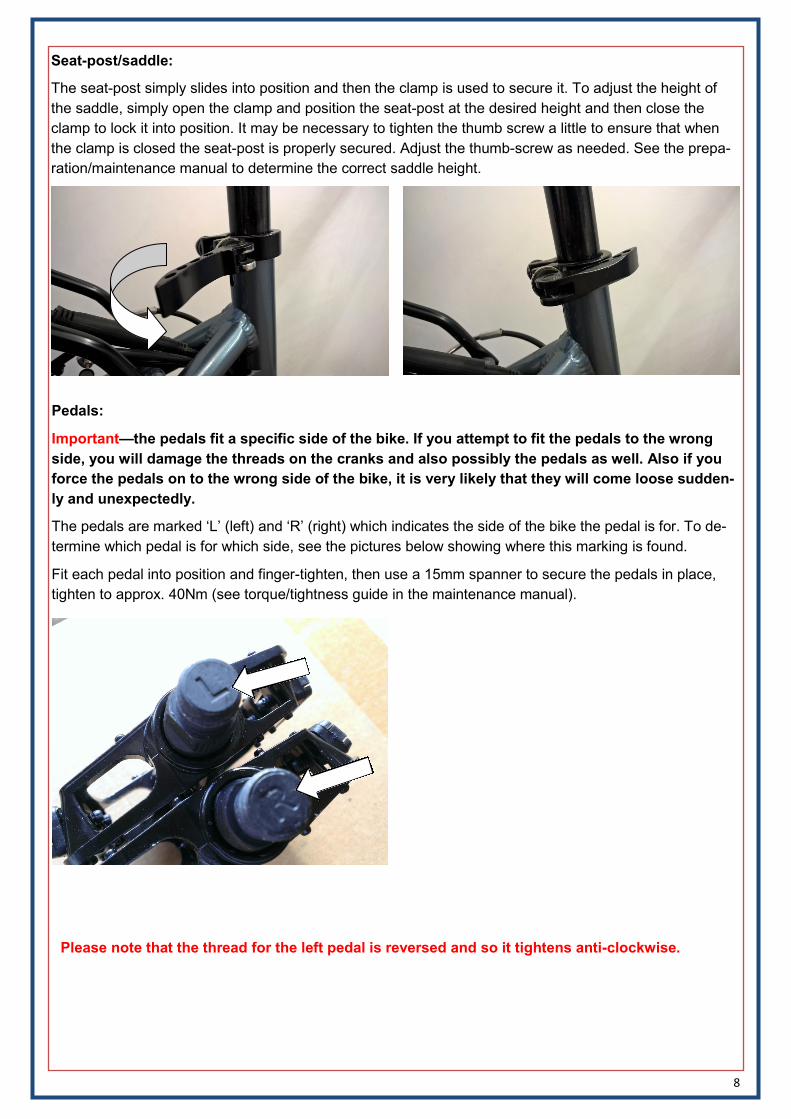
Seat-post/saddle:
The seat-post simply slides into position and then the clamp is used to secure it. To adjust the height of
the saddle, simply open the clamp and position the seat-post at the desired height and then close the
clamp to lock it into position. It may be necessary to tighten the thumb screw a little to ensure that when
the clamp is closed the seat-post is properly secured. Adjust the thumb-screw as needed. See the prepa-
ration/maintenance manual to determine the correct saddle height.
Pedals:
Important—the pedals fit a specific side of the bike. If you attempt to fit the pedals to the wrong
side, you will damage the threads on the cranks and also possibly the pedals as well. Also if you
force the pedals on to the wrong side of the bike, it is very likely that they will come loose sudden-
ly and unexpectedly.
The pedals are marked ‘L’ (left) and ‘R’ (right) which indicates the side of the bike the pedal is for. To de-
termine which pedal is for which side, see the pictures below showing where this marking is found.
Fit each pedal into position and finger-tighten, then use a 15mm spanner to secure the pedals in place,
tighten to approx. 40Nm (see torque/tightness guide in the maintenance manual).
Please note that the thread for the left pedal is reversed and so it tightens anti-clockwise.

9
Charging/locking the battery:
When the bike is shipped, the battery is usually secured with cable-ties instead of being locked with the
key. This is done to avoid damage to the battery locking mechanism in transit. Some delivery drivers take
more care than others, so by securing the battery in this way, we can prevent this issue from occurring.
Simply remove the cable-ties and lock the battery in place using the key once you’ve unpacked the
bike.
The battery may not leave us fully charged. You should fully charge the battery before using your
bike. The battery can be charged on the bike or it can be removed and charged separately. The socket
used to charge the battery is located at the left rear of the battery as shown below. Ensure that the
charger is switched OFF before attaching the charger to the bike. The master on/off switch for the
battery is located on the opposite side to the charger socket.
To charge the battery, simply lift the weatherproof cover and connect the charger to the socket and then
plug the other end into a regular mains socket. On the charger is a small light which is red while charging.
When charging is complete, this light will turn green.
The battery can be removed from the bike and charged in a convenient location such as in your home or
office. To remove the battery from your electric bike, use the supplied key to unlock the battery by turning
it anti-clockwise. Once unlocked remove the key and then slide the battery from the bike using the grip at
the rear underside of the battery.
A full charge from flat can take up to 10 hours.
Remember to separate your keys, Woosh
Bikes is not able to supply replacements if
you lose them both.

10
Important:
Although our bikes are checked prior to despatch, you must fully inspect your bike again yourself before
riding it, and satisfy yourself that it is correctly assembled and safe to ride. If you are not absolutely sure
about any aspects of your bike, you should take it to your nearest bike shop to have it checked before rid-
ing it. Obviously the bike shop will you charge for this service. Woosh Bikes will not reimburse you for
these costs.
Before riding your bike, perform the checks and set up your bike as outlined in the maintenance manual.
Check that all fixings and major components are tightened sufficiently. Check that all nuts, bolts, rear car-
rier fixings, handlebars and seat-post/saddle are also sufficiently tightened.
You must also ensure that your brakes are working correctly before you set off. If you are unsure how to
adjust your brakes yourself, there are guides on our website to help you with this. If you prefer, you can
have your local bike shop adjust them for you. The brakes are the same as you would have on a regular
bike and so any bike shop should be able to adjust them for you. You would obviously have to pay them
for this service.
See the preparation/maintenance manual for details on how to adjust/maintain your bike and its compo-
nents.

11
There are several other features available on the King-Meter and these are covered later in the manual.
The information provided so far is just enough to get you up and running as quickly as possible.
The motor will only assist you up to 15mph. Though of course you are free to pedal as fast as you like, be-
yond 15mph if you wish, but the motor will not help you beyond the 15mph limit. This limit is in accordance
with current UK law.
The Santana comes with a thumb-throttle which is located on the left side of the handlebars as shown be-
low. When the thumb-throttle is extended fully, the motor will provide the most assistance.
The thumb-throttle cannot be used to start the bike from stationary, you need to pedal a short distance
first, then slowly engage the throttle if you wish. Pushing the throttle to its maximum straight away may
generate an error on the display.
Riding the bike
To begin using the bike, press (and hold) the top ‘Mode’ button to switch on the display. The bike is now
effectively on, and if you ride it in this state, the motor will provide assistance when pedalling and you will
also be able to use the thumb-throttle if you wish—see notes on this below. To vary the amount of assis-
tance provided from the motor when pedalling, use the plus(+), minus(-) buttons to choose from the 5 as-
sistance levels.
Try to ensure that the bike is in a low gear when starting off, this will reduce the strain on the motor and
extend its life. Regularly starting off in a high gear may damage your motor and would not be covered by
the warranty.
Start-Aid - if you find it difficult to get started, pressing and holding the minus (-) button will engage the
start-assist mode which will slowly start you off without the need to pedal (up to 4mph only).

12
Riding the bike cont.
Your bike features 9 speed gears, the shifter is located on the right side of the handlebars. To change
gear, simply press (with your thumb) the lever shown in the photo below—this will select the lower gears.
To select the higher gears, press the lever that rests under your trigger finger. When changing gear,
change one gear at a time, and wait until said gear is properly engaged before changing to the next.
Remember to select a lower gear when approaching junctions and before climbing hills.
You should change the gears one at a time, waiting until the gear is properly engaged before
changing to the next gear.
Motor Care—Important
The motor on your bike is very good, but you do need to take proper care to ensure it lasts.
You need to ensure you are in the correct for any given situation. You should drop to a low gear when ap-
proaching junctions so that your are in the correct gear when you need to start moving again. A higher
gear when starting-off will put too much stress on the motor and will shorten the life of the unit.
Likewise, on hills, you should bear in mind the stress the motor is under and select a sensible gear accord-
ingly (1st or 2nd gear), do not try to climb hills in the highest gears.
Pull with trigger finger to shift to the lower
gears.
Push with thumb to shift down the lower
gears

13
Operating the lights:
The rear light is already fitted, to operate the rear light, simply press the button on the top of the light as
shown below.
To change the batteries in this unit, simply reach under the bottom edge and then pull the lower edge of
the light rearwards towards you. This unit requires 2x AA batteries.
If your light doesn’t work initially, it is likely that the insulating material fitted at the factory to stop the
battery going flat is still in place. Simply pull the external tag, or if necessary, access the battery compart-
ment and remove the small plastic insulator that sits between the battery and terminal.
The front light may also have a insulating tag that needs to be pulled/removed. The front light uses 2x AA
batteries. The on/off button is located on the top of the lamp. To change the batteries, press down on the
small black clip at the base of the lamp, and lift the lamp/reflector clear. The batteries should be oriented
as shown below.

14
Warning:
The display comes pre-configured specifically for your bike. Incorrect settings could cause damage to the
bike components and also result in a bike that is not UK road legal. Any modifications made to the control-
ler configuration will void your warranty with immediate effect.
Turning Control Module On/Off
To turn on the control module press and hold the top (Mode) button. Press and hold the same button to
turn off the module and disable all electric features of the bike.
Turning Backlight On/Off
To turn on the display backlight, press and hold the “Up” button, press and hold the same button to turn it
off.
Varying Pedal Assist Level
To alter the level of assistance provided simply press the Up/Down arrows to cycle through the 5 levels of
assistance. Level 1 offers the least assistance while level 5 offers the greatest assistance.
Speed Display Mode
There are three different modes for the speed display, these are current speed, average speed and maxi-
mum speed. To switch between these modes, press and hold the “Up and Mode” buttons for approx. 1
second to cycle through the modes.
Walking Mode/Start-Aid
The bike also supports a walking mode which is basically a very slow mode allowing you to walk next to
the bike at approx. 6m/h. This is activated by pressing and holding the “Down” button. As soon as the but-
ton is released, the bike will stop. This can also be used to get you started if you find it hard to get going.
Display Mode
To switch between Odo (overall distance travelled) and Trip mode (current trip distance travelled), press
the “Mode” button. To reset the trip computer, press and hold both the top and bottom buttons.
Control Module—Advanced
The display has many advanced features and modes, these include a back-lit display (for night riding), in-
dicator options for max speed, average speed and current speed and a battery –level indicator. It also fea-
tures a walking/start-assist mode which is used when you want to wheel/push the bike or if you need help
starting off, this is basically a very low speed mode which can be activated by pressing and holding the
minus (-) button.
On/Off/Mode button
(+) or UP Button
(-) or Down Button
Battery Level
Speed
Odometer
Assistance Level

15
16
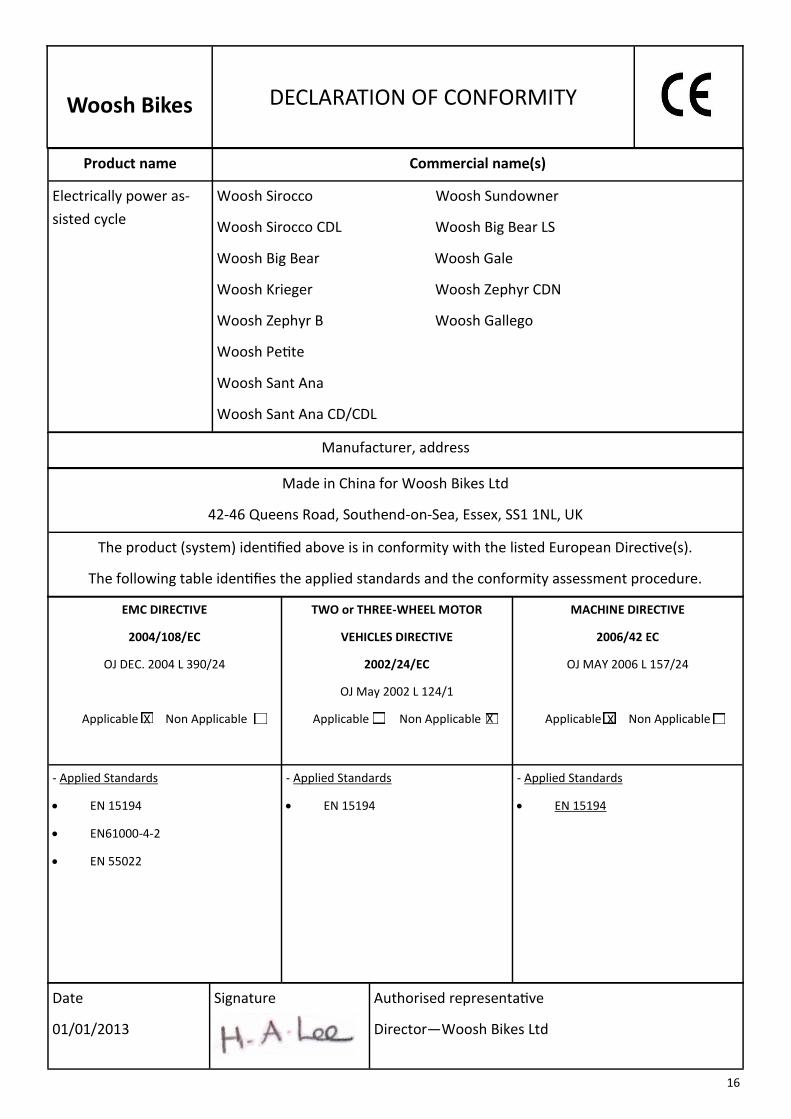
Woosh Bikes
DECLARATION OF CONFORMITY
Product name Commercial name(s)
Electrically power as-
sisted cycle
Woosh Sirocco Woosh Sundowner
Woosh Sirocco CDL Woosh Big Bear LS
Woosh Big Bear Woosh Gale
Woosh Krieger Woosh Zephyr CDN
Woosh Zephyr B Woosh Gallego
Woosh Petite
Woosh Sant Ana
Woosh Sant Ana CD/CDL
Manufacturer, address
Made in China for Woosh Bikes Ltd
42-46 Queens Road, Southend-on-Sea, Essex, SS1 1NL, UK
The product (system) identified above is in conformity with the listed European Directive(s).
The following table identifies the applied standards and the conformity assessment procedure.
EMC DIRECTIVE
2004/108/EC
OJ DEC. 2004 L 390/24
Applicable Non Applicable
TWO or THREE-WHEEL MOTOR
VEHICLES DIRECTIVE
2002/24/EC
OJ May 2002 L 124/1
Applicable Non Applicable
MACHINE DIRECTIVE
2006/42 EC
OJ MAY 2006 L 157/24
Applicable Non Applicable
- Applied Standards
EN 15194
EN61000-4-2
EN 55022
- Applied Standards
EN 15194
- Applied Standards
EN 15194
Date
01/01/2013
Signature
Authorised representative
Director—Woosh Bikes Ltd
X X X
17
© 2018 Woosh Bikes Limited
Woosh Support:
Be sure to check the FAQ section on our website before calling as the answers to the most common que-
ries are there and you may find that the solution to your problem is already online. If you do need to get
in touch, our contact details are below.
It can sometimes be useful to see the issue you have, so if possible, email a couple of photos and/or video
illustrating the problem and we’ll normally get back to you within a an hour or two (on weekdays).
Support staff are not available at the weekends, though if you send an email, it will normally be read on
the following Monday morning.
If you need support on a bike purchased from our Cambridge outlet, please note that you should call our
Southend office on the number below.
Support articles and FAQ’s: www.wooshbikes.co.uk/?support
Email: [email protected]
Telephone: 01702 684444 (If there is no answer, leave a brief message and contact no. and someone will
call you back asap).