Ryft ODBC Connector · Ryft ODBC Connector . ... Birst or Excel to the Ryft ONE server using Ryft...
57
RYFT SYSTEMS, INC. Ryft ODBC Connector Installation and User Guide Ryft Document Number: 1089 Document Version: 1.2.1 Revision Date: June 2017 © 2017 – Ryft Systems, Inc. All Rights in this documentation are reserved.
Transcript of Ryft ODBC Connector · Ryft ODBC Connector . ... Birst or Excel to the Ryft ONE server using Ryft...

RYFT SYSTEMS, INC.
Ryft ODBC Connector Installation and User Guide
Ryft Document Number: 1089
Document Version: 1.2.1
Revision Date: June 2017
© 2017 – Ryft Systems, Inc. All Rights in this documentation are reserved.

Doc #1089, V1.2.1/ June 2017 Ryft ODBC Connector: Installation and User Guide
Ryft Systems, Inc. Page ii
Copyright (c) 2017, Ryft Systems, Inc.
All rights reserved.
Redistribution and use in source and binary forms, with or without modification, are permitted provided that the following conditions are met:
Redistributions of source code must retain the above copyright notice, this list of conditions and the following disclaimer.
Redistributions in binary form must reproduce the above copyright notice, this list of conditions and the following disclaimer in the documentation and/or other materials provided with the distribution.
All advertising materials mentioning features or use of this software must display the following acknowledgement:
This product includes software developed by Ryft Systems, Inc.
Neither the name of Ryft Systems, Inc. nor the names of its contributors may be used to endorse or promote products derived from this software without specific prior written permission.
THIS SOFTWARE IS PROVIDED BY RYFT SYSTEMS, INC. ''AS IS'' AND ANY EXPRESS OR IMPLIED WARRANTIES, INCLUDING, BUT NOT LIMITED TO, THE IMPLIED WARRANTIES OF MERCHANTABILITY AND FITNESS FOR A PARTICULAR PURPOSE ARE DISCLAIMED. IN NO EVENT SHALL RYFT SYSTEMS, INC. BE LIABLE FOR ANY DIRECT, INDIRECT, INCIDENTAL, SPECIAL, EXEMPLARY, OR CONSEQUENTIAL DAMAGES (INCLUDING, BUT NOT LIMITED TO, PROCUREMENT OF SUBSTITUTE GOODS OR SERVICES; LOSS OF USE, DATA, OR PROFITS; OR BUSINESS INTERRUPTION) HOWEVER CAUSED AND ON ANY THEORY OF LIABILITY, WHETHER IN CONTRACT, STRICT LIABILITY, OR TORT (INCLUDING NEGLIGENCE OR OTHERWISE) ARISING IN ANY WAY OUT OF THE USE OF THIS SOFTWARE, EVEN IF ADVISED OF THE POSSIBILITY OF SUCH DAMAGE.

Doc #1089, V1.2.1/ June 2017 Ryft ODBC Connector: Installation and User Guide
Ryft Systems, Inc. Page iii
Revision History
Date Reason for Change Version
June 2017 Minor technical edits 1.2.1
May 2017 Update installation information Update list of Ryft-provided sample datasets
1.2.0
November 2016 Initial Release 1.1.0

Doc #1089, V1.2.1/ June 2017 Ryft ODBC Connector: Installation and User Guide
Ryft Systems, Inc. Page iv
Contents Using This Guide ....................................................................................................................................... 6 Ryft Technical Support ............................................................................................................................. 6 About Ryft Systems Inc. ........................................................................................................................... 6 1: Overview .............................................................................................................................................. 7 2: Install Ryft Connector for ODBC ........................................................................................................... 9
Ryft Provided Program: ryft1_odbcctl .................................................................................................. 9
Summary of Steps ............................................................................................................................... 10
Step 1: Unzip and Tar the Server Installation File ............................................................................... 10
Step 2: Review the README File ......................................................................................................... 10
Step 3: Run Installation Script ............................................................................................................. 11
Step 4: Modify ryftone.server.ini File ................................................................................................. 11
Step 5: Start Ryft ODBC Server ............................................................................................................ 12
ODBC Log File ...................................................................................................................................... 14
3: ODBC File System Structure ............................................................................................................... 15 4: Install Datasets ................................................................................................................................... 16
Ryft-Provided Sample Datasets........................................................................................................... 16
The RDF ........................................................................................................................................... 17
The Meta Data File .......................................................................................................................... 17
The Data File ................................................................................................................................... 18
Tar the File and Add Sample Datasets ................................................................................................ 19
Install Own Datasets ........................................................................................................................... 21
5: Install and Run on Windows Desktop/Client Server .......................................................................... 22
Install the ODBC Driver on Windows Desktop .................................................................................... 22
Upgrade Windows Client .................................................................................................................... 28
Example 1: Connect to Ryft ONE Using Tableau ................................................................................. 29
Example 2: Connect to Ryft ONE Using Microsoft Excel ..................................................................... 32
View/Edit the SQL Selection Statement .......................................................................................... 35
6: Install and Run on Mac OS Client ....................................................................................................... 38
Install the ODBC Driver on Mac OS Desktop ....................................................................................... 38
Upgrade Mac OS Client ....................................................................................................................... 40
7: Install and Run on Ubuntu Linux ........................................................................................................ 41
README File ........................................................................................................................................ 41

Doc #1089, V1.2.1/ June 2017 Ryft ODBC Connector: Installation and User Guide
Ryft Systems, Inc. Page v
Run the Installation File ...................................................................................................................... 42
Connect to Ryft ONE with LibreOffice................................................................................................. 43
Upgrade Linux Client ........................................................................................................................... 48
8: Use iSQL with Ryft Connector ............................................................................................................ 49 9: Troubleshooting ................................................................................................................................. 52 Appendix A: Commonly Used Acronyms and Terms ............................................................................. 54 Appendix B: Open Source ...................................................................................................................... 56
3rd Parties Used in Deployment: Open Source .................................................................................... 56
3rd Parties Used in Deployment: 3rd Party Purchased ......................................................................... 56
Ryft-Developed Code .......................................................................................................................... 56
Optional Ryft-Developed Open Source ............................................................................................... 57

Doc #1089, V1.2.1/ June 2017 Ryft ODBC Connector: Installation and User Guide
Ryft Systems, Inc. Page 6
Using This Guide This guide is for the System Administrator responsible for installing the Ryft Connector on your Ryft ONE server and/or clients, and making Ryft ONE accessible to your end users. It’s also for the end user who will ultimately use their business intelligence and data visualization (BI/DV) tool to access the datasets on the Ryft ONE, taking advantage of all of the benefits of the Ryft ONE server.
There are step-by-step instructions on installing the Ryft Connector and installing the sample datasets, and how to connect the BI/BA applications to the Ryft ONE.
Additional resources: Ryft Open API Library User Guide and the Ryft ONE: User Guide.
Ryft Technical Support You may access our first-tier support directly from our public website by using the Chat Widget and starting a chat with our support agents. All chat conversations are tracked and become help desk tickets in our support system. In addition, you can access our support system through the Ryft Support site: https://support.ryft.com. Log in with your credentials to see your past tickets, create new tickets, and to access limited-access content.
For technical support, contact us:
Email: [email protected]
Web: https://support.ryft.com
Phone: 1-855-793-8663 (RYFT ONE)
About Ryft Systems Inc. Ryft makes data analytics fast and simple with the world’s top cloud and physical heterogeneous compute accelerators. With more than a decade of experience, Ryft helps deliver instant insights into any data by eliminating the latency associated with data indexing and transformation/curating. Today, industry leaders rely on Ryft to quickly and simply unlock the value hidden in their data for real-time actionable insight.

Doc #1089, V1.2.1/ June 2017 Ryft ODBC Connector: Installation and User Guide
Ryft Systems, Inc. Page 7
1 1: Overview Connect your business analytics/intelligence/visualization applications such as Tableau, Birst or Excel to the Ryft ONE server using Ryft Connectors for ODBC, JDBC or Apache Spark. This is done without the need for indexing or ETL and without the need to put the data into an SQL or noSQL database inside the Ryft ONE. Instead, the Ryft ONE can work with structured files like XML and JSON, with future support for flat files, key values and CSV files, to make it look like the data is coming from an SQL database while being transparent to your business applications.
The Ryft Connector:
• Supports the SQL-92 standard, which is supported by most major database vendors.
• Enables key features for analysis including:
o Database tables and views o Column meta data o SQL commands (=, !=, LIKE, NOT LIKE) o Auto discovery of tables, views and metadata
• Client runs natively on Windows, Mac, and Linux-based infrastructures This product includes data access and analytics software including ODBC, JDBC, ADO.NET, ODBO, and XMLA developed by Simba technologies, Inc. (http:///www.simba.com).

Doc #1089, V1.2.1/ June 2017 Ryft ODBC Connector: Installation and User Guide
Ryft Systems, Inc. Page 8
This guide focuses on the Ryft ODBC Connector for the server, and Windows, Mac and Linux-based clients.
See Also:
• Ryft JDBC Connector: Installation and User Guide
• Ryft ODBC/JDBC Connector: SQL Reference Guide
• Ryft ONE Spark Integration and User Guide

Doc #1089, V1.2.1/ June 2017 Ryft ODBC Connector: Installation and User Guide
Ryft Systems, Inc. Page 9
2 2: Install Ryft Connector for ODBC Access the zipped Ryft ODBC Connector file, ryft1_odbc_server_64-x.x-y.y.tar.gz, where “x.x” is the version number, and “y.y” is the build number in the “~/install” directory on the Ryft ONE server. Once downloaded, move it to the home directory “/home/<userid>” on your Ryft ONE server, using your preferred method.
Included in the “~/install” directory is the file SampleDatabases.gz that contains a set of sample datasets that you may use to become familiar with the Ryft ONE and the primitives. Ryft recommends you unzip and tar the file once the ODBC driver is installed and the server is started.
Unzip the tar file and the “/usr/local/ryft” directory is automatically created. This directory contains the installation files for the Ryft Connector. It also creates the following sub-directories and files:
• ~/bin/x8664 - contains the binary and configuration files necessary to run the Ryft ODBC server. It also contains two programs, and a configuration information file.
o ryft1_odbcd - contains the Ryft Connector server daemon o ryft1_odbcctl - contains the control program used to start, stop and configure the Ryft
Connector server daemon. o .ryftone.server.ini - contains configuration information used by the Ryft Connector
server.
• ~/lib/x8664 - contains all of the libraries referenced by the Ryft ODBC driver components.
• ~/errormessages - contains the XML error message source for all error messages issued by the Ryft ODBC driver.
Ryft Provided Program: ryft1_odbcctl Ryft provides the ryft1_odbcctl control program with the Ryft Connector installation. The ryft1_odbcctl program is used to start, stop, and configure the Ryft Connector server daemon. System administrators use this program to start or kill the Ryft Connector server, or to install, delete or list installed datasets.
In order for a dataset to be searchable by Ryft ONE, there must be an RDF associated with the data files that make up the ODBC tables.
Doc #1089, V1.2.1/ June 2017 Ryft ODBC Connector: Installation and User Guide
Ryft Systems, Inc. Page 10
For more information about RDFs, see 4: Install Datasets. Detailed information is available in “Appendix A – Record Definition Information” in the Ryft Open API Library User Guide, available on the Ryft website.
Summary of Steps Follow these steps to unzip and install the driver:
1. Unzip and tar the file.
2. Review the README file.
3. Run the installation script.
4. Modify the .ini file to match your installation. Optional.
5. Start the Ryft ODBC server process.
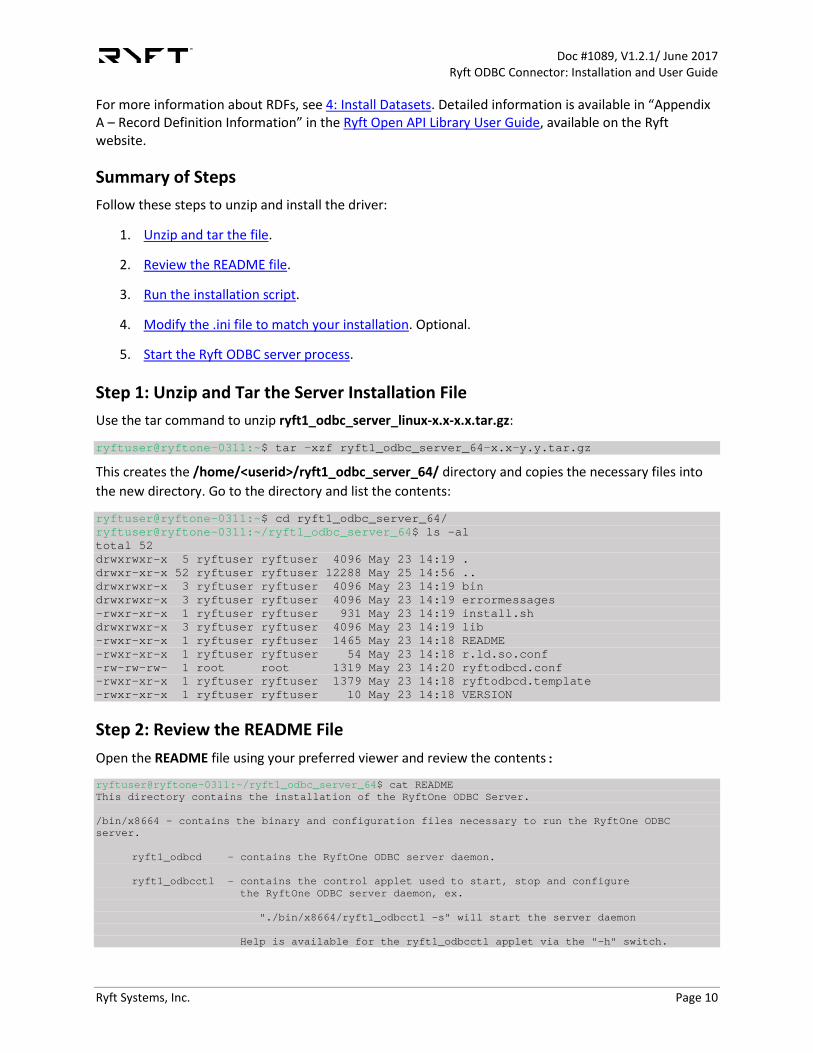
Step 1: Unzip and Tar the Server Installation File Use the tar command to unzip ryft1_odbc_server_linux-x.x-x.x.tar.gz:
ryftuser@ryftone-0311:~$ tar –xzf ryft1_odbc_server_64-x.x-y.y.tar.gz
This creates the /home/<userid>/ryft1_odbc_server_64/ directory and copies the necessary files into the new directory. Go to the directory and list the contents:
ryftuser@ryftone-0311:~$ cd ryft1_odbc_server_64/ ryftuser@ryftone-0311:~/ryft1_odbc_server_64$ ls -al total 52 drwxrwxr-x 5 ryftuser ryftuser 4096 May 23 14:19 . drwxr-xr-x 52 ryftuser ryftuser 12288 May 25 14:56 .. drwxrwxr-x 3 ryftuser ryftuser 4096 May 23 14:19 bin drwxrwxr-x 3 ryftuser ryftuser 4096 May 23 14:19 errormessages -rwxr-xr-x 1 ryftuser ryftuser 931 May 23 14:19 install.sh drwxrwxr-x 3 ryftuser ryftuser 4096 May 23 14:19 lib -rwxr-xr-x 1 ryftuser ryftuser 1465 May 23 14:18 README -rwxr-xr-x 1 ryftuser ryftuser 54 May 23 14:18 r.ld.so.conf -rw-rw-rw- 1 root root 1319 May 23 14:20 ryftodbcd.conf -rwxr-xr-x 1 ryftuser ryftuser 1379 May 23 14:18 ryftodbcd.template -rwxr-xr-x 1 ryftuser ryftuser 10 May 23 14:18 VERSION
Step 2: Review the README File Open the README file using your preferred viewer and review the contents:
ryftuser@ryftone-0311:~/ryft1_odbc_server_64$ cat README This directory contains the installation of the RyftOne ODBC Server. /bin/x8664 - contains the binary and configuration files necessary to run the RyftOne ODBC server. ryft1_odbcd - contains the RyftOne ODBC server daemon. ryft1_odbcctl - contains the control applet used to start, stop and configure the RyftOne ODBC server daemon, ex. "./bin/x8664/ryft1_odbcctl -s" will start the server daemon Help is available for the ryft1_odbcctl applet via the "-h" switch.

Doc #1089, V1.2.1/ June 2017 Ryft ODBC Connector: Installation and User Guide
Ryft Systems, Inc. Page 11
.ryftone.server.ini - contains configuration information used by the RyftOne ODBC server. /lib/x8664 - contains all of the libraries referenced by the RyftOne ODBC server components. /errormessages - contains the XML error message source for all error messages issued by the RyftOne ODBC server daemon. 1. Run 'sudo ./install.sh' from the ryft1_odbc_server_64 directory. 2. Modify the contents of the /usr/local/ryft/bin/x8664/.ryftone.server.ini file to match your installation. 3. Start the server process ('/usr/local/ryft/bin/x8664/ryft1_odbcctl -s'). NOTE: This installation assumes that OpenSSL components are already installed in your Linux distribution. If the OpenSSL libraries are not installed in your distribution, run 'sudo apt-get install libssl1.0.0'. Refer to the "Ryft Connector for ODBC Installation and User Guide" for more information on installing and configuring your RyftOne ODBC server.
Step 3: Run Installation Script Following the steps in the README file, run the install script from the ryft1_odbc_server_64 directory as the Root user. Remember, you’ll need to enter the root password once you execute the command.
$ sudo ./install.sh
This is a sub-set of the system response:
The install command copies files, installs binaries, and updates the cache libraries.
Step 4: Modify ryftone.server.ini File Next, you may modify the .ryftone.server.ini file to match your installation, if you choose. This is optional. The file is located in the “/usr/local/ryft/bin/x8664” directory.
Look at the .ini file using your preferred editor:
ryftuser@ryftone-311:/usr/local/ryft/bin/x8664$ cat .ryftone.server.ini [Server]
Doc #1089, V1.2.1/ June 2017 Ryft ODBC Connector: Installation and User Guide
Ryft Systems, Inc. Page 12
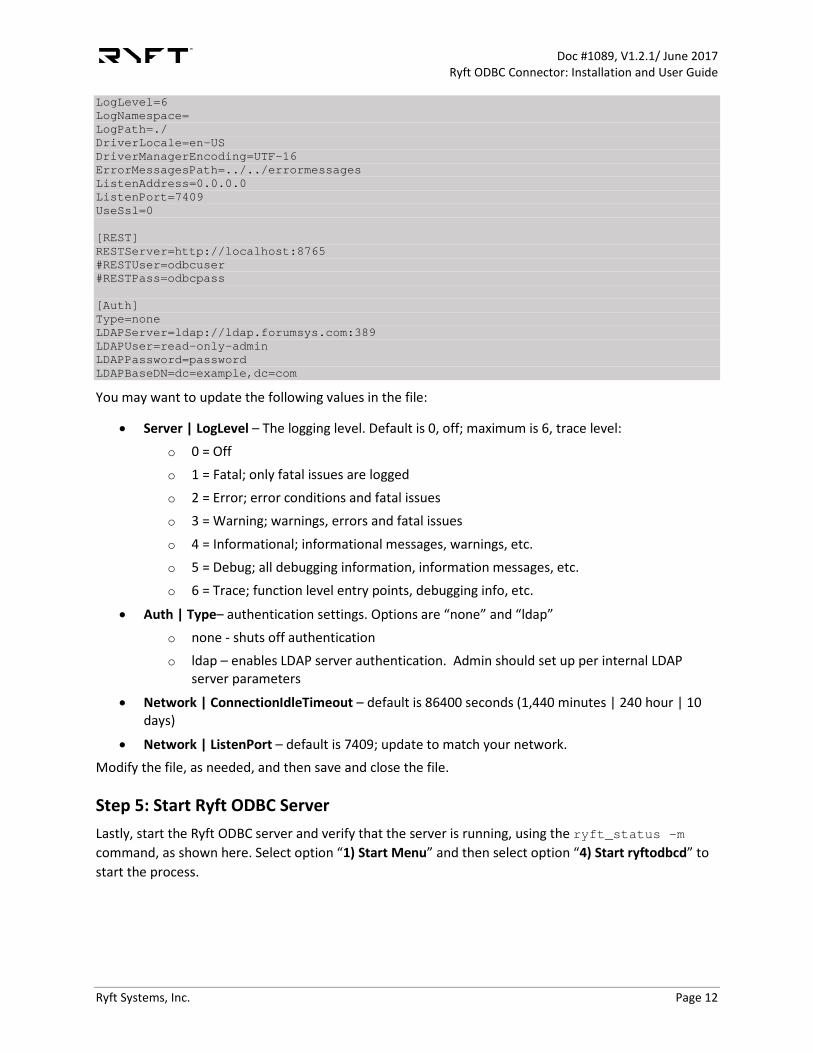
LogLevel=6 LogNamespace= LogPath=./ DriverLocale=en-US DriverManagerEncoding=UTF-16 ErrorMessagesPath=../../errormessages ListenAddress=0.0.0.0 ListenPort=7409 UseSsl=0 [REST] RESTServer=http://localhost:8765 #RESTUser=odbcuser #RESTPass=odbcpass [Auth] Type=none LDAPServer=ldap://ldap.forumsys.com:389 LDAPUser=read-only-admin LDAPPassword=password LDAPBaseDN=dc=example,dc=com
You may want to update the following values in the file:
• Server | LogLevel – The logging level. Default is 0, off; maximum is 6, trace level: o 0 = Off o 1 = Fatal; only fatal issues are logged o 2 = Error; error conditions and fatal issues o 3 = Warning; warnings, errors and fatal issues
o 4 = Informational; informational messages, warnings, etc. o 5 = Debug; all debugging information, information messages, etc. o 6 = Trace; function level entry points, debugging info, etc.
• Auth | Type– authentication settings. Options are “none” and “ldap” o none - shuts off authentication o ldap – enables LDAP server authentication. Admin should set up per internal LDAP
server parameters
• Network | ConnectionIdleTimeout – default is 86400 seconds (1,440 minutes | 240 hour | 10 days)
• Network | ListenPort – default is 7409; update to match your network. Modify the file, as needed, and then save and close the file.
Step 5: Start Ryft ODBC Server Lastly, start the Ryft ODBC server and verify that the server is running, using the ryft_status –m command, as shown here. Select option “1) Start Menu” and then select option “4) Start ryftodbcd” to start the process.

Doc #1089, V1.2.1/ June 2017 Ryft ODBC Connector: Installation and User Guide
Ryft Systems, Inc. Page 13
Alternatively, as Root use the command line to start the process and verify it is running:
$ sudo service ryftodbcd start ryftodbcd start/running, process 19282 $ ps aux | grep odbcd ryftuser 15844 0.0 0.0 11748 2072 pts/7 S+ 16:26 0:00 grep --color=auto odbcd root 29173 0.0 0.1 1113792 50032 ? Ssl Sep06 3:14 ryft1_odbcd
The Ryft ODBC server is now ready for use.
Doc #1089, V1.2.1/ June 2017 Ryft ODBC Connector: Installation and User Guide
Ryft Systems, Inc. Page 14
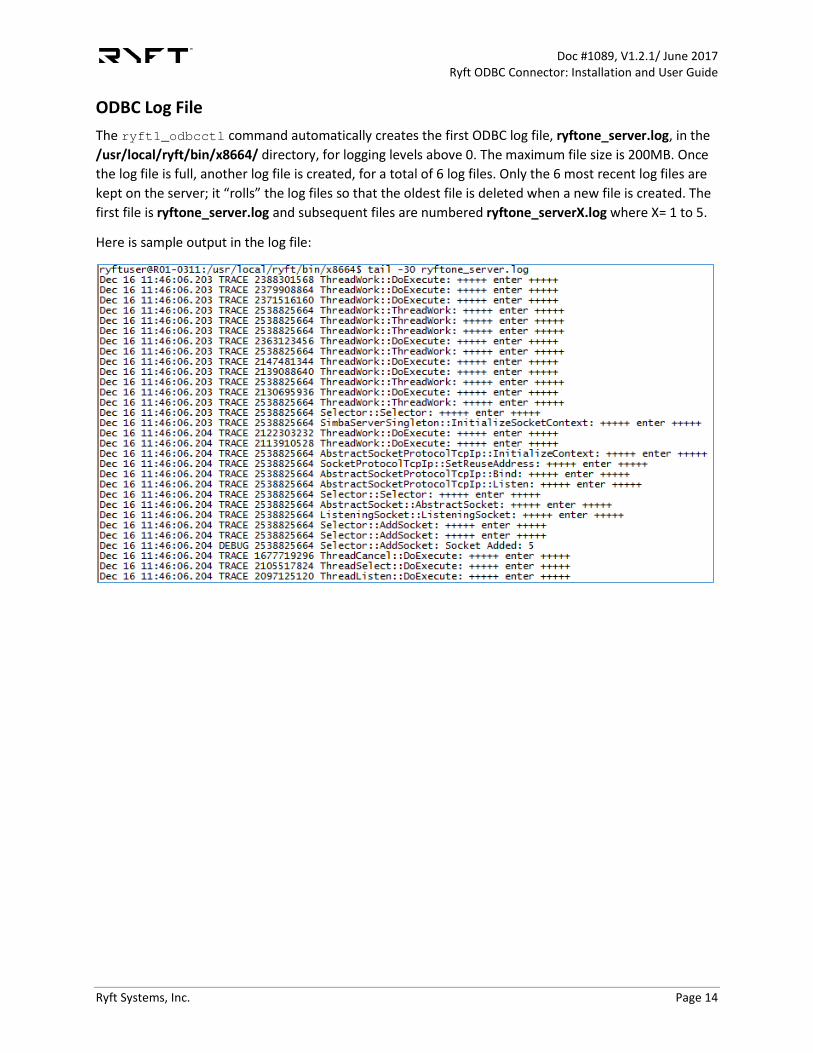
ODBC Log File The ryft1_odbcctl command automatically creates the first ODBC log file, ryftone_server.log, in the /usr/local/ryft/bin/x8664/ directory, for logging levels above 0. The maximum file size is 200MB. Once the log file is full, another log file is created, for a total of 6 log files. Only the 6 most recent log files are kept on the server; it “rolls” the log files so that the oldest file is deleted when a new file is created. The first file is ryftone_server.log and subsequent files are numbered ryftone_serverX.log where X= 1 to 5.
Here is sample output in the log file:

Doc #1089, V1.2.1/ June 2017 Ryft ODBC Connector: Installation and User Guide
Ryft Systems, Inc. Page 15
3 3: ODBC File System Structure In order to optimize the ODBC to Ryft One file structure, Ryft requires this directory structure:
• Store all the data files in the /ryftone/ODBC directory.
• Create sub-directories for each data type that use the same RDF extension. For example: o /ryftone/ODBC/myxml = XML data type using the “myxml.rdf” RDF file
o /ryftone/ODBC/xml2 = XML data type using the “xml2.rdf” RDF file o /ryftone/ODBC/json3 = JSON data type using the “json3.rdf” RDF file
This figure represents the file hierarchal structure.
/ryftone/ODBC/
passengers/chicago/ starbucks/ walmart/census/
census.censusxmlcensusxml.rdf.meta.tablePA_census.censusxml
chicago_2015.pcrimechicago_2016.pcrimechicago_all.pcrime.meta.tablepcrime.rdf
.meta.tablepassengers.pxmlpxml.rdf
java_joins.sjson.meta.tablestarbucks.sjsonstarbucks_DC.sjsonstarbucks_NY.sjsonsjson.rdf
.meta.tablesuper_walmart.wxmlwalmart.wxmlwxml.rdf
Notice that each data file exists in its own sub-directory under /ryftone/ODBC. The sub-directory has the same name as the data file, like directory /ryftone/ODBC/census and the datafile census.censusxml. Each sub-directory contains the data file, its related RDF file, and the .meta.table file which is unique to each data file. Multiple data files may exist under the same sub-directory, but only if the data file uses the exact same .meta.table and RDF.
Doc #1089, V1.2.1/ June 2017 Ryft ODBC Connector: Installation and User Guide
Ryft Systems, Inc. Page 16
4 4: Install Datasets You can install your own datasets onto the /ryftone filesystem to use with the primitives, only after creating the RDF and the meta table associated with your dataset, assuming a matching RDF does not already exist.
Before installing your own datasets, however, Ryft recommends you work with the Ryft-provided sample datasets to learn how to work with datasets.
NOTE: All data files must exist on the /ryftone filesystem, only. They cannot reside anywhere else on the RyftONE server.
Ryft-Provided Sample Datasets Prior to installing your datasets onto the Ryft ONE, install the sample datasets provided in the Ryft Connector installation file. This will help you become familiar with the Ryft Connector and how to use it to connect your business intelligence/data visualization (BI/DV) tool to the Ryft ONE sever.
Ryft provides six sample datasets for your use in one file, SampleDatabases.gz:
Name Data Type Description
census XML Sample census data created by Ryft from data obtained from publicly available data.
Chicago_Crime XML Public data available for the city of Chicago, this dataset reflects reported incidents of crime from 2001 to present. Accessible at: https://data.cityofchicago.org/
Passengers XML Sample dataset created by Ryft.
Starbucks_by_State JSON Sample dataset created by Ryft from data obtained from publicly available data.
Walmart_Stores_by_State XML Sample dataset created by Ryft from data obtained from Walmart Corporate website.
Seuss JSON Sample dataset created by Ryft from data obtained from publicly available data.

Doc #1089, V1.2.1/ June 2017 Ryft ODBC Connector: Installation and User Guide
Ryft Systems, Inc. Page 17
Once all datasets have been installed, there is a sub-directory for each dataset, and each sub-directory contains three types of files that are specific to each dataset: *.rdf, .meta.table and an xml file.
The Passengers dataset is used in the following examples. The Passengers sub-folder contains three files:
• RDF File: pxml.rdf
• Meta Data File: .meta.table
• Data File: passengers.pxml All three files are required to use the Connector with your dataset
The RDF
The record definition file (RDF) defines chunk size, the data type (XML, JSON, CSV, etc. ), and each field in the Passengers dataset, including any tags.
This is the pxml.rdf for the Passengers dataset:
ryftuser@R01-0311:/ryftone/ODBC/Passengers$ cat pxml.rdf # pxml.rdf record definition rdf_name = "pxml"; chunk_size_mb = 64; file_glob = "*.pxml"; record_start = "<csv_record>"; record_end = "</csv_record>"; data_type = "xml"; fields = { Name = ( "<Name>","</Name>" ), DoB = ( "<DoB>", "</DoB>" ), Phone = ( "<Phone>","</Phone>" ), Notes = ( "<Notes>","</Notes>" ), };
Here is star.rdf, a sample JSON RDF for Starbucks datafile. Notice that individual fields are not listed. Instead the record_path is specified as a top-level array:
ryftuser@R01-0311:/ryftone/ODBC/Starbucks_by_State$ cat star.rdf # Starbucks RDF # data_type = "JSON"; rdf_name = "star" chunk_size_mb = 64; file_glob = "*.sjson"; record_path = "[]";
For more information about RDFs, refer to the Ryft ONE: User Guide or the Ryft Open API Library User Guide.
The Meta Data File
.meta.table – contains the field definition information for each field in the dataset, which enables the Ryft Connector to determine the type of data that is contained in the file. It also contains any optionally

Doc #1089, V1.2.1/ June 2017 Ryft ODBC Connector: Installation and User Guide
Ryft Systems, Inc. Page 18
pre-defined “views” for each dataset to provide a smaller view into the data; this is accessible from your BI/DV tool. Notice that the parameter “rdf” states the full path of the related RDF file.
NOTE: A .meta.table file must exist for JSON data files, even if no fields are defined in the file.
This example contains the metadata for the Passengers dataset. It also includes one sample view at the bottom of the file so that you can see the list of “Action hero passengers with the name T” from the Passengers table.
ryftuser@R01-0311:/ryftone/ODBC/Passengers$ cat .meta.table # table metadata definition file table_name = "Passengers" table_remarks = "Action hero passenger database" rdf = "/ryftone/ODBC/Passengers/pxml.rdf"; columns = { Name = ( "Name","VARCHAR(80)", "" ), DoB = ( "Date_of_Birth", "VARCHAR(80)", "" ), Phone = ( "Phone","VARCHAR(80)", "" ), Notes = ( "Notes","VARCHAR(256)", "" ), }; views = { Passengers_Named_T = ( "Passengers_Named_T", "(RECORD.Name EQUALS \"T\")", "Action hero passengers with the name T" ), };
The Data File
passengers.pxml – the Passengers data file. Notice that in this example <csv_record> and </csv_record> are used to define the start and end of each record.
ryftuser@R01-0311:/ryftone/ODBC/Passengers$ head -25 passengers.pxml <?xml version = "1.0" encoding = "UTF-8" ?> <xml_root> <csv_record> <Name>Hannibal Smith</Name> <DoB>10-01-1928</DoB> <Phone>011-310-555-1212</Phone> <Notes>A-team, baby, A-team!</Notes> </csv_record> <csv_record> <Name>DR. Thomas Magnum</Name> <DoB>01-29-1945</DoB> <Phone>310-555-2323</Phone> <Notes>Magnum PI himself.</Notes> </csv_record> <csv_record> <Name>Steve McGarett</Name> <DoB>12-30-1920</DoB> <Phone>310-555-3434</Phone> <Notes>The new Hawaii Five-O.</Notes> </csv_record>

Doc #1089, V1.2.1/ June 2017 Ryft ODBC Connector: Installation and User Guide
Ryft Systems, Inc. Page 19
Tar the File and Add Sample Datasets Follow these steps to tar the sample dataset file and add the sample datasets.
1. Once Ryft Connector is installed on your Ryft ONE server, copy the SampleDatabases.tar.gz file to your home directory (/home/<userid>) on the Ryft ONE server.
2. Tar the file. It automatically creates a sub-directory for each sample dataset, and create files in each dataset sub-directory. Here is a subset of the datasets:
$ tar –xvzf SampleDatabases.gz odbc_setup.sh ODBC/ ODBC/Chicago_Crime/ ODBC/Chicago_Crime/.meta.table ODBC/Chicago_Crime/chicago.pcrime ODBC/Chicago_Crime/pcrime.rdf ODBC/Passengers/ ODBC/Passengers/.meta.table ODBC/Passengers/pxml.rdf ODBC/Passengers/passengers.pxml ODBC/census/ ODBC/census/.meta.table ODBC/census/census.censusxml ODBC/census/censusxml.rdf ODBC/Walmart_Stores_by_State/ ODBC/Walmart_Stores_by_State/.meta.table ODBC/Walmart_Stores_by_State/walmart.wxml ODBC/Walmart_Stores_by_State/wxml.rdf ODBC/Starbucks_Stores_by_State/ ODBC/Starbucks_Stores_by_State/.meta.table ODBC/Starbucks_Stores_by_State/starbucks.stxml ODBC/Starbucks_Stores_by_State/stxml.rdf ODBC/Starbucks_by_State/ ODBC/Starbucks_by_State/.meta.table ODBC/Starbucks_by_State/starbucks.sjson ODBC/Starbucks_by_State/star.rdf
3. The tar command includes the odbc_setup.sh script. Execute the script and it will install the rdf files, sample dataset, and associated meta data files.
$ ./odbc_setup.sh rhfsctl -R 1: RawBinary => *.bin (system) 2: PlainText => *.txt (system) 3: PCRIME => *.pcrime 4: xcalls => *.xcalls 5: CRIMESTAT => *.crimestat 6: popra.rdf => *.popra 7: JBS => *.jbs 8: xml-insurance.rdf => *.xml-insurance 9: xml-insurance4.rdf => *.xml-insurance4 10: twitter-json => *.json 11: oxml.rdf => *.oxml 12: DB => *.db 13: twitter-txml-1 => *.txml 14: BRS => *.brs 15: censusxml => *.censusxml 16: pxml.rdf => *.pxml 17: dtxml.rdf => *.dtxml 18: pbin256m => *.pbin256m

Doc #1089, V1.2.1/ June 2017 Ryft ODBC Connector: Installation and User Guide
Ryft Systems, Inc. Page 20
19: data1g => *.data Adding RDFs to RHFS...pxml.rdf, wxml.rdf, star.rdf, stxml.rdf, pcrime.rdf, censusxml.rdf 14:15:42.512539: Adding RDF from ODBC/Passengers/pxml.rdf FAILED: RDF already exists with glob *.pxml 14:15:42.521383: RDF from ODBC/Walmart_Stores_by_State/wxml.rdf added successfully as ID 20. 14:15:42.528760: RDF from ODBC/Starbucks_by_State/star.rdf added successfully as ID 21. 14:15:42.535531: RDF from ODBC/Starbucks_Stores_by_State/stxml.rdf added successfully as ID 22. 14:15:42.542327: Adding RDF from ODBC/Chicago_Crime/pcrime.rdf FAILED: RDF already exists with glob *.pcrime 14:15:42.548845: Adding RDF from ODBC/census/censusxml.rdf FAILED: RDF already exists with glob *.censusxml rhfsctl -R 1: RawBinary => *.bin (system) 2: PlainText => *.txt (system) 3: PCRIME => *.pcrime 4: xcalls => *.xcalls 5: CRIMESTAT => *.crimestat 6: popra.rdf => *.popra 7: JBS => *.jbs 8: xml-insurance.rdf => *.xml-insurance 9: xml-insurance4.rdf => *.xml-insurance4 10: twitter-json => *.json 11: oxml.rdf => *.oxml 12: DB => *.db 13: twitter-txml-1 => *.txml 14: BRS => *.brs 15: censusxml => *.censusxml 16: pxml.rdf => *.pxml 17: dtxml.rdf => *.dtxml 18: pbin256m => *.pbin256m 19: data1g => *.data 20: wxml => *.wxml 21: star => *.sjson 22: stxml => *.stxml Copying ODBC files to /ryftone/ODBC/... cp -rf ODBC /ryftone ls /ryftone/ODBC/ Calls census Chicago_Crime Passengers Starbucks_by_State Starbucks_Stores_by_State Walmart_Stores_by_State ryftprim -p es -f ODBC/Chicago_Crime/chicago.pcrime -od mychicago.txt -q '((RECORD.district EQUALS "012") AND (RECORD.arrest EQUALS "true"))' -vv Duration : 0.382 seconds Total Bytes : 6.57 MB Matches : 80 Fabric Data Rate : 3.21 GB/sec Data Rate : 17.21 MB/sec
4. Verify that all directories and sub-directories have been copied over.
/ryftone/ODBC$ ls -al total 0

Doc #1089, V1.2.1/ June 2017 Ryft ODBC Connector: Installation and User Guide
Ryft Systems, Inc. Page 21
drwxr-xr-x 0 ryftuser ryftuser 0 Sep 6 2016 . drwxrwxr-x 0 ryftone ryftone 0 Mar 8 2016 .. drwxrwxr-x 0 ryftuser ryftuser 0 Sep 6 2016 census drwxrwxr-x 0 ryftuser ryftuser 0 Sep 6 2016 Chicago_Crime drwxrwxr-x 0 ryftuser ryftuser 0 Sep 6 2016 Passengers drwxrwxr-x 0 ryftuser ryftuser 0 Sep 6 2016 Starbucks_by_State drwxrwxr-x 0 ryftuser ryftuser 0 Sep 6 2016 Walmart_Stores_by_State drwxrwxr-x 0 ryftuser ryftuser 0 Nov 3 14:55 Seuss /ryftone/ODBC$ /ryftone/ODBC$ ls -al Walmart_Stores_by_State/ total 8 drwxrwxr-x 0 ryftuser ryftuser 0 Sep 6 2016 . drwxr-xr-x 0 ryftuser ryftuser 0 Sep 6 2016 .. drwxr-xr-- 0 ryftuser ryftuser 0 Dec 27 11:30 .caches -rwxrwxr-x 0 ryftuser ryftuser 441 Sep 6 2016 .meta.table -rwxrwxr-x 0 ryftuser ryftuser 8144 Sep 6 2016 walmart.wxml -rw-rw-r-- 0 ryftuser ryftuser 394 Sep 6 2016 wxml.rdf
Use these sample datasets from a Windows OS, Mac OS or Linux OS environment and connect to the Ryft ONE using the Ryft Connector to learn and test the server. Once familiar with the setup and installation, add your own datasets following the steps, below.
Install Own Datasets You may create and install your own datasets onto the Ryft ONE by using ryft1_odbcctl –a with your own XML or JSON file. The first step, is to create the sub-directory for the dataset, and it’s related RDF and .meta.table files. These must exist in the /ryftone/ODBC directory before you create your dataset or copy it from another source.
In this example, the xml file is people and the dataset will be named People. Here is the syntax.
ryftuser@ryftone-310:~$ /usr/local/ryft/bin/x8664/ryft1_odbcctl -a people XML record delimiter [<csv_record>]: Table name [people]: People File chunk size [64]: 14:25:09.384790: RDF from /ryftone/ODBC/People/people.rdf added successfully as ID 39. ryftuser@ryftone-310:~$
List the contents of the /ryftone/ODBC/People directory to see the files that were automatically created based on the people.xml file:
~$ /usr/local/ryft/bin/x8664/ryft1_odbcctl –a People people.xml csv_record 11:46:46.837830: RDF from /ryftone/ODBC/People/People.rdf added successfully as ID 17. ~$ cd /ryftone/ODBC/ /ryftone/ODBC$ ls Chicago_Crime Passengers People Starbucks_Stores_by_State Walmart_Stores_by_State /ryftone/ODBC$ ls –al People/ Total 2 Drwxrwxr-x 0 root ryftuser 0 Nov 12 11:46 . Drwxrwxr-x 0 root ryftuser 0 Nov 11 14:30 .. -rw-rw-r—- 0 root ryftuser 263 Nov 12 11:46 .meta.table -rw-rwxr-- 0 root ryftuser 2166 Nov 12 11:46 people.People -rw-rw-r-- 0 root ryftuser 300 Nov 12 11:46 People.rdf

Doc #1089, V1.2.1/ June 2017 Ryft ODBC Connector: Installation and User Guide
Ryft Systems, Inc. Page 22
5 5: Install and Run on Windows Desktop/Client Server This section covers how to install the ODBC client driver on your Windows desktop. Included are examples of how to connect to the Ryft ONE server using the Ryft ONE ODBC connector using Tableau and Microsoft Excel.
Steps to update your existing Ryft ONE ODBC connector are at the end of this section.
Install the ODBC Driver on Windows Desktop 1. Locate and run the Ryft Connector installation file, ryft1_odbc_client_win_64_x.x.y.y, where
“x.x” is the version number, and “y.y” is the build number.
2. The Setup wizard displays to guide you through installing the Ryft ODBC Driver (64-bit). Click Next.

Doc #1089, V1.2.1/ June 2017 Ryft ODBC Connector: Installation and User Guide
Ryft Systems, Inc. Page 23
3. The End User License Agreement window displays. Ensure you read the agreement.
4. Select the I accept the terms in the License Agreement checkbox and click Next.

Doc #1089, V1.2.1/ June 2017 Ryft ODBC Connector: Installation and User Guide
Ryft Systems, Inc. Page 24
5. Specify or accept the default destination folder. Click Next.
6. Click Install and the installation starts.
7. Allow the program to update your system.
Doc #1089, V1.2.1/ June 2017 Ryft ODBC Connector: Installation and User Guide
Ryft Systems, Inc. Page 25
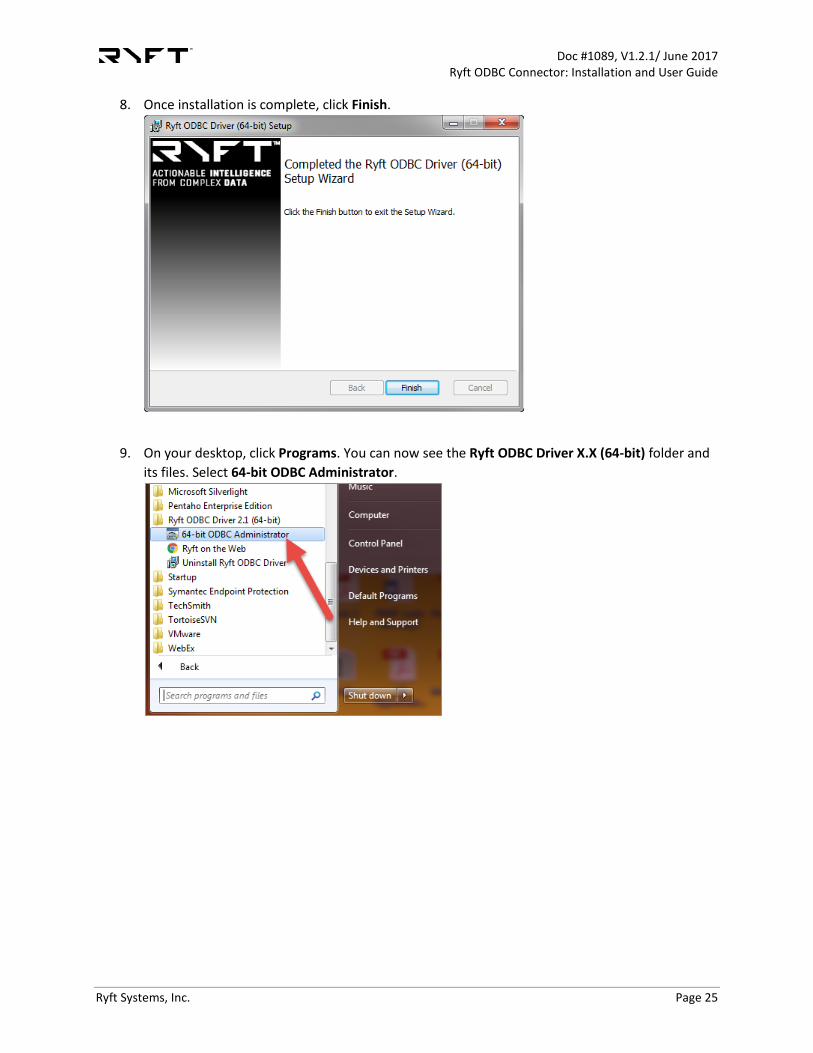
8. Once installation is complete, click Finish.
9. On your desktop, click Programs. You can now see the Ryft ODBC Driver X.X (64-bit) folder and its files. Select 64-bit ODBC Administrator.

Doc #1089, V1.2.1/ June 2017 Ryft ODBC Connector: Installation and User Guide
Ryft Systems, Inc. Page 26
10. The ODBC Data Source Administrator pop-up window displays. On the User DSN tab, click Add to create a new data source.
11. On the Create New Data Source window ensure Ryft ODBC Driver is selected. Click Finish.

Doc #1089, V1.2.1/ June 2017 Ryft ODBC Connector: Installation and User Guide
Ryft Systems, Inc. Page 27
12. The Configure Ryft window displays. Enter a Name and Description for Ryft. Enter the User name and Password for the Ryft server, and specify the IP address of the server. By default, the Port is 7409, but should be changed to match your environment.
13. Click Test Connection to verify connectivity to the Ryft ONE server. If the test is successful, this message displays.
If the IP address or the Port is bad, this message displays.

Doc #1089, V1.2.1/ June 2017 Ryft ODBC Connector: Installation and User Guide
Ryft Systems, Inc. Page 28
If the Username/Password is bad, this message displays.
Make the necessary corrections and test again.
14. After a successful test, click OK to close the Connection Test pop-up. Click OK to close the Configure Ryft pop-up.
15. You’re back on the ODBC Data Source Administrator window. Notice that the Ryft ONE data source has been added.
16. Click OK to close this window.
Upgrade Windows Client When a new release of the Windows client is released, you need to run the new windows installer on your desktop, and set up the connections to your Ryft servers. You can install the new version without uninstalling/deleting the old version, but Simba does not allow Ryft to automatically recreate existing connections to the Ryft server. You must manually re-establish these connections.
Follow the same steps for installation, as covered in the beginning of this chapter. Ensure you complete the Configure Ryft window for each Ryft server connection.
Doc #1089, V1.2.1/ June 2017 Ryft ODBC Connector: Installation and User Guide
Ryft Systems, Inc. Page 29
See Also:
• 6: Install and Run on Mac OS Client - install the ODBC client driver on Mac OS
• 7: Install and Run on Ubuntu Linux - install the ODBC client driver on Ubuntu
Example 1: Connect to Ryft ONE Using Tableau You can connect a business intelligence tool, like Tableau, to the Ryft ONE server to view datasets stored on the server. From using pre-defined views to creating custom views using SQL, you can easily connect to your datasets from a BI tool, like Tableau, by using the Ryft Connector.
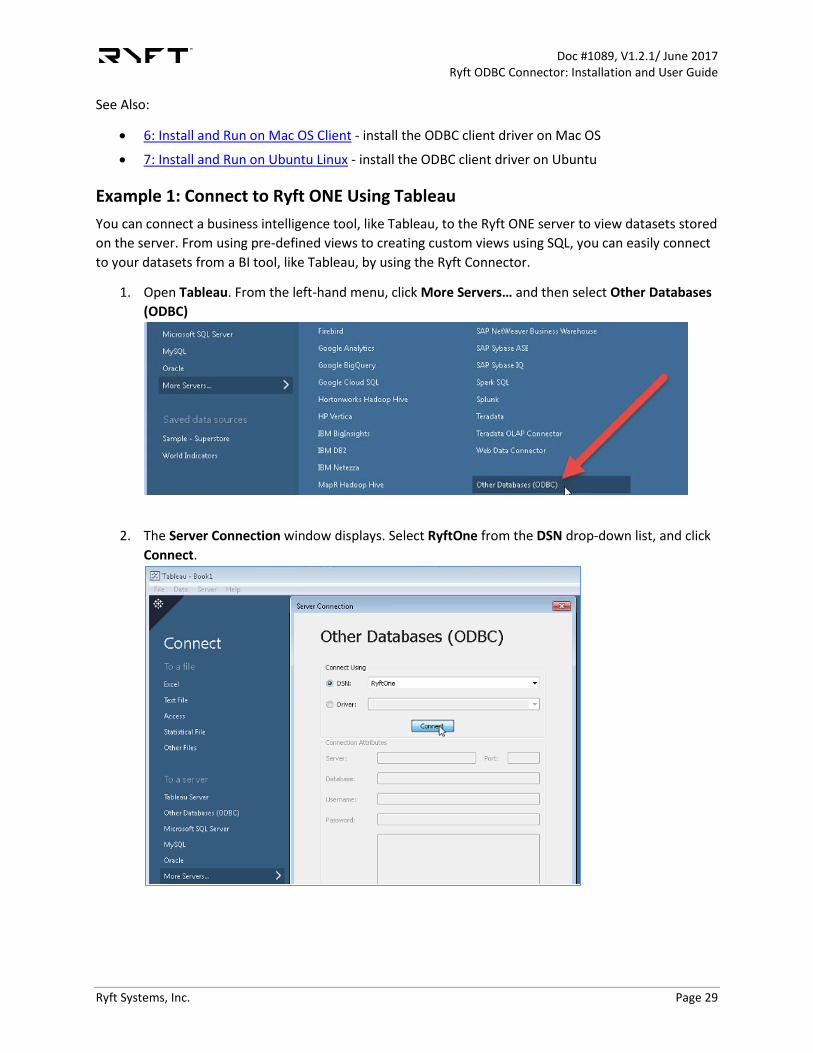
1. Open Tableau. From the left-hand menu, click More Servers… and then select Other Databases (ODBC)
2. The Server Connection window displays. Select RyftOne from the DSN drop-down list, and click Connect.

Doc #1089, V1.2.1/ June 2017 Ryft ODBC Connector: Installation and User Guide
Ryft Systems, Inc. Page 30
3. The Connect to Ryft window displays. Enter the credentials and verify the server IP and Port number. Click OK.
4. After successfully connecting to the Ryft ONE server, the Server Connection window populates with information. Verify the information and then click OK at the bottom of the window.
Doc #1089, V1.2.1/ June 2017 Ryft ODBC Connector: Installation and User Guide
Ryft Systems, Inc. Page 31
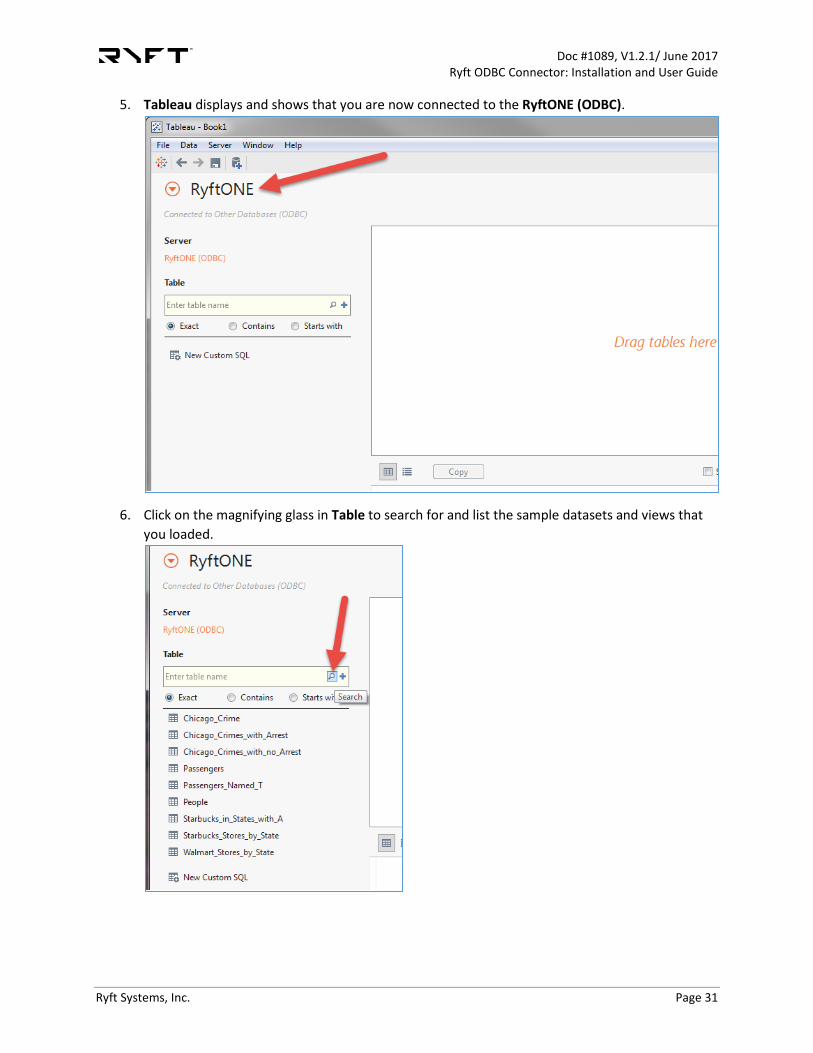
5. Tableau displays and shows that you are now connected to the RyftONE (ODBC).
6. Click on the magnifying glass in Table to search for and list the sample datasets and views that you loaded.

Doc #1089, V1.2.1/ June 2017 Ryft ODBC Connector: Installation and User Guide
Ryft Systems, Inc. Page 32
7. Select a table. You are now connected and can use the sample datasets and views provided, or create your own custom SQL.
Example 2: Connect to Ryft ONE Using Microsoft Excel Microsoft Excel can connect to the Ryft ONE using the Ryft Connector. Please note that only the 64-bit version of Excel works with the Ryft Connector.
Open Microsoft Excel and follow these steps:
1. From the Data ribbon, select From Other Sources and then From Data Connection Wizard.
2. The Data Connection Wizard window displays. Select ODBC DSN and then click Next.
3. Select Ryft ONE as your ODBC data source and click Next.

Doc #1089, V1.2.1/ June 2017 Ryft ODBC Connector: Installation and User Guide
Ryft Systems, Inc. Page 33
4. The Connect to Ryft dialog box displays. Enter the Password for the server, enter/verify your server IP and Port information, and click OK.
5. The Data Connection Wizard re-displays and shows the tables and views available on the Ryft ONE, such as the sample datasets and views. Select a view or table and click Next.

Doc #1089, V1.2.1/ June 2017 Ryft ODBC Connector: Installation and User Guide
Ryft Systems, Inc. Page 34
6. Verify the information and click Finish.
7. Specify how to import your data and then click OK.
8. Enter the Ryft password and click OK.

Doc #1089, V1.2.1/ June 2017 Ryft ODBC Connector: Installation and User Guide
Ryft Systems, Inc. Page 35
9. The selected view displays in Excel and shows the sub-set of data that met the predefined selection criteria.
View/Edit the SQL Selection Statement
To view or edit the SQL statement used by a view, use Existing Connections on the Data ribbon.
1. From the Data ribbon, select Existing Connections.
Doc #1089, V1.2.1/ June 2017 Ryft ODBC Connector: Installation and User Guide
Ryft Systems, Inc. Page 36
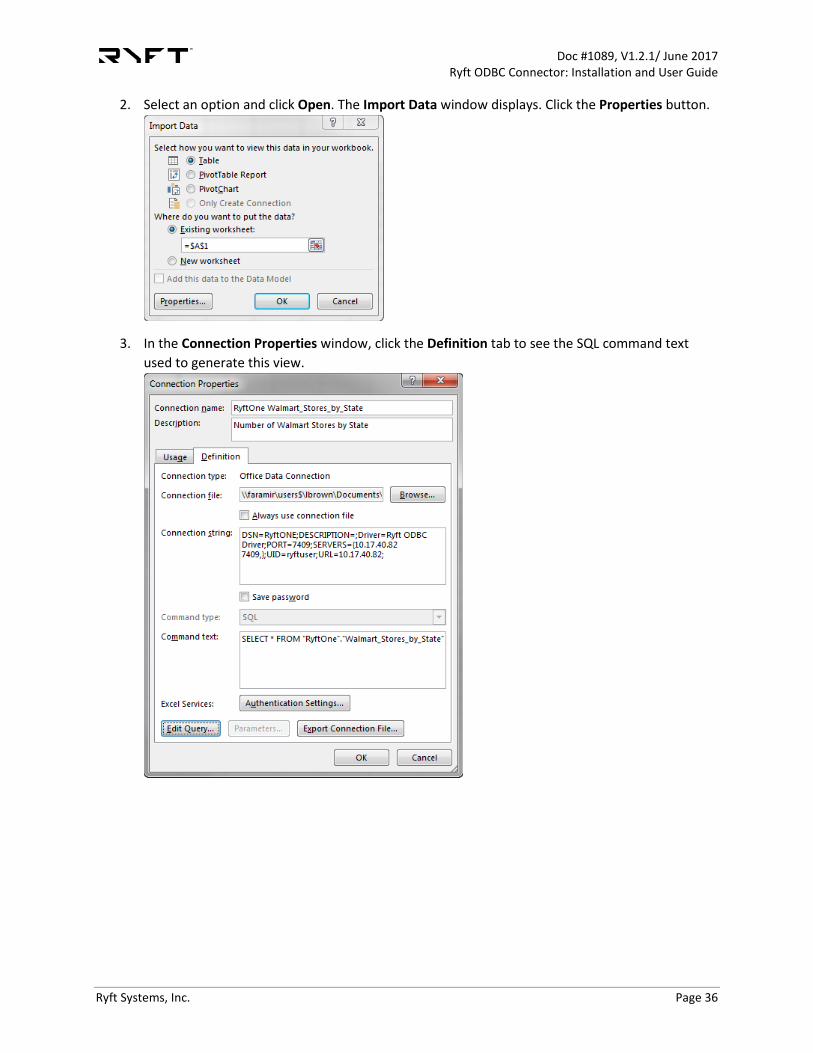
2. Select an option and click Open. The Import Data window displays. Click the Properties button.
3. In the Connection Properties window, click the Definition tab to see the SQL command text used to generate this view.

Doc #1089, V1.2.1/ June 2017 Ryft ODBC Connector: Installation and User Guide
Ryft Systems, Inc. Page 37
4. To edit the query text, click Edit Query. Enter the password to access the Ryft server and click OK.
5. The Microsoft Query window displays and shows the data in the specified dataset.
6. To edit the query statement, click the SQL button and edit the SQL statement.
NOTE: The Fuzzy Search/Hamming Distance capability is also available in Excel. The syntax remains the same: ‘-Hx (variable to match)’

Doc #1089, V1.2.1/ June 2017 Ryft ODBC Connector: Installation and User Guide
Ryft Systems, Inc. Page 38
6 6: Install and Run on Mac OS Client This section covers how to install the ODBC client driver on your Mac OS desktop. Once you download and untar the installation file, review the README file.
This directory contains the installation of the Ryft ODBC driver. /lib - contains all of the libraries referenced by the Ryft ODBC driver components. /errormessages - contains the XML error message source for all error messages issued by the Ryft ODBC driver. 1. Download and install the iODBC Driver Manager for Mac OS X (www.iodbc.org). 2. Untar the Ryft ODBC Mac OS X Client tarball using 'tar -xzf ryft1_odbc_client_macosx-x.x-x.x.tar.gz'. 3. Navigate to the ryft1_odbc_client_macosx directory and run './install.sh' or optionally 'sudo ./install.sh'. If install is run as root, the Ryft ODBC Mac OS X Client files will be installed in the /usr/local/lib and /usr/local/ryft directories. If you are not running as root at the time of the install, the Ryft ODBC Mac OS X Client files will instead be installed in ~/lib and ~/ryft. 4. During the installation the odbc.ini and odbcinst.ini files were created for you. These files are iODBC configuration files. If you preiously had ODBC drivers and DSNs installed, you must merge the contents of the odbc.ini and odbcinst.ini files with the ~/.odbc.ini and ~/.odbcinst.ini files. If no ~/.odbc.ini or ~/.odbcinst.ini file were located at the time of installation, these files were created for you. Refer to the "Ryft Connector for ODBC Installation and User Guide" for more information on installing and configuring your RyftOne ODBC driver.
Install the ODBC Driver on Mac OS Desktop 1. Download and install the iODBC Driver Manager for Mac OSX from www.iodbc.org.
2. Download the Ryft ONE ODBC Client for Mac OS, ryft1_odbc_client_macosx-x.x-y.y.tar.gz.
Doc #1089, V1.2.1/ June 2017 Ryft ODBC Connector: Installation and User Guide
Ryft Systems, Inc. Page 39
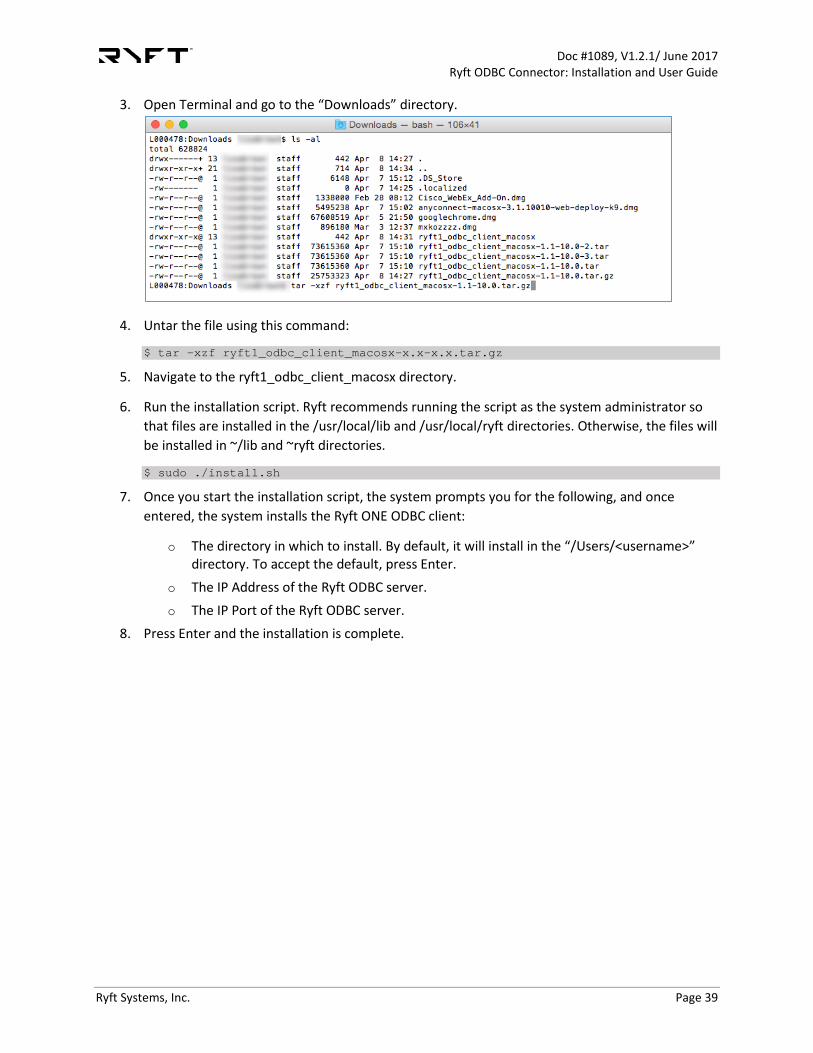
3. Open Terminal and go to the “Downloads” directory.
4. Untar the file using this command:
$ tar –xzf ryft1_odbc_client_macosx-x.x-x.x.tar.gz
5. Navigate to the ryft1_odbc_client_macosx directory.
6. Run the installation script. Ryft recommends running the script as the system administrator so that files are installed in the /usr/local/lib and /usr/local/ryft directories. Otherwise, the files will be installed in ~/lib and ~ryft directories.
$ sudo ./install.sh
7. Once you start the installation script, the system prompts you for the following, and once entered, the system installs the Ryft ONE ODBC client:
o The directory in which to install. By default, it will install in the “/Users/<username>” directory. To accept the default, press Enter.
o The IP Address of the Ryft ODBC server. o The IP Port of the Ryft ODBC server.
8. Press Enter and the installation is complete.
Doc #1089, V1.2.1/ June 2017 Ryft ODBC Connector: Installation and User Guide
Ryft Systems, Inc. Page 40
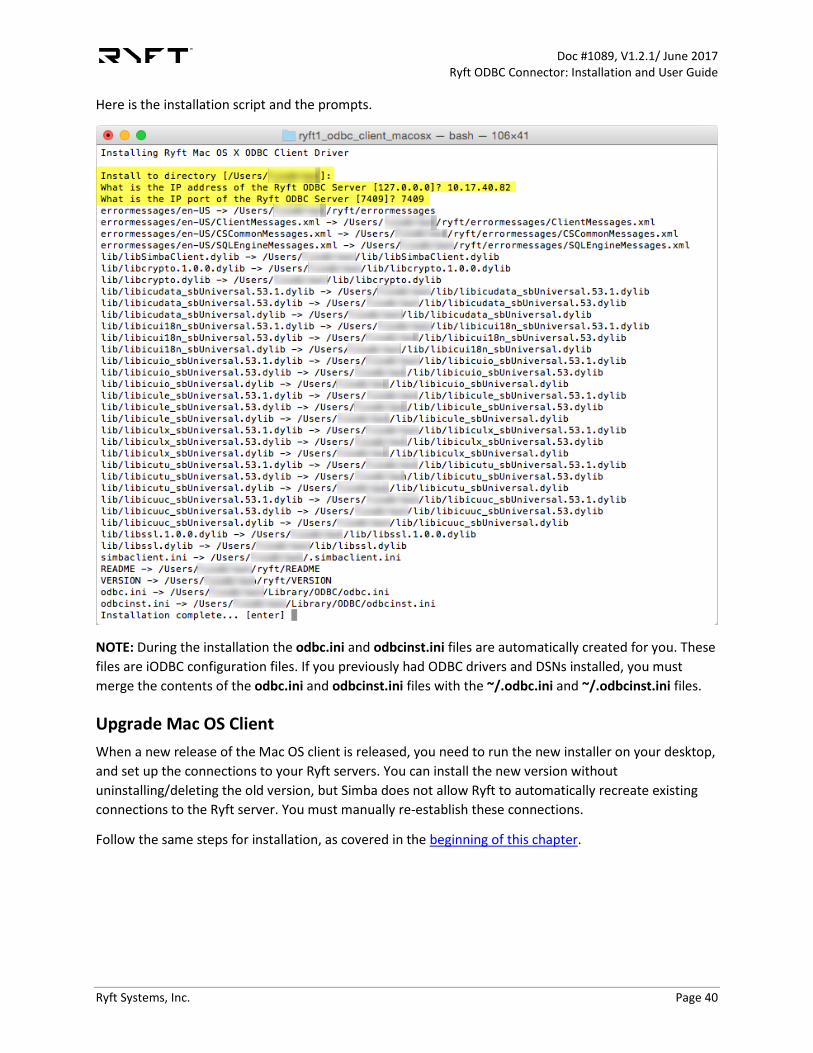
Here is the installation script and the prompts.
NOTE: During the installation the odbc.ini and odbcinst.ini files are automatically created for you. These files are iODBC configuration files. If you previously had ODBC drivers and DSNs installed, you must merge the contents of the odbc.ini and odbcinst.ini files with the ~/.odbc.ini and ~/.odbcinst.ini files.
Upgrade Mac OS Client When a new release of the Mac OS client is released, you need to run the new installer on your desktop, and set up the connections to your Ryft servers. You can install the new version without uninstalling/deleting the old version, but Simba does not allow Ryft to automatically recreate existing connections to the Ryft server. You must manually re-establish these connections.
Follow the same steps for installation, as covered in the beginning of this chapter.
Doc #1089, V1.2.1/ June 2017 Ryft ODBC Connector: Installation and User Guide
Ryft Systems, Inc. Page 41
7 7: Install and Run on Ubuntu Linux The Ryft Connector can be run in a Linux/Ubnutu operating system, and enables LibreOffice to connect with the Ryft ONE server using the Ryft Connector.
The installation file, ryft1_odbc_client_linux_64-x.x-y.y.tar.gz, is stored in the “~/install” directory on the Ryft ONE. Install it in Ubuntu, and then follow the instructions in the README file to install the Ryft ONE ODBC connector.
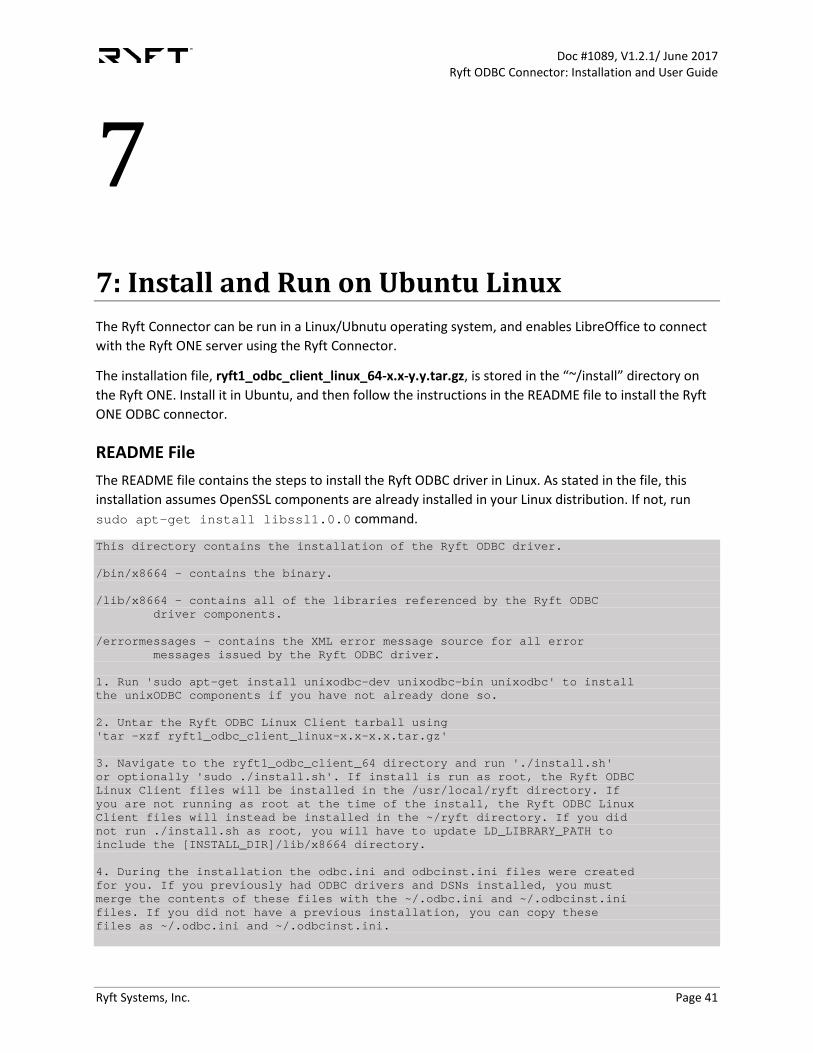
README File The README file contains the steps to install the Ryft ODBC driver in Linux. As stated in the file, this installation assumes OpenSSL components are already installed in your Linux distribution. If not, run sudo apt-get install libssl1.0.0 command.
This directory contains the installation of the Ryft ODBC driver. /bin/x8664 - contains the binary. /lib/x8664 - contains all of the libraries referenced by the Ryft ODBC driver components. /errormessages - contains the XML error message source for all error messages issued by the Ryft ODBC driver. 1. Run 'sudo apt-get install unixodbc-dev unixodbc-bin unixodbc' to install the unixODBC components if you have not already done so. 2. Untar the Ryft ODBC Linux Client tarball using 'tar -xzf ryft1_odbc_client_linux-x.x-x.x.tar.gz' 3. Navigate to the ryft1_odbc_client_64 directory and run './install.sh' or optionally 'sudo ./install.sh'. If install is run as root, the Ryft ODBC Linux Client files will be installed in the /usr/local/ryft directory. If you are not running as root at the time of the install, the Ryft ODBC Linux Client files will instead be installed in the ~/ryft directory. If you did not run ./install.sh as root, you will have to update LD_LIBRARY_PATH to include the [INSTALL_DIR]/lib/x8664 directory. 4. During the installation the odbc.ini and odbcinst.ini files were created for you. If you previously had ODBC drivers and DSNs installed, you must merge the contents of these files with the ~/.odbc.ini and ~/.odbcinst.ini files. If you did not have a previous installation, you can copy these files as ~/.odbc.ini and ~/.odbcinst.ini.

Doc #1089, V1.2.1/ June 2017 Ryft ODBC Connector: Installation and User Guide
Ryft Systems, Inc. Page 42
5. To use Libre Office Base on Ubuntu, you must also run 'sudo apt-get install libreoffice-base' if you have not already done so. NOTE: This installation assumes that OpenSSL components are already installed in your Linux distribution. If the OpenSSL libraries are not installed in your distribution, run 'sudo apt-get install libssl1.0.0'. Refer to the "Ryft Connectors: Installation and User Guide" for more information on installing and configuring your RyftOne ODBC driver.
Run the Installation File 1. First, install the Unix ODBC components and update cache, if it hasn’t already been done.
$ sudo apt-get install unixodbc-dev unixodbc-bin unixodbc
2. Move the file to the HOME directory.
3. Open a terminal window and list the contents of the HOME directory.
4. Untar the installation file:
$ tar –xzf ryft1_odbc_server_linux_64-x.x-x.x.tar.gz
5. Go to the ryft1_odbc_client_64 directory and list the files.
6. As root, run the installation script. You need to enter the administrator password.
$ sudo ./intall.sh
o If you ran the command as Root, the Ryft ODBC Linux Client files are installed in the “/user/local/ryft” directory.
o If you are not Root when you run the command, the files are installed in the “~/ryft” directory. You must also update the LD_LIBRARY_PATH to include the "[INSTALL_DIR]/lib/x8664" directory.
7. Modify contents of the “~/.odbc.ini” file, created during installation, using your preferred editor. Update the IP address and port associated with Server to point to your Ryft ONE server.
Doc #1089, V1.2.1/ June 2017 Ryft ODBC Connector: Installation and User Guide
Ryft Systems, Inc. Page 43
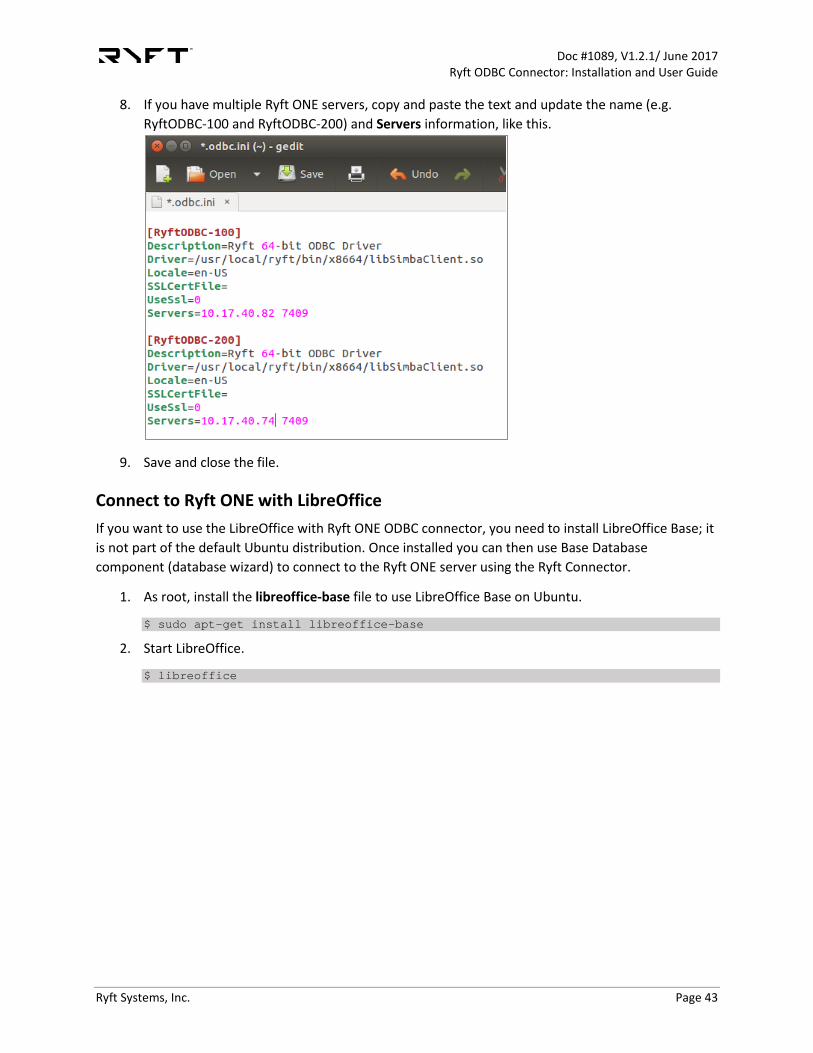
8. If you have multiple Ryft ONE servers, copy and paste the text and update the name (e.g. RyftODBC-100 and RyftODBC-200) and Servers information, like this.
9. Save and close the file.
Connect to Ryft ONE with LibreOffice If you want to use the LibreOffice with Ryft ONE ODBC connector, you need to install LibreOffice Base; it is not part of the default Ubuntu distribution. Once installed you can then use Base Database component (database wizard) to connect to the Ryft ONE server using the Ryft Connector.
1. As root, install the libreoffice-base file to use LibreOffice Base on Ubuntu.
$ sudo apt-get install libreoffice-base
2. Start LibreOffice.
$ libreoffice

Doc #1089, V1.2.1/ June 2017 Ryft ODBC Connector: Installation and User Guide
Ryft Systems, Inc. Page 44
3. In LibreOffice, select Base Database, and the Database Wizard window opens. Select ODBC in the Connect to an existing database drop-down list.
4. Click Next. Browse the ODBC data sources and select RyftODBC. Click OK, and then click Next.

Doc #1089, V1.2.1/ June 2017 Ryft ODBC Connector: Installation and User Guide
Ryft Systems, Inc. Page 45
5. In the Set up the user authentication page, enter the “ryftuser” user name and select the Password required checkbox. Click Test Connection.
6. The Authentication Required window displays. Enter the password for the Ryft ONE server and click OK.
Doc #1089, V1.2.1/ June 2017 Ryft ODBC Connector: Installation and User Guide
Ryft Systems, Inc. Page 46
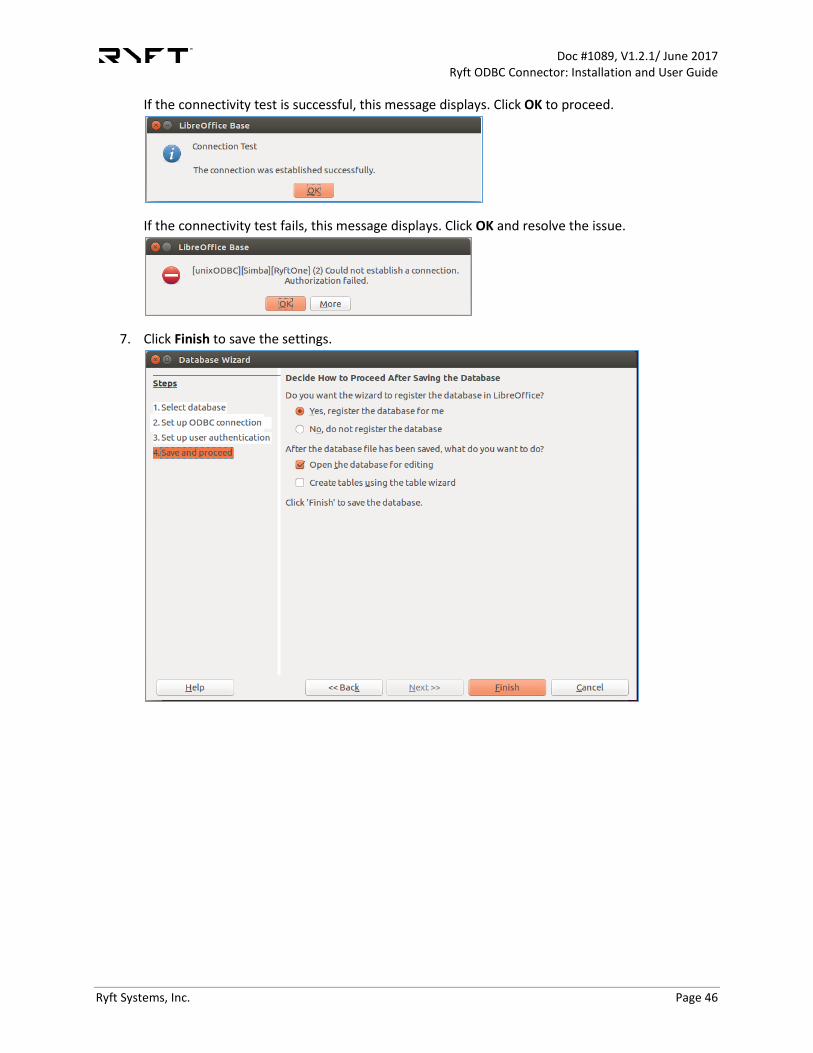
If the connectivity test is successful, this message displays. Click OK to proceed.
If the connectivity test fails, this message displays. Click OK and resolve the issue.
7. Click Finish to save the settings.

Doc #1089, V1.2.1/ June 2017 Ryft ODBC Connector: Installation and User Guide
Ryft Systems, Inc. Page 47
8. Give the connection a name, shown as “Ryft-R0001” in this example, and then click Save.

Doc #1089, V1.2.1/ June 2017 Ryft ODBC Connector: Installation and User Guide
Ryft Systems, Inc. Page 48
9. Lastly, LibreOffice Base starts and shows the tables and views already established on the Ryft ONE server.
Upgrade Linux Client When a new release of the windows client is released, you need to run the new windows installer on your desktop, and set up the connections to your Ryft servers. You can install the new version without uninstalling/deleting the old version, but Simba does not allow Ryft to automatically recreate existing connections to the Ryft server. You must manually re-establish these connections.
Follow the same steps for installation, as covered in the beginning of this chapter. Ensure you complete the Configure Ryft window for each Ryft server connection.
Doc #1089, V1.2.1/ June 2017 Ryft ODBC Connector: Installation and User Guide
Ryft Systems, Inc. Page 49
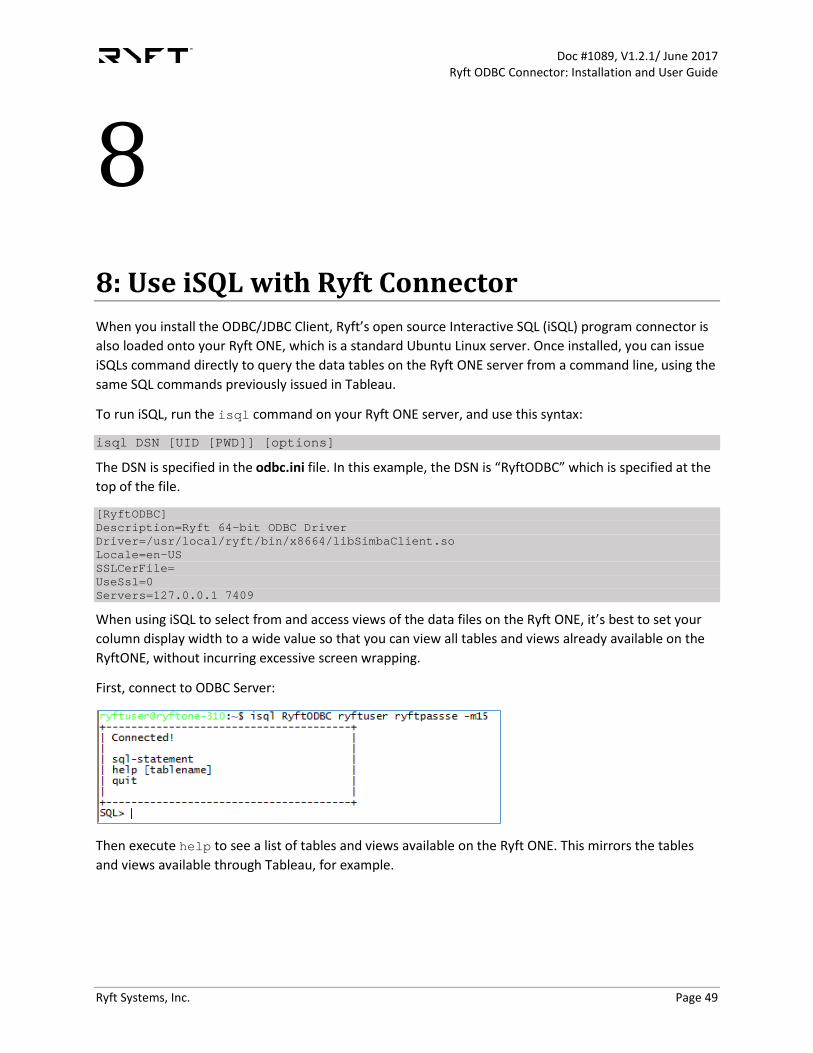
8 8: Use iSQL with Ryft Connector When you install the ODBC/JDBC Client, Ryft’s open source Interactive SQL (iSQL) program connector is also loaded onto your Ryft ONE, which is a standard Ubuntu Linux server. Once installed, you can issue iSQLs command directly to query the data tables on the Ryft ONE server from a command line, using the same SQL commands previously issued in Tableau.
To run iSQL, run the isql command on your Ryft ONE server, and use this syntax:
isql DSN [UID [PWD]] [options]
The DSN is specified in the odbc.ini file. In this example, the DSN is “RyftODBC” which is specified at the top of the file.
[RyftODBC] Description=Ryft 64-bit ODBC Driver Driver=/usr/local/ryft/bin/x8664/libSimbaClient.so Locale=en-US SSLCerFile= UseSsl=0 Servers=127.0.0.1 7409
When using iSQL to select from and access views of the data files on the Ryft ONE, it’s best to set your column display width to a wide value so that you can view all tables and views already available on the RyftONE, without incurring excessive screen wrapping.
First, connect to ODBC Server:
Then execute help to see a list of tables and views available on the Ryft ONE. This mirrors the tables and views available through Tableau, for example.

Doc #1089, V1.2.1/ June 2017 Ryft ODBC Connector: Installation and User Guide
Ryft Systems, Inc. Page 50
For example, you can run this simple SQL statement against the Passengers data file for the exact match of name like “Michelle.”
(Command: select * from Passengers where name like 'Michelle')
You can also join two tables to conduct your query, like these examples:
(Command: select * from Walmart_Stores_by_State JOIN Starbucks_by_State on Walmart_Stores_by_State.State=Starbucks_by_State.State where Walmart_Stores_by_State.State like '-H1(Ala%)' ORDER BY Starbucks_by_State.Population)
Both examples join data tables with Walmart stores by state and Starbucks stores by state:

Doc #1089, V1.2.1/ June 2017 Ryft ODBC Connector: Installation and User Guide
Ryft Systems, Inc. Page 51
• The top example is a fuzzy hamming search looking for any record where the State contains “Ala” in both Starbucks and Walmart data files.
• The bottom example is an edit distance search looking for records where the State is like “Ala” with up to 1 character difference.

Doc #1089, V1.2.1/ June 2017 Ryft ODBC Connector: Installation and User Guide
Ryft Systems, Inc. Page 52
9 9: Troubleshooting The ODBC/JDBC Server creates a log file called ryftone_server.log for all submitted transactions. By default, it’s located in /usr/local/ryft/bin/x8664 but it can be modified by updating the LogPath in the .ryftone.server.ini file, shown here, which is also located in the same directory.
ryftuser@ryftone-310:/usr/local/ryft/bin/x8664$ cat .ryftone.server.ini [Server] LogLevel=6 LogNamespace= LogPath=./ DriverLocale=en-US DriverManagerEncoding=UTF-16 ErrorMessagesPath=../../errormessages ListenAddress=0.0.0.0 ListenPort=7409 UseSsl=0 [REST] RESTServer=http://localhost:8765 #RESTUser=odbcuser #RESTPass=odbcpass [Auth] Type=none LDAPServer=ldap://ldap.forumsys.com:389 LDAPUser=read-only-admin LDAPPassword=password LDAPBaseDN=dc=example,dc=com
You can also modify the logging level in the file by changing the LogLevel parameter. By default, it’s set to "0" or no logging. The maximum is 6 and, if modified, the ODBC server must be restarted.
Only change the LogLevel to capture information when trouble shooting an issue. The options are:
• 0 = Off
• 1 = Fatal; only fatal issues are logged
• 2 = Error; error conditions and fatal issues
• 3 = Warning; warnings, errors and fatal issues
• 4 = Informational; informational messages, warnings, etc.
• 5 = Debug; all debugging information, information messages, etc.
Doc #1089, V1.2.1/ June 2017 Ryft ODBC Connector: Installation and User Guide
Ryft Systems, Inc. Page 53
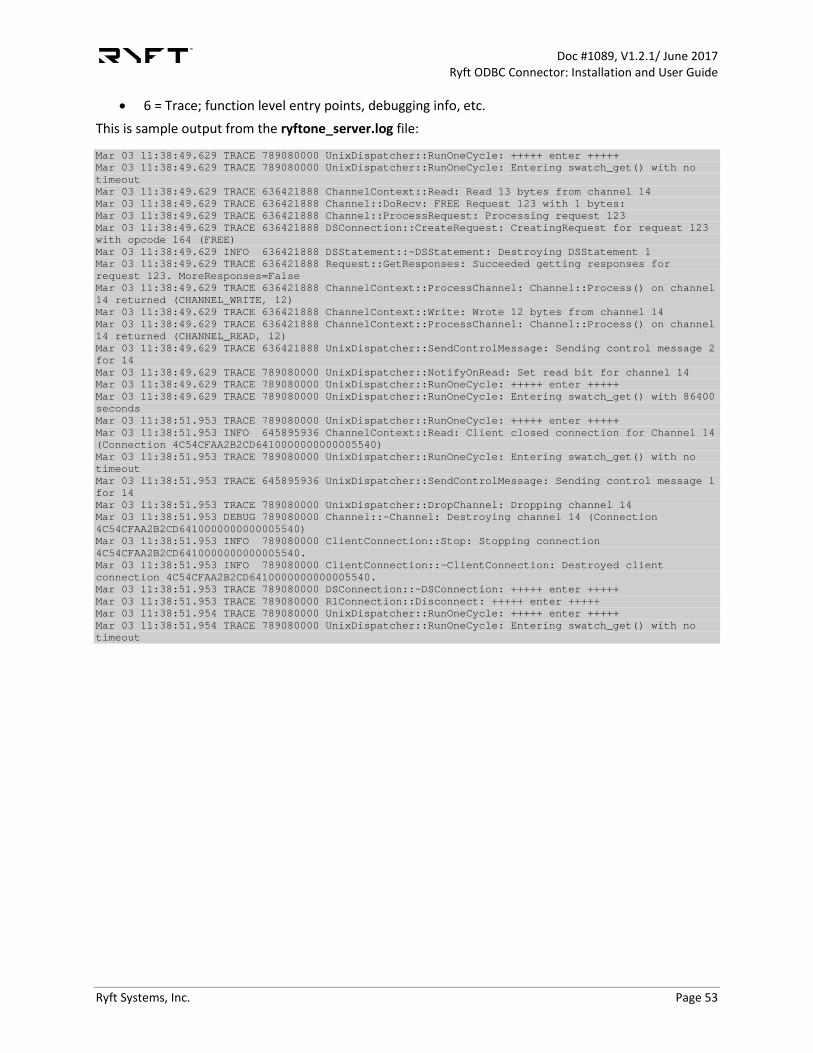
• 6 = Trace; function level entry points, debugging info, etc. This is sample output from the ryftone_server.log file:
Mar 03 11:38:49.629 TRACE 789080000 UnixDispatcher::RunOneCycle: +++++ enter +++++ Mar 03 11:38:49.629 TRACE 789080000 UnixDispatcher::RunOneCycle: Entering swatch_get() with no timeout Mar 03 11:38:49.629 TRACE 636421888 ChannelContext::Read: Read 13 bytes from channel 14 Mar 03 11:38:49.629 TRACE 636421888 Channel::DoRecv: FREE Request 123 with 1 bytes: Mar 03 11:38:49.629 TRACE 636421888 Channel::ProcessRequest: Processing request 123 Mar 03 11:38:49.629 TRACE 636421888 DSConnection::CreateRequest: CreatingRequest for request 123 with opcode 164 (FREE) Mar 03 11:38:49.629 INFO 636421888 DSStatement::~DSStatement: Destroying DSStatement 1 Mar 03 11:38:49.629 TRACE 636421888 Request::GetResponses: Succeeded getting responses for request 123. MoreResponses=False Mar 03 11:38:49.629 TRACE 636421888 ChannelContext::ProcessChannel: Channel::Process() on channel 14 returned (CHANNEL_WRITE, 12) Mar 03 11:38:49.629 TRACE 636421888 ChannelContext::Write: Wrote 12 bytes from channel 14 Mar 03 11:38:49.629 TRACE 636421888 ChannelContext::ProcessChannel: Channel::Process() on channel 14 returned (CHANNEL_READ, 12) Mar 03 11:38:49.629 TRACE 636421888 UnixDispatcher::SendControlMessage: Sending control message 2 for 14 Mar 03 11:38:49.629 TRACE 789080000 UnixDispatcher::NotifyOnRead: Set read bit for channel 14 Mar 03 11:38:49.629 TRACE 789080000 UnixDispatcher::RunOneCycle: +++++ enter +++++ Mar 03 11:38:49.629 TRACE 789080000 UnixDispatcher::RunOneCycle: Entering swatch_get() with 86400 seconds Mar 03 11:38:51.953 TRACE 789080000 UnixDispatcher::RunOneCycle: +++++ enter +++++ Mar 03 11:38:51.953 INFO 645895936 ChannelContext::Read: Client closed connection for Channel 14 (Connection 4C54CFAA2B2CD6410000000000005540) Mar 03 11:38:51.953 TRACE 789080000 UnixDispatcher::RunOneCycle: Entering swatch_get() with no timeout Mar 03 11:38:51.953 TRACE 645895936 UnixDispatcher::SendControlMessage: Sending control message 1 for 14 Mar 03 11:38:51.953 TRACE 789080000 UnixDispatcher::DropChannel: Dropping channel 14 Mar 03 11:38:51.953 DEBUG 789080000 Channel::~Channel: Destroying channel 14 (Connection 4C54CFAA2B2CD6410000000000005540) Mar 03 11:38:51.953 INFO 789080000 ClientConnection::Stop: Stopping connection 4C54CFAA2B2CD6410000000000005540. Mar 03 11:38:51.953 INFO 789080000 ClientConnection::~ClientConnection: Destroyed client connection 4C54CFAA2B2CD6410000000000005540. Mar 03 11:38:51.953 TRACE 789080000 DSConnection::~DSConnection: +++++ enter +++++ Mar 03 11:38:51.953 TRACE 789080000 R1Connection::Disconnect: +++++ enter +++++ Mar 03 11:38:51.954 TRACE 789080000 UnixDispatcher::RunOneCycle: +++++ enter +++++ Mar 03 11:38:51.954 TRACE 789080000 UnixDispatcher::RunOneCycle: Entering swatch_get() with no timeout
Doc #1089, V1.2.1/ June 2017 Ryft ODBC Connector: Installation and User Guide
Ryft Systems, Inc. Page 54
A Appendix A: Commonly Used Acronyms and Terms This guide frequently uses the following acronyms and terms:
Word / Term Description
API Application Programming Interface * Code that allows two software programs to communicate with each other. It defines the correct way for a developer to write a program that requests services from an operating system (OS) or other application.
CLI Command Line Interface * A user interface to a computer’s operating system or an application in which the user responds to a visual prompt by typing in a command on a specified line, receives response back from the system, etc.
JDBC Java Database Connectivity A Java API that enables Java programs to execute SQL statements. This allows Java programs to interact with any SQL-compliant database.
LDAP Lightweight Directory Access Protocol A software protocol for enabling anyone to locate organizations, individuals, and other resources such as files and devices in a network, whether on the public Internet or on a corporate intranet.
ODBC Open Database Connectivity A standard API for accessing database management systems. Built to be independent of database systems and operating systems.
Spark RDD Spark Resilient Distributed Dataset A collection of elements partitioned across the nodes of the cluster that can be operated on in parallel. (See Spark Programming Guide: http://spark.apache.org/docs/latest/programming-guide.html)
RDF Record Definition File It defines how files with a particular extension should be treated by the Ryft system. These settings determine how the file is to be broken up for

Doc #1089, V1.2.1/ June 2017 Ryft ODBC Connector: Installation and User Guide
Ryft Systems, Inc. Page 55
Word / Term Description optimized reads/writes, and specifies whether the file is raw data, text, or structured text (records-based). When dealing with structured text, it is best to define an RDF for that file extension type, so that each record will stay intact as a single entity, and so that operations can be tailored to specific fields, if desired.
REST API Representational State Transfer Application Programming Interface * An application program interface (API) that allows communication between a web-based client and server that employs representational state transfer (REST) constraints. It uses HTTP requests to GET, PUT, POST and DELETE data.
ROL Ryft Open API Library The library that abstracts and manages Ryft ONE hardware resources.
RHFS Ryft Hybrid File System The file system that manages data flow into and out of the Ryft ONE’s advanced array of 48 solid state drives (SSDs).
NOTE: * - Definitions from www.techtarget.com/network.

Doc #1089, V1.2.1/ June 2017 Ryft ODBC Connector: Installation and User Guide
Ryft Systems, Inc. Page 56
B Appendix B: Open Source Ryft uses the following Open Sources in the deployment of the Ryft ONE server, obtained from third parties, that Ryft Systems, Inc. has developed and contribute as open source, and some that are optional open source for the Ryft ONE.
3rd Parties Used in Deployment: Open Source • Ansible – simple IT automation platform that makes your applications and systems easier to
deploy (if customer elects to deploy Ryft Cluster)
• Apache Spark (If customer elects to deploy the Spark connector)
• Consul – cluster management software (if customer elects to deploy Ryft Cluster)
• DKMS – driver management
• Fuse - file systems
• iSQL – interactive SQL tool (only needed if customer elects to deploy the ODBC/JDBC Connector)
• SQL Lite – used for settings database for core Ryft ONE: also used for simple database tool used for caching ODBC/JDBC connector.
• Swagger – simple yet powerful framework for the RESTful API
• Ubuntu - open source operating system platform
3rd Parties Used in Deployment: 3rd Party Purchased • Simba ODBC SDK (only needed if customer elects to deploy the ODBC connector)
Ryft-Developed Code • Ryft Open API – the set of bindings description (headers, etc.) provided for C, C++, Java, see
ryft.com/api for details (API document is a freely downloadable (no login required) PDF document.)
• Ryftprim – an open source command line tool that wraps the Ryft Open API, which enables bash scripting, that Ryft provides to invoke Ryft analytics functions from standard Ubuntu 14.04 LTS Linux.
• Ryft C API Web UI – an open source web-based demo software that Ryft created. Uses the Ryft REST API wrapper that executes the Ryft C API calls from a simple Single Page Application.

Doc #1089, V1.2.1/ June 2017 Ryft ODBC Connector: Installation and User Guide
Ryft Systems, Inc. Page 57
• Ryft JSON RESTFul API published on GitHub
Optional Ryft-Developed Open Source These are Ryft-developed open source that the customer may choose to add to the system.
• Open source ODBC/JDBC connector for SQL access to Ryft functionality; soon to be published on GitHub.
• Open source Spark connector for seamless Ryft ONE integration into Spark clusters. Published on GitHub and also available in Spark-Packages: http://spark-packages.org/package/getryft/spark-ryft-connector.
• Open source Consul connector for integration with Ryft ONE; soon to be published on GitHub.


![DataStaxODBCdriverforApache ......[ODBC Drivers] DataStax ODBC driver for Apache Cassandra and DataStax Enterprise with CQL connector 32-bit=Installed DataStax ODBC driver for Apache](https://static.fdocuments.us/doc/165x107/5f4a5ecf88ed921a2d1ef791/datastaxodbcdriverforapache-odbc-drivers-datastax-odbc-driver-for-apache.jpg)