Run x20 GPS - Timexassets.timex.com/user_guides/W302_RUN_x20/W302_RUN-X20-All... · 2 3 Thank you...
83
Run x20 GPS Quick Start Guide • Guía rápida • Guide de démarrage rapide • Guia Rápido • Guida di avviamento rapido • Kurzanleitung • Snelstartgids WW W302 062-095000 Run x20 n x20 GPS Run x Run x20 GPS S Run x Run x20 GPS S Run x20 GP x20 GPS
Transcript of Run x20 GPS - Timexassets.timex.com/user_guides/W302_RUN_x20/W302_RUN-X20-All... · 2 3 Thank you...

1 2
Run x20 GPSQuick Start Guide
• Guía rápida • Guide de démarrage rapide • Guia Rápido • Guida di avviamento rapido
• Kurzanleitung • Snelstartgids
WW W302 062-095000
Run x20 GPSRun x20 GPSRun x20 GPS Run x20 GPSRun x20 GPSRun x20 GPSRun x20 GPS Run x20 GPSRun x20 GPSRun x20 GPSRun x20 GPS Run x20 GPSRun x20 GPSRun x20 GPSRun x20 GPS Run x20 GPS

3
English 1
Français 23
Español 47
Português 69
Italiano 91
Deutsch 115
Nederlands 139
Table of Contents
Important Safety Instructions and Warnings ...........2What’s Included ..........................................................................................4Getting Started............................................................................................4Introducing the Watch ........................................................................5Charging the Watch ...............................................................................7Navigating the Watch ..........................................................................8First-Time Setup .........................................................................................9Going for a Run .......................................................................................10Interval Training .......................................................................................11Reviewing Workouts ..........................................................................13Troubleshooting .......................................................................................13Full Instructions .......................................................................................14Water Resistance ...................................................................................15Warranty ..........................................................................................................16Declaration of Conformity ...........................................................20
2 3
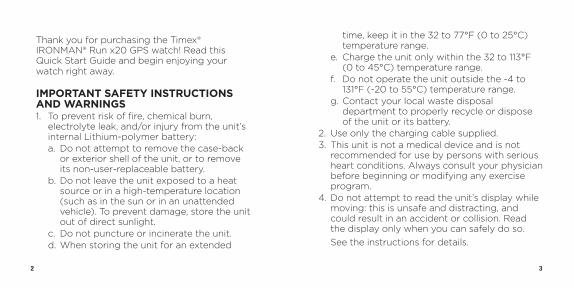
Thank you for purchasing the Timex® IRONMAN® Run x20 GPS watch! Read this Quick Start Guide and begin enjoying your watch right away.
IMPORTANT SAFETY INSTRUCTIONS AND WARNINGS1. To prevent risk of fire, chemical burn,
electrolyte leak, and/or injury from the unit’s internal Lithium-polymer battery:
a. Do not attempt to remove the case-back or exterior shell of the unit, or to remove its non-user-replaceable battery.
b. Do not leave the unit exposed to a heat source or in a high-temperature location (such as in the sun or in an unattended vehicle). To prevent damage, store the unit out of direct sunlight.
c. Do not puncture or incinerate the unit. d. When storing the unit for an extended
time, keep it in the 32 to 77°F (0 to 25°C) temperature range.
e. Charge the unit only within the 32 to 113°F (0 to 45°C) temperature range.
f. Do not operate the unit outside the -4 to 131°F (-20 to 55°C) temperature range.
g. Contact your local waste disposal department to properly recycle or dispose of the unit or its battery.
2. Use only the charging cable supplied.3. This unit is not a medical device and is not
recommended for use by persons with serious heart conditions. Always consult your physician before beginning or modifying any exercise program.
4. Do not attempt to read the unit’s display while moving: this is unsafe and distracting, and could result in an accident or collision. Read the display only when you can safely do so.
See the instructions for details.

4 5
WHAT’S INCLUDED1. Timex® IRONMAN® Run x20 GPS watch2. Charging cable
GETTING STARTEDCongratulations on your purchase of the Timex IRONMAN® Run x20 GPS watch. For first use, please follow this Quick Start Guide to get started:1. Become familiar with your watch 2. Charge your watch3. Learn how to navigate the watch’s display4. Configure your watch5. Record your first workout6. Review your performance
INTRODUCING THE WATCH
STOP / UP (n /p) Highlights the previous item in a menu. Moves up in a screen. Pauses a workout. Increases a setting.
STOP/UPn/p
MENU/ENTER8
BACK/DISPLAYO
POWER/INDIGLO®
NIGHT-LIGHT
START/SPLIT/DOWNu/q

6 7
MENU / ENTER (8 ) Opens the main menu. Selects a highlighted menu option. Moves to the next field in a settings screen. Shows the time display during a workout.
START / SPLIT / DOWN (u/q) Highlights the next item in the menu. Moves down in a screen. Starts a workout. Takes a split. Decreases a setting.
BACK / DISPLAY (O) Returns to the previous menu. Moves to the next display during a stopwatch workout. Shows total time and distance for a few seconds during an interval workout.
POWER / INDIGLO® NIGHT-LIGHT Press to light the night-light for a few seconds. Press and hold to turn the watch on or off.
ICONS
GPS status Solid: GPS is acquired.Flashing: Searching for GPS.
x Alarm Alarm is active and will sound at the programmed time.
Battery status
Solid: Battery charge in 25% increments.Flashing: Watch is powered on and charging.
CHARGING THE WATCHBefore you use the watch the first time, fully charge the battery using your computer or a wall outlet as a power source.1. Attach the charging cable clip to the watch so
the clip’s pins align with the contacts on the back of the watch.
2. Select a power source: • Computer: Insert the free end of the charging
cable into a powered USB port on your computer.

8 9
• Wall outlet: Insert the free end of the charging cable into a USB power adapter, then insert the adapter into a wall outlet.
3. Let the battery charge at least 3 hours.
NAVIGATING THE WATCHUse the p, q, 8 , and O buttons to access the watch’s features. • Press p or q to highlight a menu item. • Press 8 to select the item. • Press O to return to the previous menu.
From the watch’s initial (Time) display, press 8 to open the main menu.
• Workout – Choose a workout: stopwatch (timed) or interval (variable intensity).
• History – Display your saved workouts.• Settings – Customize your watch and
workout settings.
If the display shows p or q at the bottom, press the watch’s p or q button to scroll through additional menu items.
FIRST-TIME SETUPThe first time you power on the watch, you will set up language, units, personal profile, and other required information.1. Press and hold POWER to power on the watch.
The watch then begins the first-time setup process.
If first-time setup does not begin, press 8 to go to the main menu, then select SETTINGS > ABOUT > FACTORY RESET (YES). The watch then powers down. Press and hold POWER to continue.
2. Follow the instructions shown in the watch’s display, using the p, q, 8 , and O buttons.

10 11
GOING FOR A RUN1. From the main menu, select WORKOUT >
STOPWATCH. The watch then automatically searches for GPS. Tip: To acquire GPS more quickly, move away from tall buildings and trees, and stand still.
2. Select START.3. The stopwatch begins timing. While the
workout is running, press O to cycle through workout data.
HANDS-FREE RECORDING Every time you reach a mile or kilometer (chosen in your Distance settings), the watch automatically records a lap.
STOPPING AND SAVING A WORKOUT1. Press n to stop timing. 2. Select SAVE, RESUME, or DISCARD.
INTERVAL TRAININGUse interval training to combine running and walking—or high- and low-intensity running—to improve your endurance and make the most of your workout time.
SETTING UP AN INTERVAL WORKOUT1. From the main menu, select SETTINGS >
INTERVALS. 2. Select INT 1 to configure and select the Name.3. Select to end the interval after a DISTANCE or
after a TIME, and enter the value.4. Repeat for INT 2.
STARTING AN INTERVAL WORKOUT1. From the main menu, select WORKOUT >
INTERVALS.2. Press 8 to confirm the displayed settings. The
watch then automatically searches for GPS. Tip: To acquire GPS more quickly, move away
from tall buildings and trees, and stand still.

12 13
3. From GPS READY, select START.4. During your workout, press O to see elapsed
time and total distance.5. At the end of each interval, the watch beeps
and displays the next interval’s name and the remaining time.
6. When both intervals are complete, the workout repeats and the rep count increases. The intervals continue repeating until you stop the workout.
STOPPING AND SAVING A WORKOUT1. Press n to stop timing. 2. Select SAVE, RESUME, or DISCARD.
REVIEWING WORKOUTSThe workout summary provides complete data about your recent workouts. 1. From the main menu, select HISTORY >
STOPWATCH or INTERVALS. This displays your recent workouts from newest (top) to oldest (bottom).
2. Select the workout to review, then select SUMMARY.
3. Use p and q to scroll through the workout data.
4. Press 8 to return to the main menu.
TROUBLESHOOTING
PROBLEMS CONNECTING TO GPS • Always connect from outside. Acquiring GPS
is difficult indoors. • Move away from buildings and tall trees,
which can interfere with GPS.

14 15
• Stand still. Movement can delay GPS acquisition.
• Do not start running or walking until you acquire GPS.
FULL INSTRUCTIONSFor detailed instructions, consult the full-length User Guide posted at: http://www.Timex.com/Manuals
For instructional videos, visit: http://www.YouTube.com/TimexUSA
WATER RESISTANCEThe Run x20 GPS watch is water-resistant to 50 m (164 ft). You can swim with the watch, but the GPS function will not work while swimming.
Water-Resistance Depth Water Pressure Below Surface
50 m/164 ft 86 PSIA*
*Pounds per square inch absolute
WARNING: To maintain water resistance, do not press watch buttons under water. • The watch is water-resistant only while the
lens, push buttons, and case remain intact. • Do not use the watch for diving. • Rinse the watch with fresh water after every
exposure to perspiration or salt water.

16 17
TIMEX INTERNATIONAL WARRANTY(U.S. – LIMITED WARRANTY – PLEASE SEE FRONT OF INSTRUCTION BOOKLET FOR TERMS OF EXTENDED WARRANTY OFFER)Your TIMEX® device is warranted against manufacturing defects by Timex Group USA, Inc. for a period of ONE YEAR from the original purchase date. Timex and its worldwide affiliates will honor this International Warranty.Please note that Timex may, at its option, repair your device by installing new or thoroughly reconditioned and inspected components or replace it with an identical or similar model. IMPORTANT — PLEASE NOTE THAT THIS WARRANTY DOES NOT COVER DEFECTS OR DAMAGES TO YOUR WATCH:
1) after the warranty period expires;2) if the device was not originally purchased from an
authorized Timex retailer;3) from repair services not performed by Timex;4) from accidents, tampering or abuse; and5) lens or crystal, strap or band, watch case,
attachments or battery. Timex may charge you for replacing any of these parts.
THIS WARRANTY AND THE REMEDIES CONTAINED HEREIN ARE EXCLUSIVE AND IN LIEU OF ALL OTHER WARRANTIES, EXPRESS OR IMPLIED, INCLUDING
ANY IMPLIED WARRANTY OF MERCHANTABILITY OR FITNESS FOR PARTICULAR PURPOSE. TIMEX IS NOT LIABLE FOR ANY SPECIAL, INCIDENTAL OR CONSEQUENTIAL DAMAGES. Some countries and states do not allow limitations on implied warranties and do not allow exclusions or limitations on damages, so these limitations may not apply to you. This warranty gives you specific legal rights and you may also have other rights which vary from country to country and state to state.To obtain warranty service, please return your device to Timex, one of its affiliates or the Timex retailer where the device was purchased, together with a completed original Watch Repair Coupon or, in the U.S. and Canada only, the completed original Watch Repair Coupon or a written statement identifying your name, address, telephone number and date and place of purchase. Please include the following with your device to cover postage and handling (this is not a repair charge): a US$ 8.00 check or money order in the U.S.; a CAN$10.00 cheque or money order in Canada; and a UK£3.50 cheque or money order in the U.K. In other countries, Timex will charge you for postage and handling. NEVER INCLUDE A SPECIAL WATCHBAND OR ANY OTHER ARTICLE OF PERSONAL VALUE IN YOUR SHIPMENT.For the U.S., please call 1-800-328-2677 for additional warranty information. For Canada, call 1-800-263-0981. For Brazil, call +55 (11) 5572 9733. For Mexico, call

18 19
01-800-01-060-00. For Central America, the Caribbean, Bermuda and the Bahamas, call (501) 370-5775 (U.S.). For Asia, call 852-2815-0091. For the U.K., call 44 020 8687 9620. For France, call 03 81 63 42 51 (10 a.m. - 12 Noon). For Germany/Austria: +43 662 88921 30. For the Middle East and Africa, call 971-4-310850. For other areas, please contact your local Timex retailer or Timex distributor for warranty information.©2014 Timex Group USA, Inc. TIMEX and INDIGLO are registered trademarks of Timex Group B.V. and its subsidiaries. IRONMAN® and MDOT are registered trademarks of World Triathlon Corporation. Used here by permission.
TIMEX INTERNATIONAL WARRANTY REPAIR COUPON
Original Purchase Date: ____________________________________(attach a copy of sales receipt, if available)
Purchased by: __________________________________________ (name, address, telephone number)
Place of Purchase: _______________________________________ (name and address)
Reason for Return: _______________________________________
______________________________________________________

20 21
Declaration of ConformityManufacturers Name: Timex Group USA, Inc. Manufacturers Address: 555 Christian Road Middlebury, CT 06762 United States of Americadeclares that the product: Product Name: Timex® Ironman® Run x20 GPSModel Numbers: M062conforms to the following specifications:R&TTE: 2014/53/EU Standards: EN 300 440-1 V1.6.1 (2010-08) EN 300 440-2 V1.4.1 (2010-08) EN 301 489-1 V1.9.2 (2011-09) EN 301 489-3 V1.4.1 (2002-08) IC RSS-310 Issue 3, December 2010LVD: 2006/95/EC Standards: EN 60950-1: 2006/A2:2013Digital Device Emissions Standards: FCC CFR 47 PART 15 B: 2013 EN 55022:2010+AC:2011 EN 55024:2010
Agent: Sam Everett, Quality Regulatory Engineer Date: 10 June, 2014, Middlebury, Connecticut, U.S.A.
22
Sommaire
Instructions de sécurité et mises en garde .............24Ce qui est inclus ......................................................................................26Mise en marche ........................................................................................26Présentation de la montre ...........................................................27Charge de la montre ..........................................................................30Naviguer dans le menu de la montre .............................31Configuration de première utilisation ............................32Effectuer une course .........................................................................33Exercice par intervalles ...................................................................35Récapitulatif des séances d’exercice ..............................37Dépannage ....................................................................................................38Instructions complètes ....................................................................39Étanchéité ......................................................................................................40Garantie.............................................................................................................41Déclaration de conformité ..........................................................45

24 25
Merci d’avoir acheté la montre IRONMAN® Run x20 GPS de Timex® ! Lisez ce Guide de démarrage rapide et profitez de votre montre immédiatement.
INSTRUCTIONS DE SÉCURITÉ ET MISES EN GARDE1. Pour écarter les risques d’incendie, de
brûlure chimique, de fuite d’électrolyte et de blessures causées par la batterie lithium-polymère interne :
a. Ne pas tenter d’enlever le dos du boîtier ou l’enveloppe extérieure de la montre ni sortir la batterie, qui ne peut pas être changée par l’utilisateur.
b. Ne pas laisser la montre exposée à une source de chaleur ou dans un endroit très chaud (au soleil ou dans un véhicule en stationnement, par exemple). Pour éviter les dommages, ranger la montre à l’abri du soleil.
c. Ne pas percer ni incinérer la montre. d. En cas d’inutilisation prolongée, garder la
montre à une température comprise entre 0 et 25°C (32 et 77°F).
e. La charge de la montre ne doit s’effectuer qu’à une température comprise entre 0 et 45°C (32 et 113°F).
f. Ne pas utiliser la montre en dehors de la plage de température comprise entre -20 et 55°C (-4 et 131°F).
g. Consulter le service des ordures ménagères local concernant le recyclage ou l’élimination du produit ou de la batterie.
2. Utiliser uniquement le câble de charge fourni.3. Ceci n’est pas un appareil médical et son emploi
est déconseillé aux personnes souffrant de troubles cardiaques graves. Veiller à toujours consulter un médecin avant d’entamer ou de modifier un programme d’exercice physique.
4. Ne pas tenter de lire l’affichage de la montre durant le déplacement : ceci constitue un
26 27
danger et une distraction, et peut entraîner un accident ou une collision. Lire l’affichage une fois que vous pouvez le faire sans risque.
Voir les instructions détaillées.
CE QUI EST INCLUS1. La montre IRONMAN® Run x20 GPS de Timex®2. Le câble de charge
MISE EN MARCHEFélicitations pour votre achat de la montre IRONMAN® Run x20 GPS de Timex. Pour la première utilisation, veuillez suivre le Guide de démarrage rapide pour commencer :1. Se familiariser avec sa montre 2. Charger sa montre3. Apprendre à naviguer dans le menu de la
montre4. Configurer sa montre5. Enregistrer sa première séance d’exercice6. Revoir sa performance
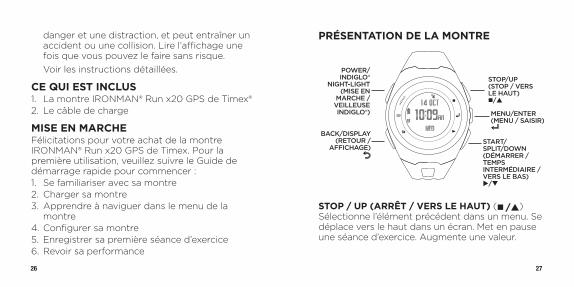
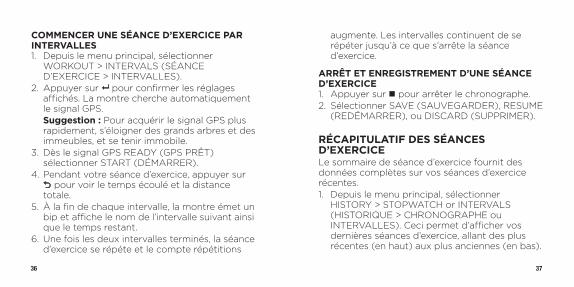
PRÉSENTATION DE LA MONTRE
STOP / UP (ARRÊT / VERS LE HAUT) (n /p) Sélectionne l’élément précédent dans un menu. Se déplace vers le haut dans un écran. Met en pause une séance d’exercice. Augmente une valeur.
STOP/UP (STOP / VERS LE HAUT)n/p
MENU/ENTER (MENU / SAISIR)8
BACK/DISPLAY (RETOUR /
AFFICHAGE)O
POWER/INDIGLO®
NIGHT-LIGHT (MISE EN
MARCHE / VEILLEUSEINDIGLO®)
START/SPLIT/DOWN (DÉMARRER / TEMPS INTERMÉDIAIRE / VERS LE BAS)u/q

28 29
MENU / ENTER (MENU / SAISIR) (8 ) Ouvre le menu principal. Ouvre une option de menu sélectionnée. Passe au champ suivant dans un écran de réglage. Affiche l’heure pendant une séance d’exercice.
START / SPLIT / DOWN (DÉMARRER / TEMPS INTERMÉDIAIRE /VERS LE BAS) (u/q) Sélectionne l’élément suivant dans le menu. Se déplace vers le bas dans un écran. Démarre une séance d’exercice. Marque un temps intermédiaire. Diminue une valeur.
BACK / DISPLAY (RETOUR / AFFICHAGE) (O) Retourne au menu précédent. Passe à l’affichage suivant lors d’une séance d’exercice chronométrée. Affiche la durée totale et la distance pendant quelques secondes pendant une séance d’exercice par intervalles.
POWER / INDIGLO® NIGHT-LIGHT (MISE EN MARCHE / VEILLEUSE INDIGLO®) Appuyer pour utiliser la veilleuse pendant quelques secondes. Appuyer et maintenir enfoncer pour activer ou désactiver la montre.
ICÔNES
Recherche de signal GPS
En continu : Le signal GPS est acquis.Clignotant : Recherche de signal GPS.
x Alarme L’alarme est activée et sonnera à l’heure programmée.
État de la batterie
En continu : Charge de la batterie indiquée en incréments de 25 %.Clignotant : La montre est en marche et en train de se charger.

30 31
CHARGE DE LA MONTREAvant la première utilisation de la montre, charger complètement la batterie en utilisant comme source d’alimentation votre ordinateur ou une prise murale.1. Attacher le clip de charge à la montre de
manière à ce que les broches du clip s’alignent avec les contacts sur le dos de la montre.
2. Sélectionner une source d’alimentation : • Ordinateur : Insérer l’extrémité libre du câble dans
un port USB sous tension sur l’ordinateur. • Prise murale : Insérer l’extrémité libre du
câble dans l’adaptateur secteur USB, puis insérer l’adaptateur dans une prise murale.
3. Charger la batterie pendant au moins 3 heures.
NAVIGUER DANS LE MENU DE LA MONTREUtiliser les boutons p, q, 8 , et O pour accéder aux fonctions de la montre. • Appuyer sur p ou q pour sélectionner un
élément de menu. • Appuyer sur 8 pour ouvrir l’élément. • Appuyer sur O pour retourner au menu
précédent.
Depuis l’affichage initial (heure) de la montre, appuyer sur 8 pour ouvrir le menu principal.
• Séance d’exercice – Choisir une séance d’exercice : chronographe (chronométrage) ou intervalle (intensité variable).
• Historique – Afficher vos séances d’exercice sauvegardées.
• Réglages – Personnaliser les réglages de votre montre et de vos séances d’exercice.

32 33
Si l’affichage indique p ou q au bas de l’écran, appuyer sur le bouton p ou q de la montre pour faire défiler d’autres éléments de menu.
CONFIGURATION DE PREMIÈRE UTILISATIONLors de la première mise en marche de la montre, vous devrez choisir la langue, les unités, le profil d’utilisateur, et indiquer d’autres renseignements.1. Tenir enfoncé POWER (MISE EN MARCHE)
pour activer la montre. La montre commence alors le processus de configuration de première utilisation.
Si la configuration de première utilisation ne commence pas, appuyer sur 8 pour aller au menu principal, puis sélectionner SETTINGS > ABOUT > FACTORY RESET (YES). La montre s’éteint alors. Tenir enfoncé POWER (MISE EN MARCHE) pour continuer.
2. Suivre les instructions indiquées sur l’écran de la montre, en utilisant les boutons p, q, 8 , et O.
EFFECTUER UNE COURSE1. Depuis le menu principal, sélectionner
WORKOUT > STOPWATCH (SÉANCE D’EXERCICE > CHRONOGRAPHE). La montre cherche automatiquement le signal GPS. Suggestion : Pour acquérir le signal GPS plus rapidement, s’éloigner des grands arbres et des immeubles, et se tenir immobile.
2. Sélectionner START (DÉMARRER).3. La montre commence à chronométrer.
Pendant la séance d’exercice en cours de chronométrage, appuyer sur O pour faire défiler les données de la séance d’exercice.

34 35
ENREGISTREMENT MAINS LIBRES Chaque fois que vous atteignez un mile ou un kilomètre (unités choisies dans les réglages de distance), la montre enregistre automatiquement un temps au tour.
ARRÊT ET ENREGISTREMENT D’UNE SÉANCE D’EXERCICE1. Appuyer sur n pour arrêter le chronographe. 2. Sélectionner SAVE (SAUVEGARDER), RESUME
(REDÉMARRER), ou DISCARD (SUPPRIMER).
EXERCICE PAR INTERVALLESUtiliser le mode exercice par intervalles pour combiner course et marche, ou course d’intensité élevée ou faible, pour améliorer votre endurance et tirer le meilleur parti de votre séance d’exercice.
RÉGLAGE D’UNE SÉANCE D’EXERCICE PAR INTERVALLES1. Depuis le menu principal, sélectionner
SETTINGS > INTERVALS (RÉGLAGES > INTERVALLES).
2. Sélectionner INT 1 pour configurer et attribuer un nom.
3. Choisir de terminer un intervalle après une DISTANCE ou un TEMPS donné, puis saisir la valeur.
4. Répéter pour INT 2.
36 37
COMMENCER UNE SÉANCE D’EXERCICE PAR INTERVALLES1. Depuis le menu principal, sélectionner
WORKOUT > INTERVALS (SÉANCE D’EXERCICE > INTERVALLES).
2. Appuyer sur 8 pour confirmer les réglages affichés. La montre cherche automatiquement le signal GPS.
Suggestion : Pour acquérir le signal GPS plus rapidement, s’éloigner des grands arbres et des immeubles, et se tenir immobile.
3. Dès le signal GPS READY (GPS PRÊT) sélectionner START (DÉMARRER).
4. Pendant votre séance d’exercice, appuyer sur O pour voir le temps écoulé et la distance totale.
5. À la fin de chaque intervalle, la montre émet un bip et affiche le nom de l’intervalle suivant ainsi que le temps restant.
6. Une fois les deux intervalles terminés, la séance d’exercice se répéte et le compte répétitions
augmente. Les intervalles continuent de se répéter jusqu’à ce que s’arrête la séance d’exercice.
ARRÊT ET ENREGISTREMENT D’UNE SÉANCE D’EXERCICE1. Appuyer sur n pour arrêter le chronographe. 2. Sélectionner SAVE (SAUVEGARDER), RESUME
(REDÉMARRER), ou DISCARD (SUPPRIMER).
RÉCAPITULATIF DES SÉANCES D’EXERCICELe sommaire de séance d’exercice fournit des données complètes sur vos séances d’exercice récentes. 1. Depuis le menu principal, sélectionner
HISTORY > STOPWATCH or INTERVALS (HISTORIQUE > CHRONOGRAPHE ou INTERVALLES). Ceci permet d’afficher vos dernières séances d’exercice, allant des plus récentes (en haut) aux plus anciennes (en bas).

38 39
2. Choisir la séance d’exercice à revoir, puis selectionner SUMMARY (SOMMAIRE).
3. Utiliser p et q pour faire défiler les données de la séance d’exercice.
4. Appuyer sur 8 pour retourner au menu principal.
DÉPANNAGE
PROBLÈMES DE CONNEXION AU GPS • Toujours se connecter depuis l’extérieur.
L’acquisition du signal GPS est difficile à l’intérieur.
• S’éloigner des grands arbres et des immeubles, qui sont susceptibles de perturber le signal GPS.
• Se tenir immobile. Le déplacement peut ralentir l’acquisition du signal GPS.
• Ne pas commencer à courir ou à marcher tant que le signal GPS n’est pas acquis.
INSTRUCTIONS COMPLÈTESPour des instructions détaillées, consulter le mode d’emploi complet à : http://www.Timex.com/Manuals
Pour des vidéos pédagogiques, visiter : http://www.YouTube.com/TimexUSA

40 41
ÉTANCHÉITÉLa montre Run x20 GPS est étanche jusqu’à 50 m (164 pi). Il est possible de nager avec la montre, mais le GPS ne fonctionne pas tant que vous êtes en train de nager.
Profondeur d’étanchéité Pression d’eau sous la surface
50 m / 164 pi pression absolue de 593 kPa (86 PSIA*)
*Livres par pouce carré (abs.)
ATTENTION : Afin de préserver l’étanchéité, n’appuyer sur aucun bouton lorsque la montre est immergée. • La montre est étanche aussi longtemps que
le verre, les boutons et le boîtier sont intacts. • Ne pas utiliser la montre pour la plongée. • Rincer à l’eau douce après tout contact avec
la transpiration et l’eau de mer.
GARANTIE INTERNATIONALE TIMEX(GARANTIE LIMITÉE – É.-U. – PRIÈRE DE SE REPORTER À LA COUVERTURE DU LIVRET D’INSTRUCTION POUR LES MODALITÉS DE L’OFFRE DE GARANTIE PROLONGÉE)Votre produit TIMEX® est garanti contre les défauts de fabrication par Timex Group USA, Inc. pour une période d’UN AN, à compter de la date d’achat. Timex ainsi que ses filiales du monde entier honoreront cette Garantie Internationale.Timex se réserve le droit de réparer votre appareil en y installant des composants neufs ou révisés, ou bien de le remplacer par un modèle identique ou similaire. IMPORTANT — VEUILLEZ NOTER QUE CETTE GARANTIE NE COUVRE PAS LES DÉFAUTS OU DOMMAGES DE VOTRE MONTRE :
1) après l’expiration de la période de garantie ;2) si l’appareil n’a pas été acheté initialement chez un
revendeur Timex agréé ;3) si la réparation n’a pas été effectuée par Timex ;4) suite à un accident, une falsification ou un emploi
abusif ; et5) s’il s’agit du verre, du bracelet ou brassard,
du boîtier, des accessoires ou de la pile. Le remplacement de ces pièces peut vous être facturé par Timex.

42 43
CETTE GARANTIE ET LES RECOURS AUX PRÉSENTES SONT EXCLUSIFS ET REMPLACENT TOUTE AUTRE GARANTIE, EXPRESSE OU IMPLICITE, Y COMPRIS TOUTE GARANTIE IMPLICITE DE QUALITÉ MARCHANDE OU D’ADAPTATION À UN USAGE PARTICULIER. TIMEX N’EST RESPONSABLE D’AUCUN DOMMAGE PARTICULIER, ACCESSOIRE OU INDIRECT. Certains pays ou états n’autorisent pas les limitations de garanties implicites et n’autorisent pas les exclusions ou limitations pour des dommages, auquel cas lesdites limitations pourraient ne pas vous concerner. Cette garantie vous confère des droits légaux précis. Il se peut que vous bénéficiez d’autres droits, lesquels varient d’un pays à un autre ou d’un état à un autre.Pour obtenir le service de garantie, veuillez retourner votre montre à Timex, à une de ses filiales ou au détaillant Timex où la montre a été achetée. Inclure un coupon de réparation original dûment rempli ou, aux É-U. et au Canada seulement, le coupon original dûment complété ou une déclaration écrite comprenant votre nom, adresse, numéro de téléphone ainsi que la date et le lieu d’achat. Veuillez inclure la somme suivante avec votre appareil pour couvrir les frais de port et de manutention (ce ne sont pas des frais de réparation) : un chèque ou mandat de 8,00 $ US aux États-Unis, de 10,00 $ CAN au Canada et de 3,50 £ au Royaume-Uni. Dans les autres pays, Timex vous facturera les frais d’envoi et de manutention. N’INCLUEZ JAMAIS DANS VOTRE ENVOI UN BRACELET
SPÉCIAL OU TOUT AUTRE ARTICLE AYANT UNE VALEUR PERSONNELLE.Aux É.-U. veuillez composer le 1-800-328-2677 pour plus de renseignements sur la garantie. Au Canada, composez le 1-800-263-0981. Au Brésil, composez le +55 (11) 5572 9733. Au Mexique, composez le 01-800-01-060-00. Pour l’Amérique centrale, les Caraïbes, les Bermudes et les Bahamas, composez le (501) 370-5775 (É.-U.). En Asie, composez le 852-2815-0091. Au Royaume-Uni, composez le 44 020 9620. En France, composez le 03 81 63 42 51 (de 10h à 12h). En Allemagne/Autriche : +43 662 88921 30. Pour le Moyen-Orient et l’Afrique, composez le 971-4-310850. Pour les autres régions, veuillez contacter votre détaillant ou distributeur Timex local pour toute information sur la garantie.©2014 Timex Group USA, Inc., TIMEX, et INDIGLO sont des marques déposées de Timex Group B.V. et de ses filiales. IRONMAN® et MDOT sont des marques déposées de World Triathlon Corporation. Utilisées avec une autorisation.

44 45
GARANTIE INTERNATIONALE TIMEX – COUPON DE RÉPARATION
Date d’achat initiale : _____________________________________(si possible, joindre une copie du reçu)
Acheté par : ____________________________________________ (nom, adresse et numéro de téléphone)
Lieu d’achat : ___________________________________________ (nom et adresse)
Raison du renvoi : ________________________________________
______________________________________________________
Déclaration de conformitéNom du fabricant : Timex Group USA, Inc. Adresse du fabricant : 555 Christian Road Middlebury, CT 06762 États-Unis d’Amériquedéclare que le produit suivant : Nom du produit : Timex® Ironman® Run x20 GPSNuméros de modèle : M062est conforme aux spécifications suivantes :R&TTE : 2014/53/EU Normes : EN 300 440-1 V1.6.1 (2010-08) EN 300 440-2 V1.4.1 (2010-08) EN 301 489-1 V1.9.2 (2011-09) EN 301 489-3 V1.4.1 (2002-08) IC RSS-310 Émis 3, décembre 2010LVD : 2006/95/EC Normes : EN 60950-1: 2006/A2:2013d’émissions d’appareils numériques : Normes : FCC CFR 47 PART 15 B: 2013
EN 55022:2010+AC:2011 EN 55024:2010
Agent : Sam Everett. Ingénieur Qualité Réglementaire Date : le 10.06.14, Middlebury, Connecticut, États-Unis d’Amérique

46
Índice de contenidos
Instrucciones y advertencias importantes de seguridad ........................................................................................48
Lo que va incluido ................................................................................50Para comenzar ..........................................................................................50Introducción al reloj ............................................................................51Carga del reloj ...........................................................................................53Explorando el reloj ...............................................................................54Programación inicial ...........................................................................55Saliendo a correr ....................................................................................56Entrenamiento interválico ............................................................57Revisión de ejercicios ........................................................................59Solución de problemas ....................................................................60Instrucciones completas ................................................................60Resistencia al agua...............................................................................61Garantía .............................................................................................................62Declaración de cumplimiento ..................................................66

48 49
Gracias por la compra del reloj Timex® Ironman® Run x20 GPS . Lea esta guía rápida y comience a disfrutar su reloj enseguida.
INSTRUCCIONES Y ADVERTENCIAS IMPORTANTES DE SEGURIDAD1. Para evitar el riesgo de incendio, quemaduras
químicas, pérdida de electrolitos y/o lesiones debidas a la batería interna de litio-polímero:
a. No intente retirar la tapa trasera ni la cubierta exterior de la unidad o retirar la batería ya que no puede reemplazarla el usuario.
b. No deje la unidad expuesta a una fuente de calor o en un lugar a temperatura elevada (como al sol o en un vehículo desatendido). Para evitar daños guárdela donde no reciba luz solar directa.
c. No perfore ni incinere la unidad. d. Cuando almacene la unida por tiempo
prolongado, manténgala en el rango de 32 a 77°F (0 a 25°C) de temperatura.
e. Cargue la unidad solo dentro del rango de 32 a 113°F (0 a 45°C) de temperatura.
f. No utilice la unidad fuera del rango de -4 a 131°F (-20 a 55°C) de temperatura.
g. Comuníquese con su departamento de desechos para reciclar o desechar adecuadamente la unidad o la batería.
2. Sólo use el cable de carga suministrado.3. Éste no es un dispositivo médico y no se
recomienda que lo utilicen personas con enfermedades cardiacas graves. Consulte siempre a su médico antes de comenzar o modificar un programa de ejercicios.
4. No intente leer la información en la pantalla estando en movimiento: no es seguro, pues distrae y puede ocasionar un accidente o un choque. Lea la pantalla solo cuando lo puede hacer con seguridad.
Vea los detalles en las instrucciones.

50 51
LO QUE VA INCLUIDO1. Reloj Timex® IRONMAN® Run x20 GPS2. Cable de carga
PARA COMENZARFelicitaciones por la compra del reloj Timex IRONMAN® Run x20 GPS. Al usarlo la primera vez, sírvase seguir esta guía resumida para aprender cómo:1. Familiarizarse con su reloj 2. Cargar el reloj 3. Aprender a navegar por la pantalla del reloj4. Programar el reloj5. Grabar su primer ejercicio6. Revisar su rendimiento
INTRODUCCIÓN AL RELOJ
STOP / UP (n/p) Destacar el elemento previo en el menú. Desplazarse hacia arriba en el menú. Pausar un ejercicio. Incrementar un valor programado.
STOP/UP (parar/arriba)n/p
MENU/ENTER8
BACK/DISPLAY (volver/pantalla)
O
POWER (encendido)/
LUZ NOCTURNA
INDIGLO®
START/SPLIT/DOWN (inicio/fracción/abajo)u/q

52 53
MENU / ENTER (8 ) Abrir el menú principal. Seleccionar una opción del menú destacada. Pasar a la siguiente casilla en una pantalla de programación. Mostrar la pantalla de hora durante un ejercicio.
START / SPLIT / DOWN (u/q) Destacar el siguiente elemento en el menú. Desplazarse hacia abajo en el menú. Iniciar un ejercicio. Tomar un intervalo. Disminuir un valor programado.
BACK / DISPLAY (O) Retornar al menú anterior. Pasar a la siguiente pantalla durante un ejercicio cronometrado. Mostrar el tiempo total y la distancia para unos cuantos segundos durante un ejercicio de intervalo.
ENCENDIDO/LUZ NOCTURNA INDIGLO® Presionar para usar la luz nocturna- durante unos cuantos segundos. Pulse y sostenga para encender o apagar el reloj.
SÍMBOLOS
Posición de GPS
Sólido: GPS obtenido.Destellando: Buscando GPS.
x Alarma La alarma está activada y sonará a la hora programada.
Estado de la pila
Sólido: La pila se carga en incrementos de 25%.Destellando: El reloj está encendido y cargando.
CARGA DEL RELOJAntes de usar el reloj por primera vez, cargue por completo la pila usando un computador o el tomacorriente de la pared como fuente.1. Enganche el clip del cable al reloj de modo que
los pines del clip se alineen con los contactos al dorso del reloj.
54 55
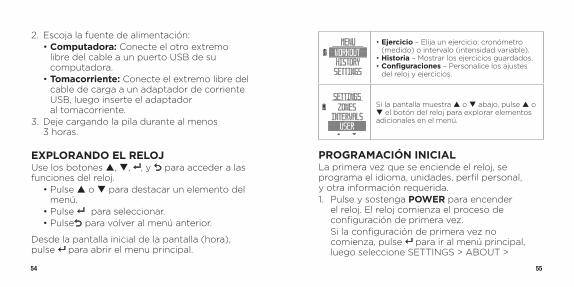
2. Escoja la fuente de alimentación: • Computadora: Conecte el otro extremo
libre del cable a un puerto USB de su computadora.
• Tomacorriente: Conecte el extremo libre del cable de carga a un adaptador de corriente USB, luego inserte el adaptador al tomacorriente.
3. Deje cargando la pila durante al menos 3 horas.
EXPLORANDO EL RELOJUse los botones p, q, 8 , y O para acceder a las funciones del reloj. • Pulse p o q para destacar un elemento del
menú. • Pulse 8 para seleccionar. • PulseO para volver al menú anterior.
Desde la pantalla inicial de la pantalla (hora), pulse 8 para abrir el menu principal.
• Ejercicio – Elija un ejercicio: cronómetro (medido) o intervalo (intensidad variable).
• Historia – Mostrar los ejercicios guardados.• Configuraciones – Personalice los ajustes
del reloj y ejercicios.
Si la pantalla muestra p o q abajo, pulse p o q el botón del reloj para explorar elementos adicionales en el menú.
PROGRAMACIÓN INICIALLa primera vez que se enciende el reloj, se programa el idioma, unidades, perfil personal, y otra información requerida.1. Pulse y sostenga POWER para encender
el reloj. El reloj comienza el proceso de configuración de primera vez.
Si la configuración de primera vez no comienza, pulse 8 para ir al menú principal, luego seleccione SETTINGS > ABOUT >

56 57
FACTORY RESET (YES). El reloj se apagará. Pulse y sostenga POWER para continuar.
2. Siga las instrucciones que aparecen en la pantalla del reloj, usando los botones p, q, 8 y O.
SALIENDO A CORRER1. Desde el menú principal, seleccione
WORKOUT > STOPWATCH. El reloj buscará automáticamente el GPS Sugerencia: Para adquirir la señal GPS más rápido, aléjese de árboles y edificios altos y permanezca quieto.
2. Seleccione START.3. El cronómetro empieza a tomar tiempo.
Mientras el ejercicio está en marcha, pulse O para circular a través de los datos del mismo.
REGISTRO MANOS-LIBRES Cada vez que se alcanza una milla o kilómetro (elegidos en la configuración de distancia), el reloj graba automáticamente una vuelta.
PARAR Y GUARDAR UN EJERCICIO1. Pulse n STOP para parar el cronometraje. 2. Seleccione SAVE, RESUME, o DISCARD.
ENTRENAMIENTO INTERVÁLICOUse el entrenamiento interválico para combinar carrera y caminata —o carrera de alta y baja intensidad— para mejorar resistencia y aprovechar al máximo su ejercicio.
PROGRAMANDO UN EJERCICIO INTERVÁLICO1. Desde el menú principal, seleccione
SETTINGS > INTERVALS. 2. Seleccione INT 1 para configurar y seleccione el
nombre.3. Seleccione el fin del intervalo después de
una DISTANCIA o después de un TIEMPO, e ingrese el valor.
4. Repita para INT 2.

58 59
COMENZANDO UN EJERCICIO INTERVÁLICO1. Desde el menú principal, seleccione
WORKOUT > INTERVALS.2. Pulse 8 para confirmar los ajustes que
aparecen. El reloj buscará automáticamente el GPS
Sugerencia: Para adquirir la señal GPS más rápido, aléjese de árboles y edificios altos y permanezca quieto.
3. Desde GPS READY, seleccion START.4. Durante el ejercicio, pulse O para ver el tiempo
transcurrido y la distancia total.5. Al final de cada intervalo, el reloj da pitidos
y muestra el nombre del siguiente intervalo y el tiempo restante.
6. Cuando ambos intervalos se completan, el ejercicio se repite y el conteo repetitivo se incrementa. Los intervalos continúan repitiéndose hasta que se pare el ejercicio.
PARAR Y GUARDAR UN EJERCICIO1. Pulse n STOP para parar el cronometraje. 2. Seleccione SAVE, RESUME, o DISCARD.
REVISIÓN DE EJERCICIOSEl resumen del ejercicio suministra datos completos acerca de los ejercicios recientes. 1. Desde el menú principal, seleccione HISTORY >
STOPWATCH o INTERVALS. Esto muestra sus ejercicios recientes, desde los más nuevos (arriba) hasta los más antiguos (abajo).
2. Escoja el ejercicio para revisar, luego escoja SUMMARY.
3. Use p y q para desplazarse por los datos del ejercicio.
4. Pulse 8 para volver al menú principal.

60 61
SOLUCIÓN DE PROBLEMAS
PROBLEMAS CONECTÁNDOSE AL GPS • Conéctese siempre al aire libre. Adquirir señal
GPS bajo techo es difícil. • Aléjese de árboles y edificios altos, que
pueden interferir con GPS. • Permanezca quieto. El movimiento retarda la
adquisición de GPS. • No comience a caminar o correr hasta que
adquiera señal GPS.
INSTRUCCIONES COMPLETASPara tener instrucciones completas, consulte la guía de usuario completa en: http://www.Timex.com/Manuals
Para instrucciones en video, visite: http://www.YouTube.com/TimexUSA
RESISTENCIA AL AGUAEl reloj Run x20 GPS es resistente al agua a 50 m (164 pies). Puede nadar con el reloj, pero el GPS no funcionará mientras esté nadando.
Profundidad de Resistencia al Agua
Presión Bajo la Superficie del Agua
50 m/164 pies 86 PSIA*
*libras por pulgada cuadrada absoluta
ADVERTENCIA: Para mantener la resistencia al agua, no pulse ningún botón bajo el agua. • El reloj es resistente al agua solamente
mientras el cristal, los botones y la caja estén intactos.
• No utilice el reloj para buceo. • Enjuague el reloj con agua fresca después de
la exposición al sudor o agua salada.

62 63
GARANTÍA INTERNACIONAL DE TIMEX(GARANTÍA LIMITADA EN EE. UU. – VEA LA PARTE DELANTERA DEL FOLLETO DE INSTRUCCIONES RESPECTO A LOS TÉRMINOS DE LA OFERTA DE GARANTÍA EXTENDIDA)Timex Group USA, Inc garantiza su dispositivo TIMEX® contra defectos de fabricación durante un periodo de UN AÑO a partir de la fecha de compra original. Timex y sus sucursales en todo el mundo respaldarán esta garantía internacional.Cabe aclarar que Timex puede, a su elección, reparar su dispositivo con componentes nuevos o reacondicionados e inspeccionados cuidadosamente o reemplazarlo por un modelo idéntico o similar. IMPORTANTE: POR FAVOR ADVIERTA QUE ESTA GARANTÍA NO CUBRE DEFECTOS O DAÑOS A SU RELOJ:
1) después de vencido el plazo de la garantía;2) si el dispositivo no se compró inicialmente a un
minorista de Timex autorizado;3) si las reparaciones efectuadas no las hizo Timex;4) si son consecuencia de accidentes, manipulación no
autorizada o abuso, y5) en el cristal o lente, la correa o pulsera, la caja, los
accesorios o la pila. Timex podrá cobrarle por el reemplazo de cualquiera de estas piezas.
ESTA GARANTÍA Y LAS COBERTURAS QUE CONTIENE SON EXCLUSIVAS Y SUSTITUYEN A CUALQUIER OTRA GARANTÍA, EXPRESA O IMPLÍCITA, INCLUSO CUALQUIER GARANTÍA IMPLÍCITA DE COMERCIABILIDAD O ADECUACIÓN PARA UN FIN PARTICULAR. TIMEX NO SE HARÁ RESPONSABLE POR CUALQUIER DAÑO ESPECIAL, SECUNDARIO O A CONSECUENCIA. En ciertos países y estados no se permiten limitaciones de las garantías implícitas ni exclusiones o limitaciones de daños, por lo cual puede que estas limitaciones no sean de aplicación en su caso particular. Esta garantía le concede derechos legales específicos; usted también podría estar amparado por otros derechos, que varían según el país y el estado donde viva.Para solicitar los servicios incluidos en la garantía, devolver el dispositivo a Timex, a una de sus sucursales o al comercio minorista adonde se compró el reloj, adjuntando el cupón de reparación que originalmente viene con éste. En EE. UU. y Canadá se puede adjuntar el original del cupón de reparación del reloj o una nota en la que figure su nombre, domicilio, número de teléfono, fecha y lugar de compra. Para cubrir gastos de manejo y envío (éste no es el costo de la reparación), por favor incluya junto con su reloj GPS lo siguiente: En EE. UU., un cheque o giro por valor de US $ 8.00 (dólares estadounidenses); en Canadá, un cheque o giro por valor de CAN $10.00 (dólares canadienses); en el Reino Unido,

64 65
un cheque o giro por valor de UK £ 3.50 (libras). En otros países, Timex se encargará de cobrarle el importe por gastos de envío. NO INCLUIR CON EL ENVÍO UNA PULSERA ESPECIAL NI NINGÚN OTRO ARTÍCULO DE VALOR PERSONAL.En EE.UU., por favor llame al 1-800-328-2677 para obtener información adicional sobre la garantía. En Canadá, llame al 1-800-263-0981. En Brasil, llame al +55 (11) 5572 9733. En México, llame al 01-800-01-060-00. En América Central, el Caribe, Bermudas y Bahamas, llame al (501) 370-5775 (U.S.). En Asia, llame al 852-2815-0091. En el Reino Unido, llame al 44 020 8687 9620. En Francia, llame al 03 81 63 42 51 (de 10 am a 12 del mediodía). En Alemania o Austria: +43 662 88921 30. En Medio Oriente y África, llame al 971-4-310850. En otras regiones, comuníquese con su minorista local de Timex o el distribuidor de Timex para obtener información sobre la garantía.©2014 Timex Group USA, Inc. TIMEX e INDIGLO son marcas registradas de Timex Group B.V. y sus afiliados. IRONMAN® y MDOT son marcas registradas de World Triathlon Corporation. Usadas aquí con permiso.
CUPÓN DE REPARACIÓN DE LA GARANTÍA INTERNACIONAL TIMEX
Fecha de compra original: __________________________________(si está disponible, adjunte el recibo de compra)
Comprado por: __________________________________________ (nombre, dirección y número de teléfono)
Lugar de compra: ________________________________________ (nombre y dirección)
Motivo de la devolución: ___________________________________
______________________________________________________

66 67
Declaración de cumplimientoNombre del fabricante: Timex Group USA, Inc Dirección del fabricante: 555 Christian Road Middlebury, CT 06762 United States of Americadeclara que el producto: Nombre del producto: Timex® Ironman® Run x20 GPSNúmeros de modelo: M062cumple con las siguientes especificaciones del producto:R&TTE: 2014/53/EU Normas: EN 300 440-1 V1.6.1 (2010-08) EN 300 440-2 V1.4.1 (2010-08) EN 301 489-1 V1.9.2 (2011-09) EN 301 489-3 V1.4.1 (2002-08) IC RSS-310 Expedido 3, diciembre 2010LVD: 2006/95/EC Normas: EN 60950-1: 2006/A2:2013Emisiones de dispositivos digitales Normas: FCC CFR 47 PART 15 B: 2013 EN 55022:2010+AC:2011 EN 55024:2010
Agente: Sam Everett, Ingeniero regulador de calidad Fecha: 10 de junio de 2014, Middlebury, Connecticut, U.S.A.

68
Índice
Instruções de segurança e advertências importantes ...........................................................................................70
A embalagem contém......................................................................72Início da utilização ................................................................................72Apresentação do seu relógio ...................................................73Carregar a bateria do relógio ..................................................75Conhecendo o relógio ......................................................................76Configuração inicial .............................................................................77Faça uma corrida ...................................................................................78Treinamento com intervalos ......................................................79Revendo os exercícios ......................................................................81Resolução de problemas ...............................................................82Intruções completas ...........................................................................83Resistência à água ................................................................................83Garantia .............................................................................................................85Declaração de conformidade...................................................89

70 71
Parabéns pela compra do relógio Timex® IRONMAN® Run x20 com GPS! Leia o guia rápido e comece a desfrutar do seu aparelho imediatamente.
INSTRUÇÕES DE SEGURANÇA E ADVERTÊNCIAS IMPORTANTES1. Para evitar o risco de incêndios, queimaduras
químicas, vazamento de eletrólitos e/ou lesões relativos à bateria interna de polímero de lítio do relógio:
a. Não tente retirar a parte posterior da caixa ou o invólucro externo do relógio nem retire a bateria que não é substituível pelo usuário.
b. Não deixe o relógio exposto a fontes de calor ou em altas temperaturas (como deixá-lo ao sol ou em um veículo). Para evitar danos, armazene o relógio protegido da ação direta de raios solares.
c. Não perfure nem incinere o relógio. d. Quando armazenar o relógio por períodos
prolongados, mantenha dentro da faixa de temperatura de 0 a 25°C (32 a 77°F).
e. Carregue o relógio em uma faixa de temperatura de 0 a 45°C (32 a 113°F).
f. Não utilize o relógio fora da faixa de temperatura de 0 a 55°C (32 a 131°F).
g. Entre em contato com o departamento de limpeza local para reciclar ou descartar adequadamente o relógio ou a bateria.
2. Para carregar, use somente o cabo fornecido.3. Este relógio não é um aparelho médico e não
deve ser utilizado por pessoas com doenças cardíacas graves. Consulte sempre o seu médico antes de iniciar ou modificar qualquer programa de exercício.
4. Não tente ler a informação no mostrador quando você estiver se movimentando pois não é seguro, causa distração e poderá causar
72 73
um acidente ou colisão. Leia o mostrador apenas quando for seguro.
Consulte as instruções para obter informações detalhadas.
A EMBALAGEM CONTÉM1. Relógio Timex® IRONMAN® Run x20 com GPS2. Cabo para carregar
INÍCIO DA UTILIZAÇÃOParabéns pela compra do relógio Timex IRONMAN® Run x20 com GPS. Antes de usar pela primeira vez, siga o guia rápido abaixo:1. Familiarize-se com o seu relógio 2. Carregue a bateria do seu relógio3. Aprenda como passar através das diferentes
telas do relógio4. Configure o seu relógio5. Grave o seu primeiro exercício6. Reveja os dados da sua performance
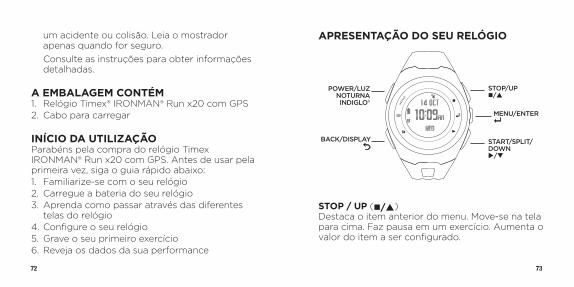
APRESENTAÇÃO DO SEU RELÓGIO
STOP / UP (n/p) Destaca o item anterior do menu. Move-se na tela para cima. Faz pausa em um exercício. Aumenta o valor do item a ser configurado.
STOP/UPn/p
MENU/ENTER8
BACK/DISPLAYO
POWER/LUZ NOTURNA INDIGLO®
START/SPLIT/DOWNu/q

74 75
MENU / ENTER (8 ) Abre o menu principal. Seleciona uma opção de menu que está destacada. Passa para o campo seguinte em uma tela de configuração. Mostra a tela da hora durante um exercício.
START / SPLIT / DOWN (u/q) Destaca o item seguinte do menu. Move-se na tela para baixo. Inicia um exercício. Registra um tempo fracionado. Diminui o valor do item a ser configurado.
BACK / DISPLAY (O) Volta para o menu anterior. Passa para a tela seguinte durante um exercício cronometrado. Mostra a distância e o tempo total, por alguns segundos, durante um exercício de intervalos.
POWER (LIGAR) / LUZ NOTURNA INDIGLO® Pressione para acender a luz noturna durante alguns segundos. Mantenha pressionado para ligar ou desligar a luz do relógio.
ÍCONES
Estado do GPS
Sólido: O GPS foi adquirido.Piscando: Buscando o GPS.
x Alarme O alarme está ativo e tocará na hora programada.
Estado da bateria
Sólido: A bateria carrega de 25 em 25%.Piscando: O relógio está ligado e carregando.
CARREGAR A BATERIA DO RELÓGIOAntes de usar o relógio pela primeira vez, carregue totalmente a bateria usando o seu computador ou uma tomada de parede como fonte de corrente elétrica.1. Conecte o clipe do cabo de carregar ao relógio
para que o pinos do clipe se alinhem com os contatos na parte posterior do relógio.

76 77
2. Selecione uma fonte de corrente elétrica: • Computador: Insira a extremidade livre
do cabo de carregar em uma entrada USB energizada do seu computador.
• Tomada de parede: Insira a extremidade livre do cabo de carregar em um carregador com USB e, em seguida, conecte o transformador à tomada de parede.
3. Deixe carregar a bateria durante pelo menos 3 horas.
CONHECENDO O RELÓGIOUtilize os botões p, q, 8 , e O para acessar as funções do relógio. • Pressione p ou q para destacar um item
do menu. • Pressione 8 para selecionar o item. • Pressione O para voltar para o menu anterior.
No mostrador inicial do relógio (Hora), pressione 8 para abrir o menu principal.
• Exercício – Escolha um exercício: cronometrado (com contagem de tempo) ou com intervalos (intensidade variável).
• História – Mostra os seus exercícios salvos.• Configurações – Personalize o seu relógio e
as configurações dos exercícios.
Se o mostrador apresenta p ou q na parte inferior, pressione o botão p ou q do relógio para passar pelos outros itens do menu.
CONFIGURAÇÃO INICIALA primeira vez que ligar o relógio, você vai configurar o idioma, as unidades, o perfil pessoal e outras informações necessárias.1. Mantenha POWER pressionado para ligar
o relógio. O relógio começa então o processo de configuração inicial.

78 79
Se a configuração inicial não começa, pressione 8 para ir para o menu principal e, em seguida, selecione SETTINGS > ABOUT > FACTORY RESET (YES). O relógio apaga-se. Mantenha POWER pressionado para continuar.
2. Siga as instruções apresentadas no mostrador do relógio, utilizando os botões p, q, 8 , e O.
FAÇA UMA CORRIDA1. Do menu principal, selecione WORKOUT >
STOPWATCH. O relógio começa a busca automática do GPS. Dica: Para adquirir o GPS mais rápido, afaste-se de árvores e edifícios altos, e fique parado.
2. Selecione START.3. O cronógrafo começa a cronometrar. Enquanto
um exercício está em progresso, pressione O para percorrer a informação do exercício.
GRAVAÇÃO COM MÃOS LIVRES Cada vez que você chega a uma milha ou quilômetro (escolha na sua configuração de Distância), o relógio grava automaticamente uma volta.
PARANDO E SALVANDO UM EXERCÍCIO1. Pressione n para parar a cronometragem. 2. Selecione SALVAR, CONTINUAR ou
DESCARTAR.
TREINAMENTO COM INTERVALOSUtilize o treinamento com intervalos para combinar correr e caminhar — ou corrida de alta e baixa intensidade — para melhorar a sua resistência e tirar o melhor resultado possível do seu tempo de exercício.

80 81
CONFIGURAÇÃO DE UM EXERCÍCIO COM INTERVALOS1. Do menu principal, selecione SETTINGS >
INTERVALS. 2. Selecione INT 1 para configurar e selecionar
o Nome.3. Selecione o fim do intervalo depois de uma
DISTÂNCIA ou depois de um TEMPO e insira o valor.
4. Repita para o INT 2.
INICIANDO UM EXERCÍCIO COM INTERVALOS1. Do menu principal, selecione WORKOUT >
INTERVALS.2. Pressione 8 para confirmar a configuração
mostrada. O relógio começa a busca automática do GPS.
Dica: Para adquirir o GPS mais rápido, afaste-se de árvores e edifícios altos, e fique parado.
3. Do GPS READY, selecione START.
4. Durante o seu exercício, pressione O para ver o tempo decorrido e a distância total.
5. No fim de cada intervalo, o relógio emite um bipe e mostra o nome do intervalo seguinte e o tempo remanescente.
6. Quando os dois intervalos estão completos, o exercício repete-se e a contagem do número das repetições aumenta. Os intervalos continuam a repetir-se até que você pare o exercício.
PARANDO E SALVANDO UM EXERCÍCIO1. Pressione n para parar a cronometragem. 2. Selecione SALVAR, CONTINUAR ou
DESCARTAR.
REVENDO OS EXERCÍCIOSO sumário do exercício fornece a informação completa sobre os seus exercícios recentes. 1. Do menu principal, selecione HISTORY >
STOPWATCH ou INTERVALS. Isto mostra

82 83
os seus exercícios recentes desde o mais novo (na parte superior) até ao mais velho (na parte inferior).
2. Selecione o exercício que quer rever e, em seguida, selecione SUMMARY.
3. Utilize p e q para rever a informação do exercício.
4. Pressione 8 para voltar para o menu principal.
RESOLUÇÃO DE PROBLEMAS
PROBLEMAS CONECTANDO COM O GPS • Conecte sempre na rua. É difícil de adquirir
o sinal de GPS dentro de casa. • Afaste-se de edifícios e árvores altas os quais
podem interferir com o GPS. • Fique parado. O movimento pode demorar
a aquisição de GPS. • Não comece a caminhar ou a correr até ter
adquirido o sinal de GPS.
INTRUÇÕES COMPLETASPara obter instruções mais detalhadas, consulte o guia do usuário completo publicado em: http://www.Timex.com/Manuals
Para vídeos instrutivos, visite: http://www.YouTube.com/TimexUSA
RESISTÊNCIA À ÁGUAO relógio Run x20 com GPS é à prova d'água até 50 m (164 ft). Você pode nadar com o relógio, mas a função de GPS não funcionará enquanto estiver nadando.
Profundidade da resistência à água
Pressão da água abaixo da superfície
50 m/164 pés 86 PSIA*
*Pressão absoluta em libras por polegada quadrada
84 85
ADVERTÊNCIA: Para manter a resistência à água, não pressione nenhum botão quando estiver debaixo d’água. • O relógio é à prova d'água enquanto as
lentes, os botões e a caixa se mantiverem intactos.
• Não use o relógio para mergulhar. • Enxágue o relógio com água doce cada vez
que entre em contato com transpiração ou água salgada.
GARANTIA INTERNACIONAL TIMEX(EUA – GARANTIA LIMITADA – VEJA NA PARTE FRONTAL DO MANUAL DO USUÁRIO OS TERMOS DA OFERTA DA EXTENSÃO DA GARANTIA)A Timex Group USA, Inc. garante o seu aparelho TIMEX® contra defeitos de fabricação por um período de UM ANO a partir da data original da compra. A Timex e suas filiais em todo o mundo reconhecerão esta Garantia Internacional.Observe que a Timex poderá opcionalmente consertar o seu aparelho colocando componentes novos ou totalmente recondicionados e inspecionados ou substituí-lo por um modelo idêntico ou similar. IMPORTANTE – OBSERVE QUE ESTA GARANTIA NÃO COBRE DEFEITOS OU DANOS OCASIONADOS AO SEU RELÓGIO:
1) após vencer o período de garantia;2) se o aparelho não foi comprado originalmente de
um revendedor Timex autorizado;3) se for por consertos não executados pela Timex;4) se for devido a acidentes, adulteração ou abuso; e5) se o defeito for no cristal, na pulseira, na caixa
do relógio, nos acessórios ou na bateria. A Timex poderá cobrar o custo de substituição de qualquer uma dessas peças.
86 87
ESTA GARANTIA E OS RECURSOS AQUI CONTIDOS SÃO EXCLUSIVOS E SUBSTITUEM TODAS AS OUTRAS GARANTIAS, EXPRESSAS OU IMPLÍCITAS, INCLUSIVE QUALQUER GARANTIA IMPLÍCITA DE COMERCIABILIDADE OU ADEQUAÇÃO A UM FIM PARTICULAR. A TIMEX NÃO ASSUME NENHUMA RESPONSABILIDADE QUANTO A DANOS ESPECIAIS, INCIDENTAIS OU INDIRETOS. Alguns países e Estados não permitem limitações sobre garantias implícitas nem permitem exclusões ou limitações de danos, por isso, essas limitações poderão não se aplicar ao seu caso. Esta garantia lhe confere direitos legais específicos, bem como outros direitos, os quais variam de um país para outro e de um estado para outro.Para obter o serviço de garantia, devolva o seu aparelho à Timex, a uma das filiais ou ao revendedor autorizado Timex onde o aparelho foi comprado, juntamente com o Cupom de Conserto original devidamente preenchido ou, somente nos EUA e no Canadá, o Cupom de Conserto original devidamente preenchido ou uma declaração por escrito identificando o seu nome, endereço, número de telefone, data e local da compra. Com o seu aparelho inclua o seguinte pagamento para cobrir as despesas de envio (não se refere a custos de conserto): nos Estados Unidos, um cheque ou vale postal no valor de 8,00 dólares americanos; no Canadá, um cheque ou vale postal no valor de 10,00 dólares canadenses; no Reino Unido, um cheque ou vale postal no valor de 3,50 libras
esterlinas. Nos outros países, deverá pagar as despesas de frete. NUNCA INCLUA NENHUMA PULSEIRA ESPECIAL OU OUTRO ARTIGO DE VALOR PESSOAL NA SUA REMESSA.Nos EUA, ligue para 1-800-328-2677 para obter informações adicionais sobre a garantia. No Canadá, ligue para 1-800-263-0981. No Brasil, ligue para +55 (11) 5572 9733. No México, ligue para 01-800-01-060-00. Na América Central, no Caribe, nas Bermudas e nas Bahamas, ligue para (501) 370-5775 (EUA). Na Ásia, ligue para 852-2815-0091. No Reino Unido, ligue para 44 020 8687 9620. Na França, ligue para 03 81 63 42 51 (das 10h às 12h). Na Alemanha/Áustria: +43 662 88921 30. No Oriente Médio e na África, ligue para 971-4-310850. Para outras regiões, entre em contato com o representante autorizado ou distribuidor Timex para obter informações sobre garantia.©2014 Timex Group USA, Inc. TIMEX e INDIGLO são marcas comerciais registradas da Timex Group B.V. e suas subsidiárias. IRONMAN® e MDOT são marcas comerciais registradas da World Triathlon Corporation. Utilizados aqui com autorização.

88 89
CUPOM DA GARANTIA INTERNACIONAL TIMEX PARA CONSERTO
Data original da compra: ___________________________________(se possível, anexe uma cópia do recibo de venda)
Comprador: ____________________________________________ (nome, endereço e número de telefone)
Local da compra: ________________________________________ (nome e endereço)
Motivo da devolução: _____________________________________
______________________________________________________
Declaração de conformidadeNome do fabricante: Timex Group USA, Inc. Endereço do fabricante: 555 Christian Road Middlebury, CT 06762 EUAdeclara que o produto: Nome do produto: Timex® Ironman® Run x20 com GPSNúmero do modelo: M062está em conformidade com as seguintes especificações:R&TTE: 2014/53/EU Padrões: EN 300 440-1 V1.6.1 (2010-08) EN 300 440-2 V1.4.1 (2010-08) EN 301 489-1 V1.9.2 (2011-09) EN 301 489-3 V1.4.1 (2002-08) IC RSS-310 Edição 3, dezembro 2010LVD: 2006/95/EC Padrões: EN 60950-1: 2006/A2:2013Emissões Digitais do Aparelho Padrões: FCC CFR 47 PART 15 B: 2013 EN 55022:2010+AC:2011 EN 55024:2010
Representante: Sam Everett, Engenheiro de Regulamentação e Qualidade Data: 10 de junho de 2014, Middlebury, Connecticut, EUA

90
Indice generaleImportanti avvertenze e istruzioni per
la sicurezza ............................................................................................92Contenuto .......................................................................................................94Come iniziare ..............................................................................................95Presentiamo l'orologio .....................................................................96Caricare l'orologio .................................................................................99Come spostarsi nell'ambito delle funzioni
dell'orologio .......................................................................................100Approntamento per la prima volta che
si usa il prodotto ..........................................................................101Fare una corsa ........................................................................................102Allenamento a intervalli ...............................................................103Come esaminare gli allenamenti .......................................106Risoluzione dei problemi ............................................................107Istruzioni complete ...........................................................................107Resistenza all'acqua .........................................................................108Garanzia .........................................................................................................109Dichiarazione di conformità ....................................................113
92 93
Grazie di aver acquistato l'orologio con GPS Timex® IRONMAN® Run x20! Leggete questa Guida di avviamento rapido per poter iniziare subito a godervi il vostro orologio.
IMPORTANTI AVVERTENZE E ISTRUZIONI PER LA SICUREZZA1. Per prevenire il rischio di incendio, ustioni
chimiche, perdite di elettroliti e/o lesioni derivanti dalla batteria interna al polimero di litio di questa unità, attenersi a quanto segue.
a. Non tentare di rimuovere il retro della cassa né il guscio esterno dell'unità, e non rimuovere la batteria non sostituibile dall'utente.
b. Non lasciare l'unità esposta a fonti di calore o in un luogo in cui siano presenti alte temperature (come ad esempio al sole o in un veicolo non custodito). Per prevenire danni, conservare l'unità lontano dalla luce solare diretta.
c. Non forare né incenerire l'unità. d. Quando si ripone l'unità per lunghi periodi,
conservarla a temperature comprese fra 0 e 25 °C (32-77 °F).
e. Caricare l'unità solo mentre si trova a temperature comprese fra 0 e 45 °C (32-113 °F).
f. Non operare l'unità al di fuori dell'intervallo di temperature compreso fra -20 e 55 °C (fra -4 e 131 °F).
g. Contattare l'ente locale responsabile dello smaltimento dei rifiuti per informazioni su come riciclare o smaltire adeguatamente l'unità o la sua batteria.
2. Usare solo il cavo di ricarica in dotazione.3. Quest'unità non è un dispositivo medico e il
suo uso non è consigliato alle persone con gravi cardiopatie. Consultare sempre il proprio medico prima di iniziare o modificare qualsiasi programma di esercizio fisico.

94 95
4. Non cercare di leggere il display dell'unità mentre ci si muove: questo è poco sicuro e causa distrazioni, e potrebbe portare a un incidente o una collisione. Leggere il display solo quando lo si può fare in modo sicuro.
Consultare le istruzioni per i dettagli.
CONTENUTO1. Orologio con GPS Timex® IRONMAN® Run x202. Cavo di ricarica
COME INIZIARECongratulazioni per l'acquisto dell'orologio con GPS Timex® IRONMAN® Run 20. Per l’uso iniziale, si prega di seguire questa Guida di avviamento rapido per:1. Familiarizzarsi con l'orologio 2. Caricare l'orologio3. Imparare come spostarsi nell'ambito del
display dell'orologio4. Configurare l'orologio5. Registrare il primo allenamento6. Esaminare le proprie prestazioni

96 97
PRESENTIAMO L'OROLOGIO
STOP / UP (SU) (n/p) Evidenzia la voce precedente in un menu. Sposta verso l'alto in una schermata. Mette in pausa un allenamento. Aumenta un'impostazione.
MENU / ENTER (INVIO) (8 ) Apre il menu principale. Seleziona un'opzione di menu evidenziata. Passa al campo successivo in una schermata di impostazioni. Mostra il display dell'ora durante un allenamento.
START / SPLIT / DOWN (AVVIO / TEMPO INTERMEDIO / GIÚ) (u/q) Evidenzia la voce successiva nel menu. Sposta verso il basso in una schermata. Avvia un allenamento. Registra un tempo intermedio. Diminuisce un'impostazione.
BACK (INDIETRO) / DISPLAY (O) Ritorna al menu precedente. Passa al display successivo durante un allenamento con cronometro. Mostra per alcuni secondi il tempo totale e la distanza durante un allenamento a intervalli.
STOP/UP (SU)n/p
MENU/ENTER (INVIO)8
BACK (INDIETRO)/
DISPLAY O
POWER (ACCENSIONE)/
INDIGLO®ILLUMINAZIONE
DEL QUADRANTE
START/SPLIT/DOWN(AVVIO/TEMPO INTERMEDIO/GIÚ)u/q

98 99
ACCENSIONE / ILLUMINAZIONE DEL QUADRANTE INDIGLO® Premere per accendere per alcuni secondi l'illuminazione del quadrante. Premere e tenere premuto per accendere o spegnere l'orologio.
ICONE
Stato del GPS
Ferma: segnale del GPS in corso di acquisizione.Lampeggiante: ricerca del segnale GPS.
x Sveglia La sveglia è abilitata e suonerà all'ora programmata.
Stato della batteria
Ferma: carica della batteria in incrementi del 25%Lampeggiante: l'orologio è acceso e in corso di carica.
CARICARE L'OROLOGIOPrima di usare l'orologio per la prima volta, caricare completamente la batteria usando il computer o una presa da parete come fonte di alimentazione.1. Collegare all'orologio la clip del cavo di
ricarica in modo che i pin della clip siano allineati con i contatti sul retro dell'orologio.
2. Scegliere una fonte di alimentazione fra le seguenti.
• Computer: inserire l’estremità libera del cavo di ricarica ad una porta USB alimentata sul computer.
• Presa da parete: inserire l’estremità libera del cavo di ricarica in un adattatore di alimentazione USB, e poi inserire l'adattatore in una presa da parete.
3. Lasciare in carica la batteria per almeno 3 ore.

100 101
COME SPOSTARSI NELL'AMBITO DELLE FUNZIONI DELL'OROLOGIOUsare i pulsanti p, q, 8 , e O per accedere alle funzioni dell'orologio. • Premere p o q per evidenziare una voce
di menu. • Premere 8 per selezionare la voce. • Premere O per ritornare al menu precedente.
Dal display iniziale dell'orologio (Ora), premere 8 per aprire il menu principale.
• Workout (Allenamento) – Per scegliere un allenamento: stopwatch/cronometro (allenamento cronometrato) o interval/intervallo (allenamento a intensità variabile).
• History (Storico) – Per visualizzare gli allenamenti salvati.
• Settings (Impostazioni) – Per person aliz-zare le impostazioni dell'orologio e degli allenamenti.
Se il display mostra p o q sul fondo, premere il pulsante p o q dell'orologio per scorrere fino alle voci di menu addizionali.
APPRONTAMENTO PER LA PRIMA VOLTA CHE SI USA IL PRODOTTOLa prima volta che si accende l'orologio, si impostano la lingua, le unità di misura, il profilo personale e altre informazioni richieste.1. Premere e tenere premuto il pulsante
ACCENSIONE per accendere l'orologio. L'orologio inizia quindi il processo di approntamento per la prima volta che si usa il prodotto
Se tale processo non ha inizio, premere 8 per passare al menu principale, quindi selezionare SETTINGS (impostazioni) > ABOUT (informazioni su) > FACTORY RESET (YES) [ripristino valori di fabbrica
102 103
(Sì)]. L'orologio si spegne. Premere e tenere premuto il pulsante ACCENSIONE per continuare.
2. Seguire le istruzioni indicate sul display dell'orologio, usando i pulsanti p, q, 8 e O.
FARE UNA CORSA1. Dal menu principale, selezionare WORKOUT
(allenamento) > STOPWATCH (cronometro). L'orologio cerca automaticamente il segnale GPS. Consiglio: per acquisire più rapidamente il segnale GPS, allontanarsi da edifici ed alberi alti, e restare fermi.
2. Selezionare START (Avvio).3. Il cronometro inizia il cronometraggio. Mentre
è in corso l'allenamento, premere O per passare in rassegna i dati relativi.
REGISTRAZIONE SENZA L'USO DELLE MANI Ogni volta che si raggiunge un miglio o un chilometro (a seconda della selezione nelle impostazioni sulla Distanza), l'orologio registra automaticamente un giro.
INTERRUZIONE E MEMORIZZAZIONE DI UN ALLENAMENTO1. Premere n per interrompere il cronometraggio. 2. Selezionare SAVE (salva), RESUME (riprendi)
o DISCARD (elimina).
ALLENAMENTO A INTERVALLIUsare l'allenamento a intervalli per combinare la corsa e il cammino — oppure la corsa ad alta o bassa intensità — al fine di migliorare la propria resistenza e sfruttare al meglio il tempo dedicato all'allenamento.

104 105
COME IMPOSTARE UN ALLENAMENTO A INTERVALLI1. Dal menu principale, selezionare SETTINGS
(impostazioni) > INTERVALS (intervalli). 2. Selezionare INT 1 per configurare e selezionare
il Name (nome).3. Selezionare di terminare l'intervallo dopo
una DISTANCE (distanza) o dopo un TIME (tempo), e inserire il valore.
4. Ripetere per l'INT 2.
AVVIARE UN ALLENAMENTO A INTERVALLI1. Dal menu principale, selezionare WORKOUT
(allenamento) > INTERVALS (intervalli).2. Premere 8 per confermare le impostazioni
visualizzate. L'orologio cerca automaticamente il segnale GPS.
Consiglio: per acquisire più rapidamente il segnale GPS, allontanarsi da edifici ed alberi alti, e restare fermi.
3. Da GPS READY (GPS pronto), selezionare START (avvio).
4. Durante l'allenamento, premere O per vedere il tempo trascorso e la distanza totale.
5. Al termine di ciascun intervallo, l'orologio emette un segnale acustico e visualizza il nome dell'intervallo successivo e il tempo restante.
6. Quando entrambi gli intervalli sono stati completati, l'allenamento si ripete e aumenta il conteggio delle ripetizioni. Gli intervalli continuano a ripetersi fino a quando l'utente interrompe l'allenamento.
INTERRUZIONE E MEMORIZZAZIONE DI UN ALLENAMENTO1. Premere n per interrompere il
cronometraggio. 2. Selezionare SAVE (salva), RESUME (riprendi)
o DISCARD (elimina).

106 107
COME ESAMINARE GLI ALLENAMENTIIl riepilogo degli allenamenti offre dati completi sui propri allenamenti recenti. 1. Dal menu principale, selezionare HISTORY
(storico) > STOPWATCH (cronometro) o INTERVALS (intervalli). Questo visualizza i propri allenamenti recenti, dal più recente (in alto) fino al meno recente (in basso).
2. Selezionare l'allenamento da esaminare, quindi selezionare SUMMARY (riepilogo).
3. Usare p e q per passare in rassegna i dati sull'allenamento.
4. Premere 8 per ritornare al menu principale.
RISOLUZIONE DEI PROBLEMI
PROBLEMI DI COLLEGAMENTO AL GPS • Collegarsi sempre all'aperto. L'acquisizione
del segnale GPS è difficile negli interni. • Allontanarsi da edifici e alberi alti, che
possono interferire con il segnale GPS. • Restare fermi. Il movimento può ritardare
l'acquisizione del segnale GPS. • Non iniziare a correre o a camminare finché
non si acquisisce il segnale GPS.
ISTRUZIONI COMPLETEPer istruzioni dettagliate, consultare l'intera Guida dell'utente affissa all'indirizzo: http://www.Timex.com/Manuals
Per filmati di istruzioni, visitare il sito: http://www.YouTube.com/TimexUSA

108 109
RESISTENZA ALL'ACQUAL'orologio con GPS Run x20 è resistente all'acqua fino a 50 m (164 piedi). Si può nuotare indossando l'orologio, ma la funzione di GPS non funziona mentre si nuota.
Profondità di resistenza all’acqua
Pressione dell'acqua sotto la superficie
50 m/164 piedi 86 PSIA*
*Libbre per pollice quadrato assolute
AVVERTENZA: per mantenere la resistenza all'acqua, non premere i pulsanti dell'orologio mentre ci si trova sott'acqua. • L'orologio è impermeabile solo se la lente,
i pulsanti e la cassa restano intatti. • Non usare l'orologio per le immersioni
subacquee. • Sciacquare l'orologio con acqua dolce dopo
l'esposizione al sudore o all'acqua marina.
GARANZIA INTERNAZIONALE TIMEX(U.S.A. – GARANZIA LIMITATA – PER I TERMINI DELL'OFFERTA DI GARANZIA ESTESA LEGGERE LA PRIMA PAGINA DEL LIBRETTO DI ISTRUZIONI)Il dispositivo TIMEX® è garantito contro difetti di produzione dalla Timex Group USA, Inc. per un periodo di UN ANNO dalla data di acquisto originaria. Timex e le sue affiliate di tutto il mondo onoreranno questa Garanzia Internazionale.Si prega di notare che la Timex potrà, a sua discrezione, riparare il dispositivo installando componenti nuovi o accuratamente ricondizionati e ispezionati, oppure sostituirlo con un modello identico o simile. IMPORTANTE — SI PREGA DI NOTARE CHE QUESTA GARANZIA NON COPRE I DIFETTI O I DANNI ALL'OROLOGIO:
1) dopo la scadenza del periodo di garanzia;2) se il dispositivo non era stato acquistato
originariamente presso un dettagliante autorizzato Timex;
3) causati da servizi di riparazione non eseguiti da Timex;
4) causati da incidenti, manomissione o abuso; e5) a lente o cristallo, cinturino in pelle o a catena,
cassa dell'orologio, periferiche o batteria. Timex
110 111
potrebbe addebitare al cliente la sostituzione di una qualsiasi di queste parti.
QUESTA GARANZIA E I RIMEDI IN ESSA CONTENUTI SONO ESCLUSIVI E SOSTITUISCONO TUTTE LE ALTRE GARANZIE, ESPRESSE O IMPLICITE, INCLUSA QUALSIASI GARANZIA IMPLICITA DI COMMERCIABILITÀ O IDONEITÀ AD UN USO PARTICOLARE. TIMEX NON È RESPONSABILE DI NESSUN DANNO SPECIALE, INCIDENTALE O CONSEQUENZIALE. Alcuni Paesi e Stati non permettono limitazioni su garanzie implicite e non permettono esclusioni o limitazioni sui danni; pertanto queste limitazioni potrebbero non pertenere al cliente. Questa garanzia dà al cliente diritti legali specifici, e il cliente potrebbe avere anche altri diritti, che variano da Paese a Paese e da Stato a Stato.Per ottenere il servizio sotto garanzia, si prega di restituire il dispositivo a Timex, ad una delle sue affiliate o al rivenditore Timex dove è stato acquistato il dispositivo, insieme al Buono di riparazione originale compilato o, solo negli U.S.A. e nel Canada, insieme al Buono di riparazione compilato o una dichiarazione scritta indicante nome, indirizzo, numero di telefono e data e luogo dell'acquisto. Per coprire le spese di spedizione e gestione (non si tratta di addebiti per la riparazione) si prega di allegare al dispositivo quanto segue: un assegno o un vaglia da US $8,00 negli U.S.A.;
un assegno o vaglia da CAN $10,00 in Canada; un assegno o vaglia da UK £3,50 nel Regno Unito. Negli altri Paesi, la Timex addebiterà il cliente per le spese di spedizione e la gestione. NON ALLEGARE MAI ALLA SPEDIZIONE UN CINTURINO SPECIALE O QUALSIASI ALTRO ARTICOLO DI VALORE PERSONALE.Per gli U.S.A., si prega di chiamare il numero 1-800-328-2677 per ulteriori informazioni sulla garanzia. Per il Canada, chiamare l'1-800-263-0981. Per il Brasile, chiamare il +55 (11) 5572 9733. Per il Messico, chiamare lo 01-800-01-060-00. Per America Centrale, Caraibi, Bermuda e Bahamas, chiamare il (501) 370-5775 (U.S.A.). Per l'Asia, chiamare l'852-2815-0091. Per il Regno Unito, chiamare il 44 020 8687 9620. Per la Francia, chiamare lo 03 81 63 42 51 (dalle ore 10 alle ore 12). Germania/Austria: +43 662 88921 30. Per il Medio Oriente e l'Africa, chiamare il 971-4-310850. Per altre zone, contattare il proprio dettagliante o distributore Timex di zona per informazioni sulla garanzia.©2014 Timex Group USA, Inc. TIMEX e INDIGLO sono marchi depositati del Timex Group B.V. e delle sue sussidiarie. IRONMAN® ed MDOT sono marchi depositati di World Triathlon Corporation. Usati qui dietro licenza.

112 113
GARANZIA INTERNAZIONALE TIMEX - BUONO DI RIPARAZIONE
Data dell'acquisto originario: _______________________________(se possibile, allegare una copia della ricevuta di acquisto)
Acquistato da: _________________________________________ (nome, indirizzo e numero di telefono)
Luogo dell'acquisto: _____________________________________ (nome e indirizzo)
Motivo della restituzione: _________________________________
_____________________________________________________
Dichiarazione di conformitàNome del fabbricante: Timex Group USA, Inc. Indirizzo del fabbricante: 555 Christian Road Middlebury, CT 06762 Stati Uniti d'Americadichiara che il prodotto: Nome del prodotto: Timex® Ironman® Run x20 GPSNumeri modello: M062è conforme alle seguenti specifiche di prodotto:R&TTE: 2014/53/UE Norme: EN 300 440-1 V1.6.1 (2010-08) EN 300 440-2 V1.4.1 (2010-08) EN 301 489-1 V1.9.2 (2011-09) EN 301 489-3 V1.4.1 (2002-08) IC RSS-310 edizione 3, dicembre 2010LVD: 2006/95/CE Norme: EN 60950-1: 2006/A2:2013Emissioni dei dispositivi digitali Norme: FCC CFR 47 PARTE 15 B: 2013 EN 55022:2010+AC:2011 EN 55024:2010
Agente: Sam Everett, Ingegnere addetto alla qualità normativa Data: 10 giugno 2014, Middlebury, Connecticut, U.S.A.

114
Inhaltsverzeichnis
Wichtige Sicherheitsanleitungen ......................................116Lieferumfang ............................................................................................118Erste Schritte ...........................................................................................119Uhr-Einführung ......................................................................................120Die Uhr aufladen ..................................................................................123Uhr-Wegweiser .....................................................................................124Ersteinrichtung ......................................................................................125Beim Laufen ..............................................................................................126Intervall-Training ..................................................................................127Trainingseinheiten einsehen ...................................................130Problemlösungen ................................................................................131Vollständige Anleitung .................................................................131Streckendatenkeit ..............................................................................132Garantie..........................................................................................................133Konformitätserklärung ..................................................................137

116 117
Vielen Dank für Ihren Kauf der Timex® IRONMAN® Run x20 GPS Uhr! Sie können direkt nach dem Lesen dieser Schnellstart-Anleitung mit der Nutzung Ihrer Uhr beginnen.
WICHTIGE SICHERHEITSANLEITUNGEN1. Informationen zur Vermeidung von
Brandrisiko, chemischen Verbrennungen, Elektrolytlecks bzw. Verletzungen durch den internen Lithium-Polymer-Akku der Uhr:
a. Nicht versuchen, die Rückseite oder Außenhülle der Uhr bzw. den nicht durch den Benutzer austauschbaren Akku zu entfernen.
b. Die Uhr nicht einer Hitzequelle ausgesetzt oder an einem Ort mit hoher Temperatur (z. B. in der Sonne oder in einem unbeaufsichtigten Fahrzeug) lassen. Zur Vermeidung von Schäden, die Uhr außerhalb direkter Sonneneinstrahlung aufbewahren.
c. Die Uhr nicht durchstechen oder verbrennen.
d. Beim Lagern über einen längeren Zeitraum, die Uhr innerhalb des Temperaturbereichs von 0°C bis 25°C lagern.
e. Die Uhr nur in einem Temperaturbereich von 0°C bis 45°C aufladen.
f. Die Uhr nicht außerhalb des Tempera-turbereichs von -20°C bis 55°C verwenden.
g. Informationen über die ordnungsgemäße Entsorgung der Uhr oder des Akkus erhalten Sie von Ihrer örtlichen Abfallentsorgungsbehörde.
2. Verwenden Sie ausschließlich das mitgelieferte Ladekabel.
3. Diese Uhr ist kein medizinisches Gerät und nicht geeignet für Personen mit Herzproblemen. Ziehen Sie stets den Rat Ihres Arztes zu Hilfe, bevor Sie ein Trainingsprogramm beginnen oder ändern.

118 119
4. Versuchen Sie nicht, das Uhrendisplay während der Fahrt zu lesen. Es ist nicht sicher und lenkt ab und kann zu einem Unfall oder Zusammenstoß führen. Lesen Sie das Display nur, wenn Ihre Sicherheit gewährleistet ist.
Detailinformationen hierzu finden Sie in den Anleitungen.
LIEFERUMFANG1. Timex® IRONMAN® Run x20 GPS Uhr2. Ladekabel
ERSTE SCHRITTEHerzlichen Glückwunsch zum Erwerb der Timex IRONMAN® Run x20 GPS Uhr. Machen Sie sich vor der ersten Verwendung mit dieser Schnellstart-Anleitung vertraut:1. Lernen Sie Ihre Uhr kennen 2. Laden Sie Ihre Uhr auf3. Machen Sie sich mit dem Display der Uhr
vertraut4. Konfigurieren Sie Ihre Uhr5. Zeichnen Sie Ihre erste Trainingseinheit auf6. Überprüfen Sie Ihre Leistung

120 121
UHR-EINFÜHRUNG
STOP / UP (Stopp/Hoch) (n/p) Den vorherigen Posten im Menü markieren. Auf dem Display nach oben bewegen. Eine Trainingseinheit anhalten. Eine Einstellung hinaufsetzen.
MENU / ENTER (Menü/Eingabe) (8 ) Das Hauptmenü öffnen. Eine markierte Menüoption auswählen. Zum nächsten Feld in einem Einstellungsdisplay wechseln. Die Zeit während einer Trainingseinheit anzeigen.
START / SPLIT / DOWN (Start/Zwischenzeit/Hinunter) (u/q) Den nächsten Posten im Menü markieren. Auf dem Display nach unten bewegen. Mit einer Trainingseinheit beginnen. Zwischenzeit aufzeichnen. Eine Einstellung hinabsetzen.
BACK / DISPLAY (Zurück/Anzeigen) (O) Zurück zum vorherigen Menü wechseln. Zur nächsten Anzeige bei einer Trainingseinheit mit Stoppuhr wechseln. Zeigt mehrere Sekunden lang die Gesamtdauer und -entfernung während eines Intervall-Trainings an.
STOP/UP (Stopp/Hoch)n/p
MENU/ENTER (Menü/Eingabe)8
BACK/DISPLAY (Zurück/
Anzeigen)O
POWER (Ein/Aus)/INDIGLO®
NIGHT-LIGHT(Zifferblatt-
beleuchtung)
START/SPLIT/DOWN (Start/(Zwischenzeit/Herunter)u/q

122 123
POWER / INDIGLO® NIGHT-LIGHT (Ein/Aus / Zifferblattbeleuchtung) Zur Verwendung der Zifferblattbeleuchtung einige Sekunden lang drücken. Drücken und halten, um Uhr ein- oder auszuschalten.
SYMBOLE
GPS-Status Ausgefüllt: GPS geortet.Blinkt: Sucht nach GPS.
x Wecker Weckruf wurde eingestellt, der zur festgelegten Zeit ertönt.
Akkustatus
Ausgefüllt: Akkuladung in Einheiten von 25 %.Blinkt: Uhr ist eingeschaltet und wird aufgeladen.
DIE UHR AUFLADENVor der ersten Verwendung der Uhr muss der Akku voll aufgeladen werden. Schließen Sie die Uhr dafür an einen Computer oder eine Steckdose an.1. Beim Anschließen des Aufladekabel-Clips
an die Uhr die Metallstifte des Clips mit den Kontakten auf der Rückseite der Uhr ausrichten.
2. Eine Stromquelle auswählen: • Computer: Das freie Ende des Aufladekabels
in einen USB-Anschluss auf Ihrem Computer einstecken.
• Steckdose: Das freie Ende des Ladekabels in ein USB-Netzteil einstecken und dieses dann in die Steckdose stecken.
3. Den Akku mindestens 3 Stunden lang aufladen lassen.
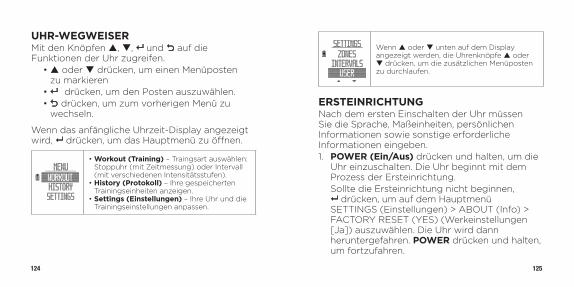
124 125
UHR-WEGWEISERMit den Knöpfen p, q, 8 und O auf die Funktionen der Uhr zugreifen. • p oder q drücken, um einen Menüposten
zu markieren • 8 drücken, um den Posten auszuwählen. • O drücken, um zum vorherigen Menü zu
wechseln.
Wenn das anfängliche Uhrzeit-Display angezeigt wird, 8 drücken, um das Hauptmenü zu öffnen.
• Workout (Training) – Traingsart auswählen: Stoppuhr (mit Zeitmessung) oder Intervall (mit verschiedenen Intensitätsstufen).
• History (Protokoll) – Ihre gespeicherten Trainingseinheiten anzeigen.
• Settings (Einstellungen) – Ihre Uhr und die Trainingseinstellungen anpassen.
Wenn p oder q unten auf dem Display angezeigt werden, die Uhrenknöpfe p oder q drücken, um die zusätzlichen Menüposten zu durchlaufen.
ERSTEINRICHTUNGNach dem ersten Einschalten der Uhr müssen Sie die Sprache, Maßeinheiten, persönlichen Informationen sowie sonstige erforderliche Informationen eingeben.1. POWER (Ein/Aus) drücken und halten, um die
Uhr einzuschalten. Die Uhr beginnt mit dem Prozess der Ersteinrichtung.
Sollte die Ersteinrichtung nicht beginnen, 8 drücken, um auf dem Hauptmenü SETTINGS (Einstellungen) > ABOUT (Info) > FACTORY RESET (YES) (Werkeinstellungen [Ja]) auszuwählen. Die Uhr wird dann heruntergefahren. POWER drücken und halten, um fortzufahren.

126 127
2. Den auf der Uhr angezeigten Anweisungen mithilfe der Knöpfe p, q, 8 und O folgen.
BEIM LAUFEN1. Auf dem Hauptmenü WORKOUT (Training) >
STOPWATCH (Stoppuhr) auswählen. Die Uhr sucht dann automatisch nach einem GPS-Signal. Tipp: Zur schnelleren Ortung des GPS-Signals von hohen Gebäuden und hohen Bäumen entfernen und nicht bewegen.
2. START wählen.3. Die Stoppuhr beginnt mit der Zeitmessung. Bei
laufender Trainingseinheit O drücken, um die Trainingsdaten zu durchlaufen.
FREIHANDAUFNAHME Beim Erreichen jedes Kilometers oder jeder Meile (gemäß der Entfernungseinstellungen) zeichnet die Uhr automatisch eine Runde auf.
EINE TRAININGSEINHEIT ABBRECHEN UND SPEICHERN1. n drücken, um die Zeitmessung zu beenden. 2. SAVE (Speichern), RESUME (Fortsetzen) oder
DISCARD (Verwerfen) auswählen.
INTERVALL-TRAININGBeim Intervall-Training können Sie Laufen und Gehen kombinieren – bzw. intensives und weniger intensives Laufen –, um Ihre Ausdauer zu verbessern und am meisten von Ihrem Training zu profitieren.
EIN INTERVALL-TRAINING EINSTELLEN1. Auf dem Hauptmenü SETTINGS
(Einstellungen) > INTERVALS (Intervalle) auswählen.
2. INT 1 zur Konfiguration auswählen und benennen.
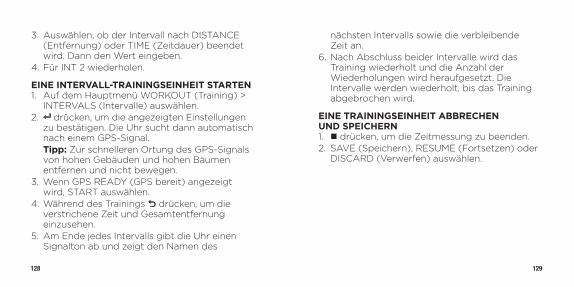
128 129
3. Auswählen, ob der Intervall nach DISTANCE (Entfernung) oder TIME (Zeitdauer) beendet wird. Dann den Wert eingeben.
4. Für INT 2 wiederholen.
EINE INTERVALL-TRAININGSEINHEIT STARTEN1. Auf dem Hauptmenü WORKOUT (Training) >
INTERVALS (Intervalle) auswählen.2. 8 drücken, um die angezeigten Einstellungen
zu bestätigen. Die Uhr sucht dann automatisch nach einem GPS-Signal.
Tipp: Zur schnelleren Ortung des GPS-Signals von hohen Gebäuden und hohen Bäumen entfernen und nicht bewegen.
3. Wenn GPS READY (GPS bereit) angezeigt wird, START auswählen.
4. Während des Trainings O drücken, um die verstrichene Zeit und Gesamtentfernung einzusehen.
5. Am Ende jedes Intervalls gibt die Uhr einen Signalton ab und zeigt den Namen des
nächsten Intervalls sowie die verbleibende Zeit an.
6. Nach Abschluss beider Intervalle wird das Training wiederholt und die Anzahl der Wiederholungen wird heraufgesetzt. Die Intervalle werden wiederholt, bis das Training abgebrochen wird.
EINE TRAININGSEINHEIT ABBRECHEN UND SPEICHERN1. n drücken, um die Zeitmessung zu beenden. 2. SAVE (Speichern), RESUME (Fortsetzen) oder
DISCARD (Verwerfen) auswählen.

130 131
TRAININGSEINHEITEN EINSEHENIn der Trainingsübersicht werden alle Daten Ihrer aktuellsten Trainingseinheiten dargestellt. 1. Auf dem Hauptmenü HISTORY (Protokoll) >
STOPWATCH (Stoppuhr) oder INTERVALS (Intervalle) auswählen. Hierdurch werden Ihre aktuellsten Trainingseinheiten von der aktuellsten (oben) bis zur ältesten (unten) angezeigt.
2. Die zu überprüfende Trainingseinheit auswählen und SUMMARY (Übersicht) wählen.
3. p und q drücken, um die Trainingsdaten zu durchlaufen.
4. 8 drücken, um zum vorherigen Menü zu wechseln.
PROBLEMLÖSUNGEN
PROBLEME BEIM GPS-ANSCHLUSS • Immer draußen orten. Die GPS-Ortung in
Innenräumen ist schwierig. • Von Gebäuden und hohen Bäumen entfernen.
die bei der GPS-Ortung stören können. • Nicht bewegen. Bewegung kann die GPS-
Ortung verzögern. • Nicht Laufen oder Gehen, bis das GPS-Signal
geortet wurde.
VOLLSTÄNDIGE ANLEITUNGEine ausführliche Anleitung finden Sie im vollständigen Benutzerhandbuch unter: http://www.Timex.com/Manuals
Anleitungsvideos unter: http://www.YouTube.com/TimexUSA

132 133
STRECKENDATENKEITDie Run x20 GPS Uhr ist bis 50 m wasserbeständig. Sie können mit der Uhr zu schwimmen, die GPS-Funktion funktioniert aber beim Schwimmen nicht.
Wasserbeständigkeit/Tiefe Wasserdruck unterhalb der Oberfläche
50 m 86 PSIA*
*Pounds per square inch absolute
ACHTUNG: Damit Streckendatenkeit gewährleistet ist, unter Wasser keine Knöpfe drücken. • Die Uhr ist nur wasserbeständig, solange Glas,
Knöpfe und Gehäuse intakt sind. • Die Uhr nicht beim Tauchen verwenden. • Uhr nach Kontakt mit Schweiß oder
Salzwasser mit klarem Wasser abspülen.
INTERNATIONALE TIMEX-GARANTIE(USA – EINGESCHRÄNKTE GARANTIE – SIEHE VORDERSEITE DER GEBRAUCHSANWEISUNG FÜR ANGEBOTSBEDINGUNGEN EINER ERWEITERTEN GARANTIE)Für Ihr TIMEX®-Gerät übernimmt die Timex Group USA, Inc. für die Dauer EINES JAHRES ab dem Erstverkaufsdatum eine Garantie auf Herstellungsmängel Timex und seine Partner erkennen diese internationale Garantie weltweit an.Bitte beachten Sie, dass Timex nach eigenem Ermessen das Gerät durch Installieren neuer oder gründlich überholter und überprüfter Komponenten reparieren bzw. durch ein identisches oder ähnliches Modell ersetzen kann. WICHTIG – BITTE BEACHTEN SIE, DASS UNTER FOLGENDEN BEDINGUNGEN MÄNGEL ODER SCHÄDEN AN IHRER UHR VON DIESER GARANTIE AUSGENOMMEN SIND:
1) nach Ablauf der Garantiezeit;2) wenn das Gerät ursprünglich nicht von einem
autorisierten Timex-Händler gekauft wurde;3) wenn Reparaturen nicht von Timex durchgeführt
wurden;4) Mängel oder Schäden infolge von Unfällen,
unbefugten Eingriffen oder unsachgemäßer Behandlung; und

134 135
5) wenn Glas, Gurt oder Armband, Uhrengehäuse, Zubehör oder Batterie betroffen sind. Timex kann den Ersatz dieser Teile in Rechnung stellen.
DIESE GARANTIE UND DIE DARIN ENTHALTENEN ABHILFEN GELTEN AUSSCHLIESSLICH UND ANSTATT ALLER ANDEREN AUSDRÜCKLICHEN ODER STILLSCHWEIGENDEN GARANTIEN, EINSCHLIESSLICH JEDER STILLSCHWEIGENDEN GARANTIE HANDELSÜBLICHER QUALITÄT ODER EIGNUNG ZU EINEM BESTIMMTEN ZWECK. TIMEX HAFTET NICHT FÜR SONDER-, NEBEN- ODER FOLGESCHÄDEN. In manchen Ländern oder Staaten sind keine Einschränkungen stillschweigender Garantien bzgl. Fehlerfreiheit, sowie Ausnahmen oder Einschränkungen des Schadenersatzes erlaubt. Daher gelten die Einschränkungen u. U. nicht für Sie. Diese Garantie gibt Ihnen bestimmte Rechte. Darüber hinaus haben Sie u. U. weitere Rechte, die je nach Land oder Bundesstaat unterschiedlich sind.Um den Garantie-Service in Anspruch zu nehmen, senden Sie Ihr Gerät an Timex, einen Timex-Partner oder den Timex-Einzelhändler, bei dem Sie das Gerät gekauft haben, mit ausgefülltem Original-Reparaturschein als Anlage. Ausschließlich für USA und Kanada: legen Sie den ausgefüllten Original-Reparaturschein oder eine schriftliche Erklärung mit Namen, Adresse, Telefonnummer, Ort und
Kaufdatum bei. Schicken Sie zusammen mit Ihrem Gerät folgenden Betrag für Porto- und Verpackung ein (hierbei handelt es sich nicht um Reparaturkosten): einen Scheck oder eine Zahlungsweisung in Höhe von US$ 8,00 innerhalb der USA.; in Kanada, einen Scheck oder eine Zahlungsanweisung über CAN$ 10,00; und in Großbritannien, einen Scheck oder eine Zahlungsanweisung über £ 3,50. In allen anderen Ländern wird Ihnen Timex die Porto- und Verpackungskosten in Rechnung stellen. SCHICKEN SIE BITTE NIEMALS BESONDERE ARMBÄNDER ODER SONSTIGE ARTIKEL VON PERSÖNLICHEM WERT MIT EIN.Für die USA erhalten Sie zusätzliche Garantie informa-tionen unter der Nummer 1 800 328 2677. Für Kanada wählen Sie die Nummer 1-800-263-0981. Für Brasilien wählen Sie die Nummer +55 11 5572 9733. Für Mexiko wählen Sie die Nummer 01-800-01-060-00. Für Zentralamerika, die Karibik, Bermuda und die Bahamas wählen Sie die Nummer (501) 370-5775 (USA). Für Asien wählen Sie die Nummer 852-2815-0091. Für Großbritannien wählen Sie die Nummer 44 020 8687 9620. Für Frankreich wählen Sie die Nummer 03 81 63 42 51 (zwischen 10 und 12 Uhr). Für Deutschland/Österreich: +43 662 88921 30. Für den Mittleren Osten und Afrika wählen Sie die Nummer 971-4-310850. Für andere Länder wenden Sie sich bitte für Garantieinformationen an Ihren örtlichen Timex-Händler oder Timex-Großhändler.

136 137
©2014 Timex Group USA, Inc. TIMEX und INDIGLO sind eingetragene Marken der Timex Group B.V. und ihren angeschlossenen Unternehmen. IRONMAN® und MDOT sind eingetragene Marken der World Triathlon Corporation. Hier mit Genehmigung verwendet.
INTERNATIONALER TIMEX-GARANTIEREPARATURSCHEIN
Original-Kaufdatum: ______________________________________(Fügen Sie eine Kopie der Kaufunterlagen bei, falls verfügbar)
Käufer: ________________________________________________ (Name, Adresse und Telefonnummer)
Kaufort: ________________________________________________ (Name und Adresse)
Rückgabegrund: _________________________________________
______________________________________________________
KonformitätserklärungHerstellername: Timex Group USA, Inc. Herstelleranschrift: 555 Christian Road Middlebury, CT 06762 USAerklärt, dass das Produkt: Produktname: Timex® Ironman® Run x20 GPSModellnummern: M062den folgenden Produktspezifikationen entspricht:R&TTE: 2014/53/EU Normen: EN 300 440-1 V1.6.1 (2010-08) EN 300 440-2 V1.4.1 (2010-08) EN 301 489-1 V1.9.2 (2011-09) EN 301 489-3 V1.4.1 (2002-08) IC RSS-310 Ausgabe 3, Dezember 2010NSR: 2006/95/EG Normen: EN 60950-1: 2006/A2:2013Emissionsnormen für digitale Geräte: FCC CFR 47 TEIL 15 B: 2013 EN 55022:2010+AC:2011 EN 55024:2010
Bevollmächtigter: Sam Everett, Qualitätsaufsicht Datum: Dienstag, 10. Juni 2014, Middlebury, Connecticut, USA.

138
Inhoudsopgave
Belangrijke veiligheidsinstructies en waarschuwingen ..................................................................140
Inhoud van de doos .........................................................................142Aan de slag ................................................................................................143Introductie van het horloge ....................................................144Het horloge opladen .......................................................................146Het horloge bedienen ....................................................................147Aanvankelijke instelling ................................................................148Gaan lopen .................................................................................................149Intervaltraining .......................................................................................150Trainingen bekijken ...........................................................................153Oplossen van problemen ...........................................................154Volledige instructies ........................................................................154Waterbestendigheid ........................................................................155Garantie ..........................................................................................................156Conformiteitsverklaring ...............................................................160
140 141
Wij danken u voor de aankoop van het Timex® IRONMAN® Run x20 GPS horloge! Lees deze snelstartgids en begin nu meteen van uw horloge te genieten.
BELANGRIJKE VEILIGHEIDSINSTRUCTIES EN WAARSCHUWINGEN1. Om het risico van brand, chemische
brandwonden, elektrolytlekkage en/of letsel als gevolg van de interne lithium-polymeer batterij te voorkomen:
a. Niet proberen om de achterkant van de kast of het omhulsel van de eenheid of de niet door de gebruiker vervangbare batterij te verwijderen.
b. De eenheid niet aan een warmtebron blootgesteld, of op een plaats met hoge temperatuur, laten (bv. in de zon of in een onbeheerd voertuig). Niet in direct zonlicht opbergen om beschadiging van de eenheid te voorkomen.
c. De eenheid niet doorboren of verbranden. d. Bij opslag gedurende langere tijd de
eenheid binnen het temperatuurbereik van 0 tot 25 °C (32 tot 77 °F) houden.
e. De eenheid alleen opladen binnen het temperatuurbereik van 0 tot 45 °C (32 tot 113 °F).
f. De eenheid niet gebruiken buiten het temperatuurbereik van -20 tot 55 °C (-4 tot 131 °F).
g. Contact opnemen met de plaatselijke instantie voor afvalverwerking om de eenheid of batterij naar behoren te recyclen of af te voeren.
2. Gebruik uitsluitend de bijgeleverde oplaadkabel.
3. Dit is geen medisch apparaat en wordt niet aanbevolen voor gebruik door personen met ernstige hartkwalen. Raadpleeg altijd uw arts voordat u een trainingsprogramma begint of wijzigt.

142 143
4. Probeer het display van de eenheid niet te lezen terwijl u beweegt. Dit is onveilig en leidt af, en kan een ongeluk of botsing tot gevolg hebben. Lees het display alleen wanneer u dat veilig kunt doen.
Zie de instructies voor bijzonderheden.
INHOUD VAN DE DOOS1. Timex® IRONMAN® Run x20 GPS horloge2. Oplaadkabel
AAN DE SLAGGefeliciteerd met de aankoop van het Timex IRONMAN® Run x20 GPS horloge. Volg deze snelstartgids wanneer u het horloge voor de eerste keer gebruikt, om aan de slag te gaan:1. Bekend raken met het horloge 2. Het horloge opladen3. Leren hoe u op het display van het horloge
kunt navigeren4. Het horloge configureren5. Uw eerste training registreren6. Uw prestaties bekijken

144 145
INTRODUCTIE VAN HET HORLOGE
STOP / UP (OMHOOG) (n/p) Markeert het vorige item in een menu. Gaat omhoog in een scherm. Onderbreekt een training. Verhoogt een instelling.
MENU / ENTER (8 ) Opent het hoofdmenu. Selecteert een gemarkeerde menu-optie. Gaat naar het volgende veld in een instellingenscherm. Toont het tijddisplay tijdens een training.
START / SPLIT (TUSSENTIJD) / DOWN (OMLAAG) (u/q) Markeert het volgende item in het menu. Gaat omlaag in een scherm. Start een training. Neemt een tussentijd op. Verlaagt een instelling.
BACK (TERUG) / DISPLAY (O) Keert naar het vorige menu terug. Gaat tijdens een training met stopwatch naar het volgende display. Toont de totale tijd en afstand gedurende enkele seconden tijdens intervaltraining.
POWER (AAN/UIT) / INDIGLO® NACHTVERLICHTING Indrukken om de nachtverlichting enkele seconden in te schakelen. Ingedrukt houden om het horloge in of uit te schakelen.
STOP/UP (OMHOOG)n/p
MENU/ENTER8
BACK (TERUG)/DISPLAY
O
POWER (AAN/UIT)/
INDIGLO®NACHTVER-
LICHTING
START/SPLIT/DOWN(START/TUSSENTIJD/OMLAAG)u/q
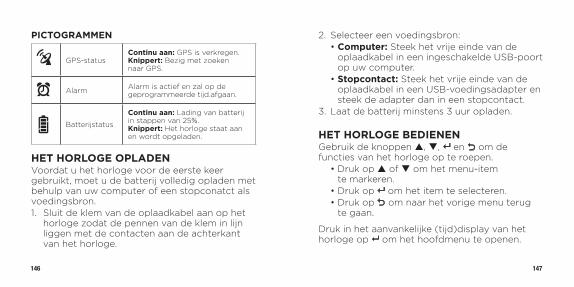
146 147
PICTOGRAMMEN
GPS-statusContinu aan: GPS is verkregen.Knippert: Bezig met zoeken naar GPS.
x Alarm Alarm is actief en zal op de geprogrammeerde tijd.afgaan.
Batterijstatus
Continu aan: Lading van batterij in stappen van 25%.Knippert: Het horloge staat aan en wordt opgeladen.
HET HORLOGE OPLADENVoordat u het horloge voor de eerste keer gebruikt, moet u de batterij volledig opladen met behulp van uw computer of een stopconatct als voedingsbron.1. Sluit de klem van de oplaadkabel aan op het
horloge zodat de pennen van de klem in lijn liggen met de contacten aan de achterkant van het horloge.
2. Selecteer een voedingsbron: • Computer: Steek het vrije einde van de
oplaadkabel in een ingeschakelde USB-poort op uw computer.
• Stopcontact: Steek het vrije einde van de oplaadkabel in een USB-voedingsadapter en steek de adapter dan in een stopcontact.
3. Laat de batterij minstens 3 uur opladen.
HET HORLOGE BEDIENENGebruik de knoppen p, q, 8 en O om de functies van het horloge op te roepen. • Druk op p of q om het menu-item
te markeren. • Druk op 8 om het item te selecteren. • Druk op O om naar het vorige menu terug
te gaan.
Druk in het aanvankelijke (tijd)display van het horloge op 8 om het hoofdmenu te openen.

148 149
• Workout (training) – Een training kiezen: stopwatch (getimed) of interval (variabele intensiteit).
• History (geschiedenis) – Uw opgeslagen trainingen weergeven.
• Settings (instellingen) – De instellingen van uw horloge en training aanpassen.
Als er p of q onder aan het display staat, drukt u op de knop p of q van het horloge om meer menu-items te doorlopen.
AANVANKELIJKE INSTELLINGDe eerste keer dat u het horloge aanzet, stelt u taal, eenheden, persoonlijk profiel en andere vereiste informatie in.1. Houd POWER (AAN/UIT) ingedrukt om het
horloge aan te zetten. Het horloge begint dan het eerste instellingsproces.
Als de eerste instelling niet begint, drukt u op 8 om naar het hoofdmenu te gaan
en selecteert u SETTINGS (instellingen) > ABOUT (informatie) > FACTORY RESET (YES) [fabrieksreset (ja)]. Het horloge schakelt daarna uit. Houd AAN/UIT ingedrukt om verder te gaan.
2. Volg de instructies op het display van het horloge en gebruik daarbij de knoppen p, q, 8 en O.
GAAN LOPEN1. Selecteer WORKOUT (training) > STOPWATCH
uit het hoofdmenu. Het horloge zoekt dan automatisch naar GPS. Tip: Om sneller GPS te verkrijgen moet u bij hoge gebouwen en bomen vandaan gaan en stilstaan.
2. Selecteer START.3. De stopwatch begint de tijd op te meten.
Terwijl de training aan de gang is, drukt u op O om de trainingsgegevens te doorlopen.

150 151
HANDSFREE REGISTREREN Steeds wanneer u een mijl of kilometer (gekozen in de instellingen voor afstand) bereikt, registreert het horloge automatisch een ronde.
EEN TRAINING STOPPEN EN OPSLAAN1. Druk op n om het opnemen van de tijd te
stoppen. 2. Selecteer SAVE (opslaan), RESUME
(hervatten) of DISCARD (weggooien).
INTERVALTRAININGGebruik intervaltraining om lopen en hardlopen te combineren — of hardlopen met hoge en lage intensiteit — te combineren om uw uithoudingsvermogen te verbeteren en het meeste uit uw trainingstijd te halen.
EEN TRAINING MET INTERVALLEN INSTELLEN1. Selecteer SETTINGS (instellingen) >
INTERVALS (intervallen) uit het hoofdmenu.
2. Select INT 1 om te configureren en selecteer de naam.
3. Selecteer om het interval na een bepaalde DISTANCE (afstand) of TIME (tijd) te beëindigen en voer de waarde in.
4. Herhaal dit voor INT 2.
EEN TRAINING MET INTERVALLEN STARTEN1. Selecteer WORKOUT (training) > INTERVALS
(intervallen) uit het hoofdmenu.2. Druk op 8 om de weergegeven instellingen
te bevestigen. Het horloge zoekt dan automatisch naar GPS.
Tip: Om sneller GPS te verkrijgen moet u bij hoge gebouwen en bomen vandaan gaan en stilstaan.
3. Selecteer START in GPS READY (GPS gereed).4. Druk tijdens de training op O om de
verstreken tijd en totale afstand te zien.
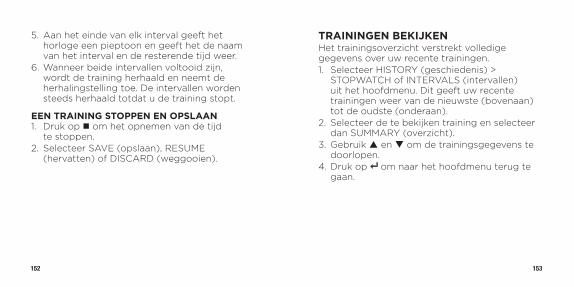
152 153
5. Aan het einde van elk interval geeft het horloge een pieptoon en geeft het de naam van het interval en de resterende tijd weer.
6. Wanneer beide intervallen voltooid zijn, wordt de training herhaald en neemt de herhalingstelling toe. De intervallen worden steeds herhaald totdat u de training stopt.
EEN TRAINING STOPPEN EN OPSLAAN1. Druk op n om het opnemen van de tijd
te stoppen. 2. Selecteer SAVE (opslaan), RESUME
(hervatten) of DISCARD (weggooien).
TRAININGEN BEKIJKENHet trainingsoverzicht verstrekt volledige gegevens over uw recente trainingen. 1. Selecteer HISTORY (geschiedenis) >
STOPWATCH of INTERVALS (intervallen) uit het hoofdmenu. Dit geeft uw recente trainingen weer van de nieuwste (bovenaan) tot de oudste (onderaan).
2. Selecteer de te bekijken training en selecteer dan SUMMARY (overzicht).
3. Gebruik p en q om de trainingsgegevens te doorlopen.
4. Druk op 8 om naar het hoofdmenu terug te gaan.
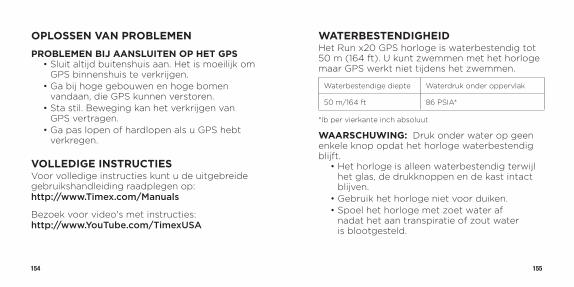
154 155
OPLOSSEN VAN PROBLEMEN
PROBLEMEN BIJ AANSLUITEN OP HET GPS • Sluit altijd buitenshuis aan. Het is moeilijk om
GPS binnenshuis te verkrijgen. • Ga bij hoge gebouwen en hoge bomen
vandaan, die GPS kunnen verstoren. • Sta stil. Beweging kan het verkrijgen van
GPS vertragen. • Ga pas lopen of hardlopen als u GPS hebt
verkregen.
VOLLEDIGE INSTRUCTIESVoor volledige instructies kunt u de uitgebreide gebruikshandleiding raadplegen op: http://www.Timex.com/Manuals
Bezoek voor video's met instructies: http://www.YouTube.com/TimexUSA
WATERBESTENDIGHEIDHet Run x20 GPS horloge is waterbestendig tot 50 m (164 ft). U kunt zwemmen met het horloge maar GPS werkt niet tijdens het zwemmen.
Waterbestendige diepte Waterdruk onder oppervlak
50 m/164 ft 86 PSIA*
*lb per vierkante inch absoluut
WAARSCHUWING: Druk onder water op geen enkele knop opdat het horloge waterbestendig blijft. • Het horloge is alleen waterbestendig terwijl
het glas, de drukknoppen en de kast intact blijven.
• Gebruik het horloge niet voor duiken. • Spoel het horloge met zoet water af
nadat het aan transpiratie of zout water is blootgesteld.

156 157
INTERNATIONALE GARANTIE VAN TIMEX(VS – BEPERKTE GARANTIE – ZIE DE VOORKANT VAN HET INSTRUCTIEBOEKJE VOOR DE VOORWAARDEN VAN HET AANBOD VOOR VERLENGDE GARANTIE)Het TIMEX® apparaat heeft een garantie van de Timex Group USA, Inc. voor gebreken in fabricage gedurende een periode van EEN JAAR vanaf de oorspronkelijke aankoopdatum. Timex en gelieerde ondernemingen over de hele wereld erkennen deze internationale garantie.Timex mag, naar eigen keuze, het apparaat repareren door nieuwe of grondig gereviseerde en geïnspecteerde componenten te installeren of het vervangen door een identiek of gelijksoortig model. BELANGRIJK — DEZE GARANTIE DEKT GEEN GEBREKEN OF SCHADE AAN HET HORLOGE:
1) nadat de garantietermijn is verlopen;2) als het apparaat oorspronkelijk niet bij een erkende
Timex-winkelier is gekocht;3) als gevolg van reparaties die niet door Timex zijn
uitgevoerd;4) als gevolg van ongelukken, knoeien of misbruik en5) het glas, de band, de kast, de accessoires of
de batterij. Timex kan het vervangen van deze onderdelen in rekening brengen.
DEZE GARANTIE EN HET HIERIN UITEENGEZETTE VERHAAL ZIJN EXCLUSIEF EN KOMEN IN DE PLAATS VAN ALLE ANDERE GARANTIES, UITDRUKKELIJK OF IMPLICIET, MET INBEGRIP VAN IMPLICIETE GARANTIE VAN VERKOOPBAARHEID OF GESCHIKTHEID VOOR EEN BEPAALD DOEL. TIMEX IS NIET AANSPRAKELIJK VOOR SPECIALE, INCIDENTELE OF GEVOLGSCHADE. Sommige landen en staten staan geen beperkingen toe met betrekking tot impliciete garanties en staan geen uitsluitingen of beperkingen met betrekking tot schade toe, zodat deze beperkingen wellicht niet voor u van toepassing zijn. Deze garantie geeft u specifieke wettelijke rechten en u kunt ook andere rechten hebben die van land tot land en van staat tot staat verschillen.Voor het verkrijgen van service onder de garantie dient u uw apparaat naar Timex, een van de gelieerde ondernemingen of de Timex winkelier waar het apparaat gekocht is, te retourneren, samen met een ingevulde, originele horlogereparatiebon of, alleen in de VS en Canada, de ingevulde originele horlogereparatiebon of een schriftelijke verklaring waarin uw naam, adres, telefoonnummer en datum en plaats van aankoop worden vermeld. Wilt u het volgende bij het apparaat insluiten voor port en behandeling (dit zijn geen reparatiekosten): een cheque of postwissel voor US$ 8,00 in de VS; een cheque of postwissel voor CAN$ 10,00 in Canada; en een cheque of postwissel voor UK£ 3,50 in het V.K. In andere landen zal Timex

158 159
port en behandeling in rekening brengen. STUUR NOOIT EEN SPECIAAL HORLOGEBANDJE OF ENIG ANDER ARTIKEL VAN PERSOONLIJKE WAARDE MEE.Voor de VS kunt u 1-800-328-2677 bellen voor meer informatie over de garantie. Voor Canada belt u 1-800-263-0981. Voor Brazilië +55 (11) 5572 9733. Voor Mexico 01-800-01-060-00. Voor Midden-Amerika, het Caribisch gebied, Bermuda en de Bahama's (501) 370-5775 (V.S.). Voor Azië 852-2815-0091. Voor Groot-Brittannië 44 020 8687 9620. Voor Frankrijk 03 81 63 42 51 (10.00 tot 12.00 uur). Voor Duitsland/Oostenrijk: +43 662 88921 30. Voor het Midden-Oosten en Afrika 971-4-310850. Voor andere gebieden kunt u contact opnemen met uw plaatselijke Timex-winkelier of -distributeur voor informatie over de garantie.©2014 Timex Group USA, Inc. TIMEX en INDIGLO zijn gedeponeerde handelsmerken van Timex Group B.V. en zijn dochterondernemingen. IRONMAN® en MDOT zijn gedeponeerde handelsmerken van de World Triathlon Corporation. Hier gebruikt met toestemming.
REPARATIEBON INTERNATIONALE GARANTIE VAN TIMEX
Oorspronkelijke aankoopdatum: ____________________________(een kopie van het ontvangstbewijs aanhechten, indien beschikbaar)
Gekocht door: _________________________________________ (naam, adres, telefoonnummer)
Plaats van aankoop: _____________________________________ (naam en adres)
Reden voor terugzending: _________________________________
_____________________________________________________

160 161
ConformiteitsverklaringNaam van fabrikant: Timex Group USA, Inc. Adres van fabrikant: 555 Christian Road Middlebury, CT 06762 Verenigde Staten van Americaverklaart dat het product: Productnaam: Timex® Ironman® Run x20 GPSModelnummer: M062voldoet aan de volgende specificaties:R&TTE: 02014/53/EU Normen: EN 300 440-1 V1.6.1 (2010-08) EN 300 440-2 V1.4.1 (2010-08) EN 301 489-1 V1.9.2 (2011-09) EN 301 489-3 V1.4.1 (2002-08) IC RSS-310 uitgave 3, december 2010LVD: 2006/95/EC Normen: EN 60950-1: 2006/A2:2013Emissies van digitale apparaten Normen: FCC CFR 47 DEEL 15 B: 2013 EN 55022:2010+AC:2011 EN 55024:2010
Agent: Sam Everett, Quality Regulatory Engineer Datum: 10 juni 2014, Middlebury, Connecticut, VS