rs-b605technics rs-b605 deck service manual full service manual
Upload
sergiu-colunCategory
view
224download
0
7/31/2019 RS Spectroscope Manual
http://slidepdf.com/reader/full/rs-spectroscope-manual 1/16
Copyright Rigel Systems 2004 page 1
RS-Spectroscope™
User's Manual
Decoding the Message in Starlight
The RS-Spectroscope attaches to an eyepiece to spread light from stars and nebulae into a
rainbow of colors – colors that provide a whole new way to enjoy astronomy.
Astronomers analyze the rainbows of stars -- analyze the colors present and the colors
missing -- to decode the message in starlight, a message that reveals the true nature of
stars, nebulae and the universe. Use the RS-Spectroscope to experience what astronomy
textbooks only describe. Discover the absorption and emission lines that fingerprint the
chemical makeup of stars and nebulae. See the OBAFGKM spectral sequence in livingcolor. Visualize the Hertzsprung-Russell diagram that arranges stars by luminosity, size,
temperature, pasts, presents and futures.

7/31/2019 RS Spectroscope Manual
http://slidepdf.com/reader/full/rs-spectroscope-manual 2/16

7/31/2019 RS Spectroscope Manual
http://slidepdf.com/reader/full/rs-spectroscope-manual 3/16
Copyright Rigel Systems 2004 page 3
spectral features created by molecules in the star's atmosphere can be made out (bands of color with
slight dimming between them) in the blue/green, but that's about it.
Add the widening lens element and much, much more is revealed. Below is the spectrum of Betelgeuse
widened to show many more spectral features. The molecular bands are clearly shown in the blue and
green, and individual absorption lines (dark lines running across the width of the spectrum) throughoutthe whole spectrum.
By the way, you now know why astronomers speak of spectral features as spectral lines, not spectral
dots. It is the widening of the width of the spectrum that stretches spectral dots into spectral lines.Lines are much easier to see because, well because they are (that's how the eye works).
Attachment the widening element is easy. Push it into the hole on top of the grating element with the
white line aligned with the white line on the spectroscope. Fine tune alignment by rotating it in the holeto make sure spectrum is widened correctly. Test drive it on a distant sodium vapor street light to make
sure the lines are at right angles to the spectrum. Below is the bright line spectrum of a distant sodium
vapor street lamp without (top) and with (bottom) the widening lens Note that the length of the spectrum
is about 10x the width of the spectrum. This will give you a feeling for how wide the spectrum shouldappear with the widening lens. Bright line spectra are much easier to see than dark line (stellar) spectra.
For nebulae and other non-stellar celestial delights only the grating element is required. Many nebulae,
like planetary nebulae, have rainbows that consist of a few widely spaced colors with the colors in
between missing. These are called emission line spectra. That's why nebular filters make viewingnebulae easier, they let though the colors nebulae emit, and block the other colors which are just
skyglow from city lights. Through the RS-Spectroscope, planetary nebulae can appear as single or
multiple images, one in each of the brighter emission lines, while nearby stars will appear as streaks.
We recommend using eyepieces with long eye relief, as the RS-Spectroscope will place your eye about an inch back from the eyepiece. Small, sharp star images is important, as it is the sharpness of the star
image that defines the sharpness of the lines in a star's spectrum, as seen through the RS-Spectroscope.
Attaching the RS- Spectroscope to an eyepiece
Remove the rubber eyeguard from the eyepiece (1). Loosen the three red thumb knobs, mate the RS-
Spectroscope to the eyepiece, tighten the three red thumb knobs into the rubber eyeguard groove (2).

7/31/2019 RS Spectroscope Manual
http://slidepdf.com/reader/full/rs-spectroscope-manual 4/16
Copyright Rigel Systems 2004 page 4
Attach the rubber eyeguard to the RS-Spectroscope camera adaptor groove if you prefer. For smaller
diameter eyepieces, use the 3 long thumb screws.
(1) Remove rubber eyeguard (2) Attach RS-Spectroscope
Acquiring, Focusing and Viewing a Star's Spectrum
Acquire, center, and focus either Sirius or Vega as you normally would before attaching the RS-Spectroscope to the eyepiece. Focus the telescope for normal vision (with your glasses on) then attach
the RS-Spectroscope to see the spectrum. Sirius and Vega are bright and have strong, easy to see
spectral lines (the dark, absorption lines are the spectral fingerprint of the element Hydrogen in the
star's atmosphere) and are great for focusing. Sirius' spectrum, photographed with a coolpix-995 digitalcamera and an RS-Spectroscope looks like this.
You may see dark lines that run left/right along the length of the spectrum, these are due to the star
twinkling so ignore them. The dark lines that run up/down across the width of the spectrum are the
spectral lines. Adjust telescope focus to make these sharp . Once you've focused Sirius or Vega thenyou should not have to readjust focus again. If you do adjust focus on another star remember to make
the spectral lines that run across the width of the spectrum sharp.
If your spectrum looks like a sharp streak (below), then you’re not focused. The spectrum should have awidth approximately 1/10th the length of the spectrum (above) with dark lines running across it. Adjust
the focus from the sharp streak (below) so the blue end of the spectrum widens first followed the red end
of the spectrum (because the widening lens bends blue light more than red light). Continue to adjust thefocus in that direction until you see the dark lines like above.
You don't have to remove the RS-Spectroscope from the eyepiece to acquire subsequent stars. The RS-
Spectroscope spreads about 60% of a star's light into a first order spectrum which exits the RS-

7/31/2019 RS Spectroscope Manual
http://slidepdf.com/reader/full/rs-spectroscope-manual 5/16
Copyright Rigel Systems 2004 page 5
Spectroscope grating element at about a 23 degree angle (that's why the back of the grating element is
tilted over at 23 degrees).
(1) Acquiring a star using zero order (2) Viewing the first order spectrum
Another 20% of the star's light comes straight out the back in what is called the zero order. The zero
order looks like a normal but fainter image of the starfield with the stars appearing as small dashes of light (due to the RS-Spectroscope widening lens element). View the zero order to acquire a star and
center it by looking through the RS-Spectroscope, straight-on into the eyepiece (1), then lean over at 23
degrees to view the star's spectrum (2).
Seeing Does Matter
The astronomical seeing (how sharp a star appears in the eyepiece appear, depending upon how wiggly
the air) can make a big difference on the visibility of spectral lines. Below is a comparison of Spica on a
good night (top) with steady air and good seeing and a poor night (bottom) with wiggly air and poorseeing. The effects of astronomical seeing can be mitigated by picking a night of good .seeing
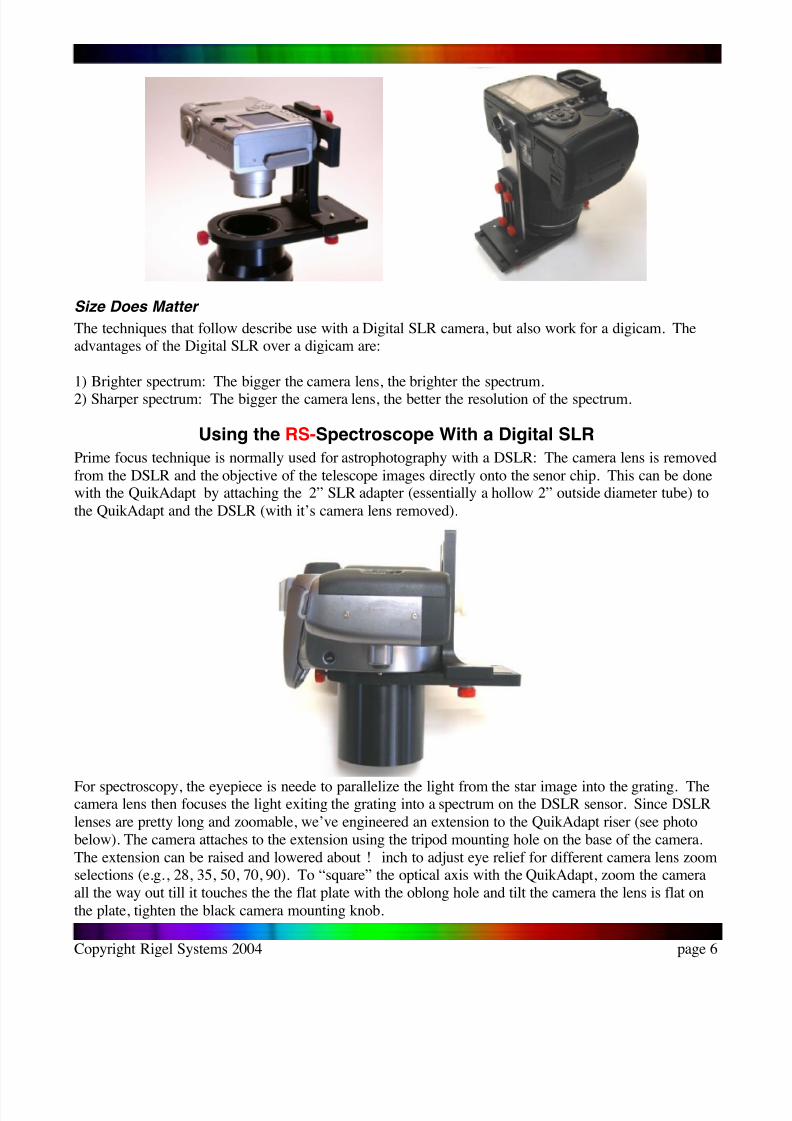
Using the RS-Spectroscope With a Digital Camera
Attach the RS-Spectroscope to an eyepiece, acquiring a star to view, focusing and viewing the spectrumthe same as described for visual observation. The RS-Spectroscope is compatible with digital camera
adapters like the QuikAdapt shown below with a consumer digicam (left) and a Digital SLR (right).
7/31/2019 RS Spectroscope Manual
http://slidepdf.com/reader/full/rs-spectroscope-manual 6/16
Copyright Rigel Systems 2004 page 6
Size Does Matter
The techniques that follow describe use with a Digital SLR camera, but also work for a digicam. Theadvantages of the Digital SLR over a digicam are:
1) Brighter spectrum: The bigger the camera lens, the brighter the spectrum.2) Sharper spectrum: The bigger the camera lens, the better the resolution of the spectrum.
Using the RS-Spectroscope With a Digital SLR
Prime focus technique is normally used for astrophotography with a DSLR: The camera lens is removed
from the DSLR and the objective of the telescope images directly onto the senor chip. This can be donewith the QuikAdapt by attaching the 2” SLR adapter (essentially a hollow 2” outside diameter tube) to
the QuikAdapt and the DSLR (with it’s camera lens removed).
For spectroscopy, the eyepiece is neede to parallelize the light from the star image into the grating. Thecamera lens then focuses the light exiting the grating into a spectrum on the DSLR sensor. Since DSLR
lenses are pretty long and zoomable, we’ve engineered an extension to the QuikAdapt riser (see photo
below). The camera attaches to the extension using the tripod mounting hole on the base of the camera.
The extension can be raised and lowered about ! inch to adjust eye relief for different camera lens zoomselections (e.g., 28, 35, 50, 70, 90). To “square” the optical axis with the QuikAdapt, zoom the camera
all the way out till it touches the the flat plate with the oblong hole and tilt the camera the lens is flat on
the plate, tighten the black camera mounting knob.

7/31/2019 RS Spectroscope Manual
http://slidepdf.com/reader/full/rs-spectroscope-manual 7/16
Copyright Rigel Systems 2004 page 7
Below is the optical stack – eyepiece + RS-Spectroscope + DSLR. Notice the orientation of the RS-Spectroscope and the DSLR lets the RS-Spectroscope disperses the spectrum along the long dimension
of the DSLR sensor

7/31/2019 RS Spectroscope Manual
http://slidepdf.com/reader/full/rs-spectroscope-manual 8/16
Copyright Rigel Systems 2004 page 8
Attach this stack directly into the focuser. If you use a diagonal be careful, it may rotate due to the
combined weight of the stack. Since you’ll be using your laptop to remotely control the DSLR, you’llonly need to look through the camera viewfinder for initial focusing and alignment.
Initial Alignment and Focusing
Center and focus a bright star in the eyepiece alone then adjust the finder crosshairs. You’ll be using thefinder to realign the telescope, not the eyepiece or camera. Remove the eyepiece, reassemble the optical
stack, reinsert the stack the RS-Grating tilting NORTH and cinch the eyepiece set screw snugly, so the
stack doesn’t rotate or fall out. Using the stack with the RS-Spectroscope angling north lets you widen
the spectrum by turning the clock drive off. The additional benefit is any clock drive tracking errors willwiden the spectrum, not blur it.
Center on a bright star (using the finder telescope) and set the camera manual focus at infinity, and to a
mild zoom (e.g., 70mm). Pick a bright A spectral type star as they have broad Hydrogen lines whichwill make fine focusing easier. Set the camera focus to infinity and zoom to 70mm. Looking through
the camera viewfinder you should see a faint rainbow streak (the spectrum) which you can focus into a
sharp gray streak by adjusting the telescope focus.
Center the rainbow streak in the camera viewfinder (if you half press the shutter button, a green ruler
will appear soon the bottom of the camera viewfinder that will help you with this alignment.
Seeing Does Matter (Part 2)
The astronomical seeing (how sharp a star appears in the eyepiece appear, depending upon how wiggly
the air) can make a big difference on the sharpness of spectral lines. Below is a comparison of Spica on
a good night (top) with steady air and good seeing and a poor night (bottom) with wiggly air and poor
seeing.
The effects of astronomical seeing also show up in the top (good night) as the wiggling back in forth of
the spectral line from top to bottom, as the spectrum of the star drifted across the eyepiece (drift
spectrum. This wiggling shows up in a drift spectrum as sharp spectral lines wiggling back in forth, in
a streak spectrum the effect of seeing will show up as blurry spectral lines.

7/31/2019 RS Spectroscope Manual
http://slidepdf.com/reader/full/rs-spectroscope-manual 9/16
Copyright Rigel Systems 2004 page 9
The effects of poor seeing and wiggling air can be minimized with a slit in front of the eyepiece, which
is how spectroscopes are usually equipped. The star may bloom, shrink and wiggle but the slit doesn’t.
The only light that gets into the spectrum is the light that gets through the slit. The trade off is the loss
of the light that doesn’t make it through the slit, cost and complexity. The effects of seeing of can bemitigated for the RS-Spectroscope by picking a night of good seeing and by using a telecompressor to
make the star images and the wiggles smaller.
Size Does Matter (Part 2)
The spacing of the telecompressor lens from the eyepiece focal plane (usually found by looking into the
end of the eyepiece for the aperture stop using this equation. Sample inputs for F, s, f produce a
resulting magnification reduction of 0.51. This required attaching the telecompressor lens to the front of
the diagonal, not to the eyepiece.Telecompressor
1.00 theta deg beam angle used for the calculation
2032.00 F mm focal length of telescope
35.47 D mm D = F*tan(theta) distance of beam from centerline at focal plane150.00 s mm TC lens to focal plane spacing
34.85 r mm r = (F-s)*tan(theta) distance of beam from centerline at TC lens
300.00 f mm focal length of TC lens
6.63 phi deg phi = 90-atan(f/r) angle beam bent back towards centerline by TC lens
17.42 z mm z = s*tan(phi) distance beam bent back towards centline at focal plane
18.04 d mm d = D-z distance of bent beam from centerline at focal plane
0.51 M M = d/D magnification
Here’s the result for Arcturus. The top spectrum is without a telecompressor, the bottom spectrum is
with a telecompressor spaced at the correct distance from the focal plane of the eyepiece.
The compressed spectrum is about half the width, as expected from the magnification reduction, plus it
its also brighter and less noisy (most obvious in red end of spectrum), as the spectrum stays on each row
of pixels twice as long – another advantage of the telecompressor for obtaining spectra of fainter stars.
7/31/2019 RS Spectroscope Manual
http://slidepdf.com/reader/full/rs-spectroscope-manual 10/16
Copyright Rigel Systems 2004 page 10
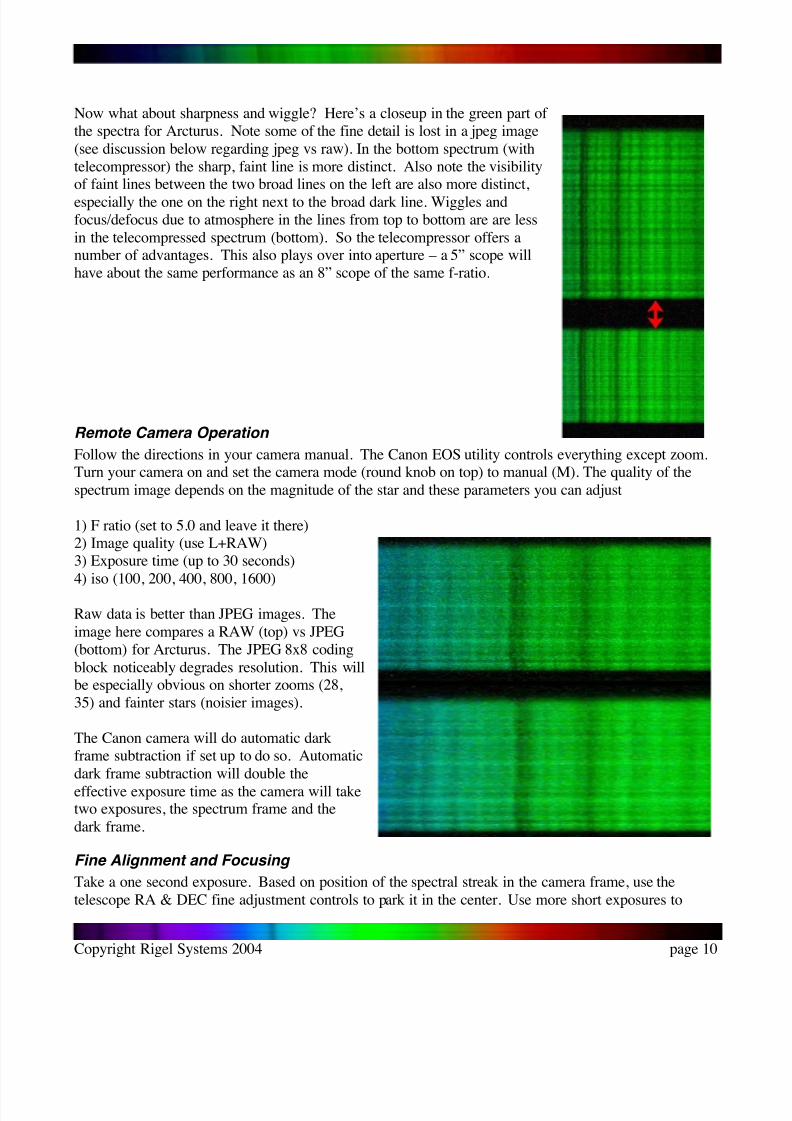
Now what about sharpness and wiggle? Here’s a closeup in the green part of
the spectra for Arcturus. Note some of the fine detail is lost in a jpeg image
(see discussion below regarding jpeg vs raw). In the bottom spectrum (with
telecompressor) the sharp, faint line is more distinct. Also note the visibilityof faint lines between the two broad lines on the left are also more distinct,
especially the one on the right next to the broad dark line. Wiggles and
focus/defocus due to atmosphere in the lines from top to bottom are are less
in the telecompressed spectrum (bottom). So the telecompressor offers anumber of advantages. This also plays over into aperture – a 5” scope will
have about the same performance as an 8” scope of the same f-ratio.
Remote Camera Operation
Follow the directions in your camera manual. The Canon EOS utility controls everything except zoom.Turn your camera on and set the camera mode (round knob on top) to manual (M). The quality of the
spectrum image depends on the magnitude of the star and these parameters you can adjust
1) F ratio (set to 5.0 and leave it there)2) Image quality (use L+RAW)
3) Exposure time (up to 30 seconds)
4) iso (100, 200, 400, 800, 1600)
Raw data is better than JPEG images. The
image here compares a RAW (top) vs JPEG
(bottom) for Arcturus. The JPEG 8x8 coding
block noticeably degrades resolution. This willbe especially obvious on shorter zooms (28,
35) and fainter stars (noisier images).
The Canon camera will do automatic dark
frame subtraction if set up to do so. Automatic
dark frame subtraction will double theeffective exposure time as the camera will taketwo exposures, the spectrum frame and the
dark frame.
Fine Alignment and Focusing
Take a one second exposure. Based on position of the spectral streak in the camera frame, use the
telescope RA & DEC fine adjustment controls to park it in the center. Use more short exposures to

7/31/2019 RS Spectroscope Manual
http://slidepdf.com/reader/full/rs-spectroscope-manual 11/16
Copyright Rigel Systems 2004 page 11
confirm after each adjustment. When it’s centered, check your finder to see where the star is on the
crosshairs. You could adjust the finder to put it back on the crosshair but I do not recommend that sincebecause of the weight of the optical stack, it will change as you move around the sky. It’s best just to
remember where it the star is in the finder when it’s centered in the camera.
Drift Spectrum
Exposure time sets the width of the spectrum while iso and zoom adjust the quality of the spectrum
image. Using Arcturus as an example, a C8 telescope, with zoom at 70mm and iso at 800 and some
processing produces pretty spectacular results.
For fainter stars adjust iso up and/or zoom down. For brighter stars adjust iso down and/or zoom
up. For example, Vega is too bright for iso 800, so use iso 400 or 200. For Regulus try iso 800 or 600and zoom 70 or 50.
To collect a drift spectrum like the above for Arcturus, Set the camera to
1) Zoom = 70mm
2) iso = 800
3) Exposure = 8 sec
Turn the clock drive off and start the
exposure. When you hear the camera finish
the exposure, turn the clock drive back on.Examine the spectrum on your computer.
You should see two broad Hydrogen lines in
the blue end of the spectrum, like this, for
Vega. If the lines aren’t sharp, adjust thefocus about 1:20th of a turn one way and take
another exposure.
If the spectral lines got blurrier, adjust focusthe other way and take another exposure.
You get the idea. Stop when the lines are
sharp! I’ve found that the focusing is very
forgiving with a long focal length eyepiece,like the 40 or 55 mm televue plossls.
7/31/2019 RS Spectroscope Manual
http://slidepdf.com/reader/full/rs-spectroscope-manual 12/16
Copyright Rigel Systems 2004 page 12
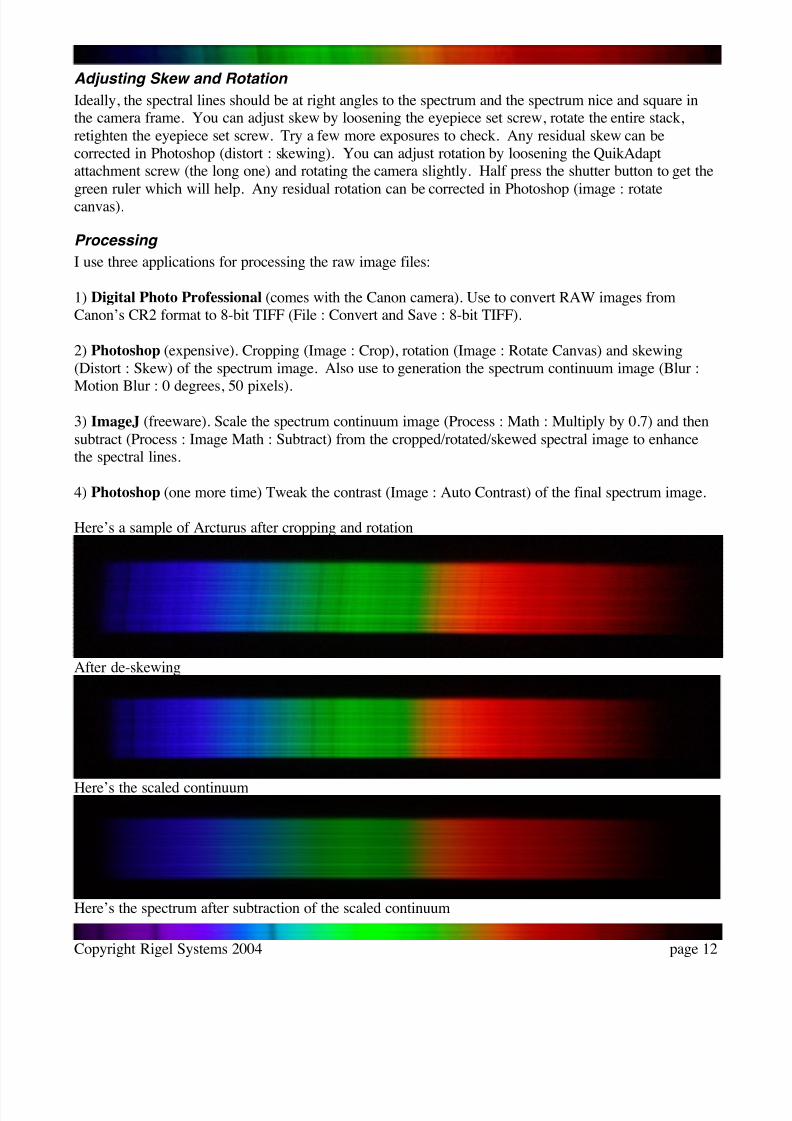
Adjusting Skew and Rotation
Ideally, the spectral lines should be at right angles to the spectrum and the spectrum nice and square inthe camera frame. You can adjust skew by loosening the eyepiece set screw, rotate the entire stack,
retighten the eyepiece set screw. Try a few more exposures to check. Any residual skew can be
corrected in Photoshop (distort : skewing). You can adjust rotation by loosening the QuikAdaptattachment screw (the long one) and rotating the camera slightly. Half press the shutter button to get the
green ruler which will help. Any residual rotation can be corrected in Photoshop (image : rotatecanvas).
Processing
I use three applications for processing the raw image files:
1) Digital Photo Professional (comes with the Canon camera). Use to convert RAW images fromCanon’s CR2 format to 8-bit TIFF (File : Convert and Save : 8-bit TIFF).
2) Photoshop (expensive). Cropping (Image : Crop), rotation (Image : Rotate Canvas) and skewing
(Distort : Skew) of the spectrum image. Also use to generation the spectrum continuum image (Blur :
Motion Blur : 0 degrees, 50 pixels).
3) ImageJ (freeware). Scale the spectrum continuum image (Process : Math : Multiply by 0.7) and then
subtract (Process : Image Math : Subtract) from the cropped/rotated/skewed spectral image to enhancethe spectral lines.
4) Photoshop (one more time) Tweak the contrast (Image : Auto Contrast) of the final spectrum image.
Here’s a sample of Arcturus after cropping and rotation
After de-skewing
Here’s the scaled continuum
Here’s the spectrum after subtraction of the scaled continuum

7/31/2019 RS Spectroscope Manual
http://slidepdf.com/reader/full/rs-spectroscope-manual 13/16
Copyright Rigel Systems 2004 page 13
And the final product after auto-contrast
Here are more examples of Drift Spectra
Streak Spectrum
Streak Spectrum is for fainter stars or non-stellar objects. Leave the clock drive on while collecting the
spectrum and the spectrum is collected as an unwidened streak. This concentrates more photons intoeach pixel and produces a brighter spectrum than the drift method but resolving spectral lines (lines
being an artifact of widening the spectrum by techniques like turning the clock drive off) is much more
difficult. Here, for example is the streak spectrum of Arcturus, processed as described above for a 1/4th second exposure at iso 1600, zoom 70,mm.
7/31/2019 RS Spectroscope Manual
http://slidepdf.com/reader/full/rs-spectroscope-manual 14/16
Copyright Rigel Systems 2004 page 14
Some of the broad dark spectral features are visible. To make them more visible, the height of the
spectrum can be stretched in Photoshop (image : image size) to stretch the spectral features into lines.
Apply a little vertical smoothing (blur : motion blur : 90 deg), cut out the middle of the streak, stretch itvertically (image : image size) to further “enhance” the spectral lines and voila! But…
Compare it to this drift spectrum of Arcturus, the strong lines are real but the weak are “artificial”.
Streak Spectrum works for the broader, darker, spectral features but for faint stars with noisy spectra,
be suspicious of spurious weak lines.
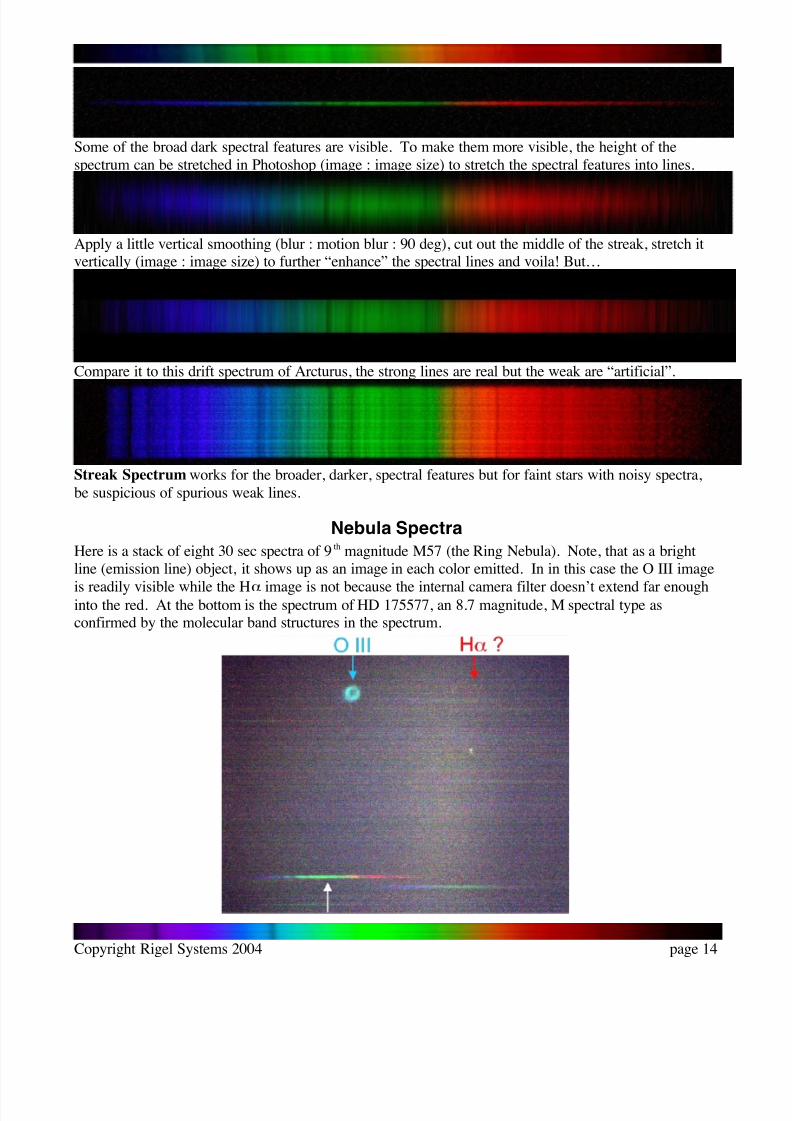
Nebula Spectra
Here is a stack of eight 30 sec spectra of 9 th magnitude M57 (the Ring Nebula). Note, that as a bright
line (emission line) object, it shows up as an image in each color emitted. In in this case the O III image
is readily visible while the H! image is not because the internal camera filter doesn’t extend far enoughinto the red. At the bottom is the spectrum of HD 175577, an 8.7 magnitude, M spectral type asconfirmed by the molecular band structures in the spectrum.

7/31/2019 RS Spectroscope Manual
http://slidepdf.com/reader/full/rs-spectroscope-manual 15/16
Copyright Rigel Systems 2004 page 15

7/31/2019 RS Spectroscope Manual
http://slidepdf.com/reader/full/rs-spectroscope-manual 16/16
Copyright Rigel Systems 2004 page 16
Care of the RS-Spectroscope
Treat the optical surfaces as you would any optical surface, blow or dislodge dust with a soft brush. Beespecially careful of the microglass window on the top side of the RS-Spectroscope grating element that
protects the ruled surface of the grating. Do not impact it.
Links to Other Information on SpectroscopyVisit our website at www.rigelsys.com for links to more information on astronomical spectroscopy both
professional and amateur, and listings of interesting objects to enjoy with your RS-Spectroscope!
5 Year limited Warranty5 Year limited warranty: Rigel Systems, 26850 Basswood Ave, Rancho Palos Verdes CA, 90275 warrants to the
original consumer purchaser of its product that the product will be free of defects in material or workmanship 5 years from
the date of purchase under normal use. During this warranty period, Rigel Systems will, at its option, repair or replace the
product without charge for parts or labor when delivered to Rigel Systems with proof of the date of purchase and a
statement of the problem with the product. Shipping and handling charges to Rigel Systems are your responsibility. This
warranty does not apply if the product has been altered or repaired by anyone other than Rigel Systems or has been
subjected to purchaser abuse, accident, negligence or damage subsequent to purchase including battery damage to product.
This warranty excludes incidental or consequential damages resulting from the product or use of the product. The product isnot a toy. Keep away from children.