
Q Exactive™ HF QuickStart Guide - Thermo Fisher …...4. Click the title bar of the Calibrate...
13
P/N 1372160 - Revision A - May 2014 © 2014 Thermo Fisher Scientific Inc. All rights reserved. About This Guide This Q Exactive HF QuickStart Guide gives an introduction on setting up and using the Thermo Scientific Q Exactive HF mass spectrometer. This guide is intended for all personnel who operate the Q Exactive HF mass spectrometer. Please note that this guide does not contain any safety notices and precautionary statements. Thus, it is mandatory to read also the Exactive Series Operating Manual and the Ion Max and Ion Max-S API Source Hardware Manual. Q Exactive HF Tune Use Q Exactive HF Tune to operate the Q Exactive HF mass spectrometer via the data system computer. It has the following components: • The menu bar provides drop-down menus with commands for operating the program. On its right side it shows the active user role. • The toolbar provides symbol shortcuts for frequently used commands. • The tasks panel provides five windows: Instrument Control, Mass Traces, Calibrate, Evaluate, and Vacuum/Bakeout. The instrument control window is divided into three additional windows for defining scan parameters, setting API source parameters, and acquiring and storing measurement data. • The display panel provides various windows for showing real-time information about the current measurement and the instrument status. ❖ To display the Q Exactive HF Tune program Choose Start > Programs > Thermo Exactive Series > Tune. Preparation Before going on, check that the following preconditions are fulfilled: • The main power circuit breaker switch is in the On (|) position and the electronics service switch is in the Operating Mode position, the gas pressure is within the operational limit, and the vacuum levels are sufficient for operating the instrument. • The Ion Max API source with H-ESI probe is installed on the mass spectrometer. You have checked the proper position of the H-ESI probe in the Ion Max API source housing. • Power supply and communication between syringe pump and mass spectrometer are established. A clean, 500 μL Unimetrics syringe with 450 μL of calibration solution for positive ion mode is placed into the syringe pump. An infusion line is installed between the syringe pump and the grounding union that is held by the grounding bar of the Ion Max API source. Refer to the Exactive Series Operating Manual for instructions about preparing the positive ion mode calibration solution or buying the ready-to-use solution from Thermo Fisher Scientific (refer to www.fishersci.com, catalog number 88323). Q Exactive™ HF QuickStart Guide Display Panel (Spectrum Window, Instrument Status Window, and Messages Window opened) Toolbar Menu Bar Tasks Panel (Instrument Control Window opened) User role
Transcript of Q Exactive™ HF QuickStart Guide - Thermo Fisher …...4. Click the title bar of the Calibrate...
P/N 1372160 - Revision A - May 2014© 2014 Thermo Fisher Scientific Inc.All rights reserved.
About ThisGuide
This Q Exactive HF QuickStart Guide gives an introduction on setting up and using the Thermo Scientific Q Exactive HF mass spectrometer. This guide is intended for all personnel who operate the Q Exactive HF mass spectrometer.
Please note that this guide does not contain any safety notices and precautionary statements. Thus, it is mandatory to read also the Exactive Series Operating Manual and the Ion Max and Ion Max-S API Source Hardware Manual.
Q Exactive HFTune
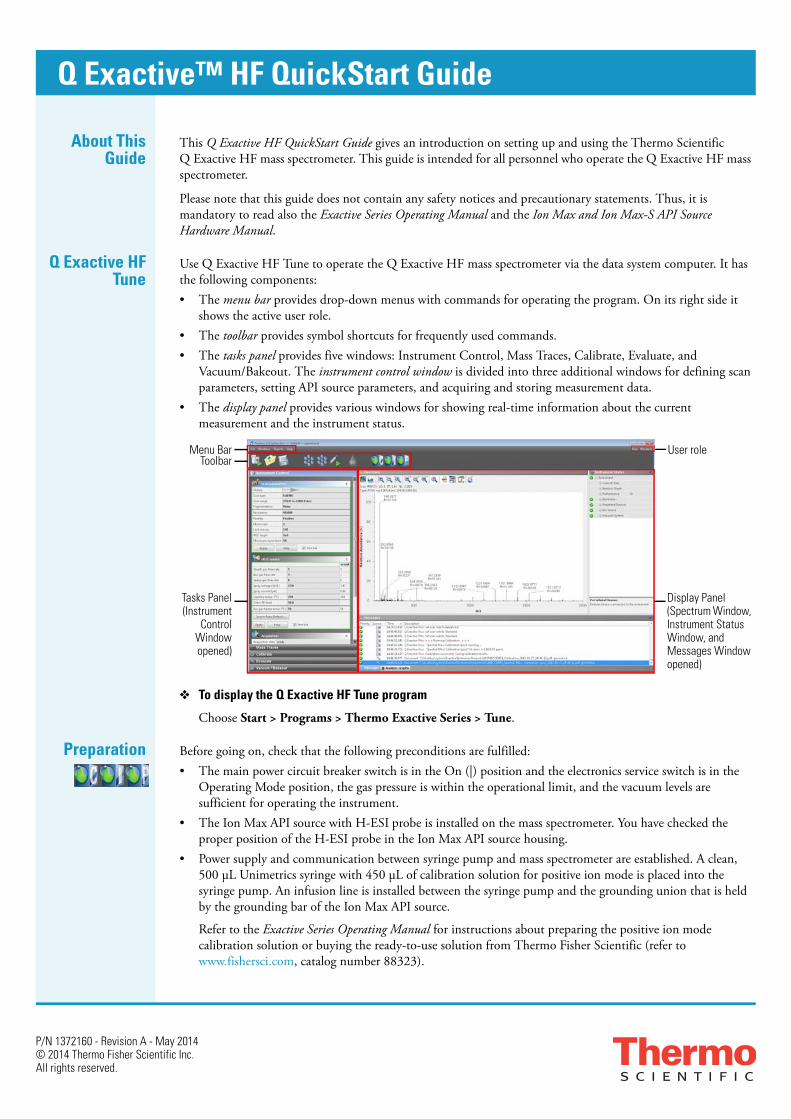
Use Q Exactive HF Tune to operate the Q Exactive HF mass spectrometer via the data system computer. It has the following components:• The menu bar provides drop-down menus with commands for operating the program. On its right side it
shows the active user role.• The toolbar provides symbol shortcuts for frequently used commands.• The tasks panel provides five windows: Instrument Control, Mass Traces, Calibrate, Evaluate, and
Vacuum/Bakeout. The instrument control window is divided into three additional windows for defining scan parameters, setting API source parameters, and acquiring and storing measurement data.
• The display panel provides various windows for showing real-time information about the current measurement and the instrument status.
❖ To display the Q Exactive HF Tune program
Choose Start > Programs > Thermo Exactive Series > Tune.
Preparation Before going on, check that the following preconditions are fulfilled:• The main power circuit breaker switch is in the On (|) position and the electronics service switch is in the
Operating Mode position, the gas pressure is within the operational limit, and the vacuum levels are sufficient for operating the instrument.
• The Ion Max API source with H-ESI probe is installed on the mass spectrometer. You have checked the proper position of the H-ESI probe in the Ion Max API source housing.
• Power supply and communication between syringe pump and mass spectrometer are established. A clean, 500 μL Unimetrics syringe with 450 μL of calibration solution for positive ion mode is placed into the syringe pump. An infusion line is installed between the syringe pump and the grounding union that is held by the grounding bar of the Ion Max API source.
Refer to the Exactive Series Operating Manual for instructions about preparing the positive ion mode calibration solution or buying the ready-to-use solution from Thermo Fisher Scientific (refer to www.fishersci.com, catalog number 88323).
Q Exactive™ HF QuickStart Guide
Display Panel (Spectrum Window, Instrument Status Window, and Messages Window opened)
ToolbarMenu Bar
Tasks Panel(Instrument
ControlWindowopened)
User role

P/N 1372160, Revision A 2 Thermo Scientific
• The data system computer with the Q Exactive HF Tune software is switched on and the mass spectrometer is placed in Standby mode.
For information about performing these tasks, refer to the Exactive Series Operating Manual, the Q Exactive HF Software Manual or the Q Exactive HF Tune Help, and the Ion Max and Ion Max-S API Source Hardware Manual.
Getting Ionsfrom InfusionExperiments
This topic describes how to test the instrument before you can calibrate your Q Exactive HF mass spectrometer automatically.
Setting upQ Exactive HF
Tune
❖ To set up the mass spectrometer in the Q Exactive HF Tune software for tuning and calibration in the H-ESI/MS mode
1. If you have not already done so, choose Start > Programs > Thermo Exactive Series> Tune to start the Q Exactive HF Tune program.
2. In the Q Exactive HF Tune window, on the toolbar, click the On/Off/Standby button to take the mass spectrometer out of the Standby mode or Off mode and turn it On. When you turn the mass spectrometer to On, you initiate the following events:• The mass spectrometer begins scanning.• Nitrogen flows into the H-ESI probe.• The Q Exactive HF mass spectrometer applies a high voltage to the H-ESI probe.• The spectrum window of Q Exactive HF Tune shows a real-time display of the mass spectrum.
3. If necessary, open an existing tune file:a. Choose File > Load Tune File to display the Open dialog box.b. Browse for the folder C:\Xcalibur\methods\. Select a tune file, for example HESI_installation.mstune.c. Click Open to open the file. Q Exactive HF Tune downloads the Tune Method parameters to the mass
spectrometer.
A tune file is specific to your particular analyte and solvent flow rate. You can load the tune file again and use it as a starting point for optimization of the mass spectrometer for a different analyte of interest or with a different flow rate.
4. Examine the pre-tune H-ESI source settings:a. From the Instrument Control panel, open the H-ESI source
window. See figure right.b. Set the sheath gas flow rate to 12.c. Leave the auxiliary gas flow rate at 0.d. Leave the sweep gas flow rate at 0.e. Set the spray voltage to 4 kV.f. Set the capillary temperature to 320 °C.g. Leave the S-lens RF level at 50.h. Set the auxiliary gas heater temperature to 0 °C.i. If you have made any changes in the window, click Apply.
NOTICE Select the Hot link check box to apply all changes in real time. A green frame around the parameter box indicates an active hot link. ▲
Thermo Scientific 3 P/N 1372160, Revision A
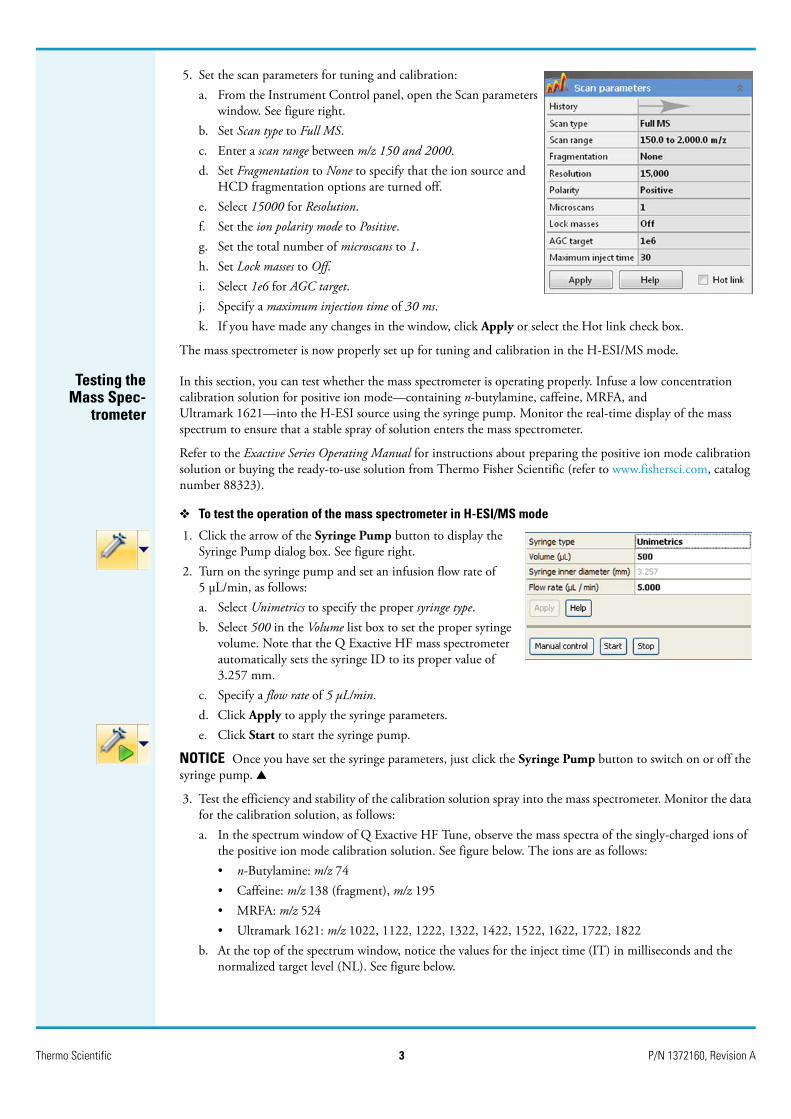
5. Set the scan parameters for tuning and calibration:a. From the Instrument Control panel, open the Scan parameters
window. See figure right.b. Set Scan type to Full MS.c. Enter a scan range between m/z 150 and 2000.d. Set Fragmentation to None to specify that the ion source and
HCD fragmentation options are turned off.e. Select 15000 for Resolution.f. Set the ion polarity mode to Positive.g. Set the total number of microscans to 1.h. Set Lock masses to Off.i. Select 1e6 for AGC target.j. Specify a maximum injection time of 30 ms.k. If you have made any changes in the window, click Apply or select the Hot link check box.
The mass spectrometer is now properly set up for tuning and calibration in the H-ESI/MS mode.
Testing theMass Spec-
trometer
In this section, you can test whether the mass spectrometer is operating properly. Infuse a low concentration calibration solution for positive ion mode—containing n-butylamine, caffeine, MRFA, and Ultramark 1621—into the H-ESI source using the syringe pump. Monitor the real-time display of the mass spectrum to ensure that a stable spray of solution enters the mass spectrometer.
Refer to the Exactive Series Operating Manual for instructions about preparing the positive ion mode calibration solution or buying the ready-to-use solution from Thermo Fisher Scientific (refer to www.fishersci.com, catalog number 88323).
❖ To test the operation of the mass spectrometer in H-ESI/MS mode
1. Click the arrow of the Syringe Pump button to display the Syringe Pump dialog box. See figure right.
2. Turn on the syringe pump and set an infusion flow rate of 5 μL/min, as follows:a. Select Unimetrics to specify the proper syringe type.b. Select 500 in the Volume list box to set the proper syringe
volume. Note that the Q Exactive HF mass spectrometer automatically sets the syringe ID to its proper value of 3.257 mm.
c. Specify a flow rate of 5 μL/min.d. Click Apply to apply the syringe parameters.e. Click Start to start the syringe pump.
NOTICE Once you have set the syringe parameters, just click the Syringe Pump button to switch on or off the syringe pump. ▲
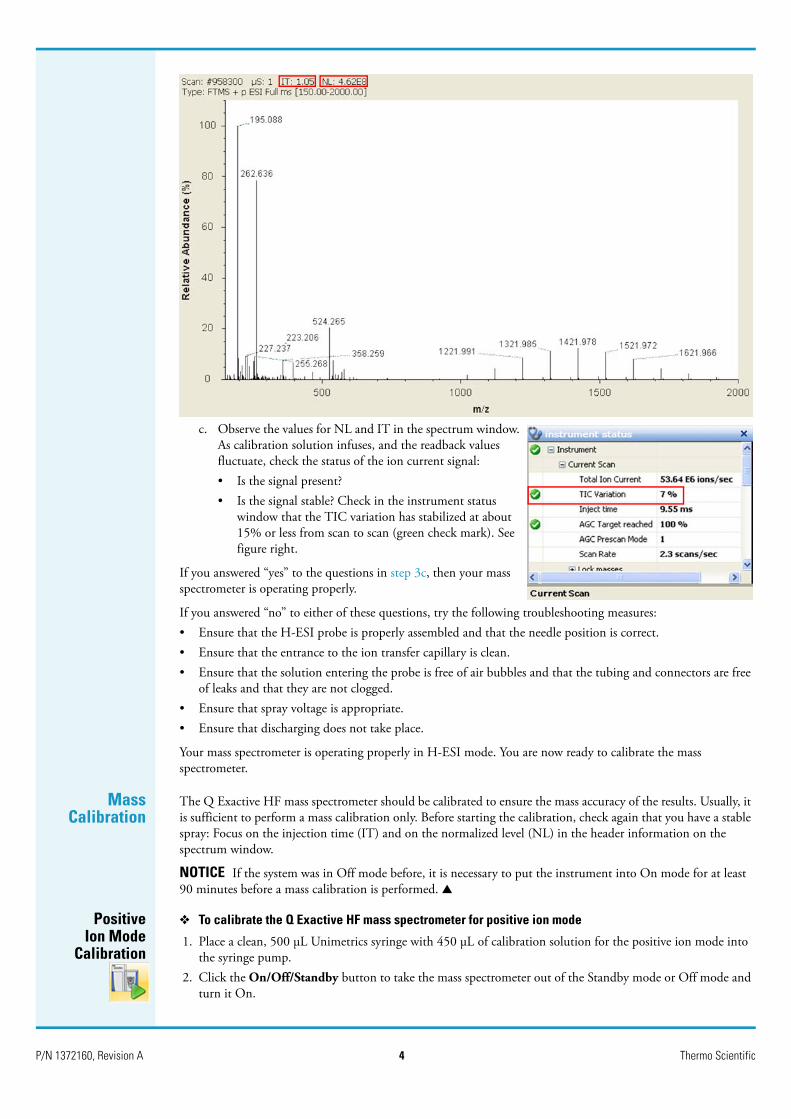
3. Test the efficiency and stability of the calibration solution spray into the mass spectrometer. Monitor the data for the calibration solution, as follows:a. In the spectrum window of Q Exactive HF Tune, observe the mass spectra of the singly-charged ions of
the positive ion mode calibration solution. See figure below. The ions are as follows:• n-Butylamine: m/z 74• Caffeine: m/z 138 (fragment), m/z 195• MRFA: m/z 524• Ultramark 1621: m/z 1022, 1122, 1222, 1322, 1422, 1522, 1622, 1722, 1822
b. At the top of the spectrum window, notice the values for the inject time (IT) in milliseconds and the normalized target level (NL). See figure below.
P/N 1372160, Revision A 4 Thermo Scientific
c. Observe the values for NL and IT in the spectrum window. As calibration solution infuses, and the readback values fluctuate, check the status of the ion current signal:• Is the signal present?• Is the signal stable? Check in the instrument status
window that the TIC variation has stabilized at about 15% or less from scan to scan (green check mark). See figure right.
If you answered “yes” to the questions in step 3c, then your mass spectrometer is operating properly.
If you answered “no” to either of these questions, try the following troubleshooting measures:• Ensure that the H-ESI probe is properly assembled and that the needle position is correct.• Ensure that the entrance to the ion transfer capillary is clean.• Ensure that the solution entering the probe is free of air bubbles and that the tubing and connectors are free
of leaks and that they are not clogged.• Ensure that spray voltage is appropriate.• Ensure that discharging does not take place.
Your mass spectrometer is operating properly in H-ESI mode. You are now ready to calibrate the mass spectrometer.
MassCalibration
The Q Exactive HF mass spectrometer should be calibrated to ensure the mass accuracy of the results. Usually, it is sufficient to perform a mass calibration only. Before starting the calibration, check again that you have a stable spray: Focus on the injection time (IT) and on the normalized level (NL) in the header information on the spectrum window.
NOTICE If the system was in Off mode before, it is necessary to put the instrument into On mode for at least 90 minutes before a mass calibration is performed. ▲
PositiveIon Mode
Calibration
❖ To calibrate the Q Exactive HF mass spectrometer for positive ion mode
1. Place a clean, 500 μL Unimetrics syringe with 450 μL of calibration solution for the positive ion mode into the syringe pump.
2. Click the On/Off/Standby button to take the mass spectrometer out of the Standby mode or Off mode and turn it On.
Thermo Scientific 5 P/N 1372160, Revision A
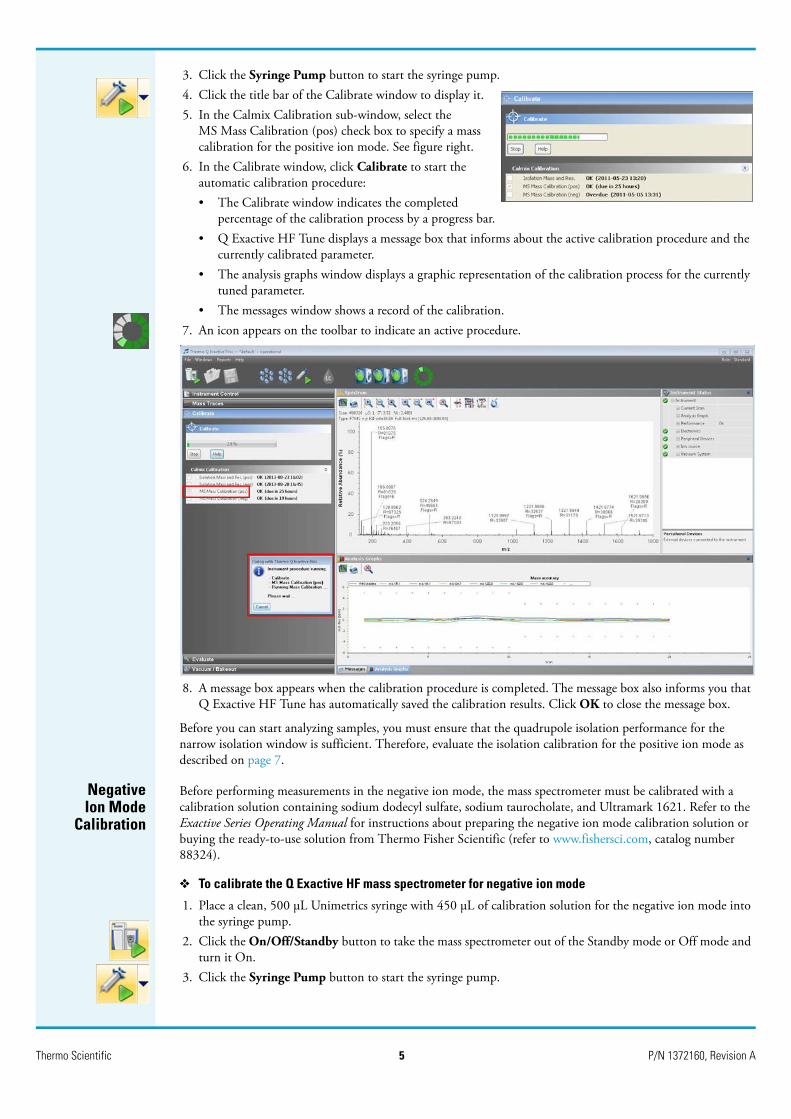
3. Click the Syringe Pump button to start the syringe pump.4. Click the title bar of the Calibrate window to display it.5. In the Calmix Calibration sub-window, select the
MS Mass Calibration (pos) check box to specify a mass calibration for the positive ion mode. See figure right.
6. In the Calibrate window, click Calibrate to start the automatic calibration procedure:• The Calibrate window indicates the completed
percentage of the calibration process by a progress bar.• Q Exactive HF Tune displays a message box that informs about the active calibration procedure and the
currently calibrated parameter.• The analysis graphs window displays a graphic representation of the calibration process for the currently
tuned parameter.• The messages window shows a record of the calibration.
7. An icon appears on the toolbar to indicate an active procedure.
8. A message box appears when the calibration procedure is completed. The message box also informs you that Q Exactive HF Tune has automatically saved the calibration results. Click OK to close the message box.
Before you can start analyzing samples, you must ensure that the quadrupole isolation performance for the narrow isolation window is sufficient. Therefore, evaluate the isolation calibration for the positive ion mode as described on page 7.
NegativeIon Mode
Calibration
Before performing measurements in the negative ion mode, the mass spectrometer must be calibrated with a calibration solution containing sodium dodecyl sulfate, sodium taurocholate, and Ultramark 1621. Refer to the Exactive Series Operating Manual for instructions about preparing the negative ion mode calibration solution or buying the ready-to-use solution from Thermo Fisher Scientific (refer to www.fishersci.com, catalog number 88324).
❖ To calibrate the Q Exactive HF mass spectrometer for negative ion mode
1. Place a clean, 500 μL Unimetrics syringe with 450 μL of calibration solution for the negative ion mode into the syringe pump.
2. Click the On/Off/Standby button to take the mass spectrometer out of the Standby mode or Off mode and turn it On.
3. Click the Syringe Pump button to start the syringe pump.
P/N 1372160, Revision A 6 Thermo Scientific
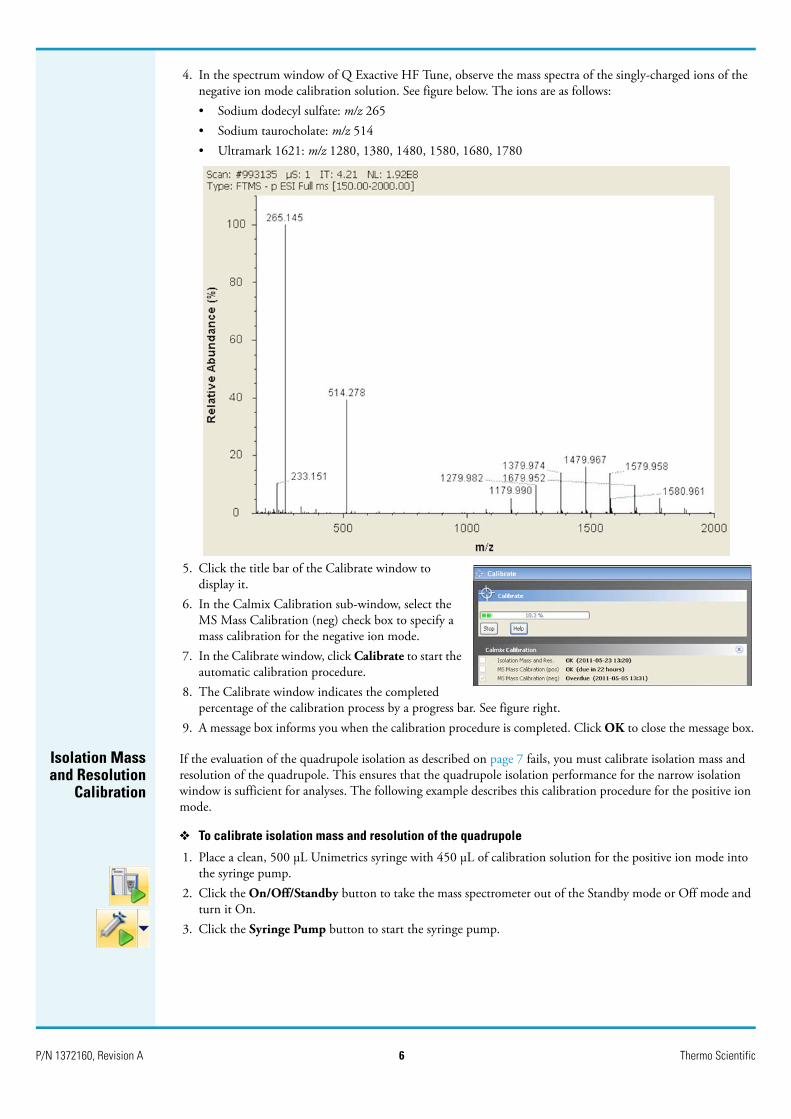
4. In the spectrum window of Q Exactive HF Tune, observe the mass spectra of the singly-charged ions of the negative ion mode calibration solution. See figure below. The ions are as follows:• Sodium dodecyl sulfate: m/z 265• Sodium taurocholate: m/z 514• Ultramark 1621: m/z 1280, 1380, 1480, 1580, 1680, 1780
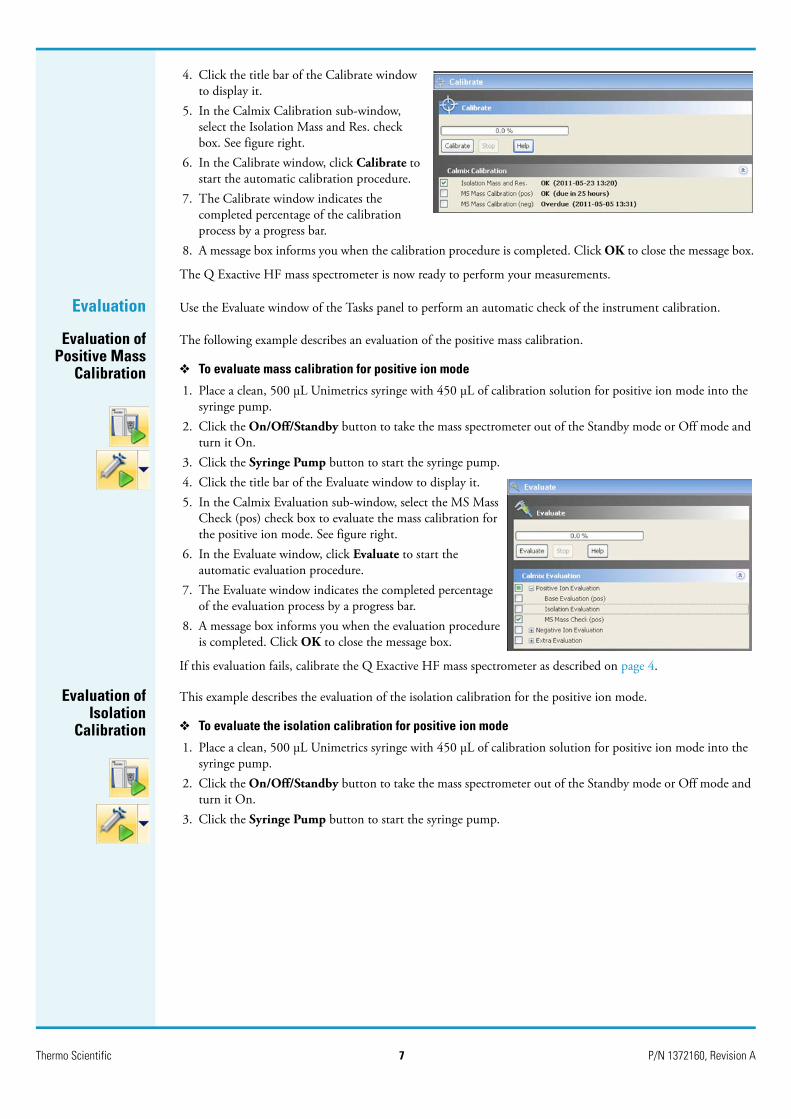
5. Click the title bar of the Calibrate window to display it.
6. In the Calmix Calibration sub-window, select the MS Mass Calibration (neg) check box to specify a mass calibration for the negative ion mode.
7. In the Calibrate window, click Calibrate to start the automatic calibration procedure.
8. The Calibrate window indicates the completed percentage of the calibration process by a progress bar. See figure right.
9. A message box informs you when the calibration procedure is completed. Click OK to close the message box.
Isolation Massand Resolution
Calibration
If the evaluation of the quadrupole isolation as described on page 7 fails, you must calibrate isolation mass and resolution of the quadrupole. This ensures that the quadrupole isolation performance for the narrow isolation window is sufficient for analyses. The following example describes this calibration procedure for the positive ion mode.
❖ To calibrate isolation mass and resolution of the quadrupole
1. Place a clean, 500 μL Unimetrics syringe with 450 μL of calibration solution for the positive ion mode into the syringe pump.
2. Click the On/Off/Standby button to take the mass spectrometer out of the Standby mode or Off mode and turn it On.
3. Click the Syringe Pump button to start the syringe pump.
Thermo Scientific 7 P/N 1372160, Revision A
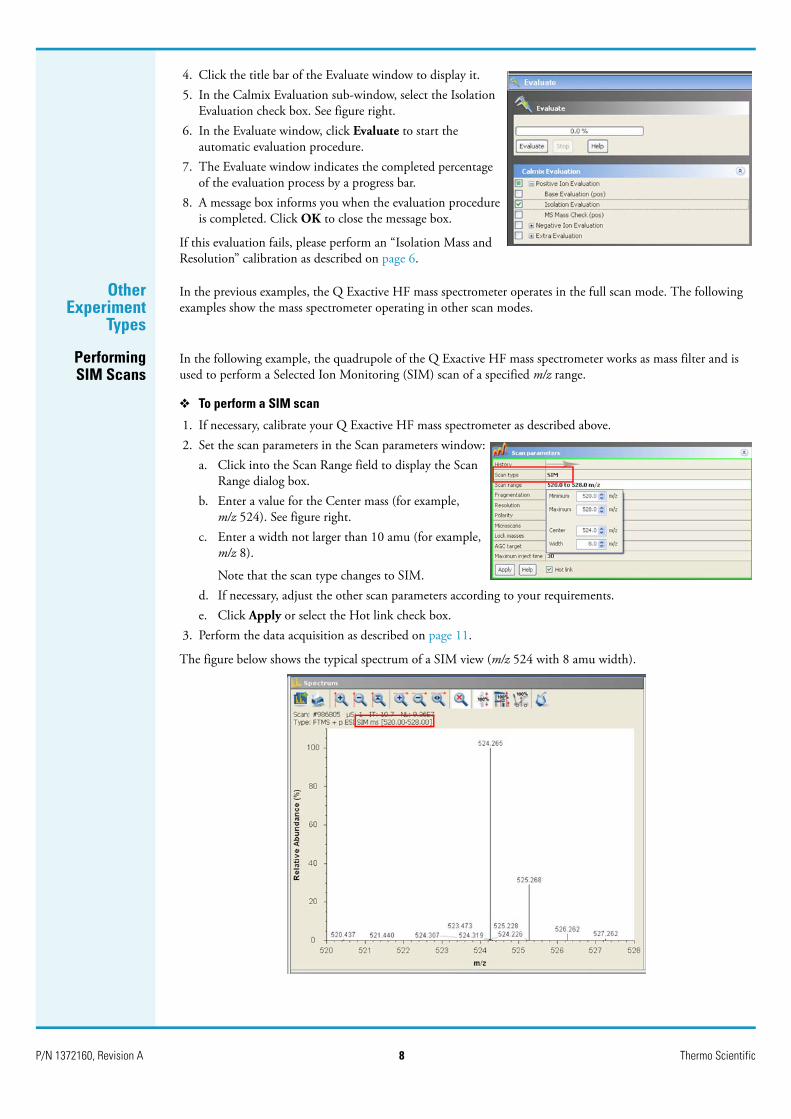
4. Click the title bar of the Calibrate window to display it.
5. In the Calmix Calibration sub-window, select the Isolation Mass and Res. check box. See figure right.
6. In the Calibrate window, click Calibrate to start the automatic calibration procedure.
7. The Calibrate window indicates the completed percentage of the calibration process by a progress bar.
8. A message box informs you when the calibration procedure is completed. Click OK to close the message box.
The Q Exactive HF mass spectrometer is now ready to perform your measurements.
Evaluation Use the Evaluate window of the Tasks panel to perform an automatic check of the instrument calibration.
Evaluation ofPositive Mass
Calibration
The following example describes an evaluation of the positive mass calibration.
❖ To evaluate mass calibration for positive ion mode
1. Place a clean, 500 μL Unimetrics syringe with 450 μL of calibration solution for positive ion mode into the syringe pump.
2. Click the On/Off/Standby button to take the mass spectrometer out of the Standby mode or Off mode and turn it On.
3. Click the Syringe Pump button to start the syringe pump.4. Click the title bar of the Evaluate window to display it.5. In the Calmix Evaluation sub-window, select the MS Mass
Check (pos) check box to evaluate the mass calibration for the positive ion mode. See figure right.
6. In the Evaluate window, click Evaluate to start the automatic evaluation procedure.
7. The Evaluate window indicates the completed percentage of the evaluation process by a progress bar.
8. A message box informs you when the evaluation procedure is completed. Click OK to close the message box.
If this evaluation fails, calibrate the Q Exactive HF mass spectrometer as described on page 4.
Evaluation ofIsolation
Calibration
This example describes the evaluation of the isolation calibration for the positive ion mode.
❖ To evaluate the isolation calibration for positive ion mode
1. Place a clean, 500 μL Unimetrics syringe with 450 μL of calibration solution for positive ion mode into the syringe pump.
2. Click the On/Off/Standby button to take the mass spectrometer out of the Standby mode or Off mode and turn it On.
3. Click the Syringe Pump button to start the syringe pump.
P/N 1372160, Revision A 8 Thermo Scientific
4. Click the title bar of the Evaluate window to display it.5. In the Calmix Evaluation sub-window, select the Isolation
Evaluation check box. See figure right.6. In the Evaluate window, click Evaluate to start the
automatic evaluation procedure.7. The Evaluate window indicates the completed percentage
of the evaluation process by a progress bar.8. A message box informs you when the evaluation procedure
is completed. Click OK to close the message box.
If this evaluation fails, please perform an “Isolation Mass and Resolution” calibration as described on page 6.
OtherExperiment
Types
In the previous examples, the Q Exactive HF mass spectrometer operates in the full scan mode. The following examples show the mass spectrometer operating in other scan modes.
PerformingSIM Scans
In the following example, the quadrupole of the Q Exactive HF mass spectrometer works as mass filter and is used to perform a Selected Ion Monitoring (SIM) scan of a specified m/z range.
❖ To perform a SIM scan
1. If necessary, calibrate your Q Exactive HF mass spectrometer as described above.2. Set the scan parameters in the Scan parameters window:
a. Click into the Scan Range field to display the Scan Range dialog box.
b. Enter a value for the Center mass (for example, m/z 524). See figure right.
c. Enter a width not larger than 10 amu (for example, m/z 8).
Note that the scan type changes to SIM.d. If necessary, adjust the other scan parameters according to your requirements.e. Click Apply or select the Hot link check box.
3. Perform the data acquisition as described on page 11.
The figure below shows the typical spectrum of a SIM view (m/z 524 with 8 amu width).

Thermo Scientific 9 P/N 1372160, Revision A
Performing AIFExperiments
The Q Exactive HF mass spectrometer allows performing All Ion Fragmentation (AIF) measurements. The following example describes an AIF fragmentation experiment.
❖ To set the scan parameters for an AIF fragmentation experiment with NCE
1. If necessary, calibrate your Q Exactive HF mass spectrometer as described above.2. Set the scan parameters in the Scan parameters window:
a. In the Scan type field, select AIF–MS/MS.b. Click into the Scan Range field to display the Scan
Range dialog box.c. Adjust the scan range according to your
requirements (from m/z 150 to m/z 2000, for example). See figure right.
d. Click into the Fragmentation field to display the Fragmentation dialog box.
e. Select the NCE option button and enter the value for the Normalized Collision Energy (35, for example) into the spin box. See figure right.
f. Set the Charge state appropriately, if necessary.g. If necessary, adjust the other scan parameters according to your
requirements.h. Click Apply or select the Hot link check box.
3. Perform the data acquisition as described on page 11.
The figure below shows a typical spectrum of an AIF fragmentation experiment.
Intact Ultramark 1621
MRFA fragment ion
Caffeine fragment ion
Intact caffeine
Caffeine fragment ion
MRFA fragment ions

P/N 1372160, Revision A 10 Thermo Scientific
PerformingMS/MS Scans
The following example shows an MS/MS experiment. Precursor ions that were selected by using the quadrupole are sent to the HCD collision cell of the Q Exactive HF mass spectrometer. Here, they are fragmented with Normalized Collision Energy (NCE) or Collision Energy (CE)—selectable by the user.
❖ To perform an MS/MS experiment
1. If necessary, calibrate your Q Exactive HF mass spectrometer as described above.2. Set the scan parameters in the Scan parameters
window:a. In the Scan type field, select AIF–MS/MS. See
figure right.b. In the Isolation area, enter a value for the precursor
mass (m/z 524, for example).c. Enter a width not larger than 10 amu (m/z 8, for
example). Note that the scan type changes to MS/MS.
d. Click into the Fragmentation field to display the Fragmentation dialog box.
e. Select the NCE (or CE) option button and enter the desired value for the collision energy (45, for example) into the spin box. See figure right.
f. Set the Charge state appropriately, if necessary.
g. Click into the Scan Range field to display the Scan Range dialog box.h. Adjust the scan range according to your requirements (from m/z 50 to
m/z 600, for example). See figure right.i. If necessary, adjust the other scan parameters according to your
requirements.j. Click Apply or select the Hot link check box.
3. Perform the data acquisition as described on page 11.

Thermo Scientific 11 P/N 1372160, Revision A
The figure below shows an example of a typical MS/MS spectrum.
DataAcquisition
After you have entered the scan parameters of your experiment, you can finally start to acquire data.
❖ To perform data acquisition
1. Specify the acquisition parameters in the Acquisition window:a. In the Destination file field, type the full path
(Drive:\path\file name) of the raw file that is used to store the acquired data. Alternatively, click the button to the right of the text box to open a dialog box to browse your directories. See figure right.
b. Click into the Acquisition time field to open the dialog box. Select the continuously option button to specify that the acquisition will continue until you click Stop. The Acquisition time field shows continuously.
2. Click the On/Off/Standby button to take the mass spectrometer out of the Standby mode or Off mode and turn it On.
3. Click the Syringe Pump button to start the syringe pump.4. In the Acquisition window, click Start to initiate the data
acquisition. The spectrum window shows a real-time display of the mass spectrum. The data are saved in the selected raw file.
5. Click Stop to stop the acquisition.
Setting up andRunning
Methods
The following example describes how to create an instrument method in the Instrument Setup view of Xcalibur. You can then use the instrument method to acquire data with the Q Exactive HF mass spectrometer. The tune file used in the instrument method is used for data acquisition. Make sure in the Q Exactive HF Tune software that your tune file has appropriate settings and save it accordingly.

P/N 1372160, Revision A 12 Thermo Scientific
Creating theInstrument
Method
❖ To set up an instrument method
1. Display the Instrument Setup page in Xcalibur:a. Choose Start > Programs > Thermo Xcalibur > Xcalibur to display the Xcalibur Home Page window.b. Choose GoTo > Instrument Setup to display the Instrument Setup window.c. If necessary, click Q Exactive HF - Orbitrap MS in the View bar to display the Method Editor.
2. In the Method Editor, drag an experiment symbol (for example, Full MS - SIM) from the Workflows pane (bottom left) to the gray bar in the Graph pane. A corresponding time bar is displayed in the Scan Groups pane.
3. Edit the fields of the Properties pane (right) to set up the experiment parameters. Refer to the Q Exactive HF Software Manual or the Q Exactive HF Tune Help for a description of the available parameters.
4. Assign a tune file:a. On the External Hardware pane, click the icon to expand the Tune Files pane.b. In the Properties of Tunefiles pane, click the Base Tunefile field. c. Click the button to open a dialog box. d. Browse for the tune file (for example, ab.mstune) and assign it to the experiment.
5. Click on the toolbar to save the new instrument method:a. In the Save As dialog box, enter the name (Full_MS.meth, for example) and the location for your
instrument method. Then click Save.b. In the File Summary Information Dialog Box, enter a comment as header information for your
instrument method. Then click OK to close the dialog box.
The instrument method can now be used to acquire data with your Q Exactive HF mass spectrometer, either from the Xcalibur Sequence Setup or from the Q Exactive HF Tune window. The next figure shows the example of an instrument method that was set up as described above.
Thermo Scientific 13 P/N 1372160, Revision A
Running theQ Exactive HF
Mass Spec-trometer
This section shows an example of how to use an instrument method to run the Q Exactive HF mass spectrometer.
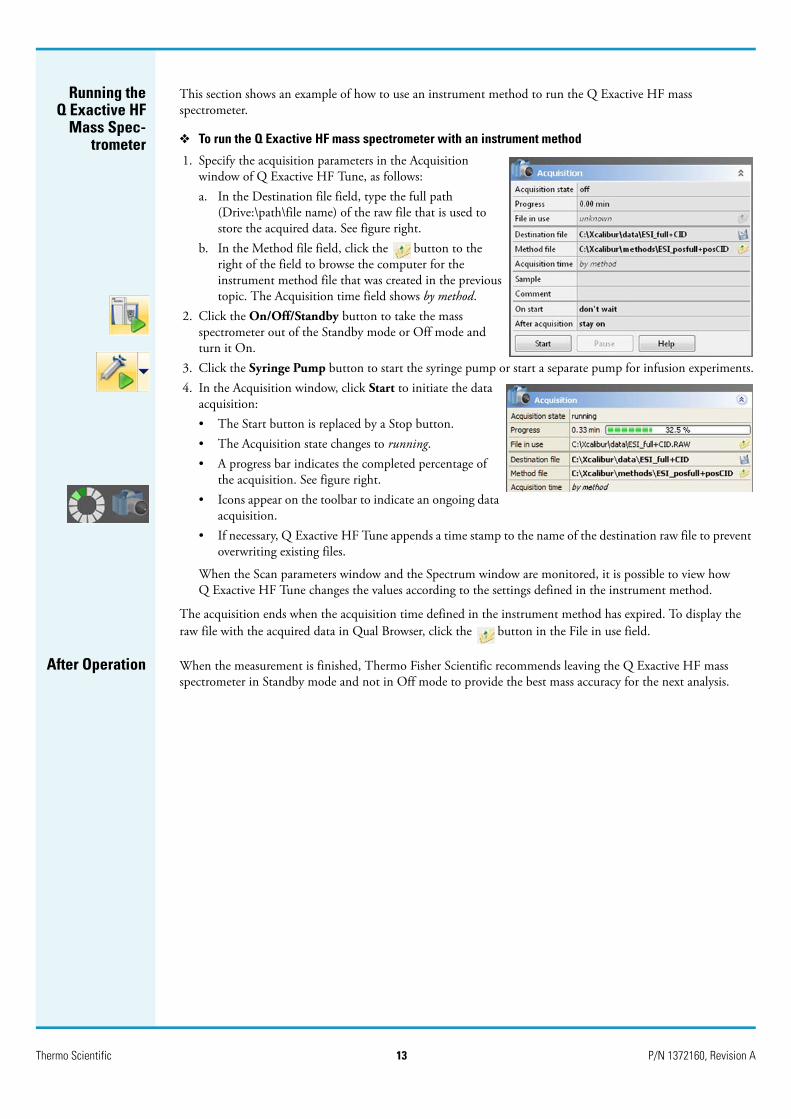
❖ To run the Q Exactive HF mass spectrometer with an instrument method
1. Specify the acquisition parameters in the Acquisition window of Q Exactive HF Tune, as follows:a. In the Destination file field, type the full path
(Drive:\path\file name) of the raw file that is used to store the acquired data. See figure right.
b. In the Method file field, click the button to the right of the field to browse the computer for the instrument method file that was created in the previous topic. The Acquisition time field shows by method.
2. Click the On/Off/Standby button to take the mass spectrometer out of the Standby mode or Off mode and turn it On.
3. Click the Syringe Pump button to start the syringe pump or start a separate pump for infusion experiments.4. In the Acquisition window, click Start to initiate the data
acquisition:• The Start button is replaced by a Stop button.• The Acquisition state changes to running.• A progress bar indicates the completed percentage of
the acquisition. See figure right.• Icons appear on the toolbar to indicate an ongoing data
acquisition.• If necessary, Q Exactive HF Tune appends a time stamp to the name of the destination raw file to prevent
overwriting existing files.
When the Scan parameters window and the Spectrum window are monitored, it is possible to view how Q Exactive HF Tune changes the values according to the settings defined in the instrument method.
The acquisition ends when the acquisition time defined in the instrument method has expired. To display the raw file with the acquired data in Qual Browser, click the button in the File in use field.
After Operation When the measurement is finished, Thermo Fisher Scientific recommends leaving the Q Exactive HF mass spectrometer in Standby mode and not in Off mode to provide the best mass accuracy for the next analysis.