
Published by AudioCodes’ Interoperability Laboratory · Figure 2: Changing Dialplan Analysis ......
16
May 2006 Document #: LTRT-82701 Published by AudioCodes’ Interoperability Laboratory
Transcript of Published by AudioCodes’ Interoperability Laboratory · Figure 2: Changing Dialplan Analysis ......

May 2006 Document #: LTRT-82701
Published by AudioCodes’ Interoperability Laboratory


H.323 Configuration Guide Contents
AudioCodes Confidential 3 May 2006
Table of Contents
1 Introduction .........................................................................................................5
2 Configuring AudioCodes’ H.323 Gateways in the Avaya© CM ........................7
2.1 Adding, Defining an H.323 IP Trunk for AudioCodes’ Gateway ......................................7
3 Preparing AudioCodes’ H.323 Gateway to Interoperate with Avaya© CM ....15
List of Figures
Figure 1: Example of AudioCodes H.323 Gateways with the Avaya© Communication Manager ............5
Figure 2: Changing Dialplan Analysis ......................................................................................................8 Figure 3: Changing Node-Names IP ........................................................................................................8 Figure 4: Add Signaling-Group.................................................................................................................9 Figure 5: Add Trunk-Group.....................................................................................................................10 Figure 6: Add Signaling-Group...............................................................................................................10 Figure 7: Change Uniform-Dialplan........................................................................................................11 Figure 8: Change aar Analysis ...............................................................................................................11 Figure 9: Change Route-Pattern ............................................................................................................12 Figure 10: Change IP Codec Set (Codecs)............................................................................................12 Figure 11: Change IP Codec Set (FAX) .................................................................................................13

Avaya©
CM
AudioCodes Interoperability Laboratory 4 Document # LTRT-82701
Notice
This guide describes the configuration of AudioCodes’ Mediant 1000, Mediant 2000 and MP-11x H.323 media gateways in the Avaya
® Communication Manager. Information
contained in this document is believed to be accurate and reliable at the time of printing. However, due to ongoing product improvements and revisions, AudioCodes cannot guarantee accuracy of printed material after the Date Published nor can it accept responsibility for errors or omissions. Updates to this document and other documents can be viewed by registered Technical Support customers at www.audiocodes.com under Support / Product Documentation.
© Copyright 2006 AudioCodes Ltd. All rights reserved.
This document is subject to change without notice.
Refer to the current release notes that may be included with your documentation or hardware delivery.
Date Published: May-10-2006 Date Printed: May-16-2006
Tip: When viewing this manual on CD, Web site or on any other electronic copy, all cross-references are hyperlinked. Click on the page or section numbers (shown in blue) to reach the individual cross-referenced item directly. To return to the point from where you accessed the cross-
reference, press Alt + ←←←←.
Trademarks
AC logo, Ardito, AudioCoded, AudioCodes, AudioCodes logo, IPmedia, Mediant, MediaPack, MP-MLQ, NetCoder, Stretto, TrunkPack, VoicePacketizer and VoIPerfect, are trademarks or registered trademarks of AudioCodes Limited.
All other products or trademarks are property of their respective owners.
WEEE EU Directive
Pursuant to the WEEE EU Directive, electronic and electrical waste must not be disposed of with unsorted waste. Please contact your local recycling authority for disposal of this product.
Customer Support
Customer technical support and service are provided by AudioCodes’ Distributors, Partners, and Resellers from whom the product was purchased. For Customer support for products purchased directly from AudioCodes, contact [email protected].
Abbreviations and Conventions
In this document, GW refers to Gateway, MG refers to AudioCodes’ Media Gateway, and CM refers to the Avaya Communication Manager.
Information contained in this document is confidential and may not be disclosed without prior written agreement from an AudioCodes signatory.

H.323 Configuration Guide 1. Introduction
AudioCodes Confidential 5 May 2006
1 Introduction This configuration guide describes:
���� How to configure AudioCodes’ H.323 Gateway (Mediant 2000, Mediant 1000 and MP-11x) in the Avaya Communication Manager.
���� How to configure AudioCodes’ H.323 Gateway with the correct ini file.
Figure 1 illustrates an example layout of a network in which the Avaya CM interoperates with AudioCodes’ H.323 equipment.
Figure 1: Example of AudioCodes H.323 Gateways with the Avaya Communication Manager

Avaya©
CM
AudioCodes Interoperability Laboratory 6 Document # LTRT-82701
Reader’s Notes

H.323 Configuration Guide 2. Configuring AudioCodes’ H.323 Gateways in the Avaya CM
AudioCodes Confidential 7 May 2006
2 Configuring AudioCodes’ H.323 Gateways in the Avaya CM
2.1 Adding, Defining an H.323 IP Trunk for AudioCodes’ Gateway � To add a new IP trunk, & configure the following in the Avaya CM
configuration tool take the next 12 steps:
1. Access the CM Configuration Tool
2. Type change system-parameters customer-options (on page 2)
���� Maximum Administered IP Trunk > 0
���� Go to page 3
���� ARS/AAR Dialing without FAC? y
���� Go to page 4
���� ISDN-PRI? = y
���� IP Trunks? = y
���� Go to page 5
���� Private Networking? y
���� Uniform Dialing Plan? y
3. Type change dialplan analysis
���� Add a range of DAC (Dial Access Code for testing trunks), for example, 2-digit starting with 9, such as 90-99
���� Dialed String = 9
���� Total length = 2
���� Call Type = dac
���� Add ext for the AudioCodes’ gateway’s extensions, for example, 3-digit starting with 1, for example, 100-199 (shown in Figure 2).
���� Dialed String = 1
���� Total length = 3
���� Call Type = ext

Avaya©
CM
AudioCodes Interoperability Laboratory 8 Document # LTRT-82701
Figure 2: Changing Dial Plan Analysis
4. Type Change Node-Names IP and add the IP address for the local Gatekeeper and gateway (CLAN/MedPro/ICC/MGP) and for the AudioCodes gateway. For example (shown in Figure 3): AudioCodesGWana in IP Address 149.49.140.241 or AudioCodesGWpri in IP Address 149.49.140.240
Figure 3: Changing Node-Names IP
5. Type add signaling-group 1 (on page 1)
���� Group Type = h.323
���� Trunk Group for Channel Selection = the number of the trunk you set up for the remote office
���� Near End Node Name = the name of the home switch Gatekeeper (ICC/CLAN)
���� Far End Node Name = the name of AudioCodes’ gateway as defined in step 3 above
���� Near End Listen Port = h.225 CM TCP port 1720 or other port (refer also to ini

H.323 Configuration Guide 2. Configuring AudioCodes’ H.323 Gateways in the Avaya CM
AudioCodes Confidential 9 May 2006
configuration in Section 1 on page 15). Refer to Figure 4 as an example (in which Near End List Port = 5007)
���� Far End Listen Port = h.225 gateway TCP port 1720 or other port (refer also to ini configuration in Section 1 on page 15). Refer to Figure 4 as an example (in which Near End List Port = 5007)
Refer for an example to Figure 4 below, in which the gateway by the node name AudioCodesGWpri (IP Address 149.49.140.240) is configured to local and remote h.225 TCP port 5007.
Figure 4: Add Signaling-Group
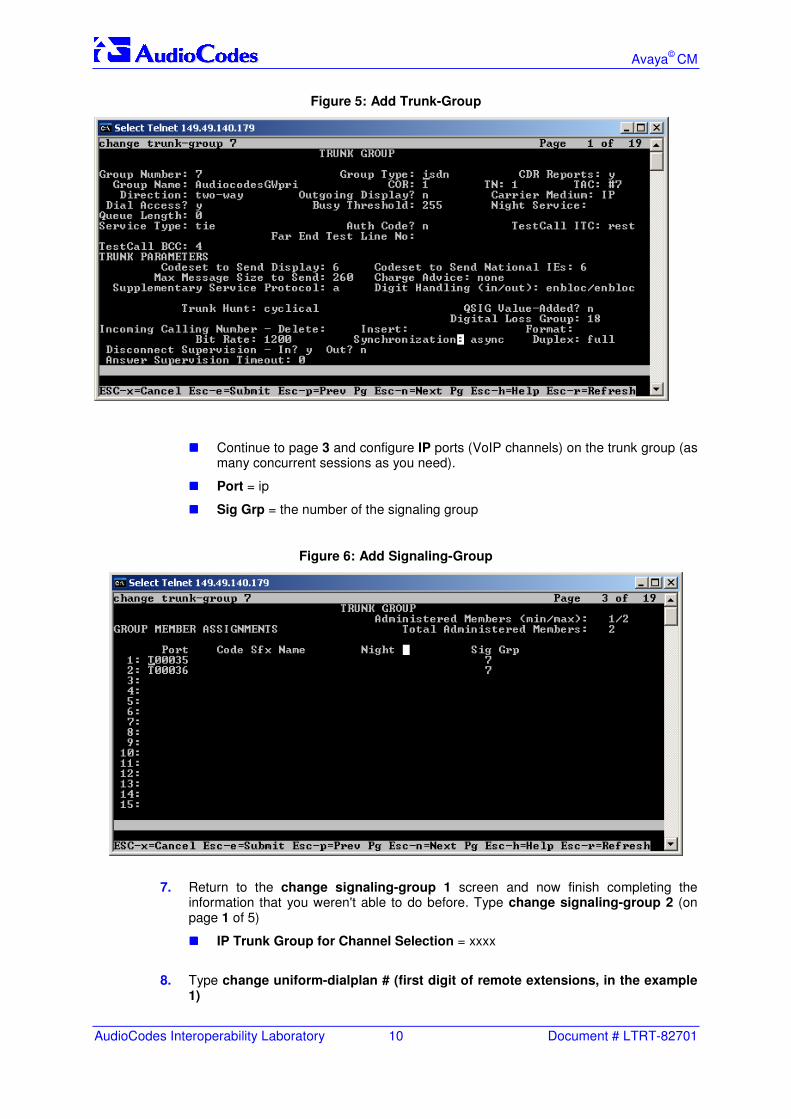
6. Type add trunk-group 1 (on page 1)
���� Group Number = the number of the signaling trunk group as defined in step 4 above.
���� Group Type = isdn
���� Group Name = the name of the trunk
���� TAC = the access code used for the trunk
���� Direction = two-way
���� Carrier Medium = IP
���� Dial Access = n
���� Service Type = tie
Avaya©
CM
AudioCodes Interoperability Laboratory 10 Document # LTRT-82701
Figure 5: Add Trunk-Group
���� Continue to page 3 and configure IP ports (VoIP channels) on the trunk group (as many concurrent sessions as you need).
���� Port = ip
���� Sig Grp = the number of the signaling group
Figure 6: Add Signaling-Group
7. Return to the change signaling-group 1 screen and now finish completing the information that you weren't able to do before. Type change signaling-group 2 (on page 1 of 5)
���� IP Trunk Group for Channel Selection = xxxx
8. Type change uniform-dialplan # (first digit of remote extensions, in the example 1)

H.323 Configuration Guide 2. Configuring AudioCodes’ H.323 Gateways in the Avaya CM
AudioCodes Confidential 11 May 2006
���� Matching Pattern = first digit of remote extensions (in the example 1)
���� Len = length
���� Net = aar
Figure 7: Change Uniform-Dial Plan
9. Type change aar analysis # - the first digit of remote extensions (in the example, it is 1)
���� Min = length
���� Max = length
���� Route Pattern = #
Figure 8: Change AAR Analysis
10. Type change route-pattern #

Avaya©
CM
AudioCodes Interoperability Laboratory 12 Document # LTRT-82701
���� Grp No = Trunk group 1
���� FRL = 0-7
Figure 9: Change Route-Pattern
11. Type change ip-codec-set 1 (on page 1) and assign audio codecs (refer also to the ini configuration in Section 1 on page 15)
Figure 10: Change IP Codec Set (Codecs)
12. Go to page 2 (shown in Figure 11 on page 13)and change the FAX Mode to t.38-standard (refer also to the ini configuration in Section 1 on page 15)

H.323 Configuration Guide 2. Configuring AudioCodes’ H.323 Gateways in the Avaya CM
AudioCodes Confidential 13 May 2006
Figure 11: Change IP Codec Set (Fax)
Avaya©
CM
AudioCodes Interoperability Laboratory 14 Document # LTRT-82701
Reader’s Notes
H.323 Configuration Guide 3. Preparing AudioCodes’ H.323 Gateway to Interoperate with Avaya CM
AudioCodes Confidential 15 May 2006
3 Preparing AudioCodes’ H.323 Gateway to Interoperate with Avaya CM � To prepare the gateway define the following 9 parameters:
Define the following 9 parameters in the ini file that relate to configuring the Mediant 2000, Mediant 1000 and MP-11x to interoperate with the Avaya CM. Note that AudioCodes’ H.323 gateway doesn’t register in the Avaya CM:
1. Connection Mode = Normal (ini parameter IsFastConnectUsed = 0)
2. H.225 Listen Port = h.225 gateway TCP port. By default, it is equal to 1720, so if it is configured differently in the CM, change the default ini file parameter value accordingly. Refer to Figure 4 on page 9 for an example in which it is equal to 5007 (ini parameter: H225ListenPort)
3. H.225 Dial Port = h.225 CM’s TCP port. By default, it is equal to 1720, so if it is configured differently in the CM, change the default ini file parameter value accordingly. Refer to Figure 4 on page 9 for an example in which it is equal to 5007 (ini parameter: H225DialPort)
4. Rx DTMF Option = H245 User Input (ini parameter RXDTMFOption = 1 and IsDTMFUsed = 1)
5. 1st Tx DTMF Option = H245 User Input (ini parameter TXDTMFOption = 1)
6. Enable Annex D/T.38 Fax Relay = Enable (ini parameter IsFaxUsed = 1)
7. Define the required coders in the Coder Table. This table should contain the same coder list as the one that is configured in the CM.
8. In the IP routing tables, define all calls to be directed to the CM IP address.
9. In the case of an AudioCodes FXS device (AudioCodes’ MP-11x FXS and the Mediant 1000 FXS module), define the endpoint phone number as the CM configuration for dialplan analysis. For AudioCodes’ MP-11x FXO, Mediant 2000 and Mediant 1000 FXO and digital module, the extension that is configured for the CM’s dialplan analysis should be a legitimate number in the PBX/PSTN connected to the device.

Avaya CM H.323 Configuration Guide
Document #: LTRT-82701 May 2006
www.audiocodes.com