Production Log - Cosmic Constructor
39
Patryk Kleczkowski In this project, I was tasked with creating a video game of my choice, whether it would be 2D or 3D, and what genre it would be. I have partnered with another games design student together to make the game a reality, we have split roles, me doing programming while he focuses on art and sound. We have come to an agreement that the game of our choice will be a space game with “modular” design, i.e. the player will fight in different levels, and in between levels he will be able to equip different modules for his spaceship that will give him many different benefits. With the game idea resolved, we also had to pick the engine on which we are going to do this, we decided for GameMaker as this was the engine that we both know the most about. After brainstorming and planning out individual elements for the game, such as what assets we will need as well as what we think should be in the game, we begun the work. First off I started placing some basic assets into the engine, since we didn’t have any particular assets at this point, I just used squares for points of reference with the coding.
-
Upload
magicalpotato9000 -
Category
Education
-
view
102 -
download
5
Transcript of Production Log - Cosmic Constructor

Patryk Kleczkowski
In this project, I was tasked with creating a video game of my choice, whether it would be 2D or 3D, and what genre it would be. I have partnered with another games design student together to make the game a reality, we have split roles, me doing programming while he focuses on art and sound. We have come to an agreement that the game of our choice will be a space game with “modular” design, i.e. the player will fight in different levels, and in between levels he will be able to equip different modules for his spaceship that will give him many different benefits. With the game idea resolved, we also had to pick the engine on which we are going to do this, we decided for GameMaker as this was the engine that we both know the most about.After brainstorming and planning out individual elements for the game, such as what assets we will need as well as what we think should be in the game, we begun the work.
First off I started placing some basic assets into the engine, since we didn’t have any particular assets at this point, I just used squares for points of reference with the coding.
Along with those square sprites I also made a couple of really simple backgrounds to go along with them while I test the code.

Patryk Kleczkowski
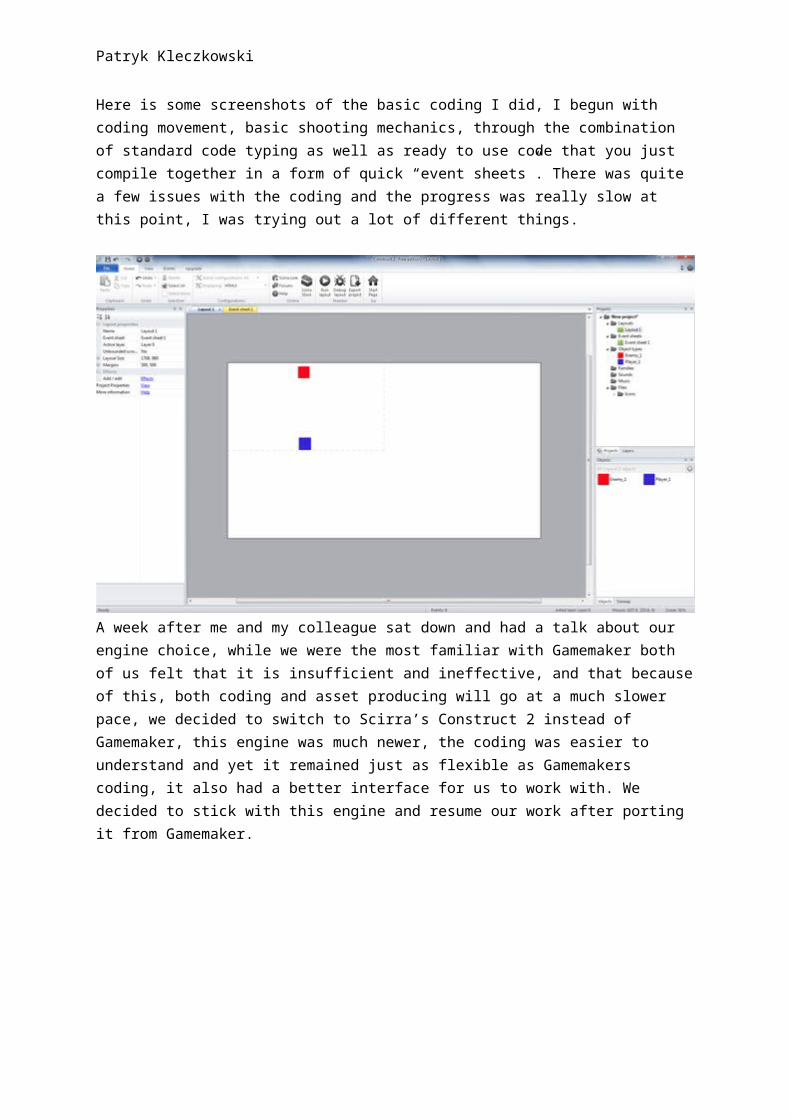
Here is some screenshots of the basic coding I did, I begun with coding movement, basic shooting mechanics, through the combination of standard code typing as well as ready to use code that you just compile together in a form of quick “event sheets”. There was quite a few issues with the coding and the progress was really slow at this point, I was trying out a lot of different things.
Patryk Kleczkowski
A week after me and my colleague sat down and had a talk about our engine choice, while we were the most familiar with Gamemaker both of us felt that it is insufficient and ineffective, and that because of this, both coding and asset producing will go at a much slower pace, we decided to switch to Scirra’s Construct 2 instead of Gamemaker, this engine was much newer, the coding was easier to understand and yet it remained just as flexible as Gamemakers coding, it also had a better interface for us to work with. We decided to stick with this engine and resume our work after porting it from Gamemaker.
While working with Gamemaker, all of the code, even for the simplest of things, had to be typed in

Patryk Kleczkowski
quite a lot of lines, such as basic movement, in Construct 2, all of that is done via a couple of clicks, which makes it a lot more practical, easier to use as well as simply fun. At this stage I was testing out all the different “behaviours” for the player/enemy and see how I can use each one of them in the near future.
Here I started to try out a basic AI for my enemies, I used “Line of Sight” behaviour, as well as the “Bullet” behaviour, which basically mean that the enemy would very quickly rush towards the player as soon as he spotted him from a certain distance. This AI was straightforward but effective.
There I started to test out basic behaviour between the player and the enemy, getting to grips with the engine and how it all works. At this point there was only basic shooting and AI mechanic

Patryk Kleczkowski
implemented. Both, along with the art, placeholder.
Here, I started experimenting with the use of timing commands to make different events happen at different intervals, as well as use “trigger” events (when a player hits something for example) to trigger different events.
Here, the experimentation has stopped and I started doing the code that was going to stay. I started off with coding the basics, such as enemy bullet hitting the player and killing him and vice versa. As well as leaving that basic AI that I did before in.

Patryk Kleczkowski
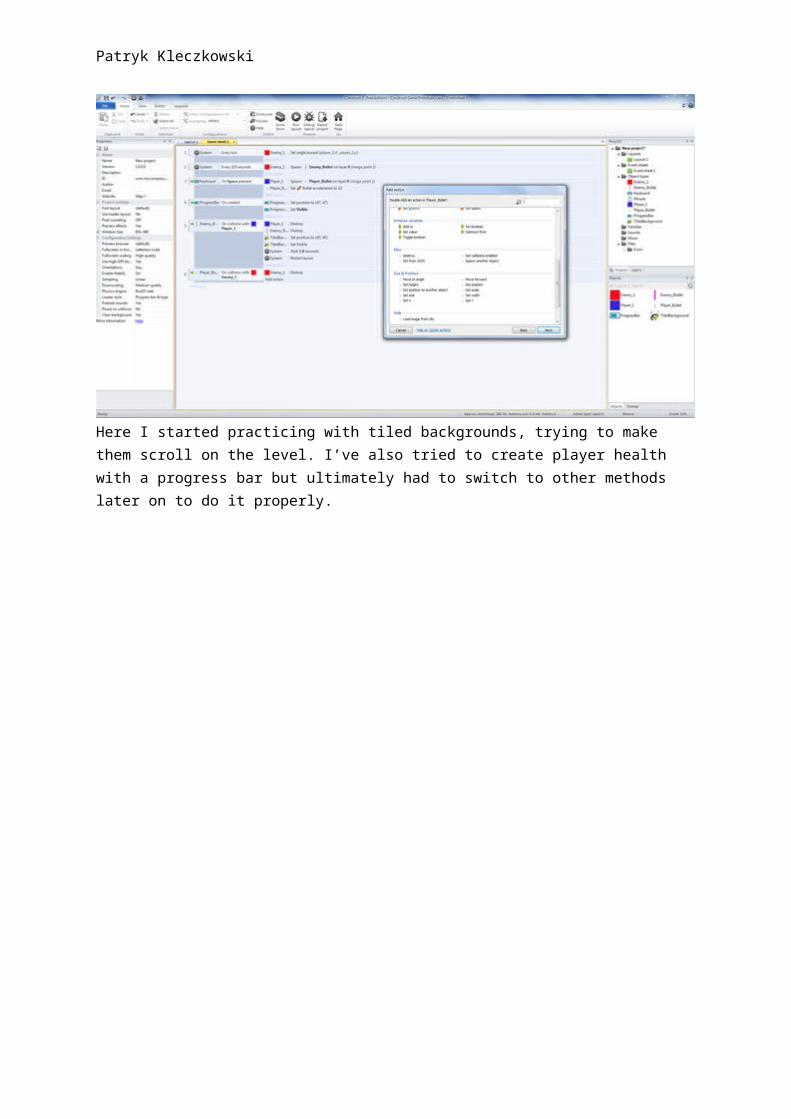
Here I started practicing with tiled backgrounds, trying to make them scroll on the level. I’ve also tried to create player health with a progress bar but ultimately had to switch to other methods later on to do it properly.
Patryk Kleczkowski
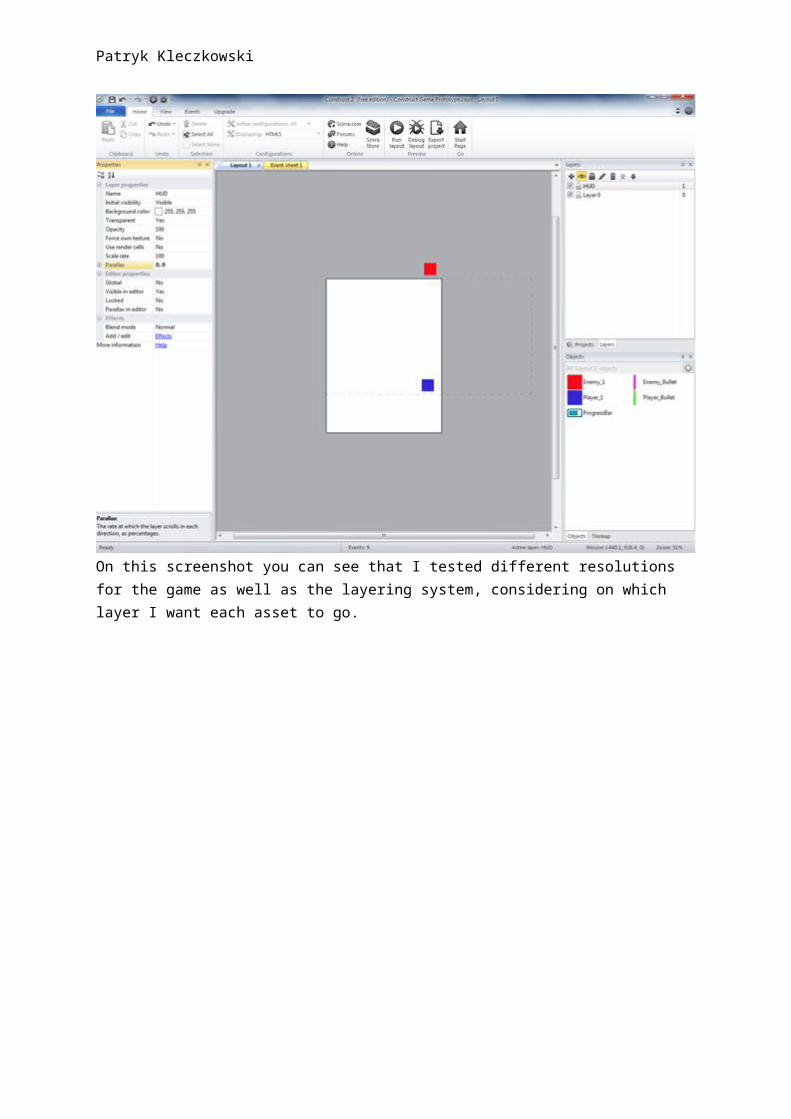
On this screenshot you can see that I tested different resolutions for the game as well as the layering system, considering on which layer I want each asset to go.
Patryk Kleczkowski
The last two screenshots showcase me trying to figure out a good background for the game, of course it was placeholder, nothing was final here and everything was subject to change. I made a very quick and simple background in paint and pasted it into Construct, and while at the start I had some problems with layering, where the player was disappearing underneath the background, I eventually managed to fix it.

Patryk Kleczkowski
Here I started to code in more things, mainly, for the system to spawn random “star particles” in the background, alongside the background that I created before, to do this I used a simple spawner with random location coordinates, and told the system to repeat it 50 times over and over. I also tried coding in a basic score counter, that would keep track of how many points the player accumulated, this would be crucial in progression later on.
This is the result.

Patryk Kleczkowski
I kept trying to do the score differently, since with each iteration there was always at least one problem, in the end, the global variable score seemed to work the best and was the most flexible to use.
Here I started doing more complex AI, instead of just homing into the player like before, now the enemy would actually try to circle the player before going in for the kill. This meant that the gameplay was much more enjoyable since the enemy was a lot of smarter and gave the player a lot

Patryk Kleczkowski
more options in terms of combat.

Patryk Kleczkowski
Here I created some basic sprites for the game, these are just an addition to the work being done by my colleague that is making most of the art as well as all of the sound design. I created these just to use them in testing my coding and have something better than just a plain square, this wouldn’t be placeholder but instead would only need slight editing to be usable in the final game. The planet was made to be a background while the other piece is a piece of wall that will be on either side of the level to block the player from going anywhere, turrets and traps will also be placed around these “walls”.

Patryk Kleczkowski
I have split the project into many different layouts, placing each thing into its own layout, for example, each the main menu and the game over screen got their own layouts while the main game was also on a separate one, this allowed me for easier coding as well as organisation.
Here I applied the created assets on top of the backgrounds as well as the newest coding with the new enemy AI.

Patryk Kleczkowski
Some of the assets from my colleague started coming through so I applied them to the project, replacing the placeholder squares.

Patryk Kleczkowski
Here I started testing switching to different levels, I had several problems with this, for a start, the screen kept freezing and I couldn’t figure out why, I also had problems with coding as well as backgrounds. After working on it for some time I decided to leave it for now and focus on something else to clear my mind and then come back to it with a fresh mind set.

Patryk Kleczkowski
I started to code in the basics for the game over and start menu screens, testing out how different buttons and commands work in order to make sure I understand everything. Then I’ve placed in some placeholder buttons for the time being.

Patryk Kleczkowski
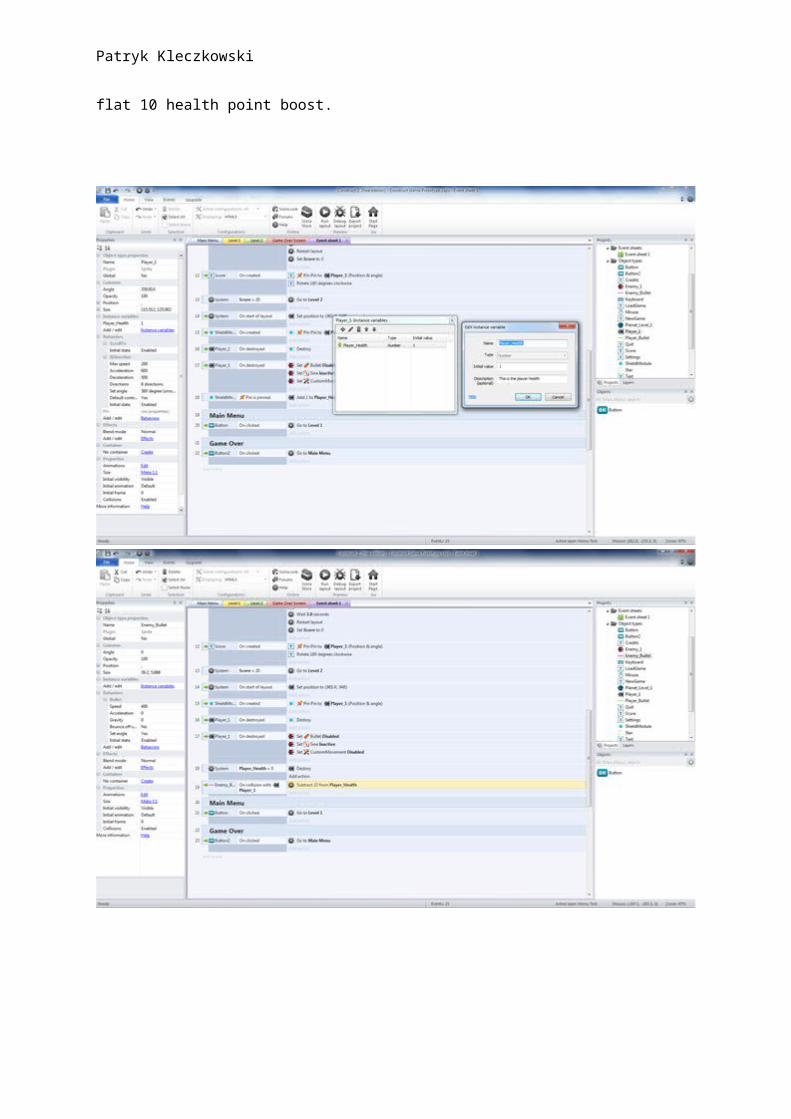
After finishing up on those buttons, I started putting in the foundations for the “module” feature, I started out by adding one simple add-on, a shield that would grant the player a flat 10 health extra. I then created an extra “image point” on the player in order to attach the module to it using the pin behaviour, once that was completed I then coded in a simple way for the game to recognize that it is indeed on the player so that it will give the player that flat 10 health point boost.

Patryk Kleczkowski

Patryk Kleczkowski
While coding in that shield module of course I realised that I haven’t implemented proper health for the player yet, the player so far died after getting hit once, so I decided to change that, I added an instance variable with a number of 100 (players max standard health) and then coded in changes to that number in every action, such as the player getting hit by an enemy bullet or colliding with the enemy. Then I created a piece of code that would throw the player into the game over screen once the players health reached 0.
Patryk Kleczkowski
I then created a simple health bar that would correspond graphically to the amount of health that the player had. I simply done it by creating a sprite of a green bar and then adding a simple code that can be seen above to take away some of that life bar in correspondence to how hard the player got hit.
After all the health was done and coded in, I then put in the shield module extra 10 health bonus and tested if it worked as intended, and it did.

Patryk Kleczkowski
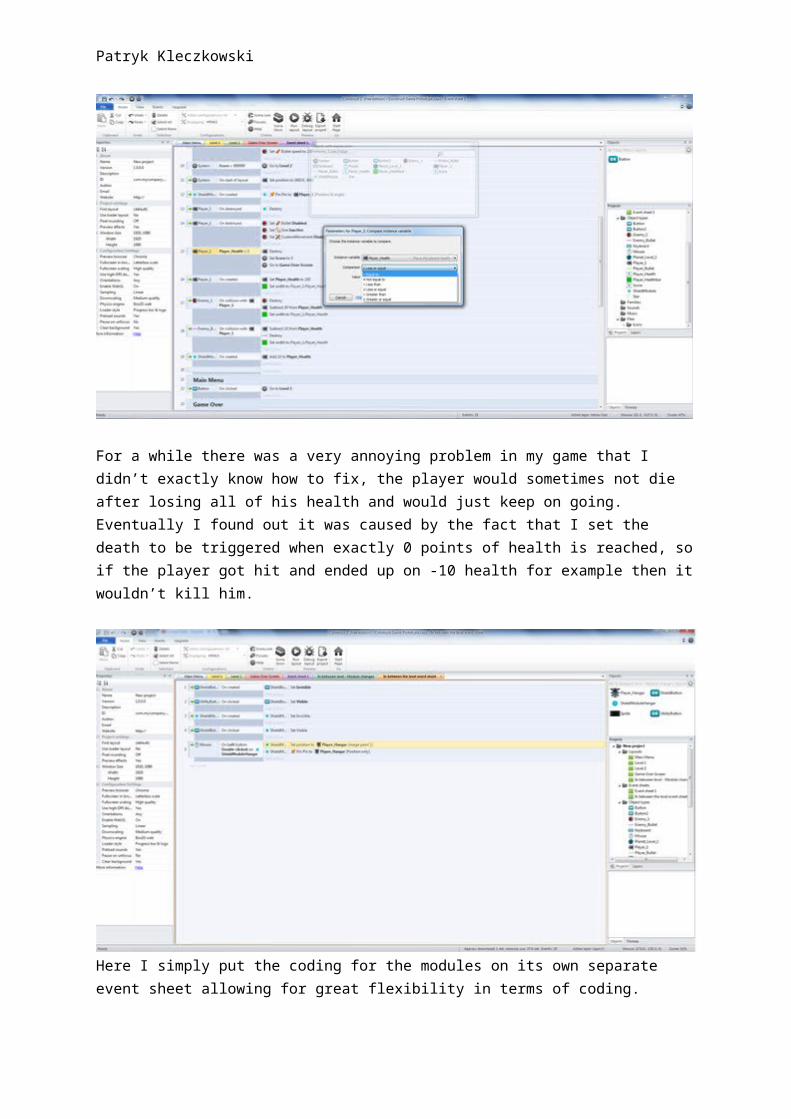
For a while there was a very annoying problem in my game that I didn’t exactly know how to fix, the player would sometimes not die after losing all of his health and would just keep on going. Eventually I found out it was caused by the fact that I set the death to be triggered when exactly 0 points of health is reached, so if the player got hit and ended up on -10 health for example then it wouldn’t kill him.
Here I simply put the coding for the modules on its own separate event sheet allowing for great flexibility in terms of coding.

Patryk Kleczkowski
Patryk Kleczkowski
I then came back to the problematic notion of changing the levels and this time I decided to approach it from a different perspective, instead of doing levels on individual layouts, I decided to have all the levels on the same layout and instead just have the backgrounds switch around with the scenery to make it look like the layout itself changed. To do this I created a lot of global variable numbers to determine what level it is, how many points have been earned, and how many levels there are in total in the game. Then all the player had to do was to collect a certain amount of points by killing enemies, get desired modules from the shop, and then the level would automatically see that the player has entered the next level, making previous backgrounds invisible and making the next one visible. Unfortunately this system was very hard to implement with the way my game was coded, there were a lot of issues, a lot of them coming from the fact that I disorganised my coding groups and it all very hard to manage. Overall however this system, while looking very efficient and promising,

Patryk Kleczkowski
ended up being very confusing and hard to code. So in the end I decided to scrap it.
Instead I came back to the idea of having a separate layout for each level and decided to stick with it. I extended each level (layout) by a very large amount in terms of its length, and made it wide enough so that it would fill most of the screen. Then I did some simple coding for the game to focus on the player. Of course some layouts weren't the levels and they had to be kept in a much smaller

Patryk Kleczkowski
resolution. So I inserted some simple coding for each level on how to scale the actual canvas of the level. As can be seen from the screenshot I also re-organized all the coding so that it would be much easier to sort through it and fix/add/remove anything that I need. This made it much easier to work with as well as made me work at a faster pace. I sorted the code mainly into 3 categories, coding for the player, coding for the enemies as well as coding for level specific things. I have also put in all the finished assets from my partners work as well as any sounds and music, replacing all the old placeholder assets. This made everything look quite much nicer.
After this was done I wanted to do something about the player’s movement, instead of implying the 8 direction movement which I didn’t feel like represented how a spaceship should move, I changed it to the “car” movement model and adjusted the values of acceleration, braking and general speed, this change made the steering feel much better and firm which I was very happy about.

Patryk Kleczkowski
In this screenshot I was continuing to adjust the values for how far back the player should be able to view the level, still testing which solution was the best gameplay wise.
I went to create some art assets myself to test some coding on it in terms of image points (connecting turrets to specific image points on the walls and then coding around that) in the end however I found it ineffective. Later on my partner provided me with better assets of walls which I needed anyway.

Patryk Kleczkowski
Here is me testing the layers in terms of how wide it needs to be to fill the screen, I made the background pink to distinguish where it ends when I launch the application.

Patryk Kleczkowski
Eventually I found out the proper dimensions and stayed with them, changed the background back to black and added the walls to block the player from leaving the level.

Patryk Kleczkowski
Then I started adding the said turrets to the level, only without attaching them to the image points on the walls, I then programmed each one of them to have specific health, shoot at specific intervals and generally be a pain to the player while he traverses the level.
I deviated from working on the main layout for now to create the other screens, including this one, the game over screen, as well as a simple button to take the player back to the beginning.

Patryk Kleczkowski
This is another screen I made, with instructions on how to play the game and what the aim of the game is.

Patryk Kleczkowski
I then went on to create the module change levels, I first edited the modules a little bit in the sprite editor and then attached some image points to them, so they could be easily attachable to the player model itself. Then I lined them under 3 different categories on the menu. (Offensive, Utility – Extra Health and mobility, Defensive) Now the player could click the desired modules and they would be attached to the player ready to be used.
This is just a showcase for the coding on the module changes.

Patryk Kleczkowski

Patryk Kleczkowski
I then started adding all the other enemies into the level, all of them with their unique behaviour (AI that was developed earlier), their own amount of health, how much points they give towards completing the level, how much damage they do upon hitting or colliding with the player etc. Some enemy types would home on the player, others would go pass by him without trying to collide into him for example. This created a lot of variety for the level that I am very happy about.

Patryk Kleczkowski
I also programmed in some traps that I then scattered across the levels, those included things like explosive barrels or debris that slowed you down. This created additional dynamic to the level and gave more enemy/threat variety to the player.
This is the end result, the traps laid out onto the level, turrets ready, and the initial enemies as well as all the necessary assets laid out on top that then spawn within the level. Everything programmed in and ready along with all the final assets.
To conclude this production log I think that this project has taught me a lot, being my very first proper game that I made with serious planning and teamwork I think I did pretty well, albeit I would

Patryk Kleczkowski
love and think that I could do better. I had so many ideas in my head throughout the project but most of them I couldn’t implement simply because it would take too much time for me to learn how to do them in the first place. I am still however very happy for how the game has turned out and I can safely say that I learned a lot anyway and all my future projects will come out much better than this one did. If I were to do this again I would certainly try to plan better for my actions as well as study the idea of the game better first before trying to do it, at this stage where I am still a learner I needed a lot of resources to help me get through some of the problems I had to fix, and for the type of the game that I was doing there wasn’t that much resources available simply because it is quite an unusual idea which isn’t asked about a lot. I did however manage to pull through.


![Comp151 Construction & Initializationjohnmave126.github.io/.../p/lectures/constructor-destructor.pdf · Constructor: Introduction [comp151] 3 default constructor blank CD MD to CD](https://static.fdocuments.us/doc/165x107/5edae51709ac2c67fa687b6b/comp151-construction-initi-constructor-introduction-comp151-3-default-constructor.jpg)