PRE-ACADEMY FIREARMS TRAINING - LCLEPRE-ACADEMY FIREARMS TRAINING HOME STUDY MANUAL Second Edition -...
64
PRE-ACADEMY FIREARMS TRAINING HOME STUDY MANUAL Second Edition - February 2009 Louisiana Commission on Law Enforcement Peace Officer Standards and Training 1885 Wooddale Blvd., Room 708 Baton Rouge, LA 70806 www.lcle.la.gov (225) 925-4942
Transcript of PRE-ACADEMY FIREARMS TRAINING - LCLEPRE-ACADEMY FIREARMS TRAINING HOME STUDY MANUAL Second Edition -...

PRE-ACADEMY FIREARMS TRAINING HOME STUDY MANUAL
Second Edition - February 2009
Louisiana Commission on Law Enforcement
Peace Officer Standards and Training
1885 Wooddale Blvd., Room 708
Baton Rouge, LA 70806
www.lcle.la.gov
(225) 925-4942

Pre‐Academy Firearms Manual Page 2 of 64
Dear Fellow Law Enforcement Officers:
The proper and safe use of a firearm is probably the most important facet of basic law enforcement training. Not only can improper or unsafe use result in litigation against the individual and the parent agency, but also the injury or death of a human being.
Recognizing the importance of proper firearms training to each new officer and the public at large, the Louisiana Legislature and POST Council, in 1998, mandated that any person employed or commissioned as a peace officer, or reserve or part-time peace officer, must successfully complete the Pre-Academy Firearms Training Program within 30 days from the date of initial employment if that person will be performing the duties of a peace officer before attending a basic law enforcement training course.
We are certain that through this manual and the instruction you will receive when you report to a POST Certified Firearms Instructor to shoot the POST course you will be better equipped to handle the duties assigned to you as a Louisiana Peace Officer.
As Chairman of the Louisiana POST Council, I am proud to have had a part in bringing together another tool of instruction that will help the Peace Officers within our state develop into the professional law enforcement officer that is so drastically needed to meet society’s needs today.
SHERIFF JEFF WILEY Chairman, Louisiana POST Council

Pre‐Academy Firearms Manual Page 3 of 64
Acknowledgments This manual was produced by the Louisiana Commission on Law Enforcement, Peace Officer Standards and Training (POST). We would like to thank the POST Council and the POST Firearms Curriculum Committee for the time and hard work they devoted to updating the contents of this manual.
2009 POST Council Members:
Sheriff Jeff Wiley (Chairman) Ascension Parish Sheriff’s Office
Sheriff Stephen Prator (Vice-Chairman) Caddo Parish Sheriff’s Office
Chief Jay Barber Ball Police Department
Hon. James D. “Buddy” Caldwell Louisiana Attorney General
Sheriff Larry Deen Bossier Parish Sheriff’s Office
Ms. Judy Dupuy, Executive Director Louisiana Commission on Law Enforcement
Mr. B.E. “Gene” Durand, President Louisiana Constable’s Association
Col. Mike Edmonson Louisiana State Police
Chief Hunter Grimes Walker Police Department
Hon. Jerry Jones 4th JDC District Attorney
Hon. Harry J. Morel, Jr. 29th JDC District Attorney
2009 POST Firearms Curriculum Committee Members:
Sgt. Patrick Knab, Chairman Denham Springs Police Department
Sgt. Carl Dabadie, Vice-Chairman Baton Rouge Police Department
Sgt. Ricky Arnett Baton Rouge Police Department
Capt. Brian Charpentier Terrebonne Parish Sheriff’s Office
Capt. Jeff Eddy Jefferson Parish Sheriff’s Office
MSgt. Gerry Emerel Ouachita Parish Sheriff’s Office
Cpl. Rodney Horton Shreveport Police Department
Lt. Col. Paul Robert Ascension Parish Sheriff’s Office
Sgt. George Rollin St. Charles Parish Sheriff’s Office
Lt. Bruce Teutsch Bossier Parish Sheriff’s Office
Lt. Frank Washington East Baton Rouge Parish Sheriff’s Office

Pre‐Academy Firearms Manual Page 4 of 64
INTRODUCTION
The proper and safe use of a firearm is probably the most important facet of basic law enforcement training. Not only can improper or unsafe use result in litigation against the individual and the parent agency, but also the injury or death of a human being.
Act 108 of 1998 mandates that any person employed or commissioned as a peace officer, or reserve or part-time peace officer, must successfully complete the Pre-Academy Firearms Training Program within 30 days from the date of initial employment if that person will be performing the duties of a peace officer before attending a basic law enforcement training course.
During a Pre-Academy Training Program, a student who fails may be given retests. Any person who fails shall be prohibited from exercising the authority of a peace officer until they have successfully completed the course. However, such persons shall not be prohibited from performing administrative duties. In addition, students shall qualify with an approved service weapon on the POST Firearms Qualification Course. All scoring will be computed and record by a Firearms Instructor certified by the POST Council.
Act 108 also requires that any person who begins employment as a peace officer must successfully complete a POST Certified Training Program and pass a POST Examination within one (1) calendar year from the date of initial employment or be prohibited from exercising the authority of a peace officer.
Most law enforcement agencies have armed their officers with semi-automatic pistols to better defend themselves against the criminal element. However, you may, at some time, be required to handle revolvers in the course of your duties. This will require a basic understanding of the operation of both types of weapons. You should also be familiar with the safe handling and unloading of these weapons. Therefore, this course will discuss both types of handguns.
We will attempt in this course to give you the basic minimum requirements for safe firearm use to help you protect yourself and the citizens of your jurisdiction. At the beginning of each section, the Goals and Objectives will be listed to better acquaint you with the purpose of that section. After studying each section, you should be able to return to the Goals and Objectives to assess your progress.
This manual has been reviewed and updated by a committee of POST Certified Firearms Instructors who have strived to bring you the most up-to-date information that you will need to get started. You will, of course, receive more guidance and instructions when you report to the range for practice. Good Luck!

Pre‐Academy Firearms Manual Page 5 of 64
TABLE OF CONTENTS
FUNDAMENTALS OF SHOOTING 7 Basic Rules of Safety 9 Safety Rules While Off Duty 10 Additional Safety Rules While On Duty 10 Ammunition Safety 10 Dominant Eye Determination 11 Dominant Hand Determination 11 Proper Hand Position 12 Nomenclature and Maintenance of the Revolver 13 Cleaning and Maintenance 14 Nomenclature and Maintenance of Semi-Automatics 18 Maintenance 19 Malfunctions of Semi-Automatics 19 Proper Stance 21 Proper Grip 22 Sighting (Sight Alignment and Sight Picture) 24 Breath Control 25 Trigger Control 26 Follow Through 27 Call the Shot 28 Rhythm and Habit 28 Combat Shooting 29 Double Action Shooting 29 Single Action Fire 30 Stances 31 Weaver 31 Close Quarters Position 32 Point Shoulder Shooting 32 Standing – Unsupported 33 Barricade 34 Kneeling 35 Extended Hip (or Point) Shooting 36 Ready Gun Position 37 Draw 37 Loading and Reloading the Revolver 39 Loading and Reloading the Semi-Automatic Pistol 41 Sight Adjustment 42
Pre‐Academy Firearms Manual Page 6 of 64
LEGAL AND MORAL RESPONSIBILITY 43 Transactional Analysis 44 Understanding Fear 45 Stress 46 Cultural Differences 48 Use of Force in Self-Defense 51 Use of Force to Protect Others 52 Use of Force to Effect an Arrest 52 Use of Force to Prevent Flight or Escape 53 Use of Force to Prevent Escape from Prison 53 POST QUALIFICATION COURSE 54 Suggested Safety/Operational Notes 55 Stages of Fire 56 Stage I – 25 yards 56 Training Considerations 56 Stage II – 15 yards 56 Training Considerations 56 Stage III – 7 yards 56 Training Considerations 57 Stage IV – 4 yards 57 Training Considerations 57 Stage V – 2 yards 58 Training Considerations 58 OFFICIAL POST COURSE 59 SCORING OF TARGET 60 FIREARMS PROFICIENCY PRACTICE 61 General Range Rules 63

Pre‐Academy Firearms Manual Page 7 of 64
FUNDAMENTALS OF SHOOTING GOAL:
Each officer should be instructed on how to shoot properly. The instruction should include basic marksmanship, as well as combat shooting techniques. In addition, range conduct, safety and discipline should be maintained.
OBJECTIVES:
SAFETY
1. Demonstrate the proper method of checking each weapon’s condition (i.e. loaded or unloaded) and unloading it, given a revolver and a semi-automatic handgun with fired or dummy (inert) ammunition.
2. List six (6) of the general rules of safe firearms handling on a range. See Range Safety Rules.
3. List and Describe the proper actions to be taken in the event of:
a. Misfire
b. “Squib” or “Primer” Load
c. Hang Fire
4. List at least two (2) places to safely store a weapon in the home and one (1) method of securing a weapon so that it cannot be fired easily.
REVOLVERS – NOMENCLATURE
1. Properly identify the major components of the weapon (given a revolver or a line drawing of a revolver).
2. Describe the movement of the trigger, hammer and cylinder, in proper sequence, for:
a. Single action fire
b. Double action fire
REVOLVERS – MAINTENANCE
1. Given a revolver and all necessary tools, equipment and supplies, the student will clean it so that:
a. All powder fouling has been removed from all surfaces.
b. All significant lead fouling has been removed from the barrel and forcing cone.
c. The revolver functions smoothly and properly in double and single action dry firing.
d. The outer surface of blue steel revolvers receives a very light coat of oil.
SEMI-AUTOMATIC PISTOLS – NOMENCLATURE
1. Identify the major components of the weapon (given a semi-automatic pistol or a line drawing of a representative type of a semi-automatic pistol).
2. Write a step-by-step description of the functioning of a semi-automatic pistol, with particular emphasis on the action of the major components of the weapon.

Pre‐Academy Firearms Manual Page 8 of 64
3. Safely unload the pistol (given a loaded semi-automatic pistol with round in chamber and slide closed).
SEMI-AUTOMATIC PISTOLS – MAINTENANCE
1. Fieldstrip a semi-automatic pistol for cleaning and reassemble it.
2. Clean and lubricate a semi-automatic pistol (given all the necessary tools, equipment and supplies) so that:
a. All powder fouling has been removed from all surfaces.
b. All significant lead fouling has been removed from the barrel.
c. The pistol will work smoothly and properly.
d. The outer surface of blue steel pistols receives a very light coat of oil.
BASIC MARKSMANSHIP
1. Identify the seven (7) fundamentals of basic handgun marksmanship.
2. Assume the proper grip (given an unloaded weapon).
3. Demonstrate proper breath control while dry firing (given an unloaded weapon).
4. Draw proper sight alignment.
5. Draw a proper sight picture.
6. Demonstrate proper trigger control (given an unloaded weapon) for:
1. Single action fire
2. Double action fire
7. Physically assume the proper stance (given an unloaded weapon).
COMBAT SHOOTING
1. Identify the reason why all combat shooting is fired double action.
2. Physically assume each of the combat shooting stances.
3. Unload a revolver, reload and fire at least one (1) round within twelve (12) seconds (given a revolver containing six (6) fired cartridges and six (6) live rounds in a pouch, bullet loops, or in a speed loader in a pouch on the gun belt).
4. Remove the magazine, reload and begin firing in twelve (12) seconds (given a semi-automatic pistol containing an empty magazine, with slide locked back and safety off, and a loaded magazine in a pouch on the gun belt).

Pre‐Academy Firearms Manual Page 9 of 64
FUNDAMENTALS OF SHOOTING The basic fundamentals of shooting are the heart of good shooting. The purpose of a basic course is to teach
the student how to get good hits from a variety of shooting positions. This can be done best on a range, with known and consistent factors – distance, target and firearm. Good shooting form, like good form in golf, swimming, or tennis, may seem awkward and uncomfortable at first, but this because the shooter is using muscles he is unaccustomed to using.
Learning to shoot a handgun is a mechanical operation, the same as learning to drive an automobile. The so-called “natural ability” is no more vital to one than the other. The ability to do either depends upon the sound application of the basic fundamentals and the interest of the person concerned. Before a beginner can acquire the necessary knowledge for accurate shooting, he must first master all the factors that will help him develop into a good shooter.
The seven fundamentals of basic marksmanship are Proper Stance, Proper Grip, Proper Sight Alignment, Proper Sight Picture, Breath Control, Trigger Control, and Follow Through. However, before going into the fundamentals in detail, we will learn the basic safety rules. Safety is the number one rule of handling a firearm.
Every time you see a firearm or see the word “firearm”, it should trigger an idea in your mind comparable to the flashing of a neon sign reading “safety”. Remember that once the bullet goes off, “It’s history!” Use common sense when handling firearms and be alert to firearms safety rules. Before handling any firearm, you should know and use the proper method of checking that weapon’s condition. If a weapon is handed to you, keep the weapon pointed in a safe direction and make sure that it is unloaded. A safe direction is one in which, in the event of an unintentional discharge, no physical injury will result and only minor property damage will result. Remove ammunition from the weapon without dropping any rounds and visually inspect all chambers to make sure the weapon is not loaded.
Basic Rules of Safety:
Treat every firearm as if it were loaded.
A firearm is always presumed to be loaded; never take anyone’s word that it is not loaded.
Never place your finger on the trigger until ready to shoot.
Alcohol and gunpowder do not mix.
Never point a firearm, loaded or unloaded, at anyone or anything that you do not intend to shoot.
Never handle, point, or look over the sights of any firearm without first opening it and making absolutely certain that it is not loaded (DOUBLE CHECK!).
Never give a revolver to anyone nor take a revolver from anyone unless the cylinder has been opened and left open.
Never give a semi-automatic handgun to anyone nor accept one unless the magazine has been removed and it is obvious that there is no round in the chamber.
Do not handle a firearm unless you are thoroughly familiar with it.
Do not leave a firearm unsecured.
When drawing your firearm, make sure that the gun barrel is not pointed at any part of your body. When cleaning a weapon, treat it the same as you would a loaded weapon.

Pre‐Academy Firearms Manual Page 10 of 64
Safety Rules while Off Duty:
Each officer is responsible for his weapon at all times.
Weapons and ammunition should be stored in a safe place.
Keep all firearms from the reach of children or immature and irresponsible people.
Educate and train family members as to the potential danger of firearms.
A loaded weapon at home presents a greater danger than an unloaded weapon. Individual circumstances will dictate how a weapon should be stored.
Be selective in off-duty weapons (procedurally approved brands).
Follow your department’s procedures regarding use of off-duty firearms.
Additional Safety Rules while On Duty:
Always be conscious of exposure of your weapon to civilians while in its holster.
Do not use the holstered weapon as a hat rack or armrest.
Do not allow your weapon to become a conversation piece by removing it from the holster for examination by friends, relatives, etc.
Use care when placing weapons in prison or jail lockers.
Firearms should be carried fully loaded at all times.
Firearm safety also includes safe storage for your weapon. Nearly 40% of the times that officers’ weapons discharge “accidentally”, the firings occur at home – an extremely high rate, considering that one would normally expect a police weapon to have the least amount of use there. Educating your immediate family about your weapon is mandatory, of course. However, even assuming they are all mature enough to absorb and obey instructions on avoiding or properly handling your firearm, you’ll quite likely have visitors who know nothing about firearms. And we know that people unfamiliar with firearms almost always handle them in the most dangerous way possible, by immediately putting a finger on the trigger and pointing the muzzle in an unsafe direction.
For maximum security, you want to make your weapon inoperative and inaccessible. Unload your firearm when you come home, and put your ammunition in a separate location. There are several commercially manufactured locking devices for use with a semi-automatic, including trigger locks and keyless entry boxes. If you’re afraid of scratching your weapon, trigger or cylinder, locks with protective padding are available. For inaccessibility, you can lock the weapon inside a substantial metal storage box that is up high, as on a closet shelf, and bolted into place. The ammunition can then be put in a soft container, like a chamois bag, and kept in some other hard-to-reach place that’s cool and dry.
Ammunition Safety:
Safety discussions should also include ammunition. At some point you may experience malfunctions with your ammunition, such as a misfire, hangfire, and “squib loads” or “primer loads”. A misfire is defined as the failure of a primer to ignite the powder charge. A hangfire is described as the temporary failure of the primer to ignite the powder charge. The problem lies in not knowing, at the outset, which is which. When what appears to be a misfire occurs, the weapon should be kept pointed in a safe direction (on the range it is pointed toward the target). Hangfire rarely take more than five seconds to ignite. The standard range rule (except as

Pre‐Academy Firearms Manual Page 11 of 64
related to fully automatic weapons) is to allow ten seconds and then unload. The unloading should be done with the weapon pointed in a safe direction. If there is any foreign material in the bore, it should be removed prior to any subsequent firing. Most range regulations specify that a Range Officer must be called when a misfire occurs.
The term “squib load” or “primer load” is used to describe a cartridge in which no powder charge has been loaded. Although it happens on rare occasions in commercial ammunition, it happens with some frequency in reloaded ammunition. When the primer is struck in such a cartridge, there is enough energy released to start the bullet into the barrel. If it lodges partially in the barrel and the chamber of the cylinder, the cylinder will not rotate to bring the next round into firing position. However, the bullet most often goes into the barrel. When this happens, the cylinder will rotate allowing another bullet to be fired into the one already lodged in the barrel. This can damage the revolver. Trainees should be alerted to this possibility. It is better, even, to prepare some “squib” loads and fire them during practice in order to hear the subdued “pop” which occurs when one is fired. Whether he hears such a sound in practice or in an actual combat situation, the officer should recognize it and know that his revolver is no longer of any use to him/her until the bullet is dislodged. A cleaning rod or any other similar item can be used to remove the bullet. Brass or wood should be used to avoid damaging the barrel.
Dominant Eye Determination:
Another discussion, which should come before plunging into the basic fundamentals is determining which eye, is your dominant eye. This will help you during the lessons on aiming and sight alignment.
The dominant eye or master eye theory is based on the fact that one eye focuses directly on a given object while the other eye focuses indirectly on that object. This exercise is designed to help you find out which one of your eyes is your dominant eye.
1. Make a circle using both your hands. Place the thumb and first finger of both hands together to make a circle.
2. Extend your arms all the way out, hands together, circle in front.
3. Look through the circle with both eyes. Now look at an object across the room. With both eyes looking through the circle, put that object in the center of the circle.
4. Now close your right eye. Then open your right eye and close your left eye. Did the object move?
5. If the object does not move when you are looking through your right eye, you have a dominant eye and should shoot from your right shoulder. If the object does not move when you are looking through your left eye, you have a dominant eye and should shoot from your left shoulder.
Another simple way to find which eye is the dominant eye is to hold a piece of 8½” x 11” paper with a dime-sized hole in the center at arm’s length away from the face. Both eyes should be used to look through the hole at some object that almost fills it. The paper is then brought into contact with the face without losing sight of the object. When the paper is brought into contact with the face, the hole will be over the dominant eye.
Dominant Hand Determination:
For the purposes of this manual, we will use the term “strong-hand” to describe your dominant hand or the one you would normally use to shoot. For instance, the right hand of a right-handed shooter will be called the strong-hand. Obviously, then, since very few people even approximate being ambidextrous, the left hand is the off-hand. Use of the off-hand is entirely practical because there are numerous circumstances under which the strong-hand may not be available. Injury to the strong-hand and the necessity for shooting from behind cover without undue exposure are the outstanding reasons.

Pre‐Academy Firearms Manual Page 12 of 64
Learning to shoot with the offhand will require some practice. This will necessitate beginning all over again with many of the basic fundamentals of shooting. You will have to go through the process of finding the right feel of the weapon in the offhand and become accustomed to it. You will have to, perhaps, accommodate to a different position and feel in the trigger finger. You must get used to the fact that the offhand trigger finder will not squeeze through as smoothly as the other. You will have to be aware that your grip must be tighter than with the strong-hand. You will think you are applying the same amount of pressure and the weapon will shift because you have really just expended the same amount of energy. Because the offhand may be weaker, the amount of energy must be greater to achieve the same result. Dry firing exercises, both on and off the range, will speed confidence in the offhand.
Proper Hand Position:
Both body position and the way a pistol is held are of vital importance in getting good hits. In the beginning both may seem awkward but practice will eliminate that feeling.
The importance of the hand position on the grip of a pistol cannot be overemphasized. Although the grip configuration of the revolver and semi-automatic are different, the gripping procedure is essentially the same. The weapon is cradled under the trigger guard with the offhand and placed into the “V” formed by the strong-hand thumb and first finger. The grip should be as high as possible with the heel of the hand solidly behind the weapon so the recoil will be straight back. The trigger finger should be outside the trigger guard. The exact same hand position is important for every shot for consistent shooting.

NOMENCLATURE AND MAINTENANCE OF THE REVOLVER:
The major components of the revolver are:
1. Barrel 2. Frame 3. Cylinder 4. Trigger 5. Hammer 6. Grip 7. Front Sight 8. Rear Sight 9. Trigger Guard 10. Yoke/Crane 11. Top Strap 12. Back Strap 13. Extractor Rod 14. Cylinder Release 15. Strain Screw
Pre‐Academy Firearms Manual Page 13 of 64

Pre‐Academy Firearms Manual Page 14 of 64
Cleaning and Maintenance:
When the revolver is carried daily, there is always a chance of having it bumped, dropped or inadvertently fouled with some foreign substance. The weapon should be serviced as needed, especially if exposed to weather, dropped in a creek, or rolled in the dirt while you wrestle with a suspect. Check with your department for maintenance policy and procedure.
Before loading the revolver and placing it in the holster for duty, the following one-minute safety check is strongly recommended:
1. Open the cylinder and inspect the chambers to be sure that there are no “forgotten” live cartridges, then close the cylinder and check to see that it locks in place properly.
2. Pull the trigger a few times while holding the weapon pointed in a safe direction. Check to see that the cylinder rotates properly each time.
3. Try to wiggle the cylinder clockwise and counter-clockwise. If there is too much play, the excessive motion will prevent the chamber from aligning properly with the barrel. A bullet fired from a revolver with a loose cylinder will shave lead as it enters the barrel. This condition is dangerous in that it can cause injury to the shooter or to someone nearby. The condition should be corrected by a gunsmith immediately.
4. With the cylinder open and the weapon pointed in a safe direction, dry fire it a few times, double action. (On a Smith & Wesson, the cylinder latch must be held back when the cylinder is open.) While firing, place your finger against the firing pin orifice to determine that the firing pin protrudes far enough to detonate the primer.
5. With the cylinder open, pivot the crane up and down a few times. A bent crane will prevent the cylinder from closing properly, and dirt or foreign particles at the pivot point will cause the crane to swing up and down very sluggishly.
6. Work the ejector/extractor rod in and out a few times. Check to see that there are no damaged teeth on the ejector head and that it bottoms properly.
7. Check to see that the grip stock and faceplate screws are tight (a key chain screwdriver is ideal for this). Use a screwdriver with a blade that is not larger than the screw heads to avoid scratching or marring the metal surface.
The revolver should be wiped externally after each handling. It should be cleaned thoroughly after each firing. The equipment you will need is:
1. Screwdriver that is a good fit in the screw slots. 2. Appropriate size bore brushes. 3. Cleaning rod. 4. Cleaning patches. 5. Good grade gun cleaning solvent. 6. Good grade gun oil. 7. Clean rags. 8. Small container to put cylinder lock screws in.
For specific disassembling instructions, be sure to check the manufacturer’s instructions for each model.
The steps to use to clean the revolver are:

Pre‐Academy Firearms Manual Page 15 of 64
1. Remove cylinder and crane from frame. 2. Remove crane from cylinder, if applicable to your model. 3. Cleaning of cylinder
a. Chambers – a shoulder called a cartridge stop is built inside the chambers of service weapons. The purpose of the cartridge stop is to eliminate the possibility of a 357 Magnum cartridge being inserted in the cylinder if a .38 special revolver. If lead is allowed to build up around the cartridge stop, a cartridge will not fit into the chamber freely. This may result in a weapons malfunction. Excessive lead can be observed by a visual check and/or that the cartridge must be forced into the cylinder. The lead can be removed by using a .45 caliber brush. A back and forth circular motion is recommended.
i. For best results, immerse into cleaning solvent for at least two hours prior to cleaning.
ii. On a Smith & Wesson, replace the crane in the cylinder before cleaning with a wire brush. This will keep bristles from falling into the opening.
A thorough scrubbing with a stiff bristle brush dipped in solvent will ordinarily remove fouling from individual cylinder chambers; however, look for leading near the leading edge of each chamber. It may be necessary to occasionally use a wire brush to remove stubborn deposits. After cleaning, only a thin coat of preservative oil is necessary to protect each chamber. Do not over oil.
b. Face of Cylinder – lead tends to form a ring around each chamber on the face of the cylinder. The space between the cylinder and barrel is from four to six thousandths of an inch. Due to this close tolerance, the accumulation of any lead on the face of the cylinder often causes the cylinder to bind on the barrel. This makes it difficult to cock the weapon single action or fire double action. Existence of lead can be determined by a visual check. Due to its shiny appearance, excessive lead is often mistakenly taken for a need for bluing. Lead can be removed by laying a wire brush across the face of the cylinder, exerting pressure on top of the brush with the finer, and moving the brush back and forth. Care should be taken not to scratch the face of the cylinder with the end of the brush. A binding cylinder may damage internal parts of the weapon.
c. Ejector and Ratchet – an accumulation of lead, powder residue and dirt tends to collect on the cylinder under the ejector. This foreign matter should be removed with a wire brush.
4. Cleaning of the Crane
a. The portion of the bearing surface of the crane that fits inside the center of the cylinder should be kept clean and well lubricated. Quite often when the crane is removed from the cylinder for cleaning, foreign matter will drop inside the cylinder. Even one bristle dropping inside the center of the cylinder will keep the cylinder from spinning freely. If foreign matter is lodged in this portion of the weapon, the officer usually will experience difficulty in closing the cylinder. The cylinder should never be forced into position. This may spring the crane out of alignment.
b. Powder residue and lead has a tendency to collect on the portion of the crane located in the front of the cylinder.
5. Cleaning of the Barrel
a. When lead is allowed to accumulate in the throat or breech end of the barrel, the weapon will “spit” lead. Excessive lead can be observed by visual inspection. This area should be cleaned with a wire brush only, using a circular motion. Objects such as knives or screwdrivers should

Pre‐Academy Firearms Manual Page 16 of 64
never be used. They will scratch the throat of the weapon, resulting in a faster accumulation of lead and making it even more difficult to clean.
b. Clean the ore with a wire brush dipped in bore cleaner solvent, using a back and forth motion. Do not use an electric drill with wire brush attachment to clean the bore. The brush should clear the bore at either end of the stroke, as changing direction in midstroke will cause the brush to bind and possibly score the metal. After cleaning the bore with brush and solvent, run clean patches through the bore until they remain clean afterward. Coat the bore with a thin film of preservative gun oil. Do not over oil.
c. Extreme care should be taken when cleaning a weapon from its muzzle end. The crown is defined as the last point the bullet contacts prior to exiting the barrel. Because of this, any dings or dents in the crown will cause loss of accuracy.
6. Cleaning of the Frame
a. Powder and lead tend to accumulate on the frame around the breech end of the carrel, under the top strap and in all four corners of the cylinder opening. With a stiff brush (a toothbrush is ideal) dipped in solvent, clean the interior surfaces of the frame. Scrub around the firing pin orifice, cylinder lock and the hand (cylinder advancing pawl). Accumulation of carbon, lead and gummed lubricants induce corrosion and are often the cause of mechanical malfunction. Do not over oil.
b. Bring the hammer to full cock, and with a brush that is small enough (an electric razor cleaning brush is ideal), clean the rear end of the hammer and firing pin recess at the top end of the frame. Clean the exposed portion of the leading edge of the hammer assembly as far down into the frame as possible. Do not allow an excessive amount of solvent to run down into the action through the frame opening. After cleaning, dry thoroughly and coat with just a drop of preservative oil on each surface. Do not over oil.
c. Push the ejector rod in and out vigorously a few times. It should operate freely, but can become sluggish from an accumulation of carbon and/or lead around the spline shaft or behind the ejector head. While holding the ejector rod all the way in, clean the entire assembly with a bristle brush and solvent. After cleaning thoroughly, wipe off the residue and apply a small amount of oil to the shaft. Work the ejector rod in and out a few times to spread the oil evenly. Release the ejector rod and check to see that the shaft goes all the way back, and that the ejector head bottoms properly in the cylinder recess. Do not over oil.
7. Lubrication of Internal Parts
a. The internal parts of the weapon should be lubricated often, according to usage and exposure to weather or other adverse conditions. Check the manufacturer’s instructions or your department’s policy on lubrication of internal parts. Do not over oil.
8. Inspection of Firearm After Cleaning
a. Check side plate screw for tightness. b. Check cylinder latch screw for tightness. c. Check mainspring tension screw for tightness. d. Check ejector/extractor rod for tightness. e. Close and rotate cylinder to make sure cylinder rotates freely.

Pre‐Academy Firearms Manual Page 17 of 64
Periodically, the exterior of the weapon should be wiped off with an oily cloth or chamois to prevent rusting.
CAUTION: After cleaning and wiping off the excess oil, the external surfaces of the revolver should be thoroughly wiped with a silicone cloth to remove acids from handling and to shine and preserve the weapon’s finish.
A revolver need not be dripping with oil to insure that it will not malfunction or rust, nor does a graphite lubricant cause the parts to work any smoother than would normal care and a small amount of preservative oil. On the contrary, excessive oil will cause dust and dirt to accumulate that much faster and may actually trap moisture and acids beneath its layer. The graphite gun grease (or black grease) tends to rapidly accumulate carbon and lead deposits because of its density, which can cause sluggishness and jamming of parts.
When cleaning the revolver, make it a habit to give your ammunition a wipe with a silicone cloth, including all ammunition in your cartridge carrier. This will remove grit, fingerprints and any corrosion that may have begun to accumulate. Replace all ammunition as often as necessary, especially if your weapon or ammunition has been exposed to weather or adverse conditions or has not been used in a specific period of time. Check with your department for policy on ammunition exchange. You want to ensure that you have a weapon that is loaded with fresh ammunition that has been properly stored. Use old ammunition to practice with on the range.

NOMENCLATURE AND MAINTENANCE OF SEMI-AUTOMATICS:
The major components of the semi-automatic handgun are:
1. Slide 2. Trigger 3. Grip Safety (if equipped) 4. Safety (if equipped) 5. Muzzle/Barrel 6. Ejection Port 7. Magazine Well 8. Magazine Release 9. Slide Stop 10. Frame 11. Tang
The major functioning components are:
1. Slide 2. Hammer 3. Unfired Cartridge 4. Bullet upon firing 5. Cartridge Case
Pre‐Academy Firearms Manual Page 18 of 64

Pre‐Academy Firearms Manual Page 19 of 64
Maintenance:
Field stripping procedures will vary according to the manufacturer and model of each semi-automatic.
For specific disassembling instructions, be sure to check the manufacturer’s instructions for each model.
The basic procedures for field stripping for cleaning and maintenance are:
1. Remove the magazine. 2. Rack the slide to clear the chamber of any live rounds. Physically double-check the chamber and
magazine well to make sure they are clear. 3. Let the slide go forward into the battery, point the pistol in a safe direction and pull the trigger. 4. Pull the slide slightly to the rear, and pull down on the slide lock located on either side of the receiver
above the trigger guard. 5. Remove the slide forward off the frame. 6. Remove the recoil spring assembly. 7. Remove the barrel from the slide. Proper cleaning procedures for the semi-automatic should ensure that all powder fouling has been removed
from all surfaces, that any lead fouling has been removed and that the pistol functions smoothly and correctly in the following function check:
1. Pull the slide to the rear and release. 2. Engage the safety. 3. Pull the trigger; the hammer should not fall. 4. Release the safety. 5. Pull the trigger; the hammer should fall (depress grip safety, if so equipped).
NOTE: The number of different semi-automatics available makes it almost impossible for us to picture each of them and list their parts. Please refer to the manufacturers’ description of your model.
Malfunctions of a Semi-Automatic:
Malfunctions in a semi-automatic weapon are mainly shooter induced; however, here we will discuss some malfunctions caused by defective ammunition. The most common jam is the stovepipe, the empty hull lodged straight up in the ejection port. The usual cause of a stovepipe jam is underpowered ammunition, a recoil spring that is too stiff or a limp-wristed shooter. The way to clear it is to use the offhand to strip the case off the firearm, pulling the slide back as well. As the case flies loose, the slide rams forward and chambers another round – most of the time. If you are shooting from a barricade, scrape the case off against the barricade. If necessary, scrape the case off against your leg.
The two other kinds of jams are a bit more serious – failure to feed and failure to extract. A failure to feed is the easiest jam to prevent. Do not just stick a new batch of ammunition in your weapon and put it away. Try the ammunition first – this applies to both revolvers and semi-automatics. It is a simple rule, and one that is violated too many times.

Pre‐Academy Firearms Manual Page 20 of 64
Should a feed jam occur, you should go through a clearing or malfunction drill, i.e. tap the magazine and rack the slide. If this does not clear the jam, drop the magazine, lock the slide back, and shake the round out of the magazine well, letting it fall, insert a new magazine, and release the slide. This is a slow process, which is why you want to prevent this sort of thing from happening.
Another type of failure to feed can occur when the casing is slightly ballooned or oversized thus being too large for the chamber. If the casing enters the chamber of your weapon but will not seat, pull back the slide and eject the round (rack the slide). If you have a long ejector, the procedure is more complicated. You should drop the magazine and get the round out from the bottom. Be very careful – if the round slips off the extractor, the live primer can be forced against the sharp end of the ejector. It can and has fired! When you are trying to eject a live round, never slam the weapon around to jar it loose!
A failure to extract, which is not all that common, is the worst jam you can get. You have a casing in the chamber and a live round coming up behind it. Lock the slide back; drop the magazine to get rid of the live round. Slam the slide forward to pick up the lodged casing, and then insert a new magazine. Pull back and release the slide once more, ideally ejecting the offending casing and chambering a live round.

Proper Stance:
Your grip should be part of a solid, firm stance that lets your whole body work at keeping your weapon steady so you can concentrate fully on making your shots count. There are two basic positions suitable for point shooting, the Weaver Stance (which will be covered in detail in the Combat Shooting Section) and the Combat Stance. By experimenting in your practice sessions you can learn which stance is more comfortable and effective for you. Rather than just planting your feet and facing downrange, try these positions extensively on surprise targets at different angles and distances to get the feel for how they’ll work in a real confrontation.
For our purposes here, we will describe each stance, as it should be assumed if you are caught in the open in a gunfight. With appropriate modification, each can be adapted for use behind cover, where you need to conform to the shape of your barricade.
The more commonly taught stance is the combat position or isosceles stance, so called because your arms are extended away from your chest like two equal sides of a triangle. As your firearm comes out and up, you face the suspect squarely, and if you are right-handed, you move your left foot straight out to the left so your legs are in a solid, braced position should you want to move to cover, engage a second opponent, etc. Bend your torso slightly forward from the hips and flex your knees to assume a crouch similar to that of a baseball infielder. As your arms move up for the supported grip, you thrust your hands out at the midline of your body, straight out from your chest. Neither arm dominates; in the final on-target position, both are pointed straight toward your assailant. Your wrists, elbows and shoulders are firmly locked, with the muzzle of your weapon at or just slightly below eye level. In effect, your firearm becomes an extension of your arms and fingers. Remember, straight arms help to shoot straight. Also, they carry the recoil back into your shoulders to help reduce the shock to your hands and keep you from “bouncing” off target when you fire.
Isosceles Two-Hand Grip Isosceles One-Hand Grip
Crouching lets you get your weapon up and “on” quicker. Both your weapon and your eyes are at about the chest level of the suspect, which should help your aim. Also, the crouch provides better balance.
Stance is largely a matter of personal preference and varies markedly from shooter to shooter. Each shooter must experiment to determine the stance or position best suited to his physical conformation, while providing the greatest degree of stability for his body. Basically, the feet should be spread comfortably at approximately shoulder width, supporting the body weight equally. They should be on a line facing about 45 degrees to the
Pre‐Academy Firearms Manual Page 21 of 64

left of the target for a right-handed shooter, though this can be varied somewhat as the shooter finds best. The body is upright, not leaned back in an attempt to balance the outstretched arm. The shooting arm is straight, not rigid, and the head is turned slightly to the right to look thru the sights. The left-hand (non-shooting hand) is usually placed above the waist in a defensive or interview position. All strain should be avoided when the shooting arm is extended towards the target, while locking the wrist and elbow. Assume a firm but relaxed position.
Proper Grip:
The most important feature of the grip is constant uniformity. The firearm should be held exactly the same each time you start to shoot and for each shot fired. The grip must be firm and yet not interfere with the independent action of the trigger finger. The firearm should be held firmly enough while firing a shot so that shifting or slipping of the grip would not cause loss of control of the weapon. For the beginner shooter, learning how to grip the pistol properly can only come through constant practice, repetition, and many hours of dry firing.
One-Handed Grip (Semi-Automatic) One-Handed Grip (Revolver) The handhold should be made high up on the back strap of the revolver. Ideally, the axis of the bore should
align with the centerline of the strong-hand forearm as the shooter “shakes hands” with the grip handle. This detail is imperative for precision shooting with semi-automatics; it is not so critical with revolvers. Because the trigger reach on the revolver may be a bit long for a given individual’s fingers, revolver shooters sometimes shift the handhold around toward the trigger slightly to make the double action trigger pull more controlled. A little use of this technique is not bad if it is not overdone and is consistent. However, it is best to obtain custom grips that will allow the “square” master handhold on the grip, since it is an aid to consistent scoring and control of both recoil and rapid fire in the double action mode.
On the double action revolver, enough of the forefinger must engage the trigger to provide adequate grounds for the double action pull. Ideally, the contact should be at the first joint. The fingertip placement should be comfortable to the individual shooter within these functional guidelines.
The middle, third, and little fingers close on the grip, taking a firm set against the front strap. This action should be strong enough to draw up the heel and palm of the hand against the back strap in a vise-like motion. Little finger pressure should be substantial and coordinated with middle and third finger tension. If the pistol’s grip design has too large a girth at the bottom, custom grips should be obtained that allow the middle knuckles of these three fingers to align.
Shooting semi-automatics requires good wrist control for recoil recovery. Due to the shifts in the center of gravity of the pistol as it cycles, much of the recoil effect of semi-automatics derives from this dynamic shift as
Pre‐Academy Firearms Manual Page 22 of 64
the slide smacks the frame. A “locked” wrist is needed to counteract this movement that tends to rotate the weapon in the shooting hand.
Steps to achieve proper grip are:
1. Place the stock of the weapon in the web of the shooting hand, and grip the stock keeping the thumb down. The grip should be as firm as possible without the hand trembling.
2. Usually the first joint of the trigger finger should be placed at the leading edge of the trigger. The trigger finger should not touch the frame of the weapon.
3. Once the proper grip is assumed, it should not be relaxed or changed during a course of fire.
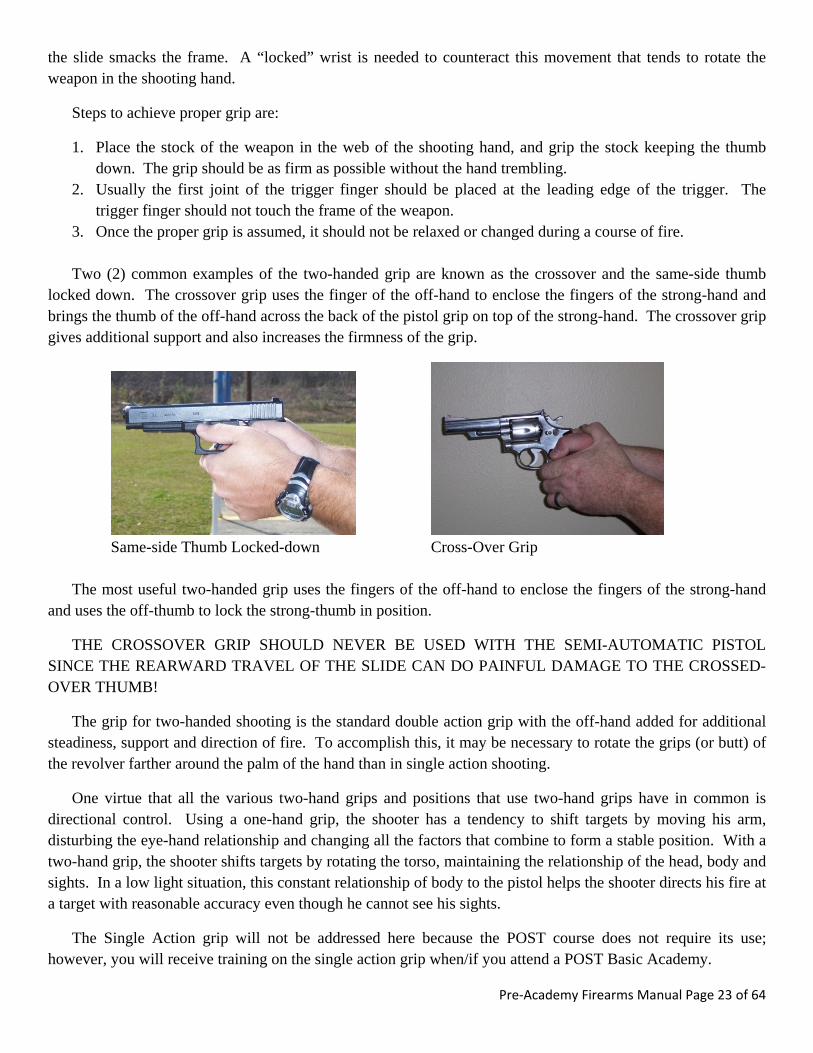
Two (2) common examples of the two-handed grip are known as the crossover and the same-side thumb locked down. The crossover grip uses the finger of the off-hand to enclose the fingers of the strong-hand and brings the thumb of the off-hand across the back of the pistol grip on top of the strong-hand. The crossover grip gives additional support and also increases the firmness of the grip.
Same-side Thumb Locked-down Cross-Over Grip The most useful two-handed grip uses the fingers of the off-hand to enclose the fingers of the strong-hand and uses the off-thumb to lock the strong-thumb in position.
THE CROSSOVER GRIP SHOULD NEVER BE USED WITH THE SEMI-AUTOMATIC PISTOL SINCE THE REARWARD TRAVEL OF THE SLIDE CAN DO PAINFUL DAMAGE TO THE CROSSED-OVER THUMB!
The grip for two-handed shooting is the standard double action grip with the off-hand added for additional steadiness, support and direction of fire. To accomplish this, it may be necessary to rotate the grips (or butt) of the revolver farther around the palm of the hand than in single action shooting.
One virtue that all the various two-hand grips and positions that use two-hand grips have in common is directional control. Using a one-hand grip, the shooter has a tendency to shift targets by moving his arm, disturbing the eye-hand relationship and changing all the factors that combine to form a stable position. With a two-hand grip, the shooter shifts targets by rotating the torso, maintaining the relationship of the head, body and sights. In a low light situation, this constant relationship of body to the pistol helps the shooter directs his fire at a target with reasonable accuracy even though he cannot see his sights.
The Single Action grip will not be addressed here because the POST course does not require its use; however, you will receive training on the single action grip when/if you attend a POST Basic Academy.
Pre‐Academy Firearms Manual Page 23 of 64

Pre‐Academy Firearms Manual Page 24 of 64
Sighting (Sight Alignment and Sight Picture):
Modern gun sights have two main purposes, to point the firearm at the target and, by adjustment, to compensate for the effect of gravity and wind on the bullet in flight. Before any new shooter can learn proper sighting and aiming, they should first familiarize themselves with the different general types of metallic front and rear sight combinations, and must understand completely the picture produced by the correctly aligned rear sight, front sight, and target. The lining up of the front and rear sights is called Sight Alignment. When the target is added, what the shooter sees is called Sight Picture. During the aiming process the two sights can be kept in alignment even though they may stray from the center of the target. Misaligned sights will result in greater error than when they are aligned but off the center.
Sighting and aiming, and particularly sight alignment, are essential to accurate shooting with a weapon. You should take every opportunity offered you to practice sight alignment, such as dry firing practice. Before going on to the other fundamentals of shooting, be certain you understand sight alignment and sight picture.
The most important factor in firing an accurate shot is sight alignment. In order for the bullet to hit the target, the shooter must aim the pistol and give the barrel a definite direction relative to the target. Proper sight alignment is the front sight centered in the notch of the rear sight, with the top of the front sight even with the top of the rear sight and with equal light showing in the rear sight notch on both sides of the front sight. In this position, the sight should be aligned with the center of the intended target.
With aimed shots, your focus should always be on the front sight and not on the target. The question as to where the eye or eyes should be focused confuses many shooters. It is common knowledge that the eyes cannot be focused on two different objects so far removed from each other as the sights and the aiming point. Remember that sight alignment has to do with only the alignment of front and rear sights and has nothing to do with the target. Aiming as the target (with sights perfectly aligned) is what most shooters refer to as “Sight Picture”. It is physically impossible to focus your eyes on both sights and target at the same time; one or the other has not been brought into sharp focus. You must look at the sights by focusing your eyes on them. The target does not have to be perfectly clear, but the sights must be outlined sharply and distinctly. The relationship of the sights to the target is secondary. It does not matter that the hold is not perfect. If the sights are properly aligned, the bullet will strike where the sights were aimed. If the hold is perfect but the sights are not aligned, a poor shot will result. Perfect Sight Alignment is necessary to get good scores, so the shooter has to concentrate intensely on keeping the two sights lined up. Continue to focus on the front sight during recoil. Do not search the target for prior shots during any course of fire.
The aiming point is usually indicated by and “X” on a bulls-eye type target; however, on police combat targets the aiming point will be what is called the “Center of Mass”, as indicated by a “P” on the POST target (LA P-1).
See Correct Method and Incorrect Method “Sight Picture” on next page.
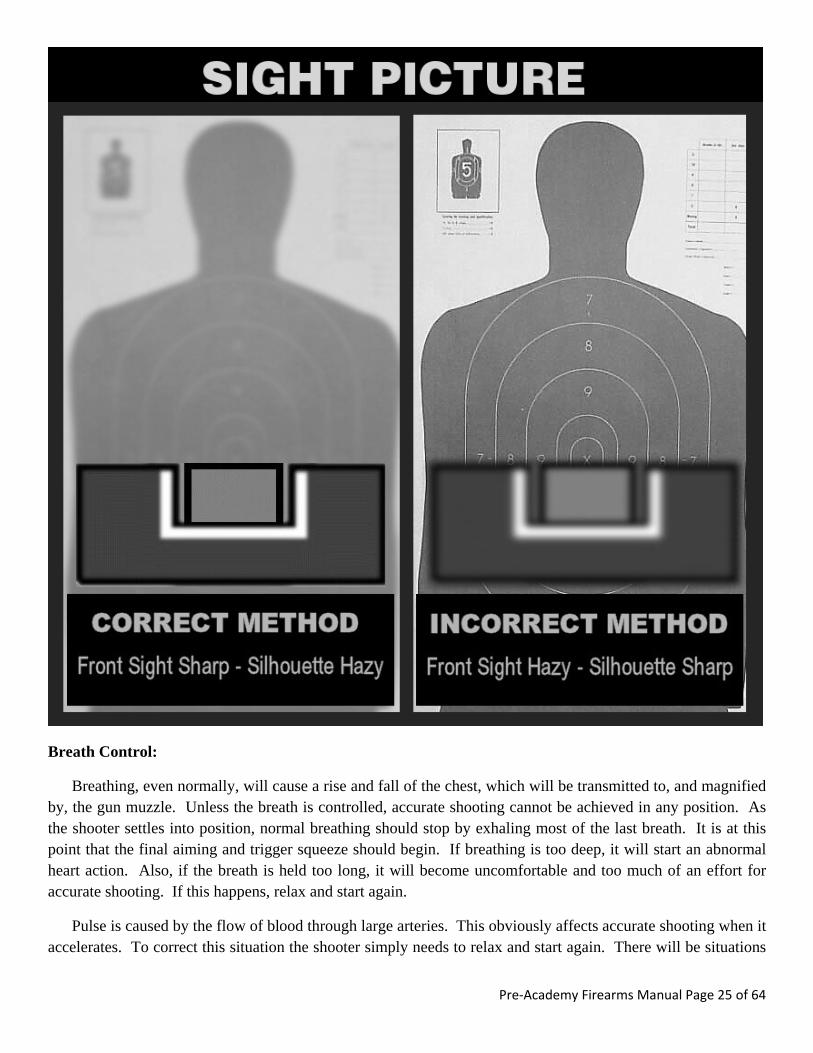
Breath Control:
Breathing, even normally, will cause a rise and fall of the chest, which will be transmitted to, and magnified by, the gun muzzle. Unless the breath is controlled, accurate shooting cannot be achieved in any position. As the shooter settles into position, normal breathing should stop by exhaling most of the last breath. It is at this point that the final aiming and trigger squeeze should begin. If breathing is too deep, it will start an abnormal heart action. Also, if the breath is held too long, it will become uncomfortable and too much of an effort for accurate shooting. If this happens, relax and start again.
Pulse is caused by the flow of blood through large arteries. This obviously affects accurate shooting when it accelerates. To correct this situation the shooter simply needs to relax and start again. There will be situations
Pre‐Academy Firearms Manual Page 25 of 64

Pre‐Academy Firearms Manual Page 26 of 64
where the shooter is out of breath and possibly unable to relax before taking a shot, and while he may have no control over this, he must be aware that this situation may make it impossible to deliver a well-aimed shot.
Some stages of the POST course can be fired by holding your breath the entire time. On some stages you will have to breathe between strings of fire, such as the 25-yard line.
Basic Steps are:
1. Inhale 2. Release half-breathe 3. Hold 4. Exhale
It is not often the average individual would have to think about breathing. We do it so unconsciously that we rarely give it much thought. Taking several deep breaths before you are ready to fire will increase oxygen level in the blood, resulting in a more relaxed and comfortable feeling. Every shooter should practice proper breathing techniques when dry firing so that it soon becomes a habit, and he will unconsciously exercise proper breathing while on the firing line.
Proper breath control assists the shooter in the completion of an accurate shot or series of shots. During slow firing, as you raise the weapon to the target, inhale and then exhale to the point of comfort. Hold your breath until the shot is fired. During more rapid firing, you may be able to shoot a string of fire without breathing again.
Trigger Control:
Trigger pressure that causes the hammer to fall and make the weapon fire will be referred to as trigger control. The proper application of pressure on the trigger determines the accuracy of the shot. Trigger control is constantly increasing pressure, straight to the rear, in such a way as not to disturb the sight alignment or the lay of the firearm until the hammer falls. It means gradual without hesitation rather than sudden. A too-slow increase in pressure may set up tensions, and getting a shot off too fast can lead to a disastrous trigger jerk. Trigger control is applied until the weapon fires.
Trigger pressure must come from the trigger finger only. The trigger is pressed by the steady increase of the forefinger only. The trigger finger must move independently from the rest of the hand. Grip pressure should not change as trigger pressure increases.
After the proper grip has been maintained, and your sights are aligned properly, then with the trigger finger only, exert steadily increasing pressure straight to the rear until the hammer falls. The shooter must not pick out a definite moment to fire the weapon. He may know by the amount of pressure to the trigger when it is about to fall but not the exact instant. Each shot should surprise the shooter when it actually goes off. There is only one correct way to start a bullet on its way – PRESS THE TRIGGER WITH SUCH A SMOOTH, STEADY, AND CONTINUOUS INCREASE OF PRESSURE THAT YOU CANNOT TELL EXACTLY WHEN THE GUN WILL FIRE.
It is quite natural to flinch when we hear a loud noise or are expecting a physical shock of some kind. It is this natural anticipation of the noise and recoil of a weapon being fired that causes the jerk, heel, and flinch that

Pre‐Academy Firearms Manual Page 27 of 64
ruins our best efforts toward proper trigger control. Keep in mind that all of us are plagued by this natural flinch. The big difference is realizing we are affected and taking the steps to control ourselves. One step toward controlling flinching is good ear protection.
A good way to test trigger control is to shoot ball and dummy strings of fire. This can be done by loading the cylinder in a clockwise direction with one live round, one dummy, two live, then two dummy, spin the cylinder, and close. Loading in this manner will prohibit the shooter from knowing if the round under the hammer is a live or a dummy round. Now shoot a couple of strings of fire from the part of the course that gives you the most trouble. If the sights do not move out of alignment when the hammer falls on a dummy round, you have accomplished good trigger control.
Practice is necessary for good trigger operation. “Dry firing” can be the best form of practice if done properly and even top shooters practice dry firing. Most importantly, ensure the weapon is safe. Place a small target across the room and fire an empty firearm at it just as if you were trying to hit a record trophy with every shot. Repetitive dry firing develops finger muscles and the habit of perfect trigger control.
In single action shooting with a revolver, the hammer is cocked with the off-hand thumb in the two-hand hold by a simple motion up and over the strong-hand. This fast and efficient technique does not disturb the strong-hand grip. With practice, thumb movements can be coordinated easily without interrupting standard shooting routines.
The double action revolver substitutes manual cycling of the action for the self-operating features of the semi-automatic. By working the double action pull, the shooter manually retracts the hammer against the mainspring, rotates the cylinder to align a fresh cartridge with the barrel, and releases the hammer to fire the weapon. All double action revolvers accomplish these functions with similar internal working parts. However, designs differ enough that the characteristics of double action pulls vary considerably.
A test of good double action trigger technique is to dry-fire with a coin balanced on the barrel rib. Sights should not move as the hammer falls. A stable coin means good technique. Most shooters will find this coin balancing routine quite difficult at first, indicating poor double action trigger coordination.
Follow-Through:
Follow through is the subconscious attempt to keep everything just as it was at the time the shot broke. In other words, you are continuing to fire the shot even after it is gone. Follow through is not to be confused with recovery. Merely recovering and holding on the target after the shot is no indication that you are following through. Follow through is important because the flight of the bullet can be disturbed as long as it is still in the barrel. Follow through is maintaining perfect sight alignment, grip, stance and all other techniques while the shot is being fired, the weapon recoils and the bullet leaves the barrel.
The importance of follow through is usually understood and accepted in baseball, golf, or tennis, but frequently is not accepted in shooting, even though it is vitally important. A bullet travels extremely fast and the time it takes to pass through the barrel is infinitesimal, but it does take SOME time. In fact, it takes long enough to make it possible to move the gun barrel between the time the trigger is pressed and the time the bullet leaves the muzzle. Consequently, wild shots can occur even though the sight picture looks good when the shot is fired.

Pre‐Academy Firearms Manual Page 28 of 64
All shooters should realize that the weapon moves in recoil slightly before the bullet exits the barrel. For this reason, we must offer the same resistance to recoil for each shot in each position.
Call the Shot:
The ability to call the location of a shot on the target is an important part of shooting and is essential to the learning process. This is associated with follow through since it is during this period of time that the shooter registers a mental picture of the relationship between the sights and the target, thus “calling” to their self where the shot should hit the target. Other items, which have to be considered, would include any sudden movement of the hand, a tendency of the arm to swing in an uncertain direction, flinching, or a change in the atmosphere or light conditions. It is extremely important that the shooter learn to predict where every shot should have struck the target. The location of the shot is “called” by thinking of the target as a clock face. It is the only means by which the shooter can begin to analyze his own mistakes.
No one can hold a revolver or pistol on any certain point on a target. In aiming a firearm it is necessary to fully realize that an aiming point is in reality an aiming area. When an experienced shooter state that he aims at six o’clock or in the middle of the bullseye, he does not mean that he holds a point exactly at six o’clock, which is the bottom center of the bullseye, or a point exactly in the middle of the bullseye. What he does mean is that he tries to hold as close to such a point as possible. Every person’s arm shakes or moves when aiming a weapon, but the extent of the movement depends on how well the shooter’s muscles and nerves are conditioned and trained. With experience and training his natural movement will be less and his aiming area is thereby cut down. The belief that you must hold on an aiming point can be harmful, especially to the new shooter. It causes them to try to “frame” the shot to make the weapon go off when it is aimed exactly at the aiming point. Naturally, the effort to make the weapon go off results in a sudden pressure on the trigger, disturbing the aim and resulting in a poor shot. A new shooter should realize that he cannot hold a weapon completely steady but it can be held steady enough to confine the movement of his sights to an area. If sight alignment is done properly and the trigger is pressed in such a manner as not to disturb the sight alignment, all of the shots will hit the targeted area.
Rhythm and Habit:
Rhythm is an important element of any physical task. Without rhythm you don’t walk, you stumble and stagger. It requires rhythm to bring your car to a smooth stop. If you have a standard shift, you press your right foot down on the brake, our left foot and two hands automatically do certain things at the right time in conjunction with your right foot in order to bring the car to a smooth halt. That’s driving rhythm.
Rhythm is required in shooting. The operations that go together to fire a single shot, such as loading, holding the breath, aiming, pressing the trigger, follow through, and calling the shot, must always be done in the same order and in the same way. When the required motions are done habitually and unconsciously, shooting rhythm has been acquired. Habit will soon establish itself with practice and rhythm will become automatic.
It is especially important that the same amount of care and patience be expended on each shot. The shot goes exactly to the point where all the conditions which surround its firing have dictated. The rhythm and habit pattern used in slow-fire shooting are simply speeded up for faster shooting. The habits stay the same. The rhythm pattern stays the same. Only the pace quickens.

Pre‐Academy Firearms Manual Page 29 of 64
COMBAT SHOOTING
Double Action Shooting:
Double action shooting occurs more frequently in police gunfights than single action shooting. Double action revolver or combat shooting is defensive shooting. A well-trained law enforcement officer, when confronted by a combat situation, will probably utilize the double action function of his service revolver. It should therefore be mastered and practiced by the basic officer.
Double action shooting requires the same fundamentals of marksmanship as single action shooting with the exception of speed, i.e., proper sight picture, grip and trigger control. However, in the former method, the grip and trigger pressure is varied slightly in order to avoid movement of the weapon by the required increased trigger pressure. Sight alignment remains the same in both double and single action shooting.
Double action shooting, if done properly, makes use of the reflexes of the shooter as well as the controlled speed of revolver quick fire to develop a quick reaction capability. This is why many law enforcement agencies, including the FBI, emphasize double action shooting in their training programs.
In double action shooting, the revolver is cocked and fired in one smooth, continuous motion of the trigger finger. Starting with the hammer down, the trigger is pressed through its complete cycle and the hammer comes back to full cock. The cylinder then rotates to bring the next chamber under the firing pin and the hammer falls forward, firing the cartridge. Of course, these motions are happening simultaneously to fire the round.
Firing double action requires close attention to grip, position of the trigger finger and trigger control. Since the relationship of the thumb to the hammer spur is no longer important, the grip is usually higher. Although the shooter may do acceptably well with a relaxed grip in single action shooting, the grip must be firm for double action work. The thumb is locked-down toward the fingers rather than relaxed alongside the cylinder latch. The trigger finger is thrust further into the trigger guard and contacts the trigger at the first knuckle or on the pad of flesh between the first and second joint, depending on the size of the hand. The uncocked trigger is about ½” further forward in the trigger guard.
The trigger pressure required to fire a revolver double action is usually a minimum of eight pounds, but may run as high as 15 pounds. The finger position is altered in order to apply more strength. The extra pressure requires more of the finger surface on the trigger, and the locked-down thumb helps to keep the grip secure. A fairly tight grip should be used to begin with to avoid getting into the bad habit of squeezing with the whole hand rather than with just the trigger finger. Care should be taken to insure that the trigger is pulled straight back, and not to one side or the other. Also, the trigger must be pulled all the way back and then completely released before engaging it again for the next shot to avoid “trigger hang-up”.
The method of shooting double action involves continuous firm pressure applied to the trigger until the shot is fired. The added pressure makes smooth trigger control more difficult, but jerking the trigger will have the same bad result it does in single action shooting. Trigger pressure should continue until the weapon fires. In turn, the necessity for having more of the forefinger on the trigger requires that shooters with small hands shift their whole hand in the direction of the finger in order to make this possible. The lock-down thumb keeps the grip secure in spite of the change in hand position. This permits accurate shooting in the least amount of time.

Pre‐Academy Firearms Manual Page 30 of 64
One of the most common errors observed in training in double action shooting is a tendency to relax the grip after the trigger is released following the first shot or the shooter is squeezing with the whole hand rather than with the trigger finger alone. This results in what is commonly referred to as “milking” the revolver where, after the first shot, subsequent shots are directed to the left or right of the target, depending on whether the shooter is right or left-handed. One means of avoiding this is to train to take a very firm grip originally. The inclination to tighten the hand almost always comes about because it has been relaxed when the trigger finger relaxed to allow the trigger to move forward. Another error observed in training is referred to as a “slap shot”, when the pressure is applied to the trigger in a quick jerky motion. This, along with anticipating the shot, will also result in inaccurate shots.
The requirement for training in the development of combat shooting ability cannot be over-emphasized. Seldom is the officer ever fortunate enough to find himself shooting under the same conditions in a duty-related combat situation as he would on a firearms practice range. Most gun battles are generally fought under conditions requiring split second reaction shooting and consequently are not favorable for precise and accurate revolver shooting. The necessity that the law enforcement officer develops the ability to shoot his service weapon with accuracy and speed using the double action technique can be accomplished by skillful instruction and continuous training.
Single Action Fire:
The sequential movements involved in single action fire are:
1. The hammer is cocked,
2. which rotates the cylinder,
3. and moves the trigger rearward to a locked position.
4. The trigger must then be pulled to fire the round.

STANCES
Weaver:
Jack Weaver, a California Police Officer, observed that when facing a target in a “squared off” two-handed position, the shooter had to break his wrist outward at some point in order to get sight alignment, violating the locked wrist principle necessary for double action trigger control. In addition, recoil and recovery time resulting from this two-handed grip was excessive. Weaver developed his technique by dropping the strong foot and shoulder back and applying a “push-pull” grip on the weapon.
Modified Weaver
Field Interrogation Stance
The position is described as follows:
Grip – the basic grip is a two-handed reinforced one with the off-hand overlapping the strong-hand. The shooter applies forward pressure with the strong-hand and pulls backwards with the off-hand, using equal pressure to create an isometric force which steadies the weapon and reduces barrel rise from recoil.
Position – the shooter’s strong foot and shoulder are dropped back, similar to the stance used in defensive tactics. The off knee is flexed and the body leans forward slightly to put the balance over the off foot. The strong leg is straight. The weapon is brought up to eye level and the strong arm can be straight or in a pronounced bend. The shooter can stand straight up, crouch, or drop to a kneeling or barricaded position.
Sight Alignment – during close-in shooting (5 – 7 yards), the shooter does not have time to acquire perfect sight alignment. He is, therefore, instructed to fire with both eyes open and to bring the sights up to eye level. As distances increase, the need for better sight alignment increases.
Isosceles:
The Isosceles position is described in detail in the “Proper Stance” section.
Pre‐Academy Firearms Manual Page 31 of 64

Close Quarters Position:
The close quarters position is appropriate when the adversary is within reaching distance of an extended firearm. The pistol is held in one hand with the forearm level and the wrist locked against the rib cage.
Care should be taken when establishing this position that the cylinder of a revolver is not held against the body and that the body will not interfere with the slide of a semi-automatic pistol. (Muzzle and cylinder-gap blast can scorch a shirt.)
Point Shoulder Shooting:
Point shooting has to involve total body functioning to be effective. Executed with finesse, point-shooting time per hits is shorter than indiscriminate hip shooting. The basic body position for point shooting is very similar to that of a boxer, feet and toes pointing forward, left foot slightly ahead of the right, knees slightly bent, and weight forward on the balls of the feet, torso bent slightly forward to place the body’s center of gravity inside the base made by foot placement. This stance focuses attention on the target.
Pre‐Academy Firearms Manual Page 32 of 64

Beginning point shooting should be done with the weapon in the shooting hand, not drawn from the holster. With the weapon in the strong-hand, the gun butt can rest against the front of the thigh, muzzle pointing down and forward of the shooter. On signal, the shooter responds much like a boxer throwing a punch. The total body responds not merely the arm and hand. The forearm is lifted off the thigh and the shoulder thrusts forward, carrying the upper arm into extension. Torso muscles react and the legs accommodate the slight shift in the center-of-gravity.
The point shoulder position is similar to the crouch position except that the torso is more erect and the firearm is brought to eye level. The Point Shoulder – One Hand position is appropriate to close ranges of about 5-7 yards.
The shooter is no longer almost in arms reach of the target. Speed is essential, but a greater degree of accuracy is required. The shooter extends his arm straight from the shoulder and points the firearm at the target. Although the shooter does not use the sights in the conventional ay, the firearm is in his cone of vision only slightly below his line of sight to the target. The shooter’s primary attention is on the target. One hand can be used; however, the two-handed grip is best for maintain good sight alignment and trigger control in double action combat point shooting. The legs are spread, being broken at the knees to maintain center of balance over the flats of the feet. The torso is leaned forward very slightly to counteract the backward push of recoil, and the head is erect. As with the one-hand point-shoulder position, the shooter achieves a proper grip on his pistol in the holster, draws and thrusts the pistol at the target just below eye level. As he is doing this, he brings up his off-hand and grasps the pistol in a two-handed grip just as it comes into firing position. The influence of the off-hand will stabilize the firearm and permit faster repeat shots with accuracy. Properly assumed, the shoulder point position can be used effectively from behind high cover, and for accurate distance shooting.
Standing – Unsupported:
In the standing position, since support it at a minimum, the elements, which contribute to good shooting, are more important than in any other shooting position. The shooter should be relaxed and unhurried. The muscles should not be tensed with effort. The smooth easy rhythm of loading, breathing, and sighting, squeezing the trigger, following through and calling the shot should be practiced with every shot until they become habit.
Pre‐Academy Firearms Manual Page 33 of 64

Pre‐Academy Firearms Manual Page 34 of 64
The use of cover is probably the most important factor contributing to the survival of an officer in an armed confrontation. Cover is not always available and, when it is, is not always suitable as a support for the shooting position. Accordingly, the officer should be proficient in shooting with support. There are limited numbers of unsupported standing positions, which have been proven to be useful and practical.
Barricade:
The barricade position is sometimes called “standing with support”. However, that term may be misleading since the shooter does not actually support his weight against the cover, but stands behind it and supports only his shooting hand at the vertical edge. Barricade training is intended to show the officer how to use cover and that any support he might receive is only incidental.
Since vertical cover on the street will vary from building corners to telephone poles, and since the object or structure providing the cover cannot be depended upon to always be on the same side as the officer’s normal shooting hand, the officer should condition himself to shoot equally well with either hand from the barricade position. As in all other combat shooting positions, off-hand shooting is stressed for the benefit of the officer, not only to enhance his ability to take advantage of any cover, but also to enable him to continue functioning in this own defense should he receive an incapacitating wound to his normal shooting side.
In combat training, the officer will shoot from both sides of the barricade. When shooting from either side, either hand may be used to hold and fire the weapon and the dominant eye is used in sighting.
One Barricade Position advocates developing a comfortable stance by facing the barricade with most of your body weight on the foot from the side you are shooting and using the other leg and foot to maintain a relaxed position for good balance. At first this position may seem awkward, but constant practice will enable you to develop a comfortable position. After establishing a comfortable standing position, you can place the knuckles of the non-gun hand directly against the barricade. Do not place your body weight against the barricade. Simply place enough pressure against the barricade to prevent the hands and weapon from leaving their positions during recoil. Let your legs hold your weight.
In another Barricade Position, the officer stands erect and advances his off foot to merely “touch” the barricade. The strong-hand pushes the weapon past the edge of the barricade. The back of the off-hand can rest against the side of the barricade if shooting from the strong side. If shooting offside with the strong-hand, some modifications will have to be made to ensure minimum exposure and those are left up to the shooter. The strong foot is brought to the rear and to the off side as far as possible to expose as little of the body as possible and still maintain balance. The shooting arm is held in a fairly rigid position. When the off-hand is used to shoot on the offside, the position is merely the direct opposite of the strong-hand position.
The barricade shooting position was designed to provide an officer with the advantage of controlled firing from cover with minimum exposure. With the arms, hands, torso and legs in proper position, the dangers to the officer are greatly reduced.
During actual firing, hold your head erect to prevent tiring of muscles in the neck, and at the same time, try to keep the weapon eye level. Extend the shooting arm as far forward as possible without becoming uncomfortable, while at the same time locking the elbow and wrist.

The recommended grip for shooting from behind cover in an armed confrontation is the two-handed combat hold. This is the same grip used in the basic point-shooting stance. Basically, one hand holds your firearm, and the other hand wraps around it to provide additional support. The fingers of the two hands may be firmly intertwined or locked together, or the support hand may simply wrap around your shooting hand. As you fire, the back of your support hand between wrist and knuckles presses against the side of your cover. This grip allows for a slight gun-hand push and support-hand pull which will give you a steady, solid grip on the firearm.
With the above detailed grip, you can shoot around anything, whether it is a square corner, a round corner, a fire hydrant, a mailbox, the hood of a car or what-have-you. The grip works whether you are standing, crouching, kneeling, even sitting or proned out. In the kneeling position, you can bolster the support it gives your firearm by placing the elbow of your non-shooting arm on your raised knee to form roughly a “V” between your shoulder and firearm. To keep this brace steadiest, avoid direct contact between your elbow and knee bone and instead place the fleshy part of your arm just above the elbow against the knee area.
In either barricade position, the shooter’s weight should not be against the barricade, he should be standing erect with the supporting hand held in place by friction, not by leaning pressure. Remember: When you deviate from a known safe practice in order to compensate for the lack of ability, you not only throw away the margin of safety, you also avoid actually acquiring the ability by pushing aside an honest effort.
Kneeling:
The kneeling position is designed for shooting from behind fairly low cover, but can also be effectively used as a support for accurate distance shooting. It can be quickly and easily assumed, offers a low silhouette, and does not hamper the officer’s ability to move quickly to another position if he has to. From a standing position, the shooter extends his off foot about one pace (as if to take a step). His strong foot is turned to his strong side at about a 45-degree angle; he draws his firearm and drops his strong knee to the ground. He sits on his strong heel and simultaneously brings his off elbow to just forward of his off knee, extending his off palm to receive and support his shooting hand. Though the one-hand position is optional, the two-hand position offers a more stable support for accurate shooting.
In the low kneeling position, the off foot is extended as far forward as is comfortable, and the strong leg is placed flat on the floor or ground with the foot flat also and rotated inward. The shooter sits on the side of the strong foot. In the high kneeling position, the shooter sits on the strong heel. In each case, the off knee supports the off arm two or three inches above the elbow. The strong elbow is not supported, and may be allowed to relax into the most comfortable position. Another variation of the high kneeling position is to go
Pre‐Academy Firearms Manual Page 35 of 64

down on the strong knee, not using the off knee to support the off elbow, keeping the off knee bent as if sitting in a chair.
Extended Hip (or Point) Shooting:
Extended Hip Shooting allows you to get on target fast and to conclude the confrontation as rapidly and effectively as possible. Today, without doubt, it is the most efficient means of firing at most assailants in most law enforcement situations.
This technique is an adaptation of a tactic developed by American soldiers in Vietnam to deal with an enemy who frequently surprised them at close quarters in areas with little available cover. Because suspects commonly confront officers under just those circumstances, it is ideal for use in law enforcement. Basically, it involves taking aim at your target by pointing your firearm as you would point your index finger at the spot you want to hit. The upper arm remains in contact with the body, with the elbow bent. The firearm is at or below the level of your sternum.
This position allows an ideal balance of speed and accuracy and power – the triple-header that wins gunfights – without using the conventional sight picture procedure. It can help you get the edge when everything seems to be against you: poor lighting, irregular terrain, an obstructed view, the cover and movement of your adversary – not to mention the tremendous physical and emotional stress that sledge hammers you from
Pre‐Academy Firearms Manual Page 36 of 64

Pre‐Academy Firearms Manual Page 37 of 64
the moment you perceive danger. Point shooting is simple, easy to learn, can be used behind cover as well as in the open, and is versatile enough to serve you in a variety of positions, including kneeling and falling down.
You do not have to be an expert shooter, in the usual target practice sense. But you do need good eye-and-hand coordination, to be able to position yourself correctly as well as to bring your firearm into action quickly and properly without conscious attention to the mechanism of firing. If you have trained correctly, the necessary mechanism will come reflexively when you are faced with a crisis situation. On the other hand, crack target shooters who have no trouble hitting a stationary target 20 yards away but who have not trained for point shooting may not hit a moving, firing suspect only 6 feet away.
Many officers in high stress situations tend to hold their weapons with one hand and shoot one round. This is because under stress they fall back on what they know best – basic academy range training, which usually emphasizes a one-hand grip for firing one shot at a time. Occasionally, one-handed shooting may be necessary; you may be wounded in the other hand, or you may be holding your firearm in one hand while crawling through a window or up a fire escape, for example. Usually, however, your preferred option is the better controlled two-handed shooting, firing multiple shots in rapid succession. This gives you the best chance of effectively stopping a suspect who is threatening your life or someone else’s.
Ready Gun Position:
Ready Gun Position is used during high-risk searching and when challenging a dangerous subject. In the “high ready” gun position, the weapon is lowered to approximately waist level, with the barrel pointed toward the target, and the forearms level with the ground. This allows maximum flexibility when you have to draw your firearm prior to pointing it at the target. Another method would be the “low ready” gun position. Assume the weaver stance. The stance is maintained except that the muzzle is lowered to a 45-degree angle with the arms straight. The shooter must keep his finger off the trigger and outside the trigger guard while in the low ready position. Once the decision to shoot has been made, raise the firearm to eye level. Focus your vision on the front sight. The trigger finger goes to the trigger and the slack is taken out. The trigger is then smoothly pressed and shots are fired. Immediately after completion of firing, the shooter removes his finger from the trigger, placing it outside the trigger guard. The pistol is lowered to the low ready position and your area of responsibility is checked. Prior to moving from one position to another or upon reholstering, the thumb safety will be engaged or the decocking level will be engaged to decock the pistol. Ensure that the trigger finger has been removed from the trigger prior to decocking.
Draw:
If you have anticipated danger, you will already have your firearm unholstered and in the firing position (not at your side) when you need to shoot. If not, you begin moving into the point shooting position as you draw. Your draw should be one continuous motion, with smoothness more important than an attempt at speed alone. You want to bring your firearm out to the same place with the same fluid maneuver every time you withdraw it from your holster. As you draw, your hand should be positioned for the proper shooting grip so that you do not have to readjust it once the firearm clears your holster. This helps enhance your accuracy. With the draw, as with other point shooting components, speed is fine, but accuracy is final. Your adversary must be hit to be incapacitated; the mere noise of your firearm going off will not do it.
To draw, grasp the stock of your firearm firmly, with your shooting hand high on the grip panels. Your thumb and fingers should be in position for shooting – except for your trigger finger. Keep this finger extended

outside the holster at first, parallel to the barrel, and allow it to fall alongside the frame above the trigger as you withdraw the firearm. This will prevent an accidental discharge. Draw from your wrist and arm. Bring the muzzle up so the barrel becomes parallel to the ground as you extend your shooting arm toward the suspect. Simultaneously, swing your other arm up so your hands come together in a supported grip, just as your firearm enters your peripheral vision. These movements should be fast and forceful, taking about 1 to 1.5 seconds with practice, and culminating in your hands and arms punching the firearm out at your target, much as you would throw a low punch to his body. You don’t look down at the firearm as you draw any more than you would look at your hand if you intended to jab your target or shine your flashlight on your target. Concentrate on the suspect. For safety, even if you intend to fire immediately, your finger should stay outside the trigger guard until your firearm has cleared the holster and the muzzle is pointing forward, clear of your body.
Steps for Unholstering and Reholstering:
1. The shooter moves both hands at the same time. The support hand is brought to a position in the area of the shooter’s abdomen or belt buckle, also known as the interview position. The supporting forearm is parallel to the ground. The supporting elbow is near the off side hip. Moving the supporting hand and arm is critical. Failure to do so will cause a number of other problems to occur. The shooter acquires a full and final firing grip on the holstered weapon, unsnapping any retaining devices. During the draw stroke, the index finger of the firing hand is kept straight, outside the holster.
2. The shooter draws the pistol from the holster and, once the muzzle has cleared the holster, the pistol is rocked up and forward, toward the authorized target until the firing hand wrist is locked and indexed under the pectoral muscle of the strong side. The muzzle will be online with the wrist and forearm. The trigger finger does not go onto the trigger at this time, nor does the trigger finger enter the trigger guard. The safety remains engaged.
3. The shooter punches forward with the shooting hand into the support hand, applies isometric tension between the shooting hand and pulling back with the supporting hand. The strong-arm elbow may be locked or slightly flexed. Too much flex however will decrease the sight radius and increase felt recoil.
4. The shooter brings the pistol up to eye level and the vision focus changes from the target to the front sight and the trigger finger goes to the trigger and takes the slack from the trigger.
5. The shooter’s vision is clearly focused on the front sight and the target will be blurred somewhat. The trigger is pressed smoothly to the rear until the hammer falls and the weapon discharges with a clean surprise break. After firing, the weapon is depressed to the low ready and a decision can be made whether to reholster.
6. To reholster, the off-hand and strong-hand move together. The support hand is removed from the two-hand grip and placed in the vicinity of the belt buckle. While the weapon is reholstered, eyes are downrange. The retaining device can then be secured.
Pre‐Academy Firearms Manual Page 38 of 64

Pre‐Academy Firearms Manual Page 39 of 64
LOADING AND RELOADING THE REVOLVER
Speed is the determining factor to success in many endeavors. In law enforcement, there are occasions when swift, sure action with the revolver means the difference between life and death to an officer. The average law enforcement officer may complete a long, honorable career in his profession without ever having to use his revolver in the defense of his life. In only a very few instances will he ever need to fire more than six (6) rounds loaded in the cylinder of his revolver. The possibility always exists, of course, that he /she may need more than six (6) rounds. Multiple gunmen, adverse shooting conditions or extreme ranges are some of the conditions which may require additional firepower.
Contrary to many gun battles portrayed in movies and on television programs, the law enforcement officer must reload. The speed with which he can do so and resume firing is determined to a large extent by the shooter’s ability to place the ammunition into the cylinder. Knowing your weapon is especially important when reloading. For instance, the cylinder on a Colt revolver rotates clockwise while the cylinder on a Smith and Wesson rotates counter-clockwise. While additional speed and skill can be acquired with practice, the proper sequence and procedure should first be mastered to eliminate wasted motion.
Reloading follows the preliminary steps of opening the cylinder and ejecting the empty cartridge cases from it. Ejection should be made with the thumb of the left hand (for the right-handed shooter) by pushing the ejector rod to the rear after the cylinder has been opened. While the ejection action is occurring, the right hand should be reaching for additional ammunition. The left-handed shooter, in reloading, holds the revolver in the right hand with the thumb through the revolver frame on top of the cylinder and the middle and ring fingers on the bottom for ease in rotating the cylinder as it is being loaded. Thus, the left-handed shooter reloads with the same skill as a right-handed shooter.
Unloading and reloading can be done from virtually any position and while the body is in motion. The officer should always reload as quickly as possible during practice, and learning to do more than one thing at a time should be stressed. During reloading, you should make yourself as small a target as possible if in the open or take advantage of any cover or concealment available. Reloading should be practiced while in all positions and while moving from one position into another, all behind cover if possible. Practicing can be done on the range, or at home or the office using dummy ammunition. In this manner, an officer conditions himself to take advantage of every precious second available to him/her. Getting into the habit of quickly dumping the empty cartridges on the ground (instead of trying to catch them in the other hand) and reloading on the move may give those extra seconds in an actual situation.
Related to reloading, but no an actual part of it, are the source of ammunition supply and the speed with which the ammunition can be obtained for reloading into the cylinder of the weapon. Once the ammunition is in the hand, there is no deviation from the normal reloading into the cylinder. Many police officers normally rely on the six (6) rounds they carry in their weapons. In those instances where the use of firearms can be anticipated, additional ammunition can be carried in the front right trousers pocket (right-handed shooter). The left-handed shooter, of course, carries his supply in the left trousers pocket.
There are also basic methods for the law enforcement officer to carry extra ammunition on his belt: 1) a flat cartridge carrier retaining the rounds in individual loops, 2) a cartridge box or pouch which releases the ammunition by unfastening a snap, and 3) speed loaders. Regardless of where it is carried, a police officer should practice obtaining his supply of ammunition and getting it into the revolver cylinder in the fastest

possible time. When engaged in a gun battle, his reach for the additional ammunition needed should be instinctive as well as without wasted motion and loss of time. There is no substitute for practice. The speed with which you can perform these functions may be the difference between living and dying.
The steps to load/reload a revolver for the right-handed shooter are:
1. Place the right side of the revolver in the palm of the left hand. 2. Place the right thumb on the cylinder latch. The revolver muzzle is kept pointed “downrange” in each
step of loading or reloading. 3. With the right thumb, either pull back or push forward on the cylinder latch, depending on the make of
the revolver used, and with the middle and ring fingers, push the cylinder and follow it through the revolver frame. The first and little fingers of the left hand remain on the frame.
4. The weapon should then be turned to a vertical position, muzzle up. The left thumb should be used to push the ejector rod down, using a downward jerking motion to eject the empty cartridges. The left hand has complete control of the revolver, freeing the right hand to reach for additional ammunition.
5. Safety Note: Do not get into the practice of catching the spent cartridges in your hand or ejecting them into the brass bucket. You could waste precious seconds during the exchange of gunfire with an adversary. You can police the area after practice, if on the range.
6. With the weapon still in the left hand, hold the weapon at approximately belt level, muzzle down at a 45 degree angle, rotate the cylinder counter-clockwise with the thumb, and insert the cartridges into the charge holes. The left hand is naturally cupped beneath the cylinder to catch any dropped cartridges.
7. Close the cylinder.
Grip for Loading a Revolver Grip for Unloading a Revolver
Pre‐Academy Firearms Manual Page 40 of 64

Pre‐Academy Firearms Manual Page 41 of 64
LOADING AND RELOADING THE SEMI-AUTOMATIC PISTOL
In a tactical situation, the officer should reload when it is convenient and not necessarily when his firearm is empty. Consequently, he may find himself removing a partially full magazine while the slide remains forward on a loaded chamber or an empty magazine with the slide locked back on an empty firearm. In either case, the officer should remember that the semi-automatic pistol without a magazine is only a complicated single-shot (or, if a magazine disconnector is part of the design, a no-shot) pistol.
The pistol is drawn with the forefinger outside the trigger guard and brought to waist level, with the shooter’s elbow locked to his side and the muzzle pointed downrange. Bringing the pistol down to the loading position, but keeping the magazine vertical, retain the grip on the pistol and use the thumb of the strong-hand to press the magazine release. (A left-handed shooter will use his forefinger and, if the magazine release is located at the bottom of the butt, the off-hand must be used to release the magazine.) The pistol is then rotated about 45 degrees so that the magazine well is angled toward the shooter’s off side. The magazine is stripped free with the off-hand and placed on your person during tactical operations. During combat situations, the magazine is dropped to save seconds in reloading. The off-hand then goes to the magazine pouch for a fresh magazine while the pistol is rotated slightly to orient the magazine well opening toward the off side. The magazine is carried in its pouch usually on the opposite side of the belt from the holster, bullets pointed forward. The off-hand extracts the magazine from the pouch, forefinger extended along the forward (bullet) edge of the magazine. Using the off-hand forefinger as a guide, the off-hand inserts the magazine into the magazine well and pushes it with the heel of the hand until the magazine seats. A positive click should be heard or felt to indicate that the magazine catch has engaged the magazine. If the slide was left forward on a loaded chamber, reloading is now complete. If the slide was locked back and the chamber empty, the slide should be drawn back and released exactly as in initial loading.
When the slide is fully to the rear, it is released by the off-hand. Remember, release the slide and let it travel forward unencumbered. Following or “riding” the slide forward with the hand interferes with the operation of the weapon as designed and frequently results in malfunctions.
If the weapon is not to be reloaded (as when the command is given, “Unload and Holster”), the magazine is removed as described. If the slide is forward, the slide is grasped by the off-hand, as in loading, with the fingers cupped over the ejection port. The grip of the strong-hand is shifted as necessary so that the thumb is pushing up on the slide stop. The pistol is rotated clockwise to the horizontal and the slide is drawn smoothly to the rear. A visual inspection is made of the chamber, the slide is released, the hammer dropped and the pistol is holstered.
Unloading Procedure:
1. Keep the pistol pointed in a safe direction at all times. 2. Remove chambered round and magazine. 3. Visually inspect chamber after unloading.
See “Reloading the Semi-Automatic” pictures on the next page.

Sight Adjustment:
While sight adjustment is vitally important to good shooting, it has been placed at the very end of this portion of the manual. This was done because other things come first. Until the shooter has progressed in the fundamentals of position, sighting, breath control, trigger press and calling the shot, he should not be allowed to attempt sight adjustment. Up to this point the student should be concerned only with shooting the smallest group possible.
However, when the shooter learns to shoot small groups anywhere on the target, he must learn how to move this group to center. This is done by adjusting the sights. The experienced shooter follows this same procedure when he is “sighting in” a new rifle. The following terms will help in understanding the subject:
1. Micrometer Sights – rear sights capable of very fine adjustment. 2. Minute of Angle – the standard measure of adjustment which will move the group one inch at 100 yards.
At other distances the ratio is the same – at half the distance (50 yards) the adjustment is one half (one half inch); at one-sixth the distance (50 feet) the adjustment is one-sixth inch.
3. Remember: One minute of angle equals one inch at 100 yards. 4. Point of Aim – the spot on the target at which the sights are aimed. 5. Center of Impact – the center of a group of shots on the target. 6. Elevation – refers to vertical (up and down) movements of sights and shots. 7. Windage – refers to horizontal (right or left) movement.
In order to adjust the sights correctly, the shooter must determine: 1) How much adjustment is needed and in what direction, and 2) How to make the adjustment on the sight he is using. Determining the direction is easy. If the shots are to the left, they should be moved to the right. If they are high, they should be brought down. If the shots are at seven o’clock, they should be moved up and to the right. The distance of movement is always considered in two directions – horizontal and vertical, never diagonally.
The actual adjustment is simple. The cardinal rule of sight adjustment is: Move the rear sight in the direction you want to move the hits on the target.
Pre‐Academy Firearms Manual Page 42 of 64

Pre‐Academy Firearms Manual Page 43 of 64
LEGAL AND MORAL RESPONSIBILITY
GOAL:
Each officer should be aware of the legal restraints regarding the use of deadly force. The moral responsibility associated with firearms should be explored and thoroughly understood.
OBJECTIVE:
1. Identify the factors that must be present before an officer may use deadly force.
STUDENT ASSIGNMENT:
Be completely familiar with Chapter 2, “Use of Force Against Persons”, in the Louisiana Law Enforcement Handbook (current edition).
TEXT:
Louisiana Law Enforcement Handbook (current edition)

Pre‐Academy Firearms Manual Page 44 of 64
LEGAL AND MORAL RESPONSIBILITY
The law enforcement officer often encounters fast moving situations that signal the need for the use of force against suspects. Under such circumstances, the officer must decide quickly and correctly the degree of force which is appropriate to the situation. Particular attention is given to the use of deadly force because its improper use has a tragic impact in the community and exposes the officer to great civil and criminal liability. Deadly force is defined as force crating a substantial risk of causing death or serious bodily injury. Although it is difficult to articulate a few simple all-inclusive rules and guidelines, this chapter will try to present workable rules and guidelines. Some general guidelines are applicable to all situations in which the use of some degree of force is appropriate. Other guidelines deal specifically with the use of force in self-defense, to protect others, to affect an arrest, and to prevent flight or escape.
If an officer finds a conflict between the rules and policies expressed here and the rules and policies of his department, it is suggested that he follow the directions of his department.
The decision to use force must be based on reasonableness and necessity, not on emotion. The use of force in any degree must be based on a reasonable judgment that force is necessary under the circumstances. For example, an officer must always prevent anger from affecting his decision to use force.
Transactional Analysis:
Conflict management should be learned as one of the first approaches to avoiding the use of deadly force. Transactional Analysis is used for oral control of a situation. The officer who develops these strategies can maintain proper and effective communications with any civilian, suspect, commander and political figure in his community. The nature of police work demands that an officer possess appropriate and effective communication skills. As an added benefit, effective communication can de-escalate a situation and save lives.
At the heart of Transactional Analysis is a definition of three social roles: parent, adult and child. The parent is the authority figure. The child is the emotional, uninhibited response to stimuli. The adult is mature, rational and logical. Throughout everyone’s workday, we maneuver among each of these roles, since not all roles will be appropriate in every situation.
Within in the chain of command of a quasi-military organization (such as a police department), a hierarchy is established. One person may assume all three roles. Contact between peers is adult to adult. From the commander to the officer is the parent to child relationship. The officer will then become the parent as he addresses his subordinates. To work successfully within the system, communication needs to flow properly. When ideas are not transmitted, communication does not occur and the system breaks down.
An officer on duty assumes the adult role. This attitude fosters respect and meaningful conversation. It promotes problem solving and cooperation. Adults communicate. Adults make rational decisions. Adults test reality. Adults are professional and reasonable. In contrast, the parent role is domineering and authoritarian. The parent “sets things/people straight”, gives orders and makes proclamations that everyone else must respond to. The opposite of the parent role is the child; immature, dependent and directionless. The interaction between parent and child is an emotional one, not a rational relationship.
In order to communicate effectively in any situation, we should strive to project the role of ourselves as adult. The key is to be confident in your own ability to incorporate adult responses while effectively listening

Pre‐Academy Firearms Manual Page 45 of 64
and analyzing the other party. If the subject insists on a parent or child relationship, you can recognize this mode of emotionalism and rationally respond.
Understanding Fear:
Understanding the components of human fear will help you understand your response in different situations. Fear is the natural, automatic response to one’s perception that he is in a dangerous situation. The key here is the officer’s perception based on the degree of “preparedness” training. Reasonable fear is common to all officers. It can be triggered by legitimately dangerous situations: conducting a building search at night for an armed suspect, being confronted by a mentally ill person predisposed toward violence or facing an armed attacker. Therefore, reasonable fear is a survival technique. It can be thought of as your mind sending warning signals to the rest of your body.
However, there is a distinct difference between controlled, legitimate and manageable fear, and uncontrolled panic. Uncontrolled and inappropriate fear is not only unreasonable, but also dangerous to the officer and everyone in his immediate environment. It is this sort of fear that can cause an officer to take inappropriate action or use excessive force. For situations like these, the legal ramification can be enormous for a law enforcement agency and the community. It is essential that officers and their supervisors develop techniques to distinguish between these two types of fear, to determine how fear affects a trained officer’s responses and to evaluate what preventive steps should be taken.
A certain amount of agency participation and cooperation is required to address the issue of unreasonable fear, although individual action will also be necessary. An officer can utilize a group discussion to evaluate his own fears in comparison with those his colleagues and thus attempt to establish a “normal” mode of behavior, or at least behavior within the normal range. It is the responsibility of the department to create the environment that encourages honest, candid discussion among its members. The practice of open discussion should begin at the recruit level and pervade throughout the agency. It may be necessary for a department to provide professional counseling services to officers who may not be able to discuss their fears openly. The department should offer to support anyone who requires professional counseling without any stigma attached or any reprisal. It is often the field-training officers who will be in the position to first observe the new recruit in action. The field-training officer can identify possible symptoms and suggest corrective actions, additional training or guidance before the problem becomes entrenched.
Types of Unreasonable Fear Type Description Symptoms Racial Prejudice, rumor, ignorance “Super Cop”, Overly officious Cultural Same ethnic group, but different values and culture Cultural superiority or resentment Physical Harm Persistent fear, inconsistent with reality Equipment fixation, excessive
requests for back-up Doing Harm Inability to use force when necessary Under-reaction to physical threats Positional Inhibited decision making Insufficient or No action taken Peer Disapproval All consuming desire for acceptance Uses excessive force to appear tough,
immature in approach to job

Pre‐Academy Firearms Manual Page 46 of 64
Stress:
When a police officer encounters a situation involving a possible use of force, it is important to recognize the factors that could affect his performance in facing this complex and difficult task. Understanding the forces of stress and inner conflict that can affect actions taken in an encounter is essential to mastering this situation. Some of the most common sources of stress and conflict in this type of performance environment include:
• Long term stress: divorce, ill child, etc.
• Short term stress: last call for service, hunger, etc.
• Anger: created by loss of control, loss of self-esteem, etc.
• Fear: created by real threats, exaggerated threats, etc.
• Prior Mind-Sets: racial, gender, political, economic, etc.
• Health Considerations: weight, blood pressure, etc.
Each of these “risk factors” presents unique issues that may have a profound impact on actions but are hard to recognize. Stress can be incremental and consequently is often unobserved. The combination of small hassles with a spouse, child or supervisor can also raise stress levels. Anger can be targeted at others who are not the source of anger. Fear is often a hidden dimension as well. Fear of injury, humiliation or generalized danger may be directed at types of persons, neighborhoods or situations. Mind-sets about fear or danger can change one’s perception of a situation. Believing that a particular housing area is dangerous may influence the approach that an officer takes toward the encounter. Health concerns may affect body positioning, gait, mobility, and sense of competence.
Recognizing these risk factors and learning to control oneself are important components in any approach to a possible use of force encounter. What will help you subdue these performance inhibitors is your rapid response to correcting them and your ability to deal with a force encounter. Specific steps include your ability to:
1. Recognize and control your emotions prior to being able to control others. 2. Balance your mind and body while anticipating your approach to the encounter. 3. Avoid impulsive words or trigger terms. 4. Reaffirm you sense of dignity in approaching the situation. 5. Have a realistic sense of what one may encounter. 6. Avoid the need to be right. Focus on resolving the encounter rather than affirming your authority or
sense of false honor. 7. Avoid tunnel vision caused by anger and loss of control or esteem.

Pre‐Academy Firearms Manual Page 47 of 64
In addition, employ techniques that model mature conflict resolution strategies with the people you encounter. This often will occur through a series of predictable phases of the encounter:
Phases of Conflict and De-escalation of Conflict Phase Keys for officer Phase One: Competitiveness (between the officer and the subject)
• Avoid responding as a competitive entity • Focus on the facts • Listen, watch, and observe • Do not be judgmental
Phase Two: Combative situation develops
• Assure safety • Develop strategy to de-escalate • Develop plan to employ steps in force continuum
Phase Three: De-escalation
• Define paths for de-escalation • Attempt resolution • Define agreement on issues • Maintain sense of alertness; prepare for re-
escalation Phase Four: Renewed cooperation
• Establish sense of cooperation • Emphasize tactical or strategic lessons • Affirm common goals
While this model may not be appropriate to all conflict situations, it provides the officer involved in a conflict ways to creatively resolve it. Additionally, it offers opportunities to employ his professional skills and reduces the chance of liability or injury. In employing this approach, consider that time is a critical control component of conflict management. Most events cannot be resolved in the first 20 minutes of the conflict. Regard the passage of time as a tactical ally. Also, when dealing with people, do not react to their dialogue or manner; respond to control the situation. Attack the problem, not the person.
Your attitude is the first obstacle to resolving the conflict. Maintaining a sense of inner control and translating it into appropriate street problem solving is a step toward facing a possible use of force with maximum professionalism and minimal risk.
Officers should employ self-assessment on a regular basis. Self-assessment is the standard for evaluating job performance, tactical maneuvers and attitudes toward the community. After each incident or citizen contact, an officer should mentally recap and evaluate:
• Tactics and approaches;
• Command presence in terms of controlling the contact;
• Demeanor, personal feelings and emotions
• Conversation patterns; and
• (Most importantly), Emotional levels.

Pre‐Academy Firearms Manual Page 48 of 64
It is likely that only the individual officer will be aware of the presence of fear. It is the officer’s responsibility to his job, family and community to accurately identify his fears, prevent injury and seek help when necessary. The ramifications of either personal or departmental denial of the existence of a problem, or even the potential for a problem, can lead to injury or death of an officer and/or innocent civilians.
Cultural Differences:
Understanding cultural differences is another way to avoid conflict. Knowledge of the values and beliefs of different cultures will assist the police officer with predicting the behavior of a suspect. Knowledge of a population’s key behavioral elements can help the officer persuade more effectively. Understanding of various cultures provides a mental mapping of behavior that makes persuasion more probable.
The results of cultural awareness will be to provide soft control techniques to deal with human behavior provide more verbal options and sustain the professional demeanor of the police officer. Cultural awareness recognizes the dignity of the subject and equips the officer with an understanding of the subject’s survival values.
Policing depends on an effective exchange of information. Recognizing that communication styles differ from culture to culture will assist the officer with information gathering. Both the police officer and the complainant must be able to send and receive verbal and nonverbal messages accurately.
For many police officers, there is more of a concern with the accuracy of communication rather than with whether the communication is appropriate. What people say and do is usually qualified by other things they say and do. Gestures, tone, inflection, posture or eye contact may enhance or negate the content of the message. Therefore, it is essential that law enforcement officers understand that communication styles are strongly correlated with race, gender, culture and ethnicity.
It is also important to note that different cultures have different perceptions and uses of personal and interpersonal space. There have been four interpersonal distance zones identified that are characteristic to American culture:
1. Intimate – from contact to 18 inches apart.
2. Personal – from ½ feet to 4 feet apart.
3. Social – from 4 feet to 12 feet apart.
4. Public (lectures and speakers) – greater than 12 feet apart.
Feelings and reactions associated with a violation of personal space may range from flight and withdrawal to anger and conflict. On the other hand, we tend to move closer to people we like or feel attraction to. Latin Americans, Africans, African Americans, Indonesians, Arabs, South Americans and the French are examples of cultures that will converse with a person at a much closer distance than is normally comfortable for white Americans. Both the investigator and the subject may benefit from understanding that their reactions and behaviors are attempts to create the spatial dimension to which they are culturally conditioned.
Effective communication requires a shared base of experience and a common set of rules about the meaning of not only words, but also intonation patterns, word order, volume, pauses, facial expressions and gestures. “If they would just learn English, everything would be okay” is the commonly heard refrain. Communication is

Pre‐Academy Firearms Manual Page 49 of 64
more than just words and, in addition to language differences, cultures have varied norms about the nonverbal aspects of getting the message across. Newcomers who learn English may still be operating according to the nonverbal rules of their native languages or may have to think in their language and then translate their responses into English.
Even the purpose of communication is culturally defined. Americans and Northern Europeans see communications pragmatically, as a means of getting their message to the receiver. Much of the rest of the world sees it instead as a means of building relationships. The direct approach taken by Americans (especially by police) may seem rude, cold, and offensive to a Latin American or an Arab expecting a more subtle approach.
Another apparent difference is the appropriateness of a subject for conversation. For example, many Asian groups regard feelings as too private to be shared. Filipinos and Arabs think nothing of asking the price you’ve paid for something while Americans may see this as rude.
What makes facial expressions and eye contact such stumbling blocks in communication is that these behaviors are learned at an early age and are generally unconscious. The widened eyes that show an American’s anger have their counterpart in the Chinese person’s narrowed eyes. A smile may not signify affability and friendliness, but may be a sign of embarrassment on the part of the Asian complainant. A smile or nod from many Asians may mean they are trying to preserve harmony and save face. A direct stare by an African American or Arab may not be a challenge to a police officer’s authority, while dropped eyes may be a sign of respect from the Latino and Asian witness.
One of the most powerful nonverbal communicators is human touch. Devout Muslim and Orthodox Jew males would never be touched by a female outside their families.
Americans, Arabs and Southern Europeans are often viewed as noisy and rude by the English and Northern Europeans, whose speech is more controlled and softer. For mainstream American culture, silence is generally avoided. Because of this discomfort, somebody will usually jump in and start talking. In Japanese culture, silence is considered a chance for serious consideration of what was said.
Some examples of cross cultural communication situations are:
1. “They are talking about me.” – When you hear members of a community speak a language other than English, you may jump to the conclusion that you are the topic of conversation. In fact, they may be talking about their families, a work problem, or the weather.
2. “They do not want to learn English.” – Huge enrollments and long waiting lists at adult education English classes in cities with large immigrant populations tell us that newcomers to this country do want to learn English. However, making a living and taking care of their families may take up all the waking hours some people have.
3. “They know English; they just do not want to use it.” – Even when someone is learning a new language, he may be hesitant o use it until he feels more proficient. Many newcomers come from cultures where social class distinctions make it difficult to initiate conversations with someone they believe to be above them in society pecking order.

Pre‐Academy Firearms Manual Page 50 of 64
When communicating with those with limited English-speaking ability, you should keep a few things in mind:
1. Make it Visual – A picture is worth a thousand words. Using pictures, signs, diagrams and symbols can give you another dimension beyond words in order to make yourself understood.
2. Show and Tell – Demonstrating what you are explaining can often get the message across faster than words in any language.
3. Use their Language – Try using the other person’s language if you are not getting through. Possibly your department has a list of its employees who may serve as translators.
4. Take it Easy – If a non-native person is struggling with English, processing information may take longer. Not only is the vocabulary unfamiliar, but also the grammar and intonation pattern are new.
5. Say it Again – If you are having difficulty making yourself understood, it may help to rephrase using different words. But beware of cognates: words in other languages that look and sound similar to English words.
6. Keep it Simple – Most of us use idiomatic expression on a daily basis: “Go the extra mile”, “Take the ball and run with it”, and “Handle it”. Policing jargon may be confusing to a civilian or a non-native speaker. Eliminate such jargon when communicating with individuals outside the law enforcement community.
The following summary will provide some guidance regarding a very complicated and difficult aspect of the law enforcement officer's job. Although the law enforcement officer must exercise restraint, there are situations in which he must swiftly and accurately use force in order to assure the prompt accomplishment of his mission and the safety of himself, his fellow officers, and the public. If the law enforcement officer is to be effective, he must understand when and how to use an appropriate degree of force.
Force should be used only when it is reasonable to believe that it is immediately necessary. When force in any degree (but particularly deadly force) is used against a suspect, the officer's action will be judged in large part by whether the force was reasonably necessary at the moment of its use. Force, especially deadly force, should not be used except as a last resort. Some of the elements to be used as criteria when making the decision to use force are ability, opportunity and jeopardy.
Ability - Did the subject have the means to do bodily harm to another person? Indicators to consider are the subject’s weapons, age, gender, size, drug or alcohol use, mental status, threatening gestures, known prior history and apparent skill level.
Opportunity - Did the subject have the opportunity to seriously injure or kill the officer or another person? Some indicators are positioning, proximity, and timing of the subject’s actions.
Jeopardy - Did the subject’s action expose the officer to a perceived danger or was there a reasonable perception that the person would seriously injure or kill the officer or other person? Indicators include the perception of imminent harm and fear of death or bodily injury.

Pre‐Academy Firearms Manual Page 51 of 64
The priorities used in determining the appropriateness of deadly force should be:
1. To protect all innocent citizens in your community.
2. To protect yourself and fellow officers.
3. To protect the subject.
4. To protect property.
An officer must know the weapons issued for his use. It is essential that a law enforcement officer learn marksmanship and firearms safety, such as the safety features of and safe handling procedures for weapons. The officer must understand the moral and ethical implications of taking a human life and must instill in himself a determination to use restraint.
An officer must avoid the use of unnecessary menacing actions. It is generally wrong for an officer to use his weapon as a means to intimidate or bluff when confronting a suspect. Such actions as firing warning shots and unnecessarily drawing and pointing weapons at suspects should be avoided. A warning shot additionally poses a threat to innocent persons who might happen to be in the path of the bullet. However, in some emergency situations, for example, to stop an attack on another officer by a riotous mob, a warning shot may be appropriate. Of course, when an officer fires warning shots, his prime consideration must be to avoid injuring innocent bystanders. Similarly, under some circumstances, it may be reasonable to draw or point a weapon even though there is no immediate need to shoot. For example, it might be reasonable for an officer who is searching a building for a burglar, or arriving at the scene of a robbery in progress, to draw his weapon and point it at a suspect.
A weapon should generally not be fired from or at a moving vehicle. Accurate fire from a moving vehicle is unlikely and poses a great threat to the safety of innocent bystanders. An officer who fires a weapon recklessly and fails to take into consideration the safety of innocent bystanders, may be as great a threat to public safety as the suspect he seeks to arrest.
Before arriving at the scene of a potentially dangerous and highly charged situation, an officer should think about possible developments and his reactions to different situations. Although it is not always possible to foresee the potential developments, if an officer is able to make an educated guess and plan his reactions accordingly, he will increase the chances that his decision to use force will be reasonable.
An officer may not use force merely to prevent the use of offensive or insulting words. Verbal abuse or profanity alone does not justify the use of force.
In general, the use of deadly force is not authorized merely to protect property, but only when the safety of human beings is in jeopardy.
Use of Force in Self-Defense:
An officer may use only the degree of force that is reasonable to protect him/her. Non-deadly force is not likely to result in or produce serious bodily injury or death. Deadly force is that level of force that would lead a reasonable police officer objectively to conclude that its use poses a high risk of death or serious injury to its human target, regardless of whether or not death, serious injury, or any harm actually occurs. Reasonable force

Pre‐Academy Firearms Manual Page 52 of 64
is force that a prudent and cautious person would use if exposed to similar circumstances; it is limited to the amount of force that is necessary to accomplish legitimate and proper results.
An officer may use deadly force in self-defense when he reasonably believes that he is in imminent danger of losing his life or of receiving great bodily harm, and he reasonably believes that the use of deadly force is immediately necessary to save him from that danger. A reasonable belief is a belief that would appear reasonable under the circumstances to the ordinary and prudent law enforcement officer. The officer's belief may not be considered reasonable unless based upon an actual physical attack or hostile demonstration. Although the danger need not be real, it must reasonably appear to the officer that the danger is real and imminent. For example, an officer may be reasonable in believing himself in imminent danger if a fleeing armed robbery suspect runs and points a pistol at the officer even though the pistol is not loaded. The officer should not use deadly force except as a last resort. If an officer is able to protect himself and do his duty without the use of deadly force, he must not use deadly force against the suspect.
Use of Force to Protect Others:
An officer may use reasonable force to prevent a forcible offense against a person or a forcible offense or trespass against property in another person's lawful possession.
An officer, in some instances, may use deadly force to prevent a violent or forcible felony involving danger to life or great bodily harm. First, the officer must reasonably believe that a forcible or violent felony involving danger to life or great bodily harm is about to be committed. Secondly, he must reasonably believe that the use of deadly force is immediately necessary for its prevention. Third, he must reasonably believe that there would be serious danger to his own life or person if he attempts to prevent the felony without the use of deadly force.
When an officer uses force to protect another person, the officer may use only such force as was reasonably apparent that the other person could have lawfully used to protect himself under the circumstances. When intervening in a dispute, an officer should be extremely cautious in using force, especially deadly force. There are certain things an officer must take into consideration. First, he must understand that an occurrence might not always be what it appears to be. Secondly, an officer should consider the possibility that the person he is attempting to defend may have been the aggressor.
Use of Force to Affect an Arrest:
A person must submit peacefully to a lawful arrest, but there is no requirement that he submit peacefully to an unlawful arrest. In order for the officer to be entitled to use force to affect an arrest, the arrest itself must be lawful. If an officer uses force to effect what he knew or should have known was an unlawful arrest, his actions will probably constitute an assault and battery. Louisiana courts have taken the position that a person has the right to resist an unlawful arrest. An officer, therefore, should do everything possible to ensure that any arrest he plans is lawful and that he proceeds in a lawful manner in making the arrest.
When making a lawful arrest, an officer may use only reasonable force to affect the arrest and/or detention. He may not use unreasonable force or subject the arrested person to unjustifiable violence.
In addition to the "lawful arrest" requirement, the officer must limit the degree of force he employs to affect the arrest to "reasonable force". This simply means that the degree of force used to overcome the threat must not be excessive and be only of the intensity necessary to accomplish the arrest.

Pre‐Academy Firearms Manual Page 53 of 64
An officer who is making a lawful arrest may use reasonable force to overcome any resistance or threatened resistance from the person being arrested or detained. An arresting officer who meets opposition is not required to retreat or to abort his objective. If the dignity of the law and of those who are charged with its enforcement is to be maintained, an officer must often stand his ground and use all force reasonably necessary to arrest and/or detain the suspect. However, one of the law enforcement officer's primary functions is to protect the public. Therefore, if an arrest at a particular time will create a foreseeable and great risk of harm to the public, the wiser course of action may be to delay the arrest.
Use of Force to Prevent Flight or Escape:
Louisiana Law is not clear with respect to the use of force to prevent flight or escape. The following guidelines are drawn from generally accepted authorities and are suggested for consideration.
An officer may use reasonable force, but not deadly force, to prevent the flight of a misdemeanant or of a non-violent, non-dangerous felon. In order to prevent flight of the non-dangerous criminal offender, an officer, when reasonably necessary, may do such things as hold, wrestle, or tackle the suspect. He should not take action that endangers the life of the suspect merely to prevent him from escaping arrest for a misdemeanor or non-violent, non-dangerous felony.
Deadly force may be used against a dangerous or violent felon who is attempting to flee when the officer reasonably believes there is a substantial risk that the felon will cause death or serious bodily harm if apprehension is delayed. Two possible conditions, which will support the officer’s reasonable belief that substantial risk is present, are:
1. The fleeing felon has already committed a crime involving a lawless readiness to take human life or cause serious bodily harm.
2. The fleeing felon possesses a firearm that he has used or threatened to use to escape or to prevent capture. It is important to remember that an officer must never use deadly force merely to ensure punishment for a crime already committed.
Use of Force to Prevent Escape from Prison:
A guard or other law enforcement officer is justified in the reasonable use of force to prevent the escape of a person under sentence or awaiting trial from a state correctional facility, a parish prison, or the physical custody of a guard or other law enforcement officer.
Deadly force may be used to prevent an escape from certain correctional facilities, only under limited circumstances. These conditions will be covered in basic training.

Pre‐Academy Firearms Manual Page 54 of 64
POST QUALIFICATION COURSE
Qualification and training are essential to a professional in any endeavor. Therefore,
training is absolutely necessary to fulfill the responsibility entrusted to law enforcement professional. The most critical training is the proper implementation and use of deadly force.
No single qualification course incorporates all the skills necessary for a successful firearms
training program. Qualification courses should be supplemented with familiarization, realistic style courses and periodic training on other alternative techniques. Training that incorporates other skills such as weapon manipulation, target identification, moving, multiple, and reactionary targets, as well as stress-induced scenarios enhance any firearms training program. When applied safely and creatively, these techniques are the key to a successful firearms program, which teaches officer survival.
This course was developed from the philosophy that the handgun in general, is a defensive
weapon and that the deployment of a handgun will most likely be in response to an unexpected attack or occurrence. Officers must possess more than marksmanship ability; they must be able to manipulate their weapons skillfully and precisely. Being able to draw and reload quickly is as important as the ability to hit the target accurately.
These stages are designed for six-round capacity weapons for administrative purposes, and
allow better instructor control of the qualification procedure. Officers using semi-automatic pistols with more than six round capacity should fully load the weapon for all stages. Except for required reloading stages, this will benefit the shooters by requiring them to account for their own ammunition. However, fully loaded weapons will require additional instructor control of the number of rounds fired per stage.
Due to the variety of handguns utilized by law enforcement agencies, all instructors MUST consider discipline and safety their utmost concern.

Pre‐Academy Firearms Manual Page 55 of 64
SUGGESTED SAFETY/OPERATIONAL NOTES:
1. Keep the trigger finger straight alongside the frame until sights are on target, and during all reloading procedures with semi-automatics.
2. Ensure a secure firing grip on the weapon prior to removing it from the holster.
3. Keep the muzzle pointed in a safe direction (usually down range) at all times while the weapon is unholstered. The exception would be with revolvers, unloading fired rounds.
4. For semi-automatic weapons, if equipped, the safety is to be engaged when the shooter lowers weapon to ready gun position.
5. For single action semi-automatic pistols, the safety is disengaged only after the grip is established, and just prior to the sights aligning with the target.
6. After shooting in the kneeling position, the shooter should reholster before standing.
7. The shooter must ensure a secure grip on the weapon with the off-hand before raising the weapon up to target.
8. All required draws should be from a snapped or secured holster. Shooter may not touch their weapon or holster, prior to the command to fire.
9. All reloading will be from duty-style ammunition pouches, speed loaders pouches, or magazine pouches. Pouches or carriers, which require snaps or other securing devices, must be closed and secured throughout the shooting stage.
10. The POST qualification course will be fired utilizing a "Hot" Line. The shooter is responsible for reloading when necessary. At the end of a stage, shooters should load if needed and secure their weapon in the holster.
11. Shooter may use the isosceles or weaver stance.
12. Shooters should use proper sight alignment at the 25, 15 and 7-yard lines. At the 4 yard line the shooter should use instinct shooting technique. At the 2-yard line, the shooter will use extended hip or close-quarter shooting technique and will NOT use their sights.

Pre‐Academy Firearms Manual Page 56 of 64
STAGES OF FIRE
STAGE I - 25 yards 6 rounds standing, strong side barricade, strong-hand 6 rounds standing, barricade, strong-hand or off-hand, offside Time Limit: 60 seconds
STAGE I - TRAINING CONSIDERATIONS:
A) The weapon must never contact the barricade; the hands may brace against the barricade. B) It is possible for the shooter to align the sights on the target and still shoot the barricade. Be sure the
muzzle clears the barricade. C) Shooters are required to fire from the offside of the barricade using the barricade for cover. Use of the
strong or off-hand is optional. Stage I stresses the basics, including the barricade position and the use of cover. It also stresses to seek cover, in that the shooter starts out from behind cover and moves to cover. Studies show officers fail to use available cover two-thirds of the time, unless trained to take cover. To keep the course uniform the distance for cover will not exceed 5 yards. Also, shooter will move up to cover before drawing. One important element in the use of deadly force is verbal warning, if there is time. To accomplish this, on the first string at (25 yards), after shooter has drawn and is covering the target, the shooter will shout "Police, Don't Move". The shooter is advised to assume that the person has put him (the officer) in immediate danger and fires the string. STAGE II – *15 yards 3 rounds right side low barricade kneeling position 3 rounds left side low barricade kneeling position (35 seconds for outdoor range) (30 seconds for indoor range with no movement from 25-yard line to 15-yardline) NOTE: *Movement from 25 yards to 15 yards. STAGE II - TRAINING CONSIDERATIONS:
A) Movement to the 15-yard line from the 25-yard line. Moving time is included in the 35 seconds for outdoor ranges.
B) Once the officer gets to the 15-yard line, the weapon will be drawn and assume cover or simulated cover if no barricade is used.
C) All rounds will be fired from the kneeling position. D) Officer may use either strong-hand or off-hand.
STAGE III - 7 yards Phase I 6 rounds strong-hand only from holster (10 seconds) Phase II 6 rounds off-hand only from ready gun (10 seconds) Phase III *6 rounds standing 6 rounds kneeling – reload while kneeling (25 seconds) *NOTE: Mandatory reloading for all weapons during Phase III in the kneeling position.

Pre‐Academy Firearms Manual Page 57 of 64
STAGE III - TRAINING CONSIDERATIONS: A) The muzzle must be forward of the shooter's leg before the knee touches the ground. The shooter will
be cautioned not to "crash" to his knees to avoid injury. The muzzle must never cross the shooter's leg. B) In Phase II the shooter will, on command, draw his weapon and come to normal, two-hand grip in the
ready gun position. Then on command, shooter transfers handgun to the off-hand and fires. C) The shooter must ensure a secure grip on the weapon with the off-hand before raising the weapon up to
target at Stage III. Phase I requires shooting with the strong-hand only. This stage of fire is designed to test basic marksmanship fundamentals using the strong-hand only. The most likely application of strong-hand shooting is in the event that the off-hand is incapacitated or occupied. The shooter starts with a holstered weapon. Phase II requires shooting with the off-hand only. A review of law enforcement situations indicates that few officers fire with the off-hand in an actual confrontation. This stage of fire is designed to test basic marksmanship fundamentals using the off-hand only. The most likely application of off-hand shooting is in the event that the strong-hand is incapacitated or occupied. The shooter starts from ready gun position. On command shooter transfers weapon to off-hand and fires using quick sight alignment. In Phase III there is a mandatory reloading of all weapons. Law enforcement statistics show that officers seldom fire, reload, and continue the confrontations. Most confrontations involve fewer than 6 rounds and less than 4 seconds. However, every situation has the potential to go beyond the typical law enforcement engagement. Shooters must be familiar enough with their weapons and equipment to maintain continuity of fire. To do this the shooter must be able to reload under pressure. Instructors should emphasize that it is not a good tactic to stand up, out from behind cover, shoot, reload and shoot again. The emphasis is on reloading under stress and hitting center mass. All reloading will be done in the kneeling position. The kneeling position can be used as both a supported or unsupported position or to utilize available cover or just to make you a smaller target. The kneeling position is the most versatile, stable position due to its simplicity and the speed with which it can be acquired. Requiring the shooter to draw and assume the kneeling position and to fire under time constraints, trains and tests manipulation skills as well as quick sight shooting skills. STAGE IV - 4 yards Phase I 3 rounds, one or two hands (3 seconds) (2 shots to body mass and 1 shot to head)
Instinct shooting technique from holster with one step to the right AFTER rounds are fired. Ready gun and return to original position. Headshot is OPTIONAL.
Repeat once and holster. Phase II 3 rounds, one or two hands (3 seconds) (2 shots to body mass and 1 shot to head)
Instinct shooting technique from holster with one step to the left AFTER rounds are fired. Ready gun and return to original position. Headshot is OPTIONAL.
Repeat once and holster. STAGE IV - TRAINING CONSIDERATIONS:
A) For double action semi-automatics pistols, the weapon should be decocked when the shooter lowers weapon to ready gun position after firing first 3 rounds at Stage IV.
B) Movement to the right/left should be immediately after rounds are fired. Stage IV reinforces the basic techniques required for officer survival in the event of a failed incapacitation. In addition, it covers use of the weapon from the ready-gun position. The ready-gun position is used during high-

Pre‐Academy Firearms Manual Page 58 of 64
risk searching and when challenging a dangerous subject. In the ready-gun position, the weapon will be lowered to approximately waist level, with the barrel pointed toward the target. STAGE V - 2 yard 2 rounds - One or two hands (2 seconds Close quarter shooting position from holster with one full step to
the rear Repeat twice STAGE V - TRAINING CONSIDERATIONS:
A) Upon completion of each string of fire, shooter waits for instructor's command to move back to two-yard line.
B) Shooter must holster weapon after each string of fire. This stage covers the most basic techniques of handgun training--the ability to respond to a sudden, close-range confrontation under realistic time constraints. The shooter is to take one step to the rear to create distance. Shooter should be stepping and drawing at the same time. The shooter has the option of using the one or two-hand, close-quarter shooting position or the extended hip shooting position. However, it must be mentioned that the off-hand at this distance might be occupied, defending or restraining a subject. Probably, if given a choice, shooter will use two hands.

Pre‐Academy Firearms Manual Page 59 of 64
OFFICIAL POST COURSE (Approved 09/24/2008 – Effective 01/01/2009)
Stage I *25 yards **6 rounds standing, strong side barricade, strong-hand 6 rounds standing, barricade, strong-hand or off-hand, off-side (60 seconds)
*NOTE: Movement to barricade required, maximum distance 5 yards. **NOTE: With verbal commands (POLICE! Don’t Move!) Stage II *15 yards 3 rounds right side kneeling position**
3 rounds left side kneeling position** (35 seconds – movement time included) (30 seconds for indoor range)
*NOTE: Movement to kneeling position from 25-yard line to 15-yard line. **NOTE: Shooter will “simulate” the usage of a low barricade if no barricade is available.
Phase I 6 rounds strong-hand only from the holster (10 seconds) Phase II 6 rounds off-hand only from ready gun (10 seconds)
Stage III 7 yards
Phase III 6 rounds standing 6 rounds kneeling – reload while kneeling* (25 seconds)
*NOTE: Mandatory reloading for all weapons during Phase III. Phase I 3 rounds, one or two hands (3 seconds) (1 round may be a head shot) Instinct shooting technique from holster with one step to the right AFTER rounds are fired. Ready gun and return to original position. Repeat once and holster.
Stage IV 4 yards
Phase II 3 rounds, one or two hands (3 seconds) (1 round may be a head shot) Instinct shooting technique from holster with one step to the left AFTER rounds are fired. Ready gun and return to original position. Repeat once and holster.
Stage V 2 yards 2 rounds, one or two hands (2 seconds) Close quarter shooting position from holster with one full step to the rear. Repeat twice.
Target: LA P-1 Possible Points: 120 Qualification: 96 (80% overall) Scoring: Inside ring = 2 points Outside ring = 1 point
POST Course is fired using a “HOT LINE”!

Pre‐Academy Firearms Manual Page 60 of 64
SCORING OF TARGET
INTRODUCTION:
The following guidelines are published to provide a standard target and scoring system for the POST Qualification Course. The POST Qualification Target will be used for the course.
SCORING OF THE POST TARGET:
1. Each hit in the silhouette, outside of the scoring ring, will be scored as one point.
2. Each hit in the scoring ring will be scored as two points.
3. A hit will not be recorded in the next higher scoring ring unless it breaks the line.
QUALIFICATION REQUIREMENTS
1. The shooter must shoot 80% of the possible 120 points (80% = 96).
2. The Pre-Academy qualification shooter will fire the course four (4) consecutive times and must average 80 % minimum.
3. For annual qualification, the POST Course must be fired once with and 80% minimum score.
4. For Pre-Academy qualification, the course MUST be fired in the order listed.
5. On the qualification course, whether Pre-Academy or Annual, the target must be scored by a POST Certified Firearms Instructor.

Pre‐Academy Firearms Manual Page 61 of 64
FIREARMS PROFICIENCY PRACTICE
GOAL:
Each officer should be given the opportunity to practice with the duty weapon.
OBJECTIVES:
Under the supervision of a POST Certified Firearms Instructor, the student will:
1. Fire his/her service weapon in preparation for qualification.
2. Demonstrate their ability to make decisions and respond appropriately with their service weapon under the direction/command of the POST Certified Firearms Instructor.
3. Demonstrate proper target acquisition, target identification, target selection, and accuracy.
STUDENT ASSIGNMENT:
Instructor’s Discretion
AUDIO-VISUAL AIDS:
LA P-1 Target (v2009)
Pre‐Academy Firearms Manual Page 62 of 64
FIREARMS PROFICIENCY PRACTICE
Safety rules in themselves have never prevented an accident. It is the practice of safety rules, to the point that they become automatic, that prevents accidents. Even that is not enough. The mind of the shooter must also be devoted to his actions. The person with a firearm in his possession has a full-time job. He cannot guess, he cannot forget, he must know! He must know:
• How it works.
• Whether it is loaded.
• Where it is pointing.
• Where the target is.
• Where the bullet will go.
• Where the bullet will stop.
Under discipline enforced on a range, the possibility of an accident is greatly minimized. It is when your eyes are the only ones devoted to the problem, when you are the only one thinking about it, that the accident has the greatest chance to happen. Carelessness on your part can bring about the injury or death of another officer, a member of your family or a friend.
Some General Safety Rules are:
1. Treat every firearm with the respect due a loaded gun.
2. A firearm is always presumed to be loaded, never take anyone’s word that it is not loaded.
3. Alcohol and guns do not mix.
4. Never point a firearm, loaded or unloaded, at anyone or anything that you do not intend to destroy.
5. Never handle, point, or look over the sights of any firearm without first checking it and making absolutely certain that it is not loaded (DOUBLE CHECK!).
6. Never give a revolver to anyone or take a revolver from anyone unless the cylinder had been opened and left open.
7. Never give a semi-automatic handgun to anyone or accept one unless the magazine has been removed and it is obvious that there is no round in the chamber.
8. Do not handle a firearm unless you are thoroughly familiar with it.
9. Do not leave a firearm unsecured.
10. When drawing your firearm, make sure that the gun barrel is not pointed at any part of your body.
11. When cleaning a weapon, treat it the same as you would a loaded weapon.

Pre‐Academy Firearms Manual Page 63 of 64
GENERAL RANGE RULES
1. When reporting to the range, carry personal weapons in a holster or suitable transportation device. Do
not remove your weapon from its holster unless told to do so by the range officer or an instructor.
Holstered weapons will be strapped down or buckled in except as otherwise directed on the firing line.
2. Do not carry a loaded weapon into the classroom or onto the range.
3. Anyone authorized to carry their revolver outside of the holster will do so by opening the cylinder and
inserting the index and middle finger through the frame with the muzzle pointing downward. The same
procedure will be used when handing your weapon to another person, weapon to be handed butt first.
4. Anyone authorized to carry his or her semi-automatic outside of the holster will do so by removing the
magazine so that it is obvious that there is no round in the chamber. The same procedure will be used
when handing your weapon to another person, weapon to be handed butt first.
5. Treat every gun as though it were loaded until you have personally checked it. The only safe weapon is
an empty weapon. No weapon is empty until it has been checked. Never lay a weapon down where
someone may pick it up unless it has been checked by you and left open.
6. Never carry a cocked revolver.
7. Guns are to be pointed downrange only. Never point a weapon, loaded or empty, at anything or
anybody that you do not intend to shoot or in a direction where an unintentional discharge may do harm.
8. Only shooters are allowed on the firing line.
9. No weapons are to be handled behind the firing line.
10. Unload, load and fire on command only. If at any time you have problems loading, stand still with the
weapon pointed downrange and raise your non-gun-hand high. If a misfire, hangfire or squib load
occurs, keep the weapon pointed downrange, take your finger out of the trigger guard and raise your
non-gun-hand high.
11. Never fire obsolete cartridges. If there is a defective cartridge, the report will be abnormal. At such
time the gun should be unloaded and the muzzle checked for obstruction. In case of misfire, the gun
should be left pointing downrange to allow for delayed fire.
12. Shoot only at designated targets.
13. Never leave a loaded gun unattended.

Pre‐Academy Firearms Manual Page 64 of 64
14. On the range, never turn around at the firing point with a weapon in your hand, loaded or not.
15. Do not move from one firing point to another unless directed to do so by the range officer.
16. Never proceed to any point forward of the firing line unless directed to do so by the range officer.
17. Never step back or away from the firing line with a weapon in hand.
18. Never handle a weapon while anyone is forward of the firing line regardless of whether the cylinder or
action is open.
19. When a weapon is in use, never place the trigger finger into the trigger guard unless and until you have
been authorized to do so.
20. Never draw a revolver from a holster with your finger on the trigger.
21. Students are allowed only one weapon on the range at a time.
22. Before firing, each shooter will safely inspect the inside of the barrel and cylinder for any obstructions.
23. Use eye and ear protection when shooting.
24. Prior to use on the range, all weapons will be inspected and approved by the range master.
25. Do not carry on a conversation with anyone on the firing line except in the capacity of coach or pupil.
For safety reasons, no idle conversation will be permitted.
26. All persons behind the firing line are charged with the responsibility of keeping movement and
conversation down to a level that is not disturbing to the shooters or distracting to the range officer.
27. Dry firing practice will only be conducted under the direction of an instructor or the range officer.
Never dry fire or dry snap your weapon while waiting your turn behind the firing line.
28. On the range, the range officer has absolute authority. Obey all commands without hesitation.
29. Any pertinent local range rules apply.