Pleural Drain Insertion on Medical in-patients
28
Title of Guideline (must include the word “Guideline” (not protocol, policy, procedure etc) Guideline for pleural drain insertion on medical in-patients Contact Name and Job Title (author) Dr Wei Shen Lim Consultant Respiratory Physician Respiratory Medicine Nottingham Univers ity Hospitals, City Hos pital Campus Hucknall Road NG8 2NE Email: [email protected] Directorate & Speciality Acute Medicine. Respiratory Medicine. Date of submission 11 November 2011 Date on which guideline must be reviewed (this should be one to three years) 11 November 2014 Explicit definition of patient group to which it applies (e.g. inclusion and exclusion criteria, diagnosis) This document is aimed at medical teams outside respiratory medicine. It will cover medical situations and therefore not include post-operative drai n insertion or trauma situations. Abstract This guideline describes situations when a chest drain may need to be inserted a) in medical patients and b) out-of-hours. It also describes the procedure of drain insertion as a training aid. Key Words Pleural Drain Statement of the evidence base of the guidel ine – has the guideline been peer reviewed by colleagues? Evidence base: (1-5) 1a meta analysis of randomised controlled trials 1b at least one randomised controlled trial 2a at least one well-designed controlled study without randomisation 2b at least one other type of well-designed quasi- experimental study 3 well –designed non-experimental descriptive studies (ie comparative / correlation and case studies) 4 expert committee reports or opinions and / or clinical experiences of respected authorities 5 recommended best practise based on the clinical experience of the guideline developer This Guideline is based on the British Thoracic Society (BTS ) Pleural G uidelines. Please see the BTS Guidelines for evidence grades of specific recommendations. The Original Guideline was peer-reviewed within NUH. The Update does not contain any major changes to recommendations. Consultation Process Initial Guideline reviewed by NUH peers. The BTS Guidelines underwent extensive consultation and is endorsed by the BTS Standards of Care Committee. Target audience This document is aimed at medical teams
-
Upload
tanveerlnh -
Category
Documents
-
view
8 -
download
0
description
Easy method explained carefully
Transcript of Pleural Drain Insertion on Medical in-patients

7/18/2019 Pleural Drain Insertion on Medical in-patients
http://slidepdf.com/reader/full/pleural-drain-insertion-on-medical-in-patients 1/28
Title of Guideline (must include the word “Guideline” (notprotocol, policy, procedure etc)
Guideline for pleural drain insertion on medicalin-patients
Contact Name and Job Title (author) Dr Wei Shen Lim
Consultant Respiratory Physician
Respiratory Medicine
Nottingham University Hospitals, City Hospital
Campus
Hucknall Road NG8 2NE
Email: [email protected]
Directorate & Speciality Acute Medicine. Respiratory Medicine.
Date of submission 11 November 2011
Date on which guideline must be reviewed (this should be one tothree years)
11 November 2014
Explicit definition of patient group to which it applies (e.g.inclusion and exclusion criteria, diagnosis)
This document is aimed at medical teams
outside respiratory medicine. It will covermedical situations and therefore not include
post-operative drain insertion or trauma
situations.
Abstract This guideline describes situations when a chestdrain may need to be inserted
a) in medical patients andb) out-of-hours.
It also describes the procedure of drain insertionas a training aid.
Key WordsPleural Drain
Statement of the evidence base of the guideline – has theguideline been peer reviewed by colleagues?
Evidence base: (1-5)
1a meta analysis of randomised controlled trials
1b at least one randomised controlled trial2a at least one well-designed controlled study withoutrandomisation
2b at least one other type of well-designed quasi-experimental study
3 well –designed non-experimental descriptive studies(ie comparative / correlation and case studies)
4 expert committee reports or opinions and / or clinicalexperiences of respected authorities
5 recommended best practise based on the clinicalexperience of the guideline developer
This Guideline is based on the British ThoracicSociety (BTS) Pleural Guidelines. Please seethe BTS Guidelines for evidence grades ofspecific recommendations.
The Original Guideline was peer-reviewed withinNUH. The Update does not contain any majorchanges to recommendations.
Consultation Process Initial Guideline reviewed by NUH peers.The BTS Guidelines underwent extensive
consultation and is endorsed by the BTSStandards of Care Committee.
Target audience
This document is aimed at medical teams
7/18/2019 Pleural Drain Insertion on Medical in-patients
http://slidepdf.com/reader/full/pleural-drain-insertion-on-medical-in-patients 2/28
outside respiratory medicine
This guideline has been registered with the trust. However,clinical guidelines are guidelines only. The interpretationand application of clin ical guidelines will remain theresponsibilit y of the individual clinician. If in doubt contact a
senior colleague or expert. Caution is advised when usingguidelines after the review date.

7/18/2019 Pleural Drain Insertion on Medical in-patients
http://slidepdf.com/reader/full/pleural-drain-insertion-on-medical-in-patients 3/28
Pleural Drain Guidelines NUH – November 2011 ver 2
1
Guideline for pleural drain insertion on medical in-patients
Nottingham University Hospitals
Produced on: 21 September 2007
Revised on: 30 November 2011
Dr Abhi Nair ( SpR Respiratory Medicine) Dr Wei Shen Lim (Consultant Respiratory Physician)
Original Document(ver1)
Dr.Chris Whale (Consultant Respiratory Medicine)
The guideline has been registered with the Trust. However, clinical guidelines are
guidelines only. The interpretation and application of clinical guidelines will remain
the responsibility of the individual clinician. If in doubt contact a senior colleague or
expert. Caution is advised when using guidelines after the review date.
Author contact details:
Dr Wei Shen Lim
Consultant Respiratory Physician
Respiratory Medicine
Nottingham University Hospitals, City Hospital Campus
Hucknall Road NG8 2NE
Email: [email protected]
Contents Page
1.1 Who is this document for? 2
1.2 General outline 2/3
1.3 Pneumothorax- General principles regarding chest drain insertion 4/5
1.4 Algorithm for management of Spontaneous Pneumothorax 6
1.5 Pleural effusion- General principles regarding chest drain insertion 7
1.6 Algorithm for out-of-hours management of pleural effusion 8
1.7 Practical points- Insertion of a large bore surgical chest drain 9
1.8 Practical points- Insertion of a Seldinger chest drain 16
1.9 Practical points-Removing a locked pigtail catheter 23

7/18/2019 Pleural Drain Insertion on Medical in-patients
http://slidepdf.com/reader/full/pleural-drain-insertion-on-medical-in-patients 4/28
Pleural Drain Guidelines NUH – November 2011 ver 2
2
1.1 Who is this document for?
This document is aimed at medical teams outside respiratory medicine and will
a) Identify the situations in which a chest drain should be inserted
b) Identify who should insert the drain
c) Specify how the procedure is carried out and
d) Highlight when to refer patients to respiratory physicians.
It will cover medical situations and therefore not include post-operative drain
insertion or trauma situations. This document incorporates the guidelines produced by
the British Thoracic Society.
This document aims to improve management of pleural disease by
a) Optimising the number of drains inserted
b) Minimising the risks associated with the procedure and
c) Ensuring correct technique and reducing patient discomfort.
1.2 Key Points
The main medical indications for inserting a chest drain are as part of the management
of pleural effusions and pneumothoraces. In general:
• All cases seen within normal working hours should be discussed
with respiratory medicine prior to drain insertion.
Pleural procedures should not take place out of hours except in an
emergency
Out of hours drain insertion should be reserved for patients
with a pneumothorax who are symptomatic and patients with empyema
who have pus aspirated from the pleural space.
• Pleural aspirations and chest drains should be inserted in a clean area using full
aseptic technique
7/18/2019 Pleural Drain Insertion on Medical in-patients
http://slidepdf.com/reader/full/pleural-drain-insertion-on-medical-in-patients 5/28
Pleural Drain Guidelines NUH – November 2011 ver 2
3
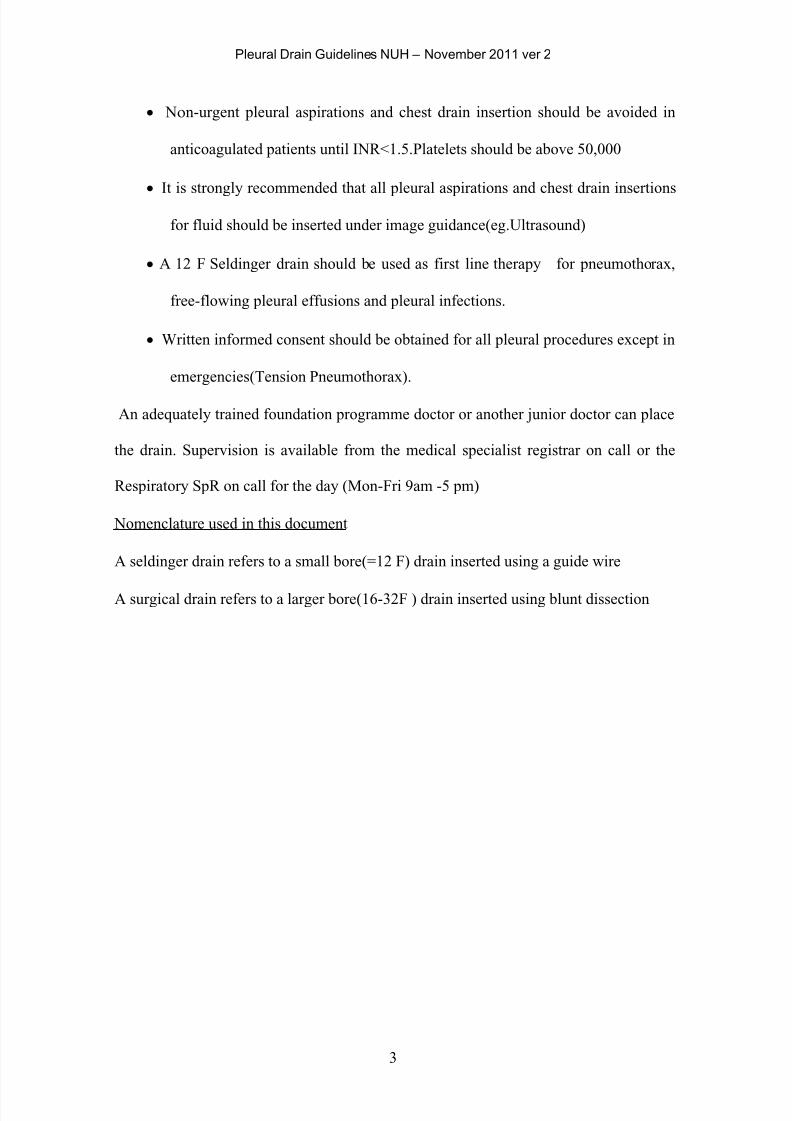
• Νοn-urgent pleural aspirations and chest drain insertion should be avoided in
anticoagulated patients until INR<1.5.Platelets should be above 50,000
• Ιt is strongly recommended that all pleural aspirations and chest drain insertions
for fluid should be inserted under image guidance(eg.Ultrasound)
• A 12 F Seldinger drain should be used as first line therapy for pneumothorax,
free-flowing pleural effusions and pleural infections.
• Written informed consent should be obtained for all pleural procedures except in
emergencies(Tension Pneumothorax).
An adequately trained foundation programme doctor or another junior doctor can place
the drain. Supervision is available from the medical specialist registrar on call or the
Respiratory SpR on call for the day (Mon-Fri 9am -5 pm)
Nomenclature used in this document
A seldinger drain refers to a small bore(=12 F) drain inserted using a guide wire
A surgical drain refers to a larger bore(16-32F ) drain inserted using blunt dissection
7/18/2019 Pleural Drain Insertion on Medical in-patients
http://slidepdf.com/reader/full/pleural-drain-insertion-on-medical-in-patients 6/28
Pleural Drain Guidelines NUH – November 2011 ver 2
4
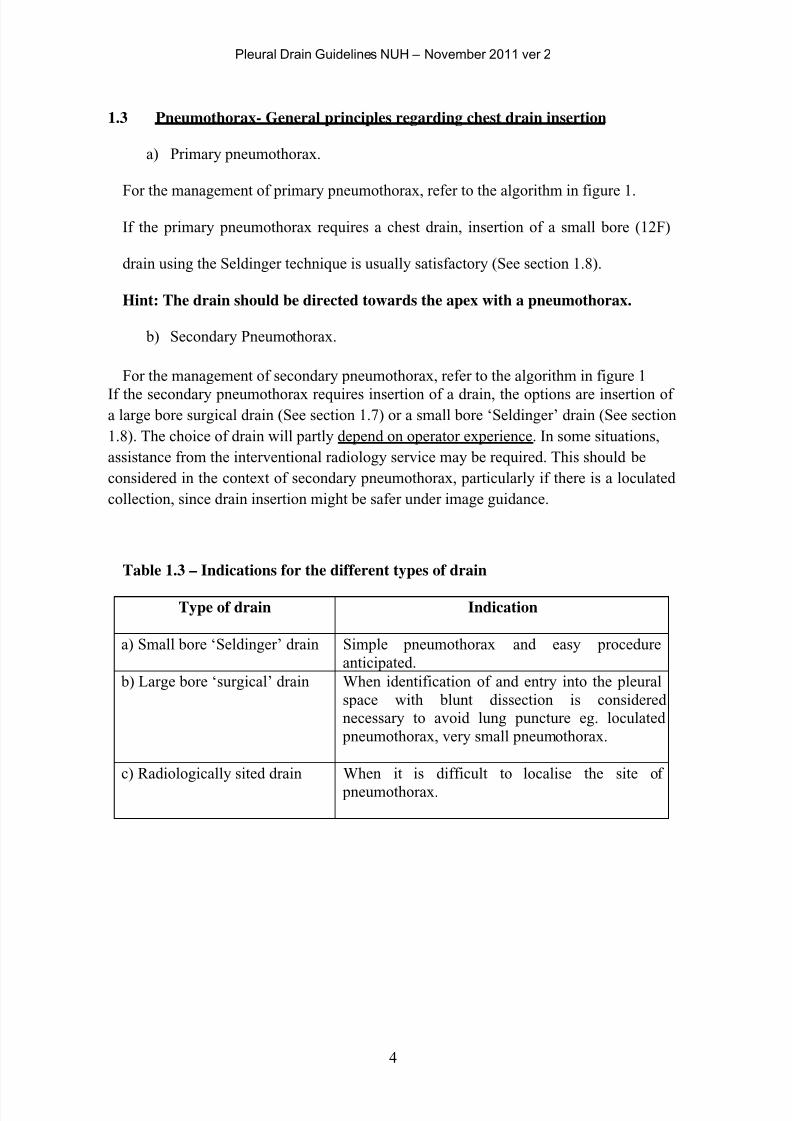
1.3 Pneumothorax- General principles regarding chest drain insertion
a) Primary pneumothorax.
For the management of primary pneumothorax, refer to the algorithm in figure 1.
If the primary pneumothorax requires a chest drain, insertion of a small bore (12F)
drain using the Seldinger technique is usually satisfactory (See section 1.8).
Hint: The drain should be directed towards the apex with a pneumothorax.
b) Secondary Pneumothorax.
For the management of secondary pneumothorax, refer to the algorithm in figure 1
If the secondary pneumothorax requires insertion of a drain, the options are insertion ofa large bore surgical drain (See section 1.7) or a small bore ‘Seldinger’ drain (See section
1.8). The choice of drain will partly depend on operator experience. In some situations,
assistance from the interventional radiology service may be required. This should be
considered in the context of secondary pneumothorax, particularly if there is a loculated
collection, since drain insertion might be safer under image guidance.
Table 1.3 – Indications for the different types of drain
Type of drain Indication
a) Small bore ‘Seldinger’ drain Simple pneumothorax and easy procedure
anticipated.
b) Large bore ‘surgical’ drain When identification of and entry into the pleural
space with blunt dissection is considered
necessary to avoid lung puncture eg. loculated
pneumothorax, very small pneumothorax.
c) Radiologically sited drain When it is difficult to localise the site of
pneumothorax.

7/18/2019 Pleural Drain Insertion on Medical in-patients
http://slidepdf.com/reader/full/pleural-drain-insertion-on-medical-in-patients 7/28
Pleural Drain Guidelines NUH – November 2011 ver 2
5
c) Tension pneumothorax
This is a medical emergency and requires prompt treatment. In this situation, put a
cannula into the pleural cavity via the second intercostal space, anteriorly, in the mid-
clavicular line. Subsequently, insert a drain in the ‘triangle of safety’ (see figure 4). If
opting for a Seldinger drain;
• Be careful not to damage the underlying lung, which may have partially
re-inflated following cannula insertion.
• Ensure the drain does not subsequently kink/block resulting in recurrent
tension pneumothorax.
• Respiratory referral is mandatory as pleurodesis is normally
recommended.
7/18/2019 Pleural Drain Insertion on Medical in-patients
http://slidepdf.com/reader/full/pleural-drain-insertion-on-medical-in-patients 8/28
Pleural Drain Guidelines NUH – November 2011 ver 2
6
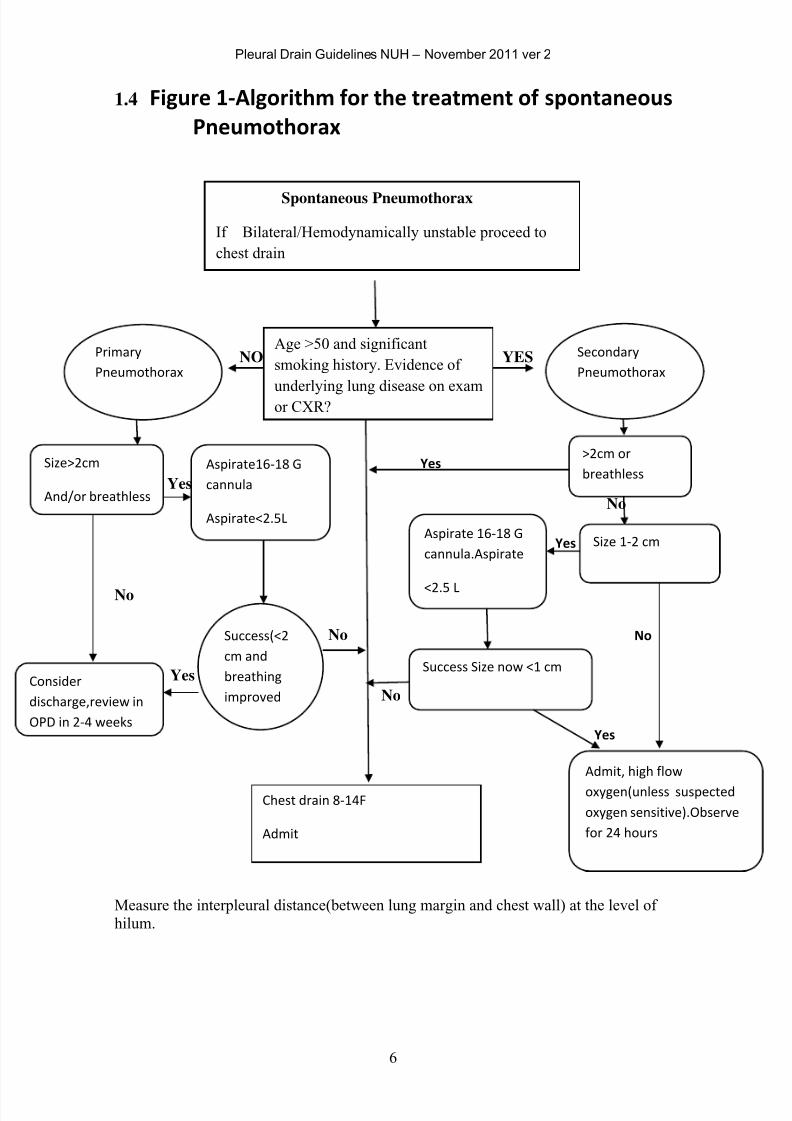
1.4 Figure 1-Algorithm for the treatment of spontaneous
Pneumothorax
NO YES
Yes
Yes
No
Yes
No
No No
Yes
No
Yes
Measure the interpleural distance(between lung margin and chest wall) at the level of
hilum.
Spontaneous Pneumothorax
If Bilateral/Hemodynamically unstable proceed to
chest drain
Age >50 and significant
smoking history. Evidence of
underlying lung disease on examor CXR?
Primary
Pneumothorax
Secondary
Pneumothorax
>2cm or
breathless
Size 1-2 cm
Admit, high flow
oxygen(unless suspected
oxygen sensitive).Observe
for 24 hours
Size>2cm
And/or breathless
Consider
discharge,review in
OPD in 2-4 weeks
Chest drain 8-14F
Admit
Aspirate 16-18 G
cannula.Aspirate
<2.5 L
Success Size now <1 cm
Aspirate16-18 G
cannula
Aspirate<2.5L
Success(<2
cm and
breathing
improved
7/18/2019 Pleural Drain Insertion on Medical in-patients
http://slidepdf.com/reader/full/pleural-drain-insertion-on-medical-in-patients 9/28
Pleural Drain Guidelines NUH – November 2011 ver 2
7
1.5 Pleural effusion- General principles regarding chest drain insertion
For the management of a unilateral exudative pleural effusion, refer to the algorithm
in figure 4.
1.5.1 An intercostal drain for pleural effusion should only be required out of hours
(5pm to 9am) in the context of a complicated parapneumonic effusion with
associated signs, clinical suspicion, or test results indicative of sepsis or when
a patient has an empyema and pus has been aspirated from the pleural cavity.
Hint: If pleural fluid pH>7.2, there is rarely a need to insert a drain immediately.
If a drain is required, it should be directed towards the base of the lung.
1.5.2 If the patient has a large pleural effusion (not empyema/complicated
parapneumonic effusion) and has symptoms of distressing dyspnoea,
therapeutic aspiration of 500-1000 ml of pleural fluid usually provides enough
symptomatic relief to allow a definitive procedure to be carried out electively
at a later time point by the respiratory team.
Hint: Take care to avoid introducing air into the pleural space by using a three-
way tap, which is never opened to the air.
If this situation arises at the weekend, the therapeutic aspiration can be
repeated if symptoms recur.
In other situations, the pleural effusion should be left until the results of the
initial diagnostic aspiration (50 – 100 mls) are available. If the results from the
initial pleural aspiration do not lead to a diagnosis, the next best investigation
may be a medical thoracoscopy. In this situation, the procedure is safer and
easier with a significant pleural effusion.
If the patient is known to have a malignant pleural effusion, consider talc
poudrage via medical thoracoscopy to achieve effective pleurodesis.
7/18/2019 Pleural Drain Insertion on Medical in-patients
http://slidepdf.com/reader/full/pleural-drain-insertion-on-medical-in-patients 10/28
Pleural Drain Guidelines NUH – November 2011 ver 2
8
1.6 Algorithm for out-of-hours management of a new pleural effusion
A) Parapneumonic effusion
Diagnostic aspiration (50 mls)
Frank pus No pus
B) Undiagnosed effusion, not
para-pneumonic
Out-of-hours drain seldom
indicated
Insert drain Preferably
Comfortable Very SOB
(12F
Seldinger-regular
flushes)
Respiratory
referral
delay drain
insertion
Respiratory
referral
Diagnostic
aspiration
(50ml)
Respiratory
referral
Therapeutic
aspiration
(500-1000ml)
i.e. not to
dryness
Respiratory
referral
Hint:
Diagnostic pleural aspiration.
Send for: cytology, protein, LDH, glucose, pH,
gram stain, MC&S.
Consider: cell count with differential (EDTA),
amylase & TB culture..
Hint: Pleural fluid should be passed through the blood gas machine ASAP to
determine pH rather than sending to the clinical chemistry laboratory. , If the
pleural fluid contains pus, determination of pH is not necessary, and indeed is
contraindicated (Pus may damage the blood gas machine).
7/18/2019 Pleural Drain Insertion on Medical in-patients
http://slidepdf.com/reader/full/pleural-drain-insertion-on-medical-in-patients 11/28
Pleural Drain Guidelines NUH – November 2011 ver 2
9
1.7 Practical points- Insertion of a large bore surgical chest drain
1) Confirm and clarify that a surgical chest drain is indicated.
Surgically inserted chest drains should be inserted by blunt dissection.
Trocars should not be used
2) Ensure there are no contra-indications e.g.
• Site location is difficult.
• Operator not experienced.
• Patient is not co-operative.
• Bleeding tendency
3) Carry out a pre-procedure risk assessment.
4) Exclude a bleeding diathesis (if clinically appropriate, check clotting screen).
5) Check to confirm the clinical signs and radiological findings are consistent.
6) The patient should then be consented for the procedure in keeping with
national guidelines, and consent form signed. Specific complications to
mention during consent include pain, bleeding, infection and persistent
pneumothorax.
Hint: Provide the patient with an information sheet where possible.
7) A cannula should be inserted into a vein to allow administration of
medication. Premedication could be with i/v anxiolytic eg: Midazolam (1-2 mg
titrated to achieve adequate sedation)or an analgesic(eg: 2.5 mg i/v morphine
given immediately prior to the procedure or 10 mg oromorph given one hour
prior to the procedure.)Flumazenil and Nalaxone should be available.
Analgesia should be prescribed for all patients with chest drain in place.
Hint: Easier if the cannula is in the back of the hand.
8) Ensure oxygen and saturation monitoring equipment is available.
7/18/2019 Pleural Drain Insertion on Medical in-patients
http://slidepdf.com/reader/full/pleural-drain-insertion-on-medical-in-patients 12/28
Pleural Drain Guidelines NUH – November 2011 ver 2
10
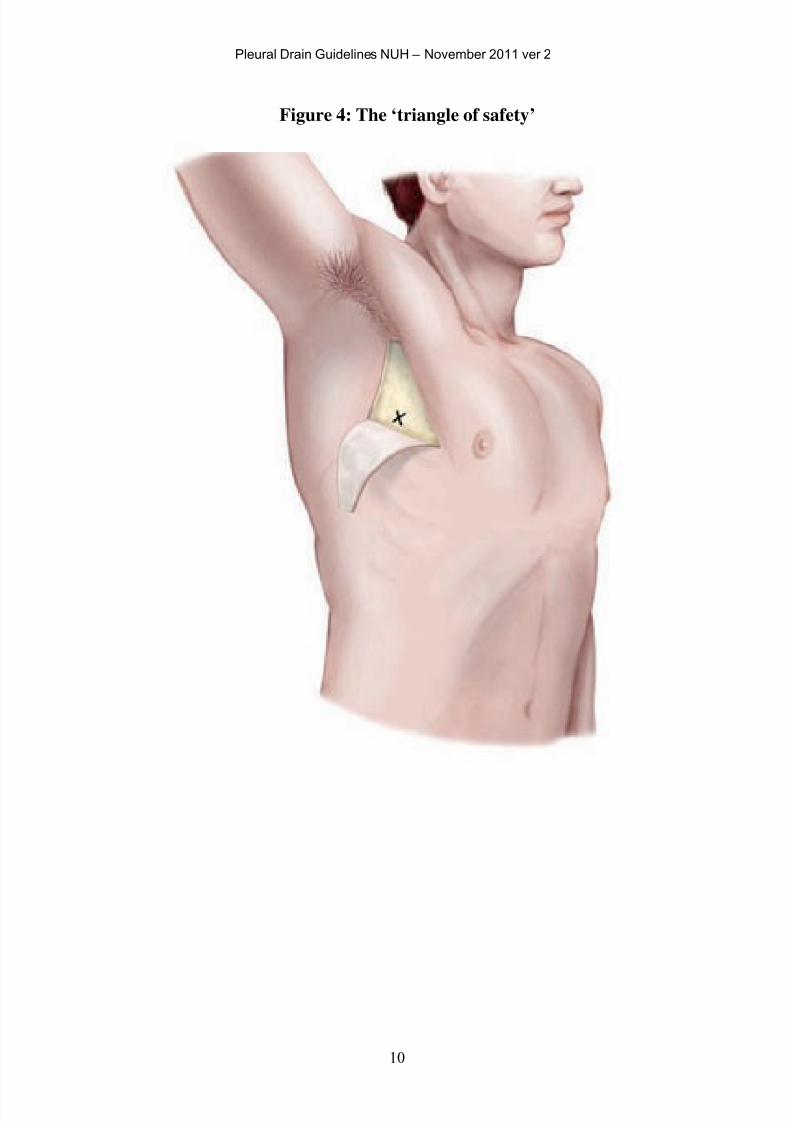
Figure 4: The ‘triangle of safety’
7/18/2019 Pleural Drain Insertion on Medical in-patients
http://slidepdf.com/reader/full/pleural-drain-insertion-on-medical-in-patients 13/28
Pleural Drain Guidelines NUH – November 2011 ver 2
11
The procedure.
9) The patient can be placed in a semi-recumbent position, in the lateral
decubitus position or sat in a chair, leaning forward with the arms crossed and
resting on a solid table. The position should take into account both patient and
operator comfort.
10) Each position allows for exposure of the axilla and access to the ‘triangle of
safety’ (see figure 4). The lateral border of pectoralis major and the anterior
border of latissimus dorsi form the sides of the ‘triangle of safety’. The apex
of the triangle is towards the top of the axilla, with the triangle base formed by
an imaginary line at the level of the nipple/5th intercostal space. This area
avoids the internal mammary artery, liver, spleen and aorta and reduces the
amount of muscle damage.
Hint: Use ultrasound where possible, with the patient remaining in the same
position until the drain is inserted. Avoid using a previously marked ultrasound
guided ‘X marks the spot’, which becomes unreliable due to patient movement.
11) Insertion of the drain should be carried out under sterile conditions, with the
operator wearing gown and gloves. The skin in the axillary region should first
be cleaned with iodine/chlorhexidine in 70% alcohol and drapes used to
further demarcate the sterile area.
12) The drain should be inserted just above a rib in the lower part of the intercostal
space, to avoid the neurovascular bundle that runs just below each rib.
Hint: This becomes a less reliable ‘rule’ as you move in a posterior direction
outside the triangle of safety, since the bundle may not run directly below the
7/18/2019 Pleural Drain Insertion on Medical in-patients
http://slidepdf.com/reader/full/pleural-drain-insertion-on-medical-in-patients 14/28
Pleural Drain Guidelines NUH – November 2011 ver 2
12
overlying rib, but instead the intercostal artery may run in parallel, in the mid-
intercostal space.
13) Insert local anaesthetic. Check the drug and expiry date. Use <20ml of
lidocaine 1%. Initially, with an orange needle, insert a bleb of anaesthetic just
below the skin surface. Change to a green needle and anaesthetise the
intercostal muscles, other soft tissues and pleura. Aspirate as the needle is
inserted to prevent injection into a vessel and to help locate fluid or air in the
pleural cavity.
14) A drain should not be inserted if free air (pneumothrax) or fluid (pleural
effusion) cannot be aspirated.
15) An incision should be made in the skin using a scalpel, just above and parallel
to the rib, with the incision length just greater than the diameter of the drain.
16) Blunt dissection should then be performed with a round-tipped instrument to
divide through the muscle fibres and soft tissues down to the pleural surface.
Repeated opening and closing of the clamp allows the muscle fibres to be
separated, forming a path down to the parietal pleura. The track can then be
continued through the pleura and should be achieved with minimal force. A
sudden ‘pop’ occurs on entry into the pleural space followed by the sensation
of free movement of the instrument tip or emergence of pleural fluid.
Hint: The procedure should be pain free for the patient. If not, use more local
anaesthetic and seek assistance. Do not proceed. Consider repeating ultrasound.
17) Where entry into the pleural space is difficult, the incision could be enlarged
to allow a finger to be passed through the track into the pleural space. A finger

7/18/2019 Pleural Drain Insertion on Medical in-patients
http://slidepdf.com/reader/full/pleural-drain-insertion-on-medical-in-patients 15/28
Pleural Drain Guidelines NUH – November 2011 ver 2
13
sweep can identify underlying organs or any local adhesions. If required, call
for more experienced assistance (eg. Respiratory or Medical SpR on-call.)
Hint: Ensure the incision & track are big enough to allow the drain to pass.
18) The large bore tube can then be inserted. The trochar should be withdrawn a
few centimetres before gentle insertion through the chest wall. This allows the
trochar to be directed towards the optimal position, before feeding the drain
over the trochar. The trochar should never protrude from the drain and enter
the pleural space.
19) Alternatively, the trochar should be removed and the tip of the tube grasped in
the tip of a pair of forceps. The forceps can then be passed down the track and
after releasing the clamp, the drain can then be passed through into the pleural
space without resistance. This technique usually requires a larger incision than
the former technique described (in para 18) and a track that is larger than the
external diameter of the drain.
Hint: Never use force. The drain should glide into the pleural cavity in the same
way as a straw would pass through the lid of a disposable cup.
20) Once the drain has been sited in an appropriate position, it is attached to a
single flow drainage system with an under water seal. Ensure that the drain tip
is in the pleural space by checking that the fluid in the drainage system is
swinging with respiration.
21) A vertical mattress stitch (see Figure 5) should be inserted across the incision
to assist wound closure once the drain is removed. A non-absorbable suture
(eg 1-0 silk) should be used.
Hint: This suture is easiest sited before passing the chest drain.
7/18/2019 Pleural Drain Insertion on Medical in-patients
http://slidepdf.com/reader/full/pleural-drain-insertion-on-medical-in-patients 16/28
Pleural Drain Guidelines NUH – November 2011 ver 2
14
22) A further stitch is required to anchor and secure the drain. Pass the needle
through skin and subcutaneous tissues near to the drain to close down the
incision. Tie and knot the two ends of the securing suture close to the skin,
then wrap the free ends around the drain. Tie and knot the free ends, with
some traction on the drain. Form a further knot 1-2 cm away and then wrap the
two free ends around the drain. Again, tie and knot the ends, with a second
traction point on the drain.
Hint: Do not use ‘purse-string’ sutures. They can be painful and scar.
23) Check the drain is secure, before covering with a simple dressing.
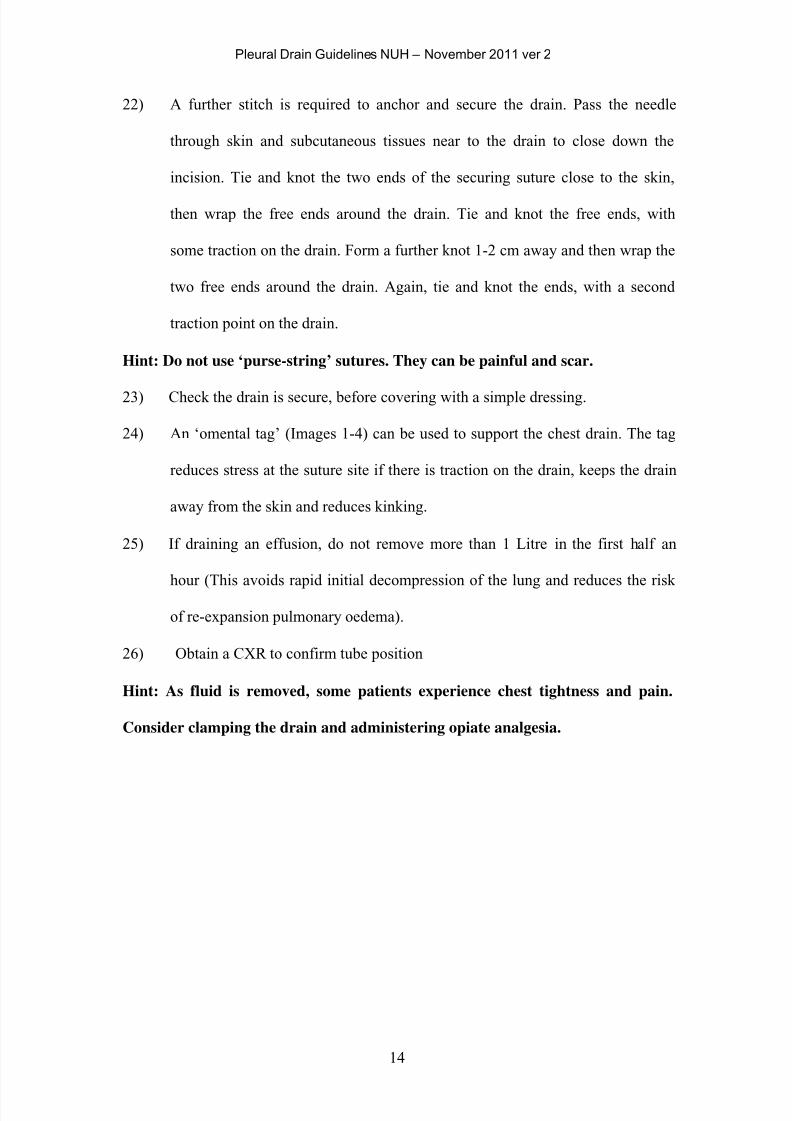
24) An ‘omental tag’ (Images 1-4) can be used to support the chest drain. The tag
reduces stress at the suture site if there is traction on the drain, keeps the drain
away from the skin and reduces kinking.
25) If draining an effusion, do not remove more than 1 Litre in the first half an
hour (This avoids rapid initial decompression of the lung and reduces the risk
of re-expansion pulmonary oedema).
26) Obtain a CXR to confirm tube position
Hint: As fluid is removed, some patients experience chest tightness and pain.
Consider clamping the drain and administering opiate analgesia.
7/18/2019 Pleural Drain Insertion on Medical in-patients
http://slidepdf.com/reader/full/pleural-drain-insertion-on-medical-in-patients 17/28
Pleural Drain Guidelines NUH – November 2011 ver 2
15
7/18/2019 Pleural Drain Insertion on Medical in-patients
http://slidepdf.com/reader/full/pleural-drain-insertion-on-medical-in-patients 18/28
Pleural Drain Guidelines NUH – November 2011 ver 2
16
1.8 Practical points- Insertion of a Seldinger chest drain.
1) Confirm and clarify that a Seldinger chest drain is indicated.
• Simple pneumothorax
• Experienced operator
• Non-viscous pleural effusion after discussion with respiratory team.
2) Ensure there are no contra- indications (See section 1.7).
3) Carry out a pre-procedure risk assessment.
4) Exclude a bleeding diathesis (recent platelet count and clotting screen).
5) Check to confirm the clinical signs and radiological findings are consistent.
6) The patient should then be consented for the procedure in keeping with
national guidelines, and consent form signed. Specific complications to
mention during consent include pain, bleeding, infection and persistent
pneumothorax.
Hint: Provide the patient with an information sheet where possible.
7) A cannula should be inserted into a vein to allow administration of
medication. Premedication could be with I/V anxiolytic eg:Midazolam(1-2 mg
titrated to achieve adequate sedation)or an analgesic(eg: 2.5 mg i/v morphine
given immediately prior to the procedure or 10 mg oromorph given one hour
prior to the procedure.)Flumazenil and Nalaxone should be available.
Analgesia should be prescribed for all patients with chest drain in place.
Hint: Easier if the cannula is in the back of the hand.
8) Ensure oxygen and saturation monitoring equipment is available.

7/18/2019 Pleural Drain Insertion on Medical in-patients
http://slidepdf.com/reader/full/pleural-drain-insertion-on-medical-in-patients 19/28
Pleural Drain Guidelines NUH – November 2011 ver 2
17
The procedure
9) The patient can be placed in a semi-recumbent position, in the lateral
decubitus position or sat in a chair, leaning forward with the arms crossed and
resting on a solid table. The position should take into account both patient and
operator comfort.
10) Each position allows for exposure of the axilla and access to the ‘triangle of
safety’ (see figure 4). The lateral border of pectoralis major and the anterior
border of latissimus dorsi form the sides of the ‘triangle of safety’. The apex
of the triangle is towards the top of the axilla, with the triangle base formed by
an imaginary line at the level of the nipple/5th intercostal space. This area
avoids the internal mammary artery, liver, spleen and aorta and reduces the
amount of muscle damage.
Hint: Use ultrasound where possible, with the patient remaining in the same
position until the drain is inserted. Avoid using an ultrasound guided ‘X marks
the spot’, which becomes unreliable due to patient movement.
11) Insertion of the drain should be carried out under sterile conditions, with the
operator wearing gown and gloves. The skin in the axillary region should first
be cleaned with iodine/chlorhexidine in 70% alcohol and drapes used to
further demarcate the sterile area.
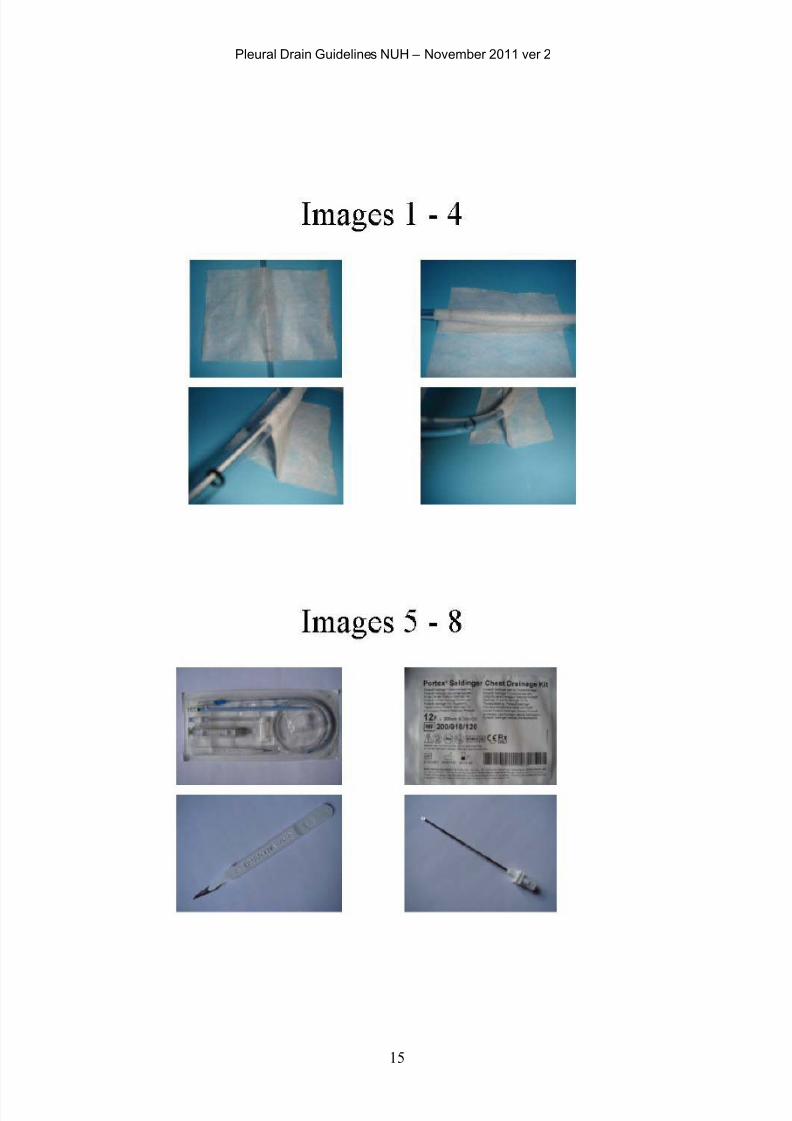
12) The drain comes in a self-contained kit and the operator should be familiar
with the components of the kit before progressing. The kit has a scalpel, an
introducer needle and syringe, a 50 centimetre guidewire, a dilator, a pleural
catheter (Images 5 & 6) and a connector.
13) The drain should be inserted just above a rib in the lower part of the intercostal
space, to avoid the neurovascular bundle that runs just below each rib.

7/18/2019 Pleural Drain Insertion on Medical in-patients
http://slidepdf.com/reader/full/pleural-drain-insertion-on-medical-in-patients 20/28
Pleural Drain Guidelines NUH – November 2011 ver 2
18
Hint: This becomes a less reliable ‘rule’ as you move in a posterior direction
outside the triangle of safety, since the bundle may not run directly below the
overlying rib, but instead the intercostal artery may run in parallel, in the mid-
intercostal space.
14) Insert local anaesthetic. Check the drug and expiry date. Use <20mL of
lidocaine 1%. Initially, with an orange needle, insert a bleb of anaesthetic just
below the skin surface. Change to a green needle and anaesthetise the
intercostal muscles, other soft tissues and pleura. Aspirate as the needle is
inserted to prevent injection into a vessel and to help locate fluid or air in the
pleural cavity.
15) A drain should not be inserted if free air (pneumothorax) or fluid (pleural
effusion) cannot be aspirated.
16) An incision should be made in the skin using the scalpel (Image 7), just above
and parallel to the rib, with the incision length just greater than the diameter of
the drain.
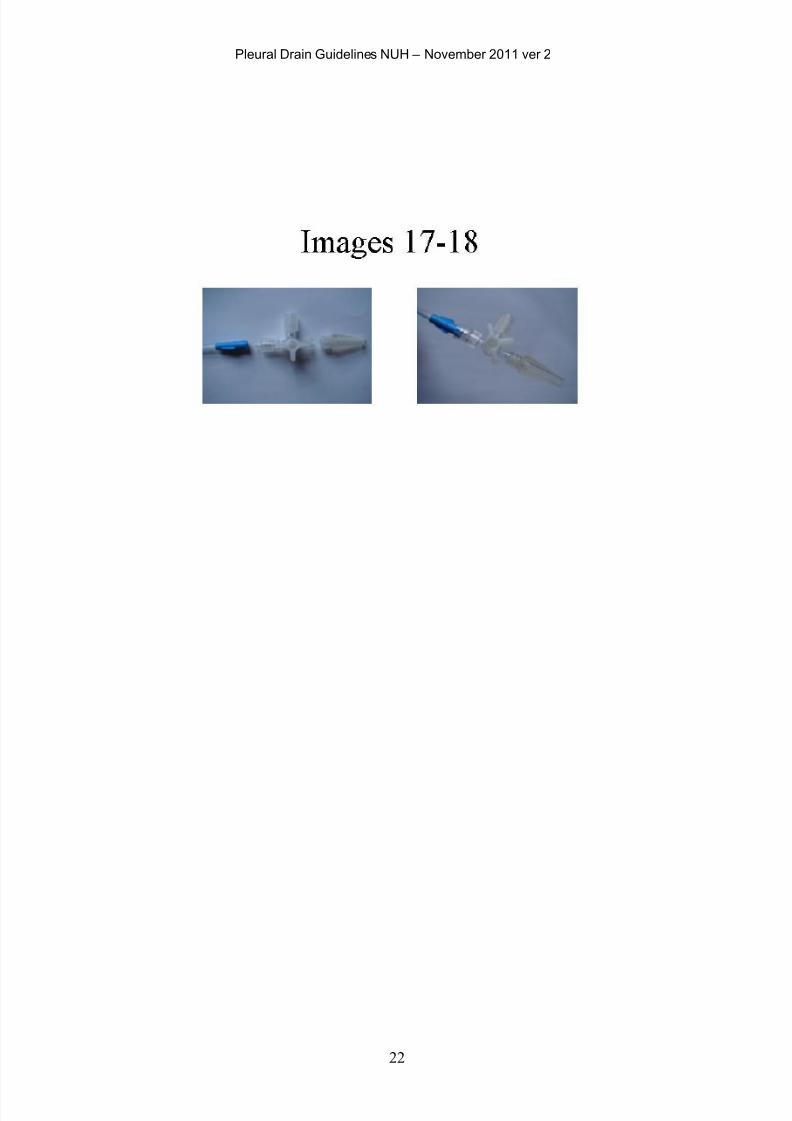
17) Connect the syringe to the introducer needle (Images 8 & 9).
Hint: The introducer needle has a curved tip, which will encourage the guidewire
to pass in a certain direction once it has been fed through (Images 10, 11 & 12).
Remove the obturator before using.
18) The introducer needle should then be passed through the incision,
subcutaneous tissues and intercostal muscles and subsequently, through the
parietal pleura, aspirating as the needle passes, until air or pleural fluid is
7/18/2019 Pleural Drain Insertion on Medical in-patients
http://slidepdf.com/reader/full/pleural-drain-insertion-on-medical-in-patients 21/28
Pleural Drain Guidelines NUH – November 2011 ver 2
19
identified. Once in the pleural space, do not advance the needle any further.
Use the needle to estimate the depth from the skin to the pleural space.
Hint: The procedure should be pain free for the patient. If in doubt, do not
proceed. Call for more experienced assistance (eg. Respiratory or Medical SpR
on-call). Consider repeating ultrasound.
19) The syringe is then removed and the guidewire is passed through the
introducer needle into the pleural cavity (Image 13).Never force the guidewire
in.
Hint: Less than 2cm of guidewire needs to enter the pleural space.
20) The introducer needle is then retracted and withdrawn over the guidewire,
which is left in situ.
21) The dilator (Image 14) is then passed over the guidewire with slight twisting
action to slightly enlarge the track into the pleural cavity and facilitate the
passage of the pleural catheter. Many of the reported injuries as a result of
chest drain insertion were due to visceral puncture due to the dilator.Force is
unnecessary and the dilator only needs to be passed 1 cm beyond the depth to
the pleura as measured with the introducer needle. The dilator should easily
pass through into the pleural cavity.If there is resistance it could because the
guidewire may have been kinked when the dilator was introduced. If this is the
case never force the dilator in .You may have to remove the guidewire and if
this is kinked repeat the procedure with a new guidewire.

7/18/2019 Pleural Drain Insertion on Medical in-patients
http://slidepdf.com/reader/full/pleural-drain-insertion-on-medical-in-patients 22/28
Pleural Drain Guidelines NUH – November 2011 ver 2
20
Hint: Only the tip of the dilator should enter the pleural space to avoid
damaging underlying structures.
22) The dilator is removed.
23) The drainage catheter (Images 15 & 16) is fed over the guidewire. The
guidewire should emerge and be grasped at the proximal end of the catheter,
before the catheter is fully advanced to avoid losing the guidewire within the
pleural cavity.
Hint: The catheter is quite flexible and has a stiffener to aid insertion. This is not
always needed and can be removed before use.
24) The guidewire is then retracted and removed, leaving the drain tip in the
pleural space. The catheter can then be attached (Images 17 & 18) to a single
flow drainage system with an under water seal. Ensure that the drain tip is
in the pleural space by checking that the fluid in the drainage system is
swinging with respiration
25) Secure the drain with a non-absorbable suture (see section 1.7.22).
26) Check the drain is secure, before covering with a simple dressing.
27) An ‘omental tag’ (Images 1-4) can be used to support the chest drain. The tag
reduces stress at the suture site if there is traction on the drain, keeps the drain
away from the skin and reduces kinking.
28) If draining an effusion, do not remove more than 1 Litre in the first half an
hour (This avoids rapid initial decompression of the lung and reduces the risk
of re-expansion pulmonary oedema).
29) Obtain a CXR post procedure to confirm tube postion
Hint: As fluid is removed, some patients experience chest tightness and pain.
Consider clamping the drain and administering opiate analgesia.
1) References: BTS Pleural Disease Guideline 2010

7/18/2019 Pleural Drain Insertion on Medical in-patients
http://slidepdf.com/reader/full/pleural-drain-insertion-on-medical-in-patients 23/28
Pleural Drain Guidelines NUH – November 2011 ver 2
21
7/18/2019 Pleural Drain Insertion on Medical in-patients
http://slidepdf.com/reader/full/pleural-drain-insertion-on-medical-in-patients 24/28
Pleural Drain Guidelines NUH – November 2011 ver 2
22
7/18/2019 Pleural Drain Insertion on Medical in-patients
http://slidepdf.com/reader/full/pleural-drain-insertion-on-medical-in-patients 25/28
Pleural Drain Guidelines NUH – November 2011 ver 2
23
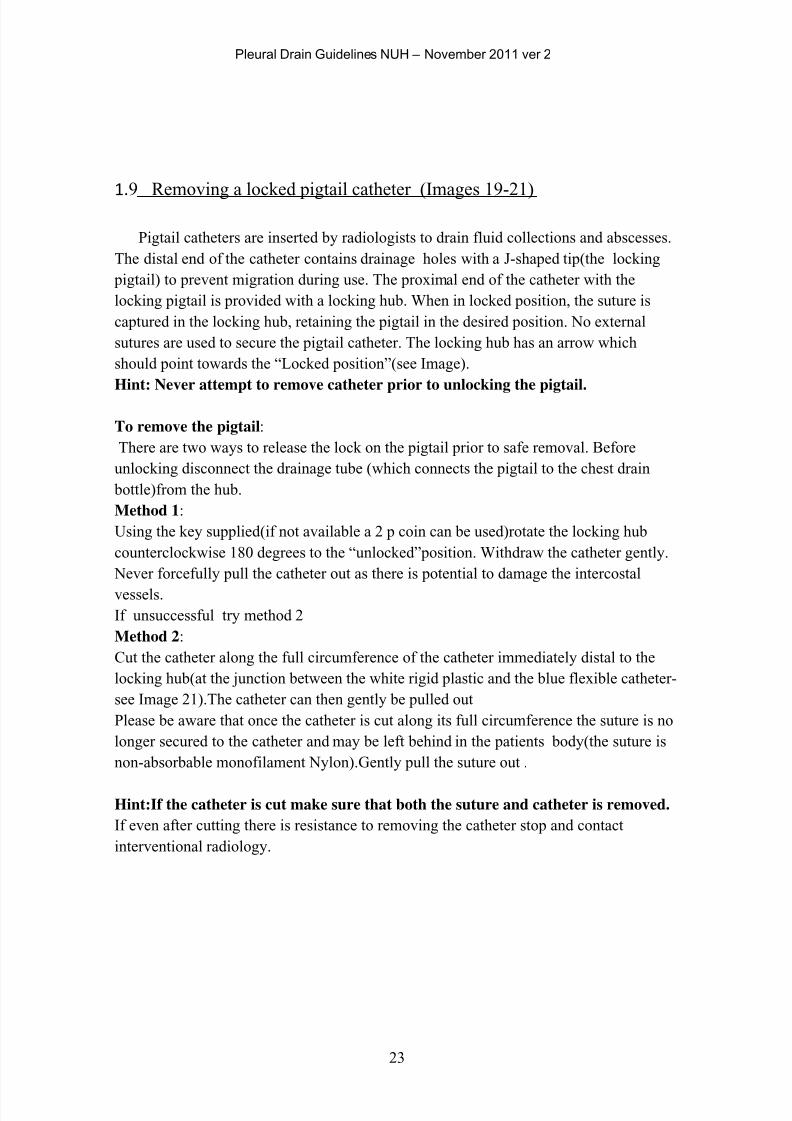
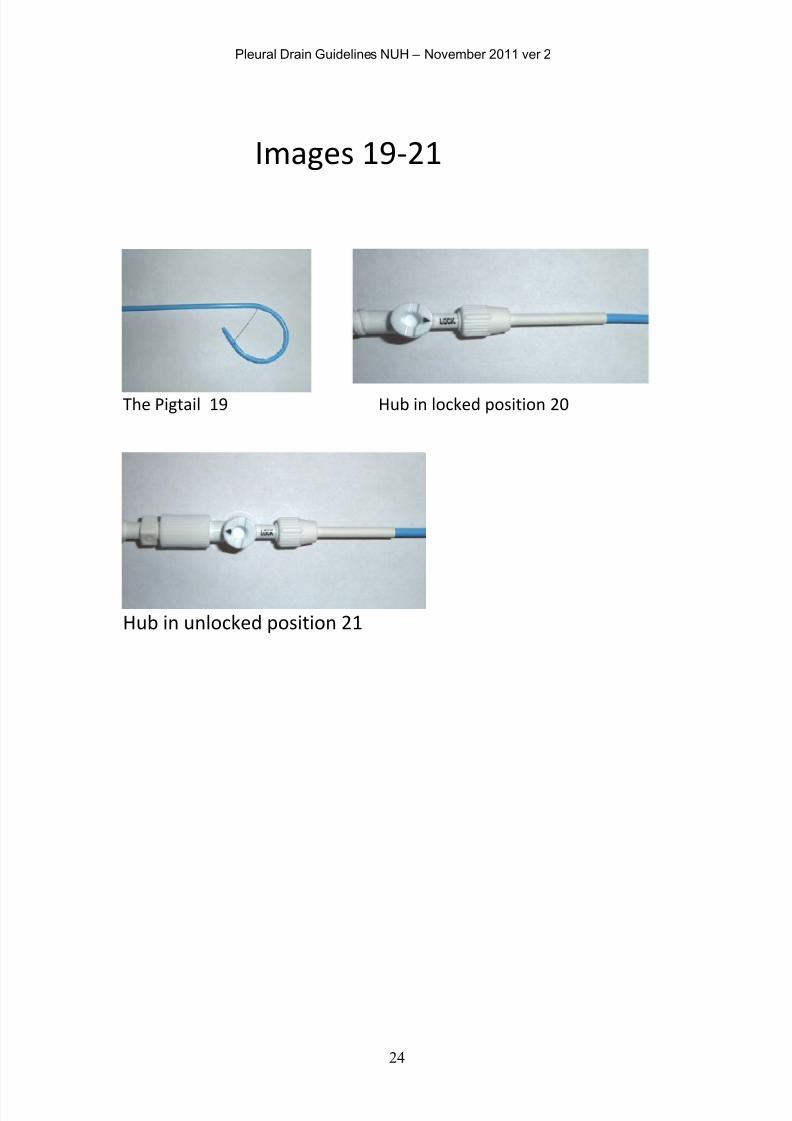
1.9 Removing a locked pigtail catheter (Images 19-21)
Pigtail catheters are inserted by radiologists to drain fluid collections and abscesses.
The distal end of the catheter contains drainage holes with a J-shaped tip(the locking
pigtail) to prevent migration during use. The proximal end of the catheter with the
locking pigtail is provided with a locking hub. When in locked position, the suture is
captured in the locking hub, retaining the pigtail in the desired position. No external
sutures are used to secure the pigtail catheter. The locking hub has an arrow which
should point towards the “Locked position”(see Image).
Hint: Never attempt to remove catheter prior to unlocking the pigtail.
To remove the pigtail:
There are two ways to release the lock on the pigtail prior to safe removal. Before
unlocking disconnect the drainage tube (which connects the pigtail to the chest drain
bottle)from the hub.
Method 1:
Using the key supplied(if not available a 2 p coin can be used)rotate the locking hub
counterclockwise 180 degrees to the “unlocked”position. Withdraw the catheter gently.
Never forcefully pull the catheter out as there is potential to damage the intercostal
vessels.
If unsuccessful try method 2
Method 2:
Cut the catheter along the full circumference of the catheter immediately distal to the
locking hub(at the junction between the white rigid plastic and the blue flexible catheter-
see Image 21).The catheter can then gently be pulled out
Please be aware that once the catheter is cut along its full circumference the suture is no
longer secured to the catheter and may be left behind in the patients body(the suture is
non-absorbable monofilament Nylon).Gently pull the suture out .
Hint:If the catheter is cut make sure that both the suture and catheter is removed.
If even after cutting there is resistance to removing the catheter stop and contact
interventional radiology.
7/18/2019 Pleural Drain Insertion on Medical in-patients
http://slidepdf.com/reader/full/pleural-drain-insertion-on-medical-in-patients 26/28
Pleural Drain Guidelines NUH – November 2011 ver 2
24
Images 19-21
The Pigtail 19 Hub in locked position 20
Hub in unlocked position 21
7/18/2019 Pleural Drain Insertion on Medical in-patients
http://slidepdf.com/reader/full/pleural-drain-insertion-on-medical-in-patients 27/28
Pleural Drain Guidelines NUH – November 2011 ver 2
25
2
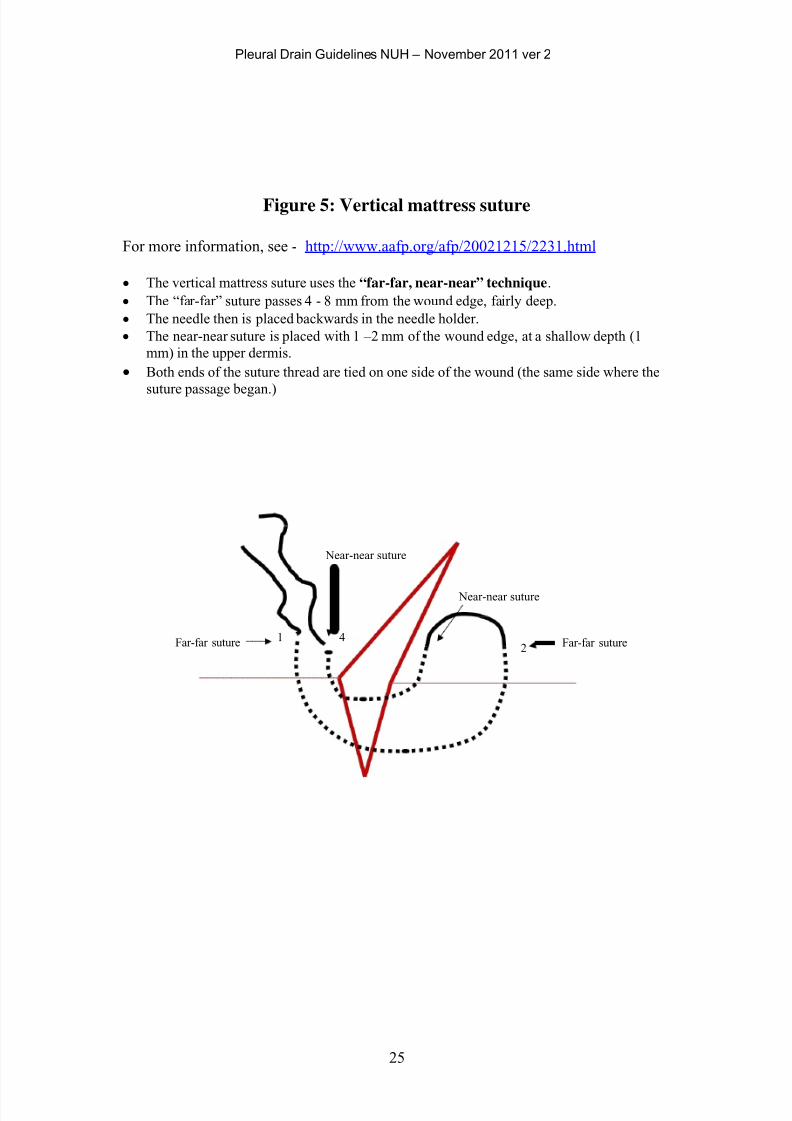
Figure 5: Vertical mattress suture
For more information, see - http://www.aafp.org/afp/20021215/2231.html
• The vertical mattress suture uses the “far-far, near-near” technique.
• The “far-far” suture passes 4 - 8 mm from the wound edge, fairly deep.
• The needle then is placed backwards in the needle holder.
• The near-near suture is placed with 1 –2 mm of the wound edge, at a shallow depth (1
mm) in the upper dermis.
• Both ends of the suture thread are tied on one side of the wound (the same side where the
suture passage began.)
Near-near suture
Near-near suture
Far-far suture 1 4 Far-far suture

7/18/2019 Pleural Drain Insertion on Medical in-patients
http://slidepdf.com/reader/full/pleural-drain-insertion-on-medical-in-patients 28/28
Pleural Drain Guidelines NUH – November 2011 ver 2