Playable DVD & Blu-ray Disc Maker for Camcorders and High ...
28
Playable DVD & Blu-ray Disc Maker for Camcorders and High-Res Cameras For Models: DM200 Series User’s Manual
Transcript of Playable DVD & Blu-ray Disc Maker for Camcorders and High ...

Playable DVD & Blu-ray Disc Maker
for Camcorders and High-Res Cameras
For Models: DM200 Series
User’s Manual


Table of Contents..............................................................1. Introduction P.2
1-1.Basic Configuration................................................. P.2
1-2.Product Features..................................................... P.2
.............................................................2. Product Tour P.4
2-1.Front Bezel............................................................. P.4
2-2.Top Bezel................................................................. P.5
2-3.Rear Panel............................................................... P.6
2-4.Battery Compartment.............................................. P.7
2-5.Car Power Adapter Kit (Optional).............................P.8
3. How to Read Display and Icons ........................... P.9
3-1.LCD Display............................................................. P.9
3-2.Icon List................................................................... P.9
4-1.Precautions.............................................................. P.10
4-2.Stand-Alone Recording............................................ P.12
4-3.USB to Disc.............................................................. P.15
4-4.M-Card to Disc......................................................... P.17
5-1.Lawful Use of Products............................................ P.25
5-2.Disclaimer................................................................ P.25
5-3.Acknowledgment & Trademark................................ P.25
6. FCC & Safety............................................................. P.25
6-1.FCC Compliance Statement.................................... P.25
6-2.FCC WARNING....................................................... P.26
6-3.Safety Instructions................................................... P.26
7. Warranty & Technical Support.............................. P.27
1
4-5.CF to Disc................................................................ P.19
5. Product Application Scope......................................... P.25
4. Recording (REC) Operating Instructions.................. P.10
4-6.Disc to USB.............................................................. P.214-7.Spanning Operating Instructions.............................. P.21

1. Introduction
Warning: Please be certain that all data on the memory card has been successfully backed up onto the disc before erasing the contents of the memory card. The manufacturer and resellers of EZDigiMagic are not responsible for any data lost from the memory card.
1-1. Basic Configuration
Please review contents to ensure your EZDigiMagic is complete.
√ EZDigiMagic DM200 main unit (Note: 1.2V AA Ni-MH batteries and battery charger are not included)
√ User’s Manual
√ (110V – 240V) Universal AC Power Adapter
1-2. Product Features
● Record video / photo files directly from camcorders and digital cameras via
● There recorded CD/DVD or Blu-ray (for BD version) diesc can be directly playedback on the regular Blu-ray Disc players.
● Keep the video resoluition and photo image quality at the same level as their
original data source with no distortion or downgrade.
● Hi-speed file transfer performance much faster than the real time recordingfrom A/V ports.
2
Thank you for purchasing our EZDigiMagic DM200 (DM200-DVD or DM200-BD). EZDigiMagic enables you to record video / photo files directly from thestorage media of camcorders and digital cameras via USB connection with NOPC NEEDED! The Recorded CD/DVD or Blu-ray (for BD version) disc can bedirectly played back on the regular Blu-ray Disc players with the same level ofvideo resolution and image quality as the original data source with no distortionor downgrade. Features lik one-touch operation and stand-alone burning makeusing EZDigiMagic a snap. EZDigiMagic’s compact size and portability make itthe perfect travel companion. There’s now no need to worry about your camera’smemory media not having enough capacity when you’re on the go. EZDigiMagicmakes digital photography EZ!
USB connection with NO PC NEEDED!
● Advanced professional features including Disc Spanning and Time/Date Stamping
3
● Advanced professional features including Disc Spanning and Time/Date Stamping
● Advanced professional features including Disc Spanning and Time/Date Stamping
● Advanced professional features including Disc Spanning and Time/Date Stamping
● Advanced professional features including Disc Spanning and Time/Date Stamping
● Advanced professional features including Disc Spanning and Time/Date Stamping

2. Product Tour2-1. Front Bezel
(1) DVD Burner: Press top Eject button in order to release DVD tray. Place blank DVD or CD disc in tray and close tray by sliding it back into operating position.
(2) CF Card Slot: CF Type I/II slot, you may insert CF card or MD 1”HDD directly into slot.
(3) USB Slot: Support USB Host for external USB Mass Storage class devices such as USB pen drive or USB HDD (must have self power), HDD-based camcorder.
(4) Multi Card Slot: Multiple card slot for MS/MS Pro, SD, MMC, xD. (Note: Only one card can be used at a time)
4
(1) (2) (3) (4)
Figure 1

2-2. Top Bezel
(1) LCD display screen : Displays the operating menu & working status
(2) Control Keypad:One-touch operations to control EZDigiMagic functions.
Key Description Function
Eject Eject key Disc ejects from unit
Set/Copy Set /Copy keyAllows special selections and setting of items, also works as QuickCopy key
▲ Up keyNavigate up a menu; or increase a value when setting a selection
▼ Down key Navigate down a menu; or decrease a value
◄ Left keyBack out of a sub-menu and goes to the next higher level; or hold for 2 sec. to return to the main menu
► Right keyEnter key; or navigate into a sub-menu or selects a function from a list
Figure 2
5
(1)
(2)
(3)

(3) LED Indicator: The green / red LED will light up as listed in table:
Item Operation Setting Light
0. Power off None
1. System initial stage G / R
2. Ready to Copy None / G
3. Copy / Busy G / F
4. Copy Error None
5. Battery Low R / F
* “F” Flash, “G” Green, “R” Red
2-3. Rear Panel
(1) USB Port:Plug the USB 2.0 cable into this socket and connect the other end to your PC.
(2) Power Connector:Insert the power connector from the AC adapter or the optional car kit adapter into this socket.
(3) Power Switch:Slide the switch to the LEFT for the “ON” position to start the unit; or slide the switch to the RIGHT for the “OFF” position to shut down the unit.
6
(1) (2) (3)
Figure 3
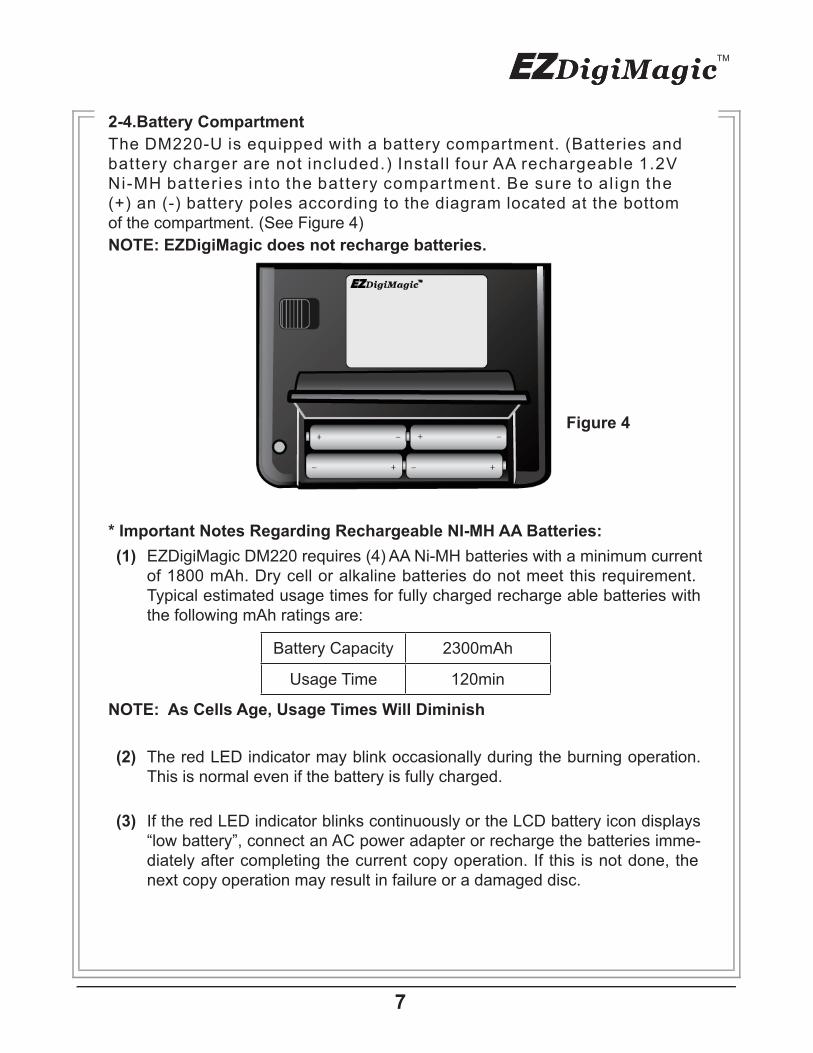
2-4.Battery Compartment
The DM220-U is equipped with a battery compartment. (Batteries and battery charger are not included.) Instal l four AA rechargeable 1.2V
Ni-MH batter ies into the battery compartment. Be sure to al ign the
(+) an (-) battery poles according to the diagram located at the bottom
of the compartment. (See Figure 4)
NOTE: EZDigiMagic does not recharge batteries.
* Important Notes Regarding Rechargeable NI-MH AA Batteries:
(1) EZDigiMagic DM220 requires (4) AA Ni-MH batteries with a minimum current of 1800 mAh. Dry cell or alkaline batteries do not meet this requirement. Typical estimated usage times for fully charged recharge able batteries with the following mAh ratings are:
Battery Capacity 2300mAh
Usage Time 120min
NOTE: As Cells Age, Usage Times Will Diminish
(2) The red LED indicator may blink occasionally during the burning operation. This is normal even if the battery is fully charged.
(3) If the red LED indicator blinks continuously or the LCD battery icon displays “low battery”, connect an AC power adapter or recharge the batteries imme-diately after completing the current copy operation. If this is not done, the next copy operation may result in failure or a damaged disc.
Figure 4
7
(4) Batteries will discharge if they are not used for a period of time. Make sure batteries are all fully-charged before major usage.(NOTE: The amount of discharge is dependent upon make and model of the batteries; please consult battery manufacturer’s specification data).
(5) Please follow instructions provided by rechargeable battery manufacturers for operation, recharging, maintenance and disposal of the batteries.
(NOTE: Mixing different brands of rechargeable batteries, or fully and partially charged batteries is NOT recommended.)
(6) For safety, batteries should be removed when discharged or when the EZDigiMagic is not being used.
(7) NOTE: Batteries are not charged by the DM220-U. When powering the unit using NiMH rechargeable batteries only, the user must consider the added power drain associated with some memory cards and USB devices. The use of MicroDrives, or certain USB Hard Drives and personal media players (which are USB-powered or recharge from the USB port) will substantially reduce the operating time for a charged set of NiMH batteries.
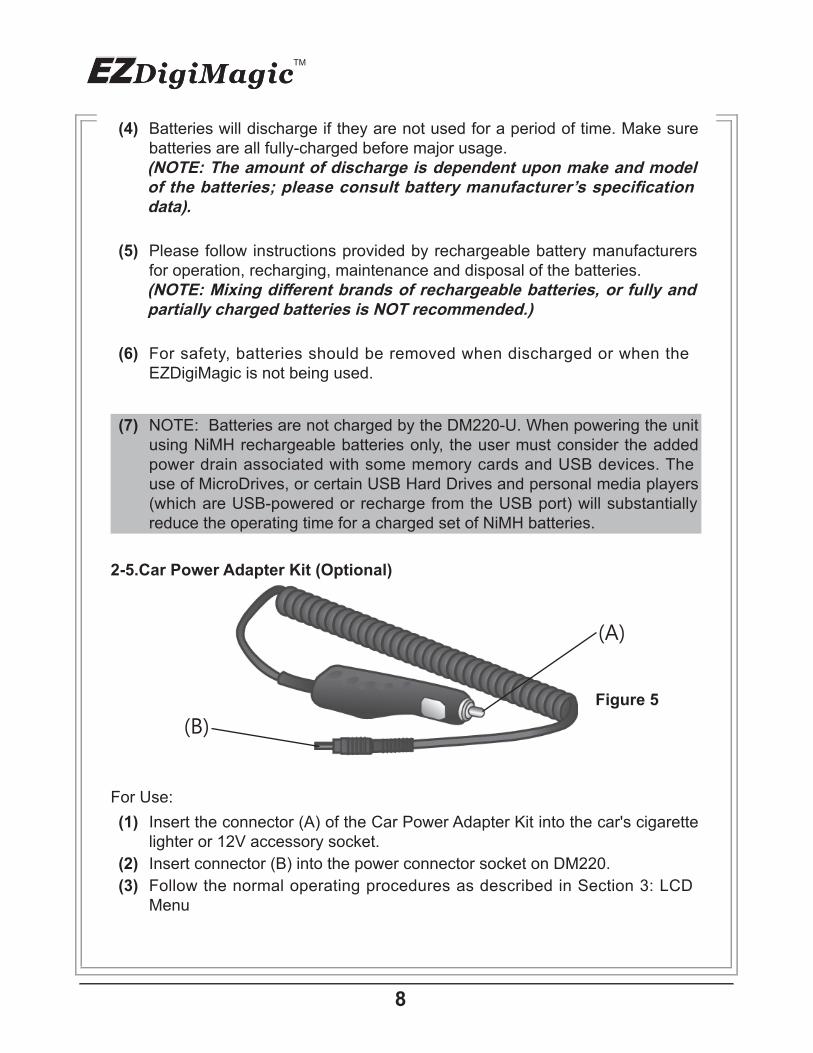
2-5.Car Power Adapter Kit (Optional)
For Use:
(1) Insert the connector (A) of the Car Power Adapter Kit into the car's cigarette lighter or 12V accessory socket.
(2) Insert connector (B) into the power connector socket on DM220.
(3) Follow the normal operating procedures as described in Section 3: LCD Menu
Figure 5
8
(A)
(B)
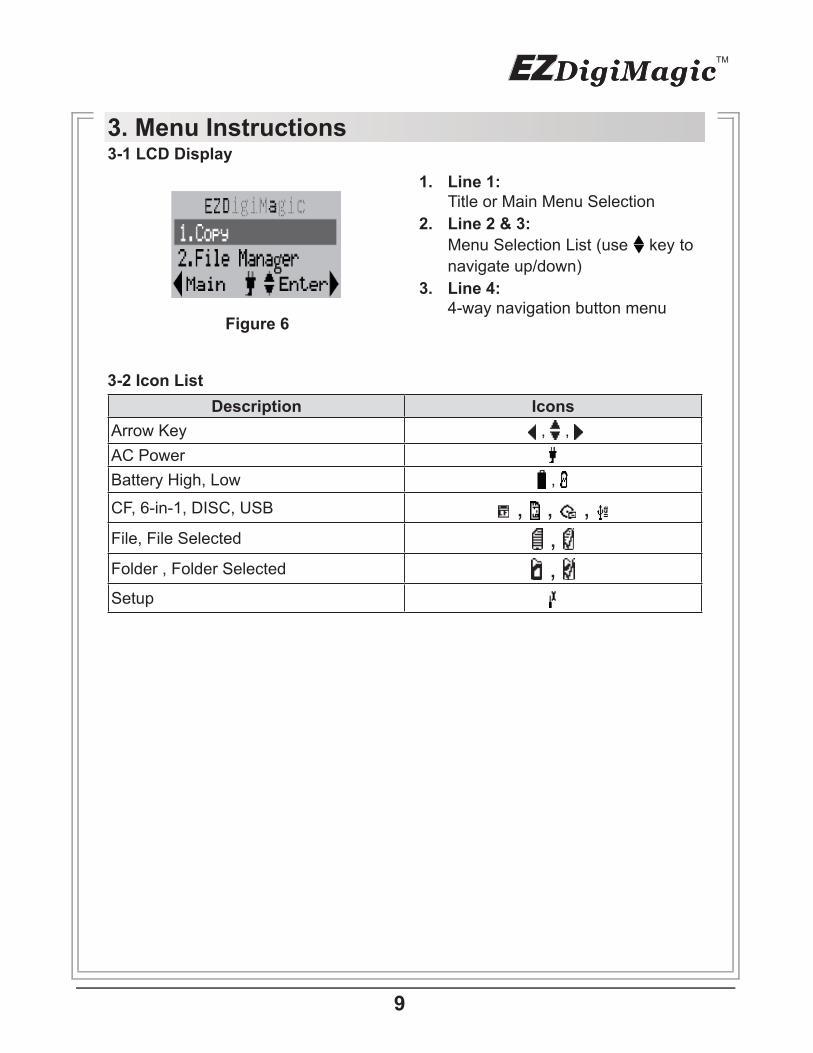
3. Menu Instructions3-1 LCD Display
1. Line 1:Title or Main Menu Selection
2. Line 2 & 3:
Menu Selection List (use key to
navigate up/down)
3. Line 4:4-way navigation button menu
3-2 Icon List
Description Icons
Arrow Key
, ,
AC Power
Battery High, Low ,
CF, 6-in-1, DISC, USB , , , File, File Selected , Folder , Folder Selected , Setup
Figure 6
9

3-3 Menu List
Main Menu Sub-Function Function Description
Copy
CF to Disc Quick copy CF Card data to disc
M-Card to Disc Quick copy M-Card data to disc
USB to Disc Quick copy USB device data to disc
Can select Copy All or Copy Photo, Copy Video, Copy Music,Copy Selected Folder/File
Copy to USB Quick copy ALL data to USB
Can select CF to USB, M-Card to USB, Disc to USB
FileManager
CF CardDisplay CF Card total capacity and used capacity, delete file, copy file to other device
M-CardDisplay SD/MMC/MS/xD card total capacity and used capacity, delete file, copy file to other device
USB DeviceDisplay USB storage total capacity and used capacity, delete file, copy file to other device
Disc Display disc capacity, copy file to other device
Verify Session
Verify the last burned session
CompareCompare data of the latest backup on the disc with the original data on the flash card or the USB device
Setup
Time Zone Set Time Zone [GMT-12 ~ GMT+13 ]
D.S.TEnable the setup of the start and end dates of daylight saving time
Date/Time Set Date / Time
Disc Burn MethodSet DISC Burn Method to “Multi-session or Single Session “
Folder NameDisplay default folder name string on the copied disc
Disc LabelDisplay default disc label string on the copied disc
LanguageCurrently supports only English; other language may be supported for special versions
Auto Tray Out Set disc auto tray out when burning is finished
LCD Contrast Set level of display contrast
ShowBackup Count
Display backup counter information
10

Setup
Show Burner Info. Show burner model version
Show System Info.Show system model Firmware & Hardware versions
FormatFormat CF,SD,MMC,XD,MS cards & USB storage device
Erase Disc Erase CD-RW,DVD+RW,DVD-RW disc
Update Firmware Update system firmware
Compare after Burn
Set compare after burn to “After Success or Never“
Power SavingSet screen-blanking time-out choices for Power Saving
11

4. Operating InstructionsTo ensure maximum usage satisfaction and extend product life, please follow the operating instructions listed below:
4-1. Stand-Alone Copy
This function can quickly copy data from USB/CF/6-IN-1 slot and burn to DVD/CD disc; the operating procedures are listed below:
(1) Make sure the power source is connected correctly (or the batteries are fully charged).
(2) Turn on the power switch.
(3) Put in a blank DVD or CD disc into the burner tray and close.
(4) Insert a USB storage device or CF, SD/MMC/MS/xD card into the appropri- ate slot. (NOTE: Insert devices into only one slot at a time)
(5) From the menu selection, use the UP and DOWN arrow keys ( ) to move to
the menu item “Copy”.
(NOTE: only three menu options will be displayed at one time. Use the up/down ( ) arrow to scroll to the additional menu options.) The selected item will be highlighted with white text. Finish the selection by pressing the RIGHT arrow key (►).
(6) Source Selection: If only one flash slot is occupied, DM220-U will automatic-ally detect and show the source card type in the dark background bar. If all three sources are occupied, then the source type will default to the 6-in-1 card slot. If two devices are inserted, then user must choose the desired source card type for the “Copy” operation.
Figure 7
12
Figure 8

(7) Once the copy source is selected, press the RIGHT arrow key (►) to activate the “Copy” command and move to any of the sub-option selections: “Copy All”, “Copy Photo”, “Copy Video”, “Copy Music”, “Copy Selected Folder/Files”.
(8) For most common applications, press the RIGHT arrow key (►) to execute “Copy All” so all data from the source media will be copied onto the disc.
(9) When the “Copy” command is being executed, the display will show the source and disc capacity for con firmation of suf ficient available space. Press the RIGHT arrow key (►) to begin the disc burning.
(10) During disc burning, the progress will be indicated by the percentage of completion.
(11) Once the burning is completed, the status will be shown on the display. If the “Auto Tray Out” option is set in the device setup, the disc tray will eject automatically; otherwise the user must press the eject button to remove.
(12) If the Copy Select sub-option is selected, then the user must use the SET
key to select the files or folders for copying. Use the UP/DOWN arrow key (
) to move to the item selected, press the SET key to confirm selection, the selected file or folder will have a check mark. You may repeat the selection above to check mark several files or folders.
Figure 9
13
Figure 10
Figure 11 ~ 13

(13) Once the selection process is completed, press the RIGHT arrow key (► ), the display will show the check-marked item (only one of the multiple-selected file will be shown). Press the RIGHT arrow key (►) again, the copying process will start and then the display will show <Copy Done> after completion.
(14)If total data size is greater than remaining space of writable disc, DM220-U will request "Disc Spanning" function. To continue the COPY operation using multiple discs, press the RIGHT ARROW key (►). Otherwise, use the LEFT ARROW key (◄) to abort. (NOTE: only complete files will be copied to each disc. Files larger than 650MB cannot be backed up to a CD disc.)
Figure 14 ~ 16
14
4-2 File Manager
File Manager enables the user to browse the media currently available onDM220-U. The user may check file sizes, delete, or copy files.
4-2.1 Operating Instructions
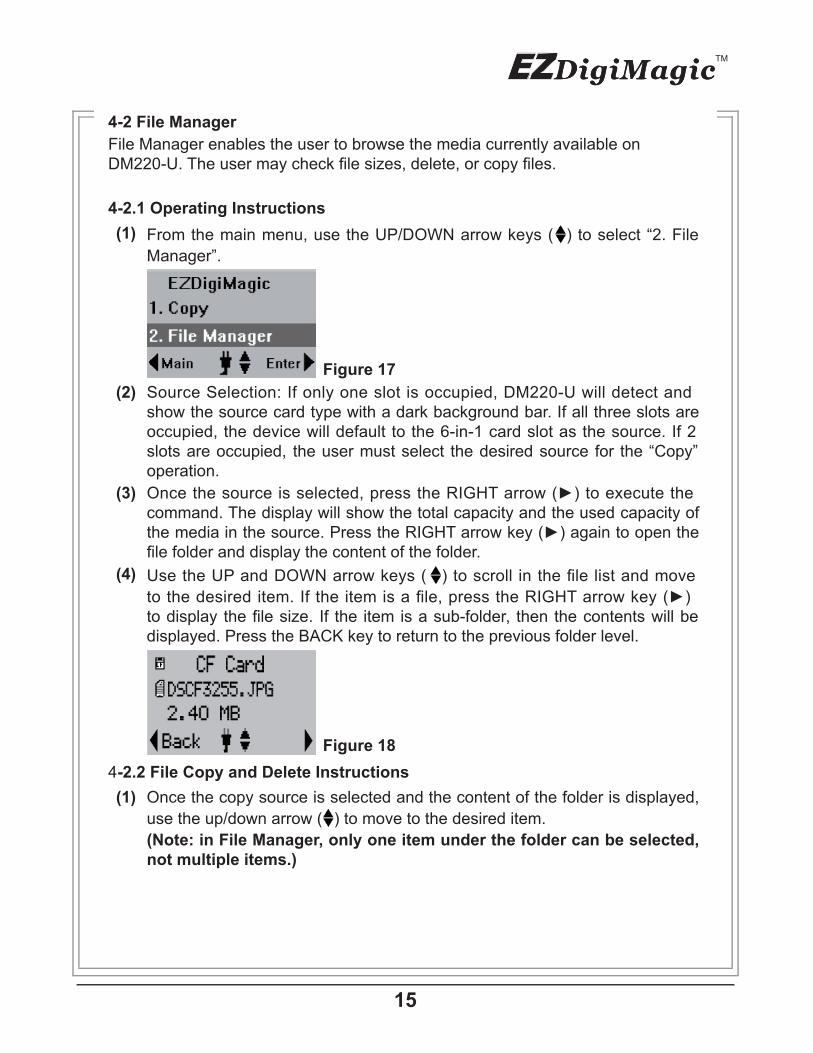
(1) From the main menu, use the UP/DOWN arrow keys ( ) to select “2. File
Manager”.
(2) Source Selection: If only one slot is occupied, DM220-U will detect and show the source card type with a dark background bar. If all three slots are occupied, the device will default to the 6-in-1 card slot as the source. If 2 slots are occupied, the user must select the desired source for the “Copy” operation.
(3) Once the source is selected, press the RIGHT arrow (►) to execute the command. The display will show the total capacity and the used capacity of the media in the source. Press the RIGHT arrow key (►) again to open the file folder and display the content of the folder.
(4) Use the UP and DOWN arrow keys ( ) to scroll in the file list and move
to the desired item. If the item is a file, press the RIGHT arrow key (►) to display the file size. If the item is a sub-folder, then the contents will be displayed. Press the BACK key to return to the previous folder level.
4-2.2 File Copy and Delete Instructions
(1) Once the copy source is selected and the content of the folder is displayed,
use the up/down arrow ( ) to move to the desired item.
(Note: in File Manager, only one item under the folder can be selected, not multiple items.)
Figure 17
15
Figure 18
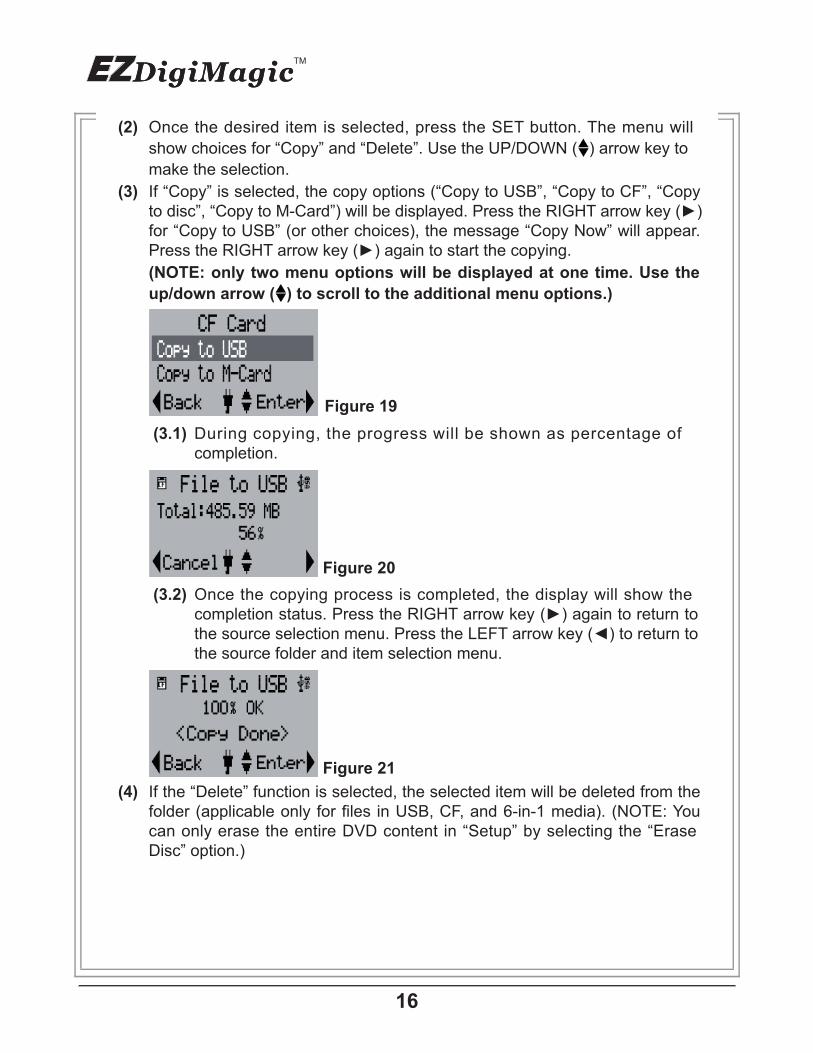
(2) Once the desired item is selected, press the SET button. The menu will
show choices for “Copy” and “Delete”. Use the UP/DOWN ( ) arrow key to
make the selection.
(3) If “Copy” is selected, the copy options (“Copy to USB”, “Copy to CF”, “Copy to disc”, “Copy to M-Card”) will be displayed. Press the RIGHT arrow key (►) for “Copy to USB” (or other choices), the message “Copy Now” will appear. Press the RIGHT arrow key (►) again to start the copying.
(NOTE: only two menu options will be displayed at one time. Use the
up/down arrow ( ) to scroll to the additional menu options.)
(3.1) During copying, the progress will be shown as percentage of completion.
(3.2) Once the copying process is completed, the display will show the completion status. Press the RIGHT arrow key (►) again to return to the source selection menu. Press the LEFT arrow key (◄) to return to the source folder and item selection menu.
(4) If the “Delete” function is selected, the selected item will be deleted from the folder (applicable only for files in USB, CF, and 6-in-1 media). (NOTE: You can only erase the entire DVD content in “Setup” by selecting the “Erase Disc” option.)
Figure 19
16
Figure 20
Figure 21
4-3 Verify Session
To verify whether the last burned session on the disc is readable or not.
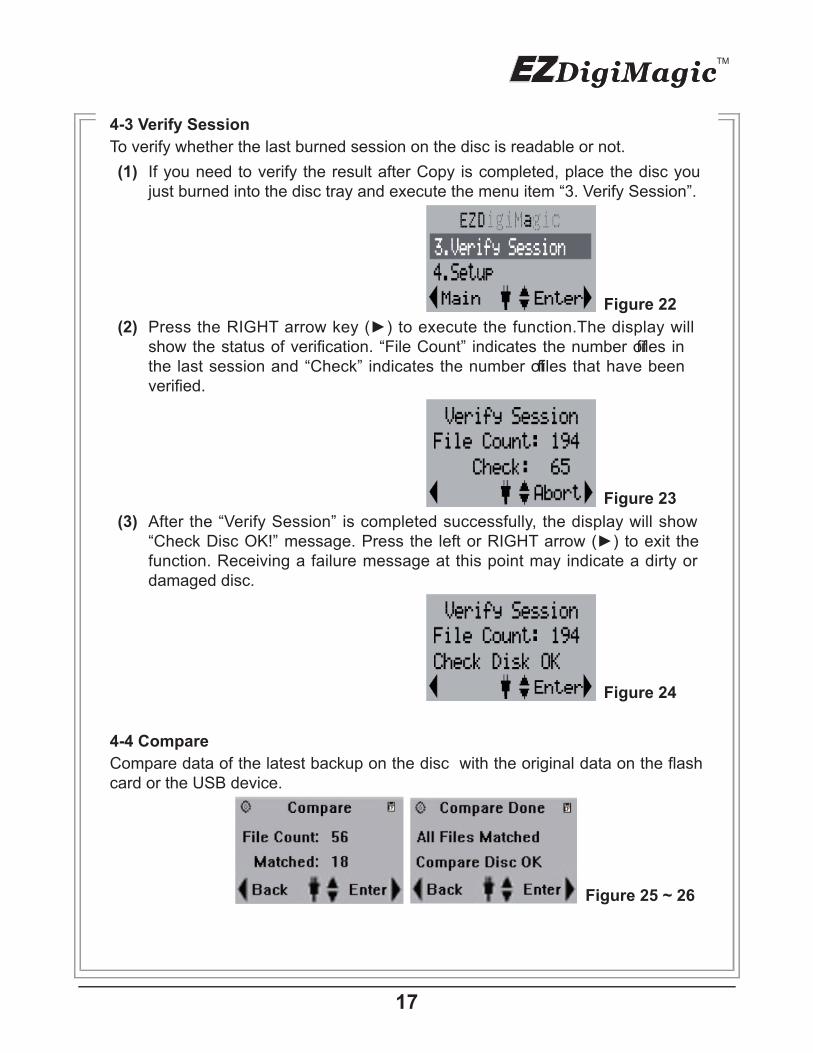
(1) If you need to verify the result after Copy is completed, place the disc you just burned into the disc tray and execute the menu item “3. Verify Session”.
(2) Press the RIGHT arrow key (►) to execute the function.The display will show the status of verification. “File Count” indicates the number ofifl es in the last session and “Check” indicates the number ofif les that have been verified.
(3) After the “Verify Session” is completed successfully, the display will show “Check Disc OK!” message. Press the left or RIGHT arrow (►) to exit the function. Receiving a failure message at this point may indicate a dirty or damaged disc.
4-4 Compare
Compare data of the latest backup on the disc with the original data on the flash card or the USB device.
Figure 22
17
Figure 23
Figure 24
Figure 25 ~ 26
4-5 Setup
Setup can display the current status of the device and allows for changes of de- faults and advanced operations that require more technical knowledge. For all
Setup options listed below, use the UP/DOWN ( ) arrows to scroll through the
setup options; use the LEFT (◄) arrow to return to the main menu; use the RIGHT (►) arrow to enter the selected menu option. (NOTE:some settings require the use of the COPY/SET button) The functions are explained below:
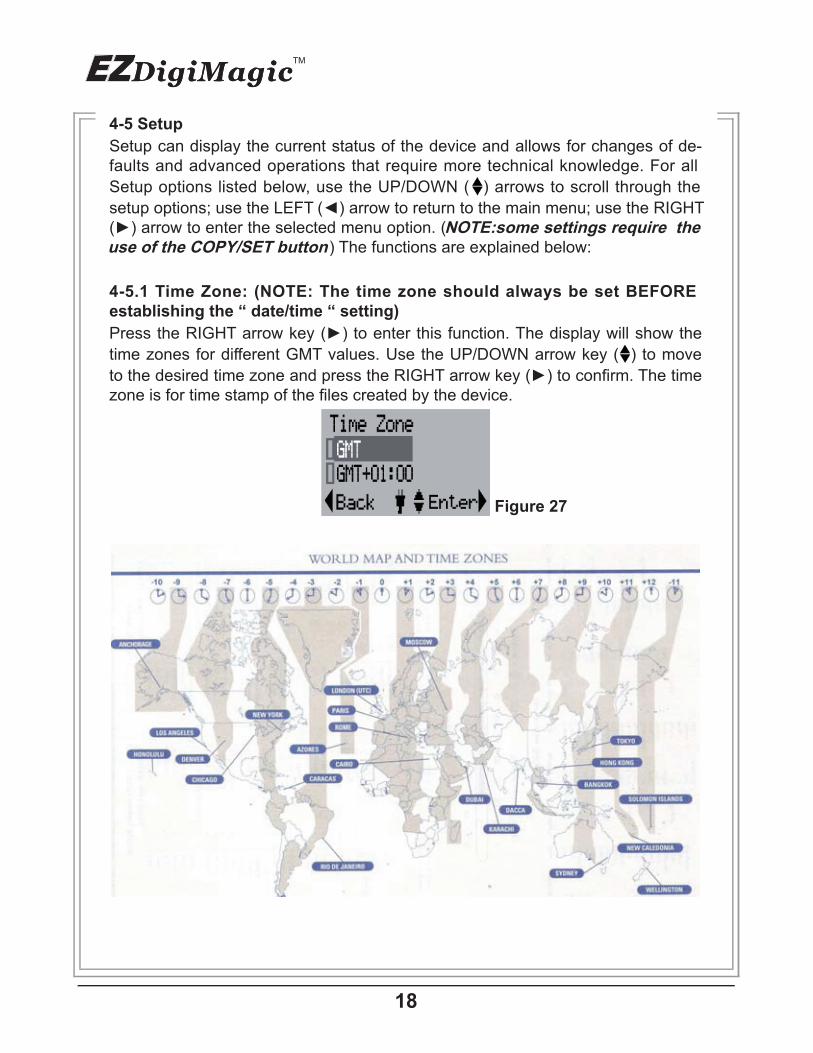
4-5.1 Time Zone: (NOTE: The time zone should always be set BEFORE establishing the “ date/time “ setting)
Press the RIGHT arrow key (►) to enter this function. The display will show the
time zones for different GMT values. Use the UP/DOWN arrow key ( ) to move
to the desired time zone and press the RIGHT arrow key (►) to confirm. The time zone is for time stamp of the files created by the device.
Figure 27
18

4-5.2 D.S.T:
This function enables the setup of the start and end dates of daylight saving time. After entering this function, select Enable and On, then use UP/DOWN arrow key
( ) to change the dates in mm/dd format.
(1) Select Enable to enter the setup. Use UP/DOWN key ( ) to move to On and
press the RIGHT arrow key (►) to confirm.
(2) After the DST is enabled, the start time of the daylight saving time can beentered by selecting Start Time from the DST setup menu and press the
RIGHT arrow key (►). The date can be changed by using the UP/DOWN (
) arrow key. After the date is set, press the LEFT arrow key (◄) to complete the setup.
(3) After completing the Start Time setup, the end time can be entered by selecting the End Time from the DST setup menu and press the RIGHT arrow key (►). The date can be changed by using the up/down arrow key. After the end date is set, press the LEFT arrow key (◄) to complete the setup.
Figure 29 ~ 30
19
Figure 28
Figure 31 ~ 32
Figure 33 ~ 34
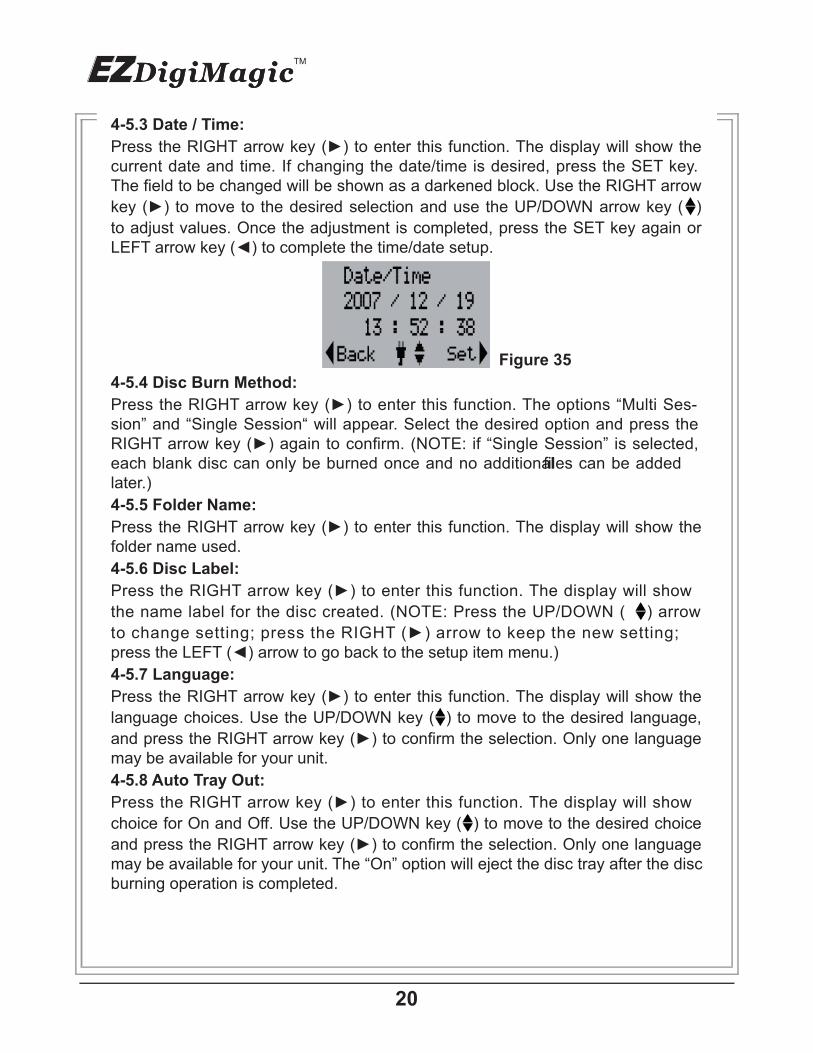
4-5.3 Date / Time:
Press the RIGHT arrow key (►) to enter this function. The display will show the current date and time. If changing the date/time is desired, press the SET key. The field to be changed will be shown as a darkened block. Use the RIGHT arrow
key (►) to move to the desired selection and use the UP/DOWN arrow key ( )
to adjust values. Once the adjustment is completed, press the SET key again or LEFT arrow key (◄) to complete the time/date setup.
4-5.4 Disc Burn Method:
Press the RIGHT arrow key (►) to enter this function. The options “Multi Ses-sion” and “Single Session“ will appear. Select the desired option and press the RIGHT arrow key (►) again to confirm. (NOTE: if “Single Session” is selected, each blank disc can only be burned once and no additionafill es can be added later.)
4-5.5 Folder Name:
Press the RIGHT arrow key (►) to enter this function. The display will show the folder name used.
4-5.6 Disc Label:
Press the RIGHT arrow key (►) to enter this function. The display will show
the name label for the disc created. (NOTE: Press the UP/DOWN ( ) arrow
to change setting; press the RIGHT (►) arrow to keep the new setting;
press the LEFT (◄) arrow to go back to the setup item menu.)
4-5.7 Language:
Press the RIGHT arrow key (►) to enter this function. The display will show the
language choices. Use the UP/DOWN key ( ) to move to the desired language,
and press the RIGHT arrow key (►) to confirm the selection. Only one language may be available for your unit.
4-5.8 Auto Tray Out:
Press the RIGHT arrow key (►) to enter this function. The display will show
choice for On and Off. Use the UP/DOWN key ( ) to move to the desired choice
and press the RIGHT arrow key (►) to confirm the selection. Only one language may be available for your unit. The “On” option will eject the disc tray after the disc burning operation is completed.
Figure 35
20

4-5.9 LCD Contrast:
Press the RIGHT arrow key (►) to enter this function. The display will show the
current contrast level. Use UP/Down key ( ) to increase/decrease adjustment.
4-5.10 Show Backup Count:
Press the RIGHT arrow key (►) to enter this function. The display will show the number of times the backup operations have been completed this time only and the total number of backups made so far.
4-5.11 Show Burner Info:
Press the RIGHT arrow key (►) to enter this function. The display will show he disc burner device model number and firmware version
4-5.12 Show System Info:
Press the RIGHT arrow key (►) to enter this function. The display will show he system model number and firmware version
4-5.13 Format:
Operating Instructions: Press the RIGHT arrow key (►) to enter this function. The options for “Source Format” will appear. The card type will be automatically detected and displayed if only one card type is inserted. If two cards are in-serted, the user must select the source card to be formatted. Press the RIGHT arrow key (►) and the “Format Now” message will appear. Press the RIGHT arrow key (►) again to start the format process. The progress will be displayed as percentage of completion until it is completed. (WARNING: The formatting function will erase all data on the card)
4-5.14 Erase Disc:
Operating Instructions: Press the RIGHT arrow key (►) to enter this function and the “Erase Now” message will appear. Press the RIGHT arrow key (►) again, the “Erase” will start and the progress will be shown in percentage completion. Once the operation is completed, the status will be shown on the display. Only CD-RW or DVD +/- RW discs can be erased.
4-5.15 Update Firmware:
Press the RIGHT arrow key (►) to enter this function. The display will show the current system firmware version number. If needed, the new firmware can be saved onto any media (Memory Card, Disc or USB drive) and loaded into the EZDigiMagic by pressing the RIGHT arrow key (►) again to install thfier mware update. (NOTE: This operation should be performed only if there is a need to update the firmware.)
Figure 36 ~ 37
21

4-5.16 Compare After Burn:
Press the RIGHT arrow key (►) to enter this function. The display will show choice for”After Success” and ”Never”. Choosing the ”After Success” setting will compare data after burning is completed; choosing ”Never” selection will not compare.
4-5.17 Screen-Blanking Feature for Power Saving:
Press the Right arrow key (►) to enter this function. The display will show the screen-blanking time-out choices for Power saving. Use the UP/Down arrow
key( ) to move to the desired power saving time-out setting and press the Right
arrow key (►) to confirm.
* PERFORMANCE NOTE:
To optimize the copy performance of your flash memory card with the EZDigiMagic DM220-U unit, it is recommended that users backup their photos, and then re-format the flash memory cards, in the camera, on a regular basis. Please refer to your camera user’s manual for re-formatting instructions. Re-formatting your memory card helps to prevent unpredictable burning results (to CD or DVD discs) that can be caused by corrupted or damaged images found on the memory card.
CAUTION:
Re-formatting the flash memory card will erase all data that was previously stored on the memory card. Be sure images are saved (to a HDD, CD disc or DVD disc) before re-formatting the memory card.
Figure 38
22
Figure 39

5. Product Application Scope5.1 Lawful Use of Products:
This product is intended to be used solely for lawful purposes and should not be used to copy or duplicate any discs, information, data or other media that is protected by copyrights, trademarks, patents or other proprietary rights without the express consent of the owner of those rights. Purchasers and users of this product agree to indemnify and hold EZPnP harmless from and against any claims of infringement of any proprietary rights of others from use of this product.
5.2 Disclaimer:
The operating speed and performance stated in the product literature are for comparison with similar products only. The actual speed or time may vary de-pending on the type and quality of media. We do not offer any warranty that the speed or performance will be identical in a similar backup copying cycle. Due to continuous product improvement efforts, product performance and specifications are subject to change without notice.
It is the user’s responsibility to make sure the data on the memory card has been successfully backed up onto the disc before erasing the content of the memory card. The manufacturer and sellers of this device are not responsible for any data lost from the memory card.
5.3 Acknowledgment & Trademark
All contents are subject to change at any time without notice. No responsibility is assumed for its use; nor for infringements of patents or other rights of third parties and no patent or license is implied hereby.
EZDigiMagic is a trademark of EZPnP Technologies Corp. All other trademarks mentioned herein are properties of their respective owners. The specifications of the product are subject to change without any prior notice.
6. FCC & Safety Scope6.1 FCC Compliance Statement
This device complies with Part 15 of the FCC Rules. Operation is subject to the following two conditions:
(1) This device may not cause harmful interference, and
(2) This device must accept any interference received, including interference that may cause undesired operation.
23
6.2 FCC WARNING
Changes or modifications not expressly approved by the party responsible for compliance could void the user’s authority to operate the equipment.
6.3 Safety Instructions
(1) Please read these safety instructions carefully.
(2) When using the unit, always follow the instructions outlined in the “Operating Instructions” section of this manual.
(3) DO NOT install or operate the product in high temperature, humidity or dusty environment.
(4) Hold CD/DVD discs by their edges. Do not touch the surface of the discs.DO NOT ATTEMPT TO USE DAMAGED DISCS OR MEMORY CARDS.
(5) DO NOT touch or attempt to clean the lens in the disc tray.
(6) Please disconnect the equipment from your AC outlet before cleaning. DO NOT use liquid or sprayed detergent for cleaning. Use a moist sheet or cloth to clean the exterior of the unit only.
(7) For pluggable equipment, the socket-outlet shall be installed near the equip-ment and shall be easily accessible.
(8) Please keep this equipment away from humid areas.
(9) Always place this equipment on a reliable surface. If the equipment is not on a reliable surface, it may drop and cause injury.
(10)Make sure the voltage of the power source is appropriate when connecting the equipment to the power outlet.
(11) Place the power cord where people will not step or trip on it. DO NOT place objects over the power cord.
(12)DO NOT use if the power cord is damaged or frayed.
(13)All Cautions and Warnings on the equipment should be noted.
(14) If the EZDigiMagic will not be in use for several days, disconnect the unit from the power outlets, to avoid damage by transient power surges. Remove batteries from compartment.
(15)Never pour any liquids into the openings; this could cause fire or electrical shock.
(16)Never open the equipment. For safety reasons, the equipment should only be opened by quali fied service personnel.
(17) If one of the following situations arises, have the equipment checked by a quali fied service person:
(a) The power cord or plug is damaged.
(b) Liquid has penetrated into the equipment.
(c) The equipment has been exposed to moisture.
24

(d) The equipment has not worked well or you can not get it to work according to the user’s manual.
(e) The equipment was dropped and damaged.
(f) If the equipment has obvious signs of damage.
(18) DO NOT store the product in environments where the temperature can reach above 60°C (140°F); this may damage the product.
(19)Use only the approved power adapter supplied with the product.
Caution:
Performing unauthorized modifications and adjustments to the unit, or using this product in a manner other than specified herein may result in hazardous radiation exposure.
DANGER!
Invisible laser radiation may be present when opened. Avoid direct ex-posure to beam. This device Complies with FDA radiation performance standards, 21CFR, subchapter J.
7. Warranty & Technical SupportLimited Product Warranty
EZPnP offers a one-year warranty covering material and workmanship of this product under normal usage conditions. Upon confirmation by our technical service staff, product failure--excluding any misuse or handling damage, will be repaired or replaced at our discretion.
WARNING!
Do NOT attempt to disassemble the device as there are no user service-able parts. Please contact EZPnP to arrange for product repair. If you at-tempt to disassemble the device, the warranty may be voided and EZPnP will not be responsible for any product damage or repair.
25

For Technical Support Please Contact:
EZPnP USA
E-Mail: [email protected]
(888)393-9960
EZPnP Taiwan
E-Mail: [email protected]