Phone Manager - Opus Technology€¦ · Phone Manager requires a basic level of configuration to...
93
Phone Manager
Transcript of Phone Manager - Opus Technology€¦ · Phone Manager requires a basic level of configuration to...

Phone Manager

1 Table of Contents1. Table of Contents 1-3
2. Overview 4
2.1. Requirements 5-6
2.1.1. Overview 5-6
2.1.2. System Requirements 5-6
2.1.3. Multi Users & Virtual Desktop System Requirements 5-6
2.2. Licensing 7
2.3. Configuration 8-9
2.3.1. Connection Details 8-9
3. Standard Features 10
3.1. Call Control 11-17
3.1.1. Making Calls 18
3.1.2. Highlight & Dial 19
3.1.3. Toaster 20-21
3.1.4. Transferring 22-23
3.1.5. Multiple Calls 24-25
3.1.6. Dial Pad 26
3.1.1. Overview 11-17
3.2. Endpoint Control 27-30
3.2.1. Do Not Disturb 31
3.2.2. ACD Agent Control 32
3.2.3. Local Forwarding 33
3.2.4. Voicemail Access 34
3.2.5. Volume Control 35
3.2.1. Overview 27-30
3.3. Contacts 36-38
3.3.1. Directories 39
3.3.1.1. Overview 39
3.3.2. Searching 40
3.3.2.1. Overview 40
3.3.1. Overview 36-38
3.4. Call History 41
3.4.1. Call Recording 42
3.4.1.1. Overview 42
Phone Manager 1
Copyright ©2014 Xarios Ltd. All Rights Reserved.

3.4.1. Overview 41
3.5. Chat 43-44
3.5.1. Overview 43-44
4. Outlook Features 45
4.1. Hot Keys 46-48
4.1.1. Overview 46-48
4.2. Call Banner Profiles 49
4.2.1. Overview 49
4.3. Integrated Toolbar 50
4.3.1. Overview 50
5. Professional Features 51
5.1. Application Support 52
5.1.1. API Access 53
5.1.1.1. Overview 53
5.1.2. Macros 54-56
5.1.2.1. Overview 54-56
5.1.2.2. Configuration 54-56
5.1.3. Application Support Plugins 57
5.1.3.1. Overview 57
5.1.3.2. Configuration 57
5.1.4. TAPI 58
5.1.4.1. Overview 58
5.2. Toolbars 59
5.2.1. Integrated Toolbar 60
5.2.2. Button Actions 61-62
5.2.2.1. Overview 61-62
5.2.1. Overview 59
6. Team Leader Features 63
6.1. Alarm Notifications 64
6.1.1. Overview 64
6.2. Hunt Group Status 65
6.2.1. Overview 65
6.3. User Control 66
6.3.1. Overview 66
7. Settings 67
7.1. Connection 68
Phone Manager 2
Copyright ©2014 Xarios Ltd. All Rights Reserved.

7.1.1. Local Connection 69
7.1.1.1. Overview 69
7.1.2. Remote Connection 70
7.1.2.1. Overview 70
7.1.1. Overview 68
7.2. Softphone 71-72
7.2.1. E911 Warning, Emergency Calls and Security 73
7.2.1.1. WARNING 73
7.2.1.2. SECURITY 73
7.2.2. General 74
7.2.2.1. Overview 74
7.2.3. Audio 75
7.2.3.1. Overview 75
7.2.4. Codecs 76
7.2.4.1. Overview 76
7.2.5. Quality 77
7.2.5.1. Overview 77
7.2.6. NAT and Firewalls 78
7.2.6.1. Overview 78
7.2.7. Keep-Alives 79
7.2.7.1. Overview 79
7.2.8. Softphone Limitations 80
7.2.8.1. Overview 80
7.2.1. Overview 71-72
7.3. Hot Keys 81-83
7.4. Macros 84-86
7.5. Application Support Plugins 87
7.6. Diagnostics 88
7.6.1. Overview 88
7.1. Overview 67
8. What's New 89
8.1. Known Issues 90
9. Index 91-92
Phone Manager 3
Copyright ©2014 Xarios Ltd. All Rights Reserved.

2 OverviewPhone Manager is designed to make using your Mitel MiVoice Office handset as easy as possible. This document isdesigned to outline the features of Phone Manager and help you get the most out of the product.
Phone Manager requires an instance of Application Server to be installed and running somewhere on the network. The licensing for the product and many of the features are controlled via the Application Server so you may need tocontact you IT department or phone system supplier for help.
Phone Manager 4
Copyright ©2014 Xarios Ltd. All Rights Reserved.

2.1 Requirements
2.1.1 OverviewThe system requires specific information and requirements to be met for any installation. Read each of the sectionsand ensure that the information requested is available prior to an installation.
2.1.2 System RequirementsTo be able to install and run Phone Manager the client computer needs to meet the following minimumrequirements. If installing into a multi user environment where multiple instances of the client will be running, forexample Microsoft Terminal Service, Citrix etc. then see the Multi User Computer Requirements section.
Operating Systems
Windows XP Pro SP3 32-bitWindows Server 2003 SP3 32-bitWindows 7 Pro/Enterprise/Ultimate 32-bit/64-bitWindows 8 Pro 32-bit/64-bitWindows 8.1 Pro 32-bit/64-bitWindows 2008 SP2 Standard/Enterprise/Datacenter 32-bit/64-bitWindows 2008 R2 Standard/Enterprise/Datacenter 32-bit/64-bitWindows 2012 R2 Standard/Datacenter 64-bit
The Windows 2008 or Windows 2008 R2 Server Core installation options are not supported.
The Windows 2012 Foundation and Essential versions are not supported.
Hardware Requirements
The minimum recommended hardware is dependent on the number of devices configured on the PBX and thenumber of clients that will be connected.
Processor Intel Core 2 Duo 1.8GHz or faster processor (or equivalent)
Memory Minimum: 1GB RAMRecommended: 2GB RAM or more
When Phone Manager is running it will use a minimum of 70MB of RAM per client - this can besignificantly more depending on configuration and number of devices and/or users on the system.
Network IPv4
HardDisk
Minimum: 7GB free space
Software Requirements
The following software is required to be installed.
.NET Framework 3.5 SP1
.NET Framework 4.0 FullWindows Installer 4.5
Phone Manager 5
Copyright ©2014 Xarios Ltd. All Rights Reserved.

2.1.3 Multi Users & Virtual Desktop System RequirementsPhone Manager can be run in multi user and virtual desktop environments such as Microsoft Terminal/RemoteDesktop Services, Citrix XenApp or VMWare Virtual Desktop Infrastructure (VDI) with the following limitations:
The 1st Party TAPI drivers is not supported
When deploying in these environments then the amount of memory and CPU usage that Phone Manager will useneeds to be determined. As the resources required are dependent on configuration and the number of devices andUsers in the system then this needs to be benchmarked first to ensure the number of concurrent Users can besupported on the hardware available.
Phone Manager 6
Copyright ©2014 Xarios Ltd. All Rights Reserved.

2.2 LicensingPhone Manager is available in several different license levels. When you connect to the Application Server a licensewill be assigned to you based on the Client Profile assigned to your User account in the XCS website.
Standard Features (Section 3): Legacy support only. Provides call control features, call history & statusvisibility of contacts.Outlook Features (Section 4): Provides call control features, call history & status visibility of contacts. Addsthe additional functionality of screen popping and populating call history journal inside Microsoft Outlook,Professional Features (Section 5): Provides call control features, call history & status visibility of contacts. Adds the additional functionality of integrating with many other CRM applications. Adds TAPI & .NET APIaccess.Team Leader Features (Section 6): Provides call control features, call history & status visibility of contacts. Adds the additional functionality of integrating with many other CRM applications. Adds TAPI & .NET APIaccess. Includes the ability to silent monitor other users and control their status.
Phone Manager 7
Copyright ©2014 Xarios Ltd. All Rights Reserved.

2.3 Configuration
2.3.1 Connection DetailsPhone Manager requires a basic level of configuration to get it connected to the Application Server and controllingyour endpoint. The following information is required when Phone Manager starts up:
Host address This is the IP address or hostname of the server running the Application Serversoftware. Phone Manager will try and find this automatically on start-up. If it does not findan Application Server or it finds more than one then some user interaction is required toconfirm the connection details.
User Credentials Phone Manager needs to connect to Application Server using a user account. By default,it will use the user account you are logged into your machine with to authenticate withthe Application Server. If you wish to override this you can do so in the Connection(Section 7.1) settings section.
Endpoint Phone Manager requires the details of the endpoint you are using when it starts so that itcan show the correct call information. There are several of ways of providing PhoneManager with this information. Please read through the Connection (Section7.1) settings section for more details.
Server Connection
The first time Phone Manager starts it will broadcast to find an Application Server instance running. If it doesn’t findone or finds more than one, the window below will be shown.
Either select the correct server from the Available hosts list or enter the IP address or hostname of the server youwish to connect to into the Host address area.
Phone Manager 8
Copyright ©2014 Xarios Ltd. All Rights Reserved.

When Phone Manager starts it will use the Windows account details of the current logged in user. If this is notappropriate then check the Override login details and enter the Username and Password to use instead.
If the User account is linked to an Microsoft Active Directory User account then enter the username in theDOMAIN\User format, otherwise use the username and password provided by your administrator.
Phone Manager 9
Copyright ©2014 Xarios Ltd. All Rights Reserved.
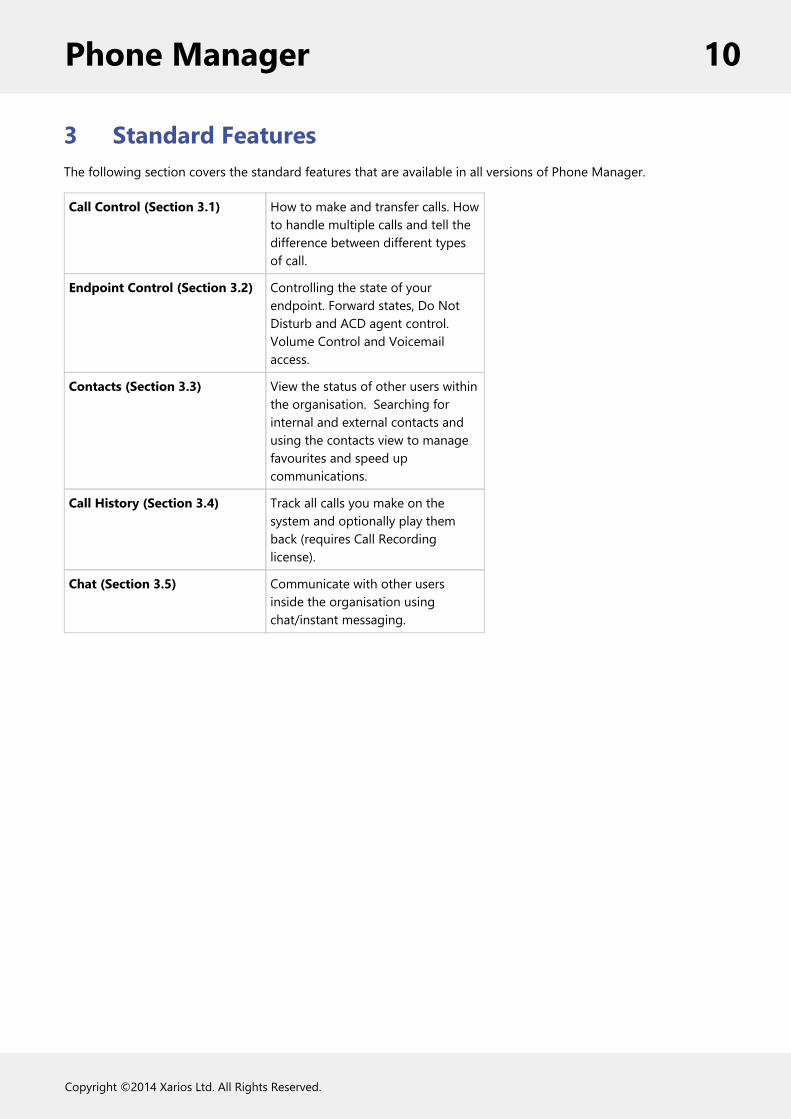
3 Standard FeaturesThe following section covers the standard features that are available in all versions of Phone Manager.
Call Control (Section 3.1) How to make and transfer calls. Howto handle multiple calls and tell thedifference between different typesof call.
Endpoint Control (Section 3.2) Controlling the state of yourendpoint. Forward states, Do NotDisturb and ACD agent control. Volume Control and Voicemailaccess.
Contacts (Section 3.3) View the status of other users withinthe organisation. Searching forinternal and external contacts andusing the contacts view to managefavourites and speed upcommunications.
Call History (Section 3.4) Track all calls you make on thesystem and optionally play themback (requires Call Recordinglicense).
Chat (Section 3.5) Communicate with other usersinside the organisation usingchat/instant messaging.
Phone Manager 10
Copyright ©2014 Xarios Ltd. All Rights Reserved.
3.1 Call Control
3.1.1 OverviewMaking and receiving calls is obviously the primary purpose of a telephone. Phone Manager makes this process assimple as possible, providing you with context sensitive action buttons and giving you all the information you needabout the calls you are on.
Making Calls How to dial internal and external numbers.
Highlight & Dial Dialling from within other applications.
Toaster Seeing details about the call you are on and performing common tasks such as putting calls onhold, retrieving calls and clearing calls.
Transferring Performing supervised/announced or direct transfers.
Multiple Calls How to handle multiple calls at your endpoint.
Dial Pad Dialling out with the dial pad or dialling DTMF digits over a call to navigate through anattendant or IVR.
Making Calls
Making a call to a number is a simple process that can be achieved a number of different ways.
Dialling a number you know
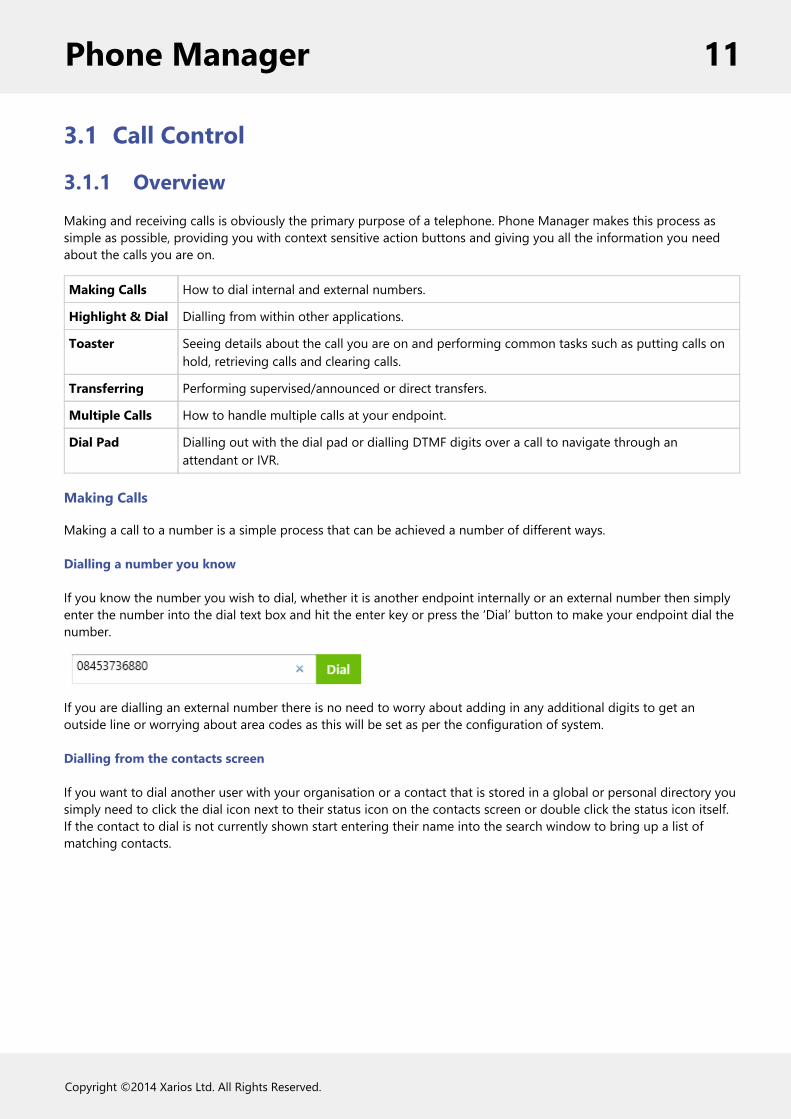
If you know the number you wish to dial, whether it is another endpoint internally or an external number then simplyenter the number into the dial text box and hit the enter key or press the ‘Dial’ button to make your endpoint dial thenumber.
If you are dialling an external number there is no need to worry about adding in any additional digits to get anoutside line or worrying about area codes as this will be set as per the configuration of system.
Dialling from the contacts screen
If you want to dial another user with your organisation or a contact that is stored in a global or personal directory yousimply need to click the dial icon next to their status icon on the contacts screen or double click the status icon itself.If the contact to dial is not currently shown start entering their name into the search window to bring up a list ofmatching contacts.
Phone Manager 11
Copyright ©2014 Xarios Ltd. All Rights Reserved.

If you dial a contact while you are already on a call with someone else, Phone manager will automatically set upa consultation/enquiry call for you.
Highlight & Dial
Dialling from another application (Highlight & Dial)
Often you will have the need to dial a number from another application. Commonly this will be a web page that youwant to dial the contact details from or an email someone has sent you.
To do this you can use the Highlight & Dial features of Phone Manager. Simply highlight the number you wish to dialand then click on the Highlight & Dial button or use the Highlight & Dial hot key (See the Hot Keys (Section4.1) section for details). You will find the button docked to the right-hand side of your screen.
You can move the Highlight & Dial button up or down the screen to suite your requirements.
Generally as long as the number can be copied to and pasted from the Windows clipboard then this should work. Thiscan be tested by highlighting the telephone number and pressing Ctrl+C and then opening Notepad and pressingCtrl+V. If the number appears then the test was successful.
Some 3rd party applications can perform their own clipboard control causing highlight and dial to not functioncorrectly. Testing with a Phone Manager client is recommended to ensure full compatibility.
Toaster
Phone Manager 12
Copyright ©2014 Xarios Ltd. All Rights Reserved.
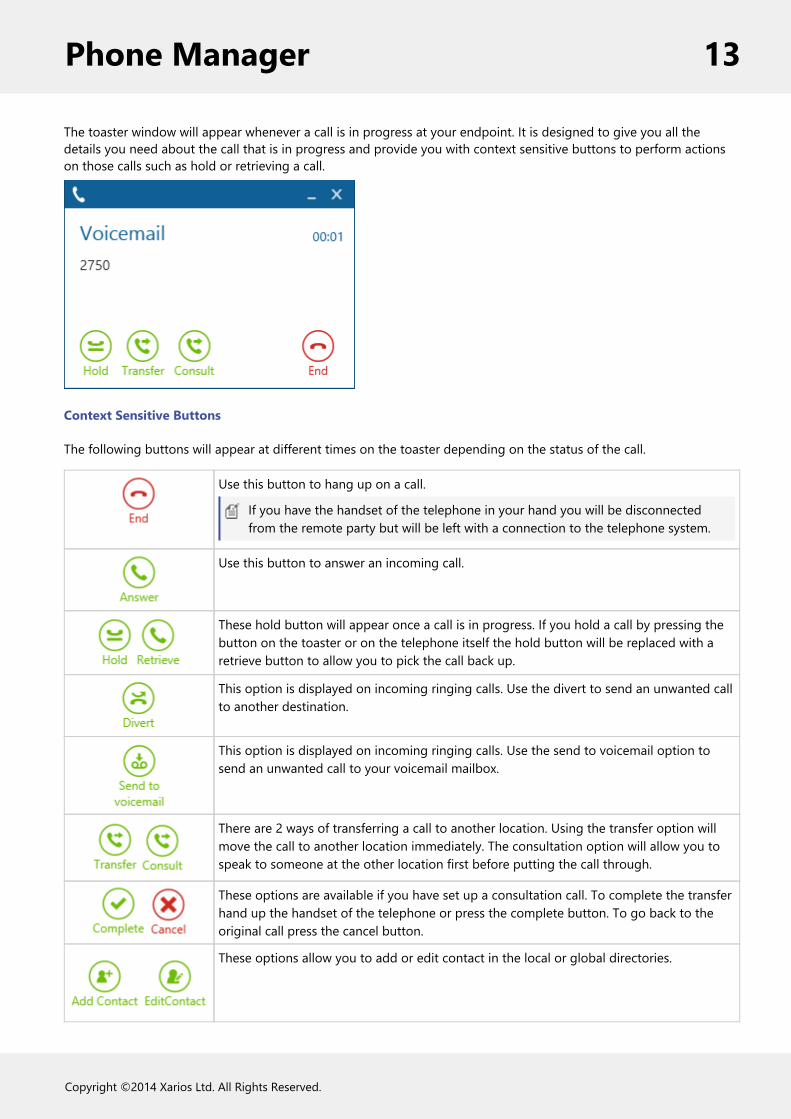
The toaster window will appear whenever a call is in progress at your endpoint. It is designed to give you all thedetails you need about the call that is in progress and provide you with context sensitive buttons to perform actionson those calls such as hold or retrieving a call.
Context Sensitive Buttons
The following buttons will appear at different times on the toaster depending on the status of the call.
Use this button to hang up on a call.
If you have the handset of the telephone in your hand you will be disconnectedfrom the remote party but will be left with a connection to the telephone system.
Use this button to answer an incoming call.
These hold button will appear once a call is in progress. If you hold a call by pressing thebutton on the toaster or on the telephone itself the hold button will be replaced with aretrieve button to allow you to pick the call back up.
This option is displayed on incoming ringing calls. Use the divert to send an unwanted callto another destination.
This option is displayed on incoming ringing calls. Use the send to voicemail option tosend an unwanted call to your voicemail mailbox.
There are 2 ways of transferring a call to another location. Using the transfer option willmove the call to another location immediately. The consultation option will allow you tospeak to someone at the other location first before putting the call through.
These options are available if you have set up a consultation call. To complete the transferhand up the handset of the telephone or press the complete button. To go back to theoriginal call press the cancel button.
These options allow you to add or edit contact in the local or global directories.
Phone Manager 13
Copyright ©2014 Xarios Ltd. All Rights Reserved.
Transferring
Transferring a call can be made via several different ways depending on if you want to transfer an answered call via adirect or announced transfer, or if the call is ringing then you can divert the call.
Transfers
When connected to a call the toaster action buttons change to reflect what you can do with this call.
Direct Transfer
To perform a direct transfer where the call is sent to the transfer destination before the consultation call has beenmade click on the Transfer button and this will give focus to the main window with the cursor in the Search or Dialbox. Search for the contact to transfer the call to and click on the dial button next to their icon (or highlight it andpress Enter) or type in the number in the Search or Dial box and click on Dial. The call will then be sent straight to thiscontact and the call will clear from your endpoint.
Announced Transfer
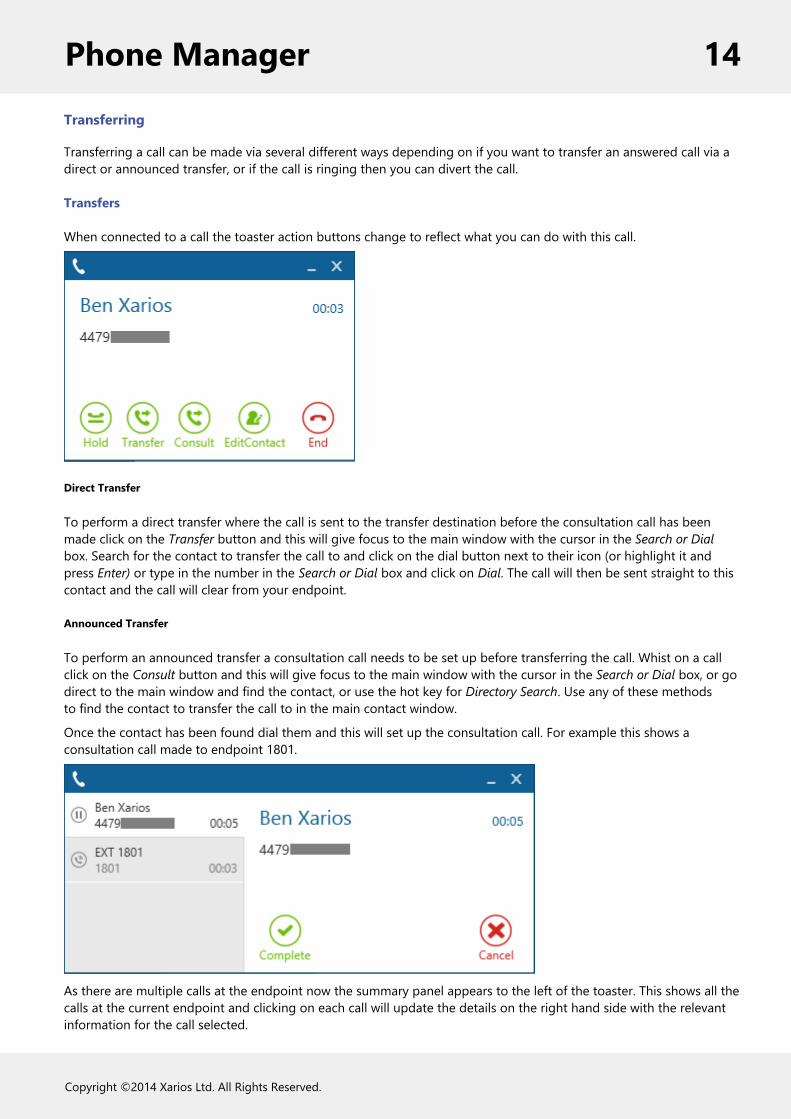
To perform an announced transfer a consultation call needs to be set up before transferring the call. Whist on a callclick on the Consult button and this will give focus to the main window with the cursor in the Search or Dial box, or godirect to the main window and find the contact, or use the hot key for Directory Search. Use any of these methodsto find the contact to transfer the call to in the main contact window.
Once the contact has been found dial them and this will set up the consultation call. For example this shows aconsultation call made to endpoint 1801.
As there are multiple calls at the endpoint now the summary panel appears to the left of the toaster. This shows all thecalls at the current endpoint and clicking on each call will update the details on the right hand side with the relevantinformation for the call selected.
Phone Manager 14
Copyright ©2014 Xarios Ltd. All Rights Reserved.

The consultation call has not been answered yet but the transfer can be completed at any time by clicking on theComplete button.
To cancel the consultation call and not perform the transfer to this contact either click on the Cancel button (shownabove) for the original call, this will then clear the consultation call and connect the original call back.
Alternatively swap over to the enquiry call and click on the End button shown below. This will cause the original call tobe left on hold and would need to be manually retrieved.
Divert
When a call is ringing the toaster action buttons change to reflect what you can do with this call.
To divert a call click on the Divert button and this will give focus to the main window with the cursor in the Search orDial box. Search for the contact to divert the call to and click on the dial button next to their icon (or highlight it andpress Enter) or type in the number in the Search or Dial box and click on Dial. The call will then be sent straight to thiscontact and the call will clear from your endpoint.
The toaster also provides a Send to voicemail button that enables a single click divert of a call to voicemail.
Multiple Calls
The toaster popup will show multiple calls at an endpoint by expanded to the left with a summary pane that lists all ofthe calls. Clicking on the entry for a specific call will update the details on the right hand side with the relevantinformation for the call selected.
For a single call the toaster will be shown without the summary pane.
Phone Manager 15
Copyright ©2014 Xarios Ltd. All Rights Reserved.
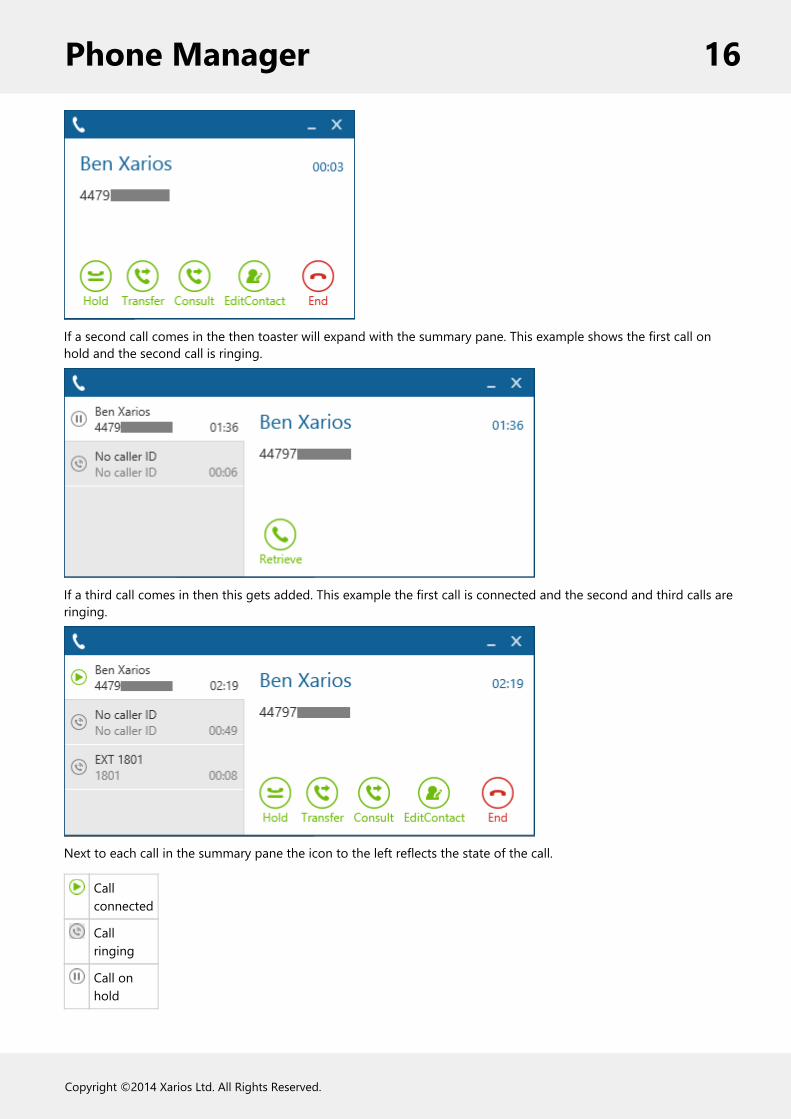
If a second call comes in the then toaster will expand with the summary pane. This example shows the first call onhold and the second call is ringing.
If a third call comes in then this gets added. This example the first call is connected and the second and third calls areringing.
Next to each call in the summary pane the icon to the left reflects the state of the call.
Callconnected
Callringing
Call onhold
Phone Manager 16
Copyright ©2014 Xarios Ltd. All Rights Reserved.
Dial Pad
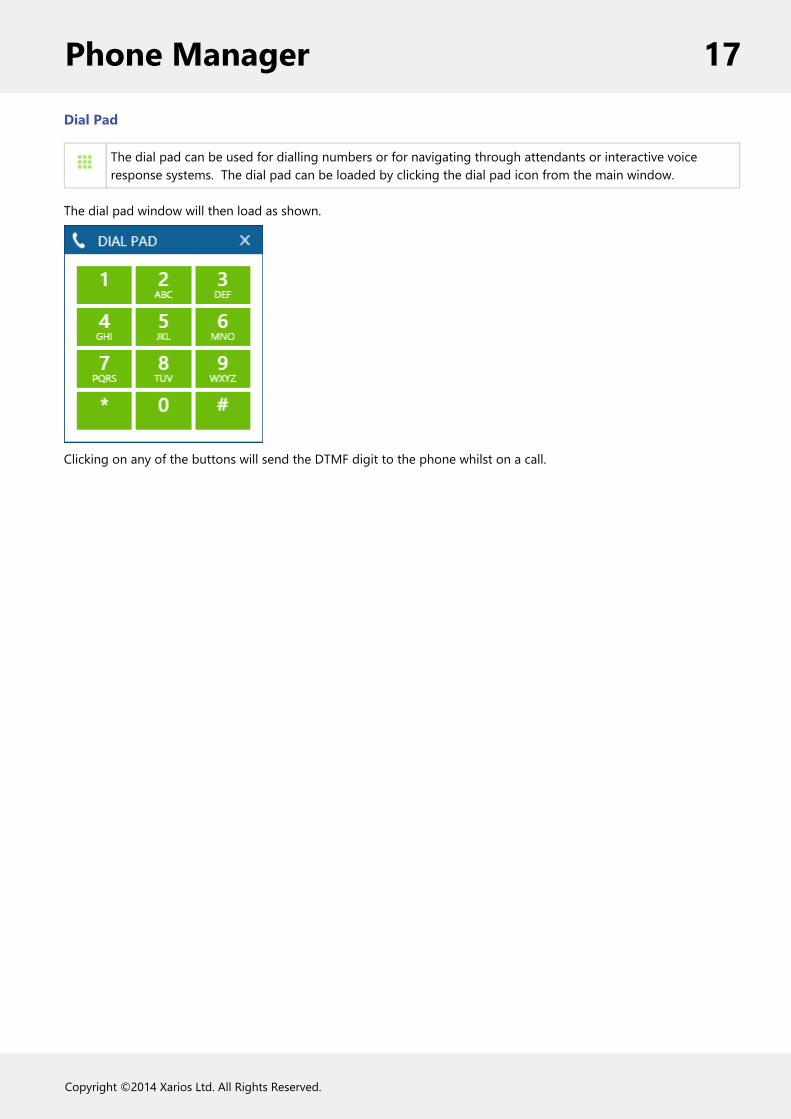
The dial pad can be used for dialling numbers or for navigating through attendants or interactive voiceresponse systems. The dial pad can be loaded by clicking the dial pad icon from the main window.
The dial pad window will then load as shown.
Clicking on any of the buttons will send the DTMF digit to the phone whilst on a call.
Phone Manager 17
Copyright ©2014 Xarios Ltd. All Rights Reserved.

3.1.1 Making CallsMaking a call to a number is a simple process that can be achieved a number of different ways.
Dialling a number you know
If you know the number you wish to dial, whether it is another endpoint internally or an external number then simplyenter the number into the dial text box and hit the enter key or press the ‘Dial’ button to make your endpoint dial thenumber.
If you are dialling an external number there is no need to worry about adding in any additional digits to get anoutside line or worrying about area codes as this will be set as per the configuration of system.
Dialling from the contacts screen
If you want to dial another user with your organisation or a contact that is stored in a global or personal directory yousimply need to click the dial icon next to their status icon on the contacts screen or double click the status icon itself.If the contact to dial is not currently shown start entering their name into the search window to bring up a list ofmatching contacts.
If you dial a contact while you are already on a call with someone else, Phone manager will automatically set upa consultation/enquiry call for you.
Phone Manager 18
Copyright ©2014 Xarios Ltd. All Rights Reserved.

3.1.2 Highlight & DialDialling from another application (Highlight & Dial)
Often you will have the need to dial a number from another application. Commonly this will be a web page that youwant to dial the contact details from or an email someone has sent you.
To do this you can use the Highlight & Dial features of Phone Manager. Simply highlight the number you wish to dialand then click on the Highlight & Dial button or use the Highlight & Dial hot key (See the Hot Keys (Section4.1) section for details). You will find the button docked to the right-hand side of your screen.
You can move the Highlight & Dial button up or down the screen to suite your requirements.
Generally as long as the number can be copied to and pasted from the Windows clipboard then this should work. Thiscan be tested by highlighting the telephone number and pressing Ctrl+C and then opening Notepad and pressingCtrl+V. If the number appears then the test was successful.
Some 3rd party applications can perform their own clipboard control causing highlight and dial to not functioncorrectly. Testing with a Phone Manager client is recommended to ensure full compatibility.
Phone Manager 19
Copyright ©2014 Xarios Ltd. All Rights Reserved.

3.1.3 ToasterThe toaster window will appear whenever a call is in progress at your endpoint. It is designed to give you all thedetails you need about the call that is in progress and provide you with context sensitive buttons to perform actionson those calls such as hold or retrieving a call.
Context Sensitive Buttons
The following buttons will appear at different times on the toaster depending on the status of the call.
Use this button to hang up on a call.
If you have the handset of the telephone in your hand you will be disconnectedfrom the remote party but will be left with a connection to the telephone system.
Use this button to answer an incoming call.
These hold button will appear once a call is in progress. If you hold a call by pressing thebutton on the toaster or on the telephone itself the hold button will be replaced with aretrieve button to allow you to pick the call back up.
This option is displayed on incoming ringing calls. Use the divert to send an unwanted callto another destination.
This option is displayed on incoming ringing calls. Use the send to voicemail option tosend an unwanted call to your voicemail mailbox.
There are 2 ways of transferring a call to another location. Using the transfer option willmove the call to another location immediately. The consultation option will allow you tospeak to someone at the other location first before putting the call through.
These options are available if you have set up a consultation call. To complete the transferhand up the handset of the telephone or press the complete button. To go back to theoriginal call press the cancel button.
Phone Manager 20
Copyright ©2014 Xarios Ltd. All Rights Reserved.

These options allow you to add or edit contact in the local or global directories.
Phone Manager 21
Copyright ©2014 Xarios Ltd. All Rights Reserved.

3.1.4 TransferringTransferring a call can be made via several different ways depending on if you want to transfer an answered call via adirect or announced transfer, or if the call is ringing then you can divert the call.
Transfers
When connected to a call the toaster action buttons change to reflect what you can do with this call.
Direct Transfer
To perform a direct transfer where the call is sent to the transfer destination before the consultation call has beenmade click on the Transfer button and this will give focus to the main window with the cursor in the Search or Dialbox. Search for the contact to transfer the call to and click on the dial button next to their icon (or highlight it andpress Enter) or type in the number in the Search or Dial box and click on Dial. The call will then be sent straight to thiscontact and the call will clear from your endpoint.
Announced Transfer
To perform an announced transfer a consultation call needs to be set up before transferring the call. Whist on a callclick on the Consult button and this will give focus to the main window with the cursor in the Search or Dial box, or godirect to the main window and find the contact, or use the hot key for Directory Search. Use any of these methodsto find the contact to transfer the call to in the main contact window.
Once the contact has been found dial them and this will set up the consultation call. For example this shows aconsultation call made to endpoint 1801.
As there are multiple calls at the endpoint now the summary panel appears to the left of the toaster. This shows all thecalls at the current endpoint and clicking on each call will update the details on the right hand side with the relevant
Phone Manager 22
Copyright ©2014 Xarios Ltd. All Rights Reserved.

information for the call selected.
The consultation call has not been answered yet but the transfer can be completed at any time by clicking on theComplete button.
To cancel the consultation call and not perform the transfer to this contact either click on the Cancel button (shownabove) for the original call, this will then clear the consultation call and connect the original call back.
Alternatively swap over to the enquiry call and click on the End button shown below. This will cause the original call tobe left on hold and would need to be manually retrieved.
Divert
When a call is ringing the toaster action buttons change to reflect what you can do with this call.
To divert a call click on the Divert button and this will give focus to the main window with the cursor in the Search orDial box. Search for the contact to divert the call to and click on the dial button next to their icon (or highlight it andpress Enter) or type in the number in the Search or Dial box and click on Dial. The call will then be sent straight to thiscontact and the call will clear from your endpoint.
The toaster also provides a Send to voicemail button that enables a single click divert of a call to voicemail.
Phone Manager 23
Copyright ©2014 Xarios Ltd. All Rights Reserved.

3.1.5 Multiple CallsThe toaster popup will show multiple calls at an endpoint by expanded to the left with a summary pane that lists all ofthe calls. Clicking on the entry for a specific call will update the details on the right hand side with the relevantinformation for the call selected.
For a single call the toaster will be shown without the summary pane.
If a second call comes in the then toaster will expand with the summary pane. This example shows the first call onhold and the second call is ringing.
If a third call comes in then this gets added. This example the first call is connected and the second and third calls areringing.
Next to each call in the summary pane the icon to the left reflects the state of the call.
Call
Phone Manager 24
Copyright ©2014 Xarios Ltd. All Rights Reserved.

connected
Callringing
Call onhold
Phone Manager 25
Copyright ©2014 Xarios Ltd. All Rights Reserved.

3.1.6 Dial PadThe dial pad can be used for dialling numbers or for navigating through attendants or interactive voiceresponse systems. The dial pad can be loaded by clicking the dial pad icon from the main window.
The dial pad window will then load as shown.
Clicking on any of the buttons will send the DTMF digit to the phone whilst on a call.
Phone Manager 26
Copyright ©2014 Xarios Ltd. All Rights Reserved.

3.2 Endpoint Control
3.2.1 OverviewPhone Manager provides complete control over the status of your endpoint. This is all done through the mainwindow using the various built in features.
Do Not Disturb Single click access to any of the 20 do not disturb states programmed on the telephonesystem to ensure you aren’t interrupted when busy.
ACD Agent Control Login to all or a selected subset of the hunt groups your agent ID is a member of.
Local Forwarding Control of the local forward state of your endpoint. For example, divert calls to voicemailor to your mobile when busy.
Voicemail Access Visual indication of when you have voicemails and single access to dial into the voicemailsystem to retrieve them.
Volume Control Increase or decrease the volume when ringing or during a call or mute the audio alltogether.
Do Not Disturb
When away from your desk or busy in a meeting you can set the do not disturb status on your phone to tell otherusers on the system.
The phone system provides 20 predefined do not disturb message for you to choose from. Simple press the do notdisturb button and select 1 of the 20 messages.
Once you have selected a message you will then be presented with a text box asking you to enter the "DND Text".You can optionally enter up to 16 characters of text here to supplement the do not disturb message selected.
For example: IN MEETING UNTIL – 12.30 PM
Phone Manager 27
Copyright ©2014 Xarios Ltd. All Rights Reserved.

Any user now ringing your endpoint or viewing your status on a Phone Manager client will see this message.
If you are in a do not disturb state, the do not disturb button will show in blue , click on the icon to remove the donot disturb status.
ACD Agent Control
ACD Agent IDs can be used on the telephone system to log in and out of various different hunt groups. Each huntgroup would generally indicate a different type of call to be answered.
If you have an Agent ID and have been given the permission to do so you can log in and out of hunt groups using the
agent icon on the main window.
If you are logged out and press the agent icon you will be presented with a list of hunt groups that you have beenassigned to. To log into all groups select the ‘Login Agent (xxxx)’ option from the top of the menu or select thespecific hunt group you wish to log in to.
While logged in, a green tick will show against all hunt groups that you are logged into. The menu can then be usedto login or out of any of the other groups at any time.
Local Forwarding
Your endpoint can have a local forward state to move calls to another destination when you don’t answer them orbusy doing something else. The different forward states available to choose from are:
No Answer Forward calls when you don’t answer them. The default no answer time on the PBX is 15seconds.
Busy Forward calls only when your handset is busy.
No Answer &Busy
This option is a combination of the first two options.
All Calls Forward all calls that alert you endpoint.
To change the forward state on your endpoint, click the forward state icon on the main window and select 1 of the4 options available.
A text input box will then appear to prompt you where you wish to forward your calls to. In this box you can enter aninternal number like the endpoint of a User or an external number such as a mobile phone number.
If the forward state is already enabled, the forward icon will show in blue , click on the icon to remove the forwardstatus form your endpoint.
Voicemail Access
Voicemail notifications are displayed on the main window with the icon, when any new messages are left then thenotification icon will show the number of messages in a red circle.
Phone Manager 28
Copyright ©2014 Xarios Ltd. All Rights Reserved.

As a single endpoint can be the voicemail notification station for more than one mailbox clicking on the icon willdisplay a list of all the mailboxes and the number of voicemails in each. Clicking on the relevant entry will dial straightinto the message retrieval for that mailbox.
Volume Control
The volume functions of Phone Manager behave differently depending on whether it is controlling a MiNET endpointor a SIP softphone.
Endpoint Volume
The volume of you endpoint can be controlled using the mute , volume increase and volume decrease icons at the bottom right of the main window.
Depending on the state of your endpoint the icons will do different things:
Idle or Ringing State Mute will be disabled.
Volume decrease will decrease the ringing volume and save it.
Volume increase will increase the ringing volume and save it.
Call in progress Mute will be enabled.
Volume decrease will decrease the handset volume and save it.
Volume increase will increase the handset volume and save it.
When the mute icon is pressed it will turn blue to indicate that audio is now muted on the call. To turn mute offsimply click on the icon again.
Phone Manager 29
Copyright ©2014 Xarios Ltd. All Rights Reserved.

Softphone Volume
The volume controls are enhanced to include a slide control when connected as a softphone. This offers a greaterlevel of control than when Phone Manager is controlling an endpoint.
Volume control for a softphone is only available when using the built in softphone.
When muting a call on the softphone both parties audio are muted.
Phone Manager 30
Copyright ©2014 Xarios Ltd. All Rights Reserved.

3.2.1 Do Not DisturbWhen away from your desk or busy in a meeting you can set the do not disturb status on your phone to tell otherusers on the system.
The phone system provides 20 predefined do not disturb message for you to choose from. Simple press the do notdisturb button and select 1 of the 20 messages.
Once you have selected a message you will then be presented with a text box asking you to enter the "DND Text".You can optionally enter up to 16 characters of text here to supplement the do not disturb message selected.
For example: IN MEETING UNTIL – 12.30 PM
Any user now ringing your endpoint or viewing your status on a Phone Manager client will see this message.
If you are in a do not disturb state, the do not disturb button will show in blue , click on the icon to remove the donot disturb status.
Phone Manager 31
Copyright ©2014 Xarios Ltd. All Rights Reserved.
3.2.2 ACD Agent ControlACD Agent IDs can be used on the telephone system to log in and out of various different hunt groups. Each huntgroup would generally indicate a different type of call to be answered.
If you have an Agent ID and have been given the permission to do so you can log in and out of hunt groups using the
agent icon on the main window.
If you are logged out and press the agent icon you will be presented with a list of hunt groups that you have beenassigned to. To log into all groups select the ‘Login Agent (xxxx)’ option from the top of the menu or select thespecific hunt group you wish to log in to.
While logged in, a green tick will show against all hunt groups that you are logged into. The menu can then be usedto login or out of any of the other groups at any time.
Phone Manager 32
Copyright ©2014 Xarios Ltd. All Rights Reserved.

3.2.3 Local ForwardingYour endpoint can have a local forward state to move calls to another destination when you don’t answer them orbusy doing something else. The different forward states available to choose from are:
No Answer Forward calls when you don’t answer them. The default no answer time on the PBX is 15seconds.
Busy Forward calls only when your handset is busy.
No Answer &Busy
This option is a combination of the first two options.
All Calls Forward all calls that alert you endpoint.
To change the forward state on your endpoint, click the forward state icon on the main window and select 1 of the4 options available.
A text input box will then appear to prompt you where you wish to forward your calls to. In this box you can enter aninternal number like the endpoint of a User or an external number such as a mobile phone number.
If the forward state is already enabled, the forward icon will show in blue , click on the icon to remove the forwardstatus form your endpoint.
Phone Manager 33
Copyright ©2014 Xarios Ltd. All Rights Reserved.

3.2.4 Voicemail AccessVoicemail notifications are displayed on the main window with the icon, when any new messages are left then thenotification icon will show the number of messages in a red circle.
As a single endpoint can be the voicemail notification station for more than one mailbox clicking on the icon willdisplay a list of all the mailboxes and the number of voicemails in each. Clicking on the relevant entry will dial straightinto the message retrieval for that mailbox.
Phone Manager 34
Copyright ©2014 Xarios Ltd. All Rights Reserved.

3.2.5 Volume ControlThe volume functions of Phone Manager behave differently depending on whether it is controlling a MiNET endpointor a SIP softphone.
Endpoint Volume
The volume of you endpoint can be controlled using the mute , volume increase and volume decrease icons at the bottom right of the main window.
Depending on the state of your endpoint the icons will do different things:
Idle or Ringing State Mute will be disabled.
Volume decrease will decrease the ringing volume and save it.
Volume increase will increase the ringing volume and save it.
Call in progress Mute will be enabled.
Volume decrease will decrease the handset volume and save it.
Volume increase will increase the handset volume and save it.
When the mute icon is pressed it will turn blue to indicate that audio is now muted on the call. To turn mute offsimply click on the icon again.
Softphone Volume
The volume controls are enhanced to include a slide control when connected as a softphone. This offers a greaterlevel of control than when Phone Manager is controlling an endpoint.
Volume control for a softphone is only available when using the built in softphone.
When muting a call on the softphone both parties audio are muted.
Phone Manager 35
Copyright ©2014 Xarios Ltd. All Rights Reserved.

3.3 Contacts
3.3.1 OverviewThe contacts tab within Phone Manager provides a DSS style view to provide real-time information about other deviceincluding Users, endpoint, agents and hunt groups. This gives a single quick view of the status of these devices andcall control features such as single click to dial.
Groups
Each device that is shown is part of a group. Clicking the directory button on the top left hand corner displays theavailable directories and gives the User the ability to be able show or hide each one.
If there is a green tick next to the entry then this will be shown. Unchecking this will cause the directory to be hidden.
Each Phone Manager User has their own Favourites group which they can add and remove devices to and from and ispersonal to each User. They can also add items from the Directories (Section 3.3.1) to this, for example Speed Dials,Personal Contacts, Central Contacts or Microsoft Outlook Contacts.
Phone Manager 36
Copyright ©2014 Xarios Ltd. All Rights Reserved.
The other groups are created automatically from the Business Unit structure configured on the XCS server.
Device Control
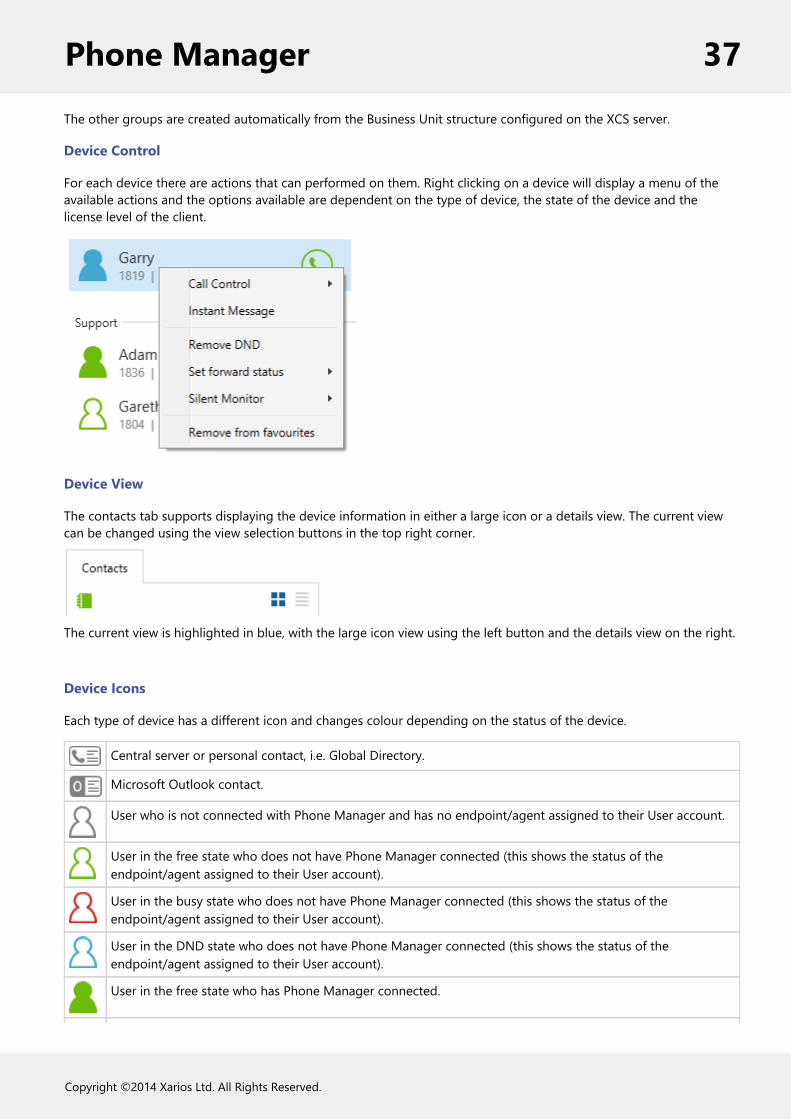
For each device there are actions that can performed on them. Right clicking on a device will display a menu of theavailable actions and the options available are dependent on the type of device, the state of the device and thelicense level of the client.
Device View
The contacts tab supports displaying the device information in either a large icon or a details view. The current viewcan be changed using the view selection buttons in the top right corner.
The current view is highlighted in blue, with the large icon view using the left button and the details view on the right.
Device Icons
Each type of device has a different icon and changes colour depending on the status of the device.
Central server or personal contact, i.e. Global Directory.
Microsoft Outlook contact.
User who is not connected with Phone Manager and has no endpoint/agent assigned to their User account.
User in the free state who does not have Phone Manager connected (this shows the status of theendpoint/agent assigned to their User account).
User in the busy state who does not have Phone Manager connected (this shows the status of theendpoint/agent assigned to their User account).
User in the DND state who does not have Phone Manager connected (this shows the status of theendpoint/agent assigned to their User account).
User in the free state who has Phone Manager connected.
Phone Manager 37
Copyright ©2014 Xarios Ltd. All Rights Reserved.

User in the busy state who has Phone Manager connected.
User in the DND state who has Phone Manager connected.
Endpoint in the free state.
Endpoint in the busy state.
Endpoint in the DND state.
Agent is logged out.
Agent in the free state.
Agent in the busy state.
Agent in the DND state.
Agent in the wrap-up state.
Hunt group.
Phone Manager 38
Copyright ©2014 Xarios Ltd. All Rights Reserved.

3.3.1 Directories
3.3.1.1 OverviewContact directory information can be imported into Phone Manager to give more information about the contacts whoare calling in and to provide directory search features to help find contacts to call.
There are several different sources that can be used to import contact information from. The include:
Central contact databases, for example Microsoft Dynamics CRM, Salesforce.com etc.Personal contacts.Microsoft Outlook personal contacts.PBX Speed Dials.
Using the contact information Phone Manager can search the directory to find any matching contacts to dial. Whenan inbound call is received or an outbound call made the relevant directories are searched automatically and thematching contact information is made available and displayed on the client toaster.
Central contact databases
For central based contacts the information is stored and accessed from single location. This can include a text file inCSV format or a direct database connection using ODBC or OLE DB. The contacts from these locations can beimported into the system manually or on a pre configured schedule.
For more information see the Contact Directories section in the XCS server help.
Microsoft Outlook personal contacts
If a User has the Download Outlook contacts option enabled on their Client Profile, then personal contacts from withinMicrosoft Outlook can be searched directly from Phone Manager.
The User needs to be connected with a Microsoft Outlook license to enable this feature.
This requires Microsoft Outlook to be running within the same session as the Phone Manager client and onlylocal contact folders are supported. For example running Phone Manager using a runas option with a differentuser account.
The contacts can be searched using the Home, Telephone or Mobile/Cell numbers as well as the first, last andcompany name fields associated with the Outlook contact. The only user that can search and access these contacts isthe local User, other Users cannot access these contacts.
PBX Speed Dials
The PBX contains its own directory in the form of system speed dials. These entries are configured from within MitelDatabase Programming and the system will download them directly from the PBX when connected automatically.Each entry only has a name and number associated with them and each of these fields can be used to search.
Every user has access to search the system speed dials.
Phone Manager 39
Copyright ©2014 Xarios Ltd. All Rights Reserved.

3.3.2 Searching
3.3.2.1 OverviewSearching for contacts is done from the main window in the Search or Dial section. Typing in a relevant search term,i.e. telephone number or name, will show any matching entries in the contacts tab.
The search will try and find a match in any of the devices on the PBX or within any of the directories that have beenassigned to the User.
To cancel a search click onto the X next to the DIal button and this will restore the contacts tab back to the DSS view.
Phone Manager 40
Copyright ©2014 Xarios Ltd. All Rights Reserved.

3.4 Call History
3.4.1 OverviewThe call history provides a list of all of the recent calls that have been made for the User. This includes internal calls,external inbound and outbound calls, and missed calls that were not answered. If the User has multiple devices(endpoints/agents) associated with their profile then the history will show calls for all these whilst the User wasassociated with them.
The history is refreshed after a call is cleared from the Users current endpoint.
The call history does not require Phone Manager to be running to save the call information - the XCS server logsthe call history.
For each call the history tab shows the following information:
Name : This is either the name of the contact that has been matched to the call or if none is available then theoutside number is shown.Time: The time that the call was made or received.Talk Time: The length of time that the call was connected.Ring Time: The length of time that the call was ringing.CLI: The caller id or outside number. This is only populated for external calls.DDI: The direct dial that a call came in on. This is only populated for inbound external calls.Hunt Group: The hunt that the call came in on. This is only populated for inbound external calls.Account Code: This shows any account codes that were set against the call whilst in progress.
As the main window is resized the number of columns shown will change as there is more space to displaythese.
To the left hand side of each entry the icon shows what type of call this is.
Outbound call
Inbound call
Inbound missed call
Next to each entry, on the right hand side, there are icons to dial the contact back and if the system has call recordingintegration enabled and the User has playback rights then they can listen to the call recording.
The call history will show a maximum of 50 calls for each User.
Phone Manager 41
Copyright ©2014 Xarios Ltd. All Rights Reserved.
3.4.1 Call Recording
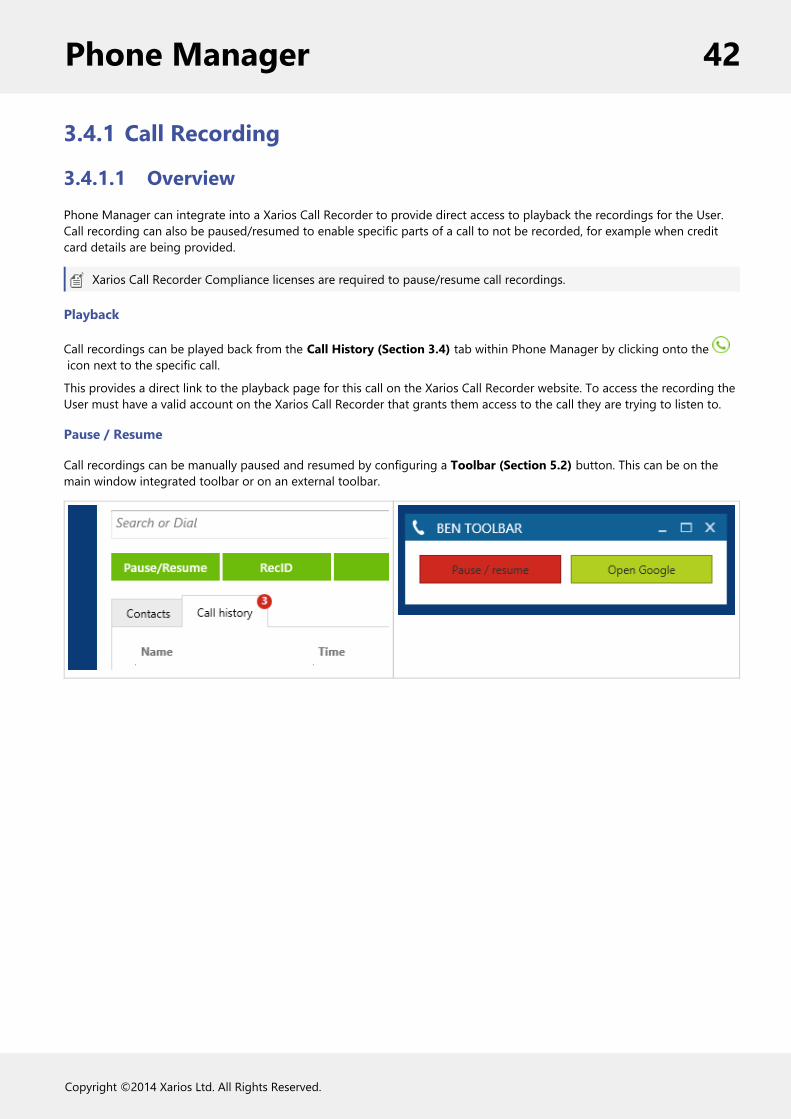
3.4.1.1 OverviewPhone Manager can integrate into a Xarios Call Recorder to provide direct access to playback the recordings for the User.Call recording can also be paused/resumed to enable specific parts of a call to not be recorded, for example when creditcard details are being provided.
Xarios Call Recorder Compliance licenses are required to pause/resume call recordings.
Playback
Call recordings can be played back from the Call History (Section 3.4) tab within Phone Manager by clicking onto the icon next to the specific call.
This provides a direct link to the playback page for this call on the Xarios Call Recorder website. To access the recording theUser must have a valid account on the Xarios Call Recorder that grants them access to the call they are trying to listen to.
Pause / Resume
Call recordings can be manually paused and resumed by configuring a Toolbar (Section 5.2) button. This can be on themain window integrated toolbar or on an external toolbar.
Phone Manager 42
Copyright ©2014 Xarios Ltd. All Rights Reserved.

3.5 Chat
3.5.1 OverviewChat is an instant messaging style feature that allows Users to exchange short messages with other Users. When achat session is started a new conversation is created that groups the messages sent to this User together. If a User isoffline when a chat message is sent they will be notified of new messages when they next come online.
Phone Manager will only show the messages received since it was last started. Closing the client and reopening willclear the chat history. Chat history is logged on the XCS server to provide access to past chat sessions for reporting.
The maximum length per message is 2500 characters.
Message Notifications
When a new message is received then the icon on the start menu will flash orange.
The Chat icon on the main windows will also display a red circle with the number of new messages.
Clicking on the icon will display the new message. Messages sent from the User are shown in orange and messagesreceived are shown in green. The time of the message is tagged to the right of the message.
Next to each conversation if there are new unread messages then the number of them will be shown against Users
Phone Manager 43
Copyright ©2014 Xarios Ltd. All Rights Reserved.

conversation.
Multiple Chat Sessions
Multiple chat sessions are grouped by the User who the message is sent to or received from. Each User has the list ofconversations shown on the left hand side and clicking on the name will change the right hand window to show thehistory.
Phone Manager 44
Copyright ©2014 Xarios Ltd. All Rights Reserved.

4 Outlook FeaturesThe following section covers the features that are available in the Microsoft Outlook licensed version of PhoneManager. The specific Microsoft Outlook features that are provided are:
Directory Integration (Section 3.3.1) Outlook contacts can be linked into the Phone Manager directory anddisplayed on the toaster.
Screen Popping Outlook contacts can be screen popping.
Call History Outlook contacts can have call history (journal entries) created.
Calendar / DND Synchronisation Outlook calendar can be used to automatically synchronise the Users DNDstate with their calendar items.
This license also provides:
Hot Keys (Section 4.1) Configure global hotkeys to automate common telephony tasks.
Call Banner Profiles(Section 4.2)
Toaster support for custom banner profiles.
Softphone (Section 7.2) Support for connecting as a softphone. Requires a softphone license.
Integrated Toolbar(Section 4.3)
Only available when connected as a softphone. This provides 5 buttons that can becustomised on the main window.
Phone Manager 45
Copyright ©2014 Xarios Ltd. All Rights Reserved.

4.1 Hot Keys
4.1.1 OverviewHot Keys enable Users to set a combination of keystrokes to access commonly used features within Phone Manager. Theconfiguration of the hot keys is specific to each User. The following list of hot key actions are supported:
Action Description
Answer call Answers the call currently ringing, if there are any calls in progress then this is ignored.
Clear call Clears the call that is connected to the endpoint.
Directory search Brings the main window to the front and sets the focus and cursor to the Search or Dial field.
Do not disturb Toggles the DND state at the endpoint. If no message is pre configured then it will prompt forthe message to use.
Highlight and dial Dials the number that is currently highlighted in other applications.
Hold or retrieve If a call is on hold then retrieves the call otherwise puts it on hold.
Launch call history Brings the main window to the front and sets the call history tab in focus.
Launch dial pad Shows the dial pad window.
Mute Mutes the audio for the current call. If this is a softphone then both sides of the call are mutedotherwise only the audio from the Users endpoint is muted. See Softphone Limitations(Section 7.2.8).
Redial Redials the last number using the Mitel feature (default code 380). Not supported onsoftphone, see Softphone Limitations (Section 7.2.8) .
Restore Phone Manager Brings the main window to the front.
Volume up Increases the volume level. See the Volume Control (Section 3.2.5) section for details.
Volume down Decrease the volume level. See the Volume Control (Section 3.2.5) section for details.
Configuration
To configure the hot keys:
1. Open the Settings window.2. Select the Hot Keys tab.
Phone Manager 46
Copyright ©2014 Xarios Ltd. All Rights Reserved.

3. Double click on the hot key entry to configure.
Phone Manager 47
Copyright ©2014 Xarios Ltd. All Rights Reserved.
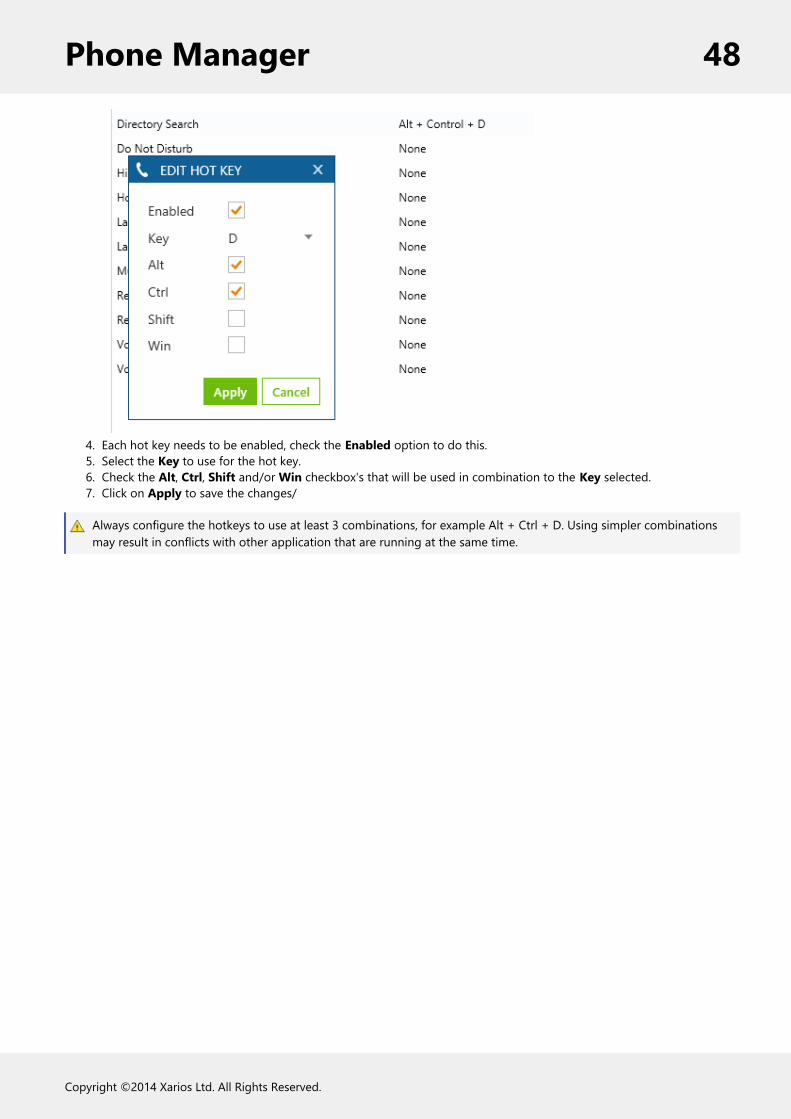
4. Each hot key needs to be enabled, check the Enabled option to do this.5. Select the Key to use for the hot key.6. Check the Alt, Ctrl, Shift and/or Win checkbox's that will be used in combination to the Key selected.7. Click on Apply to save the changes/
Always configure the hotkeys to use at least 3 combinations, for example Alt + Ctrl + D. Using simpler combinationsmay result in conflicts with other application that are running at the same time.
Phone Manager 48
Copyright ©2014 Xarios Ltd. All Rights Reserved.

4.2 Call Banner Profiles
4.2.1 OverviewBanner profiles control how the Phone Manager toaster popup is displayed when calls are received at the client. Theinformation that is displayed, the colour and text of the title bar can be changed depending on a specific set ofconditions being met for the call.
For example, using a condition on the DDI number, support line calls could be shown with a green banner.
Support line calls shown with a green banner. Sales line calls could be shown with a blue banner.
Several different profiles can be created and they can be given a priority so that if two banners have a similarcondition then the one with the highest priority will be used.
See the Call Banner Profile section on the XCS server for details on how to configure these.
Phone Manager 49
Copyright ©2014 Xarios Ltd. All Rights Reserved.

4.3 Integrated Toolbar
4.3.1 OverviewThe integrated toolbar provides five buttons on the main window shown underneath the Search or Dial field. Eachbutton can be customised by the User to set the label shown and what action is performed when the button is clicked.
This is only available when running with a Professional or higher license or when using the built in softphone.
Customising Buttons
To edit the button:
1. Right click the button and select Edit.2. Select the Action to perform from the Action drop down list. See the Button Actions (Section 5.2.2) section
for details.3. Enter the name that will be shown on the button in the Name field.4. Configure any Parameters if required by the Action selected.
Phone Manager 50
Copyright ©2014 Xarios Ltd. All Rights Reserved.
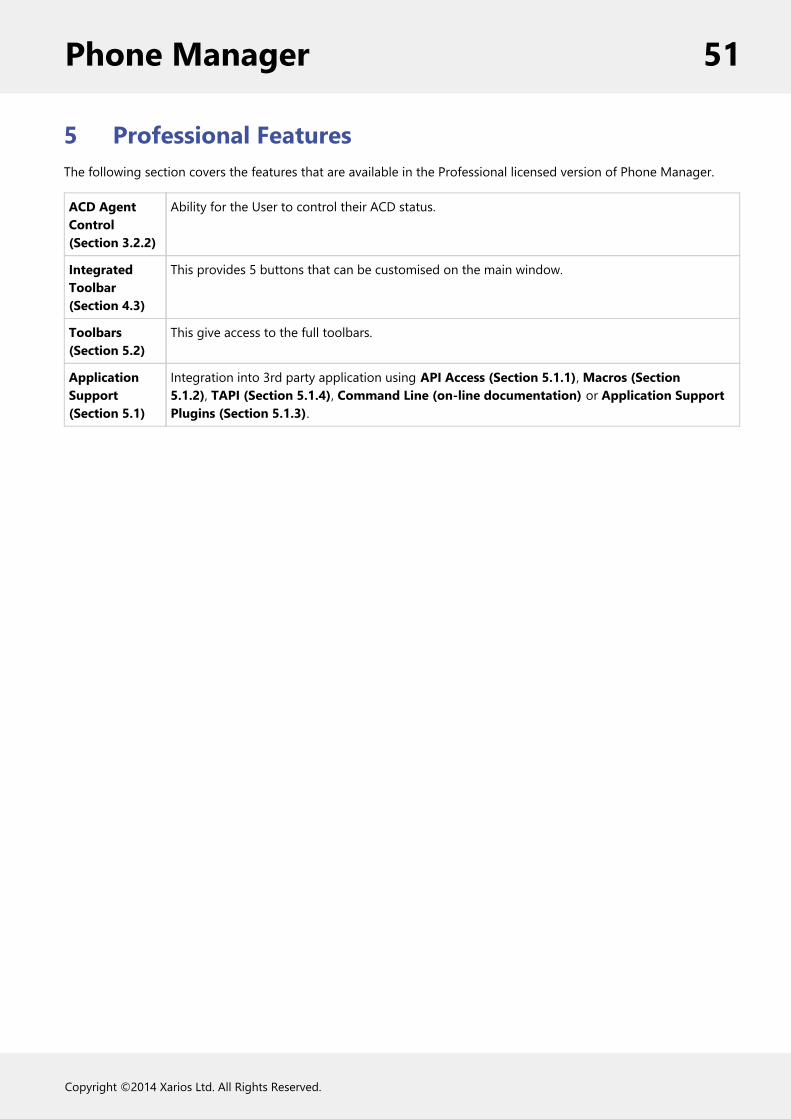
5 Professional FeaturesThe following section covers the features that are available in the Professional licensed version of Phone Manager.
ACD AgentControl(Section 3.2.2)
Ability for the User to control their ACD status.
IntegratedToolbar(Section 4.3)
This provides 5 buttons that can be customised on the main window.
Toolbars(Section 5.2)
This give access to the full toolbars.
ApplicationSupport(Section 5.1)
Integration into 3rd party application using API Access (Section 5.1.1), Macros (Section5.1.2), TAPI (Section 5.1.4), Command Line (on-line documentation) or Application SupportPlugins (Section 5.1.3).
Phone Manager 51
Copyright ©2014 Xarios Ltd. All Rights Reserved.

5.1 Application SupportPhone Manager can integrate into 3rd party applications in several ways depending on the requirements and featuresthat are supported by the application. This can be using something simple like Highlight & Dial (Section 3.1.2) ormore complex full call control and events using API Access (Section 5.1.1).
The following is the list of integration options available.
Method Description
Directories(Section 3.3.1)
Contact directory imports, to display imformation about the caller on the toaster.
Highlight & Dial(Section 3.1.2)
Dialling from other applications by selecting the number and then activating the dial by usinga Hot Keys (Section 4.1) or double clicking on the highlight and dial icon.
Command Line(on-linedocumentation)
Command line arguments can be passed to the client executable to perform actions.
Macros (Section5.1.2)
VBScript macros that can be activated on call events or manually by the User.
TAPI (Section5.1.4)
1st Party TAPI driver for integration into 3rd party applications.
ApplicationSupport Plugins(Section 5.1.3)
Plugins provide integration to a range of well known CRM style applications.
If the application or version is not currently supported then complete the integration request process and wecan investigate the possibility of supporting this application.
Phone Manager 52
Copyright ©2014 Xarios Ltd. All Rights Reserved.

5.1.1 API Access
5.1.1.1 OverviewThe client provides API components that can be used to embed some of the functionality of the Phone Manager clientinto a 3rd party application. Unlike the other Application Support (Section 5.1) options the client does not have tobe running to do this.
All of the call controls events and methods are available, so applications can react to call ringing events and receivethe call details and then perform their own handling of what to do next, i.e. screen popping, dialling out etc.
This does require development work to be performed by the application vendor or administrator.
When using the API the Phone Manager client can be running at the same time and this will only consume asingle license as long as the Phone Manager client and the application are running in the same user session.
See the Phone Manager API reference for more information.
Phone Manager 53
Copyright ©2014 Xarios Ltd. All Rights Reserved.

5.1.2 Macros
5.1.2.1 OverviewThe client supports a scripting interface to allow VBScript macros to be developed. They can then be configured totrigger on a manual User action, i.e. a toolbar button action, or on pre-defined call events. The scripting interfaceprovides access to the call information that can be used within the script and extra methods to control the endpointand other features, i.e. call recording.
For example this VBScript example will display a message box when an incoming call is received and display the callerid:
MsgBox "Call from " & PhoneControl.CLI
See the Phone Manager Macro API reference for more information.
5.1.2.2 ConfigurationThe macro design and configuration is available for Users who have the Allow macro editing option enabled on theirClient Profile. WIthout this option Users can only change the Enable event-driven macros option. This controls if themacros that have been assigned to the User will be triggered on the associated call events.
('pm_settings_macros.png' in the on-line documentation)Macros
When creating a new macro they are first designed and tested from within this section. When this is complete theycan be published and this makes them available on the XCS server and can then be assigned to the relevant Users.When they are published a copy is made of the local version of the macro and this can then not be edited. Anyupdates would need to be made on the original local version and then re published. Users would then need to bereassigned to this new published version.
The list of macros shown in the Macro Configuration section only shows the local macros not published to the serverfor this User. To see the list of published macros see the Macros section on the XCS website.
To create or edit a new macro:
1. Click on the New or Edit button.
Phone Manager 54
Copyright ©2014 Xarios Ltd. All Rights Reserved.
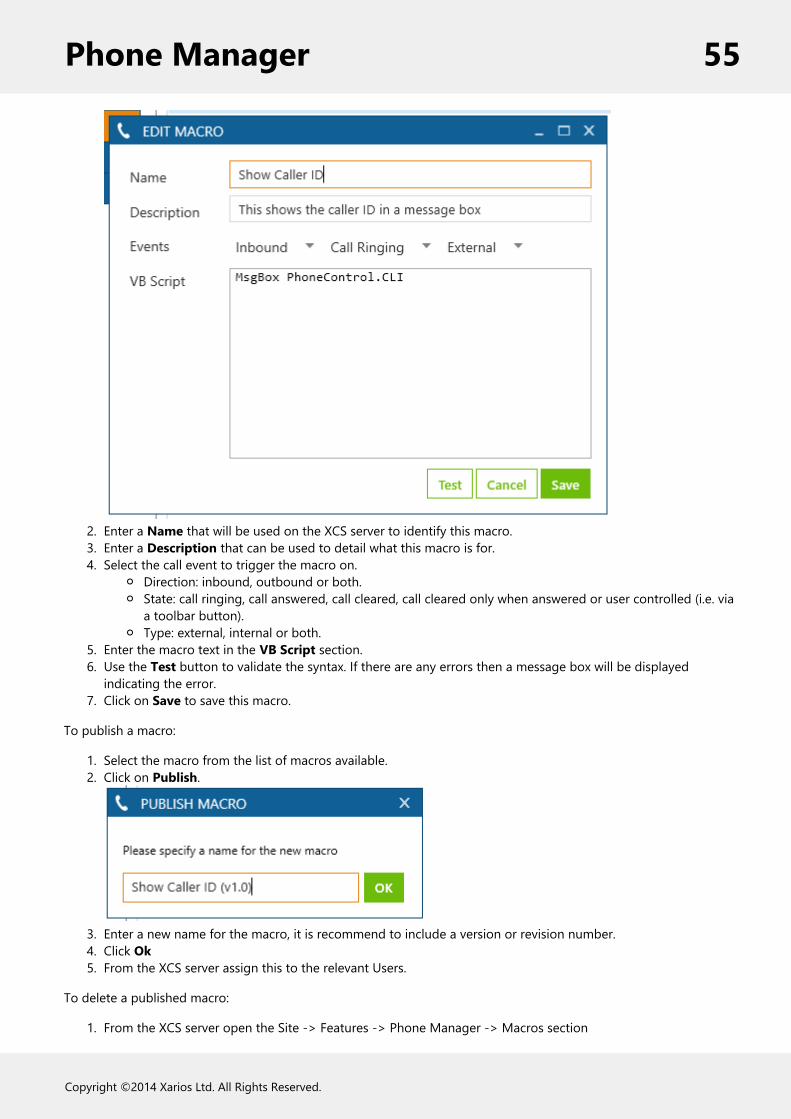
2. Enter a Name that will be used on the XCS server to identify this macro.3. Enter a Description that can be used to detail what this macro is for.4. Select the call event to trigger the macro on.
Direction: inbound, outbound or both.State: call ringing, call answered, call cleared, call cleared only when answered or user controlled (i.e. viaa toolbar button).Type: external, internal or both.
5. Enter the macro text in the VB Script section.6. Use the Test button to validate the syntax. If there are any errors then a message box will be displayed
indicating the error.7. Click on Save to save this macro.
To publish a macro:
1. Select the macro from the list of macros available.2. Click on Publish.
3. Enter a new name for the macro, it is recommend to include a version or revision number.4. Click Ok5. From the XCS server assign this to the relevant Users.
To delete a published macro:
1. From the XCS server open the Site -> Features -> Phone Manager -> Macros section
Phone Manager 55
Copyright ©2014 Xarios Ltd. All Rights Reserved.
2. Select the macro and click on Delete.
Phone Manager 56
Copyright ©2014 Xarios Ltd. All Rights Reserved.

5.1.3 Application Support Plugins
5.1.3.1 OverviewPhone Manager has plugins available that are able to directly integrate with a range of well known CRM styleapplications. The plugins generally provide deeper, more seamless integration than other methods as they leveragethe APIs of the specific application.
For an up to date list of the supported application visit http://www.xarios.com.
Features
There are 4 features that the plugins can provide. Depending on the application that is being integrated with onlysome maybe available with varying levels of support and there may need to be integration work performed by theapplication vendor or administrator of the system. See the integration document for the specific plugin for details.
Dial out directly from the application : For example having a dial button next to a telephone number field.Screen popping: Searching the application for contacts that have matching caller ids and displaying therecord.Call history: Creating a call history phone call activity in the application with the call details.Calendar and DND synchronisation : Controlling the DND state of the endpoint based upon calendar entriesin the application.
5.1.3.2 ConfigurationTo configure a plugin for one of the application support features:
1. From the Application Support Configuration section.('pm_settings_appsupport_list.png' in the on-line documentation)Plugins
2. Click on the New button.('pm_settings_appsupport_edut.png' in the on-line documentation)Plugin configuration
3. From the list of Applications select the application to integrate with.4. This will then change configuration on the right hand side to show the specific configuration required for this
plugin. See the relevant integration document for details.5. Select the Feature to enable either:
Screen popCall historyCalendar / DND sync
6. Multiple features can be enabled for each plugin by repeating the process from step 1.7. Select the event trigger that will cause the feature to be actioned (this is not applicable to Calendar / DND
sync).Direction: inbound, outbound or both.State: call ringing, call answered, call cleared, call cleared only when answered or user controlled (i.e. viaa toolbar button).Type: external, internal or both.
8. Click on Save.
Phone Manager 57
Copyright ©2014 Xarios Ltd. All Rights Reserved.

5.1.4 TAPI
5.1.4.1 OverviewThe TAPI Service Provider (TSP) provides a 1st Party TAPI support for client applications, 3rd Party TAPI is notsupported. Multi user environments such as Terminal Service, Remote Desktop or Citrix configurations are notsupported in this release.
The TSP service supports the TAPI v2 and TAPI v3 standards.
The TSP only supports call control over the first call at a device single and limited events (new & end) for additionalcalls will be provided to the client application.
The TSP cannot be tested against every application that “supports” TAPI due to the different ways that it can beimplemented. Additionally the features available within the client application are dependent on what the 3rd partyapplication has implemented. Support that the TSP will work with any given application is not provided and wouldneed to be verified to ensure proper integration.
The TSP supports the following basic telephony functions as defined by Microsoft.
http://msdn.microsoft.com/en-us/library/windows/desktop/ms725522%28v=vs.85%29.aspx#tspi.call_states_and_events_qref
Phone Manager 58
Copyright ©2014 Xarios Ltd. All Rights Reserved.

5.2 Toolbars
5.2.1 OverviewToolbar allows the application to be configured so that commonly performed actions can be performed at the touchof a button. Specific functions can be programmed under a button such as answering a call, tagging a call recording,or a macro can be executed for more advanced tasks. Toolbars are configured on the XCS server and assigned toUsers.
When a toolbar is assigned they become available to the User to open in the Toolbars menu on the main window.
Multiple toolbars can be created with varying amounts of buttons that can have custom labels and be coloured tohighlight or categorise specific types of buttons. To open a toolbar select the entry from the toolbar drop down.
Phone Manager 59
Copyright ©2014 Xarios Ltd. All Rights Reserved.

5.2.1 Integrated Toolbar
5.2.1.1 OverviewThe integrated toolbar provides five buttons on the main window shown underneath the Search or Dial field. Eachbutton can be customised by the User to set the label shown and what action is performed when the button is clicked.
This is only available when running with a Professional or higher license or when using the built in softphone.
Customising Buttons
To edit the button:
1. Right click the button and select Edit.2. Select the Action to perform from the Action drop down list. See the Button Actions (Section 5.2.2) section
for details.3. Enter the name that will be shown on the button in the Name field.4. Configure any Parameters if required by the Action selected.
Phone Manager 60
Copyright ©2014 Xarios Ltd. All Rights Reserved.

5.2.2 Button Actions
5.2.2.1 OverviewThe buttons that can be used on a toolbar have different actions that can be performed when they are clicked.Depending on the action then additional parameters may need to be configured, or in some cases if they are notprovided then the User will be prompted for these when they click the button.
Action Parameters Description
ACD endwrap
None End the wrap state for this agent and place them into the free state.
ACD status Optional:Huntgroup
Logs the agent in to the Huntgroup, if not provided then logs into all groups.If they are already logged in then logs out of the Huntgroup, if not provided then logsthem out of all groups.
Answercall
None Answers a ringing call at the endpoint.
Changecaller ID
Optional:Number
This changes the outgoing caller ID that is presented when calls are made from thisendpoint. The features needs to be enabled on the PBX and the number presented needsto be allowed by the line provider.
Clear call None Clears the call that is connected to the endpoint.
Dial digits Optional:Digits
Sends the Digits to the endpoint. If not provided then prompts the User for the digits.
Do notdisturb
Optional:NumberOptional:Text
If the endpoint is in DND then DND is removed. If they are not in DND then the endpointis placed into DND using the message Number and the message Text. If they are notprovided then the User is prompted to enter them.
Enableeventdrivenmacros
None Enables or disables event driven macros.
Featurecode
Optional:CodeOptional:Parameter
This represents any feature code that is available on the PBX. The list of feature codesavailable is downloaded automatically from the PBX along with the description.
This will run the feature Code provided or prompt the User to enter the feature codenumber. Some feature codes can accept additional Parameters and this can be configuredbut the User cannot enter them if not provided.
Headsetmode
None Enables or disable headset mode on the endpoint.
Hold call None Holds the call that is connected to the endpoint.
Make call Optional:Number
Makes a call from the endpoint to the Number. If the Number is not provided then theUser is prompted to enter this.
Pause /resume
None This pauses or resumes the call recording for the active call on the endpoint. (Requirescall recording integration to be enabled).
Phone Manager 61
Copyright ©2014 Xarios Ltd. All Rights Reserved.
callrecording
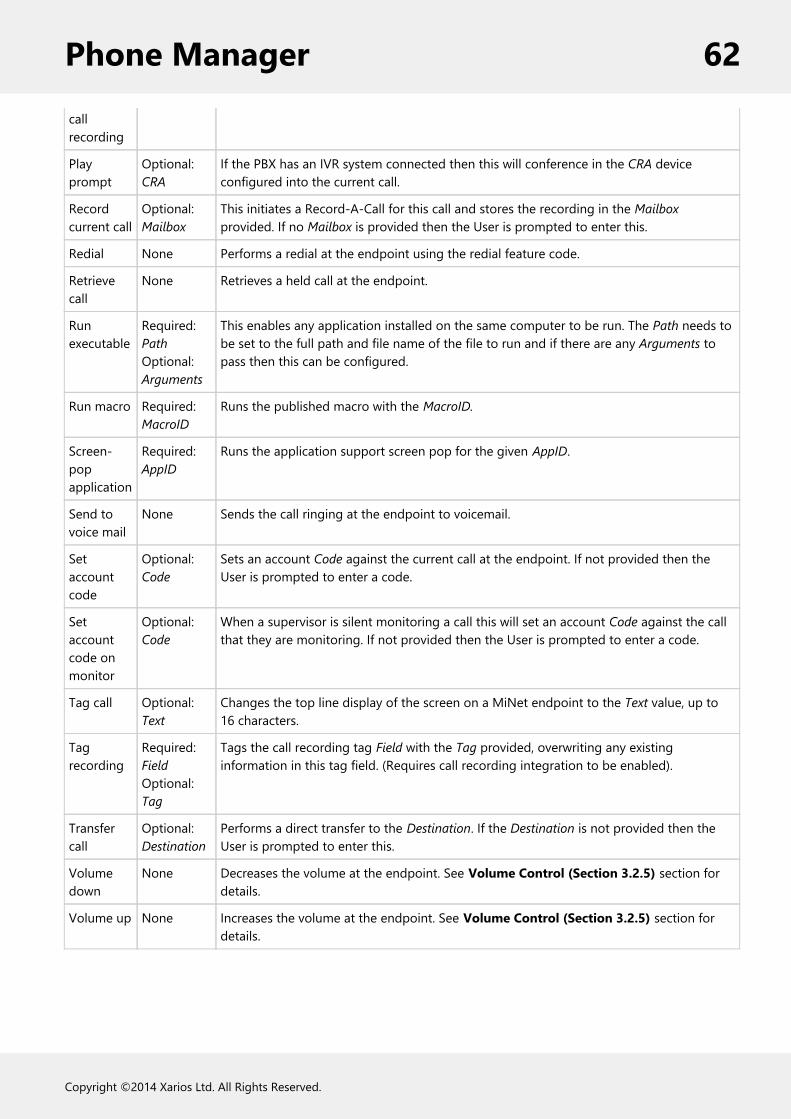
Playprompt
Optional:CRA
If the PBX has an IVR system connected then this will conference in the CRA deviceconfigured into the current call.
Recordcurrent call
Optional:Mailbox
This initiates a Record-A-Call for this call and stores the recording in the Mailboxprovided. If no Mailbox is provided then the User is prompted to enter this.
Redial None Performs a redial at the endpoint using the redial feature code.
Retrievecall
None Retrieves a held call at the endpoint.
Runexecutable
Required:PathOptional:Arguments
This enables any application installed on the same computer to be run. The Path needs tobe set to the full path and file name of the file to run and if there are any Arguments topass then this can be configured.
Run macro Required:MacroID
Runs the published macro with the MacroID.
Screen-popapplication
Required:AppID
Runs the application support screen pop for the given AppID.
Send tovoice mail
None Sends the call ringing at the endpoint to voicemail.
Setaccountcode
Optional:Code
Sets an account Code against the current call at the endpoint. If not provided then theUser is prompted to enter a code.
Setaccountcode onmonitor
Optional:Code
When a supervisor is silent monitoring a call this will set an account Code against the callthat they are monitoring. If not provided then the User is prompted to enter a code.
Tag call Optional:Text
Changes the top line display of the screen on a MiNet endpoint to the Text value, up to16 characters.
Tagrecording
Required:FieldOptional:Tag
Tags the call recording tag Field with the Tag provided, overwriting any existinginformation in this tag field. (Requires call recording integration to be enabled).
Transfercall
Optional:Destination
Performs a direct transfer to the Destination. If the Destination is not provided then theUser is prompted to enter this.
Volumedown
None Decreases the volume at the endpoint. See Volume Control (Section 3.2.5) section fordetails.
Volume up None Increases the volume at the endpoint. See Volume Control (Section 3.2.5) section fordetails.
Phone Manager 62
Copyright ©2014 Xarios Ltd. All Rights Reserved.
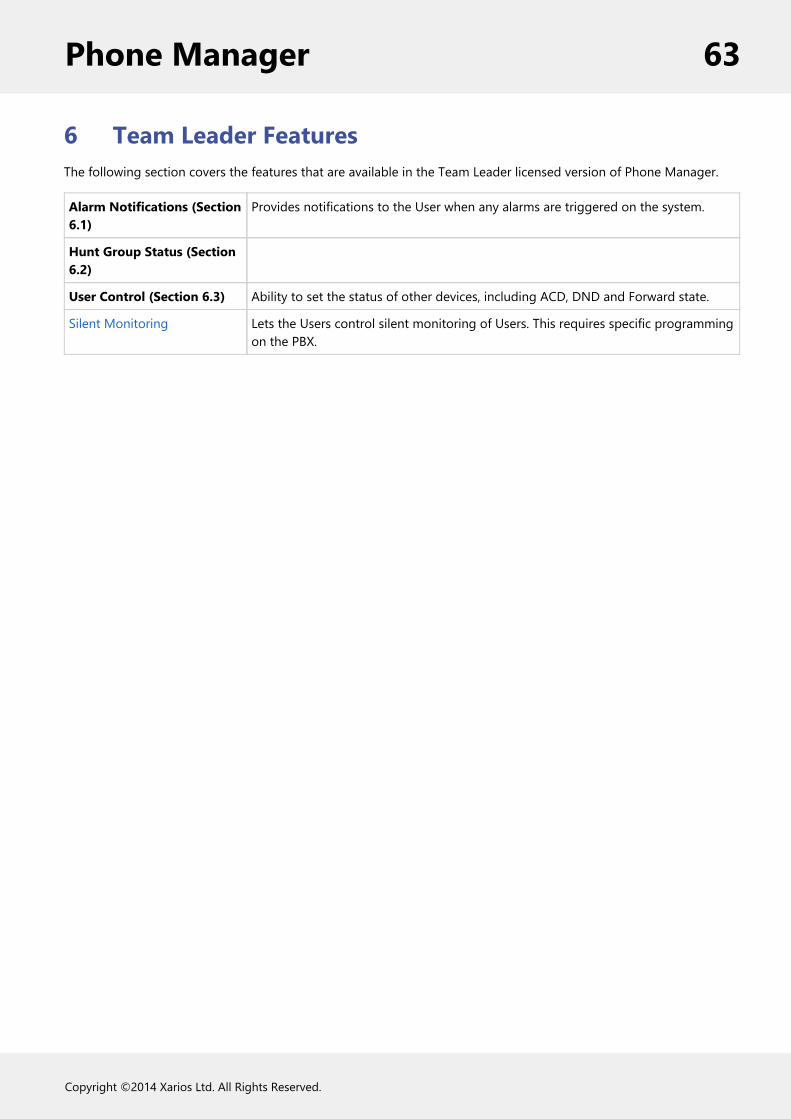
6 Team Leader FeaturesThe following section covers the features that are available in the Team Leader licensed version of Phone Manager.
Alarm Notifications (Section6.1)
Provides notifications to the User when any alarms are triggered on the system.
Hunt Group Status (Section6.2)
User Control (Section 6.3) Ability to set the status of other devices, including ACD, DND and Forward state.
Silent Monitoring Lets the Users control silent monitoring of Users. This requires specific programmingon the PBX.
Phone Manager 63
Copyright ©2014 Xarios Ltd. All Rights Reserved.

6.1 Alarm Notifications
6.1.1 OverviewAlarms generated on the PBX can be sent to Team Leader clients to notify them that they have occurred. Theconfiguration of the alarms that will be sent to the Users is configured in the Alarms section on the XCS server.
When an alarm is raised the client will display an alert window and the User can dismiss the alarm. The User may alsobe able to clear the alarm from the PBX if the endpoint they are associated with is programmed as an Administrator.
Phone Manager 64
Copyright ©2014 Xarios Ltd. All Rights Reserved.

6.2 Hunt Group Status
6.2.1 OverviewTeam leader provides information about hunt groups to the User. This gives the User details on the number of callsqueuing and ringing at any hunt groups that they have on their contact list.
Phone Manager 65
Copyright ©2014 Xarios Ltd. All Rights Reserved.

6.3 User Control
6.3.1 OverviewTeam leader provides the User with the ability to able to control other Users endpoints and perform silent monitoractions. The control actions that are available are:
DND controlEnabling and disabling DND
ACD controlLogging agents out of ACD hunt groupsLogging agents into ACD hunt groups
Forward state controlSetting forwardingRemoving forwarding
Silent monitor (this is dependent on the PBX programming)Start a silent monitorStart a continuous silent monitor
To control another endpoint, from the Contacts window right click onto the device and this will display a menu wherethe action can be selected. Depending on the type of device and its current state the list of available actions maychange.
Phone Manager 66
Copyright ©2014 Xarios Ltd. All Rights Reserved.

7 Settings
7.1 OverviewThe settings section on the client provides the User with the ability to be able to configure how the clients connectsand interacts with the system. This includes the following options.
Connection (Section7.1)
Configuration and connection settings for how the client will connect to the XCS serverfrom local and remote locations and how their endpoint number is assigned.
Softphone (Section7.2)
Options to configure the audio sources, codecs and quality of speech for the softphone.
Hot Key The hot key configuration and assignment.
Macros Enabling event-driven macros and access the macro designer.
Application Support Configuration of the plugins for CRM integration.
Diagnostics (Section7.6)
Options for enabling diagnostics and troubleshooting.
Phone Manager 67
Copyright ©2014 Xarios Ltd. All Rights Reserved.

7.1 Connection
7.1.1 OverviewThe connection settings enables the User to configure how the client will connect back to the XCS server. The optionsshown here will have been pre configured during the installation process, see the Configuration (Section 2.3) sectionfor more details, when the client was first installed and connected.
General
The general section configures how this computer will be used and the default options to connect.
If the PC that the client is installed on remains in the same physical location and uses the same connection details allof the time then check the Is the location of this PC static? option. This configures the client to always use theconnection settings from the Default Location.
If the PC does move, for example this is a laptop, then uncheck the Is the location of this PC static? option. This willconfigure the client to always prompt for the location details to connect with each time that it starts.
Phone Manager 68
Copyright ©2014 Xarios Ltd. All Rights Reserved.
7.1.1 Local Connection
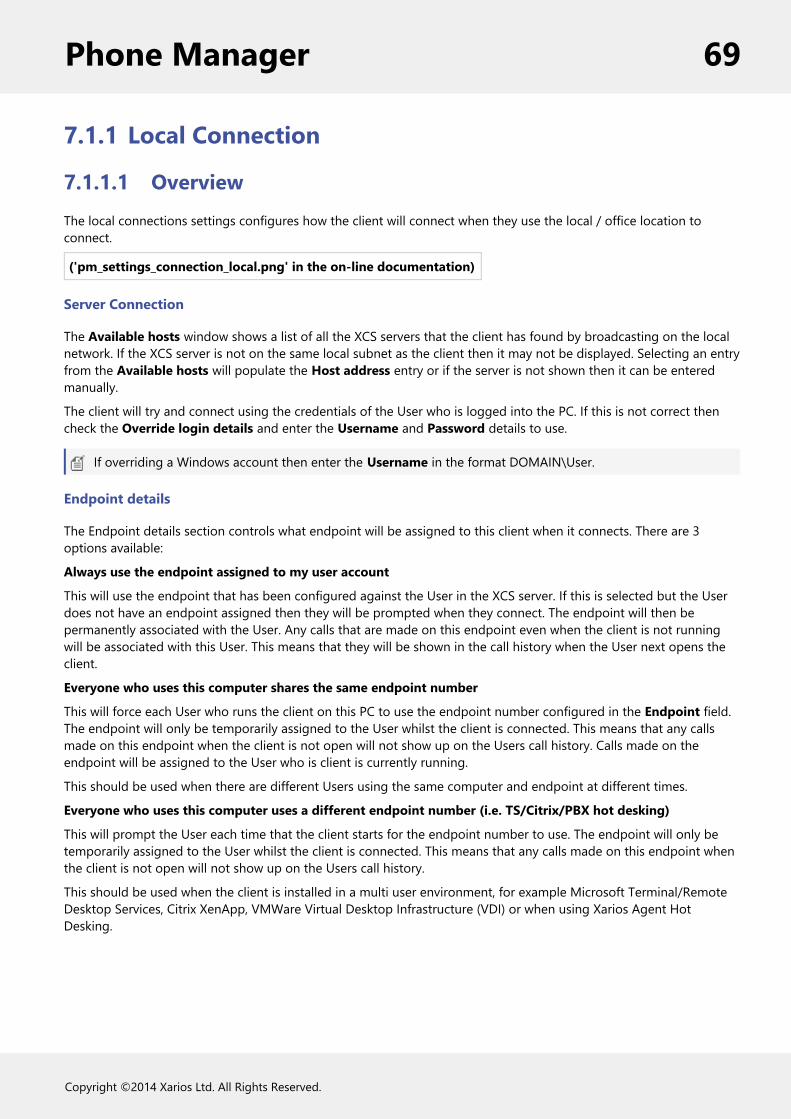
7.1.1.1 OverviewThe local connections settings configures how the client will connect when they use the local / office location toconnect.
('pm_settings_connection_local.png' in the on-line documentation)
Server Connection
The Available hosts window shows a list of all the XCS servers that the client has found by broadcasting on the localnetwork. If the XCS server is not on the same local subnet as the client then it may not be displayed. Selecting an entryfrom the Available hosts will populate the Host address entry or if the server is not shown then it can be enteredmanually.
The client will try and connect using the credentials of the User who is logged into the PC. If this is not correct thencheck the Override login details and enter the Username and Password details to use.
If overriding a Windows account then enter the Username in the format DOMAIN\User.
Endpoint details
The Endpoint details section controls what endpoint will be assigned to this client when it connects. There are 3options available:
Always use the endpoint assigned to my user account
This will use the endpoint that has been configured against the User in the XCS server. If this is selected but the Userdoes not have an endpoint assigned then they will be prompted when they connect. The endpoint will then bepermanently associated with the User. Any calls that are made on this endpoint even when the client is not runningwill be associated with this User. This means that they will be shown in the call history when the User next opens theclient.
Everyone who uses this computer shares the same endpoint number
This will force each User who runs the client on this PC to use the endpoint number configured in the Endpoint field.The endpoint will only be temporarily assigned to the User whilst the client is connected. This means that any callsmade on this endpoint when the client is not open will not show up on the Users call history. Calls made on theendpoint will be assigned to the User who is client is currently running.
This should be used when there are different Users using the same computer and endpoint at different times.
Everyone who uses this computer uses a different endpoint number (i.e. TS/Citrix/PBX hot desking)
This will prompt the User each time that the client starts for the endpoint number to use. The endpoint will only betemporarily assigned to the User whilst the client is connected. This means that any calls made on this endpoint whenthe client is not open will not show up on the Users call history.
This should be used when the client is installed in a multi user environment, for example Microsoft Terminal/RemoteDesktop Services, Citrix XenApp, VMWare Virtual Desktop Infrastructure (VDI) or when using Xarios Agent HotDesking.
Phone Manager 69
Copyright ©2014 Xarios Ltd. All Rights Reserved.

7.1.2 Remote Connection
7.1.2.1 OverviewThe remote connection settings configures how the client will connect when they use the remote location to connect.The same options as the Local Connection (Section 7.1.1) are available except for the broadcast options.
Phone Manager 70
Copyright ©2014 Xarios Ltd. All Rights Reserved.

7.2 Softphone
7.2.1 OverviewThe softphone settings enable the User to configure how the built in softphone operates and integrates with PhoneManager.
Before using the softphone please read and understand the issues raised in the E911 Warning, Emergency Calls andSecurity (Section 7.2.1) section and the limitations of using a softphone in the Softphone Limitations (Section7.2.8) section.
This softphone has the following configuration sections.
General (Section 7.2.2) Configuration of any general settings.
Audio (Section 7.2.3) Enables the audio sources for the speakers and microphone that are used to beconfigured.
Codecs (Section 7.2.4) Enables the audio codec that will be used to be configured.
Quality (Section 7.2.5) Configures options relating to voice quality and echo cancellation.
NAT and Firewalls(Section 7.2.6)
Configures firewall and NAT configuration options when connecting remotely.
DTMF Support
The softphone only supports the RFC 2833 DTMF encoding and this needs to be configured within the Mitel DatabaseProgramming call configuration section for the endpoint as shown.
Maximum calls
The softphone supports up to 2 concurrent calls, i.e. one call connected and another on hold. The number ofmaximum calls needs to be configured to 2 within the Mitel Database Programming as the default value for this is 1.This can be set in the SIP Phone Groups section for the endpoint as shown.
Phone Manager 71
Copyright ©2014 Xarios Ltd. All Rights Reserved.

Phone Manager 72
Copyright ©2014 Xarios Ltd. All Rights Reserved.

7.2.1 E911 Warning, Emergency Calls and Security
7.2.1.1 WARNINGDo not dial emergency hotline numbers from the IP SoftPhone. In the case of an emergency, dial the appropriate localemergency-service number directly, or use the nearest local public phone to dial an emergency hotline.
The IP SoftPhone communicates through a central telephone system that routes all emergency calls directly to anumber that is local to the central system. If the IP SoftPhone is not at the same address as the central system, thenemergency service will not be routed to the proper location.
Therefore, if the IP SoftPhone does not stay within the premises of the central system, you must configure the IPSoftPhone’s programmable keys to dial the local police or fire departments directly, and you must clearly label the keyicons. If the IP SoftPhone is mobile, meaning it is used in multiple locations, you must know the direct emergency-contact numbers for each location.
In the case of an emergency, you are responsible for determining the nature of the emergency and dialing theappropriate emergency-service number directly. You must provide the emergency personnel your location andtelephone number because the emergency service may not receive accurate identification information automatically.
7.2.1.2 SECURITYThe implementation of SIP within the MiVoice Office like many other systems is NOT based on a secure dataconnection using TLS and certificates, and by definition is not secure.
With this in mind Xarios would strongly suggest, when using SIP outside of your firewall infrastructure that every careis taken to ensure that a level of security is in place in line with your internal security policy. This could involve (butmay be not limited to) using NAT or establishing a secure VPN connection between remote clients and the corporateLAN.
Should you be in any doubt please consult the relevant Mitel documentation on securing your MiVoice Officeinstallation.
Phone Manager 73
Copyright ©2014 Xarios Ltd. All Rights Reserved.

7.2.2 General
7.2.2.1 OverviewThe client has a built in SIP softphone but there maybe situations when a third party SIP endpoint, for example Xlite,Bria etc., needs to be used and associated with Phone Manager. When Phone Manager connects it automaticallyknows that the endpoint associated with the User is a SIP endpoint so will start the built in softphone. Checking theThird Part SIP Endpoint option will prevent this from happening when it runs.
Using a third party SIP endpoint instead of the built in softphone will reduce the features that are available as the builtin softphone uses the CTI connection to provide a more seamless experience for the User. See the SoftphoneLimitations (Section 7.2.8) section for details.
Phone Manager 74
Copyright ©2014 Xarios Ltd. All Rights Reserved.

7.2.3 Audio
7.2.3.1 OverviewThe softphone uses the microphone and speakers attached to the local computer to provide audio for the calls thatare made. When the softphone starts it will try and use the first microphone and speakers that it finds. To override thisselection select the Speaker and Microphone from the options available.
For both the speaker and microphone the volume levels can be adjusted and using the level indications you can seewhat impact changing this will have. To test the speakers click on the Play button and a message will be played backthrough the speaker selected. To test the microphone just speak into the microphone.
Phone Manager 75
Copyright ©2014 Xarios Ltd. All Rights Reserved.

7.2.4 Codecs
7.2.4.1 OverviewThe softphone supports several different audio codecs that can be used depending on the quality of the audiorequired and the amount of network bandwidth available. By default the softphone supports G.711 A-Law, G.711 Mu-Law and G729. The softphone will negotiate with the PBX to determine the one to use based upon what isprogrammed on the PBX.
Phone Manager 76
Copyright ©2014 Xarios Ltd. All Rights Reserved.
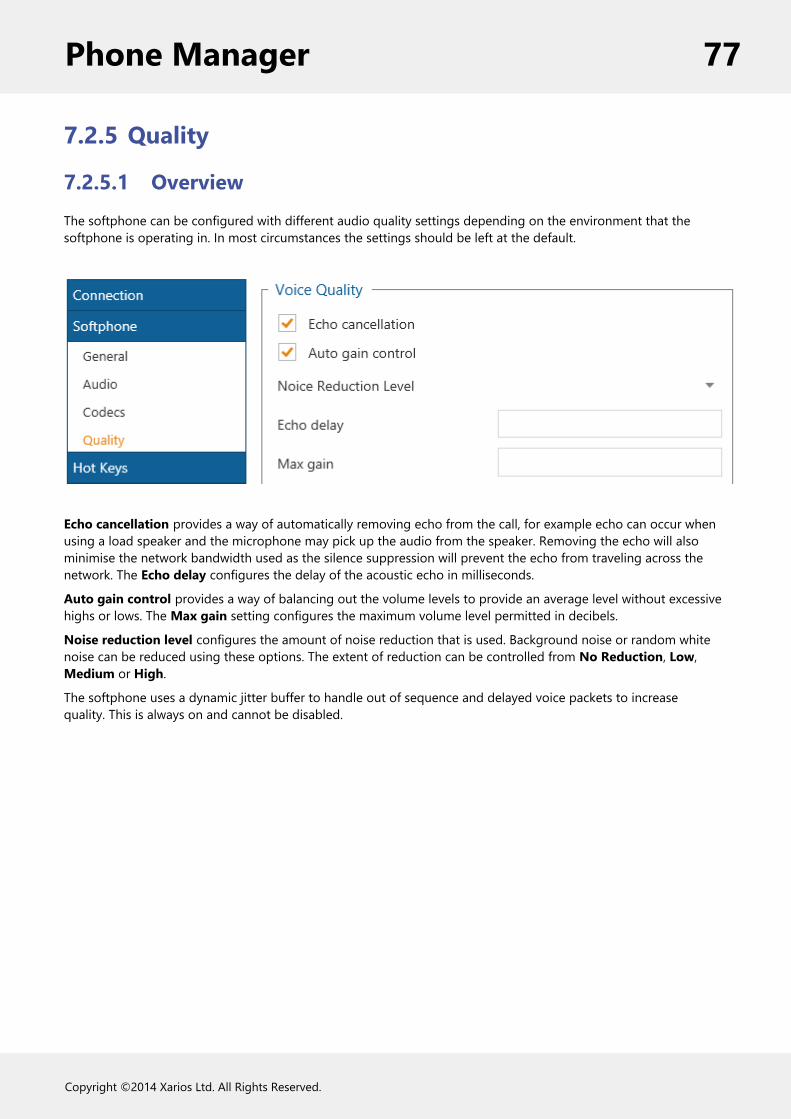
7.2.5 Quality
7.2.5.1 OverviewThe softphone can be configured with different audio quality settings depending on the environment that thesoftphone is operating in. In most circumstances the settings should be left at the default.
Echo cancellation provides a way of automatically removing echo from the call, for example echo can occur whenusing a load speaker and the microphone may pick up the audio from the speaker. Removing the echo will alsominimise the network bandwidth used as the silence suppression will prevent the echo from traveling across thenetwork. The Echo delay configures the delay of the acoustic echo in milliseconds.
Auto gain control provides a way of balancing out the volume levels to provide an average level without excessivehighs or lows. The Max gain setting configures the maximum volume level permitted in decibels.
Noise reduction level configures the amount of noise reduction that is used. Background noise or random whitenoise can be reduced using these options. The extent of reduction can be controlled from No Reduction, Low,Medium or High.
The softphone uses a dynamic jitter buffer to handle out of sequence and delayed voice packets to increasequality. This is always on and cannot be disabled.
Phone Manager 77
Copyright ©2014 Xarios Ltd. All Rights Reserved.

7.2.6 NAT and Firewalls
7.2.6.1 OverviewUsing a softphone remotely causes the voice traffic to have to flow through multiple switches, routers, firewalls etc. toreach its destination. This can cause audio problems as the devices that handle the voice packets may use a processcalled NAT traversal. NAT traversal is a standard technique for establishing and maintaining connection betweenremote devices on different networks, i.e. the softphone and the PBX.
Why this is important is that there is no single method for working with NAT that is successful in every scenario. Thereare several different options that the softphone supports. Basically each method is trying to establish what public IPaddress to use to send the voice packets to.
Session Traversal Utilities for NAT (STUN) is a standardised set of methods, including a network protocol, used inNAT traversal for applications of real-time voice, video, messaging, and other interactive IP communications. STUN isan acronym for Session Traversal Utilities for NAT, and is documented in RFC 5389.
Traversal Using Relays around NAT (TURN) is a protocol that allows for an element behind a Network addresstranslator (NAT) or firewall to receive incoming data over TCP or UDP connections. It is most useful for elementsbehind symmetric NATs or firewalls that wish to be on the receiving end of a connection to a single peer. TURN doesnot allow for users to run servers on well known ports if they are behind a NAT; it supports the connection of a userbehind a NAT to only a single peer.
None where no NAT traversal method is used but this can only be used for connections where the server and clientare on the same local network.
Manual where the public IP address to use is manually configured.
Auto Detect where the softphone attempts to automatically determine the type of method to use but if this fails thenwill fall back to the configured option.
This is not just an issue with the built in softphone but any SIP endpoint.
Phone Manager 78
Copyright ©2014 Xarios Ltd. All Rights Reserved.

7.2.7 Keep-Alives
7.2.7.1 OverviewThe softphone supports sending keep-alive requests back to the PBX. This prevents the network connection frombeing closed by any firewalls/routers that may cause the softphone when connecting via NAT.
There are three keep-alive options available that can be used depending on the network configuration.
Do not send keep alive messages: This disables any keep alive messages from being sent.
Re-register the softphone: This sends a SIP Register request to the PBX.
Send Options message: This sends a SIP Options request to the PBX.
When keep alive requests are being sent the time interval can be set to determine how often they are sent out. Thedefault is every 300 seconds or 5 minutes.
Phone Manager 79
Copyright ©2014 Xarios Ltd. All Rights Reserved.

7.2.8 Softphone Limitations
7.2.8.1 OverviewThe softphone does not have access to all of the same features as a MiNet device does. The following limitationsapply to the inbuilt softphone:
No ACD support, i.e. cannot login an ACD agent.Redial is not supported (feature code 380).Mute causes both parties audio to be muted out, unlike with a MiNET device where only the current endpointaudio is muted.
In addition to this the following restrictions apply to using a third party SIP endpoint (i.e. not the in built softphone):
Cannot make a call using Phone Manager, this means features like highlight and dial and TAPI will not work.Cannot place a call on hold or retrieve using Phone Manager.When making a call via the SIP endpoint the dial prefixes need to be set by the User, i.e. the manually have toenter the digits for an outside line.
Phone Manager 80
Copyright ©2014 Xarios Ltd. All Rights Reserved.

7.3 Hot Keys
7.3.1 OverviewHot Keys enable Users to set a combination of keystrokes to access commonly used features within Phone Manager. Theconfiguration of the hot keys is specific to each User. The following list of hot key actions are supported:
Action Description
Answer call Answers the call currently ringing, if there are any calls in progress then this is ignored.
Clear call Clears the call that is connected to the endpoint.
Directory search Brings the main window to the front and sets the focus and cursor to the Search or Dial field.
Do not disturb Toggles the DND state at the endpoint. If no message is pre configured then it will prompt forthe message to use.
Highlight and dial Dials the number that is currently highlighted in other applications.
Hold or retrieve If a call is on hold then retrieves the call otherwise puts it on hold.
Launch call history Brings the main window to the front and sets the call history tab in focus.
Launch dial pad Shows the dial pad window.
Mute Mutes the audio for the current call. If this is a softphone then both sides of the call are mutedotherwise only the audio from the Users endpoint is muted. See Softphone Limitations(Section 7.2.8).
Redial Redials the last number using the Mitel feature (default code 380). Not supported onsoftphone, see Softphone Limitations (Section 7.2.8) .
Restore Phone Manager Brings the main window to the front.
Volume up Increases the volume level. See the Volume Control (Section 3.2.5) section for details.
Volume down Decrease the volume level. See the Volume Control (Section 3.2.5) section for details.
Configuration
To configure the hot keys:
1. Open the Settings window.2. Select the Hot Keys tab.
Phone Manager 81
Copyright ©2014 Xarios Ltd. All Rights Reserved.

3. Double click on the hot key entry to configure.
Phone Manager 82
Copyright ©2014 Xarios Ltd. All Rights Reserved.

4. Each hot key needs to be enabled, check the Enabled option to do this.5. Select the Key to use for the hot key.6. Check the Alt, Ctrl, Shift and/or Win checkbox's that will be used in combination to the Key selected.7. Click on Apply to save the changes/
Always configure the hotkeys to use at least 3 combinations, for example Alt + Ctrl + D. Using simpler combinationsmay result in conflicts with other application that are running at the same time.
Phone Manager 83
Copyright ©2014 Xarios Ltd. All Rights Reserved.

7.4 Macros
7.4.1 OverviewThe client supports a scripting interface to allow VBScript macros to be developed. They can then be configured totrigger on a manual User action, i.e. a toolbar button action, or on pre-defined call events. The scripting interfaceprovides access to the call information that can be used within the script and extra methods to control the endpointand other features, i.e. call recording.
For example this VBScript example will display a message box when an incoming call is received and display the callerid:
MsgBox "Call from " & PhoneControl.CLI
See the Phone Manager Macro API reference for more information.
7.4.2 ConfigurationThe macro design and configuration is available for Users who have the Allow macro editing option enabled on theirClient Profile. WIthout this option Users can only change the Enable event-driven macros option. This controls if themacros that have been assigned to the User will be triggered on the associated call events.
('pm_settings_macros.png' in the on-line documentation)Macros
When creating a new macro they are first designed and tested from within this section. When this is complete theycan be published and this makes them available on the XCS server and can then be assigned to the relevant Users.When they are published a copy is made of the local version of the macro and this can then not be edited. Anyupdates would need to be made on the original local version and then re published. Users would then need to bereassigned to this new published version.
The list of macros shown in the Macro Configuration section only shows the local macros not published to the serverfor this User. To see the list of published macros see the Macros section on the XCS website.
To create or edit a new macro:
1. Click on the New or Edit button.
Phone Manager 84
Copyright ©2014 Xarios Ltd. All Rights Reserved.

2. Enter a Name that will be used on the XCS server to identify this macro.3. Enter a Description that can be used to detail what this macro is for.4. Select the call event to trigger the macro on.
Direction: inbound, outbound or both.State: call ringing, call answered, call cleared, call cleared only when answered or user controlled (i.e. viaa toolbar button).Type: external, internal or both.
5. Enter the macro text in the VB Script section.6. Use the Test button to validate the syntax. If there are any errors then a message box will be displayed
indicating the error.7. Click on Save to save this macro.
To publish a macro:
1. Select the macro from the list of macros available.2. Click on Publish.
3. Enter a new name for the macro, it is recommend to include a version or revision number.4. Click Ok5. From the XCS server assign this to the relevant Users.
To delete a published macro:
1. From the XCS server open the Site -> Features -> Phone Manager -> Macros section
Phone Manager 85
Copyright ©2014 Xarios Ltd. All Rights Reserved.
2. Select the macro and click on Delete.
Phone Manager 86
Copyright ©2014 Xarios Ltd. All Rights Reserved.

7.5 Application Support Plugins
7.5.1 OverviewPhone Manager has plugins available that are able to directly integrate with a range of well known CRM styleapplications. The plugins generally provide deeper, more seamless integration than other methods as they leveragethe APIs of the specific application.
For an up to date list of the supported application visit http://www.xarios.com.
Features
There are 4 features that the plugins can provide. Depending on the application that is being integrated with onlysome maybe available with varying levels of support and there may need to be integration work performed by theapplication vendor or administrator of the system. See the integration document for the specific plugin for details.
Dial out directly from the application : For example having a dial button next to a telephone number field.Screen popping: Searching the application for contacts that have matching caller ids and displaying therecord.Call history: Creating a call history phone call activity in the application with the call details.Calendar and DND synchronisation : Controlling the DND state of the endpoint based upon calendar entriesin the application.
7.5.2 ConfigurationTo configure a plugin for one of the application support features:
1. From the Application Support Configuration section.('pm_settings_appsupport_list.png' in the on-line documentation)Plugins
2. Click on the New button.('pm_settings_appsupport_edut.png' in the on-line documentation)Plugin configuration
3. From the list of Applications select the application to integrate with.4. This will then change configuration on the right hand side to show the specific configuration required for this
plugin. See the relevant integration document for details.5. Select the Feature to enable either:
Screen popCall historyCalendar / DND sync
6. Multiple features can be enabled for each plugin by repeating the process from step 1.7. Select the event trigger that will cause the feature to be actioned (this is not applicable to Calendar / DND
sync).Direction: inbound, outbound or both.State: call ringing, call answered, call cleared, call cleared only when answered or user controlled (i.e. viaa toolbar button).Type: external, internal or both.
8. Click on Save.
Phone Manager 87
Copyright ©2014 Xarios Ltd. All Rights Reserved.

7.6 Diagnostics
7.6.1 OverviewThe diagnostics section enables the Phone Manager diagnostic to be enabled.
Checking the Diagnostics Enabled option will after a restart of the client create logging information for this User inthe folder:
%PROGRAMDATA%\Xarios\PhoneManager\logs\%USERNAME%
This should only be enabled on a temporary short term basis as it can affect the performance of the client andconsume significant amount of disk space.
If you are requested to provide logging information for the client then use the Download logs button as this willcreate a ZIP file containing all the logs and configuration information required on the Users desktop that can beemailed.
Phone Manager 88
Copyright ©2014 Xarios Ltd. All Rights Reserved.

8 What's Newv4.0 - Initial release
Phone Manager 89
Copyright ©2014 Xarios Ltd. All Rights Reserved.

8.1 Known IssuesThere are no known issues at this time.
Phone Manager 90
Copyright ©2014 Xarios Ltd. All Rights Reserved.

9 IndexACD Agent Control, 32
Alarm Notifications, 64
API Access, 53
Application Support, 52
Application Support Plugins, 57
Audio, 75
Button Actions, 61-62
Call Banner Profiles, 49
Call Control, 11-17
Call History, 41
Call Recording, 42
Chat, 43-44
Codecs, 76
Configuration, 8-9
Connection, 68
Contacts, 36-38
Diagnostics, 88
Dial Pad, 26
Directories, 39
Do Not Disturb, 31
E911 Warning, Emergency Calls and Security, 73
Endpoint Control, 27-30
General, 74
Highlight & Dial, 19
Hot Keys, 46-48
Hunt Group Status, 65
Integrated Toolbar, 50
Keep-Alives, 79
Known Issues, 90
Licensing, 7
Local Connection, 69
Local Forwarding, 33
Macros, 54-56
Making Calls, 18
Multiple Calls, 24-25
NAT and Firewalls, 78
Outlook Features, 45
Phone Manager 91
Copyright ©2014 Xarios Ltd. All Rights Reserved.

Overview, 4
Phone Manager, 0
Professional Features, 51
Quality, 77
Remote Connection, 70
Requirements, 5-6
Searching, 40
Settings, 67
Softphone, 71-72
Softphone Limitations, 80
Standard Features, 10
TAPI, 58
Team Leader Features, 63
Toaster, 20-21
Toolbars, 59
Transferring, 22-23
User Control, 66
Voicemail Access, 34
Volume Control, 35
What's New, 89
Phone Manager 92
Copyright ©2014 Xarios Ltd. All Rights Reserved.