(PC) Actionpoint Quick Start Guide
19
Transcript of (PC) Actionpoint Quick Start Guide


Thank you for purchasing Qwizdom Remotes.
Now that you’ve received your set, you’re probably thinking, “What do I do now?”
We have prepared this quick-start guide to help you get up and running with your remotes as soon as possible.
Over the next few pages, Qwizdom will take you through a step-by-step process, from installing the software to running a
presentation.
System Requirements
Windows
Microsoft Windows® 7 (SP1), 8.1, or 10
MS Office® 2013, or 2016
Adobe® Flash Player 11 or above

Table of Contents
1 Checking the Remote Set
2 Installing Qwizdom® Actionpoint
3 Opening Actionpoint
4 The Actionpoint Toolbar 5 Setting Up Remotes
6 Creating a Presentation
7 Presenting The Feedback Indicator Presenting with Learning Games
8 Reporting
9 Help and Support

1 CHECKING THE REMOTE SET
Q6i or Q7 Instructor Device
Qwizdom Remotes (Q2, Q4 or Q6)
Download Software
USB Host Actionpoint Software
Batteries, Screws and Screwdriver
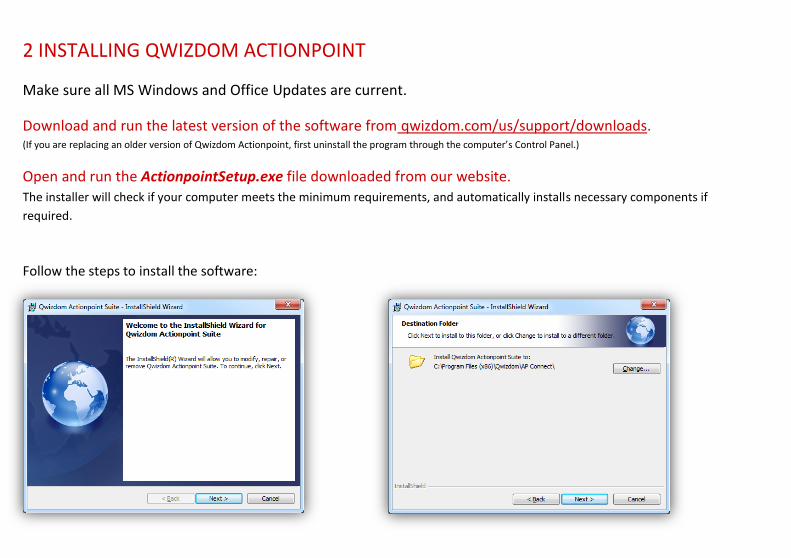
2 INSTALLING QWIZDOM ACTIONPOINT
Make sure all MS Windows and Office Updates are current.
Download and run the latest version of the software from qwizdom.com/us/support/downloads.
(If you are replacing an older version of Qwizdom Actionpoint, first uninstall the program through the computer’s Control Panel.)
Open and run the ActionpointSetup.exe file downloaded from our website. The installer will check if your computer meets the minimum requirements, and automatically installs necessary components if
required.
Follow the steps to install the software:
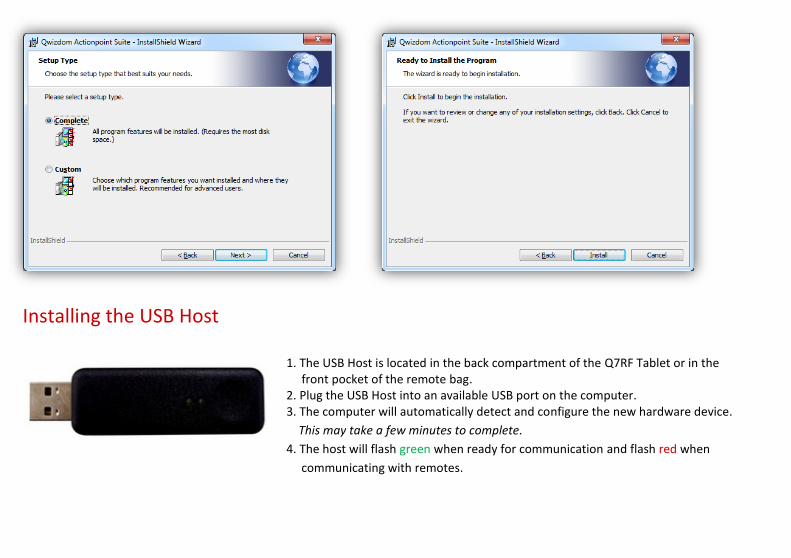
Installing the USB Host
1. The USB Host is located in the back compartment of the Q7RF Tablet or in the front pocket of the remote bag. 2. Plug the USB Host into an available USB port on the computer. 3. The computer will automatically detect and configure the new hardware device.
This may take a few minutes to complete.
4. The host will flash green when ready for communication and flash red when
communicating with remotes.
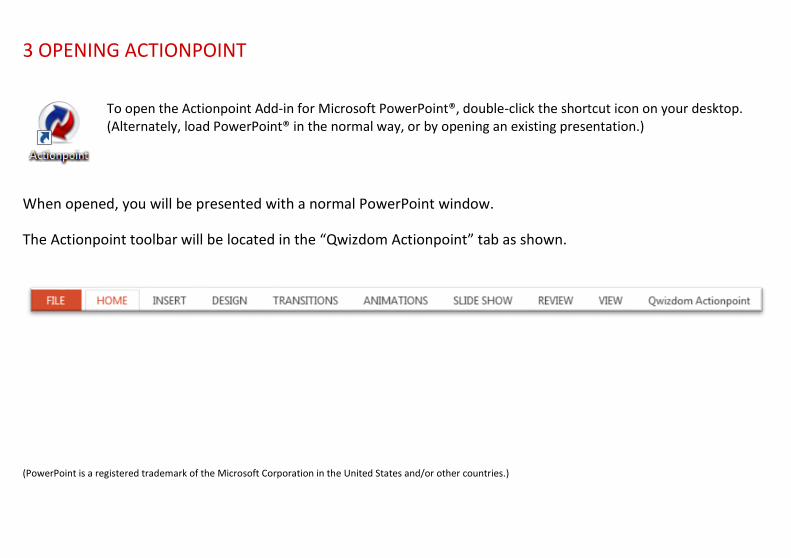
3 OPENING ACTIONPOINT
To open the Actionpoint Add-in for Microsoft PowerPoint®, double-click the shortcut icon on your desktop. (Alternately, load PowerPoint® in the normal way, or by opening an existing presentation.)
When opened, you will be presented with a normal PowerPoint window.
The Actionpoint toolbar will be located in the “Qwizdom Actionpoint” tab as shown.
(PowerPoint is a registered trademark of the Microsoft Corporation in the United States and/or other countries.)

THE ACTIONPOINT TOOLBAR
1 Insert Slide: Use this feature to add slides to your presentation.
2 Question Type: Set your question type and preferences using this feature. 3 Answer/Points/Timer: In these fields, designate an answer, allocate points, and indicate whether a question has a time limit. 4 Question Properties: Set advanced question properties (Q6/QVR only – see full user guide for more information). 5 Start Presentation: Click this button to access presentation setup options and to run the presentation. 6 Advanced Session: Resume a previous presentation or begin in self-paced mode. 7 Participants Management: Create and modify participant lists. 8 Report Generator: Browse for and view existing reports. 9 Remote Configuration: Set up your remotes for first-time use (not required for subsequent use). 10 Upload Presentations: Upload presentations for online use in Actionpoint360. See the Actionpoint360 Online User Guide for details. 11 Advanced Options: Merge results files, edit speaker notes (Q7), set up Quandary game options, and print a question overview. 12 About: Check software version number and access user guide.
5 SETTING UP REMOTES
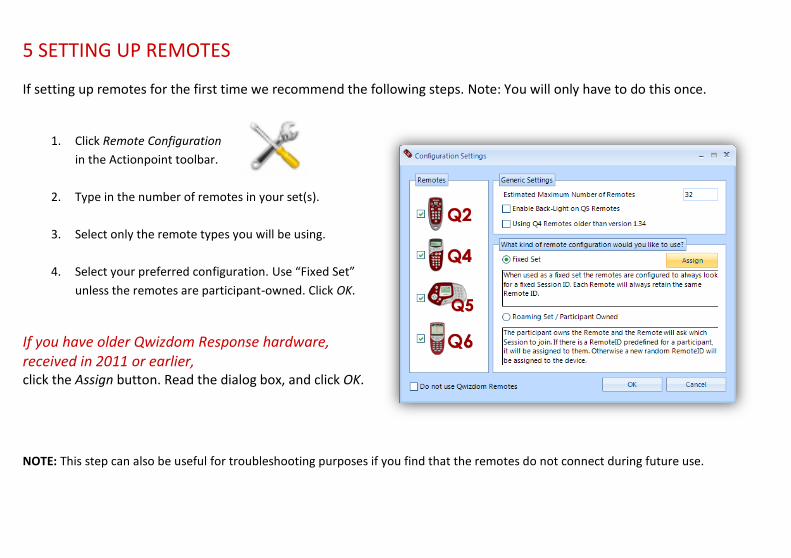
If setting up remotes for the first time we recommend the following steps. Note: You will only have to do this once.
1. Click Remote Configuration
in the Actionpoint toolbar.
2. Type in the number of remotes in your set(s).
3. Select only the remote types you will be using.
4. Select your preferred configuration. Use “Fixed Set”
unless the remotes are participant-owned. Click OK.
If you have older Qwizdom Response hardware, received in 2011 or earlier, click the Assign button. Read the dialog box, and click OK.
NOTE: This step can also be useful for troubleshooting purposes if you find that the remotes do not connect during future use.
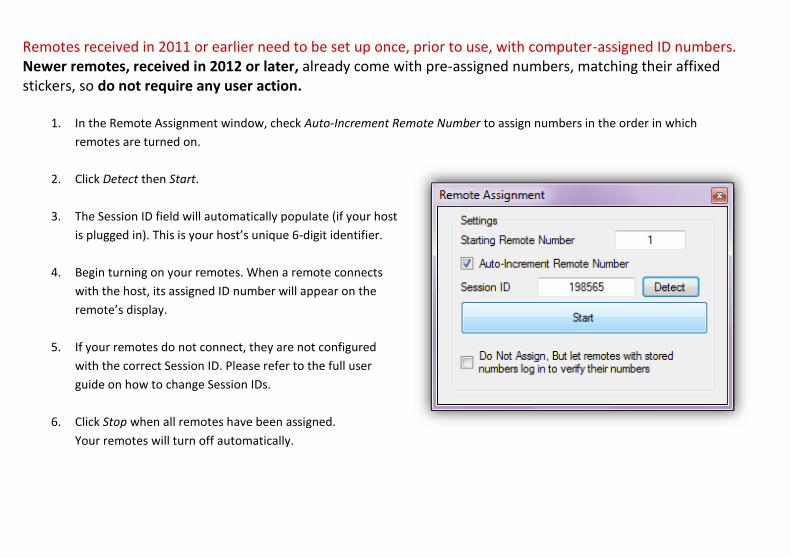
Remotes received in 2011 or earlier need to be set up once, prior to use, with computer-assigned ID numbers. Newer remotes, received in 2012 or later, already come with pre-assigned numbers, matching their affixed stickers, so do not require any user action.
1. In the Remote Assignment window, check Auto-Increment Remote Number to assign numbers in the order in which
remotes are turned on.
2. Click Detect then Start.
3. The Session ID field will automatically populate (if your host
is plugged in). This is your host’s unique 6-digit identifier.
4. Begin turning on your remotes. When a remote connects
with the host, its assigned ID number will appear on the
remote’s display.
5. If your remotes do not connect, they are not configured
with the correct Session ID. Please refer to the full user
guide on how to change Session IDs.
6. Click Stop when all remotes have been assigned.
Your remotes will turn off automatically.

6 CREATING A PRESENTATION
To create an interactive presentation, click Insert Slide on the Actionpoint toolbar and choose a question type. (Select ‘None’ for slides not intended as interactional.)
In this example, a multiple choice type of question, with 3 choices, is selected. Type the question and answer choices on the slide. In the Actionpoint toolbar, set the correct answer, points, and a time limit, if desired.
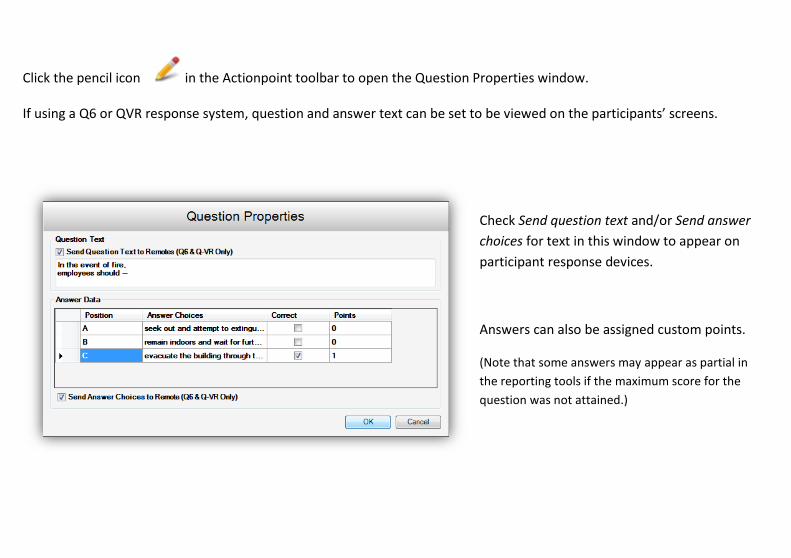
Click the pencil icon in the Actionpoint toolbar to open the Question Properties window. If using a Q6 or QVR response system, question and answer text can be set to be viewed on the participants’ screens.
Check Send question text and/or Send answer
choices for text in this window to appear on
participant response devices.
Answers can also be assigned custom points.
(Note that some answers may appear as partial in
the reporting tools if the maximum score for the
question was not attained.)
7 PRESENTING
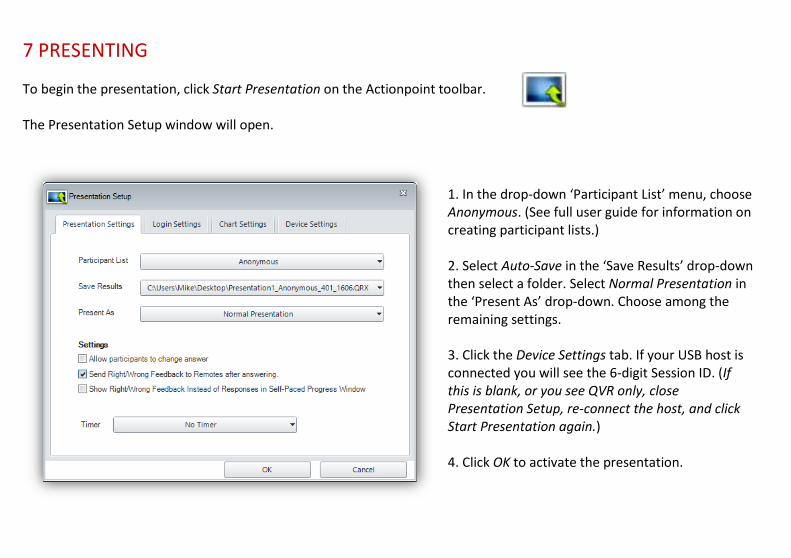
To begin the presentation, click Start Presentation on the Actionpoint toolbar. The Presentation Setup window will open.
1. In the drop-down ‘Participant List’ menu, choose Anonymous. (See full user guide for information on creating participant lists.) 2. Select Auto-Save in the ‘Save Results’ drop-down then select a folder. Select Normal Presentation in the ‘Present As’ drop-down. Choose among the remaining settings. 3. Click the Device Settings tab. If your USB host is connected you will see the 6-digit Session ID. (If this is blank, or you see QVR only, close Presentation Setup, re-connect the host, and click Start Presentation again.) 4. Click OK to activate the presentation.

For information on building and importing participant lists, presenting with Qwizdom games, QVR (Qwizdom Virtual
Remote), and in-presentation graphs, please see the full user guide at www.qwizdom.com/us/support/.
You are now ready to start asking questions! Using PowerPoint’s inbuilt features, presentations can be customized with
images and different styles, as shown below.
1. Ask participants to turn on their remotes.
2. Use the right/left directional arrows or scroll on your
instructor device to navigate through the slides.
3. To display response graphs to students, press the [3] button
on your Q6i or the icon on the Q7. Press again to hide the
graph.
4. When the presentation has finished, the remotes will
automatically switch off. Your report file will now be created if
you chose to save results.
For a detailed overview of the Q6i and Q7 instructor devices, please see the remote index cards available on the Support
tab of our website.

THE FEEDBACK INDICATOR
1 2 3 4 5 6
The feedback indicator will appear when your presentation starts. You can drag it to a preferred on-screen location. You can use your
mouse to activate each function. Alternatively, you can use the Q5 instructor commands, shown in brackets.
1 Close Session & Change Display Settings: Right-click to end session or select additional display settings.
2 Response Feedback: The percentage of participants who have responded. Click to change to a numeric value.
3 Repose Question: Click this to repose the question to the remotes. ( Press [4] on Q6i and press on the Q7 )
4 Pick a Participant: A random participant number appears on-screen. Names appear if using a participant list. ( Press [1] on the Q6i
and on the Q7 )
5 Show Graph: A graph of the results will appear on-screen. ( Press [3] on the Q6i and on the Q7 )
6 Show Game: When in Game mode, pressing this button brings up the game screens and animations. See “Presenting with Learning
Games.” ( Varies depending on selected game. )
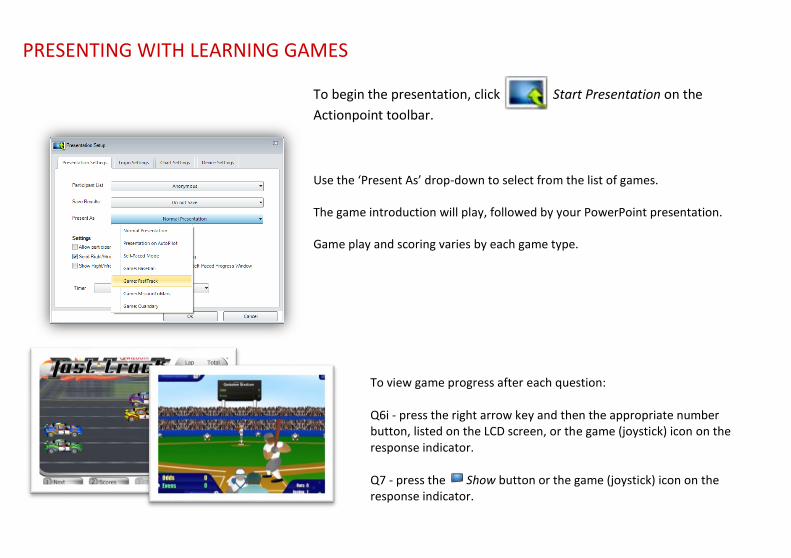
PRESENTING WITH LEARNING GAMES
To begin the presentation, click Start Presentation on the
Actionpoint toolbar.
Use the ‘Present As’ drop-down to select from the list of games.
The game introduction will play, followed by your PowerPoint presentation.
Game play and scoring varies by each game type.
To view game progress after each question: Q6i - press the right arrow key and then the appropriate number button, listed on the LCD screen, or the game (joystick) icon on the response indicator. Q7 - press the Show button or the game (joystick) icon on the response indicator.

8 REPORTING
Click Report Generator on the Actionpoint toolbar. (Opening a .QRX file directly will also bring up the Report Generator.)
1. Click Browse to locate the Qwizdom (.QRX) results file.
2. Choose your preferred report and click Generate.
The top set of reports will generate Excel-style spread sheets, useful for printing
a full list of answers, scores, or other details.
Question Summary Reports (with/without answer) will generate the same Flash-
based graphs available in presentation.
Using Answer Report (PDF), a full report can be generated for each participant.
Results can also be exported to CSV for use with external report compilers.
(Excel is a registered trademark of the Microsoft Corporation in the United States and/or other countries.)

Report Examples
Reports from left to right: Answer Report, Answer Report (Flash), PDF Report
9 HELP AND SUPPORT
Full User Guide, and updated software at http://qwizdom.com/us/support/downloads
FAQs at http://qwizdom.com/us/support/faqs-documentation
If you need further assistance…
Submit a Support Ticket at http://qwizdom.com/supportcenter/
Email Support: [email protected]
Common Qwizdom Terminology
Host: The USB device used to communicate with your Qwizdom remotes.
Participant ID: Participant ID is the student’s unique identification number. We recommend using a school/district ID number, if one is available.
Session ID: The unique 6-digit number assigned to your Host. This is the number which should be entered into the remotes.
.QRX: The file format of results / report files.
.QPL: The file format for Qwizdom participant lists.


![SSN-21 Seawolf - Quick Reference Card - PC[1]](https://static.fdocuments.us/doc/165x107/547f536fb37959892b8b58c6/ssn-21-seawolf-quick-reference-card-pc1.jpg)