Parts & Tools - O'Celloo-cello.com/files/ocello_assembly_instructions.pdf · O'Cello – printing...
15
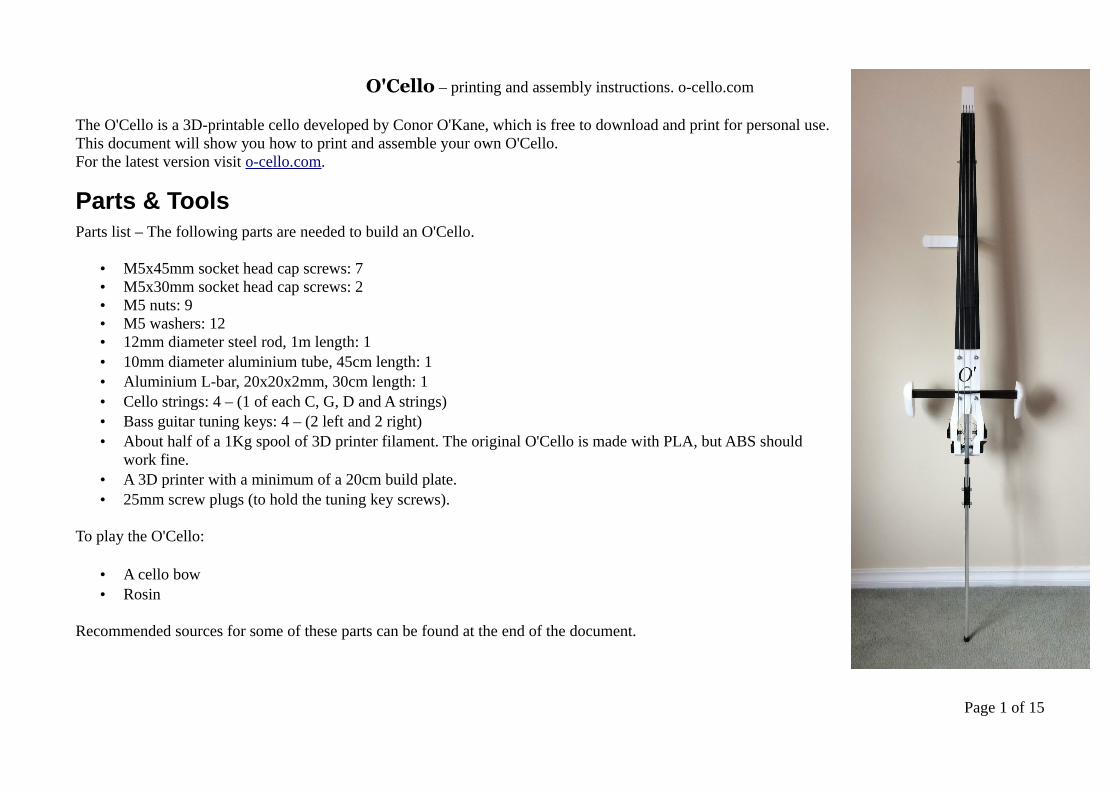
O'Cello – printing and assembly instructions. o-cello.com The O'Cello is a 3D-printable cello developed by Conor O'Kane, which is free to download and print for personal use. This document will show you how to print and assemble your own O'Cello. For the latest version visit o-cello.com . Parts & Tools Parts list – The following parts are needed to build an O'Cello. • M5x45mm socket head cap screws: 7 • M5x30mm socket head cap screws: 2 • M5 nuts: 9 • M5 washers: 12 • 12mm diameter steel rod, 1m length: 1 • 10mm diameter aluminium tube, 45cm length: 1 • Aluminium L-bar, 20x20x2mm, 30cm length: 1 • Cello strings: 4 – (1 of each C, G, D and A strings) • Bass guitar tuning keys: 4 – (2 left and 2 right) • About half of a 1Kg spool of 3D printer filament. The original O'Cello is made with PLA, but ABS should work fine. • A 3D printer with a minimum of a 20cm build plate. • 25mm screw plugs (to hold the tuning key screws). To play the O'Cello: • A cello bow • Rosin Recommended sources for some of these parts can be found at the end of the document. Page 1 of 15
Transcript of Parts & Tools - O'Celloo-cello.com/files/ocello_assembly_instructions.pdf · O'Cello – printing...
O'Cello – printing and assembly instructions. o-cello.com
The O'Cello is a 3D-printable cello developed by Conor O'Kane, which is free to download and print for personal use.This document will show you how to print and assemble your own O'Cello. For the latest version visit o-cello.com.
Parts & ToolsParts list – The following parts are needed to build an O'Cello.
• M5x45mm socket head cap screws: 7• M5x30mm socket head cap screws: 2• M5 nuts: 9• M5 washers: 12• 12mm diameter steel rod, 1m length: 1• 10mm diameter aluminium tube, 45cm length: 1• Aluminium L-bar, 20x20x2mm, 30cm length: 1• Cello strings: 4 – (1 of each C, G, D and A strings)• Bass guitar tuning keys: 4 – (2 left and 2 right)• About half of a 1Kg spool of 3D printer filament. The original O'Cello is made with PLA, but ABS should
work fine.• A 3D printer with a minimum of a 20cm build plate.• 25mm screw plugs (to hold the tuning key screws).
To play the O'Cello:
• A cello bow• Rosin
Recommended sources for some of these parts can be found at the end of the document.
Page 1 of 15
O'Cello – printing and assembly instructions. o-cello.com
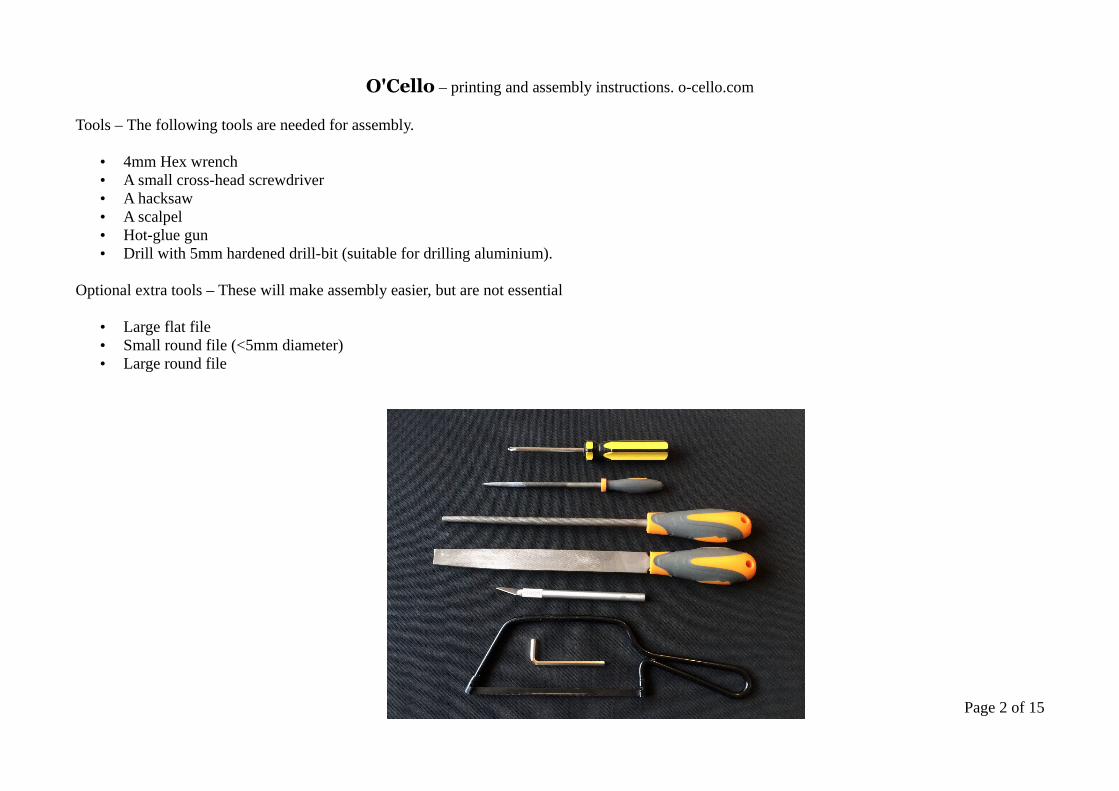
Tools – The following tools are needed for assembly.
• 4mm Hex wrench• A small cross-head screwdriver• A hacksaw• A scalpel• Hot-glue gun• Drill with 5mm hardened drill-bit (suitable for drilling aluminium).
Optional extra tools – These will make assembly easier, but are not essential
• Large flat file• Small round file (<5mm diameter)• Large round file
Page 2 of 15
O'Cello – printing and assembly instructions. o-cello.com
PrintingHere are the print settings for each part.
Parts 1 and 6:
Layer height 0.2mmInfill: 15%Top and Bottom layers: 4Perimeter shells: 3
All other parts:
Layer height 0.2mmInfill: 15%Top and Bottom layers: 4Perimeter shells: 2
Cover:
Layer height 0.2mmInfill: 100%Top and Bottom layers: 6Perimeter shells: 2
Page 3 of 15
O'Cello – printing and assembly instructions. o-cello.com
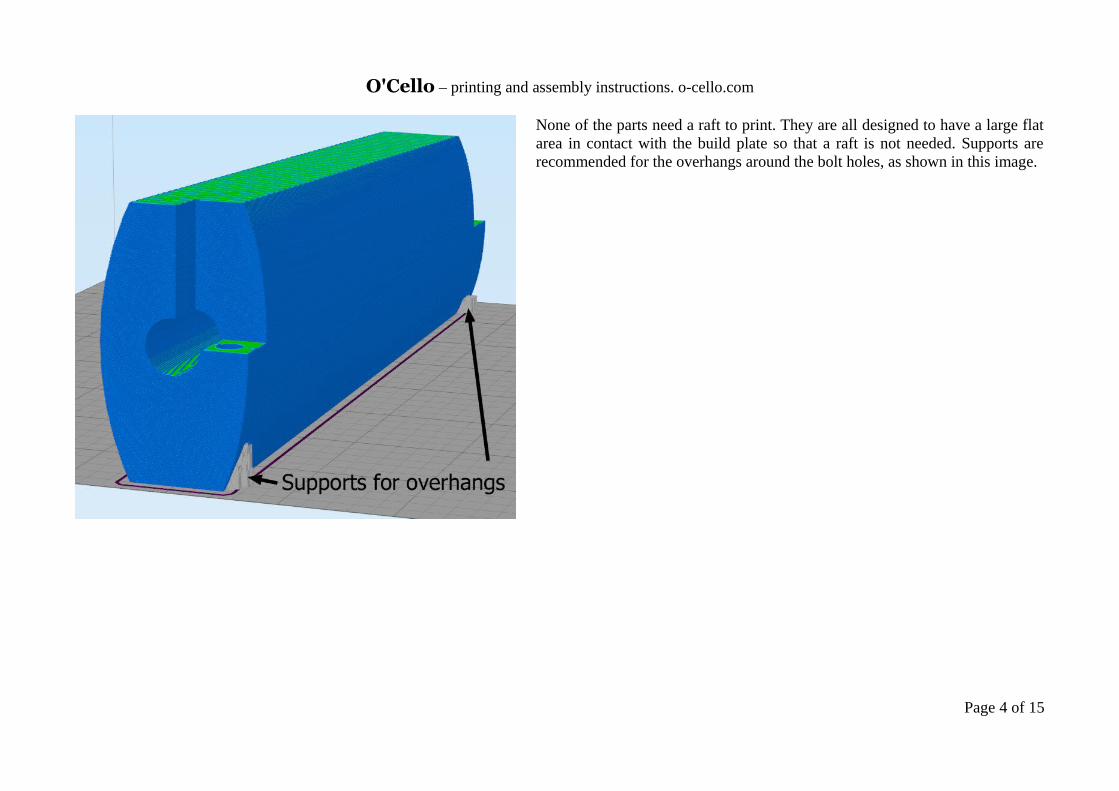
None of the parts need a raft to print. They are all designed to have a large flatarea in contact with the build plate so that a raft is not needed. Supports arerecommended for the overhangs around the bolt holes, as shown in this image.
Page 4 of 15
O'Cello – printing and assembly instructions. o-cello.com
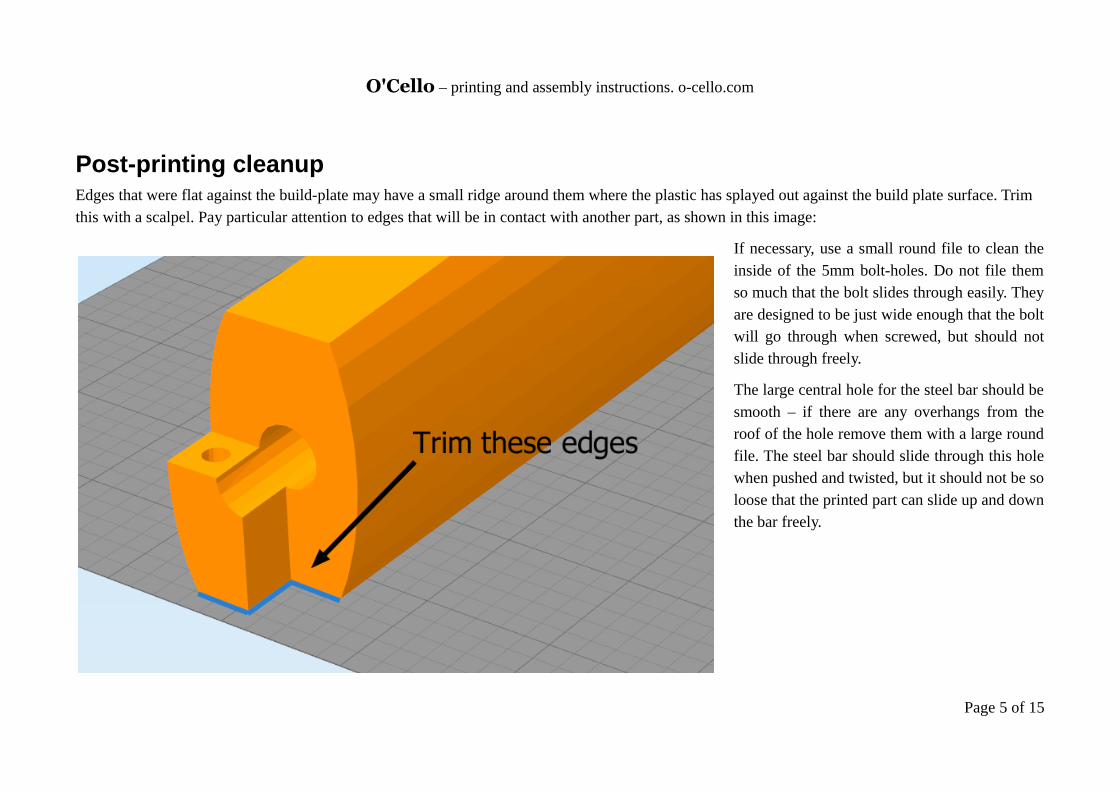
Post-printing cleanupEdges that were flat against the build-plate may have a small ridge around them where the plastic has splayed out against the build plate surface. Trim this with a scalpel. Pay particular attention to edges that will be in contact with another part, as shown in this image:
If necessary, use a small round file to clean theinside of the 5mm bolt-holes. Do not file themso much that the bolt slides through easily. Theyare designed to be just wide enough that the boltwill go through when screwed, but should notslide through freely.
The large central hole for the steel bar should besmooth – if there are any overhangs from theroof of the hole remove them with a large roundfile. The steel bar should slide through this holewhen pushed and twisted, but it should not be soloose that the printed part can slide up and downthe bar freely.
Page 5 of 15
O'Cello – printing and assembly instructions. o-cello.com
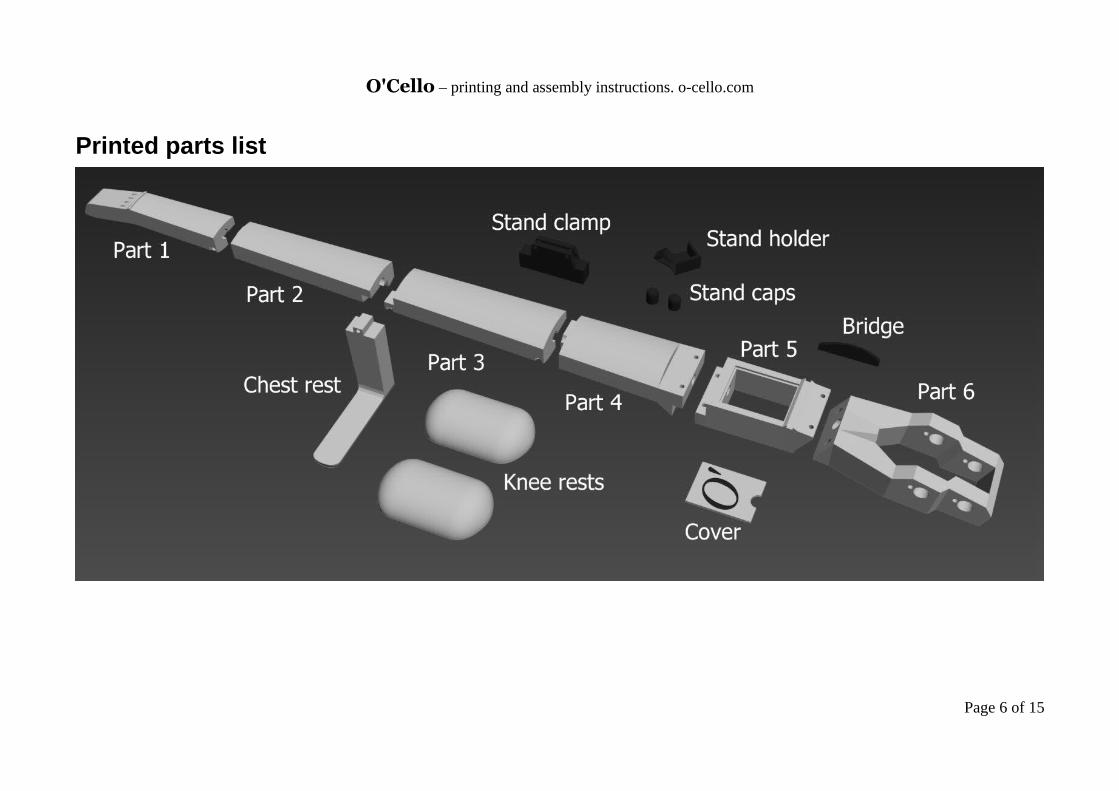
Printed parts list
Page 6 of 15
O'Cello – printing and assembly instructions. o-cello.com
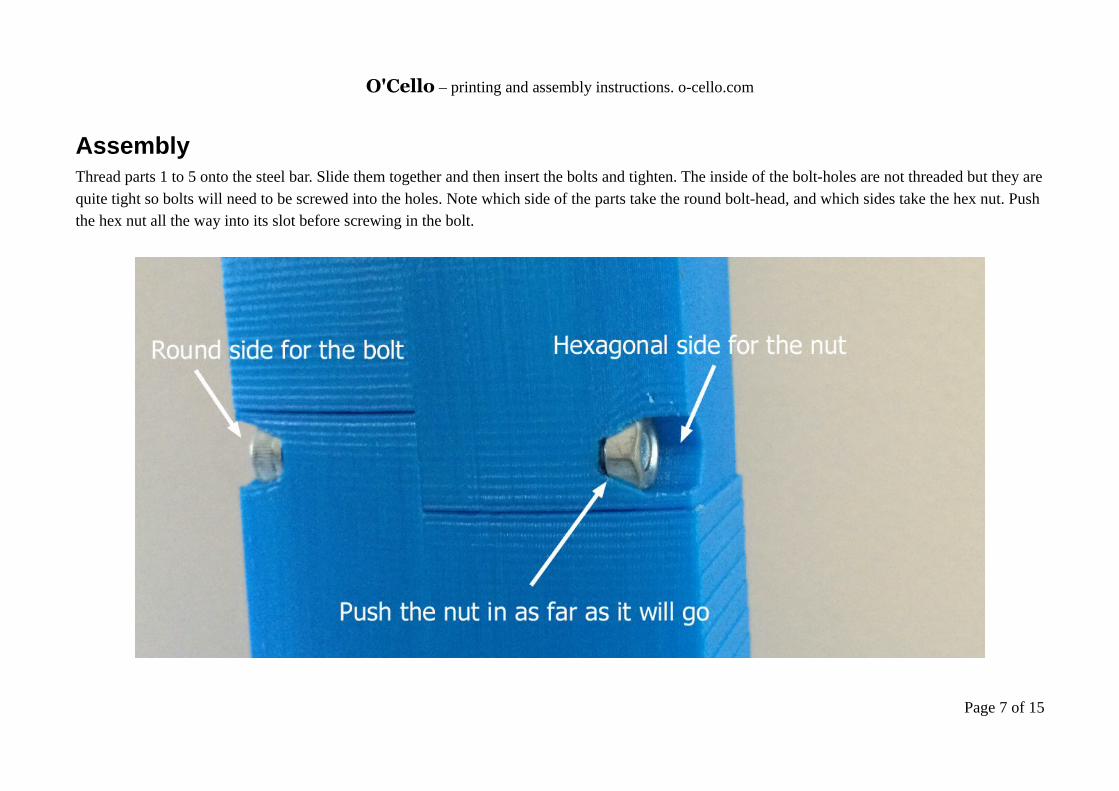
AssemblyThread parts 1 to 5 onto the steel bar. Slide them together and then insert the bolts and tighten. The inside of the bolt-holes are not threaded but they arequite tight so bolts will need to be screwed into the holes. Note which side of the parts take the round bolt-head, and which sides take the hex nut. Push the hex nut all the way into its slot before screwing in the bolt.
Page 7 of 15
O'Cello – printing and assembly instructions. o-cello.com
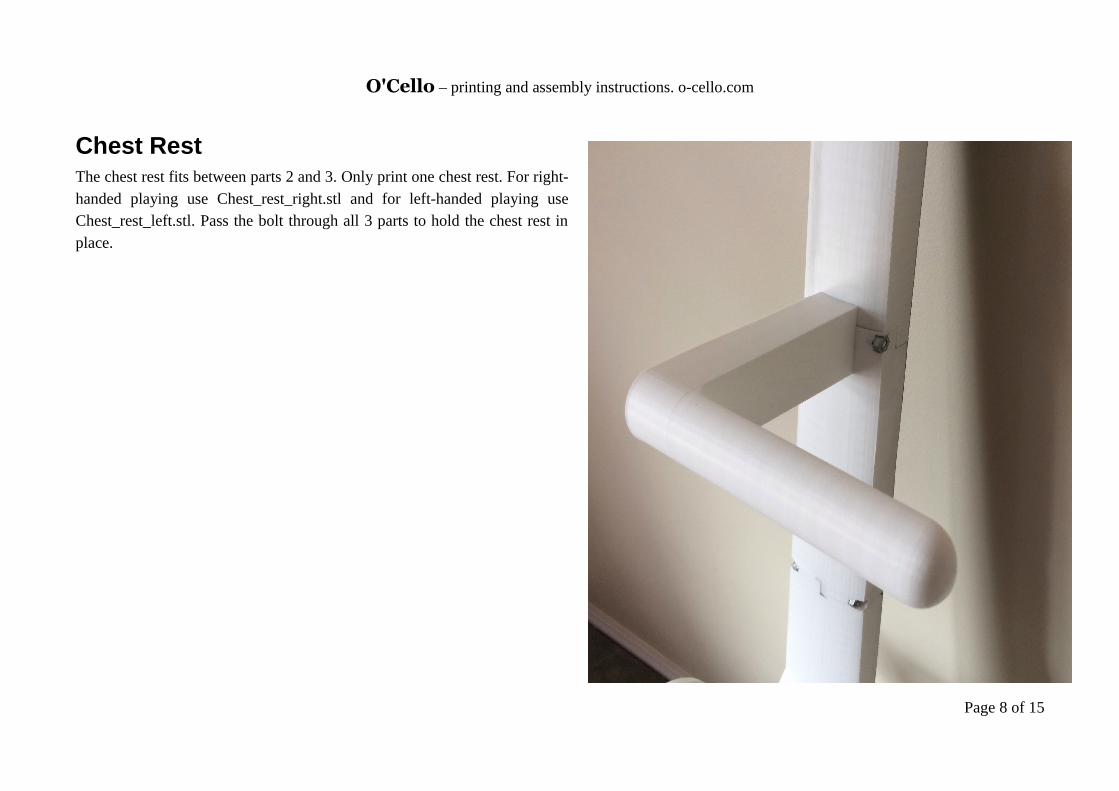
Chest RestThe chest rest fits between parts 2 and 3. Only print one chest rest. For right-handed playing use Chest_rest_right.stl and for left-handed playing useChest_rest_left.stl. Pass the bolt through all 3 parts to hold the chest rest inplace.
Page 8 of 15
O'Cello – printing and assembly instructions. o-cello.com
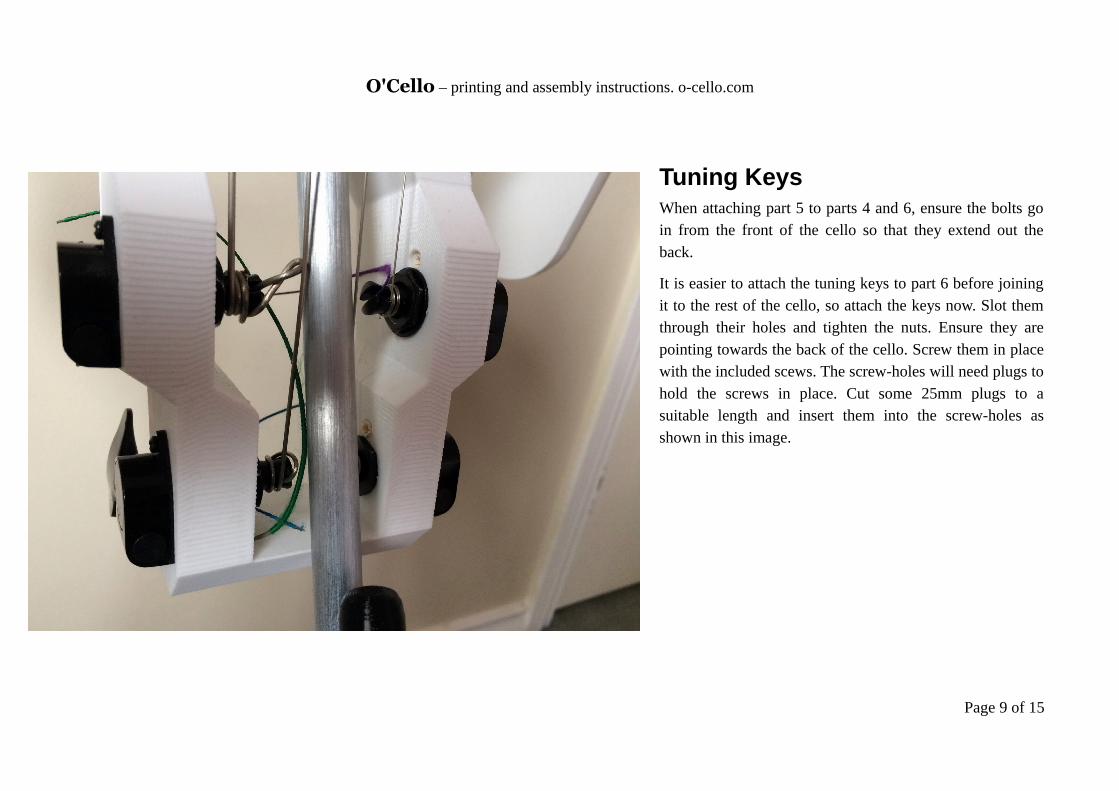
Tuning KeysWhen attaching part 5 to parts 4 and 6, ensure the bolts goin from the front of the cello so that they extend out theback.
It is easier to attach the tuning keys to part 6 before joiningit to the rest of the cello, so attach the keys now. Slot themthrough their holes and tighten the nuts. Ensure they arepointing towards the back of the cello. Screw them in placewith the included scews. The screw-holes will need plugs tohold the screws in place. Cut some 25mm plugs to asuitable length and insert them into the screw-holes asshown in this image.
Page 9 of 15
O'Cello – printing and assembly instructions. o-cello.com
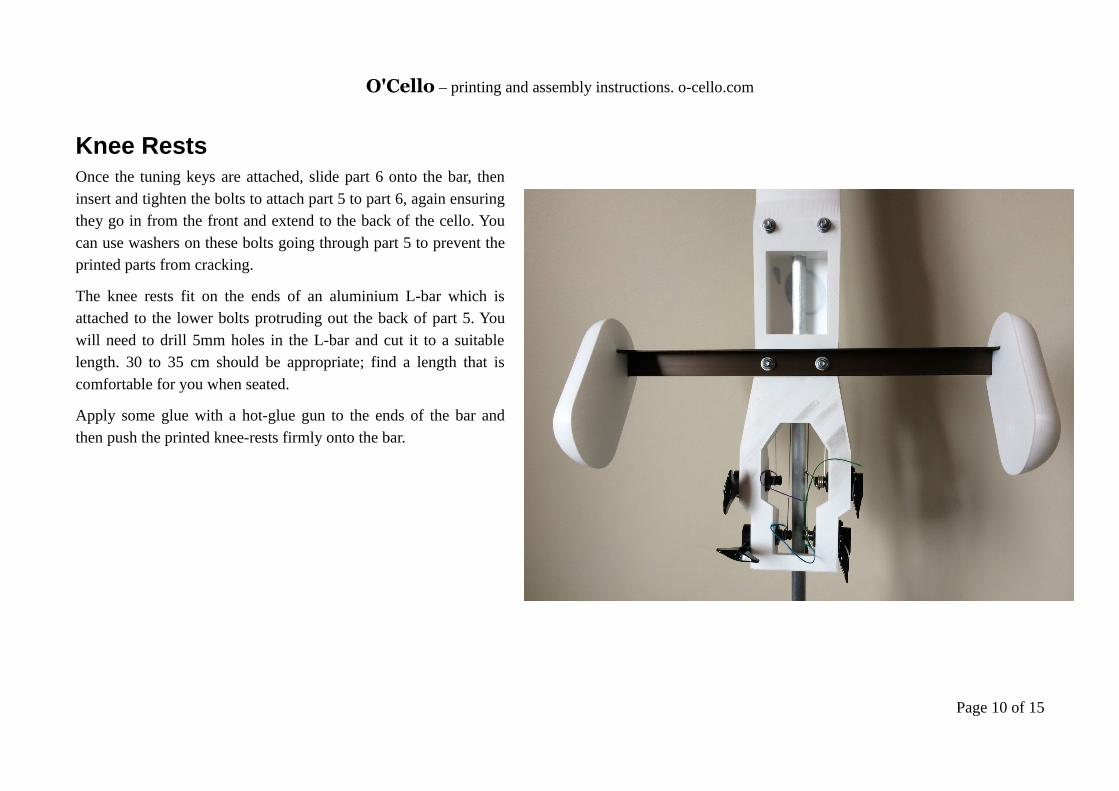
Knee RestsOnce the tuning keys are attached, slide part 6 onto the bar, theninsert and tighten the bolts to attach part 5 to part 6, again ensuringthey go in from the front and extend to the back of the cello. Youcan use washers on these bolts going through part 5 to prevent theprinted parts from cracking.
The knee rests fit on the ends of an aluminium L-bar which isattached to the lower bolts protruding out the back of part 5. Youwill need to drill 5mm holes in the L-bar and cut it to a suitablelength. 30 to 35 cm should be appropriate; find a length that iscomfortable for you when seated.
Apply some glue with a hot-glue gun to the ends of the bar andthen push the printed knee-rests firmly onto the bar.
Page 10 of 15
O'Cello – printing and assembly instructions. o-cello.com
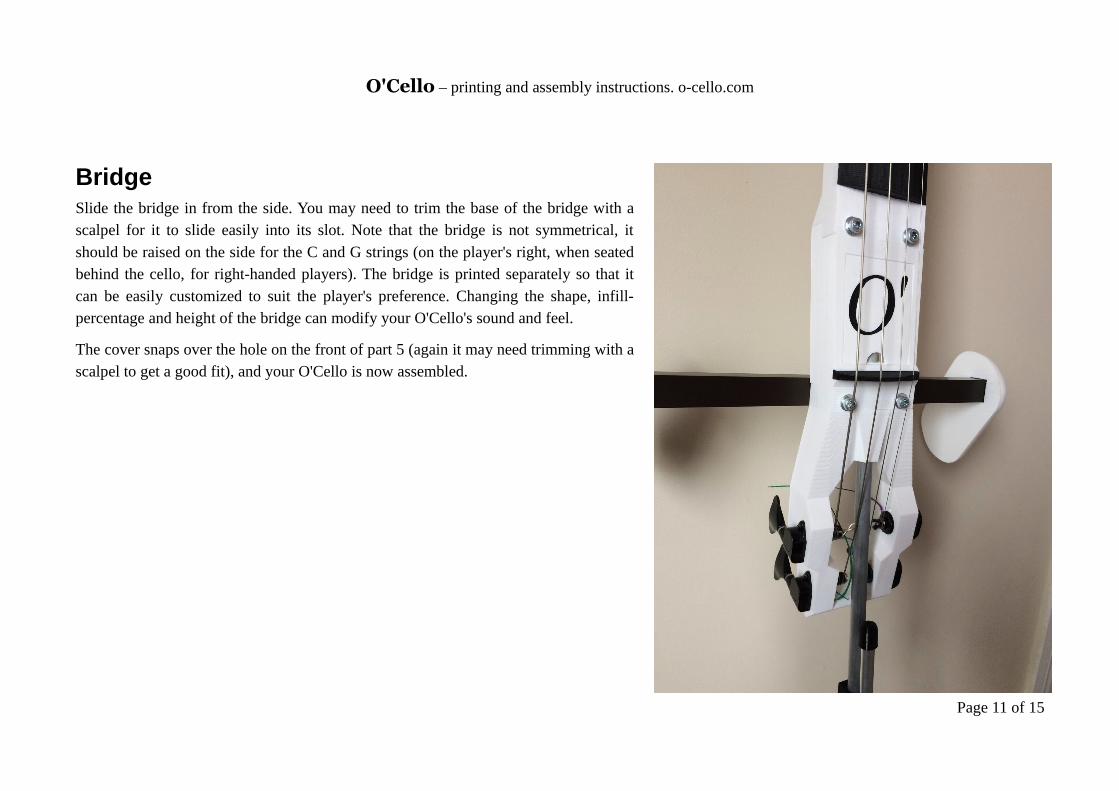
BridgeSlide the bridge in from the side. You may need to trim the base of the bridge with ascalpel for it to slide easily into its slot. Note that the bridge is not symmetrical, itshould be raised on the side for the C and G strings (on the player's right, when seatedbehind the cello, for right-handed players). The bridge is printed separately so that itcan be easily customized to suit the player's preference. Changing the shape, infill-percentage and height of the bridge can modify your O'Cello's sound and feel.
The cover snaps over the hole on the front of part 5 (again it may need trimming with ascalpel to get a good fit), and your O'Cello is now assembled.
Page 11 of 15
O'Cello – printing and assembly instructions. o-cello.com
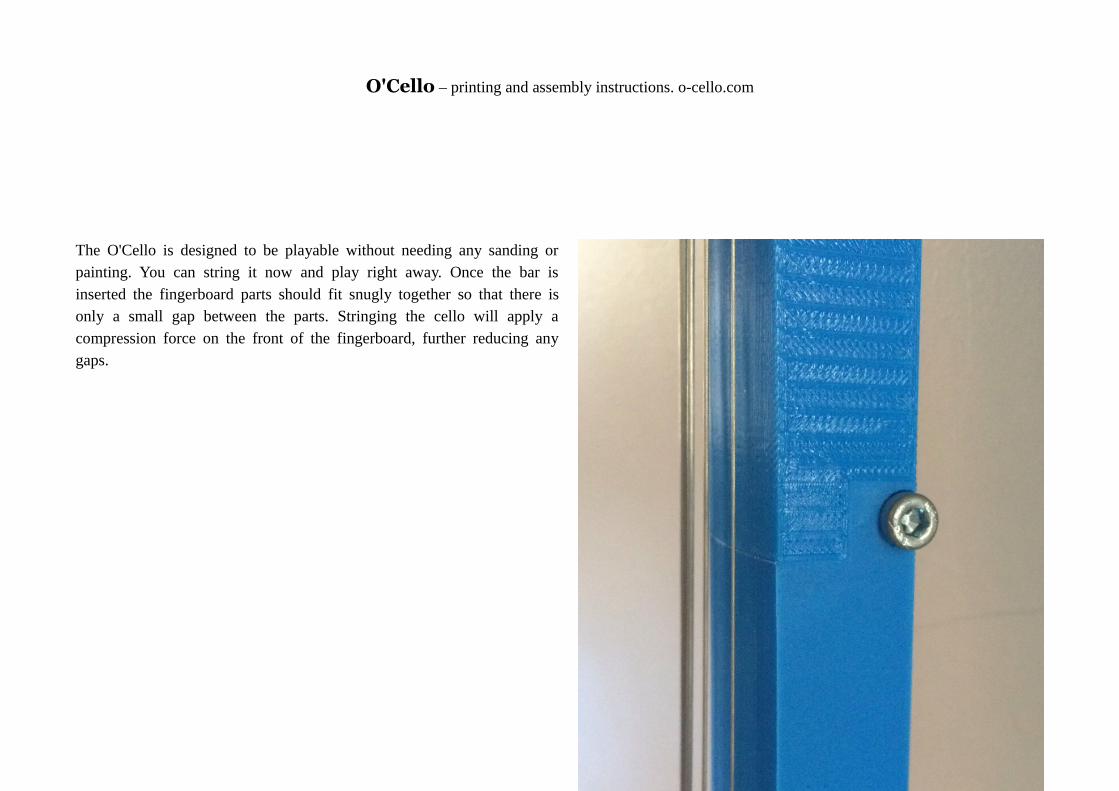
The O'Cello is designed to be playable without needing any sanding orpainting. You can string it now and play right away. Once the bar isinserted the fingerboard parts should fit snugly together so that there isonly a small gap between the parts. Stringing the cello will apply acompression force on the front of the fingerboard, further reducing anygaps.
Page 12 of 15
O'Cello – printing and assembly instructions. o-cello.com
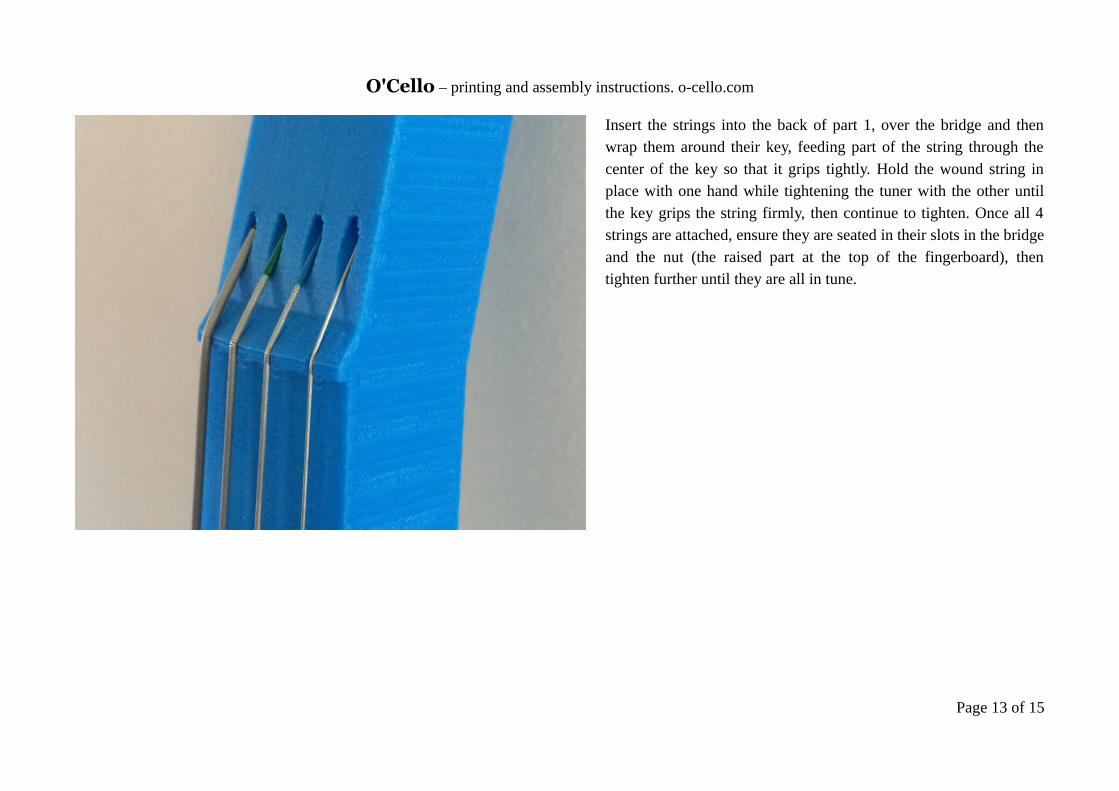
Insert the strings into the back of part 1, over the bridge and thenwrap them around their key, feeding part of the string through thecenter of the key so that it grips tightly. Hold the wound string inplace with one hand while tightening the tuner with the other untilthe key grips the string firmly, then continue to tighten. Once all 4strings are attached, ensure they are seated in their slots in the bridgeand the nut (the raised part at the top of the fingerboard), thentighten further until they are all in tune.
Page 13 of 15

O'Cello – printing and assembly instructions. o-cello.com
The Stand (End pin)Assemble the stand by inserting the protruding part of the steel bar into the standclamp then feed the aluminium tube through the slot on the front. Use 30mm boltswith washers to tighten the stand clamp to hold the O'Cello at a comfortable playingheight. Glue the two stand caps on the top and bottom of the aluminium tube to coverthe sharp edges.
When playing on a smooth floor, use the stand holder to prevent the stand fromslipping. Tie a shoolace to the stand holder and then loop it under the leg of your chair.
Page 14 of 15
O'Cello – printing and assembly instructions. o-cello.com
Recommended parts sourceseBay store i-fox sells cheap cello bows.
eBay store skull_music sells cheap cello strings.
eBay store ninehouseshop2014 sells the bass guitar tuning keys used in the O'Cello prototype.
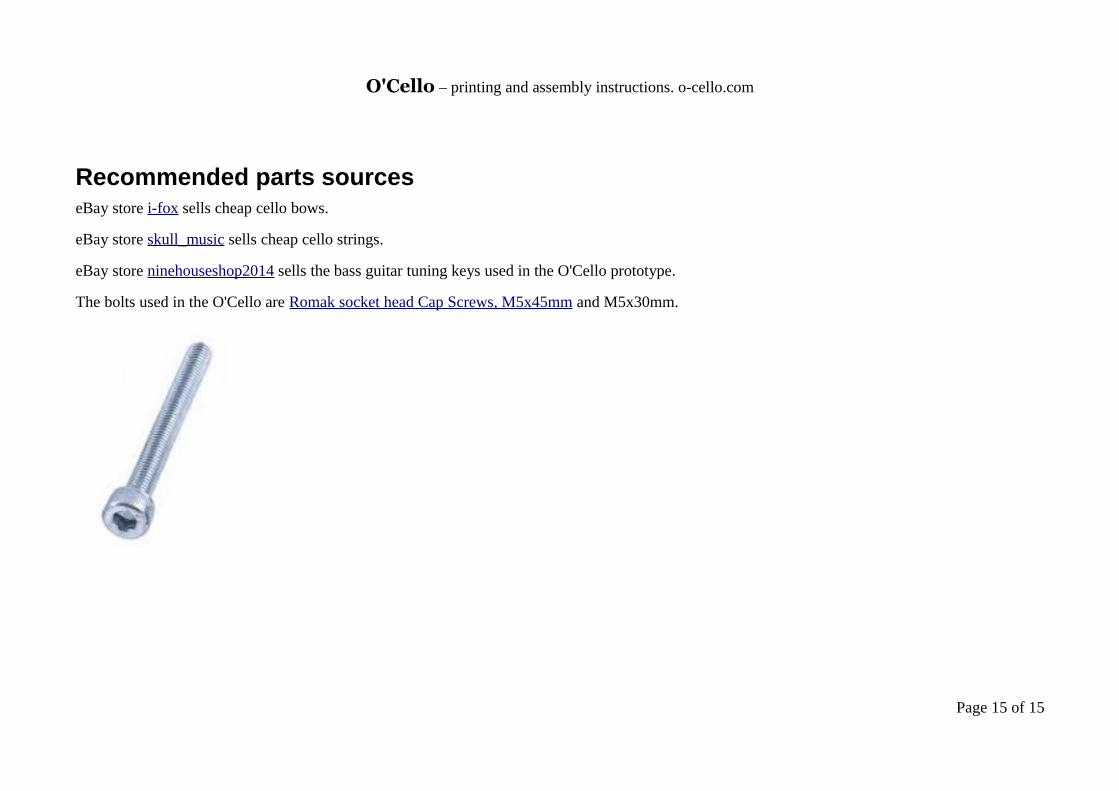
The bolts used in the O'Cello are Romak socket head Cap Screws, M5x45mm and M5x30mm.
Page 15 of 15