Part No. 700505 - Reznor HVAC
20
Part No. 700505
Transcript of Part No. 700505 - Reznor HVAC

Doc No. 700505 Page 1 of 20
Part No. 700505

Doc No. 700505 Page 2 of 20
Introduction. height regulations are adhered to at the mounting heights specified. All Dimensions shown are in mm unless
PLEASE READ this document prior to installation and use. The safety of this
heater is guaranteed only by the correct usage in accordance with these instructions, therefore it is recommended that they are retained for future reference. The manufacturer reserves the right to alter specifications without prior notice.
Welcome to the range of high frequency infra-rad heaters. Local regulations may vary in the country of use and it is the installers responsibility to ensure that such regulations are satisfied All installation, assembly, commissioning and service procedures must be carried out by suitable qualified competent persons to the statutory regulations in the country of use. When installing, commissioning and servicing is undertaken on these heaters due care and attention is required to ensure that working at
Document Index.
1 Installation Requirements 1.1 Health & Safety 1.2 Model Definitions 1.3 Mounting the unit
1.3.1 Apollo range 1.3.2 Sorrento range 1.3.2.1 General 1.3.2.2 Single units SOR15/DL30/TW45
1.3.2.3 Two SOR 15/DL30/TW45 units 1.3.2.4 Three SOR 15/DL30 units
1.4 Electrical Connections 1.4.1 General 1.4.2 Apollo range 1.4.3 Sorrento range 1.4.4 Titan range
1.5 Technical details
2 Assembly Instructions 2.1 Tools Required 2.2 Apollo range 2.3 Sorrento range 2.4 Titan range
3 Servicing Instructions 3.1 Tools Required 3.2 Maintenance
4 Replacing Parts 4.1 Replacing the lamp - general 4.2 Apollo range 4.3 Sorrento range 4.4 Titan range

Doc No. 700505 Page 3 of 20
1.1 Health and Safety AmbiRad heaters must be installed in accordance with the relevant codes and practices. Due account should also be taken of any obligations arising from the Health and Safety at Works Act 1974 or relevant codes of practice. In addition the installation must be carried out in accordance with the current IEE wiring regulations (BS 7671), BS 6896: (Industrial & Commercial) and any other relevant British Standards and Codes of Practice by a qualified installer. Isolate all electrical supplies to the heater & controller before proceeding. For your own safety we recommend the use of safety boots and leather faced gloves when handling sharp or heavy items. The use of protective eye wear is also recommended.
Caution Before using this appliance:
Check that the voltage indicated on the type plate corresponds to the mains supply voltage.
Ensure that the heater has been securely fastened in its final mountain position.
Disconnect from the supply by removing the plug from the mains socket (or disconnect pole switch) during installation, cleaning and/or lamp replacement and always ensure that the lamp is cool.
Do not locate the heater immediately below a socket outlet.
UNDER NO CIRCUMSTANCES should any person attempt to touch any of the lamps whilst the unit is switched on or when it has been recently used.
Do not handle the halogen lamp with bare hands. If it is inadvertently touched, remove finger marks with a soft cloth and methylated spirit or rubbing alcohol, otherwise the marks will burn into the quartz glass, causing premature heater failure.
Do not use an extension cord with this product.
Keep the mains cord away and from the body of the heater and never in the beam of heat, which will get hot during use.
Titan products ONLY - Only a 13A fuse must be fitted to the plug.
UNDER NO CIRCUMSTANCES should any item be placed on or above any part of the heater, whether the heater is being used or not.
Ensure that children do not tamper with the heater.
Do not insert any object through any slot or opening in the heater.
Do not use if guard is not present (Guard optional on Apollo range).
Do not install less than the minimum mounting distance from the floor.
This appliance is not intended for use by persons (including children) with reduced physical, sensory or mental capabilities, or lack of experience and knowledge, unless they have been given supervision or instruction concerning use of the appliance by a person responsible for their safety. Children should be supervised to ensure that they do not play with the appliance.
WARNING: This heater is not equipped with a device to control the room tempera-ture. Do not use this heater in small rooms when they are occupied by persons not ca-pable of leaving the room on their own, un-less constant supervision is provided.
Apollo products ONLY - This heater is for indoor use only - do not install outdoors or use the heater in a damp area, for example a bathroom or near to a swimming pool.
Titan products ONLY: The unit must be operated in the vertical position and must not be moved when switched on.
WARNING: This appliance must be earthed.
Risk of Fire Keep combustible materials such as furniture, papers, clothes and curtains at least 1.8m (6 feet) from the front of the heater and away from the sides and rear.
1.2 Model Definitions QH (QHL) = AmbiRad Apollo range of indoor heaters. Power options from 1.5kW to 9.0kW. Vertical and Horizontal adjustment. SOR (DL/TW) = AmbiRad Sorrento range of robust weatherproof heaters (IP24 rated). Power options from 1.5kW to 4.5kW. Available in a single, double or triple option. TI-STAT = AmbiRad Titan static heater. 3kW spot heating. TI-MOB = AmbiRad Titan mobile heater. 3kW spot heating, lockable wheels.
1. Installation Requirements.
Isolate any electrical supply to the heater and controller before proceeding.

Doc No. 700505 Page 4 of 20
AmbiRad Apollo Range
AmbiRad Sorrento Range
AmbiRad Titan Range
Single Unit Two Units Joined Three Units Joined
Wall
Mounted Ceiling Hung
Wall Mounted
Ceiling Hung
Wall Mounted
Ceiling Hung
AmbiRad Apollo Range Horiz 1 AmbiRad Sorrento SOR -15
Horiz or Vertical Horiz or
Vertical Horiz or Vertical
AmbiRad Sorrento SOR –DL30 Horiz
AmbiRad Sorrento SOR –TW45 Horiz AmbiRad Titan Range n/a n/a n/a n/a n/a n/a
1. Apollo can be mounted horizontally (i.e facing straight down) slung from chains. Ideally though, the better angle is to mount at 45°
1.3 Mounting the unit

Doc No. 700505 Page 5 of 20
1.3.1 Apollo range: 1.3.1.1 Wall mounted with central bracket.
The heater must be mounted in such a way
that the halogen lamp does not slant more than 4° from the horizontal, when viewed from the front.
The heater is suitable for installation only on a normally non-flammable surface. Observe the minimum safe distance between the heater body and inflammable surfaces when mounting.
Refer to Table 1 for the recommended mounting height for the heater.
Keep out of the reach of children. 1. Separate the heater from the mounting
bracket by loosening the two nuts at the rear of the heater.
2. Securely fasten the bracket to the mounting surface using the fixing holes in the bracket.
3. Replace the heater on the bracket using the nut and bolt supplied and fix in the required angular position by tightening the fixing bolt on the bracket. See diagram below.
Always isolate the heater from the mains supply when adjusting the angular position
1.3.1.2 Chain hung
The heater is suitable for installation on chains that are suitably fixed to a structure sufficient to hold the weight of the heater. Observe the minimum safe distance be-tween the heater body and inflammable sur-faces when mounting.
Please refer to Table 1 for the recommend-ed positioning of the heater with regards to minimum distances.
Do not install the heater in a corner! If installing near a corner, always ensure mini-mum side wall distance is adhered to.
Always allow the heater to cool before at-tempting to reposition/move. Never attempt to move the heater while it is switched on!
1. When chain hung, ensure chains are of ade-quate size and securely fixed to support the weight of the heater.
2. Fix the heater assembly to the chains via the holes in the body brackets if intending to face directly down as shown below. On QH30,QH45 & QHL90 units having channel brackets, attach the chains to the adjustable brackets as shown below.
3. Ensure the supply cord does not rest on the heater.

Doc No. 700505 Page 6 of 20
1.3.2 Sorrento range: 1.3.2.1 General
Always allow the heater to cool before attempting to reposition/move. Never attempt to move the heater while it is switched on!
Observe the minimum safe distance between the heater body and inflammable surfaces and objects when mounting.
When ceiling hanging any Sorrento heater, ensure the minimum distance from the ceiling is adhered to.
Please refer to Table 1 for the recommended positioning of the heater with regards to minimum distances.
When wall mounting any Sorrento heater, secure the supply cable ensuring it is not resting on the body or obstructing any air vents.
When wall mounting any Sorrento heater, the heater should be mounted with the terminal box at the bottom of the unit.
Do not install the heater in a corner!
Keep out of the reach of children. Always isolate the heater from the mains supply when adjusting the angular position. 1.3.2.2 Single units SOR 15/DL30/TW45
The Sorrento heater in singular format can be either hung from a ceiling from chains (not supplied) or wall mounted horizontally. In addition, the SOR15 can be wall mounted vertically.
When wall mounting the Sorrento heater horizontally, do not position the heater at an angle more than 90° and less than 30° as shown below.
1. When wall mounting, securely fasten the L-shaped wall brackets to the mounting surface using both of the fixing holes in the short part of the bracket .
Refer to Table 1 for recommended positioning of the heater. Please note. Wall fixings are not supplied. They should be selected to substantially support the weight of the installation. If in doubt contact a professional for advice
2. When wall mounting, fix in the required angular position by tightening the fixing bolts on the brackets at the rear of the heater as shown below.
The heater should face directly down when hanging. Ensure that the serrated washer is placed between the surface of the wall bracket and the bracket on the heater.
SOR 15 ONLY - When vertically mounting, ensure the mounting surface is angled so the heater projects downwards. Do not position the heater at an angle more than 45° and less than 30° to the horizontal as shown. Position the heater so the cord is exiting the terminal box pointing down.

Doc No. 700505 Page 7 of 20
3. When hanging from a ceiling two equal length and gauge chains are required and should be selected with fixings that are more than adequate to hold the weight of the heater. Ensure minimum distance from ceiling is adhered to as shown below. If in doubt contact a professional for advice!
1.3.2.3 Two SOR 15/DL30/TW45 units
Two Sorrento heaters can be joined together and can be hung from a ceiling from chains (not supplied). In addition, the SOR15 can be wall mounted horizontally or vertically. DO NOT WALL MOUNT THE SORDL30 OR SORTW45 UNITS!
When wall mounting two SOR15 heaters horizontally, do not position the heater at an angle more than 45° and less than 10° as shown below.
When hanging from a ceiling two chains of equal length and gauge are required and should be selected with fixings that are more than adequate to hold the weight of the heater. Ensure minimum distance from ceiling is adhered to as shown below. If in doubt contact a professional for advice!
1. Fix the heater assembly to the chains via the hole in the centre of the joining bar as shown below and ensure the heater faces directly down when hanging.
Wall mounting two SOR 15’s ONLY 1. Securely fasten the L-shaped wall brackets
to the mounting surface using both of the fixing holes in the short part of the bracket .
Refer to Table 1 for recommended positioning of the heater. Please note. wall fixings are not supplied. They should be selected to substantially support the weight of the installation. If in doubt contact a professional for advice! .
2. Fix the heater assembly to the brackets via the hole in the centre of the joining bar. The joining bars should slide inside the gap of the two wall brackets
3. Place a bolt and washer in the hole of the wall bracket and put a serrated washer on the opposite side between the bracket and joining bar. Repeat on opposite side.
4. Fit the heater assembly to the brackets and place a washer and nut on the bolts protruding through the joining bars.
5. Fully tighten the nut and bolts with the heater set at the desired angle shown opposite

Doc No. 700505 Page 8 of 20
SOR 15 ONLY - When vertically mounting, ensure the mounting surface is angled so the heater projects downwards. Do not position the heater at an angle more than 45° and less than 30° to the horizontal as shown below. Position the heater so the cord is exiting the terminal box pointing down
1.3.2.4 Three SOR 15/DL30 units
Three Sorrento heaters can be joined together and can be hung from a ceiling from chains (not supplied). In addition, the SOR15 can be wall mounted horizontally or vertically. DO NOT WALL MOUNT THE SORDL30 UNIT!
When wall mounting three SOR15 heaters horizontally, do not position the heater at an angle more than 80° and less than 60° as shown on next page.
When hanging from a ceiling four chains of equal length and gauge are required and should be selected with fixings that are more than adequate to hold the weight of the heater. Ensure minimum distance from ceiling is adhered to as shown below. If in doubt contact a professional for advice!
1. Fix the heater assembly to the chains via the hole in the centre of the joining bar as shown below and ensure the heater faces directly down when hanging.
Wall mounting three SOR 15’s ONLY 1. Securely fasten the L-shaped wall brackets
to the mounting surface using both of the fixing holes in the short part of the bracket.
Refer to Table 1 for recommended positioning

Doc No. 700505 Page 9 of 20
of the heater. Please note. wall fixings are not supplied. They should be selected to substantially support the weight of the installation. If in doubt contact a professional for advice!
2. Fix the heater assembly to the brackets via the bolt threads on the middle heater. A serrated washer should be placed on the threads first and the wall brackets should prise apart in order to fit the threads in place.
3. Place a washer and a nut on the thread on the outside of the wall brackets – both sides.
4. Fit the heater assembly to the brackets and place a washer and nut on the bolts protruding through the joining bars.
5. Fully tighten the nut and bolts with the heater set at the desired angle shown below.
SOR 15 ONLY - When vertically mounting, ensure the mounting surface is angled so the heater projects downwards. Do not position the heater at an angle more than 45° and less than 30° to the horizontal as shown below. Position the heater so the cord is exiting the terminal box pointing down.
1.4 Electrical Connections 1.4.1 General Warning - this appliance must be connected
to an earthed supply.
Pre-wired heaters are either fitted with 2.5 metres of supply cable or 3.0 meters of supply cord and a moulded 13A plug therefore it is unnecessary to remove the terminal box in order to carry out normal installation of these models.
All unwired versions should be installed by a suitably qualified electrician, following the instructions herewith.
All installations must be in accordance with the latest I.E.E safety regulations or equivalent. If in any doubt, please consult a suitably qualified electrician.
Heat resisting cable must be used.
We recommend using a RCD where applicable. If self wiring, a large double pole switch with a 3mm contact disconnection should be fitted.
If the supply cord becomes damaged, it must be replaced by the manufacturer, its service agent or a similar qualified person in order to avoid a hazard.
1.4.2 Apollo range:
Warning – this appliance must be earthed.
The single lamp Apollo series quartz heater (QH15-1) is fitted with 2.5 metres of supply cable therefore it is unnecessary to remove the terminal cover plate in order to carry out normal installation of this model.
A domestic 13 Amp socket is used for the power supply, proceed as follows for plug connections. A domestic plug/socket is only suitable for the single lamp Apollo series. The wires in the mains lead are coloured in accordance with the following code: Green and yellow: Earth, Blue: Neutral, Brown: Live. Since the colours of the wires in the mains lead of this appliance may not correspond with the markings identifying the terminals in the plug, proceed as follows: The wire which is coloured green and yellow must be connected to the terminal in the plug which is marked with the letter E, or with the earth symbol , or coloured green, or green and yellow. The wire which is coloured blue must be connected to the terminal marked N or coloured black. The wire which is coloured brown must be connected to the terminal marked L or coloured red.

Doc No. 700505 Page 10 of 20
For industrial installations, the units must be supplied via double pole miniature circuit breakers (MCB) with instantaneous coefficients in the range 7 to 10 with a separation of at least 3mm between contacts. Refer to Table 1 for MCB ratings. 1. Remove cover from terminal box mounted at the rear of the heater. 2. Feed the supply cable through the strain relief bush (not supplied) and connect to the terminal block and earth stud (as shown below).
3. Replace box cover.
1.4.3 Sorrento range:
Warning – this appliance must be earthed.
The single lamp Sorrento series heater (SOR 15) is fitted with 3.0 metres of supply cable and a moulded 13A plug therefore it is unnecessary to remove the terminal cover plate in order to carry out normal installation of this model.
The twin lamp Sorrento series heater (SORDL 30) is fitted with two 3.0 metres of supply cable and moulded 13A plugs therefore it is unnecessary to remove the terminal cover plate in order to carry out normal installation of this model.
The triple lamp Sorrento series heater (SORTL 45) is fitted with three 3.0 metres of supply cable and moulded 13A plugs therefore it is unnecessary to remove the terminal cover plate in order to carry out normal installation of this model.
When the electrical connection is outside, it is recommended that a waterproof socket is used for the connection/terminal. Otherwise, the plug should be connected to a socket indoors. If in any doubt, please contact a suitably qualified electrician.
1. Unscrew the terminal box cover at the back of the heater and feed the supply cable through the compression gland ensuring the rubber seal is on the cable.
2. Use a minimum of 1.0mm2 H05RN-F supply cable with 2 poles and earth and sleeve with silicon glass fibre braided (250°C) sleeving. The live and neutral wires must be connected to the terminal block. See below.
3. The green/yellow wire should be connected to the clamp marked with the earth symbol using a suitable wire terminal. Fit cord grip and terminal box saddle once wired.
4. Tighten the barrel nut of the compression gland so that the rubber seal grips the cable.
5. To prevent water ingress, ensure that the cover is secured well by hand tightening all for screws evenly.
1.4.4 Titan range:
Warning – this appliance must be earthed.
The Titan series heaters are fitted with 3.0 metres of supply cable and a moulded 13A plug therefore it is unnecessary to remove the terminal cover plate in order to carry out normal installation of this model.

Doc No. 700505 Page 11 of 20
1.5 Technical Details. Table 1
Model ref Voltage
Lamps x Power
Total Power Current per lamp
Amps per phase Description
V ph kW kW a a
Ap
ollo
QH 15-1 Single tube 230V 1ph 1 x 1.5 1.5 6.5 6.5
QH 30-1 Double tube 230V 1ph 2 x 1.5 3.0 6.5 13.0
QH 45-1 Triple tube 230V 1ph 3 x 1.5 4.5 6.5 19.6
QH 45-3 Triple tube 415V 3ph** 3 x 1.5 4.5 6.5 6.5
QHL 30-1 Double linear 230V 1ph 2 x 1.5 3.0 6.5 13.0
QHL 45-1 Triple linear 230V 1ph 3 x 1.5 4.5 6.5 19.6
QHL 45-3 Triple linear 415V 3ph** 3 x 1.5 4.5 6.5 6.5
QHL 90-3 Triple double 415V 3ph** 6 x 1.5 9.0 6.5 13.0
So
rren
to
SOR 15 Single tube 230V 1ph 1 x 1.5 1.5 6.5 6.5
SORDL 30 Double linear 230V 1ph 2 x 1.5 3.0 6.5 13.0
SORTW 45 Triple linear 230V 1ph 3 x 1.5 4.5 6.5 19.6
Tita
n
TI-STAT Static heater 230V 1ph 2 x 1.5 3.0 6.5 13.0
TI-MOB Mobile heater 230V 1ph 2 x 1.5 3.0 6.5 13.0
Model ref
Min height from floor
Min distance from ceiling
Min distance from side wall
Dimensions (W x H x D)
Weight Ingress
protection
m m m mm kg IP
Ap
ollo
QH 15-1 2.0 0.15 1.0 420x260x120 4.0 none
QH 30-1 2.0 0.5 1.5 420x390x120 5.0 none
QH 45-1 2.5 0.5 1.5 420x530x120 6.5 none
QH 45-3 2.5 0.5 1.5 420x530x120 6.5 none
QHL 30-1 2.5 0.15 1.0 860x260x120 7.0 none
QHL 45-1 2.5 0.15 1.5 1280x260x120 10.0 none
QHL 45-3 2.5 0.5 1.5 1280x260x120 10.0 none
QHL 90-3 4.0 0.5 1.5 860x630x120 13.5 none
So
rren
to
SOR 15 2.0 0.3 1.0 430x228x323 3.5 24
SORDL 30 2.5 0.5 1.0 815x228x323 5.6 24
SORTW 45 3.0 0.5 1.0 1202x228x323 8.0 24
Tita
n
TI-STAT n/a n/a n/a 430x650x200 430x669x509*
7.1 none
TI-MOB n/a n/a n/a 430x1140x330 650x1140x650*
20.0 none
Use MCB Type 3. * including stand. ** Star connection with neutral star point to balance load
Doc No. 700505 Page 12 of 20
2. Assembly Instructions.
PLEASE READ this section prior to assembly to familiarise yourself with the
components and tools you require at the various stages of assembly. Carefully open the packaging and check the contents against the parts and check list. The manufacturer reserves the right to alter specifications without prior notice.
Please ensure that all packaging is disposed of in a safe environmentally
friendly way. For your own safety we recommend the use of safety boots and leather faced
gloves when handling sharp or heavy items. The use of protective eye wear is also recommended.
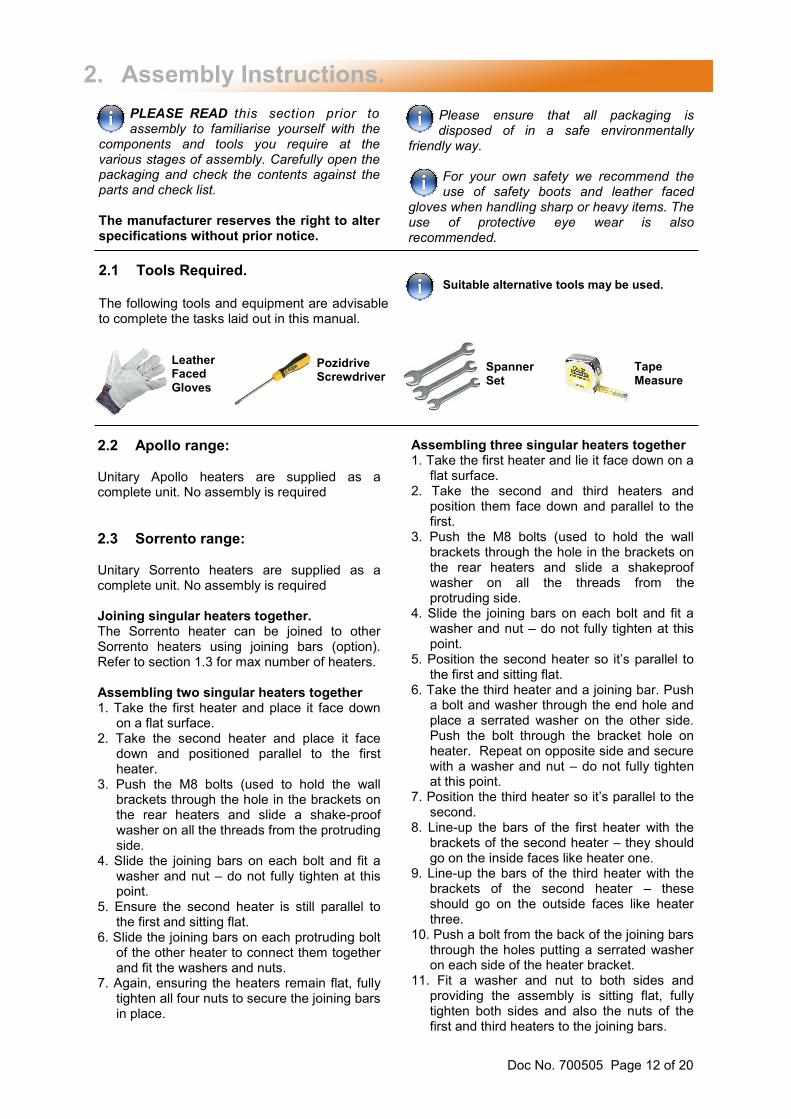
Pozidrive Screwdriver
Leather Faced Gloves
Tape Measure
Spanner Set
2.1 Tools Required. The following tools and equipment are advisable to complete the tasks laid out in this manual.
Suitable alternative tools may be used.
Assembling three singular heaters together 1. Take the first heater and lie it face down on a
flat surface. 2. Take the second and third heaters and
position them face down and parallel to the first.
3. Push the M8 bolts (used to hold the wall brackets through the hole in the brackets on the rear heaters and slide a shakeproof washer on all the threads from the protruding side.
4. Slide the joining bars on each bolt and fit a washer and nut – do not fully tighten at this point.
5. Position the second heater so it’s parallel to the first and sitting flat.
6. Take the third heater and a joining bar. Push a bolt and washer through the end hole and place a serrated washer on the other side. Push the bolt through the bracket hole on heater. Repeat on opposite side and secure with a washer and nut – do not fully tighten at this point.
7. Position the third heater so it’s parallel to the second.
8. Line-up the bars of the first heater with the brackets of the second heater – they should go on the inside faces like heater one.
9. Line-up the bars of the third heater with the brackets of the second heater – these should go on the outside faces like heater three.
10. Push a bolt from the back of the joining bars through the holes putting a serrated washer on each side of the heater bracket.
11. Fit a washer and nut to both sides and providing the assembly is sitting flat, fully tighten both sides and also the nuts of the first and third heaters to the joining bars.
2.2 Apollo range: Unitary Apollo heaters are supplied as a complete unit. No assembly is required
2.3 Sorrento range: Unitary Sorrento heaters are supplied as a complete unit. No assembly is required Joining singular heaters together. The Sorrento heater can be joined to other Sorrento heaters using joining bars (option). Refer to section 1.3 for max number of heaters. Assembling two singular heaters together 1. Take the first heater and place it face down
on a flat surface. 2. Take the second heater and place it face
down and positioned parallel to the first heater.
3. Push the M8 bolts (used to hold the wall brackets through the hole in the brackets on the rear heaters and slide a shake-proof washer on all the threads from the protruding side.
4. Slide the joining bars on each bolt and fit a washer and nut – do not fully tighten at this point.
5. Ensure the second heater is still parallel to the first and sitting flat.
6. Slide the joining bars on each protruding bolt of the other heater to connect them together and fit the washers and nuts.
7. Again, ensuring the heaters remain flat, fully tighten all four nuts to secure the joining bars in place.

Doc No. 700505 Page 13 of 20
2.4.2 Titan Mobile heater The support stand for the Titan Static heater is supplied in two halves for ease of packing. 1. Interlock the two base plates with the base
anchor plate uppermost. 2. Affix the casters to each of the four ends. 3. Join the support to the anchor plate and bolt
trough the base pieces. 4. Affix the head anchor bracket to the top of
the support. 5. Attach the heater head to the top of the
support.
2.4 Titan range: 2.4.1 Titan Static heater The support stand for the Titan Static heater is supplied in two halves for ease of packing. 1. Place the base half stand ‘A’ on the work
surface. 2. Remove both self tapping screws ‘D’ from
the inside of each leg. 3. Slide the top half of the stand ‘B’ into
position to fit inside of the base half stand. 4. Replace the self tapping screw ‘D’ and fully
tighten. 5. Remove the 2 bolts and washers ‘C’ from
the back of the heater. 6. Place the heater against the top half of the
stand and replace the 2 screws and washers ‘C’ ensuring they pass through the fixing bracket and fully tighten.
Typical multiple heater assembly

Doc No. 700505 Page 14 of 20
Small Flat Head Screwdriver
3. Servicing Instructions.
These appliances should be serviced annually by a competent person to ensure safe and efficient operation. In exceptional dusty or polluted conditions more frequent servicing may be required. The manufacturer offers a maintenance service. Details available on request
Soft Brush
Pozidrive Screwdriver
Leather Faced Gloves
3.1 Tools Required. The following tools and equipment are advisable to complete the tasks laid out in this manual.
Suitable alternative tools may be used.
Lint-free cloth
3.2 Maintenance. In the event of heater failure, or for spare parts or advice, please contact the manufacturer in the first instance. Disconnect from the mains before commencing any maintenance procedure including cleaning. To ensure optimum heat effectiveness, it is recommended that that the guard is removed and the reflector is wiped with a lint-free cloth should the reflector show considerable signs of dust or dirt. Remove any finger marks from the lamp with a soft cloth and methylated spirits or alcohol. Finger marks will burn into quartz causing premature lamp failure.

Doc No. 700505 Page 15 of 20
4. Replacing Parts.
4.1 Replacing the lamp - general It is very important that your replacement lamp is exactly the same as the one it was supplied with. Failure to fit the exact same type could cause the heater to fail or even become dangerous especially when used in an outdoor environment. Please contact AmbiRad to purchase your replacement lamp and state the model number of the heater you wish to fit the lamp to. Your new lamp should not be handled with bare hands. Remove finger marks with a soft cloth and methylated spirits or alcohol. Finger marks will burn into quartz causing premature lamp failure. If you are in any doubt about following the procedure below, please contact us for technical assistance. The mains power should be disconnected before any attempts are made to replace the lamp. The following should be carried out with compliance to the latest IEE regula-tions. If you are unfamiliar with installing such fixtures, contact a qualified electri-cian to carry out.
4.2 Apollo range: 1. Disconnect the power supply to the heater. 2. Remove guard (where fitted) by flexing one end and releasing from it’s locating holes on the lamp to be replaced. 3. Remove either the three screws from both front side covers on smaller models, or remove the screws from both sides the middle cover(s) on longer models by as shown below.
4. Locate the lamp wire by the terminal and re-lease from tab. Repeat at other end.
5. Remove the lamp holding clips by squeez-ing the clip together and lifting away as shown below.
6. Slide the lamp out through the extrusion feeding one way first with the wire and then the opposite way to take out and remove.
Take care not to scratch the reflector surface. 7. Refit the new lamp. Take care not to mark the reflector or touch the new lamp with the hands (see caution below). 8. Replace the lamp holding clips. Make sure they are firmly in place over the white ceramic ends of the lamp. 9. Refit the male and female connectors by fully pushing together. Cover and refit the black sleeve. 10. Replace the front side and or middle covers in reverse order and then refit the wire guard(s) if originally fitted. Caution. Do not handle lamp with bare hands. Remove finger marks with a soft cloth and methylated spirit or alcohol. Finger marks will burn into quartz causing premature lamp failure. Please note: Apollo outer casing can reach high tempera-
Lamp wire end terminal

Doc No. 700505 Page 16 of 20
4.3 Sorrento Range: 1. Ensure the heater and lamp are cool and the power supply is disconnected by removing the plugs from the socket outlet - both plugs must be removed even if only one lamp is to be replaced. 2. Remove the screws from the terminal box at the back of the lamp you wish to replace and lift off the lid - see below.
3. Disconnect the lamp from the connector blocks by unscrewing the screws highlighted above below and remove the white coloured lamp wires from the terminal block.
4. At the back of the heater, remove the plate holding the terminal box by removing the two fixing screws as shown below.
5. Pull the lamp wires one at a time through the plate to remove as shown below.
6. At the front of the heater, the guard in front of the lamp you are replacing should be removed by gently pulling it away from the heater so it prises out of its locating holes at each end.
7. Remove the screw from the side reflector and lift it up away from the heater to remove it. 8. Remove the screws from both sides of the middle reflector and lift it up to remove it. 9. The lamp can be released from the middle lamp holder by prising back the spring clip and lifting up enough to clear the released clip as shown. 10. At the opposite end of the lamp the wire should be pulled out of the side slot and the lamp can be lifted up completely The wires should be gently pulled so they come out from behind the reflector.
Doc No. 700505 Page 17 of 20
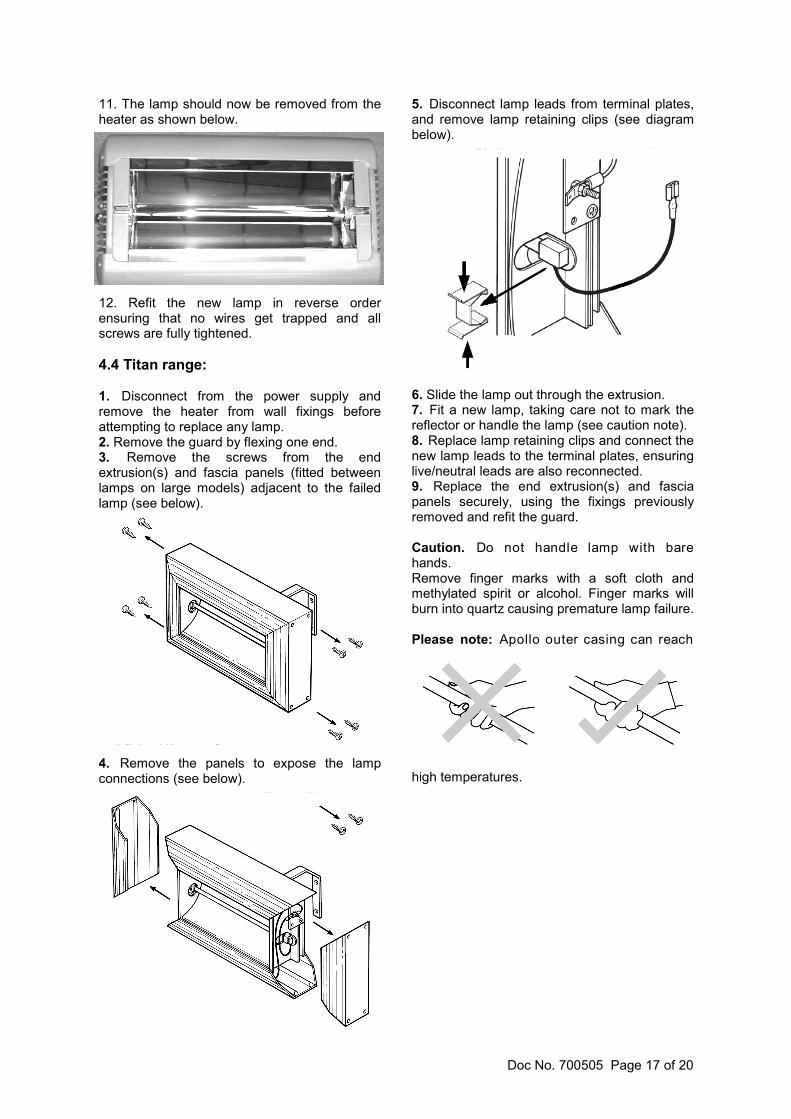
11. The lamp should now be removed from the heater as shown below.
12. Refit the new lamp in reverse order ensuring that no wires get trapped and all screws are fully tightened.
4.4 Titan range: 1. Disconnect from the power supply and remove the heater from wall fixings before attempting to replace any lamp. 2. Remove the guard by flexing one end. 3. Remove the screws from the end extrusion(s) and fascia panels (fitted between lamps on large models) adjacent to the failed lamp (see below).
4. Remove the panels to expose the lamp connections (see below).
5. Disconnect lamp leads from terminal plates, and remove lamp retaining clips (see diagram below).
6. Slide the lamp out through the extrusion. 7. Fit a new lamp, taking care not to mark the reflector or handle the lamp (see caution note). 8. Replace lamp retaining clips and connect the new lamp leads to the terminal plates, ensuring live/neutral leads are also reconnected. 9. Replace the end extrusion(s) and fascia panels securely, using the fixings previously removed and refit the guard. Caution. Do not handle lamp with bare hands. Remove finger marks with a soft cloth and methylated spirit or alcohol. Finger marks will burn into quartz causing premature lamp failure. Please note: Apollo outer casing can reach
high temperatures.

Doc No. 700505 Page 18 of 20
Notes

Doc No. 700505 Page 19 of 20
Notes

Doc No. 700505 Page 20 of 20
This
docu
men
t is
to r
epla
ce
Part
No
. 7
000
50
5