OWNERS MANUAL CAMPOUT - Carefree of Colorado · premier manufacturer of quality awnings and...
12
OWNER'S MANUAL CAMPOUT RV Before operating the awning, carefully review the Owner's Manual. The manual contains important safety information, detailed operating instructions, common maintenance procedures and other useful information. TABLE OF CONTENTS Introduction ........................................................................................................... 2 First Time Installation ........................................................................................... 3 Installing the Wall Brackets ........................................................................... 3 Setting Up the Campout Awning.......................................................................... 4 Center Rafter ................................................................................................. 5 Carport Position............................................................................................. 5 Pitch Adjustment ........................................................................................... 5 Rain Release Setting ..................................................................................... 5 Storage ................................................................................................................... 6 Awning Care .......................................................................................................... 7 Fabric Care.................................................................................................... 7 Mildew ................................................................................................. 7 Pooling ................................................................................................ 7 Leaking ................................................................................................ 7 Rafter and Vertical Support Arm Care ........................................................... 8 Hardware Maintenance ....................................................................... 8 Carefree Major Product Limited Warranty........................................................... 9
Transcript of OWNERS MANUAL CAMPOUT - Carefree of Colorado · premier manufacturer of quality awnings and...

OWNER'S MANUAL CAMPOUT
RV
Before operating the awning, carefully review the Owner's Manual. The manual contains important safety information, detailed operating instructions, common maintenance procedures and other useful information.
TABLE OF CONTENTS Introduction ........................................................................................................... 2 First Time Installation ........................................................................................... 3
Installing the Wall Brackets ........................................................................... 3 Setting Up the Campout Awning .......................................................................... 4
Center Rafter ................................................................................................. 5 Carport Position ............................................................................................. 5 Pitch Adjustment ........................................................................................... 5 Rain Release Setting ..................................................................................... 5
Storage ................................................................................................................... 6 Awning Care .......................................................................................................... 7
Fabric Care .................................................................................................... 7 Mildew ................................................................................................. 7 Pooling ................................................................................................ 7 Leaking ................................................................................................ 7
Rafter and Vertical Support Arm Care ........................................................... 8 Hardware Maintenance ....................................................................... 8
Carefree Major Product Limited Warranty ........................................................... 9

Carefree of Colorado
2
INTRODUCTION From it's beginning in the early 70's, Carefree of Colorado has emerged as the premier manufacturer of quality awnings and accessories for Recreational Vehicles (RVs). Our full line of products can provide the accessories that match your life style; no matter what type of RV you own.
Check with your dealer to discover the products that can make your life more Carefree.
Product Description Simple Installation.
Easy setup.
The rolled up awning stores in a heavy duty zippered vinyl bag attached to the RV.
Self-storing arms and braces simply fold up into the lead bar.
The pitch can be set to optimize shade and rain run-off.
The vertical support arms can be attached to the RV or set in the carport position to provide an open walkway from the side of the awning.
WARNING Awnings are designed to provide shade and
protection from the sun. The effects of wind and rain on an awning are unpredictable and can cause severe damage to the awning and/or the vehicle. If wind or extended periods of rain are expected, roll up the awning.
NOTICE It is recommended that if leaving the RV unattended
for a length of time, retract the awning to avoid unexpected climate conditions.
WARNING Keep all sources of heat and flame away from the
awning canopy. Fabric is not fire-proof and can burn if left in contact with any flame or heat source.
CALIFORNIA PROPOSITION 65 WARNING This product contains chemicals known to the
state of California to cause cancer or birth defects or other reproductive harm. California’s Proposition 65 requires this warning to be given to customers in the state of California.
CAMPOUT
3
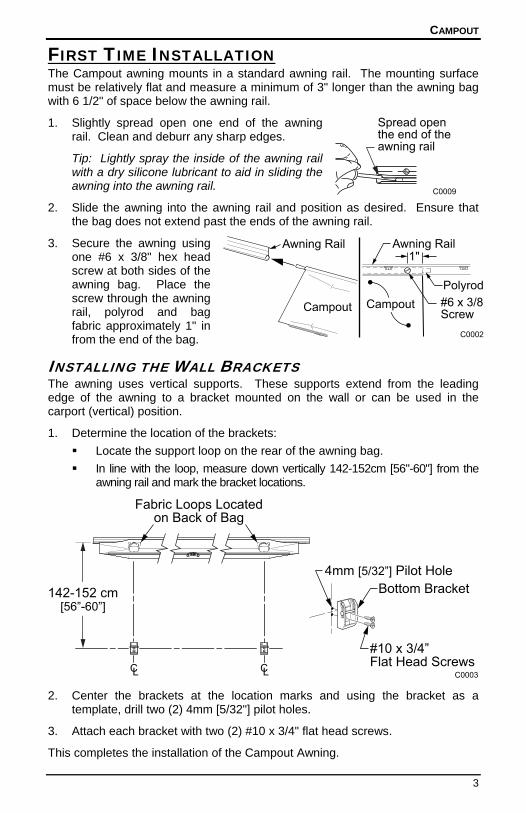
FIRST TIME INSTALLATION The Campout awning mounts in a standard awning rail. The mounting surface must be relatively flat and measure a minimum of 3" longer than the awning bag with 6 1/2" of space below the awning rail.
1. Slightly spread open one end of the awning rail. Clean and deburr any sharp edges.
Tip: Lightly spray the inside of the awning rail with a dry silicone lubricant to aid in sliding the awning into the awning rail.
2. Slide the awning into the awning rail and position as desired. Ensure that the bag does not extend past the ends of the awning rail.
3. Secure the awning using one #6 x 3/8" hex head screw at both sides of the awning bag. Place the screw through the awning rail, polyrod and bag fabric approximately 1" in from the end of the bag.
INSTALLING THE WALL BRACKETS The awning uses vertical supports. These supports extend from the leading edge of the awning to a bracket mounted on the wall or can be used in the carport (vertical) position.
1. Determine the location of the brackets:
Locate the support loop on the rear of the awning bag.
In line with the loop, measure down vertically 142-152cm [56"-60"] from the awning rail and mark the bracket locations.
142-152 cm[56”-60”]
Bottom Bracket
#10 x 3/4”Flat Head Screws
4mm [5/32”] Pilot Hole
Fabric Loops Locatedon Back of Bag
C0003
2. Center the brackets at the location marks and using the bracket as a template, drill two (2) 4mm [5/32"] pilot holes.
3. Attach each bracket with two (2) #10 x 3/4" flat head screws.
This completes the installation of the Campout Awning.
C0009
Spread openthe end of theawning rail
Campout
1"
#6 x 3/8Screw
Polyrod
Awning Rail
C0002
Awning Rail
Campout

Carefree of Colorado
4
SETTING UP THE CAMPOUT AWNING CAUTION Hold onto the lead rail when the bag is open and when the
retaining strap is released to prevent awning from unrolling and dropping unexpectedly.
Undo Retaining Strap
Unroll Lead Rail and Canopy C0004 1. Unzip the bag.
2. While holding the lead rail, move to the center and undo the retaining strap.
3. Unroll the lead rail and canopy.
4. Rotate the vertical support leg down from the bottom of the lead rail.
5. Open the latch and extend the lower leg out. Close the latch.
6. Swing the support toward the wall bracket and attach the carport foot into the wall bracket.
Carport FootBottom Bracket
Retaining Pin
C0010 Lift the retaining pin and insert the foot into
the bracket. Allow the retaining pin to drop down over the foot.
7. Repeat for other side.
8. Rotate the rafter out from the back of the lead rail.
9. Open the latch and extend the channel back toward the RV.
10. Place the end of the rafter into the support loop located inside the bag below the awning rail.
11. Extend the rafter to tension the canopy then close the latch.
12. Repeat for other side.
Open Close
Fabric LoopInside Bag C0006
Open
Close
C0005
Latch
CAMPOUT
5
CENTER RAFTER For 3.5 meter and larger Campouts, a center rafter is provided to add tension to the canopy. To use:
1. Insert the larger end into the middle of the lead rail.
2. Open the latch and extend the channel back toward the RV.
3. Place the end of the rafter into the support loop located inside the bag below the awning rail.
4. Extend the rafter to tension the canopy then close the latch.
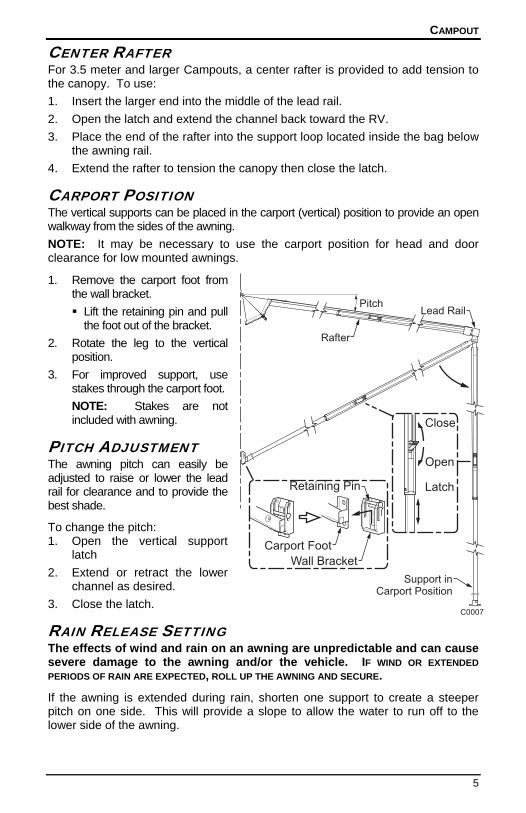
CARPORT POSITION The vertical supports can be placed in the carport (vertical) position to provide an open walkway from the sides of the awning.
NOTE: It may be necessary to use the carport position for head and door clearance for low mounted awnings.
1. Remove the carport foot from the wall bracket.
Lift the retaining pin and pull the foot out of the bracket.
2. Rotate the leg to the vertical position.
3. For improved support, use stakes through the carport foot.
NOTE: Stakes are not included with awning.
PITCH ADJUSTMENT The awning pitch can easily be adjusted to raise or lower the lead rail for clearance and to provide the best shade.
To change the pitch: 1. Open the vertical support
latch
2. Extend or retract the lower channel as desired.
3. Close the latch.
RAIN RELEASE SETTING The effects of wind and rain on an awning are unpredictable and can cause severe damage to the awning and/or the vehicle. IF WIND OR EXTENDED
PERIODS OF RAIN ARE EXPECTED, ROLL UP THE AWNING AND SECURE.
If the awning is extended during rain, shorten one support to create a steeper pitch on one side. This will provide a slope to allow the water to run off to the lower side of the awning.
Carport FootWall Bracket
Retaining Pin
Open
Close
Latch
C0007
Pitch
Rafter
Lead Rail
Support inCarport Position
Carefree of Colorado
6
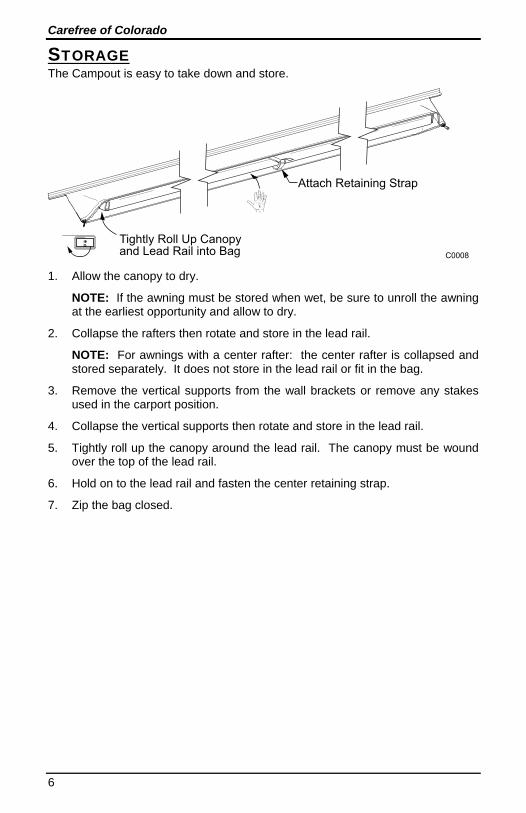
STORAGE The Campout is easy to take down and store.
Attach Retaining Strap
Tightly Roll Up Canopyand Lead Rail into Bag C0008
1. Allow the canopy to dry.
NOTE: If the awning must be stored when wet, be sure to unroll the awning at the earliest opportunity and allow to dry.
2. Collapse the rafters then rotate and store in the lead rail.
NOTE: For awnings with a center rafter: the center rafter is collapsed and stored separately. It does not store in the lead rail or fit in the bag.
3. Remove the vertical supports from the wall brackets or remove any stakes used in the carport position.
4. Collapse the vertical supports then rotate and store in the lead rail.
5. Tightly roll up the canopy around the lead rail. The canopy must be wound over the top of the lead rail.
6. Hold on to the lead rail and fasten the center retaining strap.
7. Zip the bag closed.
CAMPOUT
7
AWNING CARE Maintaining a Carefree Awning is easy. Just follow these basic steps: Always operate the awning according to the instructions. Periodically check that the fasteners are tight. Tighten if necessary. Keep the awning fabric and arms clean.
FABRIC CARE NOTICE Do not use oil based cleaners or any caustic, granulated or abrasive type cleaners on your Carefree product.
1. One of the best ways to keep the fabric looking good and to delay the need for deep or vigorous cleanings is to hose fabrics off on a monthly basis with clear water. This practice will help prevent dirt from becoming deeply imbedded in the fabric. In most environments, a thorough cleaning will be needed every two to three years.
2. When it’s time for a thorough cleaning, the fabric can be cleaned while still on the awning frame.
3. When cleaning the fabric, it is important to observe the following: Use a soft brush and warm water with soap. Always use a natural soap, never detergent. Water should be cold to lukewarm, never more than 100F. Air-dry only. Never apply heat to the fabric. Always allow the fabric to dry thoroughly before rolling up the awning.
MILDEW Mildew is a fungus growth that looks like dirt. Vinyl coated polyester fabrics are mildew resistant because of a chemical biocide in the vinyl coating. Under ordinary conditions, mildew will not appear. However, in areas where high temperature and humidity are common, mildew can be a problem and require the material to be washed more frequently. Thoroughly rinse the fabric with clean water and allow to air dry completely before rolling up the awning.
POOLING When water collects on the top of the fabric, this is known as "pooling". This can occur during inclement weather or if a running air conditioner discharges over the awning. The water is dumped when the awning is retracted. It is recommended that if water accumulates on the top; set the awning in the rain dump position (page 5) to dump the water. This will help prevent the fabric from stretching or distorting.
The effects of wind and rain on an awning are unpredictable. Severe damage to the awning and the vehicle may result. IF WIND OR EXTENDED
PERIODS OF RAIN ARE EXPECTED, ROLL UP THE AWNING AND SECURE FOR TRAVEL.
LEAKING On vinyl canopies, side hems and poly cords are stitched in with a sewing machine. On occasion, this stitching may allow water to seep or leak through the stitches. This is normal and not a defect covered by warranty. Treat the seams with a quality seam sealer.

Carefree of Colorado
8
RAFTER AND VERTICAL SUPPORT ARM CARE The best method of keeping the arms and braces operating smoothly is to clean them. Dirt and debris can cause the channels not to slide easily.
Periodically wash out the channels with running water (i.e. a hose) to keep them clean. If the channels still do not slide easily, lightly spray the joints and inside the channels with a dry silicone lubricant after the arms have been cleaned and dried thoroughly.
HARDWARE MAINTENANCE Replace any parts that become damaged. Periodically check all mounting hardware, screws, lags, etc., and re-tighten
when necessary. Locking knobs should be periodically loosened and removed then sprayed
with a dry lubricant to prevent binding and locking.

CAMPOUT
9
CAREFREE MAJOR PRODUCT LIMITED WARRANTY Carefree of Colorado (hereafter referred to as Carefree) warrants to the first retail Purchaser that the Carefree Product is free of defects in material and workmanship within the terms and conditions as set forth in the warranty statement available online at www.carefreeofcolorado.com. Carefree’s obligation under this warranty is limited to the repair or replacement, at Carefree’s option, of any defective component with new or factory refurbished components.
OWNER MUST RETAIN THE ORIGINAL PROOF OF PURCHASE AND/OR HAVE THE PRODUCT
WARRANTY REGISTRATION ON FILE AT CAREFREE FOR WARRANTY CLAIMS.
THIS WARRANTY IS NOT TRANSFERABLE.
For: - Warranty Duration; - Warranty Coverage and Exclusions; - Warranty Terms of Coverage; and, - Warranty Claim Procedures
Refer to publication "Carefree Major Product Limited Warranty"
available online at www.carefreeofcolorado.com
Register your Carefree products on-line at www.carefreeofcolorado.com

Carefree of Colorado
10

CAMPOUT
11

052881-003r4 Printed in USA June, 2016
Carefree of Colorado 2145 W. 6th Avenue Broomfield, CO 80020 a Scott Fetzer company