OVER THE RANGE CONVECTION MICROWAVE … THE RANGE CONVECTION MICROWAVE OVEN Read all instructions...
32
O V E R T H E R A N G E C O N V E C T I O N MICROWAVE OVEN Read all instructions carefully before using the oven. OPERATION MANUAL MODELS R-1870 / R-1871 / R-1872
Transcript of OVER THE RANGE CONVECTION MICROWAVE … THE RANGE CONVECTION MICROWAVE OVEN Read all instructions...

O V E R T H E R A N G EC O N V E C T I O NM I C R O W A V E O V E N
R e a d a l l i n s t r u c t i o n s c a r e f u l l y b e f o r e u s i n g t h e o v e n .
O P E R A T I O N M A N U A L
M O D E L SR-1870 / R -1871 / R -1872

To aid in reporting this microwave oven in case of loss or theft, please record below the model number andserial number located on the unit. We also suggest you record all the information listed and retain for futurereference.
MODEL NUMBER ________________________ SERIAL NUMBER ______________DATE OF PURCHASE ______________________DEALER ____________________________ TELEPHONE ________________SERVICER ___________________________ TELEPHONE ________________
PRECAUTIONS TO AVOID POSSIBLEEXPOSURE TO EXCESSIVE
MICROWAVE ENERGY(a) Do not attempt to operate this oven with the door open since open-door operation can
result in harmful exposure to microwave energy. It is important not to defeat or tamper withthe safety interlocks.
(b) Do not place any object between the oven front face and the door or allow soil or cleanerresidue to accumulate on sealing surfaces.
(c) Do not operate the oven if it is damaged. It is particularly important that the oven door closeproperly and that there is no damage to the: (1) door (bent), (2) hinges and latches (brokenor loosened), (3) door seals and sealing surfaces.
(d) The oven should not be adjusted or repaired by anyone except properly qualified servicepersonnel.
F O R C U S T O M E R A S S I S T A N C E
TO PHONE:DIAL 1-800-BE-SHARP ( 237-4277 ) for :
SERVICE (for your nearest Sharp Authorized Servicer)PARTS (for your authorized parts distributor)ADDITIONAL CUSTOMER INFORMATION
DIAL 1-800-642-2122 for :ACCESSORIES and COOKBOOK
TO WRITE:Sharp Electronics CorporationCustomer Assistance Center1300 Naperville DriveRomeoville, IL 60446-1091
TO ACCESS INTERNET: www.sharp-usa.com
Please provide the following information when you write or call: model number, serial number, date of pur-chase, your complete mailing address (including zip code), your daytime telephone number (including areacode) and description of the problem.

1
C O N T E N T S
INTERACTIVE COOKING SYSTEMThe Interactive Cooking System offers step-by-step instructions in the display for using the oven, fromsetting the clock to programming each feature. It also includes Custom Help for instructions on usingChild Lock, Audible Signal Elimination, Auto Start and Help. There is a choice of English, Spanishor French and a choice of U.S. Customary Unit-pound or Metric-kilograms. Touch CUSTOM HELPand follow the directions displayed or check page 24.
For Customer Assistance..... Inside Front CoverPrecautions to Avoid Possible
Exposure to ExcessiveMicrowave Energy ............. Inside Front Cover
Contents...................................................... 1Consumer Limited Warranty ..................... 2Product Information Card.......................... 2Important Safety Instructions ................... 3Unpacking Instructions ............................. 4Accessories ................................................ 4Grounding Instructions ............................. 4Information You Need to Know................. 5-7
About Your Oven ...................................... 5About Food ............................................... 5About Microwave Cooking ........................ 6About Safety ............................................. 6
About Children and the Microwave ........... 7About Utensils and Coverings................... 7
Part Names ................................................. 8Touch-Control Panel .................................. 9Before Operating ........................................ 10
To Set the Clock ....................................... 10Stop/Clear ................................................. 10
Manual Operation ....................................... 10-11Turntable On/Off ....................................... 10Hood Light/Hood Fan ................................ 11Time Cooking Microwave.......................... 11Keep Warm ............................................... 11
Microwave Features ................................... 12-17CompuDefrost ........................................... 12CompuDefrost Chart ................................. 12Manual Defrost.......................................... 13Sensor Cooking ........................................ 13Instant Sensors ......................................... 14Instant Sensor Reheat .............................. 14Instant Sensor Popcorn ............................ 14Popcorn Chart ........................................... 14Instant Sensor Chart ................................. 14Sensor Cook ............................................. 15Sensor Cook Chart ................................... 15Sensor Cook Recipes ............................... 16-17
Manual Convection/Automatic MixOperation .................................................... 18-22
Convection Cooking .................................. 18To Cook with Convection .......................... 18To Preheat and Cook with Convection ..... 18To Broil ...................................................... 18To Slow Cook............................................ 19Automatic Mix Cooking ............................. 19To Cook with Automatic Mix ..................... 19To Preheat and Cook with Automatic Mix 19
Convection Automatic Mix Operation ...... 20-22CompuBroil ............................................... 20CompuBroil Chart ..................................... 20CompuRoast ............................................. 21CompuRoast Chart ................................... 21CompuBake .............................................. 22CompuBake Chart .................................... 22
Other Convenient Features ....................... 23-24Multiple Sequence Cooking ...................... 23More/Less Time Adjustment ..................... 23Kitchen Timer ............................................ 23Minute Plus ............................................... 23Demonstration Mode................................. 23Help .......................................................... 23Custom Help ............................................. 24
1. Child Lock.......................................... 242. Audible Signal Elimination ................. 243. Auto Start .......................................... 244. Language Selection .......................... 245. Weight/Temp Selection ..................... 24
Touch On .................................................. 24Cleaning and Care...................................... 25-26Service Call Check ..................................... 27THE ULTIMATE ACCESSORY ................... 27COOKBOOK ORDER FORM ...................... 28Specifications ............................................. 28Guia Auto-Touch................... Parte Interior de la
Cubierta TraseraAuto-Touch Guide ............................ Back Cover

2
SHARP ELECTRONICS CORPORATION warrants to the first consumer purchaser that this Sharp brandproduct (the “Product”), when shipped in its original container, will be free from defective workmanship andmaterials, and agrees that it will, at its option, either repair the defect or replace the defective Product or partthereof with a new or remanufactured equivalent at no charge to the purchaser for parts or labor for theperiod(s) set forth below.
This warranty does not apply to any appearance items of the Product nor to the additional excluded item(s)set forth below nor to any Product the exterior of which has been damaged or defaced, which has beensubjected to misuse, abnormal service or handling, or which has been altered or modified in design orconstruction.
In order to enforce the rights under this limited warranty, the purchaser should follow the steps set forthbelow and provide proof of purchase to the servicer.
The limited warranty described herein is in addition to whatever implied warranties may be grantedto purchasers by law. ALL IMPLIED WARRANTIES INCLUDING THE WARRANTIES OFMERCHANTABILITY AND FITNESS FOR USE ARE LIMITED TO THE PERIOD(S) FROM THE DATEOF PURCHASE SET FORTH BELOW. Some states do not allow limitations on how long an impliedwarranty lasts, so the above limitation may not apply to you.
Neither the sales personnel of the seller nor any other person is authorized to make any warranties otherthan those described herein, or to extend the duration of any warranties beyond the time period describedabove on behalf of Sharp.
The warranties described herein shall be the sole and exclusive warranties granted by Sharp and shallbe the sole and exclusive remedy available to the purchaser. Correction of defects, in the manner and forthe period of time described herein, shall constitute complete fulfillment of all liabilities and responsibilitiesof Sharp to the purchaser with respect to the Product, and shall constitute full satisfaction of all claims,whether based on contract, negligence, strict liability or otherwise. In no event shall Sharp be liable, or in anyway responsible, for any damages or defects in the Product which were caused by repairs or attemptedrepairs performed by anyone other than an authorized servicer. Nor shall Sharp be liable or in any wayresponsible for any incidental or consequential economic or property damage. Some states do not allow theexclusion of incidental or consequential damages, so the above exclusion may not apply to you.
THIS WARRANTY GIVES YOU SPECIFIC LEGAL RIGHTS. YOU MAY ALSO HAVE OTHER RIGHTSWHICH VARY FROM STATE TO STATE.
Your Product Model Number& Description:
Warranty Period forthis Product:
Additional Item(s) Excluded fromWarranty Coverage (if any):
Where to Obtain Service:
R-1870, R-1871 or R-1872 Home Use Carousel Microwave Oven. (Besure to have this information available when you need service for yourProduct.)
One (1) year parts and labor in-home service. The warranty periodcontinues for an additional six (6) years, for a total of seven (7) years,with respect trÄthe magnetron tube in the Product for parts only. Laborand the servicer trip charge are not provided free of charge for thisadditional period.
Non-functional accessories, turntable and light bulbs.
From a Sharp Authorized Servicer located In the United States.Be sure to have Proof of Purchase available. For in-home service,the servicer will come to the unit’s location. If it is necessary to removethe unit for repair, the servicer will reinstall the unit at no extra charge,provided it was installed according to Sharp’s Installation Instructions.To find the location of the nearest Sharp Authorized Servicer, call Sharptoll free at 1-800-BE-SHARP (1-800-237-4277).
P R O D U C T I N F O R M A T I O N C A R DThe product information card should be completed within ten days of purchase and returned. We will keep it onfile and help you access the information in case of loss, damage or theft. This will also enable us to contact you inthe unlikely event that any adjustments or modifications are ever required for your oven.
TO OBTAIN SUPPLY, ACCESSORY OR PRODUCT INFORMATION, CALL 1-800-BE-SHARP OR VISIT www.sharp-usa.com.SAVE THE PROOF OF PURCHASE AS IT IS NEEDED SHOULD YOUR OVEN EVER REQUIRE WARRANTY SERVICE.
C O N S U M E R L I M I T E D W A R R A N T Y

3
I M P O R T A N T S A F E T Y I N S T R U C T I O N S
SAVE THESE INSTRUCTIONS
When using electrical appliances basic safety precautions should be followed, including the following:
WARNING - To reduce the risk of burns, electric shock, fire, injury to persons or exposure toexcessive microwave energy:
1. Read all instructions before using theappliance.
2. Read and follow the specific “PRECAU-TIONS TO AVOID POSSIBLE EXPO-SURE TO EXCESSIVE MICROWAVEENERGY” on inside front cover.
3. This appliance must be grounded. Connectonly to properly grounded outlet. See“GROUNDING INSTRUCTIONS” onpage 4 and INSTALLATION INSTRUC-TIONS.
4. Install or locate this appliance only in ac-cordance with the provided installationinstructions.
5. Some products such as whole eggs andsealed containers —for example, closedglass jars — may explode and should not beheated in this oven.
6. Stir liquids briskly before, during and afterheating to avoid eruption. Be careful.
7. Use this appliance only for its intended useas described in this manual. Do not usecorrosive chemicals or vapors in this appli-ance. This type of oven is specificallydesigned to heat, cook or dry food. It is notdesigned for industrial or laboratory use.
8. As with any appliance, close supervision isnecessary when used by children.
9. Do not operate this appliance if it has adamaged cord or plug, if it is not workingproperly or if it has been damaged or dropped.
10. This appliance should be serviced only byqualified service personnel. Contact nearestSharp Authorized Servicer for examination,repair or adjustment.
11. Do not cover or block any openings on theappliance.
12. Do not store or use this appliance outdoors.Do not use this product near water—for
example, near a kitchen sink, in a wet base-ment or near a swimming pool, and the like.
13. Do not immerse cord or plug in water.
14. Keep cord away from heated surfaces.
15. Do not let cord hang over edge of table orcounter.
16. See door surface cleaning instructions onpage 25.
17. To reduce the risk of fire in the oven cavity:
a. Do not overcook food. Carefully attendappliance if paper, plastic or other com-bustible materials are placed inside theoven to facilitate cooking.
b. Remove wire twist-ties from paper orplastic bags before placing bag in oven.
c. If materials inside the oven shouldignite, keep oven door closed, turnoven off and disconnect the powercord or shut off power at the fuse orcircuit breaker panel.
d. Do not use the cavity for storage pur-poses. Do not leave paper products,cooking utensils or food in the cavitywhen not in use.
18. Clean ventilation openings and grease filtersfrequently—Grease should not be allowed toaccumulate on ventilation openings, hood(louver) or grease filters.
19. Use care when cleaning the louver and thegrease filters. Corrosive cleaning agents,such as lye-based oven cleaners, may dam-age the louver and the grease filters.
20. When flaming food under the hood, turn thefan on.
21. This appliance is suitable for use above bothgas and electric cooking equipment 36” wideor less.

4
Unpacking and Examining Your OvenCarefully remove oven from carton. SAVE THE CARTON AS IT MAY MAKEINSTALLATION EASIER.
Remove:
1. all packing materials from inside the oven cavity; however, DO NOT REMOVETHE WAVEGUIDE COVER, which is located on the ceiling in the oven cavity.Check to see that there are Installation Instructions, Wall Template and Top Tem-plate. Read enclosures and SAVE the Operation Manual.
2. the feature sticker from the outside of the door, if there is one.
Check the oven for any damage, such as misaligned or bent door, damaged doorseals and sealing surfaces, broken or loose door hinges and latches and dents inside the cavity or on the door. Ifthere is any damage, do not operate the oven and contact your dealer or SHARP AUTHORIZED SERVICER.
See Installation Instructions for more details.
This appliance must be grounded. This oven is equipped with a cord having a grounding wire with a grounding plug.It must be plugged into a wall receptacle that is properly installed and grounded in accordance with the NationalElectrical Code and local codes and ordinances. In the event of an electrical short circuit, grounding reduces risk ofelectric shock by providing an escape wire for the electric current.
WARNING – Improper use of the grounding plug can result in a risk of electric shock.
Electrical RequirementsCheck Installation Instructions for proper location for the power supply.
The electrical requirements are a 120 volt 60 Hz, AC only, 15 amp. or more protectedelectrical supply. It is recommended that a separate circuit serving only the oven beprovided.
The oven is equipped with a 3-prong grounding plug. It must be plugged into a wallreceptacle that is properly installed and grounded. DO NOT UNDER ANY CIRCUM-STANCES CUT OR REMOVE THE GROUNDING PIN FROM THE PLUG.
Notes: 1. If you have any questions about the grounding or electrical instructions, consult a qualified electrician orservice person.
2. Neither Sharp nor the dealer can accept any liability for damage to the oven or personal injury resultingfrom failure to observe the correct electrical connection procedures.
Radio or TV InterferenceShould there be any interference caused by the microwave oven to your radio or TV, check that the microwaveoven is on a different electrical circuit, relocate the radio or TV as far away from the oven as feasible or checkposition and signal of receiving antenna.
U N P A C K I N G I N S T R U C T I O N S
G R O U N D I N G I N S T R U C T I O N S
Two optional accessories are available for this oven.1. Charcoal Filter (RK-220). This is required when hood exhaust is recirculated. See Charcoal Filter on page 26. To
order filter replacement, if dealer does not stock this item, it can be ordered by calling 1-800-642-2122.
2. Filler Panel Kit. For use when the oven is installed in a 36-inch or 42-inch wide opening. The metal filler panelscome in 3-inch wide pairs. One set is needed for a 36-inch opening and 2 sets for a 42-inch opening. White andblack are available.
To purchase contact: Modern-Aire Ventilating Corporation7319 Lankershim Blvd.North Hollywood, CA 91605Phone: (818) 765-9870Fax: (818) 765-4916
O P T I O N A L A C C E S S O R I E S
Ovencavity
Door seals andsealing surfaces
Hinges
Latches

5
I N F O R M A T I O N Y O U N E E D T O K N O WABOUT YOUR OVENThis Operation Manual is valuable: read it carefullyand always save it for reference.
A good microwave cookbook is a valuable asset.Check it for microwave cooking principles, techniques,hints and recipes. See pages 27 and 28 for orderingthe Ultimate Accessory, the SHARP CAROUSELMICROWAVE COOKBOOK.
NEVER use the oven without the turntable andsupport nor turn the turntable over so that a large dishcould be placed in the oven. The turntable will turn bothclockwise and counterclockwise. See page 10 forcomplete instructions.
ALWAYS have food in the oven when it is on to absorbthe microwave energy.
When using the oven at power levels below 100%, youmay hear the magnetron cycling on and off.
The fan will automatically start when heat rises fromrange surface units or burners and when convection,high mix, low mix or the broil settings are used.
Condensation is a normal part of microwave cooking.Room humidity and the moisture in food will influencethe amount of moisture that condenses in the oven.Generally, covered foods will not cause as muchcondensation as uncovered ones. Ventilation openingsmust not be blocked.
The oven is for food preparation only. It should not beused to dry clothes or newspapers.
Your oven is rated 850 watts by using the IEC TestProcedure. In using recipes or package directions,check food a minute or two before the minimum timeand add time accordingly.
Eggs, sausages,fruits &vegetables
Popcorn
Baby food
General
ABOUT FOOD
• Puncture egg yolks before cookingto prevent “explosion”.
• Pierce skins of potatoes, apples,squash, hot dogs and sausages sothat steam escapes.
• Use specially bagged popcorn for themicrowave oven.
• Listen while popping corn for thepopping to slow to 1 or 2 seconds oruse special POPCORN pad.
• Transfer baby food to small dish andheat carefully, stirring often. Checktemperature before serving.
• Put nipples on bottles after heatingand shake thoroughly. “Wrist” testbefore feeding.
• Cut baked goods with filling afterheating to release steam and avoidburns.
• Stir liquids briskly before, during andafter heating to avoid “eruption”. Becareful.
• Use deep bowl, when cooking liquidsor cereals, to prevent boilovers.
• Cook eggs in shells.
• Reheat whole eggs.
• Dry nuts or seeds in shells.
• Pop popcorn in regular brown bagsor glass bowls.
• Exceed maximum time on popcornpackage.
• Heat disposable bottles.
• Heat bottles with nipples on.
• Heat baby food in original jars.
• Heat or cook in closed glass jars orair tight containers.
• Can in the microwave as harmfulbacteria may not be destroyed.
• Deep fat fry.
• Dry wood, gourds, herbs or wet papers.
DO DON’TFOOD
6
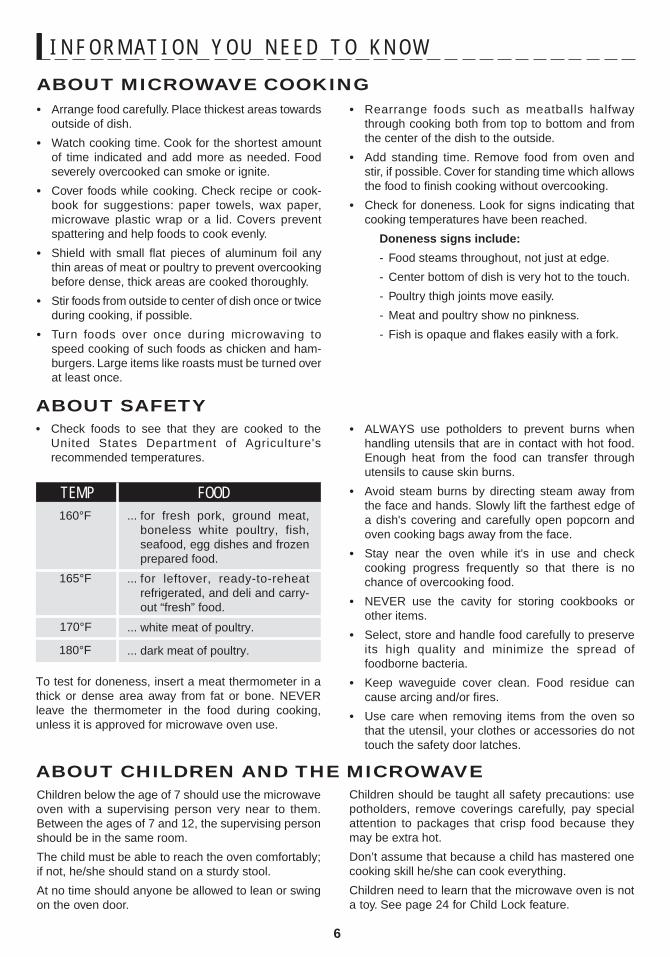
ABOUT MICROWAVE COOKING• Arrange food carefully. Place thickest areas towards
outside of dish.
• Watch cooking time. Cook for the shortest amountof time indicated and add more as needed. Foodseverely overcooked can smoke or ignite.
• Cover foods while cooking. Check recipe or cook-book for suggestions: paper towels, wax paper,microwave plastic wrap or a lid. Covers preventspattering and help foods to cook evenly.
• Shield with small flat pieces of aluminum foil anythin areas of meat or poultry to prevent overcookingbefore dense, thick areas are cooked thoroughly.
• Stir foods from outside to center of dish once or twiceduring cooking, if possible.
• Turn foods over once during microwaving tospeed cooking of such foods as chicken and ham-burgers. Large items like roasts must be turned overat least once.
I N F O R M A T I O N Y O U N E E D T O K N O W
• Rearrange foods such as meatballs halfwaythrough cooking both from top to bottom and fromthe center of the dish to the outside.
• Add standing time. Remove food from oven andstir, if possible. Cover for standing time which allowsthe food to finish cooking without overcooking.
• Check for doneness. Look for signs indicating thatcooking temperatures have been reached.
Doneness signs include:
- Food steams throughout, not just at edge.
- Center bottom of dish is very hot to the touch.
- Poultry thigh joints move easily.
- Meat and poultry show no pinkness.
- Fish is opaque and flakes easily with a fork.
• Check foods to see that they are cooked to theUnited States Department of Agriculture'srecommended temperatures.
To test for doneness, insert a meat thermometer in athick or dense area away from fat or bone. NEVERleave the thermometer in the food during cooking,unless it is approved for microwave oven use.
• ALWAYS use potholders to prevent burns whenhandling utensils that are in contact with hot food.Enough heat from the food can transfer throughutensils to cause skin burns.
• Avoid steam burns by directing steam away fromthe face and hands. Slowly lift the farthest edge ofa dish's covering and carefully open popcorn andoven cooking bags away from the face.
• Stay near the oven while it's in use and checkcooking progress frequently so that there is nochance of overcooking food.
• NEVER use the cavity for storing cookbooks orother items.
• Select, store and handle food carefully to preserveits high quality and minimize the spread offoodborne bacteria.
• Keep waveguide cover clean. Food residue cancause arcing and/or fires.
• Use care when removing items from the oven sothat the utensil, your clothes or accessories do nottouch the safety door latches.
ABOUT SAFETY
... for fresh pork, ground meat,boneless white poultry, fish,seafood, egg dishes and frozenprepared food.
... for leftover, ready-to-reheatrefrigerated, and deli and carry-out “fresh” food.
... white meat of poultry.
... dark meat of poultry.
160°F
T E M P F O O D
165°F
170°F
180°F
Children should be taught all safety precautions: usepotholders, remove coverings carefully, pay specialattention to packages that crisp food because theymay be extra hot.
Don’t assume that because a child has mastered onecooking skill he/she can cook everything.
Children need to learn that the microwave oven is nota toy. See page 24 for Child Lock feature.
ABOUT CHILDREN AND THE MICROWAVEChildren below the age of 7 should use the microwaveoven with a supervising person very near to them.Between the ages of 7 and 12, the supervising personshould be in the same room.
The child must be able to reach the oven comfortably;if not, he/she should stand on a sturdy stool.
At no time should anyone be allowed to lean or swingon the oven door.

7
I N F O R M A T I O N Y O U N E E D T O K N O W
ABOUT UTENSILS AND COVERINGSIt is not necessary to buy all new cookware. Many pieces already in your kitchen can be used successfully in yournew microwave convection oven. The chart below will help you decide what utensils and coverings should be usedin each mode.
DISH CHECK. If you wish to check if a dish is safe for microwaving, place the empty dish in the oven andmicrowave on HIGH for 30 seconds. If the dish becomes very hot, DO NOT use it for microwaving.
ACCESSORIES There are many microwave accessories available for purchase. Evaluate carefully before youpurchase so that they meet your needs. A microwave-safe thermometer will assist you in determining correctdoneness and assure you that foods have been cooked to safe temperatures. Sharp is not responsible for anydamage to the oven when accessories are used.
UTENSILS ANDCOVERINGS MICROWAVE ONLY CONVECTION BROIL,
SLOW COOKHIGH MIX/ROASTLOW MIX/BAKE
Yes Small flat pieces of aluminum foil placedsmoothly on food can be used to shield areas fromcooking or defrosting too quickly. Keep foil at least1 inch from wall of oven.
Yes Can be used if 3/4 filled with food. Keep 1 inchaway from walls and do not cover with lid.
Yes Do not exceed recommended preheating time.Follow manufacturer's directions.
Yes Excellent.
Yes Excellent
No
Yes
No
No
No
Yes Good for large meats or foods that needtenderizing. DO NOT use metal twist ties.
Yes For reheating.
Yes To cover for reheating and cooking. Do notuse recycled paper towels which may containmetal filings.
Yes
Yes Use for reheating and defrosting. Followmanufacturer's directions.
Yes
Yes Use brands specially marked for microwaveuse. DO NOT allow plastic wrap to touch food. Ventso steam can escape.
Yes Check manufacturer's recommendation forbeing microwave-safe.
Yes For reheating
Yes Good covering for cooking and reheating.
Yes May be used for short periods of time. Donot use with high fat or high sugar content foods.Could char.
Yes For shielding.
Yes Broil - No cover.
No
Yes Excellent.
Yes Excellent
No
Yes Broil - No cover.
Yes Broil - No cover.
Yes
No
Yes Broil - No
No
No
Yes For temperaturesup to 400o F. Do notuse for broiling.
No
Yes Are heat resistantup to 425o F. Do notuse for broiling.
No
Yes
No
No
No
Aluminum Foil
Aluminumcontainers
Browning dish
Glass ceramic(Pyroceram®)
Glass, heat-resistant
Glass, non-heat-resistant
Lids, glass
Lids, metal
Metal cookware
Metal, misc: dishes withmetalic trim, etc. Metaltwist-ties.
Oven cooking bags
Paper plates
Paper towels
Paper, ovenable
Microwave-safe plasticcontainers
Plastic, Thermoset®
Plastic wrap
Pottery, stoneware,porcelain
Styrofoam
Wax paper
Wicker, wood, straw
Yes For shielding.
Yes Can be used if 3/4filled with food. Keep 1inch away from walls anddo not cover with foil.
No
Yes Excellent.
Yes Excellent
No
Yes
No
Yes Do not use metalcoverings.
No
Yes Do not use metalcoverings.
No
No
Yes For temperatures upto 400o F.
No
Yes
No
Yes Must be microwave-safe and ovenable.
No
No
No

8
P A R T N A M E S
BOTTOM VIEW
(Rear of Microwave)
1. Oven door with see-through window.2. Door hinges.3. Waveguide cover
DO NOT REMOVE.4. Turntable motor shaft.5. Oven light.
It will light when oven is operating or door is open.6. Safety door latches.
The oven will not operate unless the door is securely closed.
7. One touch DOOR OPEN button.Push to open door.
8. FAN HI / LO button.Push for high/low/off.
9. LIGHT button.Push for on/off.
(Front of Microwave)
13
14
17
18
321 46 5 6 7 8 9
10
11
15
16
12
FRONT VIEW
10. Auto-Touch control panel.11. Time display: Digital display, 99 minutes
99 seconds.12. Ventilation openings.13. Light cover.14. Grease filters.15. Removable ceramic turntable.
The turntable will rotate clockwise orcounterclockwise. Only remove for cleaning.
16. Removable turntable support.Place the turntable support on the floor of theoven cavity and the turntable on the turntablesupport.
17. Removable low rack for broiling and meat andpoultry roasting.
18. Removable high rack for two level baking.

9
T O U C H C O N T R O L P A N E LINTERACTIVE DISPLAY
Words will light in the display to indicatefeatures and cooking instructions.
Number next to the control panel illustration indicates page on which
there are feature descriptions and usage information.
24
20
21
22
11
23
101110
23
10
18
19
19
19
18
18
14
12
14
2313-15

10
B E F O R E O P E R A T I N G• Before operating your new microwave oven make
sure you read and understand this operationmanual completely.
• Before the oven can be used, follow theseprocedures:
1. Plug in the oven. Close the door. The oven displaywill show SHARP SIMPLY THE BEST PRESS
CLEAR AND PRESS CLOCK .
2. Touch the STOP/CLEAR pad. will appear.
3. Touch CLOCK and follow directions to set.
:
TO SET THE CLOCK• Suppose you want to enter the correct time of day
12:30 (A.M. or P.M.).
P R O C E D U R E D I S P L A Y
1
2
This is a 12 hour clock. If you attempt to enter anincorrect clock time, will appear in the display.Touch the STOP/CLEAR pad and re-enter the time.
• If the electrical power supply to your microwaveoven should be interrupted, the display will inter-mittently show SHARP SIMPLY THE BEST. PRESS CLEAR AND PRESS CLOCK after thepower is reinstated. If this occurs during cooking,the program will be erased. The time of day will alsobe erased. Simply touch STOP/CLEAR pad andreset the clock for the correct time of day.
NOTE: Your oven can be programmed with the dooropen except for START/TOUCH ON, MINUTE PLUS,SENSOR REHEAT and POPCORN.
ERROR
STOP/CLEARTouch the STOP/CLEAR pad to:1. Erase if you make a mistake during programming.2. Cancel kitchen timer.3. Stop the oven temporarily during cooking.4. Return the time of day to the display.5. Cancel a program during cooking, touch twice.
M A N U A L M I C R O W A V E O P E R A T I O N
Touch CLOCK pad.
ENTERTURNTABLE ON
TIMETURNTABLE ON
Enter the correct time ofday by touching the numbers in sequence.
12:30000TURNTABLE ON
CLOCK
For most cooking, the turntable should be on; howeverthe turntable can be turned off so that it does not rotatewhen extra large dishes, such as the popular 13"x9"x2"glass utility casserole, are used. The casserole shouldbe placed on the turntable so that it is level.
• Suppose you want to cook lasagna in a 13"x9"x2"casserole for 45 minutes on 40% power.
TURNTABLE ON/OFF
P R O C E D U R E D I S P L A Y
1
2
3
4
3 12:30000TURNTABLE ON
Touch CLOCK pad.
CLOCK
NOTE:The door can be opened for checking food and theturntable will stay in the off position. After checking,close door and touch START/TOUCH ON.
The turntable will stay off for one minute after door isopened when time-of-day appears in the display. It ispossible to reprogram the oven during that minutewithout touching the TURNTABLE ON/OFF pad. Thedisplay always indicates whether the turntable is offor on.
THE TURNTABLE SHOULD ALWAYS BE ON WHENUSING THE SPECIAL FEATURES. On/Off functioncan be used with manual cooking modes and SensorReheat. Turntable off condition will automatically changeto on condition when you select auto cooking exceptSensor Reheat and CompuBake.
When cooking large quantities of food which cannotbe stirred, it is best to use a lower power level suchas 40 or 50%. You may speed cooking of largeamounts by programming 5 to 10 minutes on 100%power (HIGH) followed by the desired time on lowerpower. See page 23 for how to program multiplesequences. You may wish to reverse a large casseroleonce during cooking; simply open door, repositioncasserole, close door and touch START/TOUCH ON.
1 2 3 0
Touch TURNTABLE ON/OFF pad and noteTURNTABLE OFF in the display.
ENTERTURNTABLE ON OFF
Enter cooking time.45.00000
TURNTABLE ON OFF
P-40000TURNTABLE ON OFF
Enter power level.
POWERLEVEL
4 5 0 0
4
STARTTOUCH ON 45.00000
TURNTABLE ON OFF COOK
Touch START/TOUCH ON pad.
TURNTABLEON / OFF

11
5.00000TURNTABLE ON
STARTTOUCH ON
M A N U A L M I C R O W A V E O P E R A T I O N
TO SET POWER LEVELThere are eleven preset power levels.
Using lower power levels increases the cooking timewhich is recommended for foods such as cheese, milkand long slow cooking of meats. Consult cookbook orrecipes for specific recommendations.
HOOD LIGHT/ HOOD FANYour oven is equipped with a Hood Light and a HoodFan which can be used whether the door is open orclosed.
To turn the Hood Light on, touch the LIGHT pad once.To turn the Hood Light off, touch the LIGHT pad again.
To turn the Hood Fan on, touch the FAN HI/LO padonce for high speed. To turn the Hood Fan to low speed,touch pad twice and touch the pad three times to turnthe fan off.
TIME COOKING-MICROWAVEYour oven can be programmed for 99 minutes99 seconds (99.99). Always enter the seconds afterthe minutes, even if they are both zeros.
• Suppose you want to cook for 5 minutes at 100%
P R O C E D U R E D I S P L A Y
1
2Touch START/TOUCH ON pad.
Enter cooking time.
APPROXIMATEPERCENTAGEOF POWER
COMMON WORDSFOR
POWER LEVELS
TOUCH POWERLEVEL PAD ONCE
THEN TOUCH
5 0 0
5.00000TURNTABLE ON OFF COOK
KEEP WARMKEEP WARM can only be programmed with manualcooking or as a separate program.
• Suppose you want to cook a baked potato for4 minutes at 100% power and you want to keep itwarm after cooking for 30 minutes.
• Suppose you want to defrost for 5 minutes at 30%with the turntable on.
To use KEEP WARM as a separate program, touchKEEP WARM pad within 1 minute after cooking,closing the door or touching the STOP/CLEAR pad.
P R O C E D U R E
1
2
Touch the desired cook time for1 baked potato. (Ex: 4 minutes.)
STARTTOUCH ON
KEEPWARM
Touch KEEP WARM pad.
Touch START/TOUCH ON pad.
4 0 0
3
At the end of cook time, KEEP WARM is displayedwarming food until end of 30 minutes.
P-30000TURNTABLE ON
45.00000TURNTABLE ON OFF COOK
5.00000TURNTABLE ON
P R O C E D U R E D I S P L A Y
1
2
3
Enter defrosting time.
Touch POWER LEVEL pad.Enter power level.
Touch START/TOUCH ON pad.
STARTTOUCH ON
5 0 0
3POWERLEVEL
POWER LEVEL 100% High
9 90%
8 80%
7 70% Medium High
6 60%
5 50% Medium
4 40%
3 30% Med Low/Defrost
2 20%
1 10% Low
0 0%

12
P R O C E D U R E D I S P L A Y
1
2
3
M I C R O W A V E F E A T U R E S
CompuDefrost automatically defrosts ground meat,steaks, chicken pieces.
• Suppose you want to defrost a 2.0 pound steak.
COMPU DEFROST4
After the 1st stage, open the door. Turn steakover and shield any warm portions.Close the door.
After the 2nd stage, open the door. Shield anywarm portions. Close the door.
5
6 After defrost cycle ends, cover and let stand asindicated in chart below.
Touch START/TOUCH ON pad.
Touch START/TOUCH ON pad.
42.50000TURNTABLE ON OFF COOK LBS OZ KG HELP
MIX COVDEFROSTSENSOR
44.35000TURNTABLE ON OFF COOK LBS OZ KG HELP
MIX COVDEFROSTSENSOR
NOTE:
1. The weight can be entered in increments of 0.1 lb.If you attempt to enter more or less than the allowedamount or
will appear in the display.
2. CompuDefrost can be programmed with More/LessTime Adjustment. See page 23.
3. To defrost other foods or foods above or below theweights allowed on CompuDefrost Chart, use timeand 30% power. See Manual Defrost on page 13.
ERROR WEIGHT TOO SMALL TOOLARGE
NOTE: Check foods when oven signals. After final stage, small sections may still be icy. Let stand to continuethawing. Do not defrost until all ice crystals are thawed.Shielding prevents cooking from occurring before the center of the food is defrosted. Use small smoothstrips of aluminum foil to cover edges and thinner sections of the food.
COMPU DEFROST CHART
GroundMeat
once
twice
Remove any thawed pieces after each stage. Let stand,covered, for 5 to 10 minutes.
After each stage of defrost cycle, rearrange and if thereare warm or thawed portions, shield with small flat piecesof aluminum foil. Remove any meat or fish that is nearlydefrosted. Let stand, covered, for 10 to 20 minutes.
After each stage of defrost cycle, if there are warm orthawed portions, rearrange or remove. Let stand, covered,for 10 to 20 minutes.
3 times
T O U C HC O M P U D E F R O S T
P A D *F O O D F O R
A M O U N T P R O C E D U R E
ChickenPieces
0.5 - 3.0 lb(0.2 - 1.4 kg)
0.5 - 4.0 lb(0.2 - 1.8 kg)
0.5 - 3.0 lb(0.2 - 1.4 kg)
Steaks(chops, fish)
* Number of touches AFTER initial touch to access COMPU DEFROST.
Touch COMPU DEFROSTpad once. Then touch COMPUDEFROST pad two more times to select steak.
Enter weight by touchingthe number pads. (Ex. 2.0 lb)
Touch START/TOUCH ON pad.
42.00000TURNTABLE ON OFF COOK LBS OZ KG HELP
STEAK
2 0
x 3ENTER WEIGHT
MIX COVDEFROSTSENSOR
46.50000TURNTABLE ON OFF COOK LBS OZ KG HELP
MIX COVDEFROSTSENSOR
The oven will stop and directions will be displayed.Follow the indicated message.
COMPUDEFROST
STARTTOUCH ON
STARTTOUCH ON
STARTTOUCH ON

13
M I C R O W A V E F E A T U R E S
Using Sensor Settings:
MANUAL DEFROSTIf the food that you wish to defrost is not listed on theCompuDefrost Chart or is above or below the limits inthe “Amount” column on the chart, you need to defrostmanually.
You can defrost any frozen food, either raw or previ-ously cooked, by using power level 3. Follow the exact3-step procedure found under To Set Power Level onpage 11. Estimate defrosting time and press 3 for 30%when you select the power level.
For either raw or previously cooked frozen food, therule of thumb is approximately 5 minutes per pound.For example, defrost 5 minutes for 2-3 cups of casse-role or 1 pound of frozen spaghetti sauce.
Always stop the oven periodically to remove orseparate the portions that are defrosted. If food is notdefrosted at the end of the estimated defrosting time,program the oven in 1 minute increments on powerlevel 3 until totally defrosted.
When using plastic containers from the freezer, defrostonly long enough to remove from the plastic in order toplace food in a microwave-safe dish.
SENSOR COOKINGSharp's Sensor is a semi-conductor device thatdetects the vapor (moisture and humidity) emitted fromthe food as it heats. The Sensor adjusts the cookingtimes and power level for various foods and quantities.It takes the guesswork out of microwave cooking.
1. Room temperature should not exceed 95˚F.
2. Be sure the exterior of the cooking containerand the interior of the oven are dry. Wipe off anymoisture with a dry cloth or paper towel.
3. Sensor cooking can only be entered within 1 minuteafter cooking, opening and closing the door ortouching the STOP/CLEAR pad.
4. During the first part of sensor cooking, , , , , , , , , or
will appear on display. Do not open oven door ortouch STOP/CLEAR during this part of the cooking
SENSORREHEAT POPCORN REGULAR SENSOR BAKEDPOTATO FROZEN VEG SOFT
FRESH VEGFRESH
FROZENBACON FISH
cycle. The measurement of vapor will be interrupted.If this occurs, will appear and sensorcooking will be interrupted. To continue cooking,touch the STOP/CLEAR pad and select cookingtime and power. When sensor detects the vaporemitted from the food, remainder of cooking timewill appear. Door may be opened when remainingcooking time appears on display. At this time, youmay stir or season food, as desired.
5. Check food for doneness after cooking with sensorsettings. If additional time is needed, continue tocook with variable power and time.
6. If the sensor does not detect vapor, willappear and the oven will shut off.
7. At the end of any cycle, open oven door or touchSTOP/CLEAR pad. The time of day will reappearon the display.
8. Any sensor setting can be programmed with Moreor Less Time Adjustment. See page 23.
Selecting Foods:1. The sensor works with foods at normal storage
temperature. For example, foods for reheating wouldbe at refrigerator temperature and potatoes for bak-ing would be room temperature.
2. More or less food than the quantity listed in the chartsshould be cooked by time and variable power.
Covering Foods:Some foods work best when covered. Use the coverrecommended in the Sensor Cooking chart for thesefoods.
1. Casserole lid.
2. Plastic wrap: Use plastic wrap recommended formicrowave cooking. Cover dish loosely; allowapproximately 1/2 inch to remain uncovered toallow steam to escape. Plastic wrap should nottouch food.
3. Paper towel: Use paper towels to absorb excessfat and moisture when cooking bacon and potatoes.Line the turntable when baking potatoes.
4. Wax paper: Cover dish completely; fold excess wrapunder dish to secure. If dish is wider than paper,overlap two pieces at least one inch to cover.
ERROR
ERROR
HARDVEGENTREE HOT DOGS

14
P R O C E D U R E
P R O C E D U R E
F O O D A M O U N T P R O C E D U R E
After cooking, will be displayed.
will be displayedrepeatedly.
SENSOR POPCORN REGULAR
END
M I C R O W A V E F E A T U R E SINSTANT SENSORSYour oven has Instant Sensor Popcorn and InstantSensor Reheat. To use any of the Instant Sensors,simply touch the chosen pad. The oven will start auto-matically. Any sensor setting can be programmed withMore/Less Time Adjustment. See page 23.
INSTANT SENSOR REHEAT
Turntable on:You can reheat many foods by touching just one pad.You don't need to calculate reheating time or powerlevel. To reheat food with turntable on, simply touch theSENSOR REHEAT pad.
Turntable off:You may reheat using a 11"x8"x2" or 13"x9"x2"casserole with the turntable off. First touch TURN-TABLE ON/OFF and note indicator. Then touchSENSOR REHEAT. The display will indicate turntableoff and oven will start automatically. After cooking,
will be displayed.
INSTANT SENSOR POPCORN• Suppose you want to pop a 3.5 oz bag of popcorn.
will be displayed repeatedly.When sensor detects the vapor emitted from thefood, remainder of cooking time will appear.After cooking, will bedisplayed.
Touch SENSOR REHEAT pad.(Note : Sensor Reheat can beprogrammed with turntable on or off).
Touch POPCORN pad once.(Ex: Touch POPCORN once forregular size bag.)
This sensor setting works well with most brands ofmicrowave popcorn. You may wish to try several andchoose your favorite. Pop only one bag at a time.Unfold the bag and place in oven according todirections.
T O U C HP O P C O R N P A D
POPCORN CHART
F O R A M O U N T
3.0 and 3.5 oz bag (Regular size)
twice 1.5 and 1.75 oz bag (Snack size)
once
INSTANT SENSOR CHART
Leftovers such asrice, potatoes,vegetablescasseroleSoups
Canned entreesand vegetables
4 - 32 oz Place in dish or casserole slightly larger than amount to be reheated.Flatten, if possible. Cover with lid, plastic wrap or wax paper. Use coverssuch as plastic wrap or lids with larger quantities of more dense foodssuch as stews.After reheating, stir well, if possible. Foods should be very hot. If not,continue to heat with variable power and time. After stirring, recover andallow to stand 2 to 3 minutes.Use less Time Adjustment by touching POWER LEVEL pad twice forsmall quantities of canned vegetables.
1 - 4 cups
4 - 16 oz
Dinner Plate1 plate
3-6 oz ofmeat plusvegetablesand/or potato/rice
Use this pad to reheat precooked foods from the refrigerator. Place meatyportions and bulky vegetables to outside of plate. Cut large items likebaked potatoes in smaller pieces. Flatten foods such as mashedpotatoes and other dense foods. Cover with wax paper or plastic wrap.ONE PLATE ONLY. After cooking, check that food is very hot throughoutand that the bottom center of the plate is very hot. If not, continue heat-ing using time and power level. Allow to stand, covered, 2 to 3 minutes.
Popcorn Only 1package ata time
Use only popcorn packaged for microwave oven use. Try several brandsto decide which you like best. Do not try to pop unpoped kernels. More/Less Time Adjustment can be used to provide adjustment needed forolder popcorn or individual tastes.
STAND COVERLET
SENSOR REHEAT
STAND COVERLET
SENSORREHEAT
POPCORN

15
M I C R O W A V E F E A T U R E S
• Suppose you want to cook a baked potato.
SENSOR COOK
P R O C E D U R E D I S P L A Y
1
2
SENSOR COOK CHARTF O O D A M O U N T P R O C E D U R E
3
Touch SENSOR COOKpad.
SELECT
NUMBER
FOOD
BAKED
PRESS
POTATO
START
1Select desired sensorsetting. Touch 1 tocook baked potatoes.
Touch START/TOUCH ON pad.When sensor detectsthe vapor emitted fromthe food, the remainderof cooking time willappear.
Open oven door or touch STOP/CLEAR pad. The timeof day will appear in the display.
LET
COVER
STAND
1. Baked potatoes 1 - 6 medium
2. Frozenvegetables
1 - 6 cups
3. Fresh vegetables - softBroccoliBrussels sproutsCabbageCauliflower (flowerets)Cauliflower (whole)SpinachZucchiniBaked apples
0.25 - 2.0 lb0.25 - 2.0 lb0.25 - 2.0 lb0.25 - 2.0 lb1 medium0.25 - 1.0 lb0.25 - 2.0 lb2 - 4 medium
4. Fresh vegetables - hardCarrots, slicedCorn on the cobGreen beansWinter squash: diced
halves
0.25 - 1.5 lb2 - 4 pcs0.25 - 1.5 lb0.25 - 1.5 lb1 - 2
5. Frozen entrees 6 - 17 oz
6. Hot dogs 1 - 4 servings
7. Bacon 2 - 6 slices
8. Fish, seafood 0.25 - 2.0 lb
Pierce. Place on paper-towel-lined turntable. After cooking, removefrom oven, wrap in aluminum foil and let stand 5 to 10 minutes.
Cover with lid or plastic wrap. After cooking, stir and let stand3 minutes, covered.
Wash and place in casserole. Add no water if vegetables havejust been washed. Cover with lid for tender vegetables. Useplastic wrap for tender-crisp vegetables. Stir before standing, ifpossible. After cooking, let stand, covered, 2 to 5 minutes.
Place in casserole. Add 1-4 tbsp water. Cover with lid for tendervegetables. Use plastic wrap cover for tender-crisp vegetables.Stir before standing, if possible. After cooking, let stand, covered,2 to 5 minutes.
Use for frozen convenience food. It will give satisfactory resultsfor most brands. You may wish to try several and chooseyour favorite. Remove package from outer wrapping and followpackage directions for covering. After cooking, Iet stand, covered,for 1 to 3 minutes.
Place hot dog in bun and wrap in paper towel or paper napkin.
Place bacon on paper plate, lined with paper towel. Bacon shouldnot extend over the rim of plate. Cover with paper towel.
Arrange in ring around shallow glass dish (roll fillet with edgesunderneath). Cover with vented plastic wrap. After cooking, letstand, covered, 3 minutes.
SENSORCOOK

16
M I C R O W A V E F E A T U R E S
SENSOR COOK RECIPES
Cranberry Fluff Makes 6 to 8 servings
2 cups fresh cranberries 1/2 pint whipping cream, whipped or1 cup water 1 carton (8 ounces) non-dairy whipped topping3/4 cup sugar1 carton (3 ounces) orange flavored gelatin
1 Combine cranberries, water and sugar in a 2-quart casserole. Cover with wax paper. Microwave using SENSORCOOK for Fresh Vegetables-soft. Drain cranberries and reserve liquid.
2 Add enough hot water to reserved liquid to make 2 cups. Stir the gelatin into hot liquid until it dissolves. Coverwith wax paper. Microwave using SENSOR REHEAT.
3 Add berries and cool. Refrigerate until thickened. Fold whipped cream into cooled cranberry mixture. Spoon intoserving dishes and garnish with extra whipped cream. Refrigerate until ready to serve.
Curry Vegetable Chowder Makes 4 servings
6 slices bacon 3/4 teaspoon salt1 can (10 3/4 ounces) chicken broth 1/2 teaspoon curry powder3 medium potatoes, finely diced (about 2 cup) 1/8 teaspoon pepper2 carrots, shredded (about 1 cup) 1 can (12 ounces) evaporated milk1 small onion, chopped (about 1/2 cup) 2 tablespoons chopped fresh parsley
1 Layer 2 paper towels on a microwave-safe plate. Arrange bacon on the towels. Cover with another paper towel.Microwave using SENSOR COOK for Bacon. Crumble and reserve bacon.
2 Combine chicken broth, vegetables and seasonings in 4-quart casserole. Cover with vented plastic wrap.Microwave using SENSOR COOK for Baked potatoes. Vegetables should be tender.
3 Stir in evaporated milk. Re-cover with vented plastic wrap. Microwave using SENSOR REHEAT Less. Stir inparsley. Let stand, covered, 5 minutes.
4 Top each serving with crumbled bacon.
Glazed Apple Slices Makes 6 to 8 servings
1/4 cup brown sugar 3/4 cup orange juice3 tablespoons margarine or butter 1 tablespoon cornstarch2 tablespoons apricot preserves 4 baking apples (about 1 1/2 pounds), peeled and1/2 teaspoon ground nutmeg sliced into 8 pieces each1/4 teaspoon salt 3 tablespoons chopped green pistachios1/2 cup sugar
1 Combine brown sugar, margarine and apricot preserves in a small bowl. Microwave at HIGH (100%) untilmargarine melts and preserves soften, 45 seconds to 1 minute. Stir in nutmeg, salt, sugar, orange juice andcornstarch. Microwave at HIGH (100%) until thickened, 4 to 6 minutes, stirring several times.
2 Arrange apple slices in a large microwave serving dish. Spread hot sauce over apples. Cover well withvented plastic wrap. Microwave using SENSOR COOK for Fresh vegetables-soft. Allow to cool 5 minutesbefore serving.
3 Sprinkle with pistachios. Serve alone or over vanilla ice cream or sponge cake.

17
M I C R O W A V E F E A T U R E S
SENSOR COOK RECIPES (CONTINUED)
Mexican Seasoned Potatoes Makes 6 to 8 servings
4 medium baking potatoes (8 ounces each) 1/2 teaspoon oregano leaves1/4 cup olive oil 1/4 teaspoon ground cumin1 tablespoon instant minced onion 1/2 teaspoon salt1/2 teaspoon chili powder
1 Cut each potato lengthwise into 4 equal wedges. Place potato wedges into 10-inch square casserole. Tosspotatoes with oil to coat well.
2 In small bowl, combine remaining ingredients. Sprinkle over potatoes.
3 Cover potatoes with wax paper. Microwave using SENSOR COOK for Baked potatoes setting. Rearrangepotatoes when time appears on display. Let stand, covered, 5 minutes.
Spiced Carrots Makes 6 to 8 servings
3 cups sliced carrots, 1/4 inch thick 2 teaspoons vinegar1/2 cup chopped green pepper, 1-inch cubes 1 teaspoon soy sauce1/4 cup linely chopped onion 1/2 teaspoon salt3 tablespoons water 1/2 teaspoon prepared mustard1 can (7 3/4 ounces) semi-condensed tomato soup 1/8 teaspoon pepper1/2 cup sugar
1 In a 1 1/2-quart casserole, combine carrots, green pepper, onion and water. Cover with lid. Microwave usingSENSOR COOK for Fresh vegetables-hard. Carrots should be tender-crisp. Drain.
2 Stir in remaining ingredients. Cover and microwave using SENSOR REHEAT.
Savory Flounder Fillets Makes 4 servings
3/4 cup of corn flake crumbs3 tablespoons chopped parsley2 teaspoons grated lemon peel
1 On waxed paper, combine corn flake crumbs, parsley, lemon peel and paprika. Dip fillets in beaten egg, thencoat with crumb mixture.
2 Place fish in a covered, microwave-safe, baking dish. Microwave using SENSOR COOK for Fish, seafood.
3 Serve with tartar or cocktail sauce or melted cheese.
Creole Corn Makes 6 servings
2 teaspoons oil1/2 cup chopped celery1/2 cup chopped green pepper16 ounce can tomatoes4 ounce can mushroom stem and pieces, drained
1 In 2-quart casserole, combine oil, celery, green pepper, tomatoes, mushrooms, sugar, onion powder, garlicpowder, salt and pepper.
2 Microwave using SENSOR REHEAT. Set aside.
3 In covered, 1-quart casserole, microwave corn using SENSOR COOK for Frozen vegetables. Drain.
4 Combine corn and vegetable-seasoning mixture. Stir and serve immediately.
1/2 teaspoon paprika1 pound flounder fillets1 egg, slightly beaten
1 teaspoon brown sugar1/2 teaspoon onion powder1/4 teaspoon garlic powder salt and pepper to taste1 package (16 ounces) frozen corn

18
P R O C E D U R E D I S P L A Y
1
2
3
4
2
3
4
P R O C E D U R E D I S P L A Y
1
2
3 Touch START/TOUCH ON pad.START
TOUCH ON
M A N U A L C O N V E C T I O N / A U T O M A T I C M I X O P E R A T I O NThis section of the Operation Manual gives youspecific cooking instructions and procedures. Pleaseconsult your Sharp Carousel Convection MicrowaveCookbook for helpful hints for convection and combi-nation cooking.
The oven should not be used without the turntablein place, and it should never be restricted so that itcannot rotate. You may remove the turntable whenpreheating the oven and when preparing food to becooked directly on the turntable.
CONVECTION COOKINGDuring convection heating, hot air is circulated through-out the oven cavity to brown and crisp foods quicklyand evenly. This oven can be programmed for tendifferent convection cooking temperatures for up to99 minutes, 99 seconds.
TO COOK WITH CONVECTION• Suppose you want to cook at 350˚F for 20 minutes.
TO PREHEAT AND COOKWITH CONVECTIONYour oven can be programmed to combine preheatingand convection cooking operations. You can preheatat the same temperature as the convection tempera-ture or change it to a higher or lower temperature.
• Suppose you want to preheat until 350˚F and thencook 25 minutes at 375˚F convection.
NOTE:
To preheat and cook with the same temperature, entersame temperature in steps 2 and 3.
When the oven reaches the programmedtemperature, it will automatically hold at thepreheat temperature for 30 minutes and then thedisplay will change to time of day. WheneverSTOP/CLEAR pad is touched during this30 minute period, PRESS CONVEC or PRESS MIXwill be displayed and cooking mode and timecan be entered.
TO BROILIn the BROIL setting, preheating is automatic. Justenter the actual broiling time and wait for preheat tobe over before adding food. (Preset 450˚F). Oventemperature cannot be changed.
• Suppose you want to broil a ham steak for 15 minutes.
Touch BROIL pad.
Touch number padsto enter cooking time.(Ex: 1500)
450F
COOKING
ENTER
TIME
PREHEAT
SELECT TEMP
350F
ENTER COOKING
TIME
20.00
Touch CONVEC pad.
Touch numberpad for desiredtemperature.(Ex: Pad 6for 350˚F.)
Enter cooking time.(Ex: 2000 min.)
Touch START/TOUCH ON pad.START
TOUCH ON
P R O C E D U R E D I S P L A Y
1
5 STARTTOUCH ON
Touch PREHEAT pad. TEMP
SELECT PREHEAT
Touch numberpad for desiredtemperature.(Ex: Pad 6for 350˚F.)
350F
START
PRESS
Enter number padsfor cooking time.(Ex: 2500)
25.00
Touch START/TOUCH ON pad.
PRESS
OR
CONVEC
Touch CONVECthen touch numberpad for temp.(Ex: 7 for 375˚F)
SELECT
375F
TEMP
ENTER
COOKING TIME
PREHEAT
CONVEC
PREHEAT
BROIL
19
P R O C E D U R E D I S P L A Y
1
2
O V E NT E M P E R A T U R E
M I C R O W A V EP O W E R
P R O C E D U R E D I S P L A Y
1
2
P R O C E D U R E D I S P L A Y
M A N U A L C O N V E C T I O N / A U T O M A T I C M I X O P E R A T I O N
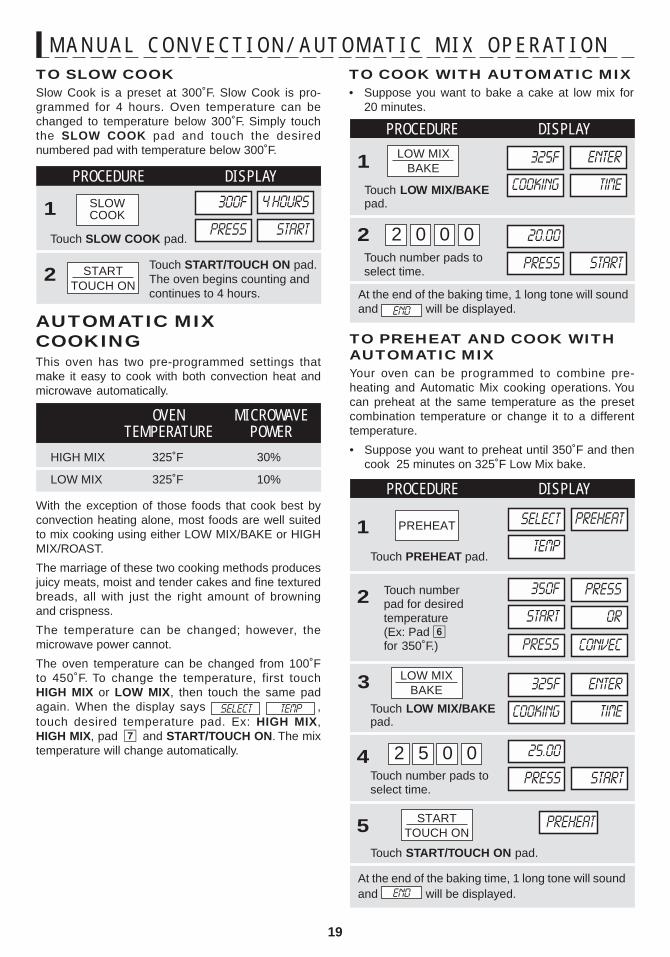
TO PREHEAT AND COOK WITHAUTOMATIC MIXYour oven can be programmed to combine pre-heating and Automatic Mix cooking operations. Youcan preheat at the same temperature as the presetcombination temperature or change it to a differenttemperature.
• Suppose you want to preheat until 350˚F and thencook 25 minutes on 325˚F Low Mix bake.
TO SLOW COOKSlow Cook is a preset at 300˚F. Slow Cook is pro-grammed for 4 hours. Oven temperature can bechanged to temperature below 300˚F. Simply touchthe SLOW COOK pad and touch the desirednumbered pad with temperature below 300˚F.
AUTOMATIC MIXCOOKINGThis oven has two pre-programmed settings thatmake it easy to cook with both convection heat andmicrowave automatically.
TO COOK WITH AUTOMATIC MIX• Suppose you want to bake a cake at low mix for
20 minutes.
2
4
350F
START
PRESS
5Touch START/TOUCH ON pad.
PRESS
OR
CONVEC
3
Touch PREHEAT pad.
1 SELECT
TEMP
PREHEAT
Touch LOW MIX/BAKEpad.
325F
COOKING TIME
ENTER
Touch number pads toselect time.
0052 25.00
PRESS START
Touch numberpad for desiredtemperature(Ex: Pad 6for 350˚F.)
PREHEAT
With the exception of those foods that cook best byconvection heating alone, most foods are well suitedto mix cooking using either LOW MIX/BAKE or HIGHMIX/ROAST.
The marriage of these two cooking methods producesjuicy meats, moist and tender cakes and fine texturedbreads, all with just the right amount of browningand crispness.
The temperature can be changed; however, themicrowave power cannot.
The oven temperature can be changed from 100˚Fto 450˚F. To change the temperature, first touchHIGH MIX or LOW MIX, then touch the same padagain. When the display says ,touch desired temperature pad. Ex: HIGH MIX,HIGH MIX, pad 7 and START/TOUCH ON. The mixtemperature will change automatically.
SELECT TEMP
At the end of the baking time, 1 long tone will soundand will be displayed.
HIGH MIX 325˚F 30%
LOW MIX 325˚F 10%
Touch LOW MIX/BAKEpad.
Touch number pads toselect time.
0002 20.00
PRESS START
325F
COOKING TIME
ENTER
At the end of the baking time, 1 long tone will soundand will be displayed.END
STARTTOUCH ON
END
Touch SLOW COOK pad.
300F
PRESS START
Touch START/TOUCH ON pad.The oven begins counting andcontinues to 4 hours.
4 HOURS
STARTTOUCH ON
SLOWCOOK
PREHEAT
LOW MIXBAKE
LOW MIXBAKE

20
P R O C E D U R E D I S P L A Y
C O N V E C T I O N A U T O M A T I C M I X F E A T U R E SThis section of the operation manual offers instructionsfor preparing 12 popular foods using CompuBroil,CompuRoast and CompuBake.
After selecting the desired feature, follow the directionsindicated in the display.
For helpful hints, simply touch CUSTOM HELP any-time HELP is lighted in the display.
COMPU BROILCompuBroil automatically broils hamburgers, chickenpieces, steaks and fish steaks.
• Suppose you want to broil 2 hamburgers.
Touch COMPU BROIL pad.
1
Touch number pad.(Ex: for hamburgers,touch 1.)
2
NUMBER
SELECT FOOD
1HAM- BURGERS
USE LOW
RACK
NUMBER
HOW MANY
PRESS
Touch number padto enter quantity.(Ex: 2.) Followinformation in displayfor cooking information.
3 2 2
NO FOOD IN OVEN
FOR MEDIUM
PRESS STARTFor well done or rare burgers, touch POWER LEVELpad to select More for well done or Less for rare.See More/ Less Time Adjustment on page 23.
4
5
After broil cycle ends, 1 long tone will sound and will be displayed.
PPREHEATTURNTABLE ON OFF COOK LBS OZ KG HELP
MIX COVDEFROSTSENSOR
NOTE:
1. CompuBroil can be programmed with More/LessTime Adjustment. See page 23.
2. If you attempt to enter more or less than the allowedweight
or will appear in the display. If you
enter more or less than the allowed number or will appear in
the display.
3. To broil other foods or foods above or below theweight or number allowed on the chart below,follow instructions in the Sharp Carousel ConvectionMicrowave Cookbook. See Broiling Chart.
Touch START/TOUCH ON pad.
After broil preheat cycle ends, 4 long tones willsound.
will be displayed repeatedly. Open the doorand place hamburgers into oven. Close the door.
END
PREHEAT PLACEOVER
ERROR WEIGHT TOO LARGE
Touch START/TOUCH ON pad.
IN OVENFOOD
PRESSCLEAR ERROR WEIGHT TOO SMALLPRESS CLEAR
PRESS CLEARERROR 0 QTYPRESS CLEARTOO MANY
ERROR
STARTTOUCH ON
STARTTOUCH ON
COMPU BROIL CHART
S E T T I N G / F O O D A M O U N T P R O C E D U R E1. Hamburgers 1 - 8 pieces
1/4 lb each
2. Chickenpieces
0.5 - 3.0 lb
3. Steaks 0.5 - 2.0 lb
4. Fish steaks 0.5 - 2.0 lb
Use this setting to broil hamburger patties. Place on low rack.
Arrange pieces on low rack. After cooking, let stand, 3-5 minutes. Dark meatshould be 180oF, and white meat should be 170˚F.
Use this setting to broil steaks from 3/4" to 1" thick. Individual bonelesssteaks broil evenly. Place steak on low rack. For well done, touch POWERLEVEL once; for rare, touch POWER LEVEL twice.
Use this setting to broil fish steak which is 3/4" to 1" thick. Place on low rack.
COMPUBROIL

21
P R O C E D U R E D I S P L A Y
COMPU ROASTCompuRoast automatically roasts chicken, turkey,turkey breast or pork.
• Suppose you want to roast a 2.5 pound chicken.
Touch COMPU ROAST pad.
1
Touch number pad.(Ex: for chickentouch 1.)
2
3Touch number pad toenter weight. (Ex: 2.5)
NUMBER
SELECT FOOD
Touch START/TOUCH ON pad.4
After COMPU ROAST cycle end, a long tone willsound.
will be displayed.
1 CHICKEN USE
LOW RACK
ENTER WEIGHT
2 5 2.5
PRESS START
COMPU ROAST CHARTS E T T I N G / F O O D A M O U N T P R O C E D U R E
1. Chicken 2.5 - 7.0 lb(1.2 - 3.1 kg)
After the cycle ends, cover with foil and let stand for 5-10 minutes.Internal temperature of white meat should be 170oF and of darkmeat, 180oF.
R A C K
Low
2. Turkey(Unstuffed)
6.5 - 9.0 lb(3.0 - 4.0 kg)
Season, as desired. Place on low rack. After the cycle ends, coverwith foil and let stand 10 minutes. Internal temperature of whitemeat should be 170oF and of dark meat, 180oF.
Low
3. Turkey breast 3.0 - 6.0 lb(1.4 - 2.7 kg)
Season, as desired. Place on low rack. After the cycle ends, coverfoil and let stand 10 minutes. Internal temperature of white meatshould be 170oF.
Low
4. Pork 2.0 - 3.5 lb(0.9 - 1.5 kg)
Boneless pork loin is recommended because it cooks evenly. Placeon low rack. After cooking, remove from oven, cover with foil andallow to stand 5-10 minutes. Internal temperature should be 160oF.
Low
LET
NOTE:
1. CompuRoast can be programmed with More/LessTime Adjustment. See page 23.
2. If you attempt to enter more or less than the allowedweight,
or will appear in the display.
3. To roast other food or foods above or below theweights allowed on the chart below, check theSharp Carousel Convection Microwave Cookbook'sCombination Roasting Chart.
ERROR WEIGHT TOO LARGEPRESS CLEAR ERROR WEIGHT TOOSMALL PRESS CLEAR
STARTTOUCH ON
FORCOVEREDSTAND5-10 MIN
C O N V E C T I O N A U T O M A T I C M I X F E A T U R E S
COMPUROAST

22
P R O C E D U R E D I S P L A Y
C O N V E C T I O N A U T O M A T I C M I X F E A T U R E S
COMPU BAKECompuBake automatically bakes cakes, brownies,muffins and French fries.
• Suppose you want to bake a 13"x9"x2" cake.
Touch COMPU BAKE pad.Note: Turntable function isautomatically turned OFF.
1
Touch number pad.(Ex: for cake, touch 1.)
2
3
NUMBER
SELECT FOOD
Touch START/TOUCH ON pad.4
After COMPU BAKE cycle ends, 1 long tone willsound, and will be displayed.1 CAKE
USE 13X9X2
INCH METAL
S E T T I N G / F O O D
1. Cake
R A C K
Low
2. Brownies Low
3. Muffins Low
4. French fries Low
NOTE:
1. CompuBake can be programmed with More/LessTime Adjustment. See page 23.
2. To bake other food, see the Sharp CarouselConvection Microwave Cookbook's Baking Section.
PAN ON
LOW RACK
NO FOOD IN OVEN
PRESS START
Touch START/TOUCH ON pad.
After CompuBake preheat cycle ends, 4 tones willsound. The display will indicate
. Open door. Place thecake pan inside. Close door and touch START/TOUCH ON.
END
COMPU BAKE CHART
4PREHEATTURNTABLE ON OFF COOK LBS OZ KG HELP
MIX COVDEFROSTSENSOR
P A N S I Z E / Q T Y
STARTTOUCH ON
STARTTOUCH ON
P R O C E D U R E
Ideal for packaged cake mix or your own recipe for 13"x9"x2"pan. Prepare according to package or recipe directions andplace in a greased and floured 13"x9"x2" baking pan. Afterthe preheat is over, place pan in oven centered on low rack.Cool before frosting and serving.
Ideal for packaged brownie mix or your own recipe for13"x9"x2" pan. Prepare according to package or recipedirections and place in a greased and floured 13"x9"x2"baking pan. After the preheat is over, place pan in ovencentered on low rack. Cool before cutting into serving pieces.
Ideal for packaged muffin mix or your own recipe for 12medium size muffins. Prepare according to package or recipedirections and place in one 12-cup muffin pan. After thepreheat is over, place pan in oven centered on low rack.
Use frozen prepared French fries.No preheat is required for the French fries baking procedure.Place French fries on cookie sheet on low rack.For shoestring potatoes, touch POWER LEVEL pad twice toenter less time before touching START/TOUCH ON pad.
13"x9"x2"
13"x9"x2"
12 cupMuffin pan
3 to 24 ozCookie sheetto hold
PREHEAT OVERPLACE FOOD IN OVENCOMPU
BAKE

23
To demonstrate, touch CLOCK, 0 and START/TOUCHON and hold for three seconds.
and will appear
in the display. Cooking operations and specialfeatures can now be demonstrated with no power inthe oven. For example, touch MINUTE PLUS, and thedisplay will show and count down quickly to0 and the .
To cancel, touch CLOCK, the number 0 and STOP/CLEAR.
O T H E R C O N V E N I E N T F E A T U R E S
The oven can be programmed for up to 4 automaticcooking sequences for the microwave mode and3 automatic cooking sequences for convection mode,switching from one setting to another automatically.
Sometimes cooking directions tell you to start on onepower level and then change to a different power level.Your oven can do this automatically.
• Suppose you want to cook roast beef for 5 minutes at90% and then continue to cook for 30 minutes at 50%.
MULTIPLE SEQUENCECOOKING
P R O C E D U R E
NOTE:1. If POWER LEVEL pad is touched twice, HIGH will
be displayed.
2. If 100% is selected as the final sequence, it is notnecessary to touch the POWER LEVEL pad.
3. If you wish to know power level, simply touch thePOWER LEVEL pad. As long as your finger is touch-ing the POWER LEVEL pad, the power level will bedisplayed.
• Suppose you want to time a 3 minute long distancephone call.
KITCHEN TIMER
P R O C E D U R E
1
2
Minute Plus allows you to cook for a minute at 100%by simply touching the MINUTE PLUS pad. You canalso extend cooking time in multiples of 1 minute byrepeatedly touching the MINUTE PLUS pad duringmanual cooking using microwave, convection, mixor broil.
• Suppose you want to heat a cup of soup for oneminute.
MINUTE PLUS
P R O C E D U R E
Touch MINUTE PLUS pad.
NOTE:1. Touch MINUTE PLUS pad within 1 minute after
cooking, closing the door, touching the STOP/CLEARpad or during cooking. Minute Plus cannot be used tostart the oven if any program is on display.
2. Minute Plus cannot be used with Special Features.
More : Should you discover that you like any of theCOMPU DEFROST, COMPU ROAST, COMPU BAKE,COMPU BROIL, SENSOR COOK or INSTANTSENSOR settings slightly more done, touch thePOWER LEVEL pad once after touching your choiceof pads.
Less : Should you discover that you like any of theCOMPU DEFROST, COMPU ROAST, COMPU BAKE,COMPU BROIL, SENSOR COOK or INSTANTSENSOR settings slightly less done, touch the POWERLEVEL pad twice after touching your choice of pads.
MORE OR LESS TIMEADJUSTMENT
DEMONSTRATION MODE
3
HELPEach setting of CompuDefrost, CompuBroil,CompuRoast, CompuBake and Sensor Cook has acooking hint. If you wish to check, touch CUSTOM HELPwhenever HELP is lighted in the Interactive Display.
1
2 9
3 005
00036
4 POWERLEVEL
5 5
7
Touch POWER LEVELpad once.
Touch POWER LEVELnumber. (Ex: 90%)
Enter cooking time.(Ex: 5 minutes.)
Touch POWER LEVELpad again.
Touch POWER LEVELnumber. (Ex: 50%)
Enter cooking time.(Ex: 30 minutes.)
Touch START/TOUCH ONpad.
STARTTOUCH ON
POWERLEVEL
Touch KITCHEN TIMER pad.
Enter time.003
Touch START/TOUCH ON pad.
KITCHENTIMER
STARTTOUCH ON
DEMO ONDURING DEMO NO POWER SHARPOVENSIMPLY THE DEMOBEST
1.00END
MINUTEPLUS

24
1
2
3
4
5
6
CUSTOM HELPCustom Help provides 5 features which make usingyour oven easy because specific instructions areprovided in the Interactive Display.
1. CHILD LOCKThe Child Lock prevents unwanted oven operationsuch as by small children. Note: Child Lock is notapplicable to Hood Fan and Hood Light buttons.
The oven can be set so that the control panel is deacti-vated or locked. To set, touch CUSTOM HELP, thenumber 1 and START/TOUCH ON pad. Should a padbe touched, will appear in the display.
To cancel, touch CUSTOM HELP, the number 1 andSTOP/CLEAR.
2. AUDIBLE SIGNAL ELIMINATIONIf you wish to have the oven operate with no audiblesignal, touch CUSTOM HELP, the number 2 andSTOP/CLEAR.
To cancel and restore the audible signal, touch CUS-TOM HELP, the number 2 and START/TOUCH ON.
3. AUTO STARTIf you wish to program your oven to begin cookingautomatically at a designated time of day, follow thisprocedure:
• Suppose you want to start cooking a stew for20 minutes on 50% at 4:30. Before setting, checkto make sure the clock is set correctly.
P R O C E D U R E
NOTE:1. Auto Start can be used for manual cooking,
CompuBroil/Roast/Bake, if clock is set.
2. If the oven door is opened after programming AutoStart, it is necessary to touch the START/TOUCHON pad for the time of day to appear in the readoutso that the oven will automatically begin programmedcooking at the chosen Auto Start time.
O T H E R C O N V E N I E N T F E A T U R E S
LANGUAGENUMBER 4 D ISPLAYOnce English
Twice Spanish
3 times French
Touch On allows you to cook at 100% power bytouching the START/TOUCH ON continuously. TouchOn is ideal for melting cheese, bringing milk to justbelow boiling etc. The maximum cooking time is3 minutes.
• Suppose you want to melt cheese on a piece of toast.
TOUCH ON
NOTE:1. Note time it takes for frequently used foods and
program that time in the future.
2. Touch TOUCH ON pad within 1 minute after cook-ing, opening and closing the door or touching theSTOP/CLEAR pad.
3. TOUCH ON can only be used 3 times in a row. Ifmore times are needed, open and close door ortouch STOP/CLEAR.
P R O C E D U R E
1
When the cheese is melted to desired degree,remove finger from START/ TOUCH ON pad.Oven stops immediately.
2
Continuously touch START/TOUCH ON pad. The cookingtime will begin counting up.
3. Be sure to choose foods that can be left in the ovensafely until the Auto Start time. Baked potatoes areoften a good choice.
4. LANGUAGE SELECTIONThe oven comes set for English language. To change,touch CUSTOM HELP and the number 4. Continue totouch the number 4 until your choice is selected fromthe table below. Then touch START/TOUCH ON pad.
LOCK
CLOCK
3
034
0002
STARTTOUCH ON
ENGLISH
ESPANOL
FR
5. WEIGHT/TEMP SELECTIONThe oven comes set for U.S. Customary Unit-pounds.To change, touch CUSTOM HELP and the number 5.Continue to touch the number 5 until your choice isselected from the table below. Then, touch START/TOUCH ON pad.
Touch the number.
Touch CUSTOMHELP pad.
Enter the start time.
Touch CLOCK pad.
Enter cooking program.
Touch START/TOUCH ON pad.
STANDARD OF WE IGHTAND TEMPERATURENUMBER 5 D ISPLAY
Once Pound/Fahrenheit
Twice Kilogram/Celsius
STARTTOUCH ON
LB F
KG C
CUSTOMHELP

25
C L E A N I N G A N D C A R EEXTERIORThe outside surface is precoated metal and plastic.Clean the outside with mild soap and water; rinse anddry with a soft cloth. Do not use any type of householdor abrasive cleaner.
DOORWipe the window on both sides with a damp cloth toremove any spills or spatters. Metal parts will be easierto maintain if wiped frequently with a damp cloth. Avoidthe use of harsh abrasives.
TOUCH CONTROL PANELCare should be taken in cleaning the touch control panel.If the control panel becomes soiled, open the oven doorto inactivate the control panel before cleaning. Wipethe panel with a cloth dampened slightly with water only.Dry with a soft cloth. Do not scrub or use any sort ofchemical cleaners. Avoid the use of excess water. Closedoor and touch STOP/CLEAR.
INTERIOR- AFTER MICROWAVECOOKINGThe oven walls, ceiling and floor are stainless steel.Cleaning after microwave cooking is easy because noheat is generated to the interior surfaces; therefore,there is no baking and setting of spills or spattering. Toclean the interior surfaces, wipe with a soft cloth andwarm water. DO NOT USE ABRASIVE OR HARSHCLEANERS OR SCOURING PADS. For heavier soil,use mild soap; rinse thoroughly with hot water.
INTERIOR- AFTER CONVECTION,MIX OR BROIL COOKINGSpatters may occur because of moisture and grease.Wash immediately after use with hot, soapy water. Rinseand polish dry. Harder to remove spatters may occur ifoven is not thoroughly cleaned or if there is long time/high temperature cooking. If so, you may wish topurchase an oven cleaner pad with liquid cleaner withinit-not a soap filled steel pad-for use on stainless orporcelain surfaces. Follow manufacturer's directionscarefully and be especially cautious not to get any ofthe liquid cleaner in the perforations on the wall orceiling or any door surfaces. Rinse thoroughly andpolish dry.
WAVEGUIDE COVERThe waveguide cover is located on the ceiling in theoven cavity. It is made from mica so requires specialcare. Keep the waveguide cover clean to assure goodoven performance. Carefully wipe with a damp clothany food spatters from the surface of the cover imme-diately after they occur. Built-up splashes may over-heat and cause smoke or possibly catch fire. DO NOTREMOVE THE WAVEGUIDE COVER.
ODOR REMOVALOccasionally, a cooking odor may remain in the oven.To remove, combine 1 cup water, grated peel and juiceof 1 lemon and several whole cloves in a 2-cup glass
measuring cup. Boil for several minutes using 100%power. Allow to set in oven until cool. Wipe interior witha soft cloth.
TURNTABLE/TURNTABLESUPPORTThe ceramic turntable and turntable support can beremoved for easy cleaning. Wash them in mild, sudsywater; for stubborn stains use a mild cleanser andscouring sponge as described above. They are alsodishwasher-safe using top rack.
OVEN RACKSThe high and low baking racks can be removed for easycleaning and stored away from the microwave ovenwhen racks are not needed. After each use, wash themin mild, sudsy water. For any stubborn stains, use amild kitchen cleanser and scouring sponge as describedabove. They are dishwasher-proof.
GREASE FILTERSFilters should be cleaned at least once a month. Neveroperate the fan or oven without the filters in place.
1. Pull the tab toward the front of the oven, down slightlyand remove the filter. Repeat for the other filter.
2. Soak the filters in a sink or dish pan filled with hotwater and detergent. DO NOT use ammonia orother alkali; they will react with the filter material anddarken it.
3. Agitate and scrub with a brush to remove embed-ded dirt.
4. Rinse thoroughly and shake dry.
5. Replace by fitting the filter back into the opening.
Tab
Greasefilter

26
C L E A N I N G A N D C A R E
FANThe fan will automatically start when heat rises fromrange surface units or burners and when convection,high mix, low mix or the broil settings are used. Thisprotects the microwave oven from excessive tempera-ture rise. The fan will stay on until the temperaturedecreases. It cannot be turned off manually duringthis time.
For other uses, select either high or low speed.
PRECAUTIONS FOR PROPER USE:
1. DO NOT leave range unattended while using hightemperatures. Automatic fan may start and provideexcessive air to the surface units. This may causespattering or boilover.
2. Avoid burning food.
3. Keep grease filters clean.
LIGHT1. To replace light bulbs, first disconnect power to the
oven at the circuit breaker panel or by unplugging.
2. To release cover remove the screw on the light cover.(See illustration.)
3. Replace bulbs only with equivalent watt bulbsavailable from a Sharp Authorized Servicer or partsdistributor. Bulbs are also available at most hard-ware stores or lighting centers. DO NOT USE A BULBLARGER THAN 30 WATTS.
4. Close light cover and secure with screw removed instep 2.
CAUTION: Light cover may become very hot. Do nottouch glass when light is on. Do not use light for longtime use such as a night light.
Light cover
Screw Light bulbs
CHARCOAL FILTERCharcoal Filter, Sharp Part Number RK-220 is used forNo-vented, recirculated installation. The filter should bechanged every 6 to 12 months depending on use.
1. Disconnect power to the oven at the circuit breakerpanel or by unplugging.
2. Remove 3 screws that secure louver.
3. Remove louver by inserting flat edge screwdriverover each tab depressing the tab down and movinglouver away from unit.
4. Pull the louver away from the oven.
5. Slide Charcoal Filter into position on support tabs.
6. Push louver back into place and gently snap tabsinto place by hand (engaging both the bottom andtop tabs) and replace the 3 screws to secure louver.
OVEN LIGHTRemove the louver per instructions 1-4 above andcharcoal filter, if used.
5. Slide the light cover forward and lift up.
6. Remove old light bulb and replace only with anequivalent watt bulb available from a SharpAuthorized Servicer or parts distributor. Bulbs arealso available at most hardware stores or lightingcenters. DO NOT USE A BULB LARGER THAN30 WATTS.
7. Replace the oven light cover and charcoal filter, ifused; push louver back in place (engaging both thebottom and top tabs) and replace the louvermounting screws.
Louver
Oven light
Charcoal filter
Screw
Screw
Top tab
Bottom tab
Screw

27
TO ORDERSimply call this toll-free number : 1-800-642-2122.Please have your credit card ready.
If you prefer to order by mail, complete and return theorder form on page 28. Please include check or moneyorder (payable to Sharp Accessories & SuppliesCenter) for $6.00 plus $4.25 shipping & handling andtax, if applicable, per book.
SATISFACTION GUARANTEEDYou must be completely satisfied with the SharpCarousel Microwave Cookbook. If, within 14 days, youare dissatisfied for any reason, simply return the bookand we'll gladly refund your $6.00 plus tax.
✪ Great recipes
✪ Reliable microwave
reference guide
✪ Many color photos
✪ Step-by-step
instructions
✪ Nutritional
information for
each recipe
✪ Durable wipe-clean
soft cover with 128
8 1/2 x 11 pages
✪ Helpful tips and
special techniques(SOLAMENTE ESCRITO EN INGLES!)
CAROUSEL MICROWAVECOOKBOOK
T H E U L T I M A T E A C C E S S O R Y
S E R V I C E C A L L C H E C KPlease check the following before calling for service:
1. Place one cup of water in a glass measuring cup in the oven and close the door securely.Operate the oven for two minutes at HIGH 100%.
A. Does the light come on in the oven? YES _____ NO _____
B. Does the cooling fan work? YES _____ NO _____(Put your hand over the top ventilation openings.)
C. Does the turntable rotate when the TURNTABLE ON/OFFpad is touched and TURNTABLE ON is in the display? YES _____ NO _____(It is normal for the turntable to turn in either direction whenTURNTABLE ON is in the display.)
D. Is the water in the oven warm? YES _____ NO _____
2. Remove the water from the oven and program:
A. Do CONV and COOK light? YES _____ NO _____
B. After the oven shuts off, is the inside of the oven hot? YES _____ NO _____
If "NO" is the answer to any of the above questions, please check electrical outlet, fuse and/or circuit breaker.If either or both are not functioning properly, CONTACT YOUR NEAREST SHARP AUTHORIZED SERVICER.A microwave oven should never be serviced by a "do-it-yourself" repair person.
NOTE: If time appearing in the display is counting down very rapidly, check Demonstration Mode on page 23and cancel.
CONVEC 450˚FSTART
TOUCH ON5 0 0

28
S P E C I F I C A T I O N S
★ The International Electrotechnical Commission’s standardized method for measuring output wattage. Thistest method is widely recognized.
In compliance with standards set by:
FCC – Federal Communications Commission Authorized.
DHHS – Complies with Department of Health and Human Services (DHHS) rule, CFR, Title 21, Chapter I,Subchapter J.
– This symbol on the nameplate means the product is listed by Underwriters Laboratories, Inc.
R-1870 / R-1871 / R-1872
Cut along this line.
PERSONAL RECIPES AND NOTES
I have enclosed a check made payable to Sharp Accessories & Supplies Center.
Please bill my VISA MASTERCARD AMERICAN EXPRESS
Acct. No. _______________________________________ Expiration date _____ / _____
Signature_________________________________________________________________(All credit card orders must be signed.)
Name ______________________________________________________________________________
Address ____________________________________________________________________________
City ____________________________________ State ____________ Zip ______________________
Daytime Phone No. ( ) ___________________________________________________________
Please send me ______ cookbooks at $10.25 each $ ________
Illinois sales tax, (if applicable) per book $.44 no. of books _____________ $ ________
Other tax, (if applicable) no. of books _____________ $ ________
TOTAL ORDER AMOUNT $ ________
Price is subject to change without notice.
MICROWAVE COOKBOOK ORDER FORM
Mail to: SHARP Accessories & Supplies Center2130 Townline RoadPeoria, Illinois 61615–1560
AC Line Voltage: Single phase 120V, 60Hz, AC only
AC Power Required: 1600 watts 13.2 amps.
Output Power
Microwave: 850 watts* (IEC Test Procedure)
Convection Heater: 1400 watts
Frequency: 2450 MHz
Outside Dimensions: 29 15/16” (W) x 16 11/32” (H) x 15 9/32” (D)
Cavity Dimensions: 17 1/8 ” (W) x 8 1/16” (H) x 13 13/16” (D)
Oven Capacity: 1.1 cu. ft.
Cooking Uniformity: Turntable & Stirrer Fan
Weight: Approx. 71 lbs.

Para mayor informacion y precauciones de seguridad, consulte el Manual de Operaciones
G U I A A U T O - T O U C H
Carousel® es una marca registrada deSharp Corporation.
ENTER
TIME
STARTPRESS
COOKING
325F
CLEAR AND PRESS CLOCK
Toque MINUTE PLUS para un minuto aun 100% de poder o para añadir minutosadicionales.
MINUTE PLUS
Cocinado de Alto Poder1. Especifique el tiempo de cocinado
tocando los botones numerados.(Ej: 1 min. 30 seg.)
2. Toque el botón START/TOUCH ON.
Cocinado de Energía Variable2. Después del paso 1 de arriba, toque
el botón POWER LEVEL.3. Elija el nivel de Energía (Ej: 5 para 50%)
y toque el botón START/TOUCH ON.
OPERACION MANUAL
Mantenga el dedo sobre START/TOUCH ON para cocinar a una potenciade 100%. Quite el dedo y el horno sedetendrá instantáneamente.
TOUCH ON
1. Toque el botón COMPU DEFROST(Ej: tres minutos para un bistec).
2. Especifique el peso tocando el botónnumerado. (Ej: 2 y 0.)
3. Toque el botón START/TOUCH ON.
COMPU DEFROST
o CompuBake o CompuBroil1. Toque el botón COMPU deseado.
2. Elija el número de COMPU deseado.(Ej: Toque 1 para pollo.)
3. Toque el botón numerado paraespecificar peso o cantidad.
4. Toque el botón START/TOUCH ON.
Ver Cuadros de CompuRoast, Bake y Broilen las páginas 20, 21 y 22.
COMPU ROAST
Durante el descongelamiento, el homose detendrá. Revise la comida. VerCuadro de CompuDefrost en la página 12.
Toque el botón LOW MIX/BAKE, especifique el tiempo decocinado que desea y toque elbotón START/TOUCH ON. Sigala información en la pantalla.
PARA COCINAR CON MIXAUTOMATICO
Su horno puede programarse para combinar operaciones decocinado mixto precalentado y automático. Ver página 19 parainformación.
SHARP SIMPLY THE BEST PRESS
PARA PRECALENTARY COCINAR CONCOVECCION
Toque SENSOR REHEAT una vez. El hornocomenzará a funcionar automáticamente. ElSENSOR REHEAT se puede programar con o sin laplataforma giratoria en funcionamiento. Ver Cuadro deRecalentamiento de Sensor Instantáneo en la página 14.
RECALENTAMIENTO DE SENSORINSTANTANEO
Cuando el horno alcance la temperatura programada,automáticamente se mantendrá a esa temperatura durante30 minutos y luego se pondrá la hora del día. Siempre que setoque STOP/CLEAR durante este periodeo de 30 munutos,aparecerá en la pantalla PRESS CONVEC o PRESS MIX yentonces se puede especificar el modo y tiempo de cocinado.Para más información sobre cocinado conveccional, ver páginas18 y 19.
Si
está en lapantalla, toque primero STOP/CLEAR.
1. Toque el botón CLOCK.2. Ponga la hora correcto del día
tocando los números. (Ej: 12:30)3. Toque el botón CLOCK
nuevamente.
1. Toque el botón SENSOR COOK.2. Elija el tiempo deseado para
SENSOR COOK. (Ej: 1)3. Toque el botón START/TOUCH ON.Ver Cuadro de Cocinado con Sensor en lapágina 15.
COCINADO CON SENSOR
1. Toque el botón PREHEAT.
INSTALACION DEL TIEMPO
Toque el botón POPCORN. Toque una vezpara tamaño regular y dos veces para tamañobocadillo. Ver página 14.
PALOMITAS DE SENSOR INSTANTANEO
2. Toque el botón numeradopara la temperatura deseada.(Ej: toque el botón 6 para350˚F.)
3. Toque el botón CONVEC.
4. Toque el botón numeradopara la temperaturadeseada. (Ej: 5 para325˚F.)
5. Especifique el tiempo decocinado tocando los botonesnumerados.(Ej: 2000 .)
6. Toque el botón START/TOUCH ON.
START
TIME
325F
TEMP
PREHEAT
SELECT PREHEAT
PRESS350F
ORSTART
CONVECPRESS
TEMPSELECT
COOKINGENTER
PRESS20.00
1 2 3 0CLOCK
SENSORREHEAT
1START
TOUCH ON
CLOCK
SENSORCOOK
POPCORN
STARTTOUCH ON
1 3 0START
TOUCH ON
POWERLEVEL 5
2 0
1
2 5START
TOUCH ON
STARTTOUCH ON
COMPUDEFROST
STARTTOUCH ON
COMPUROAST
MINUTEPLUS

A U T O - T O U C H G U I D E
¤
SHARP ELECTRONICS CORPORATIONSharp Plaza, Mahwah, NJ 07430-2135
TINSEB315MRK0
Carousel® is a registered trademark of Sharp Corporation.
PRINTED IN USA
STARTTOUCH ON
1 3 0START
TOUCH ON
POWERLEVEL 5
2 0
1
ENTER
TIME
STARTPRESS
COOKING
325F
For more complete information and safety precautions, refer to the inside instructions.
CLEAR AND PRESS CLOCK
Touch MINUTE PLUS for one munute at100% power or to add additional minutes.
MINUTE PLUS
High Power Cooking1. Enter cooking time by touching
numbers pads. (Ex: 1 min. 30 sec.)2. Touch START/TOUCH ON pad.
Variable Power Cooking2. After Step 1 above, touch POWER
LEVEL pad.3. Select power level (Ex: 5 for 50%)
and touch START/TOUCH ON pad.
MANUAL OPERATION
Continuously touch START/TOUCH ONfor 100% power cooking. Removefinger and oven will stop instantly.
TOUCH ON
1. Touch COMPU DEFROST pad(Ex: three times for a steak).
2. Enter weight by touching number pad.(Ex: 2 and 0.)
3. Touch START/TOUCH ON pad.
COMPU DEFROST
2 5START
TOUCH ON
or CompuBake or CompuBroil
1. Touch desired COMPU pad.
2. Select desired Compu setting.(Ex: Touch 1 for chicken.)
3. Touch number pad for weight or quantity.
4. Touch START/TOUCH ON pad.
See CompuRoast, Bake and Broil Chartson pages 20, 21 and 22.
COMPU ROAST
During defrosting, oven will stop.Check food. See CompuDefrost Chart on page 12.
Touch LOW MIX/BAKE pad,enter desired cooking time andtouch START/TOUCH ON pad.Follow information on thedisplay.
TO COOK WITH AUTOMATIC MIX
Your oven can be programmed to combine preheatingand automatic mix cooking operations. See page 19 forinformation.
SHARP SIMPLY THE BEST PRESS
TO PREHEAT ANDCOOK WITHCONVECTION
Touch SENSOR REHEAT once. The oven will startautomatically. SENSOR REHEAT can beprogrammed with turntable on or off.See Instant Sensor Chart on page 14.
INSTANT SENSOR REHEAT
When the oven reaches the programmed temp., it willautomatically hold at the preheat temperature for 30minutes and then the display will change to the time of day.Whenever STOP/CLEAR is touched during this 30 minuteperiod, PRESS CONVEC or PRESS MIX will be displayedand cooking mode and time can be entered.
For more information on convection cooking, see pages 18and 19.
If
is in the display,first touch STOP/CLEAR.
1. Touch CLOCK pad.2. Enter correct time of day by
touching numbers in sequence.(Ex: 12:30)
3. Touch CLOCK pad again.
1. Touch SENSOR COOK pad.2. Select desired SENSOR COOK
setting. (Ex: 1)3. Touch START/TOUCH ON pad.See Sensor Cook Chart, page 15.
SENSOR COOK
1. Touch PREHEAT pad.
SET CLOCK
Touch POPCORN pad. Touch once for regularsize and twice for snack size. See page 14.
INSTANT SENSOR POPCORN
2. Touch number pad for desiredtemperature. (Ex: touch pad6 for 350o F.)
3. Touch CONVEC pad.
4. Touch number pad fordesired temperature.(Ex: 5 for 325oF.)
5. Enter cooking time bytouching number pads.(Ex: 2000 .)
6. Touch START/TOUCH ON pad.
1 2 3 0CLOCK
SENSORREHEAT
STARTTOUCH ON
COMPUDEFROST
STARTTOUCH ON
COMPUROAST
1START
TOUCH ON
START
TIME
325F
TEMP
PREHEAT
SELECT PREHEAT
PRESS350F
ORSTART
CONVECPRESS
TEMPSELECT
COOKINGENTER
PRESS20.00
CLOCK
POPCORN
SENSORCOOK
MINUTEPLUS