
Osprey® Talon Series User Guide
39
Osprey® Talon Series User Guide
Transcript of Osprey® Talon Series User Guide

Osprey® Talon Series User Guide

Osprey Talon Series User Guide
i
Contents
Overview .................................................................................................................................... 4
Warranties ....................................................................................................................................... 5
FEEDBACK: ....................................................................................................................................... 5
Product Description ......................................................................................................................... 6
Audience .......................................................................................................................................... 6
Warnings .......................................................................................................................................... 6
Installing additional software .......................................................................................................... 8
Connecting to the Internet .............................................................................................................. 8
Package contents ............................................................................................................................. 8
Getting Started .......................................................................................................................... 9
Prerequisites .................................................................................................................................. 10
Osprey Talon front panel diagram ................................................................................................. 11
Osprey Talon back panel diagram .................................................................................................. 11
Osprey Talon Status Lights ............................................................................................................. 12
First time set up ............................................................................................................................. 13
Connecting to an electrical power source ............................................................................... 13
Web Interface ................................................................................................................................ 14
Login ............................................................................................................................................... 14
Tab ID ....................................................................................................................................... 15
System Control Tab ................................................................................................................ 16
Talon IP Setup ................................................................................................................................ 16
Device Management ................................................................................................................ 17
Set Name ........................................................................................................................................ 17
Set Password .................................................................................................................................. 17
Reboot ............................................................................................................................................ 17
Update Firmware ........................................................................................................................... 18
Updating via the Talon Web page. .......................................................................................... 18
Updating via Flash Drive .......................................................................................................... 19
NOTE: For all image updates ................................................................................................... 19
Operating Mode ....................................................................................................................... 20
1x3 MBR Mode .............................................................................................................................. 20
2X2 LC Mode .................................................................................................................................. 20

Osprey Talon Series User Guide
ii
Changing Operating Modes ........................................................................................................... 20
Status ....................................................................................................................................... 21
Encoder Setup ......................................................................................................................... 22
Stream Control Buttons ................................................................................................................. 23
Save ......................................................................................................................................... 23
Clone ........................................................................................................................................ 23
Delete ...................................................................................................................................... 23
Creating Additional Streams .......................................................................................................... 24
NOTE: More About Operating Modes ..................................................................................... 24
Encoder Setup ................................................................................................................................ 25
Video Source............................................................................................................................ 25
Video Resolution ..................................................................................................................... 25
Video Bitrate ............................................................................................................................ 25
Frame Rate Divider .................................................................................................................. 25
Video Profile ............................................................................................................................ 25
GOP Size .................................................................................................................................. 26
Number of B Frames................................................................................................................ 26
DeInterlacing ........................................................................................................................... 26
Maximum Delay ...................................................................................................................... 26
Audio Enable............................................................................................................................ 26
....................................................................................................................................................... 27
Audio Info ....................................................................................................................................... 27
Enable (all formats) ................................................................................................................. 28
Source (all formats) ................................................................................................................. 28
Codec (all formats) .................................................................................................................. 28
Sample Rate (all formats) ........................................................................................................ 28
Bit Rate .................................................................................................................................... 28
Mode (all formats) ................................................................................................................... 28
Rtp Port (RTP only) .................................................................................................................. 28
Pid (UDP only) .......................................................................................................................... 28
Max PTS-PCR (UDP only) ......................................................................................................... 28
Format ..................................................................................................................................... 28
Jumbo PES ............................................................................................................................... 28
Output Setup .................................................................................................................................. 29
RTMP ....................................................................................................................................... 30
UDP .......................................................................................................................................... 30

Osprey Talon Series User Guide
iii
RTP ........................................................................................................................................... 31
Save to File .............................................................................................................................. 31
Finding your encoder with Osprey BOSS ....................................................................................... 32
Appendix: Osprey Hardware Specifications ......................................................................... 34
Osprey Talon H.264 Encoder ......................................................................................................... 34
Osprey Talon SAH-E23 Features .................................................................................................... 35

Osprey Talon Series User Guide
iv
© 2016 Osprey Video. All rights reserved.
Osprey® and SimulStream® are registered trademarks of Osprey Video. Microsoft®, Windows® is a
registered trademark of Microsoft Corporation. Any other product names, trademarks, trade
names, service marks, or service names owned or registered by any other company and mentioned
herein are the property of their respective companies.
No part of this specification may be reproduced, transcribed, transmitted or stored in a retrieval system in any part or by any means without
the express written consent of Osprey Video. Osprey Video reserves the right to change any products herein at any time and without notice.
Osprey Video makes no representations or warranties regarding the content of this document, and assumes no responsibility for any errors
contained herein.
FCC Notice
The Osprey Talon has been tested and found to comply with the limits for a Class B digital device, pursuant to Part 15 of the FCC Rules. These
limits are designed to provide reasonable protection against harmful interference in a residential installation. This equipment generates, uses
and can radiate radio frequency energy and, if not installed and used in accordance with the instructions, may cause harmful interference to
radio communications. However, there is no guarantee that interference will not occur in a particular installation. If this device does cause
harmful interference to radio or television reception, the user is encouraged to try to correct the interference by one or more of the following
measures:
Reorient or relocate the receiving antenna.
Increase the separation between the equipment and receiver.
Connect the computer into an outlet on a circuit different from that to which the
receiver is connected.
Consult the dealer or an experienced radio/TV technician for help.
If the above measures are unsuccessful, please consult the dealer or manufacturer of your radio or television receiver, or speak with an
experienced radio/TV technician.
Shielded Cables: Connections between this device and peripherals must be made using shielded cables in order to maintain compliance with
FCC radio emission limits.
Modifications: Modifications to this device not approved by Osprey Video could void the authority granted to the user by the FCC to operate
the device.
Note to CATV Installer: This reminder is provided to call to the CATV installer’s attention Section 820-40 of the NEC, which provides guidelines for
proper grounding and, in particular, specifies that the cable ground shall be connected to the grounding system of the building, as close to the
point of cable entry as practical.
Product Disposal Information
Dispose of this product in accordance with local and national disposal regulations (if any), including those governing the recovery and
recycling of waste electrical and electronic equipment (WEEE).
RoHS Compliant: Osprey Video is committed to compliance with the European directive on the Restriction of the Use of Certain Hazardous
Substances in Electrical and Electronic Equipment, Directive 2002/95/EC, the RoHS directive.
For current RoHS statement, visit www.ospreyvideo.com
Osprey Video, 1624 Valwood Pkwy, Carrollton, TX 75006 USA
Overview Thank you for purchasing the Osprey® Talon series video encoder from Osprey Video. This user guide
provides step-by-step instructions for installing and using your new video encoder. For the latest Osprey
product information and news, visit our website at www.ospreyvideo.com.

Osprey Talon User Guide
5
Warranties For complete warranty details, refer to the specific warranty included with each product. General
warranty information includes the following:
Limited Warranty Osprey Video warrants its hardware products against
defects in material and workmanship under normal use
for the period of one year (12 months) from date of
sale. Where specific Osprey Video warranties exist that
provide more substantial coverage, notwithstanding
the warranty provisions herein, such product
warranties control and preempt or supersede the
warranty provisions herein.
Reseller Pass Through of
Standard Limited Warranties
Resellers pass the Osprey Video standard limited
warranties for the products through to the customer
without modification. Any modification of a product
voids the Osprey Video or any other existing or
available warranty.
FEEDBACK: We greatly value your input. Please direct any questions, comments or support issues to
+1 972 488 7157

Osprey Talon User Guide
6
Product Description
The Osprey Talon is a small form-factor H.264 video encoder designed to be easy to use, portable, and
easily stream both your standard definition and high definition content to broadband and mobile
networks in H.264 RTMP servers such as Adobe® and Wowza®.
Audience The audience for this user guide includes anyone who uses or administers the Osprey Talon series. Users
should have a basic technical understanding of streaming media. This user guide provides information
on the Osprey Talon series only.
Warnings Only trained and qualified personnel should install, replace, or service this equipment.
Do not attempt to open the case of the system. If you do, you incur a high risk of electrical shock that
may cause damage to the system or personal physical injury or death to you and/or others. No user-
serviceable parts exist inside the system. If you open the system case or make unauthorized changes to
the case, you void the warranty.
Install the system away from any heat sources. This remains vital to the safety of the product users. Do
not install the system near any heat sources such as:
Radiators
Heat registers
Stoves
Other heat-producing equipment
WARNING! Installing the system near heat sources could result in personal injury or
death.
Never insert objects of any kind into the system through any system openings, as the
objects may touch dangerous voltage points, short out parts, and result in a risk of
fire or electrical shock.
Do not stack the system atop or below other electronic devices as this can cause heat build-up and
vibration of the system. These conditions can damage the system thereby voiding the limited warranty.
You may stack multiple Osprey Talon units as these systems accommodate stacking.
Do not install the system in any area where the temperature is less than 5°C or more than 40°C. Transfer
from temperature extremes may cause condensation. Let the system remain unplugged at room
temperature for at least 45 minutes before connecting it.
Osprey Talon User Guide
7
Use an outlet with surge suppression or ground fault protection when using the system. Unplug the
power cord from the wall outlet, disconnect the network connection, and disconnect the lines between
the system and the video source for added protection:
During a lightning storm
During dangerous weather conditions
When the encoder remains unattended or unused for long periods
Reduce the risk of fire or electric shock. Do not expose the system to any rain or moisture. Exposing the
system to rain or other types of moisture could result in system damages. Do not place any liquids on or
near the system. If you place liquids in any form on or near the system, do so at your own risk, for you
incur a high risk of electrical shock that could occur and cause damage to the system.
WARNING! Exposing the system to rain or other types of moisture
could result in physical injury or death. Any liquids on or near
the system may result in electrical shock and personal injury or
death.
Refer all servicing to authorized service personnel. You must have authorized personnel only service any
damaged system. Relevant damage may occur with but is not limited to the following:
An unplugged or damaged power supply cord
Spilled liquid on the system
Fallen objects in or on the system
Appliance exposure to rain or other moisture or liquid
Failure to perform as described in the User Guide
A dropped system
Osprey Video assumes no liability or responsibility for any damaged system that clients continue using.
Use only attachments, accessories, or equipment specified by the manufacturer with the system. Using
accessories or attachments not recommended by the encoder manufacturer voids the Limited
Warranty.
Do not attempt to service the system yourself. If you open or remove covers, you may be exposed to
dangerous voltage. Such action voids the Limited Warranty. Refer all servicing issues to authorized
service personnel only.
The plug-socket combination that serves as the main disconnecting device must be accessible at all
times.
Protect the power cord from anyone walking on it and being strained or pinched particularly at plugs,
electrical receptacles, and the point where the power cord exits the system.
Do not use adapter plugs or remove the grounding prong from the power cable.

Osprey Talon User Guide
8
Use only the type of power source indicated on the marking label on the back panel of the unit to
operate the system. Unplug the system power cord by gripping the plug and removing it from the power
source. Do not pull the cord to remove the power source from the system.
Do not plug the system into a wall outlet that contains an overload of electrical cords or power
strips/extension cords. This type of overload may result in fire or electrical shock risks.
Always handle the system carefully. Always avoid excessive shock and vibration to the system. Excessive
shock or vibration can damage the system.
WARNING! Excessive shock or vibration to the system may result in electrical shock
and personal injury or death.
Installing additional software The Osprey Talon systems run an embedded version of the Linux operating system (OS). Installation of
additional software on the Osprey Talon systems is not allowed.
Connecting to the Internet
Never connect an Osprey Talon system to the Internet through a direct connection without the use of a
firewall. We recommend taking precautions against unwanted access such as installing systems behind a
router or firewall. The speed of the router or switch should match or exceed the speed of the system’s
network card. See your network administrator for recommendations.
Package contents Completely unpack all contents from the box and inspect each item for damage. Ensure that you have all
the components listed below:
System Osprey Talon
Power Supply AC to DC converter 12V International
Hardware Mounting Brackets
WARNING! Read the installation instructions before connecting
the system to the power source.
Osprey Talon User Guide
9
Getting Started Before you can use your Osprey Talon encoder, you first need to set up and configure it. This chapter is
dedicated to providing you with the details and step-by-step instructions you need to make your
installation as quick and easy as possible.
Here are three starting requirements:
AC power source (100 - 240 V)
IP connection and/or Internet connection on a dynamic host configuration protocol/domain name server (DHCP/DNS) network.
A ‘configuration host’ system A configuration host is a networked PC computer running a compatible HTML browser. The
browser on the host will be used to access the configuration web page on the Talon encoder. There is also a small application called ‘Osprey BOSS’ that is used to locate and identify Talon on the local network. BOSS works with PC, MAC and Linux. Once Talon has been identified on the network any HTML browser can be used to configure your encoder.
The Osprey Talon encoder, an easy-to-use streaming device, allows you to:
Connect to a compatible browser on a dynamic host configuration protocol/domain name server (DHCP/DNS) network.
Configure and connect your audio and video source to the Osprey Talon.
Select your output formats and streaming settings.
Enter your streaming server information.
Start streaming your media.
You can configure and use the Osprey Talon straight from the box for any streaming activities. Use the
web interface for setting options and controlling your Osprey Talon from another networked computer.
This section addresses the high-level actions you must perform to physically connect and set up your
Osprey Talon video encoder.

Osprey Talon User Guide
10
Prerequisites Before connecting the Osprey Talon encoder, ensure you comply with the following prerequisites:
All packaged items are undamaged and in working order.
Your environment meets all starting requirements.
Safety instructions, notices, and warnings detailed in “Before you Begin” including:
FCC Notice
Environmental Notices
Warnings
You must complete the following tasks to setup the Osprey Talon encoder:
Address and comply with the prerequisites above.
Connect the Osprey Talon encoder using supplied power source.
Connect the Osprey Talon encoder to an IP network with DHCP enabled.
Access the ‘Configuration Host’ computer on the same network.
Start the ‘Osprey BOSS’ application.
Select the Talon that matches your serial number.
Configure the Osprey Talon encoder.

Osprey Talon User Guide
11
Osprey Talon front panel diagram You should familiarize yourself with the front panel controls for the Osprey Talon. Besides the basic
buttons for power, start/stop, up/down and menu access, there are indicator lights that are hidden until
illuminated.
OSPREY TALON FRONT PANEL
A Power On/Off
B HDMI in
C Composite in
D Unbalanced Audio in
E HD/SDI in
Osprey Talon back panel diagram
A 1G Ethernet
B Service
C USB
D 9 – 17 VDC

Osprey Talon User Guide
12
Osprey Talon Status Lights There are five lights on the front panel of Talon that indicate the status of several functions.
A and B: Indicate power and boot status of Talon.
Single Red indicates that Talon’s power is on but is not ready.
Red and Orange indicates Talon is booting. A and B will flash half way through the boot cycle
Single Blue indicates that Talon is ready.
Blue an Orange indicates that Talon is encoding
C, D and E: Green lights after Talon is ready indicate that video sync is locked.
C = HDMI
D = Composite (CVBS)
E = HD-SD/SDI

Osprey Talon User Guide
13
First time set up
You should read all instructions, notices, and warnings in the previous section prior to getting started
with your new Osprey Talon hardware for the first time. Also, ensure you have all required parts and
meet all system requirements before installing this product.
Do not continue with the installation if you find any components missing or damaged. Contact the
Osprey reseller where you purchased your Osprey Talon system for assistance in obtaining any missing
or replacement parts.
Connecting to an electrical power source
The Osprey Talon ships with an AC to DC converter 12V.
To connect the power source:
1. Attach the connector end of the AC/DC adapter to the Osprey Talon.
2. Plug the other end of the cable into a wall outlet or surge protection enabled power strip
connected to a wall outlet or other common power source.
WARNING! The plug-socket combination must remain accessible
at all times as it serves as the main disconnecting device.
Do not work on the system or connect or disconnect cables
during periods of lightning activity.

Osprey Talon User Guide
14
Web Interface Talon is configured and controlled exclusively from an internal webpage. This page was designed to
provide easy access to all of the configuration features of the Talon. Its simplicity makes it easy to use
even from tablets and smart phones.
Login To login to the Talon page, first enter the IP address of Talon in a web browser (show below) and press
enter.
By default, the Talon receives its IP address via DHCP. If you are unable to determine the address of your
encoder, we have created an application for finding Talon and performing some critical remote
functions. Please consult the section labeled finding your encoder with Osprey BOSS at the end of this
user guide.
Your browser will be directed to the Talon Web Interface. The default password is ‘osprey’. For
increased security always change the default password.
Upon login, you will reach the home page of the web configuration site.

Osprey Talon User Guide
15
Tab ID The tabs on the front page provide access to the available configuration features of the Talon.
System
Control
IP Setup, Set Device Name, Set Password, Update Firmware, Select
Mode
Status Displays real time information regarding streams and inputs
Stream
1
Contains all streaming settings for one output stream including source
and output setup.
+ Selecting this item allows you to add additional encoders (streams)
Up to a total of 3.

Osprey Talon User Guide
16
System Control Tab This tab accesses most of the administrative functions of the Talon.
Talon IP Setup By default, Talon receives its IP address via DHCP. If you need to use a manual address it can be set in
the IP setup dialog box on the System Control page. If you are not familiar with the settings found here
check with your system administrator before changing any settings.
Feature (default) Description
IP Address Automatically Assigned Sets the IP address
Netmask Automatically Assigned Sets the netmask
Gateway Automatically Assigned Sets the gateway
Use DHCP Checked Enables/Disables DHCP

Osprey Talon User Guide
17
Device Management Device management tasks allow the configuration of operating system features. These features aren’t
accessed on a regular basis because they are not involved in the configuration of the encoder itself.
Set Name The model designation for Talon is loaded as the default device name. To easily distinguish multiple
Talons, you can create a new name here.
Set Password The default password is “osprey”. In order to maintain device security it is recommended you change
the default password.
Reboot Reboot performs a complete power reset of the device. Make sure you save all of your settings before
rebooting.

Osprey Talon User Guide
18
Update Firmware Talon firmware can be easily updated. Osprey recommends that you check the Osprey Video webpage
upon receipt of your Talon to ensure that you have the very latest version. There are two methods.
Updating via the Talon Web page. 1. Download the update from the Osprey Video webpage and save it on the host computer.
2. Login to the Talon via the web page a click the System Setup tab.
3. Click the Update Firmware tab.
4. From the update page click Choose File.
5. From Explorer select the Image file. This can be on the host hard drive or on a Flash drive.
6. Click Upload and Update
7. Talon will install the new image and automatically restart.

Osprey Talon User Guide
19
Updating via Flash Drive In the event you cannot access the Talon web page, it is possible to update directly from a Flash drive.
Insert a Flash drive in your host computer.
Format the drive as FAT (do not use FAT32)
Paste the image file to the root of the Flash drive.
Insert the Flash drive in the Talon USB port.
Restart the Talon
Wait at least 5 minutes until you are certain Talon has restarted.
Remove the Flash drive
Talon will silently update its image file and restart.
NOTE: For all image updates Talon stores passwords, IP settings and Saved Profiles in non-volatile memory. These settings will be
saved and made available to the restored image.

Osprey Talon User Guide
20
Operating Mode Talon has two operating modes. The current operating mode is indicated in the upper right corner of the
webpage along with the serial number and device name. The mode can be changed from the menu just
below the Device Management box on the System Control tab.
1x3 MBR Mode As the name suggests, MBR mode allows the user to select one of the available inputs and then create
three output streams. This is useful for Multiple Bit Rate streaming or for streaming one input to several
server locations at the same time. Users can create three streams to a single RTMP server, or stream
RTMP and UDP at the same time while saving to file.
2X2 LC Mode
This mode is designed for Lecture Capture and similar uses. Users may select 1 SDI input and 1 of either
HDMI or Composite and stream each separately. This is useful for streaming classroom situations where
you need to stream a camera and an additional input such as a scan converter or a laptop output for
Lecture Capture.
Changing Operating Modes On first startup Talon will use 1x3 MBR mode. If you need to change modes, select the desired mode
from the dialog at the bottom of the page. Talon will reset itself into the desired mode.
NOTE: When changing from one mode to another Talon will not retain stream settings from the
previous mode.

Osprey Talon User Guide
21
Status The Status page provides information about inputs and outputs. From this tab you can get specific
statistics about the incoming video, and outgoing audio and video streams.
Osprey Talon User Guide
22
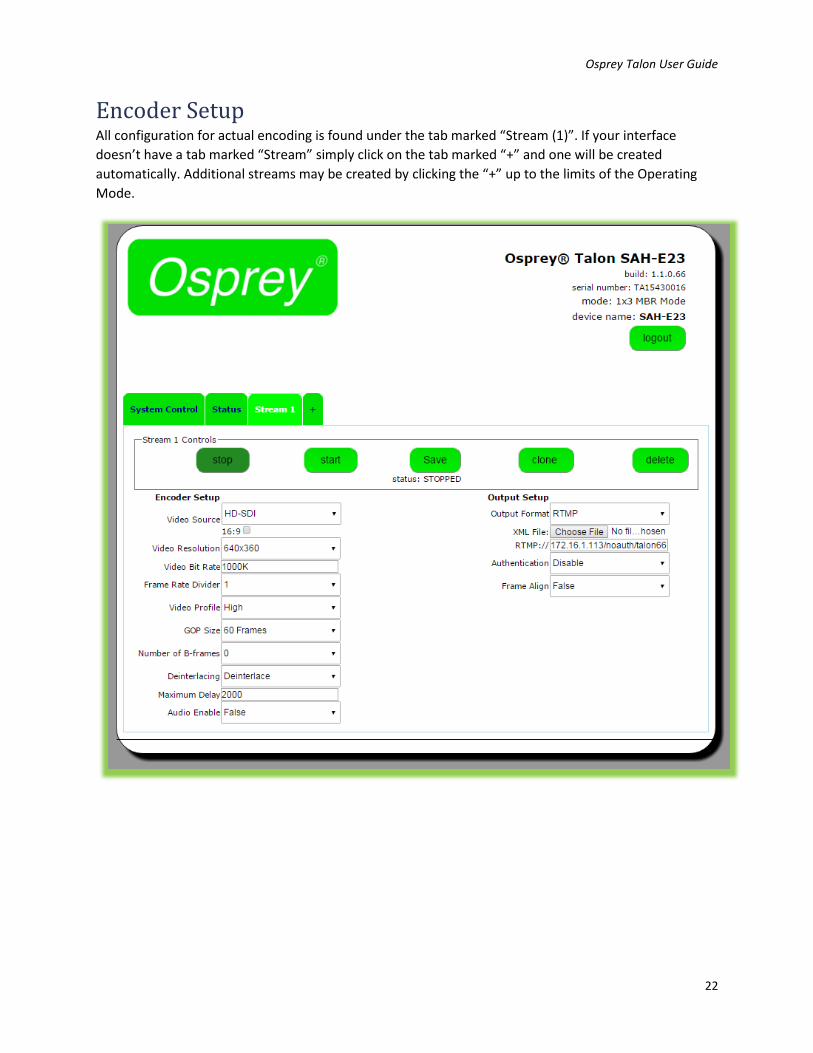
Encoder Setup All configuration for actual encoding is found under the tab marked “Stream (1)”. If your interface
doesn’t have a tab marked “Stream” simply click on the tab marked “+” and one will be created
automatically. Additional streams may be created by clicking the “+” up to the limits of the Operating
Mode.

Osprey Talon User Guide
23
Stream Control Buttons
The five buttons in the Stream 1 Control box control the Stop and Start of the encoder labeled Stream 1.
Save The Save button can be used to save the changes you make in the encoder configuration below. Use
Save if you are going to leave the configuration page without starting the encoder. Once the encoder is
started, all changes are automatically saved.
Clone Often a user wants to create second stream that is very similar to the first, with only minor differences.
You may use the ‘Clone” button to make a second stream configuration that is exactly like the first. Then
it is a simple matter to make the minor change such as address in the second stream without having to
recreate the whole thing.
Delete Delete completely removes the selected stream configuration.

Osprey Talon User Guide
24
Creating Additional Streams Clicking the “+” button will create another Stream tab. The number of tabs you can create is determined
by the Operating Mode that is selected.
NOTE: More About Operating Modes 1x3 MBR Mode will allow the creation of 3 Streams. Each must have the same Video Source. You may
select from SDI, HDMI or Composite. If you change the video source on any stream, all of the streams
will change to that source. Keep this in mind when configuring additional streams.
2x2 LC Mode will only allow the creation of 2 Streams. Stream 1 must always be SDI. Stream 2 can be
HDMI or Composite (CVBS). However, be aware that LC mode is Progressive Only. This means that it
does not apply any DeInterlacing to the incoming signal. For this reason, it is not recommended to use
Composite (CVBS) in this mode.

Osprey Talon User Guide
25
Encoder Setup Video Source The choices in the pull-down menu vary depending upon the Operating Mode you have selected.
In 1x3 MBR mode you may select from the three available input sources. Once selected, the
same input will be re-used for any additional streams.
In 2x2 LC mode the video source for Stream 1 must always be HD/SDI. The source for Stream 2
can be either HDMI or Composite.
NOTE: Composite is not recommended in 2x2 Mode.
NOTE: It is recommended in 2x2 Mode that the audio originate either from the SDI source or the Analog
source.
Video Resolution This pull-down menu sets the video resolution for the outgoing stream. To make the stream the same
resolution as the input imply select “Follow Input”. Otherwise select an outgoing resolution from the
list.
NOTE: Up-Scaling, (creating a stream larger than the incoming resolution) is not recommended as it
usually results in severely reduced quality.
Video Bitrate Video Bitrate (vrate) is the desired encoded rate of the outgoing video. Settings are expected in Kilobits
per second. For example, you may use 100000; 100k; 100K etc. You may also use 1m; 2m, etc
representing Megabits per second. 1G, etc is not accepted.
NOTE: If a setting is out of bounds for the encoder you will receive the message “status: !Error: Bad
vrate xK”. This only indicates that the setting is not acceptable to Talon. It is possible to set a value that
is acceptable to Talon, but is not adequate to support quality video.
Frame Rate Divider The frame rate for the output video is expressed as the input video size divided by the “Frame Rate
Divider”. A value of 1 means the output will be the same frame rate as the input. A value of 2 means ½
of the input rate and so on.
Video Profile Talon supports three h.264 encoding profiles; Baseline, Main and High. Profile selection should
be based on the target audience of the encoded video.
Baseline is the lowest level profile and is suitable for streaming to a broad spectrum of internet
connected devices including most older smart phones.
Main is the default setting. It is suitable for most web streaming including HD. It is also good for
most modern smart phones.
High is primarily used for broadcast, or for saving high-quality HD to file. It supports up to
1080p/60 video.

Osprey Talon User Guide
26
GOP Size GOP size refers to the distance between i-frames in a stream or file. Live streaming generally uses
shorter GOP sizes than saving to file. For live streaming a setting of 2 x (frame rate) is a good starting
point. If your encoded stream will be 30 fps, set the GOP to 60 frames. Some server based transcoders
prefer GOP up to 10 seconds.
Number of B Frames B Frames provide encoding information to the i-frame. Talon supports from 0 to 3 B Frames. When using
Baseline profile use 0 B Frames. For most situations a setting of 1 frame is best.
DeInterlacing Most steaming video is destined for delivery to a computer or smartphone screen. Such screens can only
display progressive video. Most analog video and 1080i HD video are delivered as Interlaced video.
These sources must be de-interlaced before they can be encoded for progressive delivery. Talon
supports three settings.
OFF: No DeInterlacing will be applied.
DEINTERLACE: Standard DeInterlacing will be used.
DEINTERLACE HQ: This level is suitable for some save to file HD video.
NOTE: When encoding multiple streams, the same DEINTERLACE method is used across all streams. Be
certain to select a method that is applicable for all streams. Once a stream has started the DEINTERLACE
method cannot be changed on subsequent streams until all streams are stopped.
Maximum Delay This setting adjusts the amount of internal buffer the encoder is allowed to use. Larger buffer gives the
encoder more time to produce more accurate video. The default of 2000 is generally adequate for most
live streaming. A setting of 0 will result in blocky video. A setting above 5000 does not usually provide a
significant improvement.
Audio Enable When set to “True” audio inputs are made available for embedding in the video stream. Set this to
“False” if this input will not be using audio.
IMPORTANT NOTE: In 2x2 LC mode, only one input can supply audio at a time. Make certain the audio is
enabled on the input delivering audio and disabled on the rest or the video may not start correctly.

Osprey Talon User Guide
27
Audio Info When “Audio Enable” is set to “True” the web interface exposes the “Audio Info” fields. Available
options change to reflect the Output Format as set in the Output Setup area. Only the audio features
used by the particular input will appear.

Osprey Talon User Guide
28
Enable (all formats) For Web streaming, only 1 pair of audio inputs may be used at a time. Enable the input from “Sub
Channel 1” by selecting “yes”. Be certain that all of the remaining Sub Channels are disabled.
NOTE: Multiple Sub Channels are only used for UDP and MPTS streaming. They are not available for
RTMP or RTP.
Source (all formats) Select from HD/SDI, HDMI, or Analog.
Codec (all formats) For live streaming select from AACLC (low complexity) or AACHE (high efficiency). The audio codecs
labeled MPEG2 and MPEG1L2 are only used for MPEG2 TS streams.
Sample Rate (all formats) Default sample rate is 48000 Hz. Occasionally 44100 Hz is used for older smartphones. Also available are
32000 Hz and 16000 Hz.
Bit Rate Default bit rate is 96 Kbps. Select your preferred rate from the pull down menu.
Mode (all formats) Select Stereo or Mono. Stereo is the default and preferred setting.
Rtp Port (RTP only) Select the audio port for the RTP stream. Default setting is 8900, but any port can be selected. Common
usage is from 4000 to 40000.
Pid (UDP only) Identifies the UDP Process ID for this port.
Max PTS-PCR (UDP only) Sets the maximum deviation for Presentation Time Stamps and Clock
Reference in UDP and MPTS delivery. Default is 250.
Format Values are ADTS and LATS. Use the default ADTS for RTMP streaming.
Jumbo PES Enables Jumbo PES and allows specification of number of AUs. Default is None.

Osprey Talon User Guide
29
Output Setup Talon supports delivery via RTP, UDP, and RTMP, as well as an option to save a .TS file. Select the desired
delivery from the Output Format pull down menu. Configuration options change depending upon the
format selected.

Osprey Talon User Guide
30
RTMP RTMP has become the most common delivery protocol for internet based video. RTMP streaming
requires a source, and encoder, and a streaming server. The resulting video is then played in a browser
window or via web based player. Many users us a Content Delivery Network (CDN) do distribute their
Live and On Demand video. The CDN then also becomes the web server. CDN can also add value by
recording and storing live video for later delivery as Video on Demand (VOD).
XML file Some CDN providers provide users with a .XML file the contains their encoding parameters. You can
download this configuration file to the host control computer and select it from the “Choose File” dialog.
At this time only the RTMP address will be populated. Other encoder settings such as Resolution and Bit
Rate must be set manually.
RTMP:// This is where you manually insert the URL for the RTMP server. For complex addresses it is preferred to
copy and paste the address from the host control computer. It is not necessary to add the “RTMP://” to
the address when you enter it.
Authentication If your CDN uses a user name and password, then enable Authentication. A dialog box will appear below
to receive your username and password.
Frame Alignment When creating multiple bit rate (MBR) streams it is preferred that all streams use the same GOP length
and the frames be sent at the same time. Frame Alignment “True” will allow you to apply the same
frame settings to all outbound streams.
NOTE: When creating multiple streams, be certain to enable “Frame Alignment” on all streams.
UDP UDP is a connectionless protocol often used in live video streaming. Most often it is used to create a
Multicast; a single stream that is shared across an entire network over a Multicast IP address. This type
of stream is accessible via SetTop boxes and other IP devices. It is often used for digital signage. It can
also be used for limited IP satellite video.
Destination Address Enter the Multicast address for your assigned video. It is only necessary to enter the IP address, as the
port number will be specified in the next menu.
Dest Port This is the assigned port for your broadcast. The default is assigned in the 5000 range, but any port can
be used.
Enable Save to File To save a copy of your broadcast as a .TS file set this menu to “True”

Osprey Talon User Guide
31
File Location As Talon has no hard drive, in order to save a file it is necessary to mount a USB device on the external
USB port. By default, any device mounted on this port will be designated “/media/usb/[filename].ts”.
Talon will not create sub folders to this location. If you have previously created a sub folder then you
may include that location after “/usb/” and before [filename].
Video Settings These are the video settings required by the network to deliver a stream to a particular location. If this is
the only stream you may use the defaults. Otherwise insert the values given by your network
administrator. Settings include Video PID, PCR PID and PMT PID.
TS Rate In order to support the overhead of a Transport Stream the TS rate must be set greater than the Video
Bit Rate. As a rule, 125% of the Video Bit Rate is a good starting point.
RTP RTP is a delivery protocol similar to UDP. It is simple to configure as it only requires a Destination
Address and a Destination Port.
Destination Address This address can be either Multicast or Unicast address depending upon your requirements. You need
only enter the destination IP address here.
Destination Port Enter the destination port for your video stream. Default is 5004, but nearly all ports from 4000 to
40000 are available.
NOTE: Be certain to check the port on your Audio Configuration and set that port accordingly as well.
About SDP files Most RTP/RTSP connections require an SDP file. Talon does not support automatic SDP injection. If you
are unfamiliar with the format for SDP files contact check OspreyVideo.com for the Knowledge Base
article about SDP files.
Save to File If you are using other channels for streaming with something other than UDP and you need to save the
video as a file you may create a separate stream simply for saving to file. The file will be saved as .TS
USB storage devices Talon does not have onboard storage. In order to save a file you must insert a Flash drive or USB hard
drive in the USB port. For convenience all storage is mounted as /media/usb/[filename].ts
NOTE: Talon does not determine if a device is plugged into the USB port. Be certain that you have a
storage device plugged into the USB before writing the file.
NOTE: Do not attempt more than one Save to File operation at a time.
NOTE: Do not use a USB hub with Talon.

Osprey Talon User Guide
32
NOTE: Writing to file does not stop immediately when the encoder stops. For this reason, you must wait
at least 1 minute to make sure the write is finished before removing the storage device or turning off
Talon.
Finding your encoder with Osprey BOSS
If your Talon is powered up and attached to the local network Osprey has included an application that
allows you to use a browser on another computer to locate the encoder and access it via the network.
The Base Osprey System Supervisor (BOSS) discovers Osprey Talon devices on the network by
broadcasting data packets to all IP addresses within your PC’s subnet (i.e. the IP range that your PC is
currently in). BOSS can be used if you do not know the exact IP address of your Talon systems. You do
need to know the IP subnet on which Talon is installed.
BOSS will not locate Talon if:
You are using a router in your network to connect across subnets.
Your network is firewall-protected. The UDP broadcast may not be permitted unless Port 10024
is open.
If you are unable to locate Talon, please ensure it is on the same physical and logical section of
your network and that broadcast traffic is allowed on port 10024 with a broadcast address of
224.0.0.212
To use BOSS:
Download the from the link at www.OspreyVideo.com. There are versions available for PC, MAC
and Linux.
Install the application on a computer located on the same IP Subnet as Talon.
Launch BOSS
When the BOSS screen appears, click the “Refresh” button.

Osprey Talon User Guide
33
BOSS will populate with the Serial number, Device name, IP and MAC Address along with the Description
for all Talon encoders on this Subnet.
To access the web page of a particular Talon, click on the Serial Number of the desired Talon and you
will be taken to the web GUI.
Osprey Talon User Guide
34
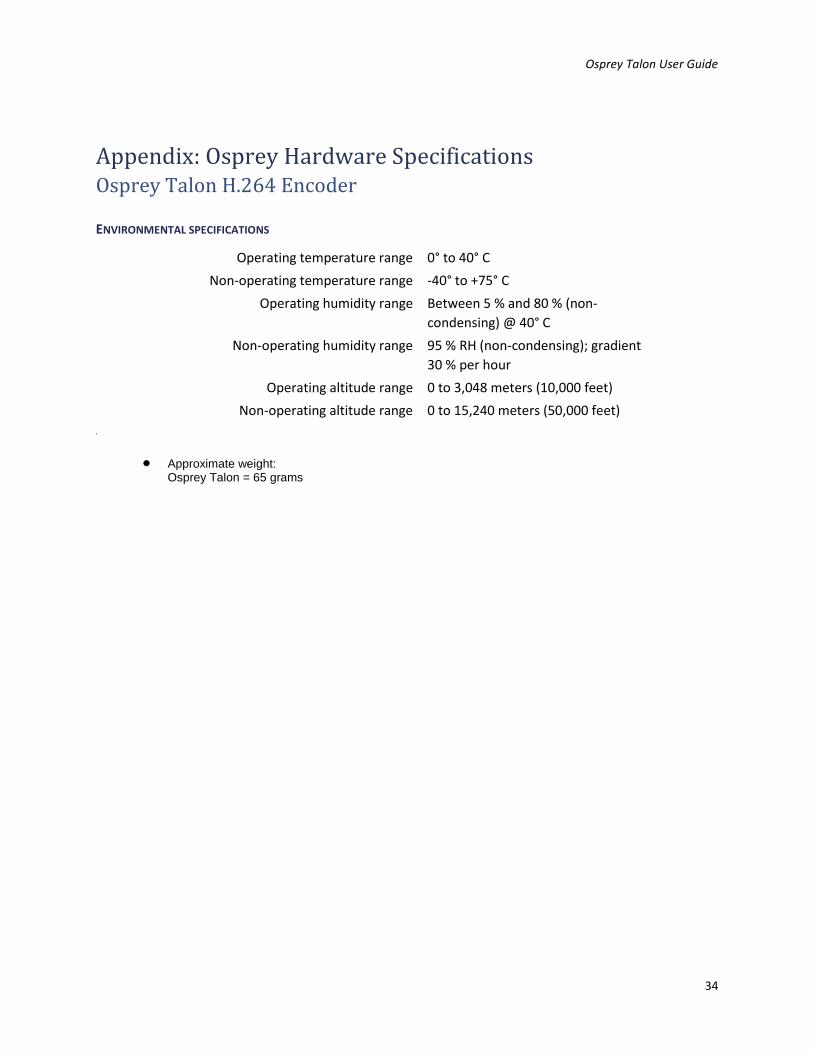
Appendix: Osprey Hardware Specifications Osprey Talon H.264 Encoder
ENVIRONMENTAL SPECIFICATIONS
Operating temperature range 0° to 40° C
Non-operating temperature range -40° to +75° C
Operating humidity range Between 5 % and 80 % (non-
condensing) @ 40° C
Non-operating humidity range 95 % RH (non-condensing); gradient
30 % per hour
Operating altitude range 0 to 3,048 meters (10,000 feet)
Non-operating altitude range 0 to 15,240 meters (50,000 feet)
e
Approximate weight: Osprey Talon = 65 grams

Osprey Talon User Guide
35
Osprey Talon SAH-E23 Features Description:
2 channel SDI HD/SD, composite, or HDMI
Software Control:
HTTP-Based GUI: Configuration and Software Update
USB: Software Update
Video Inputs:
3G SMPTE 424M x 1
HD SMPTE 292M x 1
SD SMPTE 259M x 1
Composite
Video Connectors:
Composite (RCA x 1)
SDI (BNC x 1)
HDMI (HDMI x 1)
Audio Inputs:
Unbalanced stereo
Embedded SDI/HDMI (1 stereo pair per input)
Audio Connector:
Unbalanced stereo (mini-3.5mmx1) (adapter not included)
Video Encoding:
RTMP / UDP / RTP H.264 (H.264 video encode up to 1080p60 in a single output stream or dual encode up to 1 x 1080i30 + 1 720p60)
Audio Encoding: AAC-LC & AAC-HE (32 to 320 kbps)
Closed Caption:
Closed Captioning (EIA-608 & EIA-708) Type 1 ATSC Picture User Data is automatically embedded in the H.264 SEI per SCTE 128-1
standard*** (Available in UDP & RTMP streams)
Video Modes:
HDMI / SDI: 1080p, 25, 29.97, 30, 50, 60
1080i 50, 59.94
720p, 50, 59.94, 60 480p 60
480i 29.97/30 (NTSC)
576p 60 576i 25 (PAL) Composite: 576i 25 (PAL) 480i 29.97 (NTSC)
Operating Modes:
1 x 3 MBR (Multiple Bit Rate)
2 x 2 LC (Lecture Capture)
Dimensions:
4.64” L x 4.76 W x 1.34” H (118mm L x 121mm W x 11.13cm H)
Weight:
≈65g


Osprey Video 37
Index
Audience, 6
Before you Begin, 6
Change the network settings, 23
Changing the network settings, 23
Connect the power source, 14
Connecting to an electrical power source, 14
Connecting to the Internet, 9
Easy first time set up, 14
Environmental specifications, 27
Install Overview, 10
Installing additional software, 9
Osprey Talon back panel, 13
Osprey Talon back panel diagram, 13
Osprey Talon front panel, 12
Osprey Talon H.264 Encoder, 27
Package contents, 9
Package Contents, 9
Prerequisites, 11
SAH-E20 Features, 29
SAH-E23 Features, 28
Setup System Option, 23
Stopped icon, 24
Talon Back View, 13
Warnings, 7
Warranties, iv

© 2015 Osprey Video. Osprey® and SimulStream® are registered trademarks of Osprey Video. All other trademarks are the property of their respective owners. Product specifications and
availability may change without notice.
www.ospreyvideo.com