Organizing Your Photos N
56
97 CHAPTER 4 Organizing Your Photos N ow that your photos are safely tucked into Lightroom, our goal is to find the best way for you to organize them so that can find them at a later date. Organizing your photos is a crucial undertaking in this era of digital images, cheap memory cards, and huge hard drives. The fact of it is that people are shooting far more pictures than when the cost of film (and processing) tended to limit the number of photos taken. Further, remember that Lightroom is a workflow management tool. It’s impossible to manage your workflow if you don’t manage (or can’t find) your images. Lightroom Image Management Concepts In Chapter 3, we learned that images could be imported into folders on the hard drive. The folders serve as a rudimentary way to divide a large collection up into manageable chunks. But folders provide only a physical way to 09_K52133_CH04.indd 97 09_K52133_CH04.indd 97 9/17/2008 2:56:56 PM 9/17/2008 2:56:56 PM
Transcript of Organizing Your Photos N

97
CHAPTER 4
Organizing Your Photos
Now that your photos are safely tucked into Lightroom, our goal is to fi nd the best way for you to organize them so that can fi nd them at
a later date. Organizing your photos is a crucial undertaking in this era of digital images, cheap memory cards, and huge hard drives. The fact of it is that people are shooting far more pictures than when the cost of fi lm (and processing) tended to limit the number of photos taken. Further, remember that Lightroom is a workfl ow management tool. It’s impossible to manage your workfl ow if you don’t manage (or can’t fi nd) your images.
Lightroom Image Management Concepts In Chapter 3 , we learned that images could be imported into folders on the hard drive. The folders serve as a rudimentary way to divide a large collection up into manageable chunks. But folders provide only a physical way to
09_K52133_CH04.indd 9709_K52133_CH04.indd 97 9/17/2008 2:56:56 PM9/17/2008 2:56:56 PM

Adobe Photoshop Lightroom 2
98
organize image fi les and are not especially helpful for locating specifi c images in a large collection. Besides that, folders are no help if you want to include images in multiple sets; doing this with folders would mean having duplicate copies of the images in multiple folders.
Stacking Photos Although folders help organize images on the hard drive, with a collection of thousands of images, the display of the images can become extremely cluttered. One feature that is specifi cally designed to reduce this clutter is called stacks. Stacks are great for collecting similar photos into a single displayed image, because you can view the contents of the stack any time you want. To see stacks in action, take a look at Figure 4.1 , which shows a collection of very similar photos.
FIG 4.1 This many nearly identical photos clutter up the Grid view.
Stacks let us stack all the identical or similar images one on top of the other. As you can see from Figure 4.2 , the stacked images take up only a single thumbnail now, allowing the grid to show more varied images. There are two indications that the images are stacked. The fi rst is the tiny icon in the upper-left corner with a number indicating how many images are in the stack. The other indication is the “ handle ” on the top image (the vertical lines that enable you to expand the stack).
Building Stacks To stack photos into a group, use the following steps:
1. Open the Grid mode in the Library module (G). 2. Select the photo that you want to be at the top of the stack.
09_K52133_CH04.indd 9809_K52133_CH04.indd 98 9/17/2008 2:57:01 PM9/17/2008 2:57:01 PM

Organizing Your Photos
99
3. Using the Shift or Ctrl key, select the other photos to be included in the stack.
4. Choose Stacking � Group into Stack from either the shortcut menu or the Photo menu (Ctrl � G). All of the images except the top one will disappear from view and a tiny icon appears in the upper-left corner indicating how many images are in the stack.
To unstack the photos and return them to the Grid view, select the stack and choose Photo � Stacking � Unstack (Ctrl � Shift � G). You can also choose this option from the thumbnail shortcut menu.
Working with Stacks To view the contents of a stack, select the top image and press the S key, choose Photo � Stacking � Expand Stack (or pick Stacking � Expand Stack from the shortcut menu). All of the stacked images will appear on the grid. These images are still part of the stack group as indicated by the tiny x of y icon in the upper-left corner as your mouse moves over the thumbnail ( Figure 4.3 ). Pressing the S key again (or choosing Photo � Stacking � Collapse Stack) collapses them back into the normal stack view where they are hidden.
FIG 4.2 Much better! The images are stacked now.
There are other useful commands (in the Stacking shortcut menu or the Photo � Stacking menu) you can use to manage stacks:
● Expand all stacks . Expands all the stacks you have created to show the individual images, as described previously.
● Collapse all stacks . Collapses all the expanded stacks back into their normal stack view.
If you add a stacked image to either a Quick Collection or Collection (discussed later in this chapter), only the top image joins either collection.
This is the numberof images in the stack
Click here (verticalline) to expand the stack
09_K52133_CH04.indd 9909_K52133_CH04.indd 99 9/17/2008 2:57:03 PM9/17/2008 2:57:03 PM

Adobe Photoshop Lightroom 2
100
● Remove from stack . Once you have expanded a stack, you can select images from that stack and choose Remove from stack to remove those images from the stack. When you collapse the stack, those images will no longer be part of it.
● Move to top of stack (Shift � S) . If you pick an image that is not at the top of the stack and choose this item, the selected image moves to the top of the stack. Remember that the image at the top of the stack is the only one you can see in the normal stacked view. This menu item is not available if the image is already at the top of the stack.
● Move up in stack (Shift � [ ) . Moves the image up one in the stack, changing the stacking order and the order in which you see the images when you expand a stack. This menu item is not available if the image is at the top of the stack.
● Move down in stack (Shift � ] ) . Moves the image down one in the stack, changing the stacking order and the order in which you see the images when you expand a stack. This menu item is available if the image is at the bottom of the stack, though clicking it doesn’t actually do anything.
● Split Stack . If you pick an image that is not at the top of the stack and choose this item, the stack is split into two separate stacks. The images between the original top of stack and the image before the currently selected image form the fi rst stack. The images from the currently selected image to the end of the original stack form the second stack.
FIG 4.3 Use the S key to quickly expand and collapse stacks.
This tooltip indicates how manyimages there are in the stack
This is the number of theimage in the stack order Click here (vertical line) to
collapse the stack
09_K52133_CH04.indd 10009_K52133_CH04.indd 100 9/17/2008 2:57:04 PM9/17/2008 2:57:04 PM

Organizing Your Photos
101
Automatically Creating Stacks Lightroom can automatically stack contiguous photos based on their capture time. The process is pretty simple—you specify a time interval from 0 to 1 hour. Photos that were taken closer together than the specifi ed interval are stacked together. As you can imagine, specifying shorter durations creates more stacks (with fewer pictures in each stack) and specifying longer durations creates fewer stacks (with more pictures in each stack).
To get started, choose Photo � Stacking � Auto Stack by Capture time. This opens the Auto Stack by Capture time dialog box ( Figure 4.4 ). Drag the slider to the left to decrease the time between stacks, or drag it to the right to increase the time. The time (in hours:minutes:seconds format) is shown in the upper-right corner and the number of stacks is shown in the lower-left corner. When you have the stacking set the way you want, click the Stack button.
FIG 4.4 Let Lightroom stack your photos based on capture time.
Working with Folders At the most basic level, pictures are image fi les stored on your hard drive. And, although Lightroom never actually modifi es the picture information in those fi les, it has to know where the fi les are located. Thus, when you (for example) see a thumbnail in Grid mode, behind the scenes Lightroom is maintaining a pointer to where the fi le is located in a folder on a hard drive attached to your system. As you can probably guess from this explanation, it would be a problem if you use Windows Explorer or Mac Finder to move the image fi les from their current location to some other location—in a diff erent folder or even on a diff erent hard drive. But you can perform these actions through Lightroom, which keeps everything connected.
Viewing Folders and Images The left pane of the Library module contains a Folders panel ( Figure 4.5 ) that displays any folders containing images you have imported into Lightroom, as
If you expand a stack, then select images that are part of a stack and choose Photos � Stacking � Group into Stack, nothing happens.
09_K52133_CH04.indd 10109_K52133_CH04.indd 101 9/17/2008 2:57:05 PM9/17/2008 2:57:05 PM
Adobe Photoshop Lightroom 2
102
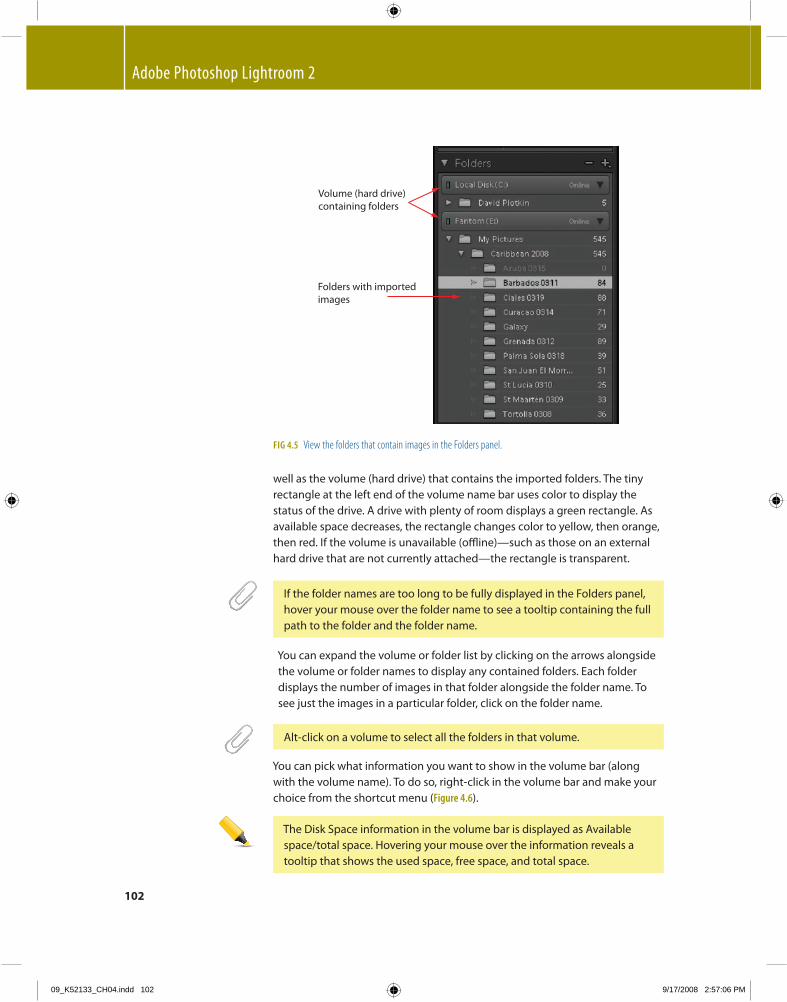
well as the volume (hard drive) that contains the imported folders. The tiny rectangle at the left end of the volume name bar uses color to display the status of the drive. A drive with plenty of room displays a green rectangle. As available space decreases, the rectangle changes color to yellow, then orange, then red. If the volume is unavailable (offl ine)—such as those on an external hard drive that are not currently attached—the rectangle is transparent.
FIG 4.5 View the folders that contain images in the Folders panel.
You can expand the volume or folder list by clicking on the arrows alongside the volume or folder names to display any contained folders. Each folder displays the number of images in that folder alongside the folder name. To see just the images in a particular folder, click on the folder name.
You can pick what information you want to show in the volume bar (along with the volume name). To do so, right-click in the volume bar and make your choice from the shortcut menu ( Figure 4.6 ).
If the folder names are too long to be fully displayed in the Folders panel, hover your mouse over the folder name to see a tooltip containing the full path to the folder and the folder name.
Alt-click on a volume to select all the folders in that volume.
The Disk Space information in the volume bar is displayed as Available space/total space. Hovering your mouse over the information reveals a tooltip that shows the used space, free space, and total space.
Volume (hard drive)containing folders
Folders with importedimages
09_K52133_CH04.indd 10209_K52133_CH04.indd 102 9/17/2008 2:57:06 PM9/17/2008 2:57:06 PM

Organizing Your Photos
103
You can also choose how you want to display the folder name by clicking on the � sign in the Folders panel:
● Folder Name Only . Displays (as you might guess) just the name of the folder.
● Path From Volume . Displays the full path from the volume (hard drive). In other words, it displays the current folder name, preceded by a list of the parent folders for that folder, going all the way back to the hard drive letter. This option only adjusts the displayed name for the topmost folder in a structure, and if you’ve included all the parent folders in the Folders panel, choosing this option doesn’t actually change anything.
● Folder and Path . Displays the name of the folder, followed by a dash and then the path from volume, as described in the previous bullet.
FIG 4.6 Pick the information you want to see about each hard drive volume.
Show and Hide Parent Folders One commonly used workfl ow in Lightroom is to import the contents of individual folders into Lightroom one at a time. If you’re like me, you group your images into folders when you fi rst transfer them to your computer. For example, when I’m shooting exotic locations, I group the images by location. By importing images this way, you can create metadata presets that include specifi c labels, captions, locations, and keywords consistent with those
You won’t be able to see the entire path in the left panel group, even if you set it to its widest setting, so these options aren’t especially useful. However, as mentioned previously, you can hover the mouse over any folder and view a tooltip containing the full path to the folder.
09_K52133_CH04.indd 10309_K52133_CH04.indd 103 9/17/2008 2:57:08 PM9/17/2008 2:57:08 PM

Adobe Photoshop Lightroom 2
104
locations (or however you group your images) and apply the metadata during the import.
However, this may leave you with something of a problem—all the image folders are imported, but the “ parent ” folder—the one that contains these folders and provides a convenient grouping—is missing. It used to be that you had to use some convoluted workarounds to add the parent folder, but no more. To add the parent folder to the Folders panel, simple right-click on one of the folders and choose Show Parent Folder from the shortcut menu. This menu option is not available if the parent folder is already present.
To remove the parent folder, right-click it and select Remove from the shortcut menu. What happens next depends on whether the parent folder is also the top folder in the structure of Lightroom folders. If the parent folder is the top folder, you can choose from the following options in the Confi rm dialog box:
● Promote Subfolders . This button removes the top folder (and any images it contains) from the catalog, although they are not deleted from the hard drive. It leaves the subfolders and their images in the catalog. The subfolders are promoted one level and are still visible in the Folders panel.
● Remove Entire Folder . This button removes the top folder and all the subfolders (and all the images) from the Lightroom catalog, though it does not delete them from the hard drive.
If the parent folder is not the top folder, the Confi rm dialog box simply asks you to confi rm that you are going to remove the folder and all its subfolders from the Lightroom catalog.
Moving Images to Diff erent Folders To move images to a diff erent folder and still have Lightroom know where the images are, you need to perform this task from within Lightroom. If you need to create the folder fi rst, use the following steps:
1. Click the � sign in the Folders panel and choose Add Folder from the drop-down menu to open the Browse For Folder dialog box ( Figure 4.7 ). You can also get to this dialog box if you select Library � New Folder (Ctrl � Shift � N) if no folders are selected (you can click on a Collection to achieve that).
2. Navigate to the drive and folder where you want to create the new folder, and then click the Make New Folder button. A new folder is created called New Folder.
3. Right-click the new folder and choose rename, or click the new folder, pause, then click again. Either technique makes the folder name editable.
4. Type in the new folder name, and press Enter. Then click OK.
While you have the Browse For Folders dialog box open, you can rename an existing folder by using steps 3 and 4 on the folder.
09_K52133_CH04.indd 10409_K52133_CH04.indd 104 9/17/2008 2:57:09 PM9/17/2008 2:57:09 PM

Organizing Your Photos
105
Regardless of where you create the new folder this way, it becomes visible in the Folder panel. To move pictures, you can either click and drag an existing folder into the new folder or select pictures in the Grid view or fi lmstrip and drag those pictures into the folder ( Figure 4.8 ).
FIG 4.7 Use the Browse For Folders dialog box to add folders or rename folders.
The individual folder shortcut (right-click) menu provides some other options for creating and renaming folders:
● Create a nested folder . To create a folder inside (that is, as a subfolder) an existing folder, choose Create Folder inside “ folder name. ” This displays the Create Folder dialog box ( Figure 4.9 ). Type the name of the folder in the Folder fi eld. Then click Create. The new folder shows up in the Folder panel as a subfolder of the originally selected folder ( Figure 4.10 ). If you want to include any selected images, select the Include selected photos check box.
You will get a warning that the move can’t be undone—just click the Move button to proceed in the dialog box. Of course, you can undo it. Simply click and drag the images back to their original folder!
09_K52133_CH04.indd 10509_K52133_CH04.indd 105 9/17/2008 2:57:10 PM9/17/2008 2:57:10 PM

Adobe Photoshop Lightroom 2
106
FIG 4.8 Drag a stack of images into a folder in the Folder panel to relocate the pictures.
FIG 4.9 Create a subfolder to further physically divide up your photos.
You can also create a nested folder by selecting the folder, clicking on the � sign in the Folders panel, and choosing Add Subfolder. Or you can select a folder and then choose Library � New Folder (Ctrl � Shift � N). In the resulting dialog box, fi ll in the Folder name and click Create.
09_K52133_CH04.indd 10609_K52133_CH04.indd 106 9/17/2008 2:57:10 PM9/17/2008 2:57:10 PM

Organizing Your Photos
107
FIG 4.10 The new subfolder shows up in the Folder panel.
● Rename a folder . To rename the folder, choose Rename from the shortcut menu to open the Rename Folder dialog box. Simply type in the new name of the folder and click Save.
● Remove a folder . To remove a folder and all its contents from the Catalog, choose Remove from the shortcut menu. You can also remove a folder by clicking the minus sign in the Folders panel. Click OK in the Confi rm dialog box to complete the removal.
● Move photos to a folder . To move selected photos to a folder, choose Move selected photo to this folder. The images are moved to the target folder and removed from the folder in which they currently reside. However, Lightroom continues to “ know ” where they are, so the images are still available in the catalog. This menu option only appears if you have selected at least one image and then right-click on a diff erent folder.
● Update the folder’s location . If you want to move an entire folder to a new location on your hard drive (or on a diff erent hard drive), choose Update Folder Location from the folder’s shortcut menu. This opens the
How do you know a folder has available subfolders? The little arrowhead just to the left of the folder name shows as a solid shape! Click the arrowhead to display the subfolders; click it again to collapse (hide) the subfolders.
09_K52133_CH04.indd 10709_K52133_CH04.indd 107 9/17/2008 2:57:12 PM9/17/2008 2:57:12 PM

Adobe Photoshop Lightroom 2
108
Browse for Files or Folders dialog box, where you can select the destination folder or create a new folder (click the Make New Folder button) to use as the destination folder. After you click OK, the folder is moved to its new destination—but Lightroom remembers where the images are located.
● Save metadata . If you aren’t saving your metadata automatically (an option you can set in the Metadata tab of the Catalog Settings dialog box), you can save all the metadata changes you have made to the images in a folder by choosing Save Metadata from the shortcut menu.
● Show in Explorer/Finder . Select this option to open Windows Explorer (in Windows) or the Finder (on a Mac) and show the folder—along with all the other folders in the same parent folder.
● Synchronize folder . This option synchronizes the catalog with the contents of the folder using a dialog box to capture the options you want ( Figure 4.11 ). You can choose to do the following: ● Add new images you may have put in the folder from outside of
Lightroom and which are therefore not currently shown in the catalog. If you wish, you can specify whether to show the import dialog box when performing the addition. As you’ll recall, the Import dialog box gives you the opportunity to specify metadata and keywords.
● Remove any photos from the catalog that you deleted from the folder outside of Lightroom. If Lightroom detects missing photos, you can click the Show Missing Photos button to display the previews of the photos that are missing.
● Scan for metadata changes.
FIG 4.11 Synchronize the Catalog with the Folder.
Lightroom only provides those options needed in the Synchronize dialog box. For example, because there are no new photos or missing photos in the folder, those options are unavailable in Figure 4.11 .
09_K52133_CH04.indd 10809_K52133_CH04.indd 108 9/17/2008 2:57:13 PM9/17/2008 2:57:13 PM

Organizing Your Photos
109
● Delete a folder . To delete a folder, select it and press the Delete key. A dialog box appears giving you the option of removing the folder and images from the catalog (click the Remove button) or deleting the folder entirely (click the Delete from Disk button).
Grouping Photos into Collections Lightroom lets you create a “ virtual ” set of pictures called a collection. A collection is set of grouped photos within a catalog. The set is virtual because the collection simply points at the pictures you specify. These pictures can span the entire Lightroom catalog and you don’t have to create duplicates or copies of the pictures (thus wasting hard drive space) in order to group them into various collections. A single picture can be in multiple collections regardless of where it is physically stored. Make as many collections as you want—they take up virtually no space.
There are two types of collections you can create—collections and Smart Collections. Each behaves diff erently and each is useful for diff erent things. You can also create collection sets, a mechanism for grouping collections. Collection sets do not hold images themselves—they just create a bucket for related collections.
Creating and Working with Collections Those who have used previous versions of Lightroom are familiar with collections, as they have been in the product since the beginning. To create a collection, use the following steps:
1. Select the photos you want to be included in the collection. 2. In the left panel group, click the � in the Collections panel and pick Create
Collection from the drop-down menu to open the Create Collection dialog box ( Figure 4.12 ). You can also right-click any item in the Collection section and choose Create Collection from the shortcut menu. Or you can select Library � New Collection (Ctrl � N).
FIG 4.12 Build a new collection in the Create Collection dialog box.
09_K52133_CH04.indd 10909_K52133_CH04.indd 109 9/17/2008 2:57:15 PM9/17/2008 2:57:15 PM

Adobe Photoshop Lightroom 2
110
3. If you want to include the new collection into a collection set, choose the collection set from the Set drop-down list (see Creating and Working with Collection Sets, later in this chapter). If you want the collection to be a “ root ” collection (not included in a collection set), choose None from the Set drop-down list.
4. Select the Include selected photos check box to include the selected photos in the collection when you create it. To populate the collection with all new virtual copies (so you can edit the images independently of the master photo), select the Make new virtual copies check box.
5. Click the Create button. The collection is created and becomes visible in the Collections panel. If the Collection is associated (is a child of ) a collection set, it appears indented under the parent collection set ( Figure 4.13 ).
FIG 4.13 The new collection appears in the Collections panel and is displayed hierarchically.
Collections are useful because there are all sorts of things you can do with the contents of a collection that can’t do with photos in a folder. For one thing, images in a collection have order—and you can change the order by clicking and dragging thumbnails to a new location. As you drag a thumbnail or a set of thumbnails, the new location is highlighted in the grid by a heavy black line ( Figure 4.14 ). Rearranging the images this way makes it easy to get the images in the right order for a slideshow (see Chapter 8) or a Web gallery (see Chapter 9) .
FIG 4.14 Rearranging the images in a collection is handy for setting up a slideshow or Web gallery.
If the images in the collection don’t appear in the order that you specifi ed, make sure the Sort drop-down list (in the toolbar just above the fi lmstrip) is set to User Order. Any other setting (such as Capture Time) will not show the images in the order you specifi ed.
Belongs to thisCollection Set
New Collection
09_K52133_CH04.indd 11009_K52133_CH04.indd 110 9/17/2008 2:57:15 PM9/17/2008 2:57:15 PM

Organizing Your Photos
111
You can add photos to a collection at any time by selecting the images and dragging them to the collection in the Collections panel. These new images appear as the fi rst images in the collection, but again, you can rearrange them. You can also easily add images to a collection that has been designated as a “ Target Collection, ” as described later in this chapter.
Removing an image from a collection is even easier—just select the image(s) and press the Delete key or choose Remove from Collection from the shortcut menu. You can also select Photo � Remove from Collection (Backspace) from the menus.
If you want to know what collections an image belongs to, right-click on the image and choose Show in Collection from the shortcut menu. The fl y-out menu lists all the collections that the image belongs to ( Figure 4.15 ).
FIG 4.15 It’s easy to fi nd out what collections an image belongs to!
Creating a Quick Collection A Quick Collection is a temporary collection. You can use a Quick Collection to assemble a temporary group of photos to work with from within any module. To add photos to a Quick Collection, just move the mouse over a thumbnail
09_K52133_CH04.indd 11109_K52133_CH04.indd 111 9/17/2008 2:57:17 PM9/17/2008 2:57:17 PM

Adobe Photoshop Lightroom 2
112
and click the circle in the upper-right corner of the thumbnail, turning the circle dark ( Figure 4.16 ). Alternatively, you can click the thumbnail and press the B key or select Photo � Add to Quick Collection. The keyboard shortcut is handy because it works in any module—for example, if you are editing an image in the Develop module, simply press the B key to add that image to the Quick Collection. By the way, clicking on the dark circle or pressing the B key again removes the image from the Quick Collection.
FIG 4.16 Click the circle or press the B key to add an image to a Quick Collection.
To view the contents of a Quick Collection, click the Quick Collection line in the Catalog panel.
You can only have one Quick Collection, so it could come in handy to save the contents of a Quick Collection to a named collection. Fortunately, this is easy to do:
1. Choose File � Save Quick Collection, choose Save Quick Collection from the Quick Collection shortcut menu, or press Ctrl � Alt � B.
2. In the Save Quick Collection dialog box ( Figure 4.17 ), type a name into the Collection Name text box.
3. If you select the Clear Quick Collection After Saving check box, it clears the Quick Collection after it has been saved as a Collection. If you don’t, the contents of the Quick Collection remain.
4. Click Save.
Are the photos in your Quick Collection missing? If you click on the Quick Collection line in the Catalog panel and discover you are facing a blank screen that says No photos selected, press Ctrl � L to disable all of the fi lters and the photos will appear.
This image is includedin the Quick Collection This image is NOT included
in the Quick Collection
09_K52133_CH04.indd 11209_K52133_CH04.indd 112 9/17/2008 2:57:18 PM9/17/2008 2:57:18 PM

Organizing Your Photos
113
FIG 4.17 Save a Quick Collection with a name.
FIG 4.18 The Target Collection is displayed with a plus sign.
Save Images Easily to a Target Collection If you were reading the last section on Quick Collections and thought to yourself, “ Wouldn’t this be great to do with any collection? ” you aren’t alone. You can add images to any collection just as you would with a Quick Collection by fi rst designating that collection as a “ Target Collection. ” Once you do that, clicking the circle, pressing the B key, or any of the other techniques for adding images to a Quick Collection now adds the images to the Target Collection. Images in the Target Collection display the dark circle in the upper-right corner.
To designate a collection as the Target Collection, right click the collection in the Collections panel and choose Set as Target Collection. The Collections panel displays a tiny plus sign alongside the image count ( Figure 4.18 ), as did the Quick Collection when it was the default Target Collection. The Set as Target Collection item in the shortcut menu also displays a checkmark. In addition, when you move the mouse over the circle on the image thumbnail, the tooltip reads, “ Add Photo to Target Collection ” instead of “ Add Photo to Quick Collection. ” This tooltip only appears if the image is not already a member of the Target Collection (in which case, the tooltip does not appear).
To clear a Quick Collection, right-click Quick Collection in the Catalog panel and choose Clear Quick Collection or select File � Clear Quick Collection (Ctrl � Shift � B).
09_K52133_CH04.indd 11309_K52133_CH04.indd 113 9/17/2008 2:57:19 PM9/17/2008 2:57:19 PM

Adobe Photoshop Lightroom 2
114
2. Decide whether you want the criteria to match all of the specifi ed rules or any of the specifi ed rules by picking all or any from the Match drop-down list.
3. Pick the fi eld upon which you want to base the fi rst criteria from the leftmost drop-down list. Options include Rating (stars), fl ags, colors, keywords, and many other criteria ( Figure 4.20 ).
Creating and Working with Smart Collections A Smart Collection is a collection of photos that meet the criteria you set. But unlike a “ standard ” collection (discussed previously), you don’t pick out specifi c photos and add them to a Smart Collection. Instead, you build a set of conditions for inclusion in the Smart Collection, Lightroom sifts through your images, and adds those that match the specifi ed conditions. One very neat thing about Smart Collections is that they are dynamic—as you add more images to your catalog, any that meet the Smart Collection criteria are added automatically.
To create a Smart Collection, use the following steps:
1. Click the � symbol in the Collections panel and pick Create Smart Collection from the drop-down menu to open the Create Smart Collection dialog box ( Figure 4.19 ). You can also choose Create Smart Collection from any Collections section shortcut menu or choose Library � New Smart Collection.
FIG 4.19 Build up the matching criteria for including images in a Smart Collection.
If you select a collection and then choose File � Set as Target Collection (Ctrl � Shift � Alt � B), the Target Collection reverts back to the Quick Collection. You get this same result if you reselect the Set as Target Collection option in a Collection shortcut menu to remove the checkmark.
09_K52133_CH04.indd 11409_K52133_CH04.indd 114 9/17/2008 2:57:21 PM9/17/2008 2:57:21 PM

Organizing Your Photos
115
FIG 4.20 Pick the criteria you want from this drop-down list.
4. Pick the comparison criteria from the next drop-down list to the right. The values in this drop-down list vary depending on the criteria you picked in step 3. For example, if you chose Rating, the comparison criteria include greater than, less than, range, is, is not, and other numeric comparisons. However, if you chose Pick Flag, the comparison criteria are limited to is and is not.
5. Pick the comparison value from the list on the right, or, alternatively, type values into this fi eld ( Figure 4.21 ). For certain criteria (such as Rating, Pick Flag, and Label Color), the rightmost fi eld is a list containing the valid values for the criteria (e.g., fl agged, unfl agged, and rejected for the Pick Flag criteria). For the rest of the criteria in the list (except for Aspect Ratio at the bottom), the rightmost fi eld is simply a text box into which you can type the values you want to match (or not match) in some way.
6. To add another criteria to combine with the fi rst, click the small plus sign at the right edge of the dialog box. This adds another row to the dialog box, which you can fi ll as described in steps 3 through 5.
7. Continue adding criteria until fi nished and then click the Create button. If you need to remove one of the criteria, click the minus sign alongside any of the criteria. The minus sign doesn’t appear until you have more than one criterion.
09_K52133_CH04.indd 11509_K52133_CH04.indd 115 9/17/2008 2:57:22 PM9/17/2008 2:57:22 PM

Adobe Photoshop Lightroom 2
116
8. To associate a Smart Collection with a collection set, choose the collection set from the Set drop-down list in the dialog box. Choose None to leave the Smart Collection in the root of the Collections section.
In addition to adding criteria as described, you can also expand a single criterion into multiple criteria with their own comparison rules. An example would probably be helpful here. Take a look at Figure 4.22 . This shows a Smart Collection with the following rules:
1. The pictures are in the “ Barbados ” folder. 2. None of the following are true:
• The Label Color is red. • Camera contains “ Sanyo. ”
3. All of the following are true: • The Rating is greater than or equal to 3 stars. • The Keywords contains “ Galaxy. ”
Each of highest-level criteria (Folder, None of the following are true, and All of the following are true) is combined using the Match drop-down list setting ( “ all, ” in this example). To build a complex Smart Collection like this one, use the following steps:
1. Alt-click the � button (which turns into a # button). This action adds the nested criterion line (this is visible in Figure 4.22 ).
2. Choose the comparison rule from the drop-down list. The options are None of the following are true, All of the following are true, and Any of the following are true.
FIG 4.21 For Label Color, pick a label color from the rightmost fi eld.
09_K52133_CH04.indd 11609_K52133_CH04.indd 116 9/17/2008 2:57:23 PM9/17/2008 2:57:23 PM

Organizing Your Photos
117
3. Continue adding criteria to each line and nesting/expanding the lines as needed.
FIG 4.22 Nest criteria in a Smart Collection to build complex matching rules.
You can adjust the criteria for Smart Collections by choosing Edit from the shortcut menu to open the Edit Smart Collection dialog box. This dialog box looks exactly like the Create Smart Collection dialog box except that it doesn’t include the Set drop-down list—you can’t change the collection set for a Smart Collection when you edit it.
To rename a Smart Collection, choose Rename from the shortcut menu. Type the new name into the Rename Smart Collection dialog box and click OK.
If you’ve gone to a lot of trouble to build a Smart Collection, you can export those settings as a fi le to share with others or even to import into another of your catalogs. To do so, select the Smart Collection and choose Export Smart Collection Settings from the shortcut menu. Type the fi lename into the Save dialog box, and click Save to save the settings as a fi le. To import Smart Collection settings, use the following steps:
1. Select either the Smart Collections collection set or one of the Smart Collections.
2. Right-click and choose Import Smart Collection Settings. 3. Choose the fi le that contains the settings (the fi le you saved using Export
Smart Collection Settings) and click Import.
Although Lightroom provides a ready-built Collection Group called “ Smart Collections, ” you don’t actually have to put your Smart Collections in that group. You can choose any Collection Group or none at all. But it is handy to have all your Smart Collections grouped together (experience is talking here).
09_K52133_CH04.indd 11709_K52133_CH04.indd 117 9/17/2008 2:57:24 PM9/17/2008 2:57:24 PM

Adobe Photoshop Lightroom 2
118
4. The fi le is imported and a new Smart Collection created. If you already have a Smart Collection with that name, Lightroom automatically renames the Smart Collection by adding a sequence number to the name. Of course, you can always rename it.
Creating and Working with Collection Sets A “ collection set ” is a mechanism for grouping collections together. For example, my wife and I went to churches in each of the cities in Mexico that we visited on our Easter cruise. I wanted to create individual collections for the set of pictures I took in each city, but I also wanted to group the collections together so I could see just the church pictures all at once.
FIG 4.23 Create a collection set to group collections with this dialog box.
To create the collection set, click the � symbol in the Collections header and choose Create Collection Set from the menu, or choose Create Collection Set from any Collections section shortcut menu (or the Library menu). This opens the Create Collection Set dialog box ( Figure 4.23 ). Simply fi ll in the name and click Create to create the collection set in the Collections panel. If you want the new collection set to belong to (next within) an existing collection set, pick the name of the collection set from the Set drop-down list.
As mentioned earlier in this chapter (Creating and Working with Collections), you can add a collection to a collection set when you create the collection by selecting the collection set from the Set drop-down list in the Create Collection dialog box. You can also add a collection to a collection set by clicking and dragging the collection to the collection set in the Collections panel. At any time, you can rearrange the hierarchy of the collections by clicking and dragging a collection to a diff erent collection set. When the collection is properly positioned to become the child of a new collection set, the icon turns into a small rectangle ( Figure 4.24 ). If you’d like to change a collection back into a “ root ” collection (not associated with a collection set), you can do that as well. Simply click and drag the collection into an area of the
Clicking on a collection set enables you to view all the images contained in collections that belong to that collection set.
09_K52133_CH04.indd 11809_K52133_CH04.indd 118 9/17/2008 2:57:25 PM9/17/2008 2:57:25 PM

Organizing Your Photos
119
Collections panel that is not within a collection set. A horizontal line shows you where the collection will be located once you release the mouse button.
Renaming and Deleting Collections You can delete a collection or collection set by selecting it and then clicking the � symbol in the Collections panel. However, if you delete a collection set that has collections associated with it, those collections will be deleted as well. You do get a warning dialog box to that eff ect if you try and delete a collection set. You can also delete a collection, Smart Collection, or collection set by right-clicking the collection and choosing Delete from the shortcut menu.
To rename a collection (or collection set), right-click the Collection and choose Rename Collection from the shortcut menu. Fill in the new name in the Rename Collection dialog box ( Figure 4.25 ) and click Rename.
FIG 4.24 Relocating a collection from one collection set to another.
FIG 4.25 Rename a collection or collection set any time you want.
09_K52133_CH04.indd 11909_K52133_CH04.indd 119 9/17/2008 2:57:26 PM9/17/2008 2:57:26 PM

Adobe Photoshop Lightroom 2
120
Importing and Exporting Collections as Catalogs Once you’ve gone to the trouble of defi ning a collection, you can export that collection as a catalog so it can be imported into another copy of Lightroom, as described later in this chapter. To do so, select the collection you want to export and choose Export this Collection as a Catalog from the shortcut menu. Then follow the instructions for exporting catalogs, as discussed later in this chapter.
The Power of Keywords Folders, collections, and the other tools work well, but when it comes to managing a library of thousands of photos you will discover that being able to quickly fi nd the exact photo (or photos) when you need it is a challenge. The key to quickly locating specifi c images is applying keywords (called keyword tags in Lightroom) to your photos. You should have applied some basic keywords when you fi rst imported these photos into Lightroom. For example, when I imported the photos from my Caribbean cruise, I imported the photos taken on each island separately and I included the name of the island in the keywords. To be able to search the catalog eff ectively, you need to take a few minutes to assign more specifi c keywords. Investing the time now will save you hours of searching later.
Keywords are words that describe the important contents of a photo. They help you identify, search for, and fi nd photos in the catalog. Keywords are stored with the image, either in the XMP sidecar fi les (for raw photos) or in the fi le itself. The best news is that after investing the time entering all of your keyword information, other Adobe applications, such as Bridge, Photoshop, or Photoshop Elements, can read this keyword data. There are image viewers and other applications that support XMP metadata that can also read the keywords added by Lightroom, but the only way to be sure is to try them out on your favorite application to see if they read the keywords.
You’ll do most of the heavy lifting (creating keywords, associating photos with them, and so on) from two panels in the right panel group the Keywording panel and the Keyword List panel ( Figure 4.26 ).
Creating and Editing New Keyword Tags The most straightforward way to create a new keyword tag is to click the � symbol in the Keyword List panel in the right panel group. This opens the Create Keyword Tag dialog box ( Figure 4.27 ). Fill in the name in the Keyword Tag fi eld and add any synonyms if you wish. Synonyms (words related to the keyword) are not useful within Lightroom, but can be useful when submitting images for stock photography.
To set the options for the keyword tag, select from the following check boxes:
● Add to selected photos . Adds any photos you selected to the keyword—that is, those photos will be associated with the newly created keyword.
09_K52133_CH04.indd 12009_K52133_CH04.indd 120 9/17/2008 2:57:27 PM9/17/2008 2:57:27 PM

Organizing Your Photos
121
FIG 4.26 The Keywording and Keyword List panels provide the tools to create and associate image with keywords.
FIG 4.27 Create a new keyword tag with the Create Keyword Tag dialog box.
Type keywords toassociate with an imagehere…
…or here
Type in a few charactershere to filter thelist of keywords
09_K52133_CH04.indd 12109_K52133_CH04.indd 121 9/17/2008 2:57:27 PM9/17/2008 2:57:27 PM

Adobe Photoshop Lightroom 2
122
● Put inside “ keyword name ” . Keywords can be nested—one keyword can be a child of another keyword. If you select a keyword before creating a new one, you can make the new keyword a child (subkeyword) of the selected keyword. Otherwise, this check box is not visible.
● Include on export . The keyword will be exported along with the image when export the image from Lightroom—for example, when you create a JPEG for Photoshop Elements.
● Export containing keywords . If this keyword has a parent keyword, selecting this check box exports those keywords with the images associated with the newly created keyword.
● Export synonyms . The synonyms of the keyword will be exported along with the image.
You can also create a keyword tag by right-clicking on an existing keyword tag and picking either Create Keyword Tag or Create Keyword Tag inside “ keyword name. ” This second option creates the new keyword tag as a child (subkeyword) of the selected keyword. This “ nesting ” can be handy for organizing keywords by family, geography, and so on.
If you are going to be adding a whole set of keywords inside of a keyword, choose Put New Keywords Inside this Keyword from the shortcut menu. Until you turn this feature off (by reselecting the option or choosing this option for a diff erent keyword), all new keywords you create in the Keywording panel (as described later in this chapter) are placed inside the selected keyword. This “ target keyword ” is indicated by a small dot to the right of keyword name.
To change the name of a keyword tag, right-click the keyword tag and select Edit Keyword Tag from the shortcut menu or double-click the keyword. Either way, the Edit Keyword Tag dialog box ( Figure 4.28 ) opens, and you can change the name, synonyms, and adjust the check boxes.
To just rename the keyword, choose Rename from the shortcut menu. This makes the keyword name editable in the Keyword List panel, so you can type in the new name and press Enter.
To delete a keyword, select it and click the � sign in the Keyword Tag panel or choose Delete from the shortcut menu.
Keywords you create using the Keyword List are not aff ected by the Put New Keywords Inside his Keyword option. In order to nest keywords you create in the Keywording list, you must use the “ Create Keyword Tag Inside… ” option.
Renaming a keyword does not detach it from any images it is attached to.
09_K52133_CH04.indd 12209_K52133_CH04.indd 122 9/17/2008 2:57:28 PM9/17/2008 2:57:28 PM

Organizing Your Photos
123
If you’re really serious about keeping track of your photos, you are going to create a lot of keywords. Once the list gets to be 30 or more, it can be hard to remember whether you already have created a particular keyword or (perhaps) exactly how you spelled it. To help with that problem, Lightroom provides the Filter Keywords text line just below the top of the Keyword List panel (shown previously in Figure 4.26 ). Simply type a few characters into that line and the Keyword list is fi ltered to show just those keywords that match what you typed. For example, if you can’t remember how you spelled “ Caribbean ” (and who can?), simply type Car into the text line and you’ll see all the diff erent ways you might have done that. Once you’re done with the fi lter, click the “ x ” button at the right end to return to the complete list of keywords.
FIG 4.28 Edit an existing keyword tag using the Edit Keyword Tag dialog box.
Adding Keywords to a Photo Of course, the main purpose to even have keyword tags is to associate images with the keywords so you can locate them later. You can associate photos with keywords using either the Keyword Tags or the Keywording panel and there are quite a few methods to associate the keywords with a photo.
Adding Photos to Keywords with Keyword List There are three ways to add photos to a keyword using the Keyword List panel. The fi rst way involves using click and drag. Just select the photos you want from the grid or the fi lmstrip, then click and drag them to the keyword tag (in the Keyword List panel) you want to associate them with.
However, although this technique works, it can quickly become tiresome to add a lot of keywords to a set of images because of all the clicking and dragging. Instead, you can select the images ahead of time, right-click on a keyword in the Keyword List, and choose Add this Keyword to Selected Photo.
To remove the keyword from the selected photos, choose Remove this Keyword from Selected Photo from the keyword shortcut list.
An even easier way to add keywords to selected images is to hover the mouse over the keyword, which shows a check box near the left margin ( Figure 4.29 ). Simply select the check box and that keyword is associated with the selected images. De-select the check box to remove the keywords from the images.
Adding Photos to Keywords with the Keywording Panel Another method involves using the top section of the Keywording panel. There are actually two ways to add keywords (and create new
09_K52133_CH04.indd 12309_K52133_CH04.indd 123 9/17/2008 2:57:29 PM9/17/2008 2:57:29 PM

Adobe Photoshop Lightroom 2
124
ones) using this panel. The fi rst is to type the keywords into the line labeled “ Click here to add keywords ” (shown previously in Figure 4.26 ). Once you click on this text line, it becomes editable, and you can type in the new keywords. They are added to the image (and to the Keyword tag text box just above the line) when you press Enter.
FIG 4.29 Select this check box to associate a keyword with an image.
The second technique for associating keywords with an image is to select the images and use the following steps:
1. Open the Keywording panel in the right panel group and ensure that Keyword Tags is set to Enter Keywords.
2. Click the cursor inside the text box, changing it from dark to white. 3. Type in the new keyword. If adding more than one keyword, separate each
word with a comma. 4. When you are fi nished, press the Enter key. The keywords will be
rearranged alphabetically and the box will become dark again.
As with the “ Click here to add keywords ” line, typing new keywords into the box will add them to Lightroom.
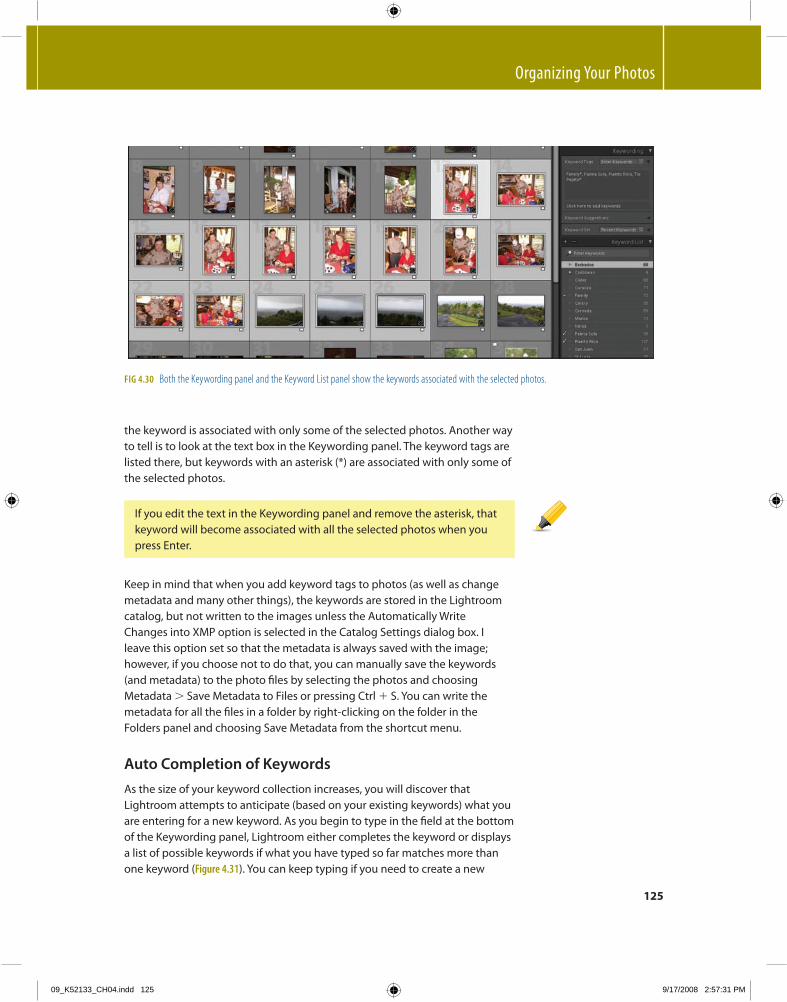
Viewing the Association between Photos and Keywords When a photo has keywords associated with it, it displays a small badge in the lower-right corner of the thumbnail in Grid view. However, this badge isn’t very useful—it doesn’t tell you what the keywords are and clicking it just makes the Keyword Tags text box editable. However, if you look in the Keyword List panel ( Figure 4.30 ), you’ll see a set of marks next to the keywords associated with the selected photos. If the mark is a checkmark, the keyword is associated with all the selected photos. If the mark is a dash (—), it means that
If you type in a new keyword (one that didn’t exist before), Lightroom creates the keyword, adds it to the image, and places it in the Keyword List panel.
09_K52133_CH04.indd 12409_K52133_CH04.indd 124 9/17/2008 2:57:30 PM9/17/2008 2:57:30 PM
Organizing Your Photos
125
the keyword is associated with only some of the selected photos. Another way to tell is to look at the text box in the Keywording panel. The keyword tags are listed there, but keywords with an asterisk (*) are associated with only some of the selected photos.
FIG 4.30 Both the Keywording panel and the Keyword List panel show the keywords associated with the selected photos.
Keep in mind that when you add keyword tags to photos (as well as change metadata and many other things), the keywords are stored in the Lightroom catalog, but not written to the images unless the Automatically Write Changes into XMP option is selected in the Catalog Settings dialog box. I leave this option set so that the metadata is always saved with the image; however, if you choose not to do that, you can manually save the keywords (and metadata) to the photo fi les by selecting the photos and choosing Metadata � Save Metadata to Files or pressing Ctrl � S. You can write the metadata for all the fi les in a folder by right-clicking on the folder in the Folders panel and choosing Save Metadata from the shortcut menu.
Auto Completion of Keywords As the size of your keyword collection increases, you will discover that Lightroom attempts to anticipate (based on your existing keywords) what you are entering for a new keyword. As you begin to type in the fi eld at the bottom of the Keywording panel, Lightroom either completes the keyword or displays a list of possible keywords if what you have typed so far matches more than one keyword ( Figure 4.31 ). You can keep typing if you need to create a new
If you edit the text in the Keywording panel and remove the asterisk, that keyword will become associated with all the selected photos when you press Enter.
09_K52133_CH04.indd 12509_K52133_CH04.indd 125 9/17/2008 2:57:31 PM9/17/2008 2:57:31 PM

Adobe Photoshop Lightroom 2
126
keyword. Auto completion speeds up the process of adding keywords to an image or a set of images; it also ensures that your keywords are all spelled (or misspelled) the same way.
Using Keyword Sets Keyword sets provide a set of keywords that allow you to quickly grab and assign the keywords to photos. Figure 4.32 shows an example of one of the
FIG 4.31 Auto completion of keywords helps you type existing keywords.
FIG 4.32 The Edit Keyword Set dialog box enables you to edit the contents of a keyword set or create a new one.
preset keyword sets that ships with Lightroom 2.0. The limitation of the keyword set is the restriction to only nine keywords. Still, it’s better than nothing. To use the keyword set, select the photo from any view and click a keyword tag from the keyword set in the Keywording panel ( Figure 4.33 ).
To switch between keyword sets, pick the set you want to use from the Keyword Set drop-down list (in the Keywording panel) or choose the set from the Metadata � Keyword Set menu.
09_K52133_CH04.indd 12609_K52133_CH04.indd 126 9/17/2008 2:57:33 PM9/17/2008 2:57:33 PM

Organizing Your Photos
127
In addition to the static keyword sets provided (such as Outdoor Photography), Lightroom provides several dynamic keyword sets. You can pick either a static or a dynamic keyword set from the drop-down list in the Keywording panel. The dynamic keyword sets change (hence the name “ dynamic ” ) as you work. The Recent Keywords set is available in the Keyword Set drop-down list, while the Keyword Suggestions set has its own area in the Keywording panel. The Recent Keywords set presents you the nine most recent keywords you have used. The Suggested Keywords set attempts to guess (based on the current keywords of an image) what other keywords you might want to assign to that image.
To create your own keyword set, choose Metadata � Keyword Set � Edit, or choose Edit Set from the Keyword Set drop-down list. Either option opens the Edit Keyword Set drop-down list, seen previously in Figure 4.27 . The currently selected keyword set will open. You can then modify it by typing new values into the individual cells, and choose Save Current Settings as new preset from the Preset drop-down list. This opens a new dialog box and you can give the set a new name.
FIG 4.33 Choose a keyword from the Keyword Set section of the Keywording panel.
If you click the Change button instead, it saves the current set with the new values.
Pick from this list of“suggested keywords”
Select a keyword setfrom this drop-down list
Click a keyword in thisarea to assign it to theselected photos
09_K52133_CH04.indd 12709_K52133_CH04.indd 127 9/17/2008 2:57:34 PM9/17/2008 2:57:34 PM

Adobe Photoshop Lightroom 2
128
The Keyword Set drop-down list and the Preset drop-down list in the Edit Keyword Set dialog box have several other useful options:
● Save current settings as a new preset . If the set of keywords you can see currently might be useful to you later, you can save them as a new preset by selecting this option. Type in a preset name in the New Preset dialog box and click Create. You can then choose this preset from the Keyword Set drop-down list.
● Delete preset “ preset name ” . If you are using a named preset (rather than a dynamic preset such as Recent Keywords ), you can delete the preset by selecting this menu option.
● Rename preset “ preset name ” . If you are using a named preset, you can rename it by selecting this menu option. Simply type the new name into the Preset Name fi eld in the Rename Preset dialog box and click Rename.
Cleaning Up Your Keyword Lists There are two reasons why you might want to clean up your list of keywords. First, you may discover that you have keywords that you created but never used. These are easy to spot, as the number of photos associated with the keyword tag (visible in the Keyword List panel) is 0 and these keywords are shown dimmed. You can either right-click on the unused keyword tag and select Delete from the menu or choose Metadata � Purge Unused Keywords.
The other reason to clean up keywords is if you misspelled or misused a keyword in some other way. For example, I realized that some of the pictures of me were associated with a keyword David P , whereas others were associated with a keyword David . To clean up an error of this type, use the following steps:
1. Click on the arrow to the right of the keyword (in the Keyword List panel) you want to get rid of to display all the photos that are associated with this keyword. This arrow is only visible if you hover the mouse over the image count in the Keyword List.
2. Click in the list of keywords in the Keywording panel to make the list editable. 3. Type in the keyword that you’ll want to keep and press Enter, thus
associating the keyword with all the images that are also associated with the keyword you are discarding.
4. Right-click on the keyword you want to discard, and select Delete from the menu or click the � symbol in the Keyword Tags panel.
5. Click Delete in the resulting Confi rm dialog box.
If you just want to disassociate all the images associated with a keyword, use the following steps:
1. Click the keyword to display all the images associated with the keyword. 2. Press Ctrl � A to select all the images. 3. Right-click the keyword and choose Remove this keyword from Selected
photo from the menu.
09_K52133_CH04.indd 12809_K52133_CH04.indd 128 9/17/2008 2:57:35 PM9/17/2008 2:57:35 PM

Organizing Your Photos
129
The Power of Metadata “ Metadata ” (at least, in the context of imaging software) refers to the information stored about the image. Your camera will fi ll in many of the fi elds for you, such as the time the picture was taken, camera name, exposure (f-stop and shutter speed), ISO, metering mode, whether the fl ash fi red, and so on. Other fi elds are fi lled in when you import the image into Lightroom using a Metadata preset, as detailed in Chapter 3 .
You can view the metadata in the Metadata panel in the right panel group ( Figure 4.34 ). To display diff erent sets of metadata, make a choice from the drop-down list at the top of the Metadata panel. Various values in the list show All the metadata, the EXIF metadata, the IPTC metadata, and so on.
FIG 4.34 View the photo metadata in the Metadata panel.
Hovering the mouse over a keyword highlights (turns the border white) all the thumbnails (in Grid view) that have that keyword.
Click here and pick avalue (Default, All, EXIF,IPTC, etc.) to choose aset of metadata to view
Click this list and pick avalue to apply a Metadatapreset to the selectedimages
09_K52133_CH04.indd 12909_K52133_CH04.indd 129 9/17/2008 2:57:35 PM9/17/2008 2:57:35 PM

Adobe Photoshop Lightroom 2
130
Adjusting Metadata in the Metadata Panel You can change some of the metadata for selected images using the Metadata panel. To apply a metadata preset, pick the photos and select the preset from the Preset drop-down list. If you need to build a preset fi rst, choose Edit Presets from the list to open the Edit Metadata Presets dialog box ( Figure 4.35 ). From here, fi ll in the values and choose Save current settings as new preset from the Preset drop-down list. Fill in the name of the preset in the New Preset dialog box and click the Create button to create the new preset. From then on, the metadata preset will appear in the Preset drop-down list in the Metadata panel.
FIG 4.35 Build a new metadata preset for future use when importing images or adjusting metadata.
The fi elds in the Metadata panel break down into three types: editable, searchable, and informational. Fields such as the File Name, Rating, Label, Title, and Caption are directly editable—just click in the fi eld and type in a value. This is also true of the fi elds in the Contact, IPTC, Image, Workfl ow, and Copyright sections ( Figure 4.36 ).
Some of the fi elds (such as the Folder fi eld) display a button alongside the fi eld. Clicking this button displays a set of pictures that have the same
Metadata presets built this way are also available for use when importing images into Lightroom.
The EXIF section is not editable, as your camera fi lls it in.
09_K52133_CH04.indd 13009_K52133_CH04.indd 130 9/17/2008 2:57:36 PM9/17/2008 2:57:36 PM

Organizing Your Photos
131
metadata value as the selected image. For example, clicking the Folder fi eld button displays a list of images that reside in the same folder, while clicking the Date Time Original fi eld displays all photos with the same value of date and time. On the other hand, the button alongside the Cropped fi eld button (in the EXIF section) opens the Cropping tool in the Develop module. Other fi elds (such as the E-mail or Website fi elds) have buttons that launch an action—in these cases, sending an email or opening your browser and navigating to the Web site.
Finally, some fi elds just “ are ” —they are informational only. The fi elds in the EXIF section ( Figure 4.37 ) are all informational—you can’t change their values. If you think about it, that makes sense—the ISO speed rating that was used isn’t something that can (or should) be changed.
FIG 4.36 Most of the fi elds in the in the Metadata panel are editable to adjust the metadata associated with an image.
FIG 4.37 Some metadata fi elds simply record information and cannot be changed.
Editing the Capture Time As I travel around the world, I often forget to reset the clock in my camera. Thus, the pictures that I took in London (which is eight hours ahead of my U.S. West Coast home) appear to have been taken at 3 o’clock in the morning! Lightroom provides a way to adjust the capture time of the images. To do so, select the image or images for which you need to make a change, and choose Metadata � Edit Capture Time to open the Edit Capture Time dialog box ( Figure 4.38 ).
There are three options for adjusting the time. Select the one you want to use from the Type of Adjustment section of the dialog box. The fi elds in the New Time section of the dialog box show you both times: the Original Time (the current capture time) and the Corrected Time (what the time will be if you make the correction). The three options are as follows:
● Adjust to a specifi ed date and time . To specify the exact date and time, select each item in the Corrected Time fi eld/drop-down list and type in the
09_K52133_CH04.indd 13109_K52133_CH04.indd 131 9/17/2008 2:57:37 PM9/17/2008 2:57:37 PM

Adobe Photoshop Lightroom 2
132
FIG 4.38 Adjust the capture time of an image using the Edit Capture Time dialog box.
FIG 4.39 Pick the time zone adjustment from the pop-up list.
value. For example, to adjust the month, click the month (fi rst two digits) in the fi eld and type in the number of month (January is 01, February is 02, and so on). If you click the down arrow, you can pick the date from a calendar.
● Shift by set number of hours (time zone adjust) . To adjust the date and time by a set number of hours, choose this option. The dialog box provides an additional fi eld to pick the number of hours to adjust either forward ( � ) or back ( � ) ( Figure 4.39 ). For example, to adjust my London pictures, I would choose � 8 from the list.
● Change to fi le’s creation date . This option adjusts the date and time to when the fi le was created on the computer. This usually isn’t a good option, as you most likely will transfer the fi le to the computer many hours (or even days) after the image was shot.
09_K52133_CH04.indd 13209_K52133_CH04.indd 132 9/17/2008 2:57:38 PM9/17/2008 2:57:38 PM

Organizing Your Photos
133
FIG 4.40 Specify which metadata you want to copy using the Copy Metadata dialog box.
Synchronizing Metadata between Images You may need to copy the metadata from one image to another. For example, you might have taken the trouble to set up the IPTC Copyright and IPTC Creator information correctly on one image and now you want to copy that information to a whole set of images. Lightroom provides several ways to do transfer metadata from one image to another.
The fi rst way to copy metadata is to use the metadata copy and paste functions:
1. Select the image that has the metadata you want to copy to another image. 2. Choose Metadata � Copy Metadata (Ctrl � Shift � Alt � C). This opens the
Copy Metadata dialog box ( Figure 4.40 ).
If you change your mind later about the adjustment, select the image and choose Metadata � Revert Capture Time to Original.
09_K52133_CH04.indd 13309_K52133_CH04.indd 133 9/17/2008 2:57:40 PM9/17/2008 2:57:40 PM

Adobe Photoshop Lightroom 2
134
3. Select the portions of the metadata you want to copy by selecting a “ header ” check box (such as IPTC Copyright) or by selecting the individual check boxes alongside each fi eld.
4. Select the Copy button to place the metadata on the clipboard. 5. Select the images for which you want to change the metadata. 6. Choose Metadata � Paste Metadata (Ctrl � Shift � Alt � V).
The other way to copy metadata from one image to another is to use the Sync Metadata function. Use the following steps:
1. Choose all the images you want to work with, including the source image (the one containing the metadata you want to add to other images).
2. Switch to Survey View (N). 3. Select the source image—it appears with a highlighted border around it
( Figure 4.41 ). 4. Click the Sync Metadata button at the bottom of the right panel group.
This opens the Synchronize Metadata dialog box, which looks just like the Copy Metadata dialog box.
FIG 4.41 Display all the images (including the source image) in Survey view.
In case you haven’t fi gured it out yet, you can type values into empty fi elds and change the contents of existing fi elds. In other words, the Copy function really just starts you out with the metadata associated with a given image—and you can then adjust that metadata any way you’d like.
Notice that the EXIF metadata (which is captured by the camera) is not available for Copy and Paste. Again, this makes sense—information about the exposure, ISO, fl ash, and so on just is what it is.
09_K52133_CH04.indd 13409_K52133_CH04.indd 134 9/17/2008 2:57:41 PM9/17/2008 2:57:41 PM

Organizing Your Photos
135
5. Select the content you want to synchronize and adjust the contents of any of the fi elds, as described previously for the Copy Metadata dialog box.
6. Click the Synchronize button to adjust the metadata of all the other images in the Survey view.
FIG 4.42 Activate and confi gure the Painter tool from the toolbar.
Applying Settings with the Painter Tool That Doesn’t Paint The Painter tool resides in the toolbar below the grid and looks like a can of spray paint. If you can’t see this tool, click the down arrow at the far right end of the toolbar and choose Painter from the list. Oddly enough, the Painter tool doesn’t actually paint the image the way you’d think—instead, this tool enables you to “ paint ” settings (such as keywords and Metadata presets) onto images.
The fi rst step in using this tool is to activate it by either clicking on the tool in the toolbar or choosing Metadata � Enable Painting. When active, the mouse pointer turns into the spray paint can and the toolbar shows an empty circle where the paint can used to be ( Figure 4.42 ).
If you are only working with two images—the source and the target—you can select them both and use Compare view (C). The Select image is used as the source for the metadata, the Candidate image is used for the target.
The spray paint can usedto be here
Click here topick what settings
you want toadd to an image
Configure thesettings here
09_K52133_CH04.indd 13509_K52133_CH04.indd 135 9/17/2008 2:57:42 PM9/17/2008 2:57:42 PM

Adobe Photoshop Lightroom 2
136
To use the Painter tool, pick the type of tool you want to use from the left pop-up list (called out in Figure 4.42 ) and then choose the confi guration settings from the right pop-up list or type values into the right fi eld (depending on the settings). Table 4.1 details what you can do with Painter tool.
TABLE 4.1 Choose and confi gure the Painter tool with these options.
Painter Tool How to Confi gure the Tool
Keywords Type the keywords you want to add to an image into the right fi eld. Autocompletion of the keywords will help you fi ll in existing keywords, but you can also type in new keywords.
Label Pick the color of the label from the color blocks or type a custom value into the fi eld just to the right of color blocks.
Flag Pick a value (Flagged, Unfl agged, Rejected) from the right pop-up list.
Rating Pick a star rating. This works just like choosing a rating in the toolbar.
Metadata Pick the name of a Metadata preset from the pop-up list. You can’t create a new preset using that list; for that, you’ll have to use the techniques described previously in this chapter.
Settings These are Develop module settings for adjusting white balance, exposure, lighting, and so on, as described in Chapters 5 and 6 . Pick the name of the Develop preset that you want to use from the pop-up list.
Rotation Rotates the image. Pick the direction of rotation or fl ip (fl ip horizontal or fl ip vertical) from the pop-up list.
Target Collection Adds the image to the Target Collection.
Finding Your Images Of course, the main reason to go to all the trouble of adding keywords, adjusting metadata, editing the capture time, fl agging and rating your images, and so on is so that you can easily fi nd the images you are looking for later. Lightroom provides powerful tools for using this information to do just that.
As discussed in Chapter 3 , you can fi lter the images by rating, color label, and more by clicking the Attribute button in the Library Filter bar at the top of the screen or the Filter strip above the fi lmstrip.
09_K52133_CH04.indd 13609_K52133_CH04.indd 136 9/17/2008 2:57:43 PM9/17/2008 2:57:43 PM
Organizing Your Photos
137
FIG 4.43 Use the search engine to fi nd the photos by up to four diff erent criteria.
Keyword Searching The quickest and easiest way to fi nd images with a certain keyword is to click the tiny right-facing arrow for that keyword in the Keyword List panel. This opens the Metadata fi lter (discussed in the next section), selects the appropriate keyword in the Keyword column, and displays all the images associated with that keyword.
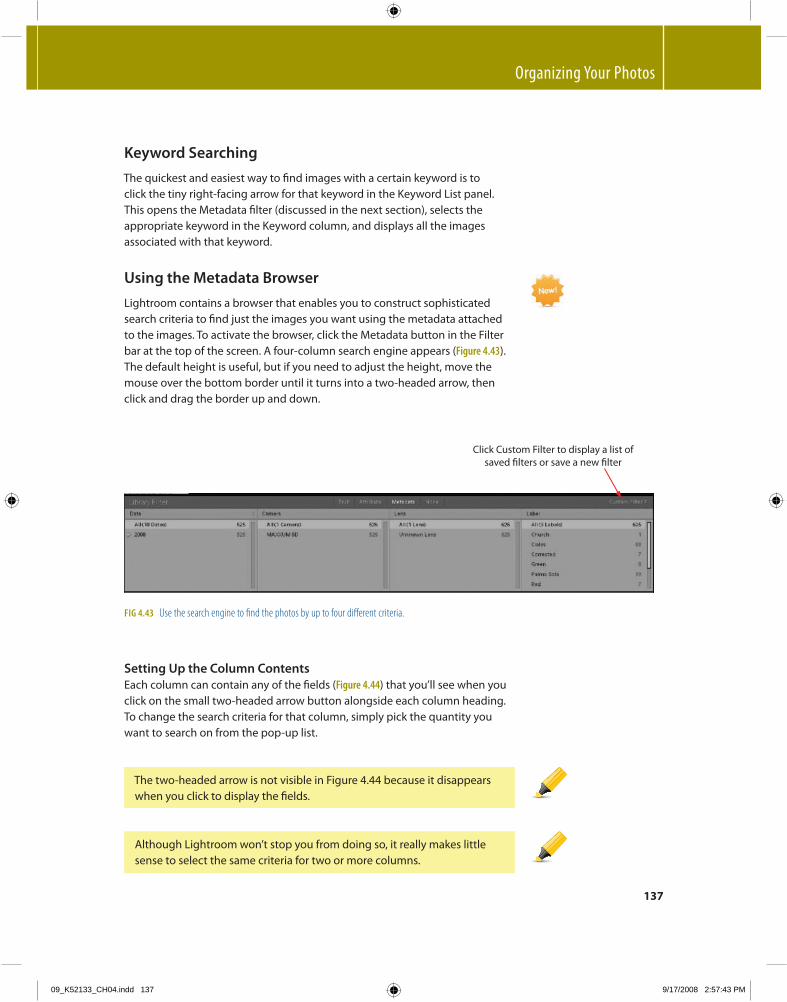
Using the Metadata Browser Lightroom contains a browser that enables you to construct sophisticated search criteria to fi nd just the images you want using the metadata attached to the images. To activate the browser, click the Metadata button in the Filter bar at the top of the screen. A four-column search engine appears ( Figure 4.43 ). The default height is useful, but if you need to adjust the height, move the mouse over the bottom border until it turns into a two-headed arrow, then click and drag the border up and down.
Setting Up the Column Contents Each column can contain any of the fi elds ( Figure 4.44 ) that you’ll see when you click on the small two-headed arrow button alongside each column heading. To change the search criteria for that column, simply pick the quantity you want to search on from the pop-up list.
The two-headed arrow is not visible in Figure 4.44 because it disappears when you click to display the fi elds.
Although Lightroom won’t stop you from doing so, it really makes little sense to select the same criteria for two or more columns.
Click Custom Filter to display a list ofsaved filters or save a new filter
09_K52133_CH04.indd 13709_K52133_CH04.indd 137 9/17/2008 2:57:43 PM9/17/2008 2:57:43 PM

Adobe Photoshop Lightroom 2
138
FIG 4.44 Pick search criteria from the pop-up list at the top of each column.
FIG 4.45 Expand the Date (Hierarchical) fi lter criteria to pinpoint images shot during the specifi ed year, month, or day.
Three of the fi elds are “ hierarchical. ” That is, there is a structure to the values contained in the fi eld. For example, the date hierarchy is year, month, date. The other two fi elds are Keywords (which can be nested) and Location. If you pick one of these fi elds, the drop-down list that appears when you click the List icon in the upper-right corner includes the options “ Flat ” and “ Hierarchical. ” “ Flat ” displays all the valid values for that fi eld. For example, if you pick Keyword, the column will display a list of all available keywords (as shown previously in Figure 4.44 ). If you pick “ Hierarchical, ” you will see the structure of the fi eld and you can click on a hierarchy level, expanding the hierarchy by one level. For example, if you pick Date, it enables you to pick a year or month or day, expanding the hierarchy as you go ( Figure 4.45 ). Clicking on a year, month, or day shows the images shot during that time period, which is especially useful for large collections of images that have been built up over time. As with other fi lter criteria, you can Ctrl � click multiple years, months, or days to show those images.
Picking the Values to Search For Now comes the fun part. You work with the search engine from left to right. That is, when you pick a matching value from the leftmost column, the other
For “ normal ” (nonhierarchical) fi elds, the Flat/Hierarchical options are not available, and the column shows all the available values for that fi eld.
09_K52133_CH04.indd 13809_K52133_CH04.indd 138 9/17/2008 2:57:45 PM9/17/2008 2:57:45 PM

Organizing Your Photos
139
FIG 4.46 Pick a range of dates in the search engine.
three columns change to show just the valid values within the image set that matches the fi rst column. In our example, if the fi rst column contains Date and you pick a date from that column, the other three columns adjust to show the camera, country, and keywords for the images taken on that date. If you then pick a value from the second column, the two rightmost columns adjust to show the values that correspond to the images that match both the criteria in the fi rst column (Date, in our example) and the criteria in the second column (Camera, in our example). You can work through all four columns this way; at the end, the visible photos match the criteria in all four of the columns.
You can choose multiple criteria within a given column by choosing the fi rst value, then Ctrl-clicking additional values. This technique chooses photos that match the fi rst value in the column or the second value in the column (or the third value, etc.). You can also click the fi rst value in the column, then Shift-click the next value, selecting the entire range of values. So, for example, you could pick photos taken over a range of dates by clicking on the fi rst date then Shift-clicking on the end date for the range ( Figure 4.46 ).
Adding and Removing Columns in the Metadata Browser If you fi nd that the default four columns aren’t enough to fi lter your images, you can add columns by clicking the list symbol in the upper-right corner of any existing column and selecting the Add column option from the drop-down menu. This adds a new column to the right of the column you clicked on. You can remove a column by clicking the Remove this column option in the list for the column.
You can also save a set of columns and the search criteria selected within the columns. Once you’ve confi gured the fi lter criteria (columns and values), click Custom Filter in the upper-right corner of the Metadata Browser and pick Save current settings as New Preset. Fill in the name of the new preset and click Create. The new preset is added to the list so you can pick it later.
The Custom Filter list contains presets for all of the Library fi lters (Text, Attribute, and Metadata). Picking a preset that applies to a fi lter that is not the currently selected fi lter automatically opens that fi lter. You may want to build the name of the fi lter into the preset name to give yourself a hint as to which fi lter the preset applies to.
Filter Using a Text Search The text fi eld that appears when you click the Text button in the Filter bar enables you to search for your photos based on almost any text fi eld including
09_K52133_CH04.indd 13909_K52133_CH04.indd 139 9/17/2008 2:57:47 PM9/17/2008 2:57:47 PM

Adobe Photoshop Lightroom 2
140
One very handy use of the Text search tool is to fi nd images that are missing important information—such as images that have no keywords. To detect images like that, select the fi eld you are interested in and choose the comparison Are Empty or Is Empty . Only images missing that information are shown, and you can use the right panel group panels to add the information you need. As you do, the image will disappear from the Grid until they are all gone—and you’re done.
FIG 4.47 Pick a fi eld to search on from the Text search tool.
keywords and various fl avors of metadata. To execute a text search, use the following steps:
1. Click the leftmost fi eld in the Text search strip to display the list of text-searchable fi elds ( Figure 4.47 ). The metadata categories Searchable EXIF and Searchable IPTC search through any of the fi elds in those sections of the Metadata panel. The Searchable Metadata entry searches through all the text fi elds in the metadata.
2. Click on the center (comparison) fi eld and choose the comparison term from the list.
3. Except for the comparison criteria that contain “ Empty ” (Is Empty, Are Empty, Isn’t Empty, Aren’t Empty), type the comparison text into the rightmost fi eld. As you type the text, Lightroom dynamically chooses the images that match what you have typed. For example, if you select Keywords and Contains any , and type Puerto into the fi eld, Lightroom fi nds all the images from Puerto Vallarte and Puerto Rico (and any other keywords that contain Puerto ). Note: The above assumes that you, like me, create Keyword tags containing the city or state name.
4. When you are done viewing the images, click the Text button to turn off the text fi lter and return to viewing all the image.
Locating Wayward Images I warned you earlier in this chapter about deleting or moving images using Explorer (Windows) or Finder (Mac). The problem is that Lightroom won’t know where the images are and thus won’t allow you to work with them. If you ignore my advice (either accidentally or on purpose), Lightroom will warn you that it can’t fi nd the images by placing a badge in the upper-right corner ( Figure 4.48 ).
09_K52133_CH04.indd 14009_K52133_CH04.indd 140 9/17/2008 2:57:48 PM9/17/2008 2:57:48 PM

Organizing Your Photos
141
FIG 4.48 Oops. File not found!
To correct this situation, click the badge to open the Confi rm dialog box ( Figure 4.49 ). The dialog box enables you to locate the fi le by clicking on the Locate button. When you do, the Locate dialog box opens. This is a standard fi le dialog box, which you can use to navigate to the folder holding the image and select it. Then click Select.
FIG 4.49 Click the Locate button to point Lightroom to the image it can’t fi nd.
If multiple images are missing, you’ll want to select the Find Nearby Missing Photo check box. When you locate the fi rst missing photo, Lightroom will check to see if the rest of the missing photos are in the same directory. If they are, the catalog will be updated for the location of all of them—saving you the trouble of performing this job manually.
Of course, if you actually deleted the image, you’ll simply have to remove the thumbnail from Lightroom by right-clicking the image and choosing Delete Photo from the shortcut menu. And don’t forget that you can synchronize an entire folder to get rid of missing images.
09_K52133_CH04.indd 14109_K52133_CH04.indd 141 9/17/2008 2:57:48 PM9/17/2008 2:57:48 PM

Adobe Photoshop Lightroom 2
142
FIG 4.50 Specify the name of the exported catalog in the Export as Catalog dialog box.
Exporting and Importing Catalogs If you’re like me, you have a master Lightroom catalog of images (backed up, of course) on your home computer. But when you’re out on the road, taking photos of exotic locales, you may be creating catalogs in Lightroom, tagging, fl agging, rating your photos, and perhaps making adjustments at the end of the day on your laptop computer. When you return home, you don’t want to lose all that work you’ve done and fortunately you don’t have to. You can export a catalog (with all its images and changes) from one computer and import them into a catalog on another—and never lose any of your hard work. Here is how you go about that.
Although some settings—like stacks and collections—are stored in the catalog, most of what I do on the road is stored either in the fi le itself (for fi les like JPEG) or in the sidecar fi le (the .xmp fi le that goes along with raw-format photos). These changes include all the Develop module adjustments, including cropping, adjusting white balance, exposure, lighting, clarity, and vibrance. In addition, the keywords and metadata are also stored with the photos. Thus, if what you want to preserve is just the adjustments, keywords, and metadata that you applied on the other computer, you don’t actually need to go to the trouble of exporting a catalog and then reimporting it on another machine. Instead, just copy the fi les (and sidecar fi les, if any) from one computer to the other. Then, open Lightroom on the target computer and simply reimport the fi les themselves (File � Import Photos from Disk). All your changes, keywords, and metadata will be intact!
Exporting a Catalog To export a catalog, the fi rst step is to fi lter the photos to show only those you want to export. You can do this by choosing a folder or collection or applying criteria from the Library fi lter. Choose File � Export as Catalog to open the (you guessed it) Export as Catalog dialog box ( Figure 4.50 ).
Fill in the name of the exported catalog in the File name fi eld. This name is used as the name of the folder where all the contents of the catalog are stored.
09_K52133_CH04.indd 14209_K52133_CH04.indd 142 9/17/2008 2:57:50 PM9/17/2008 2:57:50 PM

Organizing Your Photos
143
If you are going to move the catalog (and images) to another computer, leave both the Export negative fi les check box and Include available previews check box selected.
FIG 4.51 Find the catalog that you want to import in the Import from Lightroom Catalog dialog box.
If you only want to export the selected photos, select the Export selected photos only check box. If you leave it unselected, all the visible fi les will be exported. Finally, click Save to start the export process.
You can also export the following items as new catalogs:
● Collections . Select the collection (either a regular collection or a Smart Collection) and choose Export this Collection as a Catalog from the shortcut menu.
● Folders . Select the folder and choose Export this Folder as a Catalog from the shortcut menu.
● Keywords . To export all photos associated with a keyword, right-click the keyword in the Keyword list panel and choose Export these Photos as a Catalog from the shortcut menu.
Importing a Catalog To import a catalog and merge it with an existing catalog, open the catalog you want to merge the photos into in Lightroom. Then use the following steps:
1. Choose File � Import from Catalog to open the Import from Lightroom Catalog dialog box ( Figure 4.51 ).
If you are going to import the catalog into an existing catalog on the same machine, you don’t need to select these two check boxes.
09_K52133_CH04.indd 14309_K52133_CH04.indd 143 9/17/2008 2:57:51 PM9/17/2008 2:57:51 PM

Adobe Photoshop Lightroom 2
144
2. Navigate to the catalog you want to import (ending in .lrcat) and click Choose. This opens the Import from Catalog “ catalog name ” dialog box ( Figure 4.52 ).
FIG 4.52 Select the catalog images to import from the Import dialog box. This is the version you’ll see if all the images are new to the catalog.
Don’t get upset if you only see your new photos in the catalog. The default setting for Lightroom is to show you only the results of your previous import—exactly the images you just imported. To see all the images in the catalog, click All Photographs in the Catalog panel on the left side of the screen.
3. Select the images you want to import. If you don’t see the previews, select the Show Preview check box.
4. Adjust the settings in the Import dialog box as described in the next section, and click Import to add the photos to the current catalog.
09_K52133_CH04.indd 14409_K52133_CH04.indd 144 9/17/2008 2:57:52 PM9/17/2008 2:57:52 PM

Organizing Your Photos
145
Adjusting Import Settings for New Images You can set the fi le handling controls for new photos in the New Photos section of the Import from Catalog dialog box. Choose whether to import the images at their current location or to copy them to a new location. If you choose to copy them to a new location, the Copy to control appears ( Figure 4.53 ). Click the Choose button to specify the target folder to copy the photos to.
FIG 4.53 Use the new controls to copy images to a new location.
Adjusting Import Settings for Existing Images You can adjust what will be imported for images that already exist in the target catalog using the controls in the Existing Photos section of the Import from Catalog “ Catalog Name ” dialog box ( Figure 4.54 ). These options are only available if duplicates are detected.
Of course, if the photos are on a USB drive or CD/DVD, you’ll defi nitely want to copy them to a new location on your hard drive—and that is the only option you are off ered.
Choose to copyimages to newlocation or leavethem where theyare
Click to specifythe new imagelocation
09_K52133_CH04.indd 14509_K52133_CH04.indd 145 9/17/2008 2:57:54 PM9/17/2008 2:57:54 PM

Adobe Photoshop Lightroom 2
146
The fi rst thing you need to decide is what to replace in the target catalog. You can select from a combination of choices in the Replace drop-down list:
● Metadata, develop settings, and negative fi les . Replaces metadata values, Develop module settings and the image fi les from the source (imported) catalog. If the source catalog settings are diff erent from the target catalog settings, the target values will be overwritten unless you choose to preserve those settings as a virtual copy (discussed later).
● Metadata and develop settings only . Replaces metadata values and Develop module settings only. This option does not replace the image fi le itself. In truth, because Lightroom doesn’t make any changes to the negative (image) fi le, this is the best setting to use if you’re just working with fi les that have been modifi ed in Lightroom.
● Nothing . Nothing is replaced. The import proceeds, but only new photos are imported. Photos that are diff erent in the source catalog are not imported into the target catalog.
If you have made changes in the original catalog and are reimporting images with new Develop settings or metadata, you have the option to preserve those settings as a “ virtual copy. ” To do so, select the Preserve old settings as a virtual copy check box. Essentially, this means that you’ll appear to have two copies of the image in your Lightroom catalog ( Figure 4.55 ). What you actually have is one copy of the negative fi le itself and two sets of non-destructive changes. You can then proceed to modify each virtual copy independently, changing the metadata and Develop settings, as well as the keywords and everything else.
FIG 4.54 Adjust the parameters for what Lightroom will do with existing images.
Indicates that there-imported imageis identical to theversion in theLightroom catalogand will notbe imported(dimmed)
Indicates that thisimage exists in the current catalog,but is differentfrom the catalogyou’ll be importing(badge)
09_K52133_CH04.indd 14609_K52133_CH04.indd 146 9/17/2008 2:57:58 PM9/17/2008 2:57:58 PM

Organizing Your Photos
147
FIG 4.55 When you preserve your original settings as a copy, you’ll see two versions of your image.
Lightroom provides some additional information to help you sort out the imported results:
● Indicator of a virtual copy . The virtual copy displays a “ folded page ” icon in the lower-left corner to let you know that it was the original, preserved when you imported a new version.
● Number of copies . If there is more than one copy of the image in the catalog, a number appears in the upper-left corner of the most current version to tell you how many copies there are.
If you hover your mouse pointer over either a virtual copy or the most recent version, you’ll see a counter ( Figure 4.56 ). The counter numbers are from 1 (the most recent version) to n, where n is the number of copies. The sets of thumbnails are displayed in a dark gray with a small set of lines in either the left margin (the fi rst thumbnail) or the right margin (the last thumbnail).
FIG 4.56 Hover your mouse pointer over a thumbnail to see a counter of the number of versions of an imported image.
The multiple-version images have dark gray borders, compared to the light gray borders of “ normal ” (nonmultiple) images.
This number indicateshow many copies of theimage are in the catalog
Lines indicate thefirst thumbnail inthe set
Indicates that this is theoriginal settings preservedas a virtual copy (folded page)
Lines indicatethe lastthumbnailin the set This is a “matched pair” of
the original and the copy
09_K52133_CH04.indd 14709_K52133_CH04.indd 147 9/17/2008 2:57:59 PM9/17/2008 2:57:59 PM

Adobe Photoshop Lightroom 2
148
If you chose to replace the negative fi les in the target catalog, you can limit this option to replacing just the nonraw fi les. To do so, select the Replace nonraw fi les only (TIFF, PSD, JPEG). As stated earlier, you only need to replace the negative fi les if you made changes to the original in an external editor. This is really only possible with nonraw fi les, so it makes sense to select this option and speed up the import by replacing only those fi les.
Performing Catalog Maintenance Specifi c photo information (metadata, keywords, and Develop module adjustments) is stored with the photo itself (either in the fi le or as a sidecar fi le). However, a great deal of the information that makes Lightroom so powerful is stored in a catalog fi le and is therefore quite important. For example, this fi le contains information about how photos are grouped into collections; defi nitions of Smart Collections, Slideshow, Web, and Print module settings; user-defi ned presets and templates; preferences; and much more.
On occasion, the catalog fi le can become corrupted, resulting in strange behavior (such as not being able to fi nd images that you know exist). You can often recover the information from a corrupted fi le and rebuild it using the tools in Lightroom. And it is obviously important to back up the fi le from time to time.
Creating New Catalogs Lightroom would obviously be limited if you could have only a single catalog. Fortunately, however, you can create new catalogs and work with them—though only one at a time. To create a new catalog, use the following steps:
1. Choose File � New Catalog to open the Create Folder with New Catalog dialog box ( Figure 4.57 ).
FIG 4.57 Specify the folder that will contain the new catalog in the dialog box.
09_K52133_CH04.indd 14809_K52133_CH04.indd 148 9/17/2008 2:58:01 PM9/17/2008 2:58:01 PM

Organizing Your Photos
149
2. Type the name of the folder that will contain the new catalog and all its support fi les into the File name fi eld in the dialog box.
3. Click Save. 4. Lightroom closes and then relaunches using the New Catalog. This is because
Lightroom must shut down and relaunch each time you change catalogs.
Opening a New Catalog Of course, if you have multiple catalogs, you need a way to switch between them. Lightroom provides two menu options in the File menu to perform this task. The simplest is to choose File � Open Recent and then pick a catalog from the fl y-out menu.
To pick a catalog that doesn’t appear in the File � Open Recent menu, choose File � Open Catalog to open the File Open Catalog dialog box. Use the standard controls to navigate to the location of the catalog you want to open, and select it (catalog fi les end in .lrcat). Then click Open. Lightroom presents the Open Catalog dialog box ( Figure 4.58 ), which warns you that it will relaunch to open the selected catalog. Click Relaunch to relaunch Lightroom and switch to the selected catalog.
FIG 4.58 Relaunch Lightroom to open a new catalog.
Backing Up and Testing the Integrity of a Catalog File As mentioned earlier, catalog fi les contain considerable useful information and are worth backing up. To back up and (optionally) test the integrity of a catalog fi le, you must use the Back Up Catalog dialog box ( Figure 4.59 ), which appears periodically when you launch Lightroom.
FIG 4.59 Back up and test the integrity of your catalog when you launch Lightroom.
09_K52133_CH04.indd 14909_K52133_CH04.indd 149 9/17/2008 2:58:02 PM9/17/2008 2:58:02 PM

Adobe Photoshop Lightroom 2
150
The dialog box provides the following options:
● Choose the location of the back-up fi le . You can put the back-up fi le anywhere you want by clicking the Choose button and navigating to the folder using the resulting Browse For Folder dialog box. However, the default location (in My Pictures\Catalog Name\Backups) is as good a place as any.
● Test integrity of this catalog . Select this check box if you want Lightroom to ensure that the fi le has not gotten corrupted. This takes longer but is advisable to do at least occasionally as the fi les do become corrupted and it does you no good to back up a corrupted fi le! Just be aware that this can take a while.
● Skip now . If you don’t want to back up the fi le when the dialog box appears, just click the Skip Now button.
● Back up . Writes out the back-up fi le to the chosen location, testing its integrity if you selected the appropriate check box.
● Exit . Aborts opening Lightroom altogether and does not back up anything.
One of the most asked questions about backing up is what controls when the Back Up Catalog dialog box appears. As it turns out, the frequency of its appearance is under your control, but this is not immediately obvious. To adjust the frequency, you need to use the Catalog Settings dialog box, which you can access by choosing Edit � Catalog Settings (or Ctrl � Alt � ,) and switching to the General tab ( Figure 4.60 ).
FIG 4.60 Use the Back-up section of the Catalog Settings dialog box to set back-up frequency.
09_K52133_CH04.indd 15009_K52133_CH04.indd 150 9/17/2008 2:58:03 PM9/17/2008 2:58:03 PM
Organizing Your Photos
151
Set the frequency by choosing the value you want from the Back up Catalog drop-down list. There are a variety of frequency values, such as once a week or upon starting Lightroom (which happens to be the default). One value is worthy of special mention—Next time Lightroom starts only. Pick this value if you feel the need to back up your catalog without waiting for the next time the Back Up Catalog dialog box appears. After choosing this value, shut Lightroom down and restart it, and the dialog box is presented during start-up so you can do the back-up. After that one-time launch, the value becomes Never, so don’t forget to go in and adjust it if you want to be reminded to back up your catalog periodically.
Optimizing a Catalog As you make changes to your Lightroom catalog—adding and removing collections, building and discarding presets, and so on, the catalog fi le can grow large and ineffi cient. You can “ optimize ” the catalog fi le, which removes unneeded portions and shrinks the overall size, making it faster to load and use. To optimize the catalog, return once again to the General tab of the Catalog Settings dialog box and click the Relaunch and Optimize button. Lightroom closes and begins the process of optimizing the catalog. Once it is done, Lightroom reopens. Opening the optimized catalog the fi rst time takes a little longer than usual because it has to reload the entire catalog and rebuild various fi les.
So what do you do with a back-up? If you manage to corrupt your main catalog and can no longer use it (something I’ve never actually had happen with the released product but that has happened with the beta), you can use the back-up catalog fi le. Simply close Lightroom, fi nd the back-up fi le (.lrcat) you made, and copy it over the corrupted original. If the fi le still won’t open in Lightroom, you may have to delete the “ Catalog name ” Previews.lrdata folder. Opening the catalog should then work, but Lightroom will have to rebuild all the previews, which can take a while. Still, it’s better than having to build your catalog from scratch.
09_K52133_CH04.indd 15109_K52133_CH04.indd 151 9/17/2008 2:58:04 PM9/17/2008 2:58:04 PM

09_K52133_CH04.indd 15209_K52133_CH04.indd 152 9/17/2008 2:58:04 PM9/17/2008 2:58:04 PM