Operation Manual - Brother · 2015. 9. 1. · Operation Manual Embroidery Machine Product...
44
Operation Manual Embroidery Machine Product Code:882-T51 Be sure to read this document before using the machine. We recommend that you keep this document nearby for future reference.
Transcript of Operation Manual - Brother · 2015. 9. 1. · Operation Manual Embroidery Machine Product...

Operation ManualEmbroidery MachineProduct Code:882-T51
Be sure to read this document before using the machine.We recommend that you keep this document nearby for future reference.

Trademarks
IMPORTANT:READ BEFORE DOWNLOADING, COPYING, INSTALLING OR USING.By downloading, copying, installing or using the software you agree to this license. If you do not agree to this license, do not download, install, copy or use the software.Intel License Agreement For Open Source Computer Vision LibraryCopyright © 2000, Intel Corporation, all rights reserved. Third party copyrights are property of their respective owners.
Redistribution and use in source and binary forms, with or without modification, are permitted provided that the following conditions are met:• Redistribution’s of source code must retain the above copyright notice, this list of conditions and the following
disclaimer.• Redistribution’s in binary form must reproduce the above copyright notice, this list of conditions and the
following disclaimer in the documentation and/or other materials provided with the distribution.• The name of Intel Corporation may not be used to endorse or promote products derived from this software
without specific prior written permission.This software is provided by the copyright holders and contributors “as is” and any express or implied warranties, including, but not limited to, the implied warranties of merchantability and fitness for a particular purpose are disclaimed. In no event shall Intel or contributors be liable for any direct, indirect, incidental, special, exemplary, or consequential damages (including, but not limited to, procurement of substitute goods or services; loss of use, data, or profits; or business interruption) however caused and on any theory of liability, whether in contract, strict liability, or tort (including negligence or otherwise) arising in any way out of the use of this software, even if advised of the possibility of such damage.
All information provided related to future Intel products and plans is preliminary and subject to change at any time, without notice.
SD is a registered trademark or a trademark of SD-3C, LLC.CompactFlash is a registered trademark or a trademark of Sandisk Corporation.Memory Stick is a registered trademark or a trademark of Sony Corporation.SmartMedia is a registered trademark or a trademark of Toshiba Corporation.MultiMediaCard (MMC) is a registered trademark or a trademark of Infineon Technologies AG.xD-Picture Card is a registered trademark or a trademark of Fuji Photo Film Co. Ltd.IBM is a registered trademark or a trademark of International Business Machines Corporation.Microsoft, Windows and Windows Vista are registered trademarks or trademarks of Microsoft Corporation.
Each company whose software title is mentioned in this manual has a Software License Agreement specific to its proprietary programs.
All other brands and product names mentioned in this manual are registered trademarks of their respective companies. However, the explanations for markings such as ® and ™ are not clearly described within the text.

1
Thank you for purchasing this embroidery machine. Before using this machine, carefully read the “IMPORTANT SAFETY INSTRUCTIONS”, and then study this manual for the correct operation of the various functions.In addition, after you have finished reading this manual, store it where it can quickly be accessed for future reference.
Please read these safety instructions before attempting to use the machine.
DANGER - To reduce the risk of electric shock:
1Always unplug the machine from the electrical outlet immediately after using, when cleaning, when making any
user servicing adjustments mentioned in this manual, or if you are leaving the machine unattended.
WARNING - To reduce the risk of burns, fire, electric shock, or injury to persons:
2Always unplug the machine from the electrical outlet when lubricating it or when making any other user
servicing adjustments mentioned in the operation manual.
• To unplug the machine, switch the machine to the symbol “O” position to turn it off, then grasp the plug and pull it out of the electrical outlet. Do not pull on the cord.
• Plug the machine directly into the electrical outlet. Do not use an extension cord.• Always unplug your machine if the power is cut.
3 Electrical Hazards:
• This machine should be connected to an AC power source within the range indicated on the rating label. Do not connect it to a DC power source or inverter. If you are not sure what kind of power source you have, contact a qualified electrician.
• This machine is approved for use in the country of purchase only.
4Never operate this machine if it has a damaged cord or plug, if it is not working properly, if it has been dropped
or damaged, or water is spilled on the unit. Return the machine to the nearest authorized Brother dealer or service center for examination, repair, electrical or mechanical adjustment.
• To avoid electric shock or fire; do not use a damaged power supply plug or loose electrical outlet, and ensure that the power supply plug is fully inserted and secure.
• While the machine is stored or in use if you notice anything unusual, such as an odor, heat, discoloration or deformation, stop using the machine immediately and unplug the power cord.
• When transporting the machine, be sure to lift it from the bottom positions. Lifting the machine by any other part may damage the machine or result in the machine falling, which could cause injuries.
• When lifting the machine, be careful not to make any sudden or careless movements, otherwise you may injure your back or knees.
• While the machine is being transported, be careful not to touch the operation panel, thread guides or any other part, otherwise injuries may result.
Introduction
IMPORTANT SAFETY INSTRUCTIONS

2
5Always keep your work area clear:
• Never operate the machine with any air openings blocked. Keep ventilation openings of the machine free from the build up of lint, dust, and loose cloth.
• Do not use extension cords. Plug the machine directly into the electrical outlet.• Never drop or insert any object into any opening.• Keep fingers out of all machine openings, such as near the carriage, otherwise injuries may result.• Do not operate where aerosol (spray) products are being used or where oxygen is being administered. • Do not use the machine near a heat source, such as a stove or iron; otherwise, the machine, power cord or
garment being embroidered may ignite, resulting in fire or an electric shock.• Do not use this machine near an open flame; the movement of the embroidery frame could cause the garment
being embroidered to catch fire.• Do not place this machine on an unstable surface, such as an unsteady or slanted table, otherwise the machine
may fall, resulting in injuries.
6 Special care is required when embroidering:
• Always pay close attention to the needle. Do not use bent or damaged needles.• Keep fingers away from all moving parts. Special care is required around the machine needle.• While the machine is in operation, keep your hands away from all the moving parts, otherwise injuries may
result.• Switch the machine to the symbol “O” position to turn it off when making any adjustments in the needle area,
such as changing the needle.• Do not use a damaged or incorrect needle plate, as it could cause the needle to break.
7 This machine is not a toy:
• Your close attention is necessary when the machine is used by or near children.• This machine is not intended for use by young children or infirm persons without supervision.• Young children should be supervised to ensure that they do not play with this machine.• Do not use the included scissors or seam ripper in any other way than how they are intended. In addition, when
opening a hole with the seam ripper, do not place your hands or fingers in the cutting path, otherwise injuries may result if the seam ripper slips.
• The plastic bag that this machine was supplied in should be kept out of the reach of children or disposed of. Never allow children to play with the bag due to the danger of suffocation.
• Do not use outdoors.
8 For a longer service life:
• When storing this machine, avoid direct sunlight and high humidity locations. Do not use or store the machine near a space heater, iron, halogen lamp, or other hot objects.
• Use only neutral soaps or detergents to clean the case. Benzene, thinner, and scouring powders can damage the case and machine, and should never be used.
• Always consult the operation manual when replacing or installing any assemblies, needle, or other parts to assure correct installation.

3
9 For repair or adjustment:
• Do not try to disassemble, repair or alter this machine in any way, otherwise a fire, electric shock or injuries may result.
• If the light unit is damaged, it must be replaced by an authorized Brother dealer.• In the event a malfunction occurs or adjustment is required, first follow the troubleshooting table in the back of
the operation manual to inspect and adjust the machine yourself. If the problem persists, please consult your local authorized Brother dealer.
Use this machine only for its intended use as described in the manual.Use accessories recommended by the manufacturer as contained in this manual.Use only the interface cable (USB cable) included with this machine.The contents of this manual and specifications of this product are subject to change without notice.For additional product information and updates, visit our website at www.brother.com
SAVE THESE INSTRUCTIONSThis machine is intended for household use.
FOR USERS IN COUNTRIES EXCEPT EUROPEAN COUNTRIESThis appliance is not intended for use by persons (including children) with reduced physical, sensory or mental capabilities, or lack of experience and knowledge, unless they have been given supervision or instruction concerning use of the appliance by a person responsible for their safety. Children should be supervised to ensure that they do not play with the appliance.
FOR USERS IN EUROPEAN COUNTRIESThis appliance can be used by children aged from 8 years and above and persons with reduced physical, sensory or mental capabilities or lack of experience and knowledge if they have been given supervision or instruction concerning use of the appliance in a safe way and understand the hazards involved. Children shall not play with the appliance. Cleaning and user maintenance shall not be made by children without supervision.
FOR USERS IN THE UK, EIRE, MALTAAND CYPRUS ONLY
IMPORTANT
• In the event of replacing the plug fuse, use a fuse approved by ASTA to BS 1362, i.e. carrying the mark,
rating as marked on plug.• Always replace the fuse cover. Never use plugs with the fuse cover omitted.• If the available electrical outlet is not suitable for the plug supplied with this equipment, you should contact your
authorized Brother dealer to obtain the correct lead.

4
The following warning labels are on the machine.Be sure to observe the precautions described in the labels.
1
2
Warning Labels
Label locations
Please put a drop of oil onto the hook once a day before use.

5
Introduction ........................................... 1IMPORTANT SAFETY INSTRUCTIONS...... 1Warning Labels ....................................... 4Names of Machine Parts and Their Functions ................................................ 6
Front view........................................................... 6Right-side/rear view ............................................ 7Operation panel.................................................. 7
Accessories ............................................. 8Included accessories ........................................... 8Optional accessories........................................... 9
Setting Up the Machine ........................ 10Setup and transporting precautions ................... 10Setting up the machine ..................................... 11Preparing the thread guide assembly................. 12Attaching the embroidery frame holder............. 12
Operating Precautions.......................... 13Power supply precautions ................................. 13Needle precautions........................................... 14Checking the needle ......................................... 14Bobbin precautions........................................... 15Upper thread recommendations........................ 15Fabric recommendations................................... 15Display recommendations ................................ 15
Preparing for Starting the Embroidery ..... 16Turning on the machine.................................... 16Removing the bobbin case................................ 17Installing the bobbin ......................................... 17Installing the bobbin case ................................. 18Winding the bobbin.......................................... 18Selecting the embroidery pattern....................... 20Checking a preview image................................ 20Editing the pattern............................................. 21
Starting the Embroidery........................ 23Hooping the fabric in the embroidery frame ..... 23Attaching the embroidery frame to the machine...... 24Upper threading................................................ 25Threading the needle ........................................ 27Starting embroidering........................................ 27Easily changing the thread spools...................... 28Removing the embroidery frame ....................... 28Removing the fabric.......................................... 29Turning off the machine.................................... 29Changing the needle ......................................... 30
Appendix .............................................. 31Checking the thread tension.............................. 31
Oiling the race ................................................. 31Oiling the needle bars ...................................... 32Cleaning the hook ............................................ 33Cleaning around the needle plate ..................... 34Cleaning the thread guides ............................... 34Clean the tension dial....................................... 35
Upgrading Your Machine’s Software .... 36Upgrade procedure using USB media............... 36Upgrade procedure using computer ................. 37What you can find in the detailed operation manual on Brother Solutions Center ................. 38
Contents

6
The names of the various parts of the machine and their functions are described below. Before using the machine, carefully read these descriptions to learn the names of the machine parts.
Front view
1 Bobbin pretension discPass the thread around the pretension disk when winding the bobbin thread.
2 Thread guide holePass the thread through thread guide hole from front side to back when winding the bobbin thread.
3 Thread cutter/holderCut the thread here when changing the upper thread. Also, you can hold the thread here when not using.
4 Front hole in the thread guidePull the thread toward you placing the thread through the guide hole from top to bottom.
5 Thread guide holePlace the thread from back to front through the hole when winding the bobbin or threading the machine.
6 Thread guide assembly support7 Spool pin8 Spool stand9 Thread guide
Pass the thread through when threading the machine.0 Bobbin winder seat
Set the bobbin when bobbin winding.
A Bobbin winding switchSet to the left to start bobbin winding.
B Upper thread guide pretension knobAdjust the tension of the thread.
C Thread tension knobAdjust the tension of the thread.
D Upper thread guidePass the thread through when threading the machine.
E Operation panelF Carriage
Attach the embroidery frame holder to the carriage. When the machine is turned on or when the machine is embroidering, the carriage moves forward, backward, left and right.
G Lower thread guidePass the thread through when threading the machine.
H Thread cutterCuts and holds the thread for needle threading.
I Hook cover/HookOpen the hook cover, and then insert the bobbin case into the hook.
J FeetUse the feet to level and adjust the height of the machine.
Names of Machine Parts and Their Functions
Left side
Thread Guide Assembly
Note• Circled numbers on the “Thread Guide
Assembly” indicate the thread path for winding the bobbin.

7
Right-side/rear view
1 Touch pen holderUse the touch pen holder to hold the touch pen when not in use.
2 USB port (USB 2.0)In order to send patterns from/to USB media, plug the USB media directly into the USB port.
3 USB port for computerIn order to import/export patterns between a computer and the machine, plug the USB cable into the USB port.
4 Panel angle buttonPress to change the angle of the operation panel. Do not change the angle without pressing this button.
5 Power supply plugInsert the plug on the power supply cord into the power supply plug.
6 Main power switchUse the main power switch to turn the machine ON (I) and OFF (O). Do not turn the power on soon after you turn the power off. It is recommended that you wait 5 seconds before turning the power on again.
7 HandwheelRotate the handwheel to move the needle up and down. Be sure to rotate the handwheel toward the operation panel (counterclockwise).
8 Air ventThe air vent allows the air surrounding the motor to circulate. Do not cover the air vent while the embroidery machine is being used.
Operation panel
1 “Start/Stop” buttonPress the “Start/Stop” button to start or stop the machine. The lighting status and color of the button changes depending on the operation condition of the machine.
2 Needle position buttonPress the needle position button to raise or lower the needle position. Pressing the button twice embroiders one stitch.
3 Thread trimming buttonPress the thread trimming button to trim both the upper and the bobbin threads.
4 “Automatic Threading” buttonPress the automatic needle threading button to thread the needle.
5 Speaker6 LCD (touch panel)
Touch the keys that appear on the touch panel to select and edit patterns and confirm various information.
1
2
5
7
8
3
4
6
Lit in red : When the machine cannot start embroidering
Flashing in green : When the machine can start embroidering
Lit in green : While the machine is embroidering
Off : When the machine is turned off
654321

8
The accessories listed below are included with this machine. Make sure to use the accessories designed for this machine.
Included accessories
After opening the box, check that the following accessories are included. If any item is missing or damaged, contact your authorized Brother dealer.
Accessories
1. 2. 3. 4. 5. 6. 7. 8. 9. 10.
11. 12. 13. 14. 15. 16. 17. 18. 19. 20.
21. 22. 23. 24. 25. 26. 27. 28. 29. 30.
31. 32. 33. 34. 35. 36. 37.
No. Part Name Part Code
1 Accessory case XC6482-051
2 Needle set XC6469-001
3 Prewound bobbin × 5 XC6368-051
4 Metal bobbin × 3 100376-053
5 Spool net × 4 S34455-000
6 Seam ripper XF4967-001
7 Scissors XF2052-001
8 Tweezers XC6542-051
9 Touch pen XA9940-051
10 Needle changing tool (Threader) XF2212-001
11 Needle plate spacer XC6499-151
12 Phillips screwdriver XC6543-051
13 Standard screwdriver X55468-051
14 Allen screwdriver XC5159-051
15 Offset screwdriver XC6545-051
16 Disc-shaped screwdriver XC1074-051
17 Screwdriver (large) XC4237-021
18 Wrench 13 × 10 XC6159-051
19 Oiler XZ0206-051
20 Cleaning brush X59476-051
21 Weight (L) XC5974-151
22 Weight (S) XC6631-051
23 USB cable XD1851-051
24 Embroidery frame (extra large) 200 mm (H) × 200 mm (W)
VRTF200: XG3182-001(Other area)
25 Embroidery frame (medium) 100 mm (H) × 100 mm (W)
PRH100: XC6286-052 (Other area)
26 Compact frame (70) 41 mm (H) × 70 mm (W)
VRSF70: XG3203-001 (Other area)
27 Compact frame (50) 50 mm (H) × 50 mm (W)
VRSF50: XG3189-001 (Other area)
28 Compact frame (44) 38 mm (H) × 44 mm (W)
VRSF44: XG3186-001 (Other area)
29 Compact frame (Portrait orientation) 33 mm (H) × 75 mm (W)
VRSFV: XG3191-001 (Other area)
30 Embroidery sheet (extra large) 200 mm (H) × 200 mm (W)
XE7171-001
31 Embroidery sheet (medium) 100 mm (H) × 100 mm (W)
XC5759-051
32 Operation manual This manual
33 Embroidery design guide XG1506-001
34 Spool mat × 4 XC7134-051
35 Spool cap × 4 130012-054
36Embroidery frame holder a XG1546-001
37Embroidery frame holder e XG2408-001
Memo• The included touch pen can be stored in the
touch pen holder on the back of the operation panel. Refer to page 7.
No. Part Name Part Code
aaa
eee

9
Optional accessories
The following are available as optional accessories to be purchased separately from your authorized Brother dealer.
* We recommend using the optional embroidery table when using the flat frame or border embroidery frame.
1. 2.
3. 4.
5. 6.* 7.
8. 9. 10. 11.
12.* 13.
14. 15.
16.
No. Part Name Part Code
1 Advanced cap frame 2 set PRCF3:XE2158-001 (Other area)
2 Advanced cap frame 2 PRCFH3:XE2162-001 (Other area)
3 Mounting jig PRCFJ2:XC7611-052 (Other area)
4 Cylinder frame set PRCL1:XE2166-001 (Other area)
5 Cylinder frame PRCLH1:XE2170-001 (Other area)
6 Flat frame200 mm (H) × 200 mm (W)
VRFF200: XG3184-001 (Other area)
7 Embroidery frame (large) 130 mm (H) × 180 mm (W)
PRH180: XC6285-052(Other area)
8 Embroidery frame (small) 40 mm (H) × 60 mm (W)
PRH60: XC6287-052(Other area)
9 Embroidery card reader SAECR1
10 Embroidery card –
11 Wide table VRWT1: XG3193-001 (Other area)
12Border frame set100 mm (H) × 180 mm (W)Embroidery frame holder b
VRBF180: XG3205-001 (Other area)
13
Round frame set(Ø160 mm)(Ø130 mm)(Ø100 mm)Embroidery frame holder c
VRRFK1: XG3197-001 (Other area)
14Embroidery stand VRPRNSTD:
XG3199-001 (Other area)
15Clamp frame VRCLP45B:
XG3195-001 (Other area)
16 Free motion kit VRFMKIT1:XG3201-001(Other area)
Note• Embroidery cards sold overseas are not
compatible with this embroidery machine.• Visit your nearest authorized Brother dealer
for a complete listing of optional accessories and embroidery cards available for your machine.
Memo• Always use accessories recommended for
this machine.• All specifications are correct at the time of
printing. Please be aware that some specifications may change without notice.
No. Part Name Part Code

10
The procedures for setting up the machine are described below. If the machine is not set up correctly, it may shake or produce loud noises and the embroidery will not be sewn correctly. An optional embroidery stand is also available.
Setup and transporting precautions
Setting Up the Machine
CAUTION• The temperature of the operating environment should be between 5 °C and 40 °C. If the machine is
operated in an environment that is either too cold or too hot, the machine may malfunction.• Do not use the machine in a location where it will be exposed to direct sunlight, otherwise the machine
may malfunction.• Set up the machine with it’s four adjustable feet completely in contact with the desk or table, so that the
machine is level.• The machine weight is approximately 31 kg. The transporting or setting up of the embroidery machine
should be performed by two people.• When transporting the machine, be sure to lift it from the bottom at the indicated positions by two
people. Lifting the machine from any other area may damage the machine or result in the machine falling, which could cause injuries.
• When lightning occurs, turn off the machine and unplug the power supply cord. Lightning may cause the machine to malfunction.
• Do not plug in the power supply cord until setup of the machine is completed, otherwise injuries may result if the “Start/Stop” button is accidentally pressed and the machine starts sewing.
• When lubricating the machine, wear protective eyeglasses and gloves to prevent the oil or grease from getting into your eyes or on your skin. Do not put the oil or grease into your mouth. Keep the oil and grease out of the reach of children.

11
Setting up the machine
CAUTION• In order to prevent malfunctions or damage, do not set up the machine in a location exposed to the
following conditions.
Liquids, such as water Extreme dust
Direct sunlight Blocked ventilation slots
Insufficient space
An unstable surface
Connection to extension cords ormultiple adapters
Objects within the moving range of the embroidery frame
Extremely high or extremely lowtemperatures. The operating environment
should be between5 °C and 40 °C.
747 mm
More than 50 mm
587 mm
More than 350 mm
More than 150 mm 511 mm More than 150 mm
a b c
1 Loosen the lock nut using the included wrench.
2 Turn the adjustable foot nut with the included wrench.1 Lengthens the leg.2 Shortens the leg.
3 Tighten the lock nut after adjusting the legs.

12
Preparing the thread guide assembly
Attaching the embroidery frame holder
a b c
Remove the two screws from the thread guide assembly support.
a b c

13
The necessary points to ensure the correct operation of this machine are described below.
Power supply precautions
Be sure to observe the following precautions concerning the power supply.
Operating Precautions
WARNING• Use only regular household electricity for the power source. Using other power sources may result in fire,
electric shock, or damage to the machine.• Make sure that the plugs on the power supply cord are firmly inserted into the electrical outlet and the
power supply cord receptacle on the machine. Otherwise, a fire or electrical shock may result.• Do not insert the plug on the power supply cord into an electrical outlet that is in poor condition.• If any of the following occur, turn off the embroidery machine and unplug the power supply cord,
otherwise a fire, an electric shock or damage to the machine may result.• When you are away from the machine.• After using the machine.• If a power outage occurs while the machine is being operated.• If the machine is not operating properly, for example, when there is a loose or cut connection.• During electrical storms.
CAUTION• Use only the power supply cord included with this machine.• Do not plug this machine in with extension cords or multi-plug adapters with many other appliances
plugged into them, otherwise a fire or an electric shock may result.• Do not plug in or unplug the power supply cord with wet hands, otherwise an electric shock may result.• When unplugging the power supply cord, be sure to first turn off the machine, and then grasp the plug
when unplugging the cord. Pulling on the cord may damage it or result in a fire or an electric shock.• Do not allow the power supply cord to be cut, damaged, modified, forcefully bent, pulled, twisted, or
bundled. In addition, do not place heavy objects on the cord or expose it to heat, otherwise damage to the cord, fire or an electric shock may result. If the power supply cord or its plug is damaged, stop using the machine, and then take the machine to your authorized Brother dealer for repairs before continuing use.
• If the machine is not to be used for a long period of time, unplug the power supply cord, otherwise a fire may result.
• When leaving the machine unattended, either the main switch of the machine should be turned to OFF or the plug must be removed from the socket-outlet.
• When servicing the machine or when removing covers, the machine must be unplugged.

14
Needle precautions
Be sure to observe the following precautions concerning the correct choice of needle for your machine.
Checking the needle
Embroidering with a bent needle is extremely dangerous since the needle may break while the machine is operating.Place the flat side of the needle on a flat surface and check that the distance between the needle and the flat surface is even. If the needle is bent or the tip of the needle is broken, replace the needle with a new one. (Refer to “Changing the needle” on page 30.)
CAUTION• Your machine is designed to use household embroidery needles. The factory recommended needle is “HAX
130 EBBR” (Organ). Schmetz needles 130/705 H-E may be used as a substitute. Use of any other needles may break the needle or thread or damage the needle-threading mechanism or result in injuries.
• Never use bent needles. Bent needles can easily break, possibly resulting in injuries.
■ Good needle ■ Bad needleIf the distance between the needle and the flat surface is not even, the needle is bent. Do not use a bent needle.
1 Flat side2 Needle type marking
3 Flat surface

15
Bobbin precautions
Be sure to observe the following precautions concerning the bobbin.
Upper thread recommendations
Be sure to observe the following recommendations concerning the upper thread.
Fabric recommendations
Be sure to observe the following recommendations concerning the fabric.
Display recommendations
Be sure to observe the following recommendations concerning the use of the operation panel display.
CAUTION• Only use prewound bobbin (COATS “L” type/TRU-SEW POLYESTER
“Filaments”) or bobbins designed specifically for this machine. Use of any other bobbin may result in injuries or damage to the machine.
• Use a bobbin thread that has been correctly wound, otherwise the needle may break or the thread tension will be incorrect.
Note• It is recommended that rayon or polyester embroidery thread be used (120 den × 2 / 135 dtex × 2 / 40
weight (in Americas and Europe) / #50 (in Japan)).
Note• Your machine can embroider fabric that is up to 1 mm thick. If thicker fabric is embroidered, the
needle may bend or break.• When embroidering overlapping stitches, it is difficult for the needle to penetrate the fabric, possibly
resulting in the needle bending or breaking.• Attach stabilizers to thin or stretch fabrics. (Refer to “Attaching Iron-On Stabilizer (Backing) to Fabric”
on the detailed operation manual for information.)• When embroidering large pieces of fabric, make sure that the fabric is not caught in the carriage.
Note• Only touch the display with your finger or included touch pen. Do not use a mechanical pencil,
screwdriver or any other hard or sharp object. In addition, do not apply extreme pressure to the display screen, otherwise damage to the display screen may result.
COATS
PolyesterL
16
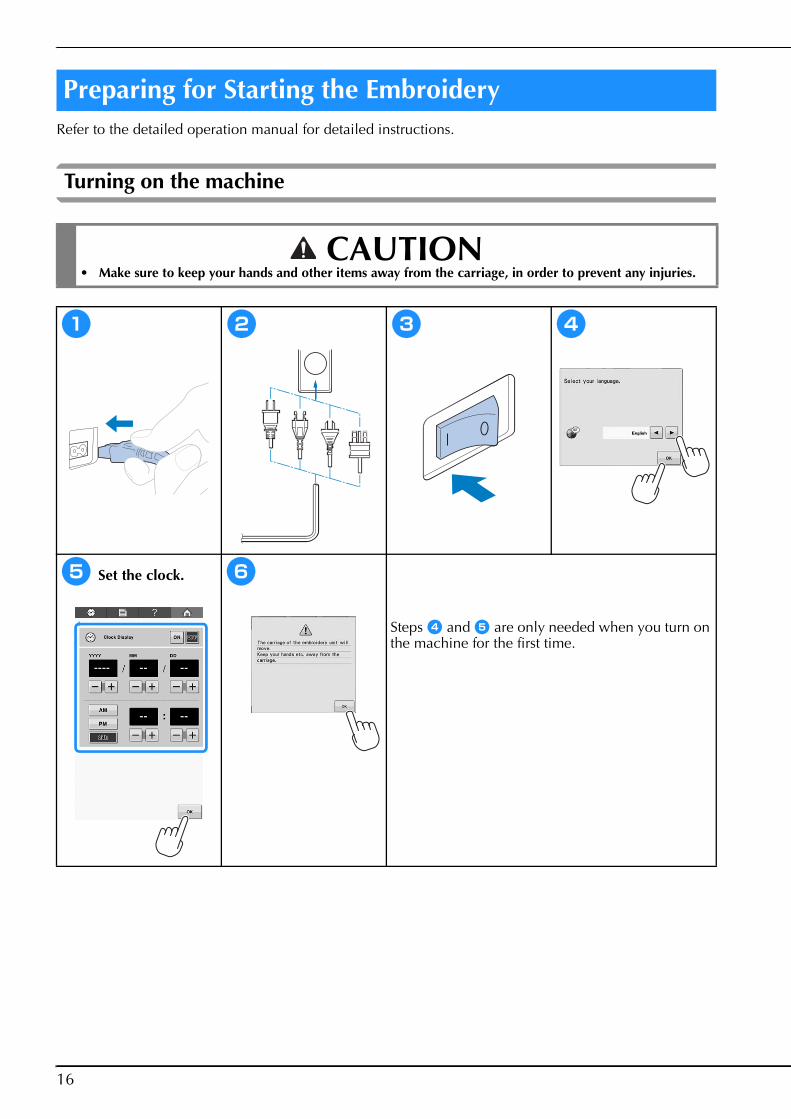
Refer to the detailed operation manual for detailed instructions.
Turning on the machine
Preparing for Starting the Embroidery
CAUTION• Make sure to keep your hands and other items away from the carriage, in order to prevent any injuries.
a b c d
e Set the clock. f
Steps d and e are only needed when you turn on the machine for the first time.

17
Removing the bobbin case
Installing the bobbin
a b
c d e
a b c
Check that the thread winds off the bobbin clockwise as shown in the illustration.
1 Pull out about 50 mm of thread.

18
Installing the bobbin case
Winding the bobbin
a b c
a b c
1 Groove in the bobbin2 Align the groove in the bobbin with
the spring on the bobbin winder shaft.
d e f

19
g h i
j k
The bobbin starts winding. The bobbin stops rotating when bobbin winding is completed. The bobbin winding switch will automatically return to its original position.

20
Selecting the embroidery pattern
Checking a preview image
a b c

21
Editing the pattern
No.Display
FunctionKey Name
1
Shows the size of the embroidery pattern currently displayed in the pattern display area. The top value shows the height and the bottom value shows the width. If the embroidery pattern consists of multiple patterns that have been combined, the size of the entire pattern, including all patterns, is shown.
Pattern size
2
Shows the sizes of embroidery frames that can be used to sew the embroidery pattern currently displayed in the pattern display area.
Embroidery frame
indicators
3Magnify the pattern by 200% in the screen.
Magnify key
4Shows the vertical length of the pattern that is being edited.
Size (vertical)
5Shows the horizontal width of the pattern that is being edited.Size
(horizontal)
6Shows the rotation angle that the pattern being edited is rotated.
Rotation angle
7Deletes the pattern. If touched, the pattern being edited is deleted.
Delete key
2
D
3
A
8
1
7
0
4
5
6
C
9
B
8Adds a pattern. If touched, the pattern group selection screen appears.Add key
9Displays an image of the pattern so that it can be previewed.
Preview key
0Shows the vertical distance that the pattern being edited is moved.Distance from
center (vertical)
A
Moves the embroidering position of the pattern that is being edited in the direction of the arrow. (If is touched, the embroidering position is moved to the center of the embroidering area.)
Positioning keys
BShows the horizontal distance that the pattern being edited is moved.Distance from
center (horizontal)
C
Selects the pattern that is being edited when the embroidery pattern consists of multiple patterns that have been combined.Pattern
selection keys
DFinish editing and continues to the embroidering screen.Embroidery
key
No.Display
FunctionKey Name

22
No.Display
FunctionKey Name
1Changes the size of the pattern that is being edited.
Size key
2Rotates the pattern that is being edited.
Rotate key
3 Changes the color of the pattern.Change thread
color key
4Makes and edits a repeating pattern.
Border key
5Flips the pattern being edited horizontally.Horizontal mirror
image key
6
Changes the density of the pattern that is being edited; can only be used if an alphabet or frame pattern is selected.Density key
7
Enables the thread color of each character in an alphabet pattern to be changed; can only be used when an alphabet is selected.Multi Color key
8Changes the orientation of the characters in the alphabet pattern that is being edited.Array key
9Changes the spacing between the characters in the alphabet pattern that is being edited.Spacing key
7
15
8
2
9
0
6
4
3
0 Duplicates the pattern.Duplicate key
No.Display
FunctionKey Name

23
Hooping the fabric in the embroidery frame
Starting the Embroidery
a b
Loosen the screw. Place the fabric with the right side up on top of the outer frame.
c
Lightly tighten the screw, and then pull the edges of the fabric.
d
1 Inner frame2 Outer frame3 Bottom of inner frame
e
1 Tighten the screw.

24
Attaching the embroidery frame to the machine
1 Left arm of embroidery frame holderMove the arm of the embroidery frame holder to the left or right to adjust it to the size of the embroidery frame.
2 Clip on embroidery frame holderInsert the embroidery frame into the clips on the embroidery frame holder.
3 Positioning pin4 Holes5 Positioning slots
CAUTION• If the embroidery frame is not correctly attached, it may hit the presser foot and damage the machine, or
cause injury to the user.• When attaching the embroidery frame, make sure that the “Start/Stop” button is lit in red. If the “Start/
Stop” button is flashing in green, the embroidery machine may start embroidering. If the embroidery machine accidentally starts operating, injuries may result.
• When attaching the embroidery frame, make sure that the embroidery frame does not hit any other part of the embroidery machine.
a b
1 Left arm2 Thumb screws
Loosen the two thumb screws on the embroidery frame holder.
1 Mark for extra-large embroidery frame2 Mark for large embroidery frame3 Mark for medium embroidery frame4 Mark for small embroidery frame5 Align the screw with the mark.

25
Upper threading
c d
Slide the embroidery frame into the clip on the embroidery frame holder. The inner frame should be on top.
Insert the embroidery frame until it snaps into place.
CAUTION• When threading the upper thread, carefully follow the instructions. If the upper threading is not
performing correctly, the thread may break or become tangled, causing the needle to bend or break.
a b

26
c d e
f g h
Wind the thread clockwise once around the thread tension disc.
i j k

27
Threading the needle
Starting embroidering
CAUTION• If the needle is not fully inserted, the hook of
the automatic threading mechanism will not pass through the eye of the needle during automatic needle threading, and the hook may bend or the needle cannot be threaded.
• If the hook of the automatic threading mechanism is bent or damaged, contact your authorized Brother dealer.
• While the hook of the automatic threading mechanism is passed through the eye of the needle, do not rotate the handwheel, otherwise the automatic threading mechanism may be damaged.
a
The hook on the automatic threading mechanism passes through the eye of the machine.
b c d
1 Pass the thread here.
a b Stop the embroidering
1
28
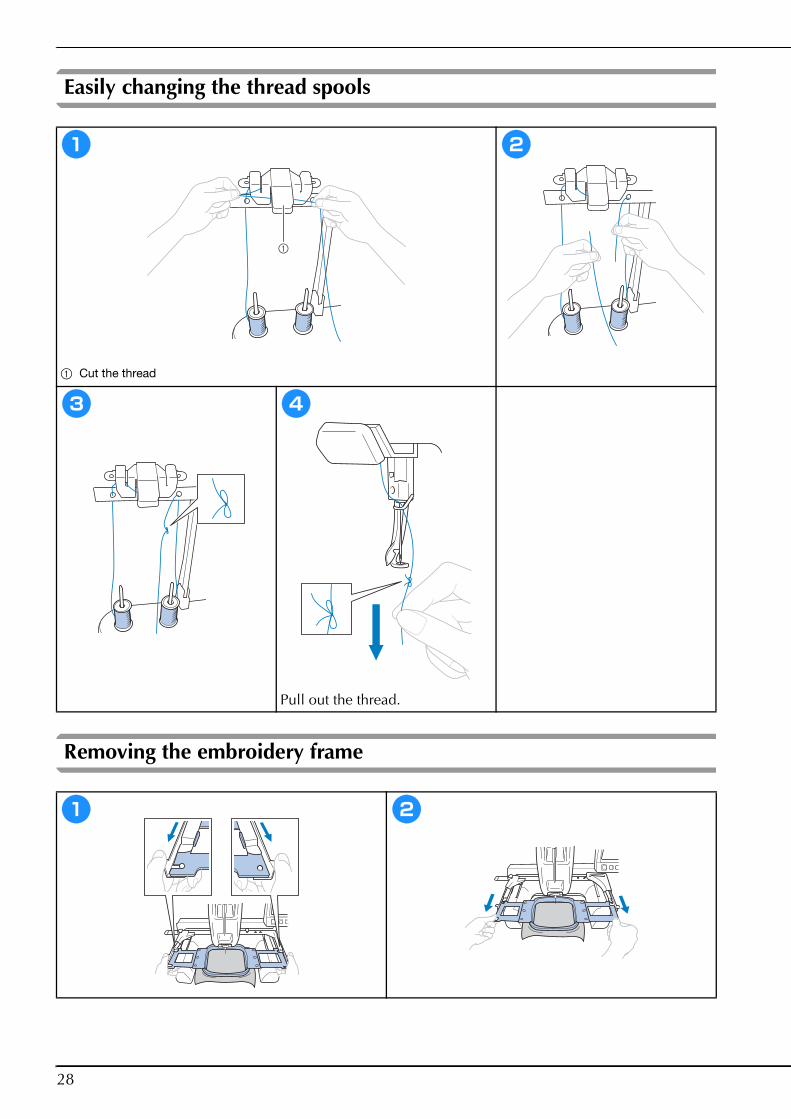
Easily changing the thread spools
Removing the embroidery frame
a b
1 Cut the thread
c d
Pull out the thread.
a b

29
Removing the fabric
Turning off the machine
a b
a b

30
Changing the needle
CAUTION• Be sure to turn off the embroidery machine before replacing the needle, otherwise injuries may result if
the machine starts embroidering.
a b
c Memo
1 End of the needle changing tool2 Needle mounting clamp
1 Needle bar stopper2 Needle3 Flat side of needle4 Needle changing tool
31
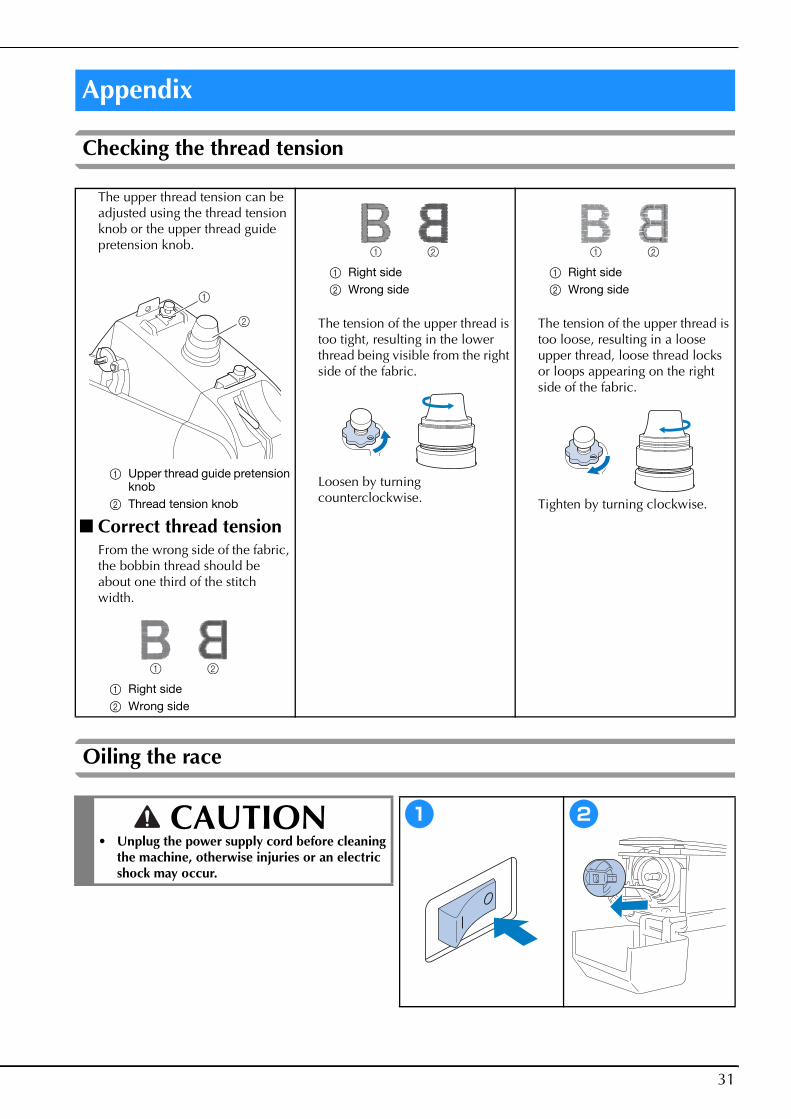
Checking the thread tension
Oiling the race
Appendix
The upper thread tension can be adjusted using the thread tension knob or the upper thread guide pretension knob.
1 Upper thread guide pretension knob
2 Thread tension knob
■ Correct thread tensionFrom the wrong side of the fabric, the bobbin thread should be about one third of the stitch width.
1 Right side2 Wrong side
1 Right side2 Wrong side
The tension of the upper thread is too tight, resulting in the lower thread being visible from the right side of the fabric.
Loosen by turning counterclockwise.
1 Right side2 Wrong side
The tension of the upper thread is too loose, resulting in a loose upper thread, loose thread locks or loops appearing on the right side of the fabric.
Tighten by turning clockwise.
CAUTION• Unplug the power supply cord before cleaning
the machine, otherwise injuries or an electric shock may occur.
a b
2
1

32
Oiling the needle bars
c d
Front angle view Side view1 Punch a small hole in oil bottle.2 Apply oil here.• Use a pointed object to punch a small hole in the tip of
the included oiler before using it.
1 Handwheel
Rotate the handwheel to a position ( ) on the machine.
e
Note• Put a drop of oil onto the hook once a day
before use.• Apply one drop of oil on the lower needle bar
above the felt washer every 40 – 50 hours of embroider time.
• Apply only sewing machine oil. Use of any other type of oil may result in damage to the embroidery machine.
• Do not apply too much oil. Fabric or thread may get contaminated. If too much oil is applied, wipe off any excess with a rag.
• If the thread breaks while embroidering or the operating noise of the hook becomes loud, apply oil onto the race hook.
1 Apply oil here.• Too much oil may drip onto the project.

33
Cleaning the hook
CAUTION• Unplug the power supply cord before cleaning
the machine, otherwise injuries or an electric shock may occur.
• If the hook is scratched or damaged, consult your authorized Brother dealer.
a b
c d
Remove any lint and dust from the hook and its surrounding area.

34
Cleaning around the needle plate
Cleaning the thread guides
CAUTION• Unplug the power supply cord before cleaning
the machine, otherwise injuries or an electric shock may occur.
a b
1 Remove the needle plate.
c d
1 Remove all lint in this area. 1 Attach the needle plate.
a b
Clean the thread guide plates for both the upper thread guide 1 and the middle thread guide 2.
1 Clean the thread guide plate.

35
Clean the tension dial
a b Note• When reassembling the tension unit,
be sure not to install the tension disc upside down.There is a magnet on the bottom.
Bottom Top
1 Turn the dial counterclockwise.
Remove any lint and dust from the two pieces of felt washers (top, bottom) inside the tension dial.
1 Magnet

36
Upgrade procedure using USB media
Upgrading Your Machine’s Software
Note• When an upgrade program is available on “ http://support.brother.com ”, please download the files
following the instructions on the website and steps below.• When using USB media to upgrade the software, check that no data other than the upgrade file is
saved on the USB media being used for this upgrade.• Compatible operating systems:
Microsoft Windows XP, Windows Vista, Windows 7, Windows 8• USB media is widely used, however some USB media may not be usable with this machine. Please
visit our website for more details.
a b c
d e f
Touch .

37
Upgrade procedure using computer
a b c
d e
Touch .
f g

38
What you can find in the detailed operation manual on Brother Solutions Center
IntroductionIMPORTANT SAFETY INSTRUCTIONSTrademarksWarning LabelsMachine Structure and FeaturesManual Structure
Read before useRead when additional information is requiredSearching for information
Chapter1 GETTING READYNames of Machine Parts and Their Functions
Front viewRight-side/rear viewOperation panel
AccessoriesIncluded accessoriesOptional accessories
Setting Up the MachineSetup and transporting precautionsSetup locationSetting up the machinePreparing the thread guide assemblyAttaching the embroidery frame holder aAttaching the embroidery frame holder e
Chapter2 EMBROIDERING TUTORIALOperating Precautions
Power supply precautionsNeedle precautionsChecking the needleBobbin precautionsUpper thread recommendationsFabric recommendationsDisplay recommendations
Basic Procedures1. Turning ON the Machine
Setting your machine for the first timeUnderstanding the screensScreen overview
2. Installing the BobbinRemoving the bobbin caseInstalling the bobbinInstalling the bobbin caseWinding the bobbin
3. Selecting an Embroidery PatternSelecting an embroidery pattern
4. Editing the Embroidery PatternContinuing to the embroidering screen
5. Specifying Embroidering SettingEmbroidery positioning marker
6. Previewing the ImageChecking a preview image
7. Hooping the Fabric in the Embroidery FrameHooping the fabric in the embroidery frame
8. Attaching the Embroidery Frame to the MachineAttaching the embroidery frame
9. Checking the Embroidery Area10. Upper Threading
Changing the display of thread informationUpper threadingThreading the needleEasily changing the thread spools
11. Starting EmbroideringStarting embroideringStopping embroidering
12. Checking the Thread Tension13. Removing the Embroidery Frame and Fabric
Removing the embroidery frameRemoving the fabric
14. Turning OFF the MachineScreen Quick Reference Guide
Key displaysUnderstanding the pattern type selection screenUnderstanding the pattern list screenUnderstanding the pattern editing screenUnderstanding the embroidering screen
When You Have a Question, This May Help YouTECHNICAL TERMS:PATTERNS:EMBROIDERING:USB connectivity
Chapter3 OTHER BASIC PROCEDURESChanging the Needle
Replacing the needleCorrectly Using the Embroidery Frames
Embroidery frame types and applicationsAttaching Iron-On Stabilizer (Backing) to FabricHooping the Fabric
Hooping the fabric in the large embroidery frameHooping the compact frame and attaching to the machineUsing the embroidery sheetLarge/small pieces of fabric
Embroidery Frame Position and MovementChanging the Embroidering Position
Adjusting the angleIf the Thread Breaks or the Bobbin Thread Runs Out While Embroidering
If the upper thread breaksIf the bobbin thread breaks or runs out
Embroidering From the Beginning or Middle of the PatternResume Embroidering After Turning Off the MachineAdjusting the Thread Tension
Adjusting the tension of the bobbin threadAdjusting the tension of the upper thread
Chapter4 EMBROIDERING SETTINGSBasting EmbroideryStarting Position Settings
Embroidering linked charactersMaximum Embroidering Speed SettingEmbroidery Color Management
Uninterrupted embroidering (monochrome - using a single color)Thread color sorting
Thread Trimming AdjustmentUsing the automatic thread cutting function (End Color Trim)Using the thread trimming function (Jump Stitch Trim)

39
Chapter5 SELECTING/EDITING/SAVING PATTERNS
Using the Memory FunctionEmbroidery data precautionsConcerning optional embroidery cardsConcerning USB media
Selecting an Embroidery PatternGeneral pattern selectionEmbroidery patterns/ Decorative alphabet patternsFrame patternsAlphabet patternsEmbroidery cards (optional)Saving embroidery patterns in the machine’s memorySaving embroidery patterns to USB mediaSaving embroidery patterns in the computerRetrieving patterns from the machine’s memoryRecalling from USB mediaRecalling from the computer
Editing the Embroidery Pattern (Pattern Editing Screen)
Combining patternsSelecting the pattern to be editedDisplaying the enlarged pattern imageMoving a patternFlipping a pattern horizontallyChanging the size of a patternRotating a patternChanging the text arrangement of a characterChanging the character spacingSeparating combined character patternsChanging the thread density (only for some character and frame patterns)Specifying multi-color textChanging the colors of the patternDesigning repeated patternsCreating a custom thread tableChoosing a color from the custom thread tableDuplicating a patternDeleting a pattern
Editing the Embroidery Pattern (Embroidering Screen)
Rotating the entire patternEditing a Combined Pattern
Chapter6 BASIC SETTINGS AND HELP FEATURE
Using the Settings KeyUnderstanding the settings screenSaving a settings screen image to USB mediaChanging the display guidesChanging the thread color informationChanging the units of measurementsChanging the embroidery basting distanceChanging the background colors of the embroidery patterns or thumbnailsSpecifying the thumbnail sizeSpecifying thread sensorChanging the speaker volumeSelecting the “Eco Mode” or “Shutoff Support Mode”Setting the opening screenChanging the languageTurning “ON” or “OFF” the lightChanging the screen brightnessSetting the LED pointer
Using the Machine Operations Guide Key
Chapter7 APPENDIXAppliqué Sewing
Sewing appliqué patternsUsing a frame pattern to create appliqués (1)
Using a frame pattern to create appliqués (2)Embroidering Split Embroidery PatternsHelpful Tips for the Operation of the Machine
Color thread tableColors of Tajima (.dst) embroidery data
Creating Beautiful EmbroideryThreadsStabilizers (backing)Hooping techniquesFabric/stabilizer compatibility chart
MaintenanceCleaning the LCDCleaning the machine surfaceCleaning the hookCleaning around the needle plateCleaning the bobbin caseCleaning the thread paths of the upper threadsOiling the machineAbout the maintenance message
TroubleshootingTroubleshootingError messagesIf the machine does not respond when a key is pressed
SpecificationsEmbroidery machine specifications
Upgrading Your Machine’s SoftwareUpgrade procedure using USB mediaUpgrade procedure using computer
Index


English882-T51
Printed in Taiwan
XG3252-0011
Please visit us at http://support.brother.com/ where you can get product support and answers to frequently asked questions (FAQs).


![Tru Laser [Basic Machine Operation & PM]](https://static.fdocuments.us/doc/165x107/55cf96ef550346d0338ebed1/tru-laser-basic-machine-operation-pm.jpg)