Operating instructions METTLER TOLEDO … precautions 4 Operating instructions 22016401 06/09...
34
Operating instructions METTLER TOLEDO MultiRange ID7sx-Sys weighing terminal www.mt.com/support
-
Upload
trinhxuyen -
Category
Documents
-
view
214 -
download
0
Transcript of Operating instructions METTLER TOLEDO … precautions 4 Operating instructions 22016401 06/09...
Operating instructions
METTLER TOLEDO MultiRangeID7sx-Sys weighing terminal
www.mt.com/support


Contents
Operating instructions 22016401 06/09 3
ID7sx-Sys
ContentsPage
1 Safety precautions....................................................................... 4
2 Introduction and commissioning................................................... 52.1 Documentation............................................................................. 52.2 Applications ................................................................................. 52.3 ID7sx-Sys weighing terminal.......................................................... 62.4 Commissioning ............................................................................ 82.5 Cleaning...................................................................................... 82.6 Disposal ...................................................................................... 8
3 Basic functions............................................................................ 93.1 Setting to zero .............................................................................. 93.2 Taring ......................................................................................... 93.3 Weighing..................................................................................... 103.4 Working with several weighing platforms......................................... 103.5 Displaying versions ...................................................................... 11
4 Additional functions..................................................................... 124.1 Display ID code and test weighing platform ..................................... 124.2 Recall information......................................................................... 134.3 Recall data from Alibi Memory........................................................ 14
5 Settings in the master mode ........................................................ 175.1 Overview of the master mode ......................................................... 175.2 Operating the master mode............................................................ 185.3 TERMINAL master mode block........................................................ 205.4 SCALE master mode block ............................................................. 225.5 INTERFACE master mode block ...................................................... 25
6 What to do if....? ......................................................................... 27
7 Technical data and accessories .................................................... 297.1 Technical data.............................................................................. 297.2 Accessories.................................................................................. 31
8 Index .......................................................................................... 33
Safety precautions ID7sx-Sys
1 Safety precautions
The ID7sx-Sys weighing terminal is approved for operation in zone 1 and 21 hazardous areas. It may only be used in areas in which the causes of static electricity build-up, which lead to propagating brush discharges, have been eliminated.If the ID7sx-Sys weighing terminal is used in hazardous areas, special care must be taken. The code of practice is oriented to the "Safe Distribution" concept drawn up by METTLER TOLEDO.
Competence ▲ The weighing system may only be installed, maintained and repaired by authorised METTLER TOLEDO service personnel.
▲ The mains connection may only be connected or disconnected by the owner’s electrician.
Ex approval ▲ For the exact specification please refer to the statement of conformity.
▲ No modifications may be made to the terminal and no repair work may be per-formed on the modules. Any weighing platform or system modules that are used must comply with the specifications. Non-compliant equipment jeopardises the intrinsic safety of the system, cancels the Ex approval and renders any warranty or product liability claims null and void.
▲ The safety of the weighing system is only guaranteed when the weighing system is operated, installed and maintained in accordance with the respective instructions.
▲ Also comply with the following: – the instructions for the system modules– the regulations and standards in the respective country– the statutory requirement for electrical equipment installed in hazardous areas
in the respective country– all instructions related to safety issued by the owner
▲ The explosion-protected weighing system must be checked to ensure compliance with the requirements for safety before being put into service for the first time, following any service work and every 3 years, at least.
Operation ▲ Prevent the build-up of static electricity. Therefore:
– always wear suitable working clothes when operating or performing service work on the system,
– do not rub or wipe off the keyboard surface with a dry cloth or glove.
▲ Do not use protective hoods.
▲ Prevent damage to the weighing terminal. Hairline cracks in the keyboard membrane are also considered damage.
4 Operating instructions 22016401 06/09
Introduction and commissioningID7sx-Sys
2 Introduction and commissioning
2.1 DocumentationThese operating instructions describe the operation of the ID7sx-Sys with the basic functions of the Sys-690 application software and all the possible interfaces. Information on your customer-specific ID7sx-Sys application can be found in the corresponding operating instructions specially authored for you.
2.2 ApplicationsWith the ID7sx-Sys weighing terminals the following applications are possible:
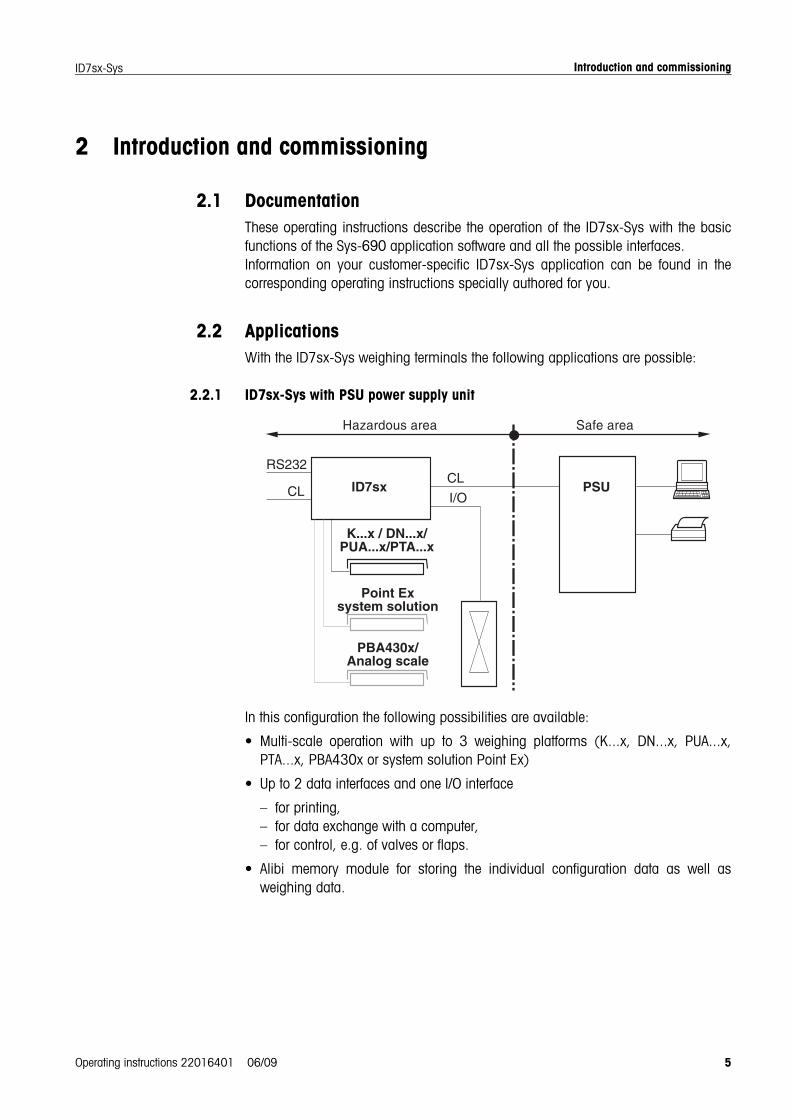
2.2.1 ID7sx-Sys with PSU power supply unit
In this configuration the following possibilities are available:
• Multi-scale operation with up to 3 weighing platforms (K...x, DN...x, PUA...x, PTA...x, PBA430x or system solution Point Ex)
• Up to 2 data interfaces and one I/O interface
– for printing,– for data exchange with a computer,– for control, e.g. of valves or flaps.
• Alibi memory module for storing the individual configuration data as well as weighing data.
��������
��� �������� �����
������������� �����
�����
�� ����
����� � ���������������� �����
Operating instructions 22016401 06/09 5
Introduction and commissioning ID7sx-Sys
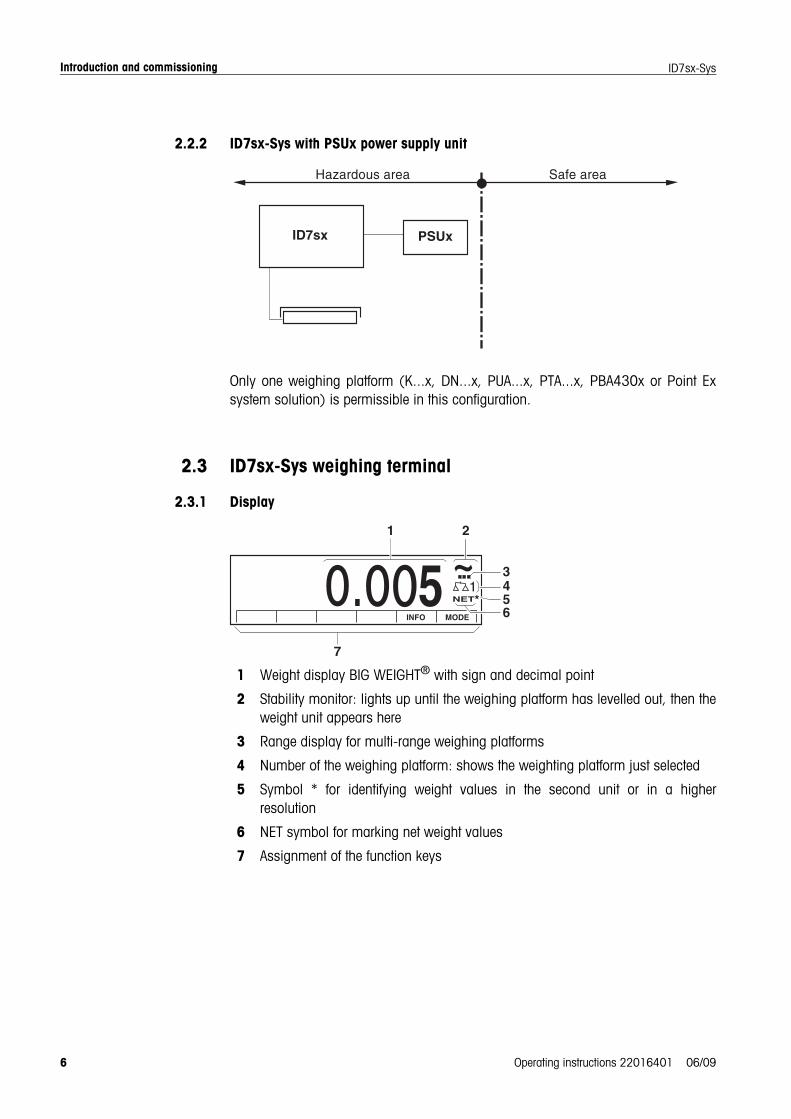
2.2.2 ID7sx-Sys with PSUx power supply unit
Only one weighing platform (K...x, DN...x, PUA...x, PTA...x, PBA430x or Point Ex system solution) is permissible in this configuration.
2.3 ID7sx-Sys weighing terminal
2.3.1 Display
1 Weight display BIG WEIGHT® with sign and decimal point
2 Stability monitor: lights up until the weighing platform has levelled out, then the weight unit appears here
3 Range display for multi-range weighing platforms
4 Number of the weighing platform: shows the weighting platform just selected
5 Symbol * for identifying weight values in the second unit or in a higher resolution
6 NET symbol for marking net weight values
7 Assignment of the function keys
PSUxID7sx
MODE
1 2
4
6
7
3
5
6 Operating instructions 22016401 06/09
Introduction and commissioningID7sx-Sys
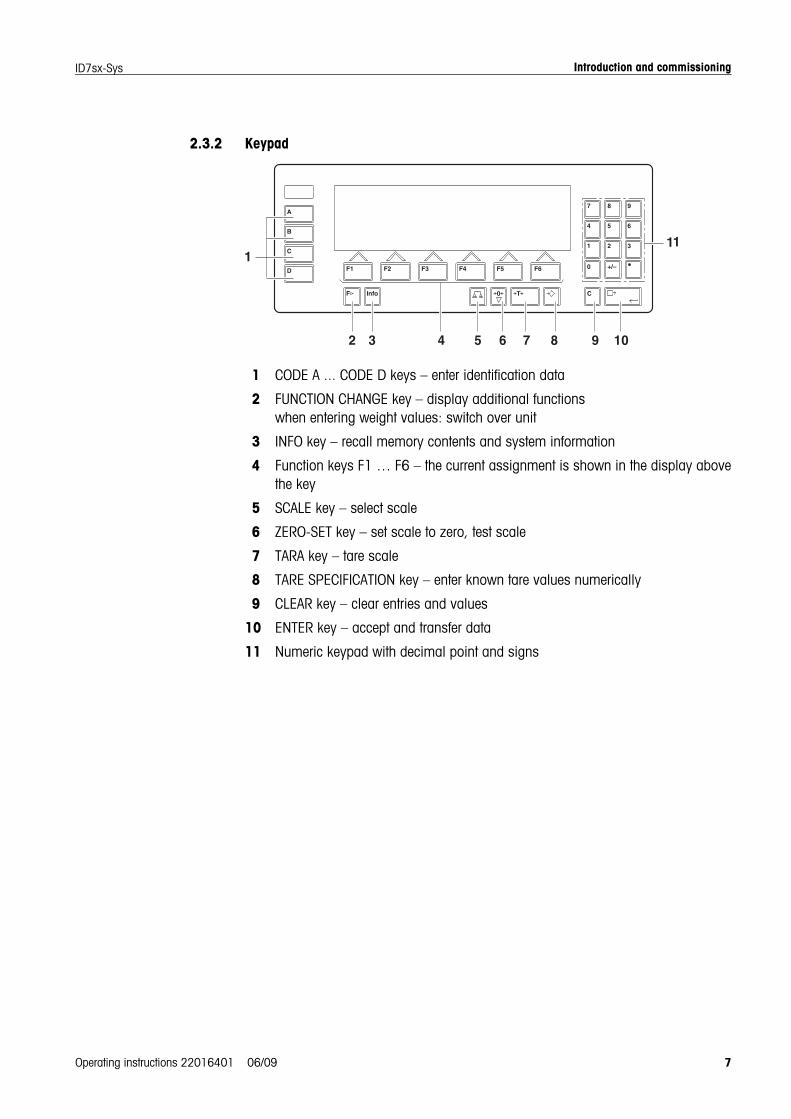
2.3.2 Keypad
1 CODE A ... CODE D keys – enter identification data
2 FUNCTION CHANGE key – display additional functions when entering weight values: switch over unit
3 INFO key – recall memory contents and system information
4 Function keys F1 … F6 – the current assignment is shown in the display above the key
5 SCALE key – select scale
6 ZERO-SET key – set scale to zero, test scale
7 TARA key – tare scale
8 TARE SPECIFICATION key – enter known tare values numerically
9 CLEAR key – clear entries and values
10 ENTER key – accept and transfer data
11 Numeric keypad with decimal point and signs
Operating instructions 22016401 06/09 7
Introduction and commissioning ID7sx-Sys
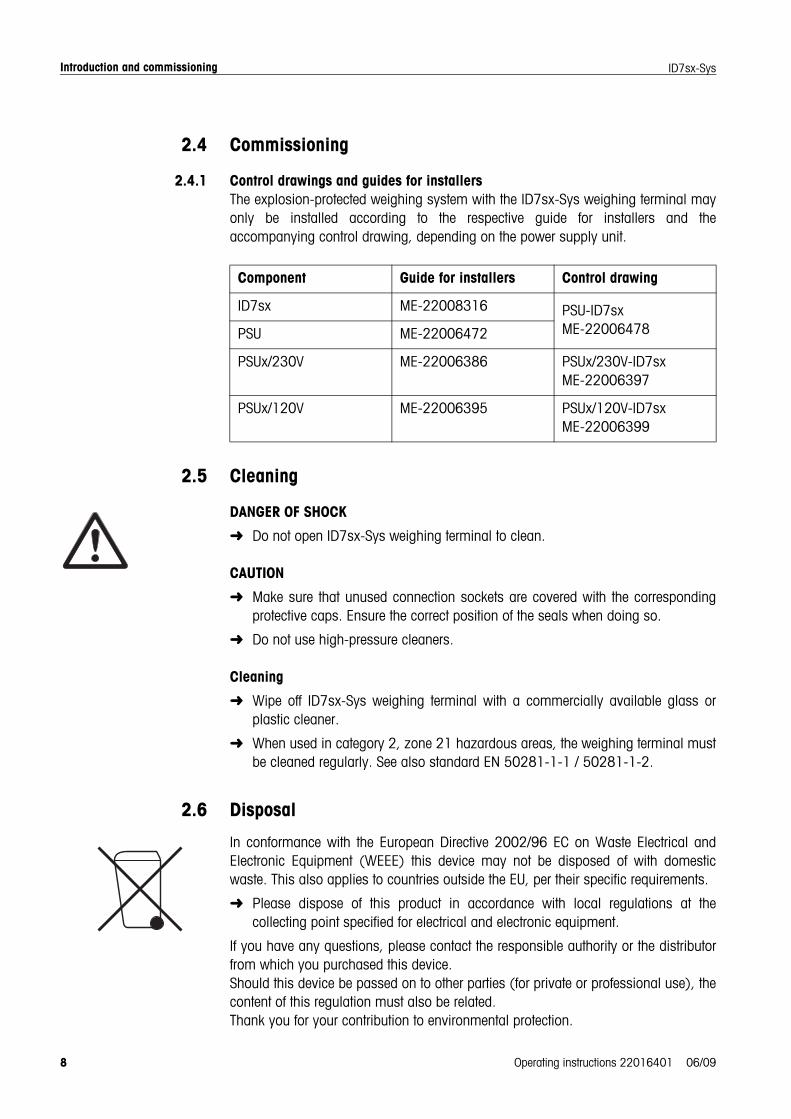
2.4 Commissioning
2.4.1 Control drawings and guides for installersThe explosion-protected weighing system with the ID7sx-Sys weighing terminal may only be installed according to the respective guide for installers and the accompanying control drawing, depending on the power supply unit.
2.5 Cleaning
DANGER OF SHOCK
➜ Do not open ID7sx-Sys weighing terminal to clean.
CAUTION
➜ Make sure that unused connection sockets are covered with the corresponding protective caps. Ensure the correct position of the seals when doing so.
➜ Do not use high-pressure cleaners.
Cleaning
➜ Wipe off ID7sx-Sys weighing terminal with a commercially available glass or plastic cleaner.
➜ When used in category 2, zone 21 hazardous areas, the weighing terminal must be cleaned regularly. See also standard EN 50281-1-1 / 50281-1-2.
2.6 Disposal
In conformance with the European Directive 2002/96 EC on Waste Electrical and Electronic Equipment (WEEE) this device may not be disposed of with domestic waste. This also applies to countries outside the EU, per their specific requirements.
➜ Please dispose of this product in accordance with local regulations at the collecting point specified for electrical and electronic equipment.
If you have any questions, please contact the responsible authority or the distributor from which you purchased this device.Should this device be passed on to other parties (for private or professional use), the content of this regulation must also be related.Thank you for your contribution to environmental protection.
Component Guide for installers Control drawing
ID7sx ME-22008316 PSU-ID7sxME-22006478PSU ME-22006472
PSUx/230V ME-22006386 PSUx/230V-ID7sxME-22006397
PSUx/120V ME-22006395 PSUx/120V-ID7sxME-22006399
8 Operating instructions 22016401 06/09
Basic functionsID7sx-Sys
3 Basic functions
3.1 Setting to zeroSetting to zero corrects the influence of minor dirt on the load plate.In the case of excessive dirt which cannot be compensated by setting to zero, the display shows OUT OF RANGE.
Manual zero set 1. Relieve weighing platform.
2. Press ZERO-SET key. The display shows 0.000 kg.
Automatic zero set On certified weighing platforms the zero point of the weighing platform is automati-cally corrected when the weighing platform is relieved.The automatic zero set can be switched off in the master mode on non-certified weighing platforms.
3.2 Taring
3.2.1 Manual taring
1. Place empty container on scale.
2. Press TARE key. The tare weight is saved and the weight display set to zero. The display shows the NET symbol.
Notes
• When the weighing platform is relieved, the saved tare weight is displayed with a negative sign.
• The weighing platform only saves one tare value.
3.2.2 Specify tare weightThis function is only available when ordered expressly.
Enter numerically 1. Press TARE SPECIFICATION key.
2. Enter tare weight (container weight) and confirm with ENTER. When weighing platform is relieved, the entered tare weight is displayed with a negative sign.
NoteWith the FUNCTION CHANGE key you can select the weight unit for entering the tare weight.
Correct entry ➜ Clear the entry character by character with CLEAR key and repeat correctly.
Operating instructions 22016401 06/09 9
Basic functions ID7sx-Sys
3.2.3 Recall currently saved tare weightThe saved tare weight can be recalled at any time.
➜ Enter INFO, TARE SPECIFICATION key sequence. The saved tare weight is displayed.
3.2.4 Clear tare weight
➜ Relieve weighing platform and tare.
– or –
➜ Recall tare weight and press CLEAR key.
3.3 Weighing
Weighing without taring ➜ Lay weighing sample on weighing platform. Gross weight (total weight) is displayed.
Weighing with taring 1. Place the empty container on the weighing platform and tare.
2. Pour in weighing sample. The display shows the net weight and the NET symbol.
Weighing with tare specification
1. Place filled container on weighing platform. The display shows the gross weight (total weight).
2. Specify tare weight or recall tare memory. The display shows the net weight (container content) and the NET symbol.
3.4 Working with several weighing platformsUp to 3 weighing platforms can be connected to the ID7sx-Sys.Depending on the setting in master mode, only the currently active scale appears in the display (serial Multi-scale mode) or all scales are operated at the same time (parallel multi-scale mode). A constantly updated sum scale is also available in parallel multi-scale mode.
3.4.1 Switch over weighing platformThe weighing platform currently selected is shown on the terminal.
➜ Press SCALE key. The next weighing platform is selected.
– or –
➜ Enter number of weighing platform and press SCALE key. The desired weighing platform is selected.
NoteThe sum scale can only be operated non-verifiably. It is therefore identified by the symbol Σ.
10 Operating instructions 22016401 06/09
Basic functionsID7sx-Sys
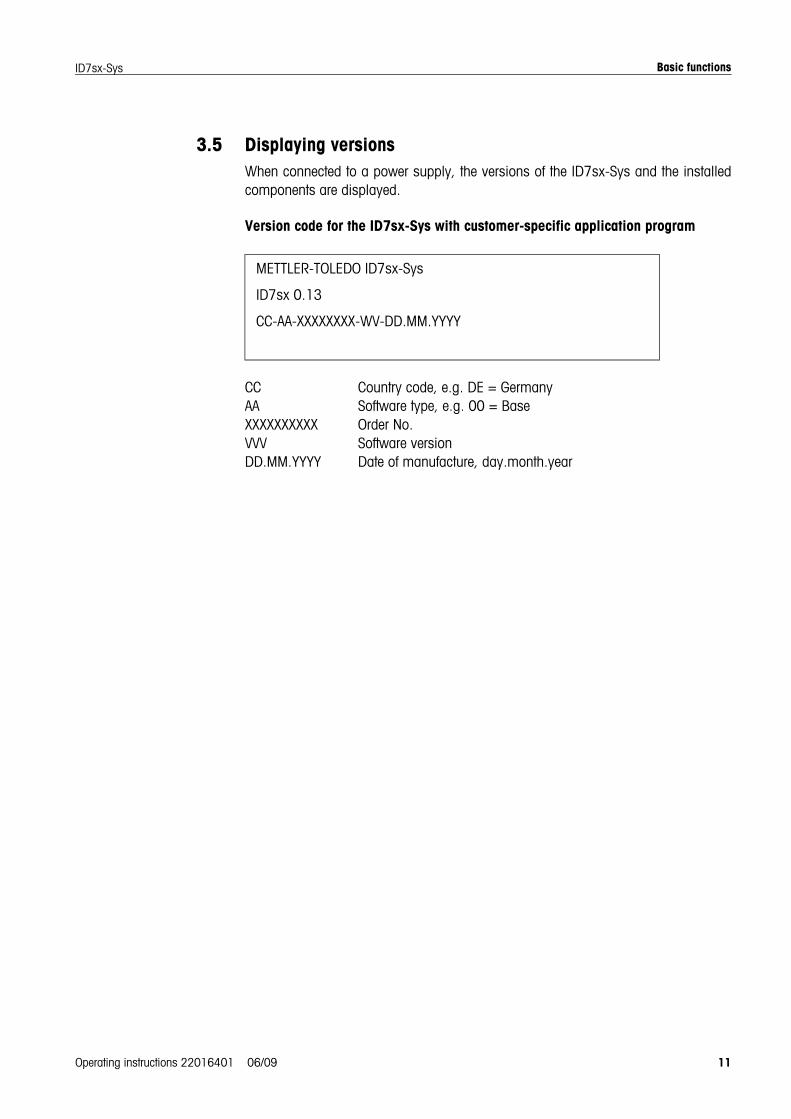
3.5 Displaying versionsWhen connected to a power supply, the versions of the ID7sx-Sys and the installed components are displayed.
Version code for the ID7sx-Sys with customer-specific application program
CC Country code, e.g. DE = GermanyAA Software type, e.g. 00 = BaseXXXXXXXXXX Order No.VVV Software versionDD.MM.YYYY Date of manufacture, day.month.year
METTLER-TOLEDO ID7sx-Sys
ID7sx 0.13
CC-AA-XXXXXXXX-WV-DD.MM.YYYY
Operating instructions 22016401 06/09 11
Additional functions ID7sx-Sys
4 Additional functions
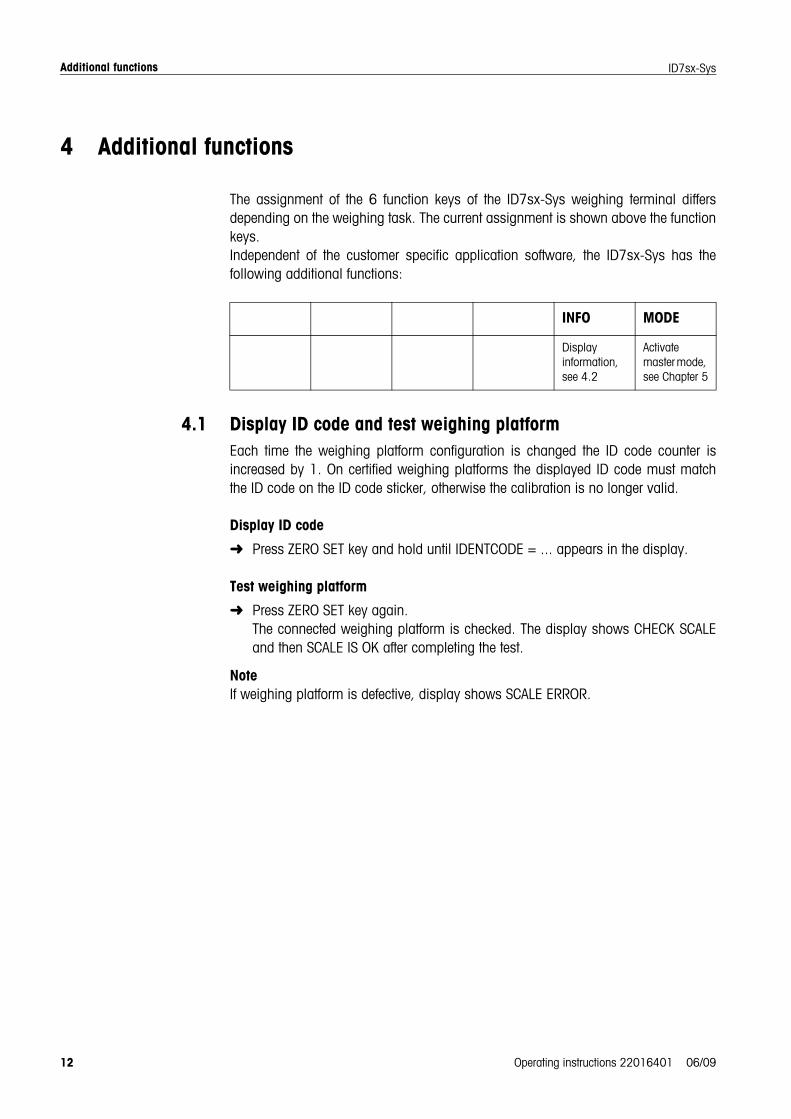
The assignment of the 6 function keys of the ID7sx-Sys weighing terminal differs depending on the weighing task. The current assignment is shown above the function keys.Independent of the customer specific application software, the ID7sx-Sys has the following additional functions:
4.1 Display ID code and test weighing platformEach time the weighing platform configuration is changed the ID code counter is increased by 1. On certified weighing platforms the displayed ID code must match the ID code on the ID code sticker, otherwise the calibration is no longer valid.
Display ID code
➜ Press ZERO SET key and hold until IDENTCODE = ... appears in the display.
Test weighing platform
➜ Press ZERO SET key again. The connected weighing platform is checked. The display shows CHECK SCALE and then SCALE IS OK after completing the test.
NoteIf weighing platform is defective, display shows SCALE ERROR.
INFO MODE
Display information, see 4.2
Activate master mode, see Chapter 5
12 Operating instructions 22016401 06/09
Additional functionsID7sx-Sys
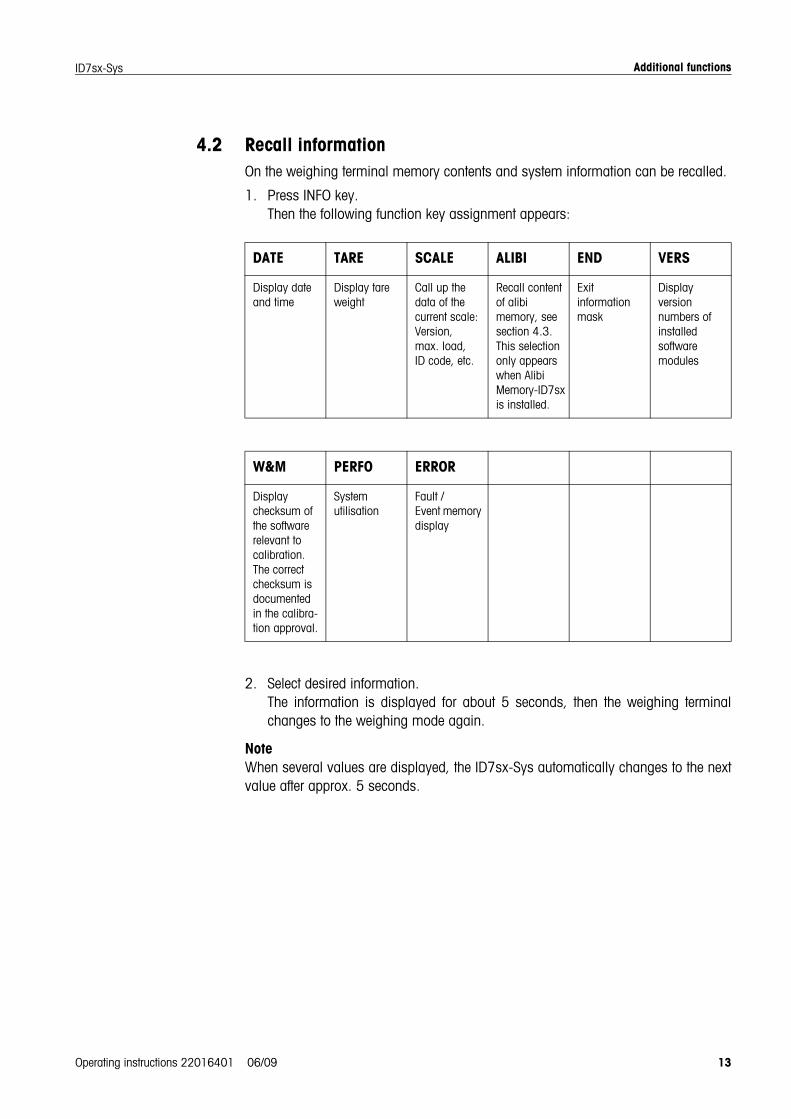
4.2 Recall informationOn the weighing terminal memory contents and system information can be recalled.
1. Press INFO key. Then the following function key assignment appears:
2. Select desired information. The information is displayed for about 5 seconds, then the weighing terminal changes to the weighing mode again.
NoteWhen several values are displayed, the ID7sx-Sys automatically changes to the next value after approx. 5 seconds.
DATE TARE SCALE ALIBI END VERS
Display date and time
Display tare weight
Call up the data of the current scale: Version, max. load, ID code, etc.
Recall content of alibi memory, see section 4.3.This selection only appears when Alibi Memory-ID7sx is installed.
Exit information mask
Display version numbers of installed software modules
W&M PERFO ERROR
Display checksum of the software relevant to calibration. The correct checksum is documented in the calibra-tion approval.
System utilisation
Fault / Event memory display
Operating instructions 22016401 06/09 13
Additional functions ID7sx-Sys
4.3 Recall data from Alibi MemoryMemoryWith the Alibi-Memory-ID7sx memory module you can fulfill your recording obligations in certified operation without having to archive paper. Alibi-Memory-ID7sx automatically assigns every weighing operation a consecutive data record number that also appears on the printout, saves the net and tare value and also the date and the time.The Alibi-Memory-ID7sx operates according to the principle of a ring memory: When the capacity limit of 12 Mbytes is reached, the oldest record block having the size of 64 Kbytes is deleted and overwritten by the data of the subsequent weighings.By entering suitable search criteria you can quickly access the data of a very specific weighing.
4.3.1 Initiate
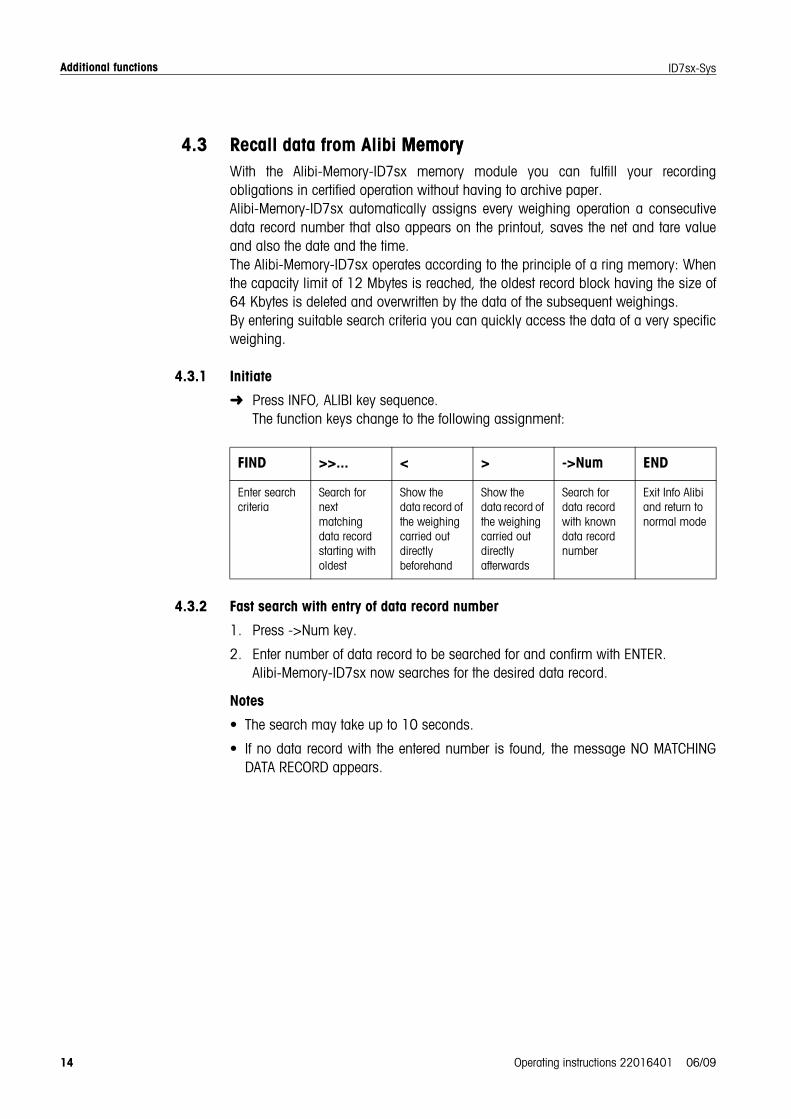
➜ Press INFO, ALIBI key sequence. The function keys change to the following assignment:
4.3.2 Fast search with entry of data record number
1. Press ->Num key.
2. Enter number of data record to be searched for and confirm with ENTER. Alibi-Memory-ID7sx now searches for the desired data record.
Notes
• The search may take up to 10 seconds.
• If no data record with the entered number is found, the message NO MATCHING DATA RECORD appears.
FIND >>... < > ->Num END
Enter search criteria
Search for next matching data record starting with oldest
Show the data record of the weighing carried out directly beforehand
Show the data record of the weighing carried out directly afterwards
Search for data record with known data record number
Exit Info Alibi and return to normal mode
14 Operating instructions 22016401 06/09
Additional functionsID7sx-Sys
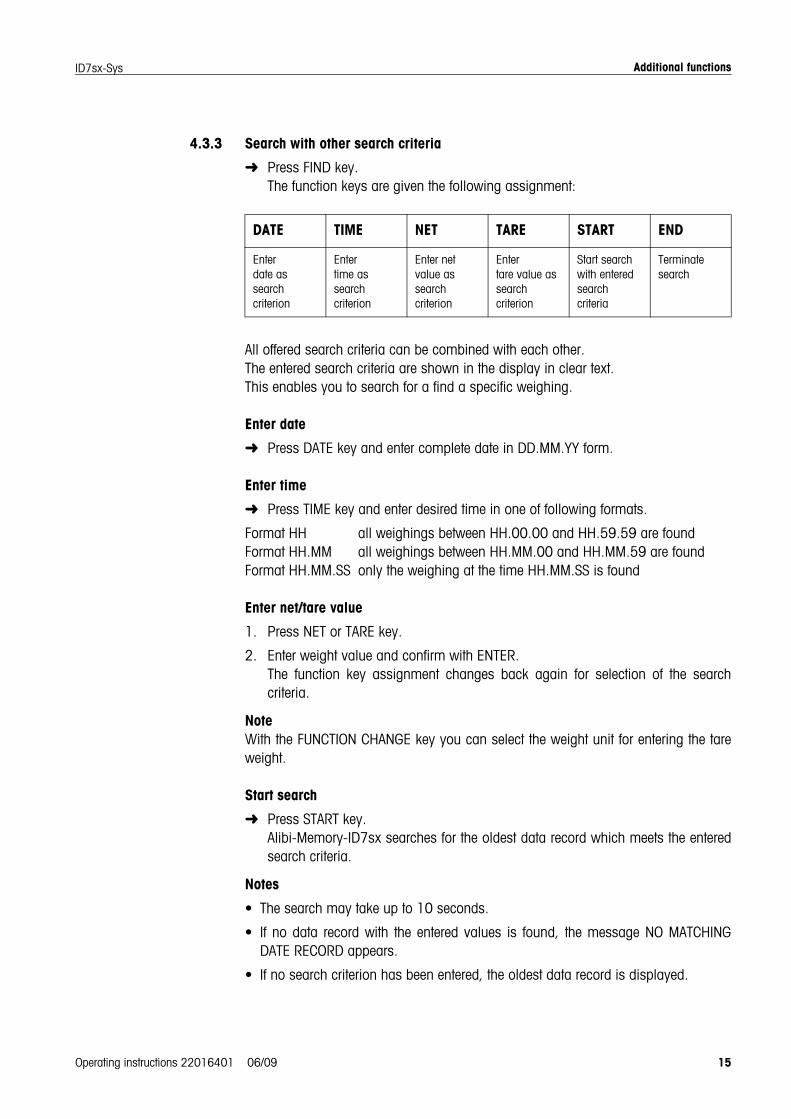
4.3.3 Search with other search criteria
➜ Press FIND key. The function keys are given the following assignment:
All offered search criteria can be combined with each other. The entered search criteria are shown in the display in clear text. This enables you to search for a find a specific weighing.
Enter date
➜ Press DATE key and enter complete date in DD.MM.YY form.
Enter time
➜ Press TIME key and enter desired time in one of following formats.
Format HH all weighings between HH.00.00 and HH.59.59 are foundFormat HH.MM all weighings between HH.MM.00 and HH.MM.59 are foundFormat HH.MM.SS only the weighing at the time HH.MM.SS is found
Enter net/tare value
1. Press NET or TARE key.
2. Enter weight value and confirm with ENTER. The function key assignment changes back again for selection of the search criteria.
NoteWith the FUNCTION CHANGE key you can select the weight unit for entering the tare weight.
Start search
➜ Press START key. Alibi-Memory-ID7sx searches for the oldest data record which meets the entered search criteria.
Notes
• The search may take up to 10 seconds.
• If no data record with the entered values is found, the message NO MATCHING DATE RECORD appears.
• If no search criterion has been entered, the oldest data record is displayed.
DATE TIME NET TARE START END
Enter date as search criterion
Enter time as search criterion
Enter net value as search criterion
Enter tare value as search criterion
Start search with entered search criteria
Terminate search
Operating instructions 22016401 06/09 15
Additional functions ID7sx-Sys
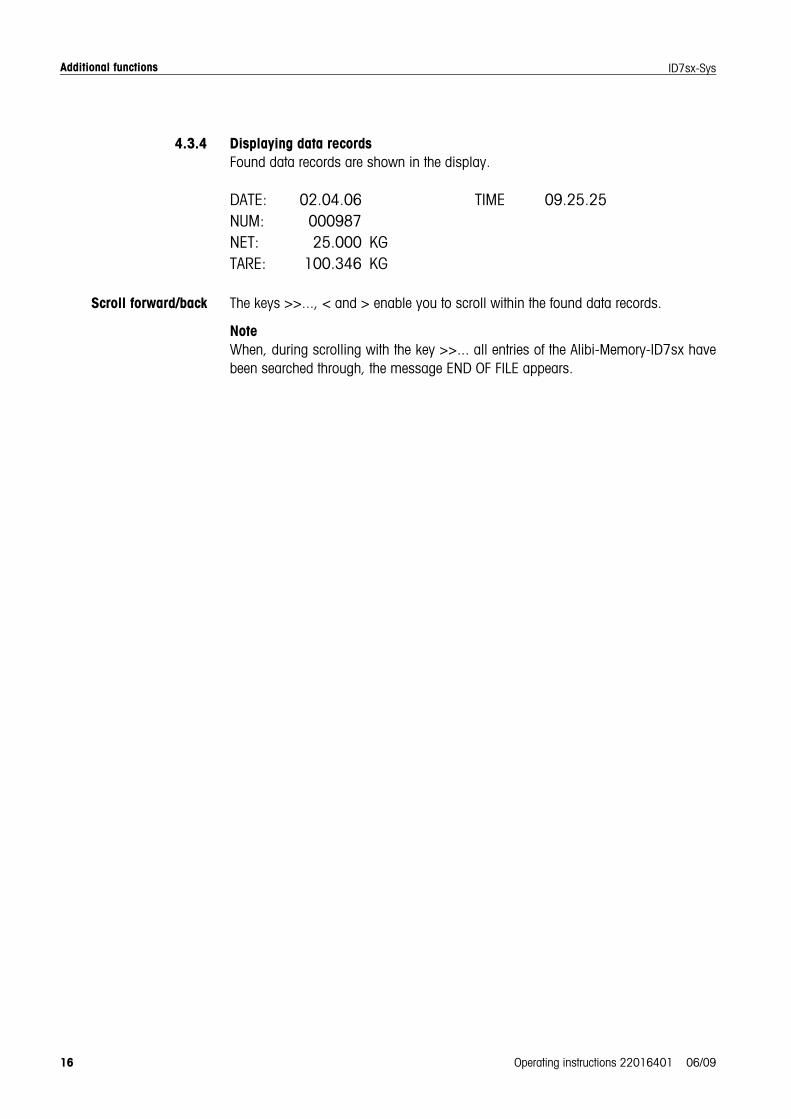
4.3.4 Displaying data recordsFound data records are shown in the display.
DATE: 02.04.06 TIME 09.25.25NUM: 000987NET: 25.000 KGTARE: 100.346 KG
Scroll forward/back The keys >>..., < and > enable you to scroll within the found data records.
NoteWhen, during scrolling with the key >>... all entries of the Alibi-Memory-ID7sx have been searched through, the message END OF FILE appears.
16 Operating instructions 22016401 06/09
Settings in the master modeID7sx-Sys
5 Settings in the master mode
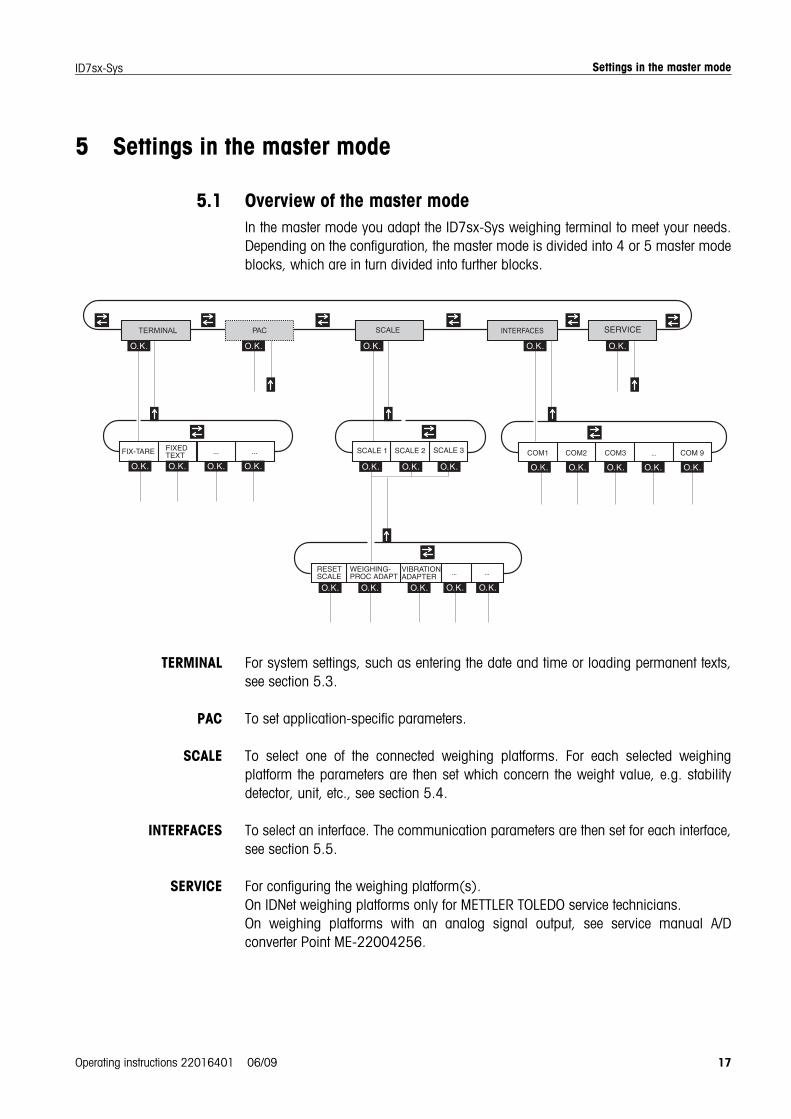
5.1 Overview of the master modeIn the master mode you adapt the ID7sx-Sys weighing terminal to meet your needs. Depending on the configuration, the master mode is divided into 4 or 5 master mode blocks, which are in turn divided into further blocks.
TERMINAL For system settings, such as entering the date and time or loading permanent texts, see section 5.3.
PAC To set application-specific parameters.
SCALE To select one of the connected weighing platforms. For each selected weighing platform the parameters are then set which concern the weight value, e.g. stability detector, unit, etc., see section 5.4.
INTERFACES To select an interface. The communication parameters are then set for each interface, see section 5.5.
SERVICE For configuring the weighing platform(s). On IDNet weighing platforms only for METTLER TOLEDO service technicians. On weighing platforms with an analog signal output, see service manual A/D converter Point ME-22004256.
Operating instructions 22016401 06/09 17
Settings in the master mode ID7sx-Sys
5.2 Operating the master mode
5.2.1 Enter the master mode
1. Press MODE key. If the current function keys assignment does not contain MODE, press the FUNCTION CHANGE key as often as necessary until the MODE key appears.
2. Enter personal code if configured. The display shows the first master mode block TERMINAL.
5.2.2 Assignment of function keys in the master mode
Assignment on the top level On the top level of the master mode the function keys are assigned as follows:
➜ Select the function by pressing the function key.
When the function keys are otherwise allocated
➜ Press the FUNCTION CHANGE key repeatedly until the function key assignment shown above appears.
Example ➜ Press the END key to exit the master mode and return to the normal mode.
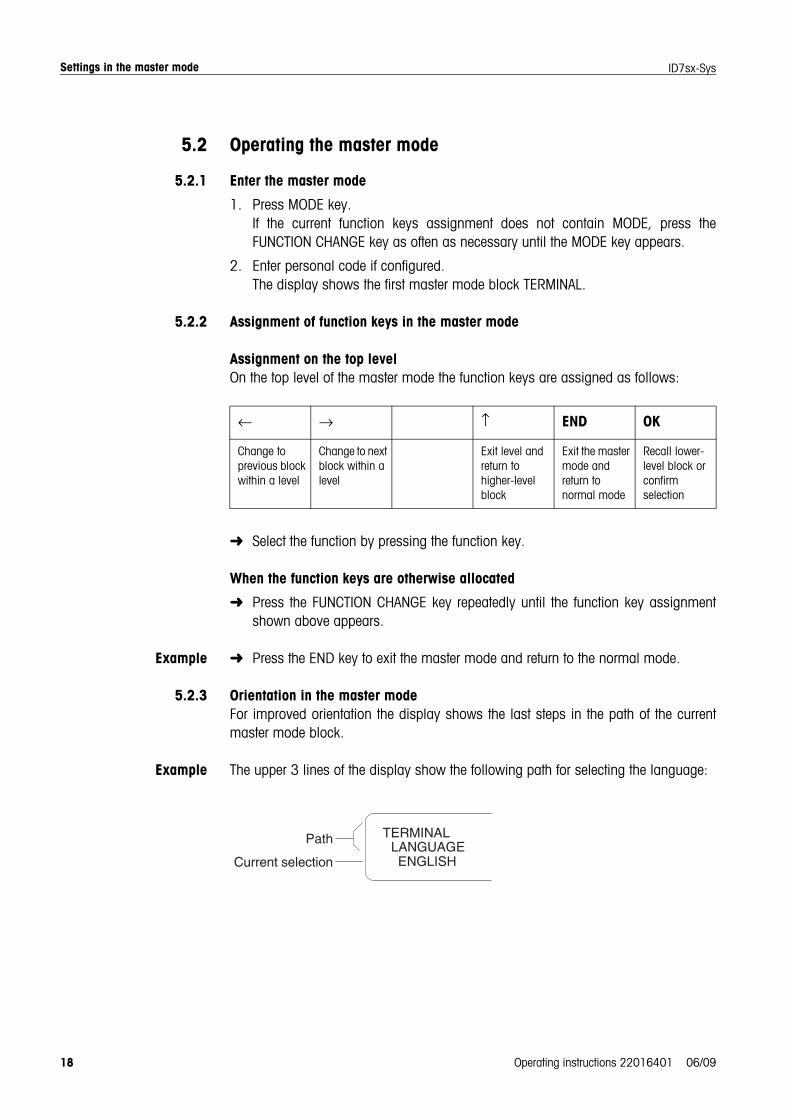
5.2.3 Orientation in the master modeFor improved orientation the display shows the last steps in the path of the current master mode block.
Example The upper 3 lines of the display show the following path for selecting the language:
← → ↑ END OK
Change to previous block within a level
Change to next block within a level
Exit level and return to higher-level block
Exit the master mode and return to normal mode
Recall lower-level block or confirm selection
18 Operating instructions 22016401 06/09
Settings in the master modeID7sx-Sys
5.2.4 Entries in the master modeThe following basic rules apply to entries made in the master mode:
• Confirm (alpha)numeric entries with ENTER.
• Alphanumeric entries with the ID7sx-Sys: see below.
• To accept the displayed value: Press ENTER key.
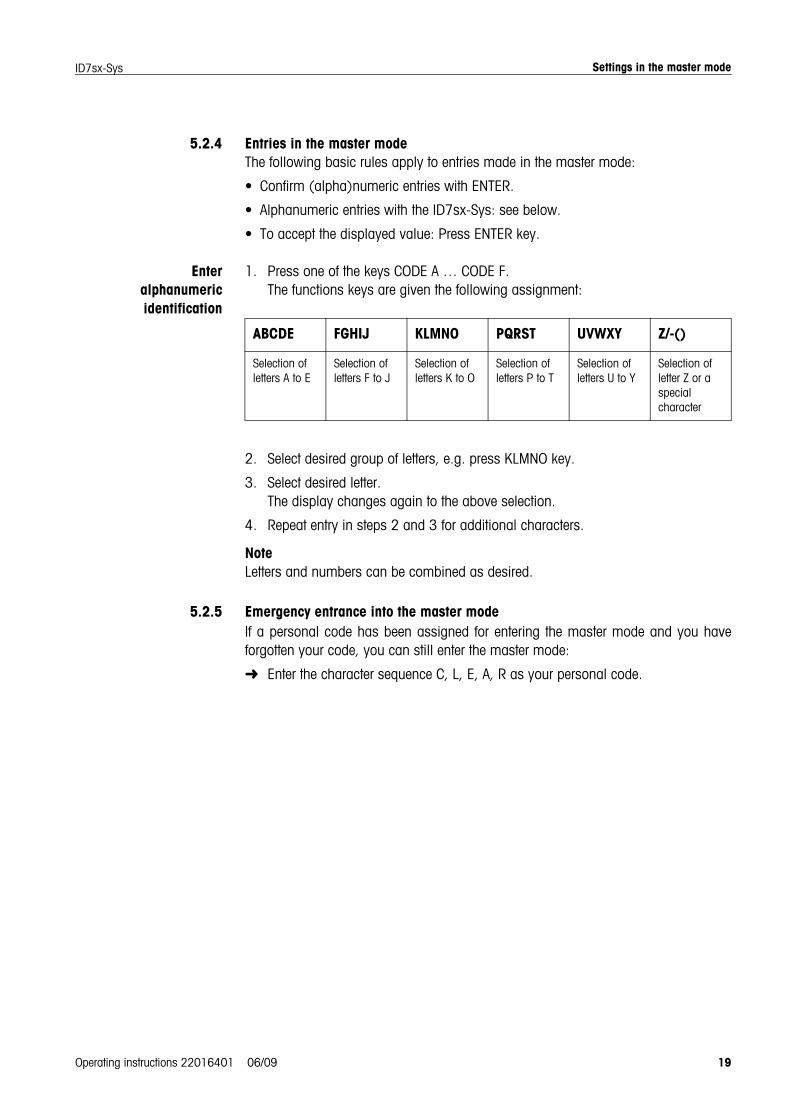
Enter alphanumeric identification
1. Press one of the keys CODE A … CODE F. The functions keys are given the following assignment:
2. Select desired group of letters, e.g. press KLMNO key.
3. Select desired letter. The display changes again to the above selection.
4. Repeat entry in steps 2 and 3 for additional characters.
NoteLetters and numbers can be combined as desired.
5.2.5 Emergency entrance into the master modeIf a personal code has been assigned for entering the master mode and you have forgotten your code, you can still enter the master mode:
➜ Enter the character sequence C, L, E, A, R as your personal code.
ABCDE FGHIJ KLMNO PQRST UVWXY Z/-()
Selection of letters A to E
Selection of letters F to J
Selection of letters K to O
Selection of letters P to T
Selection of letters U to Y
Selection of letter Z or a special character
Operating instructions 22016401 06/09 19
Settings in the master mode ID7sx-Sys
5.3 TERMINAL master mode block
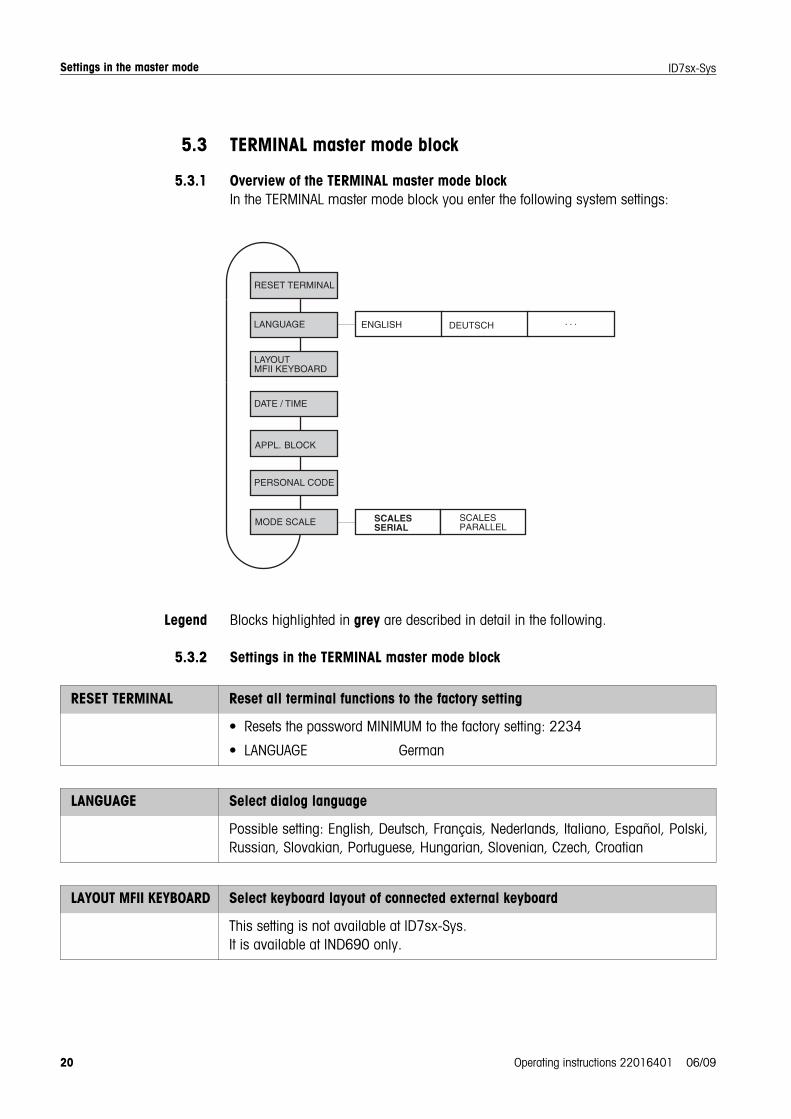
5.3.1 Overview of the TERMINAL master mode blockIn the TERMINAL master mode block you enter the following system settings:
Legend Blocks highlighted in grey are described in detail in the following.
5.3.2 Settings in the TERMINAL master mode block
RESET TERMINAL Reset all terminal functions to the factory setting
• Resets the password MINIMUM to the factory setting: 2234
• LANGUAGE German
LANGUAGE Select dialog language
Possible setting: English, Deutsch, Français, Nederlands, Italiano, Español, Polski, Russian, Slovakian, Portuguese, Hungarian, Slovenian, Czech, Croatian
LAYOUT MFII KEYBOARD Select keyboard layout of connected external keyboard
This setting is not available at ID7sx-Sys.It is available at IND690 only.
20 Operating instructions 22016401 06/09

Settings in the master modeID7sx-Sys
DATE / TIME Enter date and time
• Enter DATE in European notation: Day.Month.Year.
• Enter TIME in European notation: (24) Hours.Minutes.Seconds.
Comments • Enter single-place numbers with a preceding zero.
• The clock continues to run after the terminal is switched off.
APPL. BLOCK Editing application blocks
Assign application blocks or combinations of application blocks to keys or change key assignments for application blocs. This setting is not available at ID7sx-Sys.
PERSONAL CODE Codes for entering various master mode menus
Enter codes with a maximum of 8 alphanumeric characters.
MINIMUM Access to master mode
GENERAL Access to all personal codes
PAC Access to the PAC / RESET PAC and PAC / ERROR-INFO menus
PAC-DATAB. Access to the PAC / DATABASE menu
PAC-APPL. Access to the PAC / APPLICATION menu
INTERFACE Access to all parameters in the INTERFACE menus; the test functions are freely accessible
OPTION 1OPTION 2OPTION 3
Program dependent
Comment If only zeros are entered, the password is not used
MODE SCALES Select between serial and parallel operating mode for the connected scales
SCALES SERIAL Serial operation of the connected scales: Only the weight value of the current scale is displayed.
SCALES PARALLEL Parallel operation of the connected scales: All weight values of the connected scales are displayed simultaneously.
SUM SCALE A sum scale can be defined in parallel scale operation.
1. SUM SCALE: Select ACTIVATED.
2. With �, change to SCALE 1 and select YES with < or > if this scale is to be the sum scale.
3. Repeat the procedure for SCALE 2 - SCALE 3.
Factory setting: SUM SCALE DEACTIVATED
Operating instructions 22016401 06/09 21
Settings in the master mode ID7sx-Sys
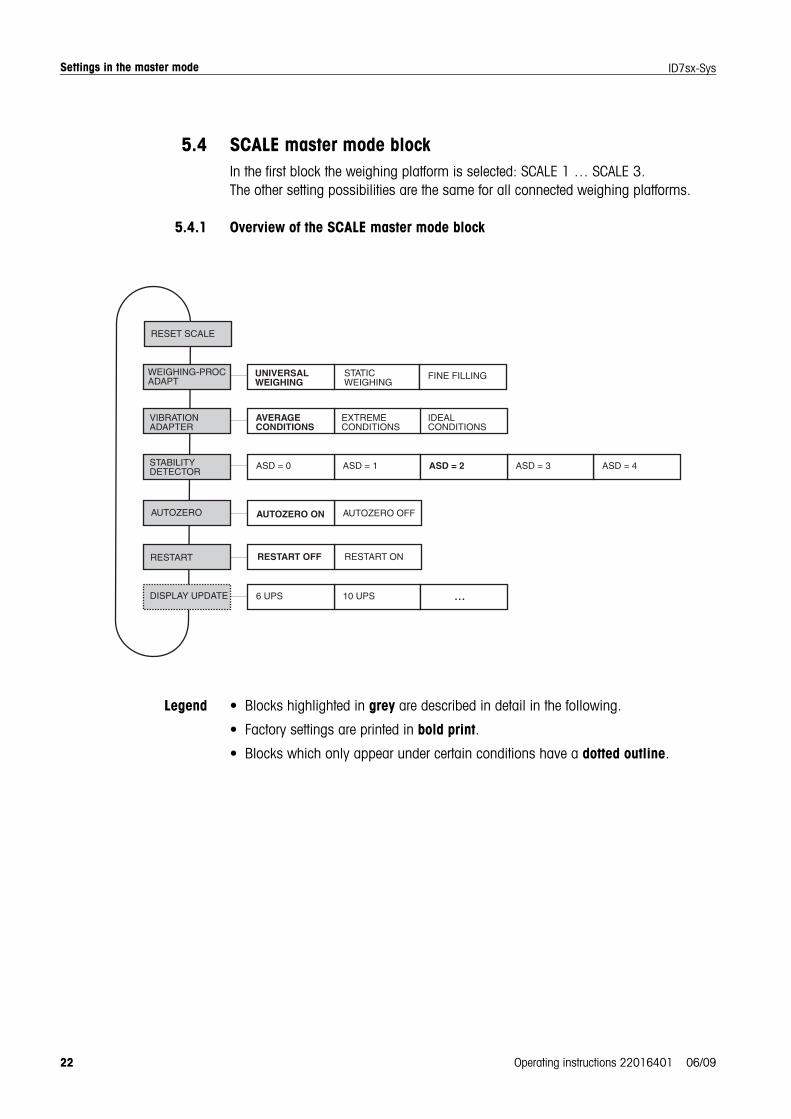
5.4 SCALE master mode blockIn the first block the weighing platform is selected: SCALE 1 … SCALE 3.The other setting possibilities are the same for all connected weighing platforms.
5.4.1 Overview of the SCALE master mode block
Legend • Blocks highlighted in grey are described in detail in the following.
• Factory settings are printed in bold print.
• Blocks which only appear under certain conditions have a dotted outline.
...
22 Operating instructions 22016401 06/09
Settings in the master modeID7sx-Sys
5.4.2 Settings in the SCALE master mode block
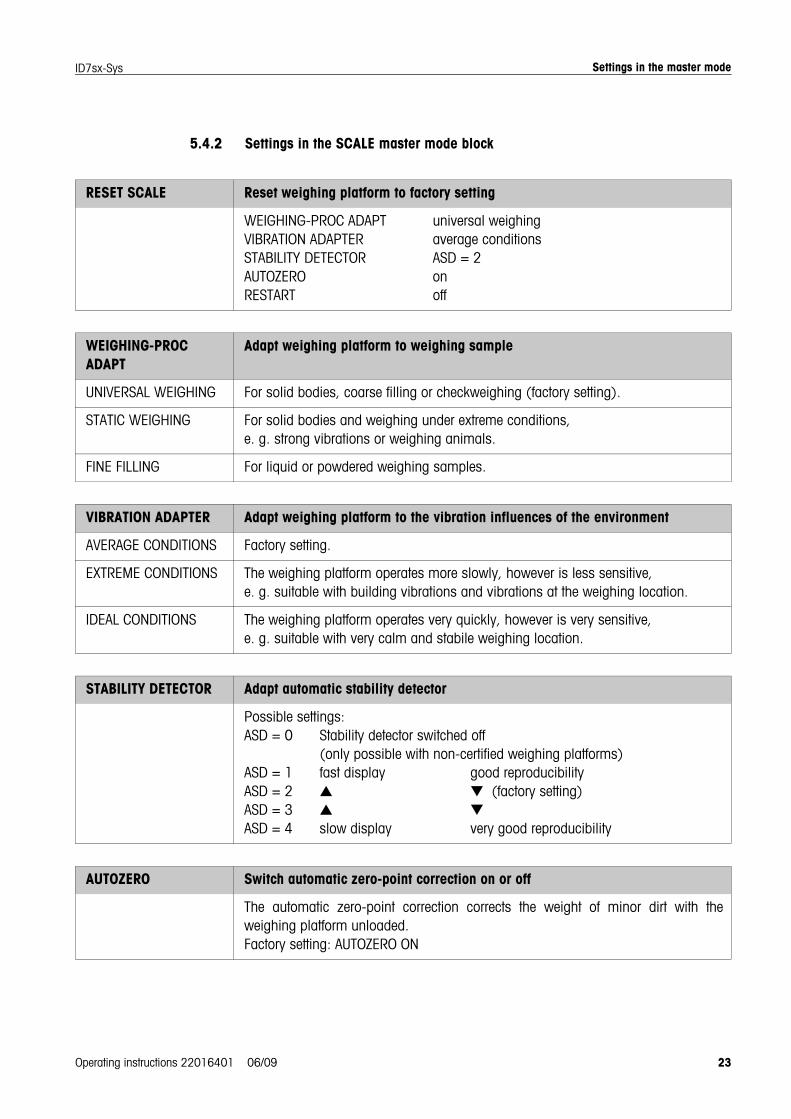
RESET SCALE Reset weighing platform to factory setting
WEIGHING-PROC ADAPT universal weighingVIBRATION ADAPTER average conditionsSTABILITY DETECTOR ASD = 2AUTOZERO onRESTART off
WEIGHING-PROC ADAPT
Adapt weighing platform to weighing sample
UNIVERSAL WEIGHING For solid bodies, coarse filling or checkweighing (factory setting).
STATIC WEIGHING For solid bodies and weighing under extreme conditions, e. g. strong vibrations or weighing animals.
FINE FILLING For liquid or powdered weighing samples.
VIBRATION ADAPTER Adapt weighing platform to the vibration influences of the environment
AVERAGE CONDITIONS Factory setting.
EXTREME CONDITIONS The weighing platform operates more slowly, however is less sensitive, e. g. suitable with building vibrations and vibrations at the weighing location.
IDEAL CONDITIONS The weighing platform operates very quickly, however is very sensitive, e. g. suitable with very calm and stabile weighing location.
STABILITY DETECTOR Adapt automatic stability detector
Possible settings:ASD = 0 Stability detector switched off
(only possible with non-certified weighing platforms)ASD = 1 fast display good reproducibilityASD = 2 ▲ ▼ (factory setting)ASD = 3 ▲ ▼
ASD = 4 slow display very good reproducibility
AUTOZERO Switch automatic zero-point correction on or off
The automatic zero-point correction corrects the weight of minor dirt with the weighing platform unloaded.Factory setting: AUTOZERO ON
Operating instructions 22016401 06/09 23
Settings in the master mode ID7sx-Sys
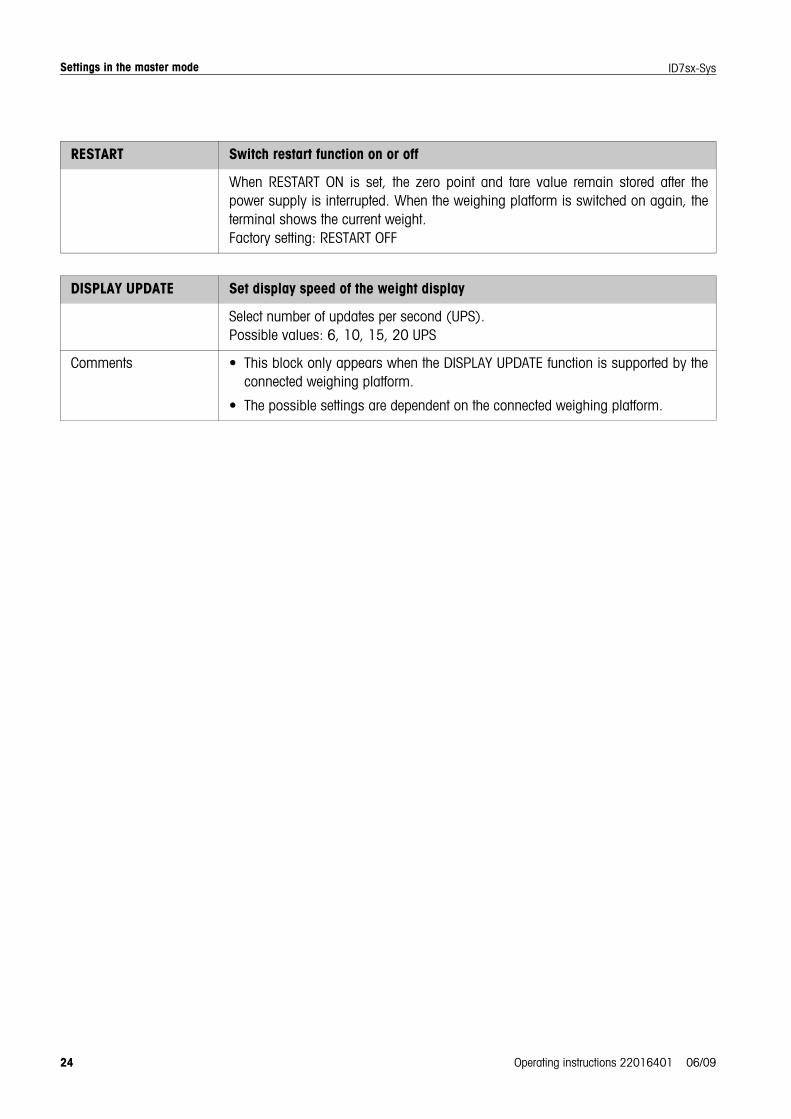
RESTART Switch restart function on or off
When RESTART ON is set, the zero point and tare value remain stored after the power supply is interrupted. When the weighing platform is switched on again, the terminal shows the current weight.Factory setting: RESTART OFF
DISPLAY UPDATE Set display speed of the weight display
Select number of updates per second (UPS).Possible values: 6, 10, 15, 20 UPS
Comments • This block only appears when the DISPLAY UPDATE function is supported by the connected weighing platform.
• The possible settings are dependent on the connected weighing platform.
24 Operating instructions 22016401 06/09
Settings in the master modeID7sx-Sys
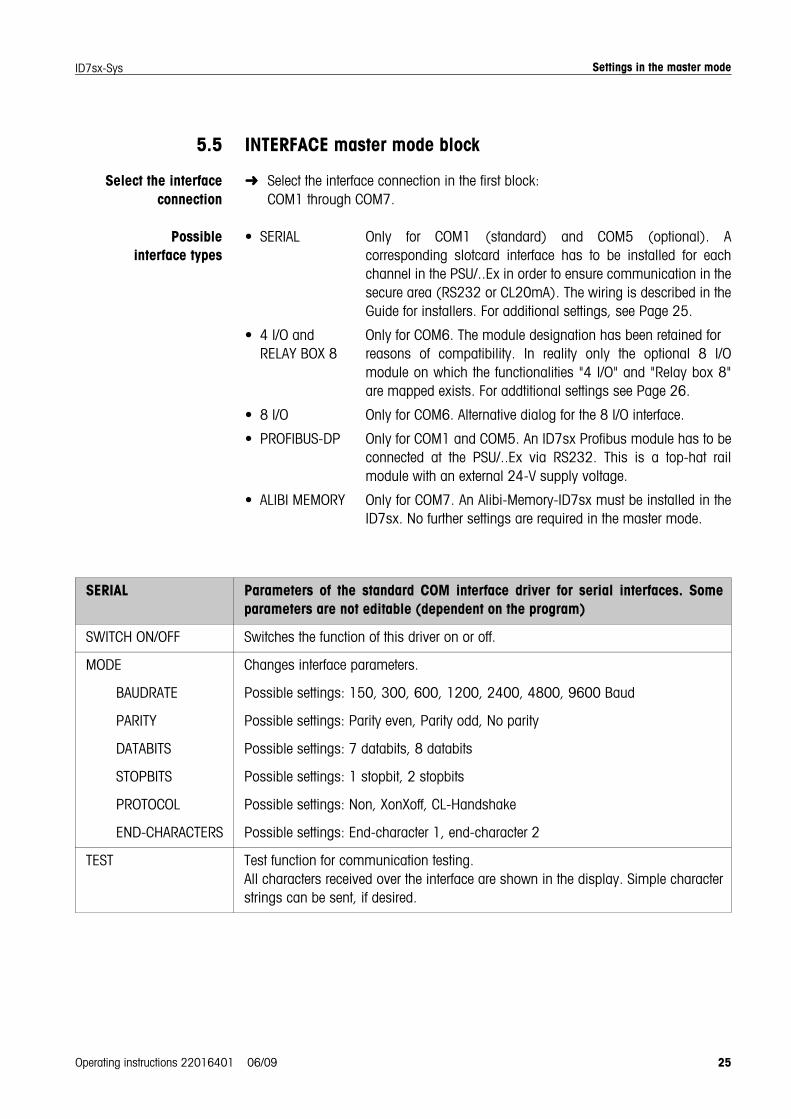
5.5 INTERFACE master mode block
Select the interface connection
➜ Select the interface connection in the first block: COM1 through COM7.
Possible interface types
• SERIAL Only for COM1 (standard) and COM5 (optional). A corresponding slotcard interface has to be installed for each channel in the PSU/..Ex in order to ensure communication in the secure area (RS232 or CL20mA). The wiring is described in the Guide for installers. For additional settings, see Page 25.
• 4 I/O and Only for COM6. The module designation has been retained forRELAY BOX 8 reasons of compatibility. In reality only the optional 8 I/O
module on which the functionalities "4 I/O" and "Relay box 8" are mapped exists. For addtitional settings see Page 26.
• 8 I/O Only for COM6. Alternative dialog for the 8 I/O interface.
• PROFIBUS-DP Only for COM1 and COM5. An ID7sx Profibus module has to be connected at the PSU/..Ex via RS232. This is a top-hat rail module with an external 24-V supply voltage.
• ALIBI MEMORY Only for COM7. An Alibi-Memory-ID7sx must be installed in the ID7sx. No further settings are required in the master mode.
SERIAL Parameters of the standard COM interface driver for serial interfaces. Some parameters are not editable (dependent on the program)
SWITCH ON/OFF Switches the function of this driver on or off.
MODE Changes interface parameters.
BAUDRATE Possible settings: 150, 300, 600, 1200, 2400, 4800, 9600 Baud
PARITY Possible settings: Parity even, Parity odd, No parity
DATABITS Possible settings: 7 databits, 8 databits
STOPBITS Possible settings: 1 stopbit, 2 stopbits
PROTOCOL Possible settings: Non, XonXoff, CL-Handshake
END-CHARACTERS Possible settings: End-character 1, end-character 2
TEST Test function for communication testing. All characters received over the interface are shown in the display. Simple character strings can be sent, if desired.
Operating instructions 22016401 06/09 25
Settings in the master mode ID7sx-Sys
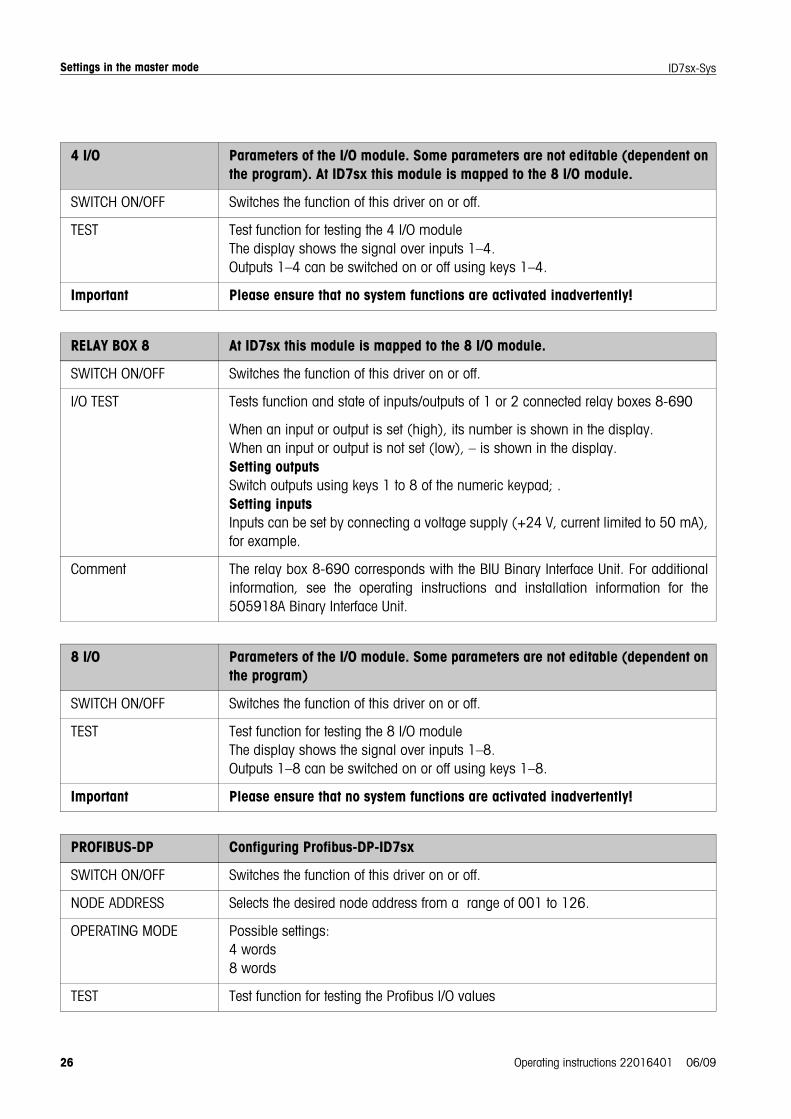
4 I/O Parameters of the I/O module. Some parameters are not editable (dependent on the program). At ID7sx this module is mapped to the 8 I/O module.
SWITCH ON/OFF Switches the function of this driver on or off.
TEST Test function for testing the 4 I/O moduleThe display shows the signal over inputs 1–4. Outputs 1–4 can be switched on or off using keys 1–4.
Important Please ensure that no system functions are activated inadvertently!
RELAY BOX 8 At ID7sx this module is mapped to the 8 I/O module.
SWITCH ON/OFF Switches the function of this driver on or off.
I/O TEST Tests function and state of inputs/outputs of 1 or 2 connected relay boxes 8-690
When an input or output is set (high), its number is shown in the display.When an input or output is not set (low), – is shown in the display.Setting outputsSwitch outputs using keys 1 to 8 of the numeric keypad; .Setting inputsInputs can be set by connecting a voltage supply (+24 V, current limited to 50 mA), for example.
Comment The relay box 8-690 corresponds with the BIU Binary Interface Unit. For additional information, see the operating instructions and installation information for the 505918A Binary Interface Unit.
8 I/O Parameters of the I/O module. Some parameters are not editable (dependent on the program)
SWITCH ON/OFF Switches the function of this driver on or off.
TEST Test function for testing the 8 I/O moduleThe display shows the signal over inputs 1–8. Outputs 1–8 can be switched on or off using keys 1–8.
Important Please ensure that no system functions are activated inadvertently!
PROFIBUS-DP Configuring Profibus-DP-ID7sx
SWITCH ON/OFF Switches the function of this driver on or off.
NODE ADDRESS Selects the desired node address from a range of 001 to 126.
OPERATING MODE Possible settings:4 words8 words
TEST Test function for testing the Profibus I/O values
26 Operating instructions 22016401 06/09
What to do if....?
Operating instructions 22016401 06/09 27
ID7sx-Sys
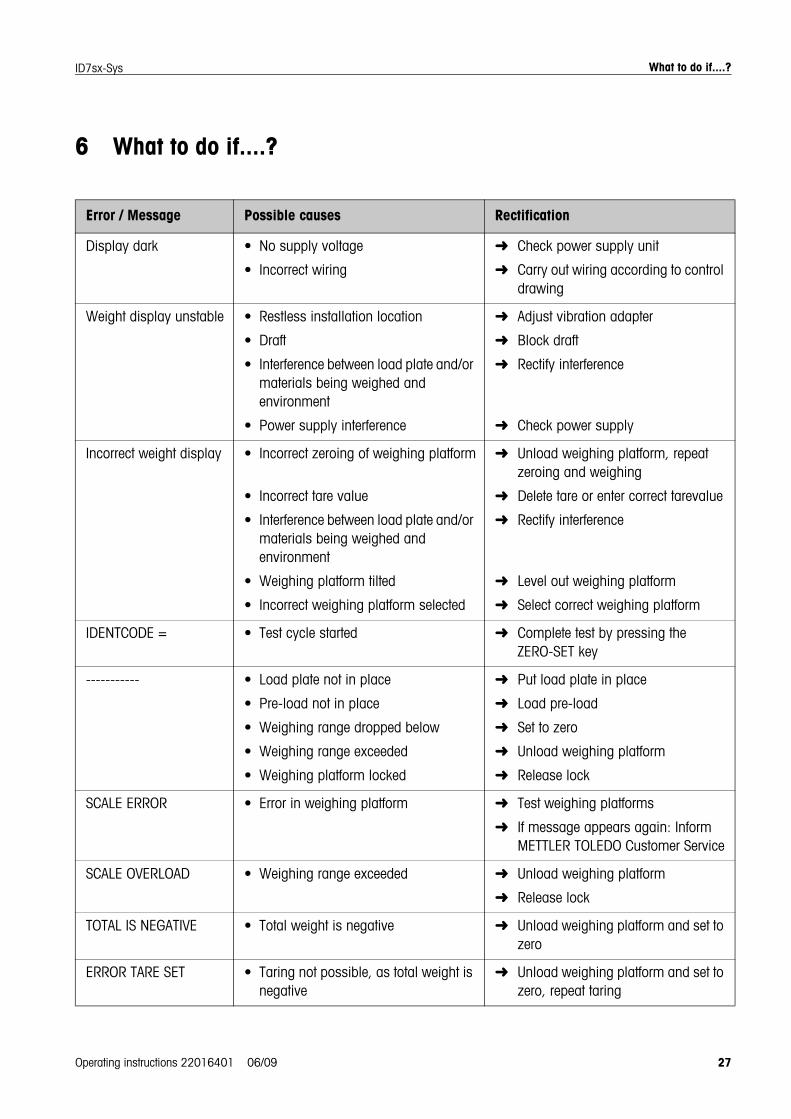
6 What to do if....?
Error / Message Possible causes Rectification
Display dark • No supply voltage
• Incorrect wiring
➜ Check power supply unit
➜ Carry out wiring according to control drawing
Weight display unstable • Restless installation location
• Draft
• Interference between load plate and/or materials being weighed and environment
• Power supply interference
➜ Adjust vibration adapter
➜ Block draft
➜ Rectify interference
➜ Check power supply
Incorrect weight display • Incorrect zeroing of weighing platform
• Incorrect tare value
• Interference between load plate and/or materials being weighed and environment
• Weighing platform tilted
• Incorrect weighing platform selected
➜ Unload weighing platform, repeat zeroing and weighing
➜ Delete tare or enter correct tarevalue
➜ Rectify interference
➜ Level out weighing platform
➜ Select correct weighing platform
IDENTCODE = • Test cycle started ➜ Complete test by pressing the ZERO-SET key
----------- • Load plate not in place
• Pre-load not in place
• Weighing range dropped below
• Weighing range exceeded
• Weighing platform locked
➜ Put load plate in place
➜ Load pre-load
➜ Set to zero
➜ Unload weighing platform
➜ Release lock
SCALE ERROR • Error in weighing platform ➜ Test weighing platforms
➜ If message appears again: Inform METTLER TOLEDO Customer Service
SCALE OVERLOAD • Weighing range exceeded ➜ Unload weighing platform
➜ Release lock
TOTAL IS NEGATIVE • Total weight is negative ➜ Unload weighing platform and set to zero
ERROR TARE SET • Taring not possible, as total weight is negative
➜ Unload weighing platform and set to zero, repeat taring
What to do if....?
28 Operating instructions 22016401 06/09
ID7sx-Sys
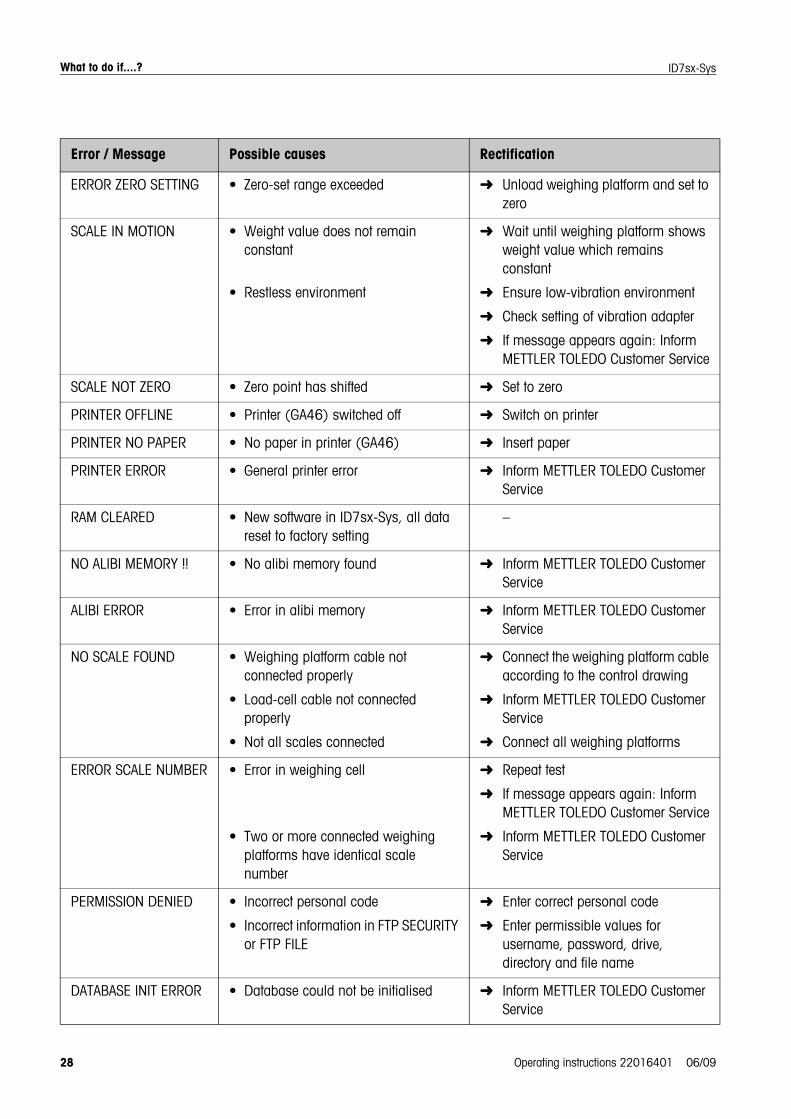
ERROR ZERO SETTING • Zero-set range exceeded ➜ Unload weighing platform and set to zero
SCALE IN MOTION • Weight value does not remain constant
• Restless environment
➜ Wait until weighing platform shows weight value which remains constant
➜ Ensure low-vibration environment
➜ Check setting of vibration adapter
➜ If message appears again: Inform METTLER TOLEDO Customer Service
SCALE NOT ZERO • Zero point has shifted ➜ Set to zero
PRINTER OFFLINE • Printer (GA46) switched off ➜ Switch on printer
PRINTER NO PAPER • No paper in printer (GA46) ➜ Insert paper
PRINTER ERROR • General printer error ➜ Inform METTLER TOLEDO Customer Service
RAM CLEARED • New software in ID7sx-Sys, all data reset to factory setting
–
NO ALIBI MEMORY !! • No alibi memory found ➜ Inform METTLER TOLEDO Customer Service
ALIBI ERROR • Error in alibi memory ➜ Inform METTLER TOLEDO Customer Service
NO SCALE FOUND • Weighing platform cable not connected properly
• Load-cell cable not connected properly
• Not all scales connected
➜ Connect the weighing platform cable according to the control drawing
➜ Inform METTLER TOLEDO Customer Service
➜ Connect all weighing platforms
ERROR SCALE NUMBER • Error in weighing cell
• Two or more connected weighing platforms have identical scale number
➜ Repeat test
➜ If message appears again: Inform METTLER TOLEDO Customer Service
➜ Inform METTLER TOLEDO Customer Service
PERMISSION DENIED • Incorrect personal code
• Incorrect information in FTP SECURITY or FTP FILE
➜ Enter correct personal code
➜ Enter permissible values for username, password, drive, directory and file name
DATABASE INIT ERROR • Database could not be initialised ➜ Inform METTLER TOLEDO Customer Service
Error / Message Possible causes Rectification
Technical data and accessoriesID7sx-Sys
7 Technical data and accessories
7.1 Technical data
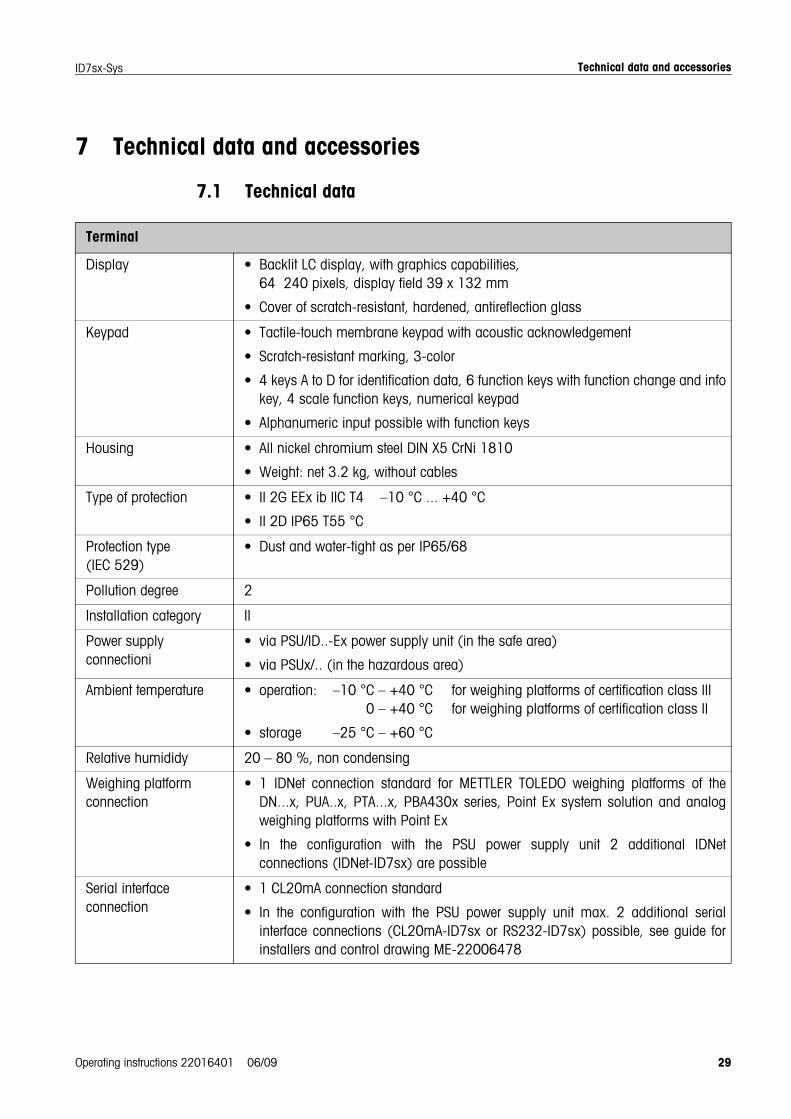
Terminal
Display • Backlit LC display, with graphics capabilities, 64 240 pixels, display field 39 x 132 mm
• Cover of scratch-resistant, hardened, antireflection glass
Keypad • Tactile-touch membrane keypad with acoustic acknowledgement
• Scratch-resistant marking, 3-color
• 4 keys A to D for identification data, 6 function keys with function change and info key, 4 scale function keys, numerical keypad
• Alphanumeric input possible with function keys
Housing • All nickel chromium steel DIN X5 CrNi 1810
• Weight: net 3.2 kg, without cables
Type of protection • II 2G EEx ib IIC T4 –10 °C ... +40 °C
• II 2D IP65 T55 °C
Protection type (IEC 529)
• Dust and water-tight as per IP65/68
Pollution degree 2
Installation category II
Power supply connectioni
• via PSU/ID..-Ex power supply unit (in the safe area)
• via PSUx/.. (in the hazardous area)
Ambient temperature • operation: –10 °C – +40 °C for weighing platforms of certification class III 0 – +40 °C for weighing platforms of certification class II
• storage –25 °C – +60 °C
Relative humididy 20 – 80 %, non condensing
Weighing platform connection
• 1 IDNet connection standard for METTLER TOLEDO weighing platforms of the DN...x, PUA..x, PTA...x, PBA430x series, Point Ex system solution and analog weighing platforms with Point Ex
• In the configuration with the PSU power supply unit 2 additional IDNet connections (IDNet-ID7sx) are possible
Serial interface connection
• 1 CL20mA connection standard
• In the configuration with the PSU power supply unit max. 2 additional serial interface connections (CL20mA-ID7sx or RS232-ID7sx) possible, see guide for installers and control drawing ME-22006478
Operating instructions 22016401 06/09 29
Technical data and accessories ID7sx-Sys
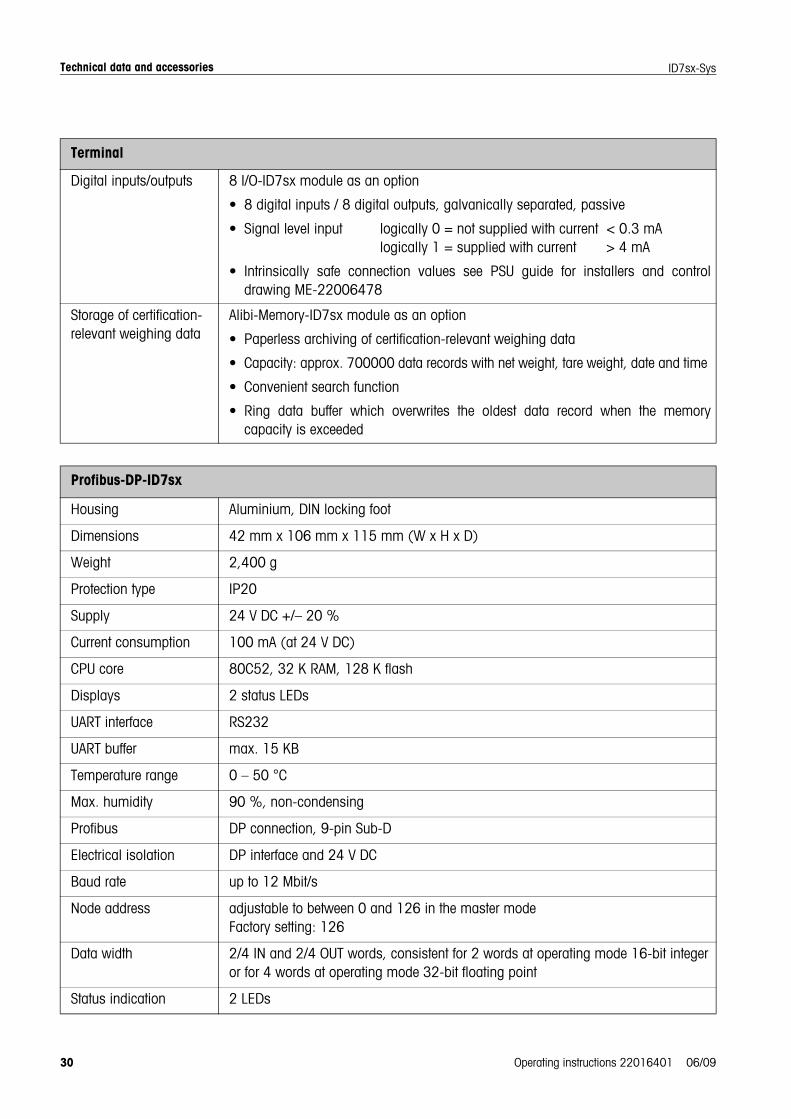
Digital inputs/outputs 8 I/O-ID7sx module as an option
• 8 digital inputs / 8 digital outputs, galvanically separated, passive
• Signal level input logically 0 = not supplied with current < 0.3 mA logically 1 = supplied with current > 4 mA
• Intrinsically safe connection values see PSU guide for installers and control drawing ME-22006478
Storage of certification-relevant weighing data
Alibi-Memory-ID7sx module as an option
• Paperless archiving of certification-relevant weighing data
• Capacity: approx. 700000 data records with net weight, tare weight, date and time
• Convenient search function
• Ring data buffer which overwrites the oldest data record when the memory capacity is exceeded
Terminal
Profibus-DP-ID7sx
Housing Aluminium, DIN locking foot
Dimensions 42 mm x 106 mm x 115 mm (W x H x D)
Weight 2,400 g
Protection type IP20
Supply 24 V DC +/– 20 %
Current consumption 100 mA (at 24 V DC)
CPU core 80C52, 32 K RAM, 128 K flash
Displays 2 status LEDs
UART interface RS232
UART buffer max. 15 KB
Temperature range 0 – 50 °C
Max. humidity 90 %, non-condensing
Profibus DP connection, 9-pin Sub-D
Electrical isolation DP interface and 24 V DC
Baud rate up to 12 Mbit/s
Node address adjustable to between 0 and 126 in the master modeFactory setting: 126
Data width 2/4 IN and 2/4 OUT words, consistent for 2 words at operating mode 16-bit integer or for 4 words at operating mode 32-bit floating point
Status indication 2 LEDs
30 Operating instructions 22016401 06/09
Technical data and accessoriesID7sx-Sys
7.2 Accessories
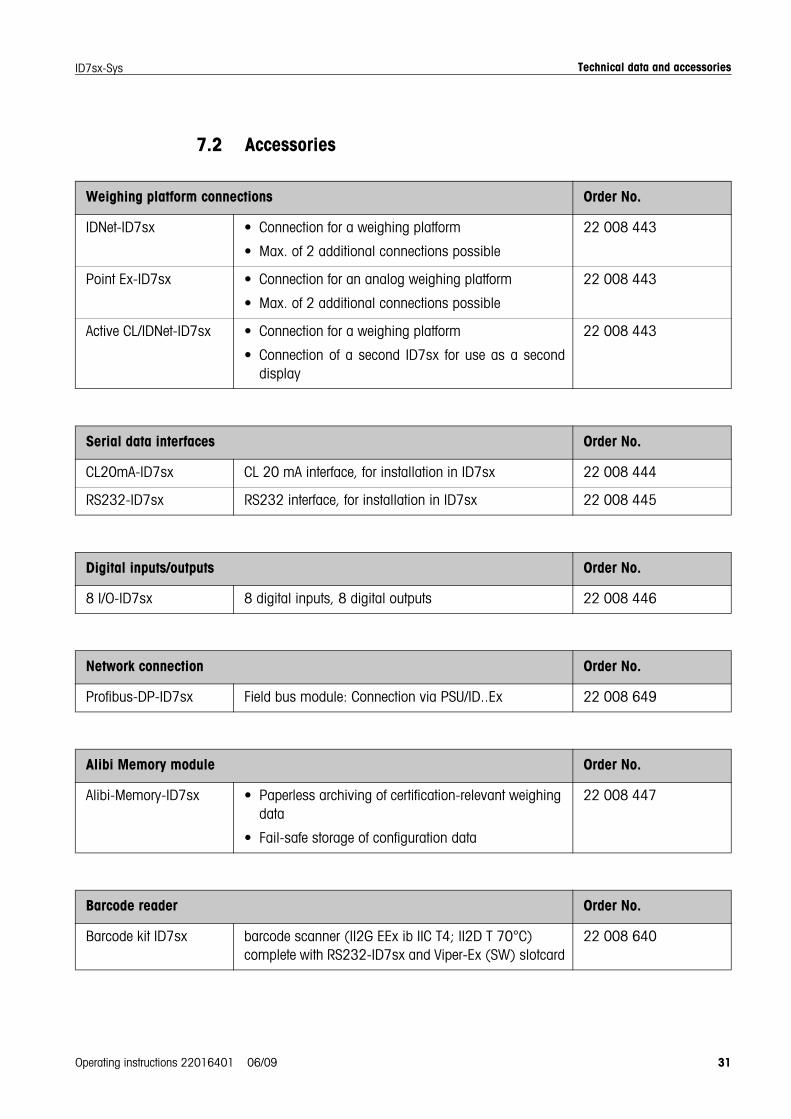
Weighing platform connections Order No.
IDNet-ID7sx • Connection for a weighing platform
• Max. of 2 additional connections possible
22 008 443
Point Ex-ID7sx • Connection for an analog weighing platform
• Max. of 2 additional connections possible
22 008 443
Active CL/IDNet-ID7sx • Connection for a weighing platform
• Connection of a second ID7sx for use as a second display
22 008 443
Serial data interfaces Order No.
CL20mA-ID7sx CL 20 mA interface, for installation in ID7sx 22 008 444
RS232-ID7sx RS232 interface, for installation in ID7sx 22 008 445
Digital inputs/outputs Order No.
8 I/O-ID7sx 8 digital inputs, 8 digital outputs 22 008 446
Network connection Order No.
Profibus-DP-ID7sx Field bus module: Connection via PSU/ID..Ex 22 008 649
Alibi Memory module Order No.
Alibi-Memory-ID7sx • Paperless archiving of certification-relevant weighing data
• Fail-safe storage of configuration data
22 008 447
Barcode reader Order No.
Barcode kit ID7sx barcode scanner (II2G EEx ib IIC T4; II2D T 70°C)complete with RS232-ID7sx and Viper-Ex (SW) slotcard
22 008 640
Operating instructions 22016401 06/09 31

Technical data and accessories ID7sx-Sys
Other accessories Order No.
ID7sx installation set for cabinet installation 22 008 439
Wall bracket Completely rust-proof 00 504 130
Floor stand Completely rust-proof 00 504 132
Stand socket Completely rust-proof 00 503 701
Bracket stand Completely rust-proof 00 504 128
32 Operating instructions 22016401 06/09
Index
Operating instructions 22016401 06/09 33
ID7sx-Sys
8 Index
AAccessories...................31Additional functions .......12Alibi memory...........14, 25Alphanumeric
identification ..............19Applications ....................5Autozero ...................9, 23
BBasic functions................9Big Weight Display ..........6
CCleaning.........................8Commissioning ...............8
DDate.............................21Digital inputs/
outputs................30, 31Display.....................6, 29Display update ..............24Documentation................5
EEntries..........................19Error messages .............27
FFunction keys......6, 12, 29
HHousing .......................29
II/O test .........................26ID code ........................12Interface
4 I/O......................268 I/O................26, 31CL20mA-ID7sx .......31
Interface connections .........25, 29
Introduction.....................5
KKeypad.....................7, 29
LLanguage .....................20
MMaster mode ................ 17Master mode block
INTERFACE ............ 25SCALE ................... 22TERMINAL.............. 20
Multi-scale mode .......... 10
PPersonal code .............. 21Profibus-DP 25, 26, 30, 31
RRecall information......... 13Relay box 8 ................. 26Reset scale .................. 23Reset terminal .............. 20Restart ......................... 24
SSafety precautions........... 4Scale modes ................ 21Serial (RS232, CL,
RS422/485) ............. 25Set zero ......................... 9Stability detector ........... 23Switch over weighing
platform.................... 10
TTare .............................. 9Technical data .............. 29Terminal ...................... 29Test weighing platform .. 12Time............................ 21
VVibration adapter .......... 23
WWeighing ..................... 10Weighing platform
connections ........ 29, 31Weighing process
adapter..................... 23What to do if....?........... 27
Congratulations on choosing the quality and precision of METTLER TOLEDO. Proper use according to these instructions and regular calibration and maintenance by our factory-trained service team ensure dependable and accurate operation, protecting your investment. Contact us about a ServiceXXL agreement tailored to your needs and budget. We invite you to register your product at www.mt.com/productregistration so we can contact you about enhancements, updates and important notifications concerning your product.
�*22016401*� 22016401
Subject to technical changes © Mettler-Toledo (Albstadt) GmbH 06/09 Printed in Germany 22016401
Mettler-Toledo (Albstadt) GmbHD-72458 AlbstadtTel. ++49-7431-14 0, Fax ++49-7431-14 232Internet: http://www.mt.com


![[Stuart E. Madnick, John J. Donovan] Operating Sys(Bookos.org)](https://static.fdocuments.us/doc/165x107/55cf9cb2550346d033aab895/stuart-e-madnick-john-j-donovan-operating-sysbookosorg.jpg)