Okta/DropboxActive, DirectoryIntegration, Guide€¦ ·...
22
Okta/Dropbox Active Directory Integration Guide 1 Okta/Dropbox Active Directory Integration Guide Okta Inc. 301 Brannan Street, 3rd Floor San Francisco CA, 94107 [email protected] 18887227871
Transcript of Okta/DropboxActive, DirectoryIntegration, Guide€¦ ·...

Okta/Dropbox Active Directory Integration Guide 1
Okta/Dropbox Active Directory Integration Guide
Okta Inc. 301 Brannan Street, 3rd Floor San Francisco CA, 94107
[email protected] 1-‐888-‐722-‐7871

Okta/Dropbox Active Directory Integration Guide 2 | 2
Table of Contents
1 Okta Directory Integration Edition for Dropbox 2 Installing Active Directory Agent Pre-‐requisites 2 System Requirements 3 Permissions required for the user running the installer 6 Installing and Configuring the AD Agent 7 AD Imports 8 Enabling Delegated Authentication (Optional) 9 Allowing users to reset AD password in Okta (Optional) 10 Ensuring High Availability 10 Multi-‐Domain support 11 Setting up Desktop SSO -‐ Installing IWA Agent (Optional) 12 Installing IWA Web App on a server with multiple Applications (Optional) 14 Desktop SSO Configuration(Optional) 15 Running the Dropbox Application Wizard 15 Setting up Dropbox Application in Okta 15 Automatic group based provisioning 17 User Experience 18 Administrative Experience 18 Troubleshooting
Okta Directory Integration Edition for Dropbox

Okta/Dropbox Active Directory Integration Guide 3
Okta is a 100-‐percent on-‐demand, turnkey solution that automates user management and SSO with cloud and web applications. Okta Directory Integration Edition for Dropbox offers a complete, robust, and easy-‐to-‐use AD integration with Dropbox that provides automated provisioning and deprovisioning of Dropbox accounts based on AD users and security groups.
With Okta Directory Integration Edition for Dropbox, you can take advantage of the following features:
l Automatic Provisioning/Deprovisioning -‐ When a user is added to AD, a Dropbox account will be
automatically provisioned and, conversely, when they are removed from AD, access to this account will be automatically removed
l Automated Group Based Provisioning-‐ Dropbox provisioning can be driven by Active Directory
security groups. .
As part of Directory Integration Edition, Okta can integrate with Active Directory to support seamless authentication with Active Directory. While the Dropbox integration focuses on provisioning, this deployment guide will cover these additional authentication features that are available to Okta customers and can be enabled if desired:
l Delegated Authentication -‐ Allows your users to login to Okta with their Active Directory credentials.
l Desktop SSO -‐ Okta leverages Microsoft’s Integrated Windows Authentication to seamlessly
authenticate users to Okta that are already authenticated with their Windows domain. You simply download and install Okta’s IWA web application, configure the relevant IP ranges, and the setup is complete. Both Mac and PC users can simply log into their corporate network once and access Dropbox with a single click. No additional usernames or passwords required, just like on-‐premises apps.
In the next sections, we’re going to:
1. Install the AD agent -‐ The Okta AD Agent connects Active Directory with the Okta service -‐ allowing
AD-‐based provisioning and authentication to take place. The section guides you through the deployment of these agents.
2. Turn on Delegated Authentication (Optional) -‐ Delegated Authentication allows Okta to authenticate
users against Active Directory. It is optional for the Dropbox deployment if Okta is only being used as a provisioning engine (end users will login through Dropbox directly). If you wish to set up single sign-‐on for Dropbox and other applications through Okta’s Active Directory integration, this will be required.
3. Install the IWA Web App to enable Desktop SSO (Optional) -‐ This provides seamless Okta access and
application single sign-‐on through Integrated Windows Authentication. Similar to the above, if Okta is only being used as a provisioning engine, then this is optional
4. Configure User management for Dropbox -‐ For Okta Directory Integration for Dropbox, Dropbox
will be the only application available. An administrator will need to instantiate an instance of the Dropbox application from the Okta Application Network and configure user management with Dropbox.

Okta/Dropbox Active Directory Integration Guide 4
Installing Active Directory Agent
System Requirements Minimum System Requirements Windows Server 2003 R2 or later 20Mb memory for service AD Service Account created upon agent installation
Suggested System Requirements 256 Mb of memory for Service Dedicated AD Service Account with Domain users permissions Separate server for Domain Controller (can be shared)
Before You Begin
Prior to installing the agent, please review these items.
1. Prior to running the AD Integration wizard, you need to create an Okta Administrative user in the Okta Service -‐ this user should have an Okta specific password and not an Active Directory password. The AD Agent connects to Okta using this account.
2. Consider the Agent a part of your IT infrastructure-‐ The windows server where the agent resides
must be on at all times. In other words, don’t install it on your laptop. The agent host server must have a continuous connection to the internet so it can communicate with Okta.
3. Run AD setup wizard from the host server -‐We recommend running this setup wizard in a web
browser on the Windows server where you want to install the agent. Otherwise, you will need to transfer the agent installer to the agent host server, then run the installer.
4. Install on Widows Server 2003 R2 or later -‐ You need access to a Windows server to install the Okta
Active Directory Agent. You do not need to install the agent on the domain controller itself.
5. Must to be a member of your Active Directory Domain-‐ The agent host server must be a member of the same windows domain your Active Directory users belong to.

Okta/Dropbox Active Directory Integration Guide 5
Permissions required for the user running the installer There are three accounts that you’ll need permissions for:
• Okta Administrative user in the Okta Service (created within Okta)
• An AD user account to run the AD Agent installer
• Okta Service Account (created by the installer) -‐ A Service account that the service runs as after
installation. This account can be created automatically by the installer, or you can select an existing account. If you select an existing account, it will need to have the permissions detailed in this section.
Okta administrative user permissions You need to create a dedicated Administrative account within Okta before you begin installing the AD Agent -‐ this user should have an Okta specific password and not an Active Directory password. The AD Agent connects to Okta using this account
1. From the People tab, click on Add person to create a user (e.g. [email protected])

Okta/Dropbox Active Directory Integration Guide 6
2. Go to Security > Administration and click on the Add Administrators button.
3. Select which type of Administrator you’d like to make this new user. We recommend making them organization or application administrators.
User Permissions required to Install the agent
The installer requires privileges of both local and domain administrators. Since domain administrators already include local administrative privileges, we recommend running the Okta AD Agent installer as a user who is a member of a Domain Admins or enterprise group.
Note: If you’re using an existing service account, you do not have to be a domain administrator.
Okta Service Account
The AD Agent installer can create a new service account, called “Okta Service”, or it can use an existing user account that you select. If you select an existing user account, it must have the following permissions on CN=Users container:
• List Content
• Read all properties
• Read permissions
Note: These permissions are granted to all authenticated domain users, so the service account doesn’t require any special permission in the domain directory to perform standard (read-‐only) operations like importing and delegated authentication.
If you choose to have the installer create the Okta Service account, it is created with the following permissions.
Okta/Dropbox Active Directory Integration Guide 7
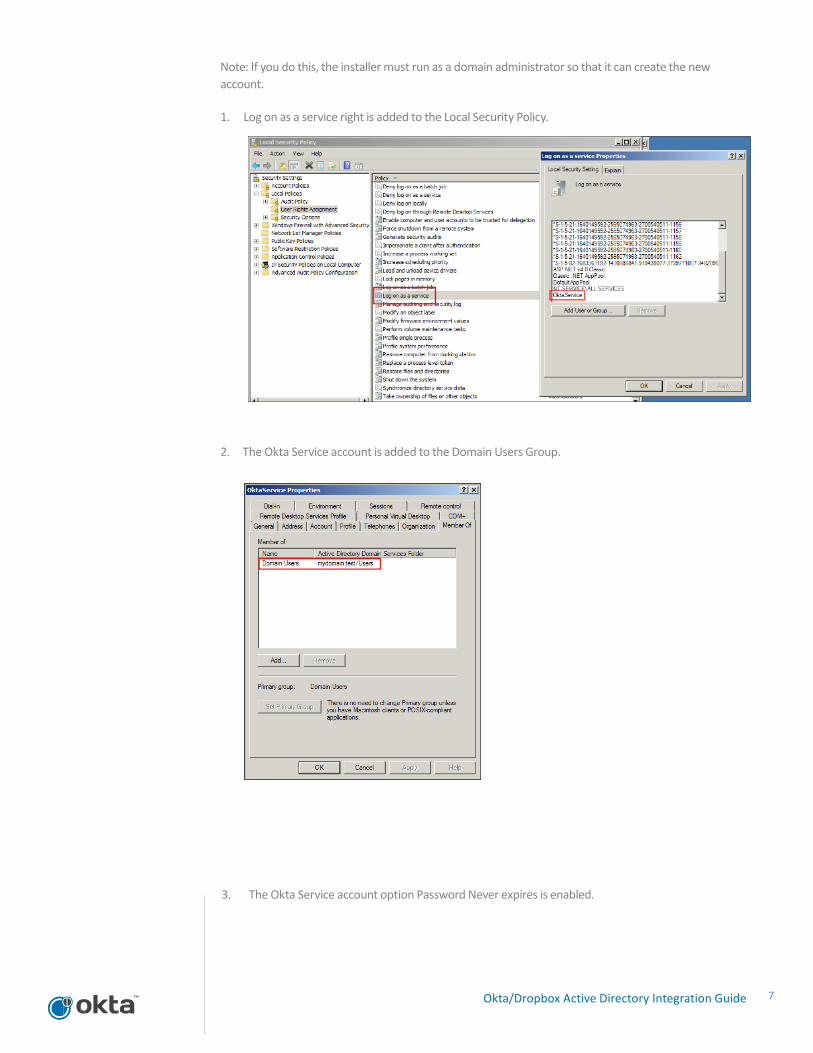
Note: If you do this, the installer must run as a domain administrator so that it can create the new account.
1. Log on as a service right is added to the Local Security Policy.
2. The Okta Service account is added to the Domain Users Group.
3. The Okta Service account option Password Never expires is enabled.

Okta/Dropbox Active Directory Integration Guide 8
Installing and Configuring 1. Make sure you created an Okta Administrative user described in the Before you Begin section.
2. From the People tab, click on the Directories tab, and then click on the Add Directory button.
3. Click on the Set up Active Directory button, and click on the Begin AD setup button.
This begins the AD agent download.
4. Run the installer. You’ll be prompted to enter the Active Directory domain you’d like to manage with
this agent and then create a new domain user for the Okta AD agent to run as and set a password (the Okta service has no access to the password you set). This user will be used by all agents managing the domain.
5. Enter your Okta credentials to register the AD Agent with Okta and follow the prompts to finish the
installation.
6. Return back to the Set up Active Directory Page in the Okta Admin application and click next in the “Active Directory Agent Started” dialog. That’s it! -‐ your agent has been successfully installed.
The Okta AD Agent Management Utility should open after the installation is complete (allows you to start/stop the agent and provides the status of the agent)
7. Import Users -‐ Select Organization units (OUs) you would like the agent to import from. Our agent
supports multiple OU import -‐ simply select individual OUs under the Parent OU. You can select import frequency settings and decide whether you would like imports to be automatically confirmed

Okta/Dropbox Active Directory Integration Guide 9
AD Import
Once the Okta AD Agent is installed and the initial user import takes place, Okta intelligently processes the results of the user import. Matching algorithms are applied to analyze the incoming AD users and to determine if there is a match to existing Okta users or to accounts you have imported from DropBox. During import and account creation, a duplicate account is created in the native Okta store that mirrors (field mapping and data) and is associated with the imported AD account. Future user imports can be set to a schedule or performed on demand.
Adding a User When a user is added to Active Directory, the new object is detected by the Okta AD Agent and automatically added to the Okta service. Only necessary fields are transmitted, including name, UPN, SAMAccountName, email address, and security group membership. The Okta AD Agent never sends passwords to Okta’s cloud service. Existing accounts in DropBox can be imported and automatically matched against Active Directory users based on explicit rules or heuristic matching.
Security Groups Import
AD Security Groups are automatically imported into Okta and show up under the “People-‐>Groups” tab along with the membership. These groups, like all other groups (eg. “Everyone” group), can be used for application assignment and provisioning purposes. For AD Security groups, because the memberships are imported from AD periodically, we can automate provisioning into applications by means of AD Security Group membership in your Active Directory. More will be discussed in the User Management setup section.

Okta/Dropbox Active Directory Integration Guide 10
Enabling Delegated Authentication Overview(Optional)
Okta’s AD integration support also allows you to delegate the authentication of users into Okta to your on-‐premise AD Domain instead. That is, user login attempts to mycompany.okta.com will be checked against Active Directory for authentication. Users can then easily log into Okta using their Okta username and active directory password.
More specifically, the process is:
1. The user types username and password in the Okta end user home page. This login page is
protected with SSL and a security image to prevent phishing; multi-‐factor authentication (extra security question or smartphone soft token) can be enabled as well.
2. The username and password are transmitted to an Okta AD Agent running behind the firewall over
the SSL connection that had previously been established during setup.
3. The Okta AD agent passes those credentials to the AD Domain Controller for authentication.
4. The AD Domain Controller responds with yes/no answer, validating the username and password.
5. The yes/no response is transmitted back to the Okta service by the Okta AD Agent. If yes, the user is authenticated and sent to their Okta homepage

Okta/Dropbox Active Directory Integration Guide 11
Because this feature governs user access into Okta, the architecture supports multiple Okta AD Agents running in your environment to provide higher throughput and redundancy. If one of the Okta AD Agents stops running or loses network connectivity, the authentication requests are automatically routed to the other Okta AD Agents.
With this authentication mechanism, the user’s password is never stored in the Okta service and Active Directory is maintained as the immediate and ultimate source for credential validation. Because AD is always relied upon for user authentication, changes to the user’s status (such as password changes or deactivations) are reflected immediately in the Okta service.
Turning on Delegated Authentication
1. Go to Security > Authentication > Active Directory and click the Edit button.
2. Select Enable Delegated authentication to Active Directory and click the Test Authentication button.
Allowing users to reset AD password in Okta (Optional)
Once you’ve integrated AD and enabled Delegated authentication, you can allow your users to change their Active Directory password in Okta. Here’s how it works:
• When their password has expired, they will be prompted to change it when they attempt to
login to Okta.
• Users can also change their password from the account tab on their homepage.
To enable, go to Security > Authentication > Delegated Authentication, click edit and select Users can change their Active Directory password in Okta.
Review Checkpoint Let’s make sure you set this up correctly.
1. Import a user and verify that the correct user was imported from the correct OU.
2. Create a test user and see if they can sign into Okta using their AD credentials.
Ok, if you’re able to do both of those, let’s keep going.

Okta/Dropbox Active Directory Integration Guide 12
Ensuring High Availability
You can install as many agents on separate servers/vms as you like for redundancy purposes -‐ we recommend setting up 2 or more agents per domain.
The install instructions are the same as when you setup your first agent. If you created the Okta service account with the first AD agent, then you’ll just be prompted to enter the password during the second agent install.
You can quickly check the status console on your dashboard in the administrative app to make sure the second agent installed. If you see a green circle, it means the agent is connected and healthy.
How does AD agent handle request when HA is setup?
Each agent connects to the Okta service independently. When the service needs to talk to AD, for example to authenticate a user, it picks one of the available agents and sends it a task to complete. If one of the agents becomes unavailable, it is automatically removed from the queue and not given additional tasks.
How does the service determine if an agent is available?
Agents send periodic messages to the services. If the service does not receive any messages for 120 seconds, it is marked as unavailable.
How does the AD Agent select a domain controller to talk to?
The AD Agent relies on the underlying OS to select which domain controller to talk to.
Multiple Domain support
You can extend all of Okta’s features (Desktop SSO, Inbound SAML, Just in Time (JIT) provisioning) to multiple AD domains.
All you have to do is install this agent on your other domains

Okta/Dropbox Active Directory Integration Guide 13
Setting up Desktop SSO(Optional)
Installation Requirements
The Okta IWA Web Application installs on a Windows Server 2008 R2 or Windows Server 2008 server.
The Web Application requires that IIS7.5 (Windows Server 2008 R2) or IIS7 (Windows Server 2008) be installed on the server. If it is not installed, the installer will quit and you will see a message informing you of this error.
We recommend that you install the IWA agent on a virtual machine or server that doesn’t have any additional web applications installed. However, see the Installing on a server with multiple applications section for additional steps you will need to complete.
Installation
1. Go to Security > Authentication and click on the Download Desktop SSO installer links.
2. Enter your Okta userid and password, as these will be used to store a number of configuration items in the Okta service later in the installation process.
3. The installer next prompts for:
a. The URL of the IIS server used to host the IWA application
b. The Okta service URL
Note: Suggested values are provided by the installer for these, based on the Okta userid supplied in the previous step. However, the person performing installation should pay special attention here to make sure that the suggested values are correct.
3. The installer next downloads and installs the Microsoft WinHttpCertCfg.msi file from
http://download.microsoft.com. This is used later in the installation process.
4. Next the installer installs a number of IIS Server Roles, on which the IWA Web Application depends. The server roles installed are:
a. ISAPI Filter
b. ISAPI Extensions
c. .NET Extensibility
d. Application Development
e. ASP.NET
f. Windows Authentication
g. IIS Management Scripting and Tools
h. IIS Management Service
Okta/Dropbox Active Directory Integration Guide 14
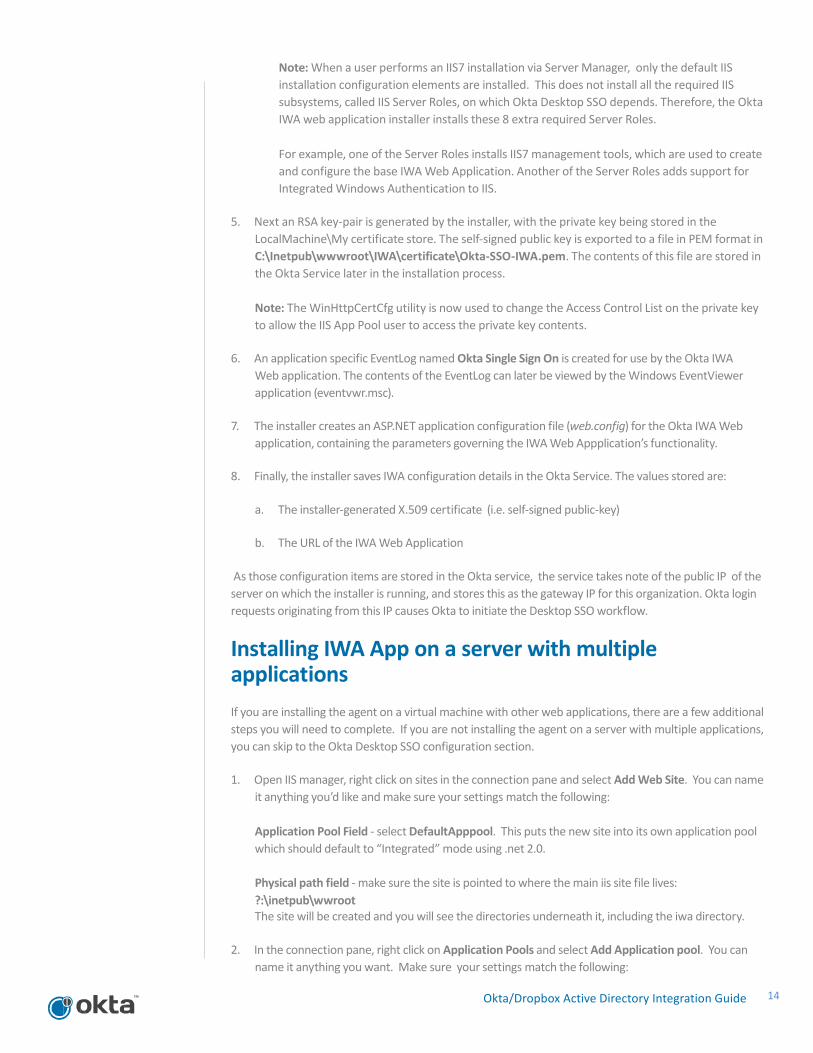
Note: When a user performs an IIS7 installation via Server Manager, only the default IIS installation configuration elements are installed. This does not install all the required IIS subsystems, called IIS Server Roles, on which Okta Desktop SSO depends. Therefore, the Okta IWA web application installer installs these 8 extra required Server Roles.
For example, one of the Server Roles installs IIS7 management tools, which are used to create and configure the base IWA Web Application. Another of the Server Roles adds support for Integrated Windows Authentication to IIS.
5. Next an RSA key-‐pair is generated by the installer, with the private key being stored in the
LocalMachine\My certificate store. The self-‐signed public key is exported to a file in PEM format in C:\Inetpub\wwwroot\IWA\certificate\Okta-‐SSO-‐IWA.pem. The contents of this file are stored in the Okta Service later in the installation process.
Note: The WinHttpCertCfg utility is now used to change the Access Control List on the private key to allow the IIS App Pool user to access the private key contents.
6. An application specific EventLog named Okta Single Sign On is created for use by the Okta IWA
Web application. The contents of the EventLog can later be viewed by the Windows EventViewer application (eventvwr.msc).
7. The installer creates an ASP.NET application configuration file (web.config) for the Okta IWA Web
application, containing the parameters governing the IWA Web Appplication’s functionality.
8. Finally, the installer saves IWA configuration details in the Okta Service. The values stored are:
a. The installer-‐generated X.509 certificate (i.e. self-‐signed public-‐key)
b. The URL of the IWA Web Application
As those configuration items are stored in the Okta service, the service takes note of the public IP of the server on which the installer is running, and stores this as the gateway IP for this organization. Okta login requests originating from this IP causes Okta to initiate the Desktop SSO workflow.
Installing IWA App on a server with multiple applications
If you are installing the agent on a virtual machine with other web applications, there are a few additional steps you will need to complete. If you are not installing the agent on a server with multiple applications, you can skip to the Okta Desktop SSO configuration section.
1. Open IIS manager, right click on sites in the connection pane and select Add Web Site. You can name
it anything you’d like and make sure your settings match the following:
Application Pool Field -‐ select DefaultApppool. This puts the new site into its own application pool which should default to “Integrated” mode using .net 2.0.
Physical path field -‐ make sure the site is pointed to where the main iis site file lives: ?:\inetpub\wwroot The site will be created and you will see the directories underneath it, including the iwa directory.
2. In the connection pane, right click on Application Pools and select Add Application pool. You can
name it anything you want. Make sure your settings match the following:

Okta/Dropbox Active Directory Integration Guide 15
• .NET Framework version field -‐ select .NET Framework v2.0 50727
• Managed Pipeline Mode field -‐ select classic
3. Expand the new site you created in step 1.
4. Right click on IWA directory underneath your new site and select convert to web application. Name the web app and in the Application pool field, select the application pool you created in step 2 (.net 2.0 CLASSIC mode).
Note: The app pool should not be assigned to any other web app.
IIS begins the conversion and when you see the IWA update from a folder icon to a web app, you know the conversion worked.
5. Click on the new site you created in step 1 and click on the authentication icon -‐ Only anonymous
Authentication should be enabled and all other options be disabled.
6. Click on IWA underneath the new site and click on the authentication iconand make sure the options match the following
Anonymous -‐ Disabled ASP .NET Impersonation -‐ Enabled Forms Authentication -‐ Disabled Windows Authentication -‐ Enabled
7. Restart IIS
That’s it! You’re good to go!
8. browser, posts this form to a special IWA authentication URL, https://mycompany.okta.com/login/sso_
iwa_auth, unique to the mycompany.okta.com sub domain, which is stored in the IWA configuration during the Okta IWA web application install.
Okta Service IWA Authentication Completion
When the HTML form is received by the Okta service, the service decodes both base-‐64 encoded form input elements.
The XML data structure is deserialized and the base-‐64 encoded encrypted limited lifetime token is extracted from the data structure. This value is base-‐64 decoded and symmetrically decrypted using the same secret key used by the service to encrypt the value. If more than 30 seconds has elapsed since the creation of this token, the IWA authentication request will fail and the browser is redirected to the URL https://mycompany.okta.com/login/default, which always displays the Okta login form, even when IWA is enabled for mycompany.com and the request is originating from within one of the mycompany.com gateway IP address ranges.
If less than 30 seconds has passed since the creation of the token, the validity of the signature of the XML data structure is verified using the public key for mycompany.com stored in the Okta service.
Once the validity has been established, the user’s Active Directory identity is extracted from the XML data
structure, and the user’s matching Okta identity is determined.

Okta/Dropbox Active Directory Integration Guide 16
If the user’s Okta account is valid, ( i.e. not deactivated or pending activation), an Okta session is then created in the identity of the Okta userid, a cookie is returned to the browser, and the Okta IWA authentication process completes successfully.
Okta Desktop SSO Configuration(Optional)
After the IWA Web Application installation is complete, the admin needs to complete the following tasks:
1. Login to the Okta service, and from the administrative dashboard, select Security > Authentication.
2. In the Desktop Single Sign-‐on section, you can choose from the following: Off -‐ Disables Desktop Single Sign On for all users. Test -‐ Choosing this option gives you a URL (i.e. https://mycompany.okta.com/login/sso_iwa to test your IWA Web Application. Users accessing Okta through other URLs, including the standard login URL (i.e. https://mycompany.okta.com) will continue to see the standard login form. On -‐ This option enables SSO for users coming from authorized gateway IP address, enabling them to automatically single sign on into Okta when they load the standard login URL (i.e. https:// mycompany.okta.com) Note: You can always sign into Okta using the https://mycompany.okta.com/login/default sign-‐in page, regardless of your selected Desktop SSO mode.
3. In the Settings section, you’ll see the Integrated Web Authentication Redirect URL. This is the
URL of the IIS Server where the Okta Single Sign on web application is running. The host and URL attributes (port number, http versus https) are editable.
4. In the Gateway IPs field, you can enter one or more gateway IPs you want the Okta service to use
during the authentication process. There is already an initial value displaying from the Okta IWA Web Application Installation. You can also specify one or more IP address ranges, with each range entered as <IpAddressRangeLowBound> -‐ <IpAddressRangeHighBound> (e.g. 192.168.0.1 -‐ 192.168.0.255). Also, make sure each range is separated by a comma or specified on a separate line.
5. Click Save.
That’s it! Now your users can access the Okta service after logging into their windows network, from a pc or a mac.
Review Checkpoint Let’s make sure you’ve set up Desktop SSO correctly -‐ Log into your domain as a user and see if you can access Okta.
If you were able to do this, then we can move onto setting up SAML and user management for DropBox. If you ran into any issues, check out our troubleshooting forum.
Okta/Dropbox Active Directory Integration Guide 17
Setting Up Dropbox Application in Okta
The key benefit for Okta Directory Integration Edition for Dropbox is automated provisioning. User Management setup allows Okta to auto-‐provision Dropbox accounts based on provisioning policies defined in Okta which can be tied to Active Directory users and AD Security Groups.
For Dropbox, the password used for Dropbox login is managed within Dropbox itself. The initial setting of the password and subsequent password updates will be handled in Dropbox. You can configure Secure Web Authentication (SWA) for Dropbox so that your users can have one click access to Dropbox.
Running the Dropbox Application Wizard -‐ 1. Sign into Okta and click on the Administration link to access the Administrative Console.
2. Click on Applications > Add Application, enter Dropbox in the search field, and select it.
This begins the Application wizard
3. On the General tab, enter in a label (this is what displays on your users homepage). Click Next.
4. You may assign a test user now or come back to this page at a later time to add additional users
manually. Click Next on the Assign Dropbox to your users screen and then click Done.
And that’s it; you’ve successfully added the Dropbox application
Setting up SWA 1. Click on the application and click on the Sign on tab.
2. There are 2 options – Secure Web Authentication (SWA) or SAML 2.0.
Okta’s Secure Web Authentication allows your users to have one click access to Dropbox from Okta. Click Edit and select one of the following options:
• User Sets username and password -‐ When users sign into Okta and click on the Dropbox icon
they will be prompted to enter their username and password. On subsequent logins, they will simply click the Dropbox icon and be automatically signed in. If their credentials change, they can update this on their home page.
• Administrator sets username, user sets password -‐ When users sign into Okta and click on the
Dropbox icon they will be prompted to enter their password. On subsequent logins, they will simply click the Dropbox icon and be automatically signed in. If their credentials change, they can update this on their home page.
• Users share a single username and password set by administrator-‐ Users will click on the
Dropbox icon on their homepage and be automatically signed in. SAML 2.0: If SAML 2.0 is chosen, click on setup instructions to enable SAML on dropbox. Browse to https://www.dropbox.com/team/admin/authentication and Enable Single sign-‐on and fill Sign-‐in URL and certificate as shown below from the Okta setup instructions.

Okta/Dropbox Active Directory Integration Guide 18
4. Click Save
Now you’re ready to set User Management options.

Okta/Dropbox Active Directory Integration Guide 19
Setting up User Management
1. Click on the User Management tab.
2. The User Management option allows you to import users directly from drobpox into Okta and enable options such as password synchronization account provisioning, and account deactivation.
To enable, click edit, and select enable user management for Dropbox. Click on Authenticate for Dropbox. A separate window will pop up prompting for Dropbox credentials. By entering the right credentials, Okta will be granted an OAuth token to access Dropbox Provisioning APIs. Make sure the credentials used here belong to an administrator account in dropox that will remain active. If the Dropbox account is disabled, the API will stop working as the OAuth token will be revoked. Once authenticated, you’ll see a Dropbox verified message display on the User Management tab.
Selecting Import Options: You can select the frequency that you’d like Okta to import users from Dropbox. If you plan to provision users manually or use group-‐based provisioning into Dropbox, you should select “Never”. You can still import users manually with the “Never” option.
Select the following User Management Option:
• Provision new Dropbox accounts from Okta -‐ Allows Okta to create new accounts in Dropbox.
Add a user, assign Dropbox, and Okta will create a new account in DropBox.

Okta/Dropbox Active Directory Integration Guide 20
• Push Okta profile to Dropbox -‐ Any profile changes detected in Okta will be pushed to Dropbox. This includes first name, last name, etc.
• Automatically deprovision Dropbox Accounts -‐ If you unassign the Dropbox application from a
user or deactivate the user, Okta will deactivate the user’s DropBox account to disable access.
After selecting options, click Save.

Okta/Dropbox Active Directory Integration Guide 21
Review Checkpoint To test SWA, assign an existing Dropbox account to an Okta user. Then go to the Okta user’s homepage and the Dropbox icon should appear. Click on the Dropbox icon and make sure the sign in experience matches the option you selected (i.e. User sets username and password).
Let’s make sure User Management has been setup correctly. From the application tab, click on Dropbox, and click on the import tab and select Import users. This should import all the existing Dropbox account info into Okta.
You’ll also want to test provisioning. You can assign a new Dropbox account by assigning Dropbox to an Okta user with a new Dropbox username. With provisioning options turned on, a new user should be auto-‐provisioned into Dropbox.
Automated Dropbox provisioning
With AD Security Groups being imported, you can now provision Dropbox accounts by associating Dropbox to the appropriate AD Security Group in Okta under the “Apps” tab of the group. When group membership is imported from AD, if a user is a member of the group, he will be provisioned a Dropbox account automatically. Similarly, if a user is disabled from AD or removed from the group responsible for creating the Dropbox account initially, automated deprovisioning will occur in Dropbox.
User Experience
Okta can be used solely as a provisioning engine. In this use case, end users will never interact with Okta. Once the administrator has set up provisioning in Okta, automated provisioning and deprovisioning will occur based on imported results from AD. During onboarding, end users will receive a notification like they would when they are created in Dropbox. If the user is in “migrating” status he/she receives an email notification to accept the invitation to the team. If a user is brand new, he/she receives an email notification to accept the invitation to the team. Once the end user responds to the notification, a team account is set up and he can begin accessing the account directly against Dropbox. When the user needs to be removed from Dropbox – based on AD import results, they will automatically be deprovisioned.

Okta/Dropbox Active Directory Integration Guide 22
Okta can be used as a single sign-‐on portal as well. This is the common use case when there is more than one application managed by Okta. In this use case, user will log into Okta with his AD credentials. On the end user homepage, click on the Dropbox icon to access the application. With Secure Web Authentication, users will be prompted for their Dropbox credentials the first time they click on the Dropbox icon. Okta will store the credentials for subsequent access. If Desktop SSO has been configured, end users who are domain-‐joined can access Okta and any Okta managed application seamlessly without providing additional credentials.
Administrative Experience
Now that you’ve integrated AD with delegated authentication, turned on Desktop SSO, and configured Dropbox for SWA and user management, let’s talk about how you roll this out.
1. Assume that you already have a Dropbox org, you can import these users manually from Dropox so
that users have Dropbox assigned to them within Okta – giving them SWA capability. This process will also create new Okta users from your Dropbox users if they don’t already exist in Okta.
2. Import from Active Directory to populate Okta with users and groups from Active Directory.
3. If group-‐based provisioning is desired, associate Dropbox with the right set of AD Security groups.
4. Once the AD Security Groups are lined up, any new users imported from AD will be evaluated based
on AD Security Group memberships to determine whether a Dropbox account is needed.
5. To fully automate the process, select “Auto-‐Confirmation” and “Auto-‐Activation” in the Active Directory setup page.
Check out the Directory Integration Edition forums for more information about general administrative tasks.
Troubleshooting
Check out the Directory Integration Edition forums for more information about troubleshooting the AD agent and IWA web app.