
OFFICIAL NINTENDO POWER PLAYER'S GUIDE · PDF fileWhat became ofW that kingdom...? ... Miss...
16
IN S T RUC T ION BOOKLET IN S T RUC T ION BOOKLET IN S T RUC T ION BOOKLET Nintendo of America Inc. P.O. Box 957, Redmond, WA 98073-0957 U.S.A. www.nintendo.com PRINTED IN USA 50520A AVAILABLE AT YOUR NEAREST RETAILER! WWW.NINTENDO.COM OFFICIAL NI NTENDO POWER PLAYER' S GUIDE 50520A AVAILABLE AT YOUR NEAREST RETAILER! WWW.NINTENDO.COM OFFICIAL NI NTENDO POWER PLAYER' S GUIDE
Transcript of OFFICIAL NINTENDO POWER PLAYER'S GUIDE · PDF fileWhat became ofW that kingdom...? ... Miss...

IN S T R U C T IO N B O O K LETIN S T R U C T IO N B O O K LETIN S T R U C T IO N B O O K LET
Nintendo of America Inc.P.O. Box 957, Redmond, WA 98073-0957 U.S.A.www.nintendo.com
PRINTED IN USA 50520A
AVAILABLE AT YOUR NEAREST RETAILER!WWW.NINTENDO.COM
OFFICIALNINTENDO POWER
PLAYER'S GUIDE
50520A
AVAILABLE AT YOUR NEAREST RETAILER!WWW.NINTENDO.COM
OFFICIALNINTENDO POWER
PLAYER'S GUIDE

IM P O R T A N T S A F E T Y IN F O R M A T IO N : R E A D T H E F O L L O W IN G W A R N IN G S B E F O R E Y O U O R Y O U R C H IL D P L A Y V ID E O G A M E S
WARNING - SeizuresSome people (about 1 in 4000) may have seizures or blackouts triggered by light flashes or patterns, such as while watching TV or playing video games, even if they have never had a seizure before.Anyone who has had a seizure, loss of awareness, or other symptom linked to an epileptic condition should consult a doctor before playing a video game.Parents should watch when their children play video games. Stop playing and consult a doctor if you or your child have any of the following symptoms:
Convulsions Eye or muscle twitching Loss of awareness Altered vision Involuntary movements Disorientation
To reduce the likelihood of a seizure when playing video games:
Sit or stand as far from the screen as possible.Play video games on the smallest available television screen.Do not play if you are tired or need sleep.Play in a well-lit room.Take a 10 to 15 minute break every hour.
Playing video games can make your muscles, joints or skin hurt after a few hours. Follow these instructions to avoid problems such as Tendinitis, Carpal Tunnel Syndrome or skin irritation:
Take a 10 to 15 minute break every hour, even if you don't think you need it.If your hands, wrists or arms become tired or sore while playing, stop and rest them for several hours before playing again.If you continue to have sore hands, wrists or arms during or after play, stop playing and see a doctor.
WARNING - Repetitive Motion Injuries
W A R N IN G : P L E A S E C A R E F U L L Y R E A D T H E S E P A R A T E P R E C A U T IO N S B O O K L E T IN C L U D E D W IT H T H IS P R O D U C T B E F O R E U S IN G Y O U R N IN T E N D O ® H A R D W A R E S Y S T E M , G A M E D IS C O R A C C E S S O R Y . T H IS B O O K L E T C O N T A IN S IM P O R T A N T S A F E T Y IN F O R M A T IO N .
1.2.3.4.5.
To avoid electric shock when you use this system:
Use only the AC adapter that comes with your system.Do not use the AC adapter if it has damaged, split or broken cords or wires.Make sure that the AC adapter cord is fully inserted into the wall outlet or extension cord.Always carefully disconnect all plugs by pulling on the plug and not on the cord. Make sure the Nintendo GameCube power switch is turned OFF before removingthe AC adapter cord from an outlet.
Playing video games can cause motion sickness. If you or your child feel dizzy or nauseous when playing video games with this system, stop playing and rest. Do not drive or engage in other demanding activity until you feel better.
The Nintendo GameCube is a Class I laser product. Do not attempt to disassemble the Nintendo GameCube. Refer servicing to qualified personnel only.Caution - Use of controls or adjustments or procedures other than those specified herein may result in hazardous radiation exposure.
CONTROLLER NEUTRAL POSITION RESETIf the L or R Buttons are pressed or the Control Stick or C Stick are moved out of neutral position when the power is turned ON, those positions will be set as the neutral position, causing incorrect game control during game play.To reset the controller, release all buttons and sticks to allow them to return to the correct neutral position, then hold down the X, Y and START/PAUSE Buttons simultaneously for 3 seconds.
WARNING - Electric Shock
CAUTION - Motion Sickness
CAUTION - Laser Device
L B utton R B utton
C S tickControl
S tick
66 77
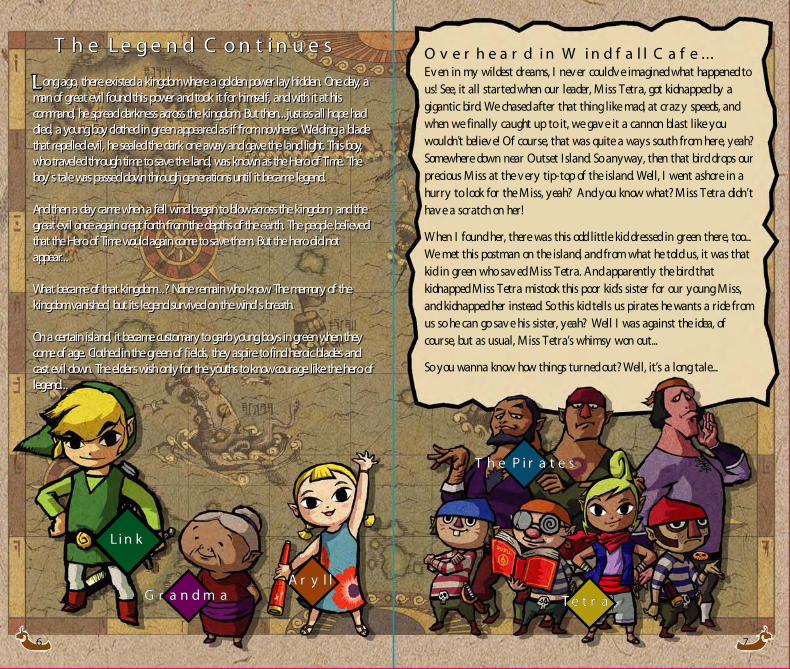
L ong ago, there existed a kingdom where a golden power lay hidden. One day, a man of great evil found this power and took it for himself, and with it at his command, he spread darkness across the kingdom. But then...just as all hope had died, a young boy clothed in green appeared as if from nowhere. Wielding a blade that repelled evil, he sealed the dark one away and gave the land light. This boy, who traveled through time to save the land, was known as the Hero of Time. The boy's tale was passed down through generations until it became legend.
And then a day came when a fell wind began to blow across the kingdom, and the great evil once again crept forth from the depths of the earth. The people believed that the Hero of Time would again come to save them. But the hero did not appear...
What became of that kingdom...? None remain who know. The memory of the kingdom vanished, but its legend survived on the wind's breath.
On a certain island, it became customary to garb young boys in green when they come of age. Clothed in the green of fields, they aspire to find heroic blades and cast evil down. The elders wish only for the youths to know courage like the hero of legend...
T h e Le g e n d C o n t i n u e sT h e Le g e n d C o n t i n u e sT h e Le g e n d C o n t i n u e s
L ong ago, there existed a kingdom where a golden power lay hidden. One day, a man of great evil found this power and took it for himself, and with it at his command, he spread darkness across the kingdom. But then...just as all hope had died, a young boy clothed in green appeared as if from nowhere. Wielding a blade that repelled evil, he sealed the dark one away and gave the land light. This boy, who traveled through time to save the land, was known as the Hero of Time. The boy's tale was passed down through generations until it became legend.
And then a day came when a fell wind began to blow across the kingdom, and the great evil once again crept forth from the depths of the earth. The people believed that the Hero of Time would again come to save them. But the hero did not appear...
What became of that kingdom...? None remain who know. The memory of the kingdom vanished, but its legend survived on the wind's breath.
On a certain island, it became customary to garb young boys in green when they come of age. Clothed in the green of fields, they aspire to find heroic blades and cast evil down. The elders wish only for the youths to know courage like the hero of legend...
Li n kLi n k
G r a n d m aG r a n d m aA r y l lA r y l l
T h e P i r a t e sT h e P i r a t e s
O v e r h e a r d i n W i n d f a l l C a f e ...Even in my wildest dreams, I never could've imagined what happened to us! See, it all started when our leader, Miss Tetra, got kidnapped by a gigantic bird. We chased after that thing like mad, at crazy speeds, and when we finally caught up to it, we gave it a cannon blast like you wouldn't believe! Of course, that was quite a ways south from here, yeah? Somewhere down near Outset Island. So anyway, then that bird drops our precious Miss at the very tip-top of the island. Well, I went ashore in a hurry to look for the Miss, yeah? And you know what? Miss Tetra didn’t have a scratch on her!
When I found her, there was this odd little kid dressed in green there, too... We met this postman on the island, and from what he told us, it was that kid in green who saved Miss Tetra. And apparently the bird that kidnapped Miss Tetra mistook this poor kid’s sister for our young Miss, and kidnapped her instead. So this kid tells us pirates he wants a ride from us so he can go save his sister, yeah? Well I was against the idea, of course, but as usual, Miss Tetra’s whimsy won out...
So you wanna know how things turned out? Well, it’s a long tale...
T e t r aT e t r a
88 99
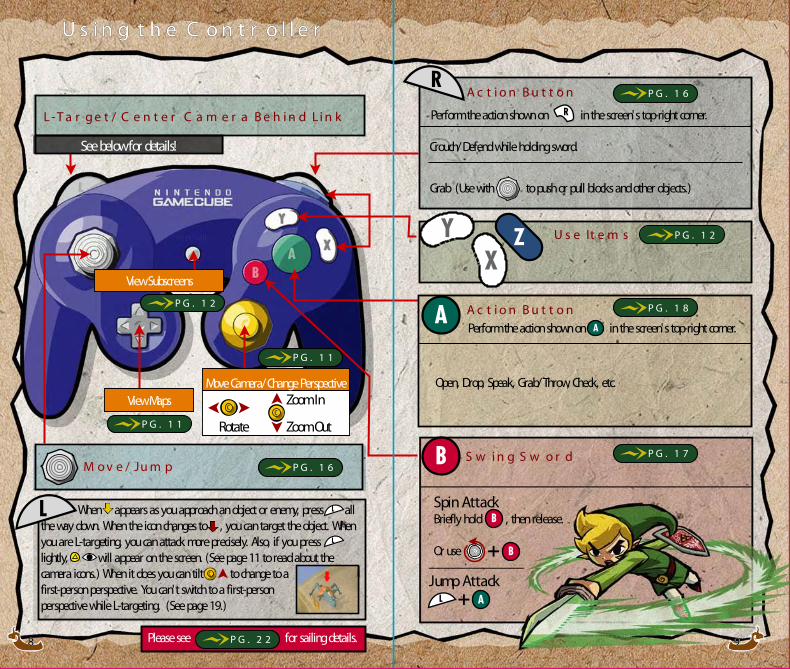
U s i n g t h e C o n t r o l l e rU s i n g t h e C o n t r o l l e r
A c t i o n B u t t o n
Crouch/Defend while holding sword.
M o v e / Ju m p
L- T a r g e t / C e n t e r C a m e r a B e h i n d L i n k
S w i n g S w o r d
Open, Drop, Speak, Grab/Throw, Check, etc.
U s e It e m s
Perform the action shown on in the screen's top-right corner.
A c t i o n B u t t o n
Perform the action shown on in the screen's top-right corner.
Grab (Use with to push or pull blocks and other objects.)
See below for details!
View MapsMove Camera/Change Perspective
Zoom In
Zoom OutRotate
View Subscreens
When appears as you approach an object or enemy, press all the way down. When the icon changes to , you can target the object. When you are L-targeting, you can attack more precisely. Also, if you press lightly, will appear on the screen. (See page 11 to read about the camera icons.) When it does you can tilt to change to a first-person perspective. You can't switch to a first-person perspective while L-targeting. (See page 19.)
Spin AttackBriefly hold , then release.
Or use
Jump Attack
P G . 1 8
P G . 1 2
P G . 1 6
P G . 1 1
P G . 1 7
P G . 1 2
P G . 1 1
P G . 1 6
P G . 2 2Please see for sailing details.

1 11 11 01 0
G e t t i n g S t a r t e dG e t t i n g S t a r t e d V i e w i n g t h e G a m e S c r e e nV i e w i n g t h e G a m e S c r e e n
Properly insert the Game Disc and Memory Card into your Nintendo GameCube system and turn the power ON. Press START/PAUSE on the title screen to access the File-Selection screen.
Follow the instructions on-screen and press to create a game file for The Legend of Zelda: The Wind Waker on the Memory Card in Slot A.
On the File-Selection screen, choose one of the three Quest Logs and press . Next, enter a name, select , and press to begin playing.
If you have a previously saved game, you can continue playing. On the File-Selection screen, just choose the Quest Log you want to continue playing.
S t a r t i n g t h e G a m e
You must have 12 blocks of memory available on the Memory Card in Slot A in order to save.Once you have played and saved a game, you can continue playing anytime you like. Just insert the Memory Card with your saved data for The Legend of Zelda: The Wind Waker into Slot A to continue playing.
Please refer to your Nintendo GameCube Instruction Booklet for information about erasing game files and formatting your Memory Card.
Beginning a New Game
Continuing a Game
Saving Your Game
Copying and Erasing Saved Data
If you take damage from enemies and run out of hearts, your game will be over.Items that consume magic power when you use them will gradually deplete your magic meter.
indicates Link’s location and the direction he is facing. The arrow in the top-right corner of the screen indicates the direction the wind is blowing in.
The button icons show which items you’ve set to , , or and which actions you can perform by pressing , , or .
Use to change the camera’s position. When appears on screen, tilt to change to a first-person view. Tilting in any other direction will activate the free camera.
This shows how many Rupees you have.
The Main Screen
View your Sea Chart or Dungeon Map.
Hide your Area Map. Change Area Map size display.
Close your Sea Chart or Dungeon Map and return to the main screen.
Sea Charts and Dungeon Maps
The Life Gauge and Magic Meter Item Buttons and Action Buttons
Area Map Rupees
Camera Icons
•
•
P G . 1 2
P G . 1 3
P G . 1 4 - P G . 1 5
1 31 31 21 2
P G . 1 3
P G . 2 4
P G . 1 3
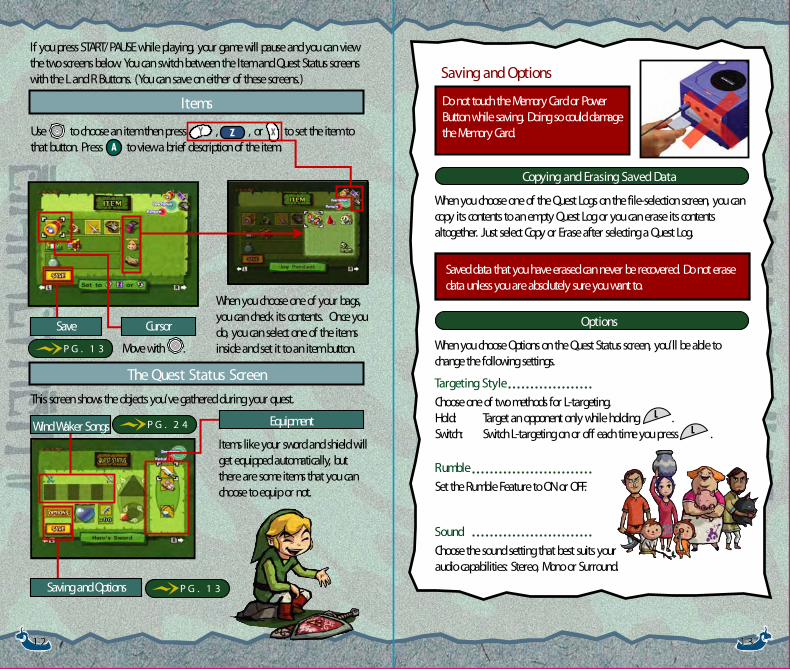
When you choose one of your bags, you can check its contents. Once you do, you can select one of the items inside and set it to an item button.
Use to choose an item then press , , or to set the item to that button. Press to view a brief description of the item.
Items
This screen shows the objects you’ve gathered during your quest.
The Quest Status Screen
Move with .
Items like your sword and shield will get equipped automatically, but there are some items that you can choose to equip or not.
Wind Waker Songs
Saving and Options
Do not touch the Memory Card or Power Button while saving. Doing so could damage the Memory Card.
Saved data that you have erased can never be recovered. Do not erase data unless you are absolutely sure you want to.
Saving and Options
When you choose one of the Quest Logs on the file-selection screen, you can copy its contents to an empty Quest Log or you can erase its contents altogether. Just select Copy or Erase after selecting a Quest Log.
Copying and Erasing Saved Data
When you choose Options on the Quest Status screen, you’ll be able to change the following settings.
Options
Choose one of two methods for L-targeting.Hold: Target an opponent only while holding .Switch: Switch L-targeting on or off each time you press .
Targeting Style
Set the Rumble Feature to ON or OFF.
Rumble
Choose the sound setting that best suits your audio capabilities: Stereo, Mono or Surround.
Sound
Equipment
If you press START/PAUSE while playing, your game will pause and you can view the two screens below. You can switch between the Item and Quest Status screens with the L and R Buttons. (You can save on either of these screens.)
CursorSave

1 41 4 1 51 5
P G . 2 3
P G . 2 3
P G . 2 2
P G . 2 3
The number of small keys you have.
Once you have found a Sea Chart, you can press Up on to view it. You can also view any Treasure Charts you find during your adventure on the Sea Chart screen.
Sea Charts
Move with Cursor
Sunken Chests Recovered
Type of Treasure Recovered
indicates the direction Link is facing or the direction the boat is traveling in.
Current Wind DirectionLink’s Current Floor
The Boss’s Floor
When in a dungeon, press Up on to view the Dungeon Map. If you have certain dungeon items, it will look like the screen below:
Dungeon Maps
Look for a particular sea creature near each island who will draw your Island Charts for you. After zooming in, press to return.
Zoom
Compare your detailed Island Charts on the left side of the screen with the terrain on your Treasure Charts on the right side of the screen.
Check
Enlarged Island Charts (Left side of screen) Use and to
switch between your detailed Island Charts and your Treasure Charts.
Dungeon Name
Dungeon Items
This map shows all rooms, including ones you haven’t entered.
Dungeon Map
This key opens the door to the boss’s lair.
Big Key
The Compass will reveal the locations of treasure chests and the boss’s lair.
Compass
Your Current Location
Rooms You’ve Visited
Unexplored Rooms
Doors
Treasure Chests
Link’s Location
Number of Treasure Charts
Island Name
There are two levels of zoom.
Treasure Charts (Right side of screen)
Dungeon Levels
Switch floors with .P r e s s o r f o r m o r e d e t a i l !P r e s s o r f o r m o r e d e t a i l !
1 71 71 61 6
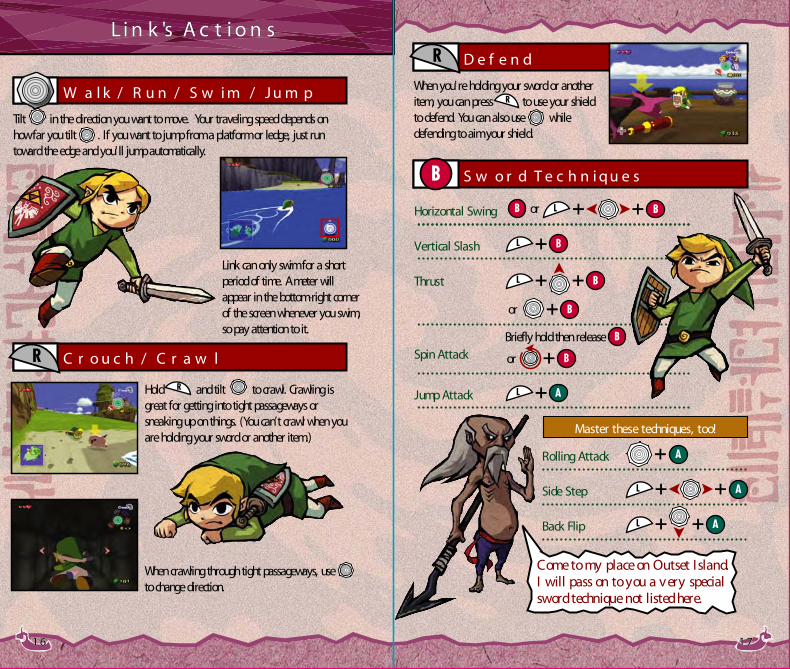
Li n k 's A c t i o n sL i n k 's A c t i o n s
Tilt in the direction you want to move. Your traveling speed depends on how far you tilt . If you want to jump from a platform or ledge, just run toward the edge and you'll jump automatically.
When you're holding your sword or another item, you can press to use your shield to defend. You can also use while defending to aim your shield.
Link can only swim for a short period of time. A meter will appear in the bottom-right corner of the screen whenever you swim, so pay attention to it.
When crawling through tight passageways, use to change direction.
Hold and tilt to crawl. Crawling is great for getting into tight passageways or sneaking up on things. (You can’t crawl when you are holding your sword or another item.)
W a l k / R u n / S w i m / J u m p
C r o u c h / C r a w l
Master these techniques, too!
S w o r d T e c h n i q u e s
D e f e n d
Thrust
Horizontal Swing
Vertical Slash
Jump Attack
Spin Attack
Rolling Attack
Side Step
Back Flip
Briefly hold then release
or
or
Come to my place on Outset Island. I will pass on to you a very special sword technique not listed here.
or

1 81 8 1 91 9
O t h e r A c t i o n s
Hang
If you accidentally slip off an edge or cliff, you will automatically grab onto the edge and hang down from it. While hanging, tilt to move along the edge with your fingertips. To climb back up, tilt . To let go of the edge and drop down below, press .
Rope Actions
When you grab onto a rope, you can use your momentum to swing. In some cases, it may carry you to another ledge or platform.
Tilt toward the rope and run at it.
Rotate with Center with
Tilt up and down to swing.
Moving the camera is very important, particularly when Link's on a rope. Try adjusting the camera until you find the best perspective.
Stop swinging
Climb up or down.
Press to jump off!
Change direction.
While holding :
The and in the top-right corner of the screen are Action Icons. Each indicates the action Link will perform when you press that particular button. The actions listed below are just some of the things that Link can do.
T h e A c t i o n Ic o n s
Lift Throw/ Drop
Lift up an item with .Press again to throw the item.Press to set the object down.
Grab Push / Pull
Press and hold to grab hold of a large object then use to push it or pull it.
Sidle
First-Person View
Tap . When appears, tilt and use to look around.
Tilt toward a wall and press to sidle up against the wall. Hold and tilt to inch along the wall.
Camera Perspectives

2 12 12 02 0
P G . 2 4
P G . 1 9
P G . 2 5
P G . 2 2
It e m sIt e m s
Useful Objects
Attack Items
Use this leaf to send gusts of air that can knock objects and enemies around. If you jump into the air and use it, you'll float...but it will consume magic power.
Deku Leaf
To take out a bomb, press the button your bombs are set to. When you’re holding a bomb, press to throw it or to set it down.
Bombs
This pouch holds your bait. Try using bait around all of the different creatures in the world.
Bait Bag
You’ll keep the different spoils you get from your enemies in this bag. For instance, you can carry around the three colors of ChuChu Jelly until you find just the right person to give them to...
Spoils Bag
This bag holds things that people give to you. If you put things people ask you to deliver into one of the many postboxes located around the islands, they'll surely be delivered.
Delivery Bag
Item BagsYou can place up to eight different items in each of your three item bags. Keep in mind that even if all eight spaces in the bag are filled, it can always carry more of the items that it already contains.
A yellow mark will appear on objects that you can latch on to.
While looking through this, use to look around and to zoom. It comes with a built-in auto-focus!
Telescope
There are other items besides these!
Soon after beginning your quest, you'll find a boat that can carry you across the sea...but it won't go anywhere without this important item.
Sail
Use this wand to conduct any songs you learn. Its powers will be essential if you hope to succeed in your quest.
Wind Waker
Using this hook and rope combination, latch on to certain objects then swing from one place to another.
Grappling Hook
Connect to a Game Boy Advance and use this item to call everyone’s favorite mapmaker—Tingle!
Tingle Tuner
Use empty bottles to carry potions that replenish life energy and magic power. If you find a fairy, you may be able to capture it in your bottle. What kind of effect might a fairy have...?
Empty Bottle
Use the to aim at enemies—it will highlight viable targets with a . Aim at everything you want to hit, because this Boomerang can home in on multiple targets!
Boomerang
If you find my shop, PLEASE! Come in! I’ve got a very special membership card just for you!
2 22 2 2 32 3
P G . 1 4
P G . 1 4
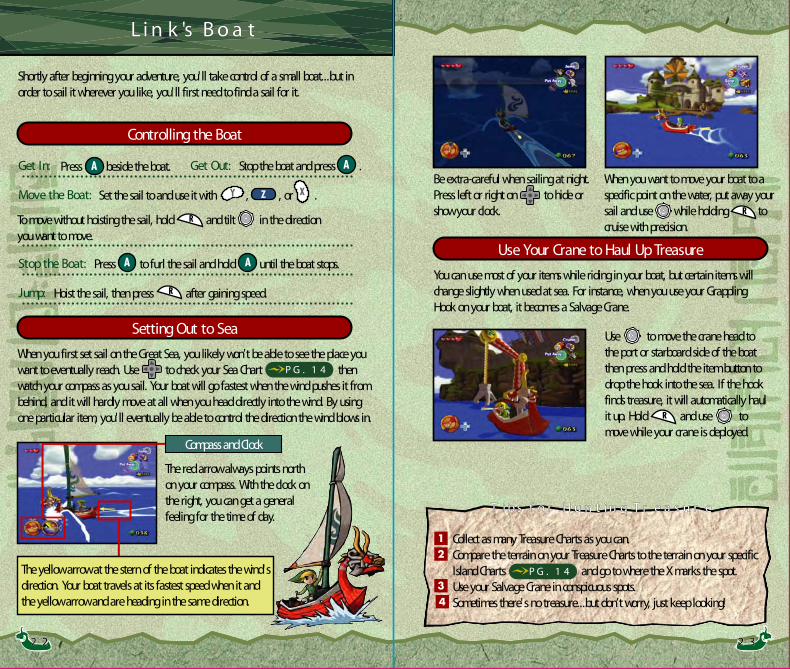
Use to move the crane head to the port or starboard side of the boat then press and hold the item button to drop the hook into the sea. If the hook finds treasure, it will automatically haul it up. Hold and use to move while your crane is deployed.
Shortly after beginning your adventure, you'll take control of a small boat...but in order to sail it wherever you like, you'll first need to find a sail for it.
Controlling the Boat
Get In: Get Out:Press beside the boat. Stop the boat and press .
Move the Boat: Set the sail to and use it with , , or .
Stop the Boat: Press to furl the sail and hold until the boat stops.
Jump: Hoist the sail, then press after gaining speed.
To move without hoisting the sail, hold and tilt in the direction you want to move.
When you first set sail on the Great Sea, you likely won’t be able to see the place you want to eventually reach. Use to check your Sea Chart then watch your compass as you sail. Your boat will go fastest when the wind pushes it from behind, and it will hardly move at all when you head directly into the wind. By using one particular item, you'll eventually be able to control the direction the wind blows in.
Setting Out to Sea
You can use most of your items while riding in your boat, but certain items will change slightly when used at sea. For instance, when you use your Grappling Hook on your boat, it becomes a Salvage Crane.
Use Your Crane to Haul Up Treasure
Be extra-careful when sailing at night. Press left or right on to hide or show your clock.
When you want to move your boat to a specific point on the water, put away your sail and use while holding to cruise with precision.
T i p s f o r H u n t i n g T r e a s u r eT i p s f o r H u n t i n g T r e a s u r e
Collect as many Treasure Charts as you can.Compare the terrain on your Treasure Charts to the terrain on your specific Island Charts and go to where the X marks the spot.Use your Salvage Crane in conspicuous spots.Sometimes there's no treasure...but don’t worry, just keep looking!
The red arrow always points north on your compass. With the clock on the right, you can get a general feeling for the time of day.
Compass and Clock
The yellow arrow at the stern of the boat indicates the wind's direction. Your boat travels at its fastest speed when it and the yellow arrow and are heading in the same direction.
Li n k 's B o a tL i n k 's B o a t
P G . 1 2
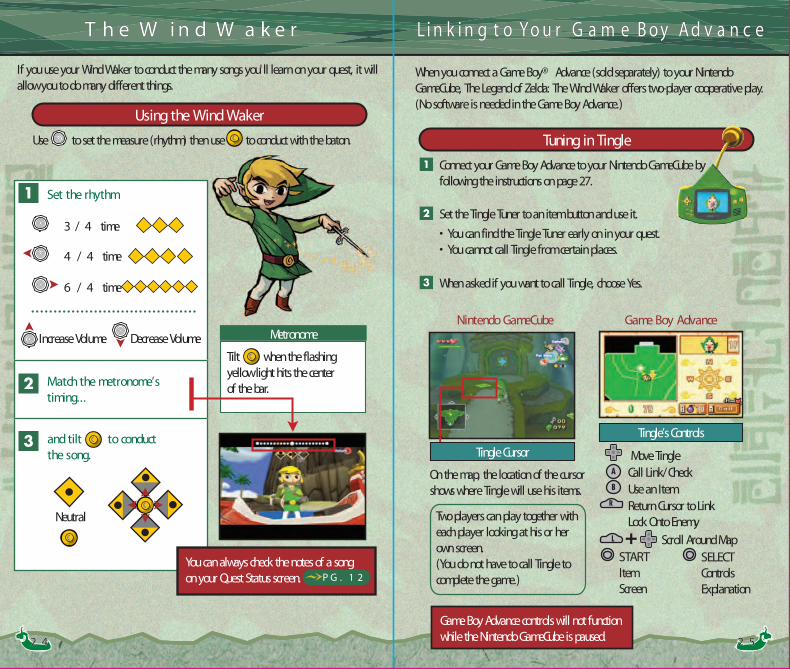
T h e W i n d W a k e rT h e W i n d W a k e r Li n k i n g t o Yo u r G a m e B o y A d v a n c eLi n k i n g t o Yo u r G a m e B o y A d v a n c e
Using the Wind Waker
Connect your Game Boy Advance to your Nintendo GameCube by following the instructions on page 27.
Tuning in TingleUse to set the measure (rhythm) then use to conduct with the baton.
You can always check the notes of a song on your Quest Status screen.
Set the rhythm
Match the metronome’s timing...
3 / 4 time
4 / 4 time
6 / 4 time
Increase Volume Decrease Volume
and tilt to conduct the song.
Tilt when the flashing yellow light hits the center of the bar.
Set the Tingle Tuner to an item button and use it.
• You can find the Tingle Tuner early on in your quest.• You cannot call Tingle from certain places.
When asked if you want to call Tingle, choose Yes.
Game Boy Advance controls will not function while the Nintendo GameCube is paused.
On the map, the location of the cursor shows where Tingle will use his items.
Metronome
Tingle’s Controls
Nintendo GameCube Game Boy Advance
Move TingleCall Link/CheckUse an ItemReturn Cursor to LinkLock Onto Enemy
Scroll Around MapSTARTItem Screen
SELECTControls Explanation
Two players can play together with each player looking at his or her own screen.(You do not have to call Tingle to complete the game.)
Tingle Cursor
Neutral
If you use your Wind Waker to conduct the many songs you'll learn on your quest, it will allow you to do many different things.
When you connect a Game Boy® Advance (sold separately) to your Nintendo GameCube, The Legend of Zelda: The Wind Waker offers two-player cooperative play. (No software is needed in the Game Boy Advance.)
2 42 4 2 52 5
2 72 72 62 6
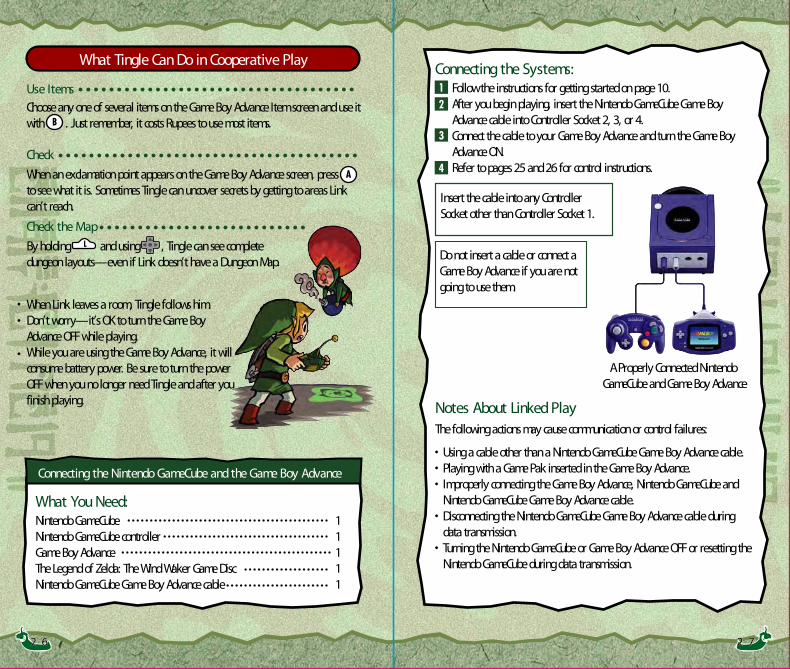
What Tingle Can Do in Cooperative Play
Choose any one of several items on the Game Boy Advance Item screen and use it with . Just remember, it costs Rupees to use most items.
Use Items
When an exclamation point appears on the Game Boy Advance screen, press to see what it is. Sometimes Tingle can uncover secrets by getting to areas Link can’t reach.
Check
By holding and using , Tingle can see complete dungeon layouts—even if Link doesn’t have a Dungeon Map.
When Link leaves a room, Tingle follows him.Don’t worry—it’s OK to turn the Game Boy Advance OFF while playing.While you are using the Game Boy Advance, it will consume battery power. Be sure to turn the power OFF when you no longer need Tingle and after you finish playing.
Check the Map
• Using a cable other than a Nintendo GameCube Game Boy Advance cable.• Playing with a Game Pak inserted in the Game Boy Advance.• Improperly connecting the Game Boy Advance, Nintendo GameCube and Nintendo GameCube Game Boy Advance cable.• Disconnecting the Nintendo GameCube Game Boy Advance cable during data transmission.• Turning the Nintendo GameCube or Game Boy Advance OFF or resetting the Nintendo GameCube during data transmission.
A Properly Connected Nintendo GameCube and Game Boy Advance
Connecting the Nintendo GameCube and the Game Boy Advance
Nintendo GameCubeNintendo GameCube controllerGame Boy AdvanceThe Legend of Zelda: The Wind Waker Game DiscNintendo GameCube Game Boy Advance cable
11111
What You Need:
Follow the instructions for getting started on page 10.After you begin playing, insert the Nintendo GameCube Game Boy Advance cable into Controller Socket 2, 3, or 4.Connect the cable to your Game Boy Advance and turn the Game Boy Advance ON.Refer to pages 25 and 26 for control instructions.
Connecting the Systems:
The following actions may cause communication or control failures:
Notes About Linked Play
Insert the cable into any Controller Socket other than Controller Socket 1.
Do not insert a cable or connect a Game Boy Advance if you are not going to use them.
••
•

2 82 8 2 92 9
What if I can’t figure out how to solve a puzzle?
Perhaps you’ve overlooked something important. Use to manipulate the camera and check your surroundings. Look for doors or passageways you may have missed. You can also use the Tingle Tuner to get hints through cooperative play.
Why does my controller rumble inexplicably?
The controller rumbles when Link is struck or attacked, but it will also rumble when a particular item is trying to tell you something. If the Action Icon changes to , press to see what it is. But remember, you won’t get rumble hints if your Rumble Feature is turned off.
Does L-targeting offer anything particularly good?By L-targeting an opponent, you can keep it in sight during battle and hit it more precisely. L-targeting is particularly useful against very quick enemies and flying enemies, and using distance weapons like the Boomerang while L-targeting ensures much greater accuracy. You can also speak to people from a distance by L-targeting
My hearts run out too quickly... What should I do?
Each time you defeat a dungeon boss, you will gain one more Heart Container. You can also increase your life gauge by searching for Pieces of Heart. Four Pieces of Heart combine to complete one Heart Container.
How can I become a Master Swordsman?
The enemies are too tough... How can I defeat them?
Always pay close attention to Link’s eyes. He will often look toward important items or objects, giving clues about how to solve puzzles.
First, go to visit Orca on Outset Island and learn how to use a sword. After that, it just takes practice. Repeatedly tapping and pressing in conjunction with will allow you to attack with successive blows. Try doing this in battle. Also, if the changes to an while you’re fighting with your sword, immediately press to perform a parry move. Only then you will know what it means to be a true Master Swordsman.
All enemies have weaknesses, so if one method of attack doesn't work, try another. Also, every time you get a new item, try using it as much as you can. You will almost always have some item that will help you overcome your foes. You should also watch your enemies carefully–they may drop their weapons. If they do, take advantage of the opportunity.
C l u e s f o r Yo u r Q u e s tC l u e s f o r Yo u r Q u e s t
3 13 13 03 0
Im p o r t a n t
WARNING: Copying of any Nintendo game is illegal and is strictly prohibited by domestic and international intellectual property laws. “Back-up” or “archival” copies are not authorized and are not necessary to protect your software. Violators will be prosecuted.
This Nintendo game is not designed for use with any unauthorized copying device or any unlicensed accessory. Use of any such device will invalidate your Nintendo product warranty. Nintendo (and/or any Nintendo licensee or distributor) is not responsible for any damage or loss caused by the use of any such device. If use of such device causes your game to stop operating, disconnect the device carefully to avoid damage and resume normal game play. If your game ceases to operate and you have no device attached to it, please contact Nintendo Customer Service (see below).
The contents of this notice do not interfere with your statutory rights.
This booklet and other printed materials accompanying this game are protected by domestic and international intellectual property laws.
For further information or assistance, please contact:Nintendo Consumer Servicewww.nintendo.com or call 1-800-255-3700 (U.S. and Canada)
W a r r a n t y & S e r v i c e In f o r m a t i o n
You may need only simple instructions to correct a problem with your product. Try our web site at www.nintendo.com or call our Consumer Assistance Hotline at 1-800-255-3700 rather than going to your retailer. Hours of operation are 6 a.m. to 9 p.m., Pacific Time, Monday - Saturday, and 6 a.m. to 7 p.m., Pacific Time, on Sundays (times subject to change). If the problem cannot be solved with the troubleshooting information available on-line or over the telephone, you will be offered express factory service through Nintendo or referred to the nearest NINTENDO AUTHORIZED REPAIR CENTERSM. Please do not send any products to Nintendo without contacting us first.
HARDWARE WARRANTYNintendo of America Inc. ("Nintendo") warrants to the original purchaser that the hardware product shall be free from defects in material and workmanship for twelve (12) months from the date of purchase.If a defect covered by this warranty occurs during this warranty period, Nintendo or a NINTENDO AUTHORIZED REPAIR CENTER will repair the defective hardware product or component, free of charge. The original purchaser is entitled to this warranty only if the date of purchase is registered at point of sale or the consumer can demonstrate, to Nintendo's satisfaction, that the product was purchased within the last 12 months.
GAME & ACCESSORY WARRANTYNintendo warrants to the original purchaser that the product (games and accessories) shall be free from defects in material and workmanship for a period of three (3) months from the date of purchase. If a defect covered by this warranty occurs during this three (3) month warranty period, Nintendo or a NINTENDO AUTHORIZED REPAIR CENTER will repair the defective product, free of charge.
SERVICE AFTER EXPIRATION OF WARRANTYPlease try our web site at www.nintendo.com or call our Consumer Assistance Hotline at 1-800-255-3700 for troubleshooting assistance and/or referral to the nearest NINTENDO AUTHORIZED REPAIR CENTER. In some instances, it may be necessary for you to ship the complete product, FREIGHT PREPAID AND INSURED FOR LOSS OR DAMAGE, to the nearest service location. Please do not send any products to Nintendo without contacting us first.
WARRANTY LIMITATIONS
THIS WARRANTY SHALL NOT APPLY IF THIS PRODUCT: (a) IS USED WITH PRODUCTS NOT SOLD OR LICENSED BY NINTENDO (INCLUDING, BUT NOT LIMITED TO, NON-LICENSED GAME ENHANCEMENT AND COPIER DEVICES, ADAPTERS, AND POWER SUPPLIES); (b) IS USED FOR COMMERCIAL PURPOSES (INCLUDING RENTAL); (c) IS MODIFIED OR TAMPERED WITH; (d) IS DAMAGED BY NEGLIGENCE, ACCIDENT, UNREASONABLE USE, OR BY OTHER CAUSES UNRELATED TO DEFECTIVE MATERIALS OR WORKMANSHIP; OR (e) HAS HAD THE SERIAL NUMBER ALTERED, DEFACED OR REMOVED.
ANY APPLICABLE IMPLIED WARRANTIES, INCLUDING WARRANTIES OF MERCHANTABILITY AND FITNESS FOR A PARTICULAR PURPOSE, ARE HEREBY LIMITED IN DURATION TO THE WARRANTY PERIODS DESCRIBED ABOVE (12 MONTHS OR 3 MONTHS, AS APPLICABLE).IN NO EVENT SHALL NINTENDO BE LIABLE FOR CONSEQUENTIAL OR INCIDENTAL DAMAGES RESULTING FROM THE BREACH OF ANY IMPLIED OR EXPRESS WARRANTIES. SOME STATES DO NOT ALLOW LIMITATIONS ON HOW LONG AN IMPLIED WARRANTY LASTS OR EXCLUSION OF CONSEQUENTIAL OR INCIDENTAL DAMAGES, SO THE ABOVE LIMITATIONS MAY NOT APPLY TO YOU.
This warranty gives you specific legal rights, and you may also have other rights which vary from state to state or province to province.Nintendo's address is: Nintendo of America Inc., P.O. Box 957, Redmond, WA, 98073-0957, U.S.A.
This warranty is only valid in the United States and Canada.
REV–C REV–N