Workpackage 3 TIDE. 1.Introduction: Ecosystem services TIDE.

OAKS Online TIDE User Guide
2014–2015
Updated September 10, 2014
© Oregon Department of Education, 2014
Descriptions of the operation of the Test Information Distribution Engine, Test Delivery System, and related systems are property of the American Institutes for Research (AIR) and are used with the permission of AIR.

OAKS Online 2014–2015 TIDE User Guide
Table of Contents Introduction to This User Guide ..............................................................................................................................5
Understanding the User Guide ...............................................................................................................................5
Overview of the Test Information Distribution Engine .........................................................................................6
User Roles and Access ..........................................................................................................................................6
Additional Resources .............................................................................................................................................7 Computer and System Requirements ....................................................................................................................7
About Microsoft Excel Files ....................................................................................................................................7
Section II. Accessing TIDE ......................................................................................................................................8
Accessing TIDE: First-Time Users .........................................................................................................................8
Activate User Account......................................................................................................................... 8
Logging into TIDE: Post-Account Activation ....................................................................................................... 10
Resetting Your Password .................................................................................................................. 10
Switching Between OAKS Online Systems ........................................................................................................ 11
Section III. Navigating the TIDE Interface ........................................................................................................... 12 TIDE Home Page ................................................................................................................................................ 12
TIDE Banner ........................................................................................................................................................ 13
TIDE Tabs ........................................................................................................................................... 13
Changing the Selected School/Test Administration ......................................................................... 14
My Account ....................................................................................................................................... 14
Updating Your Password ............................................................................................................... 15
Section IV. TIDE Tasks .......................................................................................................................................... 16 Task Group: User Information ............................................................................................................................. 17
Task: View/Edit Users ....................................................................................................................... 18
Searching for User Records ........................................................................................................... 18
Understanding the Search Results Table .................................................................................. 19
Sorting Search Results ............................................................................................................... 19
Exporting User Records (Updated) ............................................................................................... 19
Export All Records ..................................................................................................................... 19
Export Selected Records ........................................................................................................... 20
Deleting Users ............................................................................................................................... 20
Viewing and Editing User Details .................................................................................................. 21
Task: Add Users ................................................................................................................................. 22
Task: Upload Users ............................................................................................................................ 23
2

OAKS Online 2014–2015 TIDE User Guide
Download the Template (Create User Upload File) ...................................................................... 23
User File Requirements ................................................................................................................. 24
Adding or Editing User Information .......................................................................................... 24
Adding Users to Multiple Institutions ....................................................................................... 25
Updating or Correcting Previously Uploaded User Information .............................................. 25
Uploading the User File ................................................................................................................. 26
Task Group: Student Information ........................................................................................................................ 28
Task: View/Edit Students .................................................................................................................. 29
Searching for Student Records ..................................................................................................... 29
Advanced Search Options ......................................................................................................... 30
Understanding the Search Results Table ...................................................................................... 30
Sorting Search Results ............................................................................................................... 31
Exporting Student Records (Updated) .......................................................................................... 31
Export All Records ..................................................................................................................... 32
Export Selected Records ........................................................................................................... 32
Viewing a Student’s Complete Record ......................................................................................... 33
Editing Test Settings and Restricted Resources ........................................................................ 33
Task: Upload Student Settings .......................................................................................................... 37
Download the Template (Create Upload Student Settings File) .................................................. 37
Student Test Settings File Requirements ...................................................................................... 38
Adding or Editing Student Settings Information ....................................................................... 46
Uploading the Student Settings File ............................................................................................. 47
Task Group: Student Restrictions ....................................................................................................................... 49
Task: View/Edit Restrictions ............................................................................................................. 49
Searching for Student Records ..................................................................................................... 50
Understanding the Search Results Table ...................................................................................... 50
Sorting Search Results ............................................................................................................... 50
Exporting Student Records (Updated) .......................................................................................... 51
Export All Records ..................................................................................................................... 51
Export Selected Records ........................................................................................................... 51
Editing Student Test Restrictions .................................................................................................. 52
Task: Upload Restrictions .................................................................................................................. 53
Download the Template (Create Upload Student Settings File) .................................................. 53
Student Test Restrictions File Requirements ................................................................................ 54
3

OAKS Online 2014–2015 TIDE User Guide
Adding or Editing Test Restriction Information ........................................................................ 54
Uploading the Test Restrictions File ............................................................................................. 55
Task Group: Rosters ........................................................................................................................................... 58
Task: Upload Roster .......................................................................................................................... 58
Download the Template (Create Upload Roster File) ....................................................................... 59
Upload Roster File Requirements ................................................................................................. 59
Adding Roster Information ........................................................................................................... 60
Uploading the Roster File.................................................................................................................. 61
Task: Manage Roster ......................................................................................................................... 63
Creating rosters ............................................................................................................................. 63
Modifying rosters .......................................................................................................................... 65
Deleting rosters ............................................................................................................................. 66
Printing rosters.............................................................................................................................. 67
Task Group: General Resources ........................................................................................................................ 68
Task: Download Voice Pack .............................................................................................................. 69
Appendix A: Opening a CSV File in Excel .......................................................................................................... 70
Appendix B: Common Errors with File Uploads ................................................................................................ 71
4

OAKS Online 2014–2015 TIDE User Guide
Introduction to This User Guide This user guide supports users who manage testing for students participating in OAKS Online. This introduction describes the contents of this document and includes a key for identifying icons and elements found in this guide.
Understanding the User Guide This user guide provides information about all tasks available to authorized district and school personnel. Each section and appendix begins on a new page, which allows for easy printing.
• Section I, Overview of the Test Information Distribution Engine, provides a brief introduction to TIDE and the capabilities of user roles in OAKS Online.
• Section II, Accessing TIDE, includes instructions for accessing TIDE for the first time and activating your account, as well as logging in after your account has been activated.
• Section III, Understanding the TIDE Interface, provides an overview of the TIDE design and available features.
• Section IV, TIDE Tasks, includes an in-depth overview of the tasks, features, and functions available in TIDE. Tasks, features, and functions apply to all administrations, except where noted. The information presented in those sections will apply only to the specified administrations.
• The appendices provide additional information, including instructions on opening a CSV file in Excel and common errors that occur when uploading files.
Table 1. Key Icons and Elements
Icon Description
Warning: This symbol accompanies important information regarding actions that may cause errors.
Caution: This symbol accompanies important information regarding a task.
Note: This symbol accompanies helpful information or reminders.
New: This symbol appears when a section of the user guide is new. It typically appears after a section header.
Text that appears in shaded boxes provides instructions relevant to the task described:
• Numbered (ordered) lists provide step-by-step instructions.
• Bulleted lists provide instructions that do not need to be performed in a specific order.
[Text] Text in brackets is used to indicate a button or link that is clickable.
5

OAKS Online 2014–2015 TIDE User Guide
Overview of the Test Information Distribution Engine The Test Information Distribution Engine (TIDE) provides administrators with the tools to add and manage OAKS Online users. In addition to creating new administrative users and modifying roles, TIDE allows authorized users to view and edit student attributes, including target up, test restrictions, and default test settings. Enhanced searches for students based on assigned system features, target up, or restricted test access are also available. TIDE uses a role-specific design to restrict access to certain tools and applications based on the user’s designated role. Descriptions of each user role are in Table 2 below. Information about who has access to each task is contained in Section IV, TIDE Tasks.
User Roles and Access OAKS Online users are associated with a district and/or institutions. Your user role and association dictate your level of access within the OAKS Online system. Each OAKS Online user role is defined below (roles are listed in order of hierarchy). Table 2. User Roles and Access in TIDE
Role Description
State User (ODE) ODE/Lead ESD Partners can upload DSA, DTSA, DRV, STC, TA, TT, and SRV users for the entire state. They can modify users throughout the state.
District Security Administrator (DSA)
A district can only have one District Security Administrator (DSA). DSAs can create DTSA, STC, TA, TT, DRV, and SRV users within their district; set student test settings, student restrictions, and restricted resources; access reports within their district; and delegate their duties to District Test and Security Administrators (DTSAs). The only difference between DSAs and DTSAs is that DTSAs cannot create any other DTSA users. However, DSAs can create one or more DTSA for their district.
District Test and Security Administrator (DTSA)
District Test and Security Administrators (DTSAs) can create DRV, STC, TA, TT, and SRV users within their district; set student test settings, student restrictions, and restricted resources; and access reports within their district.
School Test Coordinator (STC)
School Test Coordinators (STCs) are typically school or program administrators or principals. STCs can create TA, TT, and SRV users within their institution; administer tests; view student reports; and set student test settings and student restrictions for students within their school.
Test Administrator (TA) Test Administrators (TAs) can set up test sessions and administer tests in their school. They can also view student reports and assign student test settings for students in their school.
Test Technician (TT) Test Technicians (TTs) can set up test sessions and administer tests in their school.
District Report Viewer (DRV)
District Report Viewers (DRVs) can view student reports (both participation and performance) for students in their district.
School Report Viewer (SRV)
School Report Viewers (SRVs) can view student reports (both participation and performance) for students in their school.
6

OAKS Online 2014–2015 TIDE User Guide
Additional Resources This user guide does not provide information on OAKS Online policies and procedures, or how to use the other OAKS Online applications. Resources for other OAKS Online applications, as well as general resources about the OAKS and ELPA assessments are available on the OAKS Online Portal at http://oaksportal.org/.
Computer and System Requirements This user guide does not provide information on computer or software requirements for TIDE or other OAKS Online systems. This information is provided in the Technical Specifications Manual for Online Testing, also available on the OAKS Online Portal.
About Microsoft Excel Files TIDE allows authorized users to export/download files in one of two formats: .csv and .xlsx. The file format you select will depend on what version of Excel you are using. Comma-separated values (.csv):
If you have Excel 2003 or earlier, AIR recommends that you download exported records in .csv format. These files do not automatically preserve leading zeros (numbers that begin with at least one zero, e.g., “0001234”). Therefore, to ensure that student data, especially State Student Identification numbers (SSIDs), appear in Excel correctly when using the .csv file, follow the instructions in Appendix A, Opening a CSV File in Excel. Excel:
Microsoft Excel 2007 or newer opens .xlsx files while automatically preserve leading zeros. You must use these versions of Excel to open these files correctly. These files cannot be opened using an earlier version of Excel.
7

OAKS Online 2014–2015 TIDE User Guide
Section II. Accessing TIDE This section contains information on how to activate a new TIDE account, how to log in after accessing TIDE for the first time, and how to reset a forgotten password.
Do not share your login information with anyone, even other authorized TIDE users. TIDE provides access to student information, which must be protected in accordance with federal privacy laws.
Accessing TIDE: First-Time Users Users who have been newly added to TIDE will receive an automated email. This email contains the following information:
• Your welcome to TIDE • Your user role • The OAKS Online systems you have access to (e.g., TIDE, TA Interface, Online Reporting System) • A secure, temporary, one-time only link. This link expires five days after the email was sent.
You must click the secure link in the email to activate your account. When you click the link, you will be directed to the Activate User Information page.
Figure 1. Activate User
Activate User Account The Activate User Information page requires you to create and enter your password twice, select a security question, and provide the answer.
1. Enter your password twice. The password must be eight characters long and have three of the following: one lowercase alphabetic character, one uppercase alphabetic character, one number, and one special character %, #, or !. (If you are resetting your password, it cannot be the same as your current or previous password.)
2. Select a security question from the drop-down list.
3. Provide your answer to the security question.
4. Click [Submit]. You will be directed to the TIDE Home page.
8

OAKS Online 2014–2015 TIDE User Guide
Alert: Important Information Regarding Your Passwords
If you are a user who has recently been added to TIDE, you should have received an e-mail from [email protected] that contains a temporary password and a link to sign in to the OAKS systems. You must log in with your temporary password within five days of receiving the email in order to activate your account. The temporary password is valid for five days. You will be prompted to update your password and select and answer a security question. Did your first temporary password expire?
If you did not log in within five days of receiving the first password email and activate your account, you must contact the OAKS Help Desk. You can only reset your password after you have selected a security question and answer. The OAKS Help Desk will send you a new email with a different temporary password. You MUST log in within five days to activate your account.
Did you forget your password?
If you forgot your password, you can reset it. Click the [Forgot Your Password?] button on the Single Sign On page and then enter your email address into the Email Address field. You will receive another email containing a new temporary password, which also expires in five days. (It may take up to 10 minutes to receive the new email.)
Did you not receive an email containing a temporary password?
Emails from Single Sign On come from [email protected]. Check your spam folder to make sure your email provider did not categorize it as “junk” mail. If you still do not have an email, contact your Test Coordinator to make sure you were added to TIDE. Only users who have been added to TIDE will receive an account email with a temporary password.
Additional Help
If you are unable to log in, contact the OAKS Help Desk for assistance. You must provide your name and e-mail address. Contact information is available in TIDE; click the Contacts link in the upper-right-hand corner.
9

OAKS Online 2014–2015 TIDE User Guide
Logging into TIDE: Post-Account Activation To log into TIDE, you must have an authorized username and password. If you have not yet received your login information, contact your DSA, DTSA, or STC because this person will need to add you to TIDE.
Do NOT share your login information with anyone, even other authorized TIDE users. TIDE provides access to student information, which must be protected in accordance with federal privacy laws.
1. Open your web browser and navigate to the OAKS Online portal (http://oaksportal.org/).
2. Click either [Test Administrators] or [Test Coordinators] to access TIDE and other applications.
Figure 2. User Cards on Portal
3. Click the [Test Information Distribution Engine (TIDE)] button. You will be directed to the log in page.
Figure 3. TIDE Card on Portal
4. Type your username and password in the respective text boxes and click [Log In]. You will be directed to the TIDE Home page.
5. If you are a user with multiple roles or are associated with more than one school, you will be prompted to select the district and/or school and corresponding user role.
Figure 4. Single Sign On Page
Resetting Your Password If your account was locked or if you forgot your password, click the [Forgot Your Password?] link on the login page. You will need to provide your username (email address) that is on file in TIDE. You will receive an automated email that contains a secure, temporary link, just like the email you received when you were first added to TIDE. Click the secure link to submit your answer to your selected question and enter a new password.
10

OAKS Online 2014–2015 TIDE User Guide
Switching Between OAKS Online Systems The top left corner of your browser contains a drop-down menu listing the other OAKS applications to which you have access. From the drop-down menu, select the application you want to switch to. You will be directed to the main page for that application and will not have to log in again.
Figure 5. System Navigation Drop-Down Menu
Warning: Although navigating to another system is easy, it is important to understand how the system operates in order to avoid unintended consequences of switching systems.
If you are using the TA Interface or TA Training Site and you navigate away from it, your session will stop and all students in the session will be logged out. You cannot resume your session. You will have to create a new session, and your students will have to log in again to resume testing.
11

OAKS Online 2014–2015 TIDE User Guide
Section III. Navigating the TIDE Interface TIDE Home Page The first screen you will see on logging in is the TIDE Home page. Your user role is displayed on the screen in the top right corner, next to your name.
Figure 6. Sample Home Page for DSA Users
12

OAKS Online 2014–2015 TIDE User Guide
TIDE Banner The TIDE banner, which contains the “file” tabs, is visible at all times at the top of the page and also contains specific links and features.
Figure 7. Sample TIDE Banner
The upper right corner displays the following information and links:
• Your name (User) and user role (Role)
• [My Account]—Click to view and update your personal information and change your password
• [Contact Us]—Click to view AIR Help Desk contact information
• [Logout]—Click to log out of the site
• [Help]—Click to view and download the TIDE User Guide
• [FAQ] —Click to view and download the TIDE Frequently Asked Questions document Your district or school name is also visible in the upper right corner of the screen.
TIDE Tabs The TIDE interface uses tabs, which resemble file folders, as the primary means of navigating between tasks. Some tasks in the TIDE interface contain multiple sub-tasks, as displayed below. TIDE is automatically configured to show only the tasks and subtasks that are available to you based on your user role. The above image is representative for District Security Administrators.
• Tasks that are grayed out cannot be accessed until they become active.
• Tasks with a lock icon may be viewed, but changes cannot be made on those pages.
13

OAKS Online 2014–2015 TIDE User Guide
Changing the Selected School/Test Administration This feature allows you to view information for another district or school to which you have been assigned access without logging out and then logging back in again.
Note: Depending on your user role, this feature may not be available. User accounts with only one associated institution will not be able to change schools.
Figure 8. Change Institution Window
1. Click the [Change Institution/Test Administration] button. The Change Institution window will appear, and the OAKS administration will already be selected.
2. Select a role type.
3. Confirm/select the district and institution.
4. Click [Submit].
My Account This section contains your personal information. You can update your personal information as well as change your password for accessing the OAKS Online system (TIDE, Test Administration, TA Interface Training Site, and Online Reporting).
Figure 9. My Account Window
14

OAKS Online 2014–2015 TIDE User Guide
Updating Your Password
1. Enter your current password into the “Old Password” text box. 2. Enter your new password into the “New Password” text box. The password must be eight
characters long and have three of the following: one lowercase alphabetic character, one uppercase alphabetic character, one number, and one special character %, #, or !.
3. Enter the new password again into the “New Password (again)” text box. 4. Click [Update]. If TIDE validates your new password, a message will appear saying that your account was successfully updated. Password changes take effect immediately and apply to all OAKS Online systems.
15

OAKS Online 2014–2015 TIDE User Guide
Section IV. TIDE Tasks The following features and functions, called tasks, are included in TIDE. Tasks are identified by their tabs. Table 3. User Access to Tasks in TIDE
Task Group Description Tasks and Functions
User Roles
DSA DTSA STC TA TT DRV/SRV My Account Update personal
information and password.
My Account
User Information
Add, upload, view, and edit information for users in your district or school who are below your designated role level.
Add Users View/Edit Users Upload Users
Student Information
View and edit student information, including test settings.
View/Edit Students
Edit Test Settings
Upload Student Settings
Edit Restricted Resources
Student Restrictions
View and edit student test restrictions.
View/Edit Restrictions
Upload Restrictions
Rosters View and edit rosters.
Upload Roster Manage Roster
General Resources
Access general information related to online assessments.
Download Voice Pack
User Roles Accessibility Supports
16

OAKS Online 2014–2015 TIDE User Guide
Task Group: User Information
The User Information section contains the following sub-tabs: View/Edit Users
Add Users Upload Users
This section of TIDE allows authorized users to add new users or modify existing users (either individually or through a file upload process). The following users can access the Manage Users tasks:
• District Security Administrators (DSA)
• District Test and Security Administrators (DTSA)
• School Test Coordinators (STC) Additionally, these authorized users can only view, add, or modify the users within their district and/or school who have a lower role level. For example, School Test Coordinators can add and modify Test Administrators, Test Technicians, and School Report Viewers. They cannot add or modify other School Test Coordinators or any district-level users.
17

OAKS Online 2014–2015 TIDE User Guide
Task: View/Edit Users The View/Edit Users page allows you to search for users within your district and/or school who are below your role level. For example, if you are a School Test Coordinator, you can search for Test Administrators, Test Technicians, and School Report Viewers, but not other School Test Coordinators. After you select and/or enter your search parameters, a table will be displayed listing the users who match those parameters.
Figure 10. View/Edit Users Task
Searching for User Records
1. Select a role level.
2. Select or verify your district and/or school (you also have the option to select “all schools”).
3. Enter a user’s first name, last name, phone number, and/or email address.
(Optional: Enter multiple variables to find a specific user or help narrow your search results.)
4. Click [Search]. The page will display the results that match your search criteria.
18

OAKS Online 2014–2015 TIDE User Guide
Understanding the Search Results Table
• Each row contains information for each user, including role, district, school or program, first name, last name, email address, and phone number.
• Each row also contains a [View] button and a checkbox.
o The [View] button allows you to view the complete information for the selected user and update his or her information.
o The checkbox allows you to select individual users to delete or export.
Sorting Search Results
By default, the search results table automatically sorts by last name in ascending order. However, all columns in the table are sortable in both ascending (A–Z, 0–99) and descending (Z–A; 99–0) order.
• To sort the table in ascending or descending order by a specific attribute, click on a column header (e.g., First Name). The table will automatically sort by the selected attribute.
o An arrow will appear next to the selected attribute:
When the arrow is pointing up, the column is sorted in ascending order.
When the arrow is pointing down, the column is sorted in descending order.
• To sort a selected column in the other direction (descending versus ascending), click the column header again.
Exporting User Records (Updated)
You can export search results as a .csv file, which can be opened using Microsoft Excel or a notepad application, or as an Excel .xslx file, which must be opened using Excel 2007 or later. You can export all records or export selected records.
Figure 11. Export Options
Export All Records
You can export a data file that contains all users from the search results table.
1. Hover over the [Export] tab and click either the [Export all to Excel] or [Export all to CSV] option. A file dialog box will appear.
2. Save the file to the desired location on your computer and open the file using Microsoft Excel or a compatible program (for .csv files).
19

OAKS Online 2014–2015 TIDE User Guide
Export Selected Records
You can export a data file that contains only selected (checked) users from the search results table.
1. Click the checkbox for each user whom you want to include in the file.
2. Hover over the [Export] tab and click either the [Export selected to Excel] or [Export selected to CSV] option. A file dialog box will appear.
3. Save the file to the desired location on your computer and open the file using Microsoft Excel or a compatible program (for .csv files).
Deleting Users
You may also delete users.
1. Click the checkbox for each user in the search results table that you want to delete.
2. Click [Delete].
3. A pop-up window will appear asking you to verify that you want to delete the selected users.
4. Click [OK] to confirm that you want to delete the selected users.
Caution: This change takes effect immediately, and the deleted users will no longer be able to log into OAKS Online systems.
20

OAKS Online 2014–2015 TIDE User Guide
Viewing and Editing User Details
You can also view a single user’s information on one page. To do so, click [View] next to a user who appears in the search results table. The Edit User page will load. District-level users and School Test Coordinators may edit information for users below their level.
Figure 12. Edit User Page
You can update the user’s first name, last name, and phone number. You cannot update the user’s email address or district and school affiliation.
• When you have finished updating the user’s information, click [Save].
• To return to the search results listing, click [Go Back To Search Results].
Note: If you need to re-associate a user with a different district or school or modify the person’s email address, you will need to delete the user and then re-add him or her. You may do this on an individual basis by deleting the user and then re-adding him or her via the Add User page. Alternatively, you can follow the process outlined in the Upload User section.
21

OAKS Online 2014–2015 TIDE User Guide
Task: Add Users Use the Add Users page to add new users individually to TIDE. Adding users on this page does not require uploading a file.
• District Security Administrators (DSA) and District Test and Security Administrators can add DRV, STC, TA, TT, and SRV users within their district.
• School Test Coordinators can add TA, TT, and SRV users within their school.
Figure 13. Add Users Task
1. Verify or select the role level of the user you need to add. The district and school options will automatically appear after you select a role.
2. Verify or select the district and school with which the user is associated.
3. Enter the new user’s first name, last name, and email address. You may also enter a phone number where the person can be reached. Ensure that the person’s email address is correct, as you will be unable to simply edit it later.
4. Click [Add User].
The person will be added to TIDE and will also receive an automated email requiring him or her to activate the account.
About the User Activation Process:
After you add a user to the system, that person will receive an email containing a secure URL (link).
This page will require the user to generate a password, and select a security question and answer (in case he or she forgets the password). The user cannot access any other OAKS Online systems until the password has been entered and the security question/answer selected.
Instructions on activating the new account are in the Activate User Account section in Section I of this user guide.
22

OAKS Online 2014–2015 TIDE User Guide
Task: Upload Users The Upload Users page allows you to upload a group of users to TIDE or to modify profiles for existing users. TIDE accepts uploads of user information in either Excel 2007 (.xlsx) or CSV (ASCII) format. CSV files can be opened and edited using spreadsheet applications such as Microsoft Excel or a notepad application.
• District Security Administrators (DSA) and District Test and Security Administrators can add DRV, STC, TA, TT, and SRV users within their district.
• School Test Coordinators can add TA, TT, and SRV users within their school.
Figure 14. Upload Users Task
Warnings:
• You can only upload information for users who are below your role level and who are within your district and/or school.
• If you upload a file that contains information for a user role, district or school that you are not associated with, the upload process will fail
Download the Template (Create User Upload File)
We strongly encourage you to download the template file in the format that you need rather than create the file from scratch. These templates already have the correctly formatted column headers. Using the template will reduce the risk of errors and ensure that your file upload is successful.
1. Click either [Download Excel Template] or [Download CSV Template].
2. Save the file to the desired location on your computer.
3. Open the file using Microsoft Excel or a compatible spreadsheet program (for .csv files).
23

OAKS Online 2014–2015 TIDE User Guide
User File Requirements
Table 4 provides an overview of the required and optional fields and the acceptable values for each field.
Caution: The user file undergoes validation tests after you upload it. If the entire file upload fails, you must make changes to the original file on your computer and then re-upload the file. If you receive errors or warnings for a few records, you can edit the file and re-upload it, or you can proceed with the file upload and then add or edit information for individual users by clicking either [Add Users] or [View/Edit Users].
Table 4. Upload User File Requirements
Column Description DistrictID The user’s school district ID (refer to www.ode.state.or.us/instID/ for assistance in locating
a district ID).
InstitutionID The user’s school or program ID (refer to www.ode.state.or.us/instID/ for assistance in locating an institution ID).
FirstName The first name of the user you are adding, editing, or deleting.
LastName The last name of the user you are adding, editing, or deleting.
Email The email address for the user you are adding, editing, or deleting.
Role The user role code that the user has or should have.
Phone The user’s phone number. Enter this in format xxx-xxx-xxxx. An extension may also be appended.
Action Enter one of the following options: Add – Add new user or edit existing user. Delete – Remove existing user from the system.
Adding or Editing User Information
Do not change or move the column headers in the first row. You can expand the columns to better read the headers and text that you will add. Data must be entered in each column as standard text. (Any formatting such as boldface, italics, or highlighting will be lost during the upload.)
Figure 15. Upload User Template
1. Enter each user’s information in each row and respective column.
2. For each record, enter “ADD” as the action.
3. After you have finished adding users to your file, save the file.
24

OAKS Online 2014–2015 TIDE User Guide
Adding Users to Multiple Institutions
To add users to more than one institution, follow the steps below.
Figure 16. Upload User Template: Add Users to Multiple Institutions
1. Enter the user’s information on separate lines in the upload file—one line for each district or school association.
2. For each record, enter “ADD” as the action.
3. After you have finished adding users to your file, save the file.
Note: When one user is added to multiple institutions in the same upload file, he or she will receive a single email containing a single login and password. (Users who are added to multiple institutions in more than one upload file will receive separate emails [one email per upload file].) In this event, the most recent email contains the correct information to log in to TIDE and other OAKS Online systems provided by AIR.
Updating or Correcting Previously Uploaded User Information
Email addresses are used to identify unique individuals in the system and can be corrected only by deleting the incorrect record and adding a new, correct one. Role, district, and school affiliations also can only be changed by deleting the person’s current record and adding a new one. To change a user’s email address, role, or district/school affiliation:
1. Enter the user’s current information with “DELETE” as the action. This will remove the incorrect/outdated record from the system.
2. Enter the user’s new information in a separate row with “ADD” as the action and the corrected email/affiliation entered in the user record.
To change any other user attributes, including name or phone number:
1. Upload a user file with the corrected information. Use “ADD” as the action.
Note: For users with multiple records in the system (the same email address is used for multiple districts/institutions), use “ADD” as the action when uploading a new name or phone number. This will update all records for the user. You do not need to update each individual record for that user.
When you have finished updating or creating the file, save the file.
25

OAKS Online 2014–2015 TIDE User Guide
Uploading the User File
This section outlines the steps required to upload the user file. This process has four main steps: (1) Upload File, (2) Preview File, (3) Validate File, and (4) Confirmation. This process allows you to confirm that the correct file was uploaded and that it contains no errors. Step 1: Upload File
Figure 17. Upload User File, Step 1: Locate File
1. Click [Browse] and navigate to the saved file on your computer.
2. Select the file and click [Open]. The file name will appear in the text box on the screen.
3. Click [OK], and then click [Upload File].
Step 2: Preview File
Figure 18. Upload User File, Step 2: Preview Records
1. Preview the file you selected to ensure that you uploaded the correct file. (Only a few records are visible on this preview page.)
2. Click [Next] to begin the file validation process.
Caution: If your file is large (contains 2,000 records or more), uploading it may take a long time. Do NOT cancel the upload and try again, because TIDE may have already begun processing some of the records. If your file is too large to upload while you are online, TIDE will display a window that contains your name and default email address. You will be prompted to enter your phone number and an alternate email, if desired. When the file is processed, you will receive an email alerting you that you can now view the records in TIDE.
Please be aware that if any records contained invalid data, those records were not added to TIDE.
26

OAKS Online 2014–2015 TIDE User Guide
Step 3: Validate File
If the upload was successful, the users’ information will be displayed on the screen. You will be prompted to review these records for any warnings and/or errors. The “Your file was validated” message indicates that the file was uploaded successfully and verified for any errors. (The file has not yet been committed to TIDE.)
• Files that contain records with errors will generate an error message. Depending on the severity of the error, either the entire file will fail or just the records with errors will fail.
• Records without errors will be automatically accepted by the system.
Files with data not in the correct format as shown in the template will generate error messages by row, identifying the errors in the file. The “Understanding Error Types” section in the next column provides a brief explanation of the three possible error types: fatal errors, record errors, and record warnings. Refer to Appendix B for information about common errors. If you have no errors and wish to proceed, click [Commit].
Understanding Error Types
• If your file will fail, note the errors and the corresponding record numbers. Click [Cancel]. Update your file, and then restart the upload process, beginning with Step 1: Upload File.
• If your file contains record errors, these records will not be committed to the TIDE. The records that passed validation can be committed. You may elect to fix the errors in your file and re-upload it, or to add these records using the [Add User] task.
• If your file contains record warnings, these records will be committed. However, you are strongly encouraged to review the associated records. You may edit these records using the [View/Edit Users] task.
If problems exist for a single record and you are unable to successfully upload that record, please contact your Regional Assessment Support ESD Partner for assistance.
Step 4: Confirmation
After you click [Commit], the accepted records will be uploaded to TIDE. You will also receive a confirmation message stating that your file was successfully submitted to the TIDE system.
Figure 19. Upload User File, Step 4: Confirmation
27

OAKS Online 2014–2015 TIDE User Guide
Task Group: Student Information
The Student Information section contains the following sub-tabs: View/Edit Students
Upload Student Settings
This section of TIDE allows authorized users to view students within their district or school. Users cannot add or delete students in the TIDE system. Student information is managed using data automatically sent nightly from the Oregon Department of Education to the American Institutes for Research. If student demographic information needs to be updated or students added or deleted, the school’s staff member who is responsible for inputting student information into the state’s system must enter this information using the school’s regular procedures for updating student information. The records will be updated in the TIDE system within 48–72 hours.
28

OAKS Online 2014–2015 TIDE User Guide
Task: View/Edit Students The View Students task allows authorized users to search for students within an institution and view their demographic information, including test accommodations. Authorized users may edit students’ test settings, restricted resources, accommodations, and restrictions as required. Any other settings must be updated by ODE.
Figure 20. View Students Task
Please note that if a student transfers between schools or districts, the student’s test settings will move with him or her and will not be changed or reset.
Searching for Student Records
1. Verify or select an institution and grade from the drop-down lists. (If you are affiliated with more than one district or institution, you will first need to select a district or institution.)
2. Enter or select any search criteria you want to include.
• To view all students in a district, select “All institutions” from the Institution drop-down list.
• To view all students in your school, select “All Grades” from the Enrolled Grade drop-down list.
3. Click [Search]. The page will display the records associated with the school and grade you selected.
29

OAKS Online 2014–2015 TIDE User Guide
Advanced Search Options
If your initial search results in a large number of student records, you may narrow your search to locate specific students or groups of students more easily.
Figure 21. Advanced Search Options
1. Click [Add Search Criteria]. The section will expand to display the Search Fields drop-down list.
2. Select a search variable. (Depending on the variable you selected, a subject drop-down list may appear. Select a subject.)
3. Select the values you want to limit your search to. (For example, if you want to search only for students with a specific text-to-speech setting, then click the checkbox for that value. If you want to exclude a value, make sure that value’s box is not checked.)
4. Click [Add Criteria]. The selected values will appear above the “Add Search Criteria” text.
• Note: To add another search variable (e.g., search for students whose test settings call for both Print on Demand and Text-To-Speech , repeat steps 2, 3, and 4.
5. Click [Search]. The page will display the records associated with the criteria you selected.
Understanding the Search Results Table
Each row contains the following information for each student: District ID, Institution ID, SSID, First Name, Last Name, Middle Name, Gender, Date of Birth, Enrolled Grade, as well as test settings and accommodations information listed in the additional columns.
• Each row also contains a [View] button and a checkbox.
o The [View] button allows you to view the complete information for the selected student.
o The checkbox allows you to select individual students to export.
30

OAKS Online 2014–2015 TIDE User Guide
Sorting Search Results
By default, the search results table automatically sorts by last name in ascending order. However, all columns in the table are sortable in both ascending (A–Z, 0–99) and descending (Z–A; 99–0) order.
• To sort the table in ascending or descending order by a specific attribute, click on a column header (e.g., First Name). The table will automatically sort by the selected attribute.
o An arrow will appear next to the selected attribute:
When the arrow is pointing up, the column is sorted in ascending order.
When the arrow is pointing down, the column is sorted in descending order.
• To sort a selected column in the other direction (descending versus ascending), click the column header again.
Exporting Student Records (Updated)
You can export search results as a .csv file, which can be opened using Microsoft Excel or a notepad application, or as an Excel .xslx file, which must be opened using Excel 2007 or later. You can export all records or export selected records.
Reminder: Federal law (FERPA) prohibits the release of any student’s personally identifiable information. Any saved files or printouts containing student information must be securely stored and then destroyed when no longer needed.
Figure 22. Export Options
31

OAKS Online 2014–2015 TIDE User Guide
Export All Records
You can export a data file that contains all students from the search results table.
1. Hover over the [Export] tab and click either the [Export all to Excel] or [Export all to CSV] option. A file dialog box will appear.
2. Save the file to the desired location on your computer and open the file using Microsoft Excel or a compatible program (for .csv files).
Export Selected Records
You can export a data file that contains only selected (checked) students from the search results table.
1. Click the checkbox for each student whom you want to include in the file.
2. Hover over the [Export] tab and click either the [Export selected to Excel] or [Export selected to CSV] option. A file dialog box will appear.
3. Save the file to the desired location on your computer and open the file using Microsoft Excel or a compatible program (for .csv files).
32

OAKS Online 2014–2015 TIDE User Guide
Viewing a Student’s Complete Record
To view a student’s complete record, click [View] next to his or her name. The View Student Details page allows you to view the complete demographic and testing information for the student you selected.
• You can view the student’s information, including demographics and ethnic flags, as well as address and home phone number.
• You can also view the student’s test settings and restricted resources. • Target up information is visible but not editable.
Figure 23. View Student Details Page (top portion)
Editing Test Settings and Restricted Resources
Authorized users can update test settings and accessibility supports. All test settings are configurable by subject. For more information about test settings and accessibility supports, refer to Table 5. For more information about restricted resources, refer to Table 6. Saving Changes
• When you have finished editing the student’s test settings, click [Save Changes]. • To return to the student record listing, click [Go Back To Search Results].
33

OAKS Online 2014–2015 TIDE User Guide
Table 5. Descriptions of Test Settings and Accessibility Supports
Test Settings Options* Descriptions and Notes Target Up - None - or a grade level The grade level at which the student will be
tested for the subject. If - None -, the student is tested at the enrolled grade level. This field is read only.
Blocked Subjects Writing ELA Mathematics Social Sciences Science ELPA
Subjects for which the student is not eligible for testing.
Color Choices
Black on White Yellow Blue Black on Rose Yellow on Blue Medium Gray on Light Gray Reverse Contrast
This is the background color that appears on the test.
Text-to-Speech None Stimuli Items Stimuli and Items
Students with the text-to-speech setting enabled may receive text-to-speech as an allowable resource delivered through the computer. (Note: Human-based read-aloud remains an accommodation.)
Students whose test language is set to Spanish will be able to access the Spanish text-to-speech for Math and Science tests. Both the Spanish language and the text-to-speech settings must be enabled prior to the student beginning the test opportunity. Not all options are available for all subjects.
Print Size Default/No Zoom = 1X Level 1 = 1.5X Level 2 = 1.75X Level 3 = 2.5X Level 4 = 3X
The print size the student should have when starting a test. The selected print size becomes the default for all items in that student’s test.
Note: The default print size is 14 point for ELPA K–3 and 12 point for all other tests.
Closed Captioning Closed Captioning Not Available Closed Captioning Available
Indicates if closed captioning is available for the subject.
34

OAKS Online 2014–2015 TIDE User Guide
Test Settings Options* Descriptions and Notes Language
English—ELA, Math, Science, Social Sciences, Writing, and ELPA Spanish—Math, Science, Social Sciences, Writing Braille—ELA, Math, Science, and Social Sciences
The test language.
Suppress Score Display score to student Do not display score to student
Suppress a student’s score from immediately displaying on his or her screen after the student submits a test. A student’s score may be suppressed if the staff members who provide services for the student think that displaying the score will be upsetting.
Modification Codes Multiple Identify whether the student should receive any modifications.
American Sign Language
Do not show ASL videos Show ASL Videos
Allows students to view test content translated into ASL by a human signer.
Permissive Mode Permissive Mode Disabled Permissive Mode Enabled
Permissive mode should be enabled for students who require access to accessibility software in order to interact with the test (e.g., screen readers, magnifiers, etc.). When permissive mode is disabled, the only application that can be open on the computer is the secure browser.
Word List (Glossary) English Glossary No Glossary
Students can open a glossary to view terms presented on the test that may be unfamiliar to them.
Masking Masking Not Available Masking Available
Allows blocking of content that is not of immediate need or that may be distracting to the student.
Streamlined Mode Off On
By default, all tests use the standard interface. This interface is compatible with all supported desktops and tablets. The streamlined interface presents the test in an alternate, simplified format in which the items are displayed below the stimuli. All tool and navigation buttons are on the bottom of the screen. The streamlined interface is not intended to be tablet compatible.
Accommodations
None One or more
Identify whether the student should receive any accommodations.
The General Resources > Assessment Accommodations tab in TIDE links to ODE’s Assessment Accommodations page.
35

OAKS Online 2014–2015 TIDE User Guide
Test Settings Options* Descriptions and Notes Accommodation Codes
Multiple Identify whether the student should receive any accommodations.
The General Resources > Assessment Accommodations tab in TIDE links to ODE’s Assessment Accommodations page.
* The default option for each test setting is indicated in bold type. Table 6. Descriptions of Restricted Resources
Restricted Resource Options* Descriptions and Notes Print on Demand None
Items—Mathematics, Writing Stimuli—ELA, ELPA, Mathematics Stimuli and Items—ELA, Science, Social Sciences, Mathematics
For Grades 3-11 mathematics and ELA tests, students with an IEP can request a printed copy items and/or stimuli. For all other OAKS and ELPA tests, students can request a printed copy items and/or stimuli without an IEP.
Item Types Exclusion None Grid Items
Restrict the student from viewing machine-scored graphic-response items.
Note: TIDE refers to these items as “grid items.”
ELPA Domain Exemptions
No Exemptions Listening Reading Speaking Writing
Students who are taking ELPA tests may be exempted from a specific ELPA domain in compliance with the student’s IEP. For additional information, refer to “ELPA Participation for Students with IEPs” in the Test Administration Manual and the Oregon Accessibility Manual in “Table 5ELPA: Embedded Accommodations.”
Check the domains that the student should not take. The student’s IEP must reflect the specific domain exemption(s) prior to the student taking the ELPA. Please note: No four-domain exemptions are allowed for 2014-2015.
* The default option for each restricted resource is indicated in bold type.
Before setting the Print on Demand restricted resource for a student, be sure to review the Test Administration Manual for guidelines on determining and documenting which students need access to printed test items.
36

OAKS Online 2014–2015 TIDE User Guide
Task: Upload Student Settings The Upload Student Settings page allows authorized users to upload test settings for multiple students as well as to modify students’ existing test settings. TIDE accepts upload files in either Microsoft Excel (.xlsx) or CSV (ASCII) format. CSV files can be opened and edited using spreadsheet applications such as Microsoft Excel or a notepad application. Excel .xlsx files must be opened using Excel 2007 or later.
Reminder: You can upload student settings only for students who are enrolled within your district and/or institution. You cannot upload student settings for students in a district or institution that you are not associated with. In the event that the upload file contains information for a student who is not enrolled in your district and/or institution, the system will provide an error message specifying the reason for the failed upload.
Figure 24. Upload Student Settings Task
Download the Template (Create Upload Student Settings File)
We strongly encourage you to download the template file in the format that you need rather than create the file from scratch. These templates already have the correctly formatted column headers. Using the template will reduce the risk of errors and ensure that your file upload is successful.
1. Click either [Download Excel Template] or [Download CSV Template].
2. Save the file to the desired location on your computer. We recommend using the following file naming format:
TIDETestSettingsUploadFile(10-01-13).csv OR TIDETestSettingsUploadFile(10-01-13).xlsx
3. Open the file using Microsoft Excel or a compatible spreadsheet program (for .csv files).
37

OAKS Online 2014–2015 TIDE User Guide
Note: You do not need to use the recommended file name; just ensure that your file name has no spaces (you may use hyphens or underscores _ to “create” spaces). We also recommend using the date of upload in your file name.
Student Test Settings File Requirements
Table 7 provides an overview of the required and optional fields and the acceptable values for each field.
Caution: The user file undergoes validation tests after you upload it. If the entire file upload fails, you must make changes to the original file on your computer and then re-upload the file. If you receive errors or warnings for a few records, you can edit the file and re-upload it, or you can proceed with the file upload and then add or edit information for individual students via the [View/Edit Students] task.
38

OAKS Online 2014–2015 TIDE User Guide
Table 7. Upload Student Settings Requirements
Column Name Description Valid Values
State-SSID Student’s SSID. Up to 30 alphanumeric characters. Must exist in TIDE. Required.
PrintSize:<subject> Student’s print-size accommodation for all tests in the indicated subject. For example, the column PrintSize: ELA indicates the print size for all tests in English-Language Arts.
One of the following: TDS_PS_L0—No magnification, 14 pt. TDS_PS_L1—1.5 magnification, 21 pt. TDS_PS_L2—1.75 magnification, 24.5 pt. TDS_PS_L3—2.5 magnification, 35 pt. TDS_PS_L4—3.0 magnification, 42 pt. Optional. If blank, text appears as 14 point.
Color Choices:ELA Color Choices:Mathematics
Color of text and background for all tests in the English-Language Arts and mathematics.
One of the following: TDS_CC0—Black on White. TDS_CCInvert—White on black. TDS_CCMagenta—Black on rose. TDS_CCMedGrayLtGray—Medium gray on light bray TDS_CCYellowB—Yellow on Blue. Optional. If blank, test appears as black text on white background.
Color Choices:Science Color Choices:Social Sciences Color Choices:Writing
Color of text and background for all tests in science, social sciences, and writing.
One of the following: TDS_CC0—Black on White. TDS_CCBlue—Blue on white. TDS_CCYellow—Yellow on white. TDS_CCMagenta—Black on rose. TDS_CCMedGrayLtGray—Medium gray on light bray TDS_CCYellowB—Yellow on Blue. Optional. If blank, test appears as black text on white background.
Color Choices:ELPA Color of text and background for all ELPA tests.
TDS_CC0—Black on White. TDS_CCBlue2—Light blue on white. TDS_CCYellow—Yellow on white.
39

OAKS Online 2014–2015 TIDE User Guide
Column Name Description Valid Values
Masking:ELA Masking:Mathematics
Student’s masking designated support for ELA and mathematics.
One of the following: TDS_Masking0—Masking not available. TDS_Masking1—Masking available. Optional. If blank, masking is not available.
Permissive Mode:ELA Permissive Mode:Mathematics
Student’s permissive mode accommodation for ELA and mathematics.
One of the following: TDS_PM0—Permissive Mode not available. TDS_PM1—Permissive Mode available. Optional. If blank, Permissive Mode is not available.
Streamlined Interface:ELA Streamlined Interface:Mathematics
Student’s streamlined interface accommodation for ELA and mathematics.
One of the following: TDS_TS_Modern—Streamlined Interface not available. TDS_TS_Accessibility—Streamlined Interface available.
TTS:ELA-CAT TTS:ELA-PT TTS:Science TTS:Social Sciences TTS:Writing
Student’s text-to-speech accommodation for ELA-CAT, ELA-PT, science, social sciences, and writing.
One of the following: TDS_TTS0—TTS not available. TDS_TTS_Item— Enable TTS for test items. TDS_TTS_Stim—Enable TTS for test stimuli. TDS_TTS_Stim&TDS_TTS_Item—Enable TTS for test items and stimuli. Optional. If blank, TTS is not available.
TTS:Mathematics Student’s text-to-speech accommodation for mathematics.
One of the following: TDS_TTS0—TTS not available. TDS_TTS_Stim&TDS_TTS_Item—Enable TTS for test items and stimuli. Optional. If blank, TTS is not available.
Language:ELA Language in which ELA tests appear.
One of the following: ENU—English ENU-Braille—Braille Optional. If blank, tests appear in English.
40

OAKS Online 2014–2015 TIDE User Guide
Column Name Description Valid Values
Language:Mathematics Language:Science Language:Social Sciences Language:Writing Language:ELPA
Language in which mathematics, science, social sciences, writing, and ELPA tests appear.
One of the following: ENU—English ENU-Braille—Braille ESN—Spanish, stacked translation Optional. If blank, tests appear in English.
ASL:ELA ASL:Mathematics
Indicates if the American Sign Language videos accommodation is available for ELA and mathematics tests.
One of the following: TDS_ASL0—ASL accommodation is not available. TDS_ASL1—ASL accommodation is available. Optional. If blank, ASL accommodation is not available.
Translation (Glossary): ELA
Indicates which glossary, if any, is available for the ELA tests.
TDS_WL_Glossary—English TDS_WL0—None Optional. If blank, no glossary is available.
41

OAKS Online 2014–2015 TIDE User Guide
Column Name Description Valid Values
Translation (Glossary): Mathematics
Indicates which glossary, if any, is available for mathematics tests.
TDS_WL_Glossary—English TDS_WL_ArabicGloss—Arabic TDS_WL_CantoneseGloss—Cantonese TDS_WL_ESNGlossary—Spanish TDS_WL_KoreanGloss—Korean TDS_WL_MandarinGloss—Mandarin TDS_WL_PunjabiGloss—Punjabi TDS_WL_RussianGloss—Russian TDS_WL_TagalGloss—Filipino TDS_WL_UkrainianGloss—Ukrainian TDS_WL_VietnameseGloss—Vietnamese TDS_WL_ArabicGloss&TDS_WL_Glossary—Arabic & English TDS_WL_CantoneseGloss&TDS_WL_Glossary—Cantonese & English TDS_WL_ESNGlossary&TDS_WL_Glossary—Spanish & English TDS_WL_KoreanGloss&TDS_WL_Glossary—Korean & English TDS_WL_MandarinGloss&TDS_WL_Glossary—Mandarin & English TDS_WL_PunjabiGloss&TDS_WL_Glossary—Punjabi & English TDS_WL_RussianGloss&TDS_WL_Glossary—Russian & English TDS_WL_TagalGloss&TDS_WL_Glossary—Filipino & English TDS_WL_UkrainianGloss&TDS_WL_Glossary—Ukrainian & English TDS_WL_VietnameseGloss&TDS_WL_Glossary—Vietnamese & English TDS_WL0—None Optional. If blank, no glossary is available.
Close Captioning: ELA Indicates if closed captioning is available for ELA tests.
TDS_ClosedCap0--Closed Captioning Not Available TDS_ClosedCap1--Closed Captioning Available Optional. If blank, closed captioning is not available.
42

OAKS Online 2014–2015 TIDE User Guide
Column Name Description Valid Values
Non-Embedded Designated Supports: ELA
Indicates which non-embedded designated supports are available for ELA.
NEDS0—None NEDS_BD—Bilingual Dictionary NEDS_CC—Color Contrast NEDS_CO—Color Overlay NEDS_Mag—Magnification NEDS_RA_Items—Read Aloud Items NEDS_SC_Items—Scribe Items (Non-Writing) NEDS_SS—Separate Setting NEDS_TransDirs—Translated Test Directions Optional. If blank, no non-embedded supports are available. Create one line in the upload file for each non-embedded designated support for a student.
43

OAKS Online 2014–2015 TIDE User Guide
Column Name Description Valid Values
Non-Embedded Designated Supports: Mathematics
Indicates which non-embedded supports are available for mathematics.
NEDS0—None NEDS_CC—Color Contrast NEDS_CO—Color Overlay NEDS_Mag—Magnification NEDS_RA_Items—Read Aloud Items NEDS_SC_Items—Scribe Items (Non-Writing) NEDS_SS—Separate Setting NEDS_TArabic—Glossary - Arabic NEDS_TCantonese—Glossary - Cantonese NEDS_TFilipino—Glossary - Filipino NEDS_TKorean—Glossary - Korean NEDS_TMandarin—Glossary - Mandarin NEDS_TPunjabi—Glossary - Punjabi NEDS_TRussian—Glossary - Russian NEDS_TSpanish—Glossary - Spanish NEDS_TUkrainian—Glossary - Ukrainian NEDS_TVietnamese—Glossary - Vietnamese NEDS_TransDirs—Translated Test Directions Optional. If blank, no non-embedded supports are available. Create one line in the upload file for each non-embedded designated support for a student.
44

OAKS Online 2014–2015 TIDE User Guide
Column Name Description Valid Values
Non-Embedded Designated Accommodations: ELA
Indicates which non-embedded accommodations are available for ELA.
NEA0—None NEA_AR—Alternate Response Options NEA_RA_Stimuli—Read Aloud Stimuli NEA_SC_WritItems—Scribe Items (Writing) NEA_STT—Speech-to-Text NEA_NoiseBuf—Noise Buffers Optional. If blank, no non-embedded accommodations are available. Create one line in the upload file for each non-embedded designated accommodation for a student.
Non-Embedded Designated Accommodations: Mathematics
Indicates which non-embedded accommodations are available for mathematics.
NEA0—None Code—Value NEA_Abacus—Abacus NEA_AR—Alternate Response Options NEA_Calc—Calculator NEA_MT—Multiplication Table NEA_STT—Speech-to-Text NEA_NoiseBuf—Noise Buffers Optional. If blank, no non-embedded accommodations are available. Create one line in the upload file for each non-embedded designated accommodation for a student.
Accommodations: ELA Accommodations: Mathematics Accommodations: Science Accommodations: Social Sciences Accommodations: Writing Accommodations: ELPA
Indicates which accommodations codes are granted for tests in the subject
For a listing of the available codes, see the Oregon Accessibility Manual 2014-2015, available at http://www.ode.state.or.us/teachlearn/testing/admin/alt/ea/updates/oregonaccessibilitymanual_interim5.pdf Optional.
45

OAKS Online 2014–2015 TIDE User Guide
Column Name Description Valid Values
Suppress Score:ELA Suppress Score:Mathematics Suppress Score:Science Suppress Score:Social Sciences Suppress Score:Writing Suppress Score:ELPA
Indicates if TDS displays the score to the student after submitting the test.
TDS_SS0—Do not show score. TDS_SS1—Show score. Optional. If blank, show score to student.
To ensure that districts are appropriately applying restricted resources for individual students, uploading restricted resources information is prohibited.
Information for Print on Demand and Item Types Exclusion must be updated in TIDE for individual students via the View/Edit Student task.
Adding or Editing Student Settings Information
Do not change or move the column headers in the first row. You can expand the columns to better read the headers and text that you will add. Data must be entered in each column as standard text. (Any formatting such as boldface, italics, or highlighting will be lost during the upload.)
Figure 25. Upload Student Settings Template
1. Enter each student’s test settings information in each row and respective column.
Note: If a cell is left empty, that attribute will be ignored in the upload process, and the student will continue to have the default or previously assigned attribute value for that setting.
2. When you have finished updating or creating the file, save it to a secure location on your computer.
Caution: Because student test settings are configured by subject, there are multiple columns for each test setting. You will need to use the horizontal scroll bar in Excel to view all the columns. Before saving the file, please verify that the code in each column is correct.
46

OAKS Online 2014–2015 TIDE User Guide
Uploading the Student Settings File
This section outlines the steps required to upload the student settings file. This process is the same as for upload users and has four main steps: (1) Upload File, (2) Preview File, (3) Validate File, and (4) Confirmation. This process allows you to confirm that the correct file was uploaded and that it contains no errors. Step 1: Upload File
Figure 26. Upload Student Settings File, Step 1: Locate File
1. Click [Browse] and navigate to the saved file on your computer.
2. Select the file and click [Open]. The file name will appear in the text box on the screen.
3. Click [OK], and then click [Upload File].
Step 2: Preview File
Figure 27. Upload Student Settings File, Step 2: Preview Records
1. Preview the file you selected to ensure that you uploaded the correct file. (Only a few records are visible on this preview page.)
2. Click [Next] to begin the file validation process.
Caution: If your file is large (contains 2,000 records or more), uploading it may take a long time. Do NOT cancel the upload and try again, because TIDE may have already begun processing some of the records. If your file is too large to upload while you are online, TIDE will display a window that contains your name and default email address. You will be prompted to enter your phone number and an alternate email, if desired. When the file is processed, you will receive an email alerting you that you can now view the records in TIDE.
Please be aware that if any records contained invalid data, those records were not added to TIDE.
47

OAKS Online 2014–2015 TIDE User Guide
Step 3: Validate File
If the upload was successful, the students’ test settings information will be displayed on the screen. You will be prompted to review these records for any warnings and/or errors. The “Your file was validated” message indicates that the file was uploaded successfully and verified for any errors. (The file has not yet been committed to TIDE.)
• Files that contain records with errors will generate an error message. Depending on the severity of the error, either the entire file will fail or just the records with errors will fail.
• Records without errors will be automatically accepted by the system.
Files with data not in the correct format as shown in the template will generate error messages by row, identifying the errors in the file. The “Understanding Error Types” section in the next column provides a brief explanation of the three possible error types: fatal errors, record errors, and record warnings. Refer to Appendix B for information about common errors. If you have no errors and wish to proceed, click [Commit].
Understanding Error Types
• If your file will fail, note the errors and the corresponding record numbers. Click [Cancel]. Update your file, and then restart the upload process, beginning with Step 1: Upload File.
• If your file contains record errors, these records will not be committed to the TIDE. The records that passed validation can be committed. You may elect to fix the errors in your file and re-upload it.
• If your file contains record warnings, these records will be committed. However, you are strongly encouraged to review the associated records. You may edit these records using the [View/Edit Students] task.
If problems exist for a single record and you are unable to successfully upload that record, please contact your Regional Assessment Support ESD Partner for assistance.
Step 4: Confirmation
After you click [Commit], the accepted records will be uploaded to TIDE. You will also receive a confirmation message stating that your file was successfully submitted to the TIDE system.
Figure 28. Upload Student Settings File, Step 4: Confirmation
48
OAKS Online 2014–2015 TIDE User Guide
Task Group: Student Restrictions
The Student Restrictions section contains the following sub-tabs: View/Edit Restrictions
Upload Restrictions
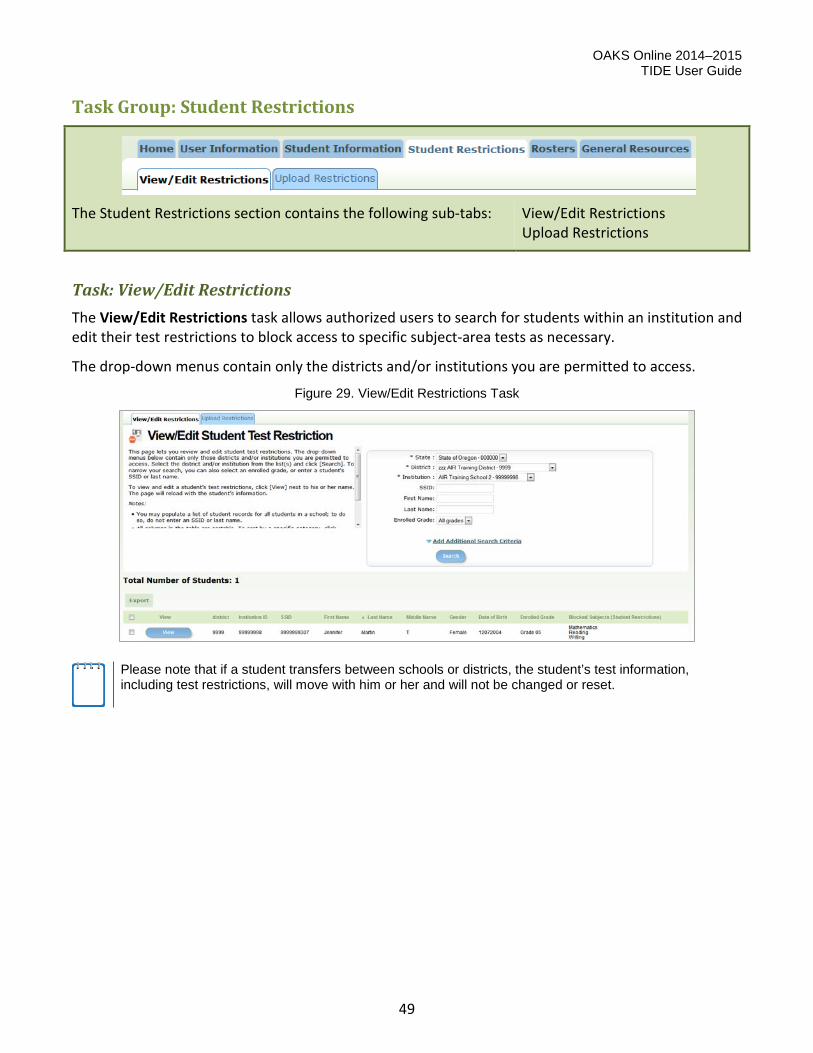
Task: View/Edit Restrictions The View/Edit Restrictions task allows authorized users to search for students within an institution and edit their test restrictions to block access to specific subject-area tests as necessary.
The drop-down menus contain only the districts and/or institutions you are permitted to access.
Figure 29. View/Edit Restrictions Task
Please note that if a student transfers between schools or districts, the student’s test information, including test restrictions, will move with him or her and will not be changed or reset.
49

OAKS Online 2014–2015 TIDE User Guide
Searching for Student Records
1. Verify or select a school and grade from the drop-down lists. (If you are affiliated with more than one district or school, you will need to select a district or school.)
2. Enter or select any search criteria you want to include.
• To view all students in a district, select “All Schools” from the School drop-down list.
• To view all students in your school, select “All Grades” from the Enrolled Grade drop-down list.
3. Click [Search]. The page will display the records associated with the school and grade you selected.
Understanding the Search Results Table
• Each row contains the following information for each student: Institution ID; SSID; first name, last name, and middle name; gender; date of birth; enrolled grade; and a blocked subjects column.
• Each row also contains a [View] button and a checkbox.
o The [View] button allows you to view the complete information for the selected student.
o The checkbox allows you to select individual students to export.
Sorting Search Results
By default, the search results table automatically sorts by last name in ascending order. However, all columns in the table are sortable in both ascending (A–Z, 0–99) and descending (Z–A; 99–0) order.
• To sort the table in ascending or descending order by a specific attribute, click on a column header (e.g., First Name). The table will automatically sort by the selected attribute.
o An arrow will appear next to the selected attribute:
When the arrow is pointing up, the column is sorted in ascending order.
When the arrow is pointing down, the column is sorted in descending order.
• To sort a selected column in the other direction (descending versus ascending), click the column header again.
50
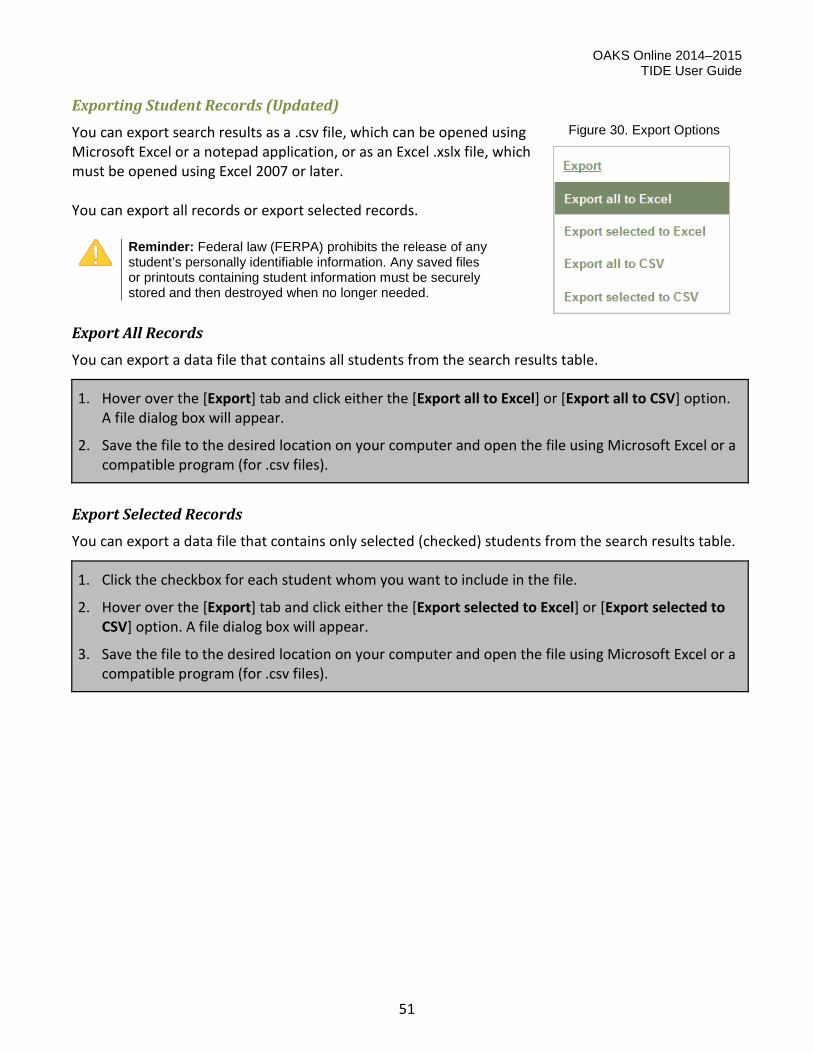
OAKS Online 2014–2015 TIDE User Guide
Exporting Student Records (Updated)
You can export search results as a .csv file, which can be opened using Microsoft Excel or a notepad application, or as an Excel .xslx file, which must be opened using Excel 2007 or later. You can export all records or export selected records.
Reminder: Federal law (FERPA) prohibits the release of any student’s personally identifiable information. Any saved files or printouts containing student information must be securely stored and then destroyed when no longer needed.
Figure 30. Export Options
Export All Records
You can export a data file that contains all students from the search results table.
1. Hover over the [Export] tab and click either the [Export all to Excel] or [Export all to CSV] option. A file dialog box will appear.
2. Save the file to the desired location on your computer and open the file using Microsoft Excel or a compatible program (for .csv files).
Export Selected Records
You can export a data file that contains only selected (checked) students from the search results table.
1. Click the checkbox for each student whom you want to include in the file.
2. Hover over the [Export] tab and click either the [Export selected to Excel] or [Export selected to CSV] option. A file dialog box will appear.
3. Save the file to the desired location on your computer and open the file using Microsoft Excel or a compatible program (for .csv files).
51

OAKS Online 2014–2015 TIDE User Guide
Editing Student Test Restrictions
The Edit Student Test Restrictions page allows you to update test restrictions for the student you selected. You can view but may not edit the student’s personal information.
Figure 31. Edit Student Test Restriction Page
• To block a student from testing in a specific subject, make sure the box for that subject is checked.
• To remove a restriction, uncheck the box for that subject.
• When you have finished updating the student’s test restrictions, click [Save Changes].
• To return to the student record listing, click [Go Back To Search Results].
52
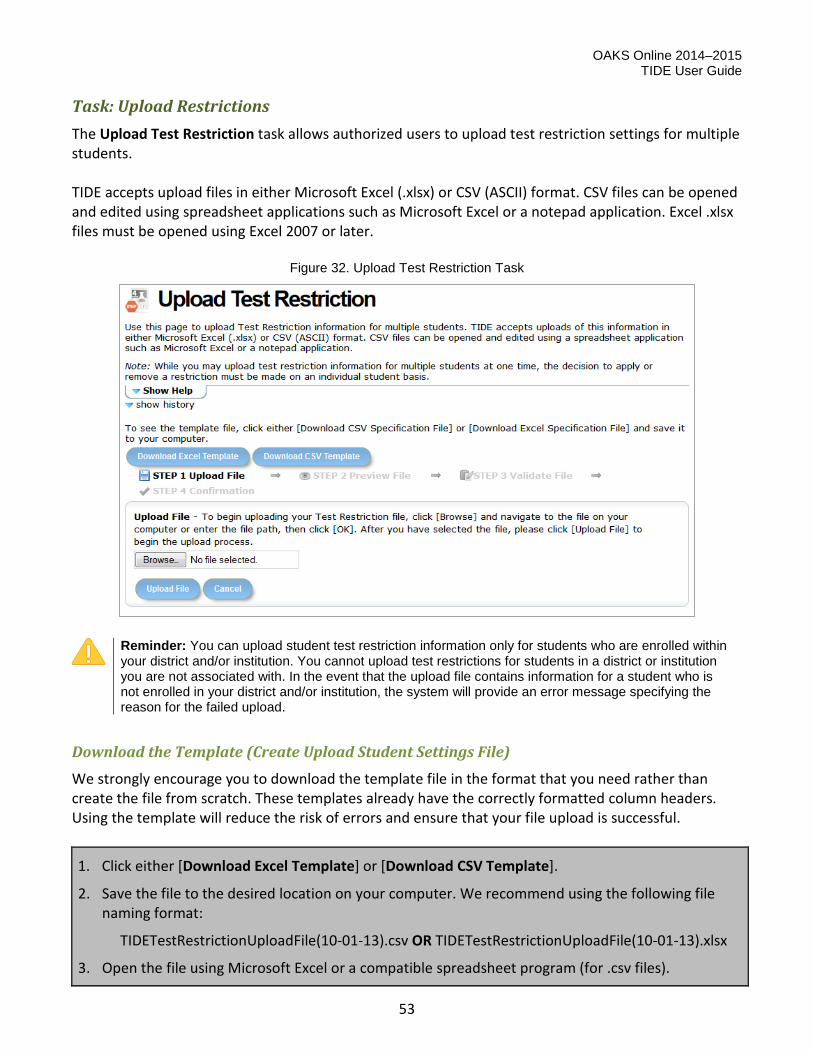
OAKS Online 2014–2015 TIDE User Guide
Task: Upload Restrictions The Upload Test Restriction task allows authorized users to upload test restriction settings for multiple students. TIDE accepts upload files in either Microsoft Excel (.xlsx) or CSV (ASCII) format. CSV files can be opened and edited using spreadsheet applications such as Microsoft Excel or a notepad application. Excel .xlsx files must be opened using Excel 2007 or later.
Figure 32. Upload Test Restriction Task
Reminder: You can upload student test restriction information only for students who are enrolled within your district and/or institution. You cannot upload test restrictions for students in a district or institution you are not associated with. In the event that the upload file contains information for a student who is not enrolled in your district and/or institution, the system will provide an error message specifying the reason for the failed upload.
Download the Template (Create Upload Student Settings File)
We strongly encourage you to download the template file in the format that you need rather than create the file from scratch. These templates already have the correctly formatted column headers. Using the template will reduce the risk of errors and ensure that your file upload is successful.
1. Click either [Download Excel Template] or [Download CSV Template].
2. Save the file to the desired location on your computer. We recommend using the following file naming format:
TIDETestRestrictionUploadFile(10-01-13).csv OR TIDETestRestrictionUploadFile(10-01-13).xlsx
3. Open the file using Microsoft Excel or a compatible spreadsheet program (for .csv files).
53

OAKS Online 2014–2015 TIDE User Guide
Note: You do not need to use the recommended file name; just ensure that your file name has no spaces (you may use hyphens or underscores _ to “create” spaces). We also recommend using the date of upload in your file name.
Student Test Restrictions File Requirements
Table 8 provides an overview of columns in the file and the acceptable values for each one.
Caution: The user file undergoes validation tests after you upload it. If the entire file upload fails, you must make changes to the original file on your computer and then re-upload the file. If you receive errors or warnings for a few records, you can edit the file and re-upload it, or you can proceed with the file upload and then add or edit information for students via the [View/Edit Restrictions] task.
Table 8. Upload Test Restriction File Requirements
Column Description SSID The student’s current SSID (numeric only; no spaces or dashes)
Mathematics Enter Y to block student from testing in this subject Enter N to unblock student from testing in this subject
ELA Enter Y to block student from testing in this subject Enter N to unblock student from testing in this subject
Science Enter Y to block student from testing in this subject Enter N to unblock student from testing in this subject
Social Sciences Enter Y to block student from testing in this subject Enter N to unblock student from testing in this subject
Writing Enter Y to block student from testing in this subject Enter N to unblock student from testing in this subject
ELPA Enter Y to block student from testing in this subject Enter N to unblock student from testing in this subject
When you have finished updating or creating the file, save it to a secure location on your computer.
Adding or Editing Test Restriction Information
Do not change or move the column headers in the first row. You can expand the columns to better read the headers and text that you will add. Data must be entered in each column as standard text. (Any formatting such as boldface, italics, or highlighting will be lost during the upload.)
Figure 33. Upload Test Restrictions Template
54

OAKS Online 2014–2015 TIDE User Guide
1. Enter each student’s test restriction information in each row and respective column.
Note: If a cell is left empty, that attribute will be ignored in the upload process, and the student will continue to have the default or previously assigned attribute value for that setting.
2. When you have finished updating or creating the file, save it to a secure location on your computer.
Uploading the Test Restrictions File
This section outlines the steps required to upload the test restrictions file. This process is the same as for upload users and upload test settings and has four main steps: (1) Upload File, (2) Preview File, (3) Validate File, and (4) Confirmation. This process allows you to confirm that the correct file was uploaded and that it contains no errors. Step 1: Upload File
Figure 34. Upload Test Restrictions File, Step 1: Locate File
1. Click [Browse] and navigate to the saved file on your computer.
2. Select the file and click [Open]. The file name will appear in the text box on the screen.
3. Click [OK], and then click [Upload File].
Step 2: Preview File
Figure 35. Upload Test Restrictions File, Step 2: Preview Records
1. Preview the file you selected to ensure that you uploaded the correct file. (Only a few records are visible on this preview page.)
2. Click [Next] to begin the file validation process.
55

OAKS Online 2014–2015 TIDE User Guide
Caution: If your file is large (contains 2,000 records or more), uploading it may take a long time. Do NOT cancel the upload and try again, because TIDE may have already begun processing some of the records. If your file is too large to upload while you are online, TIDE will display a window that contains your name and default email address. You will be prompted to enter your phone number and an alternate email, if desired. When the file is processed, you will receive an email alerting you that you can now view the records in TIDE.
Please be aware that if any records contained invalid data, those records were not added to TIDE.
56

OAKS Online 2014–2015 TIDE User Guide
Step 3: Validate File
If the upload was successful, the students’ test restriction information will be displayed on the screen. You will be prompted to review these records for any warnings and/or errors. The “Your file was validated” message indicates that the file was uploaded successfully and verified for any errors. (The file has not yet been committed to TIDE.)
• Files that contain records with errors will generate an error message. Depending on the severity of the error, either the entire file will fail or just the records with errors will fail.
• Records without errors will be automatically accepted by the system.
Files with data not in the correct format as shown in the template will generate error messages by row, identifying the errors in the file. The “Understanding Error Types” section in the next column provides a brief explanation of the three possible error types: fatal errors, record errors, and record warnings. Refer to Appendix B for information about common errors. If you have no errors and wish to proceed, click [Commit File].
Understanding Error Types
• If your file will fail, note the errors and the corresponding record numbers. Click [Cancel]. Update your file, and then restart the upload process, beginning with Step 1: Upload File.
• If your file contains record errors, these records will not be committed to the TIDE. The records that passed validation can be committed. You may elect to fix the errors in your file and re-upload it.
• If your file contains record warnings, these records will be committed. However, you are strongly encouraged to review the associated records. You may edit these records using the [View/Edit Test Restrictions] task.
If problems exist for a single record and you are unable to successfully upload that record, please contact your Regional Assessment Support ESD Partner for assistance.
Step 4: Confirmation
After you click [Commit File], the accepted records will be uploaded to TIDE. You will also receive a confirmation message stating that your file was successfully submitted to the TIDE system.
Figure 36. Upload Test Restrictions File, Step 4: Confirmation
57

OAKS Online 2014–2015 TIDE User Guide
Task Group: Rosters
The Rosters section contains the following sub-tabs: Upload Roster
Manage Roster
Task: Upload Roster The Upload Roster File page allows you to upload rosters to the Online Reporting System. While the Online Reporting System allows users to create individual rosters, the Upload Roster File feature in TIDE allows users to create multiple rosters in one upload.
Figure 37. Upload Roster File Task
Important Information about Rosters
• Students must exist in TIDE to be added to a roster. Students may be included in multiple rosters.
• Rosters can be created only at the school level. Users can create rosters only for schools they have access to and for students who are enrolled in that school.
• Rosters allow students within a school to be grouped for data reporting purposes in the Online Reporting System.
• Existing rosters cannot be edited in TIDE. To make changes once a roster has been uploaded, access the Online Reporting System and select [Manage Roster].
TIDE accepts student roster files in either Microsoft Excel (.xlsx) or CSV (ASCII) format. CSV files can be opened and edited using spreadsheet applications such as Microsoft Excel or a notepad application. Excel .xlsx files must be opened using Excel 2007 or later.
58

OAKS Online 2014–2015 TIDE User Guide
Download the Template (Create Upload Roster File) We strongly encourage you to download the template file in the format that you need rather than creating the file from scratch. These templates already have the column headers formatted correctly. Using the template will reduce the risk of errors and ensure that your file upload is successful.
1. Click either [Download Excel Template] or [Download CSV Template].
2. Save the file to the desired location on your computer. We recommend the following file name format:
TIDERosterUploadFile(10-01-2014).xlsx OR TIDERosterUploadFile(10-01-2014).csv
3. Open the file using Microsoft Excel or a compatible spreadsheet program (for .csv files).
Upload Roster File Requirements
Table 9 provides an overview of the required fields and the acceptable values for each field. The upload roster file contains six column fields.
Caution: The roster file undergoes validation tests after you upload it. If the entire file upload fails, you must make changes to the original file on your computer and then re-upload the file. If you receive errors or warnings for a few records, you can edit the file and re-upload it.
Table 9. Upload Roster File Requirements
Column Description
DISTRICT-SCHOOL-ID This is an eight-digit field. You will have to combine your four-digit district code with your four-digit school code. For example, a value of “88881234” will represent a district code of 8888 and a school code of 1234.
If your district and/or school code is less than four digits, preface it with “0” to make the code four digits in length. (For example, if your district code is “888” and your school code is “123,” then you should enter “08880123” in the field.)
USER-EMAIL This field is for the email address of the user who needs to have access to the roster in the Online Reporting System.
This user should already be present in the system and have a role that allows access to the Online Reporting System. Please ensure that you enter the user’s email address correctly.
ROSTER-NAME This is the name that can be given to the roster so that it can be easily identified.
STUDENT-SSID Enter the student’s SSID.
59

OAKS Online 2014–2015 TIDE User Guide
Adding Roster Information
Do not change or move the column headers in the first row. You can expand the columns to better read the headers and text that you will add. Data must be entered in each column as standard text. (Any formatting such as boldface, italics, or highlighting will be lost during the upload.)
Figure 38. Upload Roster File Template
1. Enter the required information in each row and respective column.
2. When you have finished entering the information, save the file to your computer.
60

OAKS Online 2014–2015 TIDE User Guide
Uploading the Roster File This section outlines the steps required to upload the Roster file. This process is the same as for upload users, as well as and upload test settings and test restrictions, and has four main steps: (1) Upload File, (2) Preview File, (3) Validate File, and (4) Confirmation. This process allows you to confirm that the correct file was uploaded and that it contains no errors. Step 1: Upload File
Figure 39. Upload Roster File, Step 1: Locate File
1. Click [Browse] and navigate to the saved file on your computer.
2. Select the file and click [Open]. The file name will appear in the text box on the screen.
3. Click [OK], and then click [Upload File].
Step 2: Preview File
Figure 40. Upload Roster File, Step 2: Preview Records
1. Preview the file you selected to ensure that you uploaded the correct file. (Only a few records are visible on this preview page.)
2. Click [Next] to begin the file validation process.
Caution: If your file is large (contains 2,000 records or more), uploading it may take a long time. Do NOT cancel the upload and try again, because TIDE may have already begun processing some of the records. If your file is too large to upload while you are online, TIDE will display a window that contains your name and default email address. You will be prompted to enter your phone number and an alternate email, if desired. When the file is processed, you will receive an email alerting you that you can now view the records in TIDE.
Please be aware that if any records contained invalid data, those records were not added to TIDE.
61

OAKS Online 2014–2015 TIDE User Guide
Step 3: Validate File
If the upload was successful, the roster information will be displayed on the screen. You will be prompted to review these records for any warnings and/or errors. The “Your file was validated” message indicates that the file was uploaded successfully and verified for any errors. (The file has not yet been committed to TIDE.)
• Files that contain records with errors will generate an error message. Depending on the severity of the error, either the entire file will fail or just the records with errors will fail.
• Records without errors will be automatically accepted by the system.
Files with data not in the correct format as shown in the template will generate error messages by row, identifying the errors in the file. The “Understanding Error Types” section in the next column provides a brief explanation of the three possible error types: fatal errors, record errors, and record warnings. Refer to Appendix B for information about common errors. If you have no errors and wish to proceed, click [Commit File].
Understanding Error Types
• If your file will fail, note the errors and the corresponding record numbers. Click [Cancel]. Update your file, and then restart the upload process, beginning with Step 1: Upload File.
• If your file contains record errors, these records will not be committed to the TIDE. The records that passed validation can be committed. You may elect to fix the errors in your file and re-upload it.
• If your file contains record warnings, these records will be committed. However, you are strongly encouraged to review the associated records. Please remember that you cannot edit rosters within TIDE.
If problems exist for a single record and you are unable to successfully upload that record, please contact your Regional Assessment Support ESD Partner for assistance.
Step 4: Confirmation
After you click [Commit File], the accepted records will be uploaded to TIDE. You will also receive a confirmation message stating that your file was successfully submitted to the TIDE system.
Figure 41. Upload Roster File, Step 4: Confirmation
62

OAKS Online 2014–2015 TIDE User Guide
Task: Manage Roster This task creates, modifies, deletes, and prints rosters.
Creating rosters
This task is available to State Users, District Security Coordinators, District Test and Security Administrator, School Test Coordinators, and Test Administrators.
Figure 42. Manage Roster Task
To create a roster:
1. Click the [Rosters] tab, then [Manage Roster]. The Manage Roster screen appears.
2. From the State, District and Institution drop-down lists, make selections for where you want to create the roster.
3. From the Roster list, select “- ADD NEW ROSTER -.”
4. Click [Next]. A form appears for creating the roster (see Figure 43).
5. In the Roster Name field, enter a name for the roster.
6. From the Teacher Name drop-down list, select a teacher. The available teachers are those associated with the institution you selected in step 2.
7. In the Select Grade section, mark one or more check boxes for the grades from which you want to create the roster. Students in those grades appear in the Available Students list.
8. From the Available Students list, select the students you want to include in the roster, and then click [Move In].
9. Click [Save].
63

OAKS Online 2014–2015 TIDE User Guide
Figure 43 is an example of a roster with two students from first grade. These students participate in a roster called Accelerated Reading taught by Lisa Braun.
Figure 43. Example Roster
64

OAKS Online 2014–2015 TIDE User Guide
Modifying rosters
You can modify existing rosters by changing the roster’s name, teacher, and adding or removing students. The modifications you make to a roster are reflected immediately in ORS. This task is available to State Users, District Security Coordinators, District Test and Security Administrator, School Test Coordinators, and Test Administrators. To modify a roster:
1. Click the [Rosters] tab, then [Manage Roster]. The Manage Roster screen appears.
2. From the State, District, Institution, and Roster drop-down lists, make selections for the roster you want to modify.
3. Click [Next]. A form appears for modifying the roster (see Figure 43).
4. In the Roster Name field, change the roster’s name as required.
5. From the Teacher Name drop-down list, select a new teacher as required. The available teachers are those associated with the school you selected in step 2.
6. If you want to add students to the roster, do the following:
a. In the Select Grade section, mark one or more check boxes for the grades from which you want to add students to the roster. Students in those grades appear in the Available Students list.
b. From the Available Students list, select the students you want to include in the roster, and then click [Move In].
7. To remove students from the roster, select them from the Students in This Roster list, and then click [Move Out].
8. Click [Save].
65

OAKS Online 2014–2015 TIDE User Guide
Deleting rosters
Deleting a roster in TIDE also deletes it from ORS, so ORS users lose visibility into test results for the deleted roster. (However, ORS retains the original test results for the students in the deleted roster.) This task is available to State Users, District Security Coordinators, District Test and Security Administrator, School Test Coordinators, and Test Administrators. To delete a roster:
1. Click the [Rosters] tab, then [Manage Roster]. The Manage Roster screen appears.
2. From the District, Institution, and Roster drop-down lists, make selections for the roster you want to delete.
3. Click [Next]. A form for the roster appears (see Figure 43).
4. Click [Delete].
66

OAKS Online 2014–2015 TIDE User Guide
Printing rosters
You can print the roster’s teacher as well as its participating students. This task is available to Super State Users, State Users, District Security Coordinators, District Test and Security Administrators, and School Test Coordinators. To print a roster:
1. Click the [Rosters] tab, then [Manage Roster]. The Manage Roster screen appears.
2. From the District, Institution, and Roster drop-down lists, make selections for the roster you want to print.
3. Click [Next]. A form appears for the roster (see Figure 43).
4. Click [Print]. A printer-friendly version of the roster appears.
5. Click [Print]. A dialog box appears for printing the roster.
Figure 44. Printer-Friendly Version of Roster
67

OAKS Online 2014–2015 TIDE User Guide
Task Group: General Resources
The General Resources section contains the following sub-tabs: Download Voice Pack
Role Definition Accessibility Supports
This task group provides access to online assessment-related information.
• The Download Voice Pack task contains a licensed voice pack for Spanish-speaking students who are granted the Spanish text-to-speech accessibility support.
• The Role Definitions page lists the description of each user role that is granted access to OAKS Online systems.
• The Accessibility Supports page contains a handy link to ODE’s Accessibility Supports page.
68

OAKS Online 2014–2015 TIDE User Guide
Task: Download Voice Pack Authorized users may download a specially licensed commercial Spanish voice pack for supported Windows computers at no cost.
This voice pack may be used only in conjunction with, and not separately from, the online assessments delivered by AIR’s Test Delivery System.
Figure 45. General Resource: Download Voice Pack
Instructions for downloading and installing the NeoSpeech™ Violeta and Julie Voice Packs are available on this page.
Additional information about configuring computers for text-to-speech is available in the Technical Specifications for Online Testing for System Administrators document on the OAKS Online portal in the General Resources section.
69

OAKS Online 2014–2015 TIDE User Guide
Appendix A: Opening a CSV File in Excel 1. Open Microsoft Excel, and click the Data menu tab. 2. In the Data menu, click the “From Text” icon. The
Import Text File dialog window will open.
3. Navigate to the location where you saved the file.
Select the file and then click [Import].
4. The Text Import Wizard window will open. You will have to navigate through three steps:
a. Step 1: Make sure “Delimited” is selected, and click [Next]. Note: This window also has a preview of the data in the file you selected. This allows you to verify that you selected the correct file.
b. Step 2: Click the checkbox next to “Comma,” and click [Next].
c. Step 3: Format numerical data as text.
2. In the Data Preview section, click a column. (The selected column will have a black background.)
3. In the Column Data Format section, click the radio button next to “Text.”
4. Repeat for each column (especially for the following columns: District ID, Institution ID, SSID, and Birth Date).
d. Click [Finish]. The data should populate in separate columns in Excel.
70

OAKS Online 2014–2015 TIDE User Guide
Appendix B: Common Errors with File Uploads For all upload tasks (Upload Users, Upload Student Settings, Upload Test Restrictions, Upload Paper Writing Orders, and Upload Roster), common errors can prevent user or student records from being added or modified in TIDE and OAKS Online Systems. File Validation TIDE “screens” each file to check for any errors in the file. This section will display any errors that exist in the file you uploaded. If your file has no errors, you will see “Your file has passed validation.” This message indicates that the file was uploaded successfully and has no errors. (The file has not yet been committed to TIDE.) If your file has errors Files with data not in the correct format as shown in the template will generate error messages by row, identifying the errors by line (row) record in the file. Some errors will prevent a record from uploading (e.g., invalid SSID or grade). A table of validation messages will appear and contains information about the errors.
Sample Error Messages
• Record #: The row in the file in which the error appeared • Field Name: The column name that contains the error • Field Value: The text that you entered in the cell • Validation Message: A brief description of the error
Note: It is possible for a single record to have multiple errors. Depending on the severity of the errors:
• the file will fail to upload, OR • the file will upload, but TIDE will exclude the
records that had errors. • The file will upload, and TIDE will accept the
records that had errors. (These records will need to be fixed in TIDE or uploaded in a new file.) Records without errors will be automatically accepted by the system. If your file included errors, you have two options:
• Abort the upload. Click [Cancel], and then click [OK]. You can then make edits to the CSV file, save it, and begin the upload process again.
• Proceed with the upload, and add the information to TIDE. To do so, click [Commit File]. Only records without errors or records with acceptable errors will be uploaded to the system (rows in yellow).
71

OAKS Online 2014–2015 TIDE User Guide
These are some common errors: • Having blank rows between records • Inserting invalid characters (refer to appropriate user guide sections for information about
accepted formats) • Uploading a file with students who are not listed in TIDE
If problems exist for a single record and you are unable to successfully upload that record, contact your Regional Assessment Support ESD Partner for assistance.
72