NetIQ® Advanced Analytics User Guide · 8 NetIQ® Advanced Analytics User Guide Contacting Sales...
38
www.netiq.com/documentation User Guide NetIQ ® Advanced Analytics October 2014
-
Upload
truongdang -
Category
Documents
-
view
219 -
download
1
Transcript of NetIQ® Advanced Analytics User Guide · 8 NetIQ® Advanced Analytics User Guide Contacting Sales...

User GuideNetIQ® Advanced Analytics
October 2014
www.netiq.com/documentation

Legal Notice
THIS DOCUMENT AND THE SOFTWARE DESCRIBED IN THIS DOCUMENT ARE FURNISHED UNDER AND ARE SUBJECT TO THE TERMS OF A LICENSE AGREEMENT OR A NON-DISCLOSURE AGREEMENT. EXCEPT AS EXPRESSLY SET FORTH IN SUCH LICENSE AGREEMENT OR NON-DISCLOSURE AGREEMENT, NETIQ CORPORATION PROVIDES THIS DOCUMENT AND THE SOFTWARE DESCRIBED IN THIS DOCUMENT "AS IS" WITHOUT WARRANTY OF ANY KIND, EITHER EXPRESS OR IMPLIED, INCLUDING, BUT NOT LIMITED TO, THE IMPLIED WARRANTIES OF MERCHANTABILITY OR FITNESS FOR A PARTICULAR PURPOSE. SOME STATES DO NOT ALLOW DISCLAIMERS OF EXPRESS OR IMPLIED WARRANTIES IN CERTAIN TRANSACTIONS; THEREFORE, THIS STATEMENT MAY NOT APPLY TO YOU.
For purposes of clarity, any module, adapter or other similar material ("Module") is licensed under the terms and conditions of the End User License Agreement for the applicable version of the NetIQ product or software to which it relates or interoperates with, and by accessing, copying or using a Module you agree to be bound by such terms. If you do not agree to the terms of the End User License Agreement you are not authorized to use, access or copy a Module and you must destroy all copies of the Module and contact NetIQ for further instructions.
This document and the software described in this document may not be lent, sold, or given away without the prior written permission of NetIQ Corporation, except as otherwise permitted by law. Except as expressly set forth in such license agreement or non-disclosure agreement, no part of this document or the software described in this document may be reproduced, stored in a retrieval system, or transmitted in any form or by any means, electronic, mechanical, or otherwise, without the prior written consent of NetIQ Corporation. Some companies, names, and data in this document are used for illustration purposes and may not represent real companies, individuals, or data.
This document could include technical inaccuracies or typographical errors. Changes are periodically made to the information herein. These changes may be incorporated in new editions of this document. NetIQ Corporation may make improvements in or changes to the software described in this document at any time.
U.S. Government Restricted Rights: If the software and documentation are being acquired by or on behalf of the U.S. Government or by a U.S. Government prime contractor or subcontractor (at any tier), in accordance with 48 C.F.R. 227.7202-4 (for Department of Defense (DOD) acquisitions) and 48 C.F.R. 2.101 and 12.212 (for non-DOD acquisitions), the government’s rights in the software and documentation, including its rights to use, modify, reproduce, release, perform, display or disclose the software or documentation, will be subject in all respects to the commercial license rights and restrictions provided in the license agreement.
© 2014 NetIQ Corporation. All Rights Reserved.
For information about NetIQ trademarks, see https://www.netiq.com/company/legal/.

Contents
About this Book and the Library 5About NetIQ Corporation 7
1 Getting Started 9
1.1 Overview . . . . . . . . . . . . . . . . . . . . . . . . . . . . . . . . . . . . . . . . . . . . . . . . . . . . . . . . . . . . . . . . . . . . . . . 91.2 Deciding Which Data Streams to Analyze . . . . . . . . . . . . . . . . . . . . . . . . . . . . . . . . . . . . . . . . . . . . . . 91.3 Understanding Advanced Analytics Components . . . . . . . . . . . . . . . . . . . . . . . . . . . . . . . . . . . . . . . . 91.4 Understanding Advanced Analytics Requirements . . . . . . . . . . . . . . . . . . . . . . . . . . . . . . . . . . . . . . 101.5 Understanding Port Usage. . . . . . . . . . . . . . . . . . . . . . . . . . . . . . . . . . . . . . . . . . . . . . . . . . . . . . . . . 111.6 Installing the Advanced Analytics Configuration Service . . . . . . . . . . . . . . . . . . . . . . . . . . . . . . . . . . 121.7 Installing the Advanced Analytics Service . . . . . . . . . . . . . . . . . . . . . . . . . . . . . . . . . . . . . . . . . . . . . 131.8 Installing the Advanced Analytics for AppManager Module . . . . . . . . . . . . . . . . . . . . . . . . . . . . . . . . 141.9 Installing the Advanced Analytics Console. . . . . . . . . . . . . . . . . . . . . . . . . . . . . . . . . . . . . . . . . . . . . 141.10 Controlling Access to the Console . . . . . . . . . . . . . . . . . . . . . . . . . . . . . . . . . . . . . . . . . . . . . . . . . . . 151.11 Understanding Optional Configuration for the Advanced Analytics Service. . . . . . . . . . . . . . . . . . . . 161.12 Unregistering the Advanced Analytics Service from the Configuration Service . . . . . . . . . . . . . . . . . 191.13 Changing the Password for Connecting to the Configuration Service . . . . . . . . . . . . . . . . . . . . . . . . 20
2 Monitoring AppManager Repositories 21
2.1 Adding AppManager Integration Adapters . . . . . . . . . . . . . . . . . . . . . . . . . . . . . . . . . . . . . . . . . . . . . 212.2 Modifying and Removing AppManager Integration Adapters. . . . . . . . . . . . . . . . . . . . . . . . . . . . . . . 222.3 Adding a QDB or CCDB. . . . . . . . . . . . . . . . . . . . . . . . . . . . . . . . . . . . . . . . . . . . . . . . . . . . . . . . . . . 232.4 Modifying and Removing a QDB or CCDB . . . . . . . . . . . . . . . . . . . . . . . . . . . . . . . . . . . . . . . . . . . . 242.5 Managing Rules . . . . . . . . . . . . . . . . . . . . . . . . . . . . . . . . . . . . . . . . . . . . . . . . . . . . . . . . . . . . . . . . . 242.6 Starting a New Learning Cycle. . . . . . . . . . . . . . . . . . . . . . . . . . . . . . . . . . . . . . . . . . . . . . . . . . . . . . 272.7 Overriding Observed Minimum and Maximum Values for Time Series . . . . . . . . . . . . . . . . . . . . . . . 28
3 Troubleshooting 31
3.1 Log File Locations . . . . . . . . . . . . . . . . . . . . . . . . . . . . . . . . . . . . . . . . . . . . . . . . . . . . . . . . . . . . . . . 313.2 Services Unable to Receive Communications from Other Components . . . . . . . . . . . . . . . . . . . . . . 313.3 Logging is Not Enabled for the Services . . . . . . . . . . . . . . . . . . . . . . . . . . . . . . . . . . . . . . . . . . . . . . 323.4 Default Log Retention Setting is Too Low . . . . . . . . . . . . . . . . . . . . . . . . . . . . . . . . . . . . . . . . . . . . . 323.5 Trace Logging for Time Series Monitoring is Not Enabled . . . . . . . . . . . . . . . . . . . . . . . . . . . . . . . . . 323.6 Unable to Log On to Advanced Analytics Console . . . . . . . . . . . . . . . . . . . . . . . . . . . . . . . . . . . . . . 323.7 AppManager Integration Adapter Unable to Connect to QDB . . . . . . . . . . . . . . . . . . . . . . . . . . . . . . 333.8 Issues with the SQLite Databases for the Advanced Analytics Services . . . . . . . . . . . . . . . . . . . . . . 333.9 SQLite Queries to Determine Time Series Patterns. . . . . . . . . . . . . . . . . . . . . . . . . . . . . . . . . . . . . . 333.10 Credentials Required to Connect to QDB Change. . . . . . . . . . . . . . . . . . . . . . . . . . . . . . . . . . . . . . . 343.11 Advanced Analytics Fails to Monitor a Time Series Even Though It Satisfies a Rule -
Scenario 1 . . . . . . . . . . . . . . . . . . . . . . . . . . . . . . . . . . . . . . . . . . . . . . . . . . . . . . . . . . . . . . . . . . . . . 343.12 Advanced Analytics Fails to Monitor a Time Series Even Though It Satisfies a Rule -
Scenario 2 . . . . . . . . . . . . . . . . . . . . . . . . . . . . . . . . . . . . . . . . . . . . . . . . . . . . . . . . . . . . . . . . . . . . . 343.13 StatusEvents or EventListener Job Unable to Retrieve Events from Configuration Service . . . . . . . 353.14 QDB Unable to Receive Events . . . . . . . . . . . . . . . . . . . . . . . . . . . . . . . . . . . . . . . . . . . . . . . . . . . . . 353.15 StatusEvents or EventListener Job Cannot Identify the QDB . . . . . . . . . . . . . . . . . . . . . . . . . . . . . . 35
Contents 3

3.16 StatusEvents or EventListener Job Cannot Register with Configuration Service. . . . . . . . . . . . . . . . 363.17 Module Configuration Utility Fails to Connect to Configuration Service During Module
Installation . . . . . . . . . . . . . . . . . . . . . . . . . . . . . . . . . . . . . . . . . . . . . . . . . . . . . . . . . . . . . . . . . . . . . 363.18 Discovery_AdvancedAnalytics Job Fails . . . . . . . . . . . . . . . . . . . . . . . . . . . . . . . . . . . . . . . . . . . . . . 363.19 Knowledge Scripts for QDBs Added to Integration Adapter Through CCDB Unavailable in
Advanced Analytics Console . . . . . . . . . . . . . . . . . . . . . . . . . . . . . . . . . . . . . . . . . . . . . . . . . . . . . . . 363.20 Configuration Service Rejects Connections from Advanced Analytics Service and Console
Does Not Refresh. . . . . . . . . . . . . . . . . . . . . . . . . . . . . . . . . . . . . . . . . . . . . . . . . . . . . . . . . . . . . . . . 37
4 NetIQ® Advanced Analytics User Guide

About this Book and the Library
The User Guide provides guidance for installing the NetIQ Advanced Analytics Console and services and for using the console to configure rules for monitoring NetIQ AppManager data streams so that Advanced Analytics can learn patterns, create dynamic thresholds, and generate events when data points fall below or exceed the thresholds.
Intended AudienceThis book provides information for individuals responsible for installing and using Advanced Analytics.
Other Information in the LibraryThe library provides the following information resources:
Advanced Analytics for AppManager Management Guide
Provides information about installing and using the NetIQ Advanced Analytics for AppManager module so that you can receive events from Advanced Analytics in AppManager.
About this Book and the Library 5

6 NetIQ® Advanced Analytics User Guide

About NetIQ Corporation
We are a global, enterprise software company, with a focus on the three persistent challenges in your environment: Change, complexity and risk—and how we can help you control them.
Our ViewpointAdapting to change and managing complexity and risk are nothing new
In fact, of all the challenges you face, these are perhaps the most prominent variables that deny you the control you need to securely measure, monitor, and manage your physical, virtual, and cloud computing environments.
Enabling critical business services, better and faster
We believe that providing as much control as possible to IT organizations is the only way to enable timelier and cost effective delivery of services. Persistent pressures like change and complexity will only continue to increase as organizations continue to change and the technologies needed to manage them become inherently more complex.
Our PhilosophySelling intelligent solutions, not just software
In order to provide reliable control, we first make sure we understand the real-world scenarios in which IT organizations like yours operate — day in and day out. That's the only way we can develop practical, intelligent IT solutions that successfully yield proven, measurable results. And that's so much more rewarding than simply selling software.
Driving your success is our passion
We place your success at the heart of how we do business. From product inception to deployment, we understand that you need IT solutions that work well and integrate seamlessly with your existing investments; you need ongoing support and training post-deployment; and you need someone that is truly easy to work with — for a change. Ultimately, when you succeed, we all succeed.
Our Solutions Identity & Access Governance
Access Management
Security Management
Systems & Application Management
Workload Management
Service Management
About NetIQ Corporation 7
Contacting Sales SupportFor questions about products, pricing, and capabilities, contact your local partner. If you cannot contact your partner, contact our Sales Support team.
Contacting Technical SupportFor specific product issues, contact our Technical Support team.
Contacting Documentation SupportOur goal is to provide documentation that meets your needs. The documentation for this product is available on the NetIQ Web site in HTML and PDF formats on a page that does not require you to log in. If you have suggestions for documentation improvements, click Add Comment at the bottom of any page in the HTML version of the documentation posted at www.netiq.com/documentation. You can also email [email protected]. We value your input and look forward to hearing from you.
Contacting the Online User CommunityNetIQ Communities, the NetIQ online community, is a collaborative network connecting you to your peers and NetIQ experts. By providing more immediate information, useful links to helpful resources, and access to NetIQ experts, NetIQ Communities helps ensure you are mastering the knowledge you need to realize the full potential of IT investments upon which you rely. For more information, visit community.netiq.com.
Worldwide: www.netiq.com/about_netiq/officelocations.asp
United States and Canada: 1-888-323-6768
Email: [email protected]
Web Site: www.netiq.com
Worldwide: www.netiq.com/support/contactinfo.asp
North and South America: 1-713-418-5555
Europe, Middle East, and Africa: +353 (0) 91-782 677
Email: [email protected]
Web Site: www.netiq.com/support
8 NetIQ® Advanced Analytics User Guide

1 1Getting Started
This chapter describes the NetIQ Advanced Analytics product and system requirements and provides instructions for installing the components.
1.1 OverviewNetIQ Advanced Analytics monitors data streams on AppManager servers that you select to learn patterns, create dynamic thresholds, and generate events when data points fall below or exceed the thresholds. Advanced Analytics uses NetIQ AppManager Integration Adapters to obtain information about the AppManager repositories (QDBs) that are available for monitoring and requires the NetIQ Advanced Analytics for AppManager module to send events to the NetIQ AppManager product.
1.2 Deciding Which Data Streams to AnalyzeBecause Advanced Analytics uses learned patterns to create dynamic thresholds, data streams that are related to performance are good candidates for analysis, whereas data streams that are related to capacity or availability are poor candidates for analysis. For example, the NT_DiskSpace and NT_SystemUptime Knowledge Scripts are related to capacity and generate data streams with data points that usually increase over time. The NT_MachineDown Knowledge Script is related to availability and generates data streams where the data points only have two possible values that indicate whether the server is up or down. In these examples, it is not possible for Advanced Analytics to learn a pattern and generate thresholds based on the pattern.
Knowledge Scripts that run on an asynchronous schedule are not allowed for analysis. Instead of running a periodic check at a set interval, these Knowledge Scripts are always active and alert you when a new event occurs. For example, the Async_FilesChanged Knowledge Script monitors one or more files for changes and raises an event when a change occurs. Advanced Analytics is able to detect Knowledge Scripts that run on an asynchronous schedule and does not consider them for analysis.
In addition, Advanced Analytics does not consider Knowledge Scripts that are configured to run at an interval that exceeds six hours for analysis.
1.3 Understanding Advanced Analytics ComponentsAdvanced Analytics includes the following required components which you can install on the same computer or distribute on multiple computers:
Advanced Analytics Console
The console is a Windows interface that allows you to:
Add and manage AppManager Integration Adapters so that you can select QDBs for monitoring.
Select the QDBs, servers, and data streams that you want to monitor.
Create and manage rules for monitoring the data streams that you select.
Advanced Analytics Configuration Service
Getting Started 9

A Windows service that connects to the AppManager Integration Adapters to obtain the latest information about the QDBs that you select for monitoring.
Advanced Analytics Service
A Windows service that uses the rules that you configure to collect and analyze data from the QDBs and forward events to the NetIQ Advanced Analytics for AppManager module.
NetIQ Advanced Analytics for AppManager module
The module receives the events that Advanced Analytics generates and allows you to view them in the Control Center console.
1.4 Understanding Advanced Analytics RequirementsAdvanced Analytics has the following requirements. The pre-installation check program verifies some requirements, but you will need to manually verify some of the requirements.
Pre-installation check verified?
Component Requirement
No Advanced Analytics installation program
Microsoft .NET Framework 2.0 or later
No NetIQ Advanced Analytics Configuration Service
NetIQ Advanced Analytics Service
One of the following Microsoft Windows operating systems:
Windows Server 2012 R2 (GUI mode only)
Windows Server 2012 (GUI mode only)
Windows Server 2008 R2
Windows Server 2003 (32-bit)
No Console One of the following Microsoft Windows operating systems:
Windows Server 2012 R2 (GUI mode only)
Windows Server 2012 (GUI mode only)
Windows Server 2008 R2
Windows 8 (64-bit)
Windows 7 (64-bit)
No Console AppManager Integration Adapter version 2.2 or later
At least one AppManager Integration Adapter installed and configured with the QDBs you want to monitor with Advanced Analytics or with the Control Center repository (CCDB) that manages the QDBs you want to monitor.
The Advanced Analytics installation package includes the installation program for the adapter. You can also download the latest adapter version from the NetIQ Aegis Current Adapters page. For more information about installing and configuring adapters, see the AppManager Integration Adapter Configuration Guide, available on the Aegis Documentation page.
10 NetIQ® Advanced Analytics User Guide
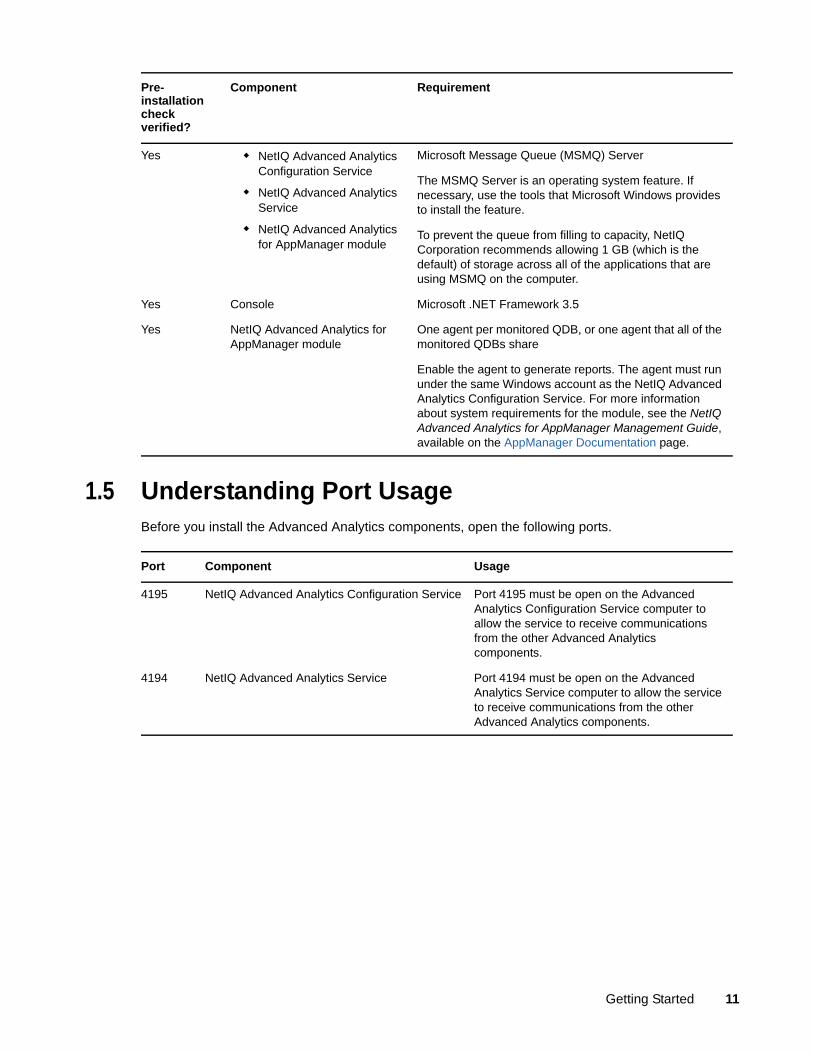
1.5 Understanding Port UsageBefore you install the Advanced Analytics components, open the following ports.
Yes NetIQ Advanced Analytics Configuration Service
NetIQ Advanced Analytics Service
NetIQ Advanced Analytics for AppManager module
Microsoft Message Queue (MSMQ) Server
The MSMQ Server is an operating system feature. If necessary, use the tools that Microsoft Windows provides to install the feature.
To prevent the queue from filling to capacity, NetIQ Corporation recommends allowing 1 GB (which is the default) of storage across all of the applications that are using MSMQ on the computer.
Yes Console Microsoft .NET Framework 3.5
Yes NetIQ Advanced Analytics for AppManager module
One agent per monitored QDB, or one agent that all of the monitored QDBs share
Enable the agent to generate reports. The agent must run under the same Windows account as the NetIQ Advanced Analytics Configuration Service. For more information about system requirements for the module, see the NetIQ Advanced Analytics for AppManager Management Guide, available on the AppManager Documentation page.
Pre-installation check verified?
Component Requirement
Port Component Usage
4195 NetIQ Advanced Analytics Configuration Service Port 4195 must be open on the Advanced Analytics Configuration Service computer to allow the service to receive communications from the other Advanced Analytics components.
4194 NetIQ Advanced Analytics Service Port 4194 must be open on the Advanced Analytics Service computer to allow the service to receive communications from the other Advanced Analytics components.
Getting Started 11

1.6 Installing the Advanced Analytics Configuration ServiceIf you are installing the Advanced Analytics components on separate computers, install the Advanced Analytics Configuration Service before you install the other components. When you install the other components, you must provide the information that allows them to connect to the Configuration Service.
You can install the service interactively or silently. Obtain the following information before you install the service:
Port the service will use to receive communications.
Windows user account under which the service will run. The account must be a member of the local Administrators group and have the right to log on as a service. During installation, specify the fully-qualified domain name for the account.
To interactively install the service:
1 Run AASetup.exe as an administrator and select to install the Advanced Analytics Configuration Service.
2 When prompted, provide the required information.
To silently install the service:
1 Open a command prompt as an administrator and change directory to the system folder. For example, C:\windows\system32.
2 Type the following command:
msiexec.exe /i "Path_to_the_Service_Setup_Program\NetIQ Advanced Analytics Configuration Service.msi" PCP_HOST=Computer_Name PCP_PORT=Port_Number PCP_SERVICE_WINUSER=Domain\User_Name PCP_SERVICE_WINPASSWORD=password INSTALLDIR="Installation_Location" /l*v "Path_to_.msi_Log_File" /qn
where:
PCP_HOST=Computer_Name is the name of the computer where you are installing the service.
PCP_PORT=Port_Number is the port the service will use to receive communications from other Advanced Analytics components.
PCP_SERVICE_WINUSER=Domain\User_Name is the fully-qualified domain name and the user name for the Windows account under which the service will run.
PCP_SERVICE_WINPASSWORD=password is the password for the Windows account under which the service will run.
For example:
C:\windows\system32\msiexec.exe /i "C:\Setup Files\NetIQ Advanced Analytics Configuration Service.msi" PCP_HOST="myserver" PCP_PORT=4195 PCP_SERVICE_WINUSER="mydomain\administrator" PCP_SERVICE_WINPASSWORD=administrator INSTALLDIR="C:\Program Files (x86)\NetIQ" /l*v "%temp%\NQAA_pcp_silent_inst.log" /qn
12 NetIQ® Advanced Analytics User Guide

1.7 Installing the Advanced Analytics ServiceIf you are installing the Advanced Analytics components on separate computers, ensure that the Advanced Analytics Configuration Service has been installed and is available before you install the Advanced Analytics Service.
You can install the service interactively or silently. Obtain the following information before you install the service:
Port the service will use to receive communications.
Windows user account under which the service will run. The account must be a member of the local Administrators group and have the right to log on as a service. During installation, specify the fully-qualified domain name for the account.
The port and account information you provided when you installed the Advanced Analytics Configuration Service.
To interactively install the service:
1 Run AASetup.exe as an administrator and select to install the Advanced Analytics Service.
2 When prompted, provide the required information.
To silently install the service:
1 Open a command prompt as an administrator and change directory to the system folder. For example, C:\windows\system32.
2 Type the following command:
msiexec.exe /i "Path_to_the_Service_Setup_Program\NetIQ Advanced Analytics Service.msi" ENGINE_PORT=Port_Number ENGINE_SERVICE_WINUSER=Domain\User_Name ENGINE_SERVICE_WINPASSWORD=password PCP_HOST=Computer_Name PCP_PORT=Port_Number PCP_DOMAIN=Domain PCP_USER=User_Name PCP_PASSWORD=password INSTALLDIR="Installation_Location" /l*v "Path_to_.msi_Log_File" /qn
where:
ENGINE_PORT=Port_Number is the port the Advanced Analytics Service will use to receive communications from other Advanced Analytics components.
ENGINE_SERVICE_WINUSER=Domain\User_Name is the fully-qualified domain name and the user name for the Windows account under which the Advanced Analytics Service will run.
ENGINE_SERVICE_WINPASSWORD=password is the password for the Windows account under which the Advanced Analytics Service will run.
PCP_HOST=Computer_Name is the name of the computer where you installed the Configuration Service.
PCP_PORT=Port_Number is the port the Configuration Service uses to receive communications from other Advanced Analytics components.
PCP_DOMAIN=Domain is the fully-qualified domain name for the Windows account under which the Configuration Service runs.
PCP_USER=User_Name is the user name for the Windows account under which the Configuration Service runs.
PCP_PASSWORD=password is the password for the Windows account under which the Configuration Service runs.
Getting Started 13

For example:
C:\windows\system32\msiexec.exe /i "C:\Setup Files\NetIQ Advanced Analytics Service.msi" ENGINE_PORT=4194 ENGINE_SERVICE_WINUSER="mydomain\administrator" ENGINE_SERVICE_WINPASSWORD=password PCP_HOST=myserver PCP_PORT=4195 PCP_DOMAIN=mydomain PCP_USER=administrator PCP_PASSWORD=password INSTALLDIR="C:\Program Files (x86)\NetIQ" /l*v "%temp%\NQAA_engine_silent_inst.log" /qn
When you install the Advanced Analytics Service, the setup program installs a configuration file, IQPHXConfData.mof, that contains parameters that specify how the service acquires data from the QDBs. You might find that you want to change the default values for the parameters. For more information about editing the file, see Section 1.11, “Understanding Optional Configuration for the Advanced Analytics Service,” on page 16.
Installing the Advanced Analytics Service also registers it with the Advanced Analytics Configuration Service. If you decide to uninstall the Advanced Analytics Service, you must also unregister it from the Configuration Service. Otherwise, the Configuration Service will continue trying to send information to the Advanced Analytics Service. For more information about unregistering the Advanced Analytics Service from the Configuration Service, see Section 1.12, “Unregistering the Advanced Analytics Service from the Configuration Service,” on page 19.
After you install the Advanced Analytics Service, if you change the password that the service uses to connect to the Configuration Service, you must use the cryptreg.exe utility that is available in the location where you installed the Advanced Analytics Service to apply the password change. For more information, see Section 1.13, “Changing the Password for Connecting to the Configuration Service,” on page 20.
1.8 Installing the Advanced Analytics for AppManager ModuleBefore you can use Advanced Analytics, you must also install the Advanced Analytics for AppManager module. For more information about installing and using the module, see the NetIQ Advanced Analytics for AppManager Management Guide, available on the AppManager Documentation page.
After you install the module, if you change the password that the module uses to connect to the Configuration Service, you must use the cryptreg.exe utility that is available in the location where you installed the module to apply the password change. For more information, see Section 1.13, “Changing the Password for Connecting to the Configuration Service,” on page 20.
1.9 Installing the Advanced Analytics ConsoleIf you are installing the Advanced Analytics components on separate computers, ensure that the Advanced Analytics Configuration Service has been installed and is available before you install the console.
You can install the console interactively or silently. Obtain the following information before you install the console:
Name of the computer where the Advanced Analytics Configuration Service is installed
Port the Configuration Service uses to receive communications from the other Advanced Analytics components
14 NetIQ® Advanced Analytics User Guide

To interactively install the console:
1 Run AASetup.exe as an administrator and select to install the console.
2 When prompted, provide the required information.
To silently install the console:
1 Open a command prompt as an administrator and change directory to the system folder. For example, C:\windows\system32.
2 Type the following command:
msiexec.exe /i "Path_to_the_Console_Setup_Program\NetIQ Advanced Analytics Console.msi" PCP_HOST=Computer_Name PCP_PORT=Port_Number INSTALLDIR="Installation_Location" /l*v "Path_to_.msi_Log_File" /qn
where:
PCP_HOST=Computer_Name is the name of the computer where you installed the Configuration Service.
PCP_PORT=Port_Number is the port the Configuration Service uses to receive communications from other Advanced Analytics components.
For example:
C:\windows\system32\msiexec.exe /i "C:\Setup Files\NetIQ Advanced Analytics Console.msi" PCP_HOST=myserver PCP_PORT=4195 INSTALLDIR="C:\Program Files (x86)\NetIQ" /l*v "%temp%\NQAA_Console_silent_inst.log" /qn
1.10 Controlling Access to the ConsoleDuring installation of the Advanced Analytics Configuration Service, the installation program created a local group called Advanced Analytics Admin Group on the installation computer. To log on to the Advanced Analytics console, users must belong to this group. Use the tools that Microsoft Windows provides to add individual users or Active Directory groups to the Advanced Analytics Admin Group.
In addition, users must have read only access to the MachineKeys folder for the RSA Cryptographic provider on the console computer. Be aware that the path to the folder varies according to operating system and the folder might be hidden. For information about changing the permissions for the folder, see the documentation for your operating system.
Getting Started 15

1.11 Understanding Optional Configuration for the Advanced Analytics ServiceThe setup program installs a service configuration file, IQPHXConfData.mof, that contains parameters that specify how the service acquires data from the QDBs. The file is located in the \Program Files\NetIQ\AdvancedAnalytics\ThresholdEngine\mof folder by default. Before you edit the file, contact Technical Support. If you edit the file, you must restart the service to apply your changes.
The following table describes the parameters in the configuration file:
Parameter Description
historicalDataFallbackInDays The number of days for which Advanced Analytics initially reads data from the monitored QDBs, starting from the local date on the Advanced Analytics Service computer and going back the number of specified days.
Specify a number of days between 35 and 160. The default value is 105, which means Advanced Analytics goes back 105 days from the current local date to read data.
dataAcquisitionIntervalInSecs The number of seconds Advanced Analytics waits to read data after the Advanced Analytics Service starts, and between attempts to read data.
Specify a number of seconds between 86,400 and 604,800. The default value is 86,400, which means that Advanced Analytics waits 86,400 seconds from the time the Advanced Analytics Service starts to read data from the QDB, and then waits 86,400 seconds before the next attempt to read data.
dataSourceStatusCheckIntervalInSecs The number of seconds Advanced Analytics waits to check the connection status with the AppManager Integration Adapter and the QDB after the Advanced Analytics Service starts, and between connection status checks.
Specify a number of seconds between 600 and 1800. The default value is 600, which means that Advanced Analytics waits 600 seconds from the time the Advanced Analytics Service starts to check the connection status, and then waits 600 seconds before the next check.
dayOfMonthMask Days of the month, from one to 31, to include in the monthly learning pattern.
You can also specify 99 to include the last day of the month and 98 to include the next to the last day of the month.
Specify the days of the month you want to include in the monthly learning pattern. The default value is {1, 98, 99}. Any number that is not included in the list will not be included in the learning pattern.
16 NetIQ® Advanced Analytics User Guide

dataAcquisitionStartTime The time, in HH:MM:SS format, that Advanced Analytics starts reading data automatically.
For the initial read attempt, Advanced Analytics starts reading data at the specified time and goes back the number of days specified for the historicalDataFallbackInDays parameter.
Specify a time using military time values. The default value is 01:00:00, which means that Advanced Analytics starts automatically reading data at 1:00 AM.
thresholdSensitivityUpper A positive floating point number that expands the learned upper boundary of a time series towards the maximum value of the time series.
When Advanced Analytics receives a data point, it compares the data point to an upper boundary value and a lower boundary value that it learned from past data and generates an event if the new data point exceeds the upper boundary value or falls below the lower boundary value.
If you find that the learned upper and lower boundary values cause Advanced Analytics to generate too many events, you can use this parameter in combination with the thresholdSensitivityLower parameter to expand the upper and lower boundaries.
As the thresholdSensitivityUpper value increases, the amount that the upper boundary expands decreases. As the value decreases, the amount of expansion increases.
You must specify a positive floating point number (for example, specify 2.0 and not 2). The default value is 2.0. You cannot specify a value of 0 or a negative number for this parameter.
If you specify 1.0, Advanced Analytics expands the upper boundary to the maximum value of the time series. If you specify a value that is less than 1.0, Advanced Analytics expands the upper boundary above the maximum value of the time series.
Parameter Description
Getting Started 17

thresholdSensitivityLower A positive floating point number that expands the learned lower boundary of a time series towards the minimum value of the time series.
When Advanced Analytics receives a data point, it compares the data point to an upper boundary value and a lower boundary value that it learned from past data and generates an event if the new data point exceeds the upper boundary value or falls below the lower boundary value.
If you find that the learned upper and lower boundary values cause Advanced Analytics to generate too many events, you can use this parameter in combination with the thresholdSensitivityUpper parameter to expand the upper and lower boundaries.
As the thresholdSensitivityLower value increases, the amount that the lower boundary expands decreases. As the value decreases, the amount of expansion increases.
You must specify a positive floating point number (for example, specify 2.0 and not 2). The default value is 2.0. You cannot specify a value of 0 or a negative number for this parameter.
If you specify 1.0, Advanced Analytics expands the lower boundary to the minimum value of the time series. If you specify a value that is less than 1.0, Advanced Analytics expands the lower boundary below the minimum value of the time series.
discoveryIntervalInSeconds The interval, in seconds, at which Advanced Analytics runs a discovery process to detect time series changes from monitored AppManager repositories (QDBs). Advanced Analytics uses the discovery process to determine whether it needs to make monitoring adjustments.
The minimum allowed value is 300 (five minutes) and the maximum allowed value is 604800 (one week). The default value is 7200 (two hours). A smaller value allows Advanced Analytics to detect changes more quickly, but increases the load on the QDBs. A larger value results in slower change detection, but does not place as much load on the QDBs.
Parameter Description
18 NetIQ® Advanced Analytics User Guide

1.12 Unregistering the Advanced Analytics Service from the Configuration ServiceIf you decide to uninstall the Advanced Analytics Service, you must also unregister it from the Configuration Service. Otherwise, the Configuration Service will continue trying to send information to the Advanced Analytics Service. Use the vis_explorer.exe utility to unregister the Advanced Analytics Service from the Configuration Service.
To unregister the Advanced Analytics Service from the Configuration Service:
1 On the Advanced Analytics Configuration Service computer, change directory to the bin folder in the location where you installed the service.
2 To start the utility, type the following command:
vis_explorer Computer_Name Port_Number IQPHXCR -pwd SSL_Certificate_Passphrase -windomain Domain_Name -user User_Name
where:
Computer_Name is the name of the computer where the Configuration Service is installed.
Port_Number is the port where the Configuration Service receives communications from other Advanced Analytics components.
SSL_Certificate_Passphrase is the passphrase required to access the SSL key file for the Configuration Service. The default value is test.
Domain_Name is the fully-qualified domain name for the Configuration Service account.
User_Name is the user name for the Configuration Service account.
3 Enter the password for the Configuration Service account.
monitorTraceOn Determines whether Advanced Analytics prints tracing logs regarding time series monitoring.
Allowed values are true and false. The default is false.
NetIQ Corporation recommends leaving the value as false because time series monitoring is continuous and the trace messages could fill up the log files, resulting in losing other error and warning messages.
You should only change the value to true when requested to do so by Technical Support in order to investigate monitoring behaviors.
additionalAnalyticsMethods Determines which methods, other than the default, Advanced Analytics uses to generate dynamic thresholds.
Consider using an alternate method if a data stream does not generate the events you expected.
Specify the number that corresponds to the method that you want to implement. If Advanced Analytics is in a learning cycle, it might take longer than normal to process data.
Parameter Description
Getting Started 19

4 To verify the name of the computer where the currently registered Advanced Analytics Service was installed, type the following command:
getChildren /IQPHXCR_ToplevelContainer=PHXCR?type=IQPHXCR_RegisteredEngine
You will need the computer name for Step 5 on page 20.
5 To unregister the Advanced Analytics Service from the Configuration Service, type the following command:
destroyObject /IQPHXCR_ToplevelContainer=PHXCR IQPHXCR_RegisteredEngine Computer_Name:Port_Number
where:
Computer_Name is the name of the computer where the Advanced Analytics Service was installed.
Port_Number is the port where the Advanced Analytics Service was receiving communications from other Advanced Analytics components.
6 To verify that the Advanced Analytics Service is no longer registered with the Configuration Service, type the following command:
getChildren /IQPHXCR_ToplevelContainer=PHXCR?type=IQPHXCR_RegisteredEngine
The Advanced Analytics Service computer name should not appear in the results.
1.13 Changing the Password for Connecting to the Configuration ServiceIf you change the password that the Advanced Analytics Service or the Advanced Analytics for AppManager module uses to connect to the Advanced Analytics Configuration Service after you install the components, you must use the cryptreg.exe utility that is available in the location where you installed the components to apply the password change.
To apply the password change:
1 (Conditional) If you changed the password that the Advanced Analytics Service uses to connect to the Configuration Service, from a command prompt on the Advanced Analytics Service computer, change directory to the bin folder of the location where you installed the service and enter the following command:
cryptreg.exe encryptitem "IQConnectServices\Advanced Analytics\ConfigurationService" defaultAuthPassword password
where password is the password the Advanced Analytics service uses to connect to the Configuration Service.
2 (Conditional) If you changed the password that the Advanced Analytics module uses to connect to the Configuration Service, from a command prompt on the computer where you installed the module, change directory to the bin folder of the location where you installed the module and enter the following command:
cryptreg.exe encryptitem "IQConnectServices\Advanced Analytics\EventSubscriptionService" defaultAuthPassword password
where password is the password the module uses to connect to the Configuration Service.
20 NetIQ® Advanced Analytics User Guide

2 2Monitoring AppManager Repositories
This chapter describes how to use the NetIQ Advanced Analytics Console to perform the following tasks:
Add AppManager Integration Adapters so that you can select the AppManager repositories (QDBs) you want to monitor with Advanced Analytics or the Control Center repository (CCDB) that manages the QDBs you want to monitor.
Add QDBs for monitoring or add the CCDB that manages the QDBs you want to monitor.
Modify the credentials used to connect to monitored QDBs or the CCDB that manages the QDBs.
Remove QDBs from monitoring.
Add, modify, change the order of, and remove rules for monitoring QDBs.
In addition, this chapter provides information about a utility that allows you to remove existing data from the Advanced Analytics Service so that you can start a new data acquisition cycle.
2.1 Adding AppManager Integration AdaptersAdvanced Analytics uses NetIQ AppManager Integration Adapters to obtain the required information for monitoring QDBs. Use the Manage Integration Adapters tab to add adapters to Advanced Analytics. You must add at least one adapter before you can select QDBs for monitoring.
Before you add an adapter, ensure that it contains the QDBs you want to monitor with Advanced Analytics or the CCDB that manages the QDBs you want to monitor. You can add a QDB to an adapter by either adding the QDB to a CCDB that has been added to the adapter or by adding the QDB directly to the adapter. For information about adding a QDB to a CCDB, see the Control Center User Guide for AppManager, available on the AppManager Documentation page. For information about directly adding a QDB to the adapter or adding a CCDB to the adapter, see the AppManager Integration Adapter Installation Guide, available on the Aegis Documentation page.
Because Advanced Analytics scans the adapters on a regular basis to obtain the latest information about the QDBs you select for monitoring, configure multiple adapters with the same set of QDBs or with the CCDB that manages the QDBs and add all of the adapters to Advanced Analytics so that it can distribute the processing load across the adapters. Each time you attempt to add an adapter to Advanced Analytics, it compares the new adapter to the first, or default, adapter you added to determine whether the new adapter meets requirements. You can have the following results from the comparison:
In this situation... Advanced Analytics...
The first adapter you add contains QDB1 and QDB2. You have not yet selected any QDBs for monitoring, and you add a second adapter which contains QDB2 and QDB3.
Adds the second adapter, but only allows you to select QDB2 for monitoring.
Because Advanced Analytics must be able to distribute the processing load across the adapters, it can only monitor the QDBs that are present in both adapters.
Monitoring AppManager Repositories 21

After you add multiple adapters with the same set of QDBs or with the same CCDB to Advanced Analytics, to continue monitoring any one of those QDBs with Advanced Analytics, you must continue to maintain the same configuration across the adapters. Removing a QDB or the CCDB from one adapter will cause that repository to be unavailable in Advanced Analytics, even if it remains in the other adapters.
To add an AppManager Integration Adapter:
1 Obtain the following information:
Name of the computer where the adapter is installed
Port number the adapter uses for communication
Windows account the console can use to connect to the adapter
2 Log on to the Advanced Analytics console with a Windows account that belongs to the Advanced Analytics Admin Group on the computer where the NetIQ Advanced Analytics Configuration Service is running.
For information about the Advanced Analytics Admin Group, see Section 1.10, “Controlling Access to the Console,” on page 15.
3 Use the Manage Integration Adapters tab to add the adapter.
2.2 Modifying and Removing AppManager Integration AdaptersUse the Manage Integration Adapters tab to modify the credentials that Advanced Analytics uses to connect to an adapter or to remove an adapter from Advanced Analytics. If only one adapter is present in Advanced Analytics and you select to remove that adapter, Advanced Analytics will also remove the remaining QDBs and, if present, the CCDB since it requires at least one adapter to retrieve the information required for monitoring activities.
To modify or remove an AppManager Integration Adapter:
1 Log on to the Advanced Analytics Console with a Windows account that belongs to the Advanced Analytics Admin Group on the computer where the NetIQ Advanced Analytics Configuration Service is running.
For information about the Advanced Analytics Admin Group, see Section 1.10, “Controlling Access to the Console,” on page 15.
2 On the Manage Integration Adapters tab, select the adapter you want to modify or remove, and then click the applicable task in the Tasks pane.
The first adapter you add contains QDB1 and QDB2. You have not selected any QDBs for monitoring, and you add a second adapter that only contains QDB3.
Does not allow you to add the second adapter, since it does not contain any of the QDBs that are present in the first adapter.
To add the second adapter, it must contain at least one of the QDBs that are present in the first adapter.
The first adapter you add contains QDB1 and QDB2. You select QDB1 for monitoring, and then you add a second adapter which contains QDB2 and QDB3.
Does not allow you to add the second adapter, since you already selected QDB1 for monitoring and QDB1 is not present in the second adapter.
After you select a QDB for monitoring, adapters that you subsequently add must contain that QDB.
In this situation... Advanced Analytics...
22 NetIQ® Advanced Analytics User Guide

2.3 Adding a QDB or CCDBUse the Manage Data Sources tab to add the QDBs you want to monitor or to add the CCDB that manages the QDBs.
If you are adding a CCDB, consider the following:
When you add a CCDB to the console, Advanced Analytics automatically adds all of the QDBs that the CCDB manages.
By default, Advanced Analytics uses Windows authentication to connect to the QDBs. If necessary, you can change the authentication method.
Because Advanced Analytics accesses the CCDB through AppManager Integration Adapter, you do not need to provide credentials to connect to the CCDB.
Advanced Analytics does not support multiple CCDBs.
Before you add a QDB or CCDB, ensure that the following actions are complete:
Either add the QDB to a CCDB that has been added to NetIQ AppManager Integration Adapter or add the QDB directly to the adapter. For information about adding a QDB to a CCDB, see the Control Center User Guide for AppManager, available on the AppManager Documentation page. For information about directly adding a QDB to the adapter or adding a CCDB to the adapter, see the AppManager Integration Adapter Installation Guide, available on the Aegis Documentation page.
Add the adapter that contains the QDB or CCDB to Advanced Analytics. For more information about adding an adapter, see Section 2.1, “Adding AppManager Integration Adapters,” on page 21.
Install the Advanced Analytics for AppManager module on the agent computer for the QDB you want to monitor, run the Discovery_Advanced Analytics job on the agent computer, and start a StatusEvents Knowledge Script job on the agent computer. You will not be able to view the status of the connection between Advanced Analytics and the QDB until you install the module and run the StatusEvents job. If the agent computer where you run the job belongs to multiple QDBs and you also want to monitor those QDBs, you must run the StatusEvents job for each QDB. For more information about installing the module and the StatusEvents Knowledge Script, see the Advanced Analytics for AppManager Management Guide, available on the AppManager Documentation page.
To add a QDB or CCDB:
1 Log on to the Advanced Analytics Console with a Windows account that belongs to the Advanced Analytics Admin Group on the computer where the NetIQ Advanced Analytics Configuration Service is running.
For information about the Advanced Analytics Admin Group, see Section 1.10, “Controlling Access to the Console,” on page 15.
2 Use the Manage Data Sources tab to add the QDB or CCDB.
(Conditional) If you select to use Windows authentication, Advanced Analytics uses the currently logged in credentials to connect to the repository. The console does not validate that the credentials have access to the repository at the time you add it.
(Conditional) If you select to use SQL Server authentication, the console validates that the credentials you provide have access to the repository. If the validation is not successful, the console allows you to continue adding the repository and correct the connection problem later.
Monitoring AppManager Repositories 23

When you add a repository, the console displays information about the initial connection attempt. After you successfully add the repository and Advanced Analytics establishes the initial connection, you can click Refresh to display the current connection status.
After you add a CCDB to the Advanced Analytics Console, if you add QDBs to or remove them from the CCDB, you must manually add the QDBs to or remove them from the console.
2.4 Modifying and Removing a QDB or CCDBUse the Manage Data Sources tab to modify the authentication method or SQL Server credentials that Advanced Analytics uses to connect to a QDB or CCDB or to remove a QDB or CCDB from monitoring.
When you remove a repository, consider the following points:
When you remove a CCDB, Advanced Analytics automatically removes all QDBs that the CCDB manages.
If a QDB belongs to a CCDB that you added to Advanced Analytics, you must remove the CCDB in order to remove the QDB. You cannot remove individual QDBs from monitoring if they belong to a CCDB that you added to Advanced Analytics. In this situation, to remove individual QDBs without removing the CCDB, first remove the QDB from the CCDB, and then remove the QDB from Advanced Analytics.
For information about removing a QDB from a CCDB, see the Control Center User Guide for AppManager, available on the AppManager Documentation page.
To modify or remove a QDB or CCDB:
1 Log on to the Advanced Analytics Console with a Windows account that belongs to the Advanced Analytics Admin Group on the computer where the NetIQ Advanced Analytics Configuration Service is running.
For information about the Advanced Analytics Admin Group, see Section 1.10, “Controlling Access to the Console,” on page 15.
2 Select the QDB or CCDB you want to modify or remove, and then click the applicable task in the Tasks pane.
(Conditional) If you change the authentication method from SQL Server authentication to Windows authentication, Advanced Analytics uses the currently logged in credentials to connect to the repository. The console does not validate that the credentials have access to the repository at the time you modify the authentication method.
2.5 Managing RulesUse the Manage Rules tab to add, modify, remove, and change the order of rules for monitoring servers on the QDBs that you previously added to the Advanced Analytics Console. For information about adding a QDB to the console, see Section 2.3, “Adding a QDB or CCDB,” on page 23. Consider the following points when you configure rules:
Advanced Analytics rules include a setting, Consecutive Violations, that specifies the number of consecutive threshold violations that must occur before Advanced Analytics generates an event. The default setting is to generate an event when two consecutive violations occur. If you find that this setting is too sensitive for your environment, you can adjust the setting up to a maximum of 20 consecutive violations before generating an event. Advanced Analytics resets
24 NetIQ® Advanced Analytics User Guide

the counter after each “good” data point. Missing data points do not reset the counter. The following table shows examples of how Advanced Analytics generates events for exceeding the threshold based on the setting:
If you have two or more rules that match the same data stream but have different event severities and event notification email addresses, Advanced Analytics uses the configuration of the rule that appears first in the grid when it generates an event. You can change the order of the rules so that Advanced Analytics generates events using the configuration you prefer.
If multiple users are logged in to the console and modify the same rule at the same time, the last user to save the rule will overwrite the previous modifications.
The console does not automatically refresh after you make changes on the Manage Rules tab. You must manually refresh the console to ensure that you are viewing the latest set of rules.
To add a rule:
1 Log on to the Advanced Analytics Console with a Windows account that belongs to the Advanced Analytics Admin Group on the computer where the NetIQ Advanced Analytics Configuration Service is running.
For information about the Advanced Analytics Admin Group, see Section 1.10, “Controlling Access to the Console,” on page 15.
2 In the Tasks pane, click Add.
3 Complete the following steps to configure the rule:
3a Select the servers you want to monitor:
Select whether to view a list of all servers, available servers based on logical server type, or available servers based on management group membership.
After you select the method for filtering the list of available servers, you can further refine the list by typing a server name or partial name to display (for example, HOU).
After you select servers from the list, you can choose to view only the servers you selected or only the servers you have not selected. Selecting All resets the list to include both selected and unselected servers.
Consecutive violations Threshold value Data point values Event triggered at data points...
1 50 65, 21, 24, 62, 67, 61, 25, 66, 78 65, 62, 67, 61, 66, 78
2 65, 21, 24, 62, 67, 61, 25, 66, 78 67, 78
65, 21, 66, 62, 67, 61, 25, 66, 78 62, 61, 78
65, 21, 24, 62, missing data point, 61
61
A missing data point does not reset the counter.
3 65, 21, 24, 62, 67, 61, 25, 66, 78, 21
61
4 65, 21, 24, 62, 67, 61, 25, 66, 78, 21
No events triggered
Monitoring AppManager Repositories 25

In addition to selecting specific servers from the list, you can type a name pattern to monitor. For example, typing IDC* results in Advanced Analytics selecting all servers that begin with IDC for monitoring.
If you add a server to a QDB while the Advanced Analytics Console is running, you must refresh the console to see the new server in the list.
3b Select the Knowledge Script that is generating the data points you want to monitor. The list contains all of the Knowledge Scripts for jobs that are running, pending, or stopped on the selected servers.
(Conditional) If you want the rule to apply to all of the Knowledge Scripts or to all of the scripts that match a pattern, use an asterisk (*).
3c Select the legend that identifies the data stream with the data points you want to monitor. The list contains all of the available legends for the selected Knowledge Script.
(Conditional) If you want the rule to apply to all of the available legends or to all of the legends that match a pattern, use an asterisk (*).
3d Select values to indicate the severity for events where a data point is below the normal range or is above the normal range, or select to not generate events.
For the rule to be valid, you must select a value for at least one of the conditions.
3e (Optional) Specify an email address for sending notifications when events are generated. Use a comma to separate multiple addresses.
3f Select the number of consecutive threshold violations that must occur before Advanced Analytics generates an event, or accept the default value of 2.
3g (Conditional) If you are ready for Advanced Analytics to process the rule, ensure that it is enabled (it should be enabled by default).
To enable the rule later, return to the Manage Rules tab and modify the rule.
After you enable a rule, Advanced Analytics must accumulate the data from the QDB before it can process the rule and generate events. Data accumulation starts at the time specified for the dataAcquisitionStartTime parameter in the IQPHXConfData.mof file. The same is true if you disable a rule and then enable it again.
For more information about the IQPHXConfData.mof file, see Section 1.11, “Understanding Optional Configuration for the Advanced Analytics Service,” on page 16.
4 In the Tasks pane, click Save.
To modify a rule:
1 Log on to the Advanced Analytics Console with a Windows account that belongs to the Advanced Analytics Admin Group on the computer where the NetIQ Advanced Analytics Configuration Service is running.
For information about the Advanced Analytics Admin Group, see Section 1.10, “Controlling Access to the Console,” on page 15.
2 Select the rule you want to modify.
3 In the Tasks pane, click Modify.
4 Make the desired changes.
5 In the Tasks pane, click Save.
To change the order of rules:
1 Log on to the Advanced Analytics Console with a Windows account that belongs to the Advanced Analytics Admin Group on the computer where the NetIQ Advanced Analytics Configuration Service is running.
26 NetIQ® Advanced Analytics User Guide

For information about the Advanced Analytics Admin Group, see Section 1.10, “Controlling Access to the Console,” on page 15.
2 Select the rule you want to move. You can only move one rule at a time.
3 In the Tasks pane, click Move Up or Move Down as appropriate until the rule is in the desired position.
4 Click Save.
To remove a rule:
1 Log on to the Advanced Analytics Console with a Windows account that belongs to the Advanced Analytics Admin Group on the computer where the NetIQ Advanced Analytics Configuration Service is running.
For information about the Advanced Analytics Admin Group, see Section 1.10, “Controlling Access to the Console,” on page 15.
2 Select the rule you want to remove.
You can select multiple rules.
3 In the Tasks pane, click Remove.
If you create and enable the same rule later, Advanced Analytics must accumulate the data from the QDB before it can process the rule and generate events. Data accumulation starts at the time specified for the dataAcquisitionStartTime parameter in the IQPHXConfData.mof file.
For more information about the IQPHXConfData.mof file, see Section 1.11, “Understanding Optional Configuration for the Advanced Analytics Service,” on page 16.
2.6 Starting a New Learning CycleIn certain situations, you might want to discard previously learned patterns and start a new learning cycle. For example, you might want to maintain your existing rules but analyze a different environment. The vis_explorer.exe utility allows you to discard existing data from the Advanced Analytics Service so that it starts a new learning cycle.
To discard existing data and start a new learning cycle:
1 Open a command prompt and change directory to the bin folder in the location where you installed the Advanced Analytics service.
2 To connect vis_explorer.exe to the Advanced Analytics Service, type the following command:
vis_explorer Computer_Name Port_Number -p IQPHX -pwd test -windomain Domain_Name -user User_Name -userpwd Password
where:
Computer_Name is the name of the computer where the Advanced Analytics Service is running.
Port_Number is the port where the service receives communications from other Advanced Analytics components.
Domain_Name is the fully-qualified domain name for the account the other components use to connect to the service.
User_Name is the user name for the account the other components use to connect to the service.
Password is the password for the account the other components use to connect to the service.
3 To remove existing data from the Advanced Analytics Service, type the following command:
Monitoring AppManager Repositories 27
execute /IQPHX_ToplevelContainer=PHX purgeAllData
4 Restart the NetIQ Advanced Analytics Service.
2.7 Overriding Observed Minimum and Maximum Values for Time SeriesTo determine the normal range of values for a time series, Advanced Analytics observes the data points that the time series generates for a specific period (the learning period). To determine the upper and lower boundary thresholds for the time series, Advanced Analytics adds a buffer to the normal range based on the observed minimum and maximum values for the time series during the learning period. After the learning period is complete, when Advanced Analytics receives a new data point, it compares the data point to the upper and lower boundary thresholds and generates an event if the data point is outside either of the thresholds. In addition, Advanced Analytics periodically runs a discovery process to detect time series changes from monitored QDBs and uses the data to determine whether it needs to dynamically adjust the upper and lower boundary thresholds.
In some cases, you might want Advanced Analytics to use different values to determine the upper and lower boundary thresholds for a time series. For example, if you have a rule that monitors CPU utilization, where the maximum possible value is 100 percent and the minimum possible value is 0 percent, events that are based on the maximum and minimum possible values might be more meaningful than events that are based on the observed maximum and minimum values. If you find that the upper and lower boundary thresholds that Advanced Analytics calculates result in events that are not useful, you can override the observed values with values that better suit your monitoring needs.
Consider the following points before you override the observed values:
When you override the observed values, the overrides apply to the Knowledge Script and legend combination that you choose. Advanced Analytics uses the override values to determine the upper and lower boundary thresholds for all of the rules that you configure with the same Knowledge Script and legend combination. You cannot choose the specific rules to which the override values apply.
Only override the observed values for Knowledge Script and legend combinations where you are extremely familiar with the behavior patterns and those patterns do not vary across monitored servers and sites.
If you define multiple overrides that match the same time series, Advanced Analytics uses the definition that appears first in the grid to calculate the upper and lower boundary thresholds.
If you remove the override values, Advanced Analytics resumes using the observed maximum and minimum values to calculate the upper and lower boundary thresholds.
To override learned time series boundary values:
1 On the ribbon, click Options.
2 Expand the Advanced folder, and then click Time series min/max overrides.
3 Click Add.
4 Provide the information required to define the override:
4a Select the Knowledge Script and legend for which you want to define the override.
4b Specify the maximum and minimum boundary values for the Knowledge Script and legend combination.
5 To save the override definition, click OK.
28 NetIQ® Advanced Analytics User Guide

6 (Optional) To modify a saved override definition, click Modify.
7 (Optional) To change the order in which the definitions appear, click Move Up or Move Down.
Monitoring AppManager Repositories 29

30 NetIQ® Advanced Analytics User Guide

3 3Troubleshooting
This chapter provides information about troubleshooting issues that can occur with Advanced Analytics. If this chapter does not describe the issue that you experience, contact Technical Support.
3.1 Log File LocationsIn the event that you contact Technical Support to help with troubleshooting, you might need to provide the following information:
Content of AdvancedAnalyticsInstallationFolder\ThresholdEngine\log
Content of AdvancedAnalyticsInstallationFolder\ConfigurationService\log
Content of AdvancedAnalyticsInstallationFolder\ThresholdEngine\data
Content of AdvancedAnalyticsInstallationFolder\ConfigurationService\data
Snapshot of the rules you configured in the Advanced Analytics Console
AdvancedAnalyticsInstallationFolder\ThresholdEngine\mof\IQPHXConfData.mof file
AdvancedAnalyticsforAppManagerInstallationFolder\Temp\NetIQ_Debug\ComputerName\EventListener.log file
The following Advanced Analytics for AppManager installation log files, located by default in AdvancedAnalyticsforAppManagerInstallationFolder\Temp\NetIQ_Debug\ComputerName:
AdvancedAnalytics_Install.log
ckPhxEventListener.log
AdvancedAnalytics_Install_MoFw_1385456053.log
3.2 Services Unable to Receive Communications from Other ComponentsEnsure that the appropriate ports are open on the computers where the services are installed.
The default port for the NetIQ Advanced Analytics Configuration Service is 4195. The service uses the VigilEntAgent.exe process.
The default port for the NetIQ Advanced Analytics Service is 4194. The service uses the VigilEntAgent.exe process.
The default port for the NetIQ AppManager Integration Adapter Namespace Provider is 2219.
Troubleshooting 31

3.3 Logging is Not Enabled for the Services
WARNING: Be careful when editing your Windows registry. If there is an error in your registry, your computer might become nonfunctional. If an error occurs, you can restore the registry to its state when you last successfully started your computer. For more information, see the Help for the Windows Registry Editor.
On the NetIQ Advanced Analytics Service computer, edit the HKEY_LOCAL_MACHINE\SOFTWARE\Wow6432Node\NetIQ\ThresholdEngine registry key so that the value of logLevel is 4 and restart the service.
On the NetIQ Advanced Analytics Configuration Service computer, edit the HKEY_LOCAL_MACHINE\SOFTWARE\Wow6432Node\NetIQ\ConfigurationService registry key so that the value of logLevel is 4 and restart the service.
3.4 Default Log Retention Setting is Too Low
WARNING: Be careful when editing your Windows registry. If there is an error in your registry, your computer might become nonfunctional. If an error occurs, you can restore the registry to its state when you last successfully started your computer. For more information, see the Help for the Windows Registry Editor.
On the NetIQ Advanced Analytics Service computer, edit the HKEY_LOCAL_MACHINE\SOFTWARE\Wow6432Node\NetIQ\ThresholdEngine registry key so that the value of logRetention is the desired number and restart the service.
On the NetIQ Advanced Analytics Configuration Service computer, edit the HKEY_LOCAL_MACHINE\SOFTWARE\Wow6432Node\NetIQ\ConfigurationService registry key so that the value of logRetention is the desired number and restart the service.
3.5 Trace Logging for Time Series Monitoring is Not EnabledOn the Advanced Analytics Service computer, edit IQPHXConfData.mof (located in the \Program Files\NetIQ\AdvancedAnalytics\ThresholdEngine\mof folder by default) so that the value of the monitorTraceOn parameter is true. For more information about the IQPHXConfData.mof file, see Section 1.11, “Understanding Optional Configuration for the Advanced Analytics Service,” on page 16.
3.6 Unable to Log On to Advanced Analytics Console1. Ensure that the user is a member of the Advanced Analytics Admin Group on the Advanced
Analytics Configuration Service computer.
Use the tools that Microsoft Windows provides to add individual users or Active Directory groups to the Advanced Analytics Admin Group.
32 NetIQ® Advanced Analytics User Guide

2. Ensure that the user has read only access to the MachineKeys folder for the RSA Cryptographic provider on the console computer.
Be aware that the path to the folder varies according to operating system and the folder might be hidden. For information about changing the permissions for the folder, see the documentation for your operating system.
3.7 AppManager Integration Adapter Unable to Connect to QDB
1. Start the NetIQ AppManager Integration Adapter Configuration Utility.
2. Select the AppManager repository (QDB).
3. Click Test Database Connection.
For more information about using the utility, see the AppManager Integration Adapter Installation Guide, available on the Aegis Documentation page.
3.8 Issues with the SQLite Databases for the Advanced Analytics ServicesUse the SQLite extension for Firefox to connect to the SQLite database for the Advanced Analytics Service or the Advanced Analytics Configuration Service. View the database files in AdvancedAnalyticsInstallationFolder/ThresholdEngine/data.
3.9 SQLite Queries to Determine Time Series Patterns Day range pattern:
select HBoundsDayRange.tsId, HBoundsDayRange.lower, HBoundsDayRange.upper, SampleSpaceTemplateDayRange.weekday1,SampleSpaceTemplateDayRange.weekday2, Interval.hhmmss1, Interval.hhmmss2 from HBoundsDayRange INNER JOIN SampleSpaceTemplateDayRange ON HBoundsDayRange.sstId = SampleSpaceTemplateDayRange.id INNER JOIN Interval ON SampleSpaceTemplateDayRange.intervalId = Interval.id
where tsID is the data ID for the time series
Weekly pattern:
select HBoundsDayOfWeek.tsId, HBoundsDayOfWeek.lower, HBoundsDayOfWeek.upper, SampleSpaceTemplateDayOfWeek.weekday, Interval.hhmmss1, Interval.hhmmss2 from HBoundsDayOfWeek INNER JOIN SampleSpaceTemplateDayOfWeek ON HBoundsDayOfWeek.sstId = SampleSpaceTemplateDayOfWeek.id INNER JOIN Interval ON SampleSpaceTemplateDayOfWeek.intervalId = Interval.id
where tsID is the data ID for the time series and weekday is the number of the day of the week (for example, 1 for Sunday)
Monthly pattern:
select HBoundsDayOfMonth.tsId, HBoundsDayOfMonth.lower, HBoundsDayOfMonth.upper, SampleSpaceTemplateDayOfMonth.monthday, Interval.hhmmss1, Interval.hhmmss2 from HBoundsDayOfMonth INNER JOIN
Troubleshooting 33

SampleSpaceTemplateDayOfMonth ON HBoundsDayOfMonth.sstId = SampleSpaceTemplateDayOfMonth.id INNER JOIN Interval ON SampleSpaceTemplateDayOfMonth.intervalId = Interval.id
where tsID is the data ID for the time series and monthday is the number of the day of the month
Use 99 for the last day of the month and 98 for the next to the last day of the month.
3.10 Credentials Required to Connect to QDB ChangeEnsure that you update the credentials in the following locations:
AppManager Integration Adapter Configuration Utility
For more information about using the utility, see the AppManager Integration Adapter Installation Guide, available on the Aegis Documentation page.
Manage Data Sources tab in the Advanced Analytics Console
3.11 Advanced Analytics Fails to Monitor a Time Series Even Though It Satisfies a Rule - Scenario 1If the connection between the AppManager Integration Adapter and the QDB is broken, the Advanced Analytics Service cannot retrieve the time series from AppManager.
To determine whether a connection problem exists:
1 Look for the following error in the log files located in AdvancedAnalyticsInstallationFolder\ThresholdEngine\log:
ERROR [Discoverer-IDCDVAP111##QDB] discovery process 1 aborted: script eval-for-endpoints failed to execute(general failure): failed to get global preference - path: /IQAM_ManagedService=IDCDVAP111##QDB, id: 150, name: PurgeDataHours
2 Look for the following errors in the AppManager Integration Adapter logs on the adapter computer:
ERROR [IQAM] [01000] [Microsoft][ODBC SQL Server Driver][Shared Memory]ConnectionWrite (send()). (0)
ERROR [IQAM] [08S01] [Microsoft][ODBC SQL Server Driver][Shared Memory]General network error. Check your network documentation. (0)
WARNING [IQAM] Unable to execute GetGlobalPref() query
ERROR PHX-Discovery-I failed to get global preference - path: /IQAM_ManagedService=IDCDVAP111##QDB, id: 150, name: PurgeDataHours
3.12 Advanced Analytics Fails to Monitor a Time Series Even Though It Satisfies a Rule - Scenario 2If there is a port conflict when the Advanced Analytics Service attempts to connect to the AppManager Integration Adapter, the service might attempt to connect using the port for another AppManager Integration Adapter Namespace Provider. If so, you will see Data Proxy Status Failed events in the AppManager consoles, even after you restart the AppManager Integration Adapter Namespace Provider.
34 NetIQ® Advanced Analytics User Guide

To determine if a port conflict exists:
1 In the AppManager Operator Console or Control Center console, view the connection status messages for the AppManager Integration Adapter to determine which port the Advanced Analytics Service is using to connect to the adapter.
2 Use the netstat command to determine whether multiple applications are listening on the port.
3.13 StatusEvents or EventListener Job Unable to Retrieve Events from Configuration ServiceEither of the Knowledge Script jobs for the Advanced Analytics for AppManager module raises the following event:
AppManager was not able to connect to the Advanced Analytics Configuration Service on Computer_Name.
The message indicates that one of the following conditions exist:
The Microsoft Message Queue (MSMQ) Service is not available on either the report-enabled agent or Configuration Service computer.
A QDB that you previously selected for monitoring was removed from monitoring through the Advanced Analytics Console.
The message queue that was created for the monitored QDB is not available on the Advanced Analytics Configuration Service computer.
3.14 QDB Unable to Receive EventsEither of the Knowledge Script jobs for the Advanced Analytics for AppManager module raises the following event:
An error is preventing the AppManager repository Repository_Name from receiving events.
The message indicates that one of the following conditions exist:
The report-enabled agent computer for the QDB is not able to connect to the SQL Server that hosts the QDB.
The account under which the agent is running does not have permission to connect to the QDB.
The account that you provided when you added the QDB to the Advanced Analytics Console does not have permission to connect to the QDB.
The report-enabled agent and the QDB are not the same version. For example, if the QDB is version 8.0 Service Pack 1, the agent must also be version 8.0 Service Pack 1.
3.15 StatusEvents or EventListener Job Cannot Identify the QDBEither of the Knowledge Script jobs for the Advanced Analytics for AppManager module fails to start and raises the following event:
The Job_Title job cannot identify the AppManager repository (QDB).
Troubleshooting 35

The message indicates that the module has not been installed on the Control Center console and Operator Console computers.
3.16 StatusEvents or EventListener Job Cannot Register with Configuration ServiceEither of the Knowledge Script jobs for the Advanced Analytics for AppManager module fails to start and raises the following event:
The Job_Title job was not able to register with the Advanced Analytics Configuration Service.
The message indicates that one of the following conditions exists:
The Configuration Service is not available.
The account under which the report-enabled agent computer is running does not have permission to access the MSMQ Service on the Configuration Service computer.
The QDB has not been added to the Advanced Analytics Configuration Console.
The MSMQ Service is not available on the report-enabled agent and Configuration Service computers.
3.17 Module Configuration Utility Fails to Connect to Configuration Service During Module InstallationWhen you install the Advanced Analytics for AppManager module, if you receive a message that indicates that the configuration utility for the module is not able to connect to the Advanced Analytics Configuration Service, ensure that the Configuration Service is available and that the computer where you are installing the module and the computer where you installed the Configuration Service are able to connect.
3.18 Discovery_AdvancedAnalytics Job FailsIf the Discovery_AdvancedAnalytics job fails, verify that module installation was successful and that the module .dll file (AdvancedAnalyticsforAppManagerInstallation Folder\NetIQ\AppManager\EventsListener\bin\qPhxEventListener.dll) is properly registered.
3.19 Knowledge Scripts for QDBs Added to Integration Adapter Through CCDB Unavailable in Advanced Analytics ConsoleIf you use AppManager to add QDBs to a CCDB and then add the CCDB to the AppManager Integration Adapter, Knowledge Scripts for the QDBs might not be available for configuring rules in the Advanced Analytics Console.
To work around the issue, add the QDBs directly to the AppManager Integration Adapter.
36 NetIQ® Advanced Analytics User Guide

3.20 Configuration Service Rejects Connections from Advanced Analytics Service and Console Does Not RefreshIf you did not specify a fully-qualified domain name when you provided account information for the Advanced Analytics Configuration Service during installation, the Configuration Service might reject connections from the Advanced Analytics Service even though both services are running. As a result, the Advanced Analytics Console does not reflect current information.
To work around the issue, complete the following steps:
WARNING: Be careful when editing your Windows registry. If there is an error in your registry, your computer might become nonfunctional. If an error occurs, you can restore the registry to its state when you last successfully started your computer. For more information, see the Help for the Windows Registry Editor.
1. On the Configuration Service computer, start the Windows Registry Editor.
2. Navigate to HKEY_LOCAL_MACHINE\SOFTWARE\Wow6432Node\NetIQ\IQConnectServices\Advanced Analytics\Configuration Service.
3. Edit the value of defaultAuthDomain to be the fully-qualified domain name of the account under which the Configuration Service runs.
Troubleshooting 37

38 NetIQ® Advanced Analytics User Guide


![Sectorwatch: Advanced Analytics - 7 Mile Advisors€¦ · Sectorwatch: Advanced Analytics June 2018. 2 Advanced Analytics June 2018 Sector Dashboard [4] Public Basket Performance](https://static.fdocuments.us/doc/165x107/5f0733c97e708231d41bd0f2/sectorwatch-advanced-analytics-7-mile-advisors-sectorwatch-advanced-analytics.jpg)