NDS-OPC - acceed.com Manual.pdf · l Appendix, “Notes for Using OPC/DCOM" describes the windows...
22
NDS-OPC OPC Server for NuDAM Modules, Windows-95/98/NT User’s Guide
Transcript of NDS-OPC - acceed.com Manual.pdf · l Appendix, “Notes for Using OPC/DCOM" describes the windows...

NDS-OPC OPC Server for NuDAM Modules,
Windows-95/98/NT User’s Guide


@Copyright 1998-1999 ADLink Technology Inc. All Rights Reserved. Manual Rev. 1.00b: September 6, 1999 The information in this document is subject to change without prior notice in order to improve reliability, design and function and does not represent a commitment on the part of the manufacturer. In no event will the manufacturer be liable for direct, indirect, special, incidental, or consequential damages arising out of the use or inability to use the product or documentation, even if advised of the possibility of such damages. This document contains proprietary information protected by copyright. All rights are reserved. No part of this manual may be reproduced by any mechanical, electronic, or other means in any form without prior written permission of the manufacturer.
Trademarks NuDAM and NDS-OPC are registered trademarks of ADLinks Technology Inc. IBM PC is a registered trademark of International Business Machines Corporation. Intel is a registered trademark of Intel Corporation. Other product names mentioned herein are used for identification purposes only and may be trademarks and/or registered trademarks of their respective companies.

Getting service from ADLink Tech. Inc. Customer satisfaction is always the most important thing for ADLink Tech. You can get more information and our service from several channels below.
1. Visit our web site: http://www.adlink.com.tw 2. For general customer service, please contact: [email protected] 3. For specific product, you can contact the product specialist as below:
NuIPC:nuipc @adlink.com.tw NuDAQ: nudaq @adlink.com.tw NuDAM: nudam @adlink.com.tw NuPRO:nupro @adlink.com.tw Software:sw @adlink.com.tw AMB: amb @adlink.com.tw
4. Or you can send a FAX to us. FAX: +886-2-2249-3235 Attn: ADLink Service 5. To take the benefit of efficiency, please give us the basic information as below: o Contact Person:
o Company/Organization:
o Tel #: o FAX #:
o Address:
o Country: o Email:
o Dealer: o Purchased Date:
o Product Model:
o Environment to Use:
o OS: o Computer Brand:
o M/B: CPU: Chipset: Bios:
o Video Card:
o Network Interface Card:
o Problem Description:
o Any Suggestion is appreciated:

Contents • i
CONTENTS How to Use This Manual......................................... iii
CHAPTER 1 Introduction to NDS-OPC....................1
CHAPTER 2 Installation...........................................5
2.1 System Requirements.................................................5
2.2 Installation ..................................................................6
2.3 Directory and Files.................................................... 10
CHAPTER 3 How to Run Sample Program of OPC Client ..................................................11
Appendix Notes of Using OPC/DCOM...................13


How to Use This Manual • iii
How to Use This Manual This manual is designed to help you to Install the NDS-OPC software. It is organized as follows:
l Chapter 1, "Introduction to NDS-OPC" describes Introduction of NDS-OPC software.
l Chapter 2, "Installation" describes the system requirement and the step of installing NDS-OPC software.
l Chapter 3, “How to run sample of OPC client” describes how to run the sample of “OpcClient.exe”.
l Appendix, “Notes for Using OPC/DCOM" describes the windows environment setting for using OPC/DCOM and some notes.


Introduction to NDS-OPC• 1
1
Introduction to NDS-OPC NDS-OPC includes a full-function OPC sever, providing immediate compatibility with a very wide range of application software systems. Any software system with OPC client capabilities can access the NDS-OPC OPC server to, monitoring and controll data to and from the NuDAM hardware.
The NDS-OPC includes an OPC server program and an explorer program that is a graphical configuration utility for easy system setup. The explorer program saves the setup proceduse during installation by integrating both hardware and software configuration into one step. Using the explorer program. First, you can interactively configure NuDAM modules, setting programmable hardware parameters such as range, data format, filters.
Secondly, you can configure the operation of the OPC server. You can set I/O scan times and timeout limits, as well as name each data item (I/O point). OPC client software can then access these data items, or tag, via this name assigned in the explorer program.
Fig.1.1 The relationship between NuDAM Explorer and OPC Server
Explorer
Server
Config File

2 • Introduction to NDS-OPC
OPC Interface of NDS-OPC
OPC defined the standard OPC Interface. So, Users can use the OPC Interface to communicate with OPC server. Following description is the OPC Interface of NDS-OPC
OPCServer Object
1. IOPCServer
HRESULT AddGroup (szName, bActive, dwRequestedUpdateRate, hClientGroup, pTimeBias, pPercentDeadband, dwLCID, phServerGroup, pRevisedUpdateRate, riid, ppUnk);
HRESULT GetErrorString (dwError, dwLocale, ppString); HRESULT GetGroupByName (szName, riid, ppUnk); HRESULT GetStatus (ppServerStatus); HRESULT RemoveGroup (hServerGroup, bForce); HRESULT CreateGroupEnumerator (dwScope, riid, ppUnk);
OPCGroup Object
1. IOPCGroupStateMgt
HRESULT GetState(pUpdateRate, pActive, ppName, pTimeBias, pPercentDeadband, pLCID, phClientGroup, phServerGroup);
HRESULT SetState(pRequestedUpdateRate, pRevisedUpdateRate, pActive, pTimeBias, pPercentDeadband, pLCID, phClientGroup);
HRESULT SetName(szName); HRESULT CloneGroup(szName, riid, ppUnk);
2. IOPCSyncIO
HRESULT Read(dwSource, dwNumItems, phServer, ppItemValues, ppErrors);
HRESULT Write(dwNumItems, phServer, pItemValues, ppErrors);

Introduction to NDS-OPC• 3
3. IOPCAsyncIO
HRESULT Read(dwConnection, dwSource, dwNumItems, phServer, pTransactionID, ppErrors);
HRESULT Write(dwConnection, dwNumItems, phServer, pItemValues, pTransactionID, ppErrors);
HRESULT Cancel (dwTransactionID); HRESULT Refresh(dwConnection, dwSource, pTransactionID);
4. IOPCItemMgt
HRESULT AddItems(dwNumItems, pItemArray, ppAddResults, ppErrors) HRESULT ValidateItems(dwNumItems, pItemArray, bBlobUpdate,
ppValidationResults, ppErrors) HRESULT RemoveItems(dwNumItems, phServer, ppErrors) HRESULT SetActiveState(dwNumItems, phServer, bActive, ppErrors) HRESULT SetClientHandles(dwNumItems, phServer, phClient,
ppErrors) HRESULT SetDatatypes(dwNumItems, phServer, pRequestedDatatypes,
ppErrors) HRESULT CreateEnumerator(riid, ppUnk)
5. IDataObject
HRESULT DAdvise(pFmt, adv, pSnk, pConnection) HRESULT DUnadvise(Connection)
Note: all other functions can be stubs which return E_NOTIMPL.
About the detail of each method of interface, please refer to “NuDAM OPC Server Reference Manual” PDF manual file in <NDS-OPC>\Doc directory.


Installation • 5
2
Installation
2.1 System Requirements NDS-OPC requires the following minimum configuration:
• An IBM PC/AT or compatibles, running Windows NT version 4.0 or higher version
• Or running Windows 98 or Windows 95 that have installed “DCOM for Window95”.
• Windows System must enable DCOM function.
• A hard disk with enough disk space to install PCIS-DASK
• A CD-ROM drive for installing NDS-OPC.
• NuDAM modules that NDS-OPC supports.
6 • Installation
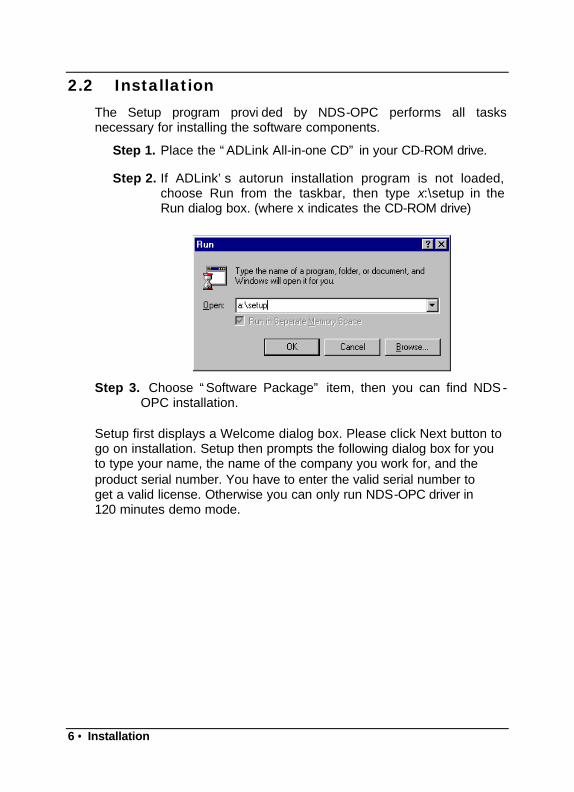
2.2 Installation The Setup program provi ded by NDS-OPC performs all tasks necessary for installing the software components.
Step 1. Place the “ADLink All-in-one CD” in your CD-ROM drive.
Step 2. If ADLink’s autorun installation program is not loaded, choose Run from the taskbar, then type x:\setup in the Run dialog box. (where x indicates the CD-ROM drive)
Step 3. Choose “Software Package” item, then you can find NDS - OPC installation.
Setup first displays a Welcome dialog box. Please click Next button to go on installation. Setup then prompts the following dialog box for you to type your name, the name of the company you work for, and the product serial number. You have to enter the valid serial number to get a valid license. Otherwise you can only run NDS-OPC driver in 120 minutes demo mode.

Installation • 7
Click Next button to continue setup.
Setup then prompts the following dialog box for you to specify the destination directory for NDS -OPC. The default path is C:\Program Files\ADLink\NuDAMOPC. If you want to install NDS-OPC in another directory, please enter the directory you would like to install NDS-OPC.

8 • Installation
Then you click Next button and Setup will show the following window:
You can install NDS-OPC in one of the following ways:
♦ Typical Installation: This installs on the hard disks all the files that NDS-OPC provides. They include Include files, Explorer program, NuDAM OPC Server program, Help files, and the sample programs of OPC Client that NDS-OPC supports ♦ Compact Installation: This installs a minimum set of files on your hard disks. They include Include files, Explorer program, NuDAM OPC Server program, Help files. ♦ Custom Installation: This opens the Custom Installation dialog box. You can select just the sample programs of the cards you want to install. Custom Installation dialog box is shown below.

Installation • 9
The selective components include Application Files, Document files, and the Sample programs of OPC Client. However, for NDS -OPC working correctly, Application Files is the requirement. Application Files MUST be selected.
When copying files have completed, Setup will show the following window.
Please click Finish button to end successfully the installation of NDS -OPC.

10 • Installation
2.3 Directory and Files If you choose “Typical Installation” option in the “Choose Installation Option” window, when the installation process is completed, the NDS -OPC directory should contain the following files and sub-directories:
File/Sub-directory Description NuDAMExplorer.EXE NuDAM Explorer program. NDOPCSvr.EXE NuDAM OPC Server program. NuDAMDrv.DLL NuDAM Driver DLL Server.cfg Registered file of server informat ion included
current configuration filename and server scan speed.
Demo.adl A configuration file. (for OpcClient sample) It have defined three NuDAM Moudes that are ND6060, ND6012 and ND6021.
Explorer.HLP Help file of NuDAM Explorer Explorer.CNT Help content file of NuDAM Explorer OPCInterface.HLP Help file of OPC Interface OPCInterface.CNT Help content file of OPC Interface Doc <DIR> Include the PDF documents of NuDAM OPC
Server Doc\NuDAMOPC.PDF Document file of NuDAM OPC Server Doc\NDOPCInstall.PDF Document file of Installation of NuDAM OPC
Server Samples <DIR> Include a sample program of OPC Client Samples\OpcClient.EXE A Sample program of OPC Client. It support
the sample operations of DI, DO, AI and AO for NuDAM OPC Server.
Samples\OpcClient<DIR> The directory of source files of OpcClient. This is the project of VC++ V5.0.
In Installation, Setup will copy two DLL files to windows system directory. They are VCL35.VPL and OPCProxy.DLL. Setup also registers NDOPCSvr.EXE to system registry.

How to Run Sample Program of OPC Client• 11
3
How to Run Sample Program of OPC Client
This section will describe how to run the OpcClient.exe.
Step1: Connect a link of NuDAM module to COM1 Port. This link must include module ND6060, ND6012, ND6021 and their address is 6, 2, 11.
Step1: Start NuDAMExplorer.EXE.
Step2: Open the Demo.adl (a configuration file)
Step3: Click menu “SettingàSave Server.cfg file”
Step4: Exit NuDAMExplorer program
Step5: Start OpcClient.EXE
Step6: Click Connect button to launch NuDAM OPC Server and connect OPC Server and create OPC Group and OPC Items. If all things are successful then Status will display “Read Ok”
Step7: Start to monitor or control the NuDAM modules using slide or switch button.
The Window of NuDAM Explorer

12 • How to Run Sample Program of OPC Client
The Window of OpcClient

Notes of Using OPC/DCOM• 13
Appendix Notes of Using OPC/DCOM
1.When the Installation of NDS-OPC is successful, the NuDAM OPC server have be registered in system registry. You can register it manually by executing the command “NDOPCSvr -RegServer” in DOS Prompt.
2.Because the OPC is based on COM/DOCM of Microsoft, So you must install the DCOM program in your window system.
3.DCOM is a standard part of the Windows NT 4.0 distribution. You preferably have applied the latest Service Pack for Windows NT 4.0 (above Service Pack 2).
4.DCOM is not a standard part of the Windows 95. You must install the “DCOM for Windows 95”. This copy is also included on the Visual C++ 5 Professional Edition CD. You can download the latest version of DCOM for Windows 95 over the Internet at the following URL:
http://www.microsoft.com/oledev/olemkt/oledcom/dcom95.htm 5.After installing of DCOM, you must check the setting of the
following registry keys.
\HKEY_LOCAL_MACHINE\SOFTWARE\Microsoft\OLE\EnableRemoteConnect = ‘Y’
\HKEY_LOCAL_MACHINE\SOFTWARE\Microdoft\OLE\EnableDCOM = ‘Y’

14 • Notes of Using OPC/DCOM
Alternately, You can start oleview.exe of VC++ 5 to setting the “System Configuation”.
6.The “client” machine would do the same configuration above. You must log on with the same user ID as on the “server” machine.
7.As for “Remote Activation”, Windows NT DCOM have the ability to automatically launch a remote server to create object instances. But on Windows 95, it is not possible to automatically launch a server. Instead, COM servers must be launched manually before they may be used remotely.


![[MS-DCOM]: Distributed Component Object Model (DCOM ...... · [MS-DCOM]: Distributed Component Object Model (DCOM) Remote Protocol ... Additionally, overview documents cover inter-protocol](https://static.fdocuments.us/doc/165x107/5e9787271edd026c3e6d6efe/ms-dcom-distributed-component-object-model-dcom-ms-dcom-distributed.jpg)