OPC Data Server - Logic Control · core of DCOM, ActiveX, and OLE technology. What is DCOM? OPC 3...
31
OPC Data Server
Transcript of OPC Data Server - Logic Control · core of DCOM, ActiveX, and OLE technology. What is DCOM? OPC 3...
OPC Data Server

iii
Table of Contents OPC ........................................................................................................................................... 1
Overview ................................................................................................................................ 1
What is OPC? ......................................................................................................................... 2
The OPC Conversation .......................................................................................................... 4
Preparing Your Computer and Network for OPC .................................................................... 5
Import Source ......................................................................................................................... 8
Importing Tags ......................................................................................................................10
Data Source Definition ...........................................................................................................13
Demo of WIN-911 Capabilities ..............................................................................................15
Creating a Demo OPC Server ...............................................................................................16
Setting up the OPC Demo .....................................................................................................17
Exploring the WIN-911 Configurator ......................................................................................19
Running the OPC Demo ........................................................................................................21
Typical Example of WIN-911 Voice Dialout ...........................................................................23
Typical Example of WIN-411 Inquiry ......................................................................................25
For More Details ....................................................................................................................27

1
OPC Overview
The “OPC” data connection allows WIN-911 to connect to a wide variety of HMI/SCADA systems by using a generic data exchange medium, OPCDA server. WIN-911 serves as a generic OPCDA client. WIN-911 only supports Data Access (DA) servers not Alarm and Event (A&E) servers. Unlike the DDE option WIN-911 is capable of browsing tags in an OPCDA server and importing them into the WIN-911 configuration. The browse function can be limited by the OPC server.
A configuration can be run with a single OPC connection or can be run simultaneously with any of our other data connections (DDE, OPC, or Direct Connects). It is important to note, however, that some of the terms (Application, Topic, Item Name, OPC Machine Name, and OPC Server Name) are components of Microsoft's DDE/OPC address nomenclature. Although these definition fields are still part of the configuration, they take on different meanings and are governed by different constraints.
Typically, the OPC server must be running before WIN-911 can establish a connection. If at any time WIN-911 loses its connection to the OPC server, WIN-911 must be restarted to establish the connection again.
Like a DDE connection the data source is passing raw values to WIN-911. This means WIN-911 must be configured to alarm on appropriate set-points, therefore owning the alarms. The OPC connection supports data tags or tags without alarm set points configured. Data tags can be used in 411 Reports to monitor or manipulate values. The OPC connection does not support Dynamic Tags nor does it support dynamic features.
The OPC connection also supports watchdog timers. The OPC's watchdog timers can be configured in two ways. WIN-911 can monitor a tag's changing value by setting the timeout value greater than the time it takes the tag's value to change. You can also define the watchdog timer with a "0". A watchdog timer set to "0" strictly monitors the connection to the OPC server. A watchdog timer set to "0" will only report an alarm when WIN-911 loses its connection to server and the server reports that the connection was broken. Once the connection is lost, WIN-911 must be restarted in order to reconnect.
OPC Data Server
2
What is OPC? In 1994 a group of vendors representing a broad spectrum of disciplines in the industrial segment formed what is now known as the OPC Foundation. The OPC Foundation put forth the goal of developing a single client/server specification that would allow any vendor to develop software and applications that could share data in a fast, robust fashion, and do it in a way that would eliminate the proprietary schemes that forced these same vendors to duplicate development efforts. The OPC Foundation developed the specification called Data Access Specification 1.0a which was released in early 1996. Using this specification, vendors were able to quickly develop client server software.
OPC (OLE for Process Control) builds on the strengths of OLE (Object Linking and Embedding) to provide a complete data sharing medium that meets the rugged demands of industry. It allows a client to browse all OPC servers for data both on the local node as well as networks and provides a filtering mechanism to help narrow the scope. Data can then be imported and linked to the source for data sharing and manipulation. The communication process is faster than DDE and provides for a much greater amount of data sharing while maintaining integrity and security.
Based on Microsoft's OLE (now ActiveX), COM (component object model), and DCOM (distributed component object model) technologies, OPC consists of a set of standard interfaces, properties, and methods for use in process-control and manufacturing-automation applications. The ActiveX/COM technologies define how individual software components can interact and share data. Backed by Microsoft's NT technology, OPC provides a common interface for communicating with diverse process-control devices, regardless of the controlling software or devices in the process.
Glossary of Terms:
What is RPC?
Remote Procedure Call (RPC) is a client/server infrastructure that increases the interoperability, portability, and flexibility of an application by allowing the application to be distributed over multiple heterogeneous platforms. It reduces the complexity of developing applications that span multiple operating systems and network protocols by insulating the application developer from the details of the various operating system and network interfaces; function calls are the programmer's interface when using RPC.
What is COM?
The Component Object Model provides standard interfaces and inter-component communications. Through COM, an application may use features of any other application object or operating system, or allow for software component upgrades without affecting the operation of the overall solution. COM can be used by developers and system integrators to create customized solutions. A binary standard, COM is generic and is the core of DCOM, ActiveX, and OLE technology.
What is DCOM?
OPC
3
The Distributed Component Object Model extends COM to networks (remote objects). It is a highly optimized protocol, where remote components appear to be local. DCOM was first released for Windows NT 4.0 in August 1996. Microsoft Java and VB Script support DCOM and ActiveX development. Other companies are developing versions of DCOM and ActiveX for non-Microsoft platforms.
What is OLE?
Object Linking and Embedding is used to provide integration among applications, enabling a high degree of application compatibility, even among diverse types of information. OLE technology is based on COM, and allows for the development of reusable, plug-and-play objects that are interoperable across multiple applications. It also provides for reusable, component-based software development, where software components can be written in any language, supplied by any software vendor.
What is ActiveX?
ActiveX is an umbrella term of a broad range of technologies that used to be known as OLE Controls, all of which rely on COM. A renaming and restructuring of the OLE Controls technology has made it object-based rather than object-oriented. ActiveX is an open, integrated platform that lets developers and Web producers create portable applications and interactive content for the World Wide Web. It is open, cross platform, and is supported on Mac, Windows, and Unix systems.

OPC Data Server
4
The OPC Conversation There are three parts to an OPC Address: OPC Machine Name or IP Address, OPC Server Name, and the Item Name. The OPC Machine Name specifies the network node that the data resides on, the OPC Server Name specifies the server that contains the data, and the Item name is the specific data point within the server.
OPC
5
Preparing Your Computer and Network for OPC This step is performed automatically by the WIN-911 install as an OPC client during setup for the WIN-911 computer. However, a remote network server may not be configured with the required components. If the WIN-911 Configurator cannot browse a remote node for OPC servers and tags, perform the following steps on that computer.
Install the OPC Redistibutable Package
OPC30030.exe . This can be found on your WIN-911 Version 7.09.00 CD within the Support folder or on our website at www.specterinstruments.com | Download Center | Support.
Setup DCOM
Note: The following step is only necessary if the default installation does not result in an OPC enabled system. Configure DCOM on both the server and client machine.
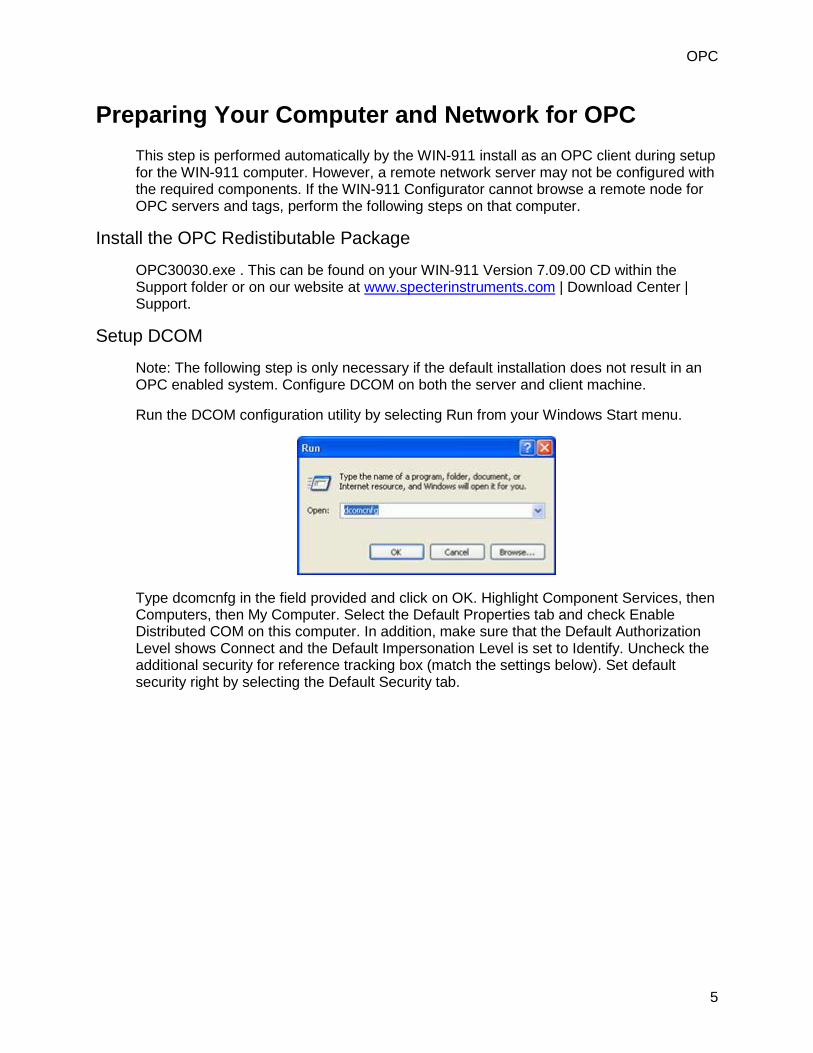
Run the DCOM configuration utility by selecting Run from your Windows Start menu.
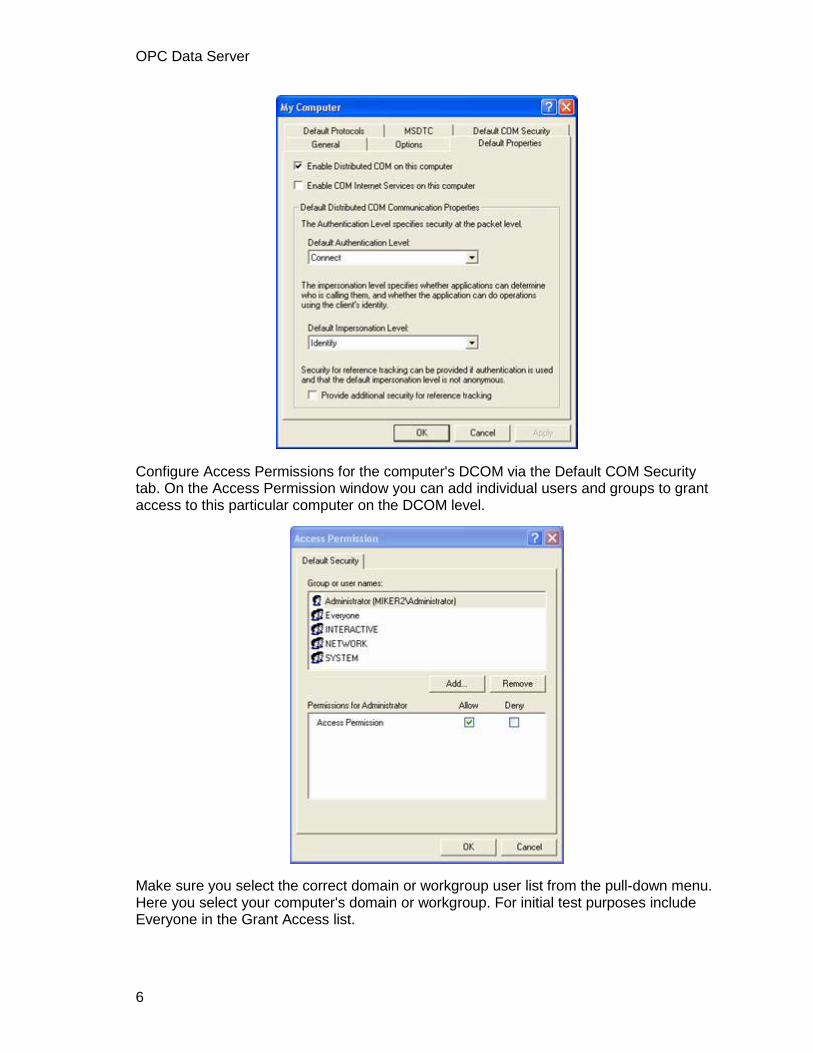
Type dcomcnfg in the field provided and click on OK. Highlight Component Services, then Computers, then My Computer. Select the Default Properties tab and check Enable Distributed COM on this computer. In addition, make sure that the Default Authorization Level shows Connect and the Default Impersonation Level is set to Identify. Uncheck the additional security for reference tracking box (match the settings below). Set default security right by selecting the Default Security tab.
OPC Data Server
6
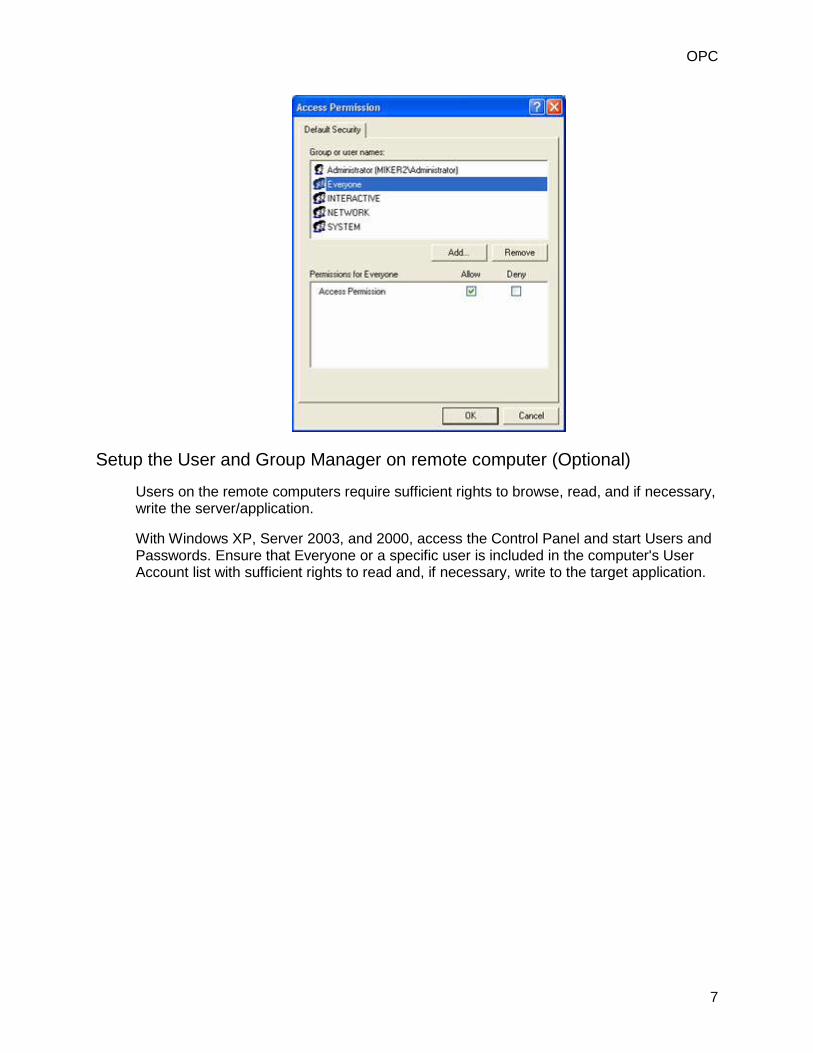
Configure Access Permissions for the computer's DCOM via the Default COM Security tab. On the Access Permission window you can add individual users and groups to grant access to this particular computer on the DCOM level.
Make sure you select the correct domain or workgroup user list from the pull-down menu. Here you select your computer's domain or workgroup. For initial test purposes include Everyone in the Grant Access list.
OPC
7
Setup the User and Group Manager on remote computer (Optional)
Users on the remote computers require sufficient rights to browse, read, and if necessary, write the server/application.
With Windows XP, Server 2003, and 2000, access the Control Panel and start Users and Passwords. Ensure that Everyone or a specific user is included in the computer's User Account list with sufficient rights to read and, if necessary, write to the target application.
OPC Data Server
8
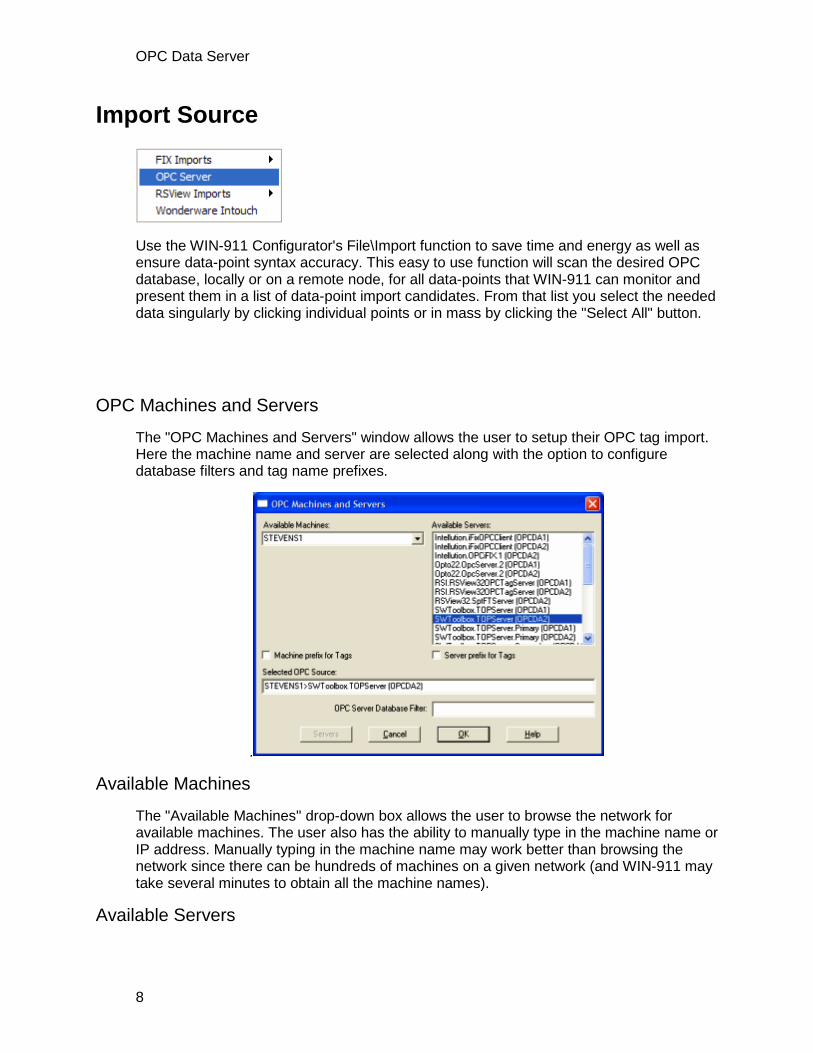
Import Source
Use the WIN-911 Configurator's File\Import function to save time and energy as well as ensure data-point syntax accuracy. This easy to use function will scan the desired OPC database, locally or on a remote node, for all data-points that WIN-911 can monitor and present them in a list of data-point import candidates. From that list you select the needed data singularly by clicking individual points or in mass by clicking the "Select All" button.
OPC Machines and Servers
The "OPC Machines and Servers" window allows the user to setup their OPC tag import. Here the machine name and server are selected along with the option to configure database filters and tag name prefixes.
.
Available Machines
The "Available Machines" drop-down box allows the user to browse the network for available machines. The user also has the ability to manually type in the machine name or IP address. Manually typing in the machine name may work better than browsing the network since there can be hundreds of machines on a given network (and WIN-911 may take several minutes to obtain all the machine names).
Available Servers
OPC
9
The "Available Servers" list box will show all available OPC Data Access servers (and their types) that are registered on the selected machine name or IP address.
Machine prefix for Tags
The "Machine prefix for Tags" checkbox will append the machine name to the beginning of every tag found on the selected server.
Server prefix for Tags
The "Server prefix for Tags" checkbox will append the server name to the beginning of every tag found on the selected server.
Selected OPC Source
The "Selected OPC Source" text box defaults to a concatenated string comprised of the selected machine name followed by the ">" symbol and the OPC Server name. This text box also allows the user to manually configure any unique user defined Access name.
OPC Server Database Filter
The "OPC Server Database Filter" is used to filter tags before the list is given to WIN-911. This filter MUST be supported by the OPC Server and is specific to each OPC Server.
OPC Data Server
10
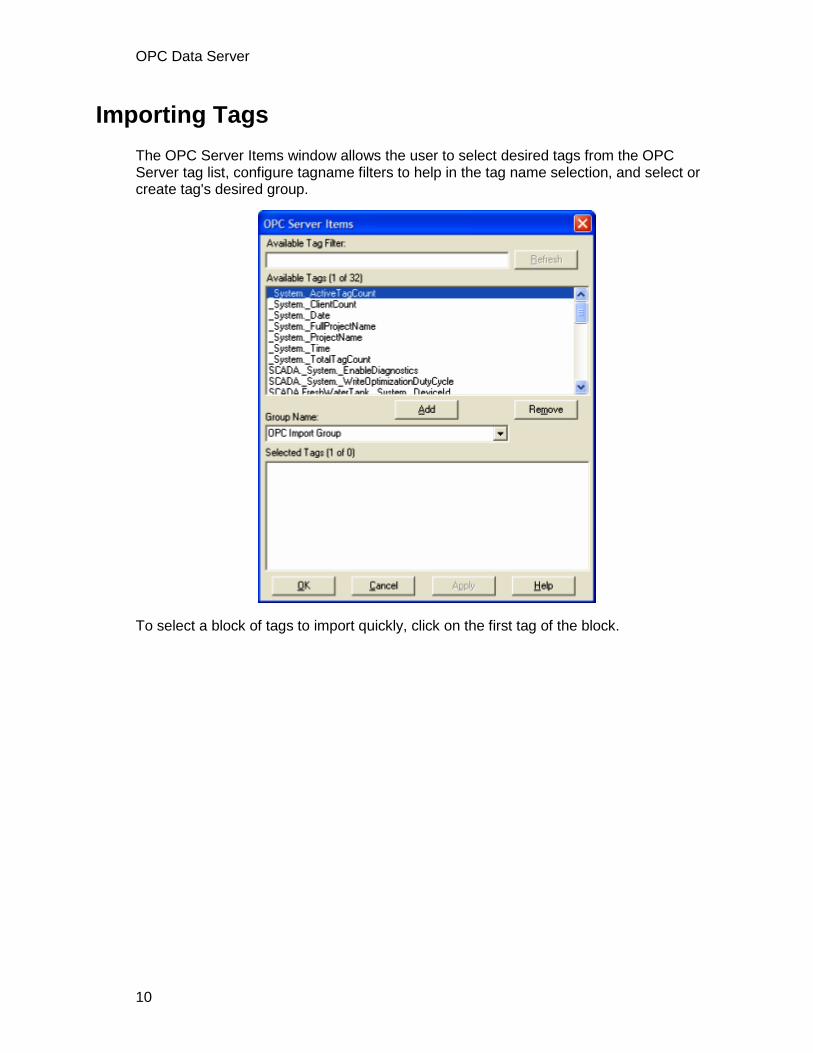
Importing Tags The OPC Server Items window allows the user to select desired tags from the OPC Server tag list, configure tagname filters to help in the tag name selection, and select or create tag's desired group.
To select a block of tags to import quickly, click on the first tag of the block.

OPC
11
Next, scroll down to the bottom of the block list and shift-click the last tag.

OPC Data Server
12
Once all the tags are selected, press the Add button and the application will fill the Selected Tags from the entire OPC Server tag list.
If you wish to deselect any of the tags from the list before the import macro is run, select them from the Selected Tags using the Remove button. Otherwise, select Apply and the WIN-911 database import will execute.
OPC
13
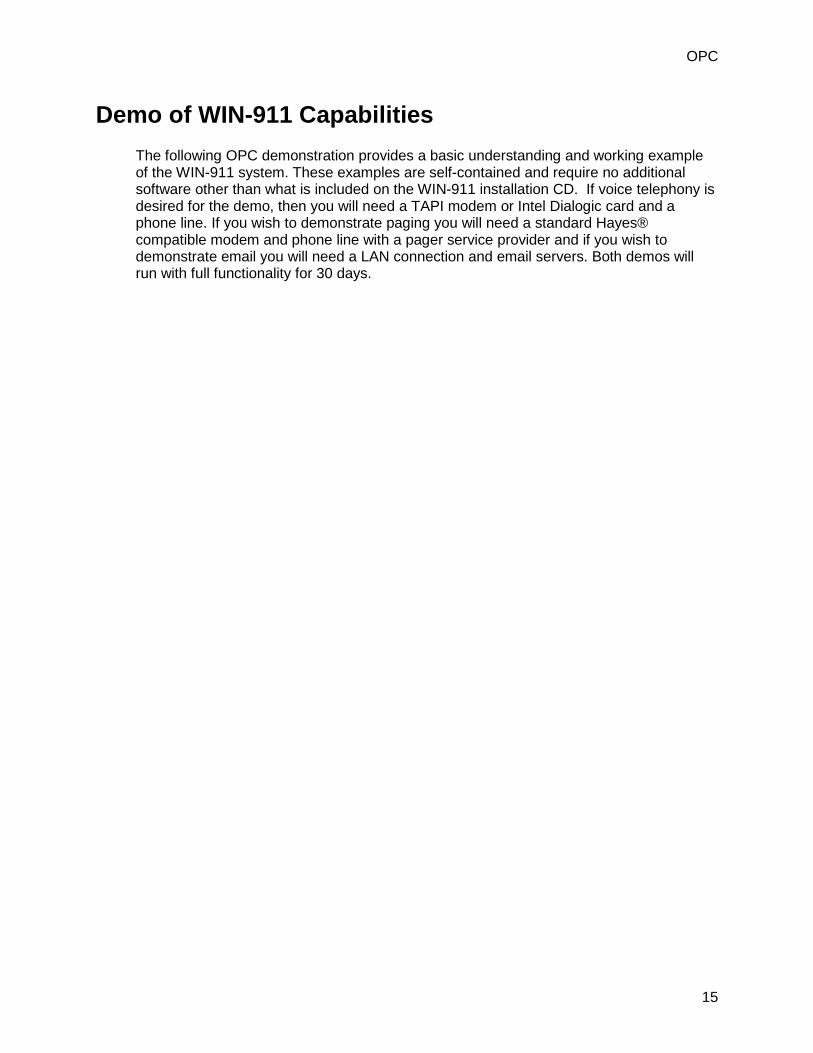
Data Source Definition
This button is used to setup data communications. Data point addressing can be monotonous and syntactically rigorous. Rather than being forced into remembering (and exactly typing) the OPC Server invocation string for each "Item Name" to be alarmed, you merely select the appropriate data source type from the selection list. When you define data points, a selection box will provide you with a list of "Access Names" to choose from. Simply select "OPC Data Server".
Note: The data source definition is automatically configured if the OPC Server database was imported using the OPC Server import utility.
The OPC Data Server Access Name, Machine Name, and Server Name are defined here. The "Access Name" is a user defined name used to represent this particular data source. The "OPC Machine Name" is the machine name where the OPC Server resides. This can be either a WINS hostname, IP address, or the text "(Local Machine)," to refer to the machine you are currently on. The "OPC Server Name" is the actual name of the OPC Server. Click OK.

OPC Data Server
14
Selecting "Edit" or double-clicking on the "Access Name" will bring you back to the OPC Data Server Options window.
OPC
15
Demo of WIN-911 Capabilities The following OPC demonstration provides a basic understanding and working example of the WIN-911 system. These examples are self-contained and require no additional software other than what is included on the WIN-911 installation CD. If voice telephony is desired for the demo, then you will need a TAPI modem or Intel Dialogic card and a phone line. If you wish to demonstrate paging you will need a standard Hayes® compatible modem and phone line with a pager service provider and if you wish to demonstrate email you will need a LAN connection and email servers. Both demos will run with full functionality for 30 days.
OPC Data Server
16
Creating a Demo OPC Server Included in the WIN-911 software package is a “Promotional” copy of TOP Server and an OPC Project (WIN-911 OPC DEMO.opf) which will offer the feel of “real-world” events. These events will trigger alarm conditions and initiate responses in the Monitor.
Note: TOP Server is not required to run WIN-911; it merely offers easy access to “user defined” OPC values, and provides an OPC Server.
The demo mode of WIN-911 will fully support all alarming options. To demonstrate the pager option, you must have a data modem installed (either internal or serial port) or a local paging system. The demo mode is unlimited with respect to Tagnames, Groups and phone book telephone/pager entries, but will time out in 30 days.
Installing TOP Server & OPC Demo
From the Support Folder of the WIN-911 install CD open the OPC Server Demo sub-folder and double-click on the topserverdemo.exe to run the setup. Step through the setup dialog to complete the software installation.
OPC
17
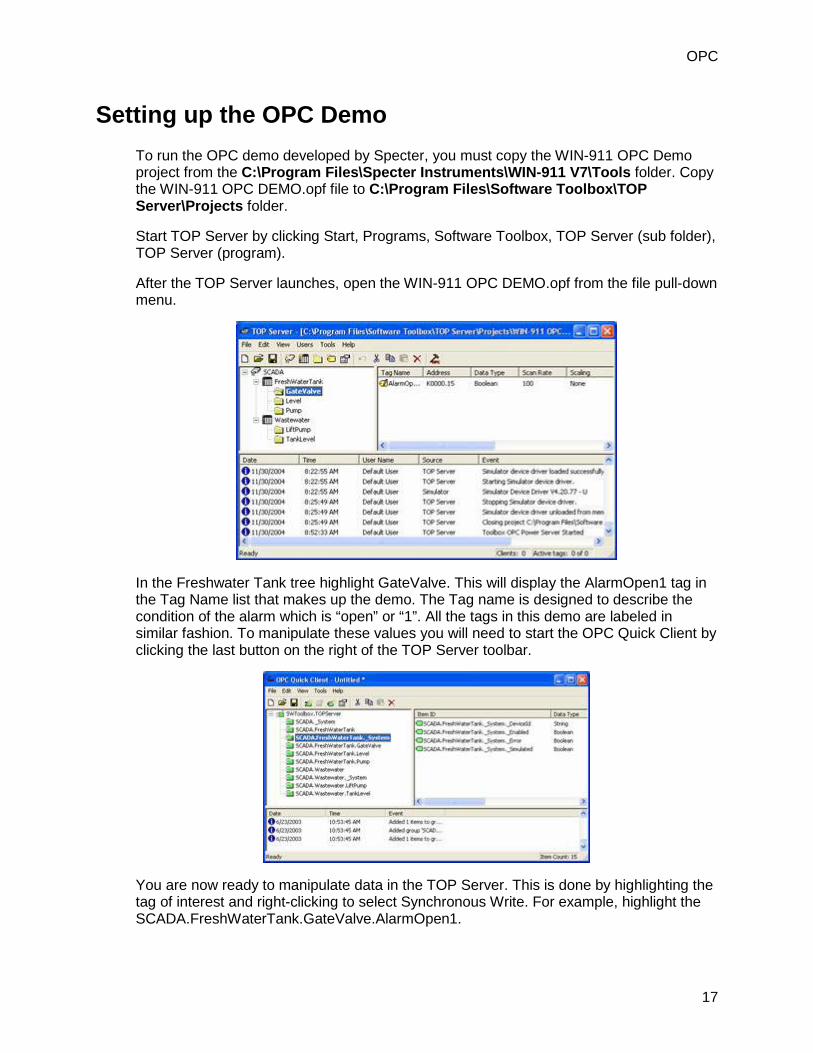
Setting up the OPC Demo To run the OPC demo developed by Specter, you must copy the WIN-911 OPC Demo project from the C:\Program Files\Specter Instruments\WIN-911 V7\Tools folder. Copy the WIN-911 OPC DEMO.opf file to C:\Program Files\Software Toolbox\TOP Server\Projects folder.
Start TOP Server by clicking Start, Programs, Software Toolbox, TOP Server (sub folder), TOP Server (program).
After the TOP Server launches, open the WIN-911 OPC DEMO.opf from the file pull-down menu.
In the Freshwater Tank tree highlight GateValve. This will display the AlarmOpen1 tag in the Tag Name list that makes up the demo. The Tag name is designed to describe the condition of the alarm which is “open” or “1”. All the tags in this demo are labeled in similar fashion. To manipulate these values you will need to start the OPC Quick Client by clicking the last button on the right of the TOP Server toolbar.
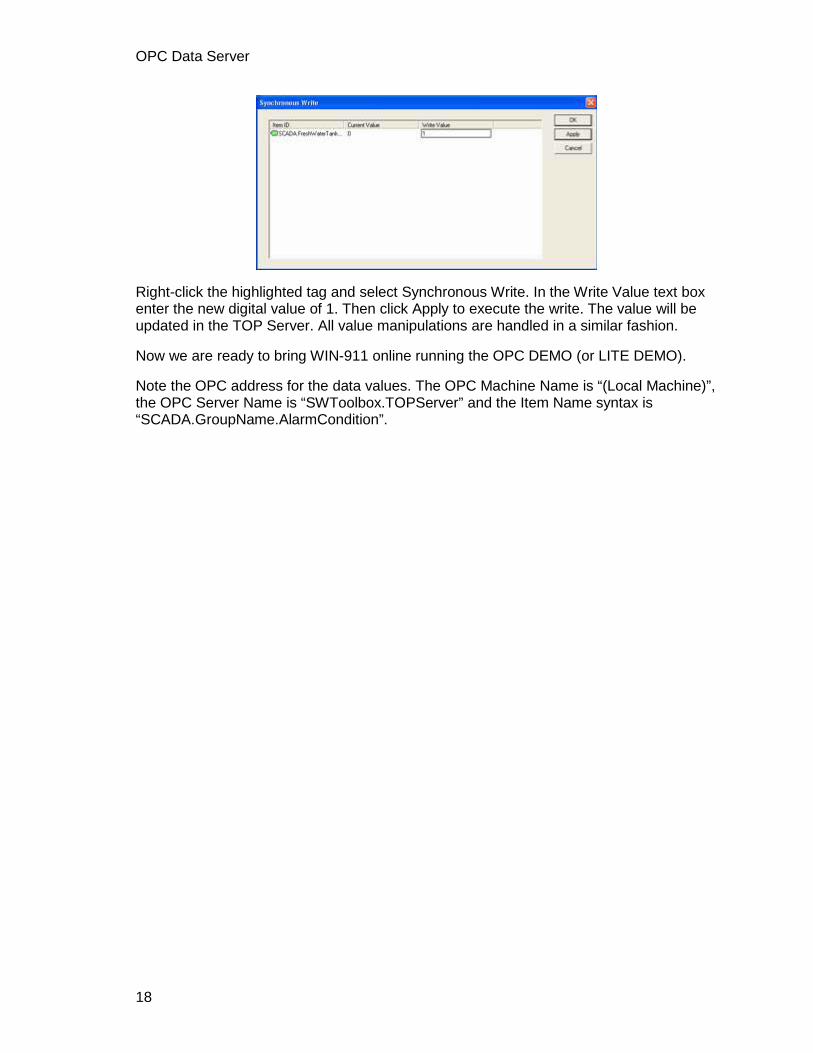
You are now ready to manipulate data in the TOP Server. This is done by highlighting the tag of interest and right-clicking to select Synchronous Write. For example, highlight the SCADA.FreshWaterTank.GateValve.AlarmOpen1.
OPC Data Server
18
Right-click the highlighted tag and select Synchronous Write. In the Write Value text box enter the new digital value of 1. Then click Apply to execute the write. The value will be updated in the TOP Server. All value manipulations are handled in a similar fashion.
Now we are ready to bring WIN-911 online running the OPC DEMO (or LITE DEMO).
Note the OPC address for the data values. The OPC Machine Name is “(Local Machine)”, the OPC Server Name is “SWToolbox.TOPServer” and the Item Name syntax is “SCADA.GroupName.AlarmCondition”.
OPC
19
Exploring the WIN-911 Configurator
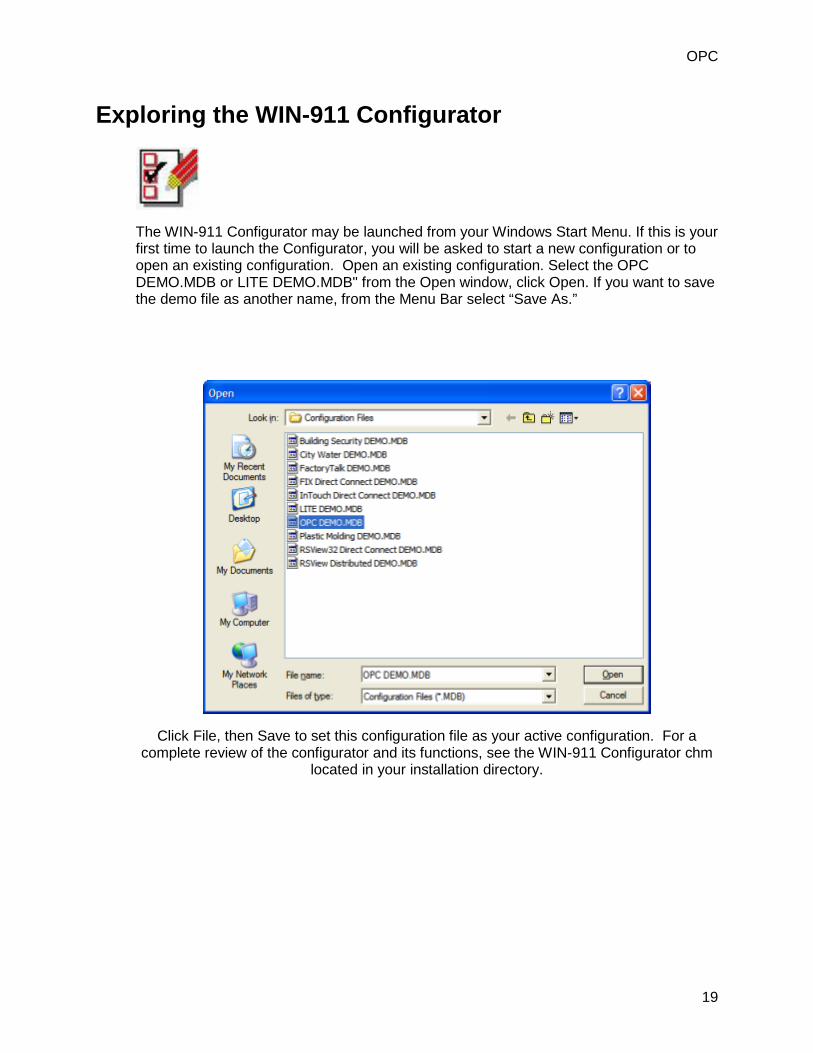
The WIN-911 Configurator may be launched from your Windows Start Menu. If this is your first time to launch the Configurator, you will be asked to start a new configuration or to open an existing configuration. Open an existing configuration. Select the OPC DEMO.MDB or LITE DEMO.MDB" from the Open window, click Open. If you want to save the demo file as another name, from the Menu Bar select “Save As.”
Click File, then Save to set this configuration file as your active configuration. For a complete review of the configurator and its functions, see the WIN-911 Configurator chm
located in your installation directory.

OPC Data Server
20
OPC
21
Running the OPC Demo
Start the Scan & Alarm from the “Start Program” button. This program will automatically start any modules needed to run the application. The demo application includes WIN911 Alarm Monitor and WIN911 Announcer. Size and position the Alarm Monitor window, TOP Server window, and OPC Quick Client window so that all windows can be seen at the same time.
From the OPC Quick Client, select SCADA.FreshWaterTank.GateValve and highlight SCADA.FreshWaterTank.GateValve.AlarmOpen1 in the right column. Then, right-click the highlighted tag and select Synchronous Write. In the Write Value text box enter the new digital value of “1” and click Apply. This simulates an alarm. You should now be experiencing multimedia alarming. The WIN-911 Alarm Monitor should be displaying an alarm and the sound card should be announcing the audio version of the same alarm.
You may acknowledge the alarm in one of two ways: a) by positioning the cursor over the alarm in the Alarm Monitor and double-clicking, or b) clicking on the Acknowledge button will “Ack” all alarms.
Exit the WIN-911 by clicking on the SCAN 911-411 tray icon with the right button. It is located in the Windows Tray Icon area. Then select “Exit WIN-911”.
If you have an alphanumeric pager, you may also try the pager option. You will first need to install a data modem. The following configuration changes are needed:
1. Select the correct Com Port for the modem by clicking on the “Pager” button and selecting the “Ports” tab.
2. From the Phone Book, double-click on “Tom Jones”, and then on the connection. Modify the connection from “None” to “Alpha Pager” and enter appropriate phone number and pager PIN number.
3. From the “Group” button, modify the groups to include Tom Jones on the group's Contact List.
4. Save and exit the configuration, and restart Scan & Alarm.
Note: If at any time you do not have a WIN-911 manual handy, just select the HELP button on the Configurator (it is an exact duplicate of the manual), or utilize the context sensitive help buttons or click on the Help Library icon to direct you to the exact reference in the manual.
Continue with the manual and try out some of the options as you read. WIN-911 was designed to meet the alarm reporting needs of most industrial applications.

OPC Data Server
22
Note: Refer to the last two sections of this chapter: “Typical Example of WIN-911 Voice Dial-Out” and “Typical Example of WIN-411 Inquiry” for a continuation of these demos.
OPC
23
Typical Example of WIN-911 Voice Dialout Overview
The following is an example of what can be expected using the WIN-911 Dial-Out Option. Note that the Dialogic and TAPI options vary slightly at the beginning of the message. With the Dialogic option, connection detect circuitry recognizes a human voice on the line and automatically knows when the phone has been answered. The TAPI option simply loops a salutation until the recipient enters their access code, which indicates to WIN-911 that the phone has been answered. Afterwards the two voice modules function the same.
Upon an alarm (which was configured for a Voice connection), WIN-911 examines the phone book to determine if the first listed person is "on duty" (at this day and time). Assume Tom Jones was selected and he was scheduled to be "on call".
The phone rings at Tom Jones' home, and reports: “This is the Water District Monitoring System, with a call for Mr. Jones.... Please enter your access code followed by the pound key.”
The access code is entered via the push button tone keypad on the telephone, followed by the # key. If the code is validated, all unacknowledged alarm messages that Mr. Jones needs to know about are reported for that alarm group, followed by: "Press star to repeat message, any other key to continue...". Assume Mr. Jones wished to continue. At this time another message is transmitted: "Enter you alarm acknowledgement code followed by the pound key."
If Mr. Jones wanted to acknowledge the announced alarms, he would then enter his acknowledgement code. If it was validated, he would then hear: "Alarms acknowledged..." and "...Thank you...good-bye".
Now, assume that Mr. Jones was not home when WIN-911 tried to call, and the baby sitter answered. In this scenario, after Mr. Jones' baby sitter answered the phone (and did not know the access code), the second name (or phone number) on the list would be called. Contact was made and the alarms were acknowledged. Upon returning home, Mr. Jones was informed of the call. He now decides to call to see if everything is going smoothly at the water department.
After dialing WIN-911's phone number, he would hear: "This is the Water District Monitoring System.... Please enter your access code followed by the pound key". Mr. Jones enters his code. The response would be: "There are no Unacknowledged Alarms to report at this time...". Mr. Jones can now have a good night's rest.
WIN-911 Demonstration
The demonstration outlined here assumes that you have successfully completed the WIN-911 demonstration. Use any of the “DEMO” files furnished and installed with the WIN-911 software.
With the WIN-911 Configurator, modify the Phone Book to include a phone number, access and acknowledgement codes, and select “Voice” from the list box. Be sure the day of the week and times are selected so that a number will be called.

OPC Data Server
24
Also, from the “Group” button, select the name to be called. Next, be sure that the individual alarms listed are not selected for either “Auto Acknowledge”, or “Acknowledge on Return”, as the Voice/Dial-out will only report an unacknowledged alarm.
After the above modifications are made, save the configuration, launch Scan and Alarm.

OPC
25
Typical Example of WIN-411 Inquiry Overview
The demonstration outlined here, featuring the power of WIN-411, assumes that you have successfully completed the WIN-911 demonstration above. Review the configuration of the 411 Reports, taking careful notice of the access numbers, voice report number, change authorization codes, and each data index number.
Demonstration
Make sure there are no points which are within an alarm range in your OPC server. Launch the Monitor.
User dials the computer.
Computer answers: “Hello, this is the computer .... Please enter your access code followed by the pound key.”
User enters his access code on the touch-tone phone and presses the # key...(911 & #).
Computer responds: “There are no unacknowledged alarms to report at this time. Select the desired report number followed by the pound key.”
User enters the report number (22 & #).
Computer responds: “You have selected Lift Station number 22. Press the pound key to accept.”
User confirms (#).
Computer: “Lift Station Number 22... the wastewater level is [value] feet.”
“Lift Station Number 22... The pump is [on/off].”
" ... Press star to repeat message, any other key to continue.”
User selects 5 (any number).
Computer: “Please enter your authorization code followed by the pound key.”
User enters his authorization code for changes (411 & #).
Computer: “Select the point to change.”
User enters the data change index number (10 & #).
Computer: “You have selected the .. pump ... Press the pound key to accept.”
User confirms (#).
Computer: “Enter new value.”
User enters a “1”(or “0”) & #.
OPC Data Server
26
Computer: ““Lift Station Number 22... the pump...the new value will be set to .. [On/Off]. Press the pound key to accept.”
User confirms (#).
Computer: “Select the point to change.”
User presses pound sign (#).
Computer: “Select the desired report number.”
User presses pound sign (#).
Computer: “Thank you, Goodbye.”
User disconnects.

OPC
27
For More Details Defined information about detailed configuration for OPC or DDE can be found in the main WIN911 Configurator help file located in the WIN-911 Help Library.