MX-12 DIGITAL HD/SD VIDEO AND AUDIO MIXERMX-12 HD/SD Digital AV Mixer Operation Manual MX-12...
28
MX-12 HD/SD Digital AV Mixer Operation Manual MX-12
Transcript of MX-12 DIGITAL HD/SD VIDEO AND AUDIO MIXERMX-12 HD/SD Digital AV Mixer Operation Manual MX-12...
MX-12HD/SD Digital AV Mixer
Operation Manual
MX-12

Disclaimers
The information in this manual has been carefully checked and is believed to be accurate. Cypress Technology assumes no responsibility for any infringements of patents or other rights of third parties which may result from its use.Cypress Technology assumes no responsibility for any inaccuracies that may be contained in this document. Cypress also makes no commitment to update or to keep current the information contained in this document.Cypress Technology reserves the right to make improvements to this document and/or product at any time and without notice.
Copyright Notice
No part of this document may be reproduced, transmitted, transcribed, stored in a retrieval system, or any of its part translated into any language or computer file, in any form or by any means - electronic, mechanical, magnetic, optical, chemical, manual, or otherwise - without express written permission and consent from Cypress Technology.
© Copyright 2010 by Cypress Technology.All Rights Reserved.Version 1.0 December 2010
Trademark Acknowledgments
All products or service names mentioned in this document may be trademarks of the companies with which they are associated.

Safety Precautions
Please read all instructions before attempting to unpack or install or operate this equipment, and before connecting the power supply.Please keep the following in mind as you unpack and install this equipment:
Always follow basic safety precautions to reduce the risk of fire, electrical shock and injury to persons.
To prevent fire or shock hazard, do not expose the unit to rain, moisture or install this product near water.
Never spill liquid of any kind on or into this product. Never push an object of any kind into this product through
module openings or empty slots, as you may damage parts. Do not attach the power supply cabling to building surfaces. Do not allow anything to rest on the power cabling or allow it to
be abused by persons walking on it. To protect the equipment from overheating, do not block the
slots and openings in the module housing that provide ventilation.
Revision History
Version No Date Summary of ChangeVS1 20101201 Add HDCP Description

Table of Contents
12333456789
1011111213161718181819202122
1. Introduction ……………………..……………………...…........….……. 2. Features …………………………………………......……........…...…… 3. Major Operating Controls and Their Functions …………………..….
■ POSITION/TIME ............................................................................ ■ FUNCTIONS .................................................................................. ■ MODE CONTROL ........................................................................ ■ DIGITAL EFFECTS .......................................................................... ■ ADJUST .........................................................................................■ VIDEO SOURCE SELECT ...............................................................■ VIDEO/AUDIO MIXER ..................................................................■ AUDIO LEVEL ...............................................................................■ REAR PANEL .................................................................................
4. Basic Operations ………..............................……...……..............……A Input signal selection and Back color Selection .....................B VIDEO MIX ...................................................................................C VIDEO WIPE ................................................................................D Picture-In-Picture .......................................................................E KEY ...............................................................................................F AUTO FADE/WIPE Selection ........................................................G DIGITAL EFFECT ..........................................................................H AUDIO MIXER ..............................................................................I OSD ADJUST ..................................................................................
5. Connector and Installation ..................…………..........…..…....…... 6. Specifications .................................................................................... 7. Acronyms ……………...……........……............................................…
1. Introduction
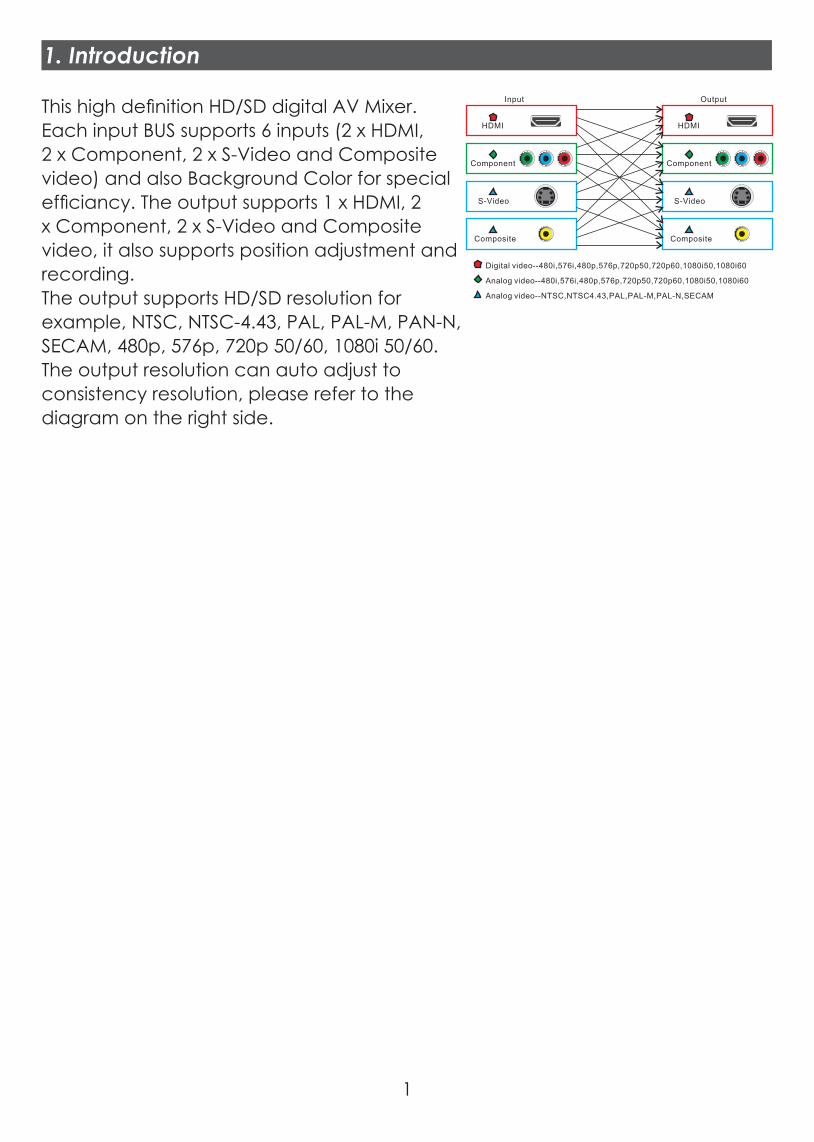
This high definition HD/SD digital AV Mixer. Each input BUS supports 6 inputs (2 x HDMI, 2 x Component, 2 x S-Video and Composite video) and also Background Color for special efficiancy. The output supports 1 x HDMI, 2 x Component, 2 x S-Video and Composite video, it also supports position adjustment and recording.The output supports HD/SD resolution for example, NTSC, NTSC-4.43, PAL, PAL-M, PAN-N,SECAM, 480p, 576p, 720p 50/60, 1080i 50/60. The output resolution can auto adjust toconsistency resolution, please refer to thediagram on the right side.
Component
S-Video
Composite
HDMI
Component
S-Video
Composite
HDMI
Input Output
Digital video--480i,576i,480p,576p,720p50,720p60,1080i50,1080i60
Analog video--NTSC,NTSC4.43,PAL,PAL-M,PAL-N,SECAM
Analog video--480i,576i,480p,576p,720p50,720p60,1080i50,1080i60
1

2. Features
Selective size and position for digital effects area and PIP windows. Automatic fade and wipe with speed preset control. Digital effects- Still,Mosaic,Paint,Negative. 96 wipe patterns. Chroma key & Luminance key. High Picture Quality. 3x8 back color. Joystick control for digital effect position. Fade control for Video and Audio. Video and Audio mixing. Two HDMI source inputs. Two Component source inputs. Two Composite and S-Video source inputs. One HDMI recording outputs. Two Component recording outputs. One Composite and S-Video recording outputs. One Composite and S-Video preview outputs(OSD). Auxiliary audio input. Microphone input and headphone output. Picture in Picture control.(3 window sizes) Each A/B BUS can adjust the Contrast / Brightness / Color / HUE / Detail & Aspect Ration. Supports Lip-Sync delay up to 170ms. Composite supports 3D comb filter and YC separation. Motion and Edge Adaptive De-interlacing. Note: When receiving content that has HDCP encryption there will be no video output except for HDMI output port.
2

3. Major Operating Controls and Their Functions
n POSITION/TIME
����
AUDIO FOLLOW
AUTO / WIPE
START
ON
-15
LAUDIOLEVEL R
DB
DB
-10 -5 -3 +3 +4+20 +1-1
-15 -10 -5 -3 +3 +4+20 +1-1
INPUT A
MAX
MIN
INPUT B
MAX
MIN
AUX
MAX
MIN
MIC
MAX
MIN
VIDEO
MAX
MIN
VIDEO/AUDIO MIXERVIDEO SOURCE SELECT
BACKCOLORSD INPUT 2SD INPUT 1HD INPUT 2HD INPUT 1HDMI 2HDMI 1
DIGITAL EFFECTS ADJUSTFUNCTIONS MODE CONTROL
KEYMIX1/41/31/2
PIP
COLOR
WIPE
EDGE
MULTIREVERSEONE-WAY
B-KEY 1/2L-KEY 1/2
1/2 1/3 1/4
A SOURCE B SOURCE
STILL
TIME
POSITION
MIN MAX
CMX-12VIDEO EFFECTS MIXER
DEMO
ADJUST
SCAN
NEGATIVEPAINT MOSAIC
B
A
A
B
ON
①
②
① Time Control For adjusting the transition time of Auto Fade function and Auto take function.② Joystick control This joystick control has two functions controls the position of the Square wipe pattern and P-IN-P picture.
n FUNCTIONS
����
AUDIO FOLLOW
AUTO / WIPE
START
ON
-15
LAUDIOLEVEL R
DB
DB
-10 -5 -3 +3 +4+20 +1-1
-15 -10 -5 -3 +3 +4+20 +1-1
INPUT A
MAX
MIN
INPUT B
MAX
MIN
AUX
MAX
MIN
MIC
MAX
MIN
VIDEO
MAX
MIN
VIDEO/AUDIO MIXERVIDEO SOURCE SELECT
BACKCOLORSD INPUT 2SD INPUT 1HD INPUT 2HD INPUT 1HDMI 2HDMI 1
DIGITAL EFFECTS ADJUSTFUNCTIONS MODE CONTROL
KEYMIX1/41/31/2
PIP
COLOR
WIPE
EDGE
MULTIREVERSEONE-WAY
B-KEY 1/2L-KEY 1/2
1/2 1/3 1/4
A SOURCE B SOURCE
STILL
TIME
POSITION
MIN MAX
CMX-12VIDEO EFFECTS MIXER
DEMO
ADJUST
SCAN
NEGATIVEPAINT MOSAIC
B
A
A
B
ON
③ ④ ⑤
⑥ ⑦ ⑧
⑨ 1) 1!
③ One-way wipe button.④ Reverse wipe button.⑤ Multiple wipe button.⑥ Straight wipe button.⑦ Split wipe button.⑧ Corner wipe button.⑨ Diagonal wipe button.⑩ Triangle wipe button.⑪ Square wipe button.
3
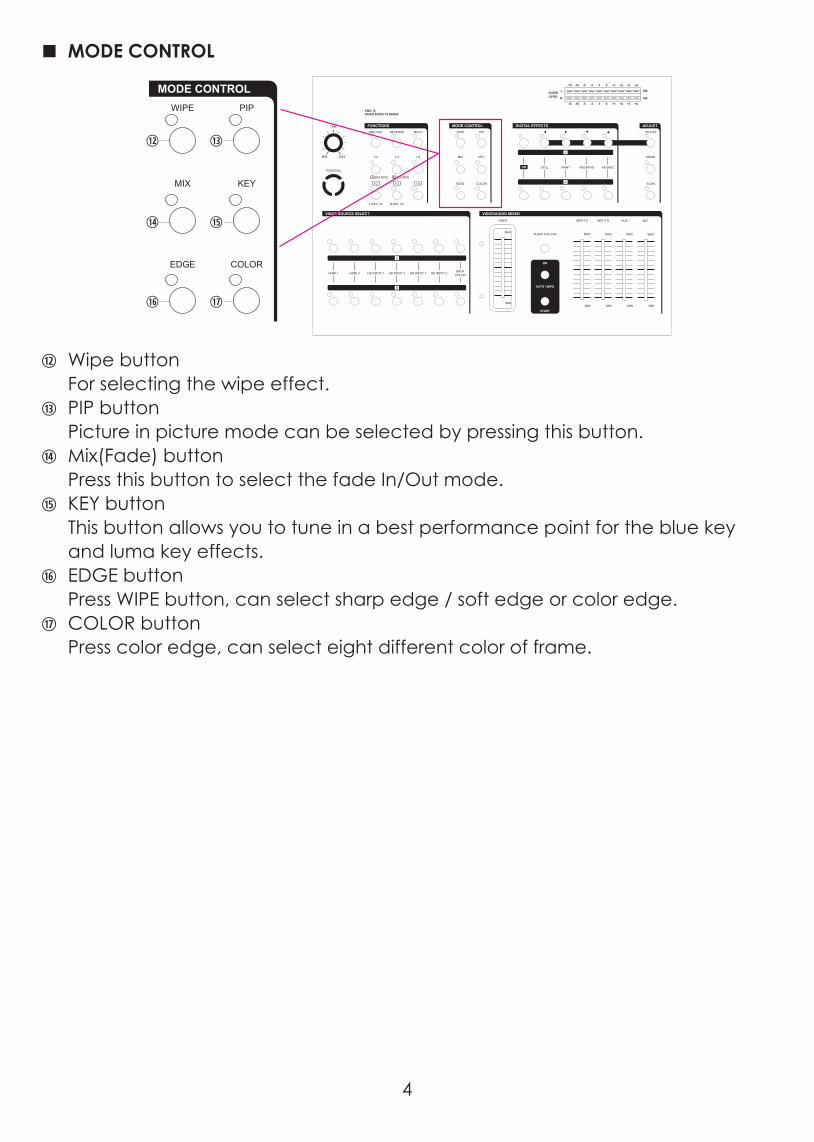
n MODE CONTROL
����
AUDIO FOLLOW
AUTO / WIPE
START
ON
-15
LAUDIOLEVEL R
DB
DB
-10 -5 -3 +3 +4+20 +1-1
-15 -10 -5 -3 +3 +4+20 +1-1
INPUT A
MAX
MIN
INPUT B
MAX
MIN
AUX
MAX
MIN
MIC
MAX
MIN
VIDEO
MAX
MIN
VIDEO/AUDIO MIXERVIDEO SOURCE SELECT
BACKCOLORSD INPUT 2SD INPUT 1HD INPUT 2HD INPUT 1HDMI 2HDMI 1
DIGITAL EFFECTS ADJUSTFUNCTIONS MODE CONTROL
KEYMIX1/41/31/2
PIP
COLOR
WIPE
EDGE
MULTIREVERSEONE-WAY
B-KEY 1/2L-KEY 1/2
1/2 1/3 1/4
A SOURCE B SOURCE
STILL
TIME
POSITION
MIN MAX
CMX-12VIDEO EFFECTS MIXER
DEMO
ADJUST
SCAN
NEGATIVEPAINT MOSAIC
B
A
A
B
ON
1@ 1#
1$ 1%
1^ 1&
⑫ Wipe button For selecting the wipe effect.⑬ PIP button Picture in picture mode can be selected by pressing this button.⑭ Mix(Fade) button Press this button to select the fade In/Out mode.⑮ KEY button This button allows you to tune in a best performance point for the blue key and luma key effects.⑯ EDGE button Press WIPE button, can select sharp edge / soft edge or color edge.⑰ COLOR button Press color edge, can select eight different color of frame.
4

n DIGITAL EFFECTS
����
AUDIO FOLLOW
AUTO / WIPE
START
ON
-15
LAUDIOLEVEL R
DB
DB
-10 -5 -3 +3 +4+20 +1-1
-15 -10 -5 -3 +3 +4+20 +1-1
INPUT A
MAX
MIN
INPUT B
MAX
MIN
AUX
MAX
MIN
MIC
MAX
MIN
VIDEO
MAX
MIN
VIDEO/AUDIO MIXERVIDEO SOURCE SELECT
BACKCOLORSD INPUT 2SD INPUT 1HD INPUT 2HD INPUT 1HDMI 2HDMI 1
DIGITAL EFFECTS ADJUSTFUNCTIONS MODE CONTROL
KEYMIX1/41/31/2
PIP
COLOR
WIPE
EDGE
MULTIREVERSEONE-WAY
B-KEY 1/2L-KEY 1/2
1/2 1/3 1/4
A SOURCE B SOURCE
STILL
TIME
POSITION
MIN MAX
CMX-12VIDEO EFFECTS MIXER
DEMO
ADJUST
SCAN
NEGATIVEPAINT MOSAIC
B
A
A
B
ON
•* •( 2) 2! 2@
2# 2$ 2% 2^ 2&
⑱ A-bus digital effect ON button.⑲ A-bus Still button and osd left adjust.⑳ A-bus Paint button and osd right adjust.2• A-bus Negative button and osd up adjust.2@ A-bus Mosaic button and osd down adjust.2# B-bus digital effect ON button.2$ B-bus Still button.2% B-bus Paint button.2^ B-bus Negative button.2& B-bus Mosaic button.
5
n ADJUST
����
AUDIO FOLLOW
AUTO / WIPE
START
ON
-15
LAUDIOLEVEL R
DB
DB
-10 -5 -3 +3 +4+20 +1-1
-15 -10 -5 -3 +3 +4+20 +1-1
INPUT A
MAX
MIN
INPUT B
MAX
MIN
AUX
MAX
MIN
MIC
MAX
MIN
VIDEO
MAX
MIN
VIDEO/AUDIO MIXERVIDEO SOURCE SELECT
BACKCOLORSD INPUT 2SD INPUT 1HD INPUT 2HD INPUT 1HDMI 2HDMI 1
DIGITAL EFFECTS ADJUSTFUNCTIONS MODE CONTROL
KEYMIX1/41/31/2
PIP
COLOR
WIPE
EDGE
MULTIREVERSEONE-WAY
B-KEY 1/2L-KEY 1/2
1/2 1/3 1/4
A SOURCE B SOURCE
STILL
TIME
POSITION
MIN MAX
CMX-12VIDEO EFFECTS MIXER
DEMO
ADJUST
SCAN
NEGATIVEPAINT MOSAIC
B
A
A
B
ON
2*
2(
3)
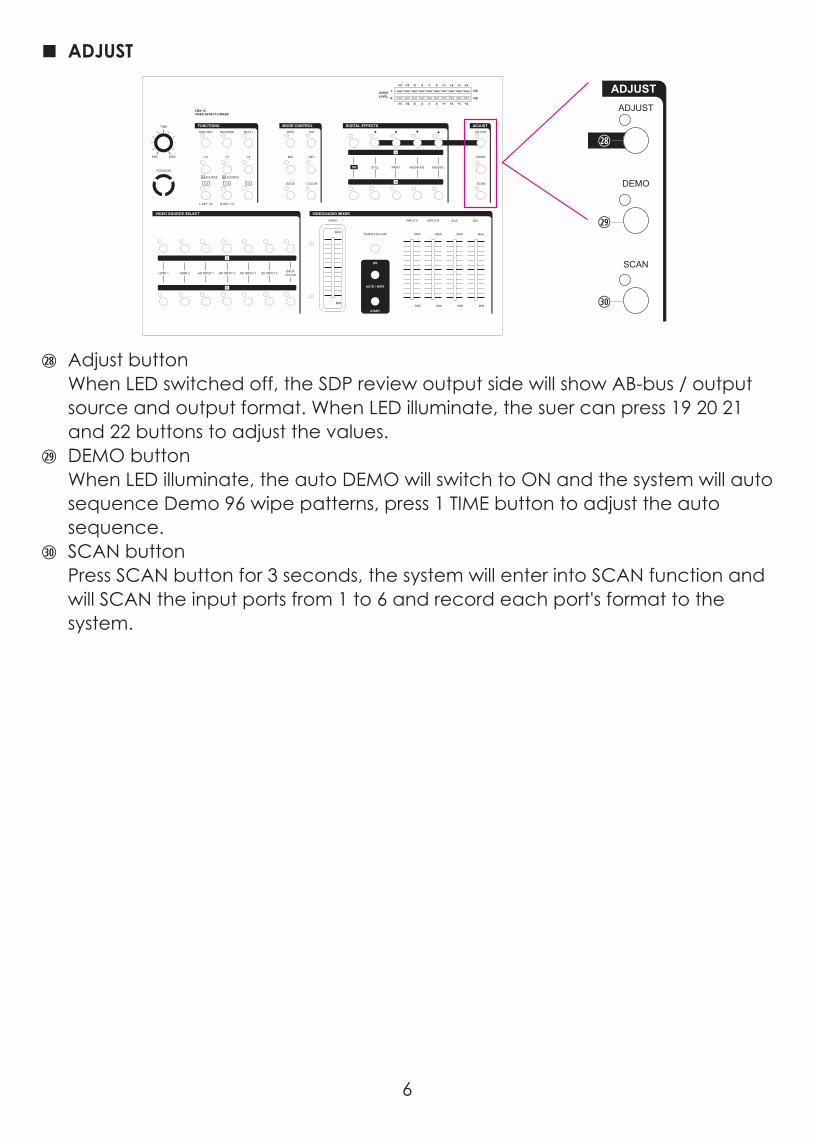
2• Adjust button When LED switched off, the SDP review output side will show AB-bus / output source and output format. When LED illuminate, the suer can press 19 20 21 and 22 buttons to adjust the values.2( DEMO button When LED illuminate, the auto DEMO will switch to ON and the system will auto sequence Demo 96 wipe patterns, press 1 TIME button to adjust the auto sequence.3) SCAN button Press SCAN button for 3 seconds, the system will enter into SCAN function and will SCAN the input ports from 1 to 6 and record each port's format to the system.
6

n VIDEO SOURCE SELECT
����
AUDIO FOLLOW
AUTO / WIPE
START
ON
-15
LAUDIOLEVEL R
DB
DB
-10 -5 -3 +3 +4+20 +1-1
-15 -10 -5 -3 +3 +4+20 +1-1
INPUT A
MAX
MIN
INPUT B
MAX
MIN
AUX
MAX
MIN
MIC
MAX
MIN
VIDEO
MAX
MIN
VIDEO/AUDIO MIXERVIDEO SOURCE SELECT
BACKCOLORSD INPUT 2SD INPUT 1HD INPUT 2HD INPUT 1HDMI 2HDMI 1
DIGITAL EFFECTS ADJUSTFUNCTIONS MODE CONTROL
KEYMIX1/41/31/2
PIP
COLOR
WIPE
EDGE
MULTIREVERSEONE-WAY
B-KEY 1/2L-KEY 1/2
1/2 1/3 1/4
A SOURCE B SOURCE
STILL
TIME
POSITION
MIN MAX
CMX-12VIDEO EFFECTS MIXER
DEMO
ADJUST
SCAN
NEGATIVEPAINT MOSAIC
B
A
A
B
ON
3*
3!
3(
3@
4)
3#
4!
3$
4@
3%
4#
3^
4$
3&
3!3* Used to select Source1,HDMI1.3@3( Used to select Source2,HDMI2.3#4) Used to select Source3,HD input 1.3$4! Used to select Source4,HD input 2.3%4@ Used to select Source5,SD input 1. When connecting both S-Video and CV at the same the time S-Video will be the first priority source to be display.3^4# Used to select Source5,SD input 2. When connecting both S-Video and Video at the same the time S-Video will be the first priority source to be display.3& A-bus back color select, can select one out of eight colors.4$ B-bus back color select, can select one out of eight colors.
7
n VIDEO/AUDIO MIXER
����
AUDIO FOLLOW
AUTO / WIPE
START
ON
-15
LAUDIOLEVEL R
DB
DB
-10 -5 -3 +3 +4+20 +1-1
-15 -10 -5 -3 +3 +4+20 +1-1
INPUT A
MAX
MIN
INPUT B
MAX
MIN
AUX
MAX
MIN
MIC
MAX
MIN
VIDEO
MAX
MIN
VIDEO/AUDIO MIXERVIDEO SOURCE SELECT
BACKCOLORSD INPUT 2SD INPUT 1HD INPUT 2HD INPUT 1HDMI 2HDMI 1
DIGITAL EFFECTS ADJUSTFUNCTIONS MODE CONTROL
KEYMIX1/41/31/2
PIP
COLOR
WIPE
EDGE
MULTIREVERSEONE-WAY
B-KEY 1/2L-KEY 1/2
1/2 1/3 1/4
A SOURCE B SOURCE
STILL
TIME
POSITION
MIN MAX
CMX-12VIDEO EFFECTS MIXER
DEMO
ADJUST
SCAN
NEGATIVEPAINT MOSAIC
B
A
A
B
ON
4%
4^
4&5$5#5@5!
4(
5)
4*
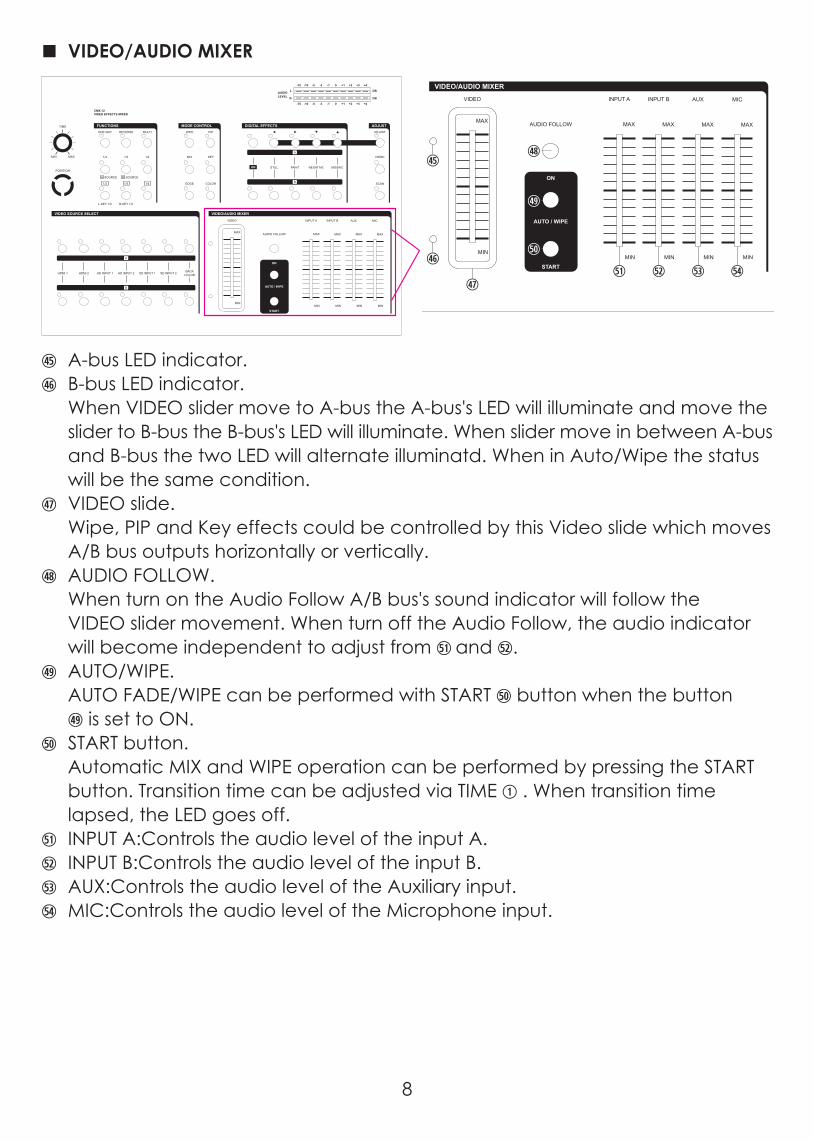
4% A-bus LED indicator.4^ B-bus LED indicator. When VIDEO slider move to A-bus the A-bus's LED will illuminate and move the slider to B-bus the B-bus's LED will illuminate. When slider move in between A-bus and B-bus the two LED will alternate illuminatd. When in Auto/Wipe the status will be the same condition.4& VIDEO slide. Wipe, PIP and Key effects could be controlled by this Video slide which moves A/B bus outputs horizontally or vertically.4* AUDIO FOLLOW. When turn on the Audio Follow A/B bus's sound indicator will follow the VIDEO slider movement. When turn off the Audio Follow, the audio indicator will become independent to adjust from 5!and [email protected]( AUTO/WIPE. AUTO FADE/WIPE can be performed with START 5) button when the button 4( is set to ON.5) START button. Automatic MIX and WIPE operation can be performed by pressing the START button. Transition time can be adjusted via TIME ① . When transition time lapsed, the LED goes off.5! INPUT A:Controls the audio level of the input A.5@ INPUT B:Controls the audio level of the input B.5# AUX:Controls the audio level of the Auxiliary input.5$ MIC:Controls the audio level of the Microphone input.
8
n AUDIO LEVEL
5%
����
AUDIO FOLLOW
AUTO / WIPE
START
ON
-15
LAUDIOLEVEL R
DB
DB
-10 -5 -3 +3 +4+20 +1-1
-15 -10 -5 -3 +3 +4+20 +1-1
INPUT A
MAX
MIN
INPUT B
MAX
MIN
AUX
MAX
MIN
MIC
MAX
MIN
VIDEO
MAX
MIN
VIDEO/AUDIO MIXERVIDEO SOURCE SELECT
BACKCOLORSD INPUT 2SD INPUT 1HD INPUT 2HD INPUT 1HDMI 2HDMI 1
DIGITAL EFFECTS ADJUSTFUNCTIONS MODE CONTROL
KEYMIX1/41/31/2
PIP
COLOR
WIPE
EDGE
MULTIREVERSEONE-WAY
B-KEY 1/2L-KEY 1/2
1/2 1/3 1/4
A SOURCE B SOURCE
STILL
TIME
POSITION
MIN MAX
CMX-12VIDEO EFFECTS MIXER
DEMO
ADJUST
SCAN
NEGATIVEPAINT MOSAIC
B
A
A
B
ON
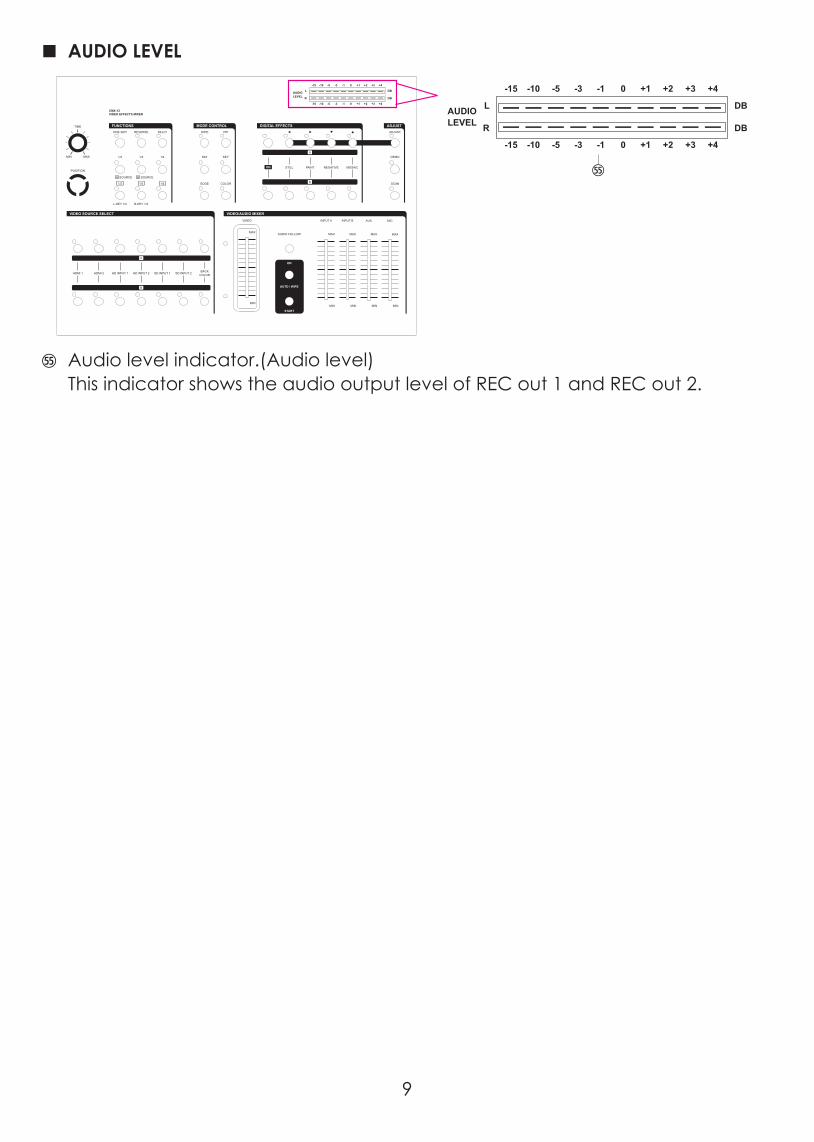
5% Audio level indicator.(Audio level) This indicator shows the audio output level of REC out 1 and REC out 2.
9

n REAR PANEL
DC INPUT12V 3.0A
R1 R1R2 R2 R R1L1 L1L2 L2 L L1 L2
PrPb V S
V S
Y
R2
V SPrPbY
V SPrPbY
HDMI 1 HDMI 2
PrPbY
AUX INPUT
SD INPUT 1
SD INPUT 2
SD AUDIO INPUTHD AUDIO INPUT
HD OUTPUT 1
HD OUTPUT 2
HD INPUT 1
HD INPUT 2
AUDIO OUTPUT
SD OUTPUT
SD PREVIEW
HDMI OUTPUTHDMI INPUT
5* 5( 6) 6! 6@ 6# 6$
6% 6^ 7! 7^6* 7#7) 7%6& 7@6( 7$
5* Source 3 HD audio input 1.5( Source 4 HD audio input 2.6) Source 5 SD audio input 1.6! Source 6 SD audio input 2.6@ Auxiliary Audio input Jack.6# Recording out 1 Audio output Jack.6$ Recording out 2 Audio output Jack.6% Source 1 HDMI input 1.6^ Source 2 HDMI input 2.6& Source 3 HD Y-PB-PR Video input 1.6* Source 4 HD Y-PB-PR Video input 2.6( Source 5 SD Video and YC input 1.7) Source 6 SD Video and YC input 2.7! HDMI output for monitor.7@ Recording out 1 HD Y-PB-PR Video output jack.7# Recording out 2 HD Y-PB-PR Video output jack.7$ SD PREVIEW out(OSD) Video and YC output jack.7% SD Recording out Video and YC output jack.7^ DC INPUT 12V 2.0A.
10

4. Basic Operations
Press the power switch on the rear panel to the ON Position. The LED's on the operation panel light up and the unit is now in inital mode for operation.
����
AUDIO FOLLOW
AUTO / WIPE
START
ON
-15
LAUDIOLEVEL R
DB
DB
-10 -5 -3 +3 +4+20 +1-1
-15 -10 -5 -3 +3 +4+20 +1-1
INPUT A
MAX
MIN
INPUT B
MAX
MIN
AUX
MAX
MIN
MIC
MAX
MIN
VIDEO
MAX
MIN
VIDEO/AUDIO MIXERVIDEO SOURCE SELECT
BACKCOLORSD INPUT 2SD INPUT 1HD INPUT 2HD INPUT 1HDMI 2HDMI 1
DIGITAL EFFECTS ADJUSTFUNCTIONS MODE CONTROL
KEYMIX1/41/31/2
PIP
COLOR
WIPE
EDGE
MULTIREVERSEONE-WAY
B-KEY 1/2L-KEY 1/2
1/2 1/3 1/4
A SOURCE B SOURCE
STILL
TIME
POSITION
MIN MAX
CMX-12VIDEO EFFECTS MIXER
DEMO
ADJUST
SCAN
NEGATIVEPAINT MOSAIC
B
A
A
B
ON
A. Input signal selection and Back color Selection 1. Slide the Video slide 4& to the A-bus position. A-bus LED 4% will illuminate, B-bus LED will turn off. 2. Press any of the Source 1 to Source 6 and Back color button. You will see the corresponding picture on the screen. 3. Press a Back Color button to select the back color you need. Any of the 8 Back Colors-BlueRedMagentaGreenCyanYellowWhiteBlack. can be selected by reapeatedly pressing the Back color selection button 3&. 4. The same procedures apply to the B-bus. * When the selected input source is not connected with source input or HDCP protection, the image will show with Blue screen.
11

����
AUDIO FOLLOW
AUTO / WIPE
START
ON
-15
LAUDIOLEVEL R
DB
DB
-10 -5 -3 +3 +4+20 +1-1
-15 -10 -5 -3 +3 +4+20 +1-1
INPUT A
MAX
MIN
INPUT B
MAX
MIN
AUX
MAX
MIN
MIC
MAX
MIN
VIDEO
MAX
MIN
VIDEO/AUDIO MIXERVIDEO SOURCE SELECT
BACKCOLORSD INPUT 2SD INPUT 1HD INPUT 2HD INPUT 1HDMI 2HDMI 1
DIGITAL EFFECTS ADJUSTFUNCTIONS MODE CONTROL
KEYMIX1/41/31/2
PIP
COLOR
WIPE
EDGE
MULTIREVERSEONE-WAY
B-KEY 1/2L-KEY 1/2
1/2 1/3 1/4
A SOURCE B SOURCE
STILL
TIME
POSITION
MIN MAX
CMX-12VIDEO EFFECTS MIXER
DEMO
ADJUST
SCAN
NEGATIVEPAINT MOSAIC
B
A
A
B
ON
2 4
3
1
B. VIDEO MIX
����
AUDIO FOLLOW
AUTO / WIPE
START
ON
-15
LAUDIOLEVEL R
DB
DB
-10 -5 -3 +3 +4+20 +1-1
-15 -10 -5 -3 +3 +4+20 +1-1
INPUT A
MAX
MIN
INPUT B
MAX
MIN
AUX
MAX
MIN
MIC
MAX
MIN
VIDEO
MAX
MIN
VIDEO/AUDIO MIXERVIDEO SOURCE SELECT
BACKCOLORSD INPUT 2SD INPUT 1HD INPUT 2HD INPUT 1HDMI 2HDMI 1
DIGITAL EFFECTS ADJUSTFUNCTIONS MODE CONTROL
KEYMIX1/41/31/2
PIP
COLOR
WIPE
EDGE
MULTIREVERSEONE-WAY
B-KEY 1/2L-KEY 1/2
1/2 1/3 1/4
A SOURCE B SOURCE
STILL
TIME
POSITION
MIN MAX
CMX-12VIDEO EFFECTS MIXER
DEMO
ADJUST
SCAN
NEGATIVEPAINT MOSAIC
B
A
A
B
ON
21
3
4
Reset the operation panel to initial mode: 1. Press the MIX button 1$. 2. Press one of the A-bus selection button. 3. Press one of the B-bus selection button. 4. Mix effect could be controlled by Video slide 4& which sliding A to B or B to A.
12
C.VIDEO WIPE
����
AUDIO FOLLOW
AUTO / WIPE
START
ON
-15
LAUDIOLEVEL R
DB
DB
-10 -5 -3 +3 +4+20 +1-1
-15 -10 -5 -3 +3 +4+20 +1-1
INPUT A
MAX
MIN
INPUT B
MAX
MIN
AUX
MAX
MIN
MIC
MAX
MIN
VIDEO
MAX
MIN
VIDEO/AUDIO MIXERVIDEO SOURCE SELECT
BACKCOLORSD INPUT 2SD INPUT 1HD INPUT 2HD INPUT 1HDMI 2HDMI 1
DIGITAL EFFECTS ADJUSTFUNCTIONS MODE CONTROL
KEYMIX1/41/31/2
PIP
COLOR
WIPE
EDGE
MULTIREVERSEONE-WAY
B-KEY 1/2L-KEY 1/2
1/2 1/3 1/4
A SOURCE B SOURCE
STILL
TIME
POSITION
MIN MAX
CMX-12VIDEO EFFECTS MIXER
DEMO
ADJUST
SCAN
NEGATIVEPAINT MOSAIC
B
A
A
B
ON
2
1
5
3
4
6
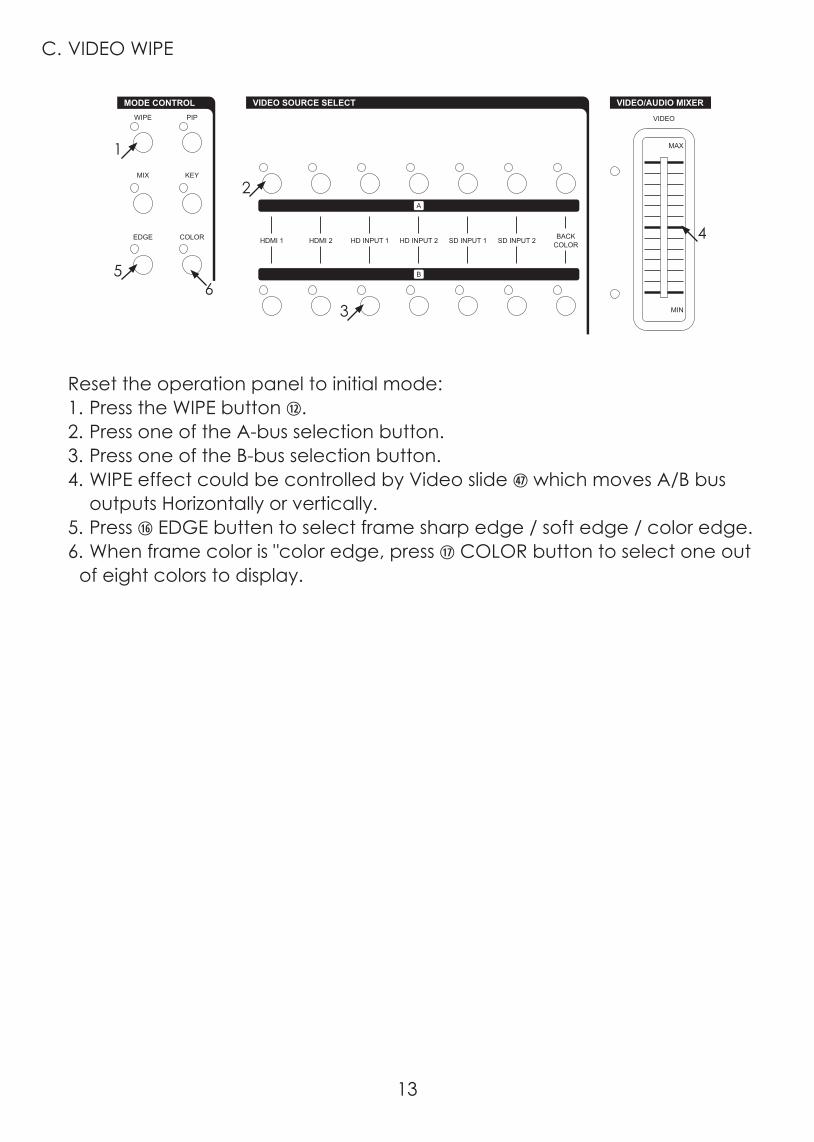
Reset the operation panel to initial mode: 1. Press the WIPE button 1@. 2. Press one of the A-bus selection button. 3. Press one of the B-bus selection button. 4. WIPE effect could be controlled by Video slide 4& which moves A/B bus outputs Horizontally or vertically. 5. Press 1^ EDGE butten to select frame sharp edge / soft edge / color edge. 6. When frame color is "color edge, press 1& COLOR button to select one out of eight colors to display.
13
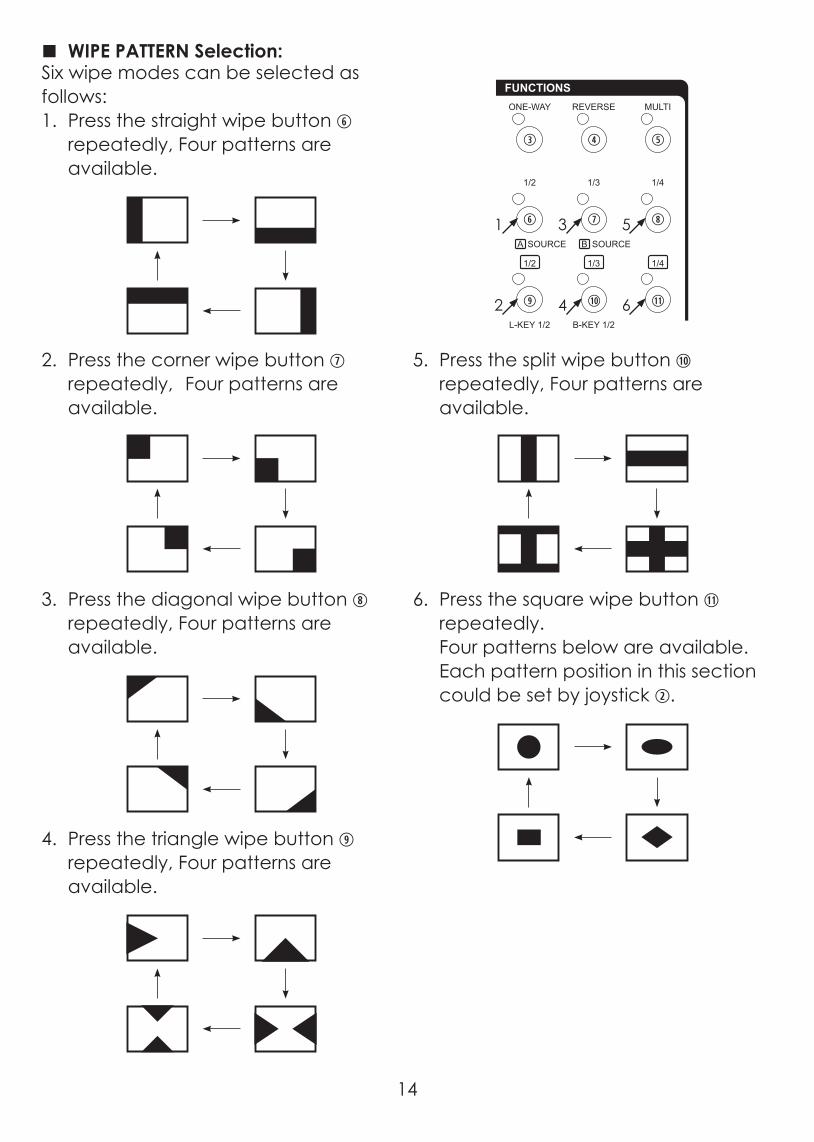
n WIPE PATTERN Selection:Six wipe modes can be selected as follows:1. Press the straight wipe button ⑥ repeatedly, Four patterns are available.
2. Press the corner wipe button ⑦ repeatedly, Four patterns are available.
3. Press the diagonal wipe button ⑧ repeatedly, Four patterns are available.
4. Press the triangle wipe button ⑨ repeatedly, Four patterns are available.
����
AUDIO FOLLOW
AUTO / WIPE
START
ON
-15
LAUDIOLEVEL R
DB
DB
-10 -5 -3 +3 +4+20 +1-1
-15 -10 -5 -3 +3 +4+20 +1-1
INPUT A
MAX
MIN
INPUT B
MAX
MIN
AUX
MAX
MIN
MIC
MAX
MIN
VIDEO
MAX
MIN
VIDEO/AUDIO MIXERVIDEO SOURCE SELECT
BACKCOLORSD INPUT 2SD INPUT 1HD INPUT 2HD INPUT 1HDMI 2HDMI 1
DIGITAL EFFECTS ADJUSTFUNCTIONS MODE CONTROL
KEYMIX1/41/31/2
PIP
COLOR
WIPE
EDGE
MULTIREVERSEONE-WAY
B-KEY 1/2L-KEY 1/2
1/2 1/3 1/4
A SOURCE B SOURCE
STILL
TIME
POSITION
MIN MAX
CMX-12VIDEO EFFECTS MIXER
DEMO
ADJUST
SCAN
NEGATIVEPAINT MOSAIC
B
A
A
B
ON
③ ④ ⑤
⑥ ⑦ ⑧
⑨ 1) 1!
1 3 5
2 4 6
5. Press the split wipe button 1) repeatedly, Four patterns are available.
6. Press the square wipe button 1! repeatedly. Four patterns below are available. Each pattern position in this section could be set by joystick ②.
14

n MULTIPLE PATTERN Selection:
����
AUDIO FOLLOW
AUTO / WIPE
START
ON
-15
LAUDIOLEVEL R
DB
DB
-10 -5 -3 +3 +4+20 +1-1
-15 -10 -5 -3 +3 +4+20 +1-1
INPUT A
MAX
MIN
INPUT B
MAX
MIN
AUX
MAX
MIN
MIC
MAX
MIN
VIDEO
MAX
MIN
VIDEO/AUDIO MIXERVIDEO SOURCE SELECT
BACKCOLORSD INPUT 2SD INPUT 1HD INPUT 2HD INPUT 1HDMI 2HDMI 1
DIGITAL EFFECTS ADJUSTFUNCTIONS MODE CONTROL
KEYMIX1/41/31/2
PIP
COLOR
WIPE
EDGE
MULTIREVERSEONE-WAY
B-KEY 1/2L-KEY 1/2
1/2 1/3 1/4
A SOURCE B SOURCE
STILL
TIME
POSITION
MIN MAX
CMX-12VIDEO EFFECTS MIXER
DEMO
ADJUST
SCAN
NEGATIVEPAINT MOSAIC
B
A
A
B
ON
4
13
2
3 3
6
5
③
⑥
④ ⑤ ⑫
4•
1. Press the wipe button 1@. 2. Press the straight wipe button ⑥ for example. 3. Press the multi ⑤ button repeatedly to have the desired multiplication. Four patterns are available. 4. Press one of the A-bus selection button. 5. Press one of the B-bus selection button. 6. Operate the video slide 4&. * The same procedures apply to other patterns.
n ONE-WAY WIPE: 1. Press the wipe button 1@. 2. Press the straight wipe button ⑥ for example. 3. Press the one-way ③ button. 4. Press one of the A-bus selection button. 5. Press one of the B-bus selection button. 6. Operate the video slide 4&.
n REVERSE WIPE: 1. Press the wipe button 1@. 2. Press the straight wipe button ⑥ for example. 3. Press the Reverse ④ button. 4. Press one of the A-bus selection button. 5. Press one of the B-bus selection button. 6. Operate the video slide 4&.
A bus B bus
* The wipe scene moves the same way every time the control is operated.
A bus B bus
* The wipe scene moves the reverse direction every time the control is operated.
15

D.Picture-In-Picture
����
AUDIO FOLLOW
AUTO / WIPE
START
ON
-15
LAUDIOLEVEL R
DB
DB
-10 -5 -3 +3 +4+20 +1-1
-15 -10 -5 -3 +3 +4+20 +1-1
INPUT A
MAX
MIN
INPUT B
MAX
MIN
AUX
MAX
MIN
MIC
MAX
MIN
VIDEO
MAX
MIN
VIDEO/AUDIO MIXERVIDEO SOURCE SELECT
BACKCOLORSD INPUT 2SD INPUT 1HD INPUT 2HD INPUT 1HDMI 2HDMI 1
DIGITAL EFFECTS ADJUSTFUNCTIONS MODE CONTROL
KEYMIX1/41/31/2
PIP
COLOR
WIPE
EDGE
MULTIREVERSEONE-WAY
B-KEY 1/2L-KEY 1/2
1/2 1/3 1/4
A SOURCE B SOURCE
STILL
TIME
POSITION
MIN MAX
CMX-12VIDEO EFFECTS MIXER
DEMO
ADJUST
SCAN
NEGATIVEPAINT MOSAIC
B
A
A
B
ON
5 ⑥
⑨
⑦
⑩
⑧
⑪
����
AUDIO FOLLOW
AUTO / WIPE
START
ON
-15
LAUDIOLEVEL R
DB
DB
-10 -5 -3 +3 +4+20 +1-1
-15 -10 -5 -3 +3 +4+20 +1-1
INPUT A
MAX
MIN
INPUT B
MAX
MIN
AUX
MAX
MIN
MIC
MAX
MIN
VIDEO
MAX
MIN
VIDEO/AUDIO MIXERVIDEO SOURCE SELECT
BACKCOLORSD INPUT 2SD INPUT 1HD INPUT 2HD INPUT 1HDMI 2HDMI 1
DIGITAL EFFECTS ADJUSTFUNCTIONS MODE CONTROL
KEYMIX1/41/31/2
PIP
COLOR
WIPE
EDGE
MULTIREVERSEONE-WAY
B-KEY 1/2L-KEY 1/2
1/2 1/3 1/4
A SOURCE B SOURCE
STILL
TIME
POSITION
MIN MAX
CMX-12VIDEO EFFECTS MIXER
DEMO
ADJUST
SCAN
NEGATIVEPAINT MOSAIC
B
A
A
B
ON
4 ⑬
����
AUDIO FOLLOW
AUTO / WIPE
START
ON
-15
LAUDIOLEVEL R
DB
DB
-10 -5 -3 +3 +4+20 +1-1
-15 -10 -5 -3 +3 +4+20 +1-1
INPUT A
MAX
MIN
INPUT B
MAX
MIN
AUX
MAX
MIN
MIC
MAX
MIN
VIDEO
MAX
MIN
VIDEO/AUDIO MIXERVIDEO SOURCE SELECT
BACKCOLORSD INPUT 2SD INPUT 1HD INPUT 2HD INPUT 1HDMI 2HDMI 1
DIGITAL EFFECTS ADJUSTFUNCTIONS MODE CONTROL
KEYMIX1/41/31/2
PIP
COLOR
WIPE
EDGE
MULTIREVERSEONE-WAY
B-KEY 1/2L-KEY 1/2
1/2 1/3 1/4
A SOURCE B SOURCE
STILL
TIME
POSITION
MIN MAX
CMX-12VIDEO EFFECTS MIXER
DEMO
ADJUST
SCAN
NEGATIVEPAINT MOSAIC
B
A
A
B
ON
2
1
3
4•
Press the operation panel to initial mode: 1. Slide the video slide fully to the B-bus position. 2. Press one of the A-bus selection button. 3. Press one of the B-bus selection button. 4. Press the PIP button f. 5. PIP mode changes by selecting ⑥~ ⑪ buttons. ⑥. Shows sub-picture in 1/2 size without edge. ⑦. Shows sub-picture in 1/3 size without edge. ⑧. Shows sub-picture in 1/4 size without edge. ⑨. Shows sub-picture in 1/2 size with edge. ⑩. Shows sub-picture in 1/3 size with edge. ⑪. Shows sub-picture in 1/4 size with edge. 6. Other PIP features: 1. 3 PIP sizes selectable for sub-picture PIP channel. 2. The color of the edge can be changed by pressing back color select button ⑰. 3. When you slide the video slide •• to the A-bus position PIP picture dissolves into back ground scene. 4. Sub-picture PIP channel may be placed into different positions by oystick w.
A busEdge
B bus 1/2
A busUnedge
B bus 1/2
16
E. KEY
����
AUDIO FOLLOW
AUTO / WIPE
START
ON
-15
LAUDIOLEVEL R
DB
DB
-10 -5 -3 +3 +4+20 +1-1
-15 -10 -5 -3 +3 +4+20 +1-1
INPUT A
MAX
MIN
INPUT B
MAX
MIN
AUX
MAX
MIN
MIC
MAX
MIN
VIDEO
MAX
MIN
VIDEO/AUDIO MIXERVIDEO SOURCE SELECT
BACKCOLORSD INPUT 2SD INPUT 1HD INPUT 2HD INPUT 1HDMI 2HDMI 1
DIGITAL EFFECTS ADJUSTFUNCTIONS MODE CONTROL
KEYMIX1/41/31/2
PIP
COLOR
WIPE
EDGE
MULTIREVERSEONE-WAY
B-KEY 1/2L-KEY 1/2
1/2 1/3 1/4
A SOURCE B SOURCE
STILL
TIME
POSITION
MIN MAX
CMX-12VIDEO EFFECTS MIXER
DEMO
ADJUST
SCAN
NEGATIVEPAINT MOSAIC
B
A
A
B
ON
4
⑥
⑨
⑦
⑩
⑧
⑪
����
AUDIO FOLLOW
AUTO / WIPE
START
ON
-15
LAUDIOLEVEL R
DB
DB
-10 -5 -3 +3 +4+20 +1-1
-15 -10 -5 -3 +3 +4+20 +1-1
INPUT A
MAX
MIN
INPUT B
MAX
MIN
AUX
MAX
MIN
MIC
MAX
MIN
VIDEO
MAX
MIN
VIDEO/AUDIO MIXERVIDEO SOURCE SELECT
BACKCOLORSD INPUT 2SD INPUT 1HD INPUT 2HD INPUT 1HDMI 2HDMI 1
DIGITAL EFFECTS ADJUSTFUNCTIONS MODE CONTROL
KEYMIX1/41/31/2
PIP
COLOR
WIPE
EDGE
MULTIREVERSEONE-WAY
B-KEY 1/2L-KEY 1/2
1/2 1/3 1/4
A SOURCE B SOURCE
STILL
TIME
POSITION
MIN MAX
CMX-12VIDEO EFFECTS MIXER
DEMO
ADJUST
SCAN
NEGATIVEPAINT MOSAIC
B
A
A
B
ON1 6⑮
����
AUDIO FOLLOW
AUTO / WIPE
START
ON
-15
LAUDIOLEVEL R
DB
DB
-10 -5 -3 +3 +4+20 +1-1
-15 -10 -5 -3 +3 +4+20 +1-1
INPUT A
MAX
MIN
INPUT B
MAX
MIN
AUX
MAX
MIN
MIC
MAX
MIN
VIDEO
MAX
MIN
VIDEO/AUDIO MIXERVIDEO SOURCE SELECT
BACKCOLORSD INPUT 2SD INPUT 1HD INPUT 2HD INPUT 1HDMI 2HDMI 1
DIGITAL EFFECTS ADJUSTFUNCTIONS MODE CONTROL
KEYMIX1/41/31/2
PIP
COLOR
WIPE
EDGE
MULTIREVERSEONE-WAY
B-KEY 1/2L-KEY 1/2
1/2 1/3 1/4
A SOURCE B SOURCE
STILL
TIME
POSITION
MIN MAX
CMX-12VIDEO EFFECTS MIXER
DEMO
ADJUST
SCAN
NEGATIVEPAINT MOSAIC
B
A
A
B
ON
2
5
3
4•
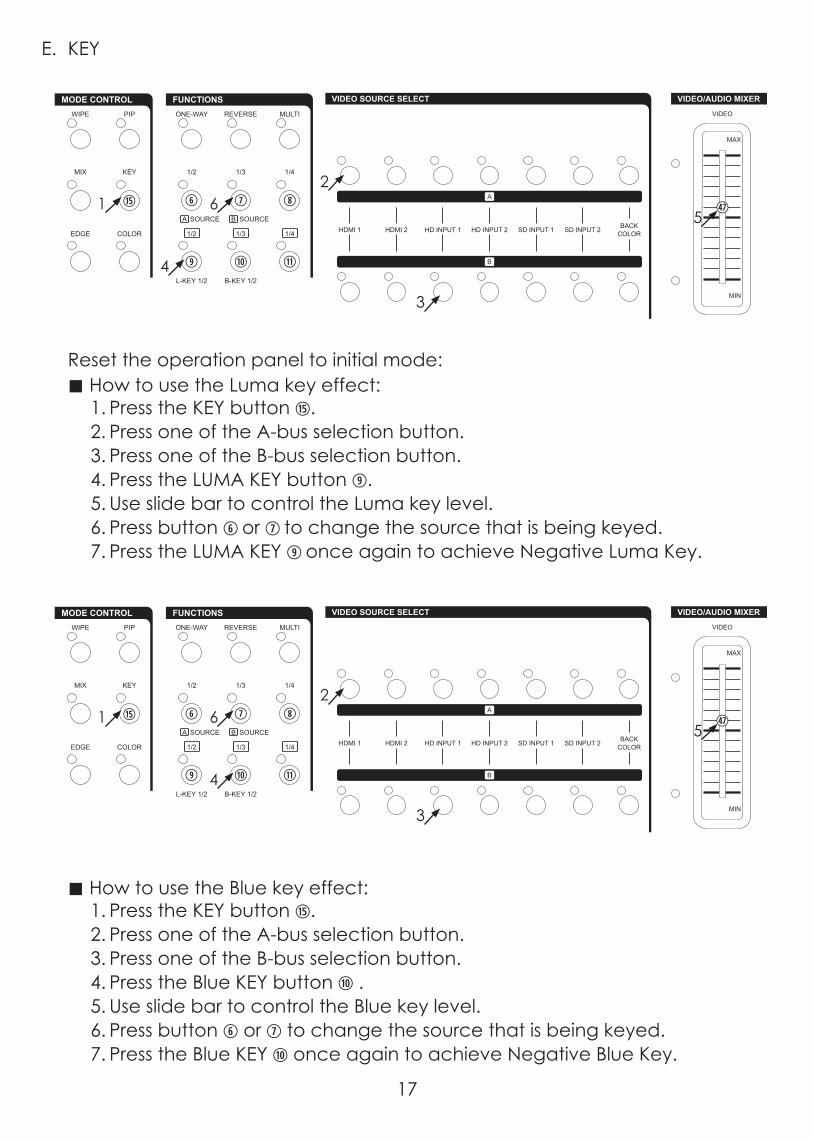
Reset the operation panel to initial mode: n How to use the Luma key effect: 1. Press the KEY button h. 2. Press one of the A-bus selection button. 3. Press one of the B-bus selection button. 4. Press the LUMA KEY button o. 5. Use slide bar to control the Luma key level. 6. Press button yor uto change the source that is being keyed. 7. Press the LUMA KEY oonce again to achieve Negative Luma Key.
����
AUDIO FOLLOW
AUTO / WIPE
START
ON
-15
LAUDIOLEVEL R
DB
DB
-10 -5 -3 +3 +4+20 +1-1
-15 -10 -5 -3 +3 +4+20 +1-1
INPUT A
MAX
MIN
INPUT B
MAX
MIN
AUX
MAX
MIN
MIC
MAX
MIN
VIDEO
MAX
MIN
VIDEO/AUDIO MIXERVIDEO SOURCE SELECT
BACKCOLORSD INPUT 2SD INPUT 1HD INPUT 2HD INPUT 1HDMI 2HDMI 1
DIGITAL EFFECTS ADJUSTFUNCTIONS MODE CONTROL
KEYMIX1/41/31/2
PIP
COLOR
WIPE
EDGE
MULTIREVERSEONE-WAY
B-KEY 1/2L-KEY 1/2
1/2 1/3 1/4
A SOURCE B SOURCE
STILL
TIME
POSITION
MIN MAX
CMX-12VIDEO EFFECTS MIXER
DEMO
ADJUST
SCAN
NEGATIVEPAINT MOSAIC
B
A
A
B
ON
4
⑥
⑨
⑦
⑩
⑧
⑪
����
AUDIO FOLLOW
AUTO / WIPE
START
ON
-15
LAUDIOLEVEL R
DB
DB
-10 -5 -3 +3 +4+20 +1-1
-15 -10 -5 -3 +3 +4+20 +1-1
INPUT A
MAX
MIN
INPUT B
MAX
MIN
AUX
MAX
MIN
MIC
MAX
MIN
VIDEO
MAX
MIN
VIDEO/AUDIO MIXERVIDEO SOURCE SELECT
BACKCOLORSD INPUT 2SD INPUT 1HD INPUT 2HD INPUT 1HDMI 2HDMI 1
DIGITAL EFFECTS ADJUSTFUNCTIONS MODE CONTROL
KEYMIX1/41/31/2
PIP
COLOR
WIPE
EDGE
MULTIREVERSEONE-WAY
B-KEY 1/2L-KEY 1/2
1/2 1/3 1/4
A SOURCE B SOURCE
STILL
TIME
POSITION
MIN MAX
CMX-12VIDEO EFFECTS MIXER
DEMO
ADJUST
SCAN
NEGATIVEPAINT MOSAIC
B
A
A
B
ON1 6⑮
����
AUDIO FOLLOW
AUTO / WIPE
START
ON
-15
LAUDIOLEVEL R
DB
DB
-10 -5 -3 +3 +4+20 +1-1
-15 -10 -5 -3 +3 +4+20 +1-1
INPUT A
MAX
MIN
INPUT B
MAX
MIN
AUX
MAX
MIN
MIC
MAX
MIN
VIDEO
MAX
MIN
VIDEO/AUDIO MIXERVIDEO SOURCE SELECT
BACKCOLORSD INPUT 2SD INPUT 1HD INPUT 2HD INPUT 1HDMI 2HDMI 1
DIGITAL EFFECTS ADJUSTFUNCTIONS MODE CONTROL
KEYMIX1/41/31/2
PIP
COLOR
WIPE
EDGE
MULTIREVERSEONE-WAY
B-KEY 1/2L-KEY 1/2
1/2 1/3 1/4
A SOURCE B SOURCE
STILL
TIME
POSITION
MIN MAX
CMX-12VIDEO EFFECTS MIXER
DEMO
ADJUST
SCAN
NEGATIVEPAINT MOSAIC
B
A
A
B
ON
2
5
3
4•
n How to use the Blue key effect: 1. Press the KEY button h. 2. Press one of the A-bus selection button. 3. Press one of the B-bus selection button. 4. Press the Blue KEY button a . 5. Use slide bar to control the Blue key level. 6. Press button y or u to change the source that is being keyed. 7. Press the Blue KEY a once again to achieve Negative Blue Key.
17
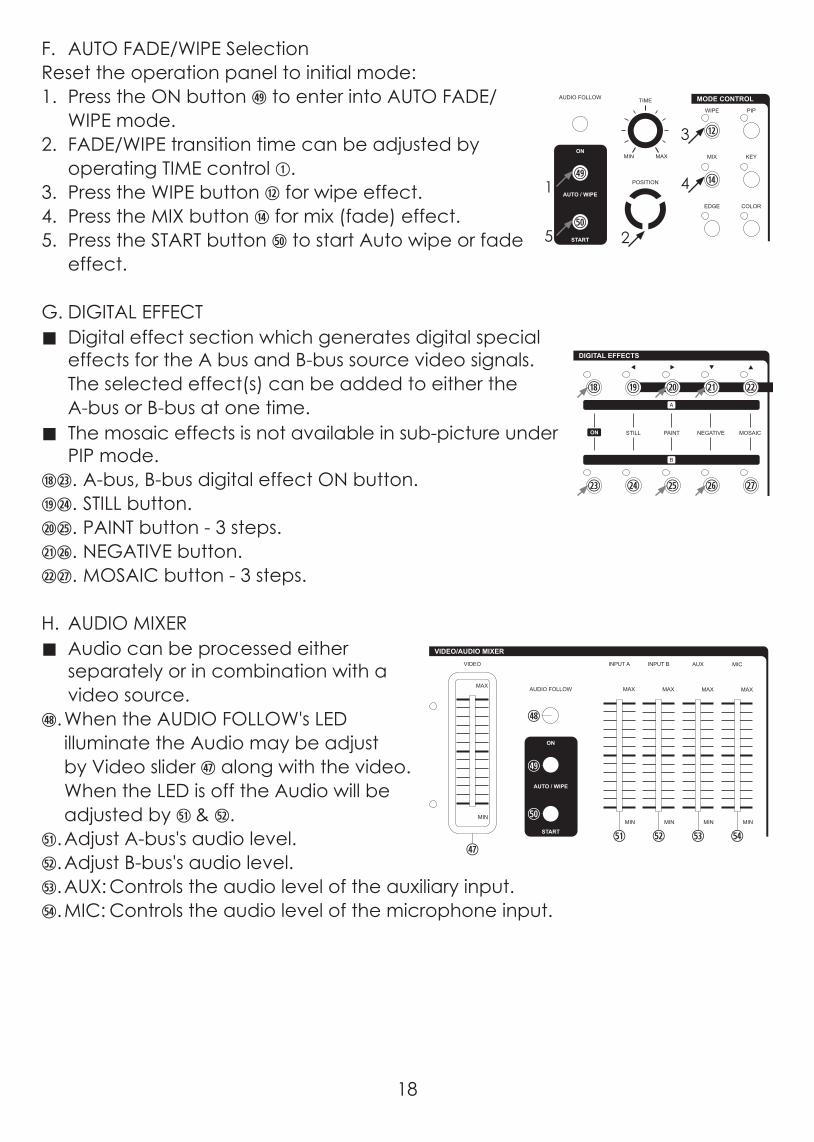
F. AUTO FADE/WIPE SelectionReset the operation panel to initial mode:1. Press the ON button •• to enter into AUTO FADE/ WIPE mode.2. FADE/WIPE transition time can be adjusted by operating TIME control q.3. Press the WIPE button d for wipe effect.4. Press the MIX button g for mix (fade) effect.5. Press the START button •• to start Auto wipe or fade effect.
G.DIGITAL EFFECTn Digital effect section which generates digital special effects for the A bus and B-bus source video signals. The selected effect(s) can be added to either the A-bus or B-bus at one time.n The mosaic effects is not available in sub-picture under PIP mode.l••. A-bus, B-bus digital effect ON button.⑲•$. STILL button.⑳•%. PAINT button - 3 steps.•••^. NEGATIVE button.•••&. MOSAIC button - 3 steps.
H.AUDIO MIXERn Audio can be processed either separately or in combination with a video source.4*. When the AUDIO FOLLOW's LED illuminate the Audio may be adjust by Video slider 4• along with the video. When the LED is off the Audio will be adjusted by 5!& [email protected]!. Adjust A-bus's audio level.5@. Adjust B-bus's audio level.5#. AUX: Controls the audio level of the auxiliary input.5$. MIC: Controls the audio level of the microphone input.
����
AUDIO FOLLOW
AUTO / WIPE
START
ON
-15
LAUDIOLEVEL R
DB
DB
-10 -5 -3 +3 +4+20 +1-1
-15 -10 -5 -3 +3 +4+20 +1-1
INPUT A
MAX
MIN
INPUT B
MAX
MIN
AUX
MAX
MIN
MIC
MAX
MIN
VIDEO
MAX
MIN
VIDEO/AUDIO MIXERVIDEO SOURCE SELECT
BACKCOLORSD INPUT 2SD INPUT 1HD INPUT 2HD INPUT 1HDMI 2HDMI 1
DIGITAL EFFECTS ADJUSTFUNCTIONS MODE CONTROL
KEYMIX1/41/31/2
PIP
COLOR
WIPE
EDGE
MULTIREVERSEONE-WAY
B-KEY 1/2L-KEY 1/2
1/2 1/3 1/4
A SOURCE B SOURCE
STILL
TIME
POSITION
MIN MAX
CMX-12VIDEO EFFECTS MIXER
DEMO
ADJUST
SCAN
NEGATIVEPAINT MOSAIC
B
A
A
B
ON
⑱
•#
⑲
•$
⑳
•%
2•
•^
••
•&����
AUDIO FOLLOW
AUTO / WIPE
START
ON
-15
LAUDIOLEVEL R
DB
DB
-10 -5 -3 +3 +4+20 +1-1
-15 -10 -5 -3 +3 +4+20 +1-1
INPUT A
MAX
MIN
INPUT B
MAX
MIN
AUX
MAX
MIN
MIC
MAX
MIN
VIDEO
MAX
MIN
VIDEO/AUDIO MIXERVIDEO SOURCE SELECT
BACKCOLORSD INPUT 2SD INPUT 1HD INPUT 2HD INPUT 1HDMI 2HDMI 1
DIGITAL EFFECTS ADJUSTFUNCTIONS MODE CONTROL
KEYMIX1/41/31/2
PIP
COLOR
WIPE
EDGE
MULTIREVERSEONE-WAY
B-KEY 1/2L-KEY 1/2
1/2 1/3 1/4
A SOURCE B SOURCE
STILL
TIME
POSITION
MIN MAX
CMX-12VIDEO EFFECTS MIXER
DEMO
ADJUST
SCAN
NEGATIVEPAINT MOSAIC
B
A
A
B
ON
4&5$5#5@5!
4(
5)
4*
����
AUDIO FOLLOW
AUTO / WIPE
START
ON
-15
LAUDIOLEVEL R
DB
DB
-10 -5 -3 +3 +4+20 +1-1
-15 -10 -5 -3 +3 +4+20 +1-1
INPUT A
MAX
MIN
INPUT B
MAX
MIN
AUX
MAX
MIN
MIC
MAX
MIN
VIDEO
MAX
MIN
VIDEO/AUDIO MIXERVIDEO SOURCE SELECT
BACKCOLORSD INPUT 2SD INPUT 1HD INPUT 2HD INPUT 1HDMI 2HDMI 1
DIGITAL EFFECTS ADJUSTFUNCTIONS MODE CONTROL
KEYMIX1/41/31/2
PIP
COLOR
WIPE
EDGE
MULTIREVERSEONE-WAY
B-KEY 1/2L-KEY 1/2
1/2 1/3 1/4
A SOURCE B SOURCE
STILL
TIME
POSITION
MIN MAX
CMX-12VIDEO EFFECTS MIXER
DEMO
ADJUST
SCAN
NEGATIVEPAINT MOSAIC
B
A
A
B
ON
1
5
4•
5)
����
AUDIO FOLLOW
AUTO / WIPE
START
ON
-15
LAUDIOLEVEL R
DB
DB
-10 -5 -3 +3 +4+20 +1-1
-15 -10 -5 -3 +3 +4+20 +1-1
INPUT A
MAX
MIN
INPUT B
MAX
MIN
AUX
MAX
MIN
MIC
MAX
MIN
VIDEO
MAX
MIN
VIDEO/AUDIO MIXERVIDEO SOURCE SELECT
BACKCOLORSD INPUT 2SD INPUT 1HD INPUT 2HD INPUT 1HDMI 2HDMI 1
DIGITAL EFFECTS ADJUSTFUNCTIONS MODE CONTROL
KEYMIX1/41/31/2
PIP
COLOR
WIPE
EDGE
MULTIREVERSEONE-WAY
B-KEY 1/2L-KEY 1/2
1/2 1/3 1/4
A SOURCE B SOURCE
STILL
TIME
POSITION
MIN MAX
CMX-12VIDEO EFFECTS MIXER
DEMO
ADJUST
SCAN
NEGATIVEPAINT MOSAIC
B
A
A
B
ON
2
����
AUDIO FOLLOW
AUTO / WIPE
START
ON
-15
LAUDIOLEVEL R
DB
DB
-10 -5 -3 +3 +4+20 +1-1
-15 -10 -5 -3 +3 +4+20 +1-1
INPUT A
MAX
MIN
INPUT B
MAX
MIN
AUX
MAX
MIN
MIC
MAX
MIN
VIDEO
MAX
MIN
VIDEO/AUDIO MIXERVIDEO SOURCE SELECT
BACKCOLORSD INPUT 2SD INPUT 1HD INPUT 2HD INPUT 1HDMI 2HDMI 1
DIGITAL EFFECTS ADJUSTFUNCTIONS MODE CONTROL
KEYMIX1/41/31/2
PIP
COLOR
WIPE
EDGE
MULTIREVERSEONE-WAY
B-KEY 1/2L-KEY 1/2
1/2 1/3 1/4
A SOURCE B SOURCE
STILL
TIME
POSITION
MIN MAX
CMX-12VIDEO EFFECTS MIXER
DEMO
ADJUST
SCAN
NEGATIVEPAINT MOSAIC
B
A
A
B
ON
⑫
⑭
3
4
18

I. OSD ADJUST2*. When turn off the OSD adjust in SD PREVIEW, output will show A/B-bus and output system information. As shown below.
����
AUDIO FOLLOW
AUTO / WIPE
START
ON
-15
LAUDIOLEVEL R
DB
DB
-10 -5 -3 +3 +4+20 +1-1
-15 -10 -5 -3 +3 +4+20 +1-1
INPUT A
MAX
MIN
INPUT B
MAX
MIN
AUX
MAX
MIN
MIC
MAX
MIN
VIDEO
MAX
MIN
VIDEO/AUDIO MIXERVIDEO SOURCE SELECT
BACKCOLORSD INPUT 2SD INPUT 1HD INPUT 2HD INPUT 1HDMI 2HDMI 1
DIGITAL EFFECTS ADJUSTFUNCTIONS MODE CONTROL
KEYMIX1/41/31/2
PIP
COLOR
WIPE
EDGE
MULTIREVERSEONE-WAY
B-KEY 1/2L-KEY 1/2
1/2 1/3 1/4
A SOURCE B SOURCE
STILL
TIME
POSITION
MIN MAX
CMX-12VIDEO EFFECTS MIXER
DEMO
ADJUST
SCAN
NEGATIVEPAINT MOSAIC
B
A
A
B
ON
⑱
•#
⑲
•$
⑳
•%
2• 2*
•^ 3)
•)
••
•&
INFORMATION
A INPUT:HDMI 1SYSTEM:1080I60
B INPUT:Y PB PR 1SYSTEM:480P60
OUTPUT:NTSC
2*. When turn ON the function in SD PREVIEW, output will show the adjust screen. As shown below.
n When in MENU mode, press ⑲t ⑳u to adjust the page. Press 2!q qand 2@ p pto select the functions; once the functions are selected press ⑲ttand ⑳uuto adjust the value.n Above values are not save to EEPROM. When the device is turn off the system will change the value back to previouse value. Press 2* ADJUST to exit the OSD adjust screen
and the system will automatically save to the systerm.n OSD adjustment function and range setting as below diagram:
CONTRST [ 5 8 ] 0~63BRIGHT [ 3 1 ] 0~63
[1]A PICTURE COLOR [ 3 1 ] 0~63HUE [ 3 1 ] 0~63DETAIL [ 1 0 ] 0~63ASPECT [ F U L L ] AUTO FULL 16:9 4:3
CONTRST [ 5 8 ] 0~63BRIGHT [ 3 1 ] 0~63
MENU [2]B PICTURE COLOR [ 3 1 ] 0~63HUE [ 3 1 ] 0~63DETAIL [ 1 0 ] 0~63ASPECT [ F U L L ] AUTO FULL 16:9 4:3
A AUDIO [AUTO] AUTO-CH1-CH2-CH3-CH4-CH5-CH6B AUDIO [AUTO] AUTO-CH1-CH2-CH3-CH4-CH5-CH6
[3]SETUP VOLUME [ 1 2 7 ] 0~127LIP SYNC [ 33MS] 0~170OUTPUT [NTSC] NTSC-NTSC 43-PAL-PAL M-PAL NDEFAULT SECAM-480P60-576P50-720P50-
720P60-1080I50-1080I60
MENU [1][2][3]
A PICTURE
CONTRAST [ 58]BRIGHT [ 31]COLOR [ 31]HUE [ 31]DETAIL [ 10]ASPECT [FULL]
19

5. Connector and Installation
DC INPUT12V 3.0A
R1 R1R2 R2 R R1L1 L1L2 L2 L L1 L2
PrPb V S
V S
Y
R2
V SPrPbY
V SPrPbY
HDMI 1 HDMI 2
PrPbY
AUX INPUT
SD INPUT 1
SD INPUT 2
SD AUDIO INPUTHD AUDIO INPUT
HD OUTPUT 1
HD OUTPUT 2
HD INPUT 1
HD INPUT 2
AUDIO OUTPUT
SD OUTPUT
SD PREVIEW
HDMI OUTPUTHDMI INPUT
HD Y PB PR 1
HDMI 1 HDMI 2 SD 1 SD 2 TV VCRor TV MONITOR
HD Y PB PR 2OtherAudioSource
n The output can select HD or SD system. Users can use SD PREVIEW to adjust the output system, or a fast way to switch is to press two keys for 1 second in the same time. The combination as below:
2(butten+ 4%butten → 480P603)butten+ 4%butten → 576P603!butten+ 4%butten → 720P503@butten+ 4%butten → 720P603#butten+ 4%butten → 1080I503$butten+ 4%butten → 1080I603%butten+ 4%butten → NTSC3^butten+ 4%butten → NTSC 433&butten+ 4%butten → PAL3*butten+ 4%butten → PAL M3(butten+ 4%butten → PAL N4)butten+ 4%butten → SECAM
20

6. Specifications
Source Input
X 6(SOURCE 1/6)HDMI Input: x2
Digital Video YUV(480i/p,576i/p,720p50/60,1080i50/60, 1080p50/60).Component Input: x2
Analog Video YUV(480i/p,576i/p,720p50/60,1080i50/60).Y/C input: x2
Y signal: 1.0 Vp-p 75Ω, Mini Din 4-pin connectorC signal: 0.3 Vp-p 75Ω, Mini Din 4-pin connector
Video input: x21.0 Vp-p 75Ω composite signal, Pin-Jack(NTSC,NTSC4.43,PAL,PAL-M,PAL-N,SECAM)
Audio input: x4-6 dBs/20 kΩ Pin Jack (L/R).
External Sound Input MIC input: x 1 (MIC); -60 dBv/600ΩAUX input: x 1 (AUX); -6 dBs/20 kΩ, Pin Jacks(L/R)
Recording Output
HDMI Output: x1Digital Video YUV(480i/p,576i/p,720p50/60,1080i50/60).
Component Output: x2Analog Video YUV(480i/p,576i/p,720p50/60,1080i50/60).
Y/C Output: x1Y signal: 1.0 Vp-p 75Ω, Mini Din 4-pin connectorC signal: 0.3 Vp-p 75Ω, Mini Din 4-pin connector
Video Output: x11.0 Vp-p 75Ω composite signal, Pin-Jack(NTSC,NTSC4.43,PAL,PAL-M,PAL-N,SECAM)
Audio Output: x2-6 dBs/20 kΩ Pin Jack (L/R).
Preview Output(OSD)
Y/C Output: x1Y signal: 1.0 Vp-p 75Ω, Mini Din 4-pin connectorC signal: 0.3 Vp-p 75Ω, Mini Din 4-pin connector
Video Output: x11.0 Vp-p 75Ω composite signal, Pin-Jack(NTSC,NTSC4.43,PAL,PAL-M,PAL-N,SECAM)
Headphone Output x 1 (Headphone); -20 dBv~ -80 dBv, 8Ωunbalance, phone-5 jack
EffectsVideo:
Still, Mosaic, Paint, Negative, Wipe, Mix, Fade,Picture-In-Picture, Chroma key, Luminance key
Back Color x3 White, Yellow, Cyan, Green, Magenta, Red, Blue, BlackWipe Patterns 96 patternsS/N (Typical) video: 48 dB (composite), 50 dB (HDMI,Component,Y/C) Audio: 60 dBPower Source 12V DC 3APower Consumption Approx. 15WDimensions 267(W) x 370(D) x 103.5(H) mmWeight 2Kgs
21

Acronyms AAcronym Complete Term
22