MW15 Ultrasound Guided Pericardiocentesis Simulator · -Anatomy includes: ribs, xiphisternum,...
20
Ultrasound Guided Pericardiocentesis Simulator MW15 ● Introduction Manufacturer’s Note ● Before You Start Set Includes Fill the Puncture Unit with Water [1] Fill the Puncture Unit with Water [2] DOs and DON’Ts ● After Training ● Training Instruction Manual P. 2 P. 1 P. 1 P.4-P.8 P.9-P.12 P.3 Do not mark on the model and other components with pen nor leave printed materials contacted on surface. Ink marks on the models cannot be removed. Caution Contents P. 13 P.14-P.17 ● Preparation Confirm the Setting of Simulated Heat and Liver
Transcript of MW15 Ultrasound Guided Pericardiocentesis Simulator · -Anatomy includes: ribs, xiphisternum,...

Ultrasound Guided Pericardiocentesis SimulatorMW15
● IntroductionManufacturer’s Note
● Before You StartSet Includes
Fill the Puncture Unit with Water [1]
Fill the Puncture Unit with Water [2]
DOs and DON’Ts
● After Training
● Training
InstructionManual
P. 2
P. 1P. 1
P.4-P.8P.9-P.12
P.3
Do not mark on the model and other components with pen nor leave printed materials contacted on surface.Ink marks on the models cannot be removed.
Caution
Contents
P. 13
P.14-P.17
● PreparationCon�rm the Setting of Simulated Heat and Liver

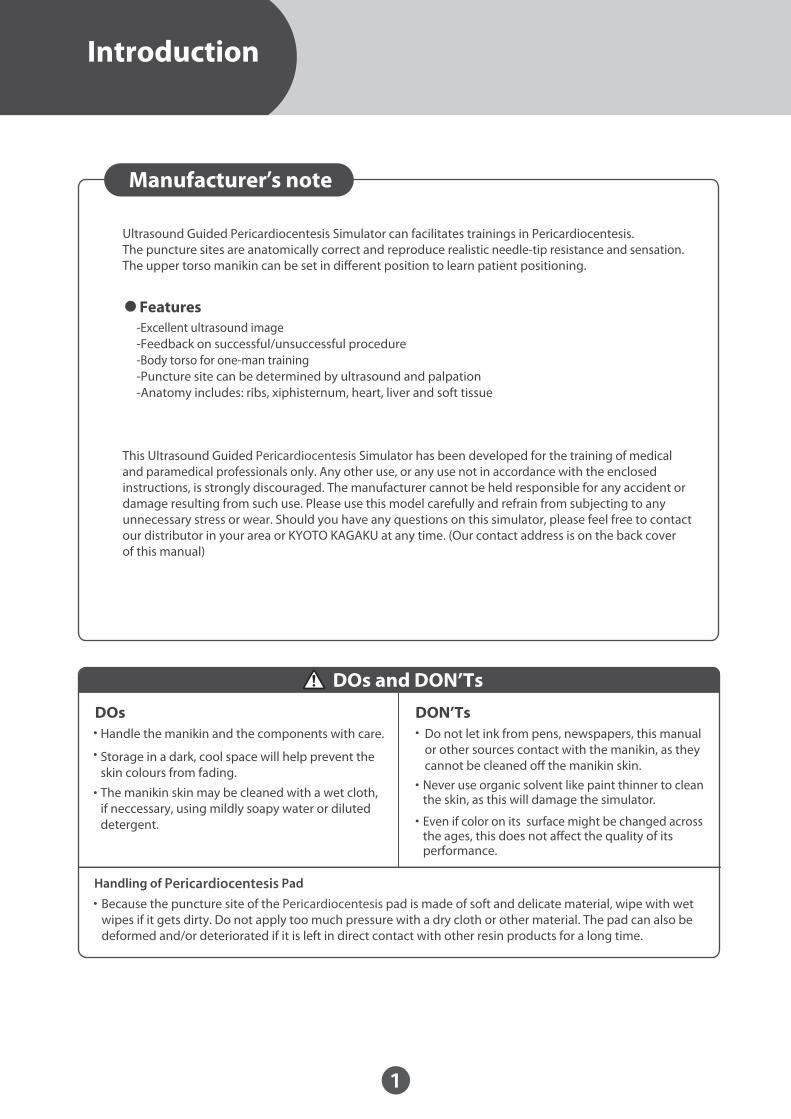
Introduction
1
Features●
・ ・
・
・
・
・
This Ultrasound Guided Pericardiocentesis Simulator has been developed for the training of medical and paramedical professionals only. Any other use, or any use not in accordance with the enclosed instructions, is strongly discouraged. The manufacturer cannot be held responsible for any accident or damage resulting from such use. Please use this model carefully and refrain from subjecting to any unnecessary stress or wear. Should you have any questions on this simulator, please feel free to contact our distributor in your area or KYOTO KAGAKU at any time. (Our contact address is on the back cover of this manual)
DOs DON’Ts
DOs and DON’Ts
Manufacturer s note
Never use organic solvent like paint thinner to clean the skin, as this will damage the simulator.
Even if color on its surface might be changed across the ages, this does not a�ect the quality of its performance.
・Because the puncture site of the Pericardiocentesis pad is made of soft and delicate material, wipe with wet wipes if it gets dirty. Do not apply too much pressure with a dry cloth or other material. The pad can also be deformed and/or deteriorated if it is left in direct contact with other resin products for a long time.
’
Ultrasound Guided Pericardiocentesis Simulator can facilitates trainings in Pericardiocentesis. The puncture sites are anatomically correct and reproduce realistic needle-tip resistance and sensation. The upper torso manikin can be set in di�erent position to learn patient positioning.
-Puncture site can be determined by ultrasound and palpation
-Feedback on successful/unsuccessful procedure-Body torso for one-man training
-Excellent ultrasound image
-Anatomy includes: ribs, xiphisternum, heart, liver and soft tissue
Handling of Pericardiocentesis Pad
Handle the manikin and the components with care.
Storage in a dark, cool space will help prevent the skin colours from fading.The manikin skin may be cleaned with a wet cloth,if neccessary, using mildly soapy water or diluted detergent.
Do not let ink from pens, newspapers, this manual or other sources contact with the manikin, as they cannot be cleaned o� the manikin skin.
code name
Consumable parts
2
Before You Start Set includes
Set Includes
Before you start, ensure that you have all components listed below.
11394-010
11394-010
Pericardiocentesis pad (a pair)
c
jja
a
e
f
o
d
r
b
h
i
g
Plastic jar (large)Irrigation bottleSpacer for the pericardiocentesispuncture unut
Connection tube (for pericardiocentesis and water supply)
Syringe (for pericardiocentesis)
1
1
1
1
1
1
1
112
a.
e.
f.
g.h.i.j.
b.c.
Pericardiocentesis pad
d. Pillow
Upper torso manikin (including the spacer)
Pericardiocentesis container(including simulated heart and liver)
Connection tube (for pericardiocentesis and water drain)
Instruction manual

3
1
1. The pericardiocentesis pad and the pericardiocentesis container are packed separately.
2. The simulated heart and liver are set in the pericardiocentesis container. Turn over the container while supporting the contents with a hand to remove them from the container. Ensure that the pin on the heart is engaged in the hole on the liver and that the heart can be moved around the pin as a fulcrum. After checking, reset them into the container.
Preparation
Con�rm the Setting of Simulated Heat and Liver
Con�rm the Setting of Simulated Heat and Liver
Pericardiocentesis pad
Pericardiocentesis container
Simulated heartPin
Simulated liver

4
1
Training with the Irrigation bottle
1. Attach the pericardiocentesis pad to the pericardiocentesis container. The upper sides are indicated by stickers. Align them in the same direction to engage them correctly, and then push the pericardiocentesis pad against the container to seal it.
2. Push the pericardiocentesis pad lock inward with both hands until you hear a "click" sound to engage it securely. Similarly engage the lock on the other side.
Preparation
Pericardiocentesis pad
Pericardiocentesis pad lock
Fill the Puncture Unit with Water
Fill the Puncture Unit with Water
Assembling of the pericardiocentesis puncture unit
Pericardiocentesis container
Do not force the locks as this may break the locks. Before applying additional force, ensure that the pad is correctly positioned on the container and well �tted.
Caution
[1]
[1]●

5
2
1. Put the upper torso manikin in spine position on the positioning pillow. Thread two connection tubes (a thick supply tube and a thin drainage tube) through the hole in the neck of the manikin. First thread the connecter of the supply tube and then thread the drainage tube similarly.
2. Insert the pericardiocentesis unit upward along the attaching slot from the lower side of the manikin to the middle of the slot. Connect the two connection tubes that are threaded through the neck hole to the connectors located on top of the pericardiocentesis unit. There are two connectors with di�erent sizes. Connect each tube to the connector of the right size. Push the connectors until you can hear a "click" sound.
Preparation
Water supply tube (thick)
Water supply tube (thick)
Water drainage tube(thin)
Water dranage tube (thin)
Connect the puncture unit and water tubes
Connector
Connector
Pericardiocentesis container
Fill the Puncture Unit with Water
connection tubes
[1]

6
2
Preparation
Connect the puncture unit and water tubes
3. After connecting the tubes to the puncture unit, push up the pericardiocentesis unit until no gap is left between the unit and the manikin.
4. Insert the spacer under the puncture unit while slightly widening the lower part of the manikin.
Both tubes are connected to the puncture unit.
Spacer
When inserting the spacer, align the concave part of the spacer to the convex part of the manikin.
Attention
Fill the Puncture Unit with Water [1]
7
3
Preparation
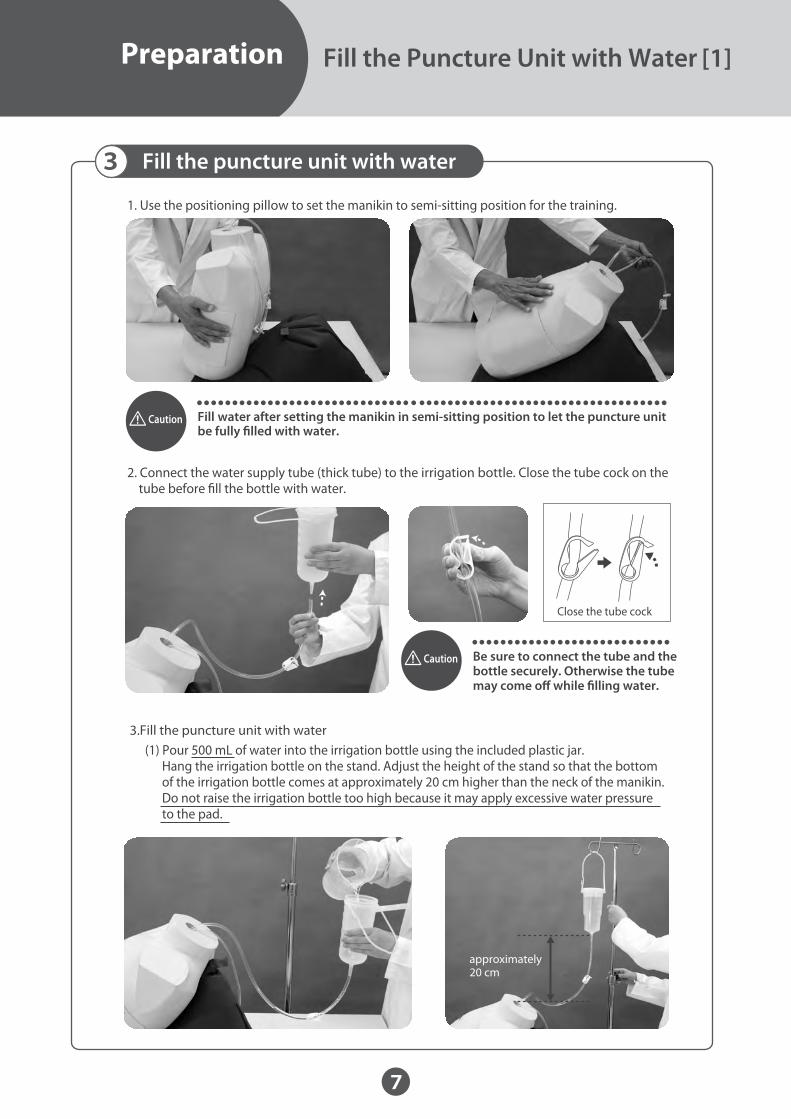
Fill the puncture unit with water
3.Fill the puncture unit with water
Fill water after setting the manikin in semi-sitting position to let the puncture unit be fully �lled with water.
Caution
Be sure to connect the tube and the bottle securely. Otherwise the tube may come o� while �lling water.
Caution
1. Use the positioning pillow to set the manikin to semi-sitting position for the training.
2. Connect the water supply tube (thick tube) to the irrigation bottle. Close the tube cock on the tube before �ll the bottle with water.
(1) Pour 500 mL of water into the irrigation bottle using the included plastic jar. Hang the irrigation bottle on the stand. Adjust the height of the stand so that the bottom of the irrigation bottle comes at approximately 20 cm higher than the neck of the manikin. Do not raise the irrigation bottle too high because it may apply excessive water pressure to the pad.
Close the tube cock
approximately 20 cm
Fill the Puncture Unit with Water [1]
8
3
Preparation
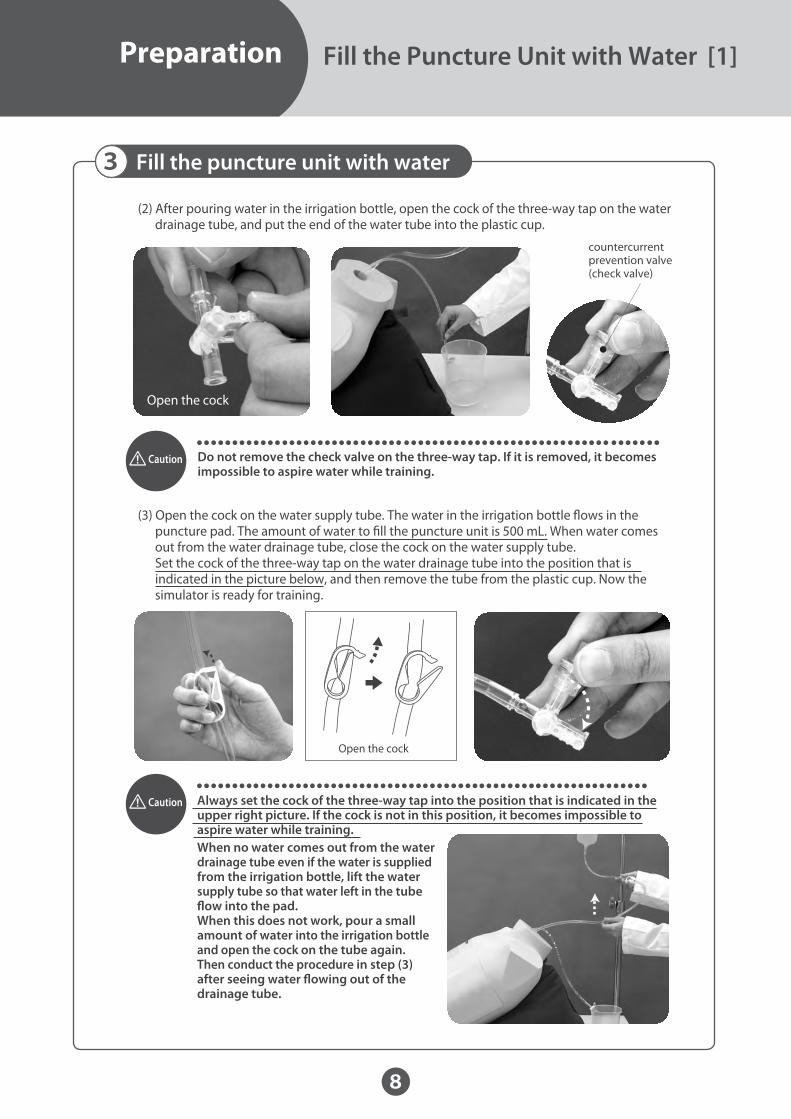
Do not remove the check valve on the three-way tap. If it is removed, it becomes impossible to aspire water while training.
Always set the cock of the three-way tap into the position that is indicated in the upper right picture. If the cock is not in this position, it becomes impossible to aspire water while training.When no water comes out from the water drainage tube even if the water is supplied from the irrigation bottle, lift the water supply tube so that water left in the tube �ow into the pad.When this does not work, pour a small amount of water into the irrigation bottle and open the cock on the tube again. Then conduct the procedure in step (3) after seeing water �owing out of the drainage tube.
Caution
Caution
(2) After pouring water in the irrigation bottle, open the cock of the three-way tap on the water drainage tube, and put the end of the water tube into the plastic cup.
(3) Open the cock on the water supply tube. The water in the irrigation bottle �ows in the puncture pad. The amount of water to �ll the puncture unit is 500 mL. When water comes out from the water drainage tube, close the cock on the water supply tube. Set the cock of the three-way tap on the water drainage tube into the position that is indicated in the picture below, and then remove the tube from the plastic cup. Now the simulator is ready for training.
Open the cock
Open the cock
countercurrent prevention valve(check valve)
Fill the Puncture Unit with Water
Fill the puncture unit with water
[1]
9
1. 心嚢穿刺用ケース内に水を注入します。1
Preparation
Caution
Training without the Irrigation bottle
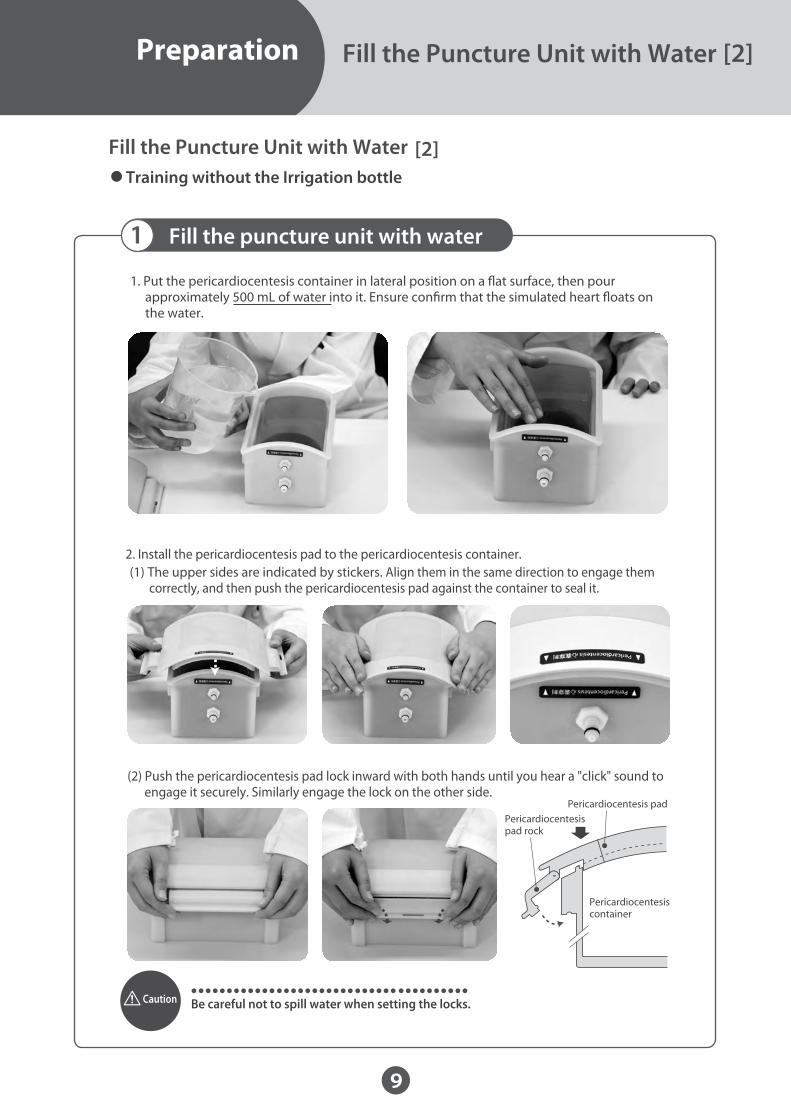
1. Put the pericardiocentesis container in lateral position on a �at surface, then pour approximately 500 mL of water into it. Ensure con�rm that the simulated heart �oats on the water.
(1) The upper sides are indicated by stickers. Align them in the same direction to engage them correctly, and then push the pericardiocentesis pad against the container to seal it.
Pericardiocentesis padPericardiocentesis pad rock
Pericardiocentesis container
2. Install the pericardiocentesis pad to the pericardiocentesis container.
Be careful not to spill water when setting the locks.
(2) Push the pericardiocentesis pad lock inward with both hands until you hear a "click" sound to engage it securely. Similarly engage the lock on the other side.
Fill the Puncture Unit with Water
Fill the Puncture Unit with Water
Fill the puncture unit with water
[2]
[2]●
10
2
Preparation
Connect the puncture unit and tubes
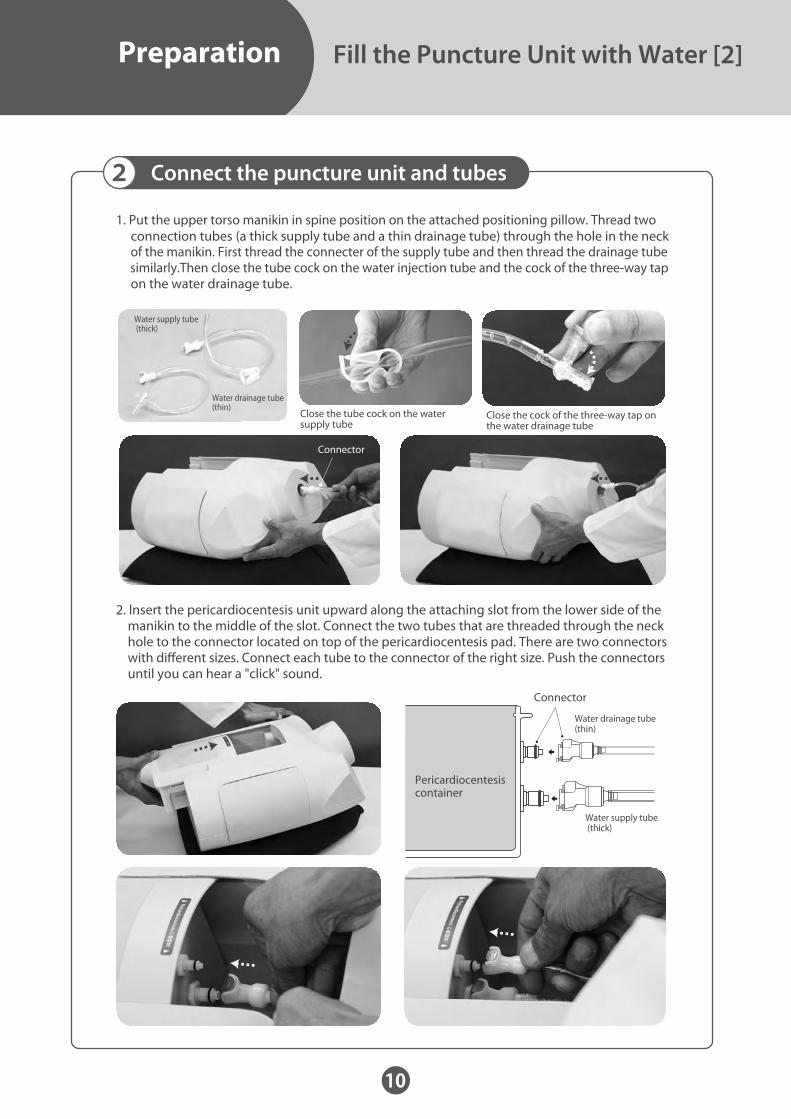
1. Put the upper torso manikin in spine position on the attached positioning pillow. Thread two connection tubes (a thick supply tube and a thin drainage tube) through the hole in the neck of the manikin. First thread the connecter of the supply tube and then thread the drainage tube similarly.Then close the tube cock on the water injection tube and the cock of the three-way tap on the water drainage tube.
Water supply tube (thick)
Water supply tube (thick)
Water drainage tube(thin)
Water drainage tube (thin)
Connector
Connector
Pericardiocentesis container
Close the tube cock on the water supply tube
Close the cock of the three-way tap on the water drainage tube
2. Insert the pericardiocentesis unit upward along the attaching slot from the lower side of the manikin to the middle of the slot. Connect the two tubes that are threaded through the neck hole to the connector located on top of the pericardiocentesis pad. There are two connectors with di�erent sizes. Connect each tube to the connector of the right size. Push the connectors until you can hear a "click" sound.
Fill the Puncture Unit with Water [2]

6
11
2 Connect the puncture unit and tubes
3. After connecting the tubes to the puncture unit, push up unituntil no gap is left between the unit and the manikin.
4. Insert the spacer under the puncture unit while slightly widening the lower part of the manikin.
The state that connected two tubes with the puncture unit
Spacer
When inserting the spacer, align the concave part of the spacer to the convex part of the manikin.
Attention
Preparation Fill the Puncture Unit with Water [2]

12
3
Preparation
Fill the puncture unit with water
1. Use the positioning pillow to set the model to semi-sitting position for the training.
2. Connect the syringe �lled with approximately 50 mL of water to the water supply tube. Open the cock of the three-way tap on the water drainage tube and put the end of the tube into the plastic cup.
2. Open the tube cock on the water supply tube and inject the water of the syringe into the puncture unit. Inject water until water comes from the water drainage tube. Then close the tube cock on the water supply tube and remove the syringe. And then set the cock of the three-way tap on the water drainage tube into the position that is indicated in the picture below, and then remove the tube from the plastic cup. Now the simulator is ready for training.
Open the cock
Open the tube cock
In case no water �ow out after injecting 50mL of water, re�ll the syringe and inject additional water into the puncture unit. Always be sure to close the cock on the water supply tube before removing the syringe. Otherwise, water in the unit will be drained due to atmospheric pressure.
Caution
Fill the Puncture Unit with Water [2]

13
1
Training
Training
1. Set the model in semi-sitting position set using the positioning pillow to conduct the training.
・ For training the disinfection procedure of the puncture part, use water instead of disinfectant.
Caution
* If you use a blood vessel custody needle thicker than 18G, the pad will deteriorate more rapidly.
・ Do not mark the manikin or the pad.
・ Do not apply anesthesia. It might cause water leakage from the pericardiocentesis pad.
・ A 18G blood vessel custody needle is recommended for puncturing.

14
1
After Training
After Training
1. After training dispose the remaining water from the irrigation bottle. Remove the water supply tube from the irrigation bottle. Remove the positioning pillow and put the manikin in supine position on the table. Prepare a container such as a bucket for discharged water. Put the end of two tubes in the container so that the tube tips come lower than the manikin.
2. Open the tube cock on the water supply tube. Then, lift the tip of the water drainage tube and open the three-way tap. Water �ows out through the water supply tube. When the out�ow of the water stops, tilt the manikin by lifting its bottom side to empty the remaining water in the unit.
Open the tube cock

15
1
After Training
After Training
After discharging the water in the puncture unit, remove the unit from the upper torso manikin.
(1) Insert a �nger into the gap between the manikin and the spacer, then pull the spacer upward while widening the opening. Slide the pericardiocentesis unit caudally to create a gap between the unit and the manikin. Put a hand into the gap and slide the unit down.
(2) Remove the two tubes connected to the puncture unit. Press the metal plate on the connector to unlock the tube. Pull out two tubes from the hole on the neck one by one. After removing the tubes, slide the puncture pad further to remove it from the manikin.
Press the metal plate to unlock. Pull o� the tube with the connector.
Water supply tube (thick)
Water drainage tube(thin)
Connector
Pericardiocentesis container

16
1
After Training
After Training
Caution
Pericardiocentesis pad
Pericardiocentesis pad lock
Pericardiocentesis container
4. Place the removed puncture unit on a �at surface, pull up the lock of the pericardiocentesis pad using both hands and disengage the lock one by one. Similarly disengage the lock on the other side. After disengaging the two locks, remove the pericardiocentesis pad from the pericardiocentesis container and then discharge the water left in the case.
5. Wipe o� the moisture left on the pericardiocentesis pad and in the pericardiocentesis container.
The locks are engaged securely to prevent water leakage. For your safety, disengage the locks one by one using both hands.

17
1
After Training
After Training
Attention
6. Turn over the container while supporting the contents to remove them from the container. Wipe o� the moisture left on the simulated heart and liver and dry them well. After they are dried, reset the heart and liver. When the positioning pillow becomes wet, dry it naturally before storage.
7. For storage, detach the pericardiocentesis pad from the pericardiocentesis container.
When the pericardiocentesis pad worn out by use, replace it with new one to conduct the training.
Caution
Do not store the thoracentesis unit with the pad and the container assembled and locked. This may cause deterioration of the watertight packing.
Pericardiocentesis pad
Pericardiocentesis pad lock
Pericardiocentesis container

Don’t mark on the model and other components with pen or leave printed materials contacted on their surface. Ink marks on the models will be irremovable.
Caution
2014.06
URL http://www.kyotokagaku.com e-mail [email protected]
■ Main Office and Factory ■ LA Office ( for USA , CANADA and Mexico customers )15 Kitanekoya-cho Fushimi-ku Kyoto 612-8388, JapanTelephone : 81-75-605-2510Facsimile : 81-75-605-2519
3109 Lomita Boulevard, Torrance, CA 90505 ,USATelephone : 1-310-325-8860Facsimile : 1-310-325-8867
The contents of the instruction manual are subject to change without prior notice.No part of this instruction manual may be reproduced or transmitted in any form without permission from the manufacturer. Please contact manufacturer for extra copies of this manual which may contain important updates and revisions. Please contact manufacturer with any discrepancies in this manual or product feedback. Your cooperation is greatly appreciated.
・For inquiries and service, please contact your distributor or KYOTO KAGAKU CO., LTD.
● ●