Pediatric Nursing Manikin Quick Start Guide
8
1 This medium-fidelity Pediatric Nursing Manikin is the size of a 3-year-old patient. It meets 2019 AHA CPR guidelines, as it includes a feedback device that provides directed, specific, real-time coaching feedback on the rate and depth of chest compressions. In addition to practicing Basic Life Support (BLS), students can use this manikin to perform over a dozen nursing procedures. Read this material before using this product. Product includes: 1. Life-sized Pediatric Nursing Manikin 2. FAST-Fluid™ Management System 3. IV training arm 4. Blood powder 5. Interchangeable female/male genitalia 6. Controller for CPR 7. Pajamas (styles may vary) 8. Butterfly needle: 21-gauge, ¾” 9. Catheter: Pediatric straight, 8Fr 10. Nasogastric feeding tube 11. Intramuscular injection needle: 21-gauge, 5 mL 12. Storage/carrying case • 1-year limited warranty • Online access to curriculum: Basic Patient Care – Pediatric Bathing, Introduction to Pediatric Catheterization, Introduction to Pediatric Immunizations, Introduction to Pediatric Endotracheal Intubation, Introduction to Pediatric Intravenous (IV) Bolus Medication Administration, Introduction to Pediatric IV Insertion, Introduction to Pediatric Ostomy Care, Introduction to Pediatric Phlebotomy, Pediatric Range of Motion Pediatric Nursing Manikin Quick Start Guide NOTICE! To access your curriculum, visit: https://www.realityworks.com/pediatricnursingmanikin-downloads 6 7 12 8 9 10 11
Transcript of Pediatric Nursing Manikin Quick Start Guide
1
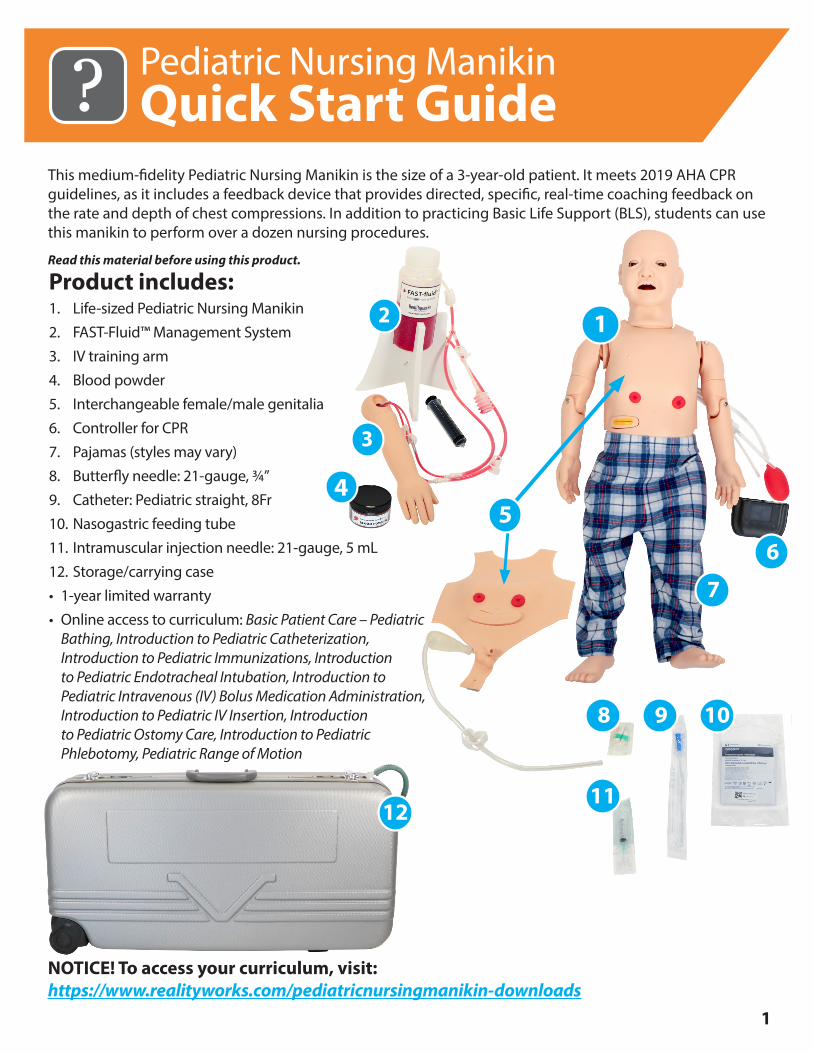
This medium-fidelity Pediatric Nursing Manikin is the size of a 3-year-old patient. It meets 2019 AHA CPR guidelines, as it includes a feedback device that provides directed, specific, real-time coaching feedback on the rate and depth of chest compressions. In addition to practicing Basic Life Support (BLS), students can use this manikin to perform over a dozen nursing procedures.
Read this material before using this product.
Product includes:1. Life-sized Pediatric Nursing Manikin2. FAST-Fluid™ Management System3. IV training arm4. Blood powder 5. Interchangeable female/male genitalia 6. Controller for CPR7. Pajamas (styles may vary) 8. Butterfly needle: 21-gauge, ¾”9. Catheter: Pediatric straight, 8Fr10. Nasogastric feeding tube11. Intramuscular injection needle: 21-gauge, 5 mL12. Storage/carrying case• 1-year limited warranty• Online access to curriculum: Basic Patient Care – Pediatric
Bathing, Introduction to Pediatric Catheterization, Introduction to Pediatric Immunizations, Introduction to Pediatric Endotracheal Intubation, Introduction to Pediatric Intravenous (IV) Bolus Medication Administration, Introduction to Pediatric IV Insertion, Introduction to Pediatric Ostomy Care, Introduction to Pediatric Phlebotomy, Pediatric Range of Motion
Pediatric Nursing ManikinQuick Start Guide
NOTICE! To access your curriculum, visit: https://www.realityworks.com/pediatricnursingmanikin-downloads
6
7
12
8 9 10
11

2
Assembly instructions: Manikin:1. Remove the screw and knee joint pi from each leg, then set them aside.2. Slide the bottom legs into the spaces in the upper legs. 3. Insert the knee joint pins through the holes in the knees. 4. Tighten the screws firmly on the inside of the knee joint pins. Changing genitalia:1. Slowly pull the skin of the attached genitalia and chest plate away from
the manikin, releasing it from the Velcro it is attached to. 2. Pull the genitalia off of the bladder tubing and finish removing.3. Choose the male or female genitalia and chest plate to attach. 4. Press the anus in place.5. Insert the bladder tubing into the genitalia.5. Press the skin of the attached genitalia back onto the Velcro on the manikin.FAST-fluid™ management system:1. Assemble the FAST-fluid™ tower by sliding the two base pieces together.2. Secure by threading the small black rubber plug through the holes, forming a circle.3. Close the clamps on the upper, lower, and pulse bulb tubing.4. Prepare the fluid for the collection bottle with distilled water or saline. Note: To represent blood, tint the fluid with red food coloring or use a mixture of
simulated blood with distilled water or saline.5. Remove the cap on the collection bottle. Fill the bottle to 800ml with fluid. Make sure
not to fill it past the upper tubing. Tighten the collection bottle cap. 6. Set the filled collection bottle onto the tower. Note: The height of the tower was designed to provide realistic flashback. Elevating
the bottle to this level will increase the fluid pressure and assist in providing the flashback.
Set-up instructions: FAST-fluid™ management system:1. Connect the upper and lower tubing Luer lock connectors on the collection bottle to
the connectors on the training arm tubing. 2. Prime the arm’s veins by opening the clamps on the upper and lower tubing. Note: To prevent air lock during priming, lay the arm and tubes on a level surface.
Purging the air from the veins takes a few seconds.3. Close the clamps on the upper and lower tubing.
4. Open the clamp on the pulse bulb tubing.
FAST-fluid™ management system:
Collection bottle
FAST-fluid tower
Upper tubing
Lower tubing
Pulse bulb
Syringe
Upper tubing clamp
Lower tubing clamp
Luer locks
PEDIATRIC NURSING MANIKIN

3
CPR Simulator:Insert AA Alkaline Batteries1. Place the CPR simulator face-down.2. Open the back cover by pulling down on the small lip under the edge of the cover.
A small, straight screwdriver may be used if needed.3. Insert the batteries over the battery ribbon; match thpositive and negative sides of
the batteries to the label inside the battery compartment. 4. Replace the battery cover by inserting the two small tabs into the rear edge of the
holder and pressing down on the lip edge.
ON
**See the curriculum for steps on performing venipuncture, IV insertion, IV medication administration, and intramuscular injections
5. Check the battery gauge at the top of the display to know when batteries need replacing. To replace the batteries, remove the battery cover, remove old batteries by pulling the battery ribbon, and replace them with two new AA alkaline batteries.
Attach Components to CPR Simulator:1. Open the storage case and remove the CPR Simulator. 2. Attach the CPR Simulator to the manikin by connecting the Luer locks from the CPR Simulator to
the compression tube coming out of the manikin.3. If using headphones (not provided), plug them into the far-right connector.Controls for CPR Simulator:The power switch turns the unit on and off. The touchscreen is the main control of the unit. The menu-based operating environment is used to run tests, practice sessions, and to program the unit. (See page 6 for complete instructions.)Use and cleaning instructions: Use the sections below for each manikin function and cleaning instructions.Venipuncture, Intramuscular Injection, and IV Insertion and Medication Administration These tasks are for the included IV training arm.Use:• A series of pulse bulb contractions will create a pulse. • A very realistic pulse will be felt at the radial site when squeezed.• Close the clamps on the upper and lower tubing and open the clamp on the pulse bulb tubing.1. To perform venipuncture, palpate for a vein and locate the injection site on the arm, then follow
the proper steps for performing a venipuncture. **2. To prepare the arm and complete intravenous insertion, apply a tourniquet. Have a partner pump
the pulse bulb to create a pulse. Palpate for a radial pulse, then follow proper procedures for performing the IV insertion.**
3. To perform IV medication administration, follow proper procedures for performing the IV medication administration.**
4. To perform an intramuscular injection, locate the injection site on the upper part of the training arm and then follow the proper steps for performing an intramuscular injection.**Note: Saline or water are recommended for the IM injection site.
Cleaning:1. Close all tubing clamps.2. Keeping the tubes above the arm, disconnect them from the collection bottle.3. Place the tubes into a basin or reservoir.4. Hold the arm above the tubes, open both clamps, and allow the tubes to empty.
Note: This works best if the arm is held high enough for the tubes to hang straight down and thus avoid kinks.Note: If the fluid used was tinted, use the syringe to flush the tubes with clean water.a. Fill the syringe with clean water. d. Disconnect the syringe and repeat steps 3-4 to drain fluidb. Stand the arm upright. e. Repeat steps a-d as needed.c. Connect the syringe to the tubing and inject until full.

4
5. Empty the collection bottle, remove the cap, and rinse it with water.6. Wipe the exterior of the arm with warm water. Pat it dry with a clean cloth. Allow all parts to dry overnight.Cleaning after intramuscular injection:1. Remove the pad from the upper arm and remove the interior sponge.2. Rinse well using warm water.3. Squeeze or wring out the additional water from the sponge.4. Allow the sponge to dry completely overnight before inserting it back into the injection pad.Additional care tips:1. Needles: 22-gauge or smaller needles are recommended, as larger needles reduce the life of the product. Puncturing
the skin repeatedly for practice will lead to deterioration over time. Use sharp needles, as dull needles may cause unnecessary damage to the skin and arteries.
2. Puncture site: To extend the life of the arm, distribute injections along the accepted injection sites.3. Use only distilled water or saline. Use of other solutions may block the tubing for the arteries.4. Do not use iodine, betadine, or other antiseptics to clean the site, as they may stain the skin permanently. You may use
alcohol pads.Intramuscular injectionsUse:• Deltoid intramuscular injections may be performed on the removable pads in both the left and right deltoids.• Vastus lateralis intramuscular injections may be performed on the removable pads in both the left and right vastus
lateralis.• After 10 injections, or when saturated with fluid, remove the sponges and squeeze them out over the sink or basin
before continuing with injections. Cleaning: 1. Remove the sponge from the injection pads by squeezing and pulling them out. 2. Insert a dry cloth into the limb and dry the area thoroughly.3. Rinse the sponge with mild soap and water.4. Squeeze or wring fluid from the sponge over sink or basin.5. Allow to dry overnight before reinserting into the injection pads. Hair and face washing:Use:• Dry shampoo is recommended for hair washing simulation. Mild shampoo and water may be used
as an alternative.• Use a damp, soft cotton cloth to bathe the face.• Do not pour water over the hair or face.Cleaning:1. Pat and dry gently with a towel and allow to dry overnight before storing. Jugular bulb:Use:• Pumping this allows students to feel for the jugular venous pulse.Ear care:Use:• Use cotton swabs gently for ear care.• The left ear may be irrigated using water and an irrigating syringe.• To drain the ear, tilt the head sideways and empty it into a basin or onto an absorbent cloth. Mouth cavity and teeth care:Use:• Use a standard, dry toothbrush.• Do not use water or cleaning agents in the mouth.
PEDIATRIC NURSING MANIKIN

5
• This is for practice of insertion only. Do not use any fluids to practice the procedure.
• Standard water-based lubricant or dish soap may be used for catheter insertion.
• Special care should be taken when using an indwelling catheter. Cuff inflation should only be attempted when catheter is in the proper position inside bladder. Balloon must be completely deflated before the catheter is removed. Catheter should not be left inserted in the simulator for an extended period. Improper use of an indwelling catheter may result in damage to manikin.
Cleaning: 1. Remove the genitalia from the manikin. 2. Rinse the genitalia with gentle soap and water and dry with
soft cloth.3. Use a pipe cleaner with the tip bent over 1/2 inch in the
urethra to remove soap or lubricant residue. 4. Allow the genitalia to dry overnight before storing the
manikin. Holistic nursing: sponge bath and dressingUse:• The manikin may be sponge-bathed from top to bottom
with gentle soap and water.• Limbs and body may be manipulated to dress the manikin
in the pajamas provided or other pedicatric garments as desired.
Do not immerse the manikin in water or pour water over it. Patient transfer, handling and positioningUse:• Manikin may be used to practice:
1. Changing occupied beds2. Changing patients' clothing3. Positioning in chairs and wheelchairs4. Transferring from bed to chair5. Assisting patients to bedside commode 6. Assisting with bedpan use7. Positioning patient for surgery
Note: Use caution around joints, which create pinching hazards. Range of motionUse:• The range of motion provided allows for practice of correct
patient positioning and flexibility exercises.• Manikin's articulation includes:
1. Knee: internal and external rotation2. Shoulder/hip: adduction, abduction, rotation, and
flexibility 3. Elbow: left and right arm flexibility
Note: Use caution around joints, which create pinching hazards.
Perineal careUse:• To practice perineal care, gently clean the female and
male genitalia with soap and water, patting them dry and avoiding cross-contamination.
Endotracheal intubationUse:• Ensure the tube clamp is closed
underneath the ribcage.Cleaning: 1. Remove tube clamp and insert a
pipe cleaner up to the vocal chords. Oral and nasal feeding and suctioningUse:• Standard nasogastric feeding tube (weighted with stylet)
and suction catheter may be used in the nostrils and mouth.
Cleaning: 1. Insert a pipe cleaner with tip bent over 1/2 inch into each
nostril to remove lubricant or soap residue.OxygenationUse:• Use a bag valve mask to practice manual ventilation. • No chest or stomach rise will be seen.Ostomy bag care and changingUse:• Gently clean the ostomy site with mild soap, a soft
washcloth, and water, following proper procedures.• Stoma will accommodate most standard skin barrier and
ostomy bag sizes used for colostomies and/or ileostomies.Cleaning: 1. Rinse with gentle soap and water and dry with soft cloth.2. Allow it to dry overnight before storing manikin. Enema insertionUse:• Compatible with standard enema kits.• This is for practice of insertion only. Do not use any fluids
to practice the procedure.• Standard water-based lubricant or dish soap may be used
for lubrication.Cleaning: 1. Rinse with gentle soap and water and dry with a soft
cloth.2. Use a pipe cleaner in the rectum to remove soap or
lubricant residue. 3. Allow it to dry overnight before storing the manikin. Urethral catheter insertionUse:• Practice urethral catheter insertion with indwelling and
straight catheters with interchangeable male and female genitalia.

6
CPRUse:• The CPR Simulator allows for the practice of Pediatric CPR procedures as set forth by the
American Heart Association (AHA).• To simulate standard open airway when CPR is performed, follow guidelines set forth by the
AHA.Instructor Use:Admin Main Menu (Instructor Menu)The Admin Main Menu is used to edit test values, calibrate the compression depth and set the volume levels. Students should not use this menu, as it provides access to modifying device settings. Access Admin Main Menu 1. Start with the simulator turned off. Note: Avoid touching the display while flipping the power switch to the on position to ensure proper operation of the touchscreen.2. Flip the power switch to the ON position. 3. Tap on the four stars in the top left corner of the screen to access Admin Main Menu.
This screen displays for four seconds before proceeding to Main Menu (Student Menu).4. If the simulator shows the Main Menu (Student Menu), turn the power off and on, then try
again.Edit Test Values1. From the Admin Main Menu, tap Edit Test Values to enter the edit screen.2. Modify the values by using the arrows located above or below the value you wish to modify.
The values are in order: Test Minutes, Low Range, and High Range.3. Before moving to the next test, tap the Save button to save changes.4. Select the Reset button to reset to the default test values after changing values if desired.5. To return to the Admin Main Menu, press the Back arrow.Calibrate Compression DepthUse the Calibrate Compression Depth option from the Admin Main Menu to calibrate.1. From Admin Main Menu, tap Calibrate Compression Depth.2. Compress the chest 5 times to the deepest acceptable point. Then
press Continue.3. Compress the chest 5 times to the most shallow acceptable
point. Then press Continue.4. If you see an error message, tap Back and retry the calibration.4. Verify the depths. Then tap Save.3. To return to the Admin Main Menu without saving, tap Cancel.
Set Volume LevelsA headset (not provided) or the speaker can be used to hear metronome sounds.1. From the Admin Main Menu, tap Set Volume Levels.2. Move the sliders to the desired value by dragging them left or right. Values will save
automatically.3. Turn the metronome on or off by checking or uncheking the Metronome box.4. To return to the Admin Main Menu, press the Back arrow.
PEDIATRIC NURSING MANIKIN

7
Factory ResetUse this screen to reset the following settings to factory default values:Compressions per minute: Low=100 High=120 Test minutes: 1Compression depth: factory settings1. From the Admin Main Menu, tap Factory Reset.2. Tap Yes to reset to factory default values or Cancel to return to the Main Menu without resetting the values.Student Use Instructions:Turn On Simulator1. Locate the On/Off power switch on the back of the simulator and press to the "I" position to turn it on. Note: Avoid touching the display while turning the simulator on to ensure proper operation of the touchscreen. Practice ModePractice Mode allows students to practice the speed and depth of compressions. The screen will show the rate and depth of compressions.1. From the Main Menu, tap Practice Compressions.2. Student should begin practicing compressions. 3. The display will show the current rate of compressions on the left and the depth on a sliding
scale on the right. If the arrow is in the upper red portion, the compressions are too shallow. If the arrow is in the lower red portion, the compressions are too deep. If the arrow is in the green range, the compressions are at the correct depth.
4. If the metronome is enabled, it will tick at the compression rate aligning with AHA standards.5. The practice screen will time out and return automatically to the Main Menu after 10 minutes.
To return to the Main Menu before it times out, tap Main Menu.Test Mode1. From the Main Menu, tap Test Compressions.2. The screen will count down from 10-1, and then the student should
begin proper compressions until the timer runs out and the Test Results screen displays.
3. Tap the Cancel button to exit the test and return to the Main Menu before the test is complete.
4. Test Results will display the number of times compressions were completed higher than, lower than, or within the correct range for Rate and Depth.
5. Tap Retake to test again or tap Main Menu to return to Main Menu.
Change the Language1. From the Main Menu, tap Language. All available languages will appear on the screen.2. Find the desired language and tap to select it. The language you select will highlight in green. 3. Tap Save to save changes. The CPR Simulator will then display the selected language and
return to the Main Menu. Turn Off Unit1. Turn the simulator off by flipping the power switch.

8
General cleaning and storage instructions:• Wash pajamas prior to using, as staining may occur.
• General cleaning can be done with a damp, soft cotton cloth and mild soap. Gently wash and pat dry with a towel. Avoid scrubbing painted areas of the manikin.
• Remove adhesive tape residue: gently wash with a damp cloth and pat dry. If adhesive residue persists, Goo Gone may be used with a soft cloth. Paper tape is recommended to eliminate adhesive buildup on the manikin.
• Stains caused by makeup, ink and materials that leach dyes including newsprint and clothing are indelible and cannot be removed. Avoid contact with these substances and do not apply iodine, betadine or other antiseptics to the Manikin. These may stain skin permanently. You may use alcohol pads.
• Only use water-based lubricants or dish soap on the manikin.
• If lubricant is used on any part of the manikin, clean thoroughly by wiping with warm water and a soft cloth. Tubes and hard-to-reach areas may be cleaned using a pipe cleaner or similar product. Pipe cleaner tip must be bent at least 1/2 inch to prevent scratching.
• Ensure all parts of manikin, including injection pads and removable parts, are completely dry before storing to prevent mold.
• Follow cleaning, care and storage guidelines in each section of this guide.
Warnings: • Use caution around joints, which create pinching hazards.
• To prevent molding, do not use or inject liquids into any unspecified areas on Manikin. Specific intramuscular injection pads and stomach have been identified in this guide as areas that may accommodate the use of liquids and can be dried appropriately.
Note: Realityworks reserves the right to change product color, materials or function as needed.
Additional help and informationOnline Product Support We’re here to help! Our online Product Support features video tutorials, downloadable documents, frequently asked questions and product notices, all of which make it easy for you to get support for products, software and more, day or night. Find our online product support area here: https://www.realityworks.com/knowledge-base/
Online Store Supplies, accessories, select simulators, curriculum and more are available for purchase from our online store 24 hours a day!
800.830.1416www.realityworks.com© 2020 Realityworks, Inc. All rights reserved.1055080-01 | 03/2020
NEED MORE HELP?