· libertario . co munis mo libertario . co munis mo libertario . created date: 20180816074318z ...

Munis General Journal Entry/Proof ______________________________________________________
Procedural Documentation
For more information, visit www.tylertech.com.

Munis® General Journal Entry/Proof, Version 2018.1 Page 2
General Journal Entry/Proof
Objective This document provides instructions on how to enter a manual general journal entry, update the entry, proof the entry, and release the entry for approval and posting.
Overview Department staff members are responsible for entering journal entries, which will be released to the approval process. General ledger posting is typically centralized to the accountants within your organization’s finance office.
Prerequisites Before you can successfully use this feature, you must ensure that the necessary permissions and settings are in place. If permissions or settings are not set up properly, or if the required programs are not available on the Munis menu, contact the system administrator. Confirm the following:
You have the appropriate general ledger permissions for processing journal entries.
The chart of accounts (COA) has been created.
The Journal Number Control program has been completed to establish journal numbers.

Munis® General Journal Entry/Proof, Version 2018.1 Page 3
Procedure Use the following steps to create a manual general journal entry:
Open the General Journal Entry/Proof program. Financials > General Ledger Menu > Journal Entry/History > General Journal Entry/Proof
Click Add.
Complete the fields according to the following table to enter the manual journal. Press Tab to move through the fields.
Field Description Notes
Effective Date Specifies the date that the transaction affects programs in Munis. The default value is the current date, but you can change this if necessary. In certain circumstances, you can enter an effective date that is a future date. Type a date or click the calendar button to select a date.
Fiscal Year Identifies the fiscal year associated with the journal entry. This field is assigned using the year entered in the Default Year/Period boxes in the General Ledger Settings program. This is a required field. Type the fiscal year in the YYYY format.
Period Indicates the period within the fiscal year associated with the journal entry. The default value for this period is the value of the Default Year/Period box in

Munis® General Journal Entry/Proof, Version 2018.1 Page 4
Field Description Notes
the General Ledger Settings program. When you are adding data, you can enter a different period if you have appropriate permissions. Period is part of the journal key for all general ledger transactions. If the default period does not match the effective date, those with the necessary permissions see a warning message and the period is updated automatically to the current period. Those who do not have permission to change the default period are warned that the effective date and period do not match, but the period does not change and entry must be made to the original default period.
Journal Displays an automatic sequential number based on the numbering system set up in Journal Number Control. The program completes this number and you cannot change it.
Source Journal Identifies the source of the journal you are entering. A general journal entry source is typically GEN for general or GCR for cash receipt. If the value is GCR and the fund is a revolving fund, the program updates the following fields in Account Master: Revised Budget (CY), Budget Transfer In (CY), Budget Transfer Out (CY), and Last Updated. If the fund is also a multiyear fund, the program updates the value of the Inception Revised Budget field.
Entity Code Indicates how Munis is shared between two locations (such as a town and a school): 1 - First entity only 2 - Second entity only 3 - Always shared Entity codes are established in the System Settings program, which is available from the System Administration menu. If your organization uses entity codes, you must select an entity code.

Munis® General Journal Entry/Proof, Version 2018.1 Page 5
Field Description Notes
Auto Reverse Journal
Designates the journal as an Auto Reverse Journal (an accrual journal entry), indicating that this journal is to be included when you select the Auto Reverse option in the Journal Reversal program. The default value is N - No. Type Y (Yes) to identify this journal as an auto reverse journal.
Short Description Contains the user-defined journal reference. Munis programs use this description on screens and reports where journal information is summarized. It occupies the Ref 4 position. This is a required field.
Journal Reference
Specifies the user-defined journal reference code that stays with each transaction throughout its life. It may be a control number, a date, or a note. The journal reference from General Journal Entry/Proof occupies the Ref 1 position on inquiry screens and reports. Entries in the Reference 2 and Reference 3 boxes display in Ref 2 and Ref 3 on screens and in reports. The short description occupies the Ref 4 position on inquiry screens and reports. Information in reference fields varies depending on the program in which the journal is created. For example, if the journal was created during Invoice Entry, it may contain the vendor number.
Journal Type Indicates the type of journal. The default value for this box is blank, but you can add a type code. There are three typical journal type codes: Normal (N), Interfund (I), or Adjustments (A). If you consistently assign type codes, they may be used as search criteria in queries and reports. If the default value for this box is “~” and the value of the Source Code box is GCR, this is an imported journal and you cannot change the type code.
Budget Year Code
Identifies the budget year code, which can be either 1 for Current Year or 2 for Carry Forward. This box can only be

Munis® General Journal Entry/Proof, Version 2018.1 Page 6
Field Description Notes
changed from the default of 1 if the value of the Budget Carry Forward Method option in the General Ledger Settings program is 3–GAAP/Budgetary Combined. Setting this option to 2–Carry Forward adds the gross amount of each transaction to the Carry Forward from Last Year Actual field in Account Master. (It codes the entry as related to last year's budget so it can be excluded from a current year budget report if desired.)
Due-to/Due-from Fund
Identifies the target fund to use when you are generating due-to/due-from accounts. The default value for these boxes is the due to/due from fund selected in the User Attributes program, but you can change this. Note: Due-to/due-from accounts must be created in the Due To/Due From Setup program.
Reference 2, 3 Offer the option for entering more detailed information. The values entered display on screens and reports. Each box contains up to ten characters.
Approval Status Indicates the current approval status of the entry. If your organization uses Munis Workflow, the program updates this value as the approval process progress. A journal that is initially entered has a status of Held until approved by a designated approver.
WO # Specifies the work order to which the journal applies. If you enter a work order number, the program creates actual supply detail lines for that work order. This box is applicable if your organization uses Munis Work Orders, Fleet and Facilities.
Task # Contains the task number or code to which the journal applies. You must enter a task in this box. This box is applicable if your organization uses Munis Work Orders, Fleet and Facilities, and you have entered a work order number.

Munis® General Journal Entry/Proof, Version 2018.1 Page 7
Field Description Notes
Vendor Identifies the vendor assigned for the work order and task specified. Type a vendor number or click the field help button to select a vendor from a list of available vendors. This box is applicable if your organization uses Munis Work Orders, Fleet and Facilities, and you have entered a work order number.
Project Accounts Apply
Indicates that project account strings apply as part of the journal entry, if selected.
Transaction Type
Indicates how the journal transaction was made: by adjustment or by wire transfer. Select the blank option to omit this value. This information appears in the thirtieth position of the comment field when the journal is posted.
Once you complete the header information, the Journal Lines group is accessible.
Complete the fields, using the following table as a guide, to enter the line detail information.
Field Description Notes Line Assigns the line number of the journal entry.
The program completes this number; there is no access to this field.
T Indicates whether the line is for an expense or funding source string, if the journal entry applies to a project from the Project Accounting module.
Project String Provides the project string to which the entry applies. Click the field help button to select a string from a list of available options.
Org Object Project
Indicate the org, object, and project codes for the general ledger account.
Account Description
Provides the account description from the Chart of Accounts for the selected general ledger account.
Line Description Contains the user-defined description for the individual line posting. The description can contain up to 30 characters.

Munis® General Journal Entry/Proof, Version 2018.1 Page 8
Field Description Notes Ref 1 Specifies the user-defined short description
of the posting for the individual journal line. The description can contain up to 10 characters.
Effective Date Indicates the date the transaction affects the general ledger.
D/C Identifies if the line is a debit (D) or credit (C). Amount Specifies the amount of the transaction. This
should be a positive number. Zeros and negative numbers are not accepted. For this value, the program checks the available budget for expense accounts. The program displays a warning if it detects an over-budget entry; it allows you to continue if you have permissions to make over-budget entries. If you are not authorized to enter over budget amounts, the program does not all you to continue without entry of a supervisor password.
To add additional detail lines, press Tab from the last box in a row and the program makes a new detail line accessible.
The Line Description from the previous line is the default value for a new line. Make necessary changes to default values; as you add details, the program tracks debits and credits in the Journal Totals group at the bottom of the screen.
Click Accept when you have completed entering your journal lines.

Munis® General Journal Entry/Proof, Version 2018.1 Page 9
Updating a Journal Entry Prior to General Ledger Posting To update a journal entry:
Open the General Journal/Entry Proof program. Financials > General Ledger Menu > Journal Entry/History > General Journal Entry/Proof
Use the Search button to find the journal to update.
If the period chosen on the batch header needs to be changed, click Period. The program displays the Journal Year/Period Change screen.
Complete the New Year/Period boxes, and then click Accept to save the change and return to the main screen. Note: You can only access this option if your permissions allow you to post outside of the default year and period.
Click Update to make the necessary changes to the fields in the Journal Information group.
Munis® General Journal Entry/Proof, Version 2018.1 Page 10
When you have completed making the changes to the journal fields, click Accept to save the changes.
To change the journal lines, click Modify Lines. This allows you to make changes to the account numbers, descriptions, and dollar amounts in the journal lines.
When you have completed making your changes to the journal lines, click Accept to save the changes.
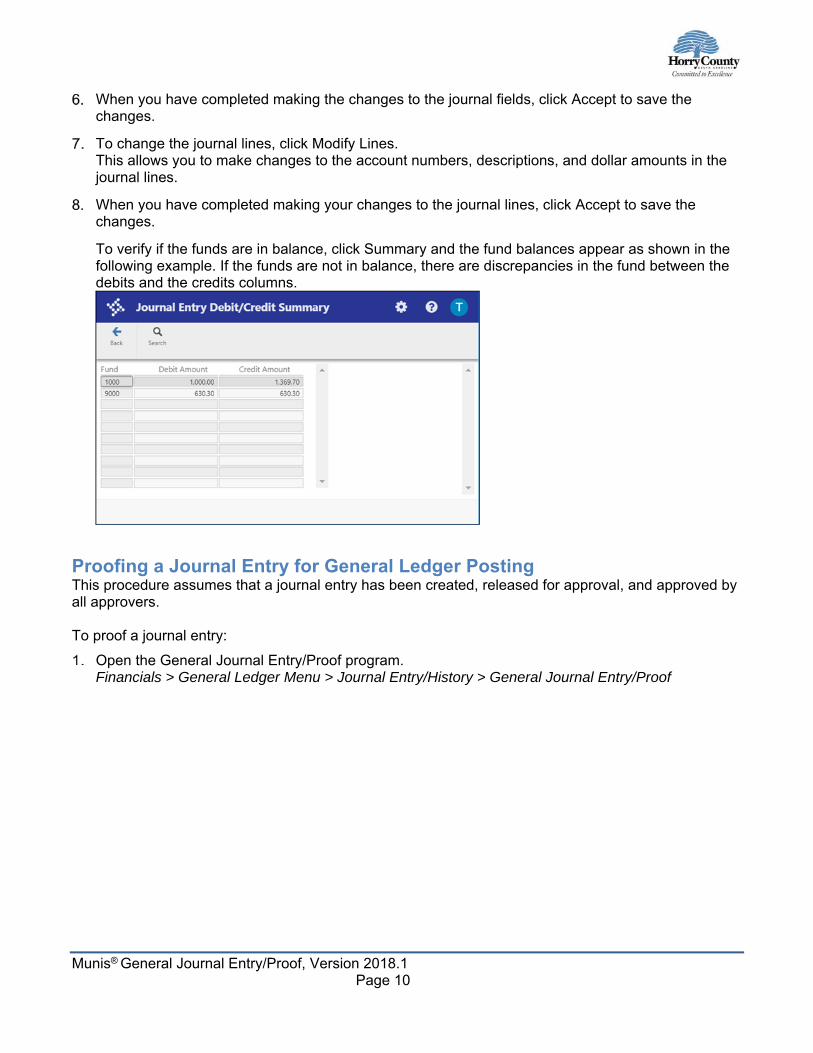
To verify if the funds are in balance, click Summary and the fund balances appear as shown in the following example. If the funds are not in balance, there are discrepancies in the fund between the debits and the credits columns.
Proofing a Journal Entry for General Ledger Posting This procedure assumes that a journal entry has been created, released for approval, and approved by all approvers.
To proof a journal entry:
Open the General Journal Entry/Proof program. Financials > General Ledger Menu > Journal Entry/History > General Journal Entry/Proof

Munis® General Journal Entry/Proof, Version 2018.1 Page 11
Click Browse. The program displays the Options screen.
Browse Own Journals—Displays only those journals created by your user ID.
Browse All Journals—Displays all available journals.
Browse by Clerk—Displays only those journals for the user ID entered in the Clerk ID box.
Make a selection and click Accept. The program displays a list of journals.

Munis® General Journal Entry/Proof, Version 2018.1 Page 12
Highlight the journal to proof and then click Accept. The program refreshes to display the selected journal.
Click Output-Post on the toolbar. The program displays the following Options screen.
The Current Journal Only—Posts only the journal currently selected.
All of Your Own Journals—Posts all available journals for your user ID.
All Journals—Posts all available journals.
All Journals for Clerk—Posts only those journals for the user ID entered in the Clerk ID box.
Select the appropriate option and then click Accept. The program displays the Output screen, where you can define the journal proof report settings.
Select the Save output option, note the file name, and click OK. If the program finds no errors, it displays the Post Journal Confirmation box.
Click No.

Munis® General Journal Entry/Proof, Version 2018.1 Page 13
Open the Saved Reports program. Departmental Functions > Saved Reports
Click Search.
Enter your user ID in the User ID field.
Click Accept to display the list of reports.
Highlight the report to view and click an output option from the toolbar to display the report. The program displays the report.
Once the journal has been verified, return to the General Journal Entry/Proof program and click Output-Post again.
Click Yes on the Post Journal Confirmation screen to post the journal.

Munis® General Journal Entry/Proof, Version 2018.1 Page 14
Verifying Posted Journals To verify posted journals:
Open the General Journal Entry/Proof program. Financials > General Ledger Menu > Journal Entry/History > General Journal Entry/Proof
Click Posted Find. The program displays the Find Posted Journals screen.
Complete one or more of the fields as search criteria, and then click Accept to execute the search. The program displays a list of journals that meet the search criteria.

Munis® General Journal Entry/Proof, Version 2018.1 Page 15
Highlight the journal to view by clicking it, and then click Accept. The program refreshes the screen to display the Inquiry, Create Journal, and Select options in the toolbar.
Click Inquiry. The Journal Inquiry/Print screen displays the journal detail.
Click Back on the toolbar to return to the Find Posted Journal program.
Click Create Jnl to copy the active journal. The program displays the Define Required Journal Fields screen.
Complete the Budget Year, Period, and Effective Date boxes.
Click Accept to create the journal. The journal entry must go through the normal approval process before it is posted to the general ledger.
Click Release to submit the journal entry for approval.
Results The journal entry posting has updated the general ledger accounts.

Munis® General Journal Entry/Proof, Version 2018.1 Page 16
GL Impact When the journal entry is posted, the general ledger accounts are affected by the amounts entered in the journal entry line detail. This impact is reflected in the Actuals box in the Account Inquiry and Account Master programs.


![[MU-IT-4-B][MU-IT-13-B] Exploring MUNIS Role …ohconnect.org/fiscal/files/munis_user_roles.pdf[MU-IT-4-B][MU-IT-13-B] Exploring MUNIS Role Based Access Control (RBAC) Munis: System](https://static.fdocuments.us/doc/165x107/5e6b43b17f31a13cd8257da8/mu-it-4-bmu-it-13-b-exploring-munis-role-mu-it-4-bmu-it-13-b-exploring-munis.jpg)