MSIP A Practical Guide to Resident Handling main · After a comprehensive literature review and ......
115
A PRACTICAL GUIDE TO RESIDENT HANDLING October 2004
Transcript of MSIP A Practical Guide to Resident Handling main · After a comprehensive literature review and ......

A PRACTICAL GUIDE TO
RESIDENT HANDLING
October 2004
- MSIP – A Practical Guide to Resident Handling
© Copyright October 2004 Preface i
Preface Interior Health is a large healthcare organization in British Columbia providing a full range of services to the population within a specified geographic area. Our vision is “To set new standards of excellence in the delivery of health services in the Province of B.C.” Interior Health is committed to providing better care, more choices of care and to improving access to services. To achieve these objectives, Interior Health embarked on the quest to become an organization of choice in 2002 in order to ensure greater workforce stability, a level of continuity that assures preservation of the knowledge base and employee satisfaction. A key result area to achieving these outcomes has been the organization’s commitment to providing a safe and healthy workplace. This manual has been developed to assist staff in residential care facilities by providing policy, guidelines and best practices for patient handling activities. The various instructions and tools available for staff use address the Workers’ Compensation Board requirements. Incorporation of these safe practices not only minimizes staff injury but improves the quality of care to the residents through consistency and standardization of care practices. Carole Taylor Corporate Director Workplace Health and Safety Interior Health Authority.

- MSIP – A Practical Guide to Resident Handling
© Copyright October 2004 Acknowledgements ii
Acknowledgements Interior Health greatly appreciates the time and expertise of the many healthcare providers (front line staff, rehabilitation staff and nursing) who shared their knowledge and practical ideas so that they could be incorporated into these “best practice” guidelines. Staff, management and unions from across Interior Health have contributed through trials, focus groups, equipment demonstrations, as well as through feedback mechanisms such as evaluations and satisfaction questionnaires. This manual comes alive because of their knowledge and extent of caring for their clients. We would also acknowledge the contribution of residents and their families in providing feedback on improvements to their quality of life as a result of these practice changes. The commitment of the Senior Leadership of Interior Health is also acknowledged in each of the four Health Service Areas through their ongoing support of resource allocation for PEER LEADERS and other workplace champions to implement these changes at facilities level. In addition, valuable feedback was provided through extensive review by the authors of the first edition of this manual: • Marjorie Brims, PT, Workplace Health and Safety • Leslie Gamble, OT, Workplace Health and Safety • Staff and Management from Cottonwoods (Kelowna) and Westview Lodge (Penticton). This document was developed by the following Workplace Health and Safety staff with support and assistance of their colleagues: • Carole Taylor, Corporate Director, Workplace Health and Safety • Nancy McGovern, MSIP Advisor, Workplace Health and Safety • Wendy Wheeler, MSIP Advisor, Workplace Health and Safety • Alison Camplejohn, MSIP Advisor, Workplace Health and Safety • Sue Filek, MSIP Advisor, Workplace Health and Safety • Avis Antonenko, MSIP Advisor, Workplace Health and Safety • Tracy Carr, MSIP Advisor, Workplace Health and Safety • A special thank you to Aida McLarty, Administrative Coordinator, Workplace Health and
Safety

- MSIP – A Practical Guide to Resident Handling
© Copyright October 2004 Introduction to the Manual iii
Introduction to the Manual Within the province of British Columbia, the health care industry has experienced more strain and sprain injuries than any other industry (WCB of BC, Health Care Industry: Focus Report on Occupational Injury and Disease, 2000). Many of these musculoskeletal injuries occur in the Residential Care Sector, primarily injuring Long Term Care Aides. A comprehensive musculoskeletal injury prevention (MSIP) project began in March 2001 when the Ceiling Track Lift Strategy Task Force brought together representatives from across the Okanagan Similkameen Health Region. After a comprehensive literature review and current situation assessment, it was determined that ceiling track lifts be installed in all resident rooms and tub rooms in extended care facilities. It was also recommended that as level of care increased in intermediate care facilities, that ceiling track lifts be installed in all Residential Care facilities. Details are documented in the Ceiling Track Lift Strategy Report (July 24, 2001). Funding was secured from the British Columbia Ministry of Health Planning Nursing Strategy, Workers’ Compensation Board of British Columbia and Interior Health to invest capital in ceiling track lifts over a three year period. MSIP advisors were assigned to facilitate all aspects of ceiling track lift implementation and followed a process similar to the one published in the Ceiling Track Lift Implementation Manual (December 2002). Facility project committees planned and coordinated the installation of the ceiling track lifts, problem solved changes to care routines, and served as local champions to increase communication to residents, families and staff as renovations and changes were taking place. MSIP Peer Leaders groups were created at each facility via a 3-day MSIP Peer Leader Training Course. These groups continue to act as local champions, mentors, and problem solvers. This manual, A Practical Guide to Resident Handling, was created in August 2002 to provide a reference to Nursing Managers, MSIP Peer Leaders, and Rehabilitation Therapists in Residential Care. It outlines the assessment tools, safe work procedures and equipment operation which will allow facilities with ceiling track lifts to effectively implement a No-Lift Policy to foster an environment where safe and comfortable care for residents is carried out, while minimizing risk of injury to care staff. The original manual was revised in October 2004 to reflect ongoing quality improvement of the program. Much of what is documented here is in support of the work of the front-line caregivers, and includes many suggestions that MSIP Advisors received from various Peer Leader groups. This revision includes minor revisions to most sections and a new section devoted to repositioning.

- MSIP – A Practical Guide to Resident Handling
© Copyright October 2004 Table of Contents iv
TABLE OF CONTENTS
Preface............................................................................................................................................. i
Acknowledgements ....................................................................................................................... ii
Introduction to the Manual......................................................................................................... iii
1.0 Understanding Musculoskeletal Injuries (MSI)..............................................................1 1.1 Introduction..............................................................................................................1
1.2 Early Signs and Symptoms of Musculoskeletal Injury (MSI) .................................2
1.3 Are you at risk of an MSI?.......................................................................................3
2.0 No Lift Policy......................................................................................................................1 2.1 Introduction to the No Lift Policy............................................................................1
2.2 No Lift Resident Handling and Moving Policy .......................................................3
3.0 Resident Transfer Assessment ..........................................................................................1 3.1 Assessing Weight Bearing Status ............................................................................1
3.2 Resident Transfer Assessment Form (Ceiling Lift) .................................................4
3.3 Resident Transfer Assessment Form (Floor Lift) ....................................................5
4.0 Sling Information...............................................................................................................1 4.1 Introduction to Slings...............................................................................................1
4.1.1 Quick Reference Guide for Common Slings ...............................................2 4.1.2 Leg Strap Configuration Options.................................................................3
4.2 General Sling Guidelines .........................................................................................4 4.2.1 Basic Sling Selection ...................................................................................4 4.2.2 Sling Safety..................................................................................................4 4.2.3 Leaving Transfer Slings Behind Residents in Chair....................................5 4.2.4 Leaving Repositioning Slings Under Residents in Bed...............................6 4.2.5 Sharing Slings between Residents ...............................................................6 4.2.6 Care and Laundering of Slings ....................................................................6
4.3 Sling Management ...................................................................................................7 4.3.1 Sling Ordering..............................................................................................7 4.3.2 Sling Inventory.............................................................................................9 4.3.3 Sling Labeling............................................................................................11 4.3.4 Sling Storage..............................................................................................11 4.3.5 Sling Inspection .........................................................................................11

- MSIP – A Practical Guide to Resident Handling
© Copyright October 2004 Table of Contents v
5.0 Total Lift Transfers ...........................................................................................................1 5.1 High Risk Methods Associated with Total Lift Transfers .......................................1
5.2 Universal Sling.........................................................................................................2 5.2.1 Sling Application in Bed (Universal Sling) .................................................2 5.2.2 Sling Application in Chair (Universal Sling)...............................................4 5.2.3 Sling Application on Floor (Universal Sling)..............................................5
5.3. Hygiene Sling Applications .....................................................................................6 5.3.1 Sling Application in Bed (Hygiene Sling) ...................................................6 5.3.2 Sling Application in Chair (Hygiene Sling) .................................................8
5.4 Repositioning Sling Applications ............................................................................9 5.4.1 Lateral Transfers (Repositioning Sling) (Use with XY Gantry Systems)......9 5.4.2 Floor to Bed Transfers (Repositioning Sling) (Use with XY Gantry Systems)..................................................................................................................10
5.5 Hammock Sling Applications ................................................................................11 5.5.1 Sling Applications in Bed (Hammock Sling)– to be added in the future..11 5.5.2 Sling Applications in Chair (Hammock Sling) – to be added in the future12 5.5.3 Sling Application on Floor (Hammock Sling) – to be added in the future 13
5.6 End Positioning Options ........................................................................................14 5.6.1 Into Manual Wheelchair from Behind (Back Method) ..............................14 5.6.2 Into Wheelchair from the Front (Front Method) .......................................15 5.6.3 Into a Reclining Chair................................................................................16
5.7 Other Slings – Special Diagnostic / Treatment Applications ................................17
6.0 Sit Stand Lift ......................................................................................................................1 6.1 General Sit Stand Lift Guidelines ............................................................................1
6.1.1 Resident Criteria for use of Sit Stand Lift ...................................................1 6.1.2 Sit Stand Lift Transfer .................................................................................2
7.0 Manual Transfers...............................................................................................................1 7.1 General Manual Transfer Guidelines.......................................................................1
7.1.1 Manual Transfer Flowchart..........................................................................2
7.2 High Risk Methods Associated with Manually Transferring Residents..................3
7.3 Manual Transfer - One Person Step Around............................................................5
7.4 Assisted Walking .....................................................................................................7 7.4.1 One Person – to be added in the future........................................................7 7.4.2 Two Person – to be added in the future .......................................................8
7.5 Transfer to a Stretcher – to be added in the future ..................................................9
8.0 Repositioning......................................................................................................................1 8.1 Introduction to Repositioning ..................................................................................1
- MSIP – A Practical Guide to Resident Handling
© Copyright October 2004 Table of Contents vi
8.2 Resident Repositioning Assessment Form...............................................................3
8.3 Risks Associated with Manual Repositioning .........................................................4
8.4 General Guidelines for Manual Repositioning In Bed ............................................5
8.5 Mechanical Repositioning in Bed............................................................................6 8.5.1 Move up the Bed or Transfer to a Stretcher (Mechanical Reposition) ........6 8.5.2 Move up the Bed and Turn to One Side Using Repositioning Sling (Mechanical Reposition)..........................................................................................7 8.5.3 Turning to One Side Using the Repositioning Sling (Mechanical Reposition) ...............................................................................................................8
8.6 Manual Repositioning in Bed ..................................................................................9 8.6.1 Two Person Assist to Side of Bed and Turning (Manual Reposition).........9 8.6.2 Two Person Assist Up the Bed – Two Feet on Floor (Manual Reposition)10 8.6.3 One Person Assist Up the Bed (Manual Reposition).................................12
8.7 Mechanical Repositioning in Chair .......................................................................13 8.7.1 Front Method in Chair (Mechanical Reposition).......................................13 8.7.2 Back Method in Chair (Mechanical Reposition) .......................................14 8.7.3 Into a Reclining Chair (Manual Reposition)..............................................15
8.8 Manual Repositioning in Wheelchair ....................................................................16 8.8.1 Two Person Assist – Front and Back in Wheelchair (Manual Reposition)16 8.8.2 One Person Assist – Front in Wheelchair (Manual Reposition)................17
8.9 Recommended Repositioning Products .................................................................18
9.0 Bathing................................................................................................................................1 9.1 Bathing Assessment Tool ........................................................................................1
9.2 Associated Risks – to be added in the future ...........................................................2
9.3 Use of Century Tub with Chair – to be added in the future ....................................3
9.4 Use of Arjo Tub with Chair – to be added in the future ..........................................4
9.5 Use of Arjo Tub with Stretcher – to be added in the future ....................................5
9.6 Use of Arjo Tub with Sling – to be added in the future ..........................................6
9.7 Use of Shower Stretcher – to be added in the future ...............................................7
9.8 Use of Shower Chair – to be added in the future.....................................................8
10.0 Dressing...............................................................................................................................1 10.1 General Dressing Guidelines ...................................................................................1
10.2 Dressing Assessment – Notice to Families and Residents.......................................2 10.2.1 Dressing Assessment Tool...........................................................................3
10.3 Adapted Clothing .....................................................................................................4 10.3.1 Local Seamstresses – to be added in the future ...........................................5 10.3.2 Commercially Available Resources – to be added in the future .................6
- MSIP – A Practical Guide to Resident Handling
© Copyright October 2004 Table of Contents vii
10.3.3 Patterns – to be added in the future .............................................................7
11.0 Bariatric Information ........................................................................................................1 11.1 Procedure – to be added in the future ......................................................................1
11.2 Resources – to be added in the future ......................................................................2
12.0 Operation of Mechanical Lift Equipment .......................................................................1 12.1 Ceiling Track Lift ....................................................................................................1
12.1.1 Operation......................................................................................................1 12.1.2 Charging Instructions for the Ceiling Track Lifts........................................4
12.2 Total Floor Lift Operation Manual ..........................................................................6
12.3 Sit Stand Lift Operation Manual..............................................................................7
13.0 Forms ..................................................................................................................................1 Resident Transfer Assessment Form (Ceiling Lift) .............................................................2
Resident Transfer Assessment Form (Floor Lift) ................................................................3
Sling Order Form For Waverly Glen Ceiling Track Lifts ...................................................3
Sling Order Form For Waverly Glen Ceiling Track Lifts ...................................................4
Sling Inventory and Tracking Form.....................................................................................5
Resident Repositioning Assessment Form (RRA)................................................................6
Bathing Assessment Tool ....................................................................................................7
Dressing Assessment Tool...................................................................................................8
- MSIP – A Practical Guide to Resident Handling
© Copyright August 2002 (Revised October 2004) Understanding Musculoskeletal Injuries (MSI) Section 1 - Page 1
MUSCULOSKELETAL INJURY PREVENTION:
A PRACTICAL GUIDE TO RESIDENT HANDLING 1.0 Understanding Musculoskeletal Injuries (MSI) 1.1 Introduction
Musculoskeletal injuries (MSI) tend to occur when the physical demands of the job task exceed the physical capabilities of the worker, resulting primarily in strain or sprain type injuries. Prevention of MSI may be enhanced when workers are aware of the early signs and symptoms of MSI and seek assistance during the early stages. Understanding ergonomic (MSI) risk factors and learning to avoid them may also help to prevent MSIs. When assessing the risk of MSI, it is important to consider how often and how long you are exposed to each risk factor. If a job task involves more than one risk factor, the level of risk increases substantially.
The prevention of MSI often requires changing work practice and redesigning job tasks. For example, replacing the task of manually lifting a resident out of bed in the morning with a mechanical lift greatly reduces the physical demand of this job task.
- MSIP – A Practical Guide to Resident Handling
© Copyright August 2002 (Revised October 2004) Understanding Musculoskeletal Injuries (MSI) Section 1 - Page 2
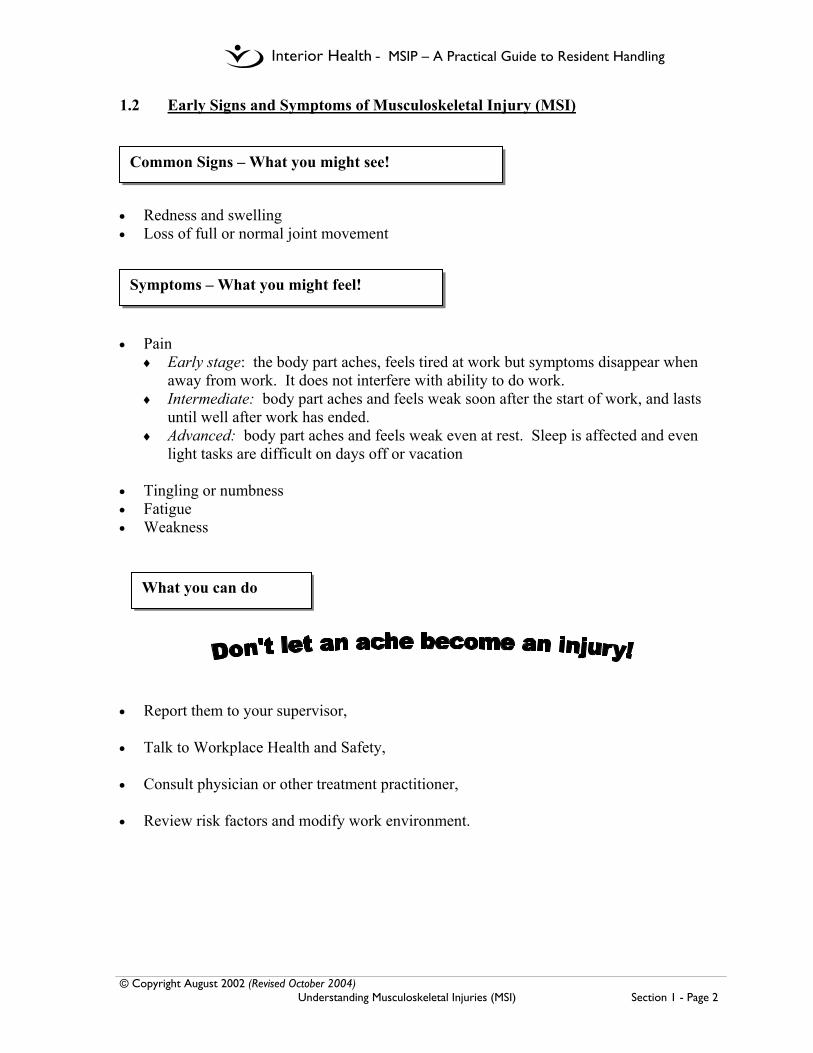
1.2 Early Signs and Symptoms of Musculoskeletal Injury (MSI) • Redness and swelling • Loss of full or normal joint movement • Pain
♦ Early stage: the body part aches, feels tired at work but symptoms disappear when away from work. It does not interfere with ability to do work.
♦ Intermediate: body part aches and feels weak soon after the start of work, and lasts until well after work has ended.
♦ Advanced: body part aches and feels weak even at rest. Sleep is affected and even light tasks are difficult on days off or vacation
• Tingling or numbness • Fatigue • Weakness
• Report them to your supervisor, • Talk to Workplace Health and Safety, • Consult physician or other treatment practitioner, • Review risk factors and modify work environment.
Common Signs – What you might see!
Symptoms – What you might feel!
What you can do

- MSIP – A Practical Guide to Resident Handling
© Copyright August 2002 (Revised October 2004) Understanding Musculoskeletal Injuries (MSI) Section 1 - Page 3
1.3 Are you at risk of an MSI? There are five main categories of MSI risk in your workplace: • Force – Effort that places high loads on the muscles, tendons, ligaments and joints of the
body increases the body’s energy demands and the possibility of injury. Manually assisting residents to transfer or reposition in bed can require forceful exertion.
♦ Power grip vs. pinch grip – A power grip involves the entire hand. A pinch grip
involves the fingers only. A power grip provides more force, and requires less effort. (e.g. Grasping a soaker pad with the tips of your fingers rather than with your full hand to reposition a resident. )
• Static Postures – Static Postures are positions held for more than 20 seconds. Muscles
then tire quickly because blood flow is restricted. Leaning over a resident bed to assist with a dressing can be an example of a static posture.
• Contact Stress – This occurs when parts of the body come into contact with hard or
sharp objects and can injure nerves and tissues beneath the skin. Pill crushing may cause contact stress to your hand.
• Awkward Postures – Awkward postures occur when using your body outside of a
neutral body position. Leaning over a bedrail when dressing or moving a resident or reaching into a bathtub to assist with bathing are examples of awkward back postures you may experience. Bringing your elbows up and out to the side when manually repositioning a resident in bed is an example of an awkward shoulder posture.
• Repetition – Repetitive tasks are those tasks which are repeated once every 30 seconds
for more than 2 hours total per shift, using the same muscle group(s) over and over again. The muscles and tendons do not get enough time to rest, leading to fatigue and possible muscle damage. Pill crushing can be considered a repetitive task.

- MSIP – A Practical Guide to Resident Handling
© Copyright August 2002 (Revised October 2004) Understanding Musculoskeletal Injuries (MSI) Section 1 - Page 4
Are you at risk of an MSI?
Risk Factors Static
Postures Awkward Postures
Contact Stress
Forceful Exertion
Repetitive Motion
- MSIP – A Practical Guide to Resident Handling
© Copyright August 2002 No Lift Policy Section 2 - Page 1
2.0 No Lift Policy 2.1 Introduction to the No Lift Policy
What are the advantages? It will mean that: • There should be considerably less risk of care staff experiencing a strain/sprain
injury related to resident handling activities. Our aim is to significantly reduce the number of staff injuries and in 2 years boast a no strain/sprain injury record.
• The first choice for transferring or repositioning a resident will be using the ceiling track lift with an appropriate sling for all care activities unless the resident has demonstrated consistent ability to move and transfer in a less supported manner.
• Residents will be provided with more consistent, comfortable and safer methods of being transferred, repositioned, dressed, and bathed. These methods will be clearly communicated to all staff including casuals and students.
• The Peer Leaders on your unit will have the ability to assist with transfer or repositioning choices and will have authority to change functional sheets. The functional sheet will be updated regularly.
• You will be provided with the necessary transfer/repositioning equipment to allow you to work more effectively – you should find that you rarely have to wait for a lift or sling.
• Equipment will be regularly maintained. We have incorporated a maintenance contract with the ceiling lift supplier and, as we standardize other equipment such as floor model lifts, we will be requesting the same type of maintenance contract.
• Management will support care staff decisions with family/residents based on the policy (e.g. need to mechanically transfer a resident, need for adapted clothing).
Does it mean that you can no longer perform 1 and 2 person assisted manual transfers? A “No Lift Policy” does not mean that care staff will never transfer or reposition any residents manually. However, the criteria for who can be transferred or repositioned manually is much more defined as follows: Manual transfers: Helping a resident to stand, move or transfer using a caregiver’s assistance and a transfer belt. A weight bearing assessment has indicated that the resident can bear full weight on at least one leg, can stand erect, effectively step, can follow instruction, and is cooperative. Alternately, a weight bearing assessment has indicated that the resident may be transferred using other assistive equipment (e.g. a sliding board or standing pole) and this method has been clearly communicated to all involved staff, and the staff have been trained in the use of this equipment with this resident.

- MSIP – A Practical Guide to Resident Handling
© Copyright August 2002 No Lift Policy Section 2 - Page 2
Manual repositioning in bed: Assisting a resident to move up in bed or to be turned in bed using approved assistive equipment such as a low-friction slider sheet, and the body strength of two caregivers following safe work procedures. A transfer assessment has indicated that this procedure is appropriate, this method has been clearly communicated to all care staff involved and staff have been trained in the use of this equipment with this resident. In facilities with ceiling track lifts, Interior Health will no longer authorize the following transfer methods except in exceptional care circumstances:
• One-person low pivot manual transfer. Research has indicated that this method
results in excessive shearing (side to side) forces and compression forces on the spine which, over time, can result in vertebral endplate micro fractures.
• Two-person side-by-side transfer. This transfer method has resulted in the most transfer injuries of any method used in our facilities. Research has shown that this is due to overreaching and the resulting awkward postures and to the compressive forces on the vertebrae that exceed recommended forces. This method places both the care staff and the resident at risk of injury.
When will it happen? We are currently working toward implementing the No Lift Policy and it will be formally implemented in each site following installation of ceiling track lift equipment and staff training on related procedures.
- MSIP – A Practical Guide to Resident Handling
© Copyright August 2002 No Lift Policy Section 2 - Page 3
2.2 No Lift Resident Handling and Moving Policy Purpose This policy is formulated to decrease resident handling and movement injuries to staff and to improve quality of resident care. The policy outlines methods, which will ensure that Interior Health employees use safe resident handling and movement techniques in residential facilities. The No-Lift policy applies to all Interior Health resident care facilities with ceiling track lift systems. Policy The Interior Health Authority places a high priority on resident safety, while maintaining a safe work environment for employees. To accomplish this, the musculoskeletal injury prevention (MSIP) program will be expanded to ensure the required infrastructure is in place to comply with the components of this No Lift Policy. This infrastructure includes management commitment and support, resident handling and movement equipment, equipment maintenance, employee training, advanced training for MSIP resource staff and a culture of safety approach. A culture of safety approach refers to the collective attitude of employees (including supervisors, care staff and management) taking shared responsibility for safety in a work environment and by doing so, providing a safe environment for themselves as well as the residents. Care staff in resident care areas must assess high-risk resident handling tasks in advance to determine the safest way to accomplish the task. (See attached Resident Transfer Assessment form) The assessment must then be clearly communicated to all staff involved. Tasks deemed to be high-risk will require use of the recommended lift and transfer equipment, approved resident handling aids (including resident clothing modifications) and other approved techniques except in exceptional resident care circumstances.
In the facilities with ceiling track lifts, the first choice for transferring or repositioning a resident will be use of the ceiling track lift for all care activities unless the resident has demonstrated consistent ability to move and transfer in a less supported manner. MSIP Program The program will consist of the following elements: 1. Ergonomic workplace assessments of resident care areas 2. Resident risk assessment and care planning for safe resident handling and
movement 3. Equipment selection, storage and maintenance 4. No Lift Policy and accompanying safe work procedures 5. Training 6. Supervision 7. Accident / incident investigations and follow-up 8. Evaluation and statistical review
- MSIP – A Practical Guide to Resident Handling
© Copyright August 2002 No Lift Policy Section 2 - Page 4
Compliance It is the duty of employees to take reasonable care for their own health and safety, as well as that of their co-workers and residents during resident handling activities by following this policy. Definitions The following definitions are included to more fully explain the scope of this policy. High-risk resident handling tasks - Resident handling tasks that have a high risk of musculoskeletal injury for staff performing the tasks. These include but are not limited to moving and repositioning residents, bathing residents and assisting with hygiene, making occupied beds, dressing residents, and tasks with long durations.
Exceptional resident care circumstances - Fire, other evacuation situations, and occasionally, clinical contraindications may require use of non-standard procedures to ensure comfort and safety of the resident and staff. The safest possible work method must be determined when clinical contraindications exist and this must be clearly communicated to all involved staff, including the unit manager.
Total lift / transfer - Using equipment to assist those residents who are unable to bear sufficient weight or cooperate during any transfer, lift or repositioning procedure. Equipment to be used includes ceiling track lifts, floor model lifts, and mechanized lateral transfer aids. This is the method of choice in most resident transfers and when repositioning in bed. Sit / stand lifts will only be considered suitable as a transfer method after a thorough assessment is performed and documented.
Manual transfers - Helping a resident to stand, move or transfer using a caregiver’s assistance and a transfer belt. A weight bearing assessment has indicated that the resident can bear full weight on at least one leg, can stand erect, effectively step, can follow instruction, and is cooperative.
Alternately, a weight bearing assessment has indicated that the resident may be
transferred using other assistive equipment (e.g. a sliding board or standing pole) and this method has been clearly communicated to all involved staff, and the staff have been trained in the use of this equipment with this resident.
Manual repositioning in bed - Assisting a resident to move up in bed or to be turned
in bed using approved assistive equipment such as a low-friction slider sheet, and the body strength of two caregivers following safe work procedures. A transfer assessment has indicated that this procedure is appropriate, this method has been clearly communicated to all care staff involved and staff have been trained in the use of this equipment with this resident.
- MSIP – A Practical Guide to Resident Handling
© Copyright August 2002 No Lift Policy Section 2 - Page 5
Alternately, a Resident Repositioning Assessment has indicated that the resident has the physical and cognitive ability to assist with manual repositioning in bed.
Manual repositioning in a chair - Assisting a resident with adequate upper body
strength to reposition in a chair. An assessment has indicated that the resident can lift their hips off the seat to assist one caregiver in performing this task. Alternately, a transfer assessment indicates the resident can safely lean forward in the chair and cooperate sufficiently to assist two caregivers who are trained in the use of a low-friction slider sheet, when performing this task, with this resident.
Peer Leader - Employee who has participated in advanced training to assist
colleagues and the facility to assess resident transfer and repositioning needs. The Peer Leaders are drawn from the care-giving staff and including Residential Care Aides, Licensed Practical Nurses, Rehabilitation staff, and Nurse Educators. Procedures
A. Resident Handling and Movement Requirements 1. All transferring, moving and repositioning of the resident are considered high-
risk activities. Use of the Resident Transfer Assessment form and Resident Repositioning Assessment form, outlining the safest way to complete the tasks are required. Results of this assessment must be documented and clearly communicated to all resident handling staff involved with the resident. Sling choices must be included in the assessment.
2. Total lifts/ transfers using the ceiling track lifts (or floor model lifts if too far
from the track location) must be used for all resident transfer and repositioning tasks unless it is clearly assessed and documented that the resident requires less supportive transferring/ repositioning assistance. The most suitable sling for each resident must also be clearly documented and used.
Sit /stand lifts will not be substituted for total lifts and are only acceptable on those residents who meet the criteria set out in the Resident Transfer Assessment form.
3. Manual transferring will only be acceptable as a means to assist a resident
who can weight bear on at least one leg, can stand erect, effectively step, can follow instruction and is cooperative. Manual repositioning in bed or chair using a low-friction slider repositioning device will only be acceptable for those residents also assessed as being suitable for a manual transfer.
4. All resident moving and repositioning procedures must be assessed,
documented and communicated clearly to all staff. If the resident shows signs of no longer meeting the criteria for the designated transfer method or sling
- MSIP – A Practical Guide to Resident Handling
© Copyright August 2002 No Lift Policy Section 2 - Page 6
type, a re-assessment should be initiated promptly. Consultation with a unit Peer Leader or member of the Rehab staff is required prior to any change in the methods or sling used. If the Peer leaders or Rehab team are unavailable, the resident will be transferred and repositioned using the ceiling track lift and the most appropriate sling until the assessment is completed.
5. Lifting equipment and other approved resident handling aids must be used in
accordance with instructions and training.
A. Training 1. All care staff will complete and document training initially, annually, and as
required to correct improper use/understanding of safe resident handling and movement. Supervisors will maintain training records for three (3) years.
2. Members of the MSIP Peer Leaders group will complete advanced training
initially and annually. To sustain the MSIP Peer Leader group ideally two to three care staff per 50 residents should be involved. Supervisors will maintain training records for three (3) years.
3. Members of the facility maintenance department will complete and document
equipment maintenance procedures training initially and as required to adequately maintain equipment.
Responsibilities Managers/ Supervisors shall: • Convey and actively promote the Interior Health Authority’s commitment to
injury prevention by supporting the implementation of this policy. • Ensure all employees and new hires participate in initial and annual training in
safe resident handling and equipment use. (New hires to participate within 3 months of start date).
• Ensure all employees comply with the safe work procedures and practices established by this policy. Document appropriate action if non-compliance is determined.
• Ensure high-risk resident handling activities are assessed according to this policy. • Establish a method of communication to inform employees of the resident
handling risks identified and the control methods specified. • Ensure that mechanical lifting devices (including slings) and other equipment/aids
are available to staff. • Ensure that mechanical lifting devices are maintained regularly and kept in proper
working order. Supervisors must have access to updated equipment maintenance logs for the equipment on their unit.
• Ensure that mechanical lifting devices and other equipment/aids are stored conveniently and safely.
- MSIP – A Practical Guide to Resident Handling
© Copyright August 2002 No Lift Policy Section 2 - Page 7
• Complete any accident/incident investigation forms related to a resident handling incident. Assistance from a member of the MSIP Advisors or Peer Leader group or Rehab staff may be incorporated. The supervisor will be responsible to ensure the recommendations from the investigation are carried out.
• Maintain staff MSIP training records for 3 years.
Peer Leaders shall: • Develop advanced knowledge and skills in MSIP. • Provide on going staff MSIP training. • Act as a resource to ensure safe resident handling and movement. • Assist in assessing high-risk resident handling activities. • Assist in orientation of all staff and new hires in resident handling activities. • Assist in establishing a method of communication to inform employees of the
resident handling risks identified and the control methods specified. • Participate in ongoing education to enhance their own knowledge and skills of
MSIP. • Liaise, as required, with the Interior Health MSIP Advisors as well as other
members of the Workplace Health and Safety Department, equipment suppliers, outside resources, rehabilitation staff and the facility management.
• Assist Supervisors with any accident/incident investigations as required. Employees shall: • Comply with all the safe work procedures and practices established by this policy
during performance of high risk resident handling and movement tasks. • Participate in initial and annual MSIP training and as required to correct improper
use/ understanding of safe resident handling and movement. • Ensure that mechanical lifting devices and other equipment/aids are stored
conveniently and safely. • Report all incident/injuries resulting from resident handling and movement by
completing the Interior Health ‘ Accident/Incident Report’ form. • Notify Supervisor/Maintenance of equipment in need of repair.
Workplace Health &Safety / MSIP Advisor shall: • Provide initial training to Peer Leader groups. • Act as an ongoing resource for further MSIP education and problem solving when
requested. • Research and introduce new resident handling equipment for trial and evaluation. • Assist with accident investigations and recommendations when requested • Provide injury statistics to the facility on a quarterly basis; analyze these statistics
and make recommendations to site management and the OH&S committee.
- MSIP – A Practical Guide to Resident Handling
© Copyright August 2002 (Revised October 2004) Resident Transfer Assessment Section 3 - Page 1
3.0 Resident Transfer Assessment 3.1 Assessing Weight Bearing Status
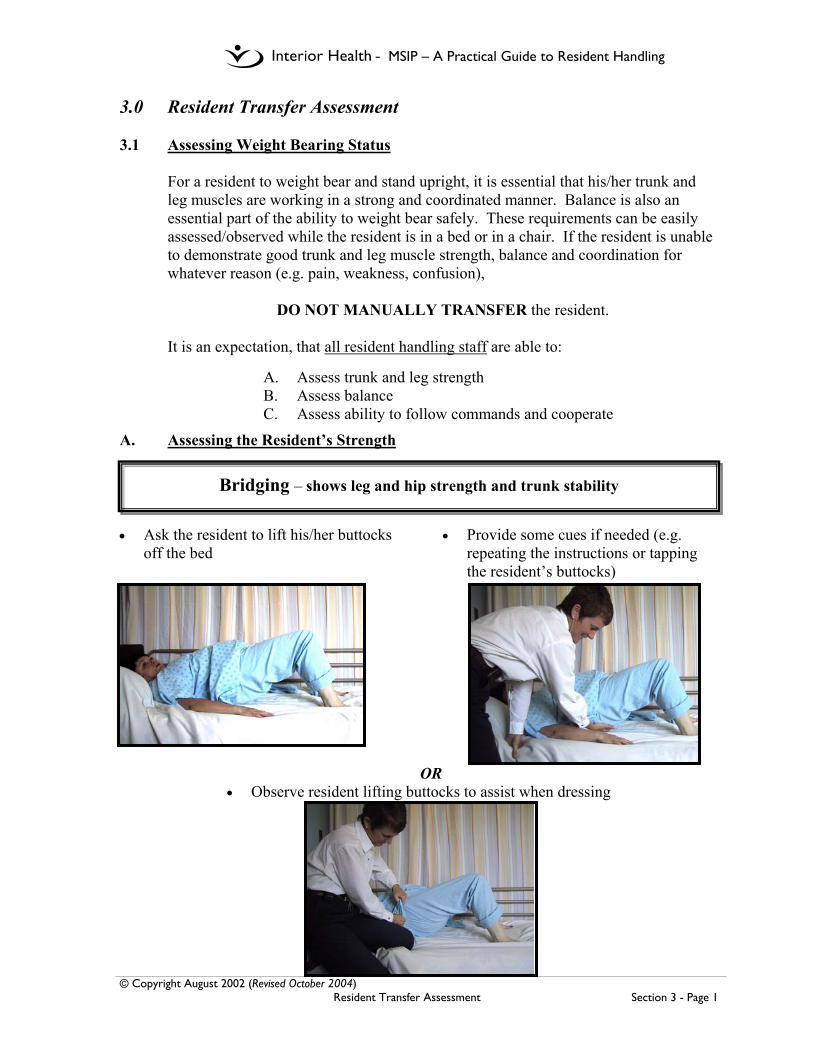
For a resident to weight bear and stand upright, it is essential that his/her trunk and leg muscles are working in a strong and coordinated manner. Balance is also an essential part of the ability to weight bear safely. These requirements can be easily assessed/observed while the resident is in a bed or in a chair. If the resident is unable to demonstrate good trunk and leg muscle strength, balance and coordination for whatever reason (e.g. pain, weakness, confusion),
DO NOT MANUALLY TRANSFER the resident.
It is an expectation, that all resident handling staff are able to:
A. Assess trunk and leg strength B. Assess balance C. Assess ability to follow commands and cooperate
A. Assessing the Resident’s Strength
• Ask the resident to lift his/her buttocks off the bed
• Provide some cues if needed (e.g. repeating the instructions or tapping the resident’s buttocks)
OR • Observe resident lifting buttocks to assist when dressing
Bridging – shows leg and hip strength and trunk stability
- MSIP – A Practical Guide to Resident Handling
© Copyright August 2002 (Revised October 2004) Resident Transfer Assessment Section 3 - Page 2
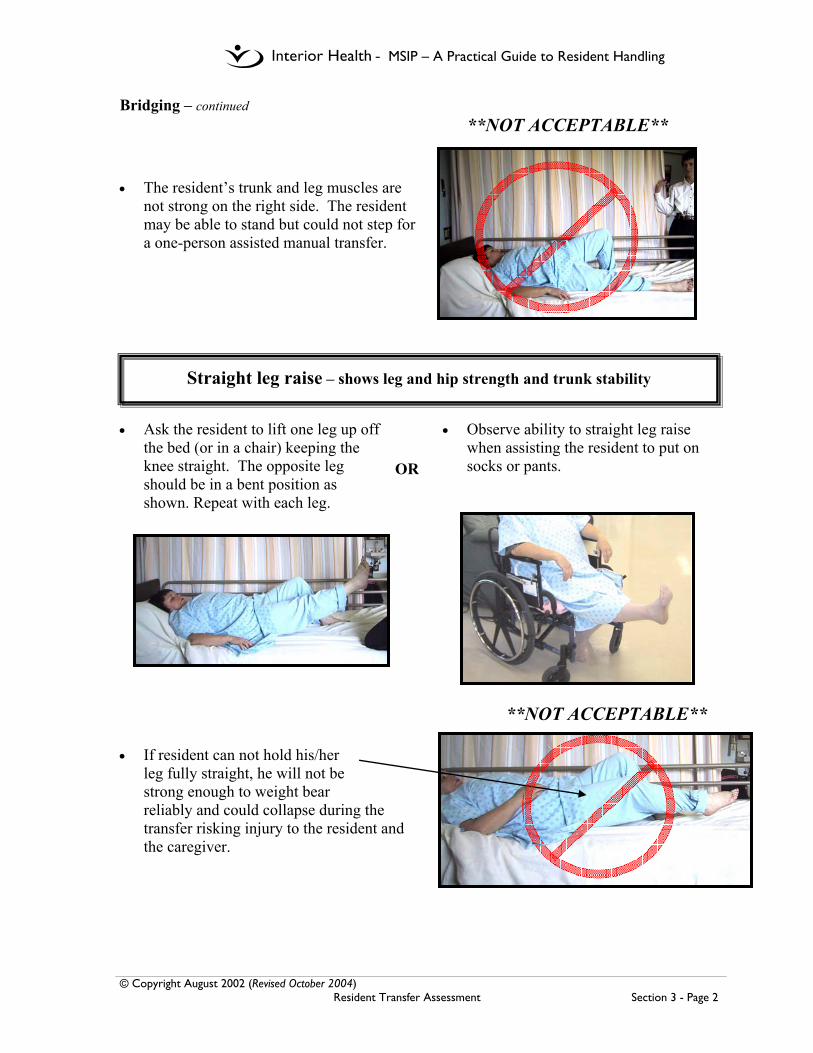
Bridging – continued **NOT ACCEPTABLE**
• The resident’s trunk and leg muscles are
not strong on the right side. The resident may be able to stand but could not step for a one-person assisted manual transfer.
• Ask the resident to lift one leg up off
the bed (or in a chair) keeping the knee straight. The opposite leg should be in a bent position as shown. Repeat with each leg.
• Observe ability to straight leg raise when assisting the resident to put on socks or pants.
**NOT ACCEPTABLE** • If resident can not hold his/her
leg fully straight, he will not be strong enough to weight bear reliably and could collapse during the transfer risking injury to the resident and the caregiver.
Straight leg raise – shows leg and hip strength and trunk stability
OR
- MSIP – A Practical Guide to Resident Handling
© Copyright August 2002 (Revised October 2004) Resident Transfer Assessment Section 3 - Page 3
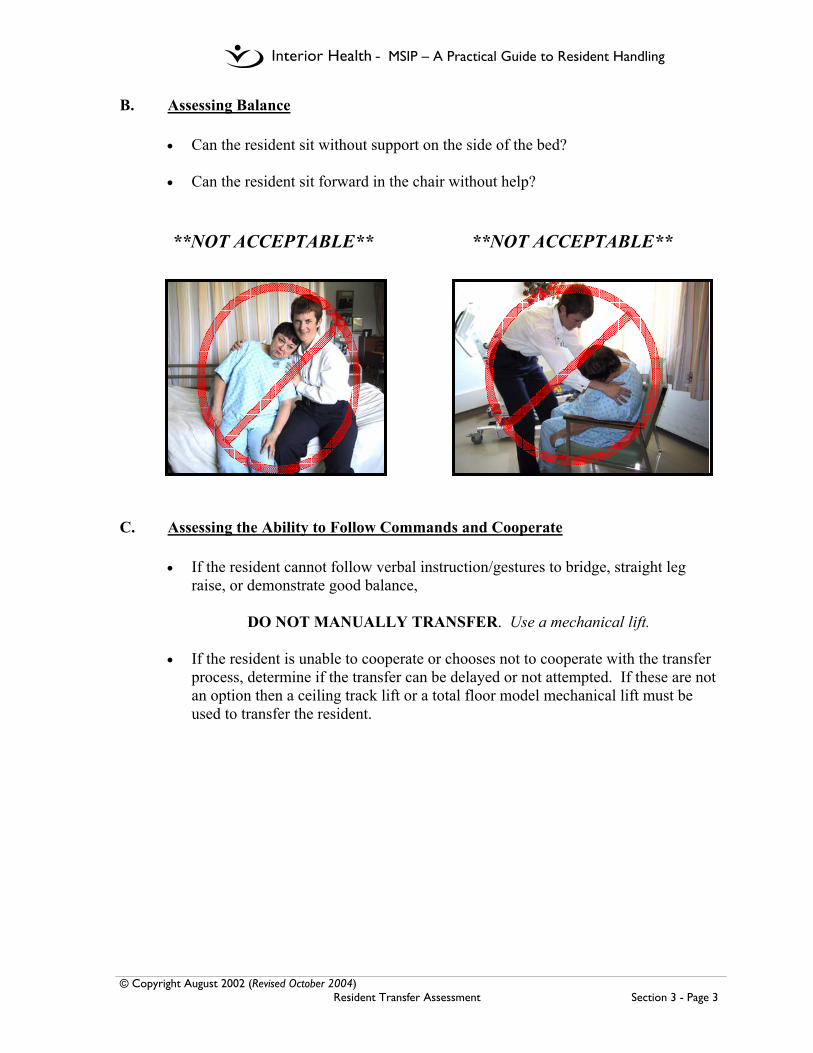
B. Assessing Balance • Can the resident sit without support on the side of the bed?
• Can the resident sit forward in the chair without help?
**NOT ACCEPTABLE** **NOT ACCEPTABLE** C. Assessing the Ability to Follow Commands and Cooperate
• If the resident cannot follow verbal instruction/gestures to bridge, straight leg raise, or demonstrate good balance,
DO NOT MANUALLY TRANSFER. Use a mechanical lift.
• If the resident is unable to cooperate or chooses not to cooperate with the transfer
process, determine if the transfer can be delayed or not attempted. If these are not an option then a ceiling track lift or a total floor model mechanical lift must be used to transfer the resident.

- MSIP – A Practical Guide to Resident Handling
© Copyright August 2002 (Revised October 2004) Resident Transfer Assessment Section 3 - Page 4
NAME _____________________________ 3.2 Resident Transfer Assessment Form (Ceiling Lift)
Observation No Yes
Strength
• In bed does the resident lift their hips clear off the bed to get onto a bedpan or assist with dressing / incontinence pads?
• In bed does the resident roll onto their side without assistance • In sitting can the resident lift each foot off the ground and straighten
each knee?
Balance • Can the resident sit upright on the side of the bed without help • Can the resident sit/ lean forward in a chair without support?
Ability to follow
direction
• Does the resident follow transfer instructions appropriately? • Does the resident’s ability remain the same throughout the day and
with different caregivers?
uNiversal or Hammock Size_____
Hygiene or Universal Size_____
Can the resident sit forwards and push down
on the arm rests with both hands?
Use the sit /stand lift until assessed by Rehab. Refer to functional sheet / Rehab for details of transfer
Sit / Stand Lift Assessment No Yes While sitting, can the resident actively lean forward?
Can resident hold onto both handles of the sit / stand lift?
Can the resident keep their feet flat on the footplate of the lift throughout the transfer?
Can resident actively straighten their hips to assist the lift?
Sit /stand lift
Can the resident stand erect and step with both feet
No Yes
No to any of the observations
No to any
observations
Yes to all observations
Use Ceiling Track Transfer
and Consider need for adaptive clothing
Yes to all of the observations
No Yes
Use repositioning sling in bed Signature(s) Date

- MSIP – A Practical Guide to Resident Handling
© Copyright August 2002 (Revised October 2004) Resident Transfer Assessment Section 3 - Page 5
NAME_______________________________
3.3 Resident Transfer Assessment Form (Floor Lift)
Observation No Yes
Strength
• In bed does the resident lift their hips clear off the bed to get onto a bedpan or assist with dressing / incontinence pads?
• In bed does the resident roll onto their side without assistance • In sitting can the resident lift each foot off the ground and straighten
each knee?
Balance • Can the resident sit upright on the side of the bed without help • Can the resident sit/ lean forward in a chair without support?
Ability to follow
direction
• Does the resident follow transfer instructions appropriately? • Does the resident’s ability remain the same throughout the day and
with different caregivers?
Can the resident sit forwards and push down
on the arm rests with both hands?
Use the sit /stand lift until assessed by Rehab. Referral to Rehab.
Sit / Stand Lift Assessment No Yes While sitting, can the resident actively lean forward?
Can resident hold onto both handles of the sit / stand lift?
Can the resident keep their feet flat on the footplate of the lift throughout the transfer?
Can resident actively straighten their hips to assist the lift?
Sit /stand lift
Can the resident stand erect and step with both feet
No Yes
No to any of the observations
No to any
observations
Yes to all observations
Use Total Floor Lift and
Consider need for adaptive clothing
Yes to all of the observations
Use low friction/slider sheet to reposition in bed if available
No Yes
uNiversal or Hammock Size_____
Hygiene or Universal Size_____
Signatures(s) Date
SEE REPOSITIONING ASSESSMENT

- MSIP – A Practical Guide to Resident Handling
© Copyright October 2004 Sling Information Section 4 - Page 1
4.0 Sling Information 4.1 Introduction to Slings
There are many types of slings. The most commonly slings used throughout Interior Health are the following types: • Universal • Hygiene • Hammock, and • Repositioning (see 4.1.1. Quick Reference Guide for Common Slings). Universal, hygiene and hammock slings come in various sizes. The most common sizes are Small (S) with red piping, Medium (M) with yellow piping, and Large (L) with green piping. Specialty slings are available in other sizes including extra small (XS) and Extra Large (XL). Some slings are made of different materials: quilted, padded and net. Repositioning slings area made of green material and are one size. All transfer slings (e.g. universal, hammock and hygiene) can be attached to the ceiling lift carry-bar with 3 leg configuration options: 1) Crossed. 2) Open, and 3) Cradled. (please see 4.1.2. Leg Strap Configuration Options). Use of these options depends on the ability of the resident and consideration of the care task. The crossed leg configuration is the most commonly used configuration, and should be used unless otherwise specified by Rehab.
Additional sling information is available from the vendor guides.

- MSIP – A Practical Guide to Resident Handling
© Copyright October 2004 Sling Information Section 4 - Page 2
4.1.1 Quick Reference Guide for Common Slings
Universal Sling(Full Body Sling)
HygieneSling
HammockSling
RepositioningSling
Sized in Small (Red piping), Medium (yellow piping) and Large (green piping)
Materials available in Quilted, Padded and Net
- MSIP – A Practical Guide to Resident Handling
© Copyright October 2004 Sling Information Section 4 - Page 3
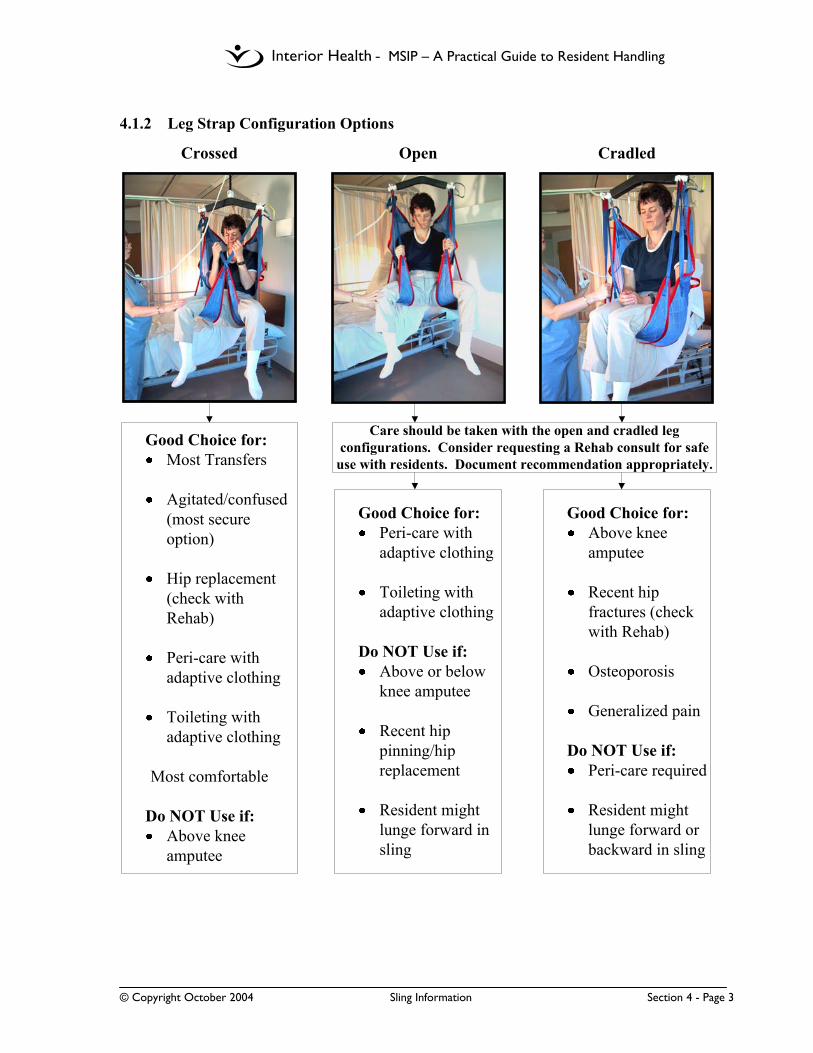
4.1.2 Leg Strap Configuration Options
Care should be taken with the open and cradled leg configurations. Consider requesting a Rehab consult for safe
use with residents. Document recommendation appropriately.
Good Choice for:Peri-care with adaptive clothing
Toileting with adaptive clothing
Do NOT Use if:Above or below knee amputee
Recent hip pinning/hip replacement
Resident might lunge forward in sling
Good Choice for:Above knee amputee
Recent hip fractures (check with Rehab)
Osteoporosis
Generalized pain
Do NOT Use if:Peri-care required
Resident might lunge forward or backward in sling
Crossed Open Cradled
Good Choice for:Most Transfers
Agitated/confused (most secure option)
Hip replacement (check with Rehab)
Peri-care with adaptive clothing
Toileting with adaptive clothing
Most comfortable
Do NOT Use if:Above knee amputee

- MSIP – A Practical Guide to Resident Handling
© Copyright October 2004 Sling Information Section 4 - Page 4
4.2 General Sling Guidelines 4.2.1 Basic Sling Selection
• Sling selection is based on assessment of the resident’s body shape and functional abilities and not the care task to be performed. The Resident Transfer Assessment Form (see Section 3 - Resident Transfer Assessment) should be used for Basic Sling Selection.
• Discuss any difficulties/issues when choosing or applying a sling (or transferring
a resident) with the unit Peer leader or a Rehab team member. • Generally, more dependent or unpredictable residents will require a universal or
hammock sling for transfers and toileting. • Residents assessed as having adequate upper body control and the ability to
follow direction may be suitable for a hygiene sling, for procedures taking a few minutes only.
• A repositioning sling will be required for turning or positioning in bed. • Residents with total hip replacements or hip pinnings, morbid obesity, bilateral
amputations or any other complications that require specialized transfer assessment or specialty slings must be referred to Rehab promptly.
• If a resident falls to the floor, a universal, hammock or repositioning sling and
either the ceiling track lift or a total floor lift are to be used to move the resident off the floor. Do NOT use hygiene slings to lift residents off the floor.
4.2.2 Sling Safety
• Slings are to be used only by staff that have been trained in their safe use and for
residents that have a RTA completed. • It is a requirement that all staff visually inspect the sling before each use. This
would include:
• Check all loops at connection points for signs of fraying or loose stitching • Check entire sling body for loose stitching, rips, holes or bleach staining • Check for signs of weakening of fabrics (e.g. heat damage, brittle, stiff,
puckered fabric) or significant staining. • Check all buckles and closures
If there are any sign of sling breakdown, ensure that the sling is removed from service, that damage is documented appropriately and that repair or replacement processes are initiated. Repairs must be completed by the vendor and/or their
- MSIP – A Practical Guide to Resident Handling
© Copyright October 2004 Sling Information Section 4 - Page 5
representative to maintain warrantee agreements and to ensure sling integrity. Please consult the vendor sling guide for contact information. Use an alternate sling for the procedure.
• Always complete an initial safety check at the beginning of each transfer. This
would include:
• Check that all loops are securely attached to the carry bar • Check that the resident is supported fully by the sling
• Always ensure that the sling material is not cutting into the resident’s skin and
causing discomfort. If the sling needs to be adjusted, place the resident back down before pulling on the sling. Avoid pulling on the sling material to adjust the sling placement while the resident is in the air.
• Residents at risk of, or with, skin breakdown may require protective covering over
the affected area before transferring. Additionally, a specialized assessment to be completed by Rehab or a wound care specialist, may indicate that an alternative sling may be required (e.g. padded universal instead of quilted universal or hammock instead of universal).
4.2.3 Leaving Transfer Slings Behind Residents in Chair
• Universal or Hammock slings may be left behind residents in their chair throughout the day. If leaving a sling behind a resident, care should be taken to remove the sling from underneath the legs and to neatly tuck all straps behind and beside the resident. Care should be taken at the end of the day to ensure that leg straps are replaced securely underneath the resident’s buttocks prior to transfer back to bed.
• Hygiene slings must not be left under or behind residents. • The decision to leave a sling behind a resident should consider both the resident’s
needs and staff safety. The decision to remove the sling should consider the resident’s ability to lean forward and to one side to lift a buttock consistently throughout the whole day. If the resident cannot lean forward to assist in placing the sling behind them, a second care staff should assist in supporting the resident’s upper body to lean forward. All residents should be reassessed prior to shift change, and slings should be replaced, if resident abilities are declining.
• Slings are to be removed from behind a resident only if,
1. Medical and/or psychological contraindications are documented, or the resident clearly expresses a desire to have it removed, and
2. A unit Peer Leader and/or Rehab has assessed that (1) the resident has the ability to assist with removal and replacement of the sling and (2) that there is minimal risk of injury to staff during sling application in the chair.
- MSIP – A Practical Guide to Resident Handling
© Copyright October 2004 Sling Information Section 4 - Page 6
4.2.4 Leaving Repositioning Slings Under Residents in Bed
• Repositioning slings may be left under residents in their bed throughout the day/night. If leaving a sling under a resident, care should be taken to remove wrinkles from the material and to tuck straps under the mattress. It is recommended that 2 care staff remove wrinkles by pulling on opposite corners of the sling at the same time.
• Flat bed sheets and/or soaker pads can be placed on top of the repositioning sling
to absorb moisture. Other items may also be used in combination with the repositioning sling (e.g. sheepskins, slider sheets).
• If the resident is on a low-pressure mattress, consult with occupational therapy or
the wound care specialist for appropriate bed make-up. Initial indications support the use of a repositioning sling on top of a low-pressure mattress when left loose on top of the mattress.
4.2.5 Sharing Slings between Residents
• It is recommended that facilities have a minimum of 1.8 slings per ceiling lift so that residents do not have to share slings.
• Under exceptional circumstances, follow Infection Control Protocols for that
Resident, if a sling needs to be shared.
4.2.6 Care and Laundering of Slings
• Facilities are encouraged to consider slings as part of their medical equipment and not bed linens. Ideally, cleaning equipment would be provided on-site.
• All manufacturers’ laundering instructions are to be followed. Please consult the vendor sling guide or care label for appropriate laundry information.
• Typical laundry instructions for slings:
• In agitator machines, slings are to be washed in a washing/laundry bag • Wash in hot water (140F or 60 - 80C) • Hang to dry or dry at low (cool) temperatures for 10 – 15 minutes. • Do not use bleach • Do not iron • Do not dry clean
• Sling safety, longevity and warrantee coverage may be compromised if
manufacturers’ laundry instructions are not followed.

- MSIP – A Practical Guide to Resident Handling
© Copyright October 2004 Sling Information Section 4 - Page 7
4.3 Sling Management 4.3.1 Sling Ordering
• After the initial capital investment from Interior Health, each facility is responsible for replacement and ordering of new slings.
• Vendor Sling Order Forms are included in this manual for your convenience (see Sling Order Form next page)

- MSIP – A Practical Guide to Resident Handling
© Copyright October 2004 Sling Information Section 4 - Page 8
Sling Order Form For Waverly Glen Ceiling Track Lifts
Date:_________________________ Facility:____________________________ Ordered by:____________________ Delivery Address: ____________________ Contact Phone #:________________ _______________________ Account #: __________________________________________________________
Description Size Vendor Catalogue # Quantity Costs
UNIVERSAL SLINGS - Quilted JR XS 537305 EA S 537310 EA M 537320 EA L 537330 EA - Padded JR XS 527305 EA S 527310 EA M 527320 EA L 527330 EA - Padded JR XS 527505 EA with Head Support S 527510 EA M 527520 EA L 527530 EA XL 527540 EA - Bath/Net JR XS 537205 EA S 537210 EA M 537220 EA L 537230 EA HAMMOCK SLINGS - Quilted JR XS 517105 EA S 517110 EA M 517120 EA L 517130 EA HYGIENE SLINGS - Quilted – Center Buckle JR XS 537605 EA S 537610 EA M 537620 EA L 537630 EA REPOSITIONING SLINGS - Intermediate - Green 36”x70” 507807 EA BAND SLINGS - Quilted - set of 2 (25/28) S 507710 EA - 1 for leg, 1 for chest (28/31) M 507720 EA - 9” wide x 25” - 34” long (31/34) L 507730 EA
TOTAL Custom slings and other options are available.

- MSIP – A Practical Guide to Resident Handling
© Copyright October 2004 Sling Information Section 4 - Page 9
4.3.2 Sling Inventory
• Slings have serial numbers for tracking purposes. • When slings arrive at your facility/unit, document their identification numbers
and the date they were put into circulation on the Sling Inventory and Tracking Form.
• All slings are warranted. Any defects can be addressed directly with the vendor.
Please consult vendor sling information for details and contact information. All problems/concerns must be documented on the Sling Inventory and Tracking Form.(see next page)

- MSIP – A Practical Guide to Resident Handling
© Copyright October 2004 Sling Information Section 4 - Page 10
Sling Inventory and Tracking Form
Site: ____________________________ Unit ________ Date: ___________ Recorder: ______________________
Serial Number Type of Sling Size of Sling
Date Received
Start Date of Use
Comments
If there are any problems with any slings, please document in comments above and contact your vendor representative. Please consult the vendor information for warrantee agreements and contact information.
- MSIP – A Practical Guide to Resident Handling
© Copyright October 2004 Sling Information Section 4 - Page 11
4.3.3 Sling Labeling
• All slings can be labeled in various ways. Slings can be labeled for each unit/facility using a laundry marker on the care label. The vendor can also assist with embroidery, if desired.
• Consider that slings may go off-site and therefore labeling should include
facility name and unit (where applicable). Avoid the use of acronyms, if possible.
• Avoid permanently labeling slings for residents. Some facilities have used
patient ID tags and laundry markers to label slings temporarily for residents. These tags may not hold up well in laundry and may become wrinkled and illegible over time. Avoid the use of iron-on laundry tags.
• It is recommended that temporary labeling include the type, size and residents
name (e.g. Small Universal Padded, Mrs. Jones). 4.3.4 Sling Storage
• It is recommended that sling hooks be installed in resident rooms for individual sling storage.
• Additional hooks should also be installed in a common area for general sling
storage (e.g. tub room, laundry drying room or storage room). This area should be used for storage of clean slings only.
4.3.5 Sling Inspection
• A visual inspection of each sling is required prior to every transfer (see Section 4.2.2 Sling Safety)
• Additionally, a complete sling inventory and inspection must be conducted on
a regular schedule (e.g. semi-annually or annually – as specified in vendor sling information).

- MSIP – A Practical Guide to Resident Handling
© Copyright October 2004 Total Lift Transfers Section 5 - Page 1
Chicken Lift method –
ouch!!!
5.0 Total Lift Transfers 5.1 High Risk Methods Associated with Total Lift Transfers
(… using floor lifts or ceiling lifts)
• Potential strain to employee’s shoulder, upper and lower back muscles
• Potential injury to resident’s shoulder
Recommend: Roll resident onto sling • Potential strain to
shoulder and upper back muscles
Recommend: Lower carry bar or raise head of bed • Potential strain to low
back and shoulder muscles
Recommend: Support weight of thigh first to allow both hands free to position sling • Potential for shoulder
and upper back strain Recommend Options: • Position chair • Use both side handles • Apply pressure to
front of resident’s knees
Physical lifting of a resident from a lying to a sitting position to apply a sling Physical lifting of a resident to attach a sling straps to carry bar prongs Holding up the resident’s leg with one hand when positioning the sling under it with the other hand Pulling up on back of sling to end position a resident in a chair
Chicken Lift method – ouch!!!!
- MSIP – A Practical Guide to Resident Handling
© Copyright October 2004 Total Lift Transfers Section 5 - Page 2
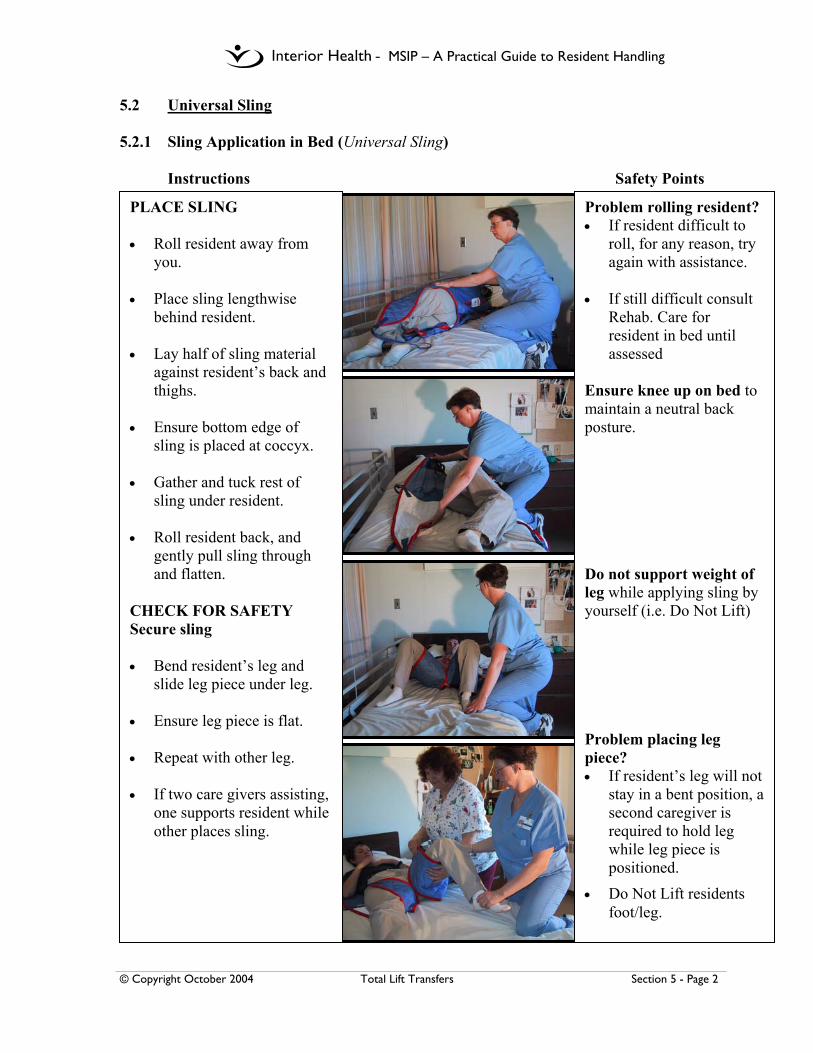
5.2 Universal Sling 5.2.1 Sling Application in Bed (Universal Sling)
Instructions Safety Points
PLACE SLING • Roll resident away from
you. • Place sling lengthwise
behind resident. • Lay half of sling material
against resident’s back and thighs.
• Ensure bottom edge of
sling is placed at coccyx. • Gather and tuck rest of
sling under resident. • Roll resident back, and
gently pull sling through and flatten.
CHECK FOR SAFETY Secure sling • Bend resident’s leg and
slide leg piece under leg.
• Ensure leg piece is flat. • Repeat with other leg.
• If two care givers assisting, one supports resident while other places sling.
Problem rolling resident? • If resident difficult to
roll, for any reason, try again with assistance.
• If still difficult consult
Rehab. Care for resident in bed until assessed
Ensure knee up on bed to maintain a neutral back posture. Do not support weight of leg while applying sling by yourself (i.e. Do Not Lift) Problem placing leg piece? • If resident’s leg will not
stay in a bent position, a second caregiver is required to hold leg while leg piece is positioned.
• Do Not Lift residents foot/leg.

- MSIP – A Practical Guide to Resident Handling
© Copyright October 2004 Total Lift Transfers Section 5 - Page 3
5.2.1 Sling Application in Bed (Universal Sling) (continued)
Instructions Safety Points
PREPARE THE TRANSFER Determine leg configuration • Crossed * • Cradled • Open - consult rehab * Remember that the crossed configuration is the most comfortable for most residents. Attach straps Attach shoulder, middle and leg straps to carry bar Transfer to stretcher • Long shoulder • Long leg Transfer to toilet, w/c • Short shoulder • Long leg Check Sling • Raise resident a few inches
and check to ensure all straps are safely attached and the sling is comfortably positioned for the resident.
COMPLETE TRANSFER • Consider front or back
options for positioning in chair. (refer to 5.6.1 to 5.6.3 for end positioning protocols)
Problem with residents buttocks dropping through the sling? • Lower resident
immediately • Reassess leg
configuration and sling choice.
Problem attaching sling? • When attaching sling,
do not pull up on sling – lower carry bar if needed
Sling not positioned comfortably? • Lower carry bar to take
weight off sling before adjusting leg piece
Difficulty getting resident to back of chair? • Use back option as
shown if resident is aggressive or may kick out.
• Do not use your arm strength to assist getting resident properly positioned in chair.
- MSIP – A Practical Guide to Resident Handling
© Copyright October 2004 Total Lift Transfers Section 5 - Page 4
5.2.2 Sling Application in Chair (Universal Sling) Instructions Safety Points
PLACE SLING • Ask resident to lean forward in
chair. If unable, ask another caregiver to lean resident forward while you place sling.
• Grasp sling by its bottom opening, Slide sling down back so that the slings bottom tucks under the edge of the resident’s buttocks
CHECK FOR SAFETY Secure sling • Grasp leg loops and pull them
forward gently until sling is positioned.
• Bend down in front of resident and place resident’s foot on your thigh.
• Using both hands, pull leg loop under the leg. Ensure leg loop is flat.
• Repeat with other leg • Determine leg configuration.
1. Crossed 2. Cradled 3. Open – consult rehab
Attach Straps • Attach appropriate leg and back
straps to carry bar for desired resident inclination. Transfer = long shoulders to bed long legs Transfer = short shoulders to toilet or long legs bathchair
Check Sling • Raise resident a few inches and
check to ensure all straps are safely attached and the sling is positioned comfortably.
COMPLETE TRANSFER
Problem leaning the resident forward? Recommend that the sling be left under the resident while resident is in the chair. If skin sensitivity is a concern, consult with the wound care specialist and/or rehab.. Please ensure this is clearly documented. Problem getting leg piece under the resident’s leg? Do not lift weight of resident’s leg at same time as positioning the leg piece. Place resident’s foot on your knee as shown. Problem attaching sling? Do not pull on sling to position straps; lower carry bar instead.

- MSIP – A Practical Guide to Resident Handling
© Copyright October 2004 Total Lift Transfers Section 5 - Page 5
5.2.3 Sling Application on Floor (Universal Sling) Instructions Safety Points
PLACE SLING • Roll resident on side. • Place sling lengthwise behind
resident. • Lay half of sling material against
the resident’s back and thighs. • Ensure bottom edge of sling is
placed at coccyx. • Gather and tuck rest of sling
under resident. • Roll resident back and gently
pull sling through and flatten. CHECK FOR SAFETY Secure Sling • Bend resident’s leg and slide leg
piece under leg. • Ensure leg piece is flat. • Repeat with other leg. • Use Crossed leg configuration by
cross leg pieces as shown. Attach Straps • Attach shoulder, middle and leg
straps to carry bar.
Transfer to bed/stretcher • Long shoulder • Long leg Transfer to chair • Short shoulder • Long leg
Check sling • Raise resident a few inches and
check to ensure all straps are safely attached and the sling is comfortably positioned for the resident
COMPLETE TRANSFER
Difficulty turning resident? • Ask for assistance • Ensure both care staff
are turning the resident towards them
Difficult to attach straps? • Do not pull up on
slings; instead lower the carry bar if needed.
- MSIP – A Practical Guide to Resident Handling
© Copyright October 2004 Total Lift Transfers Section 5 - Page 6
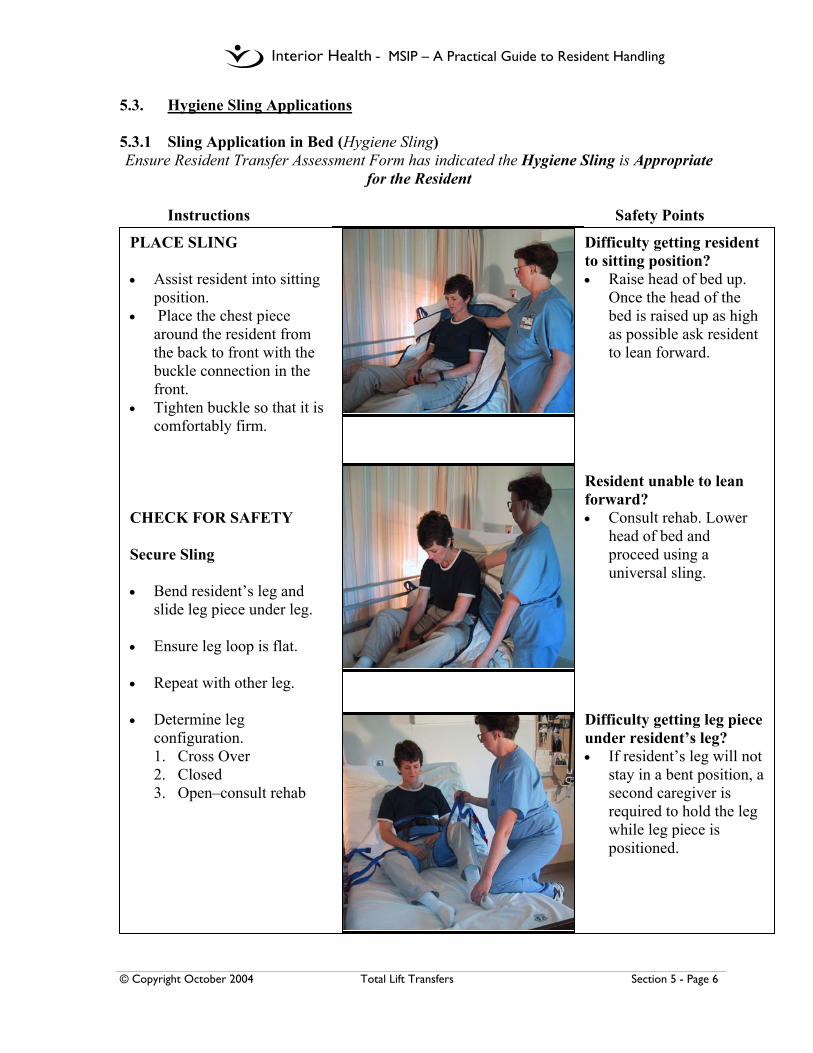
5.3. Hygiene Sling Applications 5.3.1 Sling Application in Bed (Hygiene Sling) Ensure Resident Transfer Assessment Form has indicated the Hygiene Sling is Appropriate
for the Resident Instructions Safety Points
PLACE SLING • Assist resident into sitting
position. • Place the chest piece
around the resident from the back to front with the buckle connection in the front.
• Tighten buckle so that it is comfortably firm.
CHECK FOR SAFETY Secure Sling • Bend resident’s leg and
slide leg piece under leg. • Ensure leg loop is flat. • Repeat with other leg. • Determine leg
configuration. 1. Cross Over 2. Closed 3. Open–consult rehab
Difficulty getting resident to sitting position? • Raise head of bed up.
Once the head of the bed is raised up as high as possible ask resident to lean forward.
Resident unable to lean forward? • Consult rehab. Lower
head of bed and proceed using a universal sling.
Difficulty getting leg piece under resident’s leg? • If resident’s leg will not
stay in a bent position, a second caregiver is required to hold the leg while leg piece is positioned.
- MSIP – A Practical Guide to Resident Handling
© Copyright October 2004 Total Lift Transfers Section 5 - Page 7
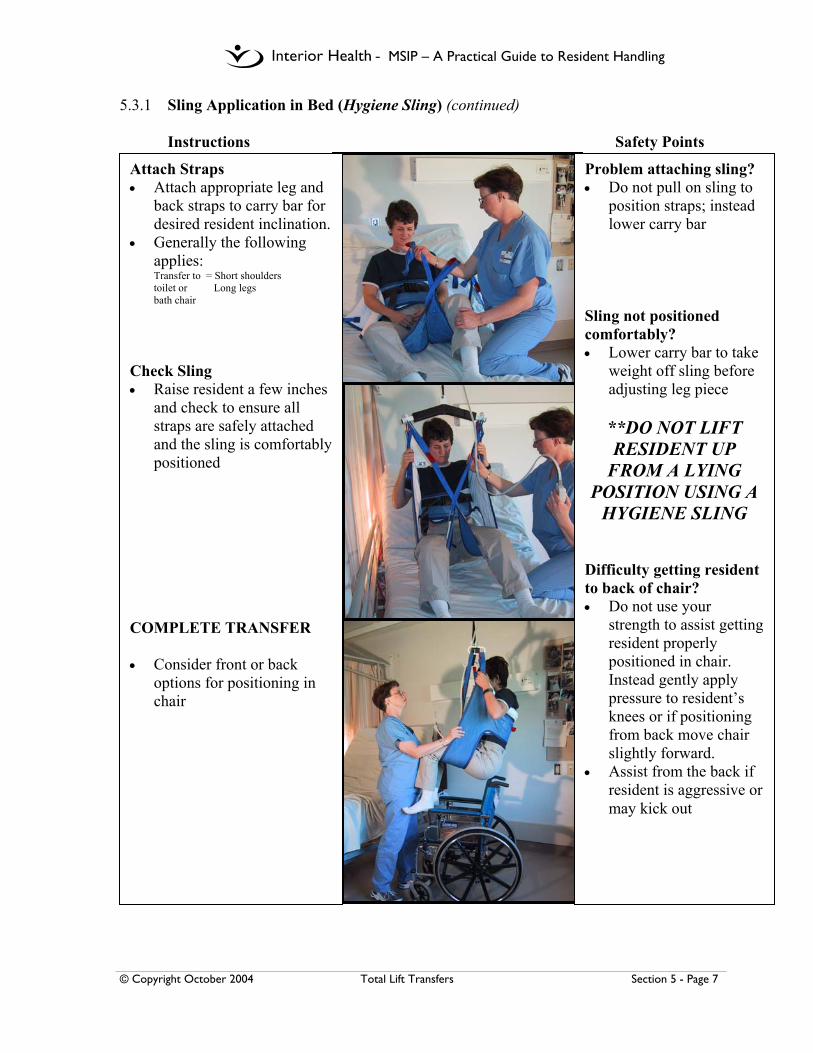
5.3.1 Sling Application in Bed (Hygiene Sling) (continued) Instructions Safety Points
Attach Straps • Attach appropriate leg and
back straps to carry bar for desired resident inclination.
• Generally the following applies: Transfer to = Short shoulders toilet or Long legs bath chair
Check Sling • Raise resident a few inches
and check to ensure all straps are safely attached and the sling is comfortably positioned
COMPLETE TRANSFER • Consider front or back
options for positioning in chair
Problem attaching sling? • Do not pull on sling to
position straps; instead lower carry bar
Sling not positioned comfortably? • Lower carry bar to take
weight off sling before adjusting leg piece
**DO NOT LIFT RESIDENT UP
FROM A LYING POSITION USING A
HYGIENE SLING Difficulty getting resident to back of chair? • Do not use your
strength to assist getting resident properly positioned in chair. Instead gently apply pressure to resident’s knees or if positioning from back move chair slightly forward.
• Assist from the back if resident is aggressive or may kick out
- MSIP – A Practical Guide to Resident Handling
© Copyright October 2004 Total Lift Transfers Section 5 - Page 8
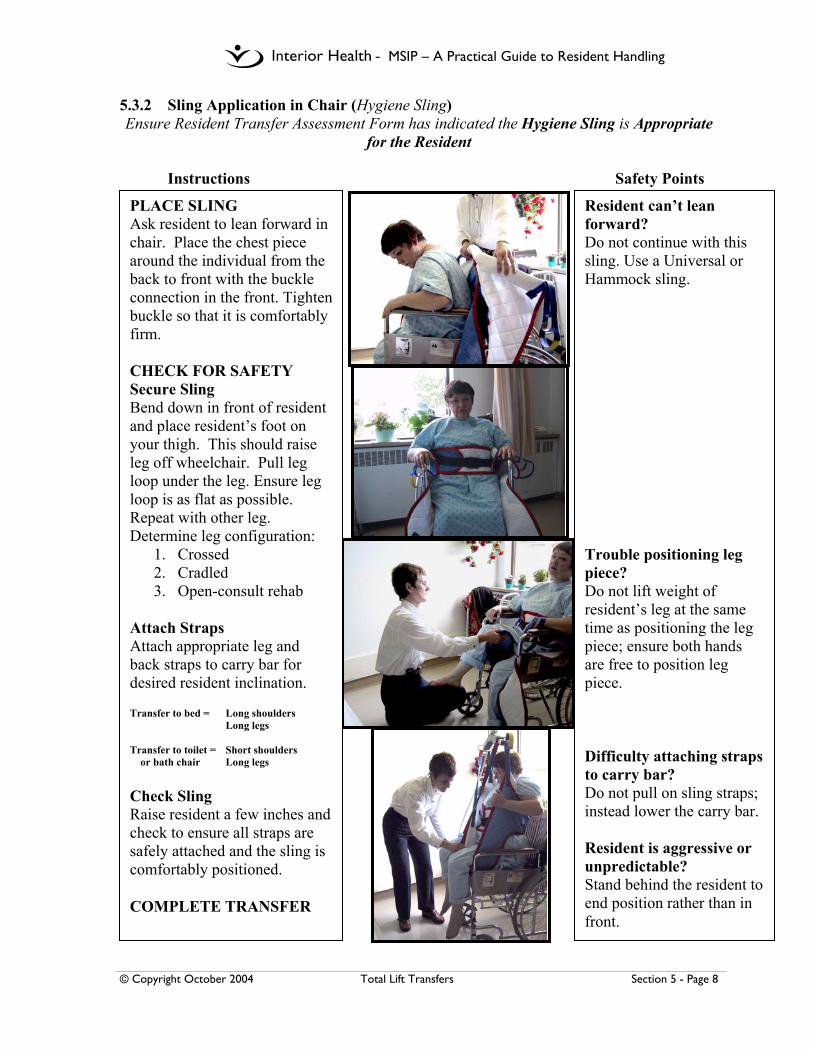
5.3.2 Sling Application in Chair (Hygiene Sling) Ensure Resident Transfer Assessment Form has indicated the Hygiene Sling is Appropriate
for the Resident
Instructions Safety Points
PLACE SLING Ask resident to lean forward in chair. Place the chest piece around the individual from the back to front with the buckle connection in the front. Tighten buckle so that it is comfortably firm. CHECK FOR SAFETY Secure Sling Bend down in front of resident and place resident’s foot on your thigh. This should raise leg off wheelchair. Pull leg loop under the leg. Ensure leg loop is as flat as possible. Repeat with other leg. Determine leg configuration:
1. Crossed 2. Cradled 3. Open-consult rehab
Attach Straps Attach appropriate leg and back straps to carry bar for desired resident inclination. Transfer to bed = Long shoulders Long legs
Transfer to toilet = Short shoulders or bath chair Long legs Check Sling Raise resident a few inches and check to ensure all straps are safely attached and the sling is comfortably positioned. COMPLETE TRANSFER
Resident can’t lean forward? Do not continue with this sling. Use a Universal or Hammock sling. Trouble positioning leg piece? Do not lift weight of resident’s leg at the same time as positioning the leg piece; ensure both hands are free to position leg piece. Difficulty attaching straps to carry bar? Do not pull on sling straps; instead lower the carry bar. Resident is aggressive or unpredictable? Stand behind the resident to end position rather than in front.

- MSIP – A Practical Guide to Resident Handling
© Copyright October 2004 Total Lift Transfers Section 5 - Page 9
5.4 Repositioning Sling Applications 5.4.1 Lateral Transfers (Repositioning Sling) (Use with XY Gantry Systems)
Instructions Safety Points
PLACING SLING Roll resident toward you so he/she is positioned on their side. Fold sling in half and lay it flat behind the resident. The top of the sling should be level with the top of the head. Turn the resident onto his back and ensure he/she is positioned in the middle of the sling. Place a pillow under the residents head to increase resident comfort. CHECK FOR SAFETY Attach Straps Position the carry bar so that it runs parallel to the resident below (not across the resident as with other sling transfers). Attach a minimum of 4 sling straps on each side of the sling. Try to ensure that the resident’s weight is evenly distributed between the front prongs of the carry bar and the back prongs. ** Note bar position Check Sling Raise resident a few inches and check to ensure all straps are safely attached and the sling is comfortably positioned. If lift is not operating as per usual, ensure that sling or additional straps are not caught on bed frame. COMPLETE TRANSFER The resident is now ready to be positioned toward the head of the bed, or to be transferred to a stretcher or other surface.
If the resident has been assessed as needing to be repositioned using the repositioning sling, the sling should be placed on the bed prior to the resident being transferred into bed. This sling should then become a regular part of the bed make-up. When attaching strap, do not pull up on sling; instead lower the carry bar if needed.

- MSIP – A Practical Guide to Resident Handling
© Copyright October 2004 Total Lift Transfers Section 5 - Page 10
5.4.2 Floor to Bed Transfers (Repositioning Sling) (Use with XY Gantry Systems) Instructions Safety Points
PLACE SLING • Roll resident onto his/her side. • Fold sling in half and lay it flat
behind the resident. the top of the sling should be level with the top of the resident’s head.
• Turn the resident onto back and ensure he is positioned in middle of sling
• Place a pillow under the resident’s head to increase resident comfort.
CHECK FOR SAFETY Attach Straps • Position the carry bar so that it
runs parallel to the resident (not across the resident as with other sling transfers).
• Attach a minimum 4 sling straps on each side of the sling. Try to ensure that the resident’s weight is evenly distributed between the front prongs and back prongs of the carry bar.
Check Sling • Raise resident a few inches and
check to ensure all straps are safely attached and the sling is comfortably positioned.
• If lift is not operating as per usual ensure that the sling or additional straps are not caught on bed frame.
COMPLETE TRANSFER
Difficulty turning resident? • Ask for assistance • Ensure both care staff
are turning the resident towards them
Difficult to attach straps? • Do not pull up on
slings; instead lower the carry bar if needed.
- MSIP – A Practical Guide to Resident Handling
© Copyright October 2004 Total Lift Transfers Section 5 - Page 11
5.5 Hammock Sling Applications 5.5.1 Sling Applications in Bed (Hammock Sling)– to be added in the future
- MSIP – A Practical Guide to Resident Handling
© Copyright October 2004 Total Lift Transfers Section 5 - Page 12
5.5.2 Sling Applications in Chair (Hammock Sling) – to be added in the future

- MSIP – A Practical Guide to Resident Handling
© Copyright October 2004 Total Lift Transfers Section 5 - Page 13
5.5.3 Sling Application on Floor (Hammock Sling) – to be added in the future
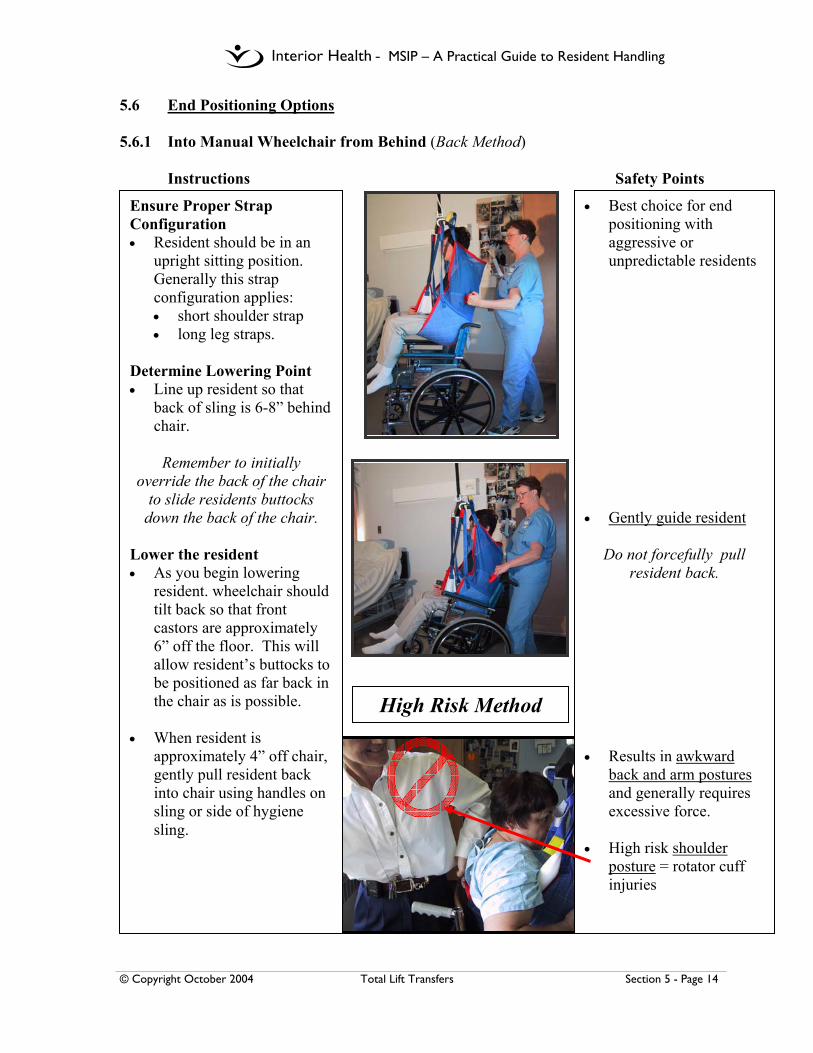
- MSIP – A Practical Guide to Resident Handling
© Copyright October 2004 Total Lift Transfers Section 5 - Page 14
5.6 End Positioning Options 5.6.1 Into Manual Wheelchair from Behind (Back Method)
Instructions Safety Points
Ensure Proper Strap Configuration • Resident should be in an
upright sitting position. Generally this strap configuration applies: • short shoulder strap • long leg straps.
Determine Lowering Point • Line up resident so that
back of sling is 6-8” behind chair.
Remember to initially
override the back of the chair to slide residents buttocks
down the back of the chair. Lower the resident • As you begin lowering
resident. wheelchair should tilt back so that front castors are approximately 6” off the floor. This will allow resident’s buttocks to be positioned as far back in the chair as is possible.
• When resident is
approximately 4” off chair, gently pull resident back into chair using handles on sling or side of hygiene sling.
• Best choice for end positioning with aggressive or unpredictable residents
• Gently guide resident
Do not forcefully pull resident back.
• Results in awkward
back and arm postures and generally requires excessive force.
• High risk shoulder
posture = rotator cuff injuries
High Risk Method

- MSIP – A Practical Guide to Resident Handling
© Copyright October 2004 Total Lift Transfers Section 5 - Page 15
5.6.2 Into Wheelchair from the Front (Front Method) Instructions Safety Points
Ensure Proper Strap Configuration • Resident should be in an
upright sitting position. Generally this strap configuration applies: • short shoulder strap • long leg straps.
Determine Lowering Point • Line up resident so that
back of sling is 6-8” behind wheelchair.
Lower the resident. • As you begin lowering
resident. wheelchair should tilt back so that front castors are approximately 6” off the floor. This will allow resident’s buttocks to be positioned as far back in the chair as is possible.
• When resident is
approximately 4” off chair, apply gentle pressure to the front of the resident’s legs.
• DO NOT USE THIS
METHOD if the resident has a history of aggressive or unpredictable behavior (refer to 5.6.1 -back method)
• If wheelchair becomes
too unstable or tippy when lowering the resident, raise the resident up and realign wheelchair.
• Avoid applying too
much pressure to resident’s knees as this is not required to properly end position a resident and it may be uncomfortable for the resident.

- MSIP – A Practical Guide to Resident Handling
© Copyright October 2004 Total Lift Transfers Section 5 - Page 16
5.6.3 Into a Reclining Chair (e.g. Broda Chair, Fallout Chair, Geri Chair, Power Chair, Lazyboy Style Chair)
Instructions Safety Points
Ensure Proper Strap Configuration • Resident should be in a
reclined position. Generally this strap configuration applies: • long shoulder strap • long leg straps.
Determine Lowering Point • Line up resident so that
back of sling is 6-8” behind chair.
Lower the resident. • When resident is
approximately 4” off chair, gentle push resident back into chair using side of sling.
• Gently guide resident
into back of chair
Do not forcefully pull resident back.

- MSIP – A Practical Guide to Resident Handling
© Copyright October 2004 Total Lift Transfers Section 5 - Page 17
5.7 Other Slings – Special Diagnostic / Treatment Applications
Instructions Safety Points
INVOLVE
PEER LEADERS
CONSULT REHABILITATION FOR
ASSESSMENT
• Ensure Assessment has
been completed and documented.
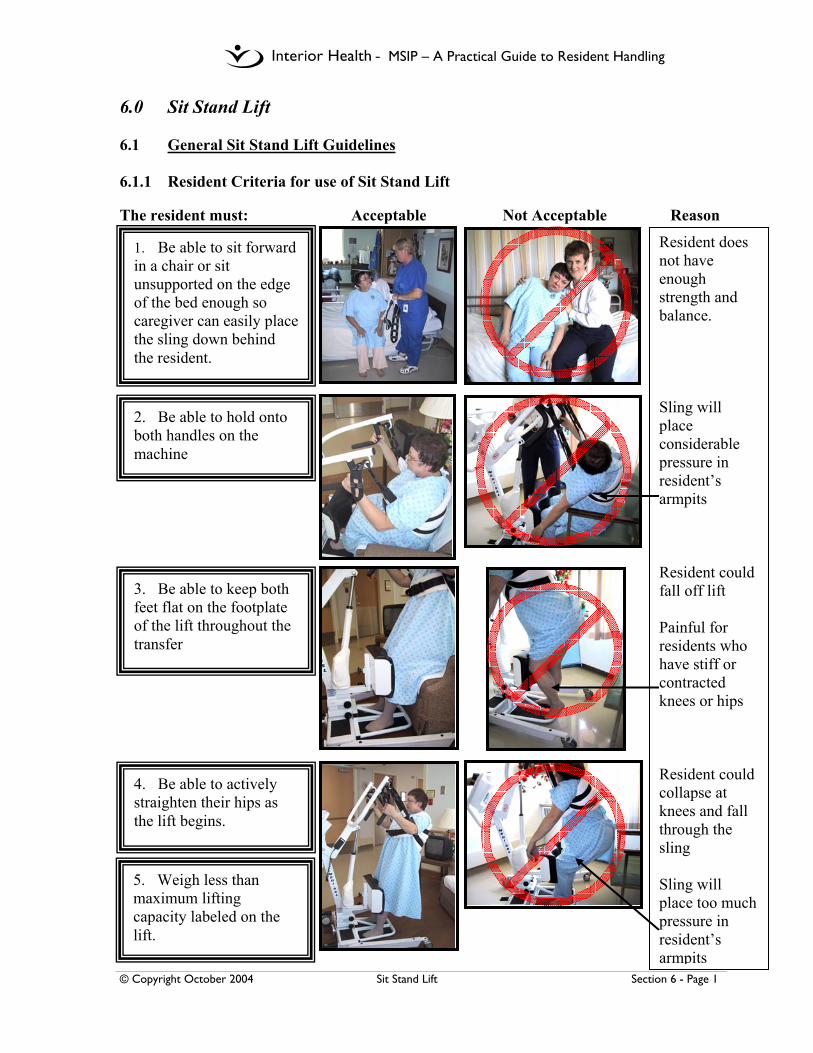
- MSIP – A Practical Guide to Resident Handling
© Copyright October 2004 Sit Stand Lift Section 6 - Page 1
6.0 Sit Stand Lift 6.1 General Sit Stand Lift Guidelines 6.1.1 Resident Criteria for use of Sit Stand Lift The resident must: Acceptable Not Acceptable Reason
1. Be able to sit forward in a chair or sit unsupported on the edge of the bed enough so caregiver can easily place the sling down behind the resident.
2. Be able to hold onto both handles on the machine
3. Be able to keep both feet flat on the footplate of the lift throughout the transfer
4. Be able to actively straighten their hips as the lift begins.
Resident does not have enough strength and balance. Sling will place considerable pressure in resident’s armpits Resident could fall off lift Painful for residents who have stiff or contracted knees or hips Resident could collapse at knees and fall through the sling Sling will place too much pressure in resident’s armpits
5. Weigh less than maximum lifting capacity labeled on the lift.

- MSIP – A Practical Guide to Resident Handling
© Copyright October 2004 Sit Stand Lift Section 6 - Page 2
6.1.2 Sit Stand Lift Transfer Instructions Safety Points
TURNING THE LIFT Turn lift from the side
Pictures demonstrate BHM Medi-SSL equipment
If resident cannot lean forward in a seated position without support, DO NOT PROCEED. Instead use a ceiling or total floor lift until assessed by Rehab. Do not travel with the base opened. It makes it more difficult to steer. Do not pull up on slings to position straps; instead lower carry bar If resident cannot grasp onto both handles or keep both feet flat on footplates, DO NOT PROCEED. Instead use a ceiling or total floor lift until assessed by Rehab. Trying to force the lift around by twisting from the front by using both handholds can cause an increased risk of strain to the low back. The lift may require 2 or more people to maneuver.
Fit Sling to Resident • Resident in sitting
position • Sling under arms &
around mid-back • Fasten buckle around
chest & adjust strap securely, snug but not tight
Adjust Base, as required Base of lift may need to be narrowed or widened to maneuver around bed frame, furniture, w/ch, etc.
Feet on Foot Plate & Attach Straps • Ask resident to position
feet on footplate; assist only if necessary.
• Adjust shin pad, just below or fully above kneecap.
• Ask resident to lean forward & securely attach sling straps to hooks on lift.
• Instruct resident to hold onto both handles and keep feet flat on footplate.
• Ensure resident’s arms are outside the sling straps.
Check Sling & Complete Transfer Instruct resident to stand with lift.
Turning the lift: • Push the frame from the
side, turn lift around the resident pivot point
OR • Apply one wheel-brake
and turn lift around brake-wheel pivot point
- MSIP – A Practical Guide to Resident Handling
© Copyright October 2004 Manual Transfers Section 7 - Page 1
7.0 Manual Transfers 7.1 General Manual Transfer Guidelines • Assess resident each time before you manually transfer:
• May be a confirmation of the transfer procedure already documented • May be a thorough initial assessment • May be a review due to changing medical condition
• Assessment provides the caregiver with accurate information:
• What does the resident do for himself/herself? • What can the resident do for himself/herself? • What does he/she want to do for himself/herself? • Determine the resident’s ability to weight bear now, prior to starting the transfer
• Assess the physical space/layout:
• Rearrange furniture, etc. to ensure there is adequate room for a safe transfer • Remove any barriers/obstacles that will increase your risk of injury
• Ensure you are trained to perform the transfer and that you feel confident that you
can complete the maneuver safely. • Use a transfer belt – remember – it’s a only a handhold, not a lifting device. • Lower the near side rail on the bed or stretcher. • When sliding a resident – use a slider device to minimize friction:
• Can use a repositioning device. e.g. slider sheet, SLIPP, garbage bag, smooth-mover, roller, etc.
• Block the resident’s knees. • Transfer over the shortest distance possible – in stages if necessary. • Never move residents by grasping under the armpit. • If the resident starts to fall, keep the resident close to you and go gently to the floor
with him/her.

- MSIP – A Practical Guide to Resident Handling
© Copyright October 2004 Manual Transfers Section 7 - Page 2
7.1.1 Manual Transfer Flowchart
Conduct ResidentTransfer Assessment (RTA)
- Choose the Most Appropriate Transfer
Prepare Yourself and the Residentfor the Transfer
Position the Resident
Assume the Correct Posture
Test Load
Complete Transfer
Evaluate Effectiveness
No
NO
NO
OKAY
YESSUCCESS
*Follow witheach transfer
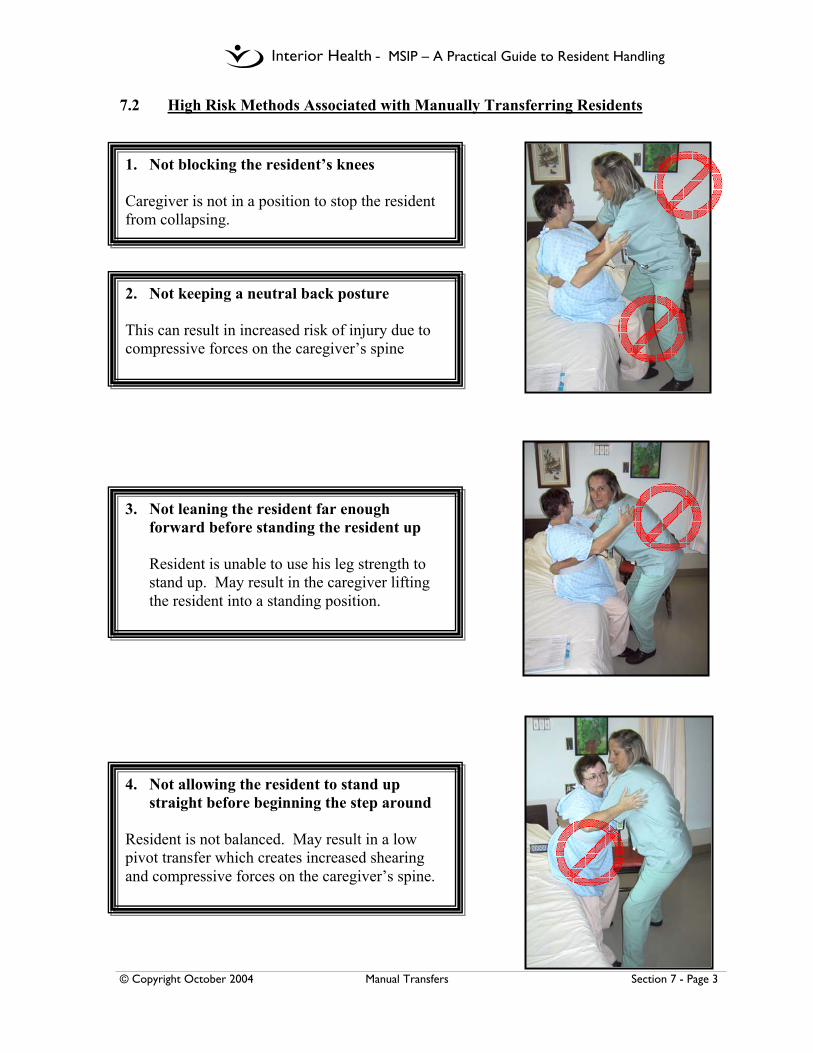
- MSIP – A Practical Guide to Resident Handling
© Copyright October 2004 Manual Transfers Section 7 - Page 3
7.2 High Risk Methods Associated with Manually Transferring Residents
1. Not blocking the resident’s knees Caregiver is not in a position to stop the resident from collapsing.
4. Not allowing the resident to stand up straight before beginning the step around
Resident is not balanced. May result in a low pivot transfer which creates increased shearing and compressive forces on the caregiver’s spine.
2. Not keeping a neutral back posture This can result in increased risk of injury due to compressive forces on the caregiver’s spine
3. Not leaning the resident far enough forward before standing the resident up
Resident is unable to use his leg strength to stand up. May result in the caregiver lifting the resident into a standing position.

- MSIP – A Practical Guide to Resident Handling
© Copyright October 2004 Manual Transfers Section 7 - Page 4
5. Hook-under-arm assistance (Chicken Lifts)
A chicken lift is any lift that involves moving the resident with the caregiver’s arms or hands under the resident’s armpits. This type of transfer and assistance is still commonly used in many facilities. This form of assistance is extremely high risk for both the caregiver(s) involved and the resident. It can damage the resident’s shoulder girdle muscles, especially if he/she suffered a stroke. It can also damage caregiver’s shoulders as they are forced into awkward postures and are lifting the resident rather than transferring or sliding the resident.
Unless exceptional care circumstances arise, caregivers in the Interior Health should not assist a resident using the hook-under-arm method for any of these tasks:
Repositioning up the bed Assisting a Resident to sit X 1 or X 2 assist
Transferring X 2 assist X 2 Walking Assist
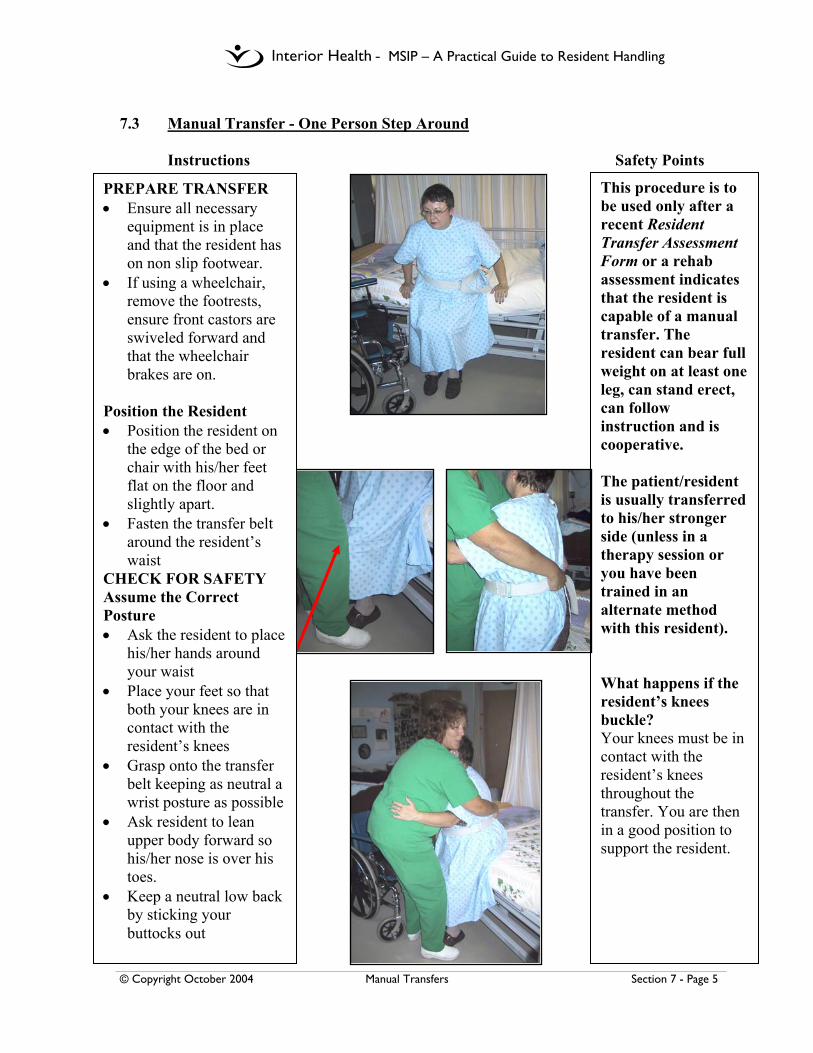
- MSIP – A Practical Guide to Resident Handling
© Copyright October 2004 Manual Transfers Section 7 - Page 5
7.3 Manual Transfer - One Person Step Around
Instructions Safety Points
This procedure is to be used only after a recent Resident Transfer Assessment Form or a rehab assessment indicates that the resident is capable of a manual transfer. The resident can bear full weight on at least one leg, can stand erect, can follow instruction and is cooperative. The patient/resident is usually transferred to his/her stronger side (unless in a therapy session or you have been trained in an alternate method with this resident). What happens if the resident’s knees buckle? Your knees must be in contact with the resident’s knees throughout the transfer. You are then in a good position to support the resident.
PREPARE TRANSFER • Ensure all necessary
equipment is in place and that the resident has on non slip footwear.
• If using a wheelchair, remove the footrests, ensure front castors are swiveled forward and that the wheelchair brakes are on.
Position the Resident • Position the resident on
the edge of the bed or chair with his/her feet flat on the floor and slightly apart.
• Fasten the transfer belt around the resident’s waist
CHECK FOR SAFETY Assume the Correct Posture • Ask the resident to place
his/her hands around your waist
• Place your feet so that both your knees are in contact with the resident’s knees
• Grasp onto the transfer belt keeping as neutral a wrist posture as possible
• Ask resident to lean upper body forward so his/her nose is over his toes.
• Keep a neutral low back by sticking your buttocks out

- MSIP – A Practical Guide to Resident Handling
© Copyright October 2004 Manual Transfers Section 7 - Page 6
Manual Transfer - One Person Step Around (continued) Instructions Safety Points
Test the Load • Ensure resident is actively
participating in transfer process. Rocking the resident back and forth prior to standing will help determine this.
• Instruct the resident to stand up straight after the count of 3: – one-two-three-Stand
COMPLETE TRANSFER • Once resident is in an
upright position instruct him/her to step around.
• When resident is in front
of wheelchair/bed, instruct resident to bend hips and lean upper body forward
• Assist resident into chair
Resident not able to stand upright, not participating in the transfer or feels too heavy? Sit the resident back down and proceed with a mechanical lift. Problems with the transfer belt slipping up as the resident stands? Ensure resident is close enough to you and his/her upper body is leaning forward. If you are too far away from the resident, you may have to lift the resident into the standing position –increased risk
Remember: **Nose over toes**
Problem with the resident falling back into the chair at the end of the transfer? Ensure resident’s upper body remains close to you during the sit down into the chair. If resident’s upper body remains more erect, you are pulled forward into the resident –risk of neck and back injury **
Three Keys to Safety: • Ensure your knees are in
contact with resident’s knees throughout the transfer
• Ensure resident is leaning far enough forward prior to standing - Remember nose over toes
• Make sure resident is standing up straight before beginning the step around
- MSIP – A Practical Guide to Resident Handling
© Copyright October 2004 Manual Transfers Section 7 - Page 7
7.4 Assisted Walking 7.4.1 One Person – to be added in the future

- MSIP – A Practical Guide to Resident Handling
© Copyright October 2004 Manual Transfers Section 7 - Page 8
7.4.2 Two Person – to be added in the future

- MSIP – A Practical Guide to Resident Handling
© Copyright October 2004 Manual Transfers Section 7 - Page 9
7.5 Transfer to a Stretcher – to be added in the future
- MSIP – A Practical Guide to Resident Handling
© Copyright August 2002 (Revised October 2004) Repositioning Section 8 - Page 1
8.0 Repositioning 8.1 Introduction to Repositioning
Moving residents in bed or in a wheelchair is a leading cause of injuries for caregivers. Providing such assistance often requires significant physical effort by workers and posturing that is less than ideal. These combined risk factors can be eliminated or minimized through careful assessment and the use of assistive devices. The Interior Health Authority is committed to developing standards to ensure that this potentially high risk task can be performed safely, and to attain compliance with the No Lift Policy. Though use of the ceiling lift is the procedure of choice, there may be times when mechanical procedures are not possible. Manual procedures are then required and these must be performed with consideration of the following: • There is no ideal manual repositioning procedure. Working at the bedside, or
with a resident in a wheelchair, requires some degree of twisting, bending, and leaning; these awkward postures combined with the weight of the resident can result in overexertion or cumulative strain injuries
• Some type of low friction slider must be used to reduce the work associated with repositioning dependent residents
• Manual procedures include an emphasis on sliding the resident. Care staff are encouraged to focus on maintaining smooth and continuous contact of the resident’s body on the surface underneath as the reposition occurs Remember to SLIDE; no lifting!!!
• Risks associated with manual repositioning are identified, as well as tips for avoiding such risks.
Repositioning generally refers to changing the resident’s position as follows: • In Bed - includes moving up the bed, to the side of the bed, and/or turning to lie
on one side • In Wheelchair - includes moving to back of seat and/or to the center to improve
postural seating.
These changes in position can be performed in a variety of ways including: • Mechanical assistance – this is the procedure of choice and requires use of a
transfer sling for repositioning in a wheelchair, or repositioning sling for moves in bed, and a ceiling lift. A total floor lift can be used in the absence of a ceiling lift.
• Manual assistance - requires 1-2 care staff and use of a low friction slider or combination of sliding devices. Examples of combined uses include slider tube and drawsheet slider, or two drawsheet sliders.
• Independent movement of the resident - this includes use of cuing and/or assistive device (ie. drawsheet slider or other)
- MSIP – A Practical Guide to Resident Handling
© Copyright August 2002 (Revised October 2004) Repositioning Section 8 - Page 2
An assessment of the resident’s abilities using the Resident Repositioning Assessment form (RRA) will determine the safest method to reposition a resident in bed or wheelchair. Completion of the RRA form must be performed on admission and at any time the resident’s condition changes. Results will be documented and clearly communicated for all caregivers to follow. Research literature states that: • the use of friction reducing assistive devices significantly reduces the forces
required for moving residents compared with standard draw sheets or soaker pads. • the various commercially available products vary in effectiveness at reducing
forces and awkward postures. • the use of assistive devices in combination requires less force than using only one
device. • residents report a greater feeling of comfort and security before, during, and after
the reposition. • caregivers report lower perceived exertion to shoulders, upper back, low back,
and body when using friction reducing devices to move residents.
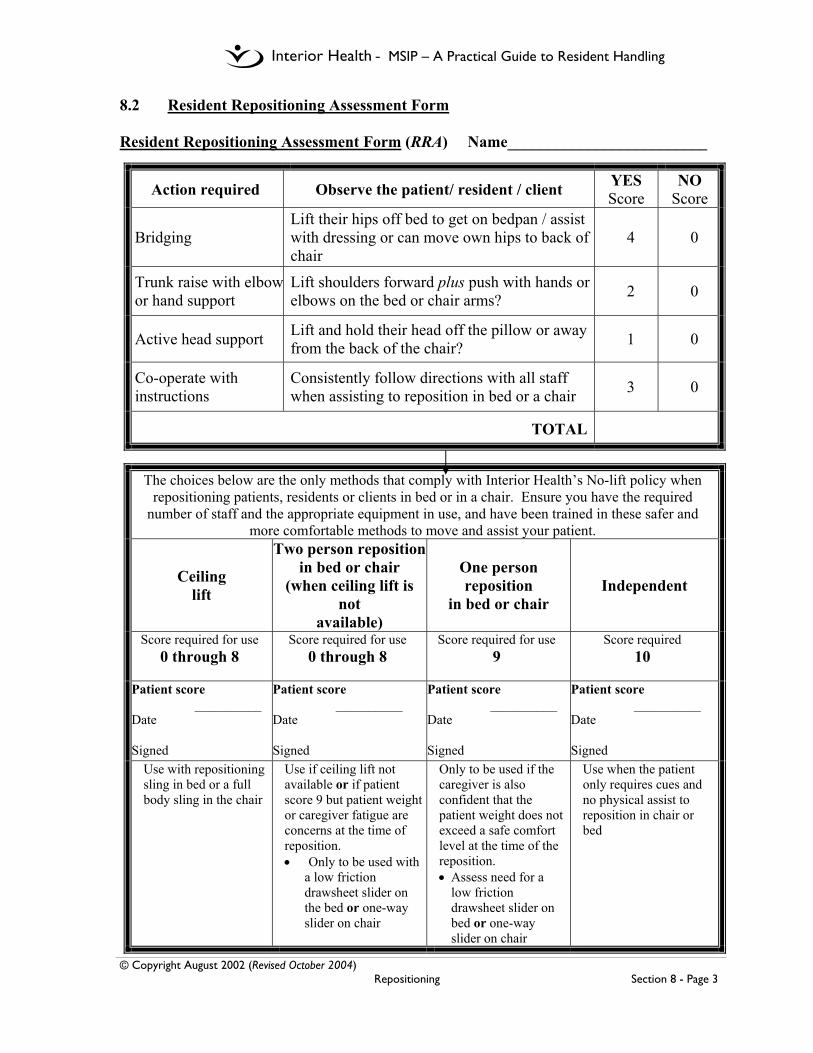
- MSIP – A Practical Guide to Resident Handling
© Copyright August 2002 (Revised October 2004) Repositioning Section 8 - Page 3
8.2 Resident Repositioning Assessment Form Resident Repositioning Assessment Form (RRA) Name_________________________
Action required Observe the patient/ resident / client YES Score
NO Score
Bridging Lift their hips off bed to get on bedpan / assist with dressing or can move own hips to back of chair
4 0
Trunk raise with elbowor hand support
Lift shoulders forward plus push with hands or elbows on the bed or chair arms? 2 0
Active head support Lift and hold their head off the pillow or away from the back of the chair? 1 0
Co-operate with instructions
Consistently follow directions with all staff when assisting to reposition in bed or a chair 3 0
TOTAL
The choices below are the only methods that comply with Interior Health’s No-lift policy when repositioning patients, residents or clients in bed or in a chair. Ensure you have the required
number of staff and the appropriate equipment in use, and have been trained in these safer and more comfortable methods to move and assist your patient.
Ceiling lift
Two person repositionin bed or chair
(when ceiling lift is not
available)
One person reposition
in bed or chair Independent
Score required for use 0 through 8
Score required for use 0 through 8
Score required for use 9
Score required 10
Patient score __________ Date Signed
Patient score __________ Date Signed
Patient score __________ Date Signed
Patient score __________ Date Signed
Use with repositioning sling in bed or a full body sling in the chair
Use if ceiling lift not available or if patient score 9 but patient weight or caregiver fatigue are concerns at the time of reposition. • Only to be used with
a low friction drawsheet slider on the bed or one-way slider on chair
Only to be used if the caregiver is also confident that the patient weight does not exceed a safe comfort level at the time of the reposition. • Assess need for a
low friction drawsheet slider on bed or one-way slider on chair
Use when the patient only requires cues and no physical assist to reposition in chair or bed

- MSIP – A Practical Guide to Resident Handling
© Copyright August 2002 (Revised October 2004) Repositioning Section 8 - Page 4
8.3 Risks Associated with Manual Repositioning • Soaker pad being used as a repositioning device — soaker pad usual placement
does not support the resident’s trunk or shoulders and has no low friction properties - results in an unbalanced load and greater effort for caregivers - use of a drawsheet slider is preferred.
• Drawsheet slider not placed correctly — if the majority of the resident’s weight
is not on the sheet increased friction forces will make the reposition more difficult.
• Not putting the side rails down — results in awkward postures and places the•
load too far away from the caregiver’s body, which increases the forces required to move the resident. This position also creates mechanical stress on the abdomen of the caregiver.
• Reposition not performed in stages — places the workers at risk of twisting and
over-reaching resulting in higher risk motions. • Inadequate space on both sides of bed for caregiver to shift weight towards
head of bed — results in limited reposition and risk of bumping into furniture/equipment. Staff have the option to clear the space required or use a different approved method. (Refers to 8.6.2)
• Not putting knee on bed — Caregiver is unable to “keep the curves of the spine”
and cannot get as close to the load - results in increased force in the low back in order to move resident. Additionally, the caregiver’s back muscles are required to support his/her upper body weight as well as the weight of the resident, thereby increasing the load on discs in the low back creating a potential for injury. (Refers to 8.6.3)
• Wrist in a flexed or extended position —results in prolonged grasp postures of
the small muscles of the fingers, hand, and forearm which may not be strong enough to perform the move safely.
• Elbows bent and positioned away from the body — this is a very high risk
position for the shoulder muscles - results in weight of the resident being taken by the shoulders in a poor functional position rather than the strong leg and trunk muscles.
• Twisting of the trunk under load— this is a very high risk movement for the
back as the load is unbalanced and places high forces on the delicate structures of the back

- MSIP – A Practical Guide to Resident Handling
© Copyright August 2002 (Revised October 2004) Repositioning Section 8 - Page 5
8.4 General Guidelines for Manual Repositioning In Bed • ADJUST BED HEIGHT to optimal working height for chosen procedure. • USE BED FEATURES such as raising of knee gatch or tilting whole bed
(Trendelenberg position) to gain gravity assistance only if no contraindications to head down position such as aspiration, increased intracranial pressure, other. Check with RN/team leader. Ensure brakes are on and working before beginning any movement.
• RECRUIT RESIDENT ABILITY to encourage residents who have some ability
to assist the movement. • COMMUNICATE CLEARLY with other caregiver(s) and resident. Count 1-2-
3 Slide with action occurring on the command word slide; agree on distance of each reposition step. Good communication is critical to the success of a reposition.
• COMPLETE THE REPOSITION IN STAGES, as many as necessary, to
ensure movement remains within safe reaching range for the caregivers. Remember all caregivers are different!
• USE SAFEST BODY POSITIONING to minimize risk of strains associated
with awkward posturing, especially of back, shoulders, and wrists. Alternate choices of approved methods to vary how you use your body.
• USE ASSISTIVE EQUIPMENT to reduce force associated with resident
handling. Ensure that device is large enough to be placed under the main points of contact i.e. under the pelvis, shoulders, and if possible, the feet. Always inspect each device before use and remove damaged equipment from service.
• REMOVE SLIDER TUBES from under resident unless rehab personnel and/or a
peer leader has assessed, documented, and communicated otherwise. Improper use may result in the resident sliding out of the bed.

- MSIP – A Practical Guide to Resident Handling
© Copyright August 2002 (Revised October 2004) Repositioning Section 8 - Page 6
8.5 Mechanical Repositioning in Bed 8.5.1 Move up the Bed or Transfer to a Stretcher (Mechanical Reposition)
Instructions Safety Points
PLAN - Place and Secure the Sling Following the Resident Repositioning Assessment (RRA) the sling is placed on the bed as part of the bed make-up.
If sling is not on the bed: Roll resident toward you so he/she is positioned on their side. Fold sling in half and lay it flat behind the resident. The top of the sling should be level with the top of the head. Place a pillow under the resident’s head to increase resident comfort. Turn the resident onto his back and ensure he/she is positioned in the middle of the sling. ATTACH STRAPS Two Options: 1. Carry bar can be positioned length wise (head to toe)
2. Carry bar can be positioning across the body (as when transferring). To use this option you will require extension loops. This option provides increased comfort for most residents (i.e. less squeezing)
Attach a minimum of 4 sling straps on each side of the sling. Try to ensure that the resident’s weight is evenly distributed. CHECK SLING Raise resident a few inches and check to ensure all straps are safely attached and the sling is comfortably positioned. If lift is not operating as per usual, ensure that sling or additional straps are not caught on bed frame. COMPLETE TRANSFER The resident is now ready to be positioned toward the head of the bed, or to be transferred to a stretcher or other surface.
When a repositioning sling is used, the sling needs to be on the bed as part of the bed make-up. When attaching strap, do not pull up on sling; instead lower the carry bar if needed. Use the mechanical features to the greatest advantage – pushing requirements are minimal. If a motorized system is used, let the system (hand controls, self centering) do the work.
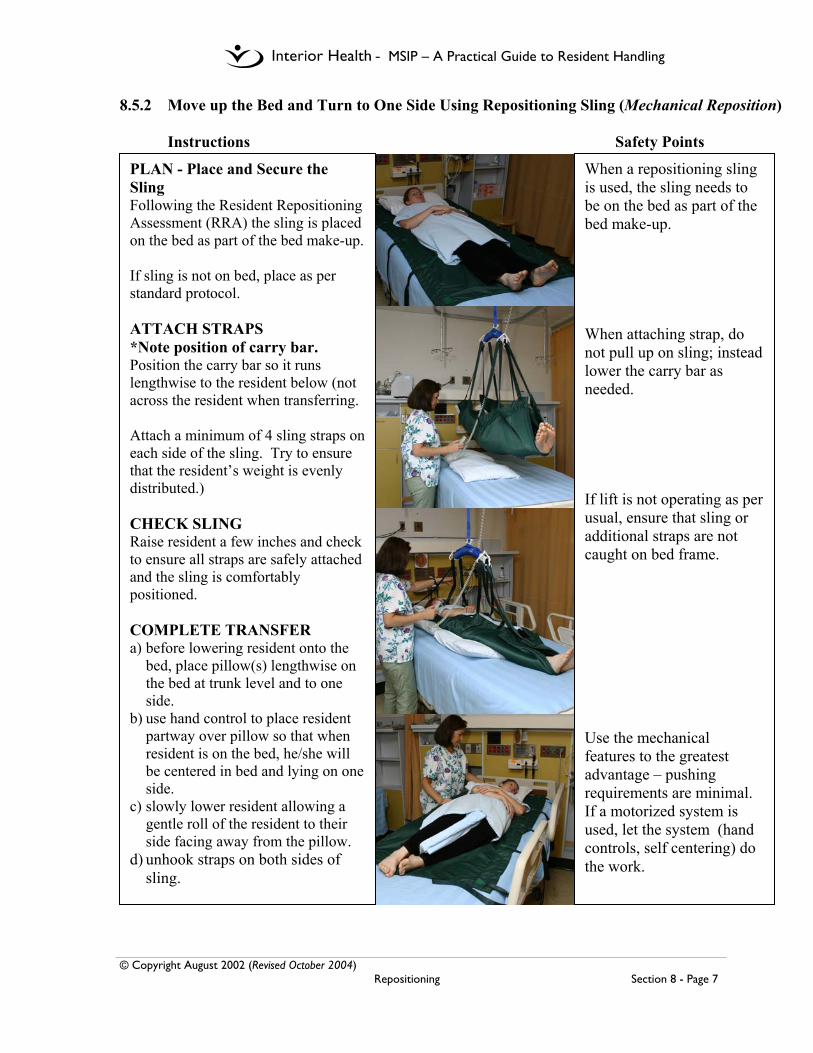
- MSIP – A Practical Guide to Resident Handling
© Copyright August 2002 (Revised October 2004) Repositioning Section 8 - Page 7
8.5.2 Move up the Bed and Turn to One Side Using Repositioning Sling (Mechanical Reposition) Instructions Safety Points
PLAN - Place and Secure the Sling Following the Resident Repositioning Assessment (RRA) the sling is placed on the bed as part of the bed make-up. If sling is not on bed, place as per standard protocol. ATTACH STRAPS *Note position of carry bar. Position the carry bar so it runs lengthwise to the resident below (not across the resident when transferring. Attach a minimum of 4 sling straps on each side of the sling. Try to ensure that the resident’s weight is evenly distributed.) CHECK SLING Raise resident a few inches and check to ensure all straps are safely attached and the sling is comfortably positioned. COMPLETE TRANSFER a) before lowering resident onto the
bed, place pillow(s) lengthwise on the bed at trunk level and to one side.
b) use hand control to place resident partway over pillow so that when resident is on the bed, he/she will be centered in bed and lying on one side.
c) slowly lower resident allowing a gentle roll of the resident to their side facing away from the pillow.
d) unhook straps on both sides of sling.
When a repositioning sling is used, the sling needs to be on the bed as part of the bed make-up. When attaching strap, do not pull up on sling; instead lower the carry bar as needed. If lift is not operating as per usual, ensure that sling or additional straps are not caught on bed frame. Use the mechanical features to the greatest advantage – pushing requirements are minimal. If a motorized system is used, let the system (hand controls, self centering) do the work.
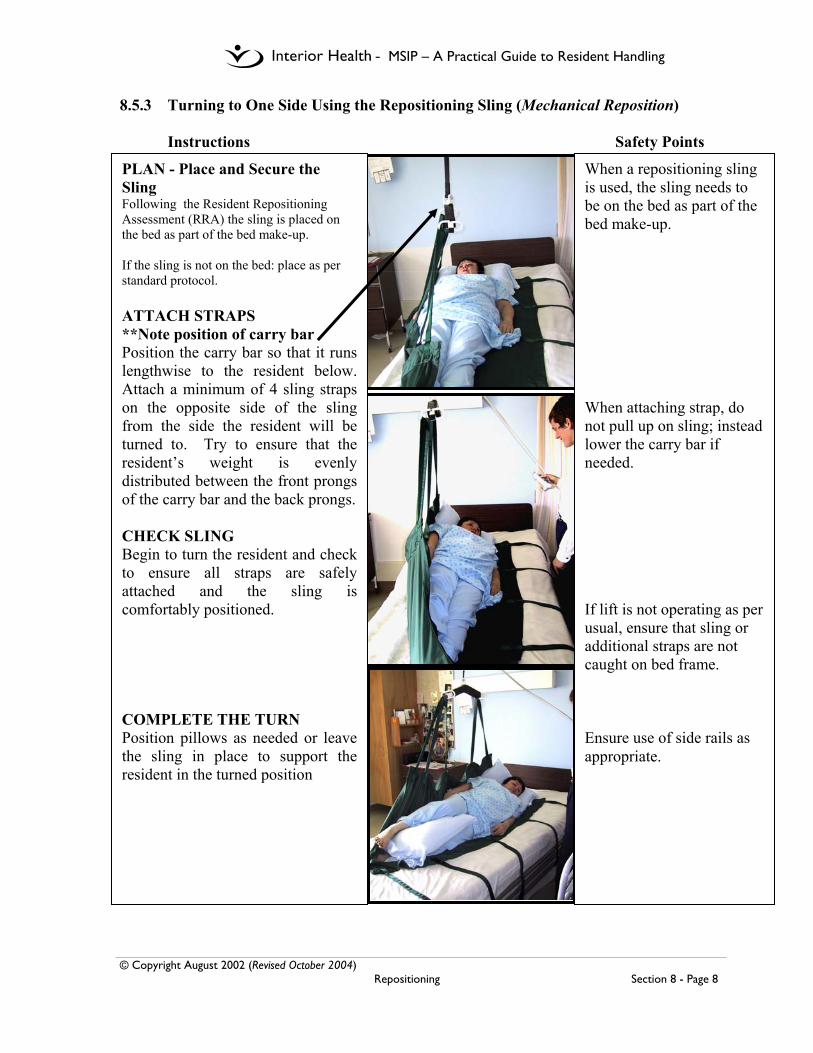
- MSIP – A Practical Guide to Resident Handling
© Copyright August 2002 (Revised October 2004) Repositioning Section 8 - Page 8
8.5.3 Turning to One Side Using the Repositioning Sling (Mechanical Reposition) Instructions Safety Points
When a repositioning sling is used, the sling needs to be on the bed as part of the bed make-up. When attaching strap, do not pull up on sling; instead lower the carry bar if needed. If lift is not operating as per usual, ensure that sling or additional straps are not caught on bed frame. Ensure use of side rails as appropriate.
PLAN - Place and Secure the Sling Following the Resident Repositioning Assessment (RRA) the sling is placed on the bed as part of the bed make-up. If the sling is not on the bed: place as per standard protocol. ATTACH STRAPS **Note position of carry bar Position the carry bar so that it runs lengthwise to the resident below. Attach a minimum of 4 sling straps on the opposite side of the sling from the side the resident will be turned to. Try to ensure that the resident’s weight is evenly distributed between the front prongs of the carry bar and the back prongs. CHECK SLING Begin to turn the resident and check to ensure all straps are safely attached and the sling is comfortably positioned. COMPLETE THE TURN Position pillows as needed or leave the sling in place to support the resident in the turned position
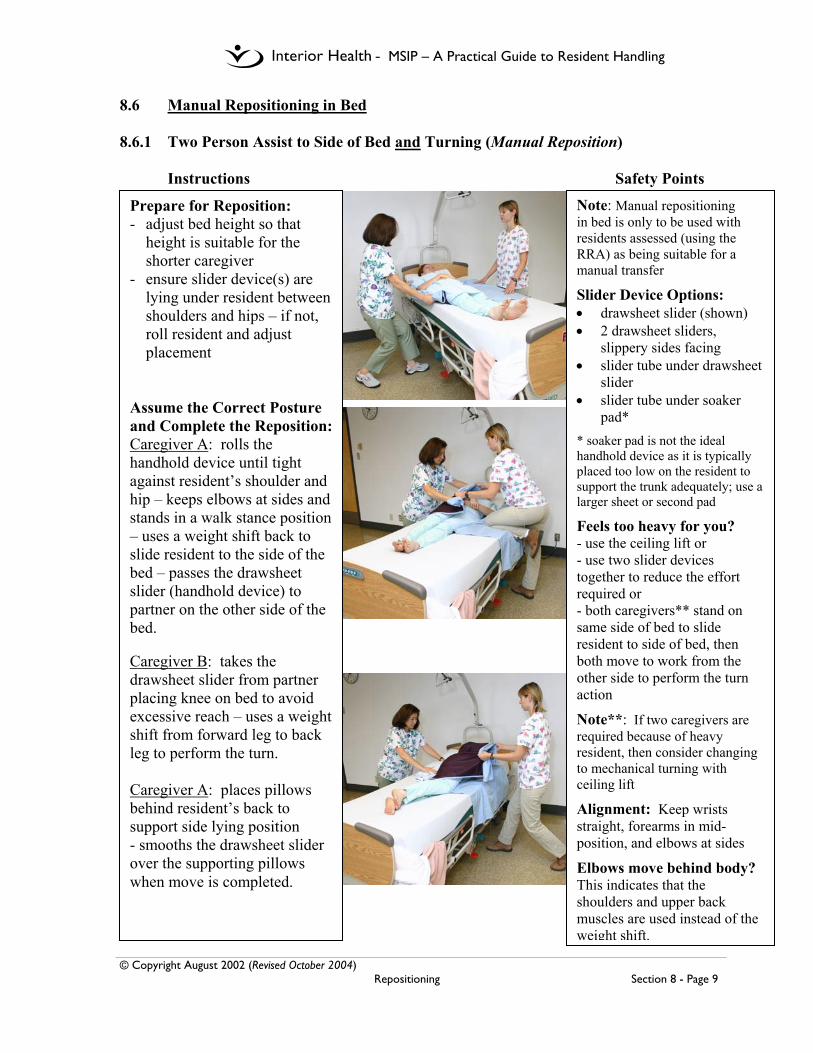
- MSIP – A Practical Guide to Resident Handling
© Copyright August 2002 (Revised October 2004) Repositioning Section 8 - Page 9
8.6 Manual Repositioning in Bed 8.6.1 Two Person Assist to Side of Bed and Turning (Manual Reposition)
Instructions Safety Points
Prepare for Reposition: - adjust bed height so that
height is suitable for the shorter caregiver
- ensure slider device(s) are lying under resident between shoulders and hips – if not, roll resident and adjust placement
Assume the Correct Posture and Complete the Reposition: Caregiver A: rolls the handhold device until tight against resident’s shoulder and hip – keeps elbows at sides and stands in a walk stance position – uses a weight shift back to slide resident to the side of the bed – passes the drawsheet slider (handhold device) to partner on the other side of the bed. Caregiver B: takes the drawsheet slider from partner placing knee on bed to avoid excessive reach – uses a weight shift from forward leg to back leg to perform the turn. Caregiver A: places pillows behind resident’s back to support side lying position - smooths the drawsheet slider over the supporting pillows when move is completed.
Note: Manual repositioning in bed is only to be used with residents assessed (using the RRA) as being suitable for a manual transfer
Slider Device Options: • drawsheet slider (shown) • 2 drawsheet sliders,
slippery sides facing • slider tube under drawsheet
slider • slider tube under soaker
pad*
* soaker pad is not the ideal handhold device as it is typically placed too low on the resident to support the trunk adequately; use a larger sheet or second pad
Feels too heavy for you? - use the ceiling lift or - use two slider devices together to reduce the effort required or - both caregivers** stand on same side of bed to slide resident to side of bed, then both move to work from the other side to perform the turn action
Note**: If two caregivers are required because of heavy resident, then consider changing to mechanical turning with ceiling lift
Alignment: Keep wrists straight, forearms in mid-position, and elbows at sides
Elbows move behind body? This indicates that the shoulders and upper back muscles are used instead of the weight shift.

- MSIP – A Practical Guide to Resident Handling
© Copyright August 2002 (Revised October 2004) Repositioning Section 8 - Page 10
8.6.2 Two Person Assist Up the Bed – Two Feet on Floor (Manual Reposition)
Instructions Safety Points
Note: Manual repositioning in bed is only to be used with residents assessed (using the RRA) as being suitable for a manual transfer
Space: This method is limited to situations where there is adequate space for the caregivers to work comfortably on both sides of the top half of the bed
Slider device options: • drawsheet slider (shown) • slider tube under legs/feet
(shown) • 2 drawsheet sliders, slippery
sides together • slider tube under drawsheet
slider • slider tube under soaker
pad*
*soaker pad is not the ideal handhold device as it is typically placed too low on resident to support trunk area adequately; use a larger sheet or second pad
Feels too heavy for you? - Use the ceiling lift or use two slider devices together to reduce the effort required
Alignment: Keep wrists straight, forearms in midposition, and elbows at sides while in walk stance position
Elbows lifting away from sides? This indicates that excessive lifting action is being used. Focus on using weight shift to perform slide action.
Prepare for Reposition: - Adjust bed height to near elbow level of shorter caregiver – ensure slider device(s) are lying under resident between shoulders and hips – if not, roll resident and adjust placement Option: place slider tube under legs and feet Position the Resident: - Have resident bend both knees, place feet firmly on bed, and lift head Option: If slider tube is used under legs and feet, resident may leave legs flat on bed Assume the Correct Posture: Roll the handhold device until tight against the resident’s hip and shoulder –use a full hand grasp, not a pinch grip - assume a walk stance stride with feet pointing towards foot end of bed – bend at the hips and knees – forearms should be close to, or resting lightly on, the bed surface Complete the Reposition: Use leg strength and weight shift action to perform the SLIDE up the bed – repeat as many times as required to position resident fully up the bed

- MSIP – A Practical Guide to Resident Handling
© Copyright August 2002 (Revised October 2004) Repositioning Section 8 - Page 11
8.6.3 Two Person Assist Up the Bed – One Knee on Bed (Manual Reposition) Instructions Safety Points
Prepare for Reposition: - Adjust bed height to shorter caregiver, approx mid thigh to hip level – ensure slider device(s) are lying under resident between shoulders and hips – if not, roll resident and adjust placement Option: place slider tube under legs and feet Position the Resident: - Have the resident bend both knees, place feet firmly on bed, and lift head Option: If slider tube is used under legs and feet, resident may leave legs flat on bed Assume the Correct Posture: - place one knee on the bed – roll the handhold device until tight against the resident’s hip and shoulder – knee on bed and foot of other leg are pointed in direction of head of bed Complete the Reposition: Use leg strength and weight shift action from back leg to leading leg to perform the SLIDE up the bed – repeat as many times as required to position resident fully up the bed
Note: Manual repositioning in bed is only to be used with residents assessed (using the RRA) as being suitable for a manual transfer Slider Device Options: • drawsheet slider • 2 drawsheet sliders,
slippery sides together (shown)
• slider tube under legs/feet (shown)
• slider tube under drawsheet slider
• slider tube under soaker pad*
* soaker pad is not the ideal handhold device as it is typically placed too low on resident to support trunk area adequately; use a larger sheet or second pad Feels too heavy for you? - Use the ceiling lift or use two slider devices together to reduce the effort required Alignment: Keep wrists straight, forearms in mid-position, and elbows at sides Elbows lifting away from sides? This indicates that excessive lifting action is being used. Focus on using weight shift to perform slide motion
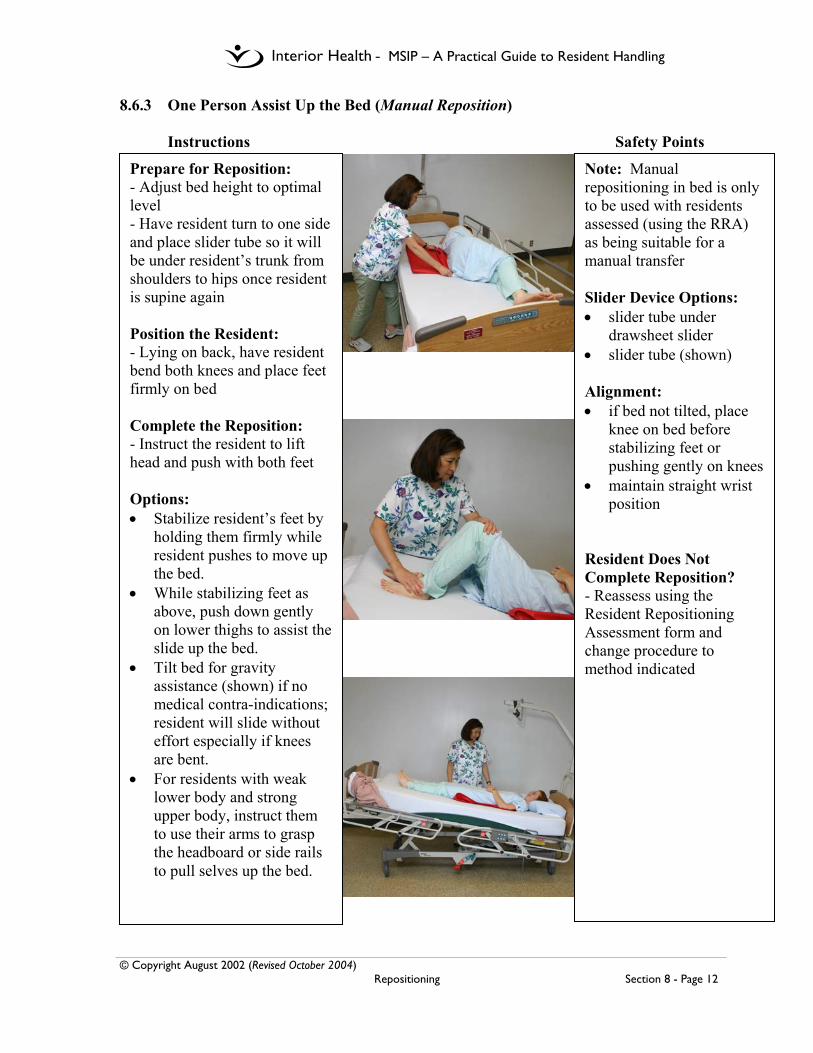
- MSIP – A Practical Guide to Resident Handling
© Copyright August 2002 (Revised October 2004) Repositioning Section 8 - Page 12
8.6.3 One Person Assist Up the Bed (Manual Reposition) Instructions Safety Points
Prepare for Reposition: - Adjust bed height to optimal level - Have resident turn to one side and place slider tube so it will be under resident’s trunk from shoulders to hips once resident is supine again Position the Resident: - Lying on back, have resident bend both knees and place feet firmly on bed Complete the Reposition: - Instruct the resident to lift head and push with both feet Options: • Stabilize resident’s feet by
holding them firmly while resident pushes to move up the bed.
• While stabilizing feet as above, push down gently on lower thighs to assist the slide up the bed.
• Tilt bed for gravity assistance (shown) if no medical contra-indications; resident will slide without effort especially if knees are bent.
• For residents with weak lower body and strong upper body, instruct them to use their arms to grasp the headboard or side rails to pull selves up the bed.
Note: Manual repositioning in bed is only to be used with residents assessed (using the RRA) as being suitable for a manual transfer Slider Device Options: • slider tube under
drawsheet slider • slider tube (shown) Alignment: • if bed not tilted, place
knee on bed before stabilizing feet or pushing gently on knees
• maintain straight wrist position
Resident Does Not Complete Reposition? - Reassess using the Resident Repositioning Assessment form and change procedure to method indicated
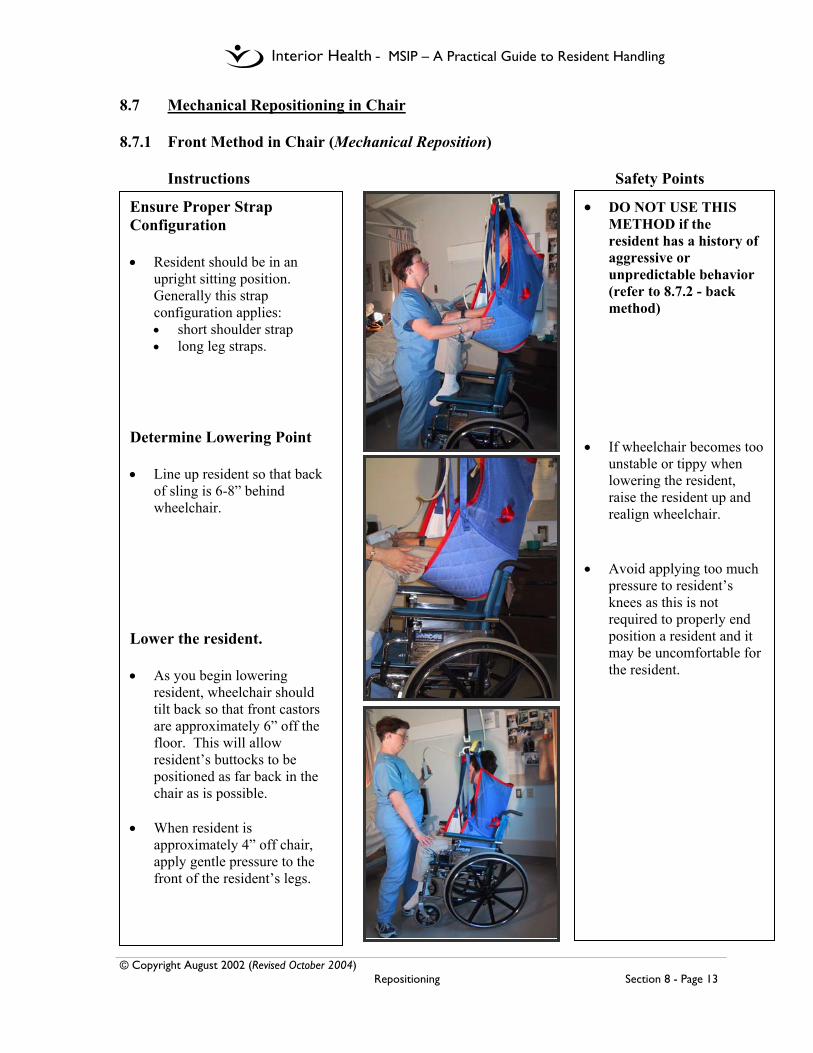
- MSIP – A Practical Guide to Resident Handling
© Copyright August 2002 (Revised October 2004) Repositioning Section 8 - Page 13
8.7 Mechanical Repositioning in Chair 8.7.1 Front Method in Chair (Mechanical Reposition)
Instructions Safety Points
Ensure Proper Strap Configuration • Resident should be in an
upright sitting position. Generally this strap configuration applies: • short shoulder strap • long leg straps.
Determine Lowering Point • Line up resident so that back
of sling is 6-8” behind wheelchair.
Lower the resident. • As you begin lowering
resident, wheelchair should tilt back so that front castors are approximately 6” off the floor. This will allow resident’s buttocks to be positioned as far back in the chair as is possible.
• When resident is
approximately 4” off chair, apply gentle pressure to the front of the resident’s legs.
• DO NOT USE THIS METHOD if the resident has a history of aggressive or unpredictable behavior (refer to 8.7.2 - back method)
• If wheelchair becomes too
unstable or tippy when lowering the resident, raise the resident up and realign wheelchair.
• Avoid applying too much
pressure to resident’s knees as this is not required to properly end position a resident and it may be uncomfortable for the resident.
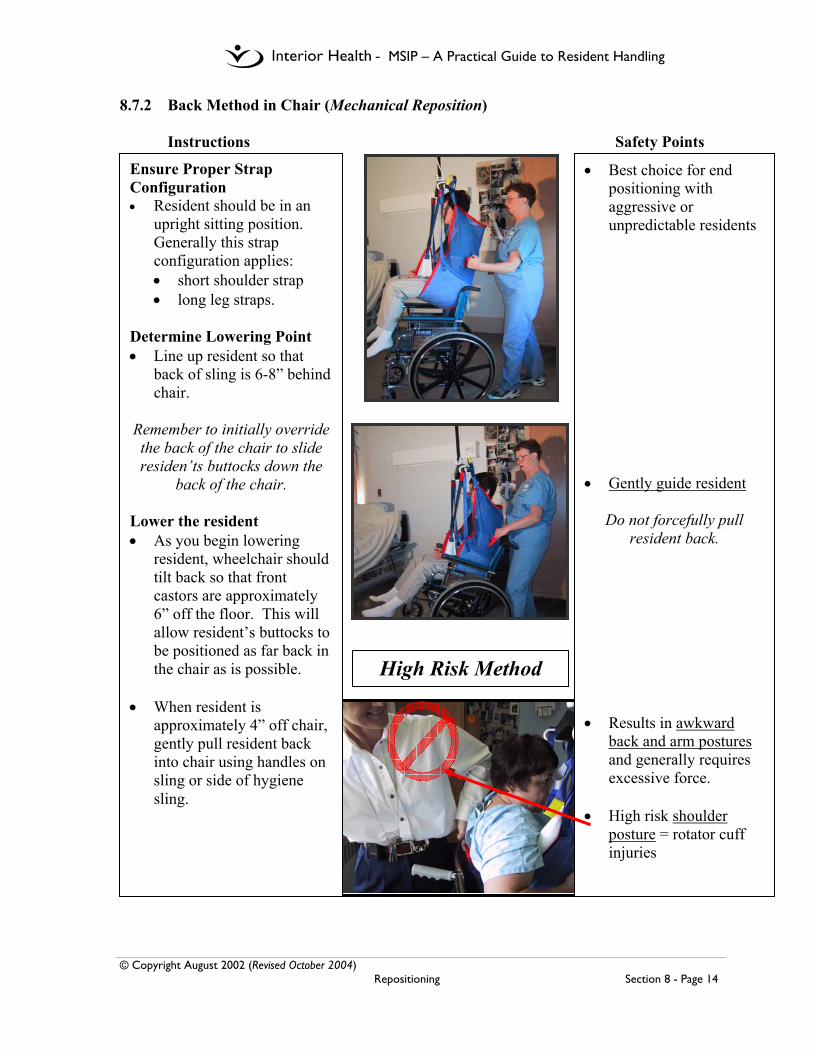
- MSIP – A Practical Guide to Resident Handling
© Copyright August 2002 (Revised October 2004) Repositioning Section 8 - Page 14
8.7.2 Back Method in Chair (Mechanical Reposition) Instructions Safety Points
Ensure Proper Strap Configuration • Resident should be in an
upright sitting position. Generally this strap configuration applies: • short shoulder strap • long leg straps.
Determine Lowering Point • Line up resident so that
back of sling is 6-8” behind chair.
Remember to initially override the back of the chair to slide residen’ts buttocks down the
back of the chair. Lower the resident • As you begin lowering
resident, wheelchair should tilt back so that front castors are approximately 6” off the floor. This will allow resident’s buttocks to be positioned as far back in the chair as is possible.
• When resident is
approximately 4” off chair, gently pull resident back into chair using handles on sling or side of hygiene sling.
• Best choice for end positioning with aggressive or unpredictable residents
• Gently guide resident
Do not forcefully pull resident back.
• Results in awkward
back and arm postures and generally requires excessive force.
• High risk shoulder
posture = rotator cuff injuries
High Risk Method

- MSIP – A Practical Guide to Resident Handling
© Copyright August 2002 (Revised October 2004) Repositioning Section 8 - Page 15
8.7.3 Into a Reclining Chair (Manual Reposition) (e.g. Broda Chair, Fallout Chair, Geri Chair, Power Chair, Lazyboy Style Chair)
Instructions Safety Points
Ensure Proper Strap
Configuration • Resident should be in a
reclined position. Generally this strap configuration applies: • long shoulder strap • long leg straps.
Determine Lowering Point • Line up resident so that
back of sling is 6-8” behind wheelchair.
Lower the resident. • When resident is
approximately 4” off chair, gentle push resident back into chair using side of sling.
• Gently guide resident
into back of chair
Do not forcefully pull resident back.

- MSIP – A Practical Guide to Resident Handling
© Copyright August 2002 (Revised October 2004) Repositioning Section 8 - Page 16
8.8 Manual Repositioning in Wheelchair 8.8.1 Two Person Assist – Front and Back in Wheelchair (Manual Reposition)
Instructions Safety Points
Prepare for Reposition: - Ensure that a one way slide device or w/c pad is on the chair seat directly under the resident - Apply w/c brakes and check effectiveness - If chair is in recline or tilt, adjust chair to upright position - Front caregiver blocks resident’s knees using own knees Position the Resident: - Encourage the resident to lean forward actively and provide gentle assistance/ support as needed - Position feet firmly on footrests or floor Complete the Reposition: - Front caregiver maintains resident in forward lean position, or holds onto w/c armrests, while blocking knees with own knees - Instruct the resident to assist by pushing with legs on the word “SLIDE” - Count 1-2-3 SLIDE - On SLIDE, front caregiver uses own knees to push against resident’s knees while back caregiver guides resident’s pelvis (as below) to back of chair - Resident assists by pushing with legs as able - If using a w/c pad, back caregiver can use this as a handhold to guide the resident’s pelvis to back of chair - If chair has a low back, caregiver may choose to hold w/c pad directly behind resident’s hips OR if not a comfortable reach, caregiver may grasp w/c pad from space between bottom of backrest and back of seat - If using a one way slide, back caregiver may choose to grasp top layer to help shift the resident’s hips back in chair
Note: Manual repositioning in a wheelchair is only to be used with residents assessed (using the RRA) as being suitable for a manual reposition
Slider Device Options/Chair Make-up: - Residents assessed as a two person manual assist reposition must have one of the following as part of their usual seating set-up:
• one-way slide • wheelchair pad*
(18”x16” cloth pad* same material as soaker pad)
No Assistive Devices Available? - Use mechanical repositioning - Without an assistive device, there is little to grasp other than resident’s limbs or pants; these are not approved methods, therefore use mechanical repositioning
Resident Nearly Falling Out of Chair? - Do not lift resident back in chair! - instead, ease resident down to floor (onto a pillow if possible) - Assess resident for injuries - If no injury, use mechanical (floor or ceiling) lift to get back into chair or bed
Caregiver Positioning: Remember to • maintain the curve in the
lower back • use a weight shift to perform
the move, do NOT lift • use a full hand grasp rather
than a pincher grasp • keep the wrists straight
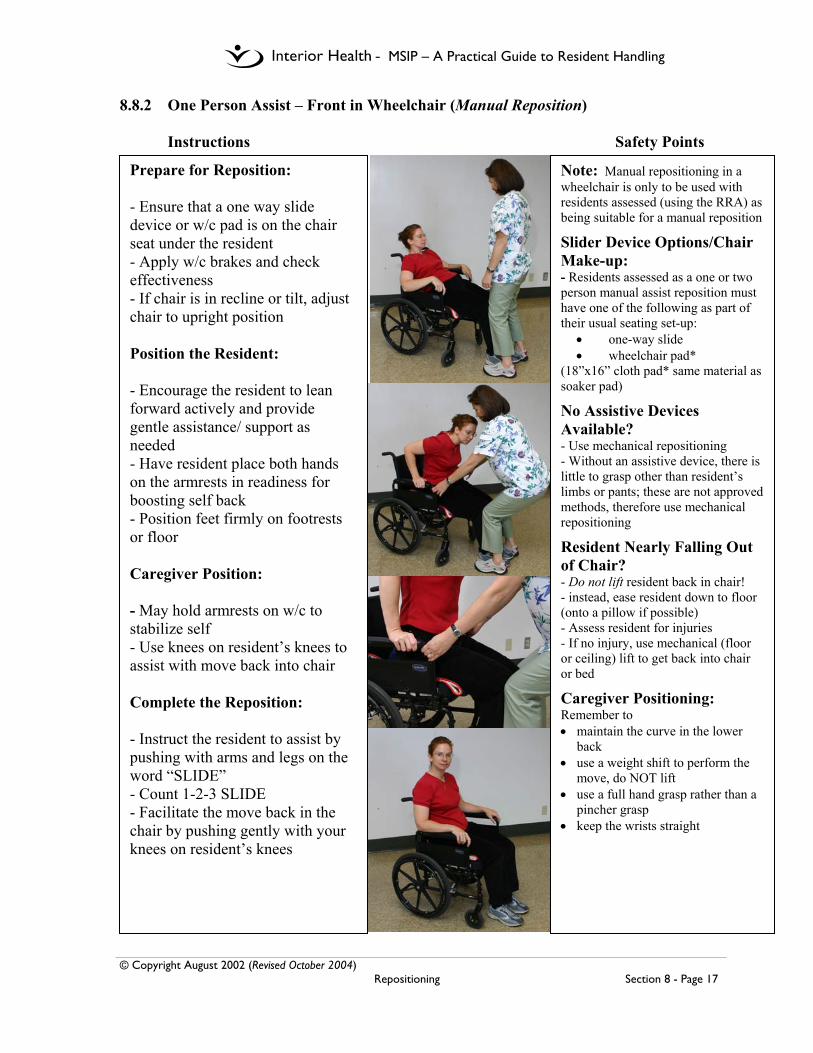
- MSIP – A Practical Guide to Resident Handling
© Copyright August 2002 (Revised October 2004) Repositioning Section 8 - Page 17
8.8.2 One Person Assist – Front in Wheelchair (Manual Reposition) Instructions Safety Points
Prepare for Reposition: - Ensure that a one way slide device or w/c pad is on the chair seat under the resident - Apply w/c brakes and check effectiveness - If chair is in recline or tilt, adjust chair to upright position Position the Resident: - Encourage the resident to lean forward actively and provide gentle assistance/ support as needed - Have resident place both hands on the armrests in readiness for boosting self back - Position feet firmly on footrests or floor Caregiver Position: - May hold armrests on w/c to stabilize self - Use knees on resident’s knees to assist with move back into chair Complete the Reposition: - Instruct the resident to assist by pushing with arms and legs on the word “SLIDE” - Count 1-2-3 SLIDE - Facilitate the move back in the chair by pushing gently with your knees on resident’s knees
Note: Manual repositioning in a wheelchair is only to be used with residents assessed (using the RRA) as being suitable for a manual reposition
Slider Device Options/Chair Make-up: - Residents assessed as a one or two person manual assist reposition must have one of the following as part of their usual seating set-up:
• one-way slide • wheelchair pad*
(18”x16” cloth pad* same material as soaker pad)
No Assistive Devices Available? - Use mechanical repositioning - Without an assistive device, there is little to grasp other than resident’s limbs or pants; these are not approved methods, therefore use mechanical repositioning
Resident Nearly Falling Out of Chair? - Do not lift resident back in chair! - instead, ease resident down to floor (onto a pillow if possible) - Assess resident for injuries - If no injury, use mechanical (floor or ceiling) lift to get back into chair or bed
Caregiver Positioning: Remember to • maintain the curve in the lower
back • use a weight shift to perform the
move, do NOT lift • use a full hand grasp rather than a
pincher grasp • keep the wrists straight
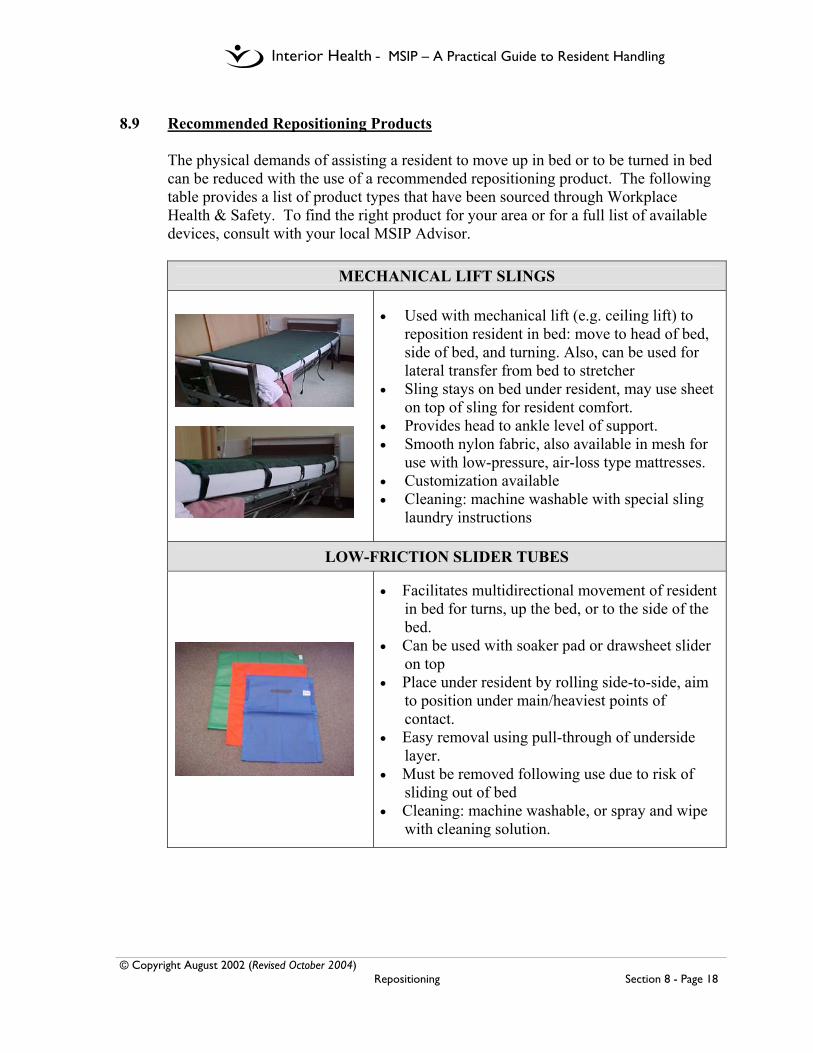
- MSIP – A Practical Guide to Resident Handling
© Copyright August 2002 (Revised October 2004) Repositioning Section 8 - Page 18
8.9 Recommended Repositioning Products
The physical demands of assisting a resident to move up in bed or to be turned in bed can be reduced with the use of a recommended repositioning product. The following table provides a list of product types that have been sourced through Workplace Health & Safety. To find the right product for your area or for a full list of available devices, consult with your local MSIP Advisor.
MECHANICAL LIFT SLINGS
• Used with mechanical lift (e.g. ceiling lift) to reposition resident in bed: move to head of bed, side of bed, and turning. Also, can be used for lateral transfer from bed to stretcher
• Sling stays on bed under resident, may use sheet on top of sling for resident comfort.
• Provides head to ankle level of support. • Smooth nylon fabric, also available in mesh for
use with low-pressure, air-loss type mattresses. • Customization available • Cleaning: machine washable with special sling
laundry instructions
LOW-FRICTION SLIDER TUBES
• Facilitates multidirectional movement of resident in bed for turns, up the bed, or to the side of the bed.
• Can be used with soaker pad or drawsheet slider on top
• Place under resident by rolling side-to-side, aim to position under main/heaviest points of contact.
• Easy removal using pull-through of underside layer.
• Must be removed following use due to risk of sliding out of bed
• Cleaning: machine washable, or spray and wipe with cleaning solution.

- MSIP – A Practical Guide to Resident Handling
© Copyright August 2002 (Revised October 2004) Repositioning Section 8 - Page 19
LOW-FRICTION DRAWSHEET SLIDERS
• Facilitates multidirectional movement of resident in bed for turns, up the bed, and to the side.
• Drawsheet slider is intended to remain on the bed; does not require removal following reposition.
• Side edges are tucked under mattress to stabilize when not in use.
• Low friction undersurface slides on bedsheet below offering reduction in effort required to perform reposition (but not as much as slider tube).
• For heavier residents, two drawsheet sliders with low friction surfaces facing each other can be used to increase slide, provided that that lower drawsheet is stabilized on bed by tucking in the side edges. The top sheet must also be tucked in following use to reduce risk of sliding out of bed.
• Cleaning: machine washable as standard laundry linens
SINGLE FLAT SHEET SLIDERS
Single flat sheet slider can be folded on itself for reposition procedure
Available in various sizes, with or without handles along the edges; 65” x 28”, 66” x 57”; 78” x 58”
Must be removed following use due to risk of sliding out of bed
Cleaning: machine washable or spray and wipe with cleaning solution
ONE-WAY SLIDES • Products are designed to move one way only
(marked by directional arrows), usually to the back of the chair or HOB; deters sliding forward/down
• Variety of sizes and fabrics available for use in bed and chairs including wheelchairs and reclining easy chairs.
• Double layer (tube) and single layer styles • Cleaning: machine washable • CAUTION: due to effects of shearing associated
with non-slide feature, a limit of approx. three hours maximum is recommended to maintain skin integrity

- MSIP – A Practical Guide to Resident Handling
© Copyright October 2004 Bathing Section 9 - Page 1
9.0 Bathing Name___________________________
9.1 Bathing Assessment Tool
Indicate the kind of seating the resident currently uses in column 1, 2, 3, 4. Then √ the most appropriate (and available) option for the resident in this column. Shaded areas may indicate unsafe bathing options. Exceptions in Columns 2 and 3 must be assessed by Peer Leaders or Rehab. If resident requires a non-standard size w/c (>18” width), Rehab consult is required.
Column 1 Column 2 Column 3 Column 4 Bed rest Adapted seating Regular Power Chair
Seating
Bathing options
Reclined seating Lateral support
Broda Fallout
Poor trunk control and /or
increased or decreased tone
Good trunk control and no problems with muscle tone
Bed bath
Shower trolley
Tilting shower chair
Universal sling into Century tub
Universal sling into Arjo tub
Bathing stretcher into Arjo tub
Rehab shower commode with straps
Consult to Rehab or Peer Leader required to use this method
High-back tub chair with pelvic and chest straps into Century tub
Consult to Rehab or Peer Leader required to use this method
Low-back tub chair with pelvic strap into Century tub
Arjo chair into Arjo long tub Consult to Rehab or Peer Leader required to use this method
Regular shower chair
Recommendations:
Signature Date

- MSIP – A Practical Guide to Resident Handling
© Copyright October 2004 Bathing Section 9 - Page 2
9.2 Associated Risks – to be added in the future
- MSIP – A Practical Guide to Resident Handling
© Copyright October 2004 Bathing Section 9 - Page 3
9.3 Use of Century Tub with Chair – to be added in the future
- MSIP – A Practical Guide to Resident Handling
© Copyright October 2004 Bathing Section 9 - Page 4
9.4 Use of Arjo Tub with Chair – to be added in the future

- MSIP – A Practical Guide to Resident Handling
© Copyright October 2004 Bathing Section 9 - Page 5
9.5 Use of Arjo Tub with Stretcher – to be added in the future
- MSIP – A Practical Guide to Resident Handling
© Copyright October 2004 Bathing Section 9 - Page 6
9.6 Use of Arjo Tub with Sling – to be added in the future

- MSIP – A Practical Guide to Resident Handling
© Copyright October 2004 Bathing Section 9 - Page 7
9.7 Use of Shower Stretcher – to be added in the future
- MSIP – A Practical Guide to Resident Handling
© Copyright October 2004 Bathing Section 9 - Page 8
9.8 Use of Shower Chair – to be added in the future
- MSIP – A Practical Guide to Resident Handling
© Copyright August 2002 (Revised October 2004) Dressing Section 10 - Page 1
10.0 Dressing 10.1 General Dressing Guidelines
1. When dressing a resident, always give the resident instructions and/or information
before you proceed. For example “I’m going to put your shirt on you, Mr. Smith, please lift up your right arm”. This allows the resident to participate as possible and helps to decrease fears of those who are dependent for dressing.
2. Although there are time constraints for dressing residents, never move yourself or the
resident in a quick or jerky manner. Movements should be deliberate and planned. 3. Always keep in mind proper back care techniques when dressing the resident. These
include:
• Adjusting the bed to the appropriate height before working with the resident • Putting one knee up on the bed (when possible) when moving or rolling a
resident. • Bend the resident’s legs, position arms across body and turn head in direction of
roll before turning the resident on his/her side
4. A dressing assessment is required with residents who have the following difficulties/needs:
• limited arm or leg movements • stiff joints • experience pain while being moved
• cannot tolerate physical touch without reactive behavior • require use of a total lift with a universal or hammock for toileting
5. General dressing techniques to keep in mind:
• When putting shirts on residents always place the weaker or affected arm through the sleeve first before the stronger arm and avoid lifting a resident’s arm straight upwards as this can result in increased discomfort.
• When putting on pants reduce rolling by planning to do several tasks at once. (e.g. roll the resident one way and place his benefit and lifting sling at the same time rather than having to roll him twice.)
Adapted from Greater Trail Community Health Council LTC Dressing Package
- MSIP – A Practical Guide to Resident Handling
© Copyright August 2002 (Revised October 2004) Dressing Section 10 - Page 2
10.2 Dressing Assessment – Notice to Families and Residents
As part of its No-lift Policy Interior Health requires all residents in facilities with ceiling track lifts to be assessed for dressing needs. Dressing a resident who has stiff or painful joints, difficulty balancing or is resistive to touch, places the resident and staff at risk of discomfort and injury during care activities. This assessment may result in the resident being considered for adapted clothing to assist with dressing and personal hygiene issues. Personal preferences will be considered but cannot take precedence over comfort and safety of the resident, and the staff. Re-assessment will occur with any changes in the resident’s condition. Answering ‘No” to any of the questions on the next page demonstrates that dressing the resident in their own, regular clothes is NOT a suitable option. Therefore, it is Interior Health policy that the resident be dressed in a recommended form of adaptive clothing to ensure comfort and safety of residents and staff. There are a number of options for residents and their families to consider. Please ensure you fully understand the reasons you are being requested to obtain this adapted clothing before you purchase or modify any clothing. The staff will explain the adapted clothing recommendations to you. Options for safer dressing include: • Purchase of oversized clothes or track pants to allow easier on/off of garment • Family or experienced seamstress modifying blouses, dresses, shirts, or pants
according to Interior Health suggested patterns. • Purchase of adaptive clothing from a recommended commercial supplier or from
an experienced seamstress according to Interior Health suggested patterns. • Use of a facility gown and blanket covers instead of clothes. Thank you for your co-operation If you have any questions or concerns please contact: Name of Resident: Date of Notification
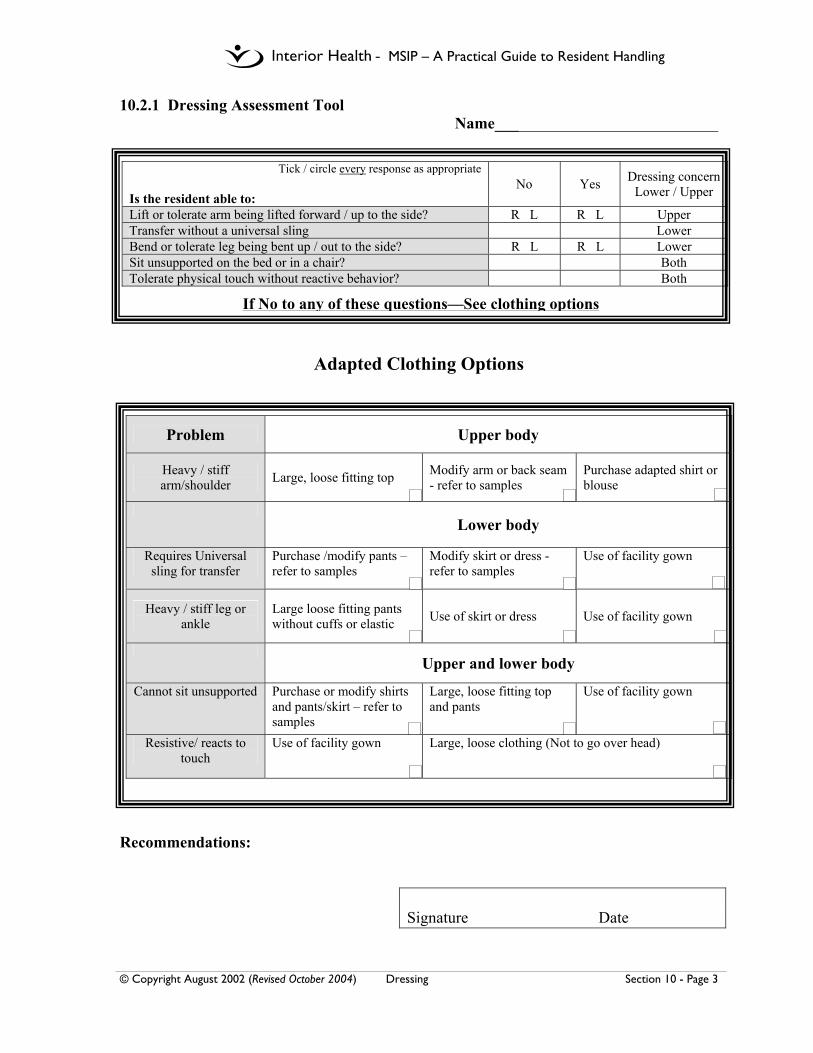
- MSIP – A Practical Guide to Resident Handling
© Copyright August 2002 (Revised October 2004) Dressing Section 10 - Page 3
10.2.1 Dressing Assessment Tool Name____________________________
Adapted Clothing Options
Recommendations:
Signature Date
Tick / circle every response as appropriate Is the resident able to:
No Yes Dressing concern Lower / Upper
Lift or tolerate arm being lifted forward / up to the side? R L R L Upper Transfer without a universal sling Lower Bend or tolerate leg being bent up / out to the side? R L R L Lower Sit unsupported on the bed or in a chair? Both Tolerate physical touch without reactive behavior? Both
If No to any of these questions—See clothing options
Problem Upper body
Heavy / stiff arm/shoulder Large, loose fitting top Modify arm or back seam
- refer to samples Purchase adapted shirt or blouse
Lower body
Requires Universal sling for transfer
Purchase /modify pants –refer to samples
Modify skirt or dress - refer to samples
Use of facility gown
Heavy / stiff leg or ankle
Large loose fitting pants without cuffs or elastic Use of skirt or dress Use of facility gown
Upper and lower body
Cannot sit unsupported Purchase or modify shirts and pants/skirt – refer to samples
Large, loose fitting top and pants
Use of facility gown
Resistive/ reacts to touch
Use of facility gown Large, loose clothing (Not to go over head)

- MSIP – A Practical Guide to Resident Handling
© Copyright August 2002 (Revised October 2004) Dressing Section 10 - Page 4
10.3 Adapted Clothing
To facilitate the cooperation of families in providing suitable clothing options for residents, it is recommended that residential facilities set up an adaptive clothing program. For additional information on creating an adaptive clothing program and adaptive clothing options, please refer to the Adaptive Clothing Resource Guide available through the Occupational Health and Safety agency of British Columbia at www.ohsah.bc.ca. Follow the links to Publications and Handbooks & Guidelines.
Some of the factors to consider may include:
• Creating an “Adapted Clothing Sample Kit” to demonstrate suitable examples of adaptive clothing options to residents and families.
• Providing contact information for local seamstresses
• Providing contact information for Canadian retailers, such as;
• Silvert’s Stores Concord, Ontario On-line orders www.silverts.com.
• Catalogues available by phoning 1-800-387-7088
• Golden Wear Clothing Winnipeg, Manitoba • On-line orders www.goldenwearclothing.com • Catalogues available by phoning 1-888-551-9484
• Coordinate regular communication with families for appropriate sizes and
clothing recommendations, as conditions change.
- MSIP – A Practical Guide to Resident Handling
© Copyright August 2002 (Revised October 2004) Dressing Section 10 - Page 5
10.3.1 Local Seamstresses – to be added in the future

- MSIP – A Practical Guide to Resident Handling
© Copyright August 2002 (Revised October 2004) Dressing Section 10 - Page 6
10.3.2 Commercially Available Resources – to be added in the future

- MSIP – A Practical Guide to Resident Handling
© Copyright August 2002 (Revised October 2004) Dressing Section 10 - Page 7
10.3.3 Patterns – to be added in the future
- MSIP – A Practical Guide to Resident Handling
© Copyright October 2004 Bariatric Information Section 11 - Page 1
11.0 Bariatric Information 11.1 Procedure – to be added in the future
- MSIP – A Practical Guide to Resident Handling
© Copyright October 2004 Bariatric Information Section 11 - Page 2
11.2 Resources – to be added in the future
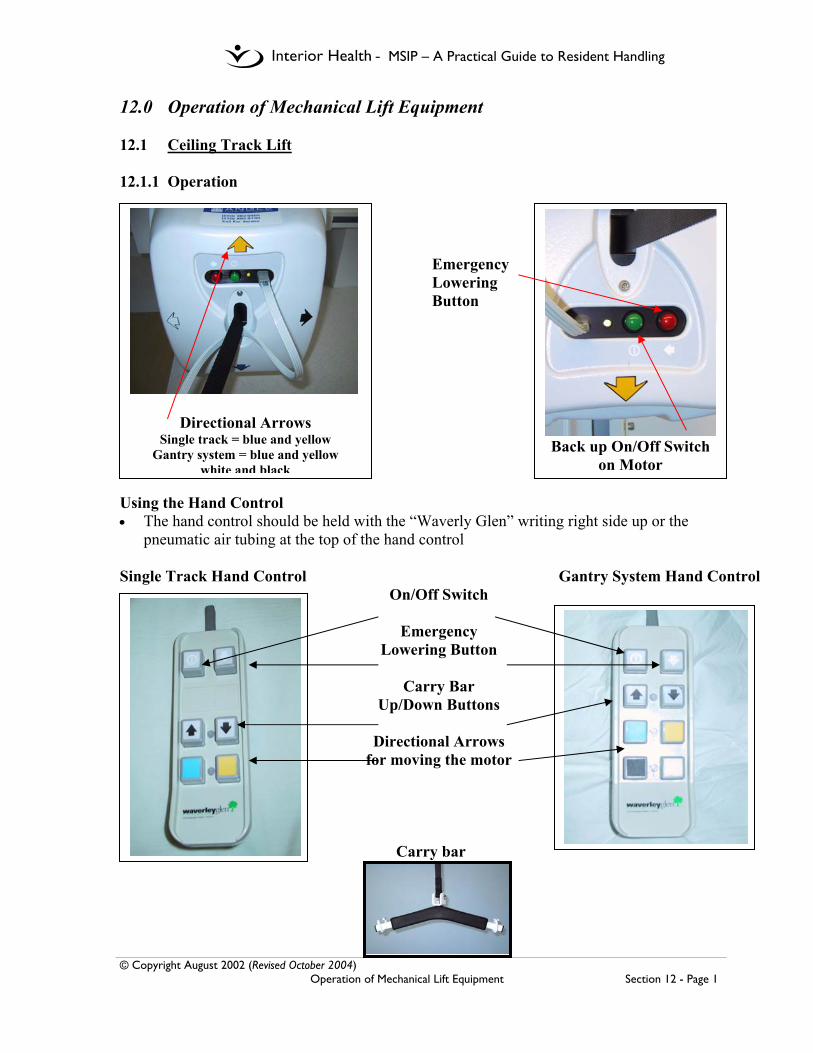
- MSIP – A Practical Guide to Resident Handling
© Copyright August 2002 (Revised October 2004) Operation of Mechanical Lift Equipment Section 12 - Page 1
12.0 Operation of Mechanical Lift Equipment 12.1 Ceiling Track Lift 12.1.1 Operation
Emergency Lowering Button
Using the Hand Control • The hand control should be held with the “Waverly Glen” writing right side up or the
pneumatic air tubing at the top of the hand control Single Track Hand Control Gantry System Hand Control
On/Off Switch
Emergency Lowering Button
Carry Bar
Up/Down Buttons
Directional Arrows for moving the motor
Carry bar
Back up On/Off Switch
on Motor
Directional Arrows Single track = blue and yellow
Gantry system = blue and yellow white and black
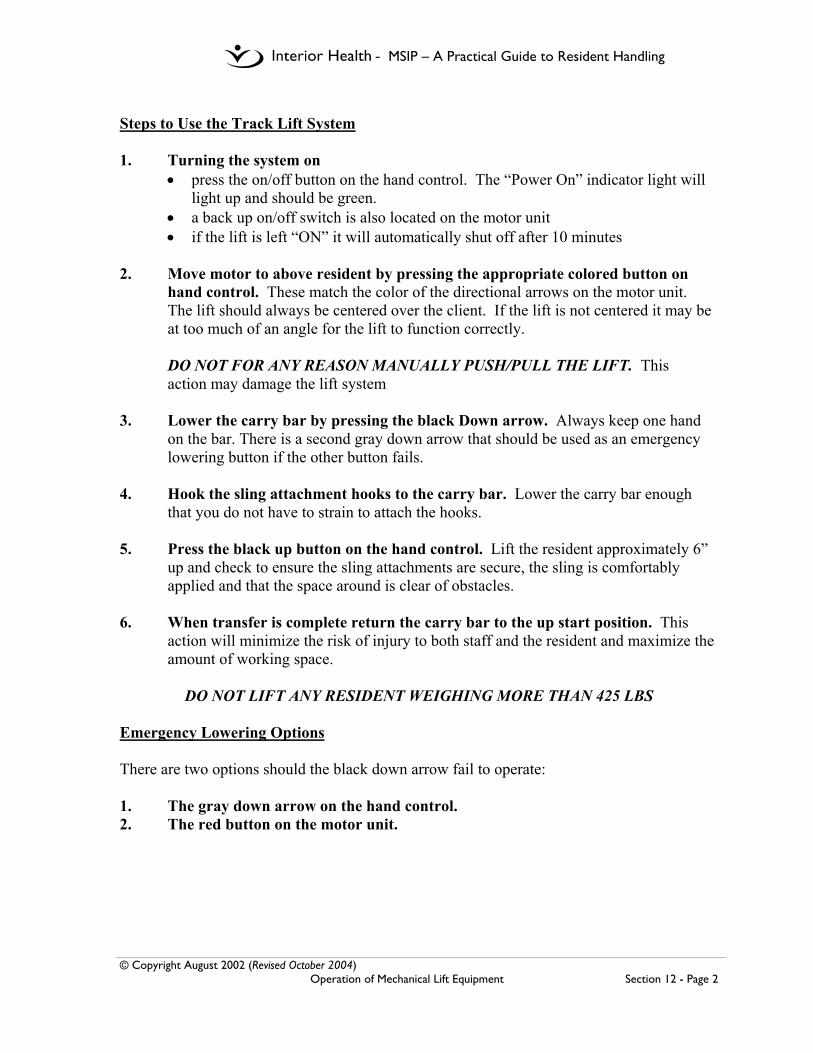
- MSIP – A Practical Guide to Resident Handling
© Copyright August 2002 (Revised October 2004) Operation of Mechanical Lift Equipment Section 12 - Page 2
Steps to Use the Track Lift System 1. Turning the system on
• press the on/off button on the hand control. The “Power On” indicator light will light up and should be green.
• a back up on/off switch is also located on the motor unit • if the lift is left “ON” it will automatically shut off after 10 minutes
2. Move motor to above resident by pressing the appropriate colored button on
hand control. These match the color of the directional arrows on the motor unit. The lift should always be centered over the client. If the lift is not centered it may be at too much of an angle for the lift to function correctly.
DO NOT FOR ANY REASON MANUALLY PUSH/PULL THE LIFT. This action may damage the lift system 3. Lower the carry bar by pressing the black Down arrow. Always keep one hand
on the bar. There is a second gray down arrow that should be used as an emergency lowering button if the other button fails.
4. Hook the sling attachment hooks to the carry bar. Lower the carry bar enough
that you do not have to strain to attach the hooks.
5. Press the black up button on the hand control. Lift the resident approximately 6” up and check to ensure the sling attachments are secure, the sling is comfortably applied and that the space around is clear of obstacles.
6. When transfer is complete return the carry bar to the up start position. This
action will minimize the risk of injury to both staff and the resident and maximize the amount of working space.
DO NOT LIFT ANY RESIDENT WEIGHING MORE THAN 425 LBS
Emergency Lowering Options There are two options should the black down arrow fail to operate:
1. The gray down arrow on the hand control. 2. The red button on the motor unit.
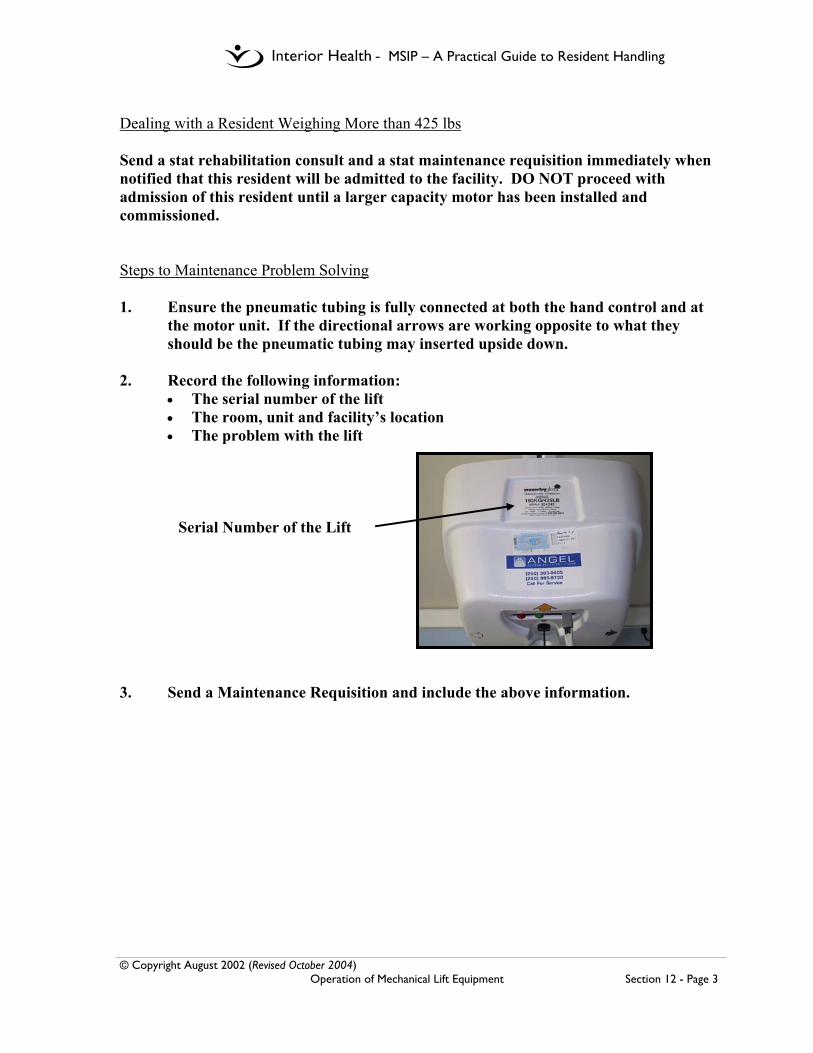
- MSIP – A Practical Guide to Resident Handling
© Copyright August 2002 (Revised October 2004) Operation of Mechanical Lift Equipment Section 12 - Page 3
Dealing with a Resident Weighing More than 425 lbs Send a stat rehabilitation consult and a stat maintenance requisition immediately when notified that this resident will be admitted to the facility. DO NOT proceed with admission of this resident until a larger capacity motor has been installed and commissioned. Steps to Maintenance Problem Solving 1. Ensure the pneumatic tubing is fully connected at both the hand control and at
the motor unit. If the directional arrows are working opposite to what they should be the pneumatic tubing may inserted upside down.
2. Record the following information:
• The serial number of the lift • The room, unit and facility’s location • The problem with the lift
Serial Number of the Lift
3. Send a Maintenance Requisition and include the above information.

- MSIP – A Practical Guide to Resident Handling
© Copyright August 2002 (Revised October 2004) Operation of Mechanical Lift Equipment Section 12 - Page 4
12.1.2 Charging Instructions for the Ceiling Track Lifts Charging unit is located on the wall with each lift system. Charger is on and working when the green indicator light is glowing. Lifts should be charged nightly. Steps to Charging Step 1: Return the motor to charging area.
• For a midline charging station this requires returning the motor as close to the wall as possible and then lining up the two black lines located to the right of the motor and close to the top ceiling track.
• For an end charging station, the motor has to be returned to the end of the track or corner area
End Charging Station for a Single Track
Midline Charging Station
Charging Lines
Figure 1 Charging Unit
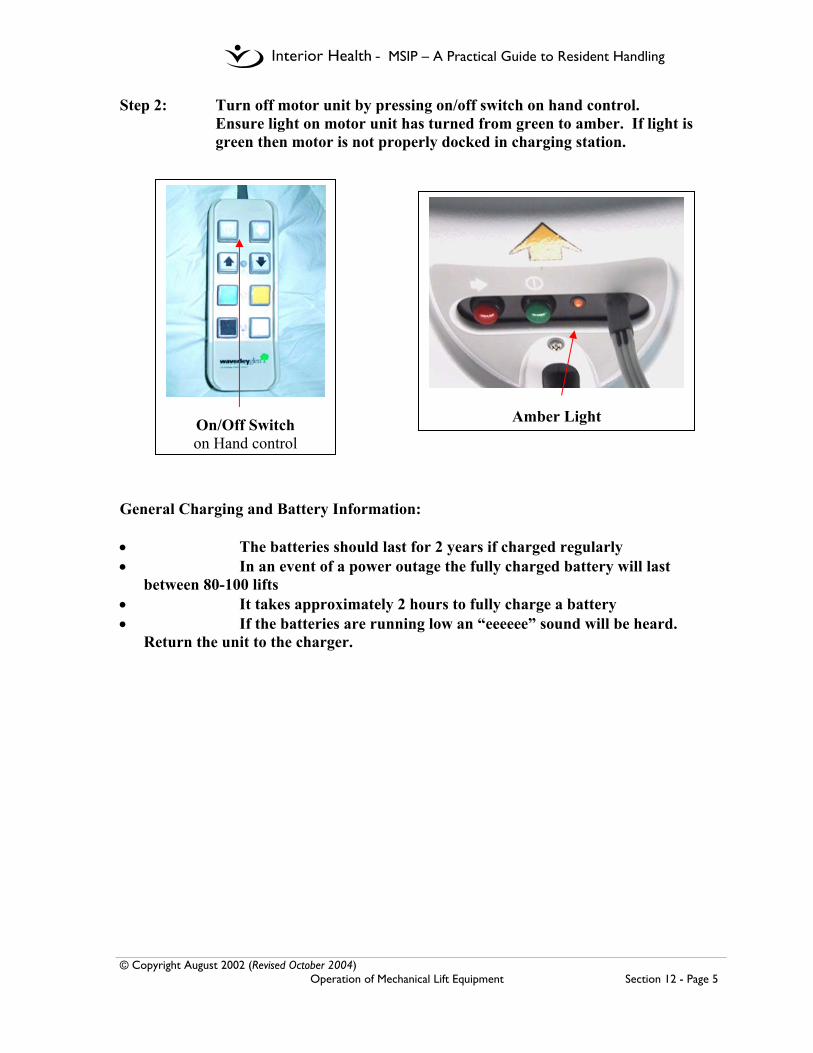
- MSIP – A Practical Guide to Resident Handling
© Copyright August 2002 (Revised October 2004) Operation of Mechanical Lift Equipment Section 12 - Page 5
Step 2: Turn off motor unit by pressing on/off switch on hand control. Ensure light on motor unit has turned from green to amber. If light is
green then motor is not properly docked in charging station. General Charging and Battery Information: • The batteries should last for 2 years if charged regularly • In an event of a power outage the fully charged battery will last
between 80-100 lifts • It takes approximately 2 hours to fully charge a battery • If the batteries are running low an “eeeeee” sound will be heard.
Return the unit to the charger.
On/Off Switch on Hand control
Amber Light
- MSIP – A Practical Guide to Resident Handling
© Copyright August 2002 (Revised October 2004) Operation of Mechanical Lift Equipment Section 12 - Page 6
12.2 Total Floor Lift Operation Manual Please insert your own facility manual.

- MSIP – A Practical Guide to Resident Handling
© Copyright August 2002 (Revised October 2004) Operation of Mechanical Lift Equipment Section 12 - Page 7
12.3 Sit Stand Lift Operation Manual Please insert your own facility manual.

- MSIP – A Practical Guide to Resident Handling
© Copyright October 2004 Forms Section 13 - Page 1
13.0 Forms In this section you will find all the forms and tools used in this Manual. They are
compiled here for ease of use.
• Resident Transfer Assessment Form (Ceiling Lift) • Resident Transfer Assessment Form (Floor Lift)
• Sling Order Form for Waverly Glen Ceiling Track Lifts
• Sling Inventory and Tracking Form
• Resident Repositioning Assessment Form (RRA)
• Bathing Assessment Tool
• Dressing Assessment Tool

- MSIP – A Practical Guide to Resident Handling
© Copyright October 2004 Forms Section 13 - Page 2
NAME
Resident Transfer Assessment Form (Ceiling Lift)
Observation No Yes
Strength
• In bed does the resident lift their hips clear off the bed to get onto a bedpan or assist with dressing / incontinence pads?
• In bed does the resident roll onto their side without assistance • In sitting can the resident lift each foot off the ground and straighten
each knee?
Balance • Can the resident sit upright on the side of the bed without help • Can the resident sit/ lean forward in a chair without support?
Ability to follow
direction
• Does the resident follow transfer instructions appropriately? • Does the resident’s ability remain the same throughout the day and
with different caregivers?
Can the resident sit forwards and push down
on the arm rests with both hands?
Use the sit /stand lift until assessed by Rehab. Refer to functional sheet / Kardex for details of transfer
Sit / Stand Lift Assessment No Yes While sitting, can the resident actively lean forward?
Can resident hold onto both handles of the sit / stand lift?
Can the resident keep their feet flat on the footplate of the lift throughout the transfer?
Can resident actively straighten their hips to assist the lift?
Sit /stand lift
Can the resident stand erect and step with both feet
No Yes
No to any of the observations
No to any
observations
Yes to all observations
Use Ceiling Track Transfer
and Consider need for adaptive clothing
Yes to all of the observations
Signed Date
No Yes
Use repositioning sling in bed
uNiversal or Hammock Size_____
Hygiene or Universal Size_____

- MSIP – A Practical Guide to Resident Handling
© Copyright August 2002 Revised October 2004 Forms Section 13 - Page 3
NAME
Resident Transfer Assessment Form (Floor Lift)
Observation No Yes
Strength
• In bed does the resident lift their hips clear off the bed to get onto a bedpan or assist with dressing / incontinence pads?
• In bed does the resident roll onto their side without assistance • In sitting can the resident lift each foot off the ground and straighten
each knee?
Balance • Can the resident sit upright on the side of the bed without help • Can the resident sit/ lean forward in a chair without support?
Ability to follow
direction
• Does the resident follow transfer instructions appropriately? • Does the resident’s ability remain the same throughout the day and
with different caregivers?
uNiversal or Hammock Size_____
Hygiene or Universal Size_____
Can the resident sit forwards and push down
on the arm rests with both hands?
Use the sit /stand lift until assessed by Rehab. Referral to Rehab.
Sit / Stand Lift Assessment No Yes While sitting, can the resident actively lean forward?
Can resident hold onto both handles of the sit / stand lift?
Can the resident keep their feet flat on the footplate of the lift throughout the transfer?
Can resident actively straighten their hips to assist the lift?
Sit /stand lift
Can the resident stand erect and step with both feet
No Yes
No to any of the observations
No to any
observations
Yes to all observations
Use Total Floor Lift and
Consider need for adaptive clothing
Yes to all of the observations
No Yes
Use low friction/slider sheet to reposition in bed if available
Signatures(s) Date
SEE REPOSITIONING ASSESSMENT
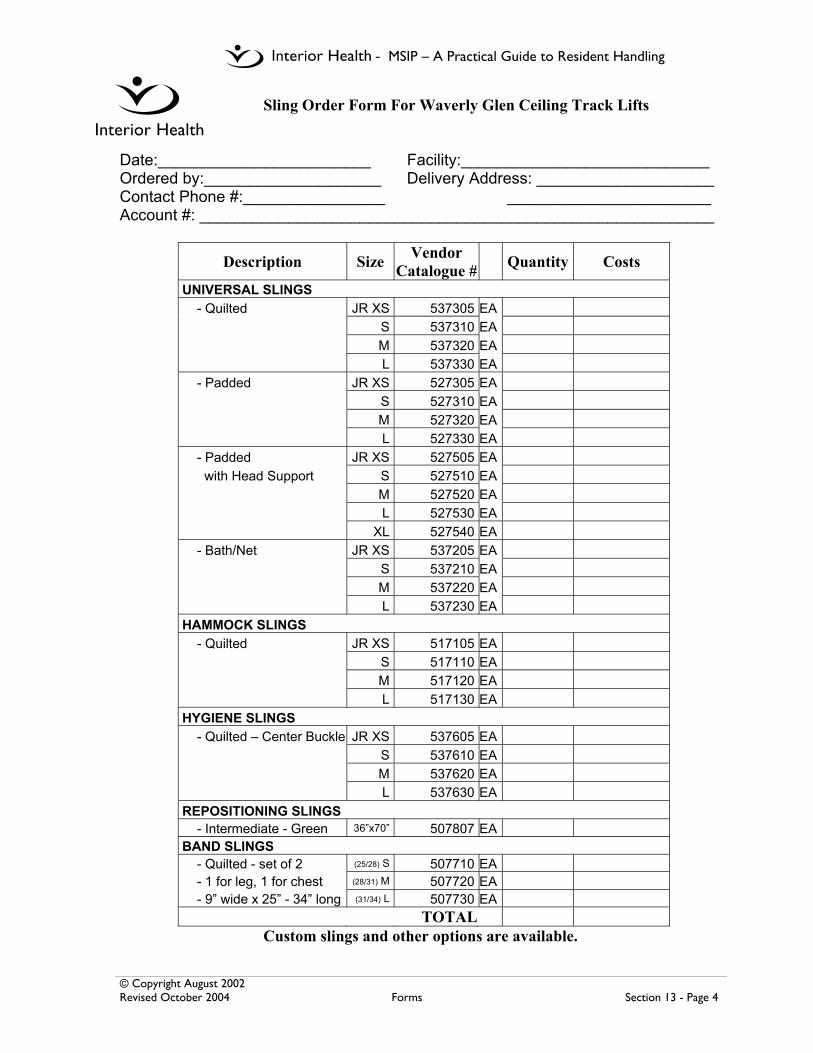
- MSIP – A Practical Guide to Resident Handling
© Copyright August 2002 Revised October 2004 Forms Section 13 - Page 4
Sling Order Form For Waverly Glen Ceiling Track Lifts
Date:________________________ Facility:____________________________ Ordered by:____________________ Delivery Address: ____________________ Contact Phone #:________________ _______________________ Account #: __________________________________________________________
Description Size Vendor Catalogue # Quantity Costs
UNIVERSAL SLINGS - Quilted JR XS 537305 EA S 537310 EA M 537320 EA L 537330 EA - Padded JR XS 527305 EA S 527310 EA M 527320 EA L 527330 EA - Padded JR XS 527505 EA with Head Support S 527510 EA M 527520 EA L 527530 EA XL 527540 EA - Bath/Net JR XS 537205 EA S 537210 EA M 537220 EA L 537230 EA HAMMOCK SLINGS - Quilted JR XS 517105 EA S 517110 EA M 517120 EA L 517130 EA HYGIENE SLINGS - Quilted – Center Buckle JR XS 537605 EA S 537610 EA M 537620 EA L 537630 EA REPOSITIONING SLINGS - Intermediate - Green 36”x70” 507807 EA BAND SLINGS - Quilted - set of 2 (25/28) S 507710 EA - 1 for leg, 1 for chest (28/31) M 507720 EA - 9” wide x 25” - 34” long (31/34) L 507730 EA
TOTALCustom slings and other options are available.
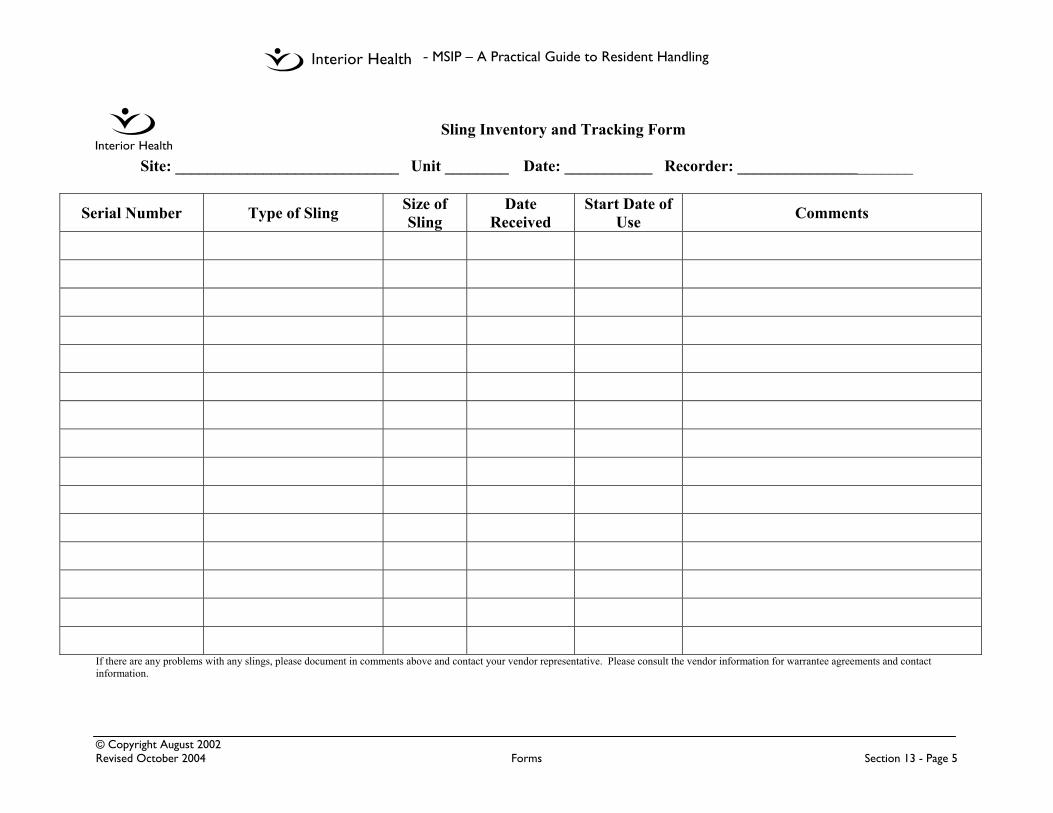
- MSIP – A Practical Guide to Resident Handling
© Copyright August 2002 Revised October 2004 Forms Section 13 - Page 5
Sling Inventory and Tracking Form
Site: ____________________________ Unit ________ Date: ___________ Recorder: ______________________
Serial Number Type of Sling Size of Sling
Date Received
Start Date of Use Comments
If there are any problems with any slings, please document in comments above and contact your vendor representative. Please consult the vendor information for warrantee agreements and contact information.

- MSIP – A Practical Guide to Resident Handling
© Copyright October 2004 Forms Section 13 - Page 6
Resident Repositioning Assessment Form (RRA)
Action required Observe the patient/ resident / client YES Score
NO Score
Bridging Lift their hips off bed to get on bedpan / assist with dressing or can move own hips to back of chair
4 0
Trunk raise with elbowor hand support
Lift shoulders forward plus push with hands or elbows on the bed or chair arms? 2 0
Active head support Lift and hold their head off the pillow or away from the back of the chair? 1 0
Co-operate with instructions
Consistently follow directions with all staff when assisting to reposition in bed or a chair 3 0
TOTAL
The choices below are the only methods that comply with Interior Health’s No-lift policy when repositioning patients, residents or clients in bed or in a chair. Ensure you have the required
number of staff and the appropriate equipment in use, and have been trained in these safer and more comfortable methods to move and assist your patient.
Ceiling lift
Two person repositionin bed or chair
(when ceiling lift is not
available)
One person reposition
in bed or chair Independent
Score required for use 0 through 8
Score required for use 0 through 8
Score required for use 9
Score required 10
Patient score __________ Date Signed
Patient score __________ Date Signed
Patient score __________ Date Signed
Patient score __________ Date Signed
Use with repositioning sling in bed or a full body sling in the chair
Use if ceiling lift not available or if patient score 9 but patient weight or caregiver fatigue are concerns at the time of reposition. • Only to be used with
a low friction drawsheet slider on the bed or one-way slider on chair
Only to be used if the caregiver is also confident that the patient weight does not exceed a safe comfort level at the time of the reposition. • Assess need for a
low friction drawsheet slider on bed or one-way slider on chair
Use when the patient only requires cues and no physical assist to reposition in chair or bed
Name_____________________

- MSIP – A Practical Guide to Resident Handling
© Copyright October 2004 Forms Section 13 - Page 7
Bathing Assessment Tool
Indicate the kind of seating the resident currently uses in column 1, 2, 3, 4. Then √ the most appropriate (and available) option for the resident in this column. Shaded areas may indicate unsafe bathing options. Exceptions in Columns 2 and 3 must be assessed by Peer Leaders or Rehab. If resident requires a non-standard size w/c (>18” width), Rehab consult is required.
Column 1 Column 2 Column 3 Column 4 Bed rest Adapted seating Regular Power Chair
Seating
Bathing options
Reclined seating Lateral support
Broda Fallout
Poor trunk control and /or
increased or decreased tone
Good trunk control and no problems with muscle tone
Bed bath
Shower trolley
Tilting shower chair
Universal sling into Century tub
Universal sling into Arjo tub
Bathing stretcher into Arjo tub
Rehab shower commode with straps
Consult to Rehab or Peer Leader required to use this method
High-back tub chair with pelvic and chest straps into Century tub
Consult to Rehab or Peer Leader required to use this method
Low-back tub chair with pelvic strap into Century tub
Arjo chair into Arjo long tub Consult to Rehab or Peer Leader required to use this method
Regular shower chair
Recommendations:
Signature Date
Name_____________________

- MSIP – A Practical Guide to Resident Handling
© Copyright October 2004 Forms Section 13 - Page 8
Dressing Assessment Tool
Adapted Clothing Options
Recommendations:
Signature Date
Tick / circle every response as appropriate Is the resident able to:
No Yes Dressing concern Lower / Upper
Lift or tolerate arm being lifted forward / up to the side? R L R L Upper Transfer without a universal sling Lower Bend or tolerate leg being bent up / out to the side? R L R L Lower Sit unsupported on the bed or in a chair? Both Tolerate physical touch without reactive behavior? Both
If No to any of these questions—See clothing options
Problem Upper body
Heavy / stiff arm/shoulder Large, loose fitting top Modify arm or back seam
- refer to samples Purchase adapted shirt or blouse
Lower body
Requires Universal sling for transfer
Purchase /modify pants –refer to samples
Modify skirt or dress - refer to samples
Use facility gown
Heavy / stiff leg or ankle
Large loose fitting pants without cuffs or elastic Use of skirt or dress Use of facility gown
Upper and lower body
Cannot sit unsupported Purchase or modify shirts and pants/skirt – refer to samples
Large, loose fitting top and pants
Use of facility gown
Resistive/ reacts to touch
Use of facility gown Large, loose clothing (Not to go over head)
Name_____________________

- MSIP – A Practical Guide to Resident Handling
© Copyright October 2004 Forms Section 13 - Page 9