
MRI Commercial Management For Web€¦ · Commercial Management Windows Training – V 4.0 Module...
298
2012 MRI Software LLC. Any unauthorized use or reproduction of this document is strictly prohibited. All Rights Reserved. MRI Commercial Management For Web Operational Training Guide Version 4.2
Transcript of MRI Commercial Management For Web€¦ · Commercial Management Windows Training – V 4.0 Module...
2012 MRI Software LLC. Any unauthorized use or reproduction of this document is strictly prohibited. All Rights Reserved.
MRI Commercial Management For Web
Operational Training Guide Version 4.2

2012 MRI Software LLC. Any unauthorized use or reproduction of this document is strictly prohibited. All Rights Reserved.

Training Guide Page i © 2008 – 2012 MRI Software LLC.
Table of Contents
Table of Contents .......................................................................................... i Course Overview .......................................................................................... 1 Module 1: User Interface ............................................................................. 4 Lesson 1: Getting Started in MRI ..................................................................... 6 Lesson 2: Getting Started in CM ..................................................................... 10 Module 2: Commercial Management Setup ................................................ 13 Lesson 1: Setting Up Transaction Classifications ............................................... 15 Lesson 2: Setting Up GL Interface Charts ........................................................ 31 Lesson 3: Setting Up Lookup Lists .................................................................. 39 Module 3: Setting Up a New Building ......................................................... 46 Lesson 1: Building Maintenance Web Pages ..................................................... 48 Lesson 2: Setting Up General Building Information ........................................... 51 Lesson 3: Setting Up Building Accounting Information ....................................... 61 Module 4: Working with Suites ................................................................... 71
Lesson 1: Setting up Suites in a Building ......................................................... 73 Lesson 2: Maintaining Suite Square Footage .................................................... 78 Module 5: Working with Leases ................................................................. 83 Lesson 1: Lease Maintenance Web Pages ......................................................... 85 Lesson 2: Creating a New Lease ..................................................................... 87 Lesson 3: Setting Up General Lease Information ............................................... 91 Lesson 4: Setting Up Lease Billing Information ............................................... 105 Lesson 5: Lease Administration .................................................................... 114 Module 6: Working with Batches ............................................................. 126 Lesson 1: Accessing the Batch Activities Menu ................................................ 127 Lesson 2: Creating and Modifying Batches ..................................................... 129 Lesson 3: Processing Tenant Cash Receipts .................................................... 134 Lesson 4: Processing Tenant Charges and Credits ........................................... 154 Lesson 5: Processing Security Deposit Transactions ........................................ 170 Lesson 6: Processing Non-Tenant Transactions ............................................... 182 Lesson 7: Reviewing or Changing Batch Transactions ...................................... 190 Lesson 8: Posting Batches ........................................................................... 196 Module 7: Performing Additional Accounts Receivable Transactions ....... 202

Table of Contents
Page ii Training Guide © 2008 – 2012 MRI Software LLC.
Lesson 1: Collections .................................................................................. 204 Lesson 2: Working with Prepayments and Concessions .................................... 216 Lesson 3: FASB 13 Adjustments ................................................................... 221 Lesson 4: Working with CPI Increases ........................................................... 229 Module 8: Performing Monthly Activities ................................................. 238 Lesson 1: Creating Recurring Charges ........................................................... 240 Lesson 2: Printing Monthly Statements .......................................................... 246 Lesson 3: Calculating Late Fees .................................................................... 251 Lesson 4: Calculating Management Fees ........................................................ 255 Lesson 5: Creating Journal Entries ................................................................ 260 Lesson 6: Closing CM Periods ....................................................................... 269 Module 9: Reports and Dashboards ......................................................... 273 Lesson 1: Accessing CM Reports ................................................................... 275 Lesson 2: Generating CM Reports ................................................................. 277 Lesson 3: Working with Report Styles ........................................................... 282
Lesson 4: Working with Dashboards ............................................................. 284

Training Guide 1 © 2008 – 2012 MRI Software LLC.
Course Overview
Introduction
Welcome Welcome to Commercial Management for Web training. This course was designed to familiarize participants with the MRI Commercial Management Web application. This course uses lecture, demonstration and hands-on exercises to teach the concepts and tasks to perform when using the MRI Commercial Management Web application.
What Will You Learn? In this training, you will learn the following main objectives:
• Navigate and use the menus and web pages on the graphical user interface of the application
• Set up and maintain Commercial Management
• Set up and maintain buildings and accounting information
• Set up and maintain suites within a building
• Manage leases including general lease and billing information
• Manage accounts receivable for a building, including cash receipts, adjustments, prepayments, and collections
• Make straight-line rent adjustments
• Perform monthly activities such as creating recurring charges, calculating late fees and management fees, creating journal entries and closing the period
• Understand and generate commercial management reports
Who Should Attend? The ideal participants for this training include:
Property Manager Assistant Manager
Lease Administrator Accounting Manager
Assistant Accounting Manager Controller

Course Overview
2 Training Guide © 2008 – 2012 MRI Software LLC.
Course Outline
A typical training day goes from 9:00 a.m. – 5:00 p.m. with the following breaks:
1st break: 10:30 a.m. – 10:45 a.m.
Lunch 12:00 p.m. – 1:00 p.m.
2nd break 2:30 p.m. – 2:45 p.m.
Below is the course outline broken down by modules and lessons:
Commercial Management Windows Training – V 4.0
Module 1: User Interface Lesson 1: Getting Started in MRI
Lesson 2: Getting Started in CM
Module 2: Commercial Management Setup
Lesson 1: Setting up Transaction Classifications
Lesson 2: Setting up GL Interface Charts
Lesson 3: Setting up Lookup Lists
Module 3: Setting up a New Building
Lesson 1: Building Maintenance Web Page
Lesson 2: Setting up General Building Information
Lesson 3: Setting up Building Accounting Information
Lesson 4: Setting up Suites in a Building
Lesson 5: Maintaining Square Footage
Module 4: Working with Suites
Lesson 1: Setting up Suites in a Building
Lesson 2: Maintaining Suite Square Footage
Module 5: Working with Leases
Lesson 1: Lease Maintenance Web Page
Lesson 2: Creating a Lease
Lesson 3: Setting up Basic Lease Information

Course Overview
Training Guide 3 © 2008 – 2012 MRI Software LLC.
Lesson 4: Setting up Lease Billing Information
Lease 5: Lease Administration
Module 6: Working with Batches
Lesson 1: Accessing the Daily Activities Menu
Lesson 2: Creating and Modifying Batches
Lesson 3: Processing Tenant Cash Receipts
Lesson 4: Processing Tenant Charges and Credits
Lesson 5: Processing Security Deposit Transactions
Lesson 6: Processing Non-Tenant Transactions
Lesson 7: Reviewing or Changing Batch Transactions
Lesson 8: Posting Batches
Module 7: Performing Additional Accounts Receivable Transactions
Lesson 1: Collections
Lesson 2: Working with Prepayments and Concessions
Lesson 3: FASB 13 Adjustments
Lesson 4: Working with CPI Increases
Module 8: Performing Monthly Activities
Lesson 1: Creating Recurring Charges
Lesson 2: Printing Monthly Statements
Lesson 3: Calculating Late Fees
Lesson 4: Management Fees
Lesson 5: Creating Journal Entries
Lesson 6: Closing CM Periods
Module 9: Reports and Dashboards
Lesson 1: Accessing CM Reports
Lesson 2: Generating CM Reports
Lesson 3: Working with Report Styles
Lesson 4: Working with Dashboards

Training Guide Page 4 © 2008 – 2012 MRI Software LLC.
Module 1: User Interface
Module Overview
Purpose The purpose of this module is to familiarize you with the MRI and Commercial Management (CM) user interface.
Objectives After completing this module, you will be able to:
• Get started using the MRI Home Page
• Get started using the Commercial Management Main Menu
Module 1: User Interface
Training Guide Page 5 © 2008 – 2012 MRI Software LLC.
Training Guide Page 6 © 2008 – 2012 MRI Software LLC.
Lesson 1: Getting Started in MRI
Overview
Purpose The purpose of this lesson is to show you how to get started with MRI Web.
Objectives After completing this lesson, you will be able to:
• Log into MRI
• Change your password
• Understand MRI web pages

Module 1: User Interface
Training Guide Page 7 © 2008 – 2012 MRI Software LLC.
Logging In
Overview Your system administrator will provide you with access to MRI for the Web, which includes your client ID, username, and initial password.
Note: There are several ways of setting up the MRI login process, and it may vary if you have a single client license or multiple licenses.
Procedure Complete the following steps to log into MRI for Web:
1. Double-click the MRI Web icon on your desktop.
Note: If you do not have an MRI Web icon on your desktop, ask your system administrator for the URL for your installation of MRI Web.
The MRI Login page displays in your browser. Your client ID will auto-populate in the Client ID field.
MRI for Web Login Page
2. Type your username in the User Name field, and press <Tab>.
3. Type your password in the Password field.

Module 1: User Interface
Page 8 Training Guide © 2008 – 2012 MRI Software LLC.
4. Click Log On.
If your organization’s installation of MRI has multiple databases and you are either not assigned to a default database or you are logging in as SYSADM, then a database menu will appear:
MRI for Web Database Menu
5. Select the appropriate database from the list, and then click OK.
The MRI Home Page appears.

Module 1: User Interface
Training Guide Page 9 © 2008 – 2012 MRI Software LLC.
Changing Your Password
Overview You may initially be required to change your password, and depending on your system settings, you may be required to occasionally change your password in the future.
Note: System configurations may vary, so verify with your system administrator for any changes in password changing procedures.
Procedure Complete the following steps to change your password:
1. Click on the Setup menu on the upper right-hand corner of the page. Select My Options and then Change Password.
2. Type your current password, and press <Tab>.
3. Type your new password, and press <Tab> again.
4. Type your new password again, and click Save.

Module 1: User Interface
Page 10 Training Guide © 2008 – 2012 MRI Software LLC.
Lesson 2: Getting Started in CM
Overview
Purpose The purpose of this lesson is to show you how to get started with the Commercial Management Web application.
Objectives After completing this lesson, you will be able to:
• Access the Commercial Management main menu
• Understand the available options on the Commercial Management Main Menu

Module 1: User Interface
Training Guide Page 11 © 2008 – 2012 MRI Software LLC.
Accessing the Commercial Management Main Menu
Overview To access the Commercial Management Main Menu, select Commercial Management from the Select an Application dropdown menu.
Commercial Management Main Menu
Description of Menu Items Refer to the following table for a description of the main menu items on the Commercial Management Main Menu: CM Main Menu Items Description Leasing Displays leasing-related activities,
such as building, suite and lease maintenance
Batch Activities Displays the CM Batch Activities menu where you perform batch-related tasks.
Daily Activities Displays the CM Daily Activities menu where you perform daily tasks such as collections
Monthly Activities Displays the CM Monthly Activities menu, where you perform monthly maintenance tasks
Retail Displays the Retail menu for calculating and processing percentage rents based on sales
Inquiry Displays the tenant inquiry page Reports Displays the Reports menu

Module 1: User Interface
Page 12 Training Guide © 2008 – 2012 MRI Software LLC.
Review
Key Points In this lesson, you learned the following key points:
• How to access the Commercial Management Main Menu
• The purpose of each option on the Commercial Management Main Menu
Module 1 Lab Exercises
Please refer to the CM Training Workbook for exercises pertaining to this module.
Training Guide Page 13 © 2008 – 2012 MRI Software LLC.
Module 2: Commercial Management Setup
Module Overview
Purpose The purpose of this module is to show you how to set up the Commercial Management Web application.
Objectives After completing this module, you will be able to understand the setup of:
• Transaction categories, which include:
o Income categories
o Security deposit categories
• GL interface charts
• Lookup lists

Module 2: Commercial Management Setup
Page 14 Training Guide © 2008 – 2012 MRI Software LLC.

Training Guide Page 15 © 2008 – 2012 MRI Software LLC.
Lesson 1: Setting Up Transaction Classifications
Overview
Purpose The purpose of this lesson is to show you how to set up transaction classifications in CM Web. When you enter an income transaction or a security deposit transaction, you assign classifications to each transaction to define how the system processes it. Transactions are classified by category, type, and how they are posted to general ledger account numbers.
Objectives After completing this lesson, you will be able to:
• Determine necessary transaction categories
• Understand the setup of income categories
• Understand the setup of security deposit categories
Module 2: Commercial Management Setup
Page 16 Training Guide © 2008 – 2012 MRI Software LLC.
Key Terms
Transaction categories – Categories that identify the purpose of transactions; transaction categories reflect the accounting practices of your organization.
Income category – A category that classifies tenant transactions, such as base rent, common area maintenance, taxes or insurance charges that are posted to the tenant ledger. Security deposit category – A category that classifies security deposit transactions that are posted to the security deposit ledger.
Source code – A code that identifies the purpose of a transaction and how the system posts CM transactions to the general ledger.

Module 2: Commercial Management Setup
Training Guide Page 17 © 2008 – 2012 MRI Software LLC.
Determining Transaction Categories
Overview In order to set up transaction categories, you must answer the following questions:
• What revenue items do you need to track?
• Are multiple income categories necessary? Can you combine expense reimbursement categories to allow for a single reconciliation process, or do your leases require separate categories for CAM, TAX, and INS?
• How detailed do you want to make your tenant statements?
• How detailed do you want to make your Aged Delinquency Report?
Procedure Complete the following steps to determine your transaction categories:
1. Answer the questions listed in the Overview.
2. Refer to the following table to determine the transaction categories that you will need to set up:
If your organization… Then prepare to set up… Bills security deposits • Income categories for billing
security deposits, • Security deposit categories for
receiving security deposits, and • A relationship between the
income categories for billing security deposits and security deposit categories
Receives security deposits without billing them to tenants
Only security deposit categories

Module 2: Commercial Management Setup
Page 18 Training Guide © 2008 – 2012 MRI Software LLC.
Setting up Income Categories
Overview Income categories classify tenant income transactions, such as base rent, common area maintenance, taxes, or insurance charges. The system posts tenant income transactions to the tenant ledger.
Before You Begin Before you can set up income categories, you must answer the following questions:
• What are the categories needed to classify income transactions?
• Does your organization bill security deposits?
• Does your organization track concessions?
• Does your organization track prepayments?
Be aware of the following situations when you set up income categories:
If your organization… Then set up income categories… Bills security deposits For billing security deposits
Tracks recurring concessions
To credit recurring concessions
Tracks prepayments To receive payments of prepaid rent or deferred revenue

Module 2: Commercial Management Setup
Training Guide Page 19 © 2008 – 2012 MRI Software LLC.
Procedure Complete the following steps to define the Income Categories:
1. Determine the categories that are needed to classify income transactions.
2. Open the Income Categories Page, by completing the following steps:
a. From the MRI Web Home Page, click Setup > Setup and Maintenance.
b. Select Commercial Management
c. Click the plus sign next to Transaction Classification Maintenance and select Income Categories
The Income Categories page appears.
Income Categories Setup Page
3. Click Add to add a new income category. The Income Categories Detail page displays.
Module 2: Commercial Management Setup
Page 20 Training Guide © 2008 – 2012 MRI Software LLC.
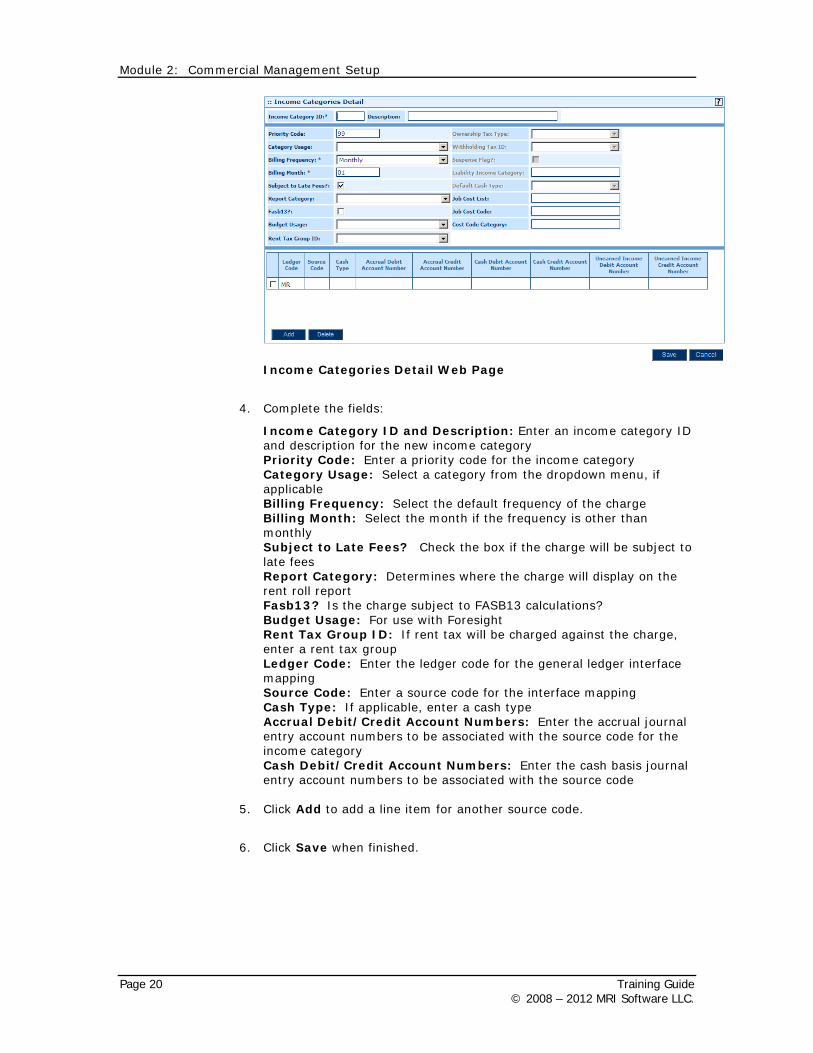
Income Categories Detail Web Page
4. Complete the fields:
Income Category ID and Description: Enter an income category ID and description for the new income category Priority Code: Enter a priority code for the income category Category Usage: Select a category from the dropdown menu, if applicable Billing Frequency: Select the default frequency of the charge Billing Month: Select the month if the frequency is other than monthly Subject to Late Fees? Check the box if the charge will be subject to late fees Report Category: Determines where the charge will display on the rent roll report Fasb13? Is the charge subject to FASB13 calculations? Budget Usage: For use with Foresight Rent Tax Group ID: If rent tax will be charged against the charge, enter a rent tax group Ledger Code: Enter the ledger code for the general ledger interface mapping Source Code: Enter a source code for the interface mapping Cash Type: If applicable, enter a cash type Accrual Debit/Credit Account Numbers: Enter the accrual journal entry account numbers to be associated with the source code for the income category Cash Debit/Credit Account Numbers: Enter the cash basis journal entry account numbers to be associated with the source code
5. Click Add to add a line item for another source code.
6. Click Save when finished.

Module 2: Commercial Management Setup
Training Guide Page 21 © 2008 – 2012 MRI Software LLC.
Setting Up Security Deposit Categories
Overview Security deposit categories classify security deposit transactions that are posted to the security deposit ledger.
Before You Begin Before you can identify the purpose of security deposit transactions, you must set up the following:
• Income categories for billing security deposits, if applicable
• Security deposit categories for receiving security deposits
• Relationships between income categories and security deposit categories, if your organization bills security deposits

Module 2: Commercial Management Setup
Page 22 Training Guide © 2008 – 2012 MRI Software LLC.
Procedure Complete the following steps to define the Security Deposit Categories:
1. From Commercial Management Main Page, click Setup > Setup and Maintenance > Commercial Management.
2. Click Sec. Dep. Income Categories. The Security Deposit Categories Page appears.
Security Deposit Categories Page
3. Click Add to add a new security deposit category.
The Security Deposit Categories Detail page appears.

Module 2: Commercial Management Setup
Training Guide Page 23 © 2008 – 2012 MRI Software LLC.
Security Deposit Categories Detail Page
4. Complete the fields on the Security Deposit Details Page. These fields are very similar to the Income Category fields.

Module 2: Commercial Management Setup
Page 24 Training Guide © 2008 – 2012 MRI Software LLC.
Source Codes
Overview Source codes identify types of transactions, such as charges (CH) or cash receipts (CR). CM includes a set of source codes you cannot modify, and they affect the general ledger for both accrual-basis and cash-basis accounting.
Things to Remember Keep the following things in mind about source codes:
• A source code must be defined for a transaction category in the general ledger interface chart in order to post a transaction to the general ledger.
• When you set up general ledger interface charts, you will define the debit and credit account numbers to which to post transactions for a specific transaction category and source code.
• The source codes you define depend on the type of transaction category for which you are setting up a general ledger interface chart.
• There are a set of source codes for income categories and a set of source codes for security deposit categories.
Note: Some source codes, such as CR (Cash Receipt), are used in both income transactions and security deposit transactions.
• The system auto-calculates the debits and credits in the general ledger based on the income or security deposit category and the source code.

Module 2: Commercial Management Setup
Training Guide Page 25 © 2008 – 2012 MRI Software LLC.
Income Source Codes The following source codes are available to use with income categories. The effect of the source code on the general ledger varies by accounting basis.
Code Description Effect on the General Ledger by Accounting Basis
CH Charge–Charge to a tenant
• Accrual Basis – Debits accounts receivable and credits income
• Cash Basis – No effect CN Concession–
One-time concession
• Accrual Basis – Debits concession and credits accounts receivable
• Cash Basis–No effect CR Cash Receipt–
Payment received
• Accrual Basis – Debits cash and credits accounts receivable
• Cash Basis – Debits cash and credits income
MF Management Fee Expense
• Accrual Basis – Debits Management Fee expense and credits either the management fee clearing account (if you enter invoices for management fees in AP) or the management fee expense account
• Cash Basis – Same NC Non-cash
Adjustment–Adjustment to an account, such as a credit due to an inaccurate charge
• Accrual Basis – Debits income and credits accounts receivable
• Cash Basis – No effect This is the opposite of a CH. Note: You do not need to set up general ledger interface charts for this source code.
NS Non-sufficient Funds–Payment returned by the bank
• Accrual Basis – Debits accounts receivable and credits cash
• Cash Basis – Debits income and credits cash
This is the opposite of a CR. Note: You do not need to set up general ledger interface charts for this source code.
PR Payment Reversal–Reversal of a cash receipt
• Accrual Basis – Debits accounts receivable and credits cash
• Cash Basis – Debits income and credits cash
This is the opposite of a CR. Note: You do not need to set up general ledger interface charts for this source code.

Module 2: Commercial Management Setup
Page 26 Training Guide © 2008 – 2012 MRI Software LLC.
Code Description Effect on the General Ledger by
Accounting Basis RF Refund–Refund
of prepayments or outstanding credits to a tenant
If you enter invoices for refunds in AP: • Accrual Basis – Debits accounts
receivable and credits rent clearing. When the refund is entered in AP, the system debits rent clearing and credits accounts payable.
• Cash Basis – Debits income and credits rent clearing account. When the refund is entered in AP, no journal entry is created. However, when the check is cut, the system debits rent clearing and credits cash.
SL Straight Line–Straight-line adjustment to rent
• Accrual Basis – Debits accounts receivable and credits straight-line income
• Cash Basis – Not used Note: You only need this for income categories that are subject to FASB13
VC Vacancy–Rent and other income lost due to vacancy
• Accrual Basis – Debits vacancy contra-income and credits income
• Cash Basis – Not used
WO Write Off–Write-off of a bad debt
• Accrual Basis – Debits bad debt expense and credits accounts receivable
• Cash Basis – Not used

Module 2: Commercial Management Setup
Training Guide Page 27 © 2008 – 2012 MRI Software LLC.
Security Deposit Source Codes The following source codes are available to use with security deposit categories. The effect of the source code on the general ledger varies by accounting basis.
Code Description Effect on the General Ledger by Accounting Basis
AR Apply Refund–Security deposit applied to an outstanding charge
• Accrual Basis–Debits security deposit liability and credits accounts receivable
• Cash Basis–Debits security deposit liability and credits income
CR Cash Receipt–Payment received
• Accrual Basis–Debits cash and credits security deposit liability
• Cash Basis–Debits cash and credits security deposit liability
FF Forfeiture–Security deposit balance forfeited by tenant
• Accrual Basis–Debits security deposit liability and credits income
• Cash Basis–Debits security deposit liability and credits income
IN Interest–Interest earned on a security deposit
• Accrual Basis–Debits interest expense and credits security deposit liability
• Cash Basis–Debits interest expense and credits security deposit liability
IR Interest Reversal–Reversal of earned interest
• Accrual Basis–Debits security deposit liability and credits interest expense
• Cash Basis–Debits security deposit liability and credits interest expense
Note: You do not need to set up general ledger interface charts for this source code.
NC Non-cash Adjustment–Increase of security deposit without receiving cash
• Accrual Basis–Debits and credits a clearing account or security deposit liability
• Cash Basis–No effect
NR Non-cash Reversal–Reversal of a noncash adjustment
• Accrual Basis–Reverses a noncash adjustment
• Cash Basis–No effect This is the opposite of NC. Note: You do not need to set up general ledger interface charts for this source code.

Module 2: Commercial Management Setup
Page 28 Training Guide © 2008 – 2012 MRI Software LLC.
Code Description Effect on the General Ledger by Accounting Basis
NS Non-sufficient Funds–Payment returned by the bank
• Accrual Basis–Debits security deposit liability and credits cash
• Cash Basis–Debits security deposit liability and credits cash
This is the opposite of CR. Note: You do not need to set up general ledger interface charts for this source code.
PR Payment Reversal–Reversal of a cash receipt
• Accrual Basis–Debits security deposit liability and credits cash
• Cash Basis–Debits security deposit liability and credits cash
This is the opposite of CR. Note: You do not need to set up general ledger interface charts for this source code.
RF Refund–Security deposit refunded to a tenant
If you enter invoices for refunds in Accounts Payable (AP): • Accrual Basis–Debits security
deposit liability and credits security clearing. When the refund is entered in AP, the system debits security clearing and credits accounts payable.
• Cash Basis–Debits security deposit liability and credits security clearing. When the refund is entered in AP, no journal entry is created. However, when the check is cut, the system debits rent clearing and credits cash.

Module 2: Commercial Management Setup
Training Guide Page 29 © 2008 – 2012 MRI Software LLC.
Review
Key Points In this lesson, you have learned the following key points:
• How to determine necessary transaction categories
• How to set up income categories
• How to set up security deposit categories
Lesson 1 Lab Exercises
Please refer to the CM Training Workbook for exercises pertaining to this lesson.

Module 2: Commercial Management Setup
Page 30 Training Guide © 2008 – 2012 MRI Software LLC.

Training Guide Page 31 © 2008 – 2012 MRI Software LLC.
Lesson 2: Setting up GL Interface Charts
Overview
Purpose The purpose of this lesson is to show you how to set up general ledger (GL) interface charts.
Objectives After completing this lesson, you will be able to:
• Create GL interface charts for an income category
• Assign GL account numbers to post to for an income category using only accrual-basis accounting
• Assign GL account numbers to post to for an income category using only cash-basis accounting
• Assign GL account numbers to post to for an income category using both accrual-basis and cash-basis accounting
• Create GL interface charts for a security deposit category
Before You Begin Before you begin, you must determine whether or not you need to set up general ledger interface charts for certain source codes. This depends on the specific accounting practices of your organization, so you must determine if your organization creates journal entries in the general ledger using:
• Accrual-basis accounting
• Cash-basis accounting
• Both accrual-basis accounting and cash-basis accounting
Key Terms General ledger interface chart – A chart that specifies the accounts to which the system posts a transaction for a unique combination of a transaction category and source code. For each source code that you define for a transaction category, you specify the debit and credit accounts to which the system posts transactions. Ledger code – A code that defines the format of a specific chart of accounts Cash type – A code that defines a cash account

Module 2: Commercial Management Setup
Page 32 Training Guide © 2008 – 2012 MRI Software LLC.
Creating a GL Interface Chart for an Income Category
Overview General ledger interface charts specify the account numbers to which the system posts CM transactions to the general ledger. For each source code that you define for a transaction category, you specify the debit and credit account numbers to which the system posts transactions. CM uses separate interface charts for income categories and security deposit categories; however, you do not need to define all available source codes for a transaction category. The system uses only those source codes for which an interface is set up to post transactions to the general ledger.
Important: If you use multiple cash types or ledger codes, you may require multiple setups for a single source code.
Procedure Complete the following steps to create a GL interface chart for an income category:
1. Open the Income Categories page from the Setup and Maintenance Home Page.
2. From the Income Category column, select the income category for which to set up an interface chart and click the Edit hyperlink.
The Income Categories Detail page appears.
Income Categories Detail Web Page

Module 2: Commercial Management Setup
Training Guide Page 33 © 2008 – 2012 MRI Software LLC.
Note: Interface chart columns are grouped by ledger code, source code, and cash type and are listed by income category.
3. To add a record, click the Add button and a new line will appear. Complete the appropriate steps for creating journal entries for an income category (See below).
4. Click Save.

Module 2: Commercial Management Setup
Page 34 Training Guide © 2008 – 2012 MRI Software LLC.
Setting up Journal Entries for an Income Category
Using Only Accrual-Basis Accounting Complete the following steps to set up journal entries for an income category using only accrual-basis accounting:
1. In the Source Code field, select a source code for which you need to define a general ledger interface chart.
2. In the Accrual Debit Account and Accrual Credit Account fields, select the general ledger account numbers to which to post debits and credits for the income category when the system creates accrual journal entries for the source code.
3. In the Unearned Income Debit Account and Unearned Income Credit Account fields, select the general ledger account numbers to which to post debits and credits for the income category when the system creates unearned income journal entries for the source code.
You can only specify general ledger account numbers for unearned income journal entries associated with charges or one-time concessions.
4. Repeat Steps 1 through 3 for each source code to which you are posting transactions associated with that income category.
Using Only Cash-Basis Accounting Complete the following steps to create journal entries for an income category using only cash-basis accounting:
1. In the Source Code field, select a source code for which to define a general ledger interface chart.
2. In the Cash Debit Account and Cash Credit Account fields, select the general ledger account numbers to which to post debits and credits for the income category when the system creates cash journal entries for the source code.
3. Repeat Steps 1 and 2 for each source code to which you are posting transactions associated with that income category.

Module 2: Commercial Management Setup
Training Guide Page 35 © 2008 – 2012 MRI Software LLC.
Using Both Accrual-Basis and Cash-Basis Accounting Complete the following steps to create journal entries for an income category using both accrual-basis and cash-basis accounting:
1. In the Source Code field, select a source code for which to define a general ledger interface chart.
2. In the Accrual Debit Account and Accrual Credit Account fields, select the general ledger account numbers to which to post debits and credits for the income category when the system creates accrual journal entries for the source code.
3. In the Cash Debit Account and Cash Credit Account fields, select the general ledger account numbers to which to post debits and credits for the income category when the system creates cash journal entries for the source code.
4. In the Unearned Income Debit Account and Unearned Income Credit Account fields, select the general ledger account numbers to which to post debits and credits for the income category when the system creates unearned income journal entries for the source code. You can only specify account numbers for unearned income journal entries associated with charges or one-time concessions.
5. Repeat Steps 1 through 4 for each source code to which you are posting transactions associated with that income category.

Module 2: Commercial Management Setup
Page 36 Training Guide © 2008 – 2012 MRI Software LLC.
Creating a GL Interface Chart for a Security Deposit Category
Procedure Complete the following steps to create a GL interface chart for a security deposit category:
1. Open the Sec. Dep. Income Categories page from the Setup and Maintenance Home Page.
2. Select a security deposit category and click the Edit hyperlink.
3. Create journal entries as you did in Step 3 of the Creating a GL Interface Chart for an Income Category procedure.
Note: This interface chart works the same way for Income Categories; however, a few additional source codes are available, like AR (Apply Refund) and FF (Forfeiture).
4. Click Save.

Module 2: Commercial Management Setup
Training Guide Page 37 © 2008 – 2012 MRI Software LLC.
Review
Key Points In this lesson, you have learned the following key points:
• How to create GL interface charts for an income category
• How to assign GL Account numbers to post to for an income category using only accrual-basis accounting, cash-basis accounting, or both.
• How to create GL interface charts for a security deposit category
Lesson 2 Lab Exercises
Please refer to the CM Training Workbook for exercises pertaining to this lesson.

Module 2: Commercial Management Setup
Page 38 Training Guide © 2008 – 2012 MRI Software LLC.

Training Guide Page 39 © 2008 – 2012 MRI Software LLC.
Lesson 3: Setting Up Lookup Lists
Overview
Purpose The purpose of this lesson is to show you how to set up lookup lists in order to begin setting up a building.
Objectives After completing this lesson, you will be able to set up basic lookup lists in CM Web.
Key Terms Entity – A representation of a general ledger cost center to which building level transactions are transferred. Lookup List – A table that contains data in order to select specific field values.

Module 2: Commercial Management Setup
Page 40 Training Guide © 2008 – 2012 MRI Software LLC.
Before You Begin Before you begin with this lesson, make sure that an entity is set up for the building(s) that you will be adding, as described in the General Ledger training documentation. An entity is a representation of a general ledger cost center to which building level transactions are transferred. Any one of the following items or groupings could be assigned to an entity in order to post transactions generated by the item or grouping to the general ledger:
• Building
• Department
• Owner
• Group of owners
• User-defined grouping relevant to your organization
When setting up an entity, you specify the following information, some of which is only required depending on the needs of your organization:
• General information
• Entity calendar to define the financial periods for the entity
• Cash map that defines the bank account and general ledger accounts affected by transactions that involve the entity
• General information required for the entity to process accounts payable transactions
• Entity attribute information if you use Viewpoint
• Multiple currency information if your system is set up to use the multiple currency feature
• General ledger (GL) interface exceptions if you use corporate AR and want to post the entity’s corporate AR transactions to the general ledger using a structure that is different than the structure set up in the general ledger interface chart for corporate AR
Note: When setting up an entity, you may be required to specify information about a bank. If so, you may need to leave the entity entry and set up the required bank information before continuing.

Module 2: Commercial Management Setup
Training Guide Page 41 © 2008 – 2012 MRI Software LLC.
Setting up Lookup Lists
Overview In order to select specific field values from various lookup lists in CM Web, you must first set up data in the lookup lists. The following table describes most of the lookup lists that you will be working with and their associated table names:
Lookup List Description Lease Addresses Lease addresses enable you to group statements for
several leases related to the same tenant, so you can consolidate the statements sent to a tenant if all lease statements for the tenant are sent to the same address. To group statements for several leases on the same statement, you assign each lease the same billing address.
Landlords A landlord is a business or individual that leases property to a tenant. The landlord may or may not own the leased property. You must specify a landlord when you add a building. You can print invoices for landlords and group information on reports by landlord. You can also run the Landlord List report to list information about all landlords. Note: If your organization does not use landlords, you must set up other types of businesses or individuals with leasing functions, such as licensing agents or lease administrators, to select in the Landlord ID field when you add a building.
Lease cost types Lease cost types identify various expenses associated with leases. Often, leasing costs are incentives offered to tenants as motivation for signing or retaining lease agreements. You can set up leasing costs for primary leases and then use leasing costs to calculate net effective rent.
Managers A manager runs the daily affairs of a property. A manager can be either an individual or a management company. You must specify a manager when you add a building. You can also do the following: • Group information on reports by manager • Run the Manager List report to list information
about all managers Note: If your organization does not use managers, you must set up other types of individuals who run the daily affairs of a property, such as licensing agents or lease administrators, to select in the Manager ID field when you add a building.
NAICS codes North American Industry Classification System (NAICS) codes enable you to categorize leases based on industry groupings defined jointly by U.S.,

Module 2: Commercial Management Setup
Page 42 Training Guide © 2008 – 2012 MRI Software LLC.
Lookup List Description Canadian, and Mexican governments. You can use NAICS codes to organize tenant information on reports for comparison purposes. Once you set up NAICS codes, you can specify a NAICS code when entering tenant category information for leases. Note: You can import NAICS codes from another database into your current database. For information about importing data, refer to the System Administration documentation.
National tenants A national tenant is a single tenant who leases multiple locations throughout a region, country, or group of countries, and is used primarily for reporting purposes. You can run reports combining information from all of the primary leases, and their respective secondary suites, associated with one national tenant. To associate a national tenant with a lease, you select a tenant ID when you specify tenant categories as part of the general information you set up in lease maintenance. You can run the National Tenant Listing report to list addresses and contact information for all national tenants.
Option types Option types identify lease-related options for which tenants may have contractual rights, such as the option to renew a lease. The signed lease agreement specifies the lease options available to a tenant. You use option types to identify the purpose of lease options when setting up lease options for a primary lease. You can group information on some CM reports by lease option. You can run the Lease Options report to display the lease options for leases based on the option type and date range specified. Other lease-related information, such as important lease dates and contact information, appears for each lease on the report.
Receipt types A receipt type identifies the form of payment of a cash receipt transaction, such as check, cash, or electronic funds transfer (EFT). Receipt types are used for both tenant and non-tenant cash receipts. When you enter a cash receipt, you must select a receipt type to identify the form of payment of the cash receipt. You must also specify receipt types when entering NSF payments or payment reversals. You can only reverse the cash receipts associated with the receipt type you select when you enter NSF payments or payment reversals.

Module 2: Commercial Management Setup
Training Guide Page 43 © 2008 – 2012 MRI Software LLC.
Lookup List Description Reference types Reference types categorize building and lease notes.
You can select up to two reference types to identify the purpose of a building or lease note. You can enter notes when entering or modifying information for buildings and leases. Based on reference type, you can group notes on reports such as the Critical [Date] report by Lease–Notes Only, which displays notes entered for leases based on the reference types and date range specified. The system groups notes by lease within a building and lists them by date.
SIC codes Standard Industry Classification (SIC) codes enable you to categorize leases based on industry groupings defined by the U.S. government. Once you set up SIC codes, you can specify a SIC code when entering tenant category information for leases. Using SIC codes, you can print reports to organize tenant information for comparison purposes.
Square foot types Square foot types identify the kinds of square footage used in buildings and suites. You can use many square foot types to track building or suite square footage, such as gross leasable and net leasable areas. CM uses square foot types to group data for calculations and reports.
Tax parcels A tax parcel is a unit of land that incurs taxes at a specified percentage. Tax parcel boundaries can divide buildings, but a tax parcel cannot divide a suite. When you set up a suite for a building, you can assign a tax parcel to the suite by selecting a value in the Tax ID field. Before you begin to set up tax parcels, you must determine if buildings managed by your organization are divided into tax parcels. If so, you must determine the gross leasable area of each tax parcel.
Rent Tax Groups Tax groups enable you to charge multiple taxes on one line item amount or to charge tax, such as the Canadian QST tax, on taxes in a multi-tiered tax setup.
Prime Interest Rates Prime Interest Rates enable you to define interest rates for late fee calculations.

Module 2: Commercial Management Setup
Page 44 Training Guide © 2008 – 2012 MRI Software LLC.
Procedure Complete the following steps to set up most lookup lists:
1. From the Commercial Management Main Page, click Setup > Setup and Maintenance > Lookup List Maintenance.
2. Click on the desired table from the list.
The table that you selected appears.
If you want to… Then… Create a new record Click Add. Modify an existing record Click the Edit hyperlink. Delete an existing record Click the checkbox and click
Delete.
3. Complete all applicable fields on the table.
4. Click Save when finished.

Module 2: Commercial Management Setup
Training Guide Page 45 © 2008 – 2012 MRI Software LLC.
Review
Key Points In this lesson, you have learned how to set up basic lookup lists in CM.
Lesson 3 Lab Exercises
Please refer to the CM Training Workbook for exercises pertaining to this lesson.

Training Guide Page 46 © 2008 – 2012 MRI Software LLC.
Module 3: Setting Up a New Building
Module Overview
Purpose The purpose of this module is to show you how to set up a new building using the Commercial Management Web application.
Objectives After completing this module, you will be able to:
• Understand Building Maintenance web page components
• Set up general building information
• Set up a building’s accounting data
Building Setup Process The building setup process consists of the following procedures:
1. Adding a new building record
2. Setting up building general information
3. Setting up building accounting information

Module 3: Setting Up a New Building
Training Guide Page 47 © 2008 – 2012 MRI Software LLC.

Training Guide Page 48 © 2008 – 2012 MRI Software LLC.
Lesson 1: Building Maintenance Web Page
Overview
Purpose The purpose of this lesson is to show you the basic components of the Building Maintenance web page.
Objectives After completing this lesson, you will be able to:
• Access the Building Maintenance web page
• Understand the major tabs on the Building Maintenance web page
Building Maintenance Web Page

Module 3: Setting Up a New Building
Training Guide Page 49 © 2008 – 2012 MRI Software LLC.
Accessing the Building Maintenance Web Page
Overview You can access Building, Suite or Lease Maintenance from the Leasing activity menu as illustrated below:
Leasing Menu
Major Tabs The General Activity Tab provides options for you to set up general information about the building.
The following table describes the items on the General Activity Tab:
Button Name Description Address Displays the building address and
alternate remittance address. Square Footage Displays the square footage types
for a building. Management Company
Displays the building’s management information.
Notes
Allows you to add notes for a building.
Retail
Displays a building’s retail reporting information and retail billing/reconciliation information. Advanced Retail only.
Facility Management Allows you to set building level default information used by the Facility Management programs. Facility Management only.

Module 3: Setting Up a New Building
Page 50 Training Guide © 2008 – 2012 MRI Software LLC.
Review
Key Points In this lesson, you have learned how to:
• Access the Building Maintenance web page
• Understand the major tabs on the Building Maintenance web page

Training Guide Page 51 © 2008 – 2012 MRI Software LLC.
Lesson 2: Setting Up General Building Information
Overview
Purpose The purpose of this lesson is to show you how to set up general building information in CM Web.
Objectives
After completing this lesson, you will be able to:
• Set up a new building
• Enter building address information
• Enter square footage information
• Enter management information
• Enter notes about the building
• Add attachments
• Add watchlist items
Key Terms Attachment – A document, such as a building survey or floor plan that may be saved as part of the building. Building – A property that is divided into suites. Landlord – A business or individual that leases property to a tenant. The landlord may or may not own the leased property. A landlord must be specified when setting up a new building. Manager – An individual or management company that runs the daily affairs of a property. A manager can be either an individual or a management company. A manager must be specified when setting up a new building. Management Information – Information that is used to calculate property management fees.
Before You Begin Before you begin setting up a building, you must first set up lookup lists for a landlord and a manager (see Setting up Lookup Lists in Module 2).

Module 3: Setting Up a New Building
Page 52 Training Guide © 2008 – 2012 MRI Software LLC.
Adding a New Building
Procedure Complete the following steps to add a new building record:
1. Verify that an entity, a manager, and a landlord have already been set up.
2. From the Commercial Management main menu, click Leasing > Building Maintenance.
3. Click Add to add a new building. The New Building Setup – Part 1 page displays.
New Building Setup – Part 1 Web Page
4. Complete the following steps:
a. Enter a building ID and building name in the appropriate fields.
b. Enter the appropriate codes into the Landlord ID and Manager ID fields.
c. Select the entity ID associated with the building.
d. Select a taxpayer type from the dropdown menu.
e. Click Continue... The New Building Setup – Part 2 page displays.
New Building Setup – Part 2 Web Page
f. Enter the current accounting period for the building and then click Finish. The Building Details Page displays.
Module 3: Setting Up a New Building
Training Guide Page 53 © 2008 – 2012 MRI Software LLC.
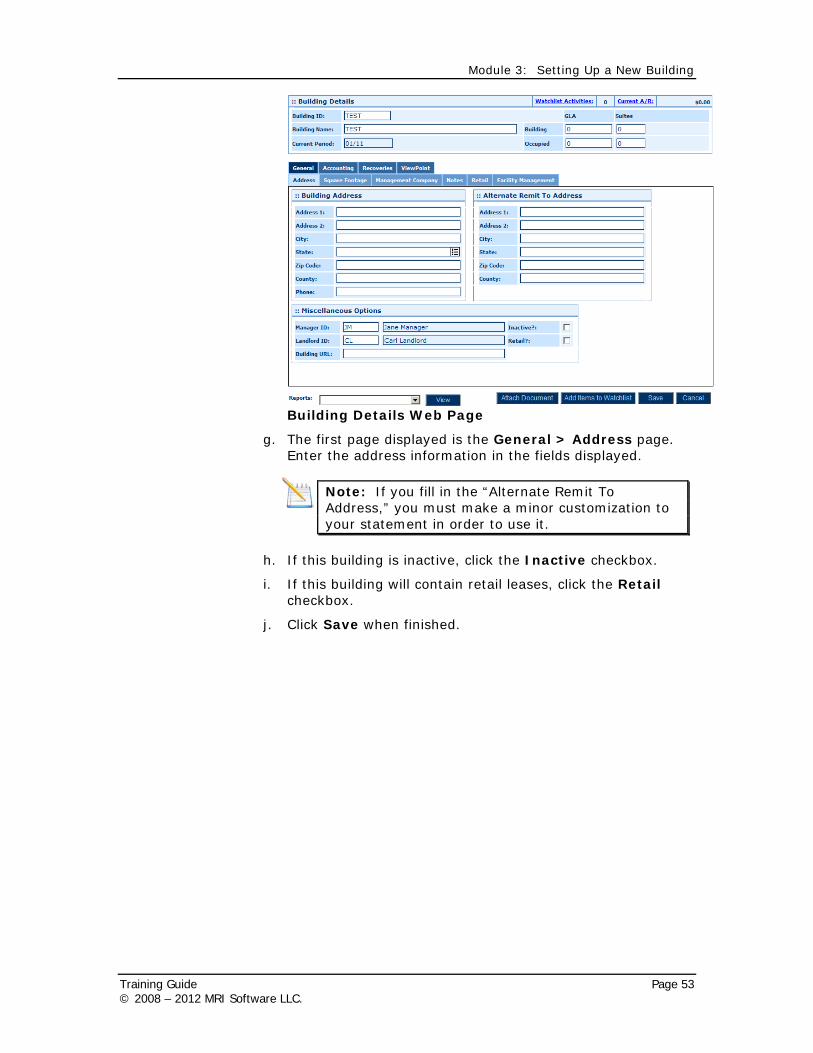
Building Details Web Page
g. The first page displayed is the General > Address page. Enter the address information in the fields displayed.
Note: If you fill in the “Alternate Remit To Address,” you must make a minor customization to your statement in order to use it.
h. If this building is inactive, click the Inactive checkbox.
i. If this building will contain retail leases, click the Retail checkbox.
j. Click Save when finished.
Module 3: Setting Up a New Building
Page 54 Training Guide © 2008 – 2012 MRI Software LLC.
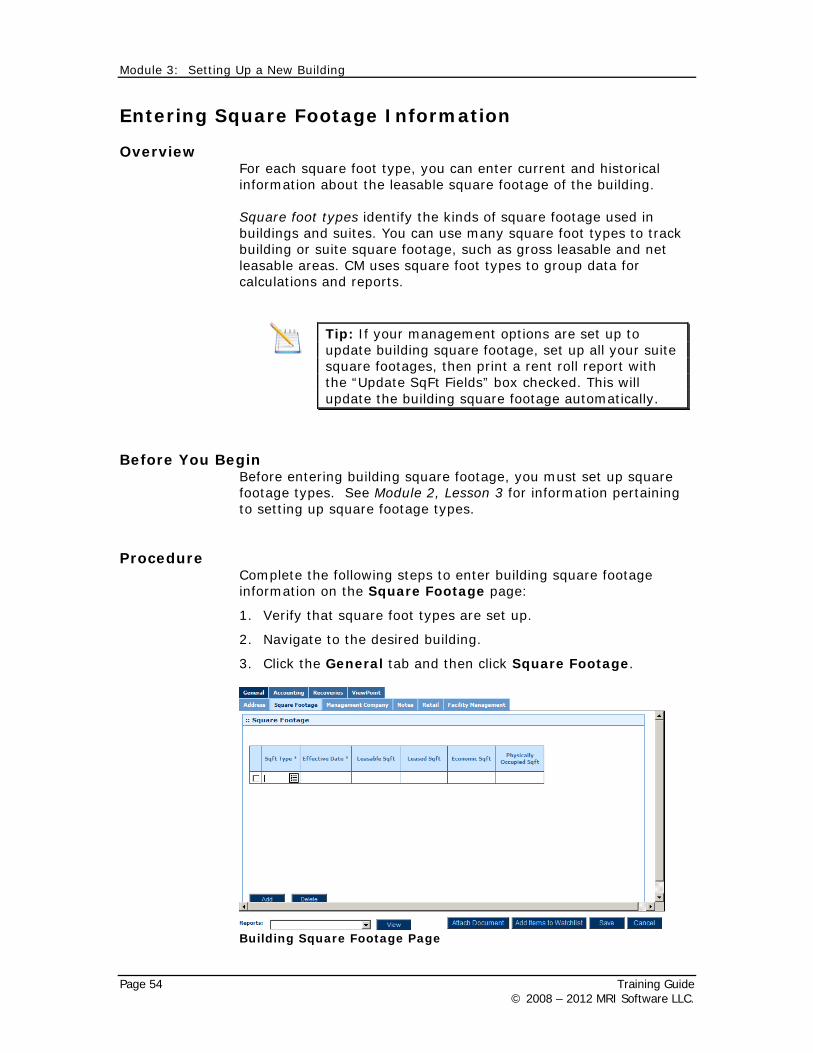
Entering Square Footage Information
Overview For each square foot type, you can enter current and historical information about the leasable square footage of the building. Square foot types identify the kinds of square footage used in buildings and suites. You can use many square foot types to track building or suite square footage, such as gross leasable and net leasable areas. CM uses square foot types to group data for calculations and reports.
Tip: If your management options are set up to update building square footage, set up all your suite square footages, then print a rent roll report with the “Update SqFt Fields” box checked. This will update the building square footage automatically.
Before You Begin Before entering building square footage, you must set up square footage types. See Module 2, Lesson 3 for information pertaining to setting up square footage types.
Procedure
Complete the following steps to enter building square footage information on the Square Footage page:
1. Verify that square foot types are set up.
2. Navigate to the desired building.
3. Click the General tab and then click Square Footage.
Building Square Footage Page

Module 3: Setting Up a New Building
Training Guide Page 55 © 2008 – 2012 MRI Software LLC.
4. Complete the applicable fields:
Field Action/Description SqFt Type (Square Footage Type)
Select the applicable square footage type by clicking the icon.
Effective Date Enter the start date of square footage for this building.
Leasable SqFt Enter the total number of leasable square feet.
Leased SqFt Enter the total number of leased square feet.
Economic SqFt (System generated.) The value in this field represents the total square footage for which you are receiving revenue for the building. The amount may be equal to or greater than the leased square feet amount but should NEVER be more than the leasable square foot amount. This value includes those leased/unoccupied leases that are still being billed.
Physically Occupied SqFt Enter the total number of leasable square feet that have tenants physically occupying the space Note: This field is not maintained by the system.
5. Click Save when finished.

Module 3: Setting Up a New Building
Page 56 Training Guide © 2008 – 2012 MRI Software LLC.
Entering Management Company Information
Overview Management information is used to calculate management fees. You can specify the following information:
• The method, rate, or flat amount used for calculations
• Income categories exempt from calculations for tenant income
• General ledger accounts exempt from calculations for non-tenant income
Procedure Complete the following steps to set up building management company information:
1. Navigate to the building.
2. Select the General tab and then Management Company.
Management Company Options Page
3. Complete the applicable fields on the Management Company page.
Note: In order for the system to calculate management fees, you must have a Start Date. Expiration Date is not required.

Module 3: Setting Up a New Building
Training Guide Page 57 © 2008 – 2012 MRI Software LLC.
Field Action/Description Calculation Method Select the applicable
management fee method: • A – Gross Cash *
Management Fee Rate • B – Flat Amount • C – Greater of Method A or
B, or • D – No fee calculation Note: Depending upon your management options, option A may be set to calculate charges instead of cash
Start Date Enter the management agreement start date
Expiration Date Enter the date the management agreement will expire
Percentage Rate Enter the management fee rate, if applicable
Flat Amount Enter the management fee flat amount, if applicable
Rent Tax ID Select the appropriate rent tax group, if applicable
Calculate by (P)eriod/(D)ate Enter P or D to indicate how to identify the transactions used to calculate management fees
Include Credit Applies? Select this checkbox if credit applies should be included in the management fee calculation
Include Security Applies? Select this checkbox if security deposit credit applies should be included in the management fee calculation
Include Non-Tenant Transactions?
Select this checkbox if non-tenant transactions should be included in the management fee calculation
Only Bill Flat Amt if There Is Activity
Select this checkbox, if applicable
Vendor ID Select the appropriate vendor ID Expense Acct No. Select the appropriate expense
account number Cash Type Select the appropriate cash type Department Select the appropriate
department, if applicable

Module 3: Setting Up a New Building
Page 58 Training Guide © 2008 – 2012 MRI Software LLC.
4. If there are any income categories to be excluded from calculating management fees for tenant transactions, enter them in the Exemption Income Categories for Tenant Transactions field.
5. If there are any account numbers to be excluded from calculating management fees for non-tenant transactions, enter them in the Exemption Account Numbers for Non-tenant Transactions field.
6. Click Save when finished.

Module 3: Setting Up a New Building
Training Guide Page 59 © 2008 – 2012 MRI Software LLC.
Adding Notes
Overview For each building, you can enter notes and memoranda about the building. Building notes appear on the Critical [Date] report by Building. On the report, the system includes notes of the reference type you select and lists them by date.
Note: Notes entered for buildings are specific to buildings. You can enter notes and memoranda specific to tenant leases when maintaining leases.
Procedure Complete the following steps to add notes to a building:
1. Set up reference types that identify the purpose of the note.
Note: Customized reference types can be set up in the Reference Types table. Refer to Module 2, Lesson 3: Setting up Lookup Lists for more information on how to set up reference types. Building notes and lease notes use the same reference types.
2. Navigate to the desired building.
3. Select the General tab and then click Notes.
Building Maintenance – Notes Page

Module 3: Setting Up a New Building
Page 60 Training Guide © 2008 – 2012 MRI Software LLC.
4. Complete the following fields:
• Date
• Reference 1
Note: It is unnecessary to use the Reference 2 field unless it is a subcategory of Reference 1. If the fields are used interchangeably, then when searching notes, you will have to search twice, looking in each field.
• Notes
5. Click Save when finished.
Review
Key Points In this lesson, you learned the following key points:
• How to set up a new building
• How to enter building address information
• Enter building square footage information
• How to enter management information
• How to enter notes for a building
Lesson 2 Lab Exercises
Please refer to the CM Training Workbook for exercises pertaining to this lesson.

Training Guide Page 61 © 2008 – 2012 MRI Software LLC.
Lesson 3: Setting Up Building Accounting Information
Overview
Purpose The purpose of this lesson is to show you how set up building accounting information.
Objectives After completing this lesson, you will be able to select and modify a building as well as set up:
• Billing options
• Accounts receivable, general ledger, and accounts payable options

Module 3: Setting Up a New Building
Page 62 Training Guide © 2008 – 2012 MRI Software LLC.
Setting up Billing Options
Overview The billing options you set up for a building affect tenant billings. Some values are used as defaults for leases within the building.
Before You Begin Before you set up billing options, you may need to first set up one or more of the following (if applicable to your organization):
• CPI indexes
• Porter wage indexes
• Square foot types
Procedure Complete the following steps to set up billing options for a building:
1. Set up the default for the following, if applicable:
• CPI index associated with the building
• Porter wage index associated with the building
• Square foot type associated with the building
2. Navigate to the desired building.
3. Select the Accounting tab, and click Billing Options.
Building Maintenance – Billing Options Page
4. The Billing Options page has two sections: Defaults for Lease Setup and Billing Options. Fields under Defaults for Lease Setup are used when setting up new leases, and the Billing Options pertain to the building as a whole.

Module 3: Setting Up a New Building
Training Guide Page 63 © 2008 – 2012 MRI Software LLC.
Complete the appropriate fields for each section using the following table:
Defaults for Lease Setup Field Action/Description Due Day of Charges Enter the day of the month on
which rent or other charges are due.
Note: The system uses this day to generate delinquency reports and calculate late fees.
No. of days to Delq Including the due date, enter the number of days before an open charge is considered delinquent.
Delinquent Bill Option Select the default method to use to determine the transaction date on which late fees are posted for delinquent charges. The system uses the method specified here as the default value for leases set up in the building.
Late Calculation Method Select the method to use to calculate late fees for open charges.
Late Fee Flat Amount Enter the flat late fee amount to charge to delinquent tenants.
Late Fee Rate Enter the percentage rate to use to calculate delinquency charges on unpaid amounts.
Late Fee Cut Off Amt Enter the minimum late fee amount the system bills. When a tenant late fee total is less than the value specified here, the system does not bill late fees to the tenant.
Days for Interest Calc Enter the number of days to use to calculate the daily late fee amount.
Print Statements Select this checkbox to have rent statements printed for the building.
CPI Index ID Select the default CPI index to use to calculate rent increases for leases in the building.
Porter Wage Table ID Select the default porter wage index to use to calculate rent increases for leases in the New York City area.

Module 3: Setting Up a New Building
Page 64 Training Guide © 2008 – 2012 MRI Software LLC.
Field Action/Description Make Check Payable To Type the name of the
individual or organization to whom to make checks payable.
Note: This name appears on tenant statements.
Charge Square Foot Type Select the square foot type of the leasable square footage amounts to use:
• In vacancy rent potential calculations for vacant suites within the building. The system calculates vacancy rent potential when recurring charges are created
• To display the square footage of the suite in the details of its associated lease
Last RENTUP Processed Enter the last date recurring charges were created for the building.
Important: Only enter a date in this field when you initially set up a building. The system updates the date each time recurring charges are created thereafter.
Last Billing Processed Enter the effective date of the last tenant billing. Important: Only enter a date in this field when you initially set up a building. The system updates the date each time recurring charges are created thereafter.
Starting Invoice No. Enter the first number to use for tenant invoices in the building, only if you invoice by building; otherwise, leave this field blank.

Module 3: Setting Up a New Building
Training Guide Page 65 © 2008 – 2012 MRI Software LLC.
Field Action/Description Auto apply by priority Select to have CM sort,
display, and apply cash receipts for the building to open charges by the priority code assigned to the income category instead of by the transaction date.
Note: Much of the data entered in the billing options page is default information for any new lease created for this building. Changes made to these options will not affect any existing leases for this building; they will only affect new leases entered after the change, and they may be modified at the lease level.
5. Click Save when finished.

Module 3: Setting Up a New Building
Page 66 Training Guide © 2008 – 2012 MRI Software LLC.
Setting Up Accounts Receivable, General Ledger and Accounts Payable Options
Overview You can specify how the system posts accounts receivable transactions and interacts with the general ledger for a building.
If you plan to interface CM with Accounts Payable (AP), you must identify the account numbers and cash types of the management fees, rent refunds, and security deposits that flow into AP.
Before You Begin Before you set up the accounts receivable and general ledger options, you must set up income categories and receipt types.
Procedure Complete the following steps to set up accounts receivable and general ledger options:
1. Set up the default receipt type to use for entering cash receipts.
2. Navigate to the desired building.
3. Select the Accounting tab, and click AR/GL/AP.
Building Maintenance – AR/GL/AP Page

Module 3: Setting Up a New Building
Training Guide Page 67 © 2008 – 2012 MRI Software LLC.
4. Complete the applicable fields using the following table:
Field Action/Description Use PR/CR to Apply Outstanding NCs
Select to use the Payment Reversal (PR) and Cash Receipt (CR) source codes for batch transactions that apply noncash credit balances for one item to the debit balances of another, which is typical of either accrual or both cash and accrual accounting. This is required for accrual, or accrual and cash accounting; however, it is not required for cash only accounting.
Note: When this checkbox is cleared, the system uses Noncash Adjustment (NC) and Charge (CH) source codes for batch transactions that apply noncash credit balances for one item to the debit balances of another, which is typical of cash accounting.
Income Default Cash Type Select the cash type to use as the default when entering cash receipts.
Deposit Default Cash Type Select the cash type to use as the default when entering security deposit cash receipts.
Default Receipt Type Select the receipt type to use as the default when entering cash receipts.
Security Deposit Interest Type the default interest rate to use to calculate interest earned by security deposits for batch transactions such as:
• unbilled security deposit cash receipts
• security deposit interest transactions
Entity ID Select the entity to use to create journal entries in the general ledger for building transactions.
JE Creation Basis Select the accounting basis to use to create journal entries in the general ledger for building transactions.

Module 3: Setting Up a New Building
Page 68 Training Guide © 2008 – 2012 MRI Software LLC.
Field Action/Description JE Creation Style Select the style of journal
entries to create in the general ledger for building transactions.
Closing Day Type the day of the month on which to close the building.
Valid values: 5, 10, 15, 20, 25, or End-of-Month (EOM)
Note: This field is for informational purposes only.
CM Interentity Account No Select the general ledger account number to use for CM intercompany or interentity transfers.
Calculate FASB13? Select to enable straight-line rent adjustment calculations for the building and create the resulting journal entries in the general ledger.
FASB13 Start Date Type the date on which to begin straight-line rent adjustment calculations for the building.
Note: If you do not specify a date and the Calculate FASB13 checkbox is selected, the system uses the lease start date as the date to begin straight-line rent adjustment calculations.
Taxpayor Type Select the federal tax payer type of the landlord.
Federal ID Type the federal tax ID or social security number of the landlord. Do not include dashes.
Rent Refund Account No Select the general ledger expense account to debit when creating rent refund invoices in AP.
Rent Refund Cash Type Select the cash type to use when creating rent refund invoices in AP.
Security Refund Account No Select the general ledger expense account to debit when creating security deposit refund invoices in AP.

Module 3: Setting Up a New Building
Training Guide Page 69 © 2008 – 2012 MRI Software LLC.
Security Refund Cash Type Select the cash type to use when creating security deposit refund invoices in AP.
Note: Much of the data in the Accounts Receivable fields is default information.
5. Click Save when finished.
Note: Complete the Rent Refund Account, Rent Refund Cash Type, Security Deposit Account, and/or Security Refund Cash Type if your management options are set to create AP invoices for refunds and management fees; otherwise you do not need to complete these fields.

Module 3: Setting Up a New Building
Page 70 Training Guide © 2008 – 2012 MRI Software LLC.
Selecting/Modifying an Existing Building
Procedure Complete the following steps to select an existing building:
1. From the Commercial Management main menu, click Leasing > Building Maintenance.
The Building Search Page appears.
Building Search Page
2. Search for the desired building.
3. Click on the building ID hyperlink to display the building details.
4. Make any desired changes to the building record.
5. Click Save when finished.
Review
Key Points In this lesson, you learned the following key points:
• How to set up billing options
• How to set up accounts receivable, general ledger, and accounts payable options
• How to select and modify a building
Lesson 3 Lab Exercises
Please refer to the CM Training Workbook for exercises pertaining to this lesson.

Training Guide Page 71 © 2008 – 2012 MRI Software LLC.
Module 4: Working with Suites
Module Overview
Purpose The purpose of this module is to show you how to setup and maintain suites in a building using the Commercial Management Web application.
Objectives After completing this module, you will be able to:
• Understand Suite Maintenance web page components
• Set up suites in a building
• Maintain suite square footage

Module 4: Working with Suites
Page 72 Training Guide © 2008 – 2012 MRI Software LLC.

Training Guide Page 73 © 2008 – 2012 MRI Software LLC.
Lesson 1: Setting up Suites in a Building
Overview
Purpose The purpose of this lesson is to show you how to set up a suite in a building.
Objectives After completing this lesson, you will be able to:
• Create a new suite in a building
• Select/modify an existing suite
• Set up suites to calculate vacancy rent potential
Key Terms Suite – A specific unit of space in a building. Annual suite market rent – The amount per square foot you could receive from tenants for the suite if it were leased, as specified in the Annual Market Rent PSF field when you set up the suite. Leasable square footage – The amount of square footage with leasing potential that is associated with the most recent effective date occurring on or before the date you specify as the effective date for the posted charges when you create recurring charges, and the charge square foot type specified for the building containing the suite.
Important: The total square footage of a building is affected by changes to the square footage amounts of its associated suites. The Square Foot Assistant allows you to adjust the square footage of one suite and adjust the square footage of another suite to properly maintain the total building square footage. For more information, refer to Lesson 2: Maintaining Square Footage.

Module 4: Working with Suites
Page 74 Training Guide © 2008 – 2012 MRI Software LLC.
Adding a Suite
Overview A suite is a unit of space in a building. After you add a suite, you can expand or reduce the space of the suite by adjusting the square footage of the suite. You must also adjust a different suite to gain or lose square footage.
Procedure Complete the following steps to add a suite:
1. From the Commercial Management main menu, click Leasing > Suite Maintenance.
The Suites Search Page is displayed.
Suites Search Page
2. Select a building and click Search.
3. Click Add to add a new suite for the building.
The Suite Detail Page is displayed.
Suite Detail Page
Module 4: Working with Suites
Training Guide Page 75 © 2008 – 2012 MRI Software LLC.
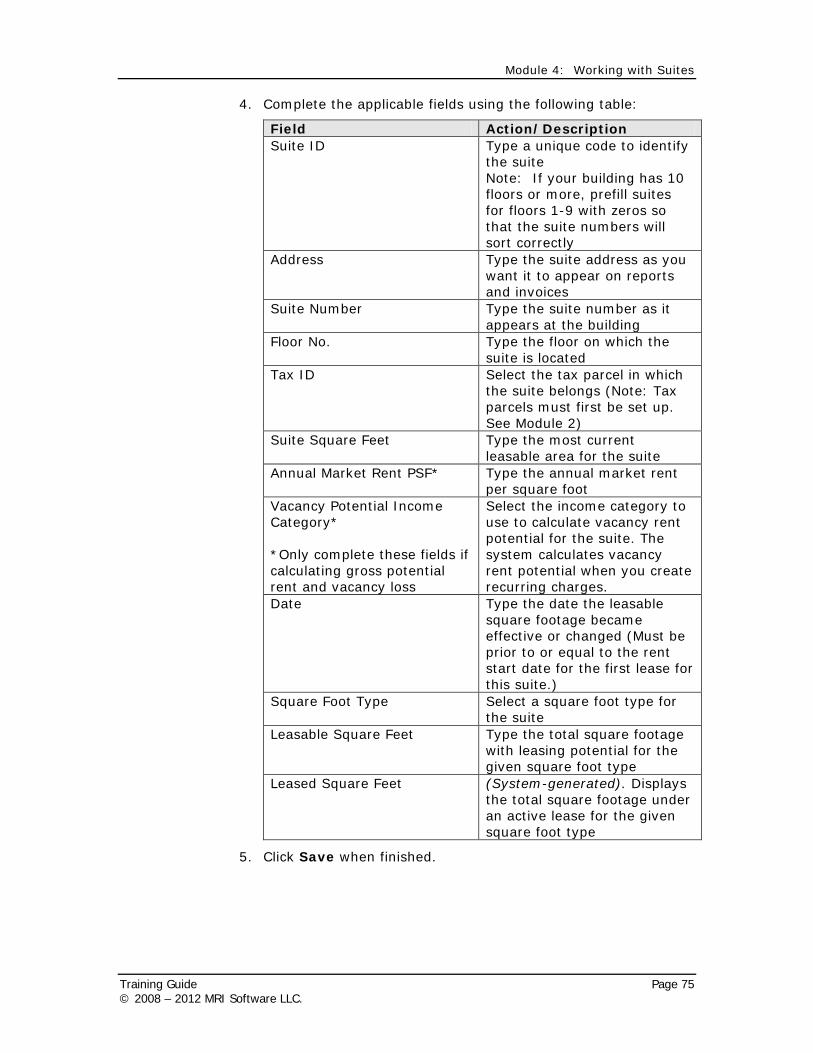
4. Complete the applicable fields using the following table:
Field Action/Description Suite ID Type a unique code to identify
the suite Note: If your building has 10 floors or more, prefill suites for floors 1-9 with zeros so that the suite numbers will sort correctly
Address Type the suite address as you want it to appear on reports and invoices
Suite Number Type the suite number as it appears at the building
Floor No. Type the floor on which the suite is located
Tax ID Select the tax parcel in which the suite belongs (Note: Tax parcels must first be set up. See Module 2)
Suite Square Feet Type the most current leasable area for the suite
Annual Market Rent PSF* Type the annual market rent per square foot
Vacancy Potential Income Category* *Only complete these fields if calculating gross potential rent and vacancy loss
Select the income category to use to calculate vacancy rent potential for the suite. The system calculates vacancy rent potential when you create recurring charges.
Date Type the date the leasable square footage became effective or changed (Must be prior to or equal to the rent start date for the first lease for this suite.)
Square Foot Type Select a square foot type for the suite
Leasable Square Feet Type the total square footage with leasing potential for the given square foot type
Leased Square Feet (System-generated). Displays the total square footage under an active lease for the given square foot type
5. Click Save when finished.

Module 4: Working with Suites
Page 76 Training Guide © 2008 – 2012 MRI Software LLC.
Selecting/Modifying an Existing Suite
Procedure Complete the following steps to select an existing suite:
1. From the Commercial Management main menu, select Leasing > Suite Maintenance.
The Suites Search page is displayed.
2. Select the appropriate building and click Search.
3. Click on the suite ID hyperlink for the suite you wish to modify.
4. Make any desired changes to the suite.
5. Click Save when finished.
Module 4: Working with Suites
Training Guide Page 77 © 2008 – 2012 MRI Software LLC.
Review
Key Points In this lesson, you learned the following key points:
• How to create a new suite in a building
• How to select/modify an existing suite
Lesson 1 Lab Exercises
Please refer to the CM Training Workbook for exercises pertaining to this lesson.

Training Guide Page 78 © 2008 – 2012 MRI Software LLC.
Lesson 2: Maintaining Suite Square Footage
Overview
Purpose The purpose of this lesson is to show you how to expand or reduce the space of a suite by adjusting the square footage of two suites simultaneously.
Objectives After completing this lesson, you will be able to:
• Maintain square footage using the Square Footage Assistant
• Manually maintain square footage
About Square Footage If you expand the square footage of one suite, you must simultaneously reduce the square footage of another suite. Likewise, if you reduce the square footage of one suite, you must increase the square footage of another suite. The square footage of each suite must be adjusted by the same amount. Each square footage amount entered for a suite has an effective date and is associated with a specific square foot type. Square foot types are set up as part of CM lookup lists.

Module 4: Working with Suites
Training Guide Page 79 © 2008 – 2012 MRI Software LLC.
Maintaining Square Footage Using the Square Footage Assistant
Overview The Web-based solution for CM includes the suite Square Footage Assistant that you can use to maintain suite square footage. The Square Footage Assistant is designed for square foot transfers between two suites. When you expand or reduce the space of the current suite, the suite Square Footage Assistant requires you to define an alternate suite to gain or lose square footage. To use the suite Square Footage Assistant, a default charge square foot type must be specified in the billing options of the building containing the suite. Otherwise, the system cannot determine the type of square footage to adjust.
Note: There may be more than one square foot type per bldg and per suite; however, the Square Foot Assistant will only change the square foot type that is referenced as the "Default" square type within the building record.
Important: When you manually adjust the space of a suite, do not modify an existing line in the detail grid. To maintain historical accuracy when you calculate recoveries or run the Rent Roll report, you must create a new line in the detail grid each time you adjust the space of a suite.

Module 4: Working with Suites
Page 80 Training Guide © 2008 – 2012 MRI Software LLC.
Procedure Complete the following steps to maintain the square footage of a suite using the Square Footage Assistant:
1. Add any new suites for the building.
2. Select the suite that needs its square footage modified.
3. Click Square Footage Assistant.
Suite Square Footage Assistant Page
4. Refer to the following table to determine how to continue:
If you want to… Then… Reduce the square footage of the suite by increasing the square footage of another suite
Click Contraction and complete the applicable fields.
Increase the square footage of the suite by reducing the square footage of another suite
Click Expansion and complete the applicable fields.
5. Click Next.
6. Review the information about the suite square footage changes.
7. Refer to the following table to determine how to continue:
If the square footage information…
Then…
Is correct Click Save to save the suite square footage changes.
Is incorrect Click Back and adjust the square footage information.

Module 4: Working with Suites
Training Guide Page 81 © 2008 – 2012 MRI Software LLC.
Manually Maintaining Square Footage
Overview There are two main instances in which you may need to manually maintain square footage:
• Expanding or contracting space between two or more suites, or
• The square footage of a suite changes (as a result of re-measurement) causing the overall building square footage to change.
If you need to expand or contract space into or out of more than two suites (i.e., splitting one large suite into three or more spaces, or combining more space to create one big space), then it must be done manually.
If square footage changes as a result of re-measurement and the suite size increases or decreases the overall building square footage but does not come from or go to another suite in the building, you need to maintain the square footage manually rather than using the Square Footage Assistant.
Procedure Complete the following steps to manually maintain the square footage of a suite:
1. Add any new suites for the building.
2. Select the suite that needs its square footage modified.
3. Click Add to add a new square foot line in the grid.
4. Complete the fields as appropriate. See the previous lesson for more information on completing these fields.
5. Repeat Steps 1 thru 4 as necessary.

Module 4: Working with Suites
Page 82 Training Guide © 2008 – 2012 MRI Software LLC.
Review
Key Points In this lesson, you learned the following key points:
• How to maintain square footage using the Square Footage Assistant
• How to maintain square footage manually
Lesson 2 Lab Exercises
Please refer to the CM Training Workbook for exercises pertaining to this lesson.

Training Guide Page 83 © 2008 – 2012 MRI Software LLC.
Module 5: Working with Leases
Module Overview
Purpose The purpose of this module is to show you how to work with leases within the Commercial Management Web application.
Objectives After completing this module, you will be able to:
• Understand Lease web page components
• Add a new lease
• Select an existing lease
• Set up basic lease information
• Set up lease billing information
• Perform lease administration activities

Module 5: Working with Leases
Page 84 Training Guide © 2008 – 2012 MRI Software LLC.
Lease Setup Process The following tasks make up the lease setup process:
1. Create a lease in one of the following ways:
• Add a new lease, or
• Select an existing lease to make modifications.
2. Set up lease general information.
3. Set up recurring charges.
4. Set up lease billing information, such as billing options and CPI or porter wage increase information.
5. If the lease agreement contains one or more secondary suites, do the following:
• Use the lease administration assistant to attach additional suites to the lease.
• Set up recurring charges for the secondary suites attached to the lease, if appropriate.
6. Perform lease administration tasks.

Training Guide Page 85 © 2008 – 2012 MRI Software LLC.
Lesson 1: Lease Maintenance Web Pages
Overview
Purpose The purpose of this lesson is to show you the basic components of the Lease Maintenance web pages.
Objective After completing this lesson, you will be able to:
• Access the Lease Details Page
• Understand the basic navigation on the Lease Details web page
Lease Details Page

Module 5: Working with Leases
Page 86 Training Guide © 2008 – 2012 MRI Software LLC.
Accessing Lease Details Page
Overview You can access the Lease Details page from the Commercial Management Home Page: Leasing > Leasing Maintenance as illustrated below:
CM Leasing Menu
Lease Search Page
Review
Key Points In this lesson, you learned how to:
• Access the Lease Details Page
• Understand the basic navigation on the Lease Details web page

Training Guide Page 87 © 2008 – 2012 MRI Software LLC.
Lesson 2: Creating a New Lease
Overview
Purpose The purpose of this lesson is to show you how to set up general lease information. When you set up a lease, you can choose to either add a new lease or select an existing lease in which to modify. If you add a new lease, you can create the lease in one of the following ways:
• Manually creating a new lease
• Importing an opportunity from Lease Flow
Note: You may import an Opportunity to create a new lease only if you are licensed for Lease Flow.
Objectives After completing this lesson, you will be able to:
• Add a new lease
• Select/modify an existing lease
Key Terms Lease – A contract which grants the right to use or occupy personal property or real property given by a lessor to another person (usually called the lessee or tenant) for a fixed or indefinite period of time, whereby the lessee obtains exclusive possession of the property in return for paying the lessor a fixed or determinable consideration

Module 5: Working with Leases
Page 88 Training Guide © 2008 – 2012 MRI Software LLC.
Adding a New Lease
Procedure Complete the following steps to add a new lease:
1. Create a new lease record by selecting Add from the Lease Search Page. The Setup a New Lease page is displayed.
Setup a New Lease Page
2. When you are prompted to specify how to add the new lease, select the Create a new lease in CM option and click Next.
Note: The Import an opportunity from LeaseFlow checkbox is only available if the Allow Lease created from LF Opportunity checkbox is selected on the Commercial Management Options form on the Management Options view in Windows. You also must be licensed to use LeaseFlow.
The Setup a New Lease window appears.
Setup a New Lease Window
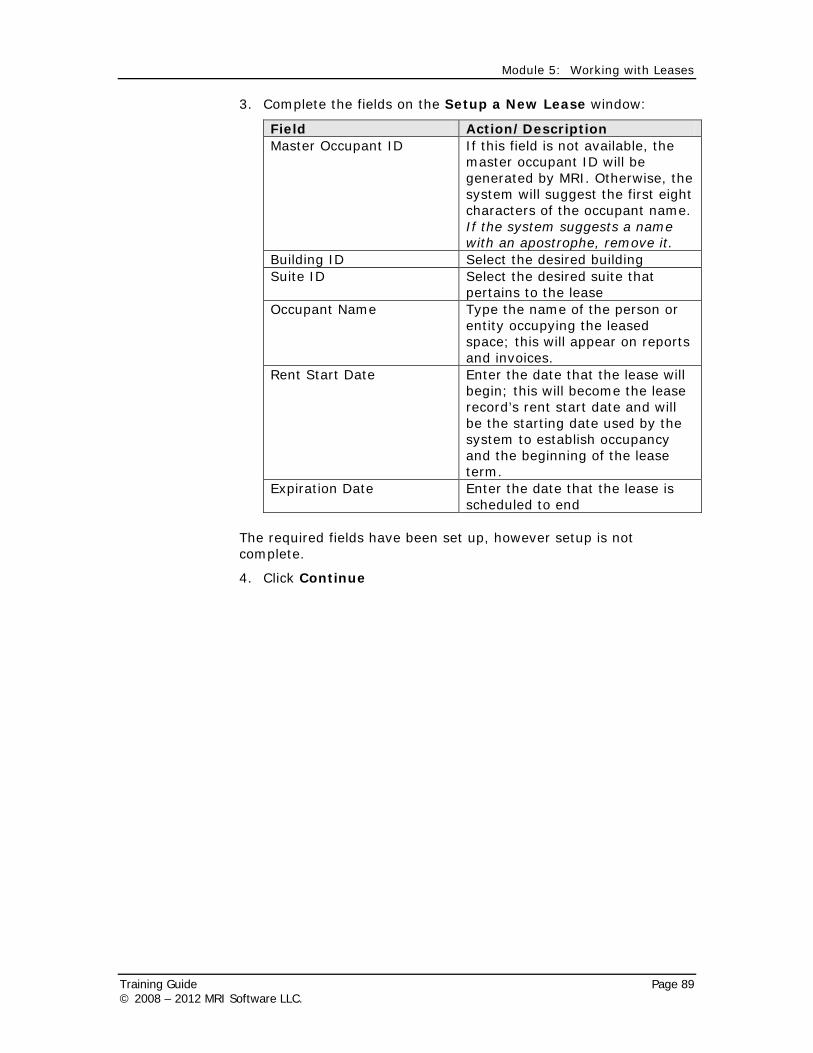
Module 5: Working with Leases
Training Guide Page 89 © 2008 – 2012 MRI Software LLC.
3. Complete the fields on the Setup a New Lease window:
Field Action/Description Master Occupant ID If this field is not available, the
master occupant ID will be generated by MRI. Otherwise, the system will suggest the first eight characters of the occupant name. If the system suggests a name with an apostrophe, remove it.
Building ID Select the desired building Suite ID Select the desired suite that
pertains to the lease Occupant Name Type the name of the person or
entity occupying the leased space; this will appear on reports and invoices.
Rent Start Date Enter the date that the lease will begin; this will become the lease record’s rent start date and will be the starting date used by the system to establish occupancy and the beginning of the lease term.
Expiration Date Enter the date that the lease is scheduled to end
The required fields have been set up, however setup is not complete.
4. Click Continue

Module 5: Working with Leases
Page 90 Training Guide © 2008 – 2012 MRI Software LLC.
Selecting/Modifying an Existing Lease
Procedure Complete the following steps to select an existing lease:
1. To select an existing lease from within the Commercial Management Home Page, click Leasing > Leasing Maintenance.
2. Enter search criteria in the Search for a Lease page.
3. Click the hyperlink pertaining to the occupant for the lease you wish to modify.
Lease Search Page
Review
Key Points In this lesson, you learned how to:
• Add a new lease • Select an existing lease to modify
Lesson 2 Lab Exercises
Please refer to the CM Training Workbook for exercises pertaining to this lesson.

Training Guide Page 91 © 2008 – 2012 MRI Software LLC.
Lesson 3: Setting Up General Lease Information
Overview
Purpose The purpose of this lesson is to show you how to set up general lease information.
Objectives After completing this lesson, you will be able to:
• Set up lease contact information
• Set up lease dates
• Enter security deposit information
• Specify tenant categories
• Set up lease options
• Enter lease notes

Module 5: Working with Leases
Page 92 Training Guide © 2008 – 2012 MRI Software LLC.
Setting Up Lease Contact Information
Overview Contact information for a lease includes the following:
• Name, phone number and fax number of the primary contact
• Legal name of the tenant
• Mailing address to which to send tenant statements
You can select a predefined billing address (set up as part of CM lookup lists) in the Billing Address ID field or type a new address in the address fields. Further implementation of information in this field must be customized for your organization.

Module 5: Working with Leases
Training Guide Page 93 © 2008 – 2012 MRI Software LLC.
Procedure Complete the following steps to set up lease contact information:
1. If you use billing addresses to group statements for leases, set up the billing address associated with the lease.
2. Select the General tab, and then click Contact Information.
3. Complete the fields in the Contact Information area:
Lease Details Page – Contact Information
Field Action/Description Contact Name Enter the name of the person
that should be contacted regarding this lease. This name shows up on the Aged Delinquency report.
Phone Enter the contact person’s phone number (without dashes). This phone number shows up on the Aged Delinquency report.
Fax Enter the contact person’s fax number (without dashes).
Legal Name If the occupant name is a legal name, then this is the DBA name. If the occupant name is DBA, then this is the legal name.
Billing Address ID (If applicable) Select the address to use for lease billings. The system displays the name of the company to which to send tenant statements.
Billing Name Enter the name of the person or entity to be billed.
Attention (If applicable) Enter to whom correspondence should be sent.

Module 5: Working with Leases
Page 94 Training Guide © 2008 – 2012 MRI Software LLC.
Field Action/Description Address Enter the street address to where
any correspondence should be sent.
City Enter the city State Select the state abbreviation County Enter the county (Informational) ZIP code Enter ZIP code Account ID Lease Flow field Billing Email Enter the billing email address
4. Click Save when finished.

Module 5: Working with Leases
Training Guide Page 95 © 2008 – 2012 MRI Software LLC.
Setting Up Lease Dates, Deposit Information and Tenant Categories
Overview You can enter a variety of dates pertaining to a lease. Normally, lease dates come from the lease document and include the following:
• Lease execution date – The date that the lease is signed by the tenant
• Lease starting date – The date that the lease period begins
• Tenant occupancy date – The date that the tenant begins occupying the suite
• Lease insurance expiration date – The date that the tenant’s insurance expires
• Lease cancellation date – The date that a lease is cancelled by the tenant
Note: These dates do not impact the occupancy status or how charges are posted to the tenant ledger.

Module 5: Working with Leases
Page 96 Training Guide © 2008 – 2012 MRI Software LLC.
Procedure Complete the following steps to set up lease dates:
1. Select the desired lease.
2. Select the General tab and then click Dates and Deposits.
Lease Details Page – Dates and Deposits
3. Complete the fields in the Lease Dates (Other) area:
Field Action/Description Execution Date The date that the lease was
signed Lease Begin Date The date the lease begins Occupancy Date The date that the tenant
begins occupying the suite Cancel Date The date that a lease is
cancelled by the tenant (if applicable)
4. Complete the fields in the Deposit Information area:
Field Action/Description Deposit On-Hand (System-generated) Once a
security deposit is entered, it will appear in this field.
Non-Cash Deposit Used to record a deposit that cannot be received into a tenant ledger, such as a certificate or letter of credit. (Informational only)

Module 5: Working with Leases
Training Guide Page 97 © 2008 – 2012 MRI Software LLC.
Field Action/Description Interest Start Date and Last Interest Earned Date
Used if security interest is calculated. You only need to enter a Last Interest Earned Date when you create the lease; the system will update the field when it calculates security interest.
Vendor ID (Optional) Select the AP vendor for whom invoices for rent or security deposit refunds are sent for the lease. If any refunds are generated by the system, a vendor ID will automatically be assigned to the tenant and populated in this field.
Insurance Cert. Expiration Date
The date that the insurance certificate expires

Module 5: Working with Leases
Page 98 Training Guide © 2008 – 2012 MRI Software LLC.
Tenant Categories Overview Tenant categories enable you to classify a lease so you can group leases by category for searching or reporting purposes.
Note: Tenant categories for retail properties often conform to guidelines by ICSC (International Council of Shopping Centers) so that the sales in a client's mall can be compared to stores of the same category in a region or area.
5. Select the Tenant Categories tab and then complete the fields in the Tenant Categories area:
Field Action/Description Tenant Type ID Select the type of tenant
occupying the suite Tenant Category ID ID will populate when the
tenant type ID is selected Store Category ID Select the store category
associated with the lease Tenant ID Select the national tenant if
there is one associated with the lease
Chain ID Select the retail chain if there is one associated with the lease
SIC Group Code Select the Standard Industry Classification (SIC) code associated with the lease
NAICS Code Select the North American Industry Classification System (NAICS) code for the industry of the tenant
Lease Details Page – Tenant Categories
6. Click Save when finished.
Note: Tenant categories must first be defined. See Module 2 for more information.

Module 5: Working with Leases
Training Guide Page 99 © 2008 – 2012 MRI Software LLC.

Module 5: Working with Leases
Page 100 Training Guide © 2008 – 2012 MRI Software LLC.
Setting up Lease Options
Overview Option types identify lease-related options for which tenants may have contractual rights, such as the option to renew a lease. The signed lease agreement specifies the lease options available to a tenant. You use option types to identify the purpose of lease options when setting up lease options for a primary lease. You can group information on some CM reports by lease option.
Standard Option Types Option Type Description CNT Contract Option EXP Expansion Option OTH Other REN Option to Renew RFR Right of First Refusal STO Option on Storage Space TER Option to Terminate
In addition to these standard option types, you may add your own option types in the OPTNTYPE table. Use the Critical Date Report by Lease to see the options that have been entered. The report uses the Option Date to determine whether an option falls within the date range of the report.
Procedure Complete the following steps to set up lease options:
1. Set up the option type that identifies the lease option.
2. Select the desired lease.
3. Select the General tab and then click Options.
Lease Options Detail Page

Module 5: Working with Leases
Training Guide Page 101 © 2008 – 2012 MRI Software LLC.
4. Complete the following fields, as applicable:
Field Action/Description Option Number System-generated Option Type Identifies the purpose of the
lease option Option Date The date the option goes into
effect Notice Date Enter the date before the
effective date of the option by which the tenant must notify the landlord of their intent to use the option
Term to Date Enter the date the term expires for the lease option
Suite ID Select the suite associated with the lease option
Square Feet Enter the total square footage of the suite associated with the lease option
Term (in Months) Enter the term in months of the lease option
Rate Enter the rate charged for the leased suite when the option becomes effective
Rate Descriptor Select a description for the rate specified in the Rate field, such as Per Square Foot or Fair Market Value
Option Notes Enter any notes associated with the lease option
5. Click Save when finished.

Module 5: Working with Leases
Page 102 Training Guide © 2008 – 2012 MRI Software LLC.
Entering Lease Notes
Overview For each lease, you can enter notes and memoranda, such as insurance and maintenance information. Notes appear on reports based on reference types you select and are listed by date. These reference types are held in the Reference Types table, which is shared with the building notes. You can also add new reference types.
Note: If you have LeaseFlow installed on your system, you can have the option to create new primary leases in CM by importing data from existing LeaseFlow opportunities. You may choose to import the clauses associated with an opportunity as lease notes in addition to the standard data copied to a lease created from an opportunity.
Lease notes appear on the following reports:
• Aged Delinquencies report
• Critical Date report by Lease
• Critical [Date] report by Lease–Notes Only
• Lease Profile report
Note: Certain notes will only appear on certain reports. For example, DELQ notes will only appear on the Aged Delinquencies report.
If you print late letters from the Collections page, or if you use the Late Letter from Commercial reports and select Update Lease Notes, a lease note will automatically be entered.

Module 5: Working with Leases
Training Guide Page 103 © 2008 – 2012 MRI Software LLC.
Procedure Complete the following steps to enter lease notes:
1. Set up reference types that identify the purpose of the note.
2. Select the desired lease.
3. Select General on the activity menu, then click Notes.
Lease Notes Detail Page
4. Complete the applicable fields:
Field Description Note Date Enter the effective date of the
note or the current date Reference 1, Reference 2 Select a reference type to
identify the note. Notes appear on reports based on the selected reference types.
Notes Enter the text of the note
5. Click Save when finished.

Module 5: Working with Leases
Page 104 Training Guide © 2008 – 2012 MRI Software LLC.
Review
Key Points In this lesson, you learned how to set up general lease information, including:
• Lease contact information
• Lease dates
• Security deposit information
• Tenant categories
• Lease options
• Lease notes
Lesson 3 Lab Exercises
Please refer to the CM Training Workbook for exercises pertaining to this lesson.

Module 5: Working with Leases
Training Guide Page 105 © 2008 – 2012 MRI Software LLC.
Lesson 4: Setting Up Lease Billing Information
Overview
Purpose The purpose of this lesson is to show you how to set up lease billing information.
Objectives After completing this lesson, you will be able to set up:
• Recurring charges
• Billing Options

Module 5: Working with Leases
Page 106 Training Guide © 2008 – 2012 MRI Software LLC.
Setting up Recurring Charges
Overview Recurring charges are charges that are billed regularly, such as base rent and maintenance fees. You must set up recurring charges for a primary lease before billing charges to a tenant. When you create recurring charges as part of your monthly activities, the system identifies the recurring charges for a lease and posts charges to the tenant ledger. You may set up current and future recurring charges and concessions on the recurring charges page.
You may also set up recurring charges for a secondary suite attached to a primary lease. Before you can set up recurring charges for a secondary suite, you must administer the primary lease and attach the secondary suite to the primary lease. For example, you may choose to set up a recurring charge for a secondary suite if the suite is primarily used for storage space and should be billed separately from the base rent and other maintenance fees associated with the primary lease.
Billing Information – Recurring Charges Detail Page
Procedure Complete the following steps to set up recurring charges for a lease:
1. Navigate to the desired lease.
2. Click the Billing tab and then click Recurring Charges.
The Recurring Charges page is displayed.

Module 5: Working with Leases
Training Guide Page 107 © 2008 – 2012 MRI Software LLC.
Lease Details – Recurring Charges Page
3. Use the option buttons to filter the charges displayed.
Note: By default, all charges appear in the detail grid. Clicking the Include Future Charges option button enables you to view future charges in addition to current charges. Clicking the Current Charges option button enables you to view only current charges.
Note: If the Current Charges, Include Future Charges, and All Charges option buttons are not available, you cannot set up recurring charges for secondary suites attached to the primary lease and you should review the settings of the primary lease billing options. To have the option to set up recurring charges for secondary suites, the Recurring Charges on Primary Lease Only checkbox must be unchecked in the billing options for the primary lease.
4. Click the Add button to add a new recurring charge.

Module 5: Working with Leases
Page 108 Training Guide © 2008 – 2012 MRI Software LLC.
Recurring Charges Detail Page
5. Complete the applicable fields:
Field Action/Description Income Category Select an income category
from the lookup list. Description System-generated Start Date Enter the date the system
should begin billing the charge.
End Date Do not enter a date here unless you are entering historical charges. If you acquire a building or the management contract for a building, you may want to enter all the charges under the lease, even if some charges are no longer in effect, particularly if you will calculate FASB 13 adjustments in this building. These are historical charges and you may enter an End Date on those charges only. The system will maintain this field going forward.
Amount Enter the amount of the charge
Frequency Select whether to bill Monthly, Quarterly, Semi-Annually, or Annually.
Billing Month For quarterly, semi-annual or annual charges, use the billing month to control which month of the frequency the charge is to be billed.

Module 5: Working with Leases
Training Guide Page 109 © 2008 – 2012 MRI Software LLC.
Charge Day Enter the day of the month on which to bill the charge.
Charged in Advance Specify whether or not to bill the charge before it is incurred.
Rent Tax Group ID Select the tax code to use for rent tax calculations.
Management Fee Exempt? Specify whether or not the charge is exempt from accruing management fees.
Last Billing Date Last Billing Date is maintained by the system. Do not enter or modify dates in this field without consulting an Implementation or Support representative.
Billing Address ID This will only appear on customized statements and invoices.
Currently In Effect? This field is maintained by the system. Charges that are in effect appear as current charges on the Lease Profile and other reports.
Proposed Increase? Specify whether or not the charge is to be reviewed before it becomes effective.
Note: Checking this box will result in this charge never being billed until it is unchecked.
Auto Apportion JEs? Specify whether or not the amount of the charge is apportioned over different periods when you create journal entries. Apportioned journal entries only apply to charges with non-monthly billing frequencies.
6. Click Save when finished.

Module 5: Working with Leases
Page 110 Training Guide © 2008 – 2012 MRI Software LLC.
Setting up Billing Options
Overview You may set up the options related to tenant billings for a primary lease. For example, you can specify late fee settings, delinquency and due dates for charges, and the management fee rate for income associated with the lease.
Note: Many of these fields default from the building’s Billing Options or Management Company pages. However, changing a value at the building level does not cascade down to existing leases. Rather, it establishes the default value when a new lease is created.
Billing Information – Billing Options Page

Module 5: Working with Leases
Training Guide Page 111 © 2008 – 2012 MRI Software LLC.
Procedure Complete the following steps to set up lease billing options:
1. Navigate to the desired lease.
2. Select the Billing tab and then click Options.
3. Complete the applicable fields:
Field/Checkbox Action/Description Due Day of Charges Enter the day of the month on which
rent or other charges are due.
Note: The system uses this value to generate delinquency reports and calculate late fees.
No. of Days to Delq Including the due date, enter the number of days before an open charge is considered delinquent.
Del. Bill Option Select an option from the dropdown menu to determine how delinquencies are billed
Late Fee Calc Method Select the method to use to calculate late fees for open charges.
Late Fee Flat Amount Enter the flat late fee amount to charge
Late Fee Rate Enter the late fee percentage rate. Late Fee Cut Off Amt Enter the minimum late fee amount
the system is to bill. When a tenant late fee total is less than the value specified here, the system does not bill late fees to the tenant.
Prime Rate Bank ID When the calculation method involves prime interest, the Prime Rate Bank ID is the Bank ID the system should use to establish the prime rate. The prime rates should be set up in the Prime Interest Rate table.
Interest Rate The amount in addition to the prime rate to be used in the calculation
Days for Interest Calc. Enter the number of days to use to calculate interest (the values in this field are typically 360 or 365).
No. of Late Charges MTD (System-generated). Displays the number of late fees charged since the last time recurring charges were created for the lease.
Max. late Charges/Month Enter the maximum number of late fee charges the system can bill the tenant in one month.

Module 5: Working with Leases
Page 112 Training Guide © 2008 – 2012 MRI Software LLC.
Field/Checkbox Action/Description Management Fee Rate This field defaults from the Lease
record’s building Management Company page. It should be changed only when a specific lease has a different rate than the rest of the building.
Print Statements? This option is checked by default. If you do not wish to print statements for this lease, uncheck the box.
Permit Cash Receipts? If Permit Cash Receipts is unchecked, you may not enter cash receipts for this tenant. This should only be selected in cases where an organization’s data entry practices can actually prevent the receipt from being deposited in the bank.
Tenant in Litigation? Tenant in Litigation will cause the words “In Litigation” to appear on the Rental Update List when you create recurring charges. Charges will still be posted to the tenant’s ledger.
Lease Stop? Lease Stop causes all recurring charges to cease billing as long as this option is selected. The amount that would have been charged is printed on the Rental Update List, along with the message: “***Warning! This Lease has been stopped, no billings will be issued.” Use this option to cease tenant billings when you do not want to change any terms of the lease, such as the expiration date. Note: there is no audit trail when this option is selected.
Recurring Charges on Primary Lease Only?
If checked, any secondary suites attached to this lease will not have separate recurring charges. All charges due under the lease are represented in the recurring charges of the primary lease
Exclude from 5 Year Min. Rent Report?
Select if this tenant should be left off of the Five Year Minimum Rent report.
4. Click Save when finished.
Module 5: Working with Leases
Training Guide Page 113 © 2008 – 2012 MRI Software LLC.
Review
Key Points In this lesson, you learned how to:
• Set up recurring charges
• Set up Billing Options
Lesson 4 Lab Exercises
Please refer to the CM Training Workbook for exercises pertaining to this lesson.

Training Guide Page 114 © 2008 – 2012 MRI Software LLC.
Lesson 5: Lease Administration
Overview
Purpose The purpose of this lesson is to show you how to perform lease administration activities. With the lease administration assistant, you can perform various administrative maintenance tasks on leases, including the following:
• Processing renewals or amendments
• Transferring a lease from one suite to another. You can only transfer a lease among existing suites.
• Adding secondary suites based on the signed lease agreement. You can only attach unoccupied suites as secondary suites.
Note: The lease term of a secondary suite can be equal to or shorter than the primary lease, but the start date cannot be earlier than the primary, nor can the expiration date be later than the primary.
• Move-outs of tenants. If the tenant moves out of a suite prior to the expiration date of the lease, determine the date on which all charges for a lease should no longer be billed to a tenant and the extent of the tenant's responsibility for charges.
The lease administration wizard will often create a new lease record, particularly in the case of a renewal. When this occurs, all pertinent lease information will be copied from the old lease record to the new record, using the new lease dates specified within the lease administration wizard.
Note: The two lease records will have different lease IDs but will share the same master occupant ID, and each record will be identified by a lease generation code and lease generation number (set by the system) to indicate the nature of the lease record.

Module 5: Working with Leases
Training Guide Page 115 © 2008 – 2012 MRI Software LLC.
Objectives After completing this lesson, you will be able to:
• Access the Lease Administration Assistant
• Renew or amend a lease
• Transfer a Lease
• Vacate a tenant
• Add a suite to an existing lease

Module 5: Working with Leases
Page 116 Training Guide © 2008 – 2012 MRI Software LLC.
Accessing the Lease Administration Assistant
Procedure Complete the following steps to open the lease administration assistant:
1. From the Commercial Management Main Menu, click Leasing > Lease Maintenance.
2. Navigate to the desired lease.
3. Click the Lease Administration tab.
The Lease Administration Choices Page displays.
Lease Administration Assistant Page
4. Select the action to be taken and click Continue.

Module 5: Working with Leases
Training Guide Page 117 © 2008 – 2012 MRI Software LLC.
Renewing or Amending a Lease
Overview You can renew or amend the lease terms for a primary or secondary suite.
Lease Administration – Renew Lease Page
Procedure Complete the following steps to renew or amend a lease:
1. Determine when you want to stop tenant billings associated with the lease being renewed.
2. Navigate to the lease record.
3. Launch the Lease Administration Assistant.
4. Select Renew This Lease from the Lease Administration Choices menu.
5. Enter the Vacate Date as the date the current lease should end. In the case of a normal renewal, this will probably be the same as the expiration date (see the important note below if you are renewing prior to the expiration of the current lease). The New Start Date will usually be the next day. Enter the New Expiration Date and select a Renewal Reason.
6. Click Save.
Important: If you are processing an early renewal, be aware that the system continues to bill the original lease until the system date reaches the date specified in either the Expiration Date or the Vacate and Alt. Stop Billing Date fields. In order to discontinue billing charges for the old lease and begin billing charges for the new lease, you must enter an alternate stop billing date for the old lease that is earlier or equal to the new lease rent start date.

Module 5: Working with Leases
Page 118 Training Guide © 2008 – 2012 MRI Software LLC.
The system performs the following actions:
• Enters a new lease for the renewal or amendment. The new lease appears on the Lease List report and the Rent Roll report.
• Terminates the original lease
Important: The system copies lease information from the original lease to the new lease, including current and future recurring charges that do not have end dates entered in the End Date field on the Billing > Recurring Charges page. Because both the original lease and the new lease share the same master occupant ID, lease transactions posted to the security deposit ledger and tenant ledger remain associated with the new lease.
7. Update any information copied over that has changed based upon the renewal. This is likely to include recurring charges.

Module 5: Working with Leases
Training Guide Page 119 © 2008 – 2012 MRI Software LLC.
Transferring a Lease
Overview You can transfer a lease from one suite to another suite.
Note: The suite to which you are transferring a tenant must be vacant.
Lease Administration – Transfer to Another Suite Page
Procedure Complete the following steps to transfer a lease from one suite to another:
1. Set up the suite to which you are transferring the lease.
2. Navigate to the record for the lease that is to be transferred.
3. Launch the Lease Administration Assistant.
4. Select Transfer to Another Suite from the Lease Administration Choices menu.
5. In the Previous Lease Vacate Date field under the Vacate Previous Lease header, enter the date of the transfer.
6. If the original lease should stop billing prior to the expiration date, as is usually the case in relocation, enter a date in the Previous Lease Alternate Stop Billing Date field.
7. Under the Occupy New Lease header, enter the information for the new generation of the lease.
8. Click Save.

Module 5: Working with Leases
Page 120 Training Guide © 2008 – 2012 MRI Software LLC.
The system processes the transfer.
Important: The system copies lease information from the original lease to the new lease including current and future recurring charges that do not have end dates entered in the End Date field on the Billing > Recurring Charges page. Because both the original lease and the new lease share the same master occupant ID, lease transactions posted to the security deposit ledger and tenant ledger remain associated with the new lease.
9. Update any information copied over that has changed based upon the transfer. This is likely to include recurring charges.

Module 5: Working with Leases
Training Guide Page 121 © 2008 – 2012 MRI Software LLC.
Processing a Move-out
Overview If a tenant has decided to move out of the space, you will need to process a move-out.
Vacate This Suite Page
Procedure Complete the following steps to move a tenant out of a suite:
1. Determine the following information:
• When to stop tenant billings associated with the lease
• The extent of the tenant's responsibility for charges if the tenant moves out of the suite before the expiration date
2. Launch the Lease Administration Assistant.
3. Select Vacate this Suite from the Lease Administration Choices menu.
4. Enter the date the tenant physically moved out or will move out of the premises in the Vacate Date field. The RENTUP program (which creates monthly recurring charges) will continue billing the tenant until both the expiration and the vacate dates have been reached (through the latter of the expiration and vacate dates).
Note: If you are moving out an additional space lease, only enter the vacate date and alternate stop billing date for the additional space lease. Make note of the lease ID for the additional space lease prior to using Lease Administration.
If you need to move out a primary lease, any additional space leases must also be vacated. If the additional space lease remains intact, you must vacate it and set up a new lease.

Module 5: Working with Leases
Page 122 Training Guide © 2008 – 2012 MRI Software LLC.
Note: If the tenant moves out of the suite before the expiration date of the lease, a generated Rent Roll report displays the suite for the lease as 'Vacant' if the tenant is not responsible for any charges for the remainder of the lease term.
If the tenant is not responsible for any charges for the remainder of the lease term or is responsible for all charges through a date occurring after the vacate date but prior to the expiration date of the lease, the Rent Roll report displays the suite for the lease as ‘Leased/Unoccupied.’
5. Refer to the following table to determine how to continue:
If the tenant moves out… Then… On or after the expiration of the lease
Complete the Alternate Stop Bill field as applicable to your situation. The system will create recurring charges for the lease until the system date reaches the greater of the dates specified in the Alternate Stop Billing and Vacate Date fields.
Before the expiration date of the lease and is responsible for all charges for the remainder of the lease term
Leave the Alternate Stop Billing field blank. The system will create recurring charges for the lease until the system date reaches the lease expiration date.
Before the expiration date of the lease and is responsible for all charges through an agreed-upon date occurring after the vacate date but prior to the expiration date of the lease
Enter the date through which the tenant is responsible for charges in the Alternate Stop Billing Date field. The system will create recurring charges for the lease until the system date reaches the date specified in the Alternate Stop Billing Date field.

Module 5: Working with Leases
Training Guide Page 123 © 2008 – 2012 MRI Software LLC.
If the tenant moves out… Then… Before the expiration date of the lease and is not responsible for any charges for the remainder of the lease term
a. Enter the date the tenant physically moved out of the premises in the Alternate Stop Billing Date field.
b. Make the Vacate Date equal to the Alternate Stop Billing Date.
The system will not create recurring charges for the lease.
6. Refer to the following to determine how to continue:
If the tenant Then… Is not in litigation Leave the checkbox unchecked Is in litigation Check the checkbox
7. Click Save when finished.

Module 5: Working with Leases
Page 124 Training Guide © 2008 – 2012 MRI Software LLC.
Adding a Suite to an Existing Lease
Overview A tenant may execute an amendment to add one or more suites to their existing lease.
Occupy an Additional Suite Page
Procedure Complete the following steps to add a secondary suite to an existing lease:
1. Set up the following items:
• The primary lease to which to attach the additional suite
• A suite to attach as the secondary suite
2. Launch the Lease Administration Assistant.
3. Select Occupy an Additional Suite from the Lease Administration Choices menu.
4. Enter or select the Bldg ID, Suite ID, New Lease Start and Expiration Dates, and select a reason.
5. Click Save.
The system performs the following tasks:
• Enters a new lease for the secondary suite.
• Assigns the master occupant ID of the original lease to the new secondary suite. As a result, you can identify the original lease to which the secondary suite is attached.
6. If you bill charges for the secondary suite separately from charges for the original lease, uncheck the Recurring Charges on Primary Lease Only checkbox on the original lease and set up recurring charges for the secondary suite.
7. Update any information copied over that has changed based upon the new lease. This is likely to include recurring charges.

Module 5: Working with Leases
Training Guide Page 125 © 2008 – 2012 MRI Software LLC.
Review
Key Points In this lesson, you learned how to:
• Complete a lease renewal
• Transfer a tenant to a new suite
• Move a tenant out of a space
• Add a secondary suite to an existing lease
Lesson 5 Lab Exercises
Please refer to the CM Training Workbook for exercises pertaining to this lesson.

Training Guide Page 126 © 2008 – 2012 MRI Software LLC.
Module 6: Working with Batches
Module Overview
Purpose The purpose of this module is to show you how to work with accounts receivable batches. A batch is a group of transactions that you want to post at one time, which enables you to control the transaction entry and posting process.
Objectives After completing this module, you will be able to:
• Access the A/R Activities Menu
• Create a new batch or select an open batch
• Enter the following types of batch transactions:
o Tenant cash receipts
o Tenant billings and adjustments
o Security deposit adjustments
o Non-tenant transactions
• Review batch transactions
• Post batches
Process for Working with Batches The following tasks make up the basic process of working with batches:
1. Create a batch or select an existing batch.
2. Enter transactions.
3. Review the transactions by running the Open Batch Listing report or the Cash Application Review report, and then modify the batch if necessary.
4. Post the batch to post its transactions to the appropriate ledger(s).
5. Verify the posted transactions by running the Closed Batch report or the Ledger Reference List report.
Training Guide Page 127 © 2008 – 2012 MRI Software LLC.
Lesson 1: Accessing the Batch Activities Menu
Overview
Purpose The purpose of this lesson is to show you how to access the CM Batch Activities Menu.
Objective After completing this lesson, you will be able to access the CM Batch Activities Menu and understand the available menu options.

Module 6: Working with Batches
Page 128 Training Guide © 2008 – 2012 MRI Software LLC.
Accessing the Batch Activities Menu
Overview The CM Batch Activities Menu gives you access to various accounts receivable batch options.
Procedure Complete the following steps to access the Batch Activities Menu:
1. From the MRI Main Page, select Commercial Management.
The Commercial Management Main Menu appears.
2. From the Commercial Management Main Menu, click Batch Activities.
The CM Batch Activities Menu appears.
Batch Activities Menu

Training Guide Page 129 © 2008 – 2012 MRI Software LLC.
Lesson 2: Creating and Modifying Batches
Overview
Purpose The purpose of this lesson is to show you how to create a new batch and select an open batch.
Objectives After completing this lesson, you will be able to:
• Create a batch
• Select an open batch
• Delete a batch
Note: Until a batch is posted, you can modify or delete batch transactions and change the batch date and description.

Module 6: Working with Batches
Page 130 Training Guide © 2008 – 2012 MRI Software LLC.
Creating a New Batch and Selecting an Open Batch
Procedure Complete the following steps to create a batch:
1. Determine how to group transactions based on the accounting practices of your organization.
2. Navigate to the Batch Activities Menu, and click Select Batch.
The Select an Open Batch page appears.
Select an Open Batch Web Page
3. To select an open batch, click on the Batch ID hyperlink associated with the open batch you wish to open.
4. To create a new batch, click New Batch at the bottom right corner of the page.
The Create New Batch dialog box appears.

Module 6: Working with Batches
Training Guide Page 131 © 2008 – 2012 MRI Software LLC.
Create New Batch Webpage Dialog Box
5. If the batch number is unavailable, it is set to autonumber.
6. The Batch Date will default to the system date but can be changed. This date will be the default date on all transactions in the batch. If you are entering cash receipts, it should be the date of deposit in the bank.
7. Enter a description for this batch.
8. Enter the Control Debit and Credit Amounts. Debit amounts increase the balance the tenant owes. Miscellaneous charges and NSF checks are examples of debits. Credit amounts reduce the balance owed by the tenant. Cash receipts and non-cash credit adjustments are examples of credits.
Note: Control totals may be edited at any time until the batch is posted. MRI recommends that you enter the expected total, then the transactions and determine the cause of any out of balance condition. Batches may only be posted when the control totals are equal to the transaction totals.
9. Click Save.
A batch may be deleted (along with all the transactions entered in the batch) by clicking Delete.
Module 6: Working with Batches
Page 132 Training Guide © 2008 – 2012 MRI Software LLC.
Basic Batch Transactions
Overview CM enables you to enter various types of transactions into the same batch, so you can enter transactions into batches based on the accounting practices of your organization. Best practice in batch entry is to enter all payments that you receive in one day into a single batch so that you can match the batch to the bank deposit. Batches in CM can contain transactions that post to the tenant ledger, security deposit ledger, or non-tenant ledger. You can enter the following types of batch transactions:
• Tenant cash receipts for charges and security deposits
• Tenant charges and adjustments
• Security deposit adjustments and refunds
• Non-tenant cash receipts and adjustments
Important: You can modify or delete the transactions in a batch until the batch is posted. Once a batch is posted, you can no longer modify its transactions, and you should follow the proper procedures to reverse a posted batch transaction. Deleting a batch permanently removes the batch and all of its transactions from your database.
A recurring charge is the only type of transaction you cannot enter in a batch because when you create recurring charges, the system automatically creates a batch and posts the charges to the tenant ledger. However, you may enter cash receipts that pay open recurring charges as batch transactions to be posted to the tenant ledger. When you create a batch, the system automatically generates the batch number if at least one of the following is true:
• The Auto-number Batch ID check box is selected on the Commercial Management Options form on the Management Options view in Windows
• Your organization uses Distributive Processing (DP) or Virtual Distributive Processing (VDP) and you are located at a virtual site

Module 6: Working with Batches
Training Guide Page 133 © 2008 – 2012 MRI Software LLC.
Review
Key Points In this lesson, you learned the following key points:
• How to create a batch
• How to select an open batch
• How to delete a batch
• You have the ability to enter any combination of transactions within a batch, allowing you to follow your organization’s procedures
Lesson 2 Lab Exercises
Please refer to the CM Training Workbook for exercises pertaining to this lesson.

Training Guide Page 134 © 2008 – 2012 MRI Software LLC.
Lesson 3: Processing Tenant Cash Receipts
Overview
Purpose The purpose of this lesson is to show you how to process various types of tenant cash receipt transactions.
Objectives After completing this lesson, you will be able to:
• Enter cash receipts for the following:
o Open charges
o New charges
o Prepayments
o Unbilled security deposits
o Billed security deposits
• Apply credits to open charges

Module 6: Working with Batches
Training Guide Page 135 © 2008 – 2012 MRI Software LLC.
Key Terms Tenant transactions – Payments, charges, credits, or adjustments to a tenant ledger. Tenant cash receipts – Cash receipts that are received from tenants for recurring charges, miscellaneous charges, or security deposits. You can enter the following types of cash receipt transactions in a batch:
• Open charges – Charges that are billed to a tenant as either miscellaneous or recurring charges.
• New charges – Charges for which you receive a tenant cash receipt but never billed to a tenant.
• Prepayments – An unapplied cash receipt entered either before the actual billing date of the corresponding charge or before the charge is billed. For example, prepaid rent is a type of prepayment.
• Unbilled security deposits – Tenant cash receipts for security deposits that are applied directly to a security deposit category because there is no charge posted to the tenant ledger for the unbilled security deposit.
• Bill security deposits – Tenant cash receipts for security deposits that are posted to the tenant ledger as miscellaneous charges and then applied to the security deposit category based on the relationship set up between the income category used for billing security deposits and the security deposit category used for security deposit receipts.

Module 6: Working with Batches
Page 136 Training Guide © 2008 – 2012 MRI Software LLC.
Components of Tenant Cash Receipt Transactions
Overview A tenant cash receipt transaction consists of the following components:
• Payment header
• Payment detail
Payment Header The payment header enables you to enter payment information for the cash receipt transaction, such as the amount and transaction date. When you complete the payment header, you must specify the master occupant or building and lease IDs, billing address, or invoice associated with the cash receipt. The payment header also specifies the receipt type and cash type of the cash receipt.
Tenant Cash Receipts Page

Module 6: Working with Batches
Training Guide Page 137 © 2008 – 2012 MRI Software LLC.
Payment Detail The payment detail displays the open transactions for the master occupant, lease, billing address, or invoice associated with the cash receipt, as specified in the payment header. You can apply the amount of the cash receipt to open charges or new charges, enter prepayments, enter unapplied cash, or enter unbilled security deposits. Transactions appear in an order based on the setting of the Auto-apply by priority checkbox in the billing options of the buildings associated with the leases for the transactions. If the Auto-apply by priority checkbox is selected, transactions appear in order based on the priority code specified for the income category of the transaction. However, if the Auto-apply by priority checkbox is cleared, transactions appear in chronological order with the oldest transactions appearing first.
Cash Receipts Detail Page

Module 6: Working with Batches
Page 138 Training Guide © 2008 – 2012 MRI Software LLC.
Cash Receipt Entry Options On the Commercial Management Options form on the Management Options view in Windows, you can set options that affect how you enter tenant cash receipts. On the Batch Entry Options form for the Commercial Management Options form, you can select the:
• Enable Multiple Cash Types per Receipt checkbox to enable you to apply one cash receipt to multiple accounts.
• Prorate Between Base and Tax On Manual Entry checkbox to enable you to prorate the tax paid when a partial payment is made for an open charge to which a tax applies. If you select this option, part of a cash receipt pays the open charge, and the other part pays a prorated amount of the tax.
Cash Receipt Reports You can use the information on a variety of reports to review tenant cash receipt transactions. You may run the following reports:
• Cash Application Review report lets you review the cash receipt transactions in open batches. If a cash receipt transaction exists in a batch and is applied to an open charge, you can review the original open amount and verify the amount applied by the cash receipt transaction.
• Cash Receipts (Summary or Detail) report lets you review the income categories and amounts of posted tenant cash receipt transactions for a date or period range you specify.
• CM Common Banking Receipt Transfers report lets you review tenant cash receipt transactions posted to central common banking accounts. For each central common bank account on the report, you can determine the cash receipt transaction amounts to transfer from the central common banking account to its related individual accounts.

Module 6: Working with Batches
Training Guide Page 139 © 2008 – 2012 MRI Software LLC.
Entering Cash Receipts for Open Charges
Overview Open charges are charges billed to a tenant as either miscellaneous or recurring charges. When you enter a cash receipt for open charges, you apply the cash receipt to the open charges for the master occupant, lease, billing address, or invoice associated with the cash receipt, as specified in the cash receipt payment header. You can apply the following amounts:
• An amount of the cash receipt to a specific open charge
• The entire amount of the cash receipt to open charges in the order in which they appear in the cash receipt payment detail
Important: You must specify a receipt type for the cash receipt transaction. If you need to enter a tenant payment reversal for the cash receipt, you can specify the receipt type to reverse the cash receipt payment.
You can run the Cash Application Review report to review the cash receipt transactions for open charges entered in open batches. For each open charge, you can review the original open amount and verify the amount applied by the cash receipt transaction.

Module 6: Working with Batches
Page 140 Training Guide © 2008 – 2012 MRI Software LLC.
Procedure Complete the following steps to enter cash receipts for open charges:
1. Determine the lease and charges to which the cash receipt applies, and ensure that charges are posted to the tenant ledger by:
• Creating recurring charges, or
• Entering security deposit or miscellaneous charges in a batch and posting the batch
2. Select or create the batch in which to enter the cash receipt.
3. From the Batch Activities menu, enter Tenant > Receipts
4. Refer to the following table to determine how to enter the cash receipt:
If you want to enter the cash receipt for…
Then select the…
A master occupant Master occupant associated with the cash receipt in the Master Occupant ID field
A lease Building and lease associated with the cash receipt in the Building ID and Lease ID fields
A billing address Billing address associated with the cash receipt in the Address ID field
An invoice Invoice number associated with the cash receipt in the Invoice Number field
Note: If you click Income, you cannot enter cash receipts for unbilled security deposits. To enter cash receipts for unbilled security deposits at the same time you enter cash receipts for open charges, you must click Both.
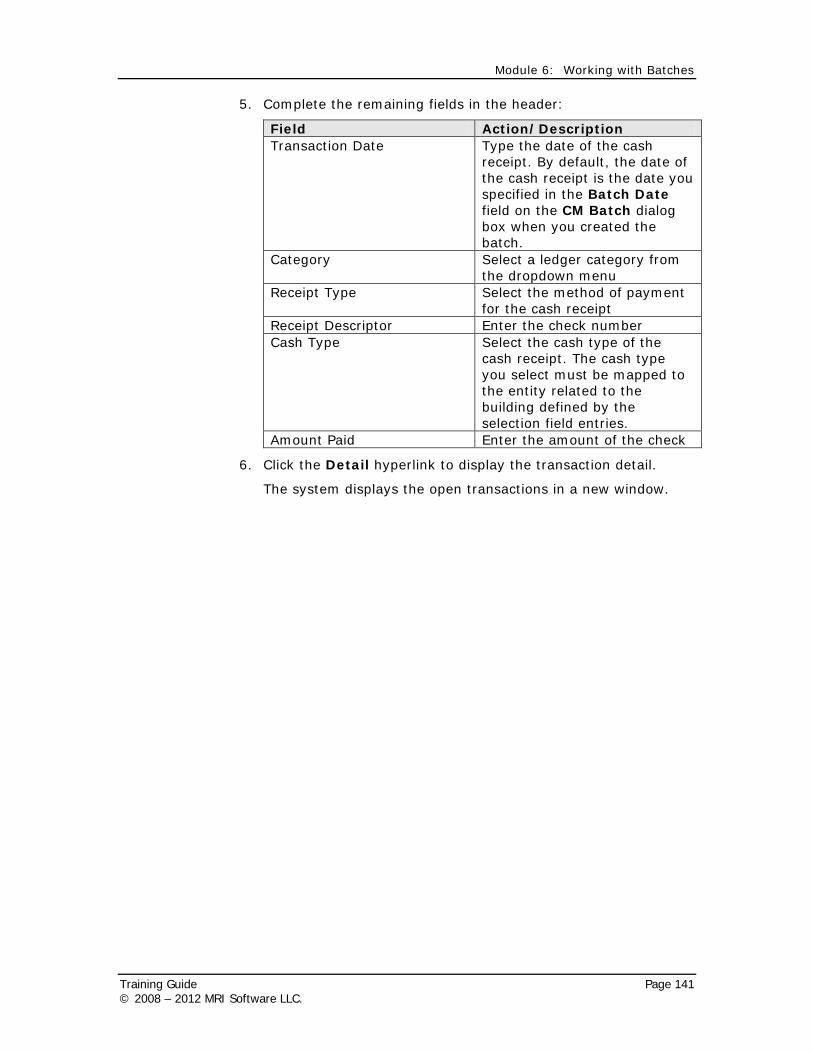
Module 6: Working with Batches
Training Guide Page 141 © 2008 – 2012 MRI Software LLC.
5. Complete the remaining fields in the header:
Field Action/Description Transaction Date Type the date of the cash
receipt. By default, the date of the cash receipt is the date you specified in the Batch Date field on the CM Batch dialog box when you created the batch.
Category Select a ledger category from the dropdown menu
Receipt Type Select the method of payment for the cash receipt
Receipt Descriptor Enter the check number Cash Type Select the cash type of the
cash receipt. The cash type you select must be mapped to the entity related to the building defined by the selection field entries.
Amount Paid Enter the amount of the check
6. Click the Detail hyperlink to display the transaction detail.
The system displays the open transactions in a new window.

Module 6: Working with Batches
Page 142 Training Guide © 2008 – 2012 MRI Software LLC.
7. Refer to the following table to determine how to apply the amount of the cash receipt:
If you want to apply...
Then...
An amount of the cash receipt to a specific open charge
a. In the detail grid, locate the open charge, and click the Transaction Amount field for the open charge.
b. Refer to the following table to determine how to continue based on where a cash receipt is applied:
If you apply the cash receipt amount to…
Then…
The full open charge amount
a. Click the Apply hyperlink
b. Click Save
A portion of the open charge amount
Type the amount to apply to the open charge in the Transaction Amount field, and then click the Apply hyperlink.
c. Apply any remaining amount of the cash receipt to another open charge by repeating Steps a and b.
The entire amount of the cash receipt to open charges in the order in which they appear in the detail grid
In the Cash Receipts Detail page, click Auto Apply to apply the amount of the cash receipt to the first open charge displayed in the detail grid, then any remaining amount to the next open charge in the detail grid and so forth.
8. To clear an application of a cash receipt, click the Clear Auto Apply button.
9. Click Save when finished.
10. To exit the Cash Receipts Detail page, click Cancel.
11. If a message appears alerting you that the cash receipt amount was not completely applied, click OK, and then completely apply the cash receipt to outstanding charges or enter the amount as a prepayment.

Module 6: Working with Batches
Training Guide Page 143 © 2008 – 2012 MRI Software LLC.
Entering Cash Receipts for New Charges
Overview New charges are charges for which you receive a tenant cash receipt but have not yet billed to a tenant. To enter a cash receipt for a new charge, create a new charge transaction on the cash receipt payment detail and select the income category for the charge. Then, the system enters the charge on the tenant ledger and applies the cash receipt to the new charge.
Important: Cash receipt transactions for new charges using the Charge (CH) source code are the only transactions for the CH source code that create charges and subsequently apply cash receipts to the charges.
You must specify a receipt type for the cash receipt transaction. If you need to enter a tenant payment reversal for the cash receipt, you can specify the receipt type to reverse the cash receipt payment. You can run the Cash Application Review report to review the cash receipt transactions for new charges entered in open batches. An asterisk (*) appears next to each cash receipt transaction for a new charge.

Module 6: Working with Batches
Page 144 Training Guide © 2008 – 2012 MRI Software LLC.
Procedure Complete the following steps to enter cash receipts for new charges:
1. Determine the lease and income category to which the cash receipt applies.
2. Select or create the batch in which to enter the cash receipt.
3. From the Commercial Management main page, select Batch Activities > Tenant > Receipts
4. Select the tenant by either selecting the master occupant ID or the building and lease IDs.
5. In the Receipt Descriptor field, enter the check number for the check received from the tenant.
6. In the Amount Paid field, type the total amount of the cash receipt, and then click the Detail hyperlink.
The system displays the open transactions in a new window.
7. Click Add to add a new line in the grid.
8. In the Income Category field of the new line, select the income category for the new charge.
9. In the Source Code field, select Charge from the dropdown menu.
10. Enter a concise, meaningful description for the item. This description will display on the tenant inquiry page when a tenant inquiry is conducted.
11. Click the Apply hyperlink to apply the receipt to the new charge.
12. Click Save when finished.
13. If a message appears alerting you that the cash receipt amount was not completely applied, click OK, and then completely apply the cash receipt to outstanding charges or enter the amount as a prepayment.

Module 6: Working with Batches
Training Guide Page 145 © 2008 – 2012 MRI Software LLC.
Entering Cash Receipts for Prepayments
Overview A prepayment is an unapplied cash receipt entered either before the actual billing date of the corresponding charge or before the charge is billed. For example, prepaid rent is a type of prepayment. Your organization may track prepayments separately from payments since a prepayment can be considered a liability until the prepayment amount is applied against the charge. You can force prepayments to be entered when you enter cash receipts for prepayments via the CM Management Options available in Windows. If you:
• Force prepayments, you can only enter cash receipts for current charges. If you receive a payment for a charge with an effective date in the future, you must enter the amount as a prepayment to the appropriate prepayment income category because the charge does not appear on the cash receipt payment detail.
Note: To force prepayments, you must select the Force Prepayments checkbox on the Batch Entry Options form on the Commercial Management Options form for the Management Options view in Windows.
• Do not force prepayments, you can enter cash receipts for future charges and current charges. If you receive a payment for a charge with an effective date in the future, you can enter the amount as a cash receipt for an open charge as long as the charge appears on the cash receipt payment detail.
Note: If you do not force prepayments, you must clear the Force Prepayments checkbox on the Batch Entry Options form on the Commercial Management Options form for the Management Options view in Windows.
To track prepayments, a relationship must be set up between income categories for charges and income categories for prepayments. When you enter a cash receipt for a prepayment, you must specify the income category for the prepayment. To ensure you select the appropriate income category, you must know whether or not your organization tracks prepayments. If your organization:
• Tracks individual prepayments, you will select the prepayment income category related to the income category for the charge to which the prepayment applies. When you apply prepayments as part of your accounts receivable

Module 6: Working with Batches
Page 146 Training Guide © 2008 – 2012 MRI Software LLC.
activities, the system determines the charge income category related to the prepayment income category you specified and applies the cash receipt for the prepayment to the open charge.
• Does not track individual prepayments, you will select a prepayment income category. Once the charge related to the prepayment is posted to the tenant ledger, you must apply the prepayment as a credit to the open charge.
You can run the Cash Application Review report to review the cash receipt transactions for prepayments entered in open batches. An asterisk (*) appears next to each cash receipt transaction for a prepayment.
Procedure Complete the following steps to enter prepayments:
1. Determine the lease for which the prepayment applies.
2. If your organization tracks individual prepayments, relate prepayment income categories to charge income categories.
3. Select or create the batch in which to enter the cash receipt.
4. From the Batch Activities menu, select Tenant > Receipts.
5. In the Amount field, type the total amount of the cash receipt, and then click on the Detail hyperlink.
The system displays the open transactions in a new window.
6. Click Add to add a new line to the grid.
7. In the Income Category field of the new line, select the income category for the prepayment.
8. In the Source Code field, select Receipt.
9. Click Apply to apply the check to the prepayment income category.
10. Click Save when finished.

Module 6: Working with Batches
Training Guide Page 147 © 2008 – 2012 MRI Software LLC.
Entering Unbilled Security Deposit Cash Receipts
Overview Unbilled security deposits are applied directly to a security deposit category because there is no charge posted to the tenant ledger for the unbilled security deposit. The system calculates interest for an unbilled security deposit using the percentage rate specified when you enter the cash receipt, if applicable.
Procedure Complete the following steps to enter a cash receipt for an unbilled security deposit:
1. Determine that your organization does not bill security deposits.
2. Determine the percentage rate to use to calculate interest on the security deposit, if applicable.
3. Select or create the batch in which to enter the cash receipt.
4. From the Batch Activities menu, select Tenant > Receipts.
5. Select the tenant by either selecting the master occupant ID or the building and lease IDs.
6. In the Receipt Descriptor field, enter the check number for the check received from the tenant.
7. Select Deposit from the Category dropdown menu.
Note: If you select Deposit, you can only enter cash receipts for unbilled security deposits. To enter other types of cash receipts at the same time you enter cash receipts for unbilled security deposits, you must select Both.
8. In the Amount Paid field, type the total amount of the cash receipt, and then click the Detail hyperlink.
The system displays the open transactions in a new window.
9. Select the appropriate deposit category within the Deposit Category field.
10. Click the Apply hyperlink to apply the receipt.
Important: To enable the system to calculate interest on the security deposit, you must either type the percentage rate to use to calculate interest in the Interest Rate field or accept the default security deposit interest rate set up in the accounts receivable information for the building.
11. Click Save when finished.

Module 6: Working with Batches
Page 148 Training Guide © 2008 – 2012 MRI Software LLC.

Module 6: Working with Batches
Training Guide Page 149 © 2008 – 2012 MRI Software LLC.
Applying Credits to Open Charges
Overview When you apply an open credit to open charges, you apply the credit amount to the open charges for the master occupant, lease, billing address, or invoice associated with the credit apply transaction. For each open charge to which the credit applies, you can apply the amount of the credit to the following:
• The full open charge amount
• A portion of the open charge amount
You can run the Cash Application Review report to review the credit apply transactions entered in open batches. For each open charge, you can review the original open amount and verify the credit amount applied.
Procedure Complete the following steps to apply a credit to open charges:
1. Determine the lease for which an open credit and open charges exist and ensure charges are posted to the tenant ledger by doing the following tasks:
• Creating recurring charges
• Entering security deposit or miscellaneous charges in a batch and then posting the batch
2. Select or create the open batch in which to enter the applied credit transaction.
3. From the Batch Activities menu, select Tenant > Apply Credits.
The Tenant – Apply Credits page is displayed.
Tenant – Apply Credits Page
4. Select the master occupant ID or the building and lease IDs associated with the tenant.
5. Click the Detail hyperlink to display the tenant’s open transactions.
The tenant’s open transactions are displayed in a new window.

Module 6: Working with Batches
Page 150 Training Guide © 2008 – 2012 MRI Software LLC.
Apply Credits Detail Page
6. In the detail grid, locate the credit to apply to open charges, and then click the Apply to Charge hyperlink.
The Apply Credit to Open Charge window is displayed.
Apply Credit to Open Charge Page
7. In the detail grid, locate an open charge to which to apply the credit and click the Apply Amount hyperlink to apply the credit to the charge.
8. Click Save when finished.

Module 6: Working with Batches
Training Guide Page 151 © 2008 – 2012 MRI Software LLC.
9. To apply any remaining amount of the credit to another open charge, repeat Steps 6 thru 8.
10. To clear an application of a credit, on the Apply Credit to Open Charge page, click Clear Apply.
11. Click Save when finished.
12. To exit the page, click Close from the Apply Credits Detail window.

Module 6: Working with Batches
Page 152 Training Guide © 2008 – 2012 MRI Software LLC.
Review
Key Points In this lesson, you learned how to:
• Enter a variety of tenant cash receipts
• Apply credits to open charges
Lesson 3 Lab Exercises
Please refer to the CM Training Workbook for exercises pertaining to this lesson.

Module 6: Working with Batches
Training Guide Page 153 © 2008 – 2012 MRI Software LLC.

Training Guide Page 154 © 2008 – 2012 MRI Software LLC.
Lesson 4: Processing Tenant Charges & Credits
Overview
Purpose The purpose of this lesson is to show you how to process tenant charges and credits.
Objectives After completing this lesson, you will be able to enter the following tenant charges and credits:
• Miscellaneous charges
• Miscellaneous credits
• Tenant NSF payments
• Tenant payment reversals
• Rent refunds
• Write-offs for outstanding balances
• One-time concessions

Module 6: Working with Batches
Training Guide Page 155 © 2008 – 2012 MRI Software LLC.
Entering Miscellaneous Charges
Overview Miscellaneous charges are charges that do not occur on a regular basis, such as the following items:
• Rent adjustments
• Miscellaneous late fee charges
• Charges for billed security deposits
Note: You can set up recurring charges for a tenant, such as rent and maintenance fees, when you set up the lease associated with the tenant.

Module 6: Working with Batches
Page 156 Training Guide © 2008 – 2012 MRI Software LLC.
Procedure Complete the following steps to enter miscellaneous charges:
1. Determine the following:
• Income category used for the tenant charge
• Lease to which the charge applies
2. Select or create the open batch in which to enter the miscellaneous charge.
3. On the Batch Activities menu, click Tenant > Charges and Credits.
Tenant Charges and Credits Page
4. Click Add to add a new line in the detail grid.
5. Complete the Building ID, Lease ID, and Transaction Date fields.
6. Select the Income Category for the charge and enter a description.
7. Enter the amount in the Charge Amount column.
8. Click Save when finished.
Note: Recurring charges, such as rent and maintenance fees, are set up on the Billing–Recurring Charges pages on the Leases page. You can set up recurring charges for primary leases or for secondary suites attached to primary leases.

Module 6: Working with Batches
Training Guide Page 157 © 2008 – 2012 MRI Software LLC.
Entering Miscellaneous Credits
Overview Miscellaneous credits are adjustments to a tenant ledger, such as a change because of an inaccurate charge. Although both miscellaneous credits and write-offs post as credit transactions to the tenant ledger, miscellaneous credits use the Non-cash Adjustment (NC) source code and write-offs use the Write Off (WO) source code. When you enter a miscellaneous credit, you can specify the open charge to which the credit applies. If the credit does not apply to a specific open charge, it is an open credit.
Note: If the Allow Open Items to Match check box is selected on the Commercial Management Options form on the Management Options view in Windows, the system applies the amount of an open credit to the total open amount for the income category associated with the credit when you post the batch containing the credit.

Module 6: Working with Batches
Page 158 Training Guide © 2008 – 2012 MRI Software LLC.
Procedure Complete the following steps to enter miscellaneous credits:
1. Determine the following:
• The income category used for the tenant credit
• The lease to which the credit applies
• Whether or not the credit applies to a specific open charge on the tenant ledger
2. Select or create the open batch in which to enter the miscellaneous credit.
3. On the Batch Activities menu, click Tenant > Charges and Credits.
Tenant Charges and Credits Page
4. Click Add to add a new line in the detail grid.
5. Complete the Building ID, Lease ID, and Transaction Date fields.
6. Select the Income Category for the credit and enter a description.
7. Enter the amount in the Credit Amount column.
8. Click Save when finished.
9. If the credit applies to an open charge, click on the Apply hyperlink on the far right of the transaction line to apply the credit to an outstanding charge.
10. Click Save when finished.

Module 6: Working with Batches
Training Guide Page 159 © 2008 – 2012 MRI Software LLC.
Entering Tenant NSF Transactions
Overview You can reverse a tenant cash receipt for a nonsufficient funds (NSF) transaction returned by the bank. The original cash receipt must be posted to the tenant ledger before you can enter an NSF transaction for the cash receipt. When you post the batch containing an NSF transaction, the system reverses all transactions made by the original cash receipt and posts the transactions to the tenant ledger as open transactions.
Important: If you enter an NSF transaction for a cash receipt transaction that paid charges on the security deposit ledger as well as the tenant ledger, you must enter a security deposit NSF transaction to reverse the charges paid on the security deposit ledger in addition to entering a tenant NSF transaction to reverse the charges paid on the tenant ledger.
For each tenant NSF payment you enter, you can review details about the amount of the original cash receipt. You can run the Returned Check report to review posted tenant NSF payment transactions. Tenant NSF transactions appear as lease income amounts for the tenant to whom the NSF transaction was posted.

Module 6: Working with Batches
Page 160 Training Guide © 2008 – 2012 MRI Software LLC.
Procedure Complete the following steps to enter a tenant NSF transaction:
1. Determine the receipt type, receipt descriptor, and amount of the cash receipt associated with the NSF payment and ensure the batch containing the cash receipt was posted.
2. Select or create the batch in which to enter the tenant NSF payment.
3. On the Batch Activities menu, click Tenant > NSF’s.
Tenant NSF’s Page
4. Click Add to add a new line in the detail grid.
5. Complete the Building ID, Lease ID, and Transaction Date fields.
6. Enter a description for the NSF and, if desired, the Receipt Type.
7. Click on the Select hyperlink. A list of the tenant’s cash receipts corresponding to the receipt type entered will display in a new window. Select the correct receipt to NSF and click Select.
8. The system displays all transactions associated with the NSF payment in the detail grid. Complete the remaining fields for the new line.
Important: When you post the batch, the system reverses all payments made by the original cash receipt.
9. Click Save when finished.

Module 6: Working with Batches
Training Guide Page 161 © 2008 – 2012 MRI Software LLC.
Entering Tenant Payment Reversals
Overview A tenant payment reversal reverses a cash receipt transaction posted to the tenant ledger. You may want to reverse a cash receipt if a check was incorrectly applied to the wrong tenant. When you post the batch containing a payment reversal, the system reverses all payments made by the original cash receipt and posts the transactions to the tenant ledger as open transactions.
Important: If you enter a payment reversal for a cash receipt transaction that paid charges on the security deposit ledger as well as the tenant ledger, you must enter a security deposit payment reversal to reverse the charges paid on the security deposit ledger in addition to entering a tenant payment reversal to reverse the charges paid on the tenant ledger.
To reverse a cash receipt transaction for a payment returned for nonsufficient funds, enter a tenant NSF transaction instead of a generic payment reversal. The system keeps track of the number of NSF transactions. When you enter a tenant payment reversal, you must specify the cash receipt to reverse. For each tenant payment reversal you enter, you can review details about the original cash receipt.

Module 6: Working with Batches
Page 162 Training Guide © 2008 – 2012 MRI Software LLC.
Procedure Complete the following steps to enter tenant payment reversals:
1. Determine the receipt type, receipt descriptor, and amount of the cash receipt associated with the payment reversal and ensure the batch containing the cash receipt was posted.
2. Select or create the batch in which to enter the tenant payment reversal.
3. On the Batch Activities Menu, click Tenant > Reversals.
4. Click Add to add a new line in the detail grid.
5. Complete the Building ID, Lease ID, and Transaction Date fields.
6. Enter a description for the payment reversal and, if desired, the Receipt Type.
7. Click on the Select hyperlink. A list of the tenant’s cash receipts corresponding to the receipt type entered will display in a new window. Select the correct receipt to reverse and click Select.
8. The system displays all transactions associated with the payment in the detail grid. Complete the remaining fields for the new line.
Important: When you post the batch, the system reverses all payments made by the original cash receipt.
9. Click Save when finished.

Module 6: Working with Batches
Training Guide Page 163 © 2008 – 2012 MRI Software LLC.
Entering Rent Refunds
Overview You can enter transactions to refund rent paid by a tenant. The batch containing the original cash receipt must be posted to the tenant ledger in order to enter a refund for the amount paid by the cash receipt. You may need to enter a rent refund if a tenant wrote two checks for a single rent payment. You cannot refund a partial rent amount; you can only refund the whole amount of the payment received for rent. When you enter a rent refund, you must specify the cash receipt to refund. For each rent refund you enter, you can review details about the original cash receipt.
Note: If the Create AP Invoices for Refunds and Management Fees checkbox is selected on the Management Fee Options form on the Commercial Management Options form for the Management Options view in Windows, the system sends the refund amount to AP where an invoice for the refund amount is created.

Module 6: Working with Batches
Page 164 Training Guide © 2008 – 2012 MRI Software LLC.
Procedure Complete the following steps to enter rent refunds:
1. Determine the receipt type, receipt descriptor, and amount of the cash receipt associated with the refund and ensure the batch containing the cash receipt was posted.
2. Select or create the batch in which to enter the refund.
3. On the Batch Activities menu, click Tenant > Rent Refunds.
Tenant Rent Refunds Page
4. Click Add to add a new line in the detail grid.
5. Complete the Building ID, Lease ID, and Transaction Date fields.
6. From the Link Type dropdown menu, select either By Descriptor or By Transaction ID.
7. Click on the Select hyperlink to display rent payments/credits available to refund.
8. Select the amount to refund and click Select.
9. Complete the remaining fields for the new line.
10. Click Save when finished.

Module 6: Working with Batches
Training Guide Page 165 © 2008 – 2012 MRI Software LLC.
Entering Write-Offs for Outstanding Balances
Overview You may choose to write off an outstanding tenant balance if you decide the tenant will not pay an amount. For example, if a specific charge is in litigation, you may write off the charge as part of a settlement. Although both write-offs and miscellaneous credits post as credit transactions to the tenant ledger, write-offs use the write-off (WO) source code and miscellaneous credits use the non-cash adjustment (NC) source code.
Procedure Complete the following steps to enter write-offs for outstanding balances:
1. Determine the following:
• The lease to which the write-off applies
• Whether or not the write-off applies to a specific open charge on the tenant ledger
2. Select or create the open batch in which to enter the write-off.
3. On the Batch Activities Menu, click Tenant > Write Offs and Concessions.
Tenant Write Offs and Concessions Page
4. Click Add to add a new line in the detail grid.
5. Complete the Building ID, Lease ID, and Transaction Date fields.
6. From the Adjustment Type dropdown menu, select Write Off.
7. Complete the remaining fields for the new line.
8. Click Save when finished.

Module 6: Working with Batches
Page 166 Training Guide © 2008 – 2012 MRI Software LLC.
Entering One-Time Concessions
Overview You may grant a concession to a tenant to reduce or waive a responsibility to pay rent or other charges. You can set up recurring concessions when you set up a lease or enter one-time concessions as batch transactions. One-time concessions pertain to specific, singular instances of inconveniences caused to tenants, such as a water leak or a blocked drive. When you enter a one-time concession, you can specify the open charge to which the one-time concession applies.
Note: One-time concessions are entered as positive amounts; recurring concessions are set up as negative amounts.
For each one-time concession you enter, you must specify the income category associated with the concession. The income category you specify depends on how your organization handles concessions.

Module 6: Working with Batches
Training Guide Page 167 © 2008 – 2012 MRI Software LLC.
Procedure Complete the following steps to enter one-time concessions:
1. Determine the following:
• Tenant to receive the concession
• Income category to which the concession applies
2. Select or create the open batch in which to enter the one-time concession.
3. On the Batch Activities menu, click Tenant > Write Offs & Concessions.
4. Click Add to add a new line in the detail grid.
5. Complete the Building ID, Lease ID, and Transaction Date fields.
6. In the Adjustment Type dropdown, select Concession.
7. In the Income Category field, select the income category associated with the concession:
If your organization… Then… Tracks the specific income category of the charge or charges associated with a concession
Select the income category of the charge for which you are granting the concession.
Enters all concessions to a single, generic income category
Select the generic income category.
8. In the Amount field, enter the amount of the concession as a positive number.
9. Click Save when finished.

Module 6: Working with Batches
Page 168 Training Guide © 2008 – 2012 MRI Software LLC.
Review
Key Points In this lesson, you learned how to enter tenant charges and credits.
Lesson 4 Lab Exercises
Please refer to the CM Training Workbook for exercises pertaining to this lesson.

Module 6: Working with Batches
Training Guide Page 169 © 2008 – 2012 MRI Software LLC.

Training Guide Page 170 © 2008 – 2012 MRI Software LLC.
Lesson 5: Processing Security Deposit Transactions
Overview
Purpose The purpose of this lesson is to show you how to process security deposit transactions.
Objectives After completing this lesson, you will be able to enter the following security deposit batch transactions:
• Refunds
• Adjustments, such as non-cash security deposit adjustments, non-cash security deposit adjustment reversals, interest, and interest reversals
• NSF payments
• Payment reversals
Security deposit transactions are posted to the security deposit ledger and are related to tenant security deposit amounts. On the Security Adjustments page, you can enter multiple security deposit transactions for a single tenant and refund, apply, or forfeit a security deposit.
Important: The Security menu is only for transactions posted to a security deposit ledger. To enter adjustments for transactions posted to a tenant ledger, you must use the Tenant > Charges and Credits page.
To review posted security deposit transactions, you can run the following reports:
• Cash Detail report: Security deposit transactions appear grouped as "Security Deposit Receipts"
• Security Deposits Ledger report

Module 6: Working with Batches
Training Guide Page 171 © 2008 – 2012 MRI Software LLC.
Entering Non-Cash Security Deposit Adjustments
Overview A non-cash security deposit adjustment is an amount entered that is not in the form of cash. You might need to enter a non-cash security deposit adjustment when you initially set up your database to verify that the security deposit was received for the lease without affecting the cash balance for the tenant.
Note: Non-cash security deposit adjustments are considered to be cash amounts, even though they do not affect the cash account when initially posted. As a result, you can refund the amount of non-cash security deposit adjustments as cash.
When you post a batch containing a non-cash security deposit adjustment transaction, the system posts the transaction to the security deposit ledger using the Non-cash Adjustment (NC) source code.
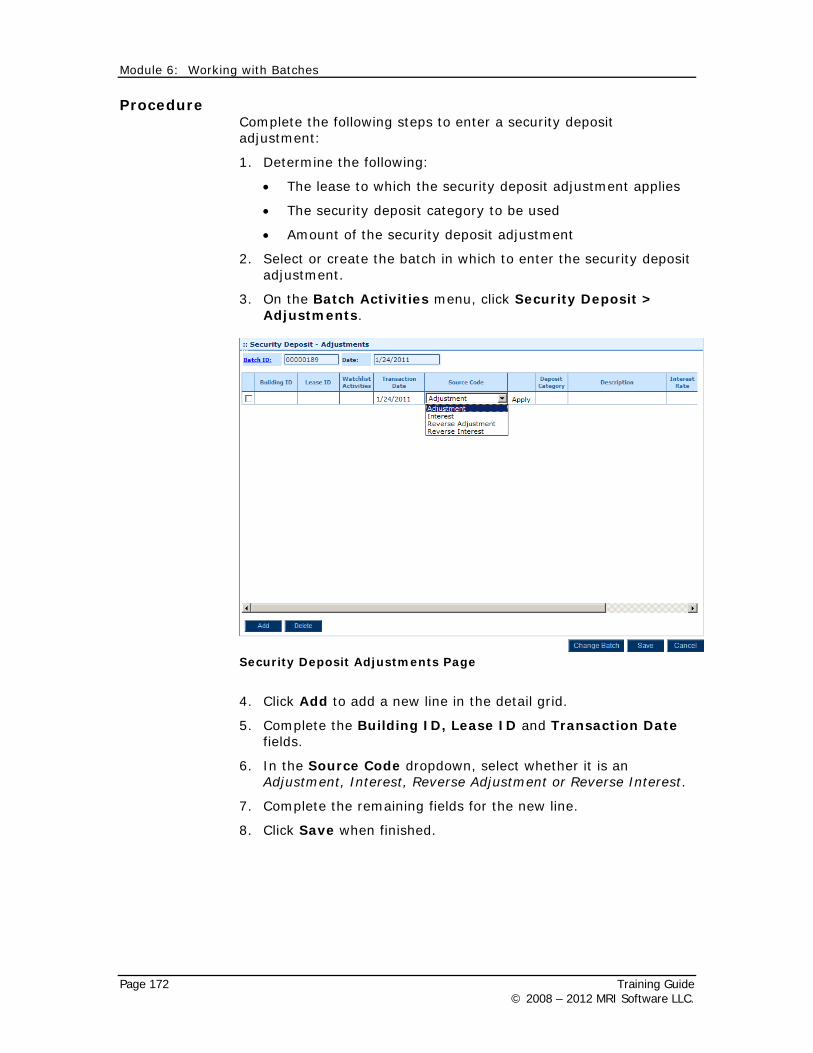
Module 6: Working with Batches
Page 172 Training Guide © 2008 – 2012 MRI Software LLC.
Procedure Complete the following steps to enter a security deposit adjustment:
1. Determine the following:
• The lease to which the security deposit adjustment applies
• The security deposit category to be used
• Amount of the security deposit adjustment
2. Select or create the batch in which to enter the security deposit adjustment.
3. On the Batch Activities menu, click Security Deposit > Adjustments.
Security Deposit Adjustments Page
4. Click Add to add a new line in the detail grid.
5. Complete the Building ID, Lease ID and Transaction Date fields.
6. In the Source Code dropdown, select whether it is an Adjustment, Interest, Reverse Adjustment or Reverse Interest.
7. Complete the remaining fields for the new line.
8. Click Save when finished.
Module 6: Working with Batches
Training Guide Page 173 © 2008 – 2012 MRI Software LLC.
Entering Security Deposit Refunds
Overview You can refund a security deposit as you might do when a tenant vacates a leased suite. After you specify the building and lease for the refund, the Refund Deposit button is available so you can dispose of the security deposit. You can enter a refund for a:
• Security deposit cash receipt posted to the security deposit ledger. Refunds can apply to unbilled or billed security deposit receipts. Cash receipt transactions are identified by the Cash Receipt (CR) source code.
• Non-cash security deposit adjustment posted to the security deposit ledger. Non-cash security deposit transactions are identified by the Non-cash Adjustment (NC) source code.
You can apply a security deposit to one or more of the following three refund transaction types:
• RF – Refund. The system refunds the amount directly to the tenant. If the Create AP Invoices for Refunds and Management Fees check box is selected on the Management Fee Options form on the Commercial Management Options form for the Management Options view in Windows, the system sends the refund amount to AP as an open invoice for payment. The invoice is created for the vendor specified in the deposit information for the lease. If a vendor is not specified, the system creates a vendor for the invoice. To create the invoice, the system uses the security refund account number and cash type specified in the accounts payable options for the building associated with the lease.
• AR – Apply Refund. The system allows you to apply the amount to outstanding charges for the lease. You select the charges to which to apply the refund amount.
Note: If a message appears informing you that no open charges exist on the tenant ledger, you must refund the security deposit amount directly to the tenant, accept the security deposit amount as a forfeiture, or both.
• FF – Forfeiture. The system accepts the amount as income and deducts it from the security deposit ledger for the tenant.

Module 6: Working with Batches
Page 174 Training Guide © 2008 – 2012 MRI Software LLC.
Procedure Complete the following steps to enter a security deposit refund:
1. Determine the following:
• The lease to which the security deposit refund applies
• How the refund amount will be applied
2. Ensure a cash receipt for the security deposit is posted to the security deposit ledger for the tenant.
3. Select or create the batch in which to enter the security deposit refund.
4. On the Batch Activities Menu, click Security Deposit > Refunds.
Security Deposit – Refunds Page
5. Click Add to add a new line item to the detail grid.
6. Complete the Building ID and Lease ID fields.
Note: The Refund hyperlink is available if a cash receipt for a security deposit is posted to the security deposit ledger for the tenant.
7. Click the Refund hyperlink. The Refund Security Deposit window is displayed.
Note: You can apply a security deposit refund to a combination of the RF, AR, and FF refund source codes.

Module 6: Working with Batches
Training Guide Page 175 © 2008 – 2012 MRI Software LLC.
Refund Security Deposit Page
8. Refer to the following table to apply an amount of the refund:
If you want to apply the refund amount...
Then...
As a refund directly to the tenant
In the Amount field for the RF refund type, enter the amount to refund.
To an open charge for the lease
a. In the Amount field for the AR refund type, enter the amount to apply to open charges on the tenant ledger.
b. Click Apply.
Note: If a message appears informing you that no open charges exist on the tenant ledger, you must apply the refund amount directly to the tenant, as a forfeiture, or both.
c. In the detail grid that appears, click the Amount field for the open charge and enter the amount to apply.
d. To apply any remaining amount of the refund to another open charge, repeat Steps c and d.
e. Click Save.
As a forfeiture and reduce the security deposit ledger by the amount
In the Amount field for the FF refund type, type the amount to forfeit.
9. Click Save when finished.

Module 6: Working with Batches
Page 176 Training Guide © 2008 – 2012 MRI Software LLC.
Entering Non-Cash Security Deposit Adjustment Reversals
Overview If necessary, you can reverse a non-cash security deposit adjustment. When you enter a non-cash security deposit adjustment reversal, you must specify the non-cash security deposit adjustment transaction to reverse. You can only reverse a non-cash security deposit adjustment transaction if the batch containing the transaction was posted. When you post a batch containing a non-cash security deposit adjustment reversal transaction, the system posts the transaction to the security deposit ledger using the Non-cash Reversal (NR) source code.

Module 6: Working with Batches
Training Guide Page 177 © 2008 – 2012 MRI Software LLC.
Procedure Complete the following steps to enter a non-cash security deposit adjustment reversal:
1. Determine the non-cash security deposit adjustment transaction to reverse and ensure the batch containing the transaction was posted.
2. Select or create the batch in which to enter the non-cash security deposit adjustment reversal.
3. On the Batch Activities menu, click Security Deposit > Adjustments.
Security Deposits – Adjustments Page
4. Click Add to add a new line in the detail grid.
5. Complete the Building ID and Lease ID fields.
6. In the Transaction Date field, type the effective date for the reversal.
7. In the Source Code dropdown, select Reverse Adjustment.
8. Click the Apply hyperlink and select the non-cash security deposit adjustment transaction to reverse, and then click Select.
9. Click Save when finished.

Module 6: Working with Batches
Page 178 Training Guide © 2008 – 2012 MRI Software LLC.
Entering Non-Cash Security Deposit Interest
Overview Security deposit interest is the interest earned on security deposit ledger transactions. You may post interest transactions to the security deposit ledger using the Interest (IN) source code. You can post security deposit interest transactions to the security deposit ledger when you:
• Enter a security deposit interest transaction as a batch transaction and then post the batch
• Run the Security Deposit Interest Earnings report as part of your monthly activities to calculate security deposit interest
Procedure Complete the following steps to enter security deposit interest:
1. Determine the following:
• Lease, security deposit category, and amount to which the interest applies
• Percentage rate used to calculate interest on the security deposit
2. Select or create the batch in which to enter the security deposit interest.
3. On the Batch Activities menu, click Security Deposit > Adjustments.
4. Click Add to add a new line in the detail grid.
5. Complete the Building ID and Lease ID fields.
6. In the Transaction Date field, enter the effective date of the interest.
7. In the Source Code dropdown, select Interest.
8. Complete the remaining fields for the new line.
9. Click Save when finished.

Module 6: Working with Batches
Training Guide Page 179 © 2008 – 2012 MRI Software LLC.
Entering Non-Cash Security Deposit Interest Reversals
Overview If necessary, you can reverse security deposit interest. When you enter a security deposit interest reversal, you must specify the interest transaction to reverse. You can only reverse an interest transaction if the batch containing the interest transaction was posted. When you post a batch containing an interest reversal transaction, the system posts the transaction to the security deposit ledger using the Interest Reversal (IR) source code.
Procedure Complete the following steps to enter a security deposit interest reversal:
1. Determine the amount and interest rate of the security deposit interest transaction to reverse and ensure the batch containing the transaction was posted.
2. Select or create the batch in which to enter the security deposit interest reversal.
3. On the Batch Activities menu, click Security Deposit > Adjustments.
4. Click Add to add a new line in the detail grid.
5. Complete the Building ID and Lease ID fields.
6. In the Transaction Date field, type the effective date for the reversal.
7. In the Source Code dropdown, select Reverse Interest.
Note: The IR source code is only available if a security deposit interest transaction using the IN source code is posted to the security deposit ledger.
8. Select the security deposit interest transaction to reverse, and then click Select.
9. Click Save when finished.

Module 6: Working with Batches
Page 180 Training Guide © 2008 – 2012 MRI Software LLC.
Review
Key Points In this lesson, you learned how to:
• Enter security deposit refunds
• Enter security deposit adjustments
• Enter security deposit NSF’s
• Enter security deposit payment reversals
Lesson 5 Lab Exercises
Please refer to the CM Training Workbook for exercises pertaining to this lesson.
Module 6: Working with Batches
Training Guide Page 181 © 2008 – 2012 MRI Software LLC.

Training Guide Page 182 © 2008 – 2012 MRI Software LLC.
Lesson 6: Processing Non-Tenant Transactions
Overview
Purpose The purpose of this lesson is to show you how to enter non-tenant transactions.
Objectives After completing this lesson, you will be able to:
• Enter non-tenant cash receipts
• Enter non-tenant NSF payments
• Enter non-tenant payment reversals
Key Terms Non-tenant transactions – Transactions that are posted to the non-tenant ledger and are associated with individual buildings rather than specific leases. Non-tenant transactions may include income such as pay phone or vending machine receipts.

Module 6: Working with Batches
Training Guide Page 183 © 2008 – 2012 MRI Software LLC.
Entering a Non-Tenant Cash Receipt
Overview You may enter a non-tenant cash receipt for building income not associated with a specific lease, such as pay phone or vending machine receipts. When you enter a non-tenant cash receipt, you must specify the following information:
• The general ledger account number to which to post the transaction amount
Because non-tenant income is not related to a specific lease, it cannot be associated with an income category. As a result, no general ledger interface chart information exists for how to post non-tenant income transactions, and the system cannot post the amount of the cash receipt unless you specify the general ledger account number.
• A receipt type to identify the form of payment
If you need to enter a non-tenant NSF payment or payment reversal for the cash receipt, you can specify the receipt type.
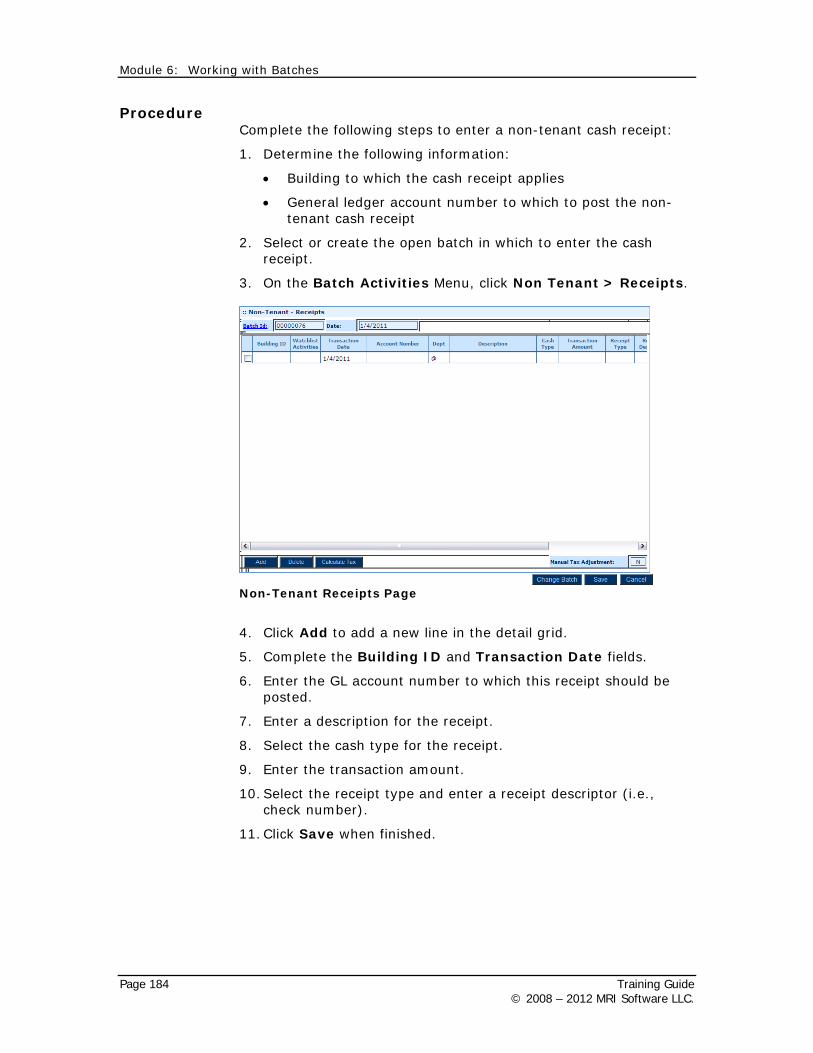
Module 6: Working with Batches
Page 184 Training Guide © 2008 – 2012 MRI Software LLC.
Procedure Complete the following steps to enter a non-tenant cash receipt:
1. Determine the following information:
• Building to which the cash receipt applies
• General ledger account number to which to post the non-tenant cash receipt
2. Select or create the open batch in which to enter the cash receipt.
3. On the Batch Activities Menu, click Non Tenant > Receipts.
Non-Tenant Receipts Page
4. Click Add to add a new line in the detail grid.
5. Complete the Building ID and Transaction Date fields.
6. Enter the GL account number to which this receipt should be posted.
7. Enter a description for the receipt.
8. Select the cash type for the receipt.
9. Enter the transaction amount.
10. Select the receipt type and enter a receipt descriptor (i.e., check number).
11. Click Save when finished.

Module 6: Working with Batches
Training Guide Page 185 © 2008 – 2012 MRI Software LLC.
Entering Non-Tenant NSF Payments
Overview You can reverse a non-tenant cash receipt paid by a nonsufficient funds (NSF) payment returned by the bank. The original cash receipt must be posted to the non-tenant ledger before you can enter an NSF transaction for the cash receipt. When you post the batch containing a non-tenant NSF transaction, the system reverses all payments made by the original cash receipt. For each non-tenant NSF payment you enter, you can review details about the original cash receipt, including all of the payments associated with the NSF transaction, such as tax amounts calculated for non-tenant payments. You can run the Returned Check report to review posted non-tenant NSF transactions. Non-tenant NSF transactions have a description of "Non-Tenant" and appear as miscellaneous income amounts.

Module 6: Working with Batches
Page 186 Training Guide © 2008 – 2012 MRI Software LLC.
Procedure Complete the following steps to enter a non-tenant NSF transaction:
1. Determine the receipt type, receipt descriptor, transaction date, and general ledger account number of the non-tenant cash receipt associated with the NSF transaction and ensure the batch containing the non-tenant cash receipt was posted.
2. Select or create the batch in which to enter the non-tenant NSF payment.
3. On the Batch Activities Menu, click Non-Tenant > NSF’s.
4. Click Add to add a new line in the detail grid.
5. Complete the Building ID and Transaction Date fields.
6. Select a Receipt Type ID
7. Click on the Select hyperlink, select the transaction to NSF and click Select.
Important: When you post the batch, the system reverses all payments made by the original cash receipt.
8. Click Save when finished.

Module 6: Working with Batches
Training Guide Page 187 © 2008 – 2012 MRI Software LLC.
Entering Non-Tenant Payment Reversals
Overview A non-tenant payment reversal reverses a non-tenant cash receipt transaction posted to the non-tenant ledger. You may want to reverse a cash receipt if a check was incorrectly applied to the wrong building.
Important: To reverse a non-tenant cash receipt transaction for a payment returned for nonsufficient funds, enter a non-tenant NSF transaction instead of a generic payment reversal.
When you enter a non-tenant payment reversal, you must specify the cash receipt to reverse.

Module 6: Working with Batches
Page 188 Training Guide © 2008 – 2012 MRI Software LLC.
Procedure Complete the following steps to enter a non-tenant payment reversal:
1. Determine the receipt type, receipt descriptor, transaction date, and general ledger account number of the non-tenant cash receipt associated with the payment reversal and ensure the batch containing the non-tenant cash receipt was posted.
2. Select or create the batch in which to enter the non-tenant payment reversal.
3. On the Batch Activities Menu, click Non-Tenant > Reversals.
Non-Tenant Reversals Page
4. Click Add to add a new line in the detail grid.
5. Complete the Building ID and Transaction Date fields.
6. In the Link Type dropdown menu, select either By Descriptor or By Transaction ID
7. Click on the Select hyperlink, select the transaction to reverse and click Select.
Important: When you post the batch, the system reverses all payments made by the original cash receipt.
8. Complete the remaining fields for the new line.
9. Click Save when finished.

Module 6: Working with Batches
Training Guide Page 189 © 2008 – 2012 MRI Software LLC.
Review
Key Points In this lesson, you learned how to:
• Enter non-tenant cash receipts
• Enter non-tenant NSF’s
• Enter non-tenant payment reversals
Lesson 6 Lab Exercises
Please refer to the CM Training Workbook for exercises pertaining to this lesson.

Training Guide Page 190 © 2008 – 2012 MRI Software LLC.
Lesson 7: Reviewing or Changing Batch Transactions
Overview
Purpose The purpose of this lesson is to show you how to verify and make changes to batch transactions.
Objective After completing this lesson, you will be able to:
• Review batch totals
• Modify or delete batch transactions
• Review transactions in open batches

Module 6: Working with Batches
Training Guide Page 191 © 2008 – 2012 MRI Software LLC.
Reviewing Batch Totals
Overview As you enter batch transactions, you can review the batch totals to ensure the totals of the transaction entries equal the control totals specified for the batch. You can review the batch totals at any time while you enter batch transactions. To balance an unbalanced batch, you review the difference between the batch control totals and the credit and debit amounts of the batch. If you try to post an unbalanced batch, the system requires you to balance the batch before you can proceed. In a balanced batch, the—
• Control credit amount of the batch equals the sum of the credit amounts for tenant, security deposit, and non-tenant transactions
• Control debit amount of the batch equals the sum of the debit amounts for tenant, security deposit, and non-tenant transactions

Module 6: Working with Batches
Page 192 Training Guide © 2008 – 2012 MRI Software LLC.
Procedure Complete the following steps to review the totals for a batch:
1. Select the batch.
2. On the Batch Activities menu, click Batch Totals.
Batch Total Web Page
3. Review the batch totals. If you want to generate a batch report, click the Report button.
4. To modify the batch control totals, modify the values in the Debit and Credit fields and click Save when finished.
5. If you wish to delete the batch, click the Delete button.
6. If you wish to post the batch, click the Post button.

Module 6: Working with Batches
Training Guide Page 193 © 2008 – 2012 MRI Software LLC.
Modifying or Deleting Batch Transactions
Overview You can modify or delete a batch transaction.
Procedure Complete the following steps to modify or delete a batch transaction:
1. Determine the type of transaction to be modified or deleted.
2. Select the batch.
3. Refer to the following table to determine how to continue based on the transaction type:
If the transaction is… Then… A tenant cash receipt Click Tenant > Receipts on
the Batch Activities Menu A tenant charge or adjustment
Click Tenant > Charges and Credits on the Batch Activities Menu
A security deposit charge or adjustment
Click Security Deposit > Adjustments on the Batch Activities Menu
A non-tenant cash receipt or adjustment
Click Non-Tenant > Receipts on the Batch Activities Menu
A non-tenant NSF or Payment Reversal
Click Non-Tenant > NSF’s (or Reversals) on the Batch Activities Menu
4. If the transaction does not appear in a detail grid on the page, click Change Batch to locate the correct batch for the transaction.
5. Modify the transaction by changing its field information or deleting the transaction.
6. Click Save when finished.

Module 6: Working with Batches
Page 194 Training Guide © 2008 – 2012 MRI Software LLC.
Reviewing Transactions in Open Batches
Overview Reviewing the transactions in an open batch enables you to:
• Verify the transactions to be posted as ledger entries before posting
• Determine if you need to balance the batch before posting or modify batch transactions to correct ledger entries
You can use the information on the Open Batch Listing report or the Cash Application Review report to review the transactions in an open batch. To review:
• All of the transactions in the batch, you run the Open Batch Listing report
• Only the cash receipt transactions in the batch, you run the Cash Application Review report
Module 6: Working with Batches
Training Guide Page 195 © 2008 – 2012 MRI Software LLC.
Review
Key Points In this lesson, you learned how to:
• Review batch totals
• Modify or delete batch transactions
• Review transactions in open batches
Lesson 7 Lab Exercises
Please refer to the CM Training Workbook for exercises pertaining to this lesson.

Training Guide Page 196 © 2008 – 2012 MRI Software LLC.
Lesson 8: Posting Batches
Overview
Purpose The purpose of this lesson is to show you how to post a CM accounts receivable batch.
Objectives After completing this lesson, you will be able to:
• Post a batch
• Verify posted batch transactions

Module 6: Working with Batches
Training Guide Page 197 © 2008 – 2012 MRI Software LLC.
Posting Batch Transactions
Overview An open batch must balance before you can post it. When you balance a batch, you review the batch totals to ensure the total of the transaction entries equals the control totals for the batch. If you try to post an unbalanced batch, the system requires you to balance the batch before you can proceed.
Important: You may modify or delete the transactions in a batch until the batch is posted. Once a batch is posted, you can no longer modify its transactions, and you should follow the proper procedures to reverse a posted batch transaction.
The transactions in a batch are posted to the period you specify when you post the batch. You can post a batch to a period other than the current period if the Select Posting Period checkbox is selected on the Commercial Management Options form on the Management Options view in Windows. You cannot post a batch to a period prior to the current CM accounting period (i.e., a closed period). When you post a batch, the system performs the following actions:
• Updates the tenant, security deposit, and non-tenant ledgers
• Prepares the transactions to transfer to the general ledger when you create journal entries for the corresponding general ledger period
Note: You can set up CM to automatically create and transfer journal entries to the general ledger upon posting batches by selecting the Real Time Journal Entry checkbox on the Commercial Management Options form on the Management Options view in Windows. To successfully create real-time journal entries, you must set up each building to create detailed journal entries.
• Changes the status of the batch to Closed (C)

Module 6: Working with Batches
Page 198 Training Guide © 2008 – 2012 MRI Software LLC.
Procedure Complete the following steps to post a batch:
1. On the Commercial Management main page, click Batch Activities > Select Batch.
2. Click the batch ID hyperlink that corresponds to the batch you wish to post.
3. On the Batch Activities menu, select Batch Totals
4. Click Post on the Batch Totals window.
The Post Open Batch window appears.
5. Refer to the following table to continue:
If... Then... A message appears alerting you that the batch totals do not match the control totals
a. Click OK. b. In the Debit field, type the sum of
the debit amounts for tenant transactions, security deposit transactions, and non-tenant transactions in the batch.
c. In the Credit field, type the sum of the credit amounts for tenant transactions, security deposit transactions, and non-tenant transactions in the batch.
d. Click Post.
The Post Open Batch dialog box appears
Continue to the next step.
Post Open Batch Webpage Dialog Box

Module 6: Working with Batches
Training Guide Page 199 © 2008 – 2012 MRI Software LLC.
6. Post the batch to either the current period, or a period other than the current period:
If you are posting the batch to…
Then...
The current period Select Current Period from the Posting Period dropdown menu and click Post.
A period other than the current period
a. Select Enter Period Manually from the Posting Period dropdown menu and then type the period (MM/YY) to which to post the batch.
b. Click Post.
Important: If you do not close your CM periods in a timely manner, you could end up posting to a period other than you originally intended if you select Current Period.
Note: If the Select Posting Period checkbox is cleared on the Commercial Management Options form on the Management Options view in Windows, you cannot post the batch to a period other than the current period.
If you select Current Period, the system posts the batch to the current period regardless of any value entered in the Posting Period field.

Module 6: Working with Batches
Page 200 Training Guide © 2008 – 2012 MRI Software LLC.
Verifying Posted Transactions Associated with Closed Batches
Overview Reviewing the transactions associated with a closed batch enables you to verify that the system posted the transactions to the appropriate ledgers. You can use the information on the Closed Batch report or the Ledger Reference List report to review the transactions associated with a closed batch.
Procedure Refer to the following table to verify posted transactions:
If you want to verify… Then… All of the transactions associated with the batch
Run the Closed Batch report. Detailed information appears for each transaction on the report, and transactions are grouped by batch and type.
Only the batch transactions posted to the tenant ledger
Run the Ledger Reference List report. You can display only transactions with open amounts and specify the income categories and level of detail to include for transactions on the report.
Module 6: Working with Batches
Training Guide Page 201 © 2008 – 2012 MRI Software LLC.
Review
Key Points In this lesson, you learned how to:
• Post an accounts receivable batch
• Verify posted batch transactions
Lesson 8 Lab Exercises
Please refer to the CM Training Workbook for exercises pertaining to this lesson.

Training Guide Page 202 © 2008 – 2012 MRI Software LLC.
Module 7: Performing Additional Accounts Receivable Transactions
Module Overview
Purpose The purpose of this module is to show you how to perform additional accounts receivable transactions in CM.
Objectives After completing this module, you will be able to:
• Work with collections
• Apply prepayments
• Apply recurring concessions
• Make FASB 13 adjustments
• Run automated credit adjustments
• Work with CPI increases

Module 7: Working with Additional A/R Transactions
Training Guide Page 203 © 2008 – 2012 MRI Software LLC.

Training Guide Page 204 © 2008 – 2012 MRI Software LLC.
Lesson 1: Collections
Overview
Purpose The purpose of this lesson is to show you how to work with collections.
Objectives After completing this lesson, you will be able to:
• Understand the CM Collections Page
• Review tenant transaction history
• Enter delinquency lease notes
• Run a late letter for a tenant
• Review delinquency information for a tenant

Module 7: Working with Additional A/R Transactions
Training Guide Page 205 © 2008 – 2012 MRI Software LLC.
Collections Page
Overview In CM, you use the Commercial Management Collections page to review tenant balances, print late letters, and gather information to collect past due amounts. Collections information appears for the tenants associated with the leases in a building. The Commercial Management Collections page consists of the following components:
• Header
• Detail Grid
Collections Page

Module 7: Working with Additional A/R Transactions
Page 206 Training Guide © 2008 – 2012 MRI Software LLC.
Header The header includes the fields above the detail grid and enables you to select the leases to appear in the detail grid. In the Select by area, you can either select leases based on the building, project, or property manager, or select all the leases in your database with amounts due. You can further filter the leases to appear in the detail grid by completing the Minimum Balance and Over (Days) fields. In addition, you can select the report format to use for generating late letters.
Note: You must select a report format in the Late Letter field in order to generate late letters.
Collections Grid Header
Detail Grid The detail grid displays the tenants and their amounts due based on the filter criteria specified in the header. The detail grid contains the following four levels of information:
• Building
• Leases
• Income categories
• Charges
Detail Grid

Module 7: Working with Additional A/R Transactions
Training Guide Page 207 © 2008 – 2012 MRI Software LLC.
Collection Detail Once you select the leases to appear in the detail grid, you can review detailed tenant transaction histories, generate late letters for all leases in the detail grid, review delinquency information for all leases in the detail grid, or click on a tenant’s hyperlink to display the Collection Detail for the tenant. On the Collection Detail page, you can do the following:
• Review lease and payment information for the tenant in the header
• Enter delinquency lease notes
• Generate a late letter for the tenant
• Review the delinquency information for the tenant
• Review the tenant ledger by clicking the Review Ledger button

Module 7: Working with Additional A/R Transactions
Page 208 Training Guide © 2008 – 2012 MRI Software LLC.
Selecting a Lease to Display
Overview You can select leases to display in the detail grid on the Commercial Management Collections Page.
Note: Make sure all tenant transactions are posted to the tenant ledger by performing accounts receivable and monthly activities.
Procedure Complete the following steps to select the leases to appear in the detail grid:
1. On the Commercial Management main page, click Daily Activities and then Collections.
2. Refer to the following table to continue: If you want to select… Then… Leases for a specific building Select Building from the
Search by dropdown and then select the building in the ID field.
Leases for a specific project Select Project, and then select the project then in the ID field.
Leases for a specific property manager
Select Property Manager, and then select the property manager in the ID field.
All leases with amounts due in the database
Select All from the Search by dropdown menu.
3. Refer to the following table to determine how to display leases with outstanding balances: If the amount due is… Then… Greater than a specified amount,
Type the minimum past due amount in the Minimum Balance field.
Past due longer than a specified amount of time
Type the minimum number of days an overdue balance must be past due in the Over (Days) field.
4. If you plan to generate late letters for any of the leases in the detail grid, then select the report format to use to generate late letters in the Late Letter field.
Note: As you complete the fields in the header, the system updates the leases displayed in the detail grid.

Module 7: Working with Additional A/R Transactions
Training Guide Page 209 © 2008 – 2012 MRI Software LLC.
Review Tenant Transaction History
Overview You can review the transaction history for a tenant in the detail grid on the Commercial Management Collections Page.
Procedure Complete the following steps to review the transaction history for a tenant:
1. Select the leases to appear in the detail grid.
Note: The detail grid displays the highest level, the building, first.
2. Click [+] next to the name of the building to display leases for the building with outstanding balances.
3. Review the leases, and locate the tenant for which to review transaction history.
4. Click [+] next to the name of the tenant to display income categories with outstanding amounts for the lease.
Note: Clicking on the name of the tenant enables you to enter delinquency notes, generate late letters, review delinquency information, and review the tenant’s ledger.
5. Review the income categories, and locate the income category charges to review.
6. Click [+] next to the description of the income category to display the outstanding balances for the income category.
7. Review the charges for the tenant.

Module 7: Working with Additional A/R Transactions
Page 210 Training Guide © 2008 – 2012 MRI Software LLC.
Entering Delinquency Lease Notes
Overview For each lease, you can enter delinquency notes within the Collections page as you make phone calls to tenants regarding late rent payments. The Aged Delinquency Report can then be generated to display these delinquency notes. When you enter delinquency lease notes on the Collection Detail page from the Commercial Management Collections page or generate late letters as part of collecting past due amounts, the system automatically enters notes for the associated lease. You can then view the notes on the Lease Notes page within the Lease page with delinquency note types.
Procedure Complete the following steps to enter a delinquency lease note for a lease:
1. Review the tenant transaction history for the lease to verify that the overdue amounts remain unpaid.
2. Select the leases to appear in the detail grid on the Commercial Management Collections page.
3. Click [+] sign next to the name of the building to display leases for the building with outstanding balances.
4. Review the leases, and locate the tenant for which to enter a delinquency lease note.
5. Click on the name of the tenant.
6. Review the lease and payment information in the header to verify the lease for which you are entering a delinquency note.
7. In the Note field, type a description of the action taken regarding the overdue charges for the selected lease.
8. Click Save when finished.

Module 7: Working with Additional A/R Transactions
Training Guide Page 211 © 2008 – 2012 MRI Software LLC.
Printing Late Letters
Overview On the Commercial Management Collections page, you can generate late letters for the following:
• A single tenant in the detail grid by clicking the Print Late Letter button on the Collection Detail page from the Commercial Management Collections page
• All leases in the detail grid by clicking the Print Late Letters button
The system generates late letters using the report format selected in the Late Letter field on the Commercial Management Collections page. You can design a custom report format for late letters in ReportDesign. To make the custom report formats available for running late letters, the Report Setup tab of the Report Options dialog box in ReportDesign must have the following:
• CM specified in the Application ID field
• Late Letters selected in the Group field
Note: For information about designing custom report formats, refer to the ReportDesign documentation.
Important: A report format must be selected in the Late Letter field in order to generate late letters.
As the system generates late letters, it enters a lease note for each tenant receiving a late letter. The date for the lease note is the system date on which you generate the late letters.

Module 7: Working with Additional A/R Transactions
Page 212 Training Guide © 2008 – 2012 MRI Software LLC.
Procedure Complete the following steps to generate late letters from the Commercial Management Collections page:
1. Determine whether you will generate late letters for a single tenant or all leases in the detail grid.
2. Verify that the report format to use for late letters is selected in the Late Letter field.
3. Refer to the following table to continue: If you want to run late letters for...
Then...
A single tenant in the detail grid
a. Select the leases to appear in the detail grid on the Commercial Management Collections page.
b. Click [+] next to the name of the building to display leases for the building with outstanding balances.
c. Review the leases, and locate the tenant for which to run a late letter.
d. Click on the name of the tenant. e. Review the lease and payment
information in the header to verify the lease for which you are running a late letter.
f. Click Print Late Letter to generate a late letter for the tenant. The system uses the report format selected in the Late Letter field on the Commercial Management Collections page.
All leases in the detail grid
a. Select the leases to appear in the detail grid on the Commercial Management Collections page.
b. Click Print Late Letters to generate late letters for all leases displayed in the detail grid. The system uses the report format selected in the Late Letter field in the header.

Module 7: Working with Additional A/R Transactions
Training Guide Page 213 © 2008 – 2012 MRI Software LLC.
Reviewing Delinquency Information
Overview The Aged Delinquencies report enables you to review outstanding balances for existing leases. For each lease on the report, the date and amount of the tenant's last payment received is displayed along with the current outstanding balances (conditional upon the date/period you specify in the runtime options of the report). You may also include delinquency notes on the report. If the report is selected by:
• Date, the system ages past due amounts based on the type of date you click in the Aging By area and the intervals you specify in the Period fields
• Period, the system ages balances based on one-month intervals

Module 7: Working with Additional A/R Transactions
Page 214 Training Guide © 2008 – 2012 MRI Software LLC.
Procedure Complete the following steps to review delinquency information and generate the Aged Delinquencies report from the Commercial Management Collections page:
1. Determine whether you will review delinquency information for a single tenant or all leases in the detail grid.
2. Refer to the following table to continue:
If you want to review delinquency information for...
Then...
A single tenant in the detail grid
a. Select the leases to appear in the detail grid on the Commercial Management Collections page.
b. Click [+] next to the name of the building to display leases for the building with outstanding balances.
c. Review the leases, and locate the tenant for which you want to review delinquency information.
d. Click on the name of the tenant. e. Review the lease and payment
information in the header to verify the lease for which you are reviewing delinquency information.
f. Click Print A/R with Notes to generate the report.
All leases in the detail grid
a. Select the leases to appear in the detail grid on the Commercial Management Collections page.
b. Click Print A/R with Notes to generate the report.
Note: When you generate the Aged Delinquencies report from the Commercial Management Collections page or the Collection Detail page, the system sets the report options. You can set the report options for the Aged Delinquencies report only if you open the report view from the Reports menu.

Module 7: Working with Additional A/R Transactions
Training Guide Page 215 © 2008 – 2012 MRI Software LLC.
Review
Key Points In this lesson, you learned the following key points:
• Delinquency lease notes can be entered and printed
• Late letters can be generated in the Commercial Management Collections page
• Delinquency information for the tenant and the Tenant Ledger can be viewed in the Collections screen
• You can generate the Aged Delinquencies Report within the Collections page
Lesson 1 Lab Exercises
Please refer to the CM Training Workbook for exercises pertaining to this lesson.

Training Guide Page 216 © 2008 – 2012 MRI Software LLC.
Lesson 2: Working with Prepayments and Concessions
Overview
Purpose The purpose of this lesson is to show you how to work with prepayments and concessions.
Objectives After completing this lesson, you will be able to auto-apply prepayments and concessions.
Module 7: Working with Additional A/R Transactions
Training Guide Page 217 © 2008 – 2012 MRI Software LLC.
Applying Prepayments and Concessions
Overview A prepayment is a cash receipt entered either before the actual billing date of the corresponding charge or before the charge is billed. For example, prepaid rent is a type of prepayment. Your organization may track prepayments separately from regular payments since a prepayment is recognized as a liability until the prepayment amount is applied against the charge. When you set up income categories, you need to know whether or not your organization tracks prepayments. Tracking prepayments may affect how you determine the categories necessary for handling cash receipts for prepayments. If you choose, you can use one income category for all prepayments. However, you may want to set up a different income category for each type of prepayment you receive. Also, to track prepayments, you must relate income categories for charges to income categories for prepayments. You can generate the Income Category Listing report to review the relationships set up for applying prepayments.
Important: If your organization tracks prepayments, ensure all income categories used to receive prepayments are related to charge income categories. If all prepayment and charge income categories are not related, the system cannot properly credit prepayments to open charges when you apply prepayments as part of your accounts receivable activities.
Whether or not your organization forces and tracks prepayments affects how you can enter cash receipts for the prepayments you receive.

Module 7: Working with Additional A/R Transactions
Page 218 Training Guide © 2008 – 2012 MRI Software LLC.
Procedure Complete the following steps to auto-apply prepayments:
1. Create a relationship between prepayment and charge income categories.
2. Enter prepayments as tenant cash receipt transactions.
3. Verify that recurring charges have been created to post charges to the tenant ledger.
4. On the Commercial Management main page, click Daily Activities > Apply Prepayments/Concessions.
CM Apply Prepayments and Concessions Options
5. In the top portion of the screen, set the standard runtime parameters by, for example, including a building or buildings.
6. Select whether to apply Prepayments or Concessions.
7. In the Processing Date field, enter the date of the charges that have become due. Very often, that will be the first day of the current month. The Processing Date will become the transaction date for the apply transactions in the affected tenants’ ledgers.

Module 7: Working with Additional A/R Transactions
Training Guide Page 219 © 2008 – 2012 MRI Software LLC.
8. Clear the Update Prepayments/Concessions? Checkbox the first time you generate this report.
9. Click Print to generate a preliminary report of the prepayments or concessions to be applied.
10. Review the details for each prepayment on the report, and then make corrections as necessary.
11. Repeat Step 4 to return to the Apply Prepayments/ Concessions page.
12. Complete the fields.
13. Select the Update Prepayments/Concession checkbox.
14. Refer to the following table to determine how to post the applied prepayments: If you want to post the applied prepayment to…
Then…
The current period Select the Post to Current Period checkbox.
A period other than the current period
Clear the Post to Current Period checkbox, and type the period (MM/YY) to which to post the applied prepayments in the Posting Period field.
Note: If the Select Posting Period check box is cleared on the Commercial Management Options form on the Management Options view in Windows, you cannot post the applied prepayments to a period other than the current period.
If you select the Post to Current Period checkbox, the system posts the applied prepayments to the current period regardless of any value entered in the Posting Period field.
15. Click Print to do the following:
• Generate a final report of the applied prepayments or concessions
• Post the applied prepayments or concessions to the tenant ledger

Module 7: Working with Additional A/R Transactions
Page 220 Training Guide © 2008 – 2012 MRI Software LLC.
Review
Key Points In this lesson, you learned the following key points:
• What a prepayment is and how it is used
• What a concession is and how it is used
• Prepayment income categories need to be mapped to charge income categories
• How to apply prepayments and concessions

Training Guide Page 221 © 2008 – 2012 MRI Software LLC.
Lesson 3: FASB 13 Adjustments
Overview
Purpose The purpose of this lesson is to show you how to create FASB 13 manual adjustments.
Objectives After completing this lesson, you will be able to manually create straight-line rent adjustments.

Module 7: Working with Additional A/R Transactions
Page 222 Training Guide © 2008 – 2012 MRI Software LLC.
Manual Straight-Line Rent Adjustments
Overview From the FASB Manual Adjustments page, you can make manual modifications to straight-line rent adjustments. You can do all of the following tasks:
• Add or modify straight-line rent adjustments
• Amortize the outstanding straight-line adjustment balances of leases with term changes
• Create straight-line rent adjustment reversals
You can review information about the manual modifications made to straight-line rent adjustments on the FASB13 Lease History report.

Module 7: Working with Additional A/R Transactions
Training Guide Page 223 © 2008 – 2012 MRI Software LLC.
Procedure Complete the following steps to manually add a straight-line rent adjustment:
1. From the Commercial Management Main Page, click Daily Activities > FASB Manual Adjustments.
2. Complete the Building ID and Lease ID fields to specify the lease associated with the straight-line rent adjustment.
The system displays the existing straight-line rent adjustments for the lease in the detail grid.
3. Click Add to add a new line in the detail grid.
4. Complete the Period, Income Category, Description, and Amount fields.
Note: Keep in mind that you can only have one manually added straight-line rent adjustment for a unique combination of a period and income category.
5. Click Save when finished.
Manual Adjustments View
Module 7: Working with Additional A/R Transactions
Page 224 Training Guide © 2008 – 2012 MRI Software LLC.
Automatic Straight-Line Rent Adjustments
Overview Using the Automatic Reversals program, you can create straight-line rent adjustment reversals for leases with term changes that occur after adjustments have already been calculated. Therefore, if you created recurring charges before a lease's term change was processed, you are able to reverse any straight-line rent adjustment amount that was calculated for a period that is no longer associated with the original lease. When you create straight-line rent adjustment reversals by generating the report for the Automatic Reversals program, the system automatically determines the applicable leases and adjustments for a period you specify. The system only creates reversing adjustments for the inactive leases with existing straight-line rent adjustments that were calculated for periods which are greater than the periods associated with the vacate dates of the leases.
Note: When you process term changes such as early renewals, transfers, or expansions using the lease administration wizard, the system enters a vacate date for the original lease that is marked as inactive as a result of the change.
In addition to creating straight-line rent adjustment reversals automatically by running the Automatic Reversals program, you can also create straight-line rent adjustments manually on the FASB Manual Adjustments page. You can create manual straight-line rent adjustment reversals only if the Automatic Reversals checkbox is cleared in the CM management options for processing straight-line rent adjustment calculations.

Module 7: Working with Additional A/R Transactions
Training Guide Page 225 © 2008 – 2012 MRI Software LLC.
Procedure Complete the following steps to automatically create straight-line rent adjustment reversals by running the Automatic Reversals program:
1. On the Reports menu, click Personalize My Reports and then click [+] next to Commercial Management.
2. Select the report FASB13 Automatic Reversals.
3. Set the standard options in the upper area of the report page.
4. Clear the Update Automatic Reversals checkbox so you can run a preliminary version of the report.
5. Refer to the following table to determine how to continue:
If you want to create straight-line rent reversals for straight-line rent adjustments calculated for…
Then…
The current period Select the Current Period checkbox.
A period other than the current period
Clear the Current Period checkbox, and type the period in MM/YY format in the Period for Reversal field.
6. Click Print to generate a preliminary report of the straight-line rent adjustment reversals to be created.
7. Review the details of each reversal on the report, and then make corrections as necessary.
Module 7: Working with Additional A/R Transactions
Page 226 Training Guide © 2008 – 2012 MRI Software LLC.
8. Repeat Step 1 to return to the report options.
9. Set the standard options in the upper area, selecting the same values you specified in Step 3.
10. Select the Update Automatic Reversals checkbox so you can run an update version of the report.
11. Complete the Current Period checkbox and the Period for Reversal field in the same manner as in Step 5 to ensure that the update version of the report contains the same information you reviewed on the preliminary report.
12. Click Print Report to do the following:
• Create straight-line rent adjustment reversals for the period you specified
• Generate a final report of the straight-line rent adjustment reversals

Module 7: Working with Additional A/R Transactions
Training Guide Page 227 © 2008 – 2012 MRI Software LLC.
Review
Key Points In this lesson, you learned the following key points:
• FASB Adjustments can be manually adjusted
• FASB Adjustments can be reversed automatically using the Automatic Reversals program
Lesson 3 Lab Exercises
Please refer to the CM Training Workbook for exercises pertaining to this lesson.

Module 7: Working with Additional A/R Transactions
Page 228 Training Guide © 2008 – 2012 MRI Software LLC.

Training Guide Page 229 © 2008 – 2012 MRI Software LLC.
Lesson 4: Working with CPI Increases
Overview
Purpose The purpose of this lesson is to show you how to print CPI invoices and bill CPI increases.
Objectives After completing this lesson, you will be able to:
• Print CPI invoices
• Bill CPI increases
Consumer Price Index (CPI) indexes enable you to increase rent charges based on a measurement of inflation documented in a CPI source. When you bill a CPI increase, the system uses this information to calculate the increase for each lease. When you invoice the CPI increase, the system generates letters and invoices you may send to tenants informing them of the adjustment amounts due as a result of the calculated CPI increase. The system calculates any retroactive adjustments and charges them to the tenant ledger. When the adjustments are calculated, the system saves the new monthly CPI amounts as recurring or future charges depending on whether the effective date occurs in the past or future.
Basic CPI Increase Process The following tasks make up the basic CPI increase process:
1. Set up CPI index amounts (as done in Module 4, Lesson 4: Setting up Lease Billing Information).
2. Set up CPI increase information for leases (as done in Module 4, Lesson 4: Setting up Lease Billing Information).
3. Print invoices for the CPI increases.
4. Bill CPI increases to calculate increases or retroactive adjustments and post the amounts to the tenant ledger.

Module 7: Working with Additional A/R Transactions
Page 230 Training Guide © 2008 – 2012 MRI Software LLC.
Setting up CPI Indexes
Overview Consumer Price Index (CPI) indexes enable you to increase rent charges based on a measurement of inflation documented in a CPI source. Many CPI sources exist, such as the U.S. All Urban Workers Index and the Los Angeles Urban Workers Index. Once you determine the CPI source to use, you set up the CPI index amounts in monthly increments by year based on the source and then set up CPI increase information for each lease when completing billing information.
Before You Begin Prior to setting up leases for CPI increases, there are several other setup points:
• Create CPI Indexes in the CPI Index table
• Update Building Table, Accounting Group, Billing Options with a default CPI Index to use for leases in each building (optional).
CPI Increase Report Page

Module 7: Working with Additional A/R Transactions
Training Guide Page 231 © 2008 – 2012 MRI Software LLC.
CPI Processing Sequence CPI processing must be done in a specific sequence:
1. Perform the setup tasks (as listed in Before You Begin), and enter CPI data in the lease record.
2. Generate the Bill CPI Increases report from the Commercial Management Monthly Activities menu in Edit mode. Be sure the Update Tables checkbox is cleared.
3. If the report is correct, Print CPI Invoices from the Commercial Management Monthly Activities menu.
4. Generate the Bill CPI Increases report again in Update mode.
• New recurring charge amounts are updated
• Retroactive billing amounts are posted directly to the tenant ledger
• The next time RENTUP is run, the new recurring amounts will be billed
Procedure Complete the following steps to set up CPI increase information for a lease:
1. Select the desired lease.
2. Click Billing on the activity bar, and then click CPI.
3. Click Add to add a new CPI record.
The CPI Detail page is displayed.
CPI Detail page

Module 7: Working with Additional A/R Transactions
Page 232 Training Guide © 2008 – 2012 MRI Software LLC.
4. Complete the applicable fields:
Field Action/Description Income Category
Identifies the income category on which to annualize and base the CPI increase. Example: RNT (Always select this category at run-time of BILLCPI).
Alt Calc Inc Cat If a user wants to base charges on one income category but create new CPI charges with another code, enter [RNT] in the Income Category field and enter the other code here on which to base the CPI increase. Example: Income Category = RNT and Alt Calc Inc Cat = CPI
Effective Month/Day This field will establish the month and day portion of the new recurring charge.
Comparison Month The month in the CPI table that will be compared to the base month. When you generate the Bill CPI Increase report, the month of the comparison period for the report will agree to the comparison month in the lease record for all those leases included in that period’s report.
# of Months Between Increases
The frequency of the lease’s CPI increases. This is typically 12,24 or 36; but may also be 6 (semi-annually) or 1 (monthly)
# of Months for Initial Billing Number of months on which to base initial billing (Informational only)
CPI Index ID Select a CPI Index ID from the list. Base Year The year in the designated CPI table
with which to base the increases. Base Month The month in the designated CPI
table with which to base the increases.
Rolling Base Year If this is checked, the CPI is always compared to the previous year. The base year and the base month fields are ignored.
CPI Value This field is updated by the system, and will show the base value used for the CPI increase calculation. However, you may enter a base CPI Value here if, for example, your CPI table does not go back far enough to establish this lease’s base value.

Module 7: Working with Additional A/R Transactions
Training Guide Page 233 © 2008 – 2012 MRI Software LLC.
Field Action/Description Initial Comparison Period This field tells the system the first
time that the lease should be included in the Bill CPI Increases report and calculation. It normally contains the same month as the comparison month. After CPI is initially billed for this lease, subsequent calculations will use the Last Increase field to determine when to bill the next increase.
Base Rent Date (e.g., original base rent amount for the lease)
Often, the current rent charge (specified in Income Category, or Alt Calc Inc Cat if both are used) provides the amount to be increased. If a historical charge should be used, enter the effective date of that charge from the recurring charges page.
Formula ID CPI increases are calculated according to formulas. Select the formula to use for this lease. Two formulas are included with MRI: BILLCPI, which calculates the new charge and the retroactive amount due; and CPIBILLRCP, which also considers any amounts not billed in prior increases because the increase exceeded the cap.
Limitation Percent This field may be used when a lease specifies that only a percentage of rent is subject to the CPI increase.
Maximum % Increase and Minimum % Increase
Use these fields if indicated by lease terms.
Unused Cap Amt (System-maintained). It may be entered if you are setting up an existing lease from a prior system and the last increase on that system exceeded the cap.
Rent Tax ID and Fee Exempt
This field is used when the Bill CPI program is creating a new recurring charge. If the new charge should have a Rent Tax ID associated with it, enter it here.
Fee Exempt This field is used when the Bill CPI program is creating a new recurring charge. If it should be exempt from management fee calculations, select this checkbox.
5. Click Save when finished.
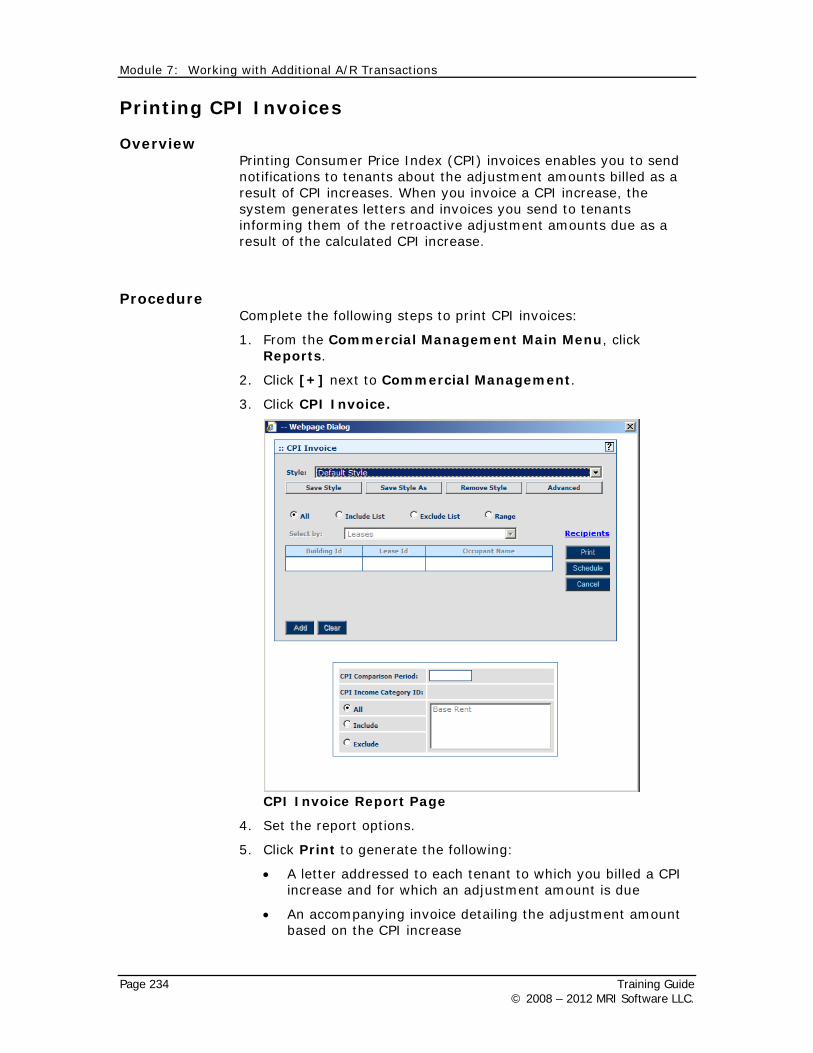
Module 7: Working with Additional A/R Transactions
Page 234 Training Guide © 2008 – 2012 MRI Software LLC.
Printing CPI Invoices
Overview Printing Consumer Price Index (CPI) invoices enables you to send notifications to tenants about the adjustment amounts billed as a result of CPI increases. When you invoice a CPI increase, the system generates letters and invoices you send to tenants informing them of the retroactive adjustment amounts due as a result of the calculated CPI increase.
Procedure Complete the following steps to print CPI invoices:
1. From the Commercial Management Main Menu, click Reports.
2. Click [+] next to Commercial Management.
3. Click CPI Invoice.
CPI Invoice Report Page
4. Set the report options.
5. Click Print to generate the following:
• A letter addressed to each tenant to which you billed a CPI increase and for which an adjustment amount is due
• An accompanying invoice detailing the adjustment amount based on the CPI increase

Module 7: Working with Additional A/R Transactions
Training Guide Page 235 © 2008 – 2012 MRI Software LLC.
Billing CPI Increases
Overview When you bill CPI increases, the system calculates a percentage increase:
• For a lease with CPI increase information set up
• For the income category specified in the Income Category field of the CPI information for the lease
• Using the formula specified in the CPI information for the lease
• Based on the percentage increase, or decrease, of a current year comparison month index from a base year and month index, as specified in the Comparison Month, Base Year, and Base Month fields in the CPI information for the lease
Note: If an income category is specified in the Alt Calc Int Cat field in the CPI information for the lease, the system uses it for the increase calculations instead of the income category in the Income Category field.
The system then applies the calculated percentage to a previous year amount. Next, the system posts the CPI increase amounts to the tenant ledger and then sets up the new recurring amount as a recurring charge. The system compares any amounts previously billed to the tenant and determines the difference between what was actually billed and what should have been billed and then retroactively bills any missing adjustments to the tenant ledger.

Module 7: Working with Additional A/R Transactions
Page 236 Training Guide © 2008 – 2012 MRI Software LLC.
Procedure Complete the following steps to bill CPI increases:
1. Determine the CPI index amount that provides the correct increase percentages.
2. Set up the following:
• CPI index amounts
• CPI increase information for applicable leases
3. On the Commercial Management main page, click Monthly Activities > Bill CPI Increases.
CPI Increase Report Page
4. Complete the applicable fields.
5. Clear the Update Tables checkbox to generate a preliminary report.
6. Click Print to generate a preliminary report of the CPI increases to be posted.
7. Review the details for each CPI increase on the report, and then make corrections as necessary.
8. Repeat Step 3 to return to the Bill CPI Increases report page.
9. Complete the applicable fields.
10. Select the Update Tables checkbox.

Module 7: Working with Additional A/R Transactions
Training Guide Page 237 © 2008 – 2012 MRI Software LLC.
11. In the Charge Date field, type the date the system will use to charge CPI increases.
12. Refer to the following table to determine how to post CPI increases: If you want to post the retroactive adjustment to…
Then…
The current period Select the Post to Current Period checkbox.
A period other than the current period
Clear the Post to Current Period checkbox and type the period (MM/YY) in the Posting Period field.
13. Click Print to do the following:
• Generate a final report of the CPI increases
• Post the calculated CPI increase amounts to the tenant ledger
Review
Key Points In this lesson, you learned the following key points:
• The basic CPI Increase process
• How CPI increases are calculated
Lesson 4 Lab Exercises
Please refer to the CM Training Workbook for exercises pertaining to this lesson.

Training Guide Page 238 © 2008 – 2012 MRI Software LLC.
Module 8: Performing Monthly Activities
Module Overview
Purpose The purpose of this module is to show you how to perform various periodic activities.
Objectives After completing this module, you will be able to:
• Create recurring charges
• Print monthly statements
• Calculate late fees
• Calculate management fees
• Calculate security deposit interest
• Create journal entries
• Close a period in CM

Module 8: Performing Monthly Activities
Training Guide Page 239 © 2008 – 2012 MRI Software LLC.

Training Guide Page 240 © 2008 – 2012 MRI Software LLC.
Lesson 1: Creating Recurring Charges
Overview
Purpose The purpose of this lesson is to show you how to create recurring charges.
Objectives After completing this lesson, you will be able to understand and create recurring charges.

Module 8: Performing Monthly Activities
Training Guide Page 241 © 2008 – 2012 MRI Software LLC.
Creating Recurring Charges
Overview Creating recurring charges, or RENTUP, is done to bill tenants for monthly rent charges and rate increases and to perform various lease maintenance tasks that ensure lease information is accurate.
Settings that Affect Creating Recurring Charges To create recurring charges for leases in a building, the building must be active. If the building is inactive, the system will not create recurring charges for the building. You can set management options that affect how you create recurring charges. The following checkboxes affect recurring charges:
• Force Transaction Date to be Greater than Last Rentup Date checkbox affects the date you can specify for tenant cash receipts entered as batch transactions. Once you create recurring charges for a building, you cannot enter cash receipts for a date before the date on which you created recurring charges. If the practices of your organization allow you to back-date cash receipt transactions, you must clear the Force Transaction Date to be Greater than Last Rentup Date checkbox.
• Force Close Prior to Rentup checkbox requires you to close a period before you can create recurring charges for a later period.

Module 8: Performing Monthly Activities
Page 242 Training Guide © 2008 – 2012 MRI Software LLC.
Preliminary Reports for Reviewing Charges You can review the charges to be posted to the tenant ledger by generating a preliminary version of the Rental Update (RENTUP) List report. To generate a preliminary version of the report, you must clear the Update Rent Assessment checkbox when you complete the fields to create recurring charges.
Important: MRI Software recommends you review the charges before posting them to the tenant ledger.
When you generate a preliminary version of the report, the system displays information about the charges on the report but does not post the charges to the tenant ledger.
Updated Versions of the Report to Post Charges After you review the details of the preliminary version of the Rental Update List report and make any corrections as necessary, you must then generate an update version of the report to post the charges to the tenant ledger. To generate an update version of the report, you must select the Update Rent Assessment checkbox when you complete the fields to create recurring charges.
Important: Be sure to verify the period to which charges should post before you generate an update version of the report. The posting period can affect management fee calculations and reports for which you can choose to select information to display by date or by period.
When you generate an update version of the report, the system performs the following tasks:
• Verifies that recurring charges were not yet created for the date you specified as the effective date for the posted charges.
• Updates the RENTUP Processing Date field in the building table to the current system date to indicate the last date recurring charges were processed for the building
• Updates the last billing date for the building with the date you specified as the effective date for the posted charges.

Module 8: Performing Monthly Activities
Training Guide Page 243 © 2008 – 2012 MRI Software LLC.
• Posts the recurring charges set up for leases to the tenant ledger as transactions using the Charge (CH) source code to indicate that the transactions are charges to tenants. If you set up recurring charges with non-monthly billing frequencies to automatically apportion journal entries, the system determines the apportioned amounts of the charges related to the posting period you specify when you complete the fields to create recurring charges, and then posts the apportioned amounts.
Important: The system does not post charges to the tenant ledger for a lease if the lease is set up not to create recurring charges as part of its billing options or if the system date reaches the alternate stop billing date for the lease.
Note: You can generate the Recurring Charges List report to review recurring charges and recurring concessions set up for leases. Past and current recurring charges appear if you click the Recurring Charges option button. In addition, you can display future recurring charges by selecting the Include Future Charges checkbox.
• Posts the recurring concessions set up for leases to the tenant ledger as transactions using the Non-cash Adjustment (NC) source code to indicate that the transactions are non-cash credits. The system only posts recurring concessions for which the start date of the concession occurs on or before the current system date and the end date for the concession occurs in the future.
• Processes rate changes if there are multiple recurring charges for the same income category, billing frequency, and lease. The system enters an end date for the old charge and then posts the charge for the new rate as it would any other recurring charge, as described above.
• Processes prorated charges, such as mid-month rent increases.
• Calculates the amount of leased and available square footage for the building, and then updates the building, if applicable.
• Calculates and assesses taxes on recurring charges, if applicable.
• Calculates the vacancy rent potential for suites in the building.
• Updates the occupancy status of each lease in the building, if applicable.

Module 8: Performing Monthly Activities
Page 244 Training Guide © 2008 – 2012 MRI Software LLC.
• Calculates straight-line rent adjustments for buildings set up for straight-line rent adjustments, if applicable.
• Resets the number of late fees charged since the last time recurring charges were created to '0' for each lease in the building.
• Summarizes the gross potential, vacancy loss, total charges, and straight-line rent adjustment amount by building for each income category on the Rental Update List report.
Procedure Complete the following steps to create recurring charges:
1. From the Commercial Management Main Page, click Monthly Activities > Create Recurring Charges.
The Rental Update List report page is displayed.
Rental Update List Report Page
2. Select the building(s) for which you want to create recurring charges.
3. Clear the Update Rental Assessment checkbox the first time you generate this report.
4. Click Print to generate a preliminary report of the charges to be posted.
5. Review the details of each charge on the report, and then make corrections as necessary.

Module 8: Performing Monthly Activities
Training Guide Page 245 © 2008 – 2012 MRI Software LLC.
6. Repeat Step 1 to return to the Create Recurring Charges page.
7. Select the building(s) for which you want to create recurring charges.
8. Select the Update Rental Assessment checkbox.
9. Refer to the following table to determine how to post the charges: If you want to post charges to…
Then…
The current Select the Post to Current Period checkbox. This will create the transaction in the oldest open period.
A period other than the current period
Clear the Post to Current Period checkbox. Type the period (MM/YY) to which to post the charges in the Posting Period field.
10. Click Print to do the following:
• Calculate rent increases
• Generate a final report of the charges
• Post charges to the tenant ledger
Review
Key Points In this lesson, you learned the following key points:
• Which settings affect the RENTUP process
• How the settings affect the process
• How to review and post recurring charges
Lesson 1 Lab Exercises
Please refer to the CM Training Workbook for exercises pertaining to this lesson.

Training Guide Page 246 © 2008 – 2012 MRI Software LLC.
Lesson 2: Printing Monthly Statements
Overview
Purpose The purpose of this lesson is to show you how to print monthly statements.
Objectives After completing this lesson, you will be able to:
• Print tenant statements
• Print immediate bill items

Module 8: Performing Monthly Activities
Training Guide Page 247 © 2008 – 2012 MRI Software LLC.
Printing Tenant Statements
Overview Tenant statements may be printed to send courtesy statements or invoices to tenants. Before you print statements, be sure to post transactions to the tenant ledger by creating recurring charges and/or posting batches. You can choose to generate the following:
• New invoices for open and closed charges without invoice numbers. The system assigns an invoice number to each charge when you generate the statements
• A range of invoices you specify
• Statements for all open charges and available credits
Print Formats You can print tenant statements using the following standard formats:
• Horizontal Perf with Remittance Slip on Bottom: Designed for statement paper with horizontal perforations on the bottom of each page.
• Horizontal Perf with Remittance Slip on Top: Designed for statement paper with horizontal perforations on the top of each page.
• Vertical Perf: Designed for statement paper with vertical perforations on the right side of each page.
You may also design your own custom statement formats. For information about designing custom formats, refer to the ReportDesign documentation.
Monthly Statement Printing Options
Module 8: Performing Monthly Activities
Page 248 Training Guide © 2008 – 2012 MRI Software LLC.
Printing Options Use the following information to select the options to print statements:
• Invoices may be reprinted by number and will only include items not previously invoiced. Statements are used to print all open items, whether or not they have been invoiced. In the runtime options, select Invoice New Items, Reprint Invoices or Print Statements.
• If printing invoices, use the Open Items Only option to specify whether paid items not previously invoiced should be included. Select to include only open charges; clear to include all items not previously invoiced.
• Invoices and statements show the aging of open charges. Use the Aging By options and the Periods to control how the aging is calculated.
• Available income categories are listed in the bottom center of the runtime options. You may include or exclude income categories or include all of them using the radio buttons. With include and exclude, you may select multiple income categories by clicking each one.
• Use the Issue From radio buttons to select the return address for the statements. If issued from Management, the system uses the address from the Management Options view in Windows. If issued by Building, the system uses the Building Address from the Addresses tab within the Building Maintenance page.
• Select the lease occupancy statuses to include. You may want to select only new and current, for example. You must select at least one status.

Module 8: Performing Monthly Activities
Training Guide Page 249 © 2008 – 2012 MRI Software LLC.
Printing Immediate Bill Items
Overview The Standard Statement–Select Period, Immediate Bill statement enables you to print statements to send to tenants for immediate bill items. The system bases information for statements on a period you specify. You may choose to include only the open charges marked for immediate billing on the statements. Before you can print statements you must post transactions to the tenant ledger by creating recurring charges and posting batches.
Note: You can only mark miscellaneous tenant charges for immediate billing. Charges marked for immediate billing have '@I' specified at the beginning of their descriptions.

Module 8: Performing Monthly Activities
Page 250 Training Guide © 2008 – 2012 MRI Software LLC.
Review
Key Points In this lesson, you learned the following key points:
• Reports that are used for printing the following:
o Tenant Statements
o Immediate Bill Items
• The printing options for tenant statements
Lesson 2 Lab Exercises
Please refer to the CM Training Workbook for exercises pertaining to this lesson.

Module 8: Performing Monthly Activities
Training Guide Page 251 © 2008 – 2012 MRI Software LLC.
Lesson 3: Calculating Late Fees
Overview
Purpose The purpose of this lesson is to show you how to calculate late fees in MRI.
Objectives After completing this lesson, you will be able to calculate late fees in MRI.

Module 8: Performing Monthly Activities
Page 252 Training Guide © 2008 – 2012 MRI Software LLC.
Calculating Late Fees
Overview A late fee is a charge assessed to a tenant for an open tenant ledger balance that has reached its delinquency day. The system posts late fee charges to the tenant ledger using the Charge (CH) source code to indicate that the transactions are charges to tenants.
Procedure Complete the following steps to calculate late fees:
1. From the Commercial Management Main Page, click Monthly Activities > Calculate Late Fees.
The Calculate Late Fees printing options page is displayed.
Calculate Late Fees Printing Options Page
2. Enter the processing date which will become the transaction date of the late fee charge.
3. Enter the income category for the late fee charge in the Late Fee Income Category field.
4. There are two Balance Due Methods: Current Open Items Only will not charge a late fee if a charge was still open on it’s delinquency date but has been paid by the processing date. Items Open on the Delinquent Date will charge a late fee if items were open on the delinquency date, even if they have since been paid.

Module 8: Performing Monthly Activities
Training Guide Page 253 © 2008 – 2012 MRI Software LLC.
5. In the Charges From and Thru fields, enter the inclusive date range for the charges evaluated by the system as to delinquency.
6. Clear the Update Late Fees checkbox the first time you generate late fees.
7. Click Print to generate a preliminary report of the late fee charges to be posted.
8. Review the details for each charge on the report, and then make corrections as necessary.
9. Repeat Step 1 to return to the Calculate Late Fees Page.
10. Complete the appropriate fields.
11. Select the Update Late Fees checkbox.
12. Refer to the following table to determine how to post late fee charges:
If you want to post to… Then… The current period Select the Post to Current
Period checkbox. A period other than the current period
Clear the Post to Current Period checkbox. Type the period (MM/YY) to which to post the late fee in the Posting Period field
13. Click Print to do the following:
• Calculate late fee charges
• Generate a final report of the late fee charges
• Post late fee charges to the tenant ledger or an open batch (This will depend upon your CM management options.)

Module 8: Performing Monthly Activities
Page 254 Training Guide © 2008 – 2012 MRI Software LLC.
Review
Key Points In this lesson, you learned how to calculate late fees.
Lesson 3 Lab Exercises
Please refer to the CM Training Workbook for exercises pertaining to this lesson.
Training Guide Page 255 © 2008 – 2012 MRI Software LLC.
Lesson 4: Calculating Management Fees
Overview
Purpose The purpose of this lesson is to show you how to calculate management fees in MRI.
Objectives After completing this lesson, you will be able to understand and calculate management fees in MRI.

Module 8: Performing Monthly Activities
Page 256 Training Guide © 2008 – 2012 MRI Software LLC.
Calculating Management Fees
Overview A management fee is an amount paid to a property manager as compensation for services provided. Management fees are calculated by building. A management fee can be either of the following:
• Flat amount for the entire building, or
• Calculated percentage of posted transactions or charges for leases in the building. For management fees calculated based on a percentage rate, you can specify the income categories to use to calculate the fees and include non-tenant, security deposit apply, and credit apply transactions.
Note: To send management fee amounts to Accounts Payable (AP) as invoices, the Create AP Invoices for Refunds and Management Fees checkbox must be selected on the Management Fee Options form on the Commercial Management Options form for the Management Options view in Windows.
When you generate an update version of the report, the system performs the following tasks:
• Calculates management fee amounts
• Stores management fee amounts for journal entries if your organization transfers management fee transactions to the general ledger as journal entries
Note: If the Create CM Journal Entries checkbox is selected on the Management Fee Options form, your organization creates journal entries for management fees in the general ledger.
• Stores management fee amounts for calculating management fees multiple times per month if your organization calculates management fees based on a percentage rate
• Sends management fee amounts to AP if your organization sends management fee amounts to AP for invoicing
Note: If the Create AP Invoices for Refunds and Management Fees checkbox is selected on the Management Fee Options form, your organization sends management fee amounts to AP.
• Generates a final report of the management fee amounts

Module 8: Performing Monthly Activities
Training Guide Page 257 © 2008 – 2012 MRI Software LLC.
Procedure Complete the following steps to calculate management fees:
1. From the Commercial Management Main Page, click Monthly Activities > Calculate Management Fees.
The Calculate Management Fee printing options page is displayed.
Calculate Management Fees Options
2. Complete the appropriate selection criteria fields.
3. The Summary, Detail and Lease Transactions report type options control the amount of detail displayed on the report but do not affect the calculation. Summary shows the total for each building upon which a fee is calculated. Detail shows the total for each lease in the building and Lease Transactions shows every transaction subject to a fee. In all cases, the report displays the calculated management fee.

Module 8: Performing Monthly Activities
Page 258 Training Guide © 2008 – 2012 MRI Software LLC.
4. The Processing Date will become the invoice date if management fees are sent to MRI Accounts Payable.
5. Clear the Update Management Fee checkbox the first time you generate the report.
6. Click Print to generate a preliminary report of the management fee amounts.
7. Review the details for each management fee amount on the report, and then make corrections as necessary.
8. Repeat Step 1 to return to the Calculate Management Fees Page.
9. Complete the appropriate fields.
10. Select the Update Management Fee checkbox. If Update Management Fee is selected and MRI Accounts Payable invoices are created for management fees, you must either select Use Building Vendor or enter a Vendor ID in the Vendor Used for Creating Invoices field.
11. Refer to the following table to determine how to post the management fee amounts: If you want to store the management fee to…
Then…
The current period Select the Post to Current Period checkbox.
A period other than the current period
Clear the Post to Current Period checkbox. Type the period (MM/YY) to which to post the management fee in the Posting Period field
12. Click Print to do the following:
• Calculate management fee amounts
• Generate a final report of the management fee amounts
• Store management fee amounts in the system
Note: You may run the Calculate Management Fees program more than once for the same period. The system will evaluate the transactions and determine what new activity should be calculated and invoiced.
Module 8: Performing Monthly Activities
Training Guide Page 259 © 2008 – 2012 MRI Software LLC.
Review
Key Points In this lesson, you learned the following key points:
• Management fees can be a flat rate for the entire building or a calculated percentage of the posted transactions or charges per lease
• You should review the management fees before generating the report in update mode
• Once you generate the report, the management fees will be calculated and stored
Lesson 4 Lab Exercises
Please refer to the CM Training Workbook for exercises pertaining to this lesson.
Training Guide Page 260 © 2008 – 2012 MRI Software LLC.
Lesson 5: Creating Journal Entries
Overview
Purpose The purpose of this lesson is to show you how to create journal entries.
Objectives After completing this lesson, you will be able to understand and create journal entries.

Module 8: Performing Monthly Activities
Training Guide Page 261 © 2008 – 2012 MRI Software LLC.
Creating Journal Entries
Overview CM transactions are posted to the general ledger by creating journal entries. Transactions used to create journal entries are selected by a period you specify, and they include:
• Transactions posted to the tenant, non-tenant, and security deposit ledgers
Note: You can set up CM to automatically create and transfer journal entries to the general ledger upon posting transactions by selecting the Real Time Journal Entry checkbox on the Commercial Management Options form on the Management Options view in Windows. To successfully create real-time journal entries, you must set up each building to create detailed journal entries.
Note: You can create accrual-basis journal entries for charges, credits, and one-time concessions posted to the tenant ledger using revenue recognition processing. To enable revenue recognition processing when creating journal entries, you must select the Revenue Recognition checkbox on the Commercial Management Options form.
• Calculated vacancy rent potential amounts for vacant suites within a building, as stored by the system when creating recurring charges
• Calculated management fee amounts, as stored by the system when calculating management fees
Note: The system only journalizes management fee amounts if the Create CM Journal Entries checkbox is selected on the Management Fee Options form on the Commercial Management Options form for the Management Options view in Windows.
Important: Although you can create journal entries multiple times during a month, you cannot close a CM period until you create journal entries for all transactions posted to the period.

Module 8: Performing Monthly Activities
Page 262 Training Guide © 2008 – 2012 MRI Software LLC.
Preliminary Reports for Reviewing Journal Entries You can review the journal entries to be transferred to the general ledger by generating a preliminary version of the Create CM Journal Entries report. To generate a preliminary version of the report, you must clear the Update Journal Entries checkbox when you select the report options to create journal entries.
Important: MRI Software recommends that you review the journal entries before transferring them to the general ledger.
When you generate a preliminary version of the report, the system displays information about the journal entries on the report but does not transfer the journal entries to the general ledger. Understanding general ledger interface chart messages that may appear on the report can help you to resolve issues pertaining to your general ledger interface charts and ensure journal entries are created successfully.

Module 8: Performing Monthly Activities
Training Guide Page 263 © 2008 – 2012 MRI Software LLC.
Update Version of the Report to Transfer Journal Entries to the GL After you review the details of the preliminary version of the Create CM Journal Entries report and make any corrections as necessary, you must then generate an update version of the report to transfer the journal entries to the general ledger. To generate an update version of the report, you must select the Update Journal Entries checkbox when you select the report options to create journal entries. When generating an update version of the report, the system performs the following tasks:
• Creates journal entries from the transactions posted to the period specified as the transaction period
• Creates relationships between transactions and the journal entries they become, if applicable
• generates a final report of the journal entries created and transferred to the general ledger
• Marks the transactions used to create journal entries as journalized
• Transfers the journal entries to the general ledger
Note: The first time you create journal entries for a new building, the system informs you that the building is in its initial balance period. For the initial balance period of a building, you can decide whether or not to create journal entries for the building.
Note: If you set up a building for inter-entity transfers, the system identifies the transactions to which inter-entity transfers apply and then creates the appropriate journal entries.
Note: If you set up recurring charges with non-monthly billing frequencies to automatically apportion journal entries, the system creates the appropriate journal entries.

Module 8: Performing Monthly Activities
Page 264 Training Guide © 2008 – 2012 MRI Software LLC.
Procedure Complete the following steps to create journal entries for a period:
1. Verify that general ledger interface charts are set up for income and security deposit categories.
2. Verify transactions are posted to the appropriate period for which to create journal entries.
3. From the Commercial Management Main Page, click Monthly Activities > End of Month Processing > Create Journal Entries.
The Create CM Journal Entries options page is displayed.
Create CM Journal Entries Options Page
4. Complete the appropriate selection criteria fields.
5. Clear the Update Journal Entries checkbox.
Important: MRI Software recommends that you review the journal entries before transferring them to the general ledger. Clearing the Update Journal Entries checkbox enables you to generate a preliminary report you can use to review the journal entries to be created and transferred to the general ledger.
Understanding GL interface chart messages that may appear on the report can help you to resolve issues pertaining to your general ledger interface charts and ensure journal entries are created successfully.
6. Click Print to generate a preliminary report of the journal entries to be created and transferred to the general ledger.

Module 8: Performing Monthly Activities
Training Guide Page 265 © 2008 – 2012 MRI Software LLC.
7. If the Initial Balance Period Journalization Selection window appears:
a. Review the buildings listed to verify that the period for which you are creating journal entries is the initial accounting period for each building.
Note: The first time you create journal entries for a new building, the system informs you that the building is in its initial balance period. For the initial balance period of a building, you can decide whether or not to create journal entries for the building.
b. Clear the checkbox to the left of each building for which to create journal entries. To clear all checkboxes for buildings on the Initial Balance Period Journalization Selection dialog box, click Deselect All.
Important: The system does not create journal entries for buildings with the checkbox selected. To create journal entries for transactions for a building, you must clear the checkbox.
c. Click OK.
8. Review the details for the journal entries on the report, and then make corrections as necessary.
9. Repeat Step 3 to return to the Create CM Journal Entries Page.
10. Complete the appropriate selection criteria fields.
11. Select the Update Journal Entries checkbox.
12. In the Transaction Period field, enter the period for which to create journal entries.
13. Click Print to do the following:
• Create journal entries from the transactions posted to the period specified in the Transaction Period field
• Generate a final report of the journal entries created and transferred to the general ledger
Important: If a message appears on the generated report alerting you that an item is not found in a general ledger interface chart, make sure an interface chart is set up for the source code and income or security deposit category identified in the message.
• Mark the CM transactions used to create journal entries as journalized
Module 8: Performing Monthly Activities
Page 266 Training Guide © 2008 – 2012 MRI Software LLC.
• Transfer the journal entries to the general ledger
14. If the Initial Balance Period Journalization Selection window appears before the system generates the report, repeat Step 7.
The system finishes creating journal entries and generates the final report.

Module 8: Performing Monthly Activities
Training Guide Page 267 © 2008 – 2012 MRI Software LLC.
Review
Key Points In this lesson, you learned the following key points:
• The transactions that are used to create journal entries
• In order to close CM, all of your transactions must be posted to the General Ledger by creating journal entries
• It is recommended that you generate the report in preliminary mode to review before posting
Lesson 5 Lab Exercises
Please refer to the CM Training Workbook for exercises pertaining to this lesson.

Module 8: Performing Monthly Activities
Page 268 Training Guide © 2008 – 2012 MRI Software LLC.

Training Guide Page 269 © 2008 – 2012 MRI Software LLC.
Lesson 6: Closing CM Periods
Overview
Purpose The purpose of this lesson is to show you how to close a period in CM.
Objectives After completing this lesson, you will be able to close a period in CM.

Module 8: Performing Monthly Activities
Page 270 Training Guide © 2008 – 2012 MRI Software LLC.
Closing CM Periods
Overview
Important: Once you close a period in CM, you cannot enter transactions, post batches, or create journal entries for the closed period.
You can close an accounting period for a building or group of buildings. Because CM operates on a calendar basis, it tracks the current period for each building until the period is closed. Each building has its own current accounting period, and all buildings must be closed each month since each building affects the ability to close the current accounting period of the entity for the building.
Important: You cannot close a period in CM unless journal entries were created for all transactions posted to the period.
When you close an accounting period for a building, the system advances the building to the next accounting period. In addition, you can document the status of a period upon closing by generating and archiving the following:
• A predefined set of closing reports if the Run Standard MRI Closing Reports checkbox is selected on the Commercial Management Options form on the Management Options view in Windows. The predefined set of CM closing reports includes the Rent Roll report and the Occupancy report.
• The reports in the closing report batch if a report batch is selected in the Closing Report Batch ID field on the Commercial Management Options form on the Management Options view in Windows.

Module 8: Performing Monthly Activities
Training Guide Page 271 © 2008 – 2012 MRI Software LLC.
Procedure Complete the following steps to close a period in CM:
1. Create journal entries for the period to close.
2. From the Commercial Management main page, click Monthly Activities > End of Month Processing > Close Period.
The Close Period options page is displayed.
Close Period Options Page
3. Complete the appropriate fields, and click Print.
4. Refer to the following table to determine how to continue based on the message that appears: If a message appears alerting you that…
Then…
You cannot close the period for a building or list of buildings
Verify the reasons provided by the system, and click OK to continue closing the period for the remaining buildings you specified.
An open batch contains transactions for a building you are closing
a. Determine whether or not the batch transactions should be posted to the period you are closing.
b. Click Yes to continue the close without including the transactions, or click No to abort the close.
Note: If all of the buildings you specified are unable to be closed, a message appears alerting you that the close is not complete. Click OK to acknowledge the close was not successfully completed. If no message appears, the period was closed successfully.
Module 8: Performing Monthly Activities
Page 272 Training Guide © 2008 – 2012 MRI Software LLC.
Review
Key Points In this lesson, you learned the following key points:
• The actions that are completed by running the close including the reports that are automatically run and stored
• All transactions must be posted before you can close a CM period
• Journal entries must be created before you can close a CM period
Lesson 6 Lab Exercises
Please refer to the CM Training Workbook for exercises pertaining to this lesson.

Training Guide Page 273 © 2008 – 2012 MRI Software LLC.
Module 9: Reports and Dashboards
Module Overview
Purpose The purpose of this module is to show you how to access and generate various CM reports.
Objectives After completing this module, you will be able to:
• Access Commercial Management Reports
• Understand the report options for the Rent Roll and Aged Delinquencies reports
• Create a report style
• Access the Property Manager dashboard

Module 9: Reports and Dashboards
Page 274 Training Guide © 2008 – 2012 MRI Software LLC.

Training Guide Page 275 © 2008 – 2012 MRI Software LLC.
Lesson 1: Accessing CM Reports
Overview
Purpose The purpose of this lesson is to show you how to access CM-specific reports.
Objectives After completing this lesson, you will be able to access the CM reports.

Module 9: Reports and Dashboards
Page 276 Training Guide © 2008 – 2012 MRI Software LLC.
Commercial Management Reports
Overview CM reports generally fall into the following categories:
• Leasing analysis
•
reports, to review detailed information about your leases. Some examples are the Rent Roll, Occupancy Report, Lease Profile and Rent Increase Report.
Ledger
•
reports, to review transactions and past due amounts posted to the tenant and security deposit ledgers and examine how the transactions affect your total accounts receivable. Some examples are the Receivables Ledger, the Security Deposits Ledger and the Aged Delinquencies.
Reference
•
reports, to review lists of information. Some examples are the Lease List, the Recurring Charges List and the Managers List.
Statements, invoices, and letters
•
to send to tenants.
Transaction
reports, to review transactions posted to the tenant, security deposit, and non-tenant ledgers. Examples include the Open Batch Listing Report, Closed Batch Report, and the Cash Detail Report.
Procedure Complete the following steps to access CM Reports:
1. From the Commercial Management Main Page, click Reports > Personalize My Reports.
2. Click the [+] sign next to Commercial Management.
3. Click the report you would like to generate. The report options will appear for that report.

Training Guide Page 277 © 2008 – 2012 MRI Software LLC.
Lesson 2: Generating CM Reports
Overview
Purpose The purpose of this lesson is to show you how to generate the Rent Roll and Aged Delinquencies reports.
Objectives After completing this lesson you will understand what the Rent Roll and Aged Delinquencies reports are used for and how to set the report options for each report.

Module 9: Reports and Dashboards
Page 278 Training Guide © 2008 – 2012 MRI Software LLC.
Generating the Rent Roll Report
Overview The Rent Roll report displays various lease information including:
• Occupancy status
• Rent dates
• Rent amounts
• Square footage information
• Other monthly income
When you generate the Rent Roll report, the system may calculate and update vacancy and occupied square footage amounts. The system determines whether or not to calculate and update the leased square footage amounts of each building or suite leased by a tenant based on the settings of checkboxes on the Commercial Management Options form on the Management Options view in Windows. If the Update Building Sqft Fields checkbox or Update Building BSQF Table checkbox is selected, the system updates the building square footage. If the Update Suite Sqft Field checkbox or Update Suite Lease Sqft checkbox is selected, the system updates the suite square footage.
Note: Although you can generate the Rent Roll report at any time, the system generates it automatically when you close a CM period if the Run Standard MRI Closing Reports checkbox is selected on the Commercial Management Options form on the Management Options view in Windows.
Procedure Complete the following steps to generate the Rent Roll report:
1. On the Commercial Management Main Menu, click Reports > Personalize My Reports.
2. Click the [+] next to Commercial Management.
3. Click on the Rent Roll report.
The Rent Roll report options page is displayed.
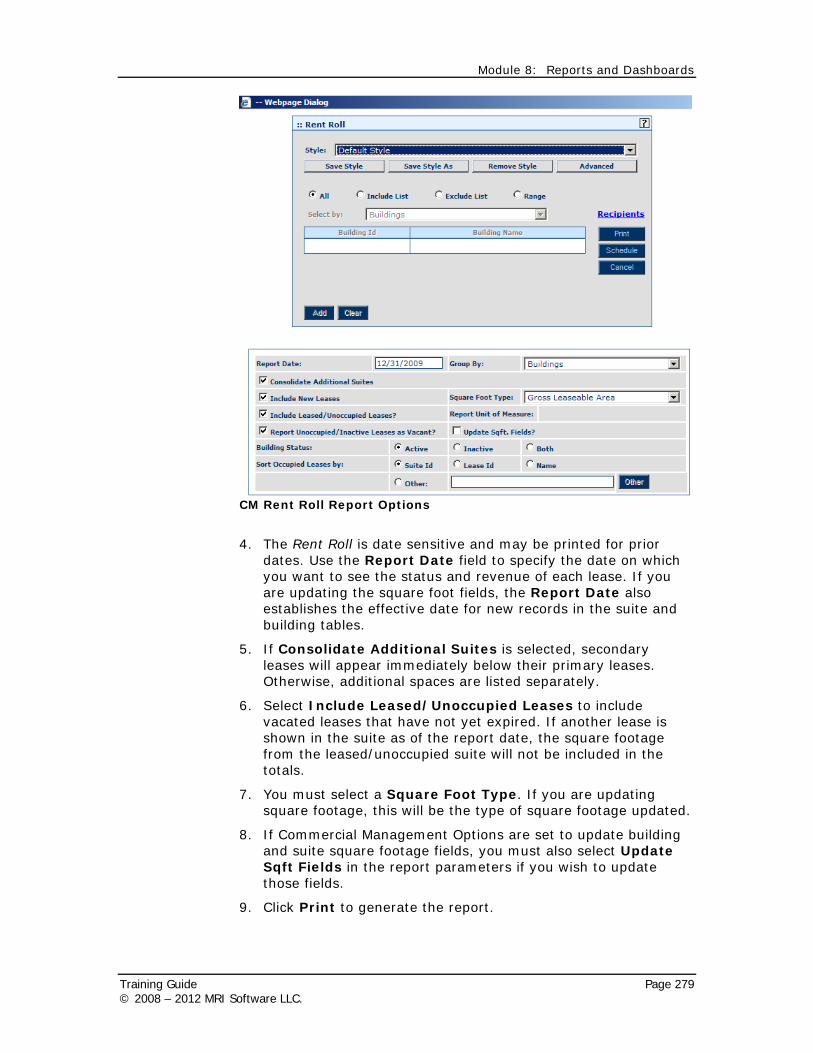
Module 8: Reports and Dashboards
Training Guide Page 279 © 2008 – 2012 MRI Software LLC.
CM Rent Roll Report Options
4. The Rent Roll is date sensitive and may be printed for prior dates. Use the Report Date field to specify the date on which you want to see the status and revenue of each lease. If you are updating the square foot fields, the Report Date also establishes the effective date for new records in the suite and building tables.
5. If Consolidate Additional Suites is selected, secondary leases will appear immediately below their primary leases. Otherwise, additional spaces are listed separately.
6. Select Include Leased/Unoccupied Leases to include vacated leases that have not yet expired. If another lease is shown in the suite as of the report date, the square footage from the leased/unoccupied suite will not be included in the totals.
7. You must select a Square Foot Type. If you are updating square footage, this will be the type of square footage updated.
8. If Commercial Management Options are set to update building and suite square footage fields, you must also select Update Sqft Fields in the report parameters if you wish to update those fields.
9. Click Print to generate the report.

Module 9: Reports and Dashboards
Page 280 Training Guide © 2008 – 2012 MRI Software LLC.
Generating the Aged Delinquencies Report
Overview The Aged Delinquencies report enables you to review outstanding tenant amounts. Only leases with outstanding amounts due appear on the report, and you can review information based on the date or period you specify. For each lease on the report, the system displays the date and amount of the last payment received above the information about the outstanding amounts. You can also include delinquency notes on the report. The way that the system ages outstanding amounts depends upon how you select information for the report:
If information for the report is selected by…
Then the system…
Date Ages outstanding amounts based on the type of date you click in the Aging By area and the intervals you specify in the Period fields.
Period Ages outstanding amounts based on one-month intervals.
Procedure Complete the following steps to generate the Aged Delinquencies report:
1. On the Report Menu, click Personalize My Reports.
2. Click the [+] next to Commercial Management.
3. Click the Aged Delinquencies report.
The Aged Delinquencies report options page is displayed.

Module 8: Reports and Dashboards
Training Guide Page 281 © 2008 – 2012 MRI Software LLC.
Aged Delinquencies Report Options
4. If you are using the Aged Delinquencies report to reconcile to the general ledger accounts receivable account, it is recommended that you generate the report by period to correspond to a general ledger period.
5. When generating the report by date, you may select which date the system should use for including transactions and for aging; the Billing Date, Due Date or Delinquency Date.
6. Detail displays every open transaction; Summary displays the items open for each lease by income category.
7. If you track prepayments to a separate general ledger account and you are reconciling your accounts receivable balance, select Don’t Age Prepayments. The prepayments will still show in the tenant totals and in the report totals.
8. Select Open Items Only if you wish to filter out any items that were outstanding as of the date or period of the report but have since been paid. The report date/period will be used to select the transactions and age them, but only the transactions still open as of the system date will be displayed on the report.
9. Select Include Notes to print any notes with reference type DELQ for the tenants on the report. You may limit the notes included by entering a Beginning Date.
10. Click Print to generate the report.

Training Guide Page 282 © 2008 – 2012 MRI Software LLC.
Lesson 3: Working with Report Styles
Overview
Purpose The purpose of this lesson is to show you how create a report style which will save your runtime settings.
Objectives After completing this lesson you will understand how to create, update and delete a report style.

Module 8: Reports and Dashboards
Training Guide Page 283 © 2008 – 2012 MRI Software LLC.
Creating, Modifying and Deleting Report Styles
Overview When generating your report, you will select options that determine what data is presented and how it is presented. If these options are used frequently, you can save time by creating a report style.
Procedure Complete the following steps to create a report style:
1. Open the report options of the report you would like to generate.
2. Select your options.
3. Click Save Style As under the Style field.
4. In the popup window, enter a description for the new style.
5. Click Save.
If there are a few styles, the next time you open the report, click the dropdown menu in the Style field and select the style you would like to use.
To delete a style, select the style, and then click Remove Style.
Module 9: Reports and Dashboards
Page 284 Training Guide © 2008 – 2012 MRI Software LLC.
Lesson 4: Working with Dashboards
Overview
Purpose The purpose of this lesson is to show you how to work within the Property Manager dashboard in CM Web.
Objectives After completing this lesson you will understand how to work with the Property Manager dashboard in CM Web.

Module 8: Reports and Dashboards
Training Guide Page 285 © 2008 – 2012 MRI Software LLC.
The Property Manager Dashboard
Overview The property manager dashboard allows you to have property information available at your fingertips, such as occupancy information and building reports that can easily be generated, enabling more efficient management of daily and monthly activities within the property.
Procedure Complete the following steps to access the dashboard:
1. From the Commercial Management main page, click on the yellow down-arrow to the right of the “home” icon.
2. Click on the Property Manager window that appears.
3. The Property Manager dashboard is displayed. In the upper
right-hand corner of the dashboard, select a building for which to display detailed information.
Property Manager Dashboard

Module 9: Reports and Dashboards
Page 286 Training Guide © 2008 – 2012 MRI Software LLC.
Refer to the below table for an explanation of each section of the dashboard: Section Function Building Information Displays information about the
building, including the address, landlord and property manager
Occupancy Information Displays occupancy statistics about the building as of a certain date. Click on the various hyperlinks in this section for more detailed information
Watchlist Displays typical watchlist information as well as any other items you may have added to your watchlist
Occupant Listing Allows you to quickly search for a particular lease for which to view details
To Do List In this section, you can add items that need to be done that pertain to the property
Building Reports Print various building reports from the available dropdown menu located in this section, such as an aged delinquency or rent roll report
Building Information
From within the Building Information section, you can view landlord or manager information by clicking on the associated hyperlink. You can also send the manager an email directly from your email client by clicking on the email hyperlink.
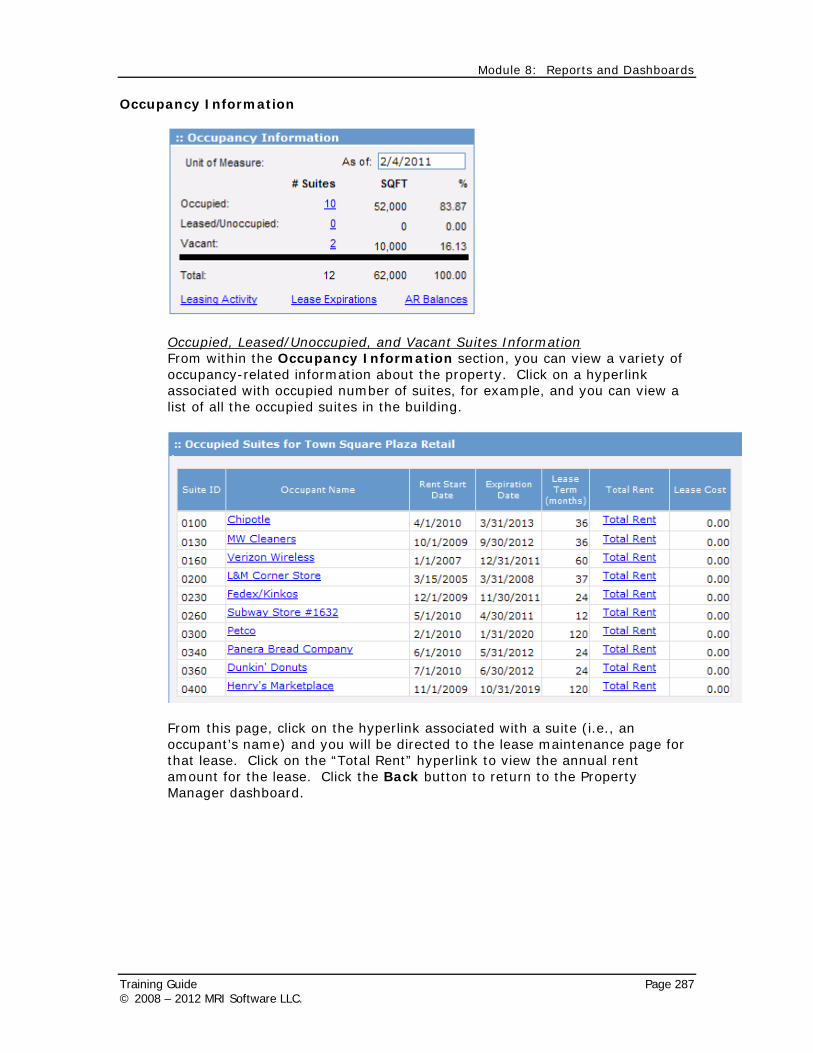
Module 8: Reports and Dashboards
Training Guide Page 287 © 2008 – 2012 MRI Software LLC.
Occupancy Information
Occupied, Leased/Unoccupied, and Vacant Suites Information From within the Occupancy Information section, you can view a variety of occupancy-related information about the property. Click on a hyperlink associated with occupied number of suites, for example, and you can view a list of all the occupied suites in the building.
From this page, click on the hyperlink associated with a suite (i.e., an occupant’s name) and you will be directed to the lease maintenance page for that lease. Click on the “Total Rent” hyperlink to view the annual rent amount for the lease. Click the Back button to return to the Property Manager dashboard.

Module 9: Reports and Dashboards
Page 288 Training Guide © 2008 – 2012 MRI Software LLC.
Leasing Activity You may also view leasing activity for a defined date range by clicking on the Leasing Activity hyperlink located in the Occupancy Information section of the dashboard. Click Back to return to the Property Manager dashboard.
Lease Expirations
To view upcoming lease expirations at the property, click on the Lease Expirations hyperlink within Occupancy Information.
To view expirations for a given year, click on the [+] sign next to the year. To view the lease maintenance pages for a lease, click on the hyperlink associated with the occupant’s name. Click Back to return to the Property Manager dashboard.
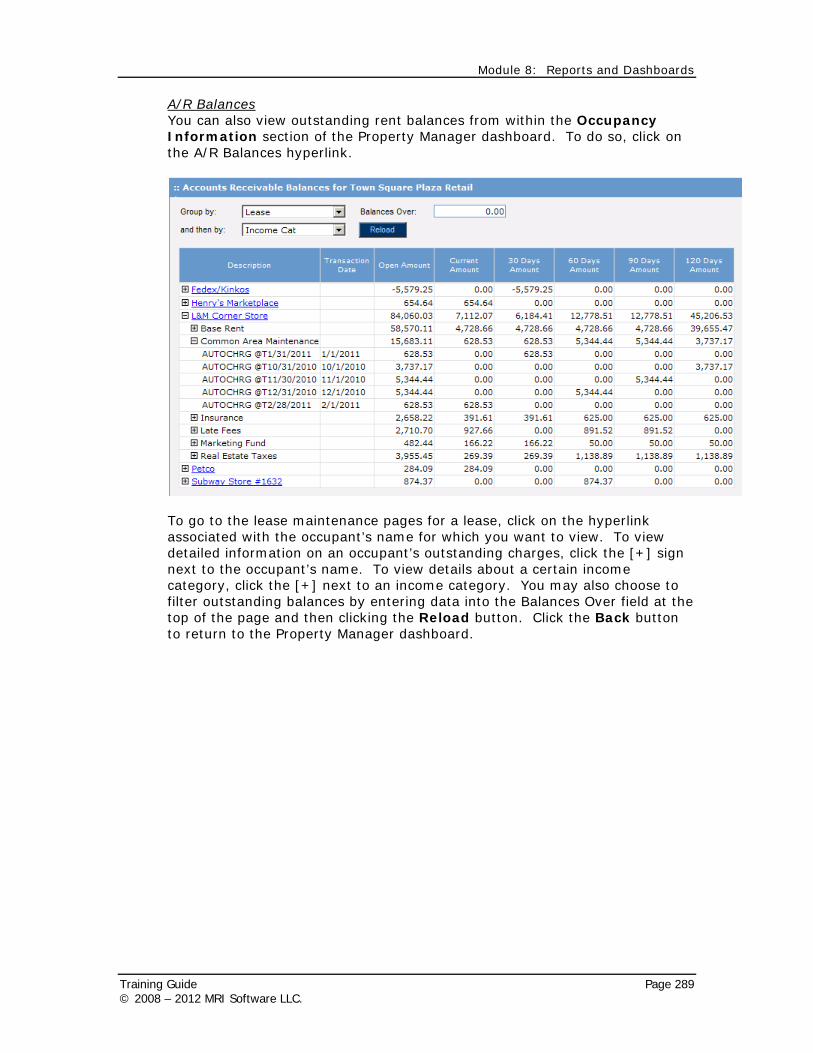
Module 8: Reports and Dashboards
Training Guide Page 289 © 2008 – 2012 MRI Software LLC.
A/R Balances You can also view outstanding rent balances from within the Occupancy Information section of the Property Manager dashboard. To do so, click on the A/R Balances hyperlink.
To go to the lease maintenance pages for a lease, click on the hyperlink associated with the occupant’s name for which you want to view. To view detailed information on an occupant’s outstanding charges, click the [+] sign next to the occupant’s name. To view details about a certain income category, click the [+] next to an income category. You may also choose to filter outstanding balances by entering data into the Balances Over field at the top of the page and then clicking the Reload button. Click the Back button to return to the Property Manager dashboard.

Module 9: Reports and Dashboards
Page 290 Training Guide © 2008 – 2012 MRI Software LLC.
Watchlist
From the Watchlist section, you may set preferences for the default watchlist items by clicking on the Set Preferences hyperlink.
Simply enter the number of days for any of the view options and click Save when finished. To view watchlist details, click on the hyperlink associated with the watchlist item, for example Leases Expired (MTM):
To view the Lease Maintenance pages associated with a lease, click on the hyperlink associated with the occupant’s name. To view an occupant’s annual rent, click on the Total Rent hyperlink.

Module 8: Reports and Dashboards
Training Guide Page 291 © 2008 – 2012 MRI Software LLC.
Occupant Listing
You can view any detailed lease information pertaining to the displayed property within the Occupant Listing section in one of two ways:
• Enter an occupant’s name or leave blank and click List • Click on a letter to display the Search for Lease page
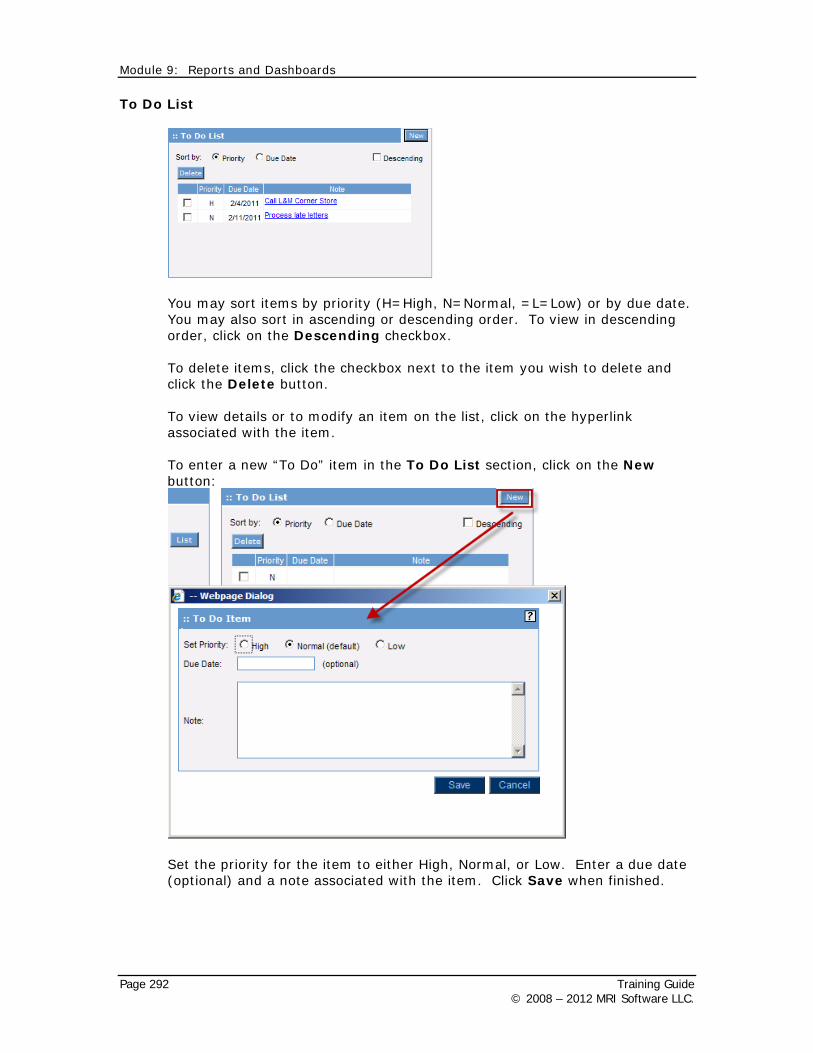
Module 9: Reports and Dashboards
Page 292 Training Guide © 2008 – 2012 MRI Software LLC.
To Do List
You may sort items by priority (H=High, N=Normal, =L=Low) or by due date. You may also sort in ascending or descending order. To view in descending order, click on the Descending checkbox. To delete items, click the checkbox next to the item you wish to delete and click the Delete button. To view details or to modify an item on the list, click on the hyperlink associated with the item. To enter a new “To Do” item in the To Do List section, click on the New button:
Set the priority for the item to either High, Normal, or Low. Enter a due date (optional) and a note associated with the item. Click Save when finished.

Module 8: Reports and Dashboards
Training Guide Page 293 © 2008 – 2012 MRI Software LLC.
Building Reports
You can quickly run one of four property reports from the Property Manager dashboard via the Building Reports section. To view a report, select the report from the dropdown menu and click View. The report options window will display, allowing you to set the desired report options for the report. To generate the report, click the Print button, and the report will be generated and available in the Communication Center.

Module 9: Reports and Dashboards
Page 294 Training Guide © 2008 – 2012 MRI Software LLC.
Review
Key Points In this module, you learned how to:
• Access Commercial Management Reports
• Understand the report options for the Rent Roll and Aged Delinquencies reports
• Create a report style
• Access and utilize the Property Manager dashboard
Module 9 Lab Exercises
Please refer to the CM Training Workbook for exercises pertaining to this module.


