MONITORING SEA TURTLES IN THE ANDAMAN & NICOBAR …
20
MONITORING SEA TURTLES IN THE ANDAMAN & NICOBAR ISLANDS CENTRE FOR ECOLOGICAL SCIENCES AND DAKSHIN FOUNDATION
Transcript of MONITORING SEA TURTLES IN THE ANDAMAN & NICOBAR …

MONITORING SEA TURTLES IN THE ANDAMAN & NICOBAR ISLANDS
CENTRE FOR ECOLOGICAL SCIENCES AND DAKSHIN FOUNDATION

Copyright © 2020 Dakshin Foundation #1818, 9th Cross, 5th Main, C Block, CQAL Layout, Sahakar Nagar, Bangalore 560 092.
Layout and Design: Ananya Singh
Authors: Adhith Swaminathan1, Muralidharan Manoharakrishnan1, Rhea George1, and Kartik Shanker1,2
1Dakshin Foundation, Bangalore, India2 Centre for Ecological Sciences, Indian Institute of Science, Bangalore, India.
Citation: Swaminathan, A, M. Manoharakrishnan, R. George and K. Shanker. 2020. Monitoring sea turtles in the Andaman & Nicobar Islands. Dakshin Foundation, Bangalore.
Cover Photo: Adhith Swaminathan
A. Species Identification
B. Beach Mapping and Profiling B.1. Data to be Collected C. Nests C.1. Data to be Collected
D. Adults D.1. CCL & CCW D.1.1. Hard-shelled turtles D.1.2. Leatherback turtles D.2. Tagging D.2.1. Flipper Tags D.2.2. PIT Tags D.3. Clutch Size D.3.1. Egg Diameter D.3.2. Oviposition Duration D.4. In Situ Nest Protection E. Data Loggers
F. Hatchlings F.1. Hatching Success F.1.1. Data to be collected
G. Genetic Studies G.1. Genetic tissue sample collection
H. Satellite Transmitters
I. Miscellaneous data
Appendix
1
35
77
888810101315161616
19
202020
2121
23
25
27
Contents
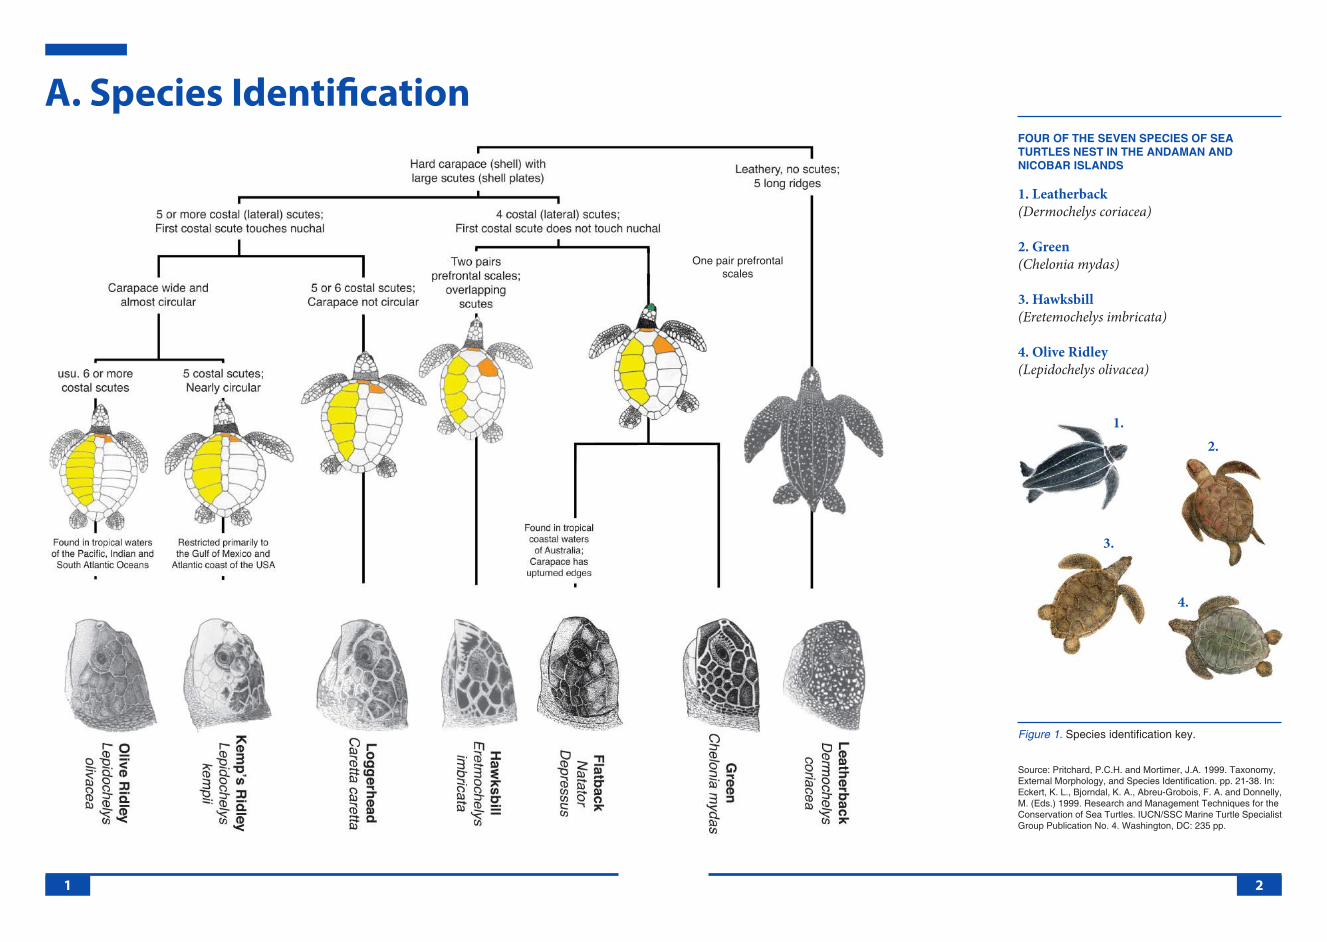
Source: Pritchard, P.C.H. and Mortimer, J.A. 1999. Taxonomy, External Morphology, and Species Identification. pp. 21-38. In: Eckert, K. L., Bjorndal, K. A., Abreu-Grobois, F. A. and Donnelly, M. (Eds.) 1999. Research and Management Techniques for the Conservation of Sea Turtles. IUCN/SSC Marine Turtle Specialist Group Publication No. 4. Washington, DC: 235 pp.
Figure 1. Species identification key.
A. Species Identification
1. Leatherback (Dermochelys coriacea)
2. Green (Chelonia mydas)
3. Hawksbill (Eretemochelys imbricata)
4. Olive Ridley (Lepidochelys olivacea)
FOUR OF THE SEVEN SPECIES OF SEA TURTLES NEST IN THE ANDAMAN AND NICOBAR ISLANDS
1 2
1. 2.
4.
One pair prefrontal scales
3.
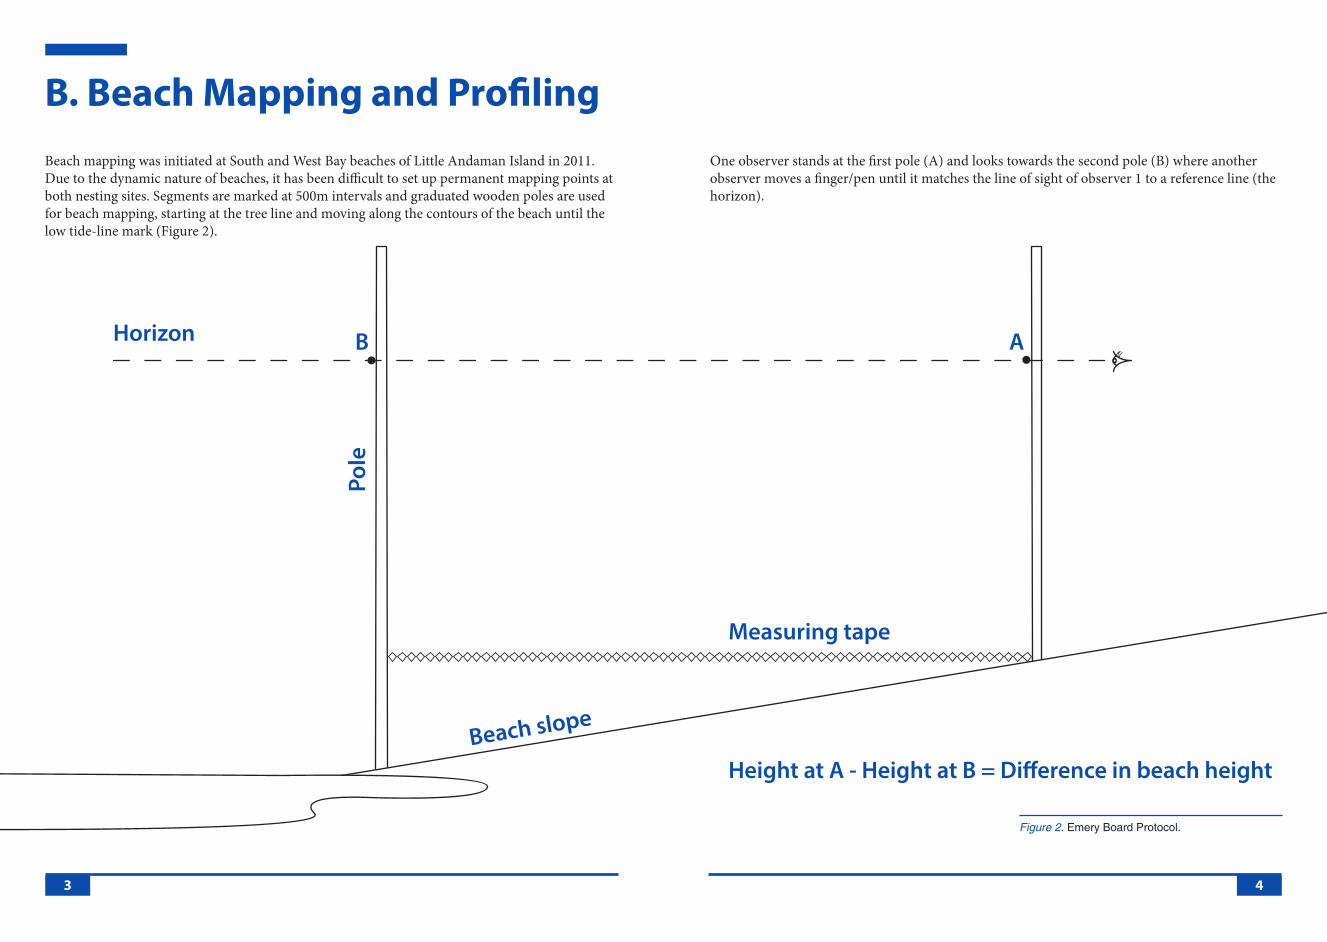
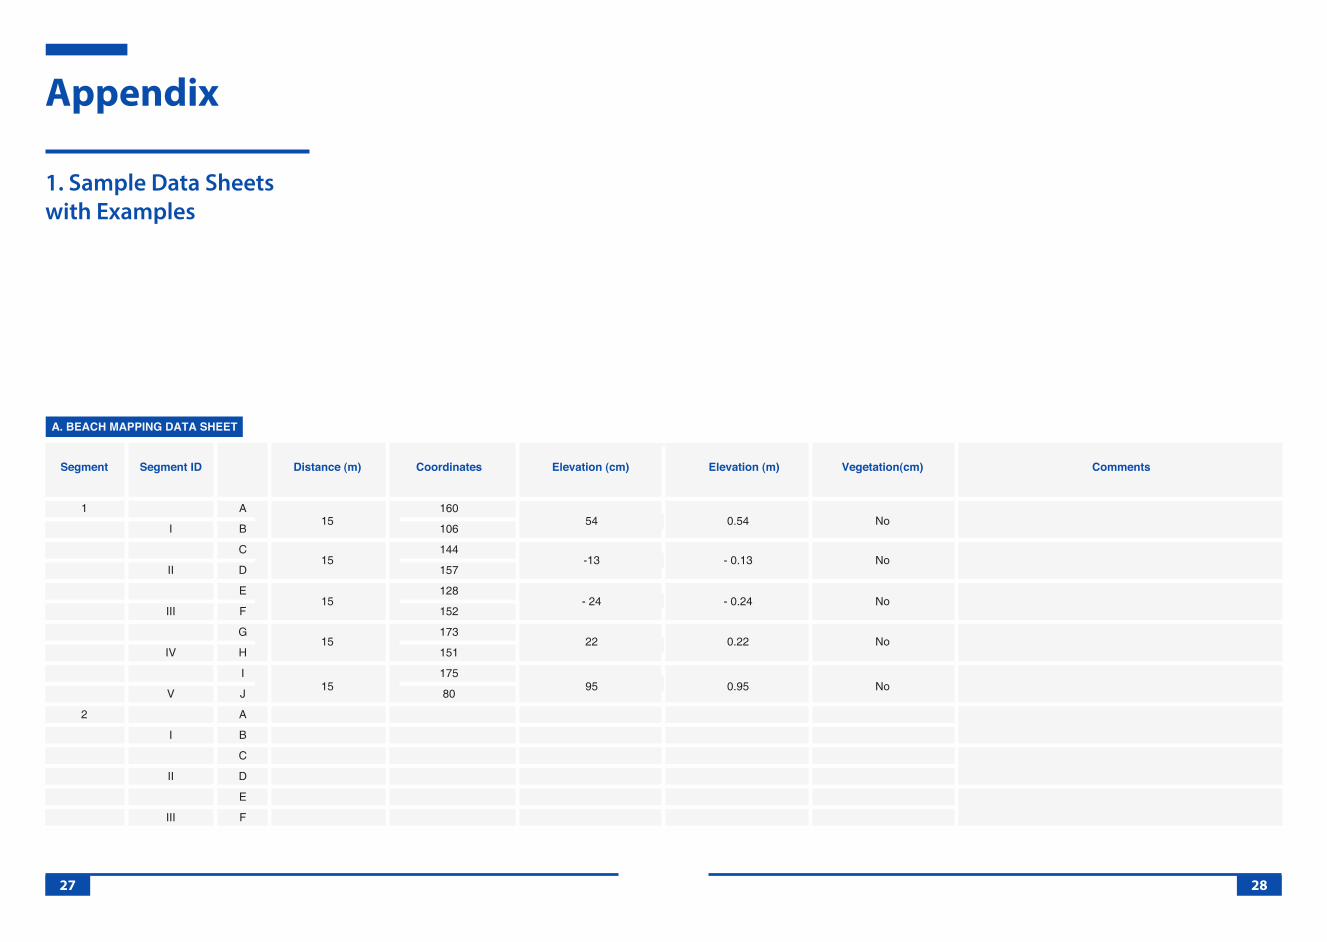
B. Beach Mapping and ProfilingBeach mapping was initiated at South and West Bay beaches of Little Andaman Island in 2011. Due to the dynamic nature of beaches, it has been difficult to set up permanent mapping points at both nesting sites. Segments are marked at 500m intervals and graduated wooden poles are used for beach mapping, starting at the tree line and moving along the contours of the beach until the low tide-line mark (Figure 2).
Figure 2. Emery Board Protocol.
Horizon
Measuring tape
Pole
Beach slope
B A
Height at A - Height at B = Difference in beach height
One observer stands at the first pole (A) and looks towards the second pole (B) where another observer moves a finger/pen until it matches the line of sight of observer 1 to a reference line (the horizon).
3 4

B.1. Data to be Collected
GPS location of the beach mapping point/segment (this should ideally be at the same location for every repeat), height of pole at observer 1 (A), height of pole at observer 2 (B), distance between poles (standard distance used is 15m) and presence of vegetation (Figure 3). The slope of the beach at each point can be calculated using trigonometry.
Figure 3. Observers at the two poles noting readings and measuring distance between the poles for beach profiling.
TABLE 1. GPS LOCATION DATA OF SEGMENTS IN SOUTH AND WEST BAY
Segment No.
1
2
3
4
5
6
7
8
9
Segment No.
1
2
3
4
5
6
7
8
9
10
11
12
13
14
15
GPS Location
N10° 32.525’ E92° 27.139’
N10° 32.648’ E92° 26.925’
N10° 32.682’ E92° 26.648’
N10° 32.756’ E92° 26.387’
N10° 32.876’ E92° 26.152’
N10° 32.925’ E92° 25.893’
N10° 32.951’ E92° 25.621’
N10° 32.922’ E92° 25.345’
N10° 32.809’ E92° 25.099’
GPS Location
N10° 36.676’ E92° 25.175’
N10° 36.951’ E92° 25.208’
N10° 37.215’ E92° 25.143’
N10° 37.478’ E92° 25.073’
N10° 37.747’ E92° 25.000’
N10° 38.013’ E92° 24.939’
N10° 38.252’ E92° 24.828’
N10° 38.504’ E92° 24.709’
N10° 38.780’ E92° 24.585’
N10° 39.019’ E92° 24.437’
N10° 39.249’ E92° 24.302’
N10° 39.478’ E92° 24.142’
N10° 39.692’ E92° 23.975’
N10° 39.897’ E92° 23.767’
N10° 39.975’ E92° 23.649’
SOUTH BAY WEST BAY
5 6
C.1. Data to be Collected
D.1. CCL & CCW
D.1.1. Hard-shelled turtles
D.1.2. Leatherback turtles
1. DATE AND TIME
2. TIDE
3. NESTING / FALSE CRAWL
4. NEST NUMBER
5. SPECIES
6. CLUTCH SIZE
7. DISTANCE FROM TIDE LINE
8. SEGMENT NUMBER (SOUTHWARD
AND GPS LOCATION
9. PREDATION DATE AND TIME
(IF APPLICABLE).
The observer(s) should conduct walks during night hours looking for nesting turtles and any nesting activity, while noting false crawls and covered nests. All nests encountered should be marked using a pole and numbered. The entire nesting beach must be covered at least once during the night patrol.
When a nest or turtle is encountered during a night patrol:
(1) Note down the date, time and the tide. The tide is marked on the basis of water movement i.e. when the tide is coming in and when the tide is going out.
(2) Assess the nesting area to check if the turtle has nested. If she has not nested, note it as a false crawl in the data sheet.
(3) If it is determined to have nested, mark the nest site with a pole/stick, and tie a ribbon annotated with the date, nest number and species in permanent pen.
(4) Measure the distance from the nest to the current high tide line using the tape (to the nearest metre).
(5) Record the GPS location of the nest or, in the absence of a GPS, record the segment number (south of the nest). This can also be done during the day.
(6) Monitor each nest on a regular basis to record any evidence of predation. If a nest is predated, write down the date and nest number on the data sheet and mark the nest marker ribbon with a “P” and mark the nest with a red ribbon.
(7) If a turtle is encountered, follow the instructions in the next section.
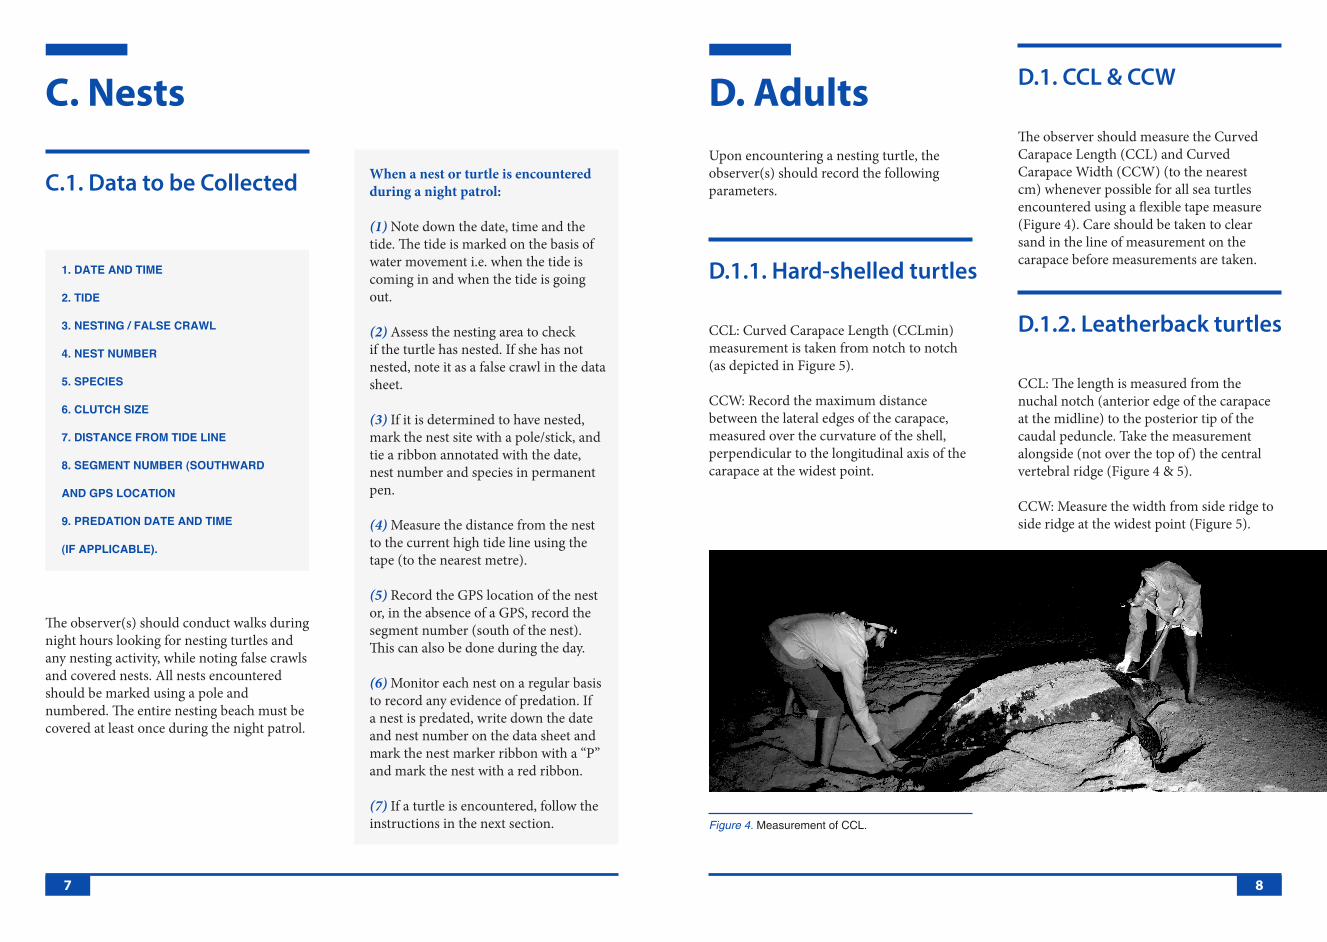
C. Nests D. AdultsUpon encountering a nesting turtle, the observer(s) should record the following parameters.
The observer should measure the Curved Carapace Length (CCL) and Curved Carapace Width (CCW) (to the nearestcm) whenever possible for all sea turtles encountered using a flexible tape measure (Figure 4). Care should be taken to clear sand in the line of measurement on the carapace before measurements are taken.
CCL: Curved Carapace Length (CCLmin) measurement is taken from notch to notch (as depicted in Figure 5).
CCW: Record the maximum distance between the lateral edges of the carapace, measured over the curvature of the shell, perpendicular to the longitudinal axis of the carapace at the widest point.
CCL: The length is measured from the nuchal notch (anterior edge of the carapace at the midline) to the posterior tip of the caudal peduncle. Take the measurement alongside (not over the top of) the central vertebral ridge (Figure 4 & 5).
CCW: Measure the width from side ridge to side ridge at the widest point (Figure 5).
Figure 4. Measurement of CCL.
7 8

Figure 6. A. Remove 1 or 2 tags at a time to prevent loss. B. Insert the tag into the applicator.Figure 5. Carapace length and width measurements
for hard-shelled turtles and leatherback turtles.
CCL CCWD.2. Tagging D.2.1. Flipper Tags
When encountering a sea turtle, always check for any evidence of external tags or tag scars and PIT tags on all flippers. If tags are encountered, note down the tag numbers and, in the case of missing flipper tags on one or both flippers, replace with a new tag.
Turtles should ideally be tagged just after oviposition or during oviposition. Turtles should never be tagged before egg laying.
Two tags, one on each flipper, should be applied to every turtle. The secure placement of two tags, referred to as “double-tagging”, increases the likelihood that a turtle will retain her unique identification over several years. The tags applied on both hard-shelled turtles and leatherback turtles should ideally be consecutive numbers, with the smaller number on the left flipper and the next on the right flipper.
To apply self-piercing, self-locking Inconel flipper tags:
(1) Remove a tag from the strip (Figure 6A) and record its identification number on the data sheet. Be careful not to bend the tag from its original shape. Only peel back enough tape on the strip to remove one or two tags at a time to prevent the loss of remaining tags.
9 10
(2) Hold the applicator in one hand. With the pointed (piercing) side of the tag facing the depression in the jaw of the pliers and with the hole placed adjacent to the depression, place the end of your index finger of the other hand inside the tag against the bend. Pull the tag straight back into the open jaws of the applicator, aligning the point opposite the small depression (Figure 6B). A firm pull will be needed to snap the tag completely into the correct position. Take care not to squeeze the applicator together before you are ready to tag the turtle or the tag will fall out.
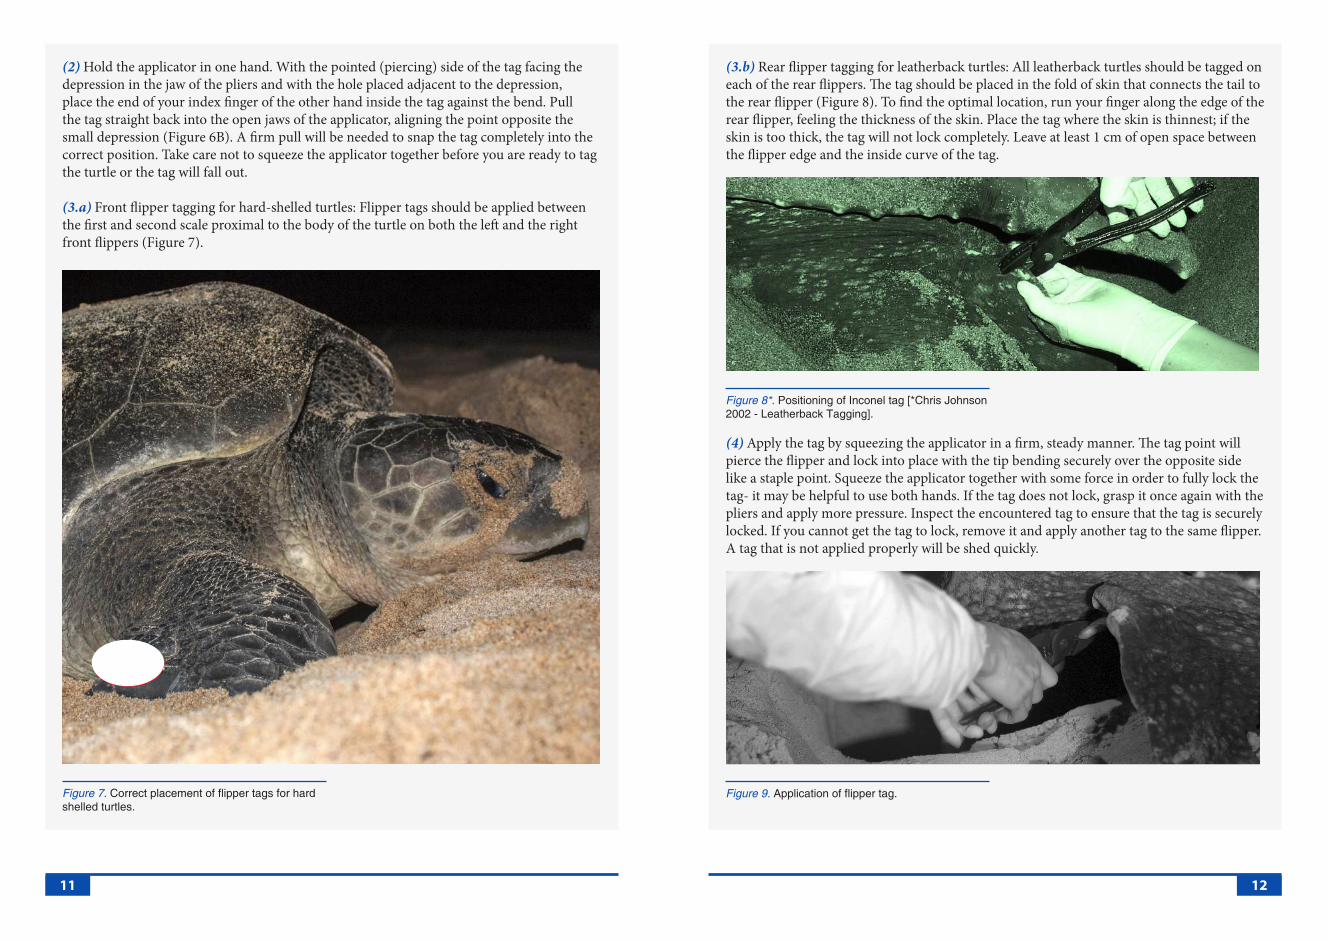
(3.a) Front flipper tagging for hard-shelled turtles: Flipper tags should be applied between the first and second scale proximal to the body of the turtle on both the left and the right front flippers (Figure 7).
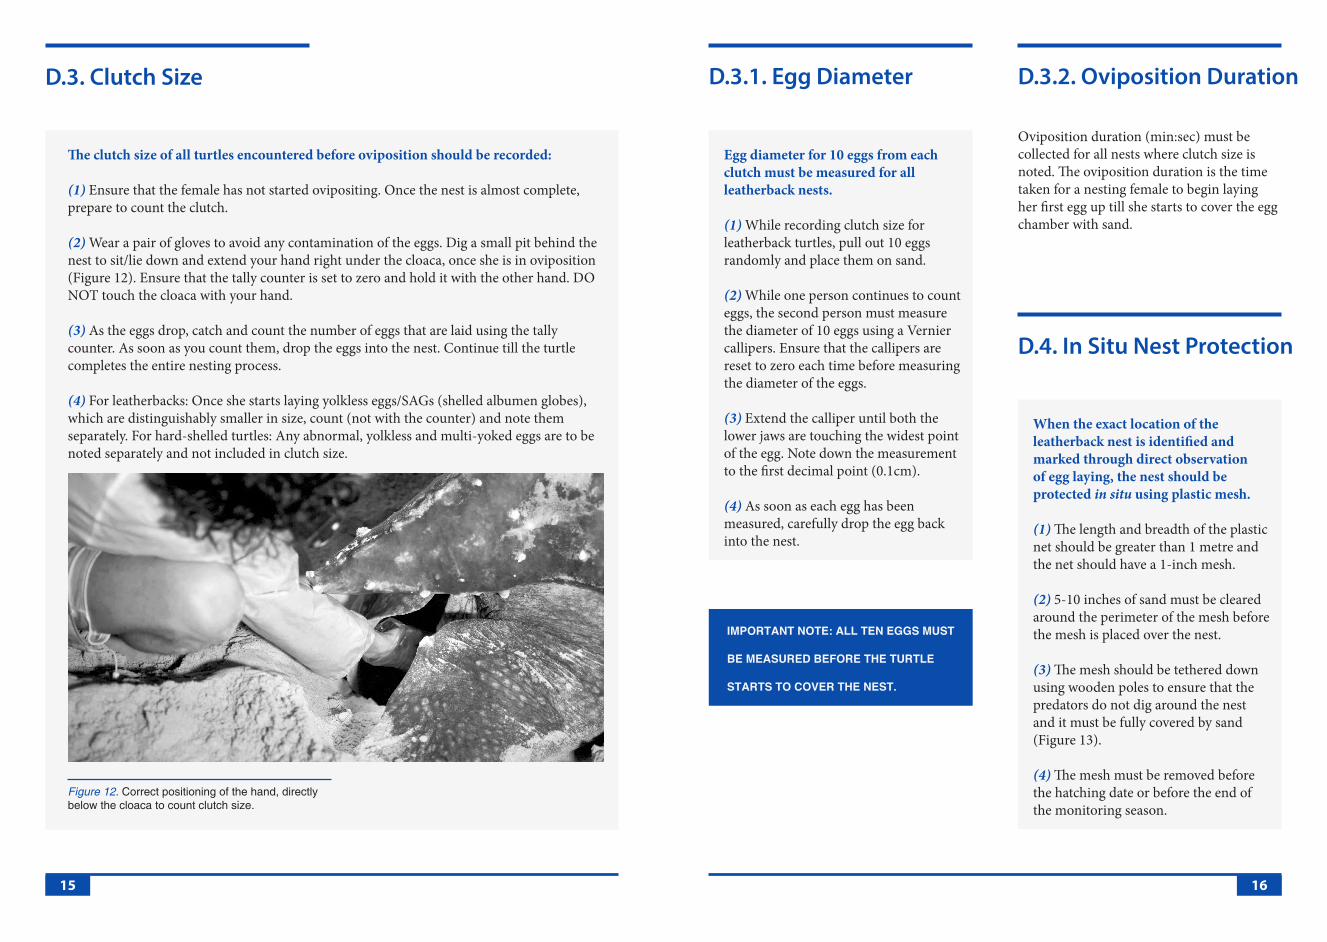
(3.b) Rear flipper tagging for leatherback turtles: All leatherback turtles should be tagged on each of the rear flippers. The tag should be placed in the fold of skin that connects the tail to the rear flipper (Figure 8). To find the optimal location, run your finger along the edge of the rear flipper, feeling the thickness of the skin. Place the tag where the skin is thinnest; if the skin is too thick, the tag will not lock completely. Leave at least 1 cm of open space between the flipper edge and the inside curve of the tag.
(4) Apply the tag by squeezing the applicator in a firm, steady manner. The tag point will pierce the flipper and lock into place with the tip bending securely over the opposite side like a staple point. Squeeze the applicator together with some force in order to fully lock the tag- it may be helpful to use both hands. If the tag does not lock, grasp it once again with the pliers and apply more pressure. Inspect the encountered tag to ensure that the tag is securely locked. If you cannot get the tag to lock, remove it and apply another tag to the same flipper. A tag that is not applied properly will be shed quickly.
Figure 7. Correct placement of flipper tags for hard shelled turtles.
Figure 9. Application of flipper tag.
Figure 8*. Positioning of Inconel tag [*Chris Johnson 2002 - Leatherback Tagging].
11 12

D.2.2. PIT Tags All leatherback turtles should be checked for PIT tags using the PIT tag scanners.
Figure 11. PIT tag applicator and scanner.Figure 10. Location for the PIT tag.
Scanning Protocol:
(1) Keep the PIT tag scanner inside a zip-lock bag at all times including during use to prevent it from getting wet. Scan a sample tag to verify that the PIT tag reader is working properly. The button on the scanner needs to be pressed once to start the scanning process, and the screen may display “SCANNING” or a similar message (depending on the type of scanner) when functioning properly.
(2) Place the PIT tag scanner directly on the turtle’s skin (you may have to press hard into the skin with the reader, as the tag may be deep). Slowly scan the dorsal musculature of both forelimbs, the shoulder region and the top of the neck and rear flippers. It is important to slowly move the scanner multiple times, allowing it to cycle through different tag frequencies to avoid missing a tag.
(3) If a PIT tag is detected, record the identification code exactly as it appears on the scanner display, including any hyphens that may appear as part of the code. ID codes are usually hexadecimal (digits 0-9 and letters A-F). Double check to make sure you have recorded the ID code exactly as it appears on the reader display.
Application Protocol:
(1) Scan the PIT tag before opening the package to ensure that it is a functional tag.
(2) Record the PIT tag number on the datasheet. Peel off the self-adhesive label on the PIT tag package, if available, and attach it to the tissue sample vial.
(3) Remove the loaded needle from the sterile wrapper and insert it into the injector or remove the preloaded syringe and needle, taking care not to depress the plunger.
(4) The tag should be placed in the shoulder region on the left front flipper (Figure 10). Apply alcohol on the site and insert the entire needle between 90 and 45 degrees to the skin before injecting the PIT tag.
(5) Put your thumb over the injection site and apply pressure while carefully removing the needle. Dispose of the needle into a zip lock bag.
(6) Scan the flipper for the PIT tag to ensure that it is functioning in the turtle.
13 14
Egg diameter for 10 eggs from each clutch must be measured for all leatherback nests.
(1) While recording clutch size for leatherback turtles, pull out 10 eggs randomly and place them on sand.
(2) While one person continues to count eggs, the second person must measure the diameter of 10 eggs using a Vernier callipers. Ensure that the callipers are reset to zero each time before measuring the diameter of the eggs.
(3) Extend the calliper until both the lower jaws are touching the widest point of the egg. Note down the measurement to the first decimal point (0.1cm).
(4) As soon as each egg has been measured, carefully drop the egg back into the nest.
When the exact location of the leatherback nest is identified and marked through direct observation of egg laying, the nest should be protected in situ using plastic mesh.
(1) The length and breadth of the plastic net should be greater than 1 metre and the net should have a 1-inch mesh.
(2) 5-10 inches of sand must be cleared around the perimeter of the mesh before the mesh is placed over the nest.
(3) The mesh should be tethered down using wooden poles to ensure that the predators do not dig around the nest and it must be fully covered by sand (Figure 13).
(4) The mesh must be removed before the hatching date or before the end of the monitoring season.
D.3. Clutch Size
The clutch size of all turtles encountered before oviposition should be recorded:
(1) Ensure that the female has not started ovipositing. Once the nest is almost complete, prepare to count the clutch.
(2) Wear a pair of gloves to avoid any contamination of the eggs. Dig a small pit behind the nest to sit/lie down and extend your hand right under the cloaca, once she is in oviposition (Figure 12). Ensure that the tally counter is set to zero and hold it with the other hand. DO NOT touch the cloaca with your hand.
(3) As the eggs drop, catch and count the number of eggs that are laid using the tally counter. As soon as you count them, drop the eggs into the nest. Continue till the turtle completes the entire nesting process.
(4) For leatherbacks: Once she starts laying yolkless eggs/SAGs (shelled albumen globes), which are distinguishably smaller in size, count (not with the counter) and note them separately. For hard-shelled turtles: Any abnormal, yolkless and multi-yoked eggs are to be noted separately and not included in clutch size.
Figure 12. Correct positioning of the hand, directly below the cloaca to count clutch size.
D.3.1. Egg Diameter D.3.2. Oviposition Duration
Oviposition duration (min:sec) must be collected for all nests where clutch size is noted. The oviposition duration is the time taken for a nesting female to begin laying her first egg up till she starts to cover the egg chamber with sand.
D.4. In Situ Nest Protection
IMPORTANT NOTE: ALL TEN EGGS MUST
BE MEASURED BEFORE THE TURTLE
STARTS TO COVER THE NEST.
15 16
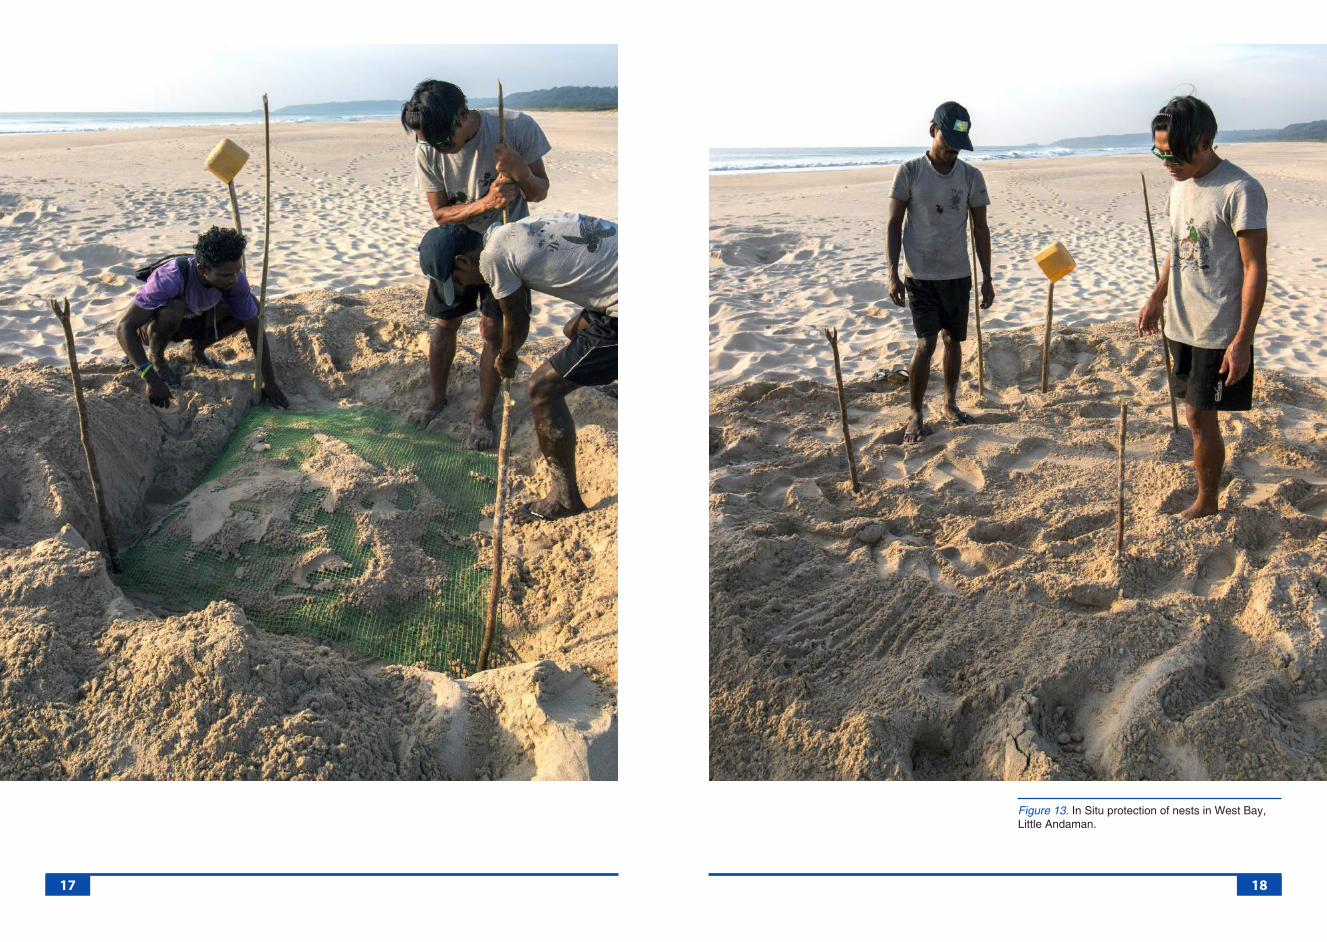
Figure 13. In Situ protection of nests in West Bay, Little Andaman.
17 18
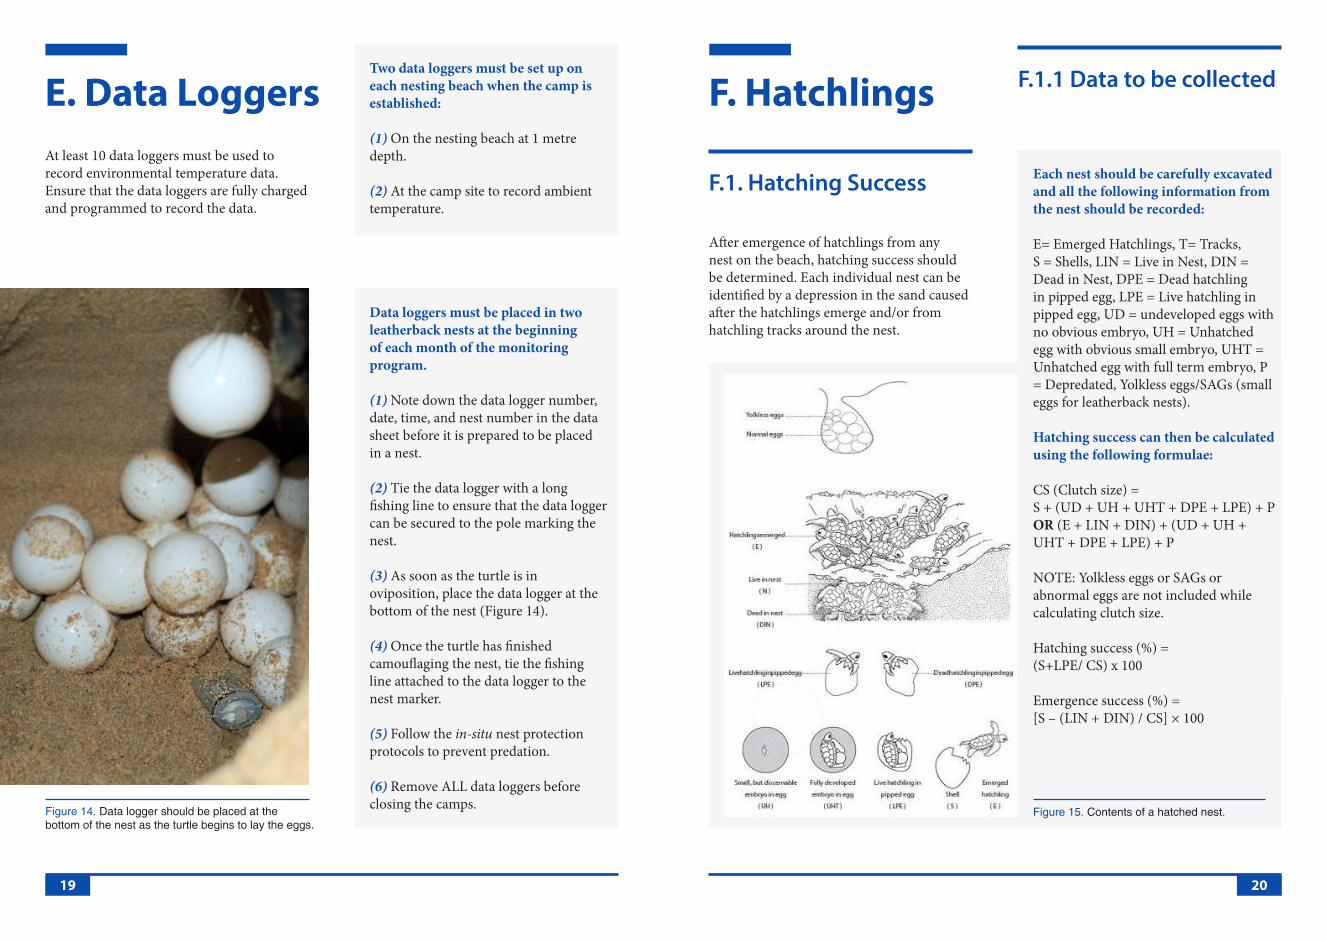
Data loggers must be placed in two leatherback nests at the beginning of each month of the monitoring program.
(1) Note down the data logger number, date, time, and nest number in the data sheet before it is prepared to be placed in a nest.
(2) Tie the data logger with a long fishing line to ensure that the data logger can be secured to the pole marking the nest.
(3) As soon as the turtle is in oviposition, place the data logger at the bottom of the nest (Figure 14).
(4) Once the turtle has finished camouflaging the nest, tie the fishing line attached to the data logger to the nest marker.
(5) Follow the in-situ nest protection protocols to prevent predation.
(6) Remove ALL data loggers before closing the camps.
Each nest should be carefully excavated and all the following information from the nest should be recorded:
E= Emerged Hatchlings, T= Tracks, S = Shells, LIN = Live in Nest, DIN = Dead in Nest, DPE = Dead hatchling in pipped egg, LPE = Live hatchling in pipped egg, UD = undeveloped eggs with no obvious embryo, UH = Unhatched egg with obvious small embryo, UHT = Unhatched egg with full term embryo, P = Depredated, Yolkless eggs/SAGs (small eggs for leatherback nests).
Hatching success can then be calculated using the following formulae:
CS (Clutch size) = S + (UD + UH + UHT + DPE + LPE) + P OR (E + LIN + DIN) + (UD + UH + UHT + DPE + LPE) + P
NOTE: Yolkless eggs or SAGs or abnormal eggs are not included while calculating clutch size.
Hatching success (%) = (S+LPE/ CS) x 100
Emergence success (%) = [S – (LIN + DIN) / CS] × 100
Two data loggers must be set up on each nesting beach when the camp is established:
(1) On the nesting beach at 1 metre depth.
(2) At the camp site to record ambient temperature.
Figure 14. Data logger should be placed at the bottom of the nest as the turtle begins to lay the eggs.
Figure 15. Contents of a hatched nest.
E. Data LoggersAt least 10 data loggers must be used to record environmental temperature data. Ensure that the data loggers are fully charged and programmed to record the data.
F.1. Hatching Success
F.1.1 Data to be collectedF. Hatchlings
After emergence of hatchlings from any nest on the beach, hatching success should be determined. Each individual nest can be identified by a depression in the sand caused after the hatchlings emerge and/or from hatchling tracks around the nest.
19 20
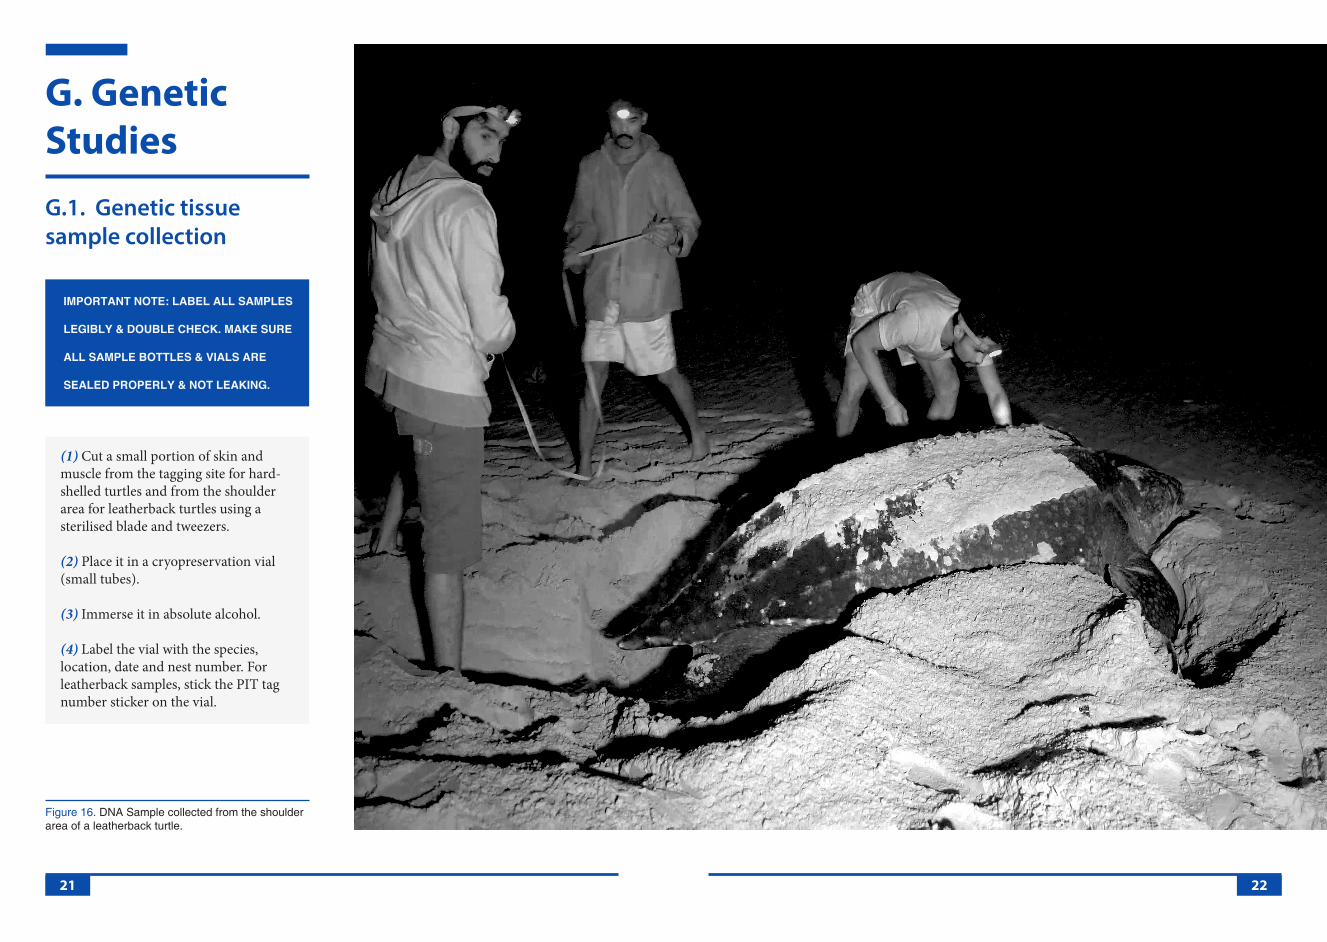
G.1. Genetic tissue sample collection
G. Genetic Studies
(1) Cut a small portion of skin and muscle from the tagging site for hard-shelled turtles and from the shoulder area for leatherback turtles using a sterilised blade and tweezers.
(2) Place it in a cryopreservation vial (small tubes).
(3) Immerse it in absolute alcohol.
(4) Label the vial with the species, location, date and nest number. For leatherback samples, stick the PIT tag number sticker on the vial.
IMPORTANT NOTE: LABEL ALL SAMPLES
LEGIBLY & DOUBLE CHECK. MAKE SURE
ALL SAMPLE BOTTLES & VIALS ARE
SEALED PROPERLY & NOT LEAKING.
Figure 16. DNA Sample collected from the shoulder area of a leatherback turtle.
21 22
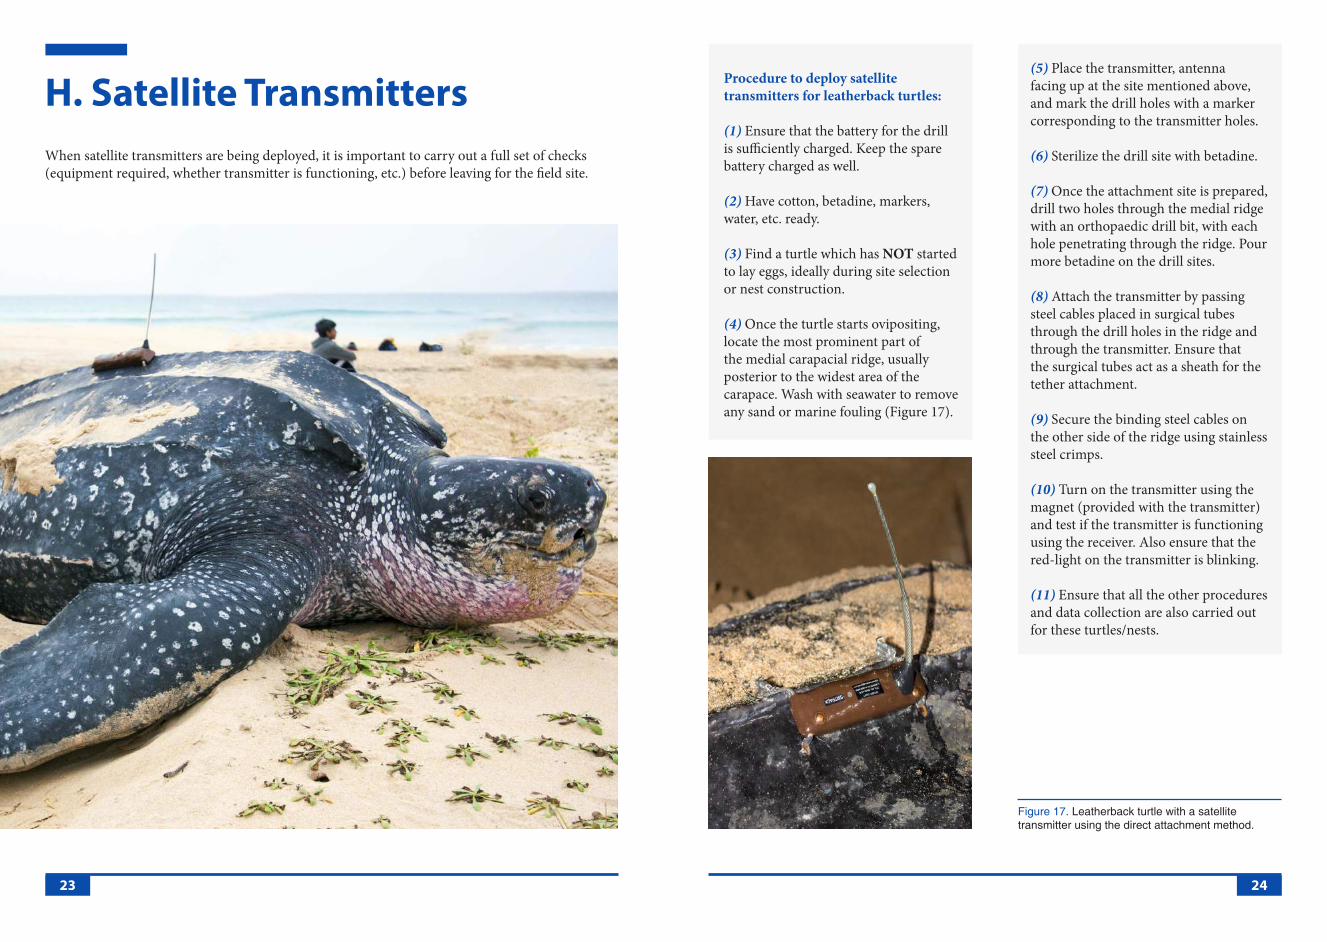
H. Satellite TransmittersWhen satellite transmitters are being deployed, it is important to carry out a full set of checks (equipment required, whether transmitter is functioning, etc.) before leaving for the field site.
Procedure to deploy satellite transmitters for leatherback turtles:
(1) Ensure that the battery for the drill is sufficiently charged. Keep the spare battery charged as well.
(2) Have cotton, betadine, markers, water, etc. ready.
(3) Find a turtle which has NOT started to lay eggs, ideally during site selection or nest construction.
(4) Once the turtle starts ovipositing, locate the most prominent part of the medial carapacial ridge, usually posterior to the widest area of the carapace. Wash with seawater to remove any sand or marine fouling (Figure 17).
(5) Place the transmitter, antenna facing up at the site mentioned above, and mark the drill holes with a marker corresponding to the transmitter holes.
(6) Sterilize the drill site with betadine.
(7) Once the attachment site is prepared, drill two holes through the medial ridge with an orthopaedic drill bit, with each hole penetrating through the ridge. Pour more betadine on the drill sites.
(8) Attach the transmitter by passing steel cables placed in surgical tubes through the drill holes in the ridge and through the transmitter. Ensure that the surgical tubes act as a sheath for the tether attachment.
(9) Secure the binding steel cables on the other side of the ridge using stainless steel crimps.
(10) Turn on the transmitter using the magnet (provided with the transmitter) and test if the transmitter is functioning using the receiver. Also ensure that the red-light on the transmitter is blinking.
(11) Ensure that all the other procedures and data collection are also carried out for these turtles/nests.
Figure 17. Leatherback turtle with a satellite transmitter using the direct attachment method.
23 24
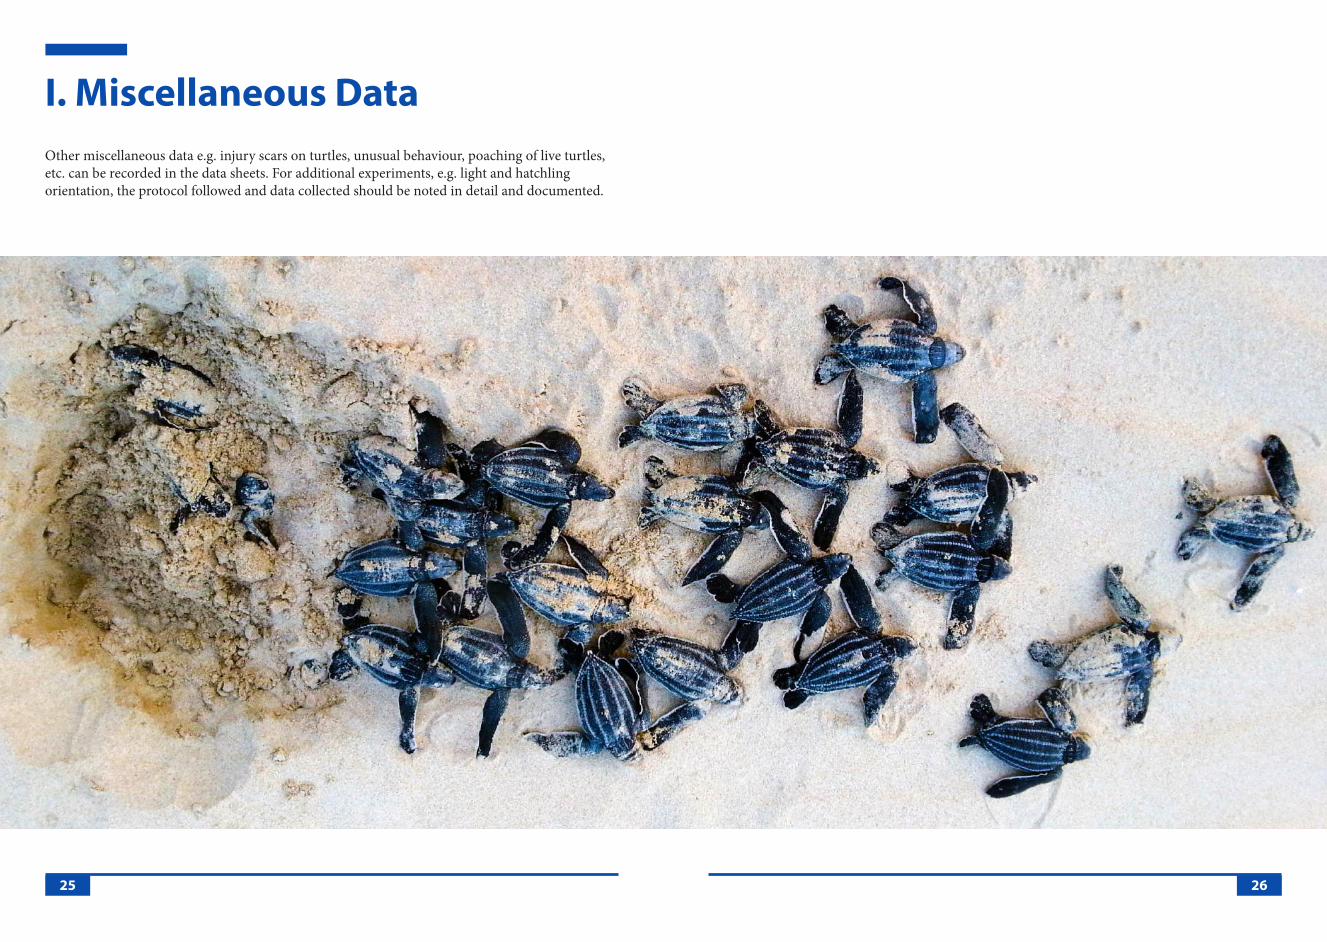
I. Miscellaneous DataOther miscellaneous data e.g. injury scars on turtles, unusual behaviour, poaching of live turtles, etc. can be recorded in the data sheets. For additional experiments, e.g. light and hatchling orientation, the protocol followed and data collected should be noted in detail and documented.
25 26
1. Sample Data Sheets with Examples
Appendix
Segment
1
2
Segment ID
I
II
III
IV
V
I
II
III
A
B
C
D
E
F
G
H
I
J
A
B
C
D
E
F
Coordinates
160
106
144
157
128
152
173
151
175
80
Elevation (cm) Elevation (m) Vegetation(cm) Comments
A. BEACH MAPPING DATA SHEET
54
-13
- 24
22
95
Distance (m)
15
15
15
15
15
0.54
- 0.13
- 0.24
0.22
0.95
No
No
No
No
No
27 28
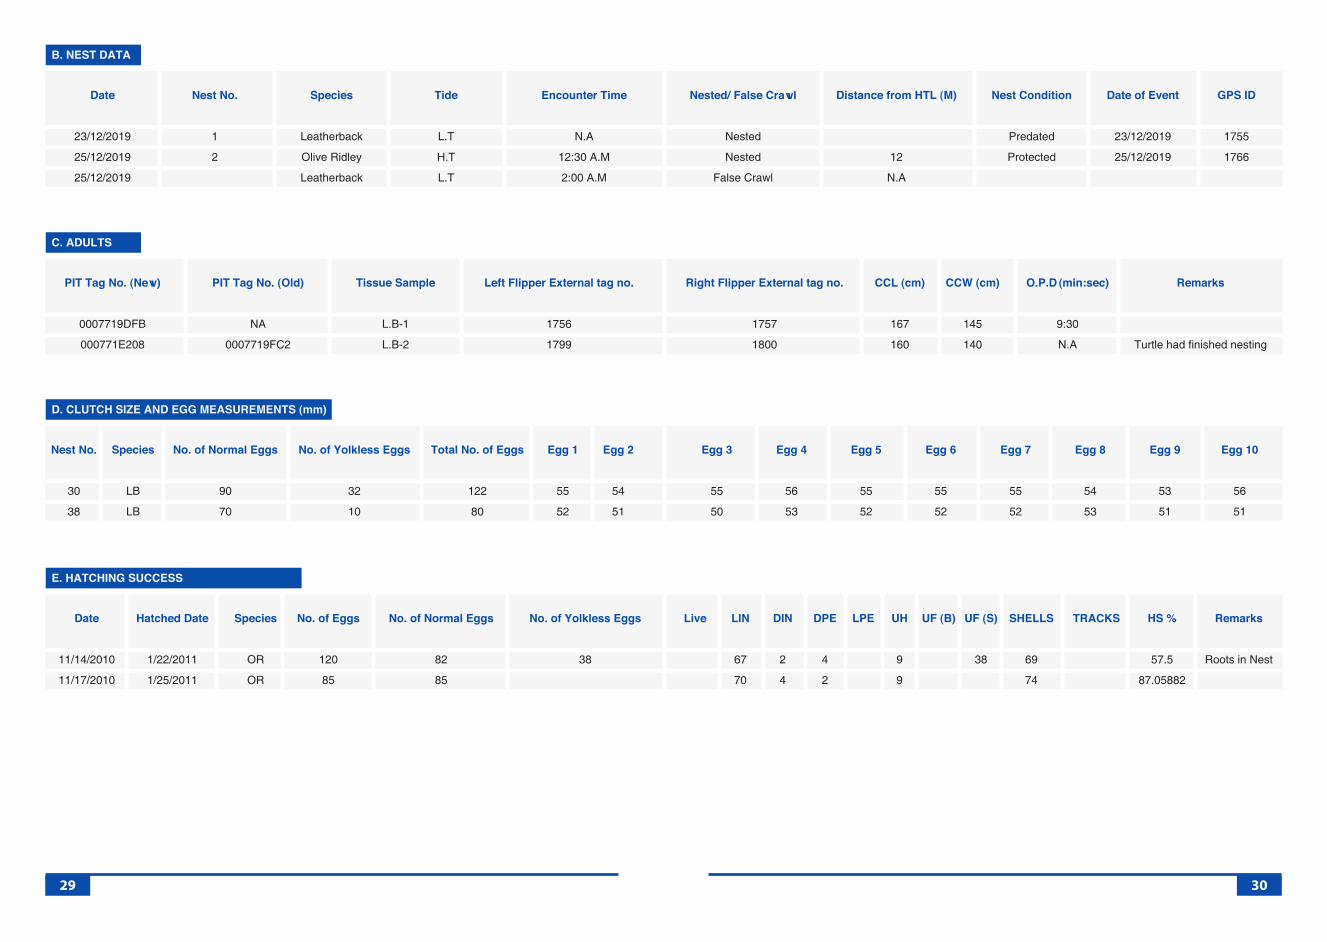
Date
23/12/2019
25/12/2019
25/12/2019
Nest No.
1
2
Species
Leatherback
Olive Ridley
Leatherback
Tide
L.T
H.T
L.T
Encounter Time
N.A
12:30 A.M
2:00 A.M
Nested/ False Crawl
Nested
Nested
False Crawl
Distance from HTL (M)
12
N.A
Nest Condition
Predated
Protected
Date of Event
23/12/2019
25/12/2019
GPS ID
1755
1766
B. NEST DATA
PIT Tag No. (New)
0007719DFB
000771E208
PIT Tag No. (Old)
NA
0007719FC2
Tissue Sample
L.B-1
L.B-2
Left Flipper External tag no.
1756
1799
Right Flipper External tag no.
1757
1800
CCL (cm)
167
160
CCW (cm)
145
140
O.P.D (min:sec)
9:30
N.A
Remarks
Turtle had finished nesting
C. ADULTS
Nest No.
30
38
Species
LB
LB
No. of Normal Eggs
90
70
Egg 5
55
52
No. of Yolkless Eggs
32
10
Egg 6
55
52
Egg 1
55
52
Egg 3
55
50
Egg 7
55
52
Total No. of Eggs
122
80
Egg 8
54
53
Egg 9
53
51
Egg 10
56
51
Egg 2
54
51
Egg 4
56
53
D. CLUTCH SIZE AND EGG MEASUREMENTS (mm)
UH
9
9
Species
OR
OR
UF (B)No. of Eggs
120
85
DPE
4
2
Date
11/14/2010
11/17/2010
UF (S)
38
No. of Normal Eggs
82
85
SHELLS
69
74
No. of Yolkless Eggs
38
TRACKSLive HS %
57.5
87.05882
LIN
67
70
Remarks
Roots in Nest
DIN
2
4
LPEHatched Date
1/22/2011
1/25/2011
E. HATCHING SUCCESS
29 30

Photo & Illustration Credits
Contents Page: Photo by Adhith SwaminathanPage 1,2: Adapted from Pritchard, P.C.H. and Mortimer, J.A. 1999. Taxonomy, External Morphology, and Species Identification. pp. 21-38. In: Eckert, K. L., Bjorndal, K. A., Abreu-Grobois, F. A. and Donnelly, M. (Eds.) 1999. Research and Management Techniques for the Conservation of Sea Turtles. IUCN/SSC Marine Turtle Specialist Group Publication No. 4. Washington, DC: 235 pp.Page 2: Illustration by Ananya Singh & Aditya BharadwajPage 3,4: Illustration by Ananya Singh Page 6: Photo by Adhith SwaminathanPage 8: Photo by Emaho FilmsPage 9: Illustration by Ananya Singh & Aditya BharadwajPage 10: Left: Image taken from “National Band & Tag Company” (https://www.nationalband.com/self- piercing-tags-691il/); Right: Photo by Emaho FilmsPage 11: Photo by Adhith SwaminathanPage 12: Top: Photo taken from “Chris Johnson 2002 - Leatherback Tagging”; Bottom: Photo by Emaho FilmsPage 13: Photo by Adhith SwaminathanPage 14: Left & Right: Photo by Gowri MallapurPage 15: Photo by Emaho FilmsPage 17: Photo by Adhith SwaminathanPage 18: Photo by Adhith SwaminathanPage 19: Photo by Adhith SwaminathanPage 20: Adapted from Sea turtles of India. 2011. A comprehensive field guide to research, monitoring and conservation (Compilers. S. Shenoy, T. Berlie and K. Shanker). Dakshin Foundation, Bangalore and Madras Crocodile Bank Trust, Mamallapuram, India. 148 pages.Page 21, 22: Photo by Emaho FilmsPage 23: Photo by Adhith SwaminathanPage 24: Photo by Adhith SwaminathanPage 25, 26: Photo by Adhith SwaminathanPage 31: Photo by Adhith Swaminathan
31