Modifying DB App - wkastudio.com DB App.pdf · Modifying DB App This document explains about...
65
WKA Technologies Modifying DB App This document explains about modifying database application such as changing prompts, UI controls etc.
Transcript of Modifying DB App - wkastudio.com DB App.pdf · Modifying DB App This document explains about...

WKA Technologies
Modifying DB App This document explains about modifying
database application such as changing prompts,
UI controls etc.

pg. 2 © WKA Technologies Pvt Ltd.
Table of Contents 1. Modifying the Application ........................................................................................................................... 3
1.1Adding Referential Integrity ................................................................................................................... 3
1.2 Changing Variable Prompt ..................................................................................................................... 8
1.3 Changing UI Controls ........................................................................................................................... 16
1.3.1 Changing Control .......................................................................................................................... 16
1.4 Formatting the Form ........................................................................................................................... 19
1.5 Adding Row Condition ......................................................................................................................... 23
1.6 Adding Rules ....................................................................................................................................... 31
1.7 Adding Dynamic Menu ........................................................................................................................ 55
pg. 3 © WKA Technologies Pvt Ltd.
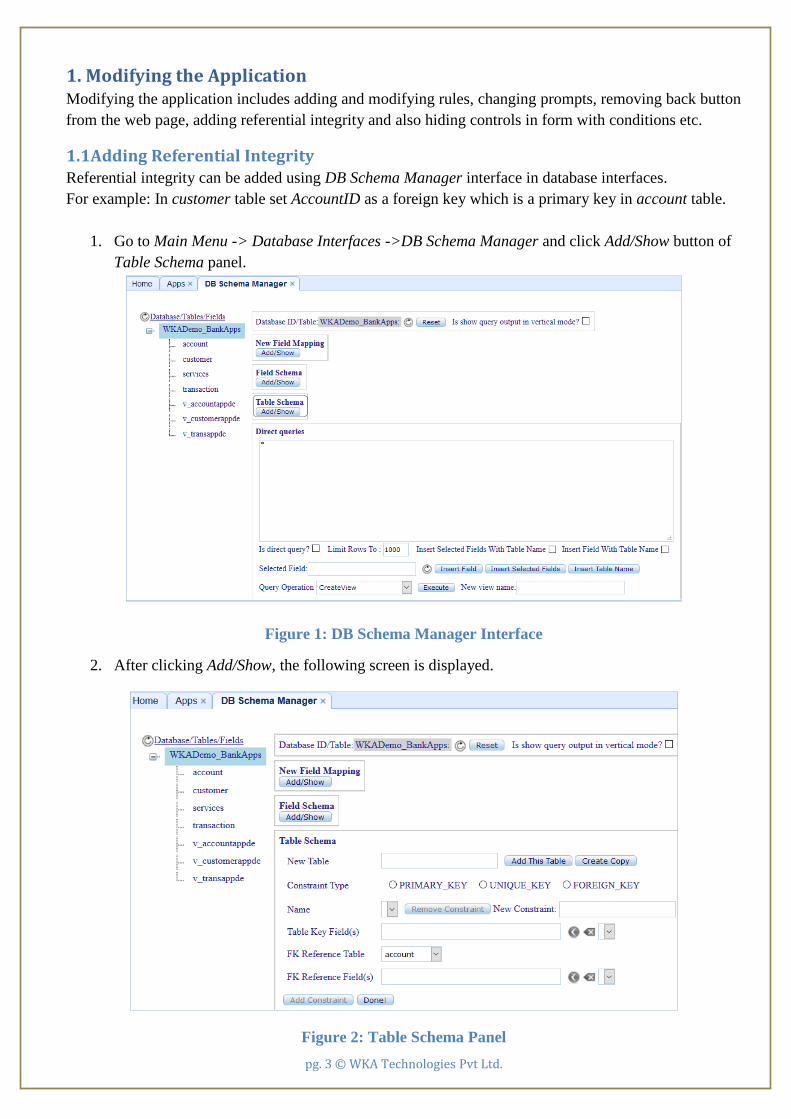
1. Modifying the Application Modifying the application includes adding and modifying rules, changing prompts, removing back button
from the web page, adding referential integrity and also hiding controls in form with conditions etc.
1.1Adding Referential Integrity Referential integrity can be added using DB Schema Manager interface in database interfaces.
For example: In customer table set AccountID as a foreign key which is a primary key in account table.
1. Go to Main Menu -> Database Interfaces ->DB Schema Manager and click Add/Show button of
Table Schema panel.
Figure 1: DB Schema Manager Interface
2. After clicking Add/Show, the following screen is displayed.
Figure 2: Table Schema Panel

pg. 4 © WKA Technologies Pvt Ltd.
3. Select the Constraint Type as Foreign Key and enter the constraint name (Example:
FK_CustomerAccount) in New Constraint field.
Figure 3: Selecting Foreign Key Constraint and Entering Constraint Name
4. Select from Table Key Field(s) dropdown menu, the field (AccountID [int(10)]) to which foreign
key needs to be set.
Figure 4: Selecting Table Key Field
5. To move the selected field in Table Key Field(s), click the button .
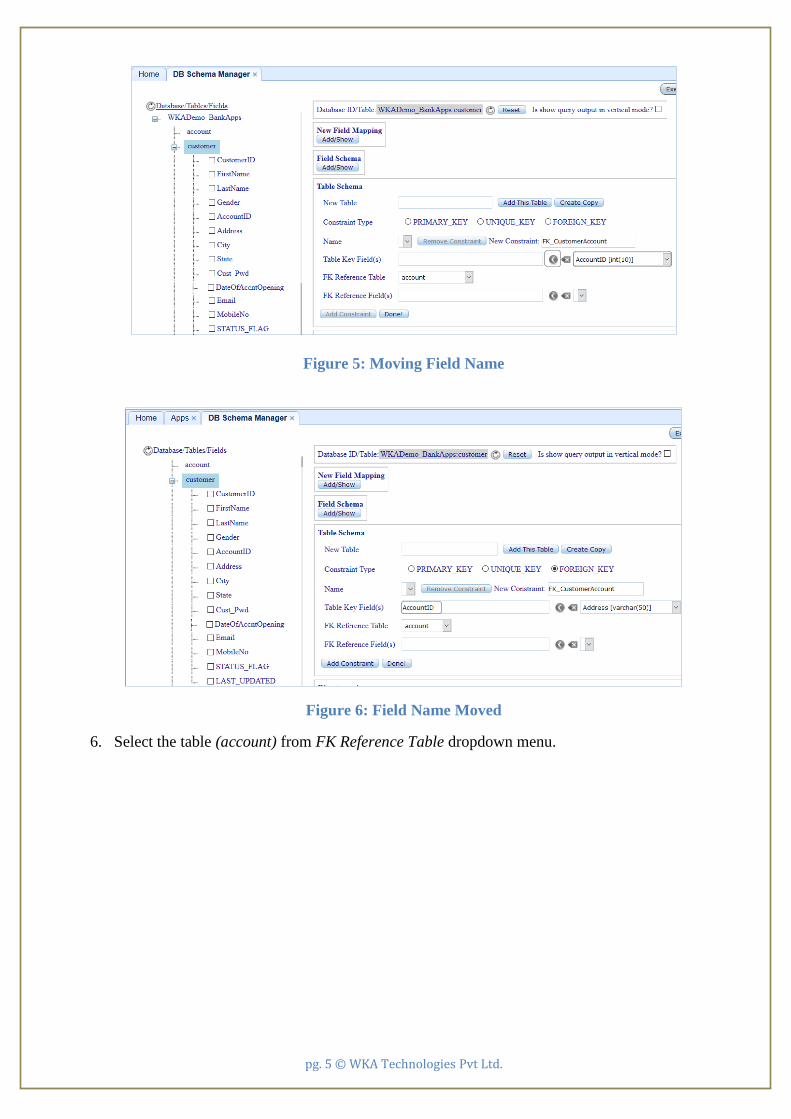
pg. 5 © WKA Technologies Pvt Ltd.
Figure 5: Moving Field Name
Figure 6: Field Name Moved
6. Select the table (account) from FK Reference Table dropdown menu.
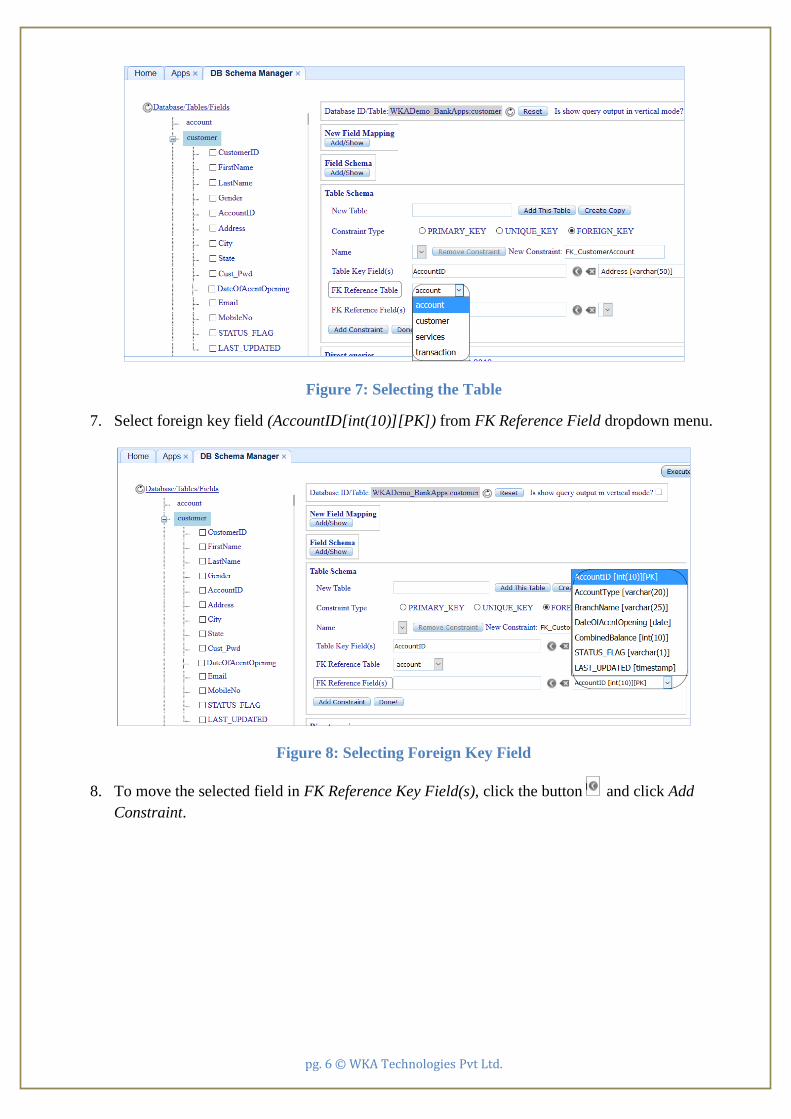
pg. 6 © WKA Technologies Pvt Ltd.
Figure 7: Selecting the Table
7. Select foreign key field (AccountID[int(10)][PK]) from FK Reference Field dropdown menu.
Figure 8: Selecting Foreign Key Field
8. To move the selected field in FK Reference Key Field(s), click the button and click Add
Constraint.

pg. 7 © WKA Technologies Pvt Ltd.
Figure 9: Moving Foreign Key Field
9. After clicking Add Constraint, foreign key constraint is added and the following message is
displayed. Also, the constraint name entered (FK_CustomerAccount) gets added in Name
dropdown menu.
Figure 10: Foreign Key Constraint Added
2
1

pg. 8 © WKA Technologies Pvt Ltd.
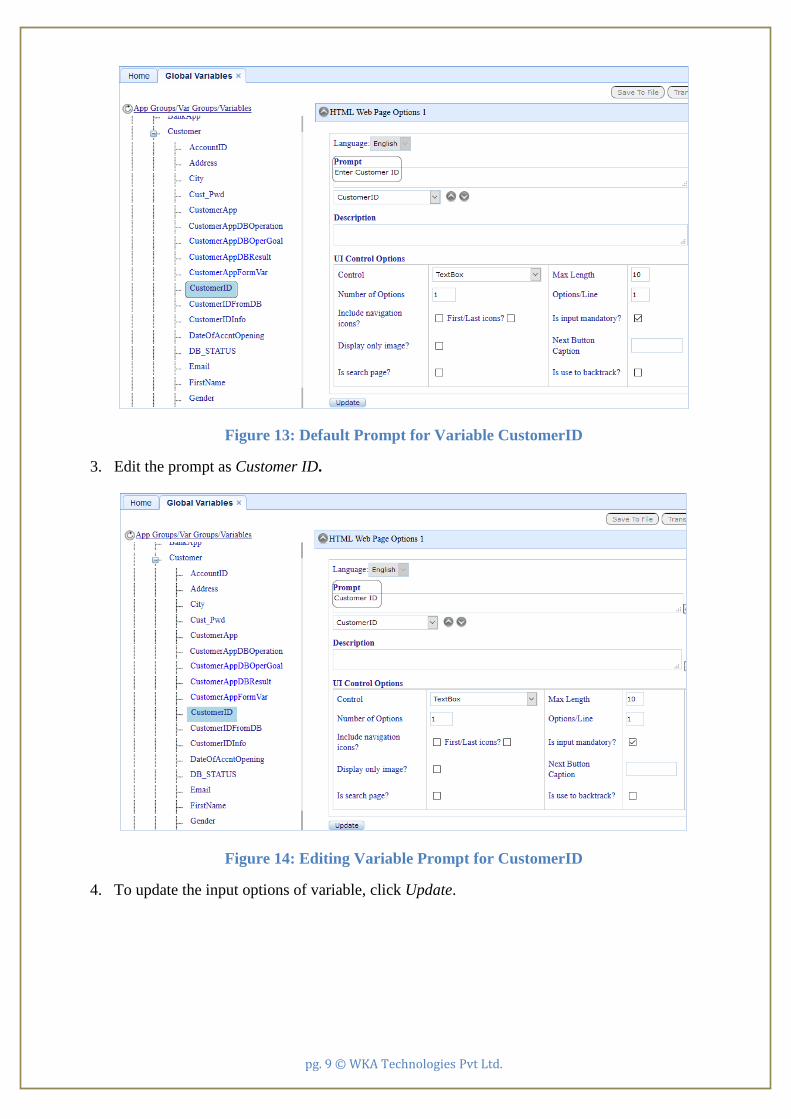
1.2 Changing Variable Prompt As per the requirement, variable prompt can be changed.As shown in figure below prompt for variable
CustomerID is Enter Customer ID.
Figure 11: Prompt For Variable Customer ID
To change prompt for Customer ID:
1. Go to Main Menu -> Domain Vocabulary -> Global Variables. Select CustomerID variable from
the list of variables in variable group Customer and click HTML Web Page Options 1from the list
of options.
Figure 12: Global Variables Interface
2. After clicking HTML Web Page Options 1, the default prompt for CustomerID can be seen (Enter
Customer ID).
pg. 9 © WKA Technologies Pvt Ltd.
Figure 13: Default Prompt for Variable CustomerID
3. Edit the prompt as Customer ID.
Figure 14: Editing Variable Prompt for CustomerID
4. To update the input options of variable, click Update.

pg. 10 © WKA Technologies Pvt Ltd.
Figure 15: Updating the Variable
5. To view the changes on web page, first a web page is created for variable CustomerID. To create
a web page, go to Main Menu -> Core Engine Configs -> Expert Systems. Select Customer
variable group from Variables and Values dropdown menu.
Figure 16: Selecting Variable Group

pg. 11 © WKA Technologies Pvt Ltd.
6. Select the variable CustomerID from Variables and Values dropdown menu and click Create Web
Page. The following message is displayed.
Figure 17: Creating Web Page
7. To preview the changes, click Preview Web Page.
Figure 18: Previewing Web Page
8. The variable CustomerID is present in form therefore need to recreate the form in which that
variable is used otherwise changes will not be reflected in the form. To recreate the form, go to
Main Menu -> Forms and Reports -> Form Designer and click the option Select Form/Report
from the list of options. Select the form created (FormCustomerApp).

pg. 12 © WKA Technologies Pvt Ltd.
Figure 19: Selecting Form
7. To recreate the form, click Create and the following message is displayed.
Figure 20: Form Recreated
8. After recreating the form, to view the changes run the application. To run the application, go to
Main Menu -> Apps, APIs and Docs -> Apps and can view that the prompt has been changed for
variable CustomerID.

pg. 13 © WKA Technologies Pvt Ltd.
Figure 21: Variable Prompt Changed
9. To view the changes in form, click Next in above screen.
Figure 22: Variable Prompt Changed in Form
10. Similarly, to change the prompts of all variables for Customer variable group follow the same
process as explained in section above and all variable prompts are changed as shown in screen
shots below.

pg. 14 © WKA Technologies Pvt Ltd.
Figure 23: All Variable Prompts Changed for Customer
Figure 24: All Variable Prompts Changed for Customer
Note:Similarly, to change the prompts of all variables for Account and Transaction variable group
follow the same process as explained in section 1.2 above and all variable prompts are changed as
shown in screen shots below.
Figure 25: Prompt Changed for Account

pg. 15 © WKA Technologies Pvt Ltd.
Figure 26: All Prompts Changed for Account
Figure 27: Prompt Changed for Transaction
Figure 28: All Prompts Changed for Transaction

pg. 16 © WKA Technologies Pvt Ltd.
1.3 Changing UI Controls HTML or UI controls for the variable can be changed. It includes changing control, control size,
maximum length of characters, number of options per line etc.
1.3.1 Changing Control
Controls can be changed for variable. For example: In the screen shot below State variable has
RadioBoxList control which can be changed to ComboList control. To change the control:
1. Go to Main Menu -> Domain Vocabulary ->Global Variables and select HTML Web Page
Options 1 from the list of options. Select State variable from variable group Customer.
Figure 29: HTML Web Page Options 1 Interface
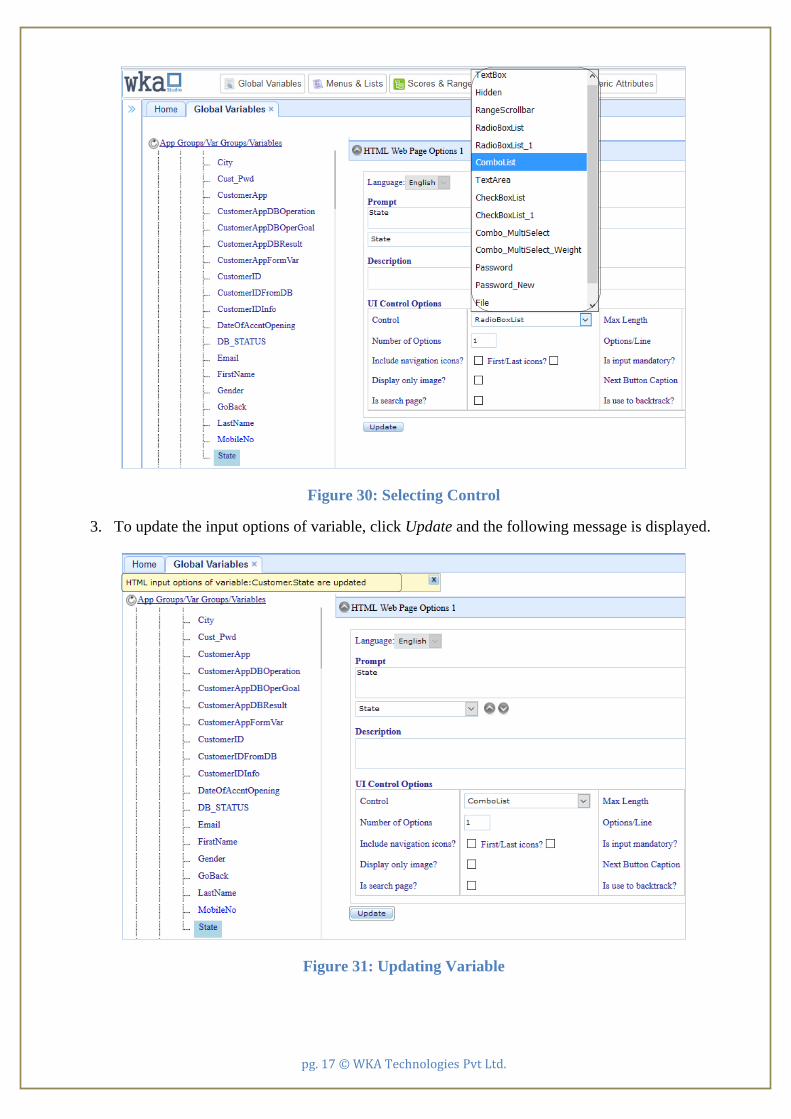
2. To change the control to ComboList, select from Control dropdown menu, ComboList.
pg. 17 © WKA Technologies Pvt Ltd.
Figure 30: Selecting Control
3. To update the input options of variable, click Update and the following message is displayed.
Figure 31: Updating Variable

pg. 18 © WKA Technologies Pvt Ltd.
4. Recreate the form for variable State from Forms and Reports interface as explained in section 1.2
above (Refer Figure 19 and Figure 20).
5. After recreating the form, to view the changes run the application. To run the application, go to
Main Menu -> Apps, APIs and Docs -> Apps and can view that the control has been changed for
variable State.
Figure 32: Control for State Changed
6. Similarly, to change the control of Account Type variable to ComboList for Account App follow
the same process as explained in section 1.3 above and control is changed as shown in screen
shots below.
Figure 33: Control for Account Type Changed

pg. 19 © WKA Technologies Pvt Ltd.
1.4 Formatting the Form Formatting of the form including alignment of the variables and labels, font size, font type, font colour,
heading size, text alignment, table properties etc. can be set. For Example: In the screen shot below, label
for form is Customer Data and its alignment can be set to center.
Figure 34: Aligning the Label to Center
To align the label Customer Data to center, follow the following steps:
1. Go to Main Menu ->Forms and Reports->Form Designer. Select the form FormCustomerApp
and click Cell Content Details and Parameters from the list of options.
Figure 35: Selecting the Form
2. Select the table, row and element (column) to modify from Table: Row: Element dropdown
menu. Since the label Customer Data which needs to be changed is in first row and first column
in the form (Refer Figure 34 above) so select Table as T1 (if there are multiple tables), Row as 1
and Element as 1.

pg. 20 © WKA Technologies Pvt Ltd.
Figure 36: Selecting Table, Row & Column to Modify
3. To align the label to center, click Formatting Parameters (by default, selected are applicable to
cell content) option from the list of options.
Figure 37: Formatting Parameters Panel (by default, selected are applicable to cell content)
4. Set Text Alignment to Center from Text Alignment dropdown menu.

pg. 21 © WKA Technologies Pvt Ltd.
Figure 38: Set Text Alignment to Center
5. To update the changes done, click Update and the following message is displayed.
Figure 39: Updating the Form
6. To create the form, click Create and the following message is displayed.
Figure 40: Creating the Form

pg. 22 © WKA Technologies Pvt Ltd.
7. To view the changes, run the application. To run the application, go to Main Menu -> Apps, APIs
and Docs -> Apps and can view that the label is set at center position.
Figure 41: Label Aligned to Center
2. Similarly, to change the alignment of label for FormAccountApp and FormTransApp,
follow the same process as explained in section 1.4 above and alignment of the label (Account
Data and Transaction Data) is changed as shown in screen shots below.
Figure 42: Label Aligned to Center for FormAccountApp

pg. 23 © WKA Technologies Pvt Ltd.
Figure 43: Label Aligned to Center for FormTransApp
1.5 Adding Row Condition This option allows hiding or showing particular row or column at specific condition. For example: In
FormCustomerApp form there is no need to display the password when View DB Operation is selected,it
must be visible when Add or Update operation is selected. (Refer Document DB App Creation). To hide
or show the particular row or column, first the variable (IsAskPassword) needs to be created.
1. To create variable IsAskPassword, go to Main Menu -> Domain Vocabulary -> Global Variables
and enter the variable name IsAskPassword in New Variable field. Click Add to create a new
variable. After the variable is created, choose Type as Input, Data Type as Text and Default Value
as No from Type, Data Type and Default Value dropdown menu.
Figure 44: Creating a Variable and Setting the Data Type
2. To update the variables created, click Update and the following message is displayed.

pg. 24 © WKA Technologies Pvt Ltd.
Figure 45: Updating Variables
3. To hide the row, go to Main Menu -> Forms and Reports -> Form Designer. Click Row
Parameters option from the list of options and select FormCustomerApp form.
Figure 46: Row Parameters Panel
4. To hide the row number, select row number from Sequence No. dropdown menu.

pg. 25 © WKA Technologies Pvt Ltd.
Figure 47: Selecting Row Number
5. Select IsAskPassword variable from the variable list.
Figure 48: Selecting Variable from Variable List
6. To insert the variable created in Condition field, click the button and enter condition
IsAskPassword==’Yes’in Conditionbox.
pg. 26 © WKA Technologies Pvt Ltd.
Figure 49: Setting Condition for Row Selected
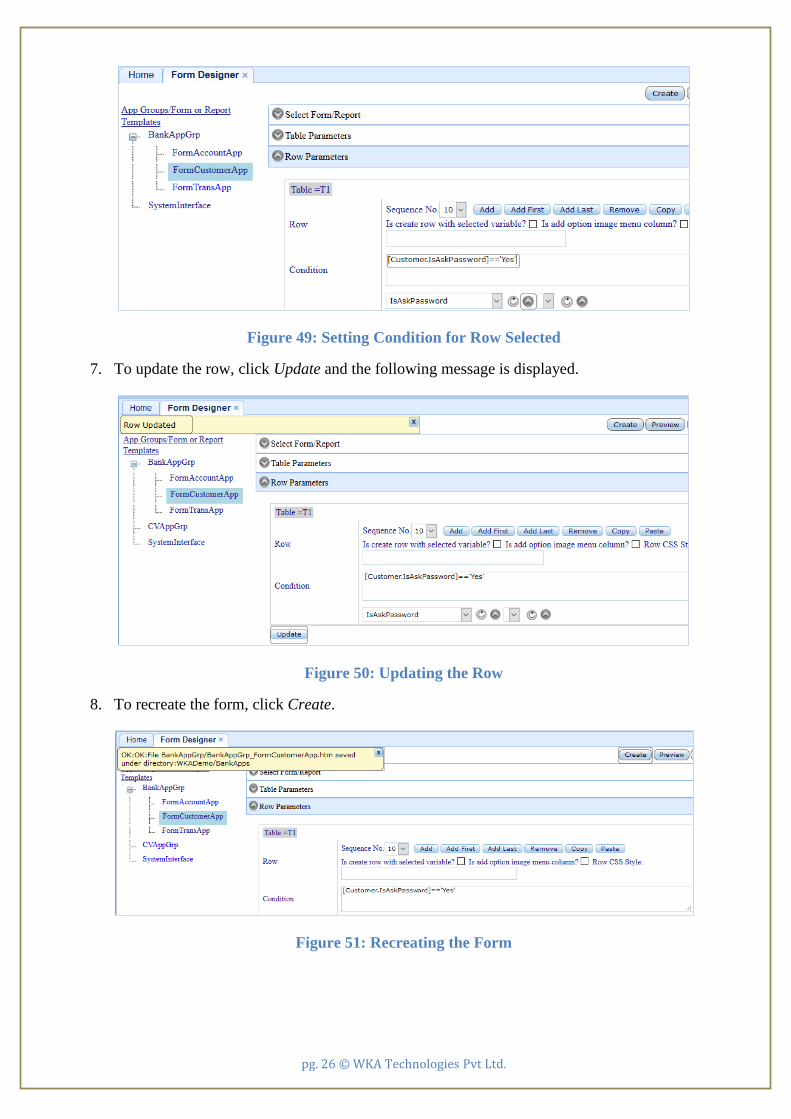
7. To update the row, click Update and the following message is displayed.
Figure 50: Updating the Row
8. To recreate the form, click Create.
Figure 51: Recreating the Form

pg. 27 © WKA Technologies Pvt Ltd.
9. To preview the form, click Preview to see condition applied on row=10.
Figure 52: Previewing the Form
Figure 53: Previewing the Form
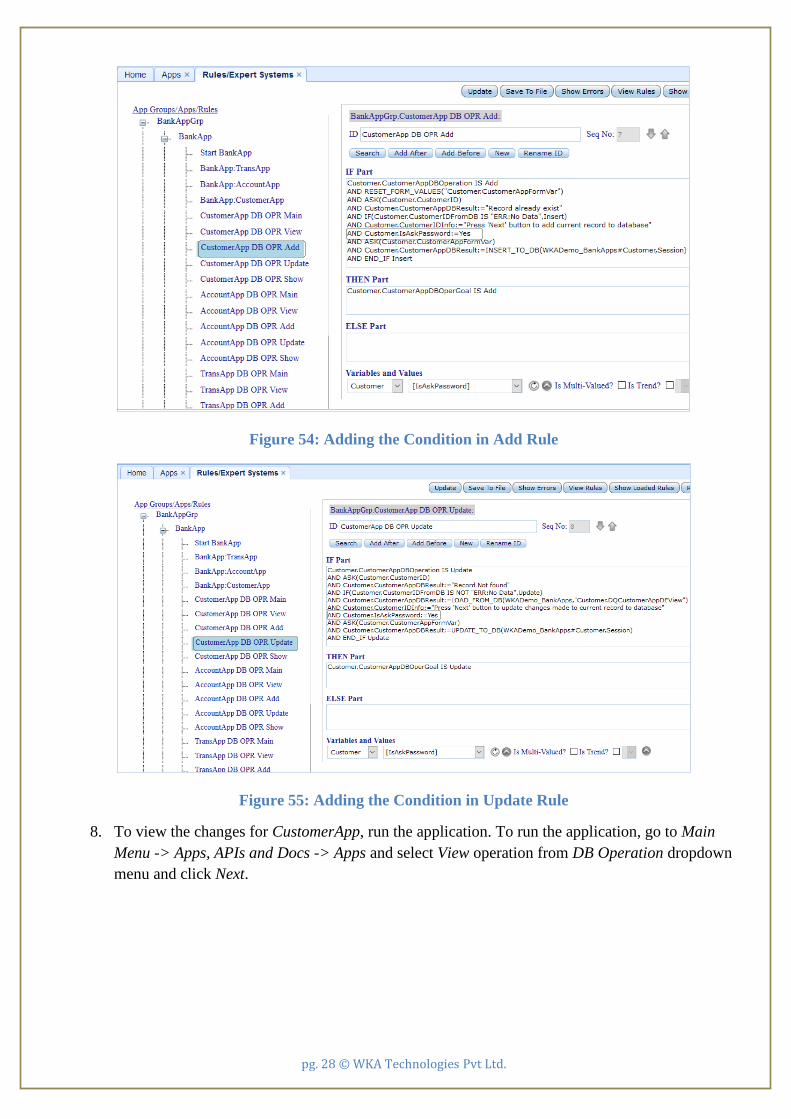
10. Since the password for form should be visible in Add and Update DB Operation so the condition
IsAskPassword:=Yes must be assigned in Add and Update rule. To add the condition in Add and
Update rule, go to Main Menu -> Core Engine Configs -> Expert Systems, select the rule
CustomerApp DB OPR Add and CustomerApp DB OPR Update as shown in screen shots below:
pg. 28 © WKA Technologies Pvt Ltd.
Figure 54: Adding the Condition in Add Rule
Figure 55: Adding the Condition in Update Rule
8. To view the changes for CustomerApp, run the application. To run the application, go to Main
Menu -> Apps, APIs and Docs -> Apps and select View operation from DB Operation dropdown
menu and click Next.

pg. 29 © WKA Technologies Pvt Ltd.
Figure 56: Selecting DB Operation
9. Enter the desired Customer ID and click Next.
Figure 57: Entering Customer ID
10. The record with customer id 110 is displayed and the row Password is hidden.
Figure 58: Row Password Hidden
pg. 30 © WKA Technologies Pvt Ltd.
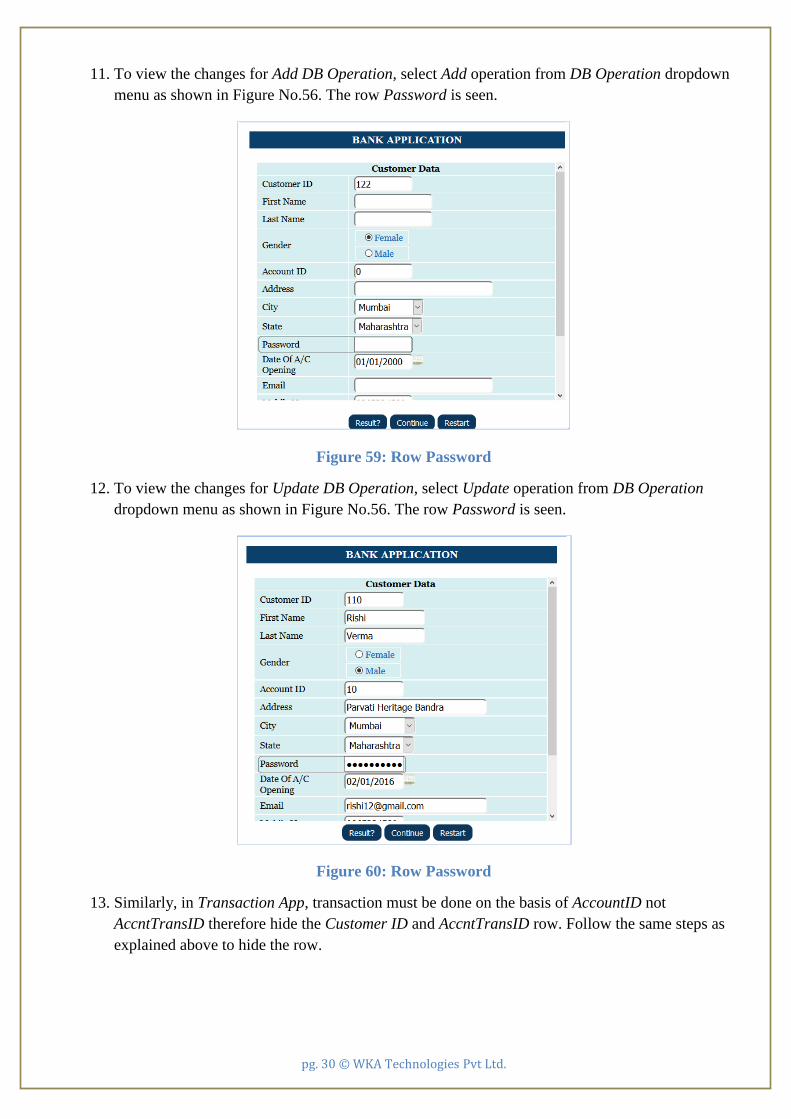
11. To view the changes for Add DB Operation, select Add operation from DB Operation dropdown
menu as shown in Figure No.56. The row Password is seen.
Figure 59: Row Password
12. To view the changes for Update DB Operation, select Update operation from DB Operation
dropdown menu as shown in Figure No.56. The row Password is seen.
Figure 60: Row Password
13. Similarly, in Transaction App, transaction must be done on the basis of AccountID not
AccntTransID therefore hide the Customer ID and AccntTransID row. Follow the same steps as
explained above to hide the row.

pg. 31 © WKA Technologies Pvt Ltd.
Figure 61: Row AccntTransID and CustomerID Hidden
1.6 Adding Rules Adding rules allows creating separate rules for debit and credit transaction. To fetch CombinedBalance
(account table) based on the AccountID for debit and credit transaction, a dynamic query needs to be
created.
1. To create dynamic query, go to Main Menu -> Database Interfaces -> Dynamic Queries.
Figure 62: Dynamic Queries Interface
2. Select variable group for which dynamic query needs to be created. Enter dynamic query ID
(Example: DQBalance) in New ID field. Since single value needs to be retrieved at run time so
select query purpose from Purpose dropdown menu as DynamicField.

pg. 32 © WKA Technologies Pvt Ltd.
Figure 63: Entering Dynamic Query ID and Selecting Purpose
3. Select database (WKADemo_BankApps) from Selected Database dropdown menu from which
data is to be fetched and click Add New.
Figure 64: Selecting Database
4. After clicking Add New, the following popup is displayed.
Figure 65: Adding Dynamic Query
pg. 33 © WKA Technologies Pvt Ltd.
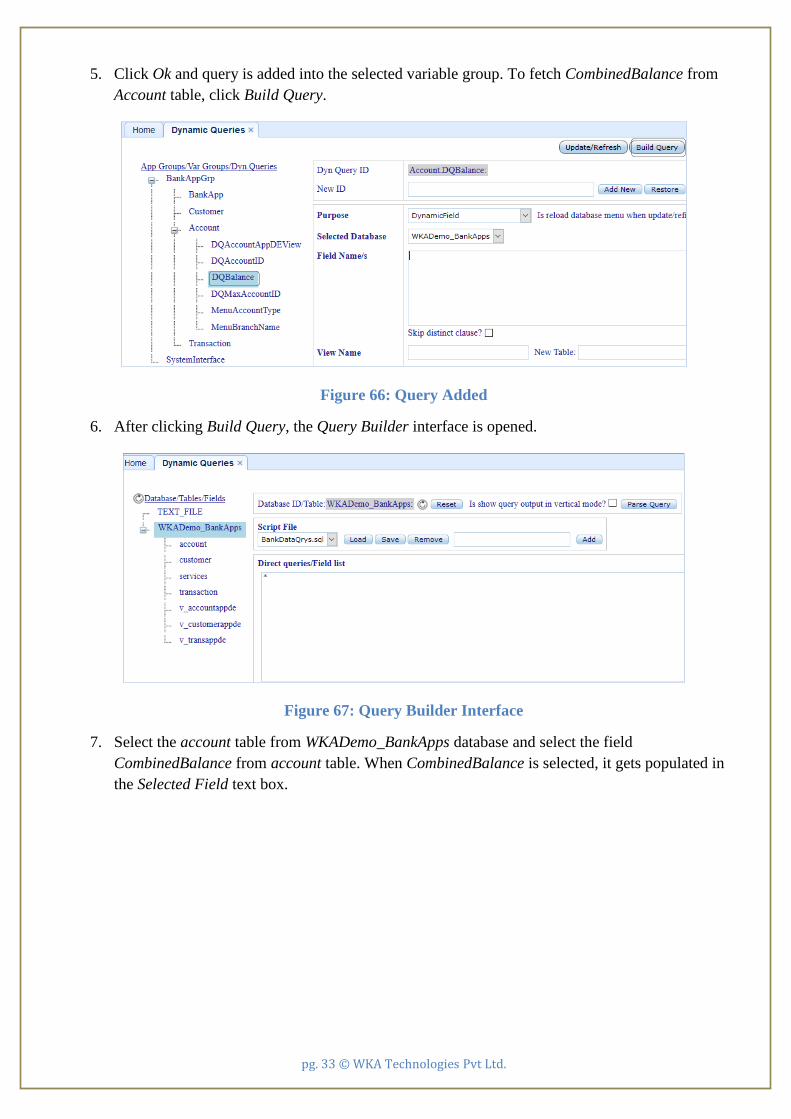
5. Click Ok and query is added into the selected variable group. To fetch CombinedBalance from
Account table, click Build Query.
Figure 66: Query Added
6. After clicking Build Query, the Query Builder interface is opened.
Figure 67: Query Builder Interface
7. Select the account table from WKADemo_BankApps database and select the field
CombinedBalance from account table. When CombinedBalance is selected, it gets populated in
the Selected Field text box.

pg. 34 © WKA Technologies Pvt Ltd.
Figure 68: Selecting Table and Field
8. To insert the field in Direct queries/Field list, click Insert Field and click OK to go back to
Dynamic Queries interface.
Figure 69: Inserting Field Name
9. After clicking Ok, field and table name is populated in Field Name/s and View Name field of the
Dynamic Query interface.
Figure 70: Dynamic Query Interface

pg. 35 © WKA Technologies Pvt Ltd.
10. AccountID from Transaction variable group is asked at the time of transaction. Therefore, select
AccountID variable and Transaction variable group from Variable dropdown menu to fetch
CombinedBalance.
Figure 71: Selecting Variable Group and Variable
11. To insert field into Filter field, click the button .
Figure 72: Inserting Field
12. To update the query, click Update/Refresh.

pg. 36 © WKA Technologies Pvt Ltd.
Figure 73: Updating the Query
13. To link Dynamic Query with a variable, create a variable Balance in Transaction Variable Group.
Follow the same steps as variable created for IsAskPassword as explained in section 1.5 above.
To update the variable details, click Update button.
Figure 74: Creating and Updating the Variable
14. Click Input Options and When Added option from the list of options in Global Variables
interface.

pg. 37 © WKA Technologies Pvt Ltd.
Figure 75: Input Options and When Added Interface
15. Select dynamic query created (Account.DQBalance) from Database Field dropdown menu.
Figure 76: Selecting Dynamic query
16. To update the variable details, click Update.

pg. 38 © WKA Technologies Pvt Ltd.
Figure 77: Updating the Variable
17. Create one goal variable GoalAddTransaction (used as a sub goal in debit and credit rule) whose
Type is Goal & Data Type is Text and click Update.
Figure 78: Adding Goal Variable
18. After a variable detail is updated, make changes in Add rule of transaction, ask AccountID in Add
rule before the Form is asked and update the rule.
2
1

pg. 39 © WKA Technologies Pvt Ltd.
Figure 79: Modifying and Updating Rules
19. Set the current date of transaction as NOW (“”). NOW function returns the current date.
Figure 80: Setting the Current Date
20. Ask the goal variable (Transaction.GoalAddTransaction) in Add rule in IF part. Select variable
from Variables and Values dropdown menu.
2
1

pg. 40 © WKA Technologies Pvt Ltd.
Figure 81: Selecting Variable from Variables and Values
18. Create rules for debit and credit transactions. Enter name of rule (TransApp Debit) in ID field.
Click Add After which adds the new rule (TransApp Debit) after selected rule i.e. here rule for
debit is added after TransApp DB OPR Add rule.
Figure 82: Entering New Rule
19. After clicking Add After, the following screen shows popup which carries previous rule.
2
1
2
1

pg. 41 © WKA Technologies Pvt Ltd.
Figure 83: Entering New Rule
18. To clear IF, THEN and ELSE part of the rule, click New.
Figure 84: Clearing IF, THEN and ELSE Part
19. After creating rule (TransAppDebit), write a rule for debit in IF Part and specify
GoalAddTransaction goal variable in THEN Part of the rule.

pg. 42 © WKA Technologies Pvt Ltd.
Figure 85: Entering Rule and Goal Variable
20. After debit transaction record is inserted into Transaction table, assign AccountID field of
Account table in Add rule.
Figure 86: Assigning AccountID Field
21. To update the rule, click Update and the following message with update screen is displayed.

pg. 43 © WKA Technologies Pvt Ltd.
Figure 87: Updating the Rule
22. When debit transaction record is inserted into transaction table, account table is also updated at
the same time so add Update function for account table and update the rule.
Figure 88: Editing Rule for TransApp Debit
23. To view the changes for Trans App, run the application. To run the application, go to Main Menu
-> Apps, APIs and Docs -> Apps and select app (Trans App) from the list of apps and click Next.
pg. 44 © WKA Technologies Pvt Ltd.
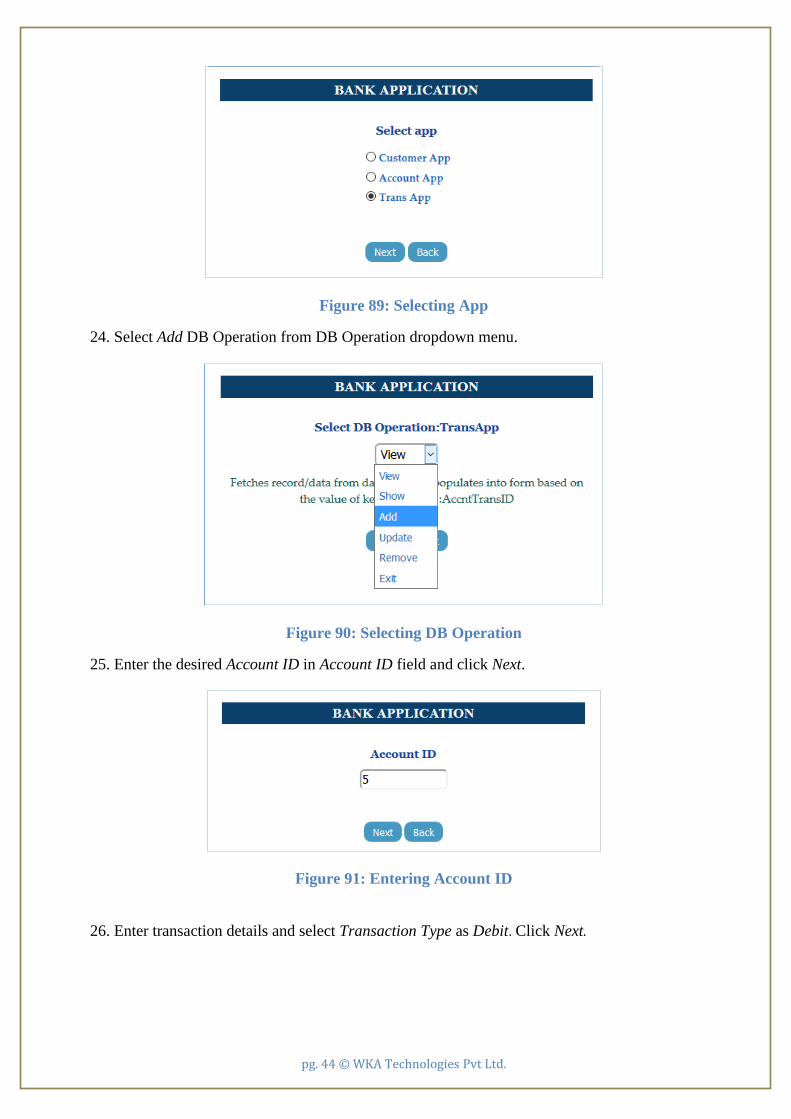
Figure 89: Selecting App
24. Select Add DB Operation from DB Operation dropdown menu.
Figure 90: Selecting DB Operation
25. Enter the desired Account ID in Account ID field and click Next.
Figure 91: Entering Account ID
26. Enter transaction details and select Transaction Type as Debit. Click Next.

pg. 45 © WKA Technologies Pvt Ltd.
Figure 92: Entering Transaction Details
27. The message DB Operation Result: OK: 1is shown which indicates that the record is added.
Select DB Operation as Main DB operation menu and click Next.
Figure 93: DB Operation Status
28. After clicking Next, session report is displayed.
Figure 94: Session Report

pg. 46 © WKA Technologies Pvt Ltd.
Figure 95: Session Report
As shown in above session report, balance for Account ID=5 is 87000which is debited by Amount 5000
so CombinedBalance is 82000.
29. Similarly, follow the same steps to add rule for credit as explained above for adding rule for debit.
Figure 96: Adding Rule for Credit
30. To update the rule, click Update andthe following message with update screen is displayed.

pg. 47 © WKA Technologies Pvt Ltd.
Figure 97: Updating the Rule
31. To view the changes, run the application. Select app (Trans App) from the list of apps and click
Next.
Figure 98: Selecting App
32. Select Add operation from Select DB Operation dropdown menu and click Next.
Figure 99: Selecting DB Operation

pg. 48 © WKA Technologies Pvt Ltd.
33. Enter account ID in Account ID field and click Next.
Figure 100: Entering Account ID
34. Enter transaction details and select Transaction Type as Credit. Click Next.
Figure 101: Selecting Transaction Type
35. Select DB Operation as Main DB operation menuand click Next.
Figure 102: DB Operation Status
36. After clicking Next, session report is displayed.

pg. 49 © WKA Technologies Pvt Ltd.
Figure 103: Session Report
As shown in above session report, balance for Account ID: 5 is 82000 which is credited by Amount 2000
so CombinedBalance is 84000.
37. For Debit transaction, account balance should not be zero. Minimum balance should be Rs.500 so
add condition in Debit rule.
Figure 104: Adding Rule for Debit Transaction
38. To update the rule, click Update.

pg. 50 © WKA Technologies Pvt Ltd.
Figure 105: Updating the Rule
39. To view the changes, run the application. Select app as Trans App from the list of apps.
Figure 106: Selecting App
40. Select Add operation from Select DB Operation dropdown menu and clickNext.
Figure 107: Selecting App

pg. 51 © WKA Technologies Pvt Ltd.
41. Enter account ID in Account ID field and click Next.
Figure 108: Entering Account ID
42. Enter transaction details and select Transaction Type as Debit. Click Next.
Figure 109: Entering Transaction Details
43. Select DB Operation as Main DB operation menu and click Next.
Figure 110: DB Operation Status
44. To make the changes in show Rule (TransApp DB OPR Show), AccountID (This ID is for
account table) is added and the filter of dynamic query called in SHOW_REPORT function is
changed to TransInfo.AccountID as shown in the screen shots below.
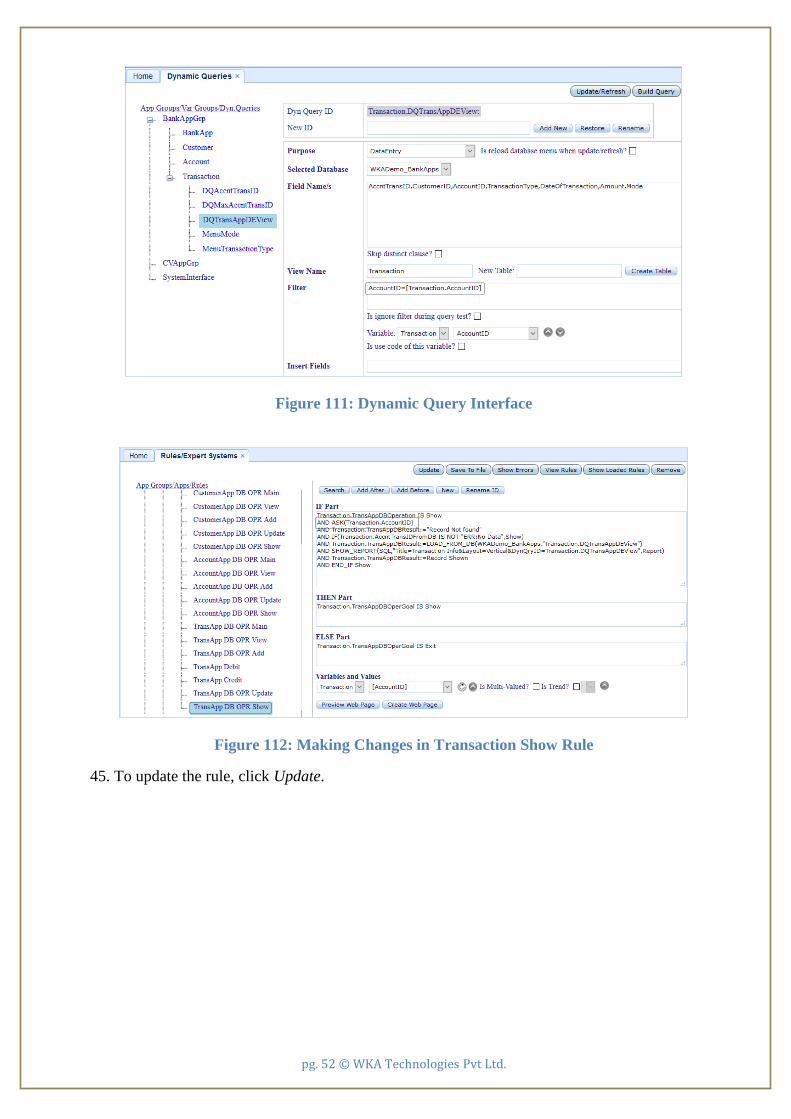
pg. 52 © WKA Technologies Pvt Ltd.
Figure 111: Dynamic Query Interface
Figure 112: Making Changes in Transaction Show Rule
45. To update the rule, click Update.

pg. 53 © WKA Technologies Pvt Ltd.
Figure 113: Updating the Show Rule
46. To view the changes, run the application, select Show from DB Operation dropdown menu.
Figure 114: Selecting DB Operation
47. Enter AccountID: 9 (enter ID whose record is present in the transaction table) and click Next.
Figure 115: Entering Account ID
pg. 54 © WKA Technologies Pvt Ltd.
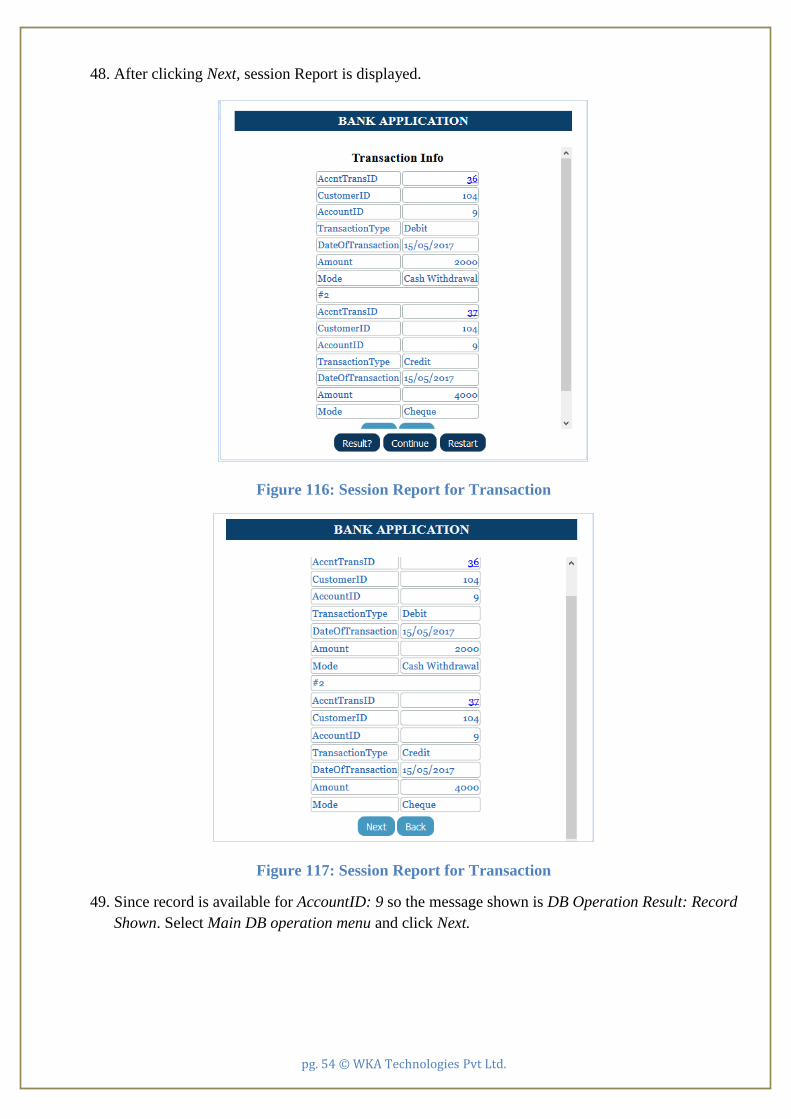
48. After clicking Next, session Report is displayed.
Figure 116: Session Report for Transaction
Figure 117: Session Report for Transaction
49. Since record is available for AccountID: 9 so the message shown is DB Operation Result: Record
Shown. Select Main DB operation menu and click Next.

pg. 55 © WKA Technologies Pvt Ltd.
Figure 118: DB Operation Status
50. After clicking Next, session report for selected AccountID is shown.
Figure 119: Session Report
As shown in above report, for AccountID: 9 the required transaction information is shown.
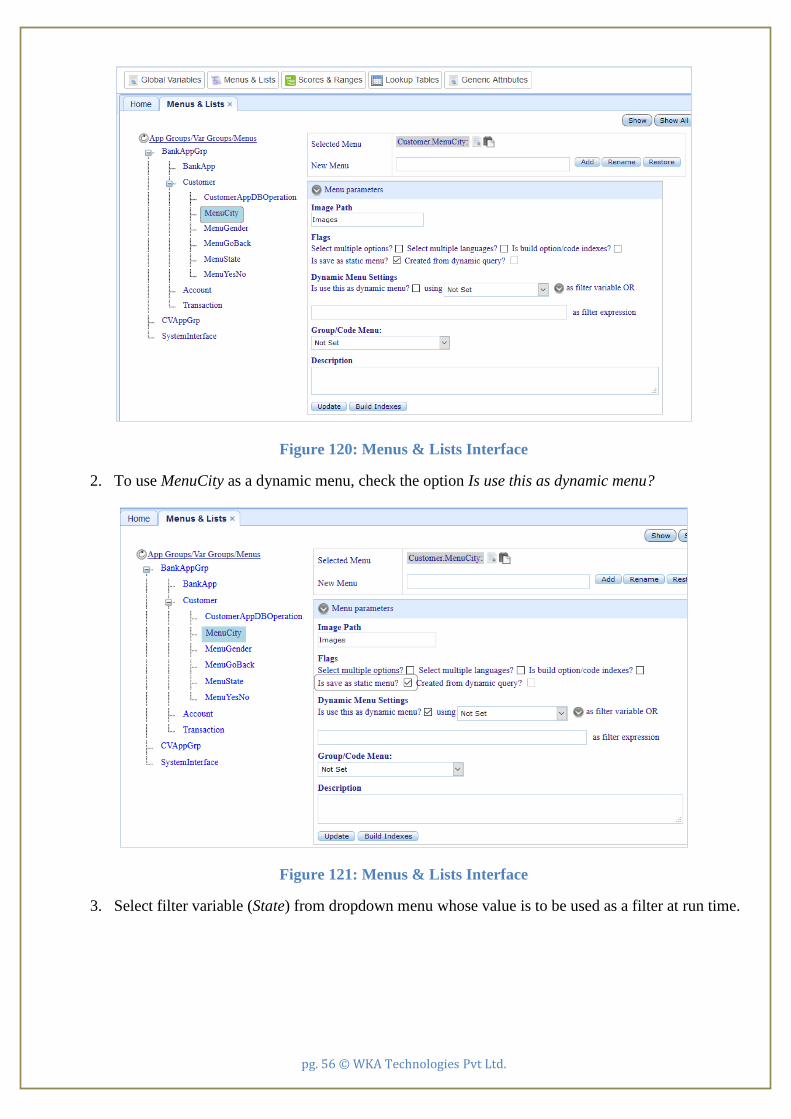
1.7 Adding Dynamic Menu The dynamic menu holds the value at run-time. Values are retrieved from database or from static menu
based on filter. When the possible values of the variable are to be retrieved and populated from database
at run-time, dynamic menu is linked to variable. For example, if a variable takes list of cities in a selected
State, the value of variable depends upon State selected. A dynamic menu is assigned in such a case
which retrieves list of cities by sending state name/code as filter. To add dynamic menu:
1. Go to Main Menu -> Domain Vocabulary -> Menus & Lists. Click MenuCity menu from
Customer variable groups. By default, Menu Parameters option is shown.
pg. 56 © WKA Technologies Pvt Ltd.
Figure 120: Menus & Lists Interface
2. To use MenuCity as a dynamic menu, check the option Is use this as dynamic menu?
Figure 121: Menus & Lists Interface
3. Select filter variable (State) from dropdown menu whose value is to be used as a filter at run time.

pg. 57 © WKA Technologies Pvt Ltd.
Figure 122: Selecting Filter Variable
4. Select group/code menu options (Customer.MenuState) from Group/Code Menu dropdown menu
to set groups/classes or codes of current menu options.
Figure 123: Selecting Group/Code Menu
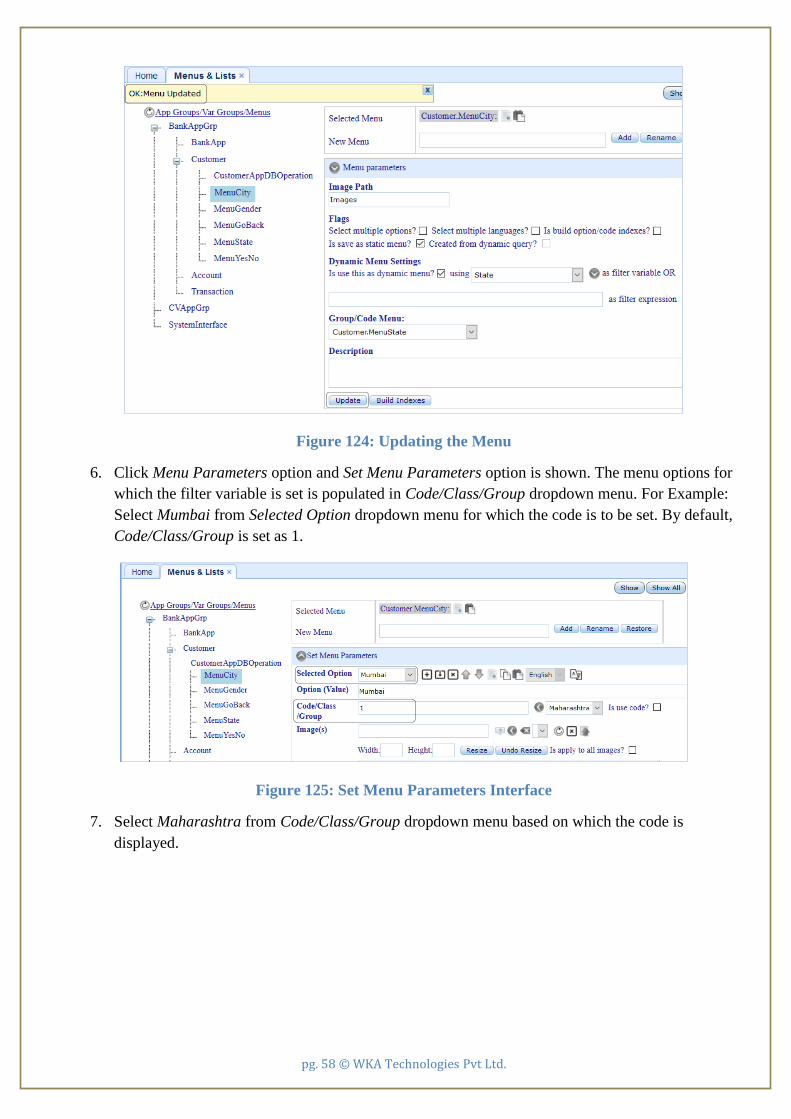
5. To update the menu, click Update.
pg. 58 © WKA Technologies Pvt Ltd.
Figure 124: Updating the Menu
6. Click Menu Parameters option and Set Menu Parameters option is shown. The menu options for
which the filter variable is set is populated in Code/Class/Group dropdown menu. For Example:
Select Mumbai from Selected Option dropdown menu for which the code is to be set. By default,
Code/Class/Group is set as 1.
Figure 125: Set Menu Parameters Interface
7. Select Maharashtra from Code/Class/Group dropdown menu based on which the code is
displayed.

pg. 59 © WKA Technologies Pvt Ltd.
Figure 126: Selecting State
8. To set the code for the city selected (Mumbai), check the option Is use code?
Figure 127: Checking the Option
9. To insert the code (MH) of selected state in Code/Class/Group field, click the button .
Figure 128: Inserting the Code
10. To update the details, click the button and the message Ok is displayed.

pg. 60 © WKA Technologies Pvt Ltd.
Figure 129: Updating Menu Option
11. Similarly, follow the same steps as explained above to insert the code for city Bangalore and
State Karnataka.
Figure 130: Inserting the Code for Bangalore
12. To view the list of codes, click Show and the following screen is displayed.
Figure 131: Viewing the List of Codes

pg. 61 © WKA Technologies Pvt Ltd.
13. The variable Customer is present in form therefore need to recreate the form in which that
variable is used otherwise changes will not be reflected in the form. To recreate the form, go to
Main Menu -> Forms and Reports -> Form Designer and click the option Select Form/Report
from the list of options. Select the form created (FormCustomerApp) and select Create, the
following message is displayed.
Figure 132: Recreating the Form
14. To view the changes, run the application. Select app (Customer App) from the list of apps and
click Next.
Figure 133: Selecting App
15. Select Add operation from DB Operationdropdown menu and click Next.
Figure 134: Selecting DB Operation
pg. 62 © WKA Technologies Pvt Ltd.
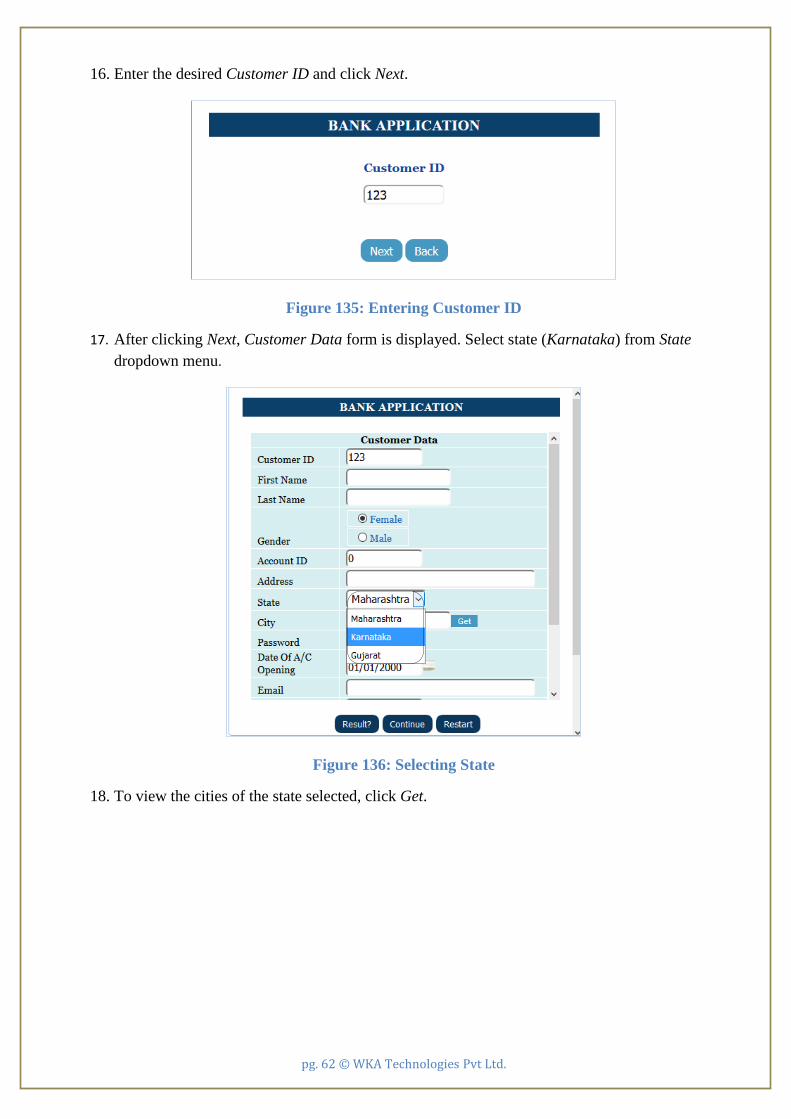
16. Enter the desired Customer ID and click Next.
Figure 135: Entering Customer ID
17. After clicking Next, Customer Data form is displayed. Select state (Karnataka) from State
dropdown menu.
Figure 136: Selecting State
18. To view the cities of the state selected, click Get.

pg. 63 © WKA Technologies Pvt Ltd.
Figure 137: Viewing the Cities
19. Select the desired city from dropdown menu.
Figure 138: Selecting City
20. Click OK and city of the selected state is shown.

pg. 64 © WKA Technologies Pvt Ltd.
Figure 139: Selecting City
21. Similarly, select State Maharashtra. Click Get and select the desired city from dropdown menu.
Figure 140: Selecting City
22. Select state Gujarat. Click Get and select the desired city from dropdown menu.

pg. 65 © WKA Technologies Pvt Ltd.
Figure 141: Selecting City