MINI-COPING SLED - Woodpeck.com Sled_Web.pdfWoodpeckers Inc., Jan. 2013 To hold a work-piece with...
2
Woodpeckers Inc., Jan. 2013 Begin by inserting two long screws up thru the bottom of the base. Then slide one tube over each screw. Put one hex nut on each screw and tighten with screw driver and wrench. Then slide one washers over each screw as shown in Figure 1. Made in USA. Hardware Pack 1 (2) Long screws. (1) Fence Guide. (2) Tubes. (4) Washers. MINI-COPING SLED Hardware Pack 2 (1) Screw. (1) Bolt. (2) Nylon washers. (2) Handles. (2) Abrasive tape. Step 2. Install Bolt into Jaw Plate. The jaw plate has a counter bored hole in the bottom. Insert the bolt up thru the counter bored hole. Screw the knob onto the bolt and tighten until the bolt head is fully seated into the counter bored hole. When finished, remove the knob. See Figure 2. Tighten knob to pull the bolt into Jaw Plate. Step 1. Assembling the Fence Guide. (2) Knobs. Figure 1a With the screws protruding up thru the slots in the fence guide, add a second washer and loosely clamp the Fence guide with two knobs. See Figure 1a. Figure 1 Figure 2 (2) Hex nuts Step 3. Applying Abrasive Tape. Orient the jaw plate as shown in Figure 3. To apply the abra- sive tape onto the jaw plate, the bolt must be facing up and is offset left of center, with the shorter distance to the left. Re- move backing and firmly press tape to the edge. Figure 3 Shorter distance Figure 3a Position the base, bottom side up as shown in Figure 3a. Apply the abrasive tape in the same manner as in Figure 3 to the inside edge of the base plate.
Transcript of MINI-COPING SLED - Woodpeck.com Sled_Web.pdfWoodpeckers Inc., Jan. 2013 To hold a work-piece with...
Woodpeckers Inc., Jan. 2013Woodpeckers Inc., Jan. 2013
Begin by inserting two long screws up thru the bottom of the base. Then slide one tube over each screw. Put one hex nut on each screw and tighten with screw driver and wrench. Then slide one washers over each screw as shown in Figure 1.
Made in USA.
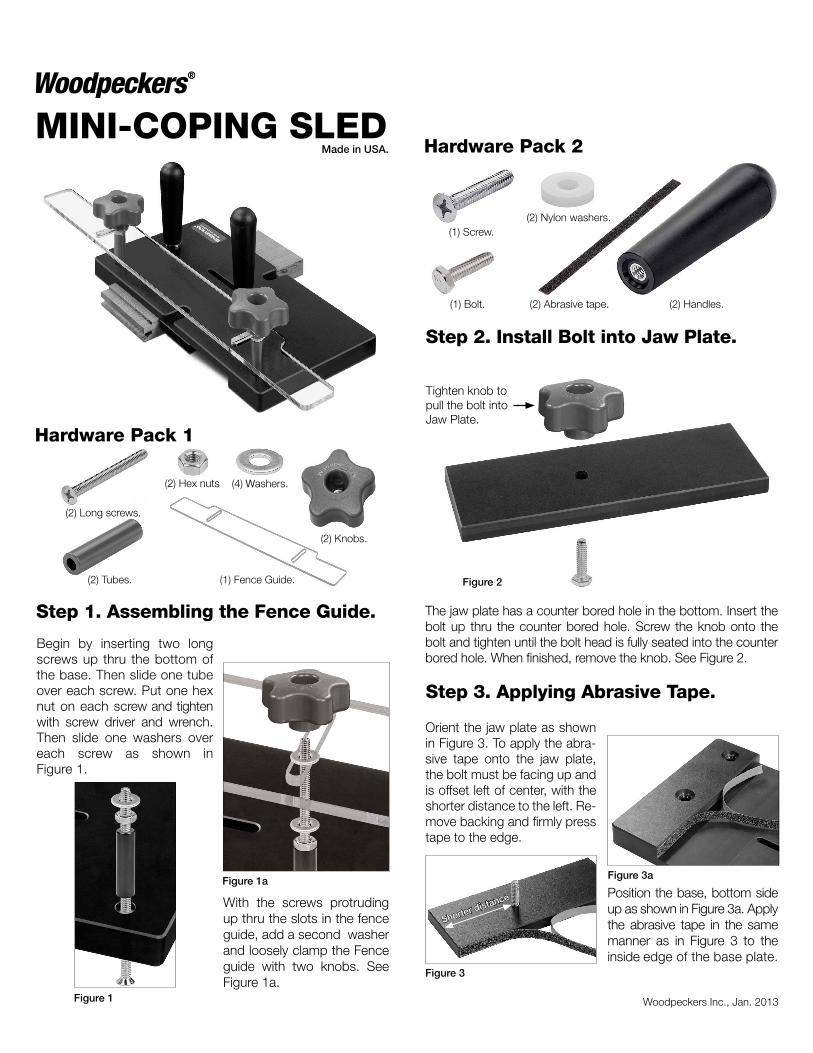
Hardware Pack 1
(2) Long screws.
(1) Fence Guide.(2) Tubes.
(4) Washers.
MINI-COPING SLED Hardware Pack 2
(1) Screw.
(1) Bolt.
(2) Nylon washers.
(2) Handles.(2) Abrasive tape.
Step 2. Install Bolt into Jaw Plate.
The jaw plate has a counter bored hole in the bottom. Insert the bolt up thru the counter bored hole. Screw the knob onto the bolt and tighten until the bolt head is fully seated into the counter bored hole. When finished, remove the knob. See Figure 2.
Tighten knob to pull the bolt into Jaw Plate.
Step 1. Assembling the Fence Guide.
(2) Knobs.
Figure 1a
With the screws protruding up thru the slots in the fence guide, add a second washer and loosely clamp the Fence guide with two knobs. See Figure 1a.
Figure 1
Figure 2
(2) Hex nuts
Step 3. Applying Abrasive Tape.
Orient the jaw plate as shown in Figure 3. To apply the abra-sive tape onto the jaw plate, the bolt must be facing up and is offset left of center, with the shorter distance to the left. Re-move backing and firmly press tape to the edge.
Figure 3
Shorter distance
Figure 3a
Position the base, bottom side up as shown in Figure 3a. Apply the abrasive tape in the same manner as in Figure 3 to the inside edge of the base plate.

Woodpeckers Inc., Jan. 2013
To hold a work-piece with the sled, fully open the jaw plate and set the sled onto your work-piece. With the fence guide press-ing firmly against the router fence, slide your work-piece in until it stops. Now bring the jaw plate up against your work-piece and tighten the handle as shown in Figure 6a.
Step 4. Installing Jaw Plate & Handles.
Step 5. Setting up the Fence Guide.
Fence Guide
Fence Guide
Work-piece Backer board
Step 6. Holding your Work-Piece.
Jaw Plate
Jaw Handle
Orient the jaw plate as shown in Figure 4. From the bottom of the base, insert the bolt up thru the slot. Slide one nylon washer over the bolt and thread on handle until it's snug.
Now insert the screw up thru the hole in the bottom of the base as shown in Figure 4a. Slide one nylon washer over the screw and thread handle onto the screw. Tighten using a screw driver.
Figure 4 Figure 4a
Figure 5
¾"
Sp
acer
Place a ¾" spacer against your router fence. With the Fence guide loosened and pulled away from the fence, slide the sled base up against the spacer.
Fence guide - slide back.
Figure 5a
Now slide the fence guide up against the router fence, then tighten both knobs to lock in place.
Figure 6
Figure 6a